Шаги
- Используйте свое любимое программное обеспечение для записи ISO (Roxio, Nero и т. д.), чтобы записать этот файл на компакт-диск.
- Вставьте компакт-диск в дисковод компакт-дисков.
- Когда появится экран загрузки, выберите первый вариант.
- Перед вашими глазами промелькнет множество загрузочных строк.
- Когда система запустится, откроется окно GParted.
Содержание
Могу ли я использовать GParted в Windows?
Используйте GParted для управления разделами диска в Windows. Вы также можете использовать его для включения или отключения флагов разделов, таких как загрузочный и скрытый. GParted написан для Linux, но может использоваться для управления разделами Windows путем загрузки с Live CD. Просто загрузите файл ISO и запишите его на компакт-диск.
Как установить GParted?
Вы можете установить его в системе или создать загрузочную флешку с ISO-файлом Gparted. Откройте терминал через «Ctrl+Alt+T» и выполните команду ниже. Откройте диспетчер программного обеспечения Ubuntu и выполните поиск в Gparted. Он будет искать Gparted.
Как запустить GParted с USB?
Как создать System Rescue USB из ISO:
- Загрузите и запустите наш универсальный установщик USB, выберите GParted и следуйте инструкциям на экране.
- Перезагрузите компьютер и настройте BIOS или меню загрузки системы на загрузку с USB-устройства, сохраните изменения и перезагрузитесь, загрузившись с карты памяти.
Как загрузить GParted?
Загрузка с компакт-диска или USB-накопителя
- Включите компьютер с носителем, содержащим GParted Live.
- Чтобы использовать настройки по умолчанию, нажмите клавишу Enter при отображении загрузочного экрана GParted Live.
- Чтобы использовать стандартную раскладку клавиатуры США, нажмите клавишу Enter.
- Чтобы использовать американский английский язык, нажмите клавишу Enter.
Как ты делаешь фдиск?
Как использовать Fdisk Tool и Format Tool для разбиения жесткого диска на разделы
- Вставьте загрузочную дискету и включите компьютер.
- В приглашении a: введите fdisk и нажмите Enter.
- Нажмите «Да», если вы хотите использовать поддержку больших дисков.
- Чтобы удалить существующий раздел, введите 3 и нажмите Enter.
- Чтобы воссоздать новый раздел, введите 1 и нажмите Enter.
Как изменить размер с помощью GParted?
2 Работа с GParted
- Выключите свою систему Linux и загрузите ее с GParted Live-CD.
- На следующем шаге я хочу уменьшить /dev/hda1, поэтому я отмечаю его и нажимаю «Изменить размер/Переместить».
- Нажмите на черную стрелку вправо и перетащите ее, пока раздел не приобретет новый (желаемый) размер, затем нажмите кнопку «Изменить размер/переместить»:
Как использовать GParted USB?
Метод GNU/Linux D: Вручную — перезаписать
- Загрузите iso-файл GParted Live.
- Вставьте флэш-накопитель USB в компьютер с Linux и подождите несколько секунд.
- В окне терминала введите следующую команду, используя имя файла gparted .iso и путь к USB-устройству, которые вы обнаружили на предыдущих шагах.
Является ли GParted бесплатным?
GParted — бесплатный редактор разделов для графического управления разделами диска. С помощью GParted вы можете изменять размер, копировать и перемещать разделы без потери данных, что позволяет вам: Увеличивать или уменьшать размер диска C:.
Как изменить размер раздела после установки Ubuntu?
2 ответа
- Вы установили Ubuntu на раздел размером 500 ГБ. Чтобы изменить размер этого раздела, вам нужно загрузить живой диск Ubuntu.
- После загрузки живого диска Ubuntu откройте gparted.
- Щелкните правой кнопкой мыши раздел размером 500 ГБ и измените его размер.
- После изменения размера было создано нераспределенное пространство.
Как разделить USB-накопитель?
Вы можете использовать Windows Diskpart для переформатирования USB-накопителя и его переразметки.
- Откройте командное окно (cmd)
- Введите часть диска.
- Введите список дисков (важно ЗНАТЬ, какой диск является USB-ключом, который вы форматируете)
- Введите select disk x, где x — ваш USB-накопитель.
- Входить чистым.
- Введите первичную часть.
- Введите выберите часть 1.
- Введите активный.
Может ли gparted клонировать диски?
Скопируйте и вставьте весь жесткий диск двумя щелчками мыши с помощью GParted. Используя GParted live CD, вы можете скопировать и вставить весь жесткий диск всего двумя нажатиями кнопки. Мы несколько раз использовали инструменты для создания разделов (включая создание разделов с помощью GParted) и утилиты резервного копирования.
Как расширить раздел Ubuntu?
Как изменить размер разделов с помощью Ubuntu или GParted Live CD
- Загрузите Ubuntu или GParted Live CD.
- Откройте GParted.
- Щелкните правой кнопкой мыши раздел, который вы хотите уменьшить.
- Выберите Изменить размер.
- Уменьшите или удалите целевой раздел (убедитесь, что вы оставили хотя бы пару ГБ для ОС, особенно для Windows, если вы не удаляете его полностью).
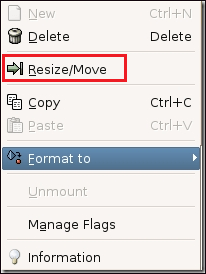
Как установить загрузочный флаг в GParted?
1 Ответ. Вы должны иметь возможность щелкнуть правой кнопкой мыши раздел, который хотите сделать загрузочным, и нажать «Управление флагами», а затем установить флажок для флага загрузки. Если вы используете parted , вы можете распечатать список разделов, а затем установить 1 загрузку, чтобы включить флаг загрузки для первого раздела.
Для чего используется GParted?
GParted (аббревиатура от GNOME Partition Editor) — это интерфейс GTK+ для GNU Parted и официальное приложение для редактирования разделов GNOME (наряду с Disks). GParted используется для создания, удаления, изменения размера, перемещения, проверки и копирования разделов диска и их файловых систем.
Как скачать Tuxboot?
Использование смокинга
- Откройте приложение.
- В главном окне (рис. A) выберите дистрибутив, который хотите установить (если вы уже загрузили образ ISO, нажмите «Предварительно загружено» и найдите файл .iso).
- Выберите USB-накопитель в раскрывающемся списке «Тип».
- Выберите правильное USB-устройство в раскрывающемся списке «Диск».
- Нажмите «ОК».
Фото в статье «Википедии» https://de.wikipedia.org/wiki/Wikipedia:Auskunft/Archiv/2011/Woche_49
Download the GParted Live iso file. From Windows, install then run the LinuxLive USB Creator program and follow the instructions in the GUI to install GParted Live on your USB flash drive.
Can I use GParted on Windows?
GParted can be used on x86 and x86-64 based computers running Linux, Windows, or Mac OS X by booting from media containing GParted Live. A minimum of 320 MB of RAM is needed to use all of the features of the GParted application.
How do I use GParted on Windows 10?
How to create drive partition using GParted Start your computer with the GParted USB drive. Select the GParted Live (Default settings) option and press Enter. Select the Don’t touch keymap option and press Enter. Select your language and press Enter. Select 0 and press Enter.
How do I run GParted?
To start GParted Live: Power on your computer with the media containing GParted Live. To use the default settings, press the Enter key when the GParted Live boot screen is displayed. To use the standard US keymap, press the Enter key. To use the US English language, press the Enter key.
What is GParted Live CD?
GParted Live is a small bootable GNU/Linux distribution for x86 based computers. It enables you to use all the features of the latest versions of the GParted application. GParted Live can be installed on CD, USB, PXE server, and Hard Disk then run on an x86 machine.
Can GParted fix MBR?
GParted Live is a bootable Linux distribution with a focus on partition management. However, it also allows you to work on your Windows partitions outside the operating system, meaning you can attempt to fix and restore your MBR issues.
Can Windows read Ext4?
Ext4 or Extended Files System version 4 is the file system for Linux. While Linux supports NTFS, Windows 10 doesn’t offer any support for Ext4. So the answer to the question can Windows 10 read ext4 is – No! But you can use third-party software to read ext4 on Windows 10.
How do I know if GParted is working?
To check if gparted is installed on your machine, first check if you have the binary, then check which package it came from, then lastly you can check the installation of the package. The ii indicate that the package is installed.
Why does GParted take so long?
In new versions of ubuntu, gparted seems to take a long time shrinking and expanding partitions. I guess it’s because it moves fragmented spaces and moving is very time-consuming, so the overall time of shrinking or expanding a partition is shrinking or expanding time plus time taken in moving fragmented spaces.
How do I create a bootable USB drive?
To create a bootable USB flash drive Insert a USB flash drive into a running computer. Open a Command Prompt window as an administrator. Type diskpart . In the new command line window that opens, to determine the USB flash drive number or drive letter, at the command prompt, type list disk , and then click ENTER.
Is GParted safe?
GParted is much faster and safe enough if you follow proper procedures.
How do I clone with GParted?
How to clone system disk to SSD with GParted alternative? Launch the software, navigate to Clone tab and select Disk Clone. Select the system disk you want to clone, click Next. Select the connected destination SSD to save the copy, click Next to proceed. Confirm the operation.
How do I run GParted in terminal?
GParted is a graphical (plus) front end to the libparted library used by the Parted project. If you want to use the command line then use parted instead (note: no g in front of name). just use sudo parted to start it.
What does the key mean in GParted?
That key icon indicates that the partition you are trying to modify is currently under use. In order to modify that/those partition/s you have to boot up from a live CD. Then you will be able to modify those partitions.
Is MiniTool Partition Wizard safe?
Overall: MiniTool Partition Wizard is a reliable and efficient software application, with a lot of tools which allows you to perform many operations with the disks and partitions.
How do I add unallocated space to my C drive?
Right-click My computer, select Manage, and open the Disk Management. Then, right click the C drive, click Extend Volume. Then, you can get into the extend volume wizard and merge C drive with unallocated space.
How do I fix the MBR in Windows?
Fix the MBR in Windows 10 Boot from the original installation DVD (or the recovery USB) At the Welcome screen, click Repair your computer. Choose Troubleshoot. Choose Command Prompt. When the Command Prompt loads, type the following commands: bootrec /FixMbr bootrec /FixBoot bootrec /ScanOs bootrec /RebuildBcd.
Is MS DOS MBR?
Yes msdos is the same as MBR so use it. The MBR partitioning scheme is the same regardless of OS (and should work provided your drive is < 2.2TB). If you want the partition to be “MSDOS” compatible you will need to select a FAT partition type – The highest version will depend on the version of MSDos.
Can I run Bootrec from within Windows?
bootrec is not available from within running Windows. It is part of recovery which is based on PE, a slimmed Windows OS.
Can Windows 10 recognize ext4?
Windows 10 now allows you to mount physical disks formatted using the Linux ext4 filesystem in the Windows Subsystem for Linux 2. Linux filesystems, such as ext4, cannot be natively accessed in Windows 10 without installing special drivers.
Can Windows read Btrfs?
Btrfs for Windows by Paragon Software is a driver that allows you to read Btrfs-formatted files on a Windows computer. Btrfs is a copy-on-write file system designed at Oracle for use in a Linux environment. Just plug in Btrfs storage to your PC and get a read access to the content with Btrfs for Windows driver.
Can Windows read Ext3?
About Ext2 and Ext3 on Windows Reading Ext3 on Windows and opening Ext3 files on Windows allows you to transfer things like songs, MP3 files, MP4 files, text documents and more. It is an important step in data transfer from Linux to Windows systems if you have a virtual machine on your computer or a dual boot setup.
Is GParted on Ubuntu live CD?
GParted preinstalled on Ubuntu liveCD Boot a Ubuntu live-CD (or live-USB), select “Try Ubuntu”, open GParted.
What is an EFI system partition and do I need it?
The EFI system partition (ESP), a small partition formatted with FAT32, is usually around 100MB, this is where the EFI boot loaders and applications used by the firmware at system during start-up are stored. In order to protect the EFI partition, Windows will attempt to prevent you from deleting it.
GParted is an open-source partition management tool for Linux, Windows, and other operating systems. This post shows you how to use GParted in Windows to resize a partition and convert MBR to GPT. Also, a GParted Windows alternative called MiniTool Partition Wizard is recommended in this post.
About GParted
GParted (Gnome Partition Editor) is a partition management tool that supports multiple file systems including Ext2/3/4, btrfs, FAT16, FAT32, NTFS, HFS+, UFS, XFS, and more.
And it can be used for resizing partitions, converting MBR to GPT, and so on, in multiple operating systems including Linux, Windows, and macOS. However, you can’t directly use the partition management tool in Windows because GParted is written in Linux. Well, how to use GParted in Windows? Keep reading.
How to Use GParted in Windows?
To use GParted in Windows, you need to install GParted Live on a CD or USB drive which is a small bootable GNU/Linux distribution for x86 based computers. To install GParted Live on a CD or USB drive, you need to download the iso file and burn it as an image to a CD. Keep reading to see the detailed operations.
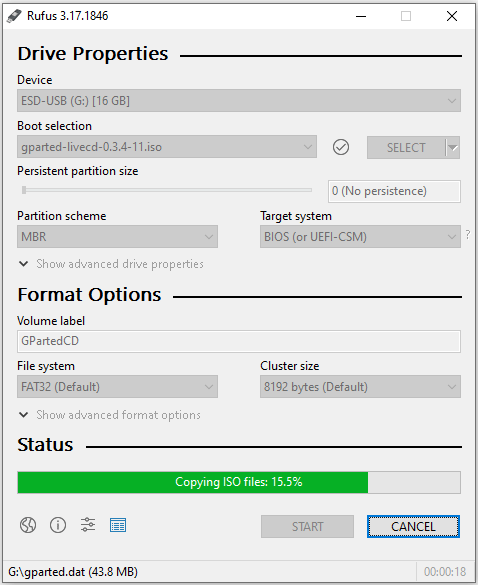
First, Set up GParted Live in Windows
Step 1: Download the .iso file. Once that finishes, locate the file on your computer.
Step 2: Connect the CD or USB to the computer and open an ISO burning software.
Note: Here we choose to burn the .iso file to a USB that has been formatted to FAT32 using Rufus.
- Choose the USB from the drop-down menu under Device.
- Click the SELECT button on the Boot selection area; then select the .iso file on the Browse window and click the Open button.
- Click the START button at the bottom of the Rufus window to start this burning.
- Wait for the burning process to complete.
Step 3: Keep the USB connected to your computer and restart your computer.
Your computer will probably boot from the USB and you will see the GNOME Partition Editor window. In this case, just skip to the next step. If that does not happen, please restart your computer again, access the BIOS screen, and set the USB as the first boot order using the corresponding key.
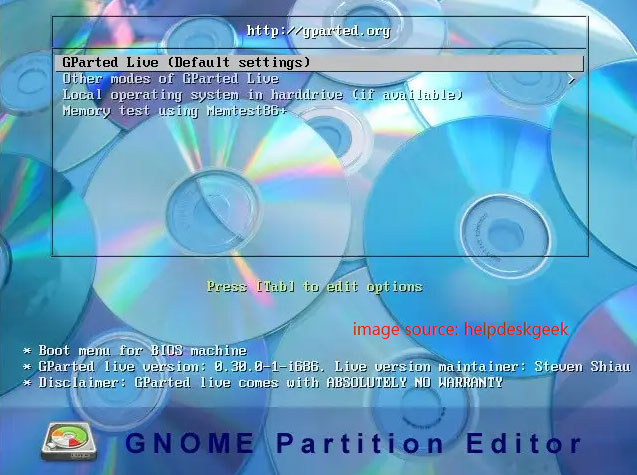
Step 4: On the GNOME Partition Editor window, the GParted Live option is selected by default. Press the Enter key to continue.
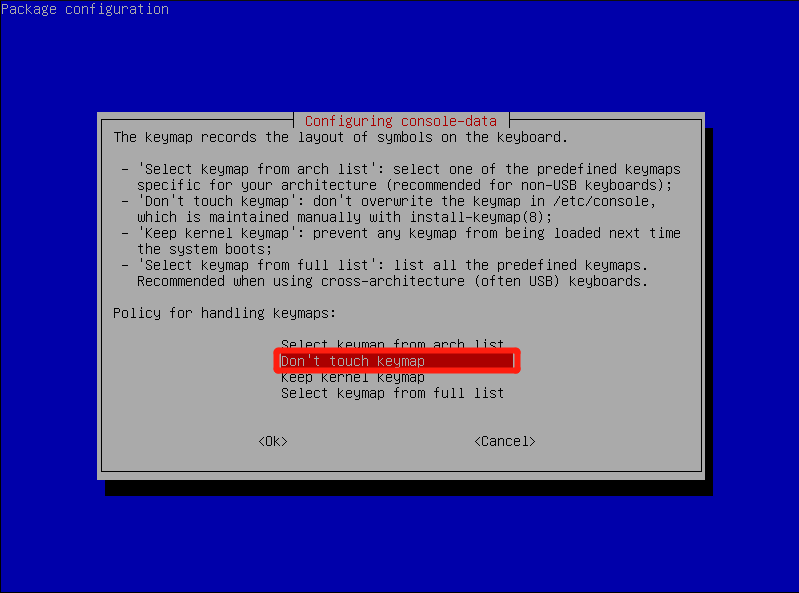
Step 5: Once inside the screen asking about what keymap to use, please choose the Don’t touch keymap option.
Step 6: When you are asked which language and mode you need, just hit the Enter key at any prompts as the default values are all fine.
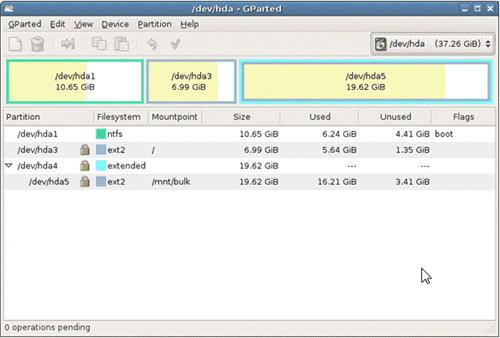
After that, GParted will load on your Windows computer, and you can see a simple and clean user interface. From the GParted interface, you can see information about each of the partitions currently on your hard drive including file system, size, and so forth. To get more information, you can right-click one partition and choose the Information option.
As mentioned earlier, GParted supports many file systems and ships with many functions. However, it cannot apply each function to every file system, and the following lists the common file systems and functions:
| File System | Create | Read | Shrink | Move | Copy | Check | Detect |
| exFAT | X | X | X | X | X | X | X |
| Ext2/3/4 | √ | √ | √ | √ | √ | √ | √ |
| FAT16/32 | √ | √ | √ | √ | √ | √ | √ |
| NTFS | √ | √ | √ | √ | √ | √ | √ |
Note: When the drive is locked by Bitlocker, all above functions are unavailable.
Then, Use GParted in Windows
GParted enables you to delete/format/resize/copy a partition, and more. Aside from these partition management solutions, GParted also supports disk management solutions like MBR to GPT conversion.
Well, how to perform these solutions? The following mainly shows how to use the most concerned GParted functions: resize partition and convert MBR to GPT.
GParted Resize Partition
To activate GParted Resize Partition, follow the steps below:
Step 1: Right-click the partition to be resized and then choose the Resize/Move option.
Step 2: In the Resize/Move window, drag the slider to adjust the size of the selected partition and click the Resize/Move button.
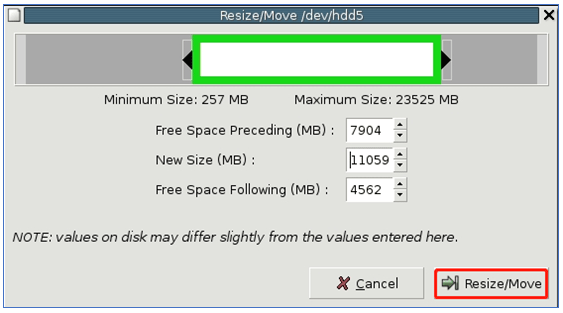
Step 3: Click the Apply button at the top of the GParted interface to let GParted start resizing the partition.
GParted Convert MBR to GPT
As to GParted Convert MBR to GPT, several steps are also required:
Note: GParted Convert MBR to GPT will erase all data on the selected disk. Therefore, make a backup and then perform the following steps.
Step 1: Click the Device tab at the top of the GParted interface and then choose the Create Partition Table option from the drop-down menu.
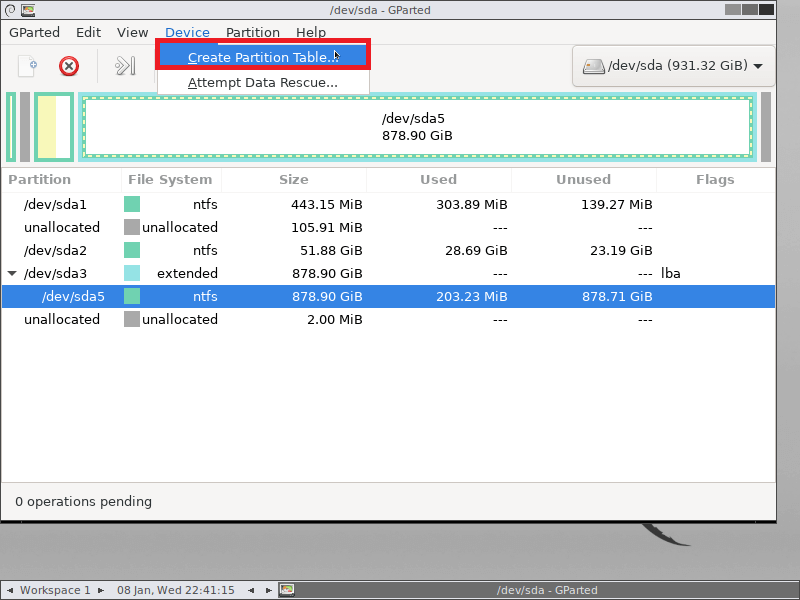
Step 2: Choose the gpt option from the Select new partition table type menu and click the Apply button.

Step 3: Wait for GParted to finish the partition table conversion.
Click to Tweet
GParted Windows Alternative
GParted has earned high praise among its users, but lots of people look for a GParted Windows alternative. Why? Join the discussion.
Two Main Reasons for Choosing a GParted Windows Alternative
As mentioned earlier, GParted is written in Linux so it cannot be directly used in Windows. To use it, you need to burn the .iso file to a USB or CD and then boot your computer to GParted Live. So, the first reason might be an inconvenience.
Then, on the account of the flaws of functions on GParted, people would like to replace GParted with a more useful partition management tool. For example, people complained that GParted can’t resize partitions, and GParted causes data loss during the MBR to GPT conversion.
Here is a true example from superuser — GParted can’t resize partition:
I used GParted to resize C. In GParted I see resized C partition. In Disc Management View I also see resized C partition. My computer partition is still not changed. GParted shows resized partition, the same Windows 10 Disc Management, but this partition remains unchanged. What can I do in that case to extend my system partition?https://superuser.com/questions/1370229/unable-to-resize-system-partition-using-gparted
Therefore, that’s why GParted users are looking for a GParted Windows alternative. What is an excellent GParted Windows alternative? Keep reading.
Try MiniTool Partition Wizard
MiniTool Partition Wizard could be an excellent GParted Windows alternative. Why?
First, it also supports many file systems such as NTFS, FTA32, ext2/3/4. Moreover, it is a multifunctional partition management tool that can do most of what GParted can. It enables you to create/format/resize/copy partitions, fix file system errors, convert MBR to GPT, migrate OS to SSD, recover lost partitions, and so on. Moreover, during the MBR and GPT conversion, no data loss happens.
Then, MiniTool Partition Wizard is a professional partition management tool for Windows and it can be directly installed on computers that run a Windows operating system like Windows 7/8/10/11.
Well, that’s why choose MiniTool Partition Wizard as the GParted Windows alternative. Now scroll down to see how to use MiniTool Partition Wizard to manage Windows partitions and disks.
Use MiniTool Partition Wizard to Manage Disks & Partitions in Windows
The following also walks you through the process of resizing partition and converting to MBR and GPT with MiniTool Partition Wizard.
MiniTool Partition Wizard Resize Partition
MiniTool Partition Wizard FreeClick to Download100%Clean & Safe
Note: To resize the system drive like a C drive, please try the bootable version of MiniTool Partition Wizard.
MiniTool Partition Wizard provides you with two ways to resize a partition:
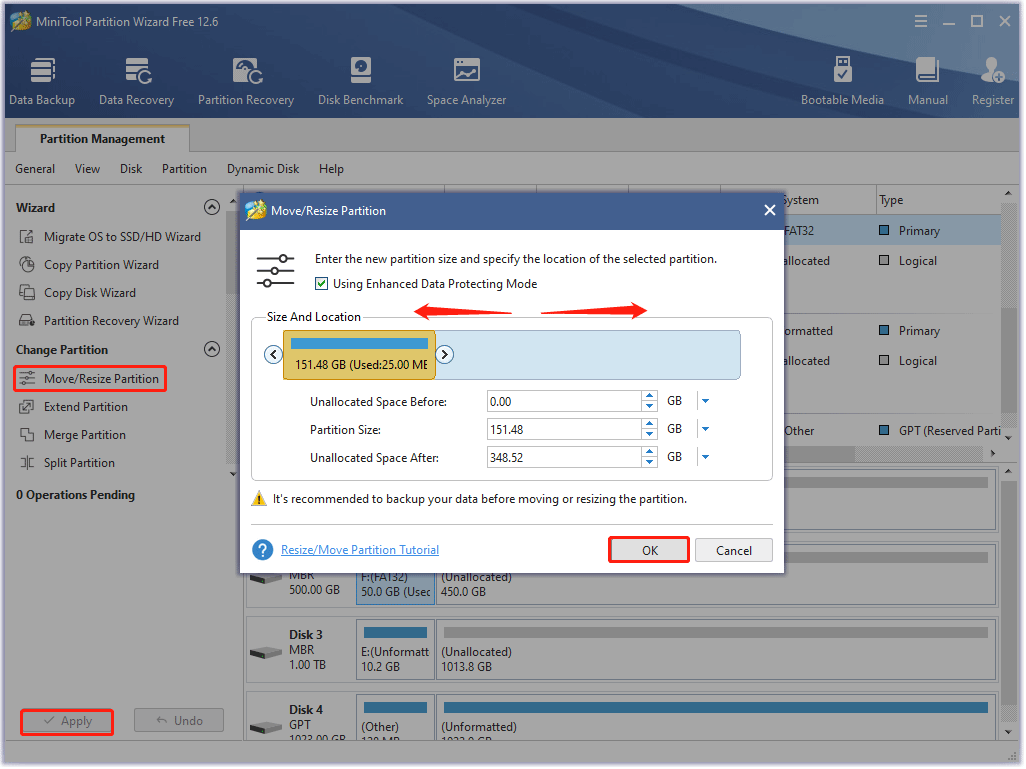
- Move/Resize Partition is used to extend, shrink, and move a partition.
- Extend Partition is used to enlarge a partition.

Use Move/Resize Partition:
Note: Make sure there is unallocated space adjacent to the partition to be extended.
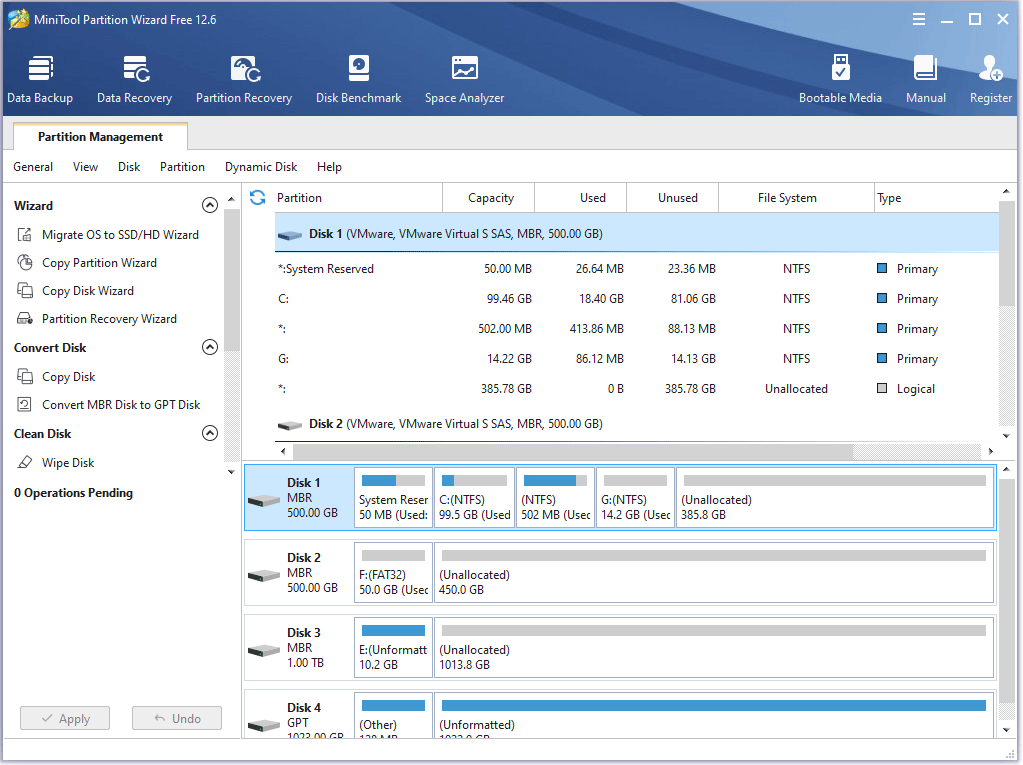
- Launch MiniTool Partition Wizard and locate the partition to be resized on the program’s interface.
- Click the Move/Resize Partition feature from the left panel.
- On the Move/Resize Partition window, drag the slider to extend or shrink the partition or move the yellow section to change the partition location on the disk. When finish, click the OK button.
- Preview the resizing result and click the Apply button on the program’s interface to let the MiniTool’s program execute the changes.
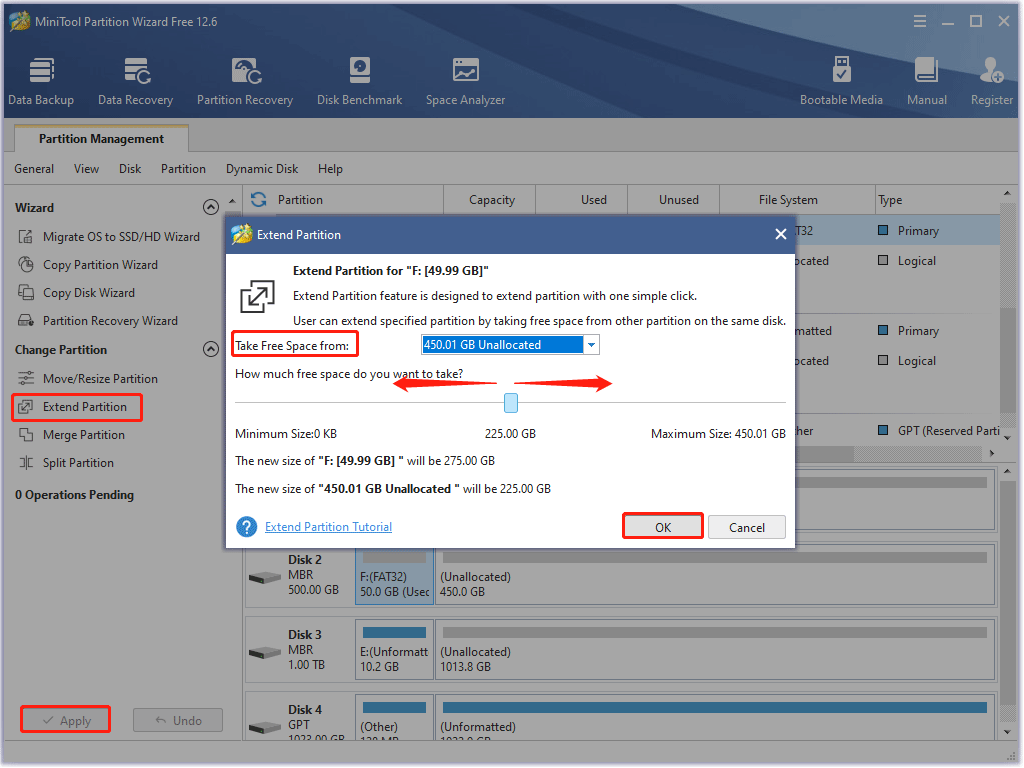
Use Extend Partition
- Launch MiniTool Partition Wizard and locate the partition to be resized on the program’s interface.
- Click the Extend Partition feature from the left panel.
- On the Extend Partition window, choose a partition that contains free space or unallocated space from the Take Free Space from menu and move the slider to determine how much you want to take. After that, click the OK button.
- Preview the extending result and click the Apply button to execute the change.
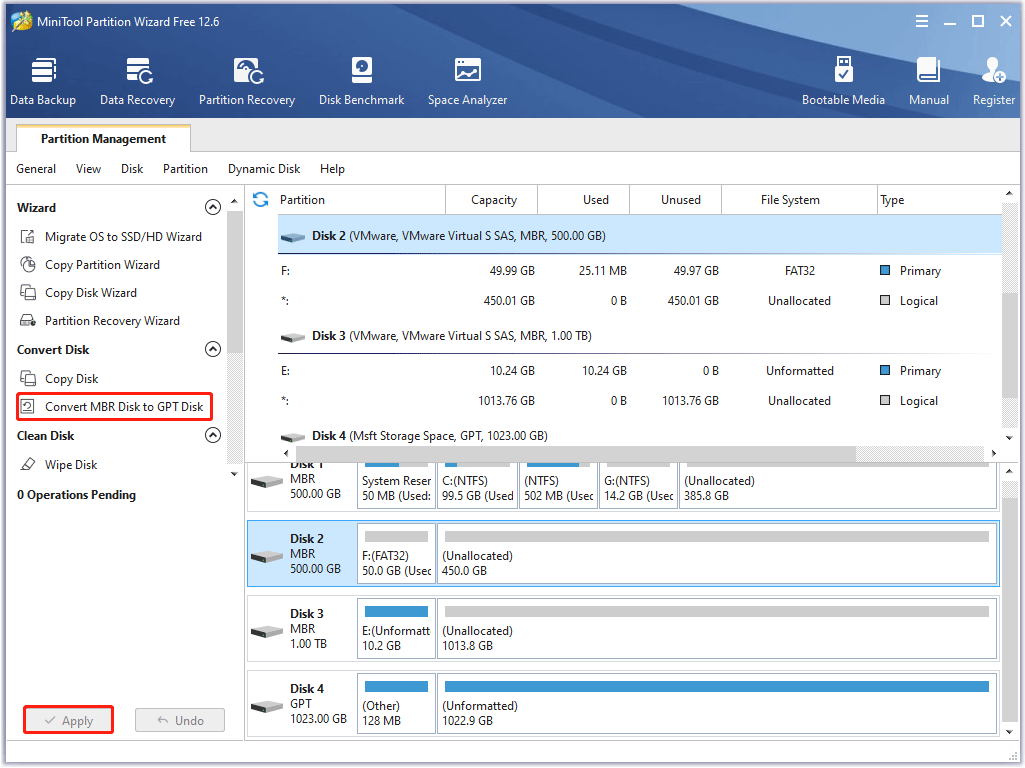
MiniTool Partition Wizard MBR to GPT Conversion
MiniTool Partition Wizard enables you to finish MBR and GPT conversion without data loss. The process goes like this:
MiniTool Partition Wizard FreeClick to Download100%Clean & Safe
Note: If the disk you want to convert to MBR or GPT contains a system, please also try the bootable version to avoid any boot issue.
- Launch MiniTool Partition Wizard and locate the disk you want to convert to MBR or GPT.
- Choose the Convert MBR Disk to GPT Disk option or the Convert GPT Disk to MBR Disk option from the left panel.
- Preview the conversion result and click the Apply button to start the conversion.
Click to Tweet
Final Thoughts on GParted in Windows
GParted is a handy partition management tool, but it becomes a bit complicated when you want to run this tool in Windows. The reason has been explained above. Also, the tutorial on how to use GParted in Windows is displayed above. If you have any questions about these two parts, please leave them in the comment zone. We will try to provide their answers soon enough.
A GParted Windows alternative MiniTool Partition Wizard is also recommended above. If any questions or suggestions appear when you use it, please contact us via [email protected].
Gparted — это мощное и удобное приложение для управления разделами на жестком диске. Оно позволяет изменять размеры разделов, создавать новые, перемещать и копировать разделы, а также выполнять другие операции, необходимые при работе с жестким диском. Однако, изначально Gparted не поддерживает Windows, и поэтому требуется дополнительная установка и настройка для работы на этой операционной системе.
Установка Gparted на Windows осуществляется с помощью дополнительного программного обеспечения, такого как Linux Live USB Creator (Lili) или Rufus. Сначала необходимо скачать и установить одну из этих программ. Затем, используя программу, создать загрузочную флешку с Gparted на базе Linux.
После создания загрузочной флешки необходимо загрузить компьютер с нее. Чтобы это сделать, необходимо включить компьютер и нажать определенную кнопку, обычно это F12 или ESC, чтобы открыть меню загрузки. Из меню следует выбрать загрузку с флешки и нажать Enter.
После загрузки с флешки откроется окно Gparted. Теперь вы можете использовать программу Gparted для управления разделами на вашем жестком диске. Помните, что предварительно следует сделать резервную копию всех важных данных, так как некорректные операции с разделами могут привести к потере информации.
Содержание
- Скачивание Gparted
- Установка Gparted на компьютер
- Запуск Gparted после установки
- Создание загрузочного диска с Gparted
- Основные функции Gparted
Скачивание Gparted
Для скачивания Gparted для Windows следуйте инструкциям ниже:
- Откройте веб-браузер и перейдите на официальный сайт Gparted.
- На главной странице найдите раздел «Downloads» (Скачать) и выберите вкладку «Stable Releases» (Стабильные версии).
- Прокрутите страницу вниз и найдите раздел «Windows packages» (Пакеты для Windows).
- Найдите ссылку для скачивания последней версии программы (.exe файл) и нажмите на нее.
- Появится окно загрузки, где вам будет предложено сохранить файл на ваш компьютер. Выберите удобную для вас папку и нажмите «Сохранить».
- После завершения загрузки откройте папку, в которую был сохранен файл.
- Найдите скачанный файл с расширением .exe и дважды кликните по нему.
- Следуйте инструкциям установщика и выберите путь для установки Gparted на вашем компьютере.
- После завершения установки вы сможете найти ярлык Gparted на рабочем столе или в меню «Пуск».
Теперь вы можете использовать Gparted для управления разделами на вашем компьютере с операционной системой Windows.
Установка Gparted на компьютер
Для установки Gparted на компьютер в операционной системе Windows, следуйте инструкциям ниже:
|
1. |
Скачайте установочный файл Gparted с официального сайта. Выберите версию программы, соответствующую вашей операционной системе. |
|
2. |
После скачивания дважды кликните на установочном файле, чтобы запустить процесс установки. |
|
3. |
Выберите язык установки и следуйте инструкциям мастера установки. |
|
4. |
При установке выберите путь, куда будет установлена программа, а также выберите компоненты, которые хотите установить (например, ярлык на рабочем столе и в меню «Пуск»). |
|
5. |
Подтвердите начало установки, нажав на соответствующую кнопку. |
|
6. |
После завершения установки вы сможете запустить Gparted через ярлык на рабочем столе или в меню «Пуск». |
Теперь у вас установлен Gparted на компьютере и вы можете использовать его для управления разделами диска в операционной системе Windows.
Запуск Gparted после установки
После установки Gparted на вашем компьютере Windows, вам потребуется запустить программу, чтобы начать использовать ее для работы с разделами на вашем жестком диске.
Чтобы запустить Gparted:
- Откройте меню «Пуск» и найдите установленное приложение Gparted.
- Щелкните по значку Gparted, чтобы открыть программу.
- После запуска Gparted вы увидите графический интерфейс программы с основным окном, отображающим разделы вашего жесткого диска.
Готово! Теперь у вас есть доступ к функциям Gparted и вы можете начать использовать его для изменения размеров, создания, перемещения и удаления разделов на вашем жестком диске.
Создание загрузочного диска с Gparted
Для создания загрузочного диска с Gparted вам понадобится диск или флеш-накопитель, который будет использоваться для загрузки и запуска программы. В этом разделе мы расскажем, как правильно создать загрузочный диск с помощью программы Rufus.
1. Скачайте и установите программу Rufus с официального сайта разработчика.
2. Вставьте флеш-накопитель или вставьте диск, который вы хотите использовать для создания загрузочного диска.
3. Запустите программу Rufus и выберите ваш флеш-накопитель (или диск) из списка доступных устройств в разделе «Устройство».
4. В разделе «Создаваемый образ» выберите опцию «ISO-образ» и нажмите на кнопку «Выбрать» рядом с этой опцией.
5. Укажите путь к скачанному ранее образу Gparted ISO-файла и нажмите на кнопку «Открыть».
6. Убедитесь, что настройки для создания загрузочного диска соответствуют следующим параметрам:
- Схема разделов: MBR, если ваш компьютер использует BIOS, или GPT, если он использует UEFI;
- Система файлов: FAT32;
- Размер кластера: автоматически;
- Метка тома: по умолчанию.
7. Нажмите на кнопку «Старт» и подтвердите удаление всех данных с флеш-накопителя или диска. Запись загрузочного диска начнется.
После завершения процесса записи загрузочного диска вы сможете использовать его для загрузки в Gparted и проведения необходимых операций с разделами вашего компьютера.
Основные функции Gparted
Gparted предлагает множество функций для управления разделами жесткого диска и создания новых разделов. Некоторые из основных функций включают:
- Редактирование разделов: Gparted позволяет изменять размеры существующих разделов, создавать новые разделы и удалять существующие разделы. Вы можете легко изменять размеры разделов, чтобы освободить место на диске или объединить несколько разделов в один.
- Форматирование разделов: С помощью Gparted вы можете форматировать разделы в различные файловые системы, такие как NTFS, FAT32, ext4 и другие. Форматирование раздела позволяет использовать его для хранения данных или установки операционной системы.
- Копирование разделов: С помощью Gparted вы можете создать точную копию раздела и сохранить ее на другом разделе или диске. Это удобно, если вы хотите создать резервную копию важных данных или скопировать раздел на другой компьютер.
- Изменение параметров разделов: Вы можете изменить тип раздела, установить флаг активности раздела или изменить метку раздела с помощью Gparted. Это полезно для настройки разделов и определения их свойств для определенных целей.
- Просмотр информации о разделах: Gparted предоставляет обширную информацию о каждом разделе на вашем жестком диске, включая размеры, использование места и файловую систему. Вы можете использовать эту информацию для более эффективного управления и организации своих данных.
Gparted предоставляет мощный набор инструментов для работы с разделами жесткого диска и может быть полезным инструментом для системных администраторов и опытных пользователей. Он имеет простой и понятный интерфейс, который делает работу с разделами простой и удобной.
How do I Run GParted on Windows 10?
Start your computer with the GParted USB drive .
Select the GParted Live Default settings option and press Enter.
Select the Dont touch keymap option and press Enter.
Select your language and press Enter.
Select 0 and press Enter.
Can GParted be Installed on Windows?
GParted can be used on x86 and x8664 based computers running Linux, Windows, or Mac OS X by booting from media containing GParted Live. A minimum of 320 MB of RAM is needed to use all of the features of the GParted application.
How do I Install GParted?
To start the installation, open up a terminal window by pressing Ctrl + Alt + T on the keyboard. Or, search for “Terminal” in the app menu. Once a terminal window is open, use the apt install command to get the “gparted” package installed on your computer.
How do I Run GParted from USB?
1 Choose your Flash Drive . 2 Select GParted Partition Tools from the list. 3 Browse to your ISO file and then click Create. Reboot your PC and set your system BIOS or Boot Menu to boot from the USB device, save your changes and reboot booting from the memory stick.
How do I Use GParted on Windows 7?
First, prepare a bootable Windows 7 installation disc, then download the GParted Live CD and burn it to CD. Then, boot off the GParted CD, and you can see all the partitions in the window. Usually, the first one is your boot partition, to ensure that, you can check the Flags column.
Is GParted Bootable?
GParted Live is a small bootable GNU/Linux distribution for x86 based computers. GParted Live can be installed on CD, USB, PXE server , and Hard Disk then run on an x86 machine. CAUTION: Creating a whole disk or partition image backup is recommended before you resize or move a partition.
GParted Live on USB
Download the GParted Live iso file . From Windows, install then run the LinuxLive USB Creator program and follow the instructions in the GUI to install GParted Live on your USB flash drive USB flash drive Common uses of USB flash drives are for storage, supplementary backups, and transferring of computer files. Compared with floppy disks or CDs, they are smaller, faster, have significantly more capacity, and are more durable due to a lack of moving parts. https://en.wikipedia.org › wiki › USB_flash_drive USB flash drive Wikipedia.
Can I Use GParted on Windows?
Requirements. GParted can be used on x86 and x8664 based computers running Linux, Windows, or Mac OS X by booting from media containing GParted Live. A minimum of 320 MB of RAM is needed to use all of the features of the GParted application.
How do I Make a Bootable GParted USB?
Step 1: Download the latest version of GParted.
Step 2: Decompress the contents of the zip file.
Step 3: Insert your USB flash or hard drive and find device and mount point.
Step 4: Copy the «/tmp/gpartedliveo.21.o1i586» directory to your USB drive.
Is GParted Good for Windows?
GParted is OK for easy operations, but it is terrible in resizing and moving system partition s. Another disadvantage of GParted is that if you resize your boot/system partition, you will be completely unable to boot without repairing Windows sometimes because GParted is developed based on Linux.