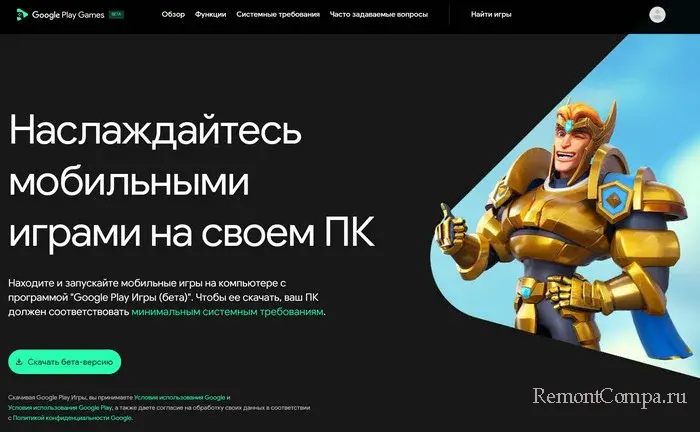
If your PC meets the minimum requirements, you can install Google Play Games Beta on PC.
Begin installation
- On your Windows computer, go to play.google.com/googleplaygames.
- Click Download.
- To install the app, open the downloaded file, then follow the instructions.
- The installation can take a few minutes.
Tip: If your computer didn’t meet the minimum requirements, you’re notified and the installation won’t continue.
Set up virtualization settings
To play mobile games on your PC, Windows virtualization settings must be turned on.
- If Windows Hypervisor Platform is turned off, you’re prompted to turn it on during installation. Restart your computer for this setting to take effect.
- If Windows Hypervisor Platform is turned on already, you won’t get this prompt.
- Before you install Google Play Games Beta on your PC, CPU virtualization must be turned on in your computer’s BIOS settings.
Tip: If you installed other emulators on your computer, they might not work when Windows Hypervisor Platform is turned on. Learn how to turn off Hypervisor after installation.
Sign in to your account
To play across devices, be sure to sign in with the same account on your mobile device and your PC.
Tip: Only the first user who installed Google Play Games Beta on PC can open it and play games.
Troubleshoot installation errors
- Address any minimum requirements that are missing. The specific items are noted during installation.
- For more info about how to update your PC, contact the PC manufacturer.
- Be sure to turn on Windows Hypervisor Platform before installation, or if prompted when you run Google Play Games Beta on PC.
- If you turned on HAXM when you installed the app, uninstall Google Play Games Beta on PC, then reinstall it. When prompted, be sure to turn on Windows Hypervisor Platform.
- As of November 11, 2022, Google Play Games Beta on PC no longer supports HAXM as an alternative to Windows Hypervisor Platform.
- Uninstall Google Play Games Beta on PC through Windows “Apps & features,” then reinstall it.
- Restart your computer.
Tip: If you try all of these troubleshooting steps and still can’t install Google Play Games Beta on your PC, contact us. This product is still in beta, so we appreciate any feedback you can send.
Related resources
- Check if you’re eligible for Google Play Games Beta on PC
- Turn off Windows Hypervisor Platform
Was this helpful?
How can we improve it?
Время на прочтение
1 мин
Количество просмотров 5.6K
Google запустила бета-версию сервиса, позволяющего запускать Android-игры на ПК под управлением Windows. Компания анонсировала сервис в начале 2022 года, а теперь расширила библиотеку игр и открыла для тестирования новые регионы.

Google представила собственный эмулятор Google Play Games в январе 2022 года. Главная особенность сервиса в том, что в отличие от других эмуляторов, Google Play Games предоставляет пользователю отдельный лаунчер, а Android используется только для запуска игр, поэтому в лаунчере нет привычного интерфейса операционной системы.
Сервис Google Play Games пока доступен только для Windows. Также после анонса доступ к нему могли получить только пользователи из Тайваня, Южной Кореи и Гонконга. Сейчас компания расширила регионы, и присоединиться к полноценному бета-тесту могут жители США, Канады, Мексики, Бразилии, Индонезии и Филиппин. Вместе с этим количество доступных игр увеличили с 12 до 85.
Для установки и запуска Google Play Games необходим ПК со следующими характеристиками:
-
Windows 10 (v2004);
-
SSD с 20 ГБ свободного места;
-
видеокарта Intel UHD Graphics 630 или аналог;
-
8 ГБ оперативной памяти.
Компания отмечает, что в игры можно играть с помощью мыши и клавиатуры. Также качество графики автоматически подстраивается под размеры монитора. Вместе с этим доступна облачная синхронизация прогресса с другими устройствами пользователя, а компания отмечает, что Google Play Games работает без участия подсистемы Windows для Android.
Best Android Games for PC
To enjoy the best Android games on a computer there is no other way to download and install an emulator such as BlueStacks, one of the best known, or the official Google: Google Play Games Android whose version of Windows offers users the possibility to access the catalog of games of the official store and download all of them to take advantage of the possibilities that a PC offers in this aspect.
Android games on Windows desktop
This is exactly what you get when you download Google Play Games for free: access to the Android game store and the possibility of installing any of them on the computer, being able to control them with greater precision than a touch screen offers thanks to the keyboard, mouse, gamepad or peripheral with which it is counted.
Google Play Games for PC offers a limited version of Google Play, dedicated exclusively to video games. It allows you to explore it and install any of the available ones, with access to the library of downloaded titles. To access, simply register with the user account used in Google.
In short, you will find a very easy-to-use emulator and an integrated store. The games are executed through a browser window and, yes, you would have to put a downside (to put some) and that is that you can only stick to the games present in Google Play. In other words, you won’t be able to load any that comes in an APK from another service. If you can live with that, it’s perfect.
Requirements and additional information:
- Minimum operating system requirements:
Windows 10.

Elies Guzmán
With a degree in History, and later, in Documentation, I have over a decade of experience testing and writing about apps: reviews, guides, articles, news, tricks, and more. They have been countless, especially on Android, an operating system…
What to know
- You can download and install the beta version of Google Play Games for Windows on your PC now at play.google.com/googleplaygames
- To use the Google Play Games app on Windows, you need to enable Hypervisor on your PC first.
- Find the guides below for the above.
Windows 11 gained a lot of traction when it was first announced that it would be bundled with the ability to install and use Android apps. Users waited eagerly for this feature; however, many were disappointed when it was revealed that one could only download and use apps from the Amazon App Store.
While there were workarounds to install and use APKs, many games that relied on Google Play Services would fail to work. Thankfully, all this is about to change thanks to Google, which has now released Google Play Games software for Windows 11. Let’s take a quick look at this new offering from Google and how you can use it to play Android games on your Windows 11 PC.
Your PC needs to fulfill a few hardware requirements to run Google Play Games to play Android games on your Windows 11 PC. Use the section below to ensure your current setup supports Google Play Games. You can then use the subsequent steps to install Google Play Games on your PC and play Android games. Let’s get started.
Requirements
Here are the minimum hardware requirements for Google Play Games. If your PC doesn’t meet these minimum system requirements, you will likely face performance issues when running graphic-intensive Android games on your Windows 11 PC.
- Windows 10 v2004 or higher
- An SSD with 10GB of free space available
- Intel UHD 630 or higher
- 4-Core CPU or higher (Some games specifically require an Intel CPU)
- 8GB of RAM or higher
- Hardware Virtualization enabled
Step 1: Enable Hypervisor on your Windows PC
We first need to enable Hyper-V, which is a requirement to install and run Android games from Google Play Games on your PC. Follow the steps below to help you enable the same on your Windows 11 PC.
Open the Settings app on your PC using the Windows + i keyboard shortcut.

Now click Apps in the left sidebar.

Click on Optional features on your right.

Scroll to the bottom and tap More Windows features.

Scroll to the bottom and check the box for Windows Hypervisor Platform.

Click OK.

Hypervisor will now be enabled on your PC. Restart your PC to apply the changes.

And that’s it! Hypervisor will now be enabled on your PC. You can now use the steps below to use Google Play Games to play Android games on your PC.
Step 2: Download and install Google Play Games
Here’s how you can download and install Google Play Games on your Windows 11 PC. Follow the steps below to help you along with the process.
Visit play.google.com/googleplaygames in your browser and click on Download beta.

A setup will now be downloaded on your PC. Save the setup in a convenient location and double-click and launch the same once it has been downloaded.

Google Play Games will now be downloaded and installed on your PC. This can take some time, depending on the available network speed and bandwidth.

Wait for the process to complete.

The setup will automatically close and launch Google Play Games once it has been installed. Click Sign in with Google.

A new browser window will now open. Type in your credentials and log into your account. If you’re already logged into your Google account, click and select the account you wish to use with Google Play Games.

Once you select an account, you will be implored to ensure you downloaded Google Play Games from the official website. Click Sign in to confirm your choice.

You will now be signed into your Google account. You can now close your browser and switch back to Google Play Games.

You will now be asked to create a profile to be used with Google Play Games. Type in your preferred username in the text box at the top.

You can also click the Refresh icon to cycle through random usernames to find one you like.

You can also click Switch account at the bottom if you wish to use another Google account with Google Play Games instead of the current one.

Once you have selected your username, click Crete profile in the bottom right corner.

You will now be shown the Terms of Service for Google and Google Play. Review both, using their respective links at the top.

Once you have reviewed everything, click on Accept.

You will now be asked if you wish to share anonymous data with Google to help it improve its apps with future updates. Click and enable the toggle in the top right corner for Help improve your experience to share your data with Google. Disable this toggle if you don’t wish to share your data.

Click Finish at the bottom once you have made your choice.

And that’s it! You will now have installed and set up Google Play Games on your PC. We can now install and play Android games on your PC using the next steps.
Step 3: Install and play games
Now that Google Play Games is installed on your PC, we can now download and play games. Follow the steps below to help you along with the process.
Open the Start menu and search for Google Play Games. Click and launch the app once it shows up in your search results.

Once the app launches on your PC, scroll the homepage to find a game you wish to download.

You can also view games in your library on your right in the quick view section.

You can also click the Library icon in the left sidebar to view your game library.

If you wish to search for a game, click the Search icon in the left sidebar.

Now click the text box in the top right corner and search for the concerned game.

You can also click one of the categories at the top to view games in the selected category.

Click on the game once it shows up in your search results.

Now click on Install to install the game on your PC.

The game will now be downloaded and installed on your PC. You can track its progress on the store page for the game.

You can also track the progress using the Downloads section in the left sidebar.

Once the game has been downloaded, click Play to play the game.

The game will now launch on your PC in full screen. Press Shift + Tab to exit the full screen or the game.

You can now click on Fullscreen to toggle full screen for the game. You can also press F11 on your keyboard to toggle the same.

You can also click Exit game to close the game.

You can now play the downloaded Android game on your PC.

And that’s it! You can now use the steps above to download and install Android games on your PC whenever needed.
Step 4: Customize your gaming experience
Although playing Android games on a Windows PC is a great experience out of the box using Google Play Games, customizing your controls and other settings can help improve your experience. Follow the steps below to help customize your gaming experience on your PC.
Open the Start menu by pressing the Windows key on your keyboard and searching for Google Play Games. Click and launch the app once it shows up in your search results.
Now click on Library in the left sidebar.

Click on the Play icon beside the game you wish to customize.

The game will now be launched on your PC. Use F11 to toggle full screen based on your preferences. Now press Shift + Tab on your keyboard to bring up the game settings.

Click on Remap controls to remap controls to your preferred control scheme on your PC.

Now click on a control you wish to remap.

Press the key you wish to use instead.

The key will be captured, and the control will now be remapped to it. Repeat the steps above to remap other controls for the game as needed.

You can also click Reset to defaults at the top to reset your remappings.

Click Reset again to confirm your choice.

Click the X icon to close the settings.

Some games might not allow you to remap the default controls. In such cases, this option will be greyed out, as shown below.

Such games might offer the option to customize your controls using the in-game settings. When the game is launched, find and click the Settings icon to check if you can customize your controls in the settings.

And that’s how you can customize your gaming experience when playing Android games using Google Play Games on your Windows 11 PC.
Google Play Games performance on Windows 11
In our testing and initial experience, the performance of Android games seems to be on par with top-of-the-line Android phones, even when using an integrated Intel GPU like the Iris XE or the UHD 630. Games seem to be well-optimized and tested before being listed on Google Play Games for PC. This is because Google is taking extra care when it comes to optimizing the games for Windows. According to Google, the company is working in close collaboration with game developers to ensure the games are properly optimized for a PC gaming experience. Additionally, Google also runs each listed game through tests to ensure it does not compromise your PC’s security or privacy. This is much like Steam’s attempts to verify games and optimize them for the Steam Deck, where users can identify optimized games using a dedicated badge. However, unlike Steam, where you can download unoptimized games to test them yourselves, Google only lists optimized and tested games in the Google Play Games for Windows app. So as long as your current setup can meet the minimum system requirements, you shouldn’t experience any performance issues unless you’re facing bottlenecks.
Is this the same Google Play Games available on Android phones and tablets?
No, Google Play Games for Windows isn’t the same as Google Play Games for Android. Google Play Games for Android works in tandem with other Google apps and services on your Android device, while Google Play Games for Windows is a standalone app. The Windows standalone app is bundled with its own version of Google services, which allows it to download and play Android games on Windows PCs using Hardware Virtualization.
However, this doesn’t mean that you’re missing out on traditional Google Play Games perks. You still get the ability to sync your game progress to the cloud, so you can pick up where you left off on any device as long as you’re using the same Google account. You also get the ability to earn Google Play Rewards, which can then be redeemed in the store for in-app purchases or subscriptions.
We hope the post above helped you easily get and play Android games on your PC using Google Play Games. If you face any issues or have any more questions for us, feel free to reach out using the comments section below.
Не так давно компания Google выпустила Google Play Games для Windows. Что это такое? Это официальное приложение знаменитой компании, которое позволяет на системе Windows 10 и 11 играть в игры с системы Android. При этом, так как приложение официальное можно не бояться подцепить вирус. Поиграть в андроидовские игры могут все у кого ПК соответствует минимальным требованиям.
Как скачать Google Play Games на ПК
Видеокарта не ниже Intel UHD 630;
Процессор минимум четырехъядерный с поддержкой виртуализации;
Оперативная память не менее 8 Гб;
Хранилище 10 Гб.
Первое, что необходимо сделать это, конечно, скачать приложение. Сделать это можно перейдя по ссылке:
https://play.google.com/googleplaygames
Для многих стран, в том числе и России потребуется запустить VPN. Далее нажимаем «Хочу узнать» и загружаем приложение.
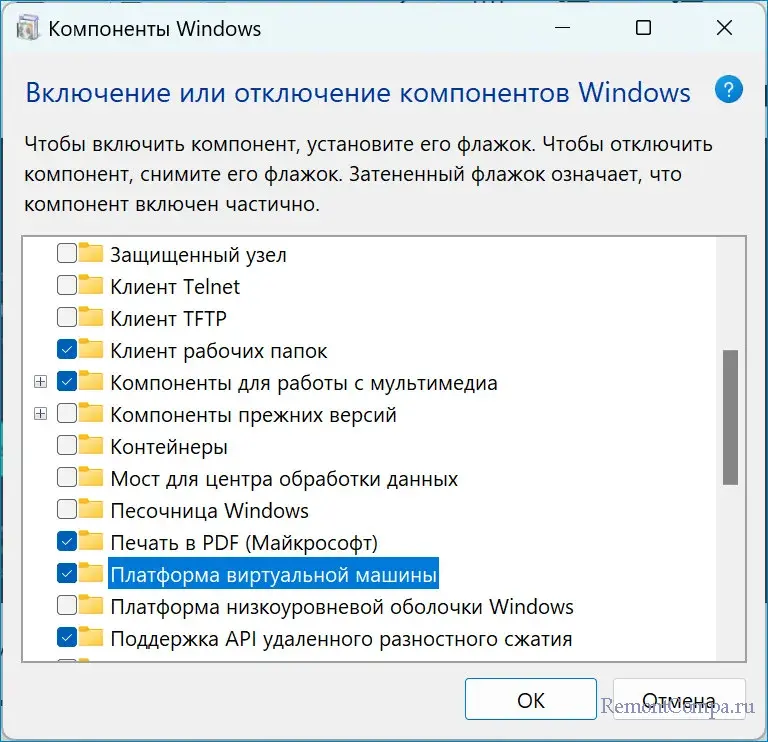
Вторым шагом будет запуск виртуализации.
1. Жмем Win+R, вводим «optionalfeatures» и подтверждаем действие.
2. В перечне компонентов ищем «Платформа виртуальной машины» и ставим рядом отметку.
3. Жмём «Ок» и перезапускаем ПК.
Помимо этого иногда требуется включение виртуализации в BIOS, хотя обычно она активирована по умолчанию.
Проверить запустили или нет можно в диспетчере задач.
1. Нажимаем Ctrl+Shift+Esc.
2. На вкладке «Производительность» в нижнем правом углу находится пункт «Виртуализация». Он должен быть включен.
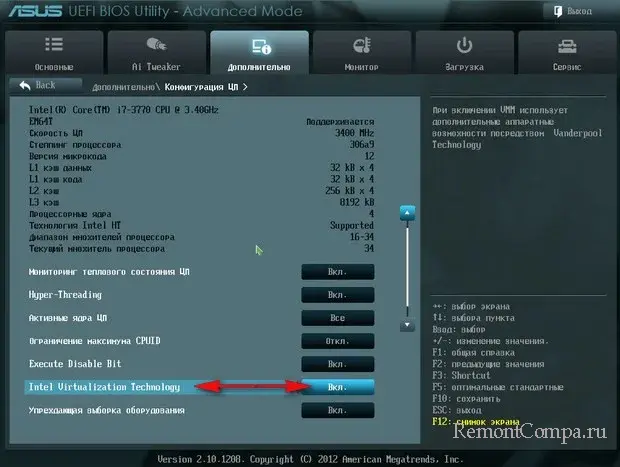
В случае если виртуализация отключена придется запустить ее в BIOS. Обычно требуется перезапустить ПК и при запуске нажать Del. У каждого производителя материнских плат и ноутбуков он имеет свое оформление и способ запуска. Поэтому тут придется поискать пункт активации. В материнских платах AMD он обычно называется SVM Mode и находится в разделе CPU Configuration. В материнках Intel это обычно Virtualization Technology. Рядом с данными пунктами ставим «Enabled» и жмем F10, чтобы сохранить настройки.
Третьим шагом устанавливаем приложение. Помимо обычного способа можно воспользоваться также командной строкой.
1. Нажимаем Win+R, пишем «cmd» и щелкаем «Ок».
2. Прописываем строку
winget search Google
3. В колонке «Имя» ищем «Google Play Games».
4. Нам необходимо запомнить или записать как называется приложение согласно колонке ИД. У нас сейчас оно имеет название Google.PlayGames.Beta.
5. Далее вводим такую строку
winget install Google.PlayGames.Beta.
Теперь приложение установлено и им можно пользоваться. Для того чтобы оно работало также придется использовать VPN сервис.