Download
GCC releases may be downloaded from our
mirror sites.
Important: these are source releases, so will be of little
use if you do not already have a C++ compiler installed.
As one option, there are
pre-compiled
binaries. for various platforms.
You can also retrieve our sources using Git.
GCC Timeline
The table is sorted by date. Please refer to our
development plan for future
releases and an alternative view of the release history.
| Release | Release date |
|---|---|
| GCC 13.2 | July 27, 2023 |
| GCC 10.5 | July 7, 2023 |
| GCC 11.4 | May 29, 2023 |
| GCC 12.3 | May 8, 2023 |
| GCC 13.1 | April 26, 2023 |
| GCC 12.2 | August 19, 2022 |
| GCC 10.4 | June 28, 2022 |
| GCC 9.5 | May 27, 2022 |
| GCC 12.1 | May 6, 2022 |
| GCC 11.3 | April 21, 2022 |
| GCC 11.2 | July 28, 2021 |
| GCC 9.4 | June 1, 2021 |
| GCC 8.5 | May 14, 2021 |
| GCC 11.1 | April 27, 2021 |
| GCC 10.3 | April 8, 2021 |
| GCC 10.2 | July 23, 2020 |
| GCC 10.1 | May 7, 2020 |
| GCC 9.3 | March 12, 2020 |
| GCC 8.4 | March 4, 2020 |
| GCC 7.5 | November 14, 2019 |
| GCC 9.2 | August 12, 2019 |
| GCC 9.1 | May 3, 2019 |
| GCC 8.3 | February 22, 2019 |
| GCC 7.4 | December 6, 2018 |
| GCC 6.5 | October 26, 2018 |
| GCC 8.2 | July 26, 2018 |
| GCC 8.1 | May 2, 2018 |
| GCC 7.3 | January 25, 2018 |
| GCC 5.5 | October 10, 2017 |
| GCC 7.2 | August 14, 2017 |
| GCC 6.4 | July 4, 2017 |
| GCC 7.1 | May 2, 2017 |
| GCC 6.3 | December 21, 2016 |
| GCC 6.2 | August 22, 2016 |
| GCC 4.9.4 | August 3, 2016 |
| GCC 5.4 | June 3, 2016 |
| GCC 6.1 | April 27, 2016 |
| GCC 5.3 | December 4, 2015 |
| GCC 5.2 | July 16, 2015 |
| GCC 4.9.3 | June 26, 2015 |
| GCC 4.8.5 | June 23, 2015 |
| GCC 5.1 | April 22, 2015 |
| GCC 4.8.4 | December 19, 2014 |
| GCC 4.9.2 | October 30, 2014 |
| GCC 4.9.1 | July 16, 2014 |
| GCC 4.7.4 | June 12, 2014 |
| GCC 4.8.3 | May 22, 2014 |
| GCC 4.9.0 | April 22, 2014 |
| GCC 4.8.2 | October 16, 2013 |
| GCC 4.8.1 | May 31, 2013 |
| GCC 4.6.4 | April 12, 2013 |
| GCC 4.7.3 | April 11, 2013 |
| GCC 4.8.0 | March 22, 2013 |
| GCC 4.7.2 | September 20, 2012 |
| GCC 4.5.4 | July 2, 2012 |
| GCC 4.7.1 | June 14, 2012 |
| GCC 4.7.0 | March 22, 2012 |
| GCC 4.4.7 | March 13, 2012 |
| GCC 4.6.3 | March 1, 2012 |
| GCC 4.6.2 | October 26, 2011 |
| GCC 4.6.1 | June 27, 2011 |
| GCC 4.3.6 | June 27, 2011 |
| GCC 4.5.3 | April 28, 2011 |
| GCC 4.4.6 | April 16, 2011 |
| GCC 4.6.0 | March 25, 2011 |
| GCC 4.5.2 | December 16, 2010 |
| GCC 4.4.5 | October 1, 2010 |
| GCC 4.5.1 | July 31, 2010 |
| GCC 4.3.5 | May 22, 2010 |
| GCC 4.4.4 | April 29, 2010 |
| GCC 4.5.0 | April 14, 2010 |
| GCC 4.4.3 | January 21, 2010 |
| GCC 4.4.2 | October 15, 2009 |
| GCC 4.3.4 | August 4, 2009 |
| GCC 4.4.1 | July 22, 2009 |
| GCC 4.4.0 | April 21, 2009 |
| GCC 4.3.3 | January 24, 2009 |
| GCC 4.3.2 | August 27, 2008 |
| GCC 4.3.1 | June 6, 2008 |
| GCC 4.2.4 | May 19, 2008 |
| GCC 4.3.0 | March 5, 2008 |
| GCC 4.2.3 | February 1, 2008 |
| GCC 4.2.2 | October 7, 2007 |
| GCC 4.2.1 | July 18, 2007 |
| GCC 4.2.0 | May 13, 2007 |
| GCC 4.1.2 | February 13, 2007 |
| GCC 4.0.4 | January 31, 2007 |
| GCC 4.1.1 | May 24, 2006 |
| GCC 4.0.3 | March 10, 2006 |
| GCC 3.4.6 | March 06, 2006 |
| GCC 4.1.0 | February 28, 2006 |
| GCC 3.4.5 | November 30, 2005 |
| GCC 4.0.2 | September 28, 2005 |
| GCC 4.0.1 | July 7, 2005 |
| GCC 3.4.4 | May 18, 2005 |
| GCC 3.3.6 | May 3, 2005 |
| GCC 4.0.0 | April 20, 2005 |
| GCC 3.4.3 | November 4, 2004 |
| GCC 3.3.5 | September 30, 2004 |
| GCC 3.4.2 | September 6, 2004 |
| GCC 3.4.1 | July 1, 2004 |
| GCC 3.3.4 | May 31, 2004 |
| GCC 3.4.0 | April 18, 2004 |
| GCC 3.3.3 | February 14, 2004 |
| GCC 3.3.2 | October 17, 2003 |
| GCC 3.3.1 | August 8, 2003 |
| GCC 3.3 | May 13, 2003 |
| GCC 3.2.3 | April 22, 2003 |
| GCC 3.2.2 | February 05, 2003 |
| GCC 3.2.1 | November 19, 2002 |
| GCC 3.2 | August 14, 2002 |
| GCC 3.1.1 | July 25, 2002 |
| GCC 3.1 | May 15, 2002 |
| GCC 3.0.4 | February 20, 2002 |
| GCC 3.0.3 | December 20, 2001 |
| GCC 3.0.2 | October 25, 2001 |
| GCC 3.0.1 | August 20, 2001 |
| GCC 3.0 | June 18, 2001 |
| GCC 2.95.3 | March 16, 2001 |
| GCC 2.95.2 | October 24, 1999 |
| GCC 2.95.1 | August 19, 1999 |
| GCC 2.95 | July 31, 1999 |
| EGCS 1.1.2 | March 15, 1999 |
| EGCS 1.1.1 | December 1, 1998 |
| EGCS 1.1 | September 3, 1998 |
| EGCS 1.0.3 | May 15, 1998 |
| EGCS 1.0.2 | March 16, 1998 |
| gcc 2.8.1 | March 2, 1998 |
| gcc 2.8.0 | January 7, 1998 |
| EGCS 1.0.1 | January 6, 1998 |
| EGCS 1.0 | December 3, 1997 |
| 2.7.2.3 | August 22, 1997 |
| 2.7.2.2 | January 29, 1997 |
| 2.7.2.1 | June 29, 1996 |
| 2.7.2 | November 26, 1995 |
| 2.7.1 | November 12, 1995 |
| 2.7.0 | June 16, 1995 |
| 2.6.3 | November 30, 1994 |
| 2.6.2 | November 12, 1994 |
| 2.6.1 | November 1, 1994 |
| 2.6.0 | July 14, 1994 |
| 2.5.8 | January 24, 1994 |
| 2.5.7 | December 12, 1993 |
| 2.5.6 | December 3, 1993 |
| 2.5.5 | November 27, 1993 |
| 2.5.4 | November 16, 1993 |
| 2.5.3 | November 11, 1993 |
| 2.5.2 | November 1, 1993 |
| 2.5.1 | October 31, 1993 |
| 2.5.0 | October 22, 1993 |
| 2.4.5 | June 20, 1993 |
| 2.4.4 | June 19, 1993 |
| 2.4.3 | June 1, 1993 |
| 2.4.2 | May 31, 1993 |
| 2.4.1 | May 26, 1993 |
| 2.4.0 | May 17, 1993 |
| 2.3.3 | December 26, 1992 |
| 2.3.2 | November 27, 1992 |
| 2.3.1 | November 1, 1992 |
| 2.3 | October 31, 1992 |
| 2.2.2 | June 14, 1992 |
| 2.2.1 | June 9, 1992 |
| 2.2 | June 8, 1992 |
| 2.1 | March 24, 1992 |
| 2.0 | February 22, 1992 |
| 1.42.0 (g++) | September 20, 1992 |
| 1.42 | September 20, 1992 |
| 1.41 | August 27, 1992 |
| 1.41.0 (g++) | July 13, 1992 |
| 1.40.3 (g++) | October 19, 1991 |
| 1.40 | June 1, 1991 |
| 1.39.1 (g++) | May 4, 1991 |
| 1.39 | January 16, 1991 |
| 1.38 | December 21, 1990 |
| 1.37.1 (g++) | March 1, 1990 |
| 1.37.0 (g++) | February 28, 1990 |
| 1.37.1 | February 21, 1990 |
| 1.37 | February 11, 1990 |
| 1.36.4 (g++) | January 30, 1990 |
| 1.36.3 (g++) | January 16, 1990 |
| 1.36 | September 24, 1989 |
| 1.35 | April 26, 1989 |
| 1.34 | February 23, 1989 |
| 1.33 | February 1, 1989 |
| 1.32 | December 21, 1988 |
| 1.31 | November 19, 1988 |
| 1.30 | October 13, 1988 |
| 1.29 | October 6, 1988 |
| 1.28 | September 14, 1988 |
| 1.27 | September 5, 1988 |
| 1.26 | August 18, 1988 |
| 1.25 | August 3, 1988 |
| 1.24 | July 2, 1988 |
| 1.23 | June 26, 1988 |
| 1.22 | May 22, 1988 |
| 1.21 | May 1, 1988 |
| 1.20 | April 19, 1988 |
| 1.19 | March 29, 1988 |
| 1.18 | February 4, 1988 |
| 1.17 | January 9, 1988 |
| 1.16 | December 19, 1987 |
| 1.15.3 (g++) | December 18, 1987 |
| 1.15 | November 28, 1987 |
| 1.14 | November 6, 1987 |
| 1.13 | October 12, 1987 |
| 1.12 | October 3, 1987 |
| 1.11 | September 5, 1987 (announced late) |
| 1.10 | August 22, 1987 |
| 1.9 | August 18, 1987 (never announced) |
| 1.8 | August 10, 1987 |
| 1.7 | July 21, 1987 |
| 1.6 | July 2, 1987 |
| 1.5 | June 18, 1987 |
| 1.4 | June 13, 1987 |
| 1.3 | June 10, 1987 |
| 1.2 | June 1, 1987 |
| 1.1 | May 24, 1987 |
| 1.0 | May 23, 1987 |
| 0.9 (first beta release) | March 22, 1987 |
In this tutorial, we will learn how to install GCC in Windows 10, Mac, and Linux.
We will use an open-source Integrated Development environment named Code::Blocks which bundles a compiler (named gcc offered by Free Software Foundation GNU), editor and debugger in a neat package.
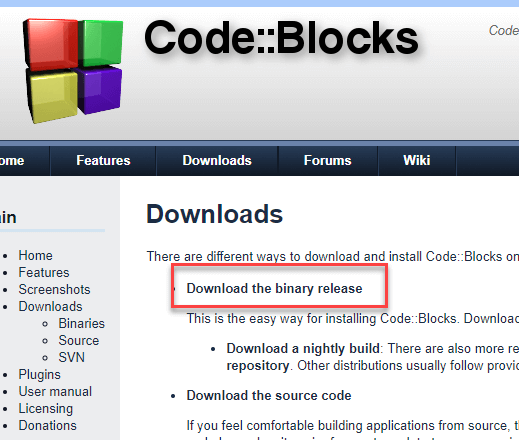
Step 1) Download Binary release
Go to http://www.codeblocks.org/downloads and click Binary Release.
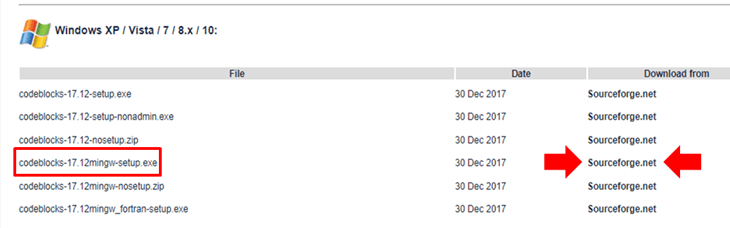
Step 2) Select the installer with GCC for Windows compiler
Choose the installer with GCC Compiler, e.g., codeblocks-17.12mingw-setup.exe which includes MinGW’s GNU GCC compiler download and GNU GDB debugger with Code::Blocks source files.
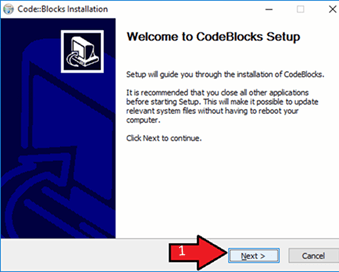
Step 3) Start installation
Run the downloaded installer and accept the default options to install GCC Windows file.
Step 4) Accept the terms and conditions
Accept the Agreement

Step 5) Keep default component selection
Keep the component selection default and click Next.

Step 6) Locate the installation path
You may change the installation folder and click Next.

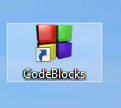
Step 7) Find and double-click on the CodeBlocks icon
To launch Code::Blocks double click on the icon.
Step  Let it detect the compiler itself
It will detect the GCC compiler for Windows automatically, set it as default.
Associate C/C++ files with code::blocks
Step 9) Open the IDE and start using
You will see the IDE Home screen.

Install GCC Linux
Linux operating systems mostly comes with GCC preinstalled. To verify if the compiler is installed on the machine, run the following command in the terminal:
gcc --version
After executing this command if the gcc is installed on the machine then it will return the information about the compiler otherwise it will ask you to install the compiler.
To set up the ‘C’ environment on Linux distributions follow the given steps:
1. Open terminal.
2. For red-hat, Fedora users, type and execute this command
# yum groupinstall 'Development Tools'
3. For Debian and Ubuntu users, type and execute following command
$ sudo apt-get update
$ sudo apt-get install build-essential manpages-dev
4. To verify that the GCC has been successfully installed on the machine as we discussed earlier, execute the following command
gcc --version
Install GCC on Mac
To set up a ‘C’ programming environment on MAC operating system, follow the given steps:
1. Visit the given link https://developer.apple.com/downloads/index.action and download. You will need an Apple developer ID
“Command Line Tools for X-Code,” pick any version (latest version is always recommended) and download the .dmg file.
2. After the file is being downloaded on the machine, double click and follow the wizard and install the file. Always keep the default settings as suggested by the installation wizard.
3. After the installation process, open a terminal and run gcc -v command to check if everything is successfully installed.
Conclusion
‘C‘ program can be written and executed on any machine that has a suitable environment to run the program. Its recommended using an IDE or C compiler for Windows to run C programs. An IDE includes a compiler, editor and debugger. Clanfg, MinGW compiler (Minimalist GNU compiler collection for Windows), Portable ‘C’ compiler, Turbo C are popular compilers available.
Overview
Compilers are used to convert the source code into machine-readable code so that the computer can understand it. For every programming language, we have to set up a compiler.
In C language, there are two ways to set up a compiler. The first one is installing the C/GCC compiler manually, and the second is installing Code::Blocks or any IDE(Integrated Development Environment) and within that, including the GCC compiler during installation.
After installing the compiler, we need to set its path to environment path variables because it allows the C program to compile from any directory on your computer.
Before reading this article, read these C Programming articles:
- History of C Language
- Importance of C Programming Language
Source Code Editors
The source code editor is a text editor tool designed specially to edit or write the source code of any programming language. There is a basic source code editor present in Windows, i.e., Notepad, but it has limited features; therefore, for better formatting and features like multiple tabs, and plugins, you can use other editors like:
-
TextPad (for Windows only): It is a powerful, general-purpose editor for plain text files. We can easily type the C program in TextPad.
You can open Project folders inside the textpad so that you don’t have to open files again and again, like in notepad. -
Notepad++ (for Windows only): It is a text editor for Microsoft Windows. Unlike notepad, it supports multiple tabs.
-
VS Code: (for Windows, Mac, and Linux) Visual Studio Code gives you suggestions to auto-complete the words. It has an inbuilt debugger to trace each line of code.
-
ATOM: (for Windows, Mac, and Linux): Atom helps you write code faster with a smart and flexible autocomplete.
-
Sublime Text: Sublime text is a free source code editor with expandable functionality using plugins. It supports almost all programming languages (such as Python, Java, C++, etc.), is community-built, and is maintained under a free license.
Installing C/GCC Compiler for Windows
C/GCC Compiler
Following are the steps to download and install the MinGW GCC Compiler for windows.
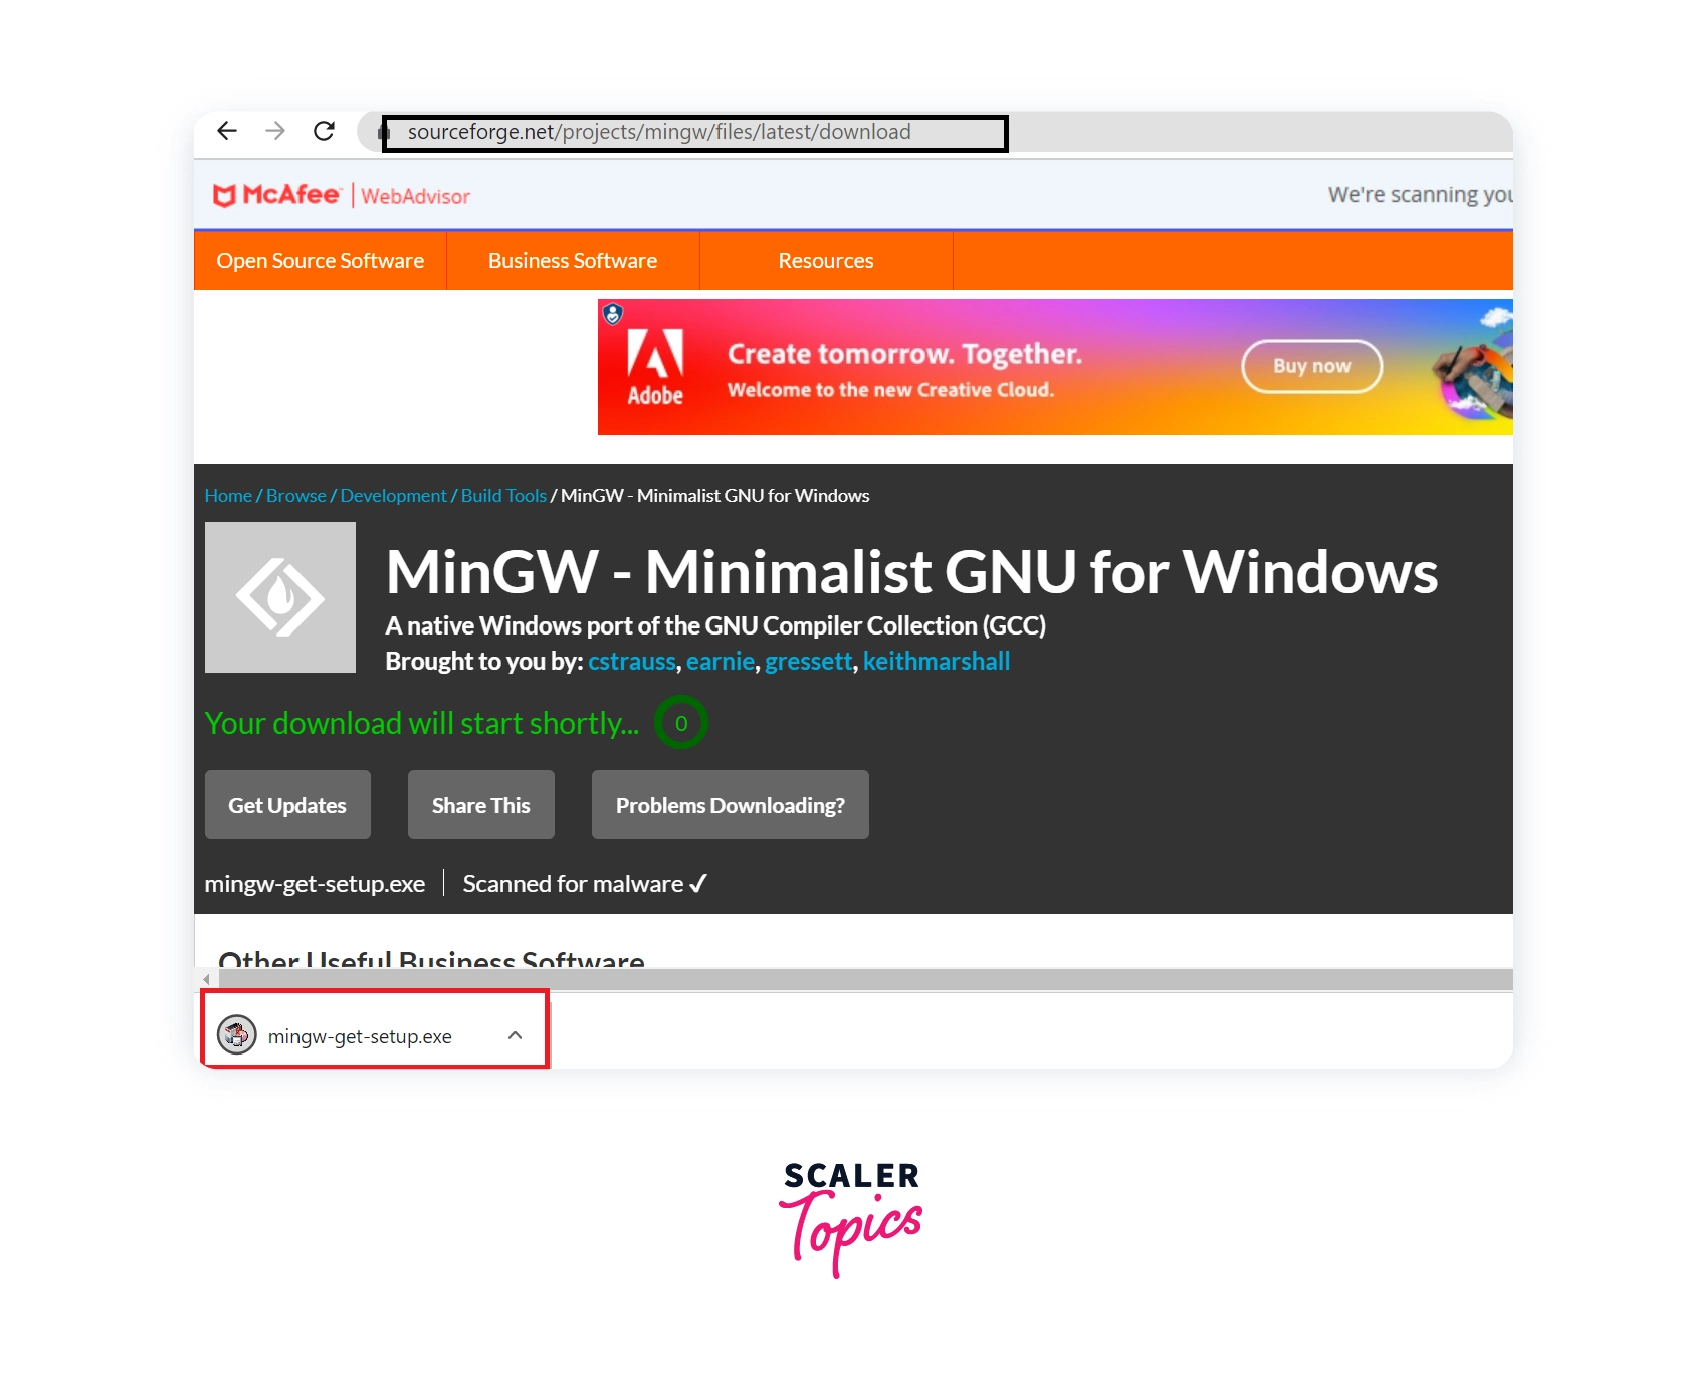
Step 1: Search MinGW C Compiler on the Web
To download the MinGW compiler, go to your favorite browser and search MinGW C Compiler or click on the sourceforge.net link.

Step 2: Download MinGW.
After clicking on the green-colored download button on the website, the MinGW setup file will start downloading.
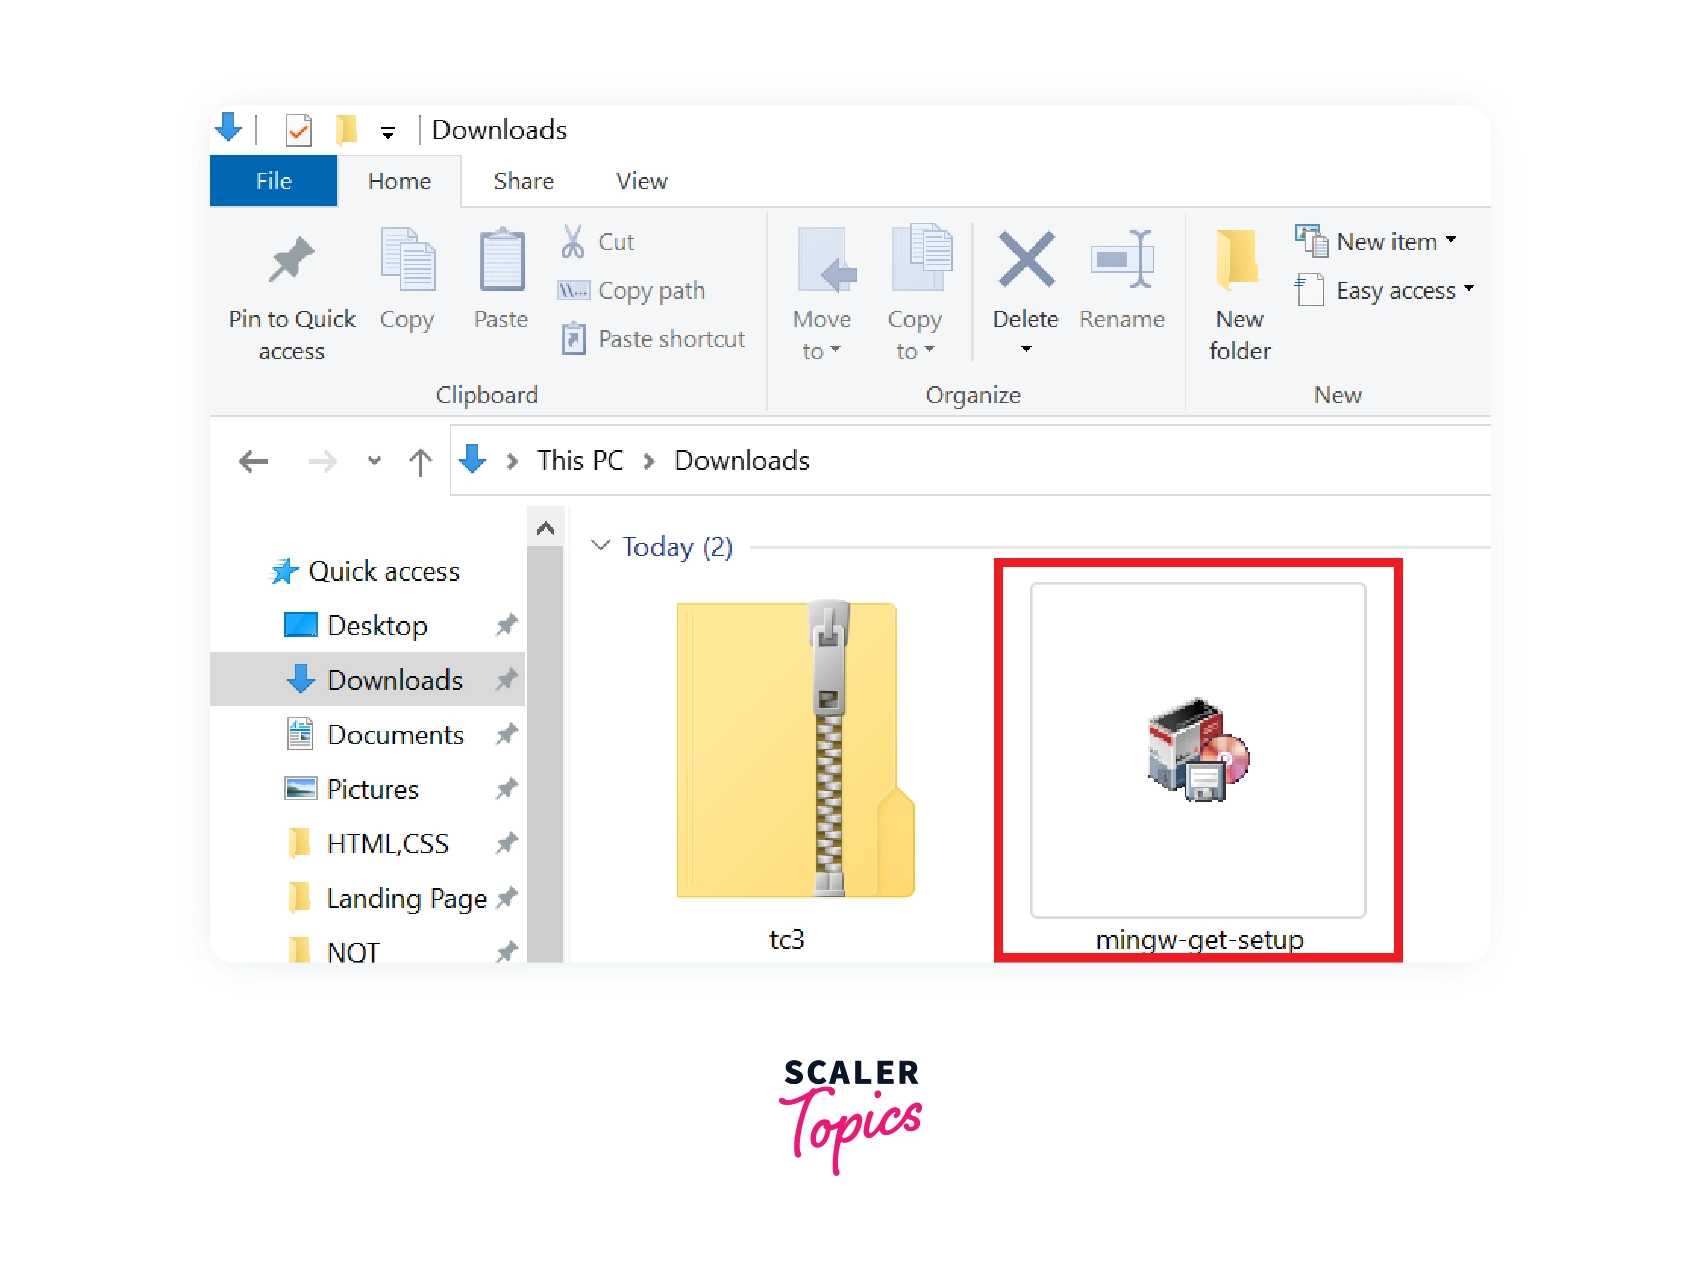
Step 3: Locate the MinGW-get-setup.exe File and Start Installation.
Locate the setup.exe file on your Downloads folder and double-click on it.
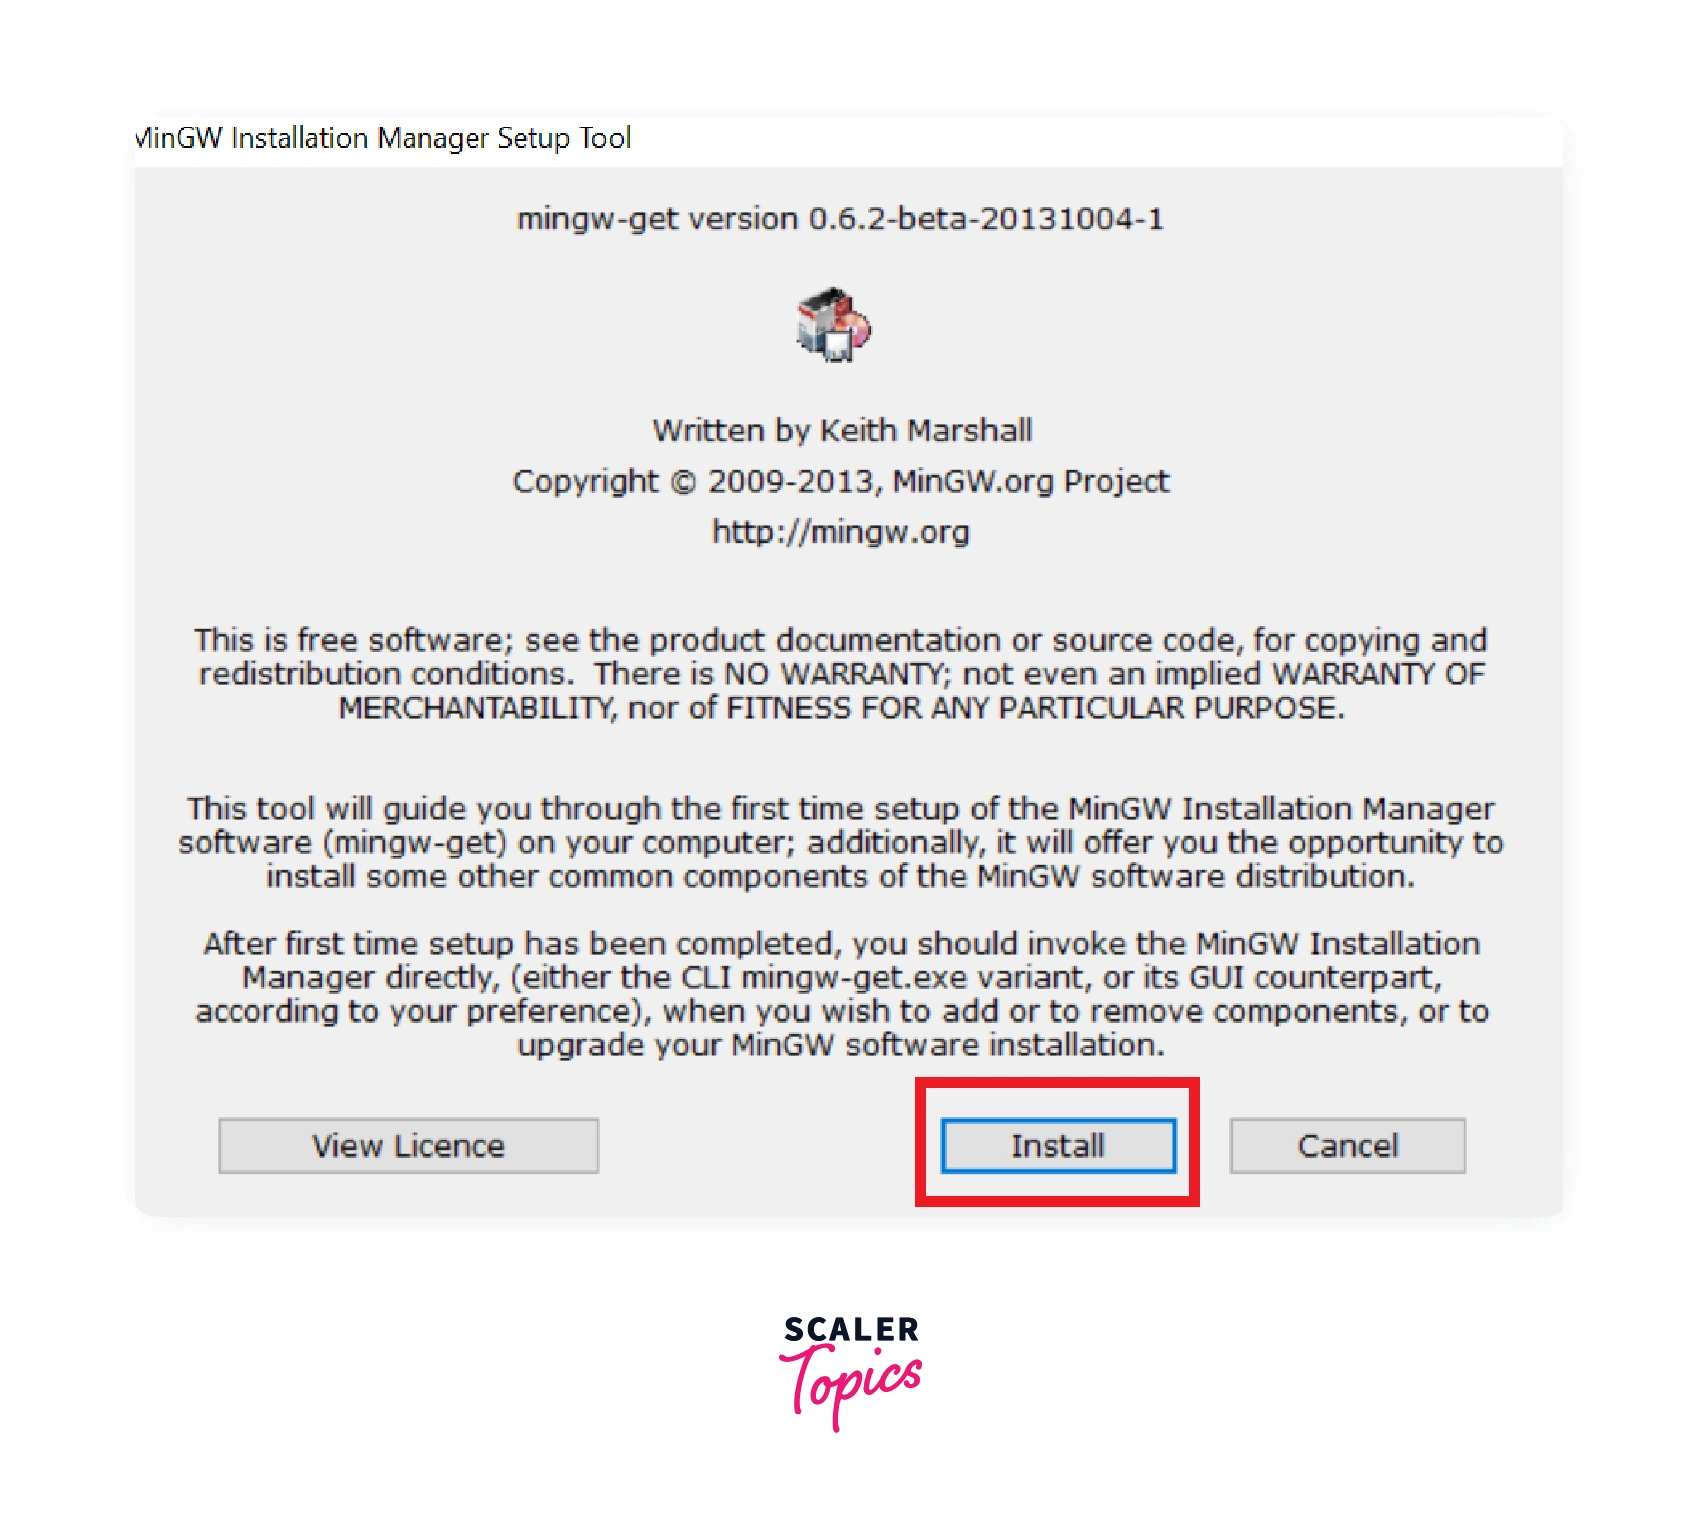
After double-clicking on the setup file, MinGW Installation Manager Setup Tool will now open. It will show the information like version, name, etc. Click on the Install button and proceed to start the installation.
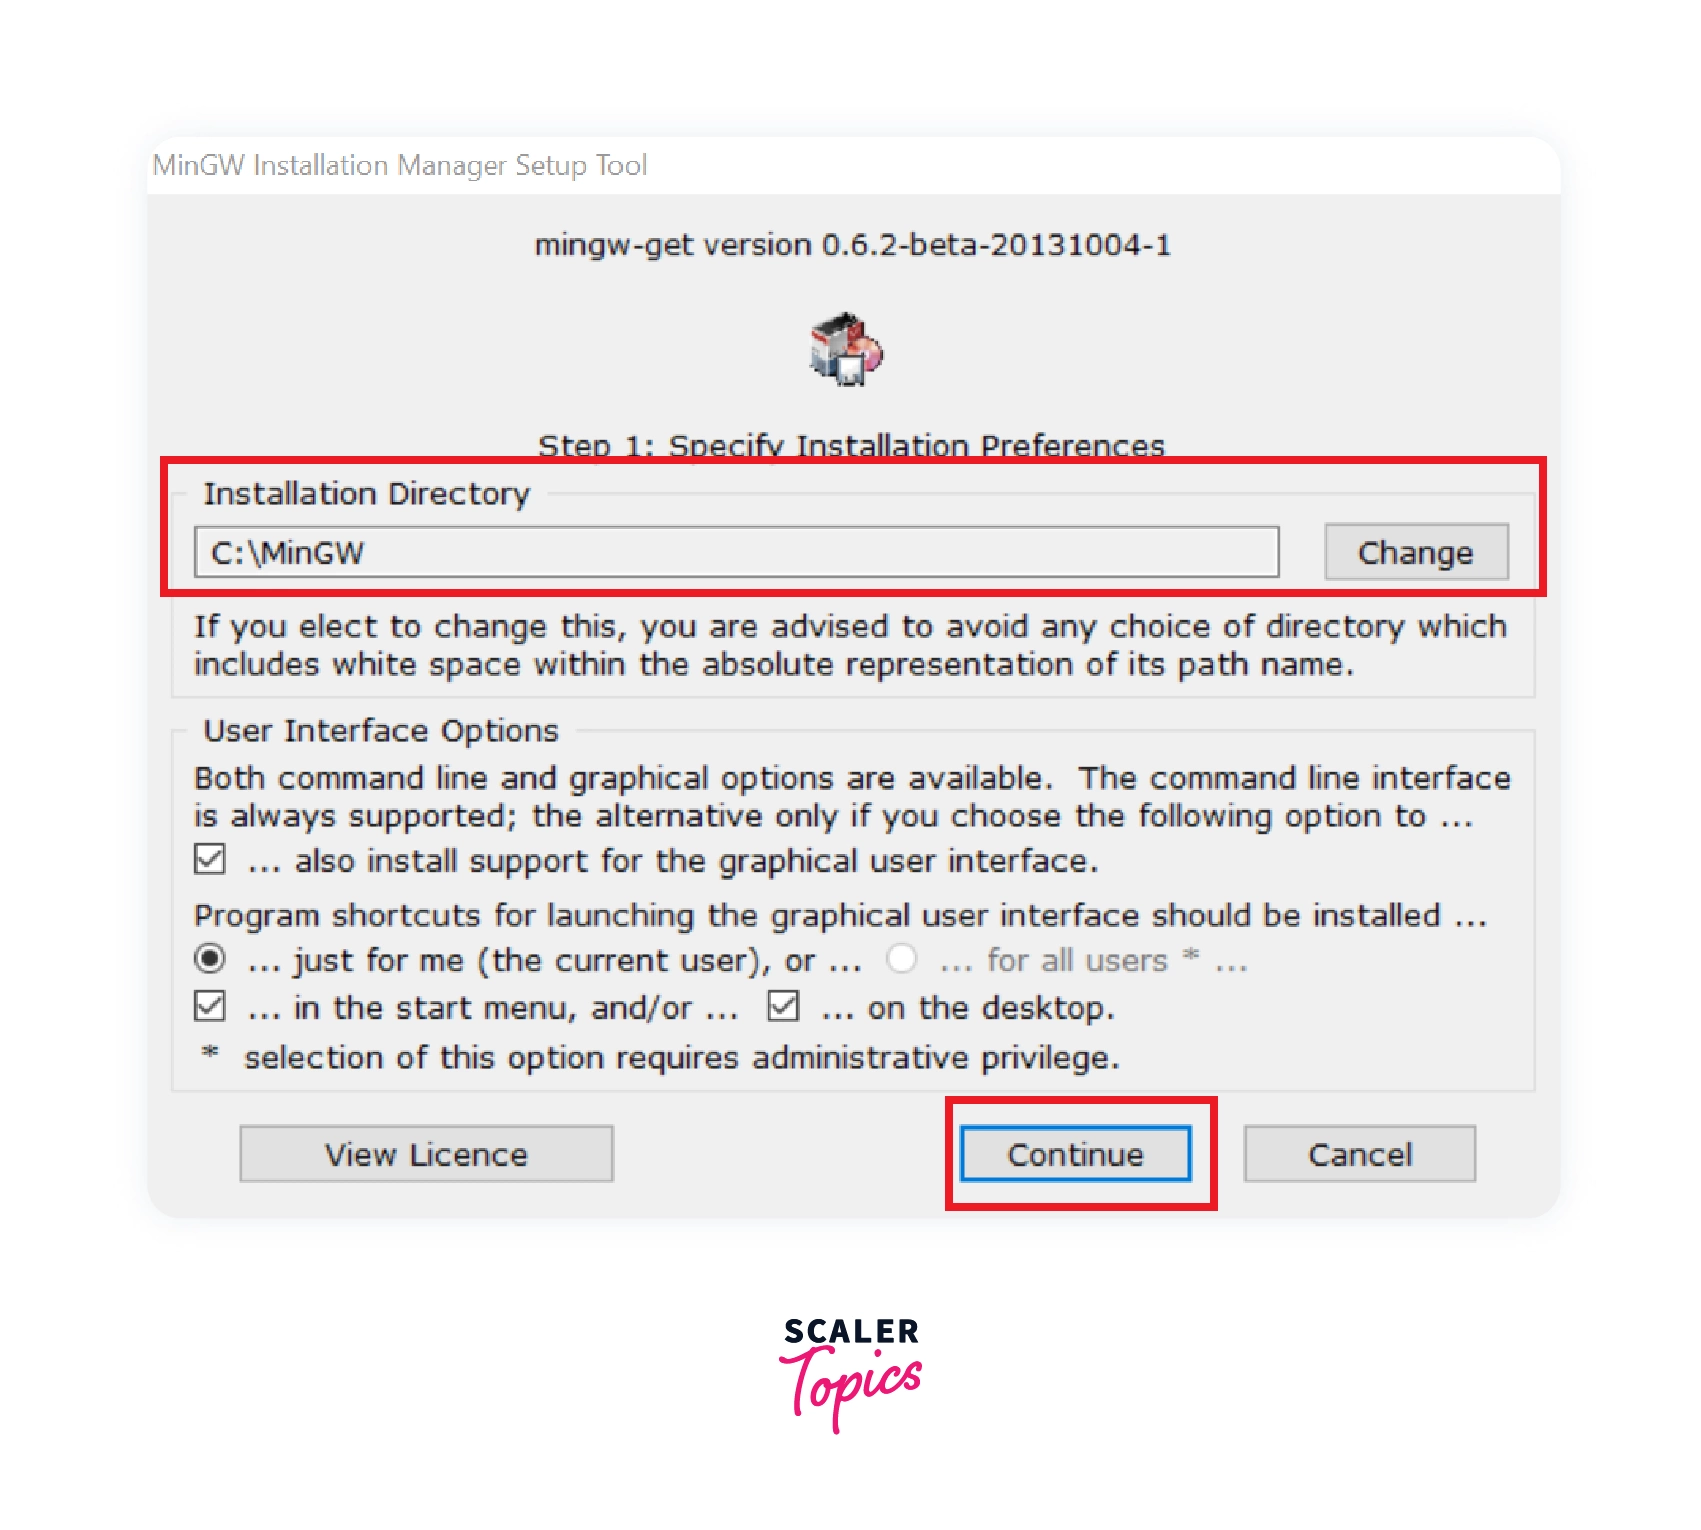
Step 4: Specify Installation Preferences.
Now the installation manager will ask you to specify the installation preferences. For that, you will be asked to choose the installation directory. If you wish to change it, you can browse the explorer and specify the location as per your requirement. After that, click on continue to proceed further.
It is recommended to install it in the default location
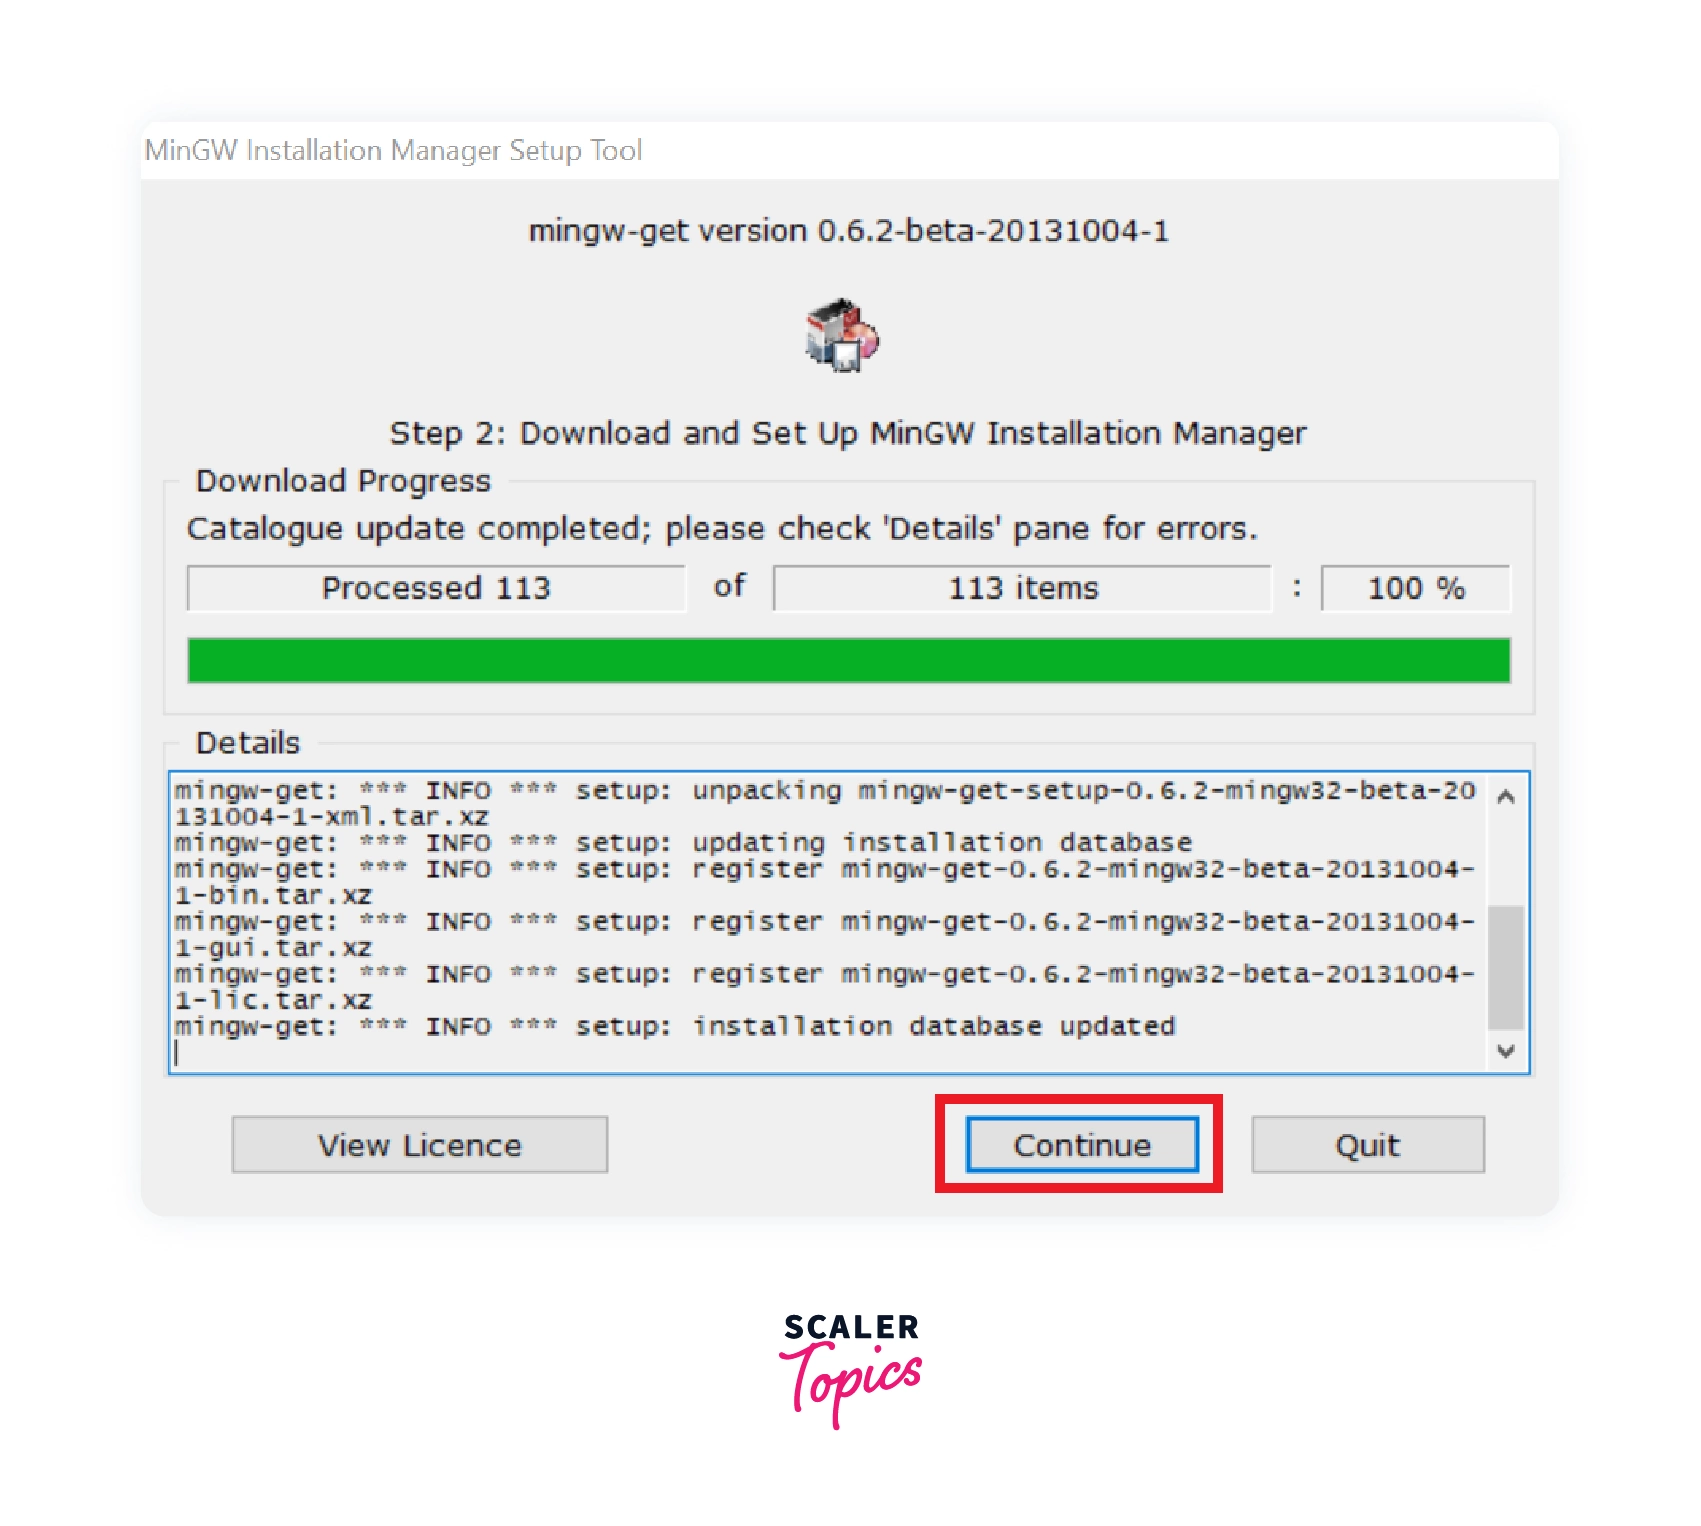
Step 5: Download and Set up MinGW Installation Manager.
The installer will now automatically download the required files for MinGW to install on your Windows system. Grab a cup of coffee and wait patiently till the installation manager finishes downloading all the files. When it is done, click on continue to proceed ahead.
Note: Active internet is required throughout the installation process.
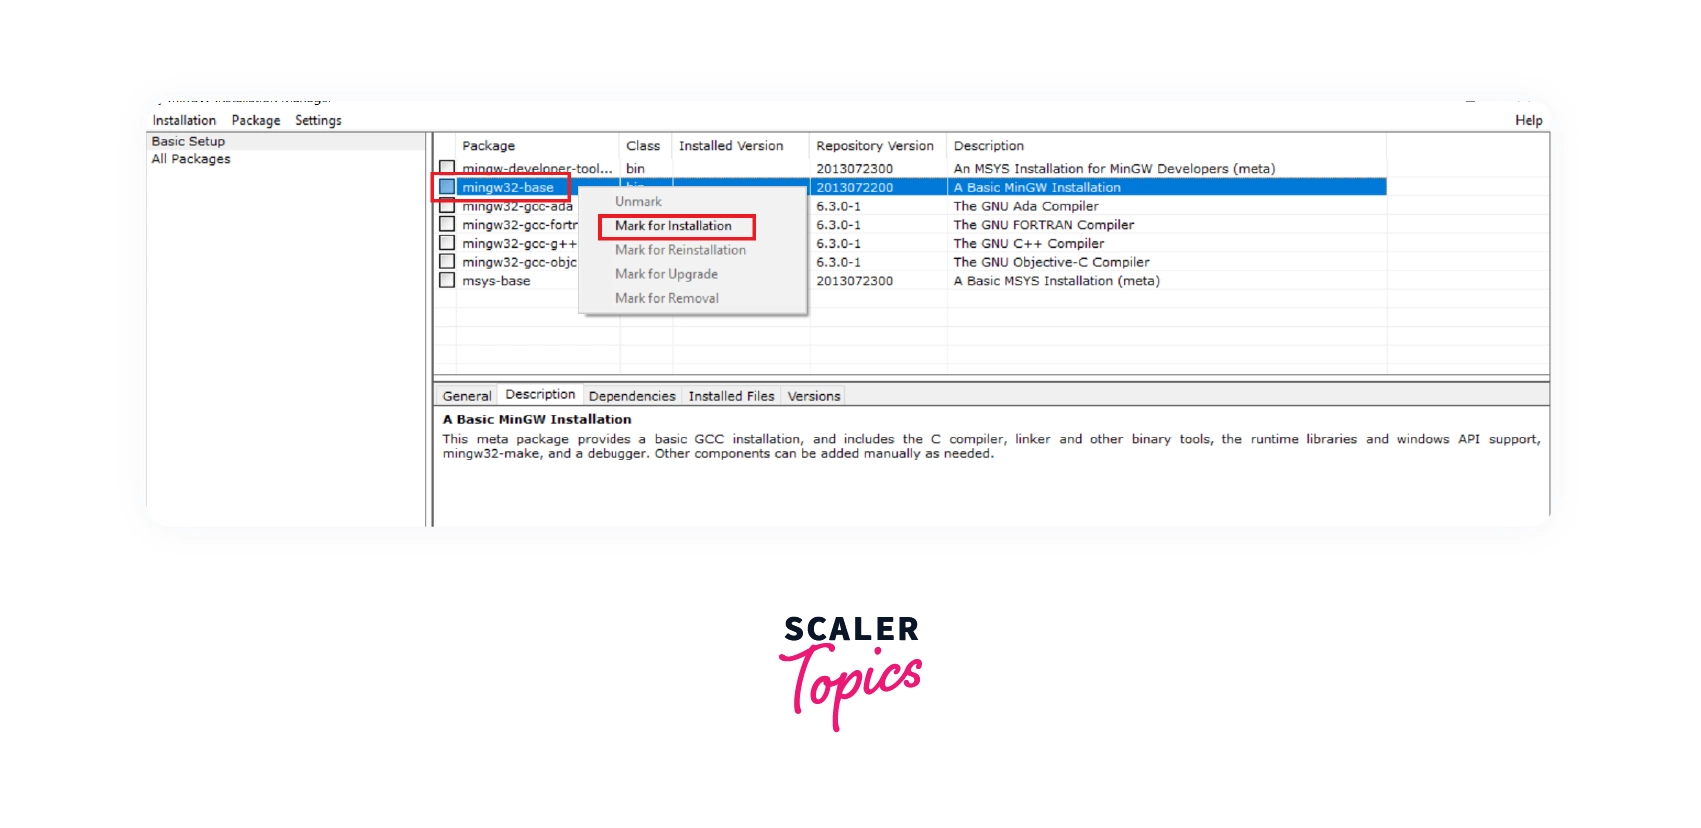
Step 6: Select Packages Required for the Compiler.
There are three packages required for the basic MinGW setup that you have to choose from the MinGW Installation Manager.
1. MinGW32-base Package.
First, you have to install the MinGW32-base package. This package is used to compile the C program, including linker and other binary tools. Right-click on the MinGW32-base option and select Mark for Installation.
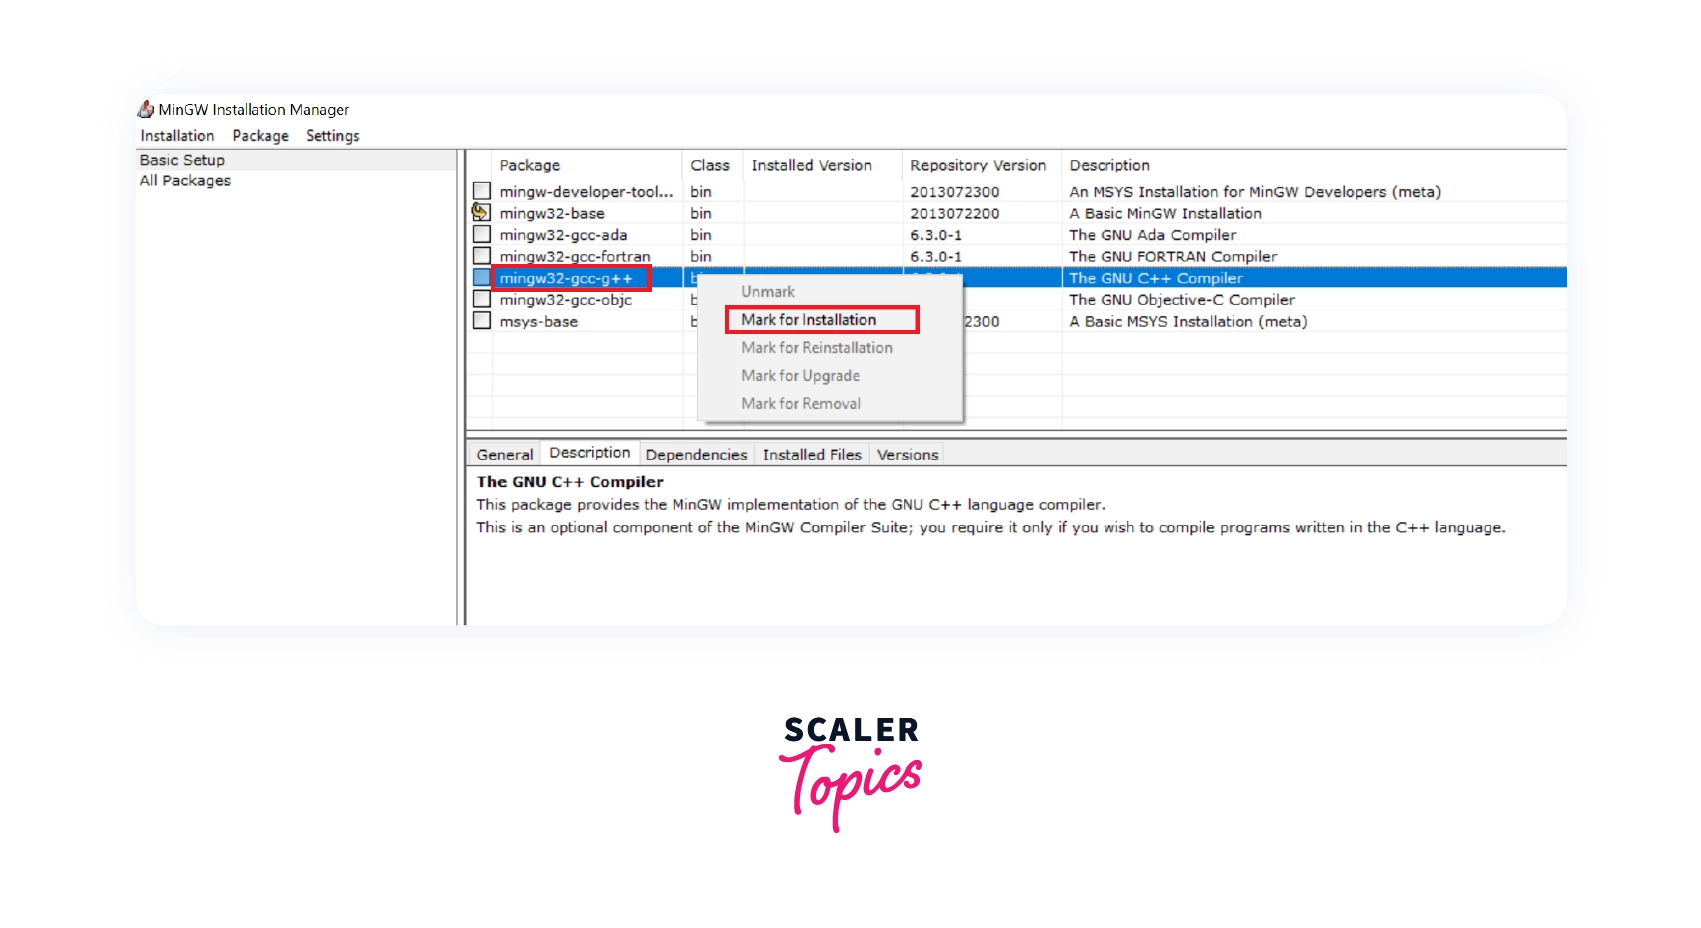
2. MinGW32-gcc-g++ Package.
Now you have to install the MinGW32-gcc-g++ package. This package is used to compile C++ source code. This is an optional component of the MinGW Compiler. It is only required if you are going to program in C++ language only. To select the MinGW32-gcc-g++ right-click on it and select Mark for Installation.
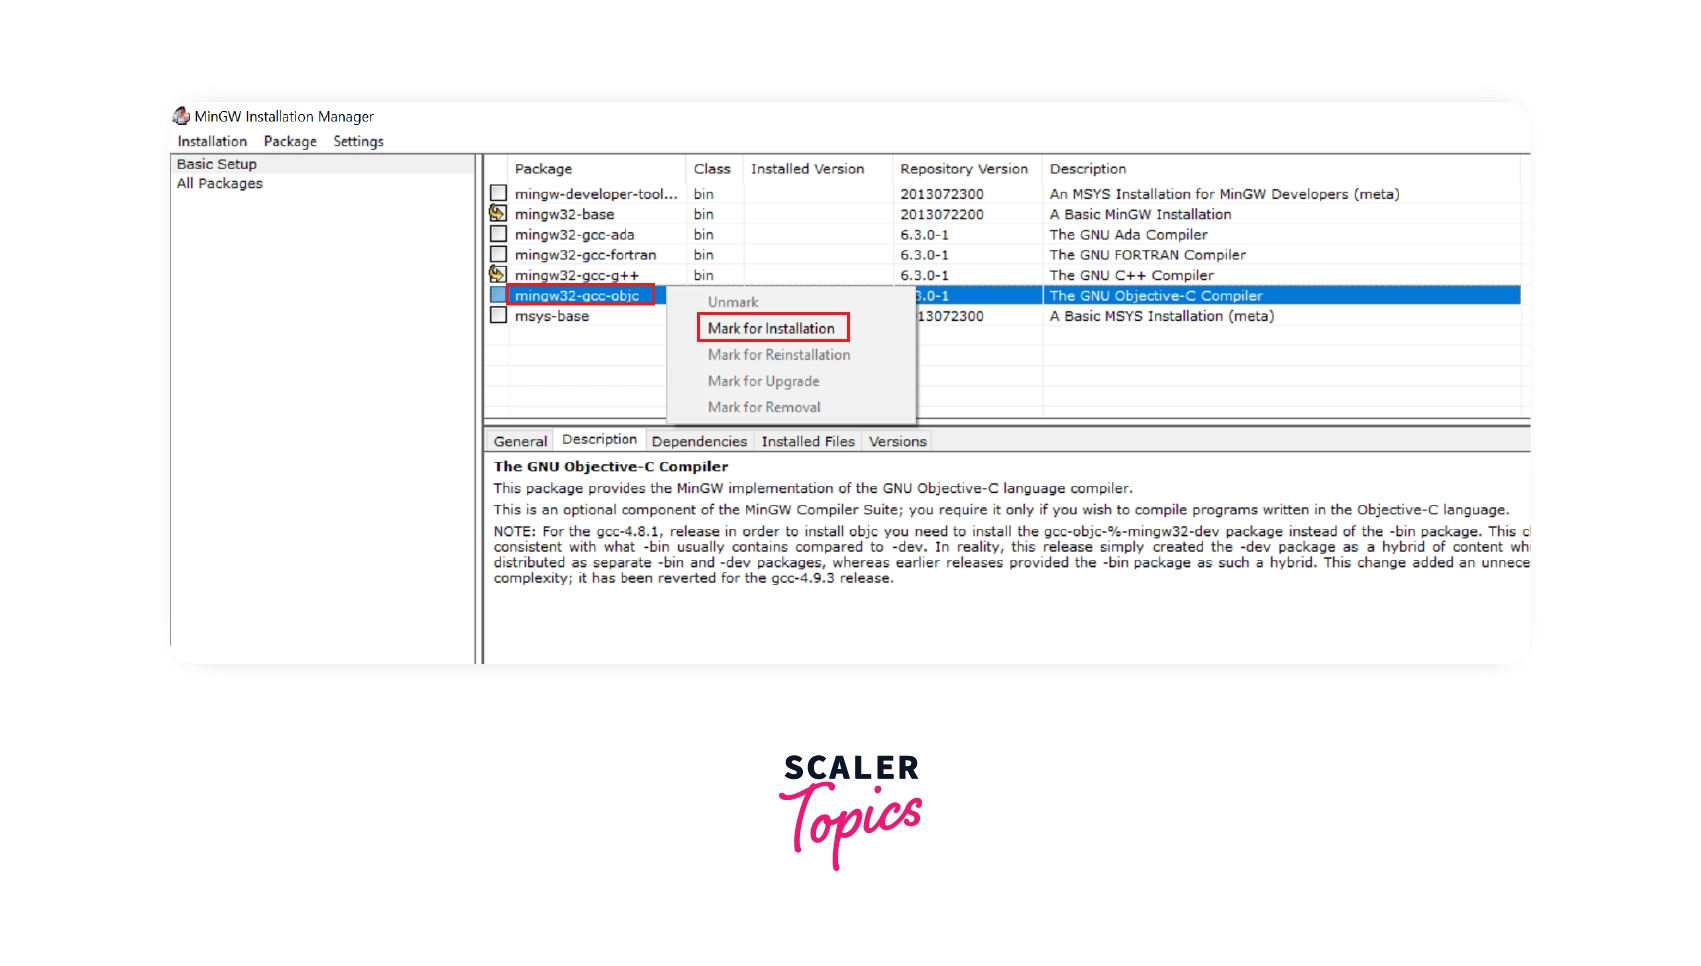
3. MinGW32-gcc-objc package.
At last, you have to install the MinGW32-gcc-objc package. This package is used to compile objective C language. It is an optional component. It is only required if you are going to program in objective C. To select the MinGW32-gcc-objc package, right-click on it and select Mark for Installation.
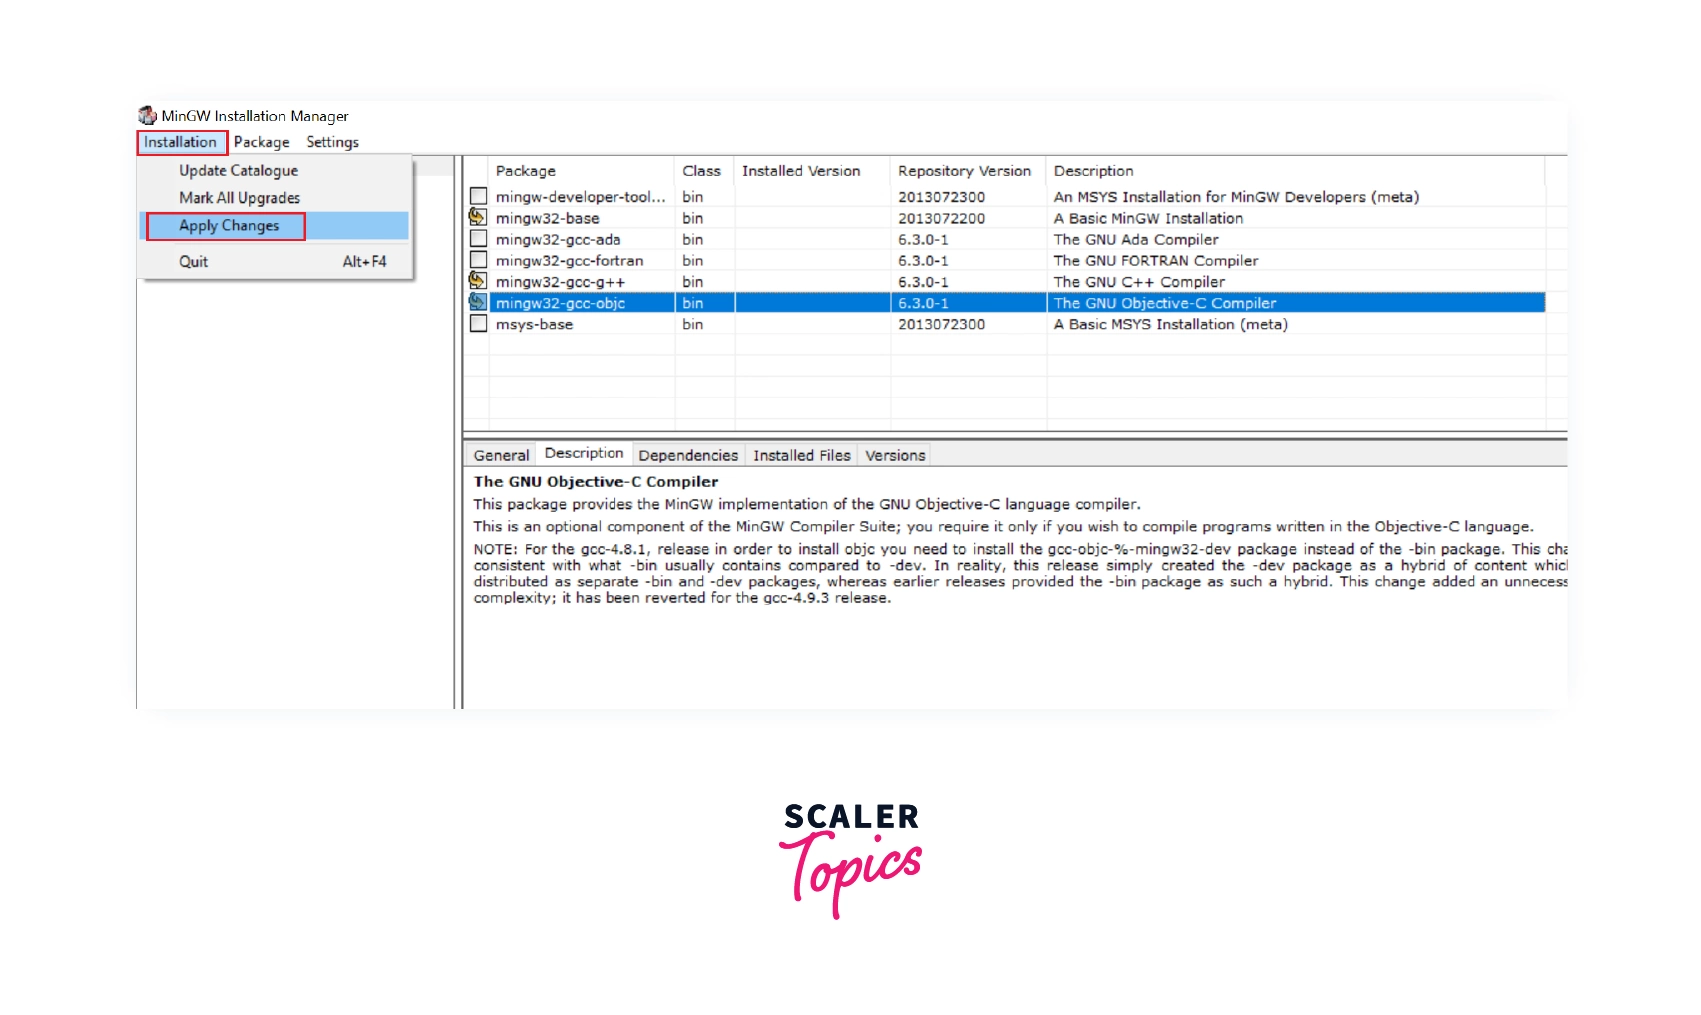
Step 7: Apply the Changes
After selecting all the required packages, go to Installation>>Apply Changes and click on Apply Changes.
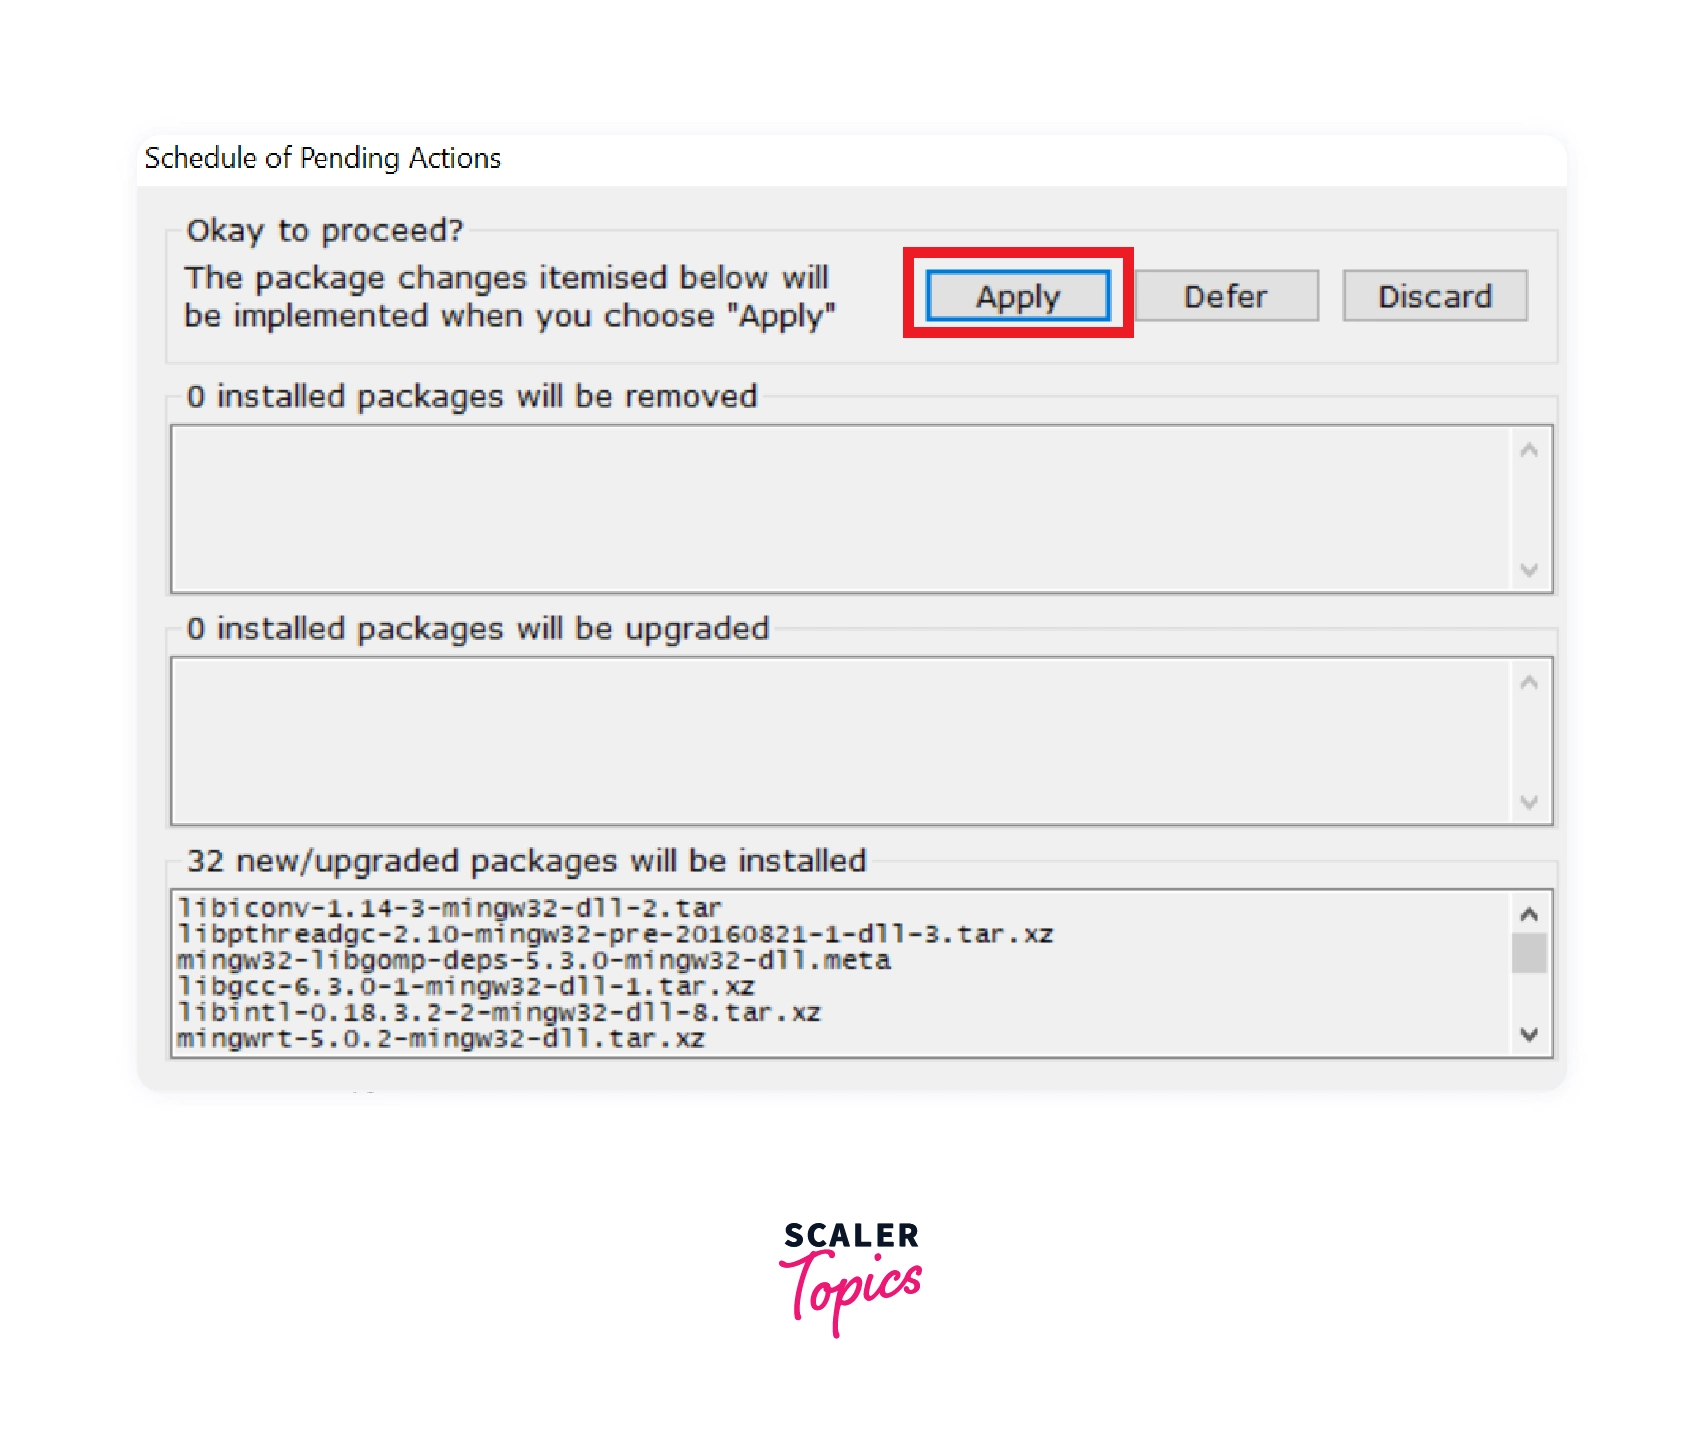
Step 8: Download the Changes.
Now it is time to download all the packages you selected in the previous step. Click on Apply and proceed further to download and install them.
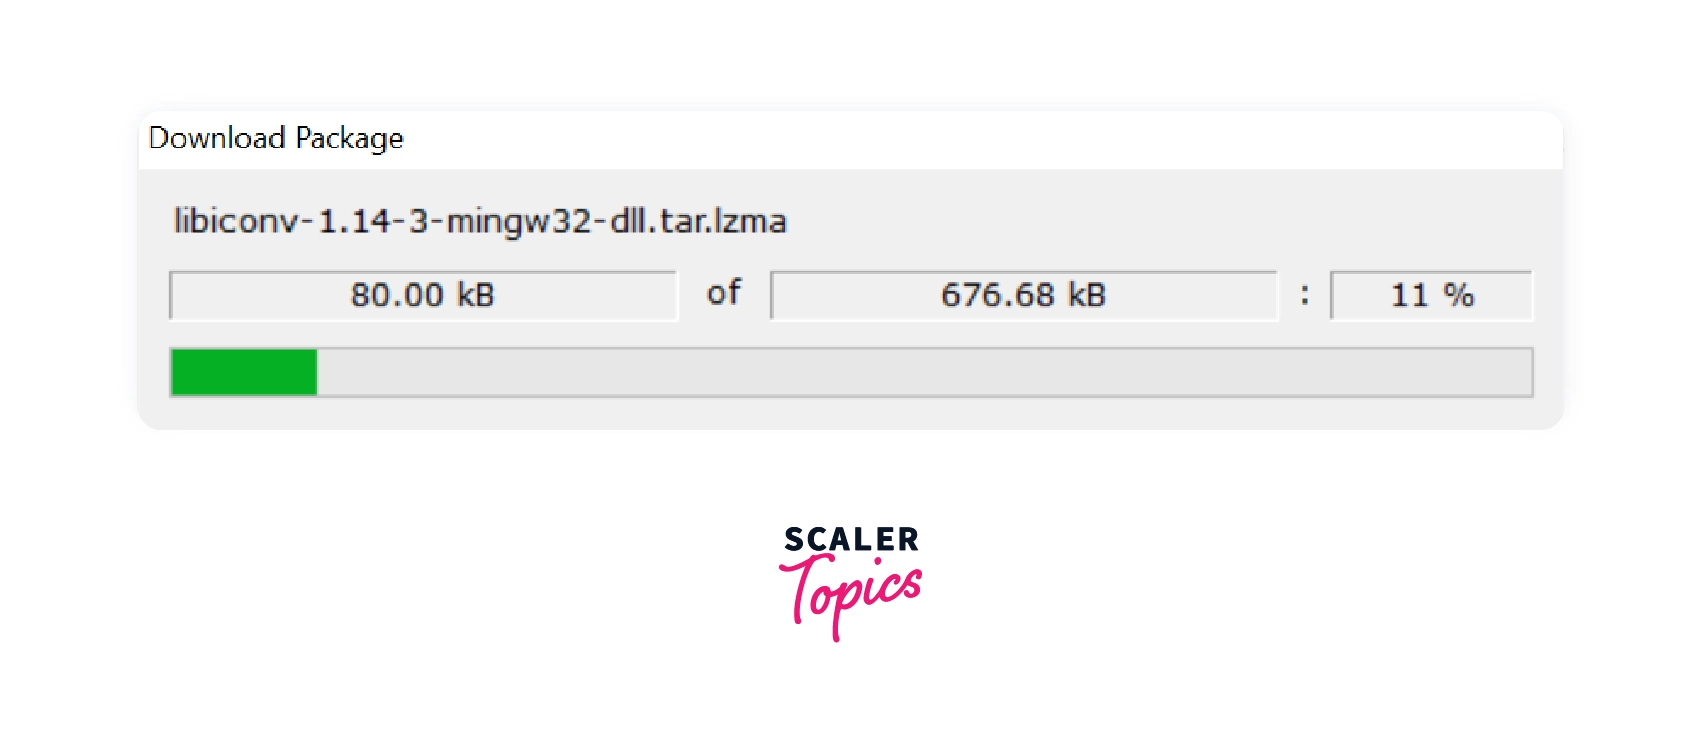
The download for the packages will now begin, as shown in the window below. Wait for a few minutes until the download completes.
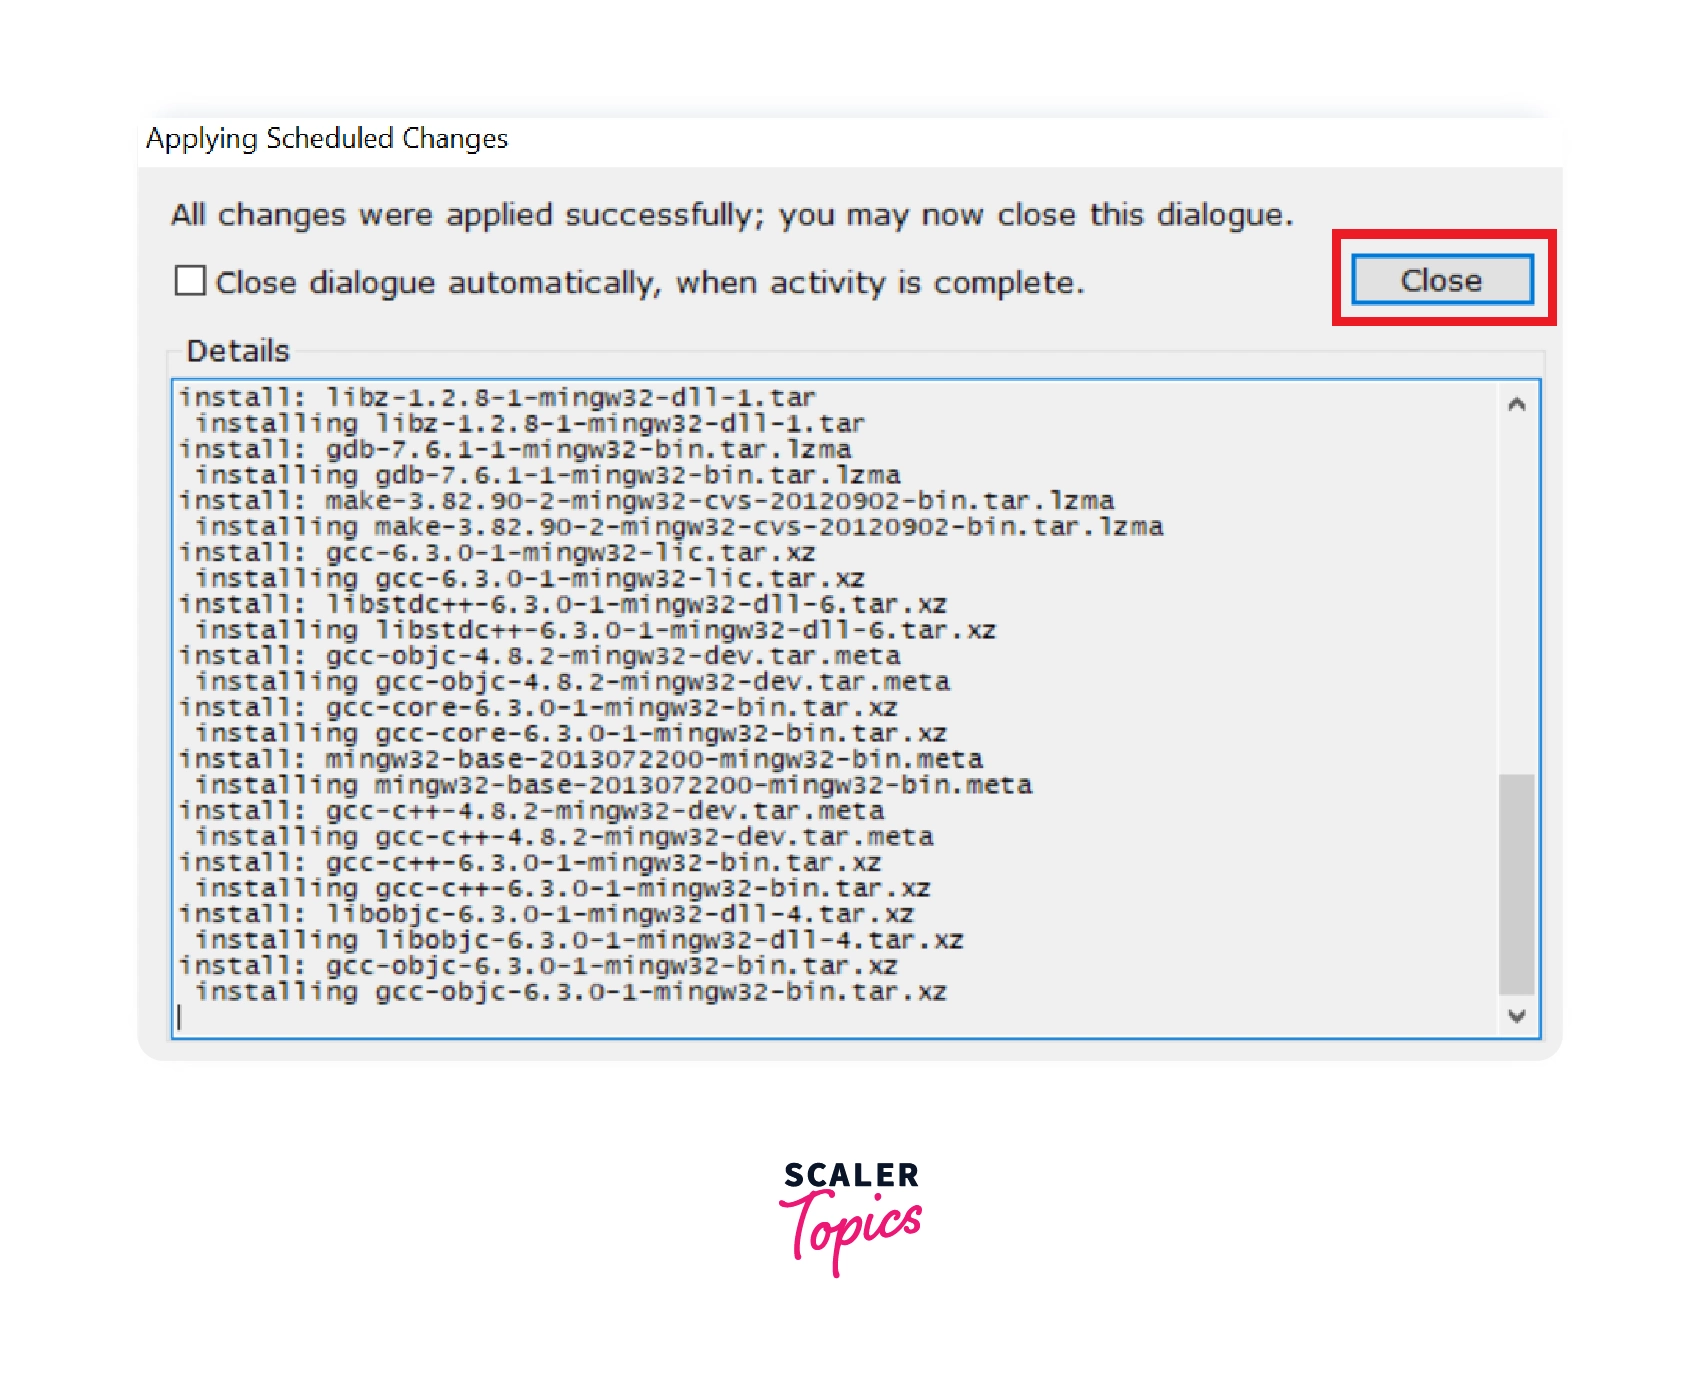
Step 9: Installation Completed.
Now the installation has been completed, click on Close to close the Installation manager.
Now the installation of MinGW is finished. To check if it is installed or not, open Command Prompt and type g++ —version.
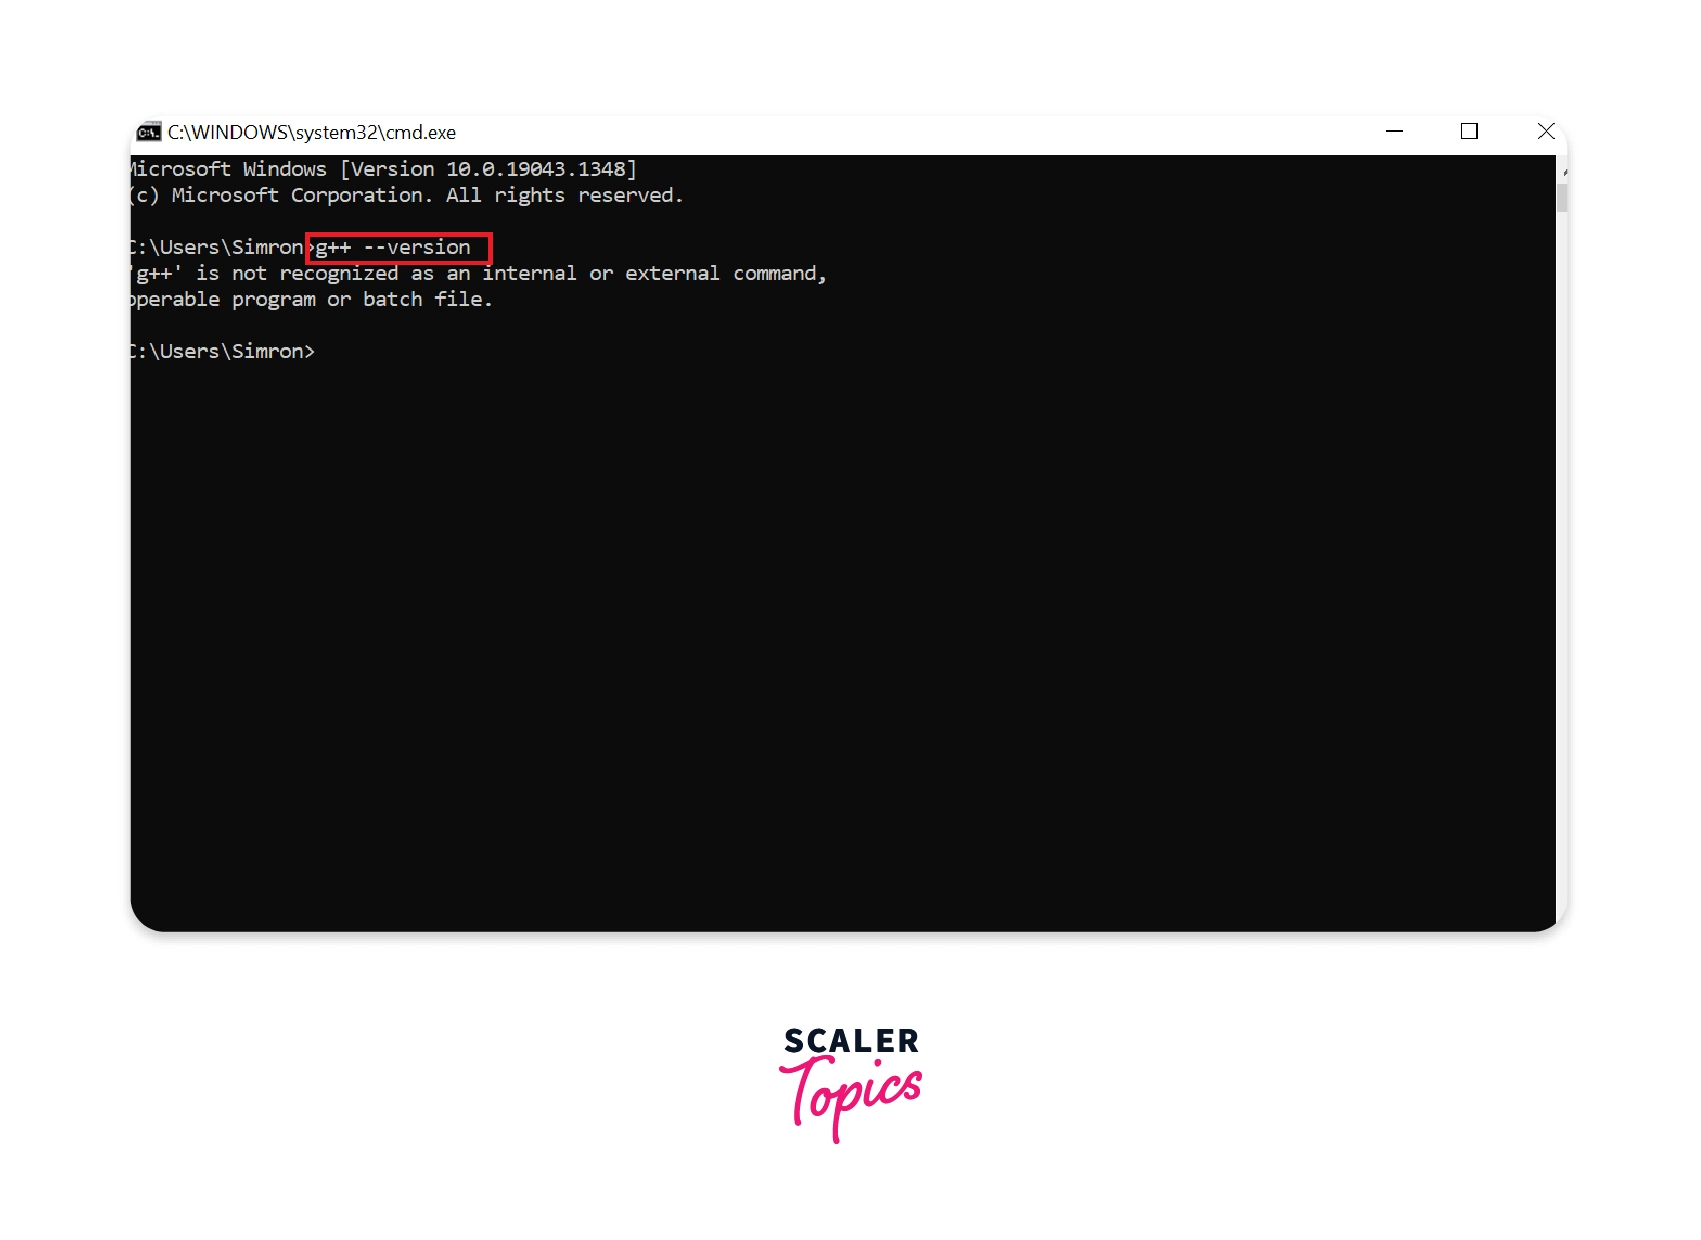
Currently, the command prompt cannot detect the MinGW compiler (GCC) because the environment path variable has not been set. The environment path variable helps to detect the compiler in your whole system. It makes the alias name for the compiler, which denotes the path. Follow the steps below to set the environment path variable for MinGW on the Windows system.
Setting up Path Variable
To set up the path for the C compiler for windows, follows the below steps :
Step 1: Copy the path of the MinGW bin.
When you install the MinGW, it creates a folder named MinGW in C: Drive.
To set the compiler’s path, we need the path to the bin directory of MinGW. So, first,
- Go to C:>MinGW>bin.
- Now, inside the bin folder, click on the address bar and copy the address.
- We require this address to be set as the path in the environment variable.
- If your install location was somewhere else, you may go to that location where you have installed MinGW.

Note: If you open command prompt directly in the bin path, the g++ —version command will work properly, but the command should work on all the directories in the computer. That is the main reason to set the environment path variable.
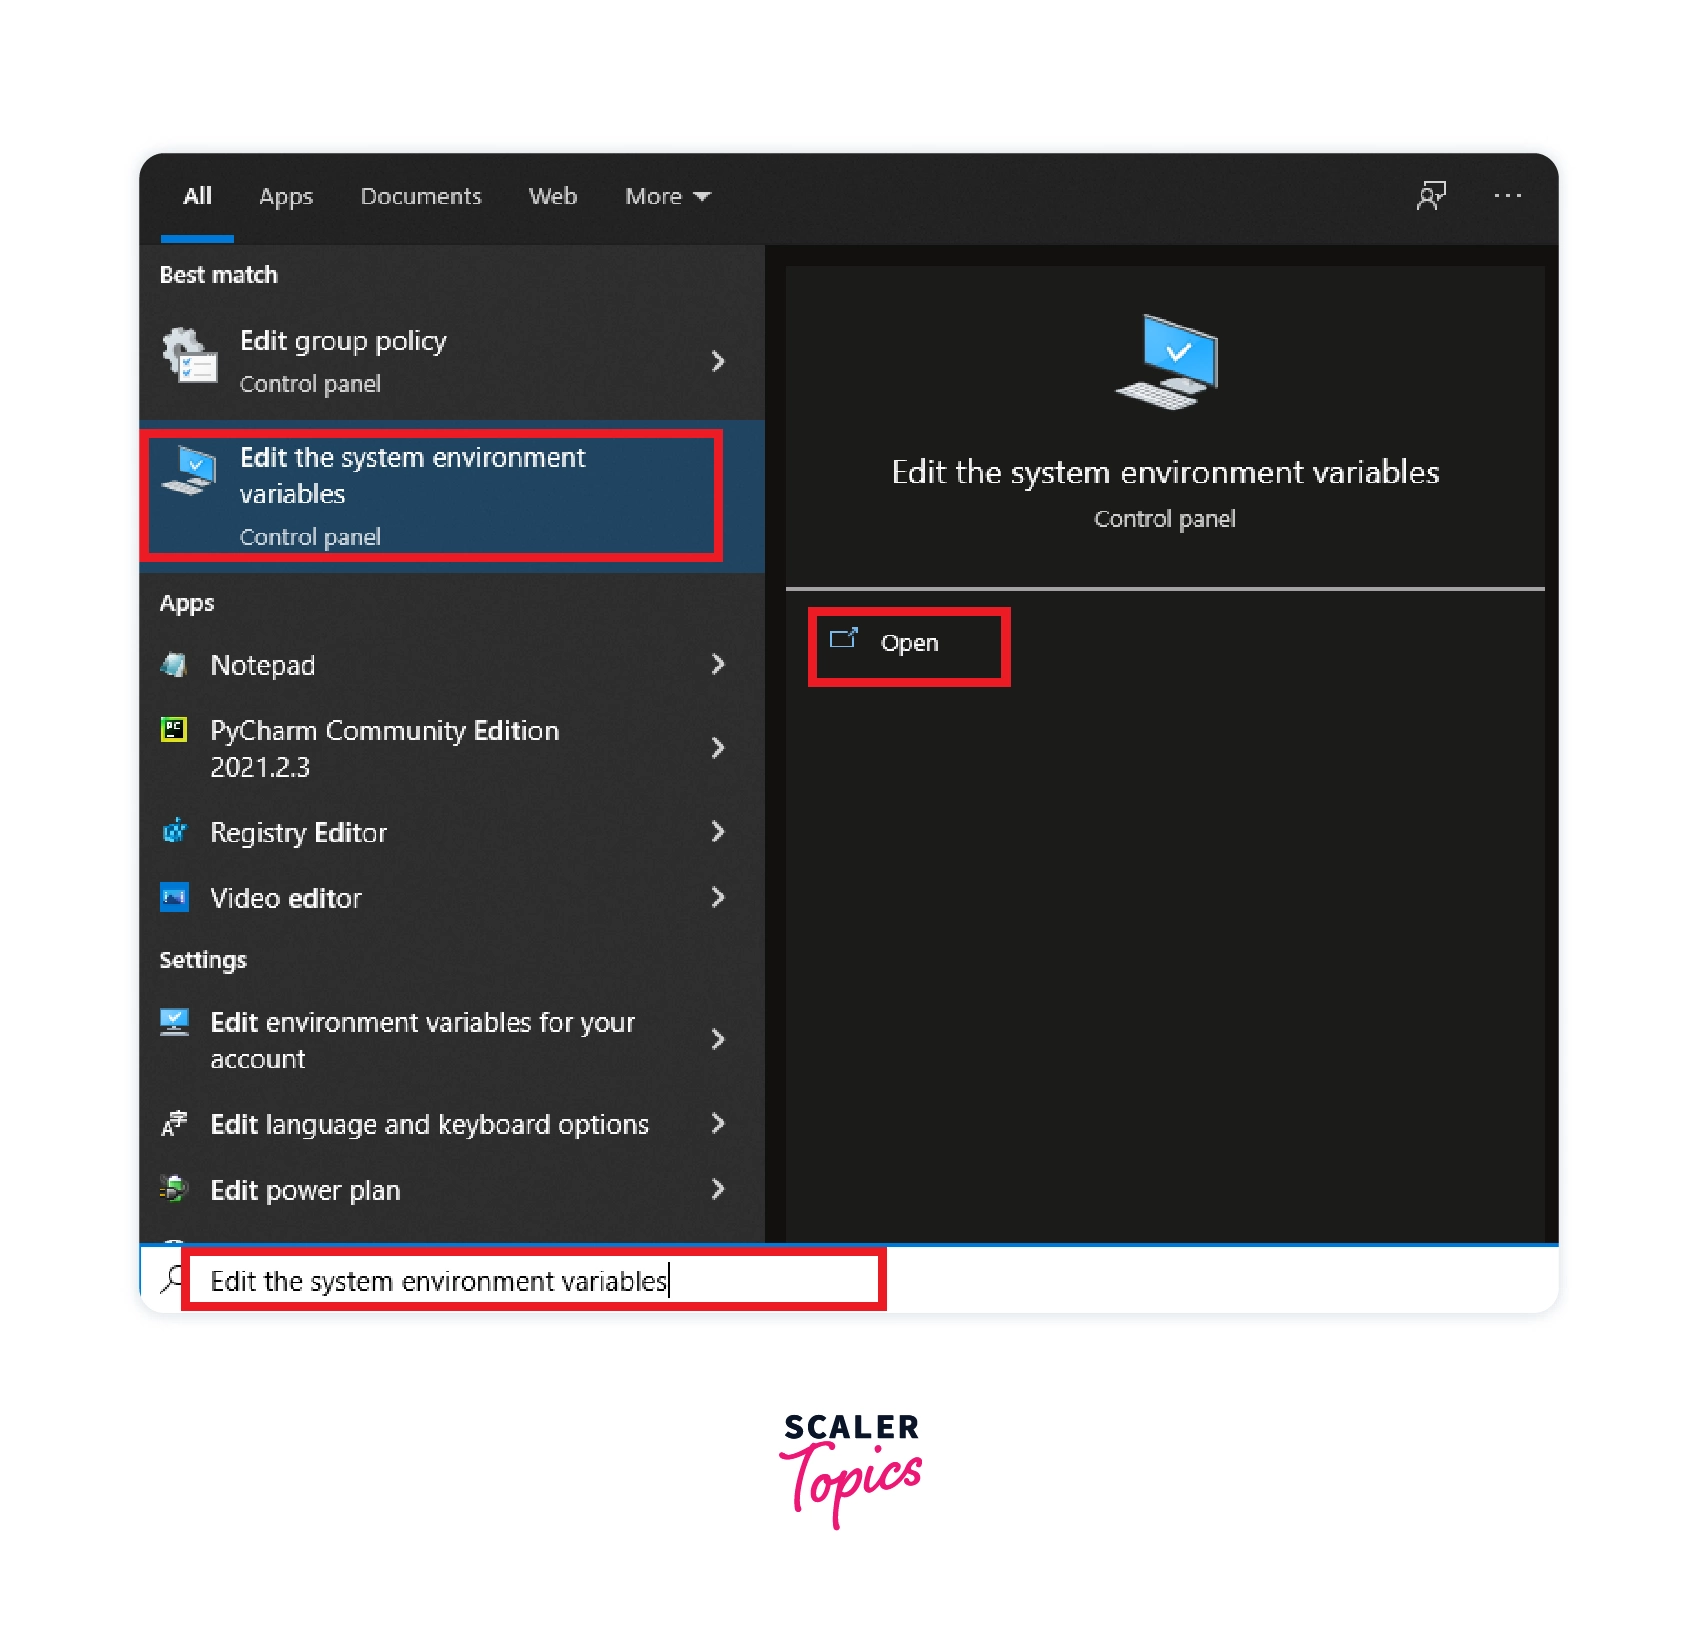
Step 2: Open Edit System Variables.
Navigate to the search bar and type Edit the system environment variables and click on open to continue to edit system environment variables.
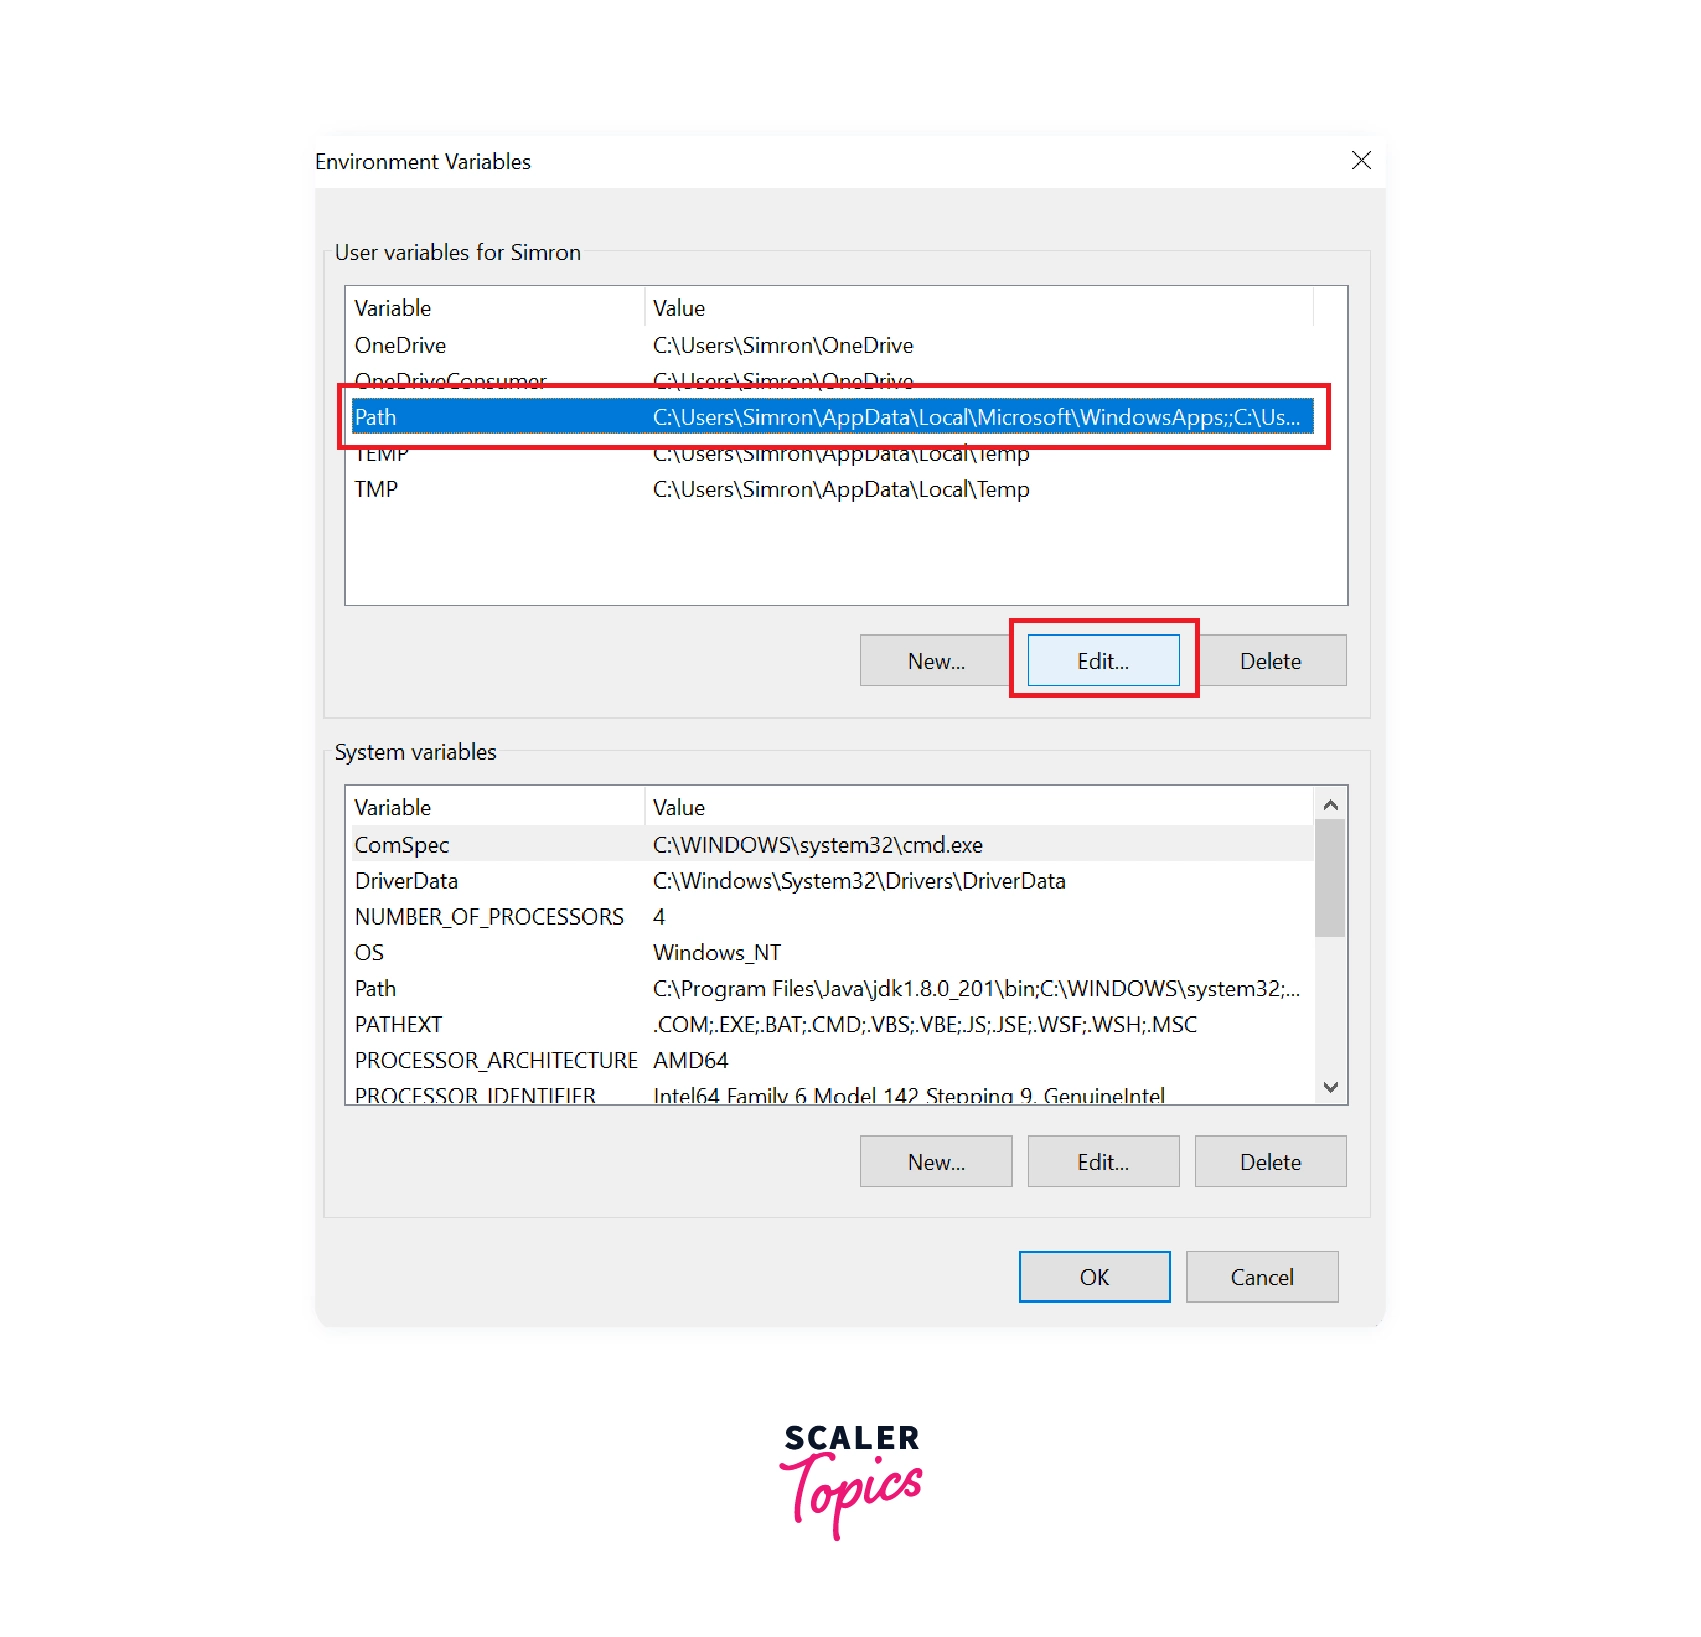
Step 3: Edit the Path.
In the User variables for the User section, select the path and click on the Edit button.
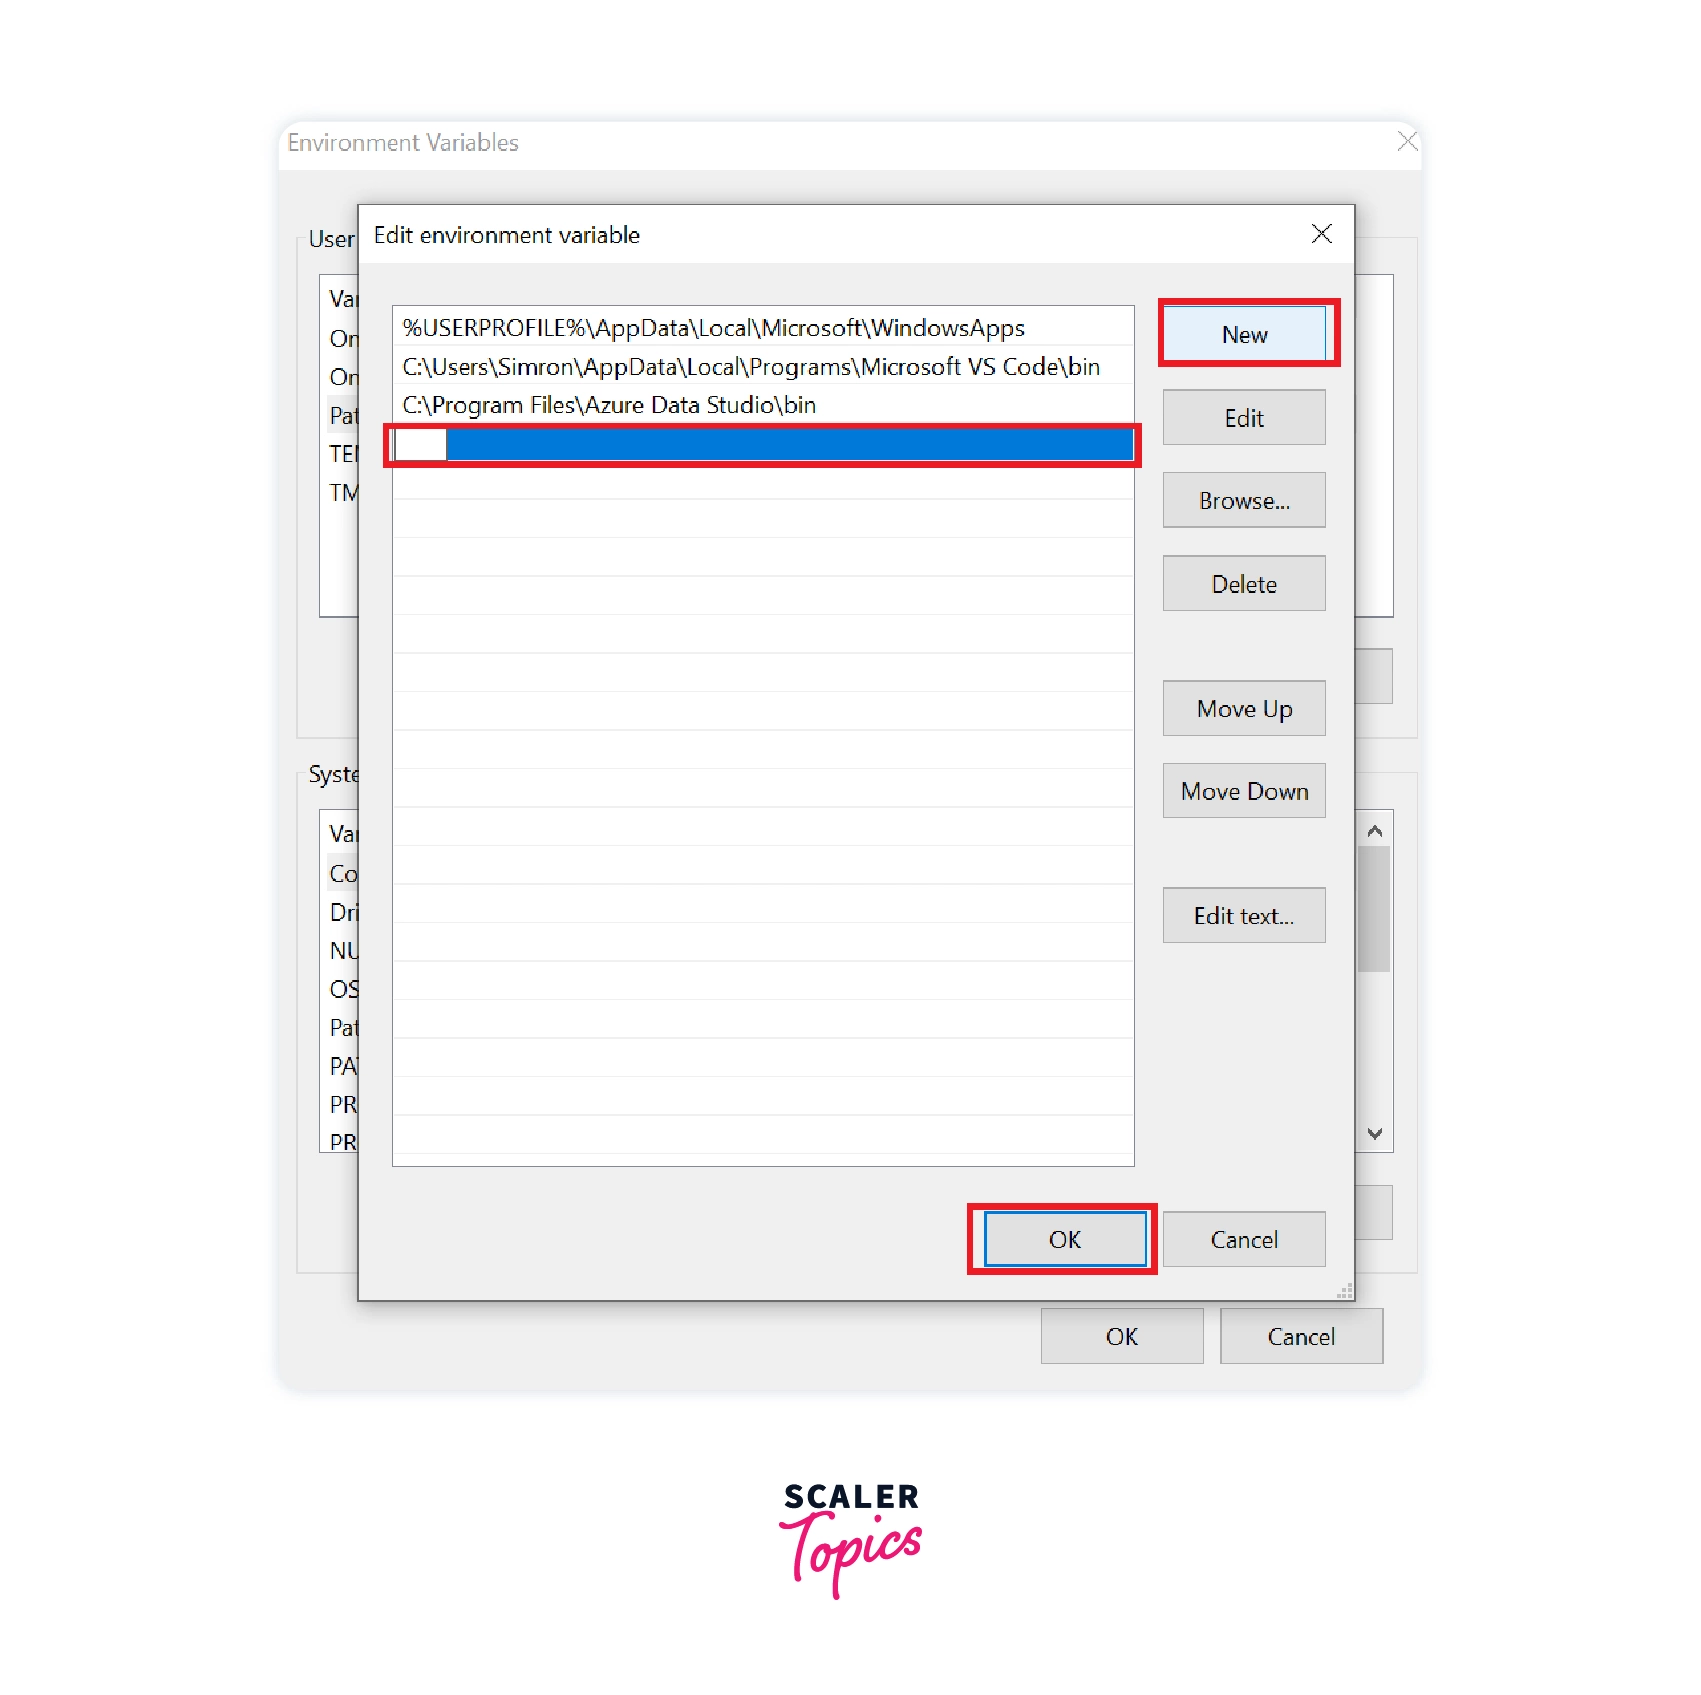
Step 4: Setup a New Path.
- After clicking on the Edit button, a new window, Edit environment variable will open. This window allows us to add the path as per our requirements.
- Since we want to add a new path, click on the New button. A new window, Edit environment variable, will open. This window allows us to add the path as per our requirements. Click on the ‘ New ‘ button since we want to add a new path.
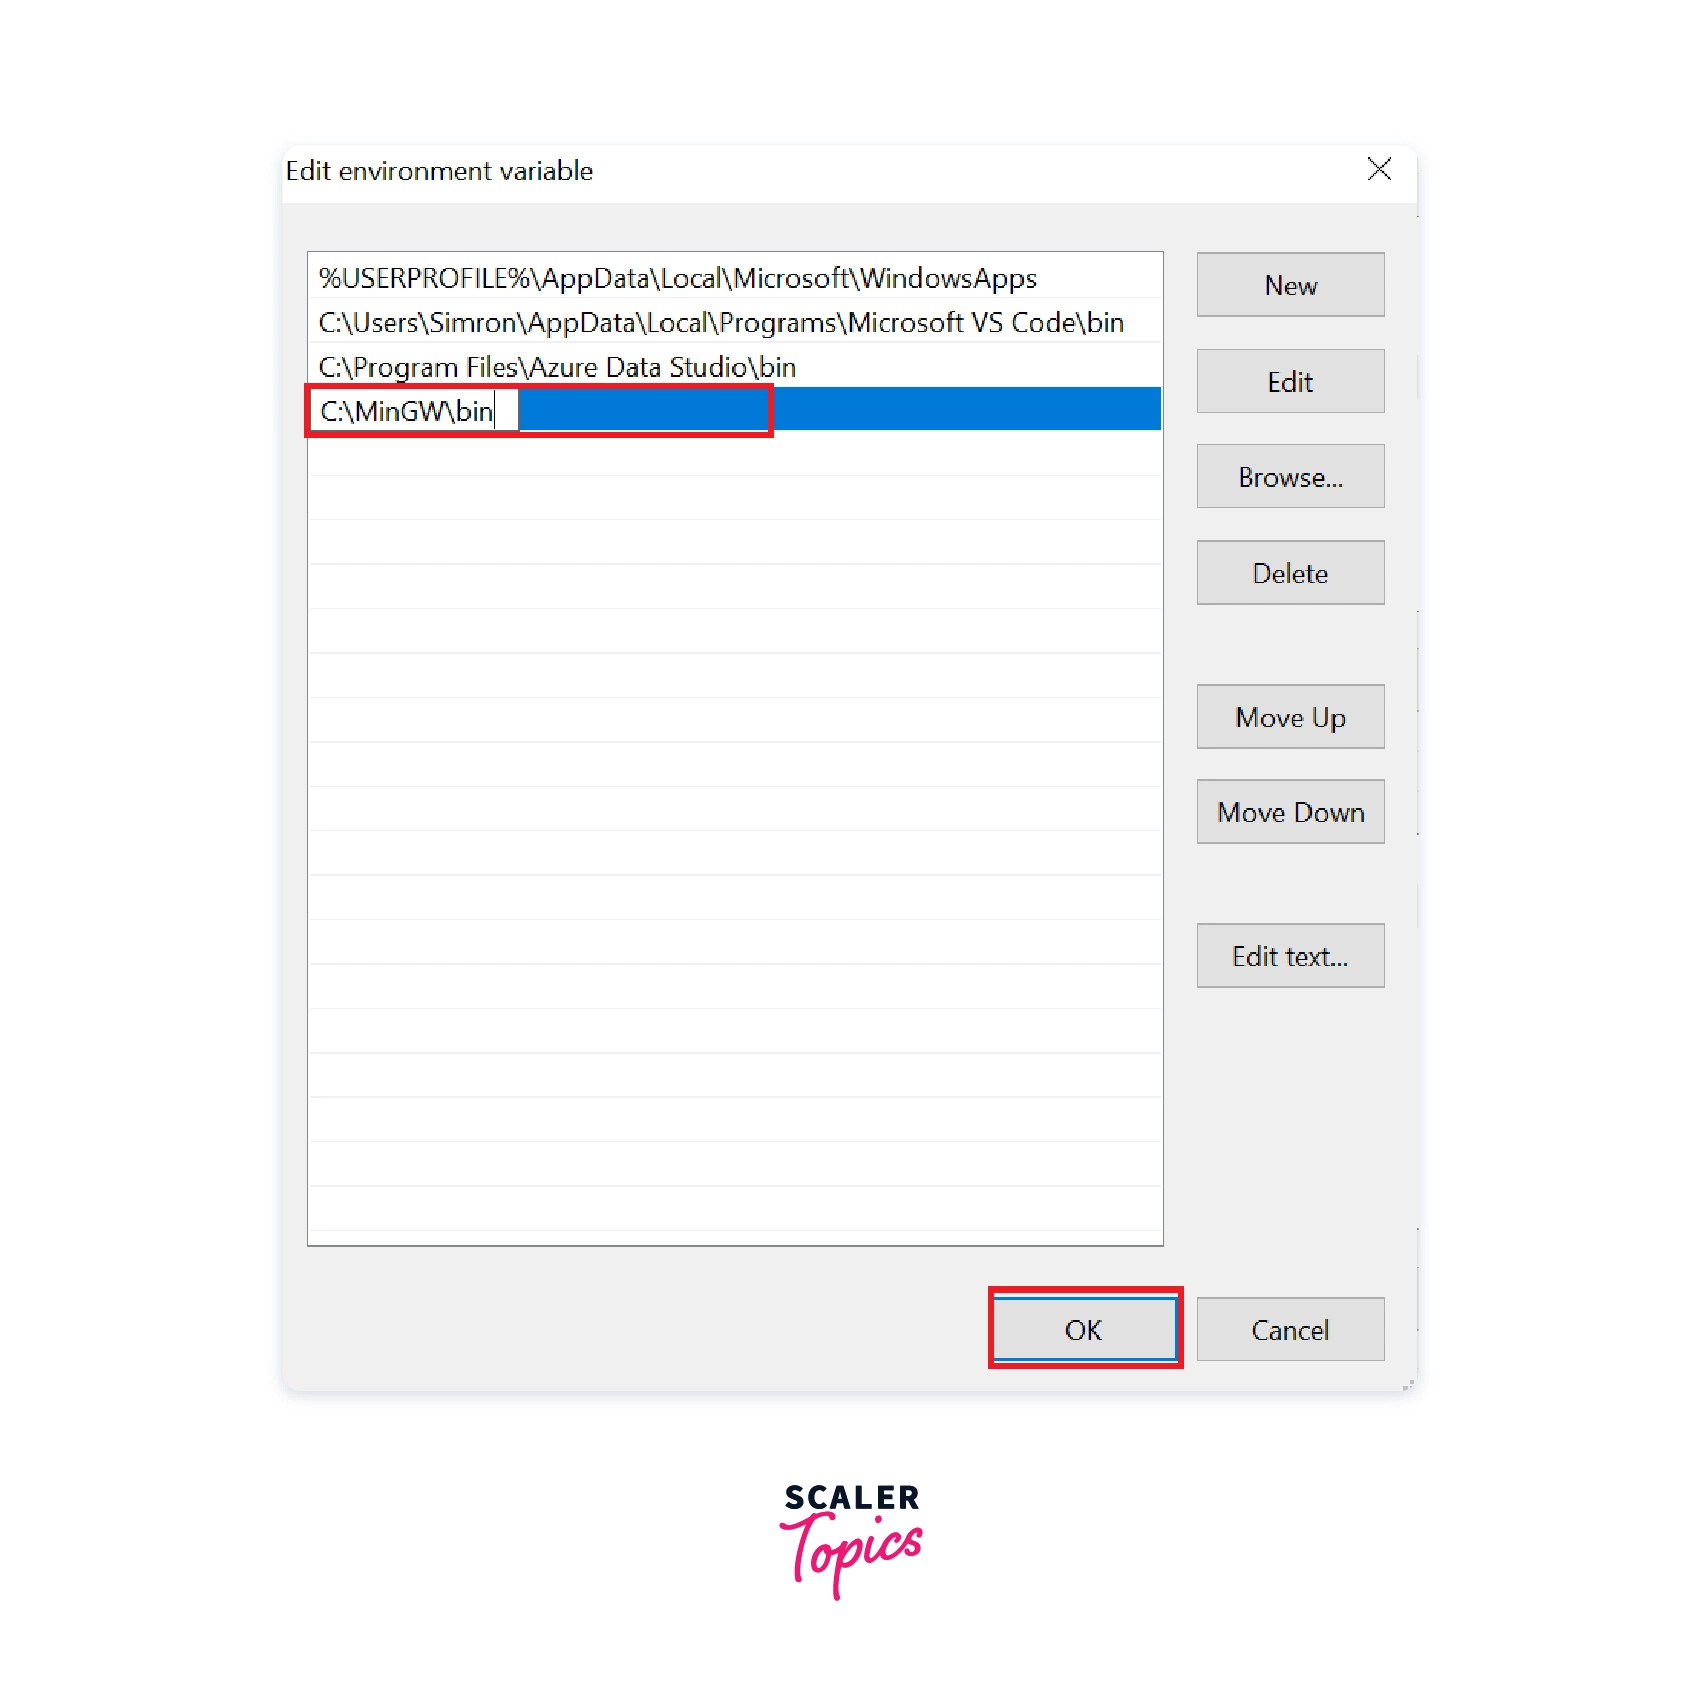
Step 5: Paste the Path.
Paste the path of the MinGW bin that was copied earlier and click on Ok.
Creating and Running a C program
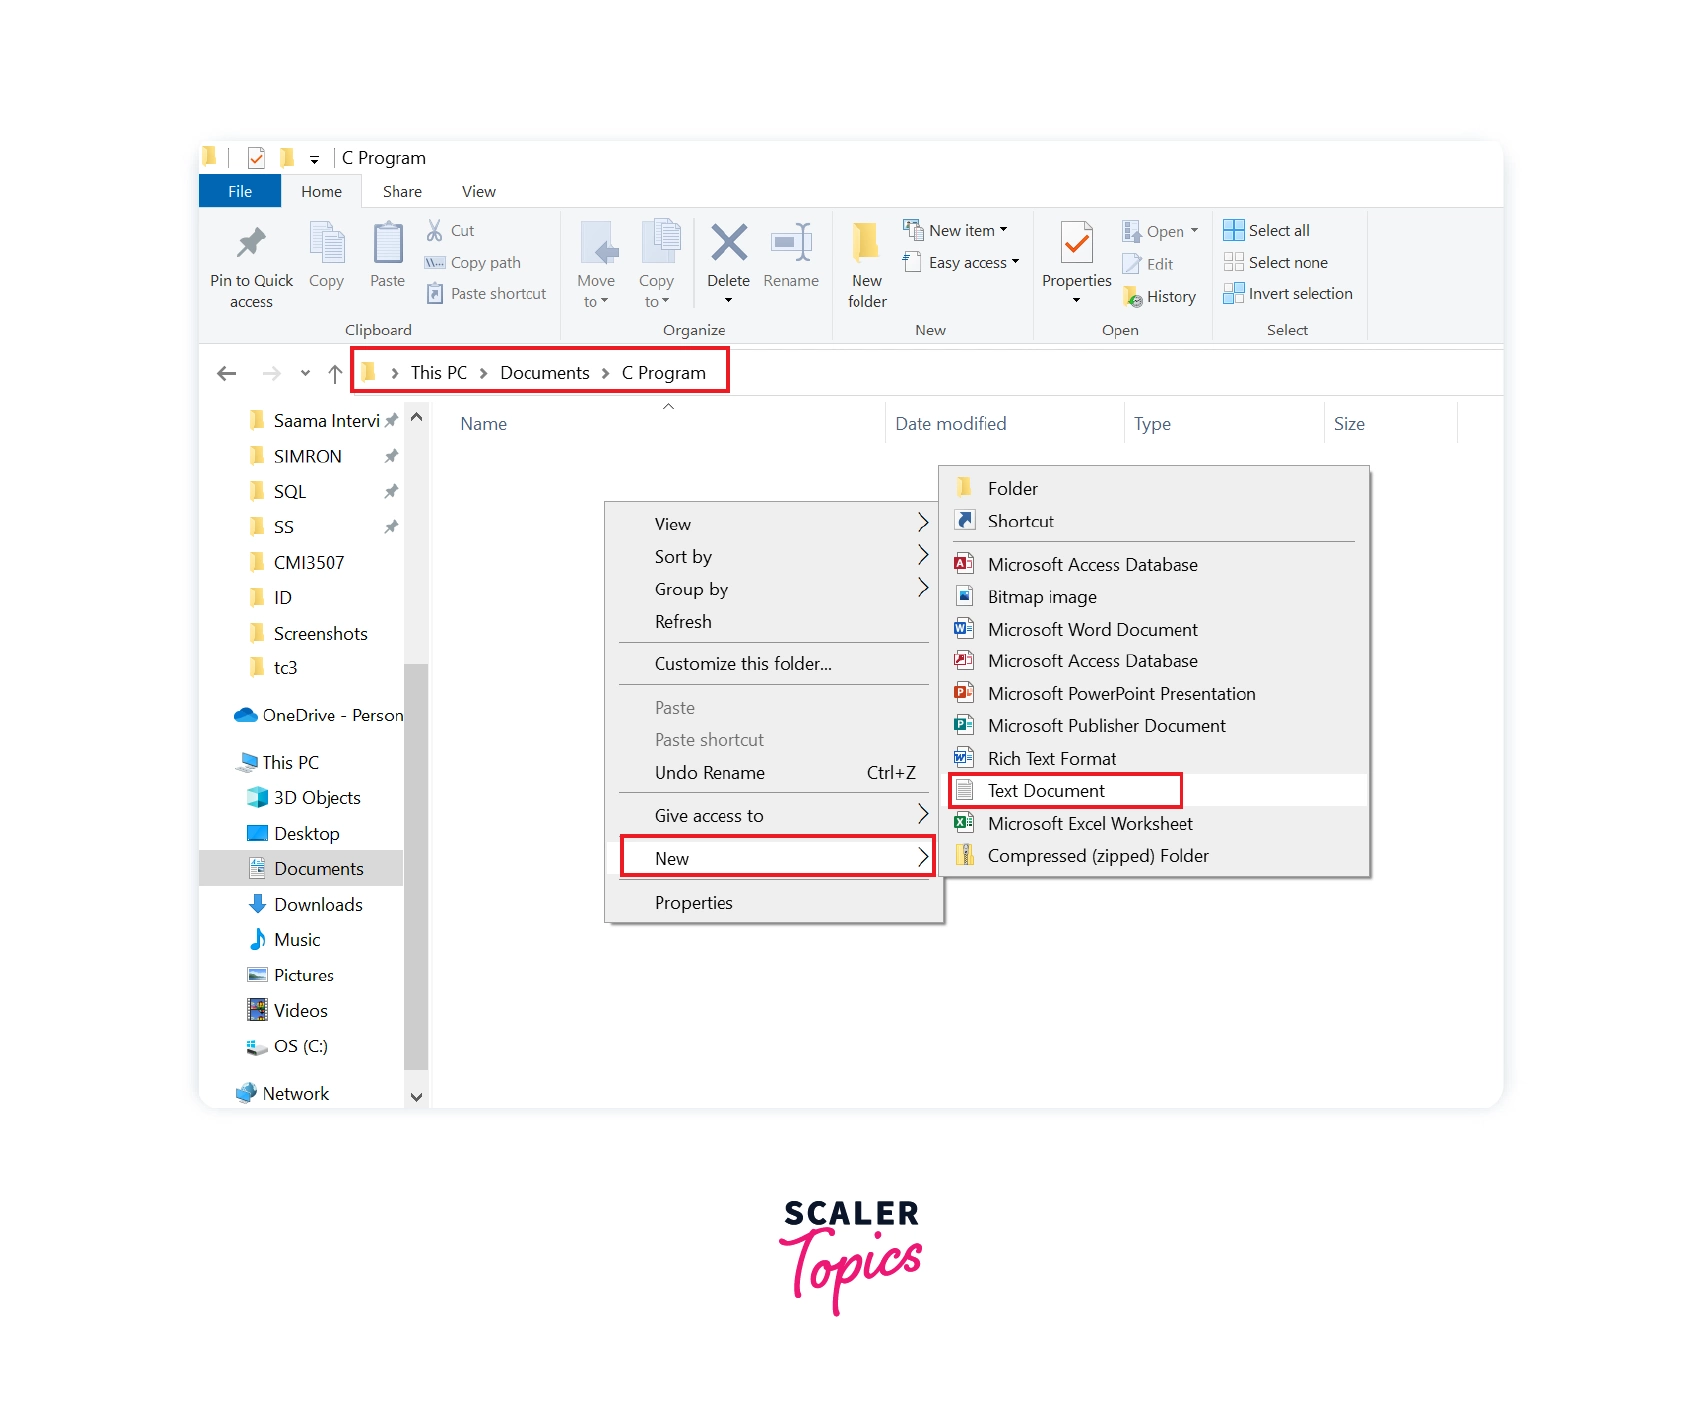
Step 1: Hello World in C.
To execute a C program, create a text file in any directory of your choice.
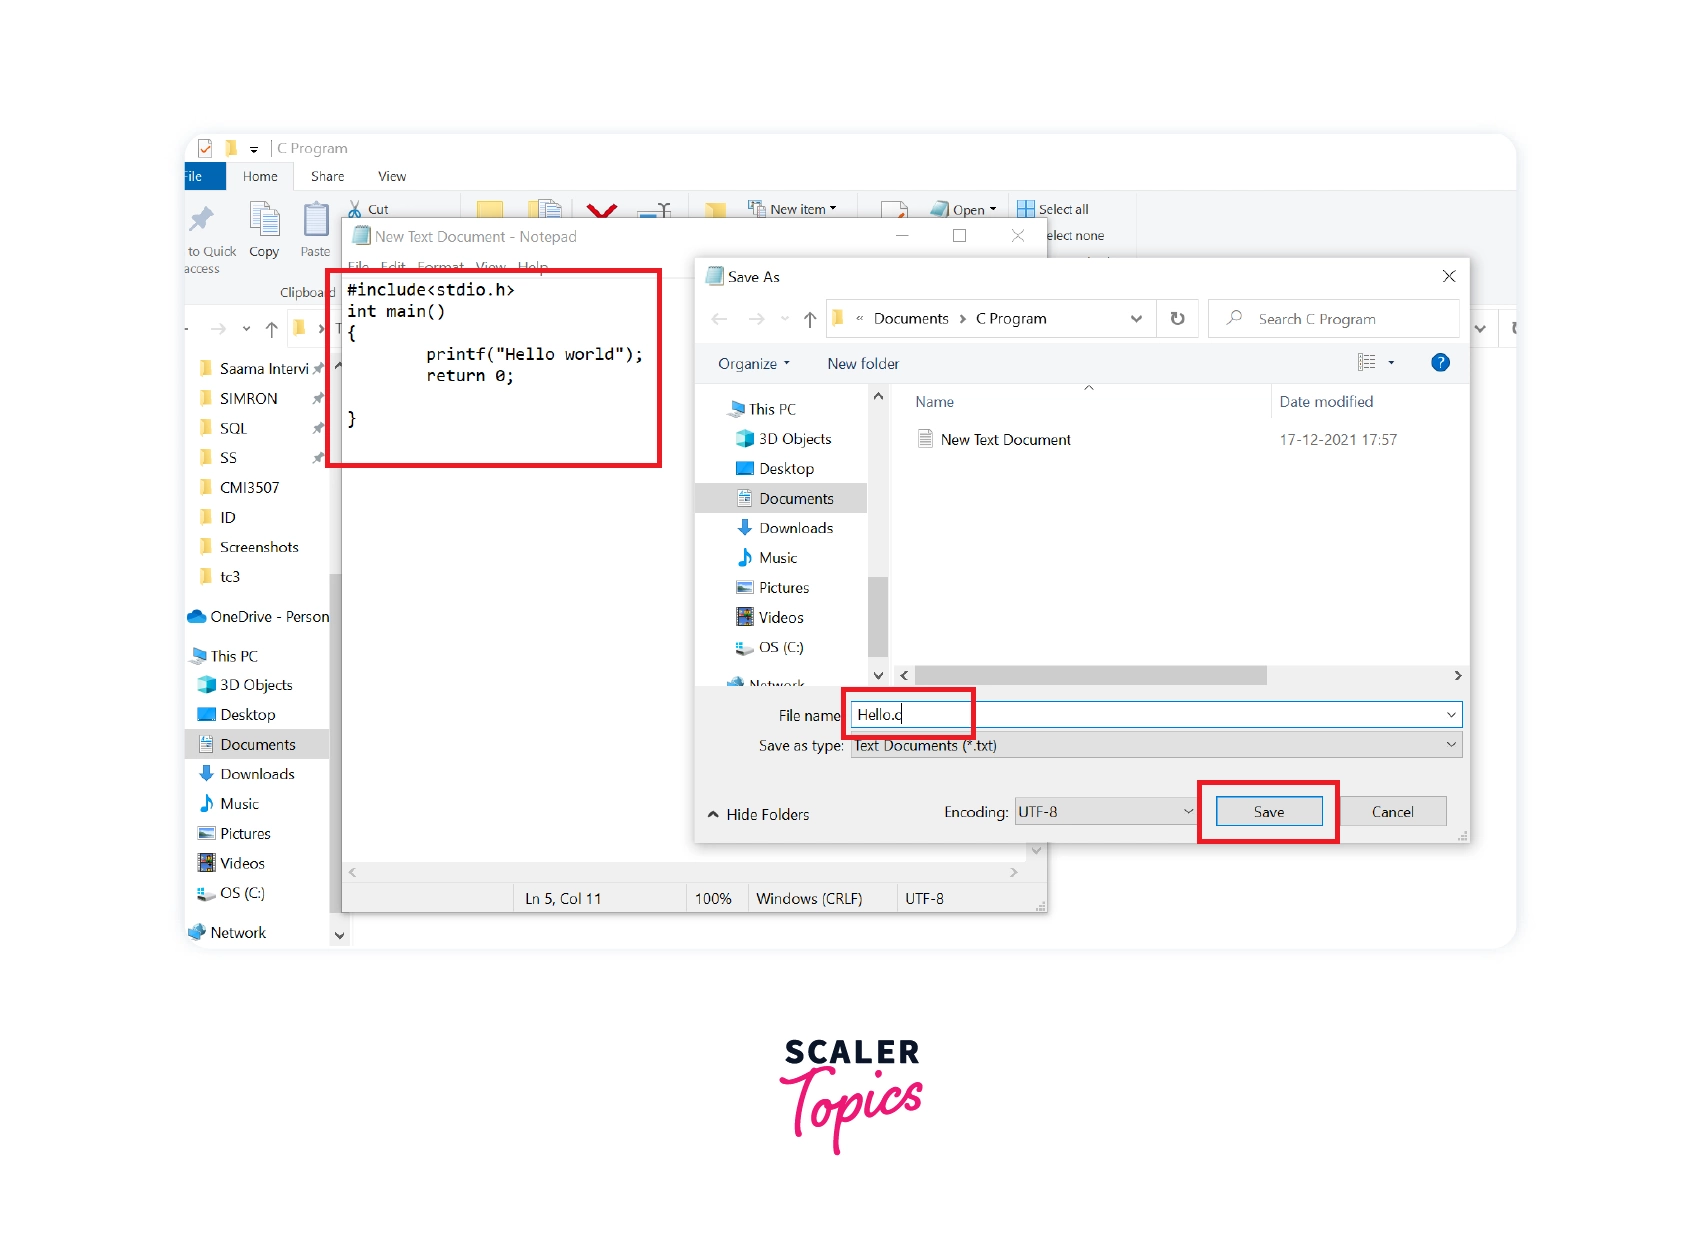
Step 2: Type the C code and Save the file.
Type the code in the notepad and save the file with the .c extension. Here we write a program to print hello world to demonstrate this step and save the file as Hello.c.
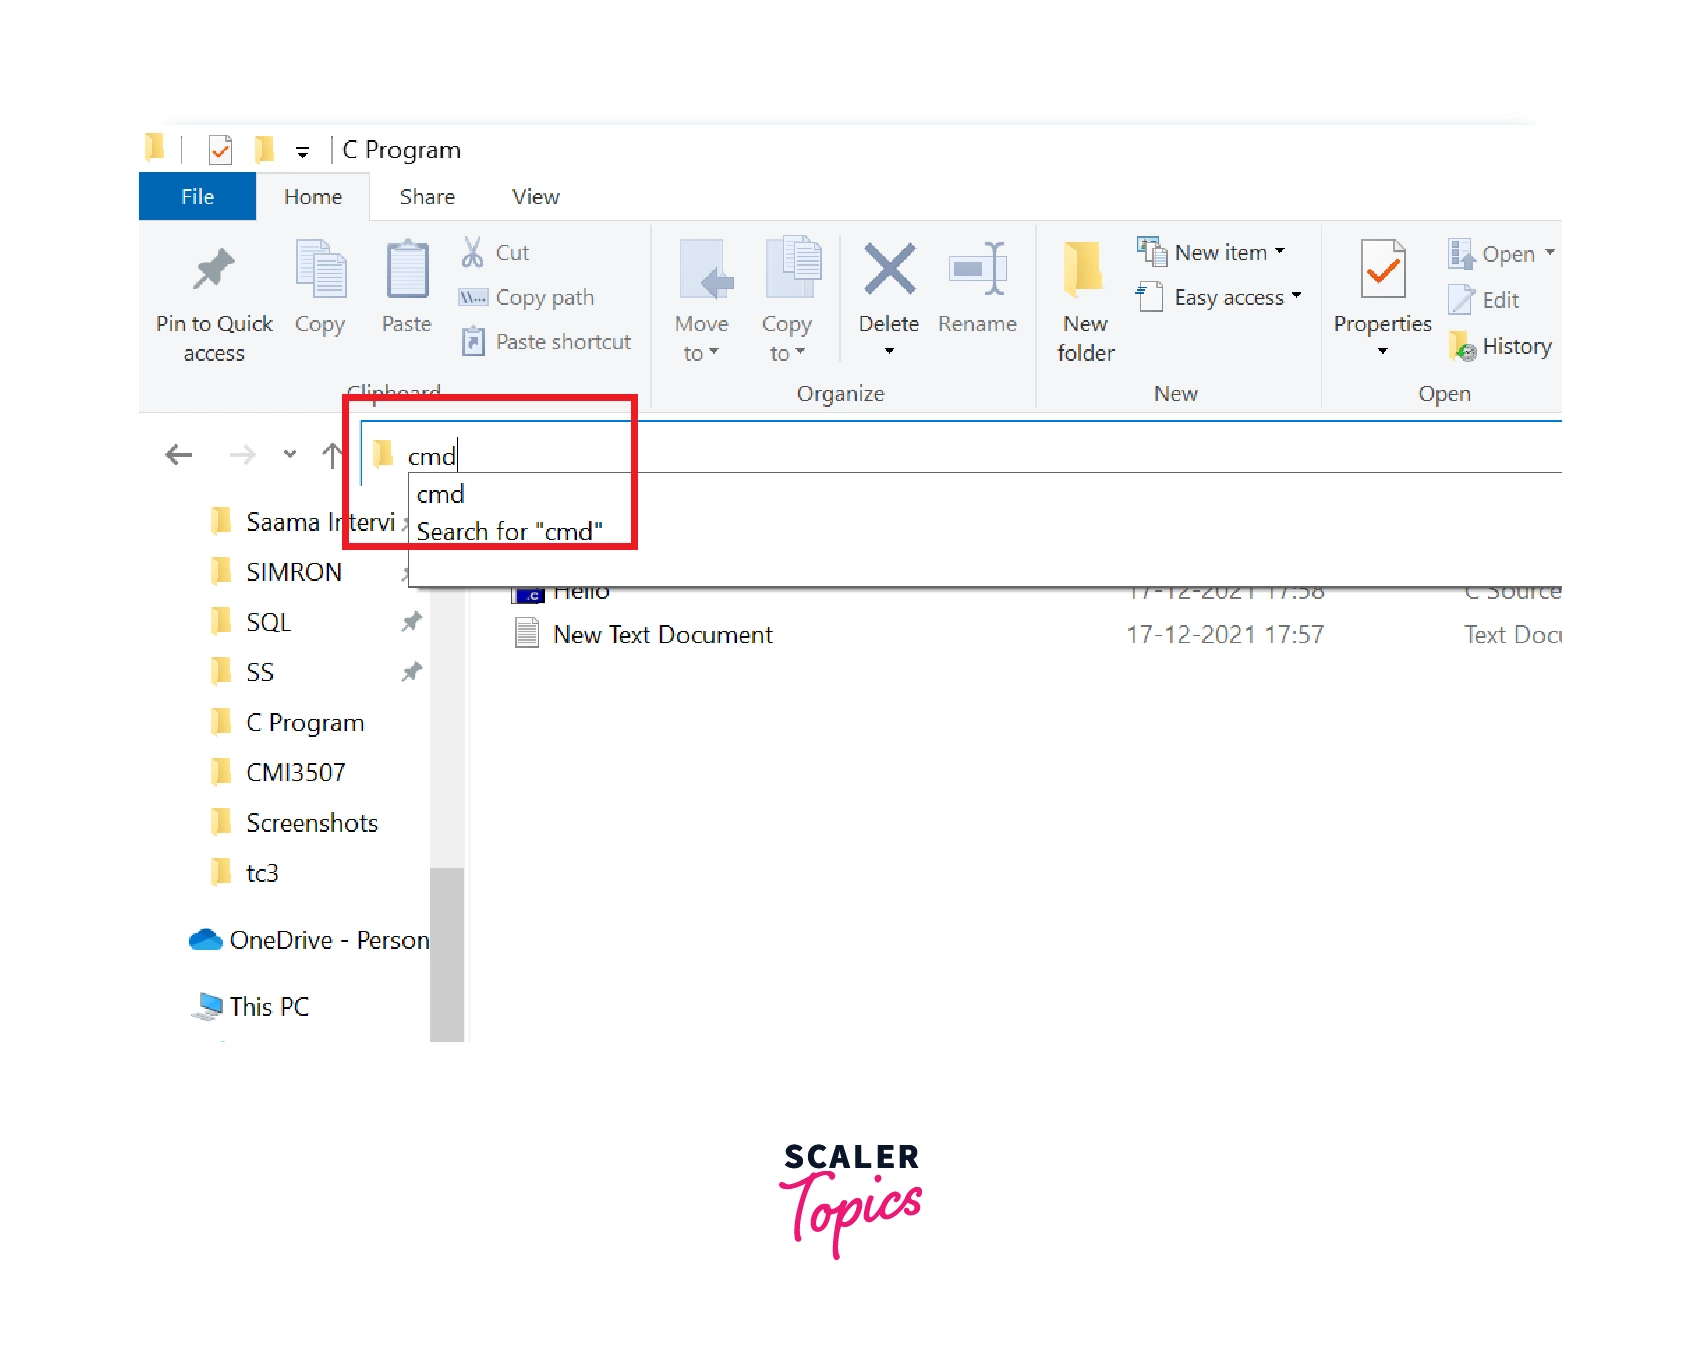
Step 3: Open Command Prompt.
Now, click on the address bar in the C program’s directory, type cmd, and press Enter.
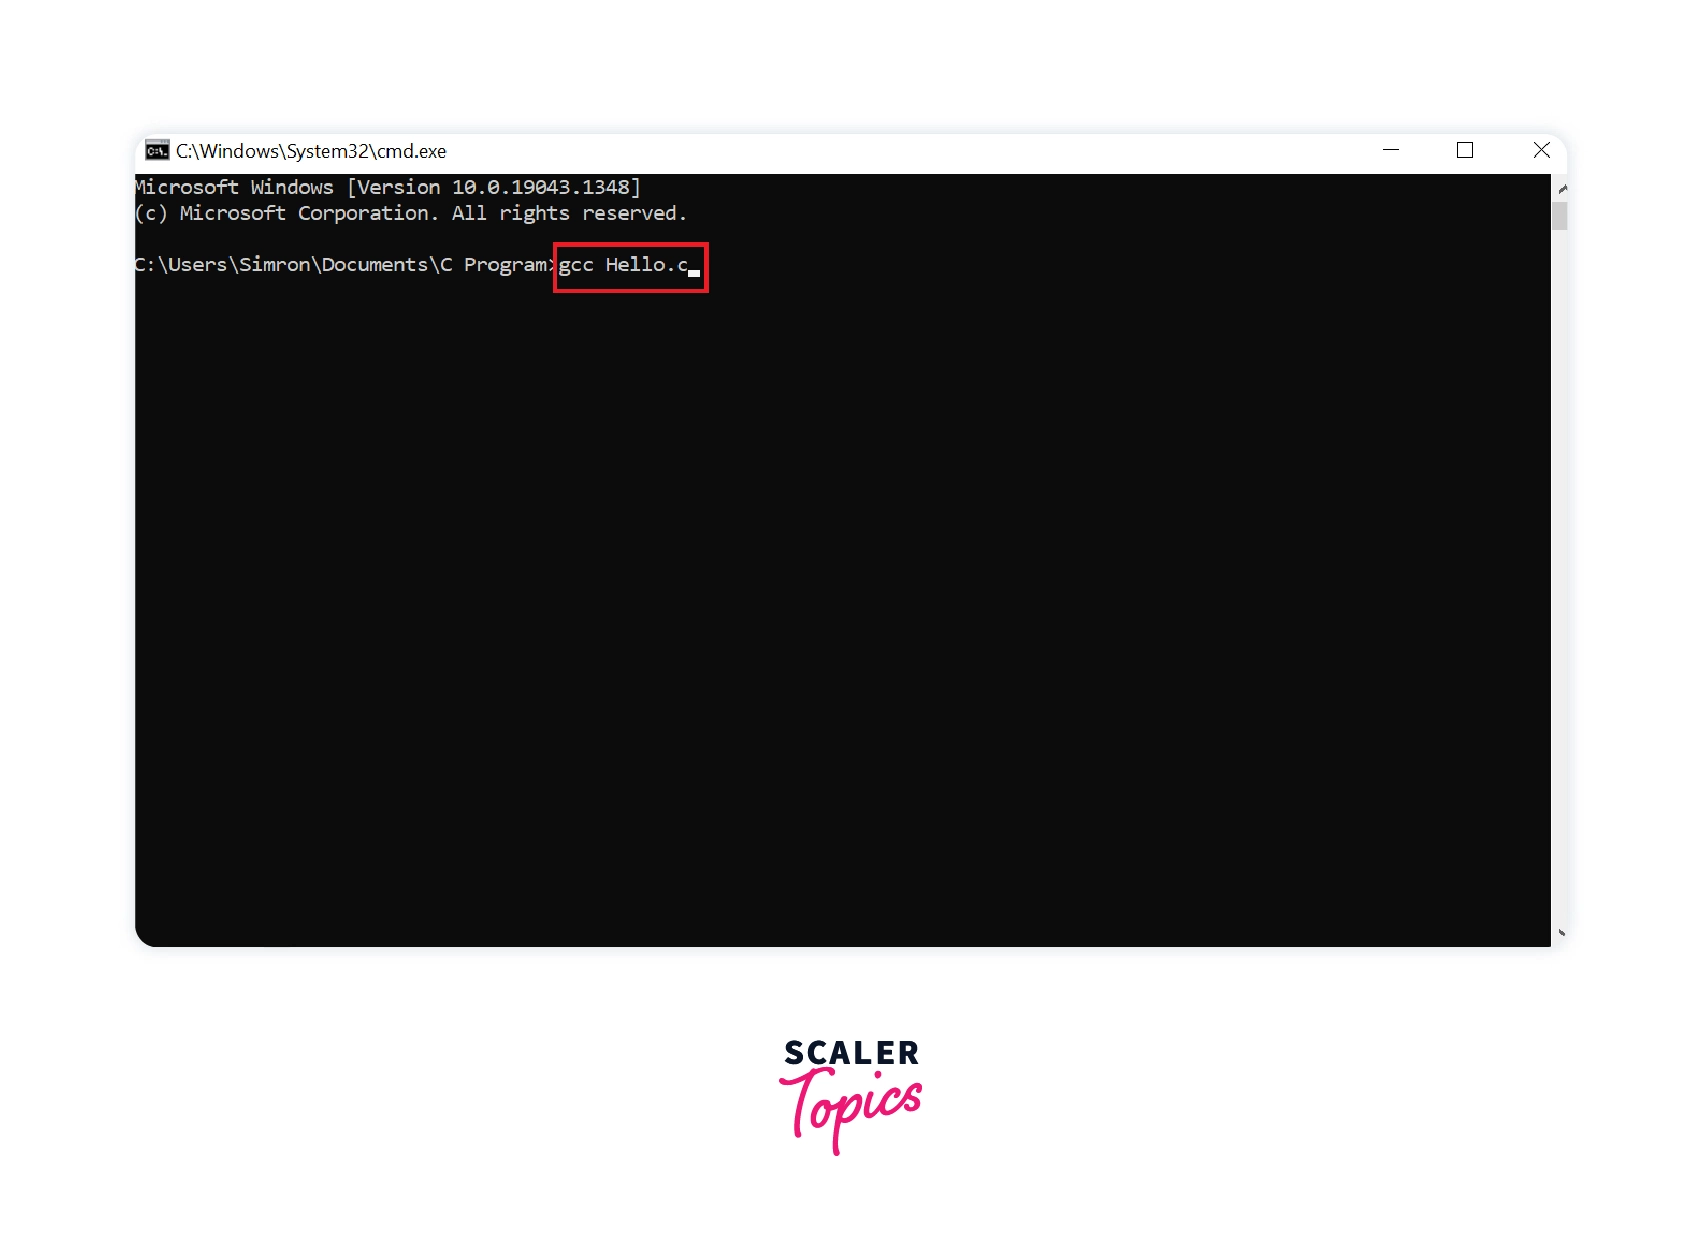
Step 4: Compile the C program.
To compile the Hello World code that we wrote earlier, type gcc Hello.c (or the name by which you will save the program) and press enter. Writing gcc will invoke the C compiler for windows.
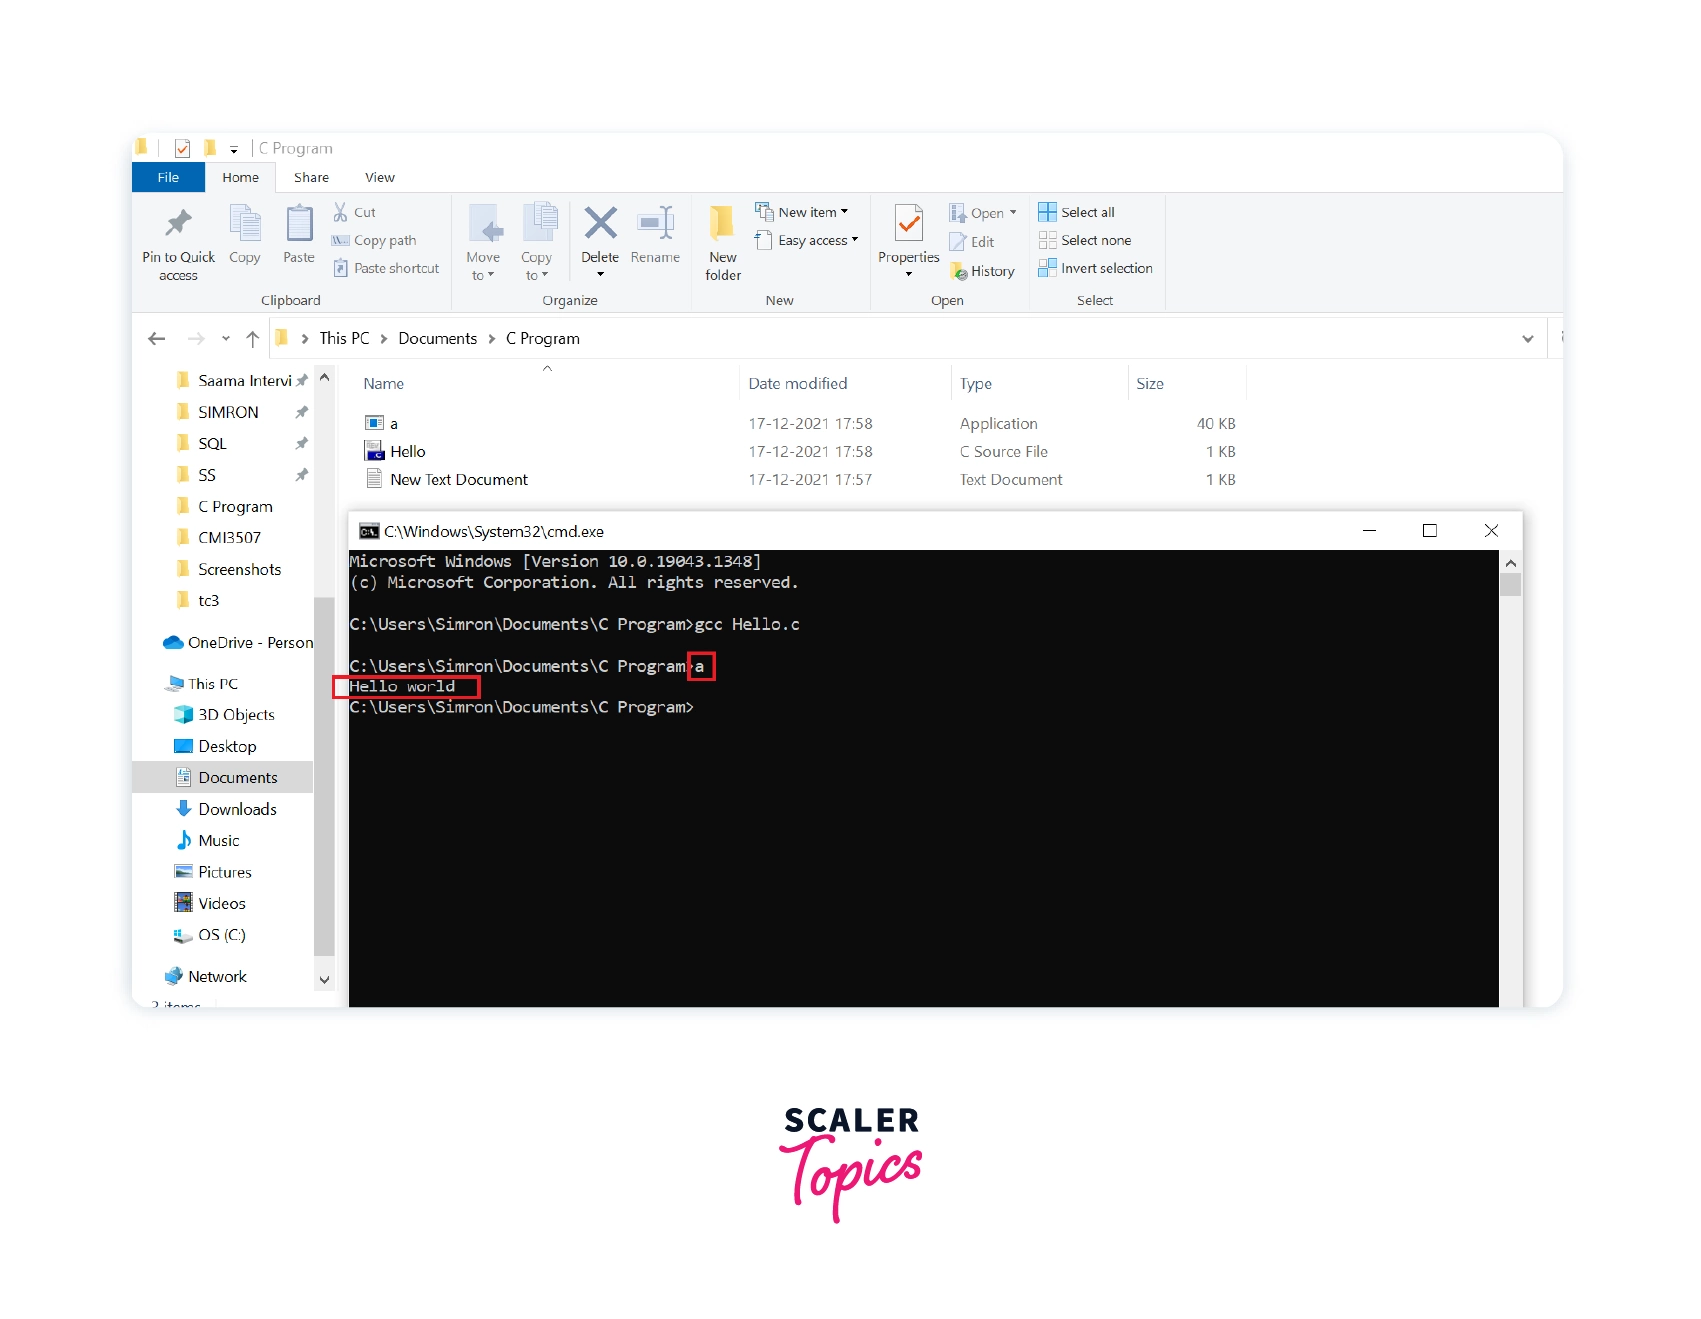
Step 5: Compilation completed.
The compiled file will be saved in the same directory with the name a (the name can be different for you).
The type of the file will be Application.

Step 6: Running the C Program.
To run the compiled file, write the name of the compiled file, i.e., a, as shown in the screenshot below.
Finally, the output will be printed in the command prompt.
There are alternate methods to install C Compilers. One of them is by installing Code::Blocks IDE.
Let’s see the step-by-step process to install Code::Blocks IDE with C Compiler.
Alternate Method:
Installation using CodeBlocks IDE Binary release
Code::Blocks
Code::Blocks is a C/C++ IDE. It comes with plugins which are external additions to any software for customization. Any kind of functionality can be added by installing a plugin. Plugins like debugger, text formatter, etc. can be added to the IDE.
Below are the steps to download and install the Code::Blocks IDE.
Step 1: Go to Code::Blocks Website.
The first step is to install the Code blocks IDE. Go to any of the browsers and open codeblocks.org. The below web page will appear on your screen. On its left side, click on the Downloads.

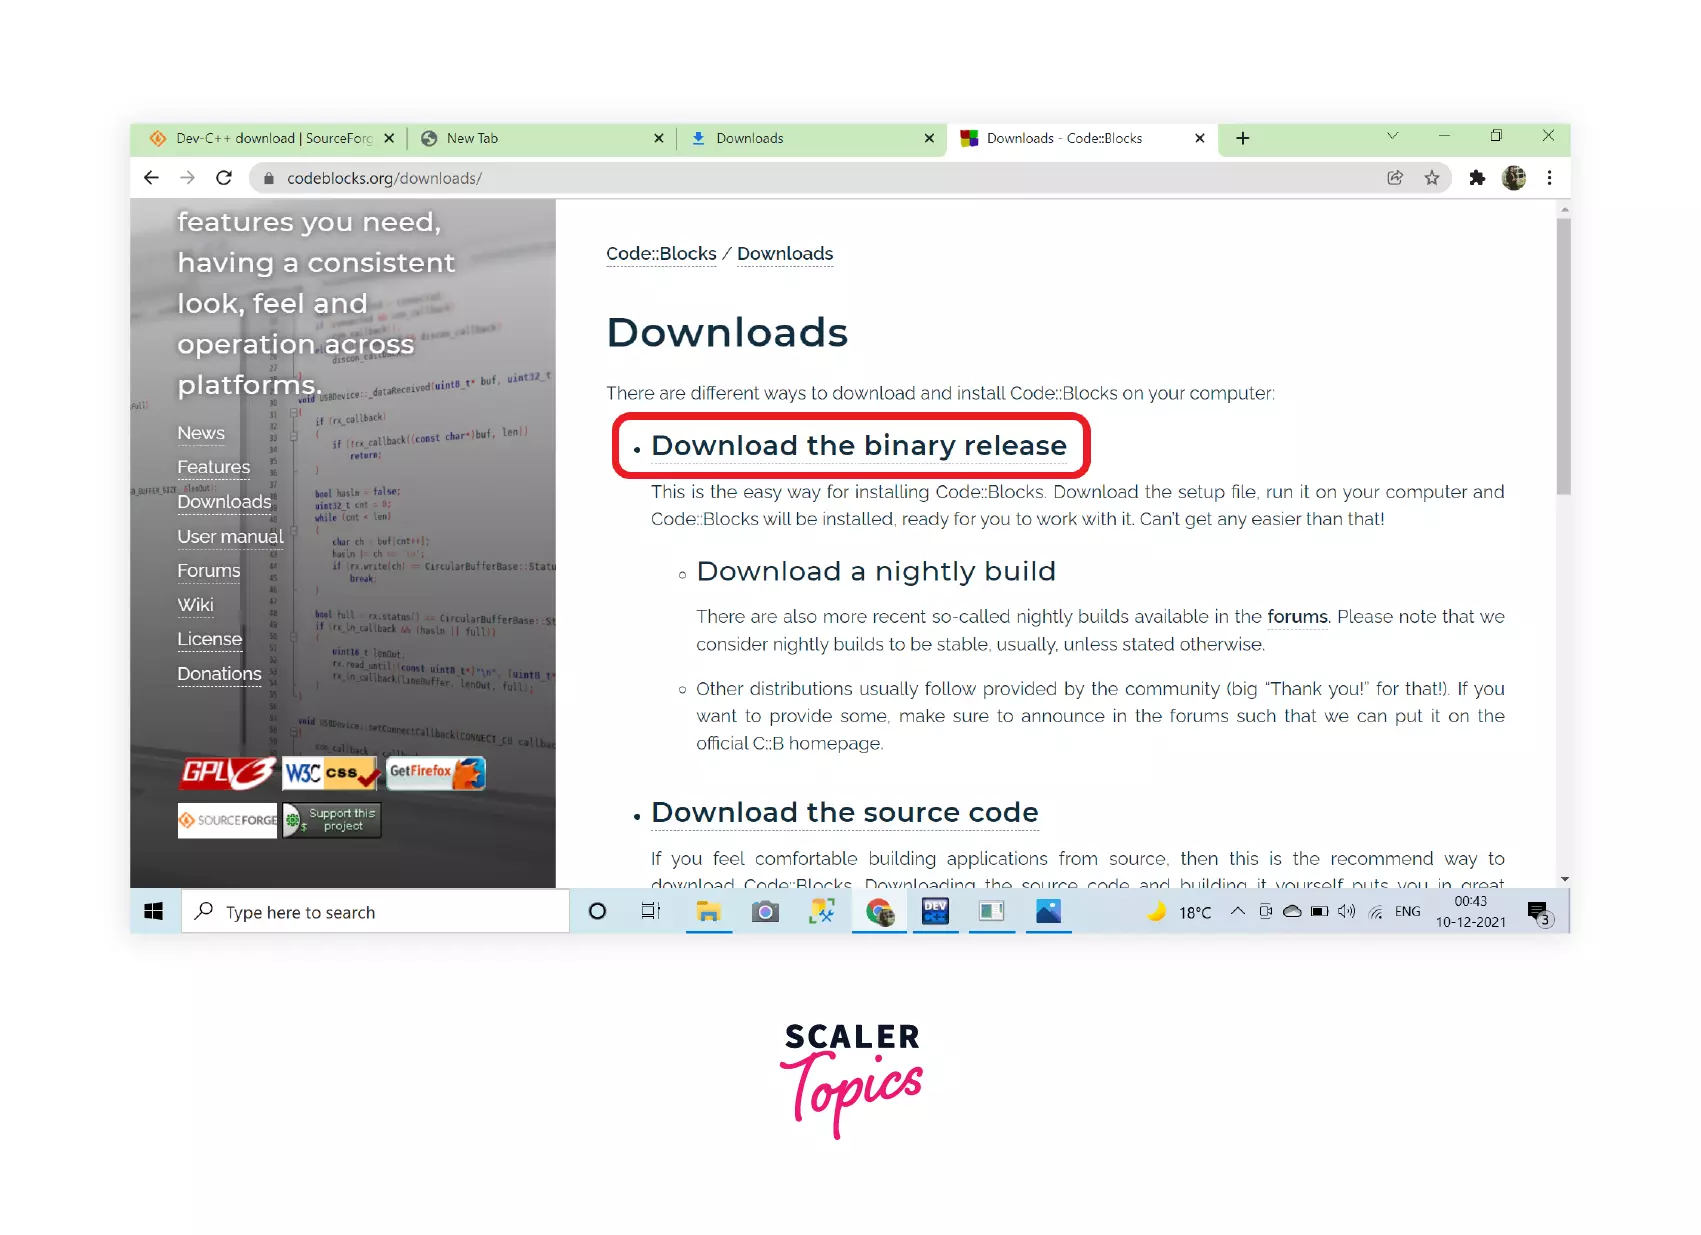
Step 2: Choose the way to download.
After clicking on the downloads on the download’s page, it will redirect you to the next page. Here click on the
Download the binary release, as we will use binary release for this tutorial.
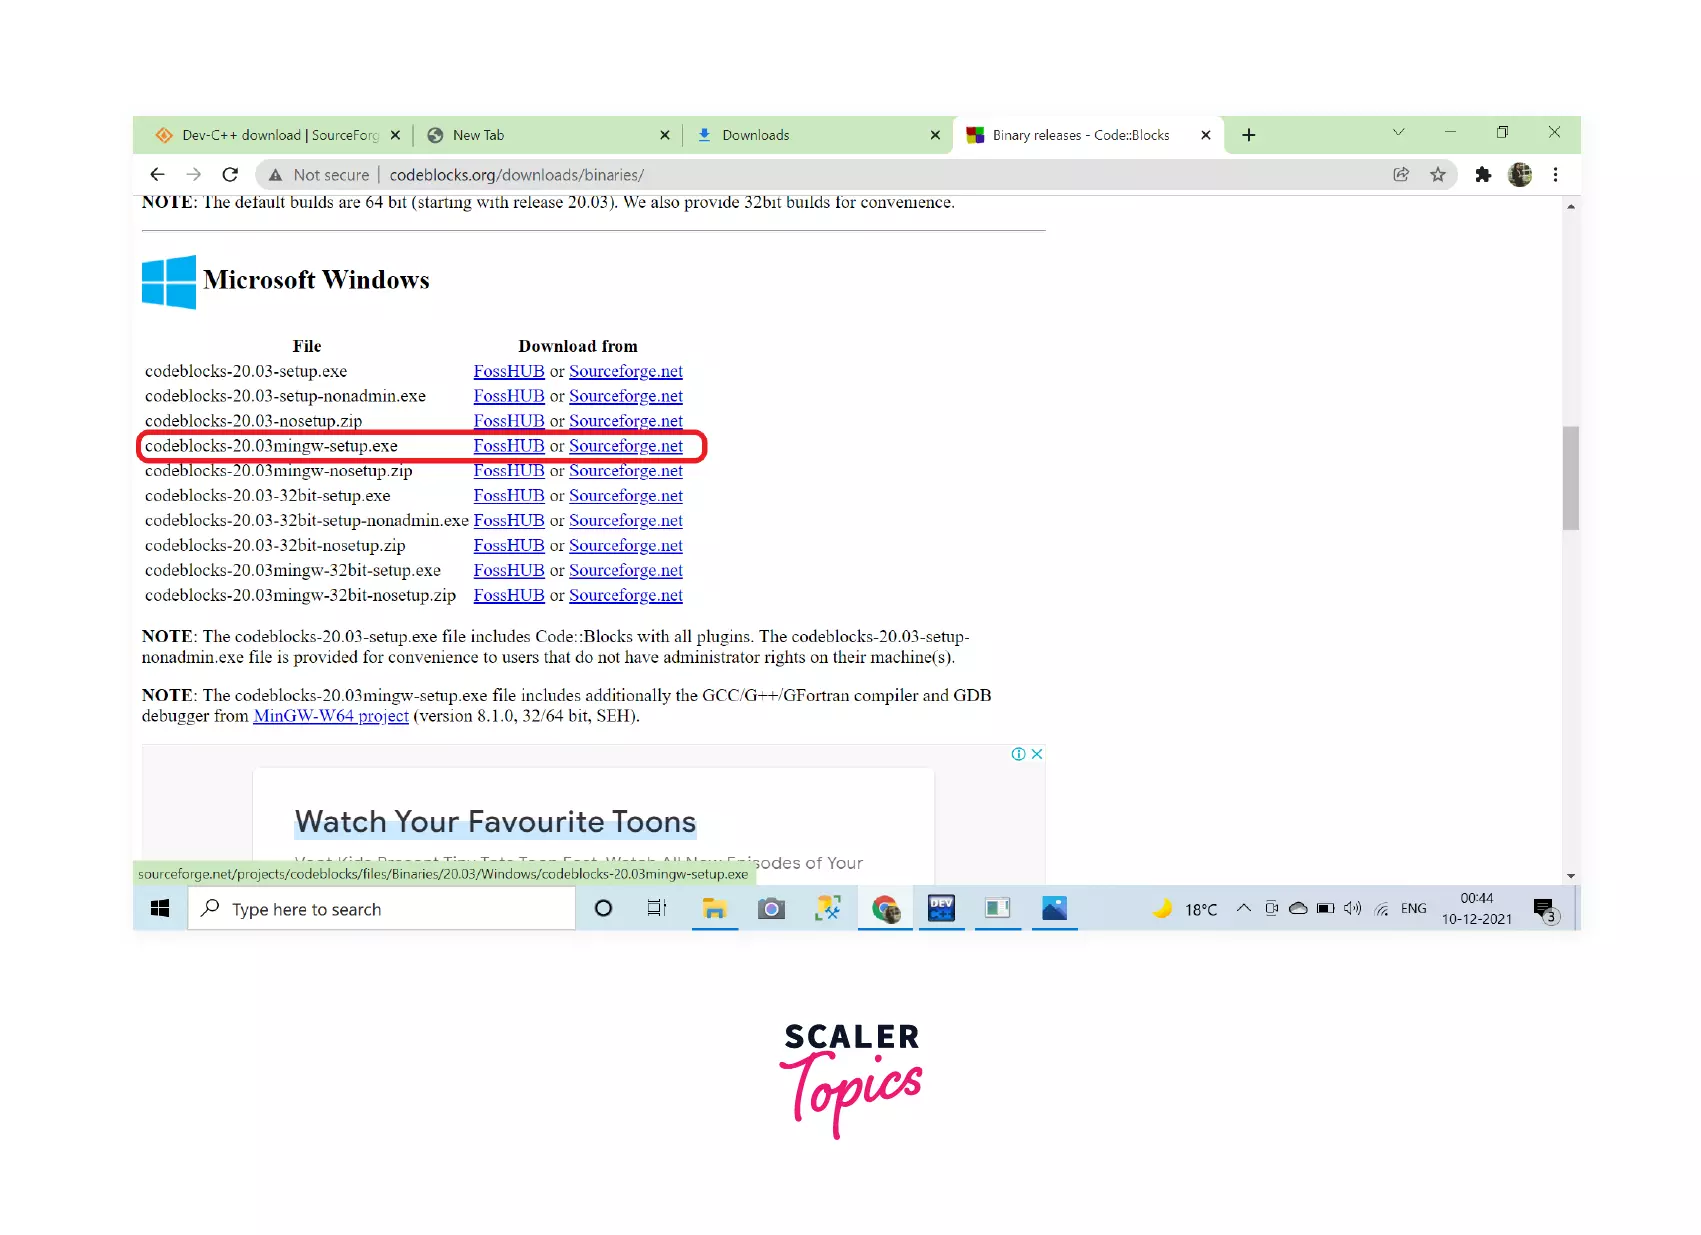
Step 3: Choose the version for download
In the Windows section, click on the codeblocks-20.03mingw-setup.exe (for the 64-bit version).
The codeblocks-20.03mingw-setup.exe comes with the MinGW, including the GCC/G++/GFortan compiler and GDB debugger.
To download the 32-bit version, choose the codeblocks-20.03mingw-32bit-setup.exe
Download the file from the link in front of the selected version, as highlighted in the screenshot below.
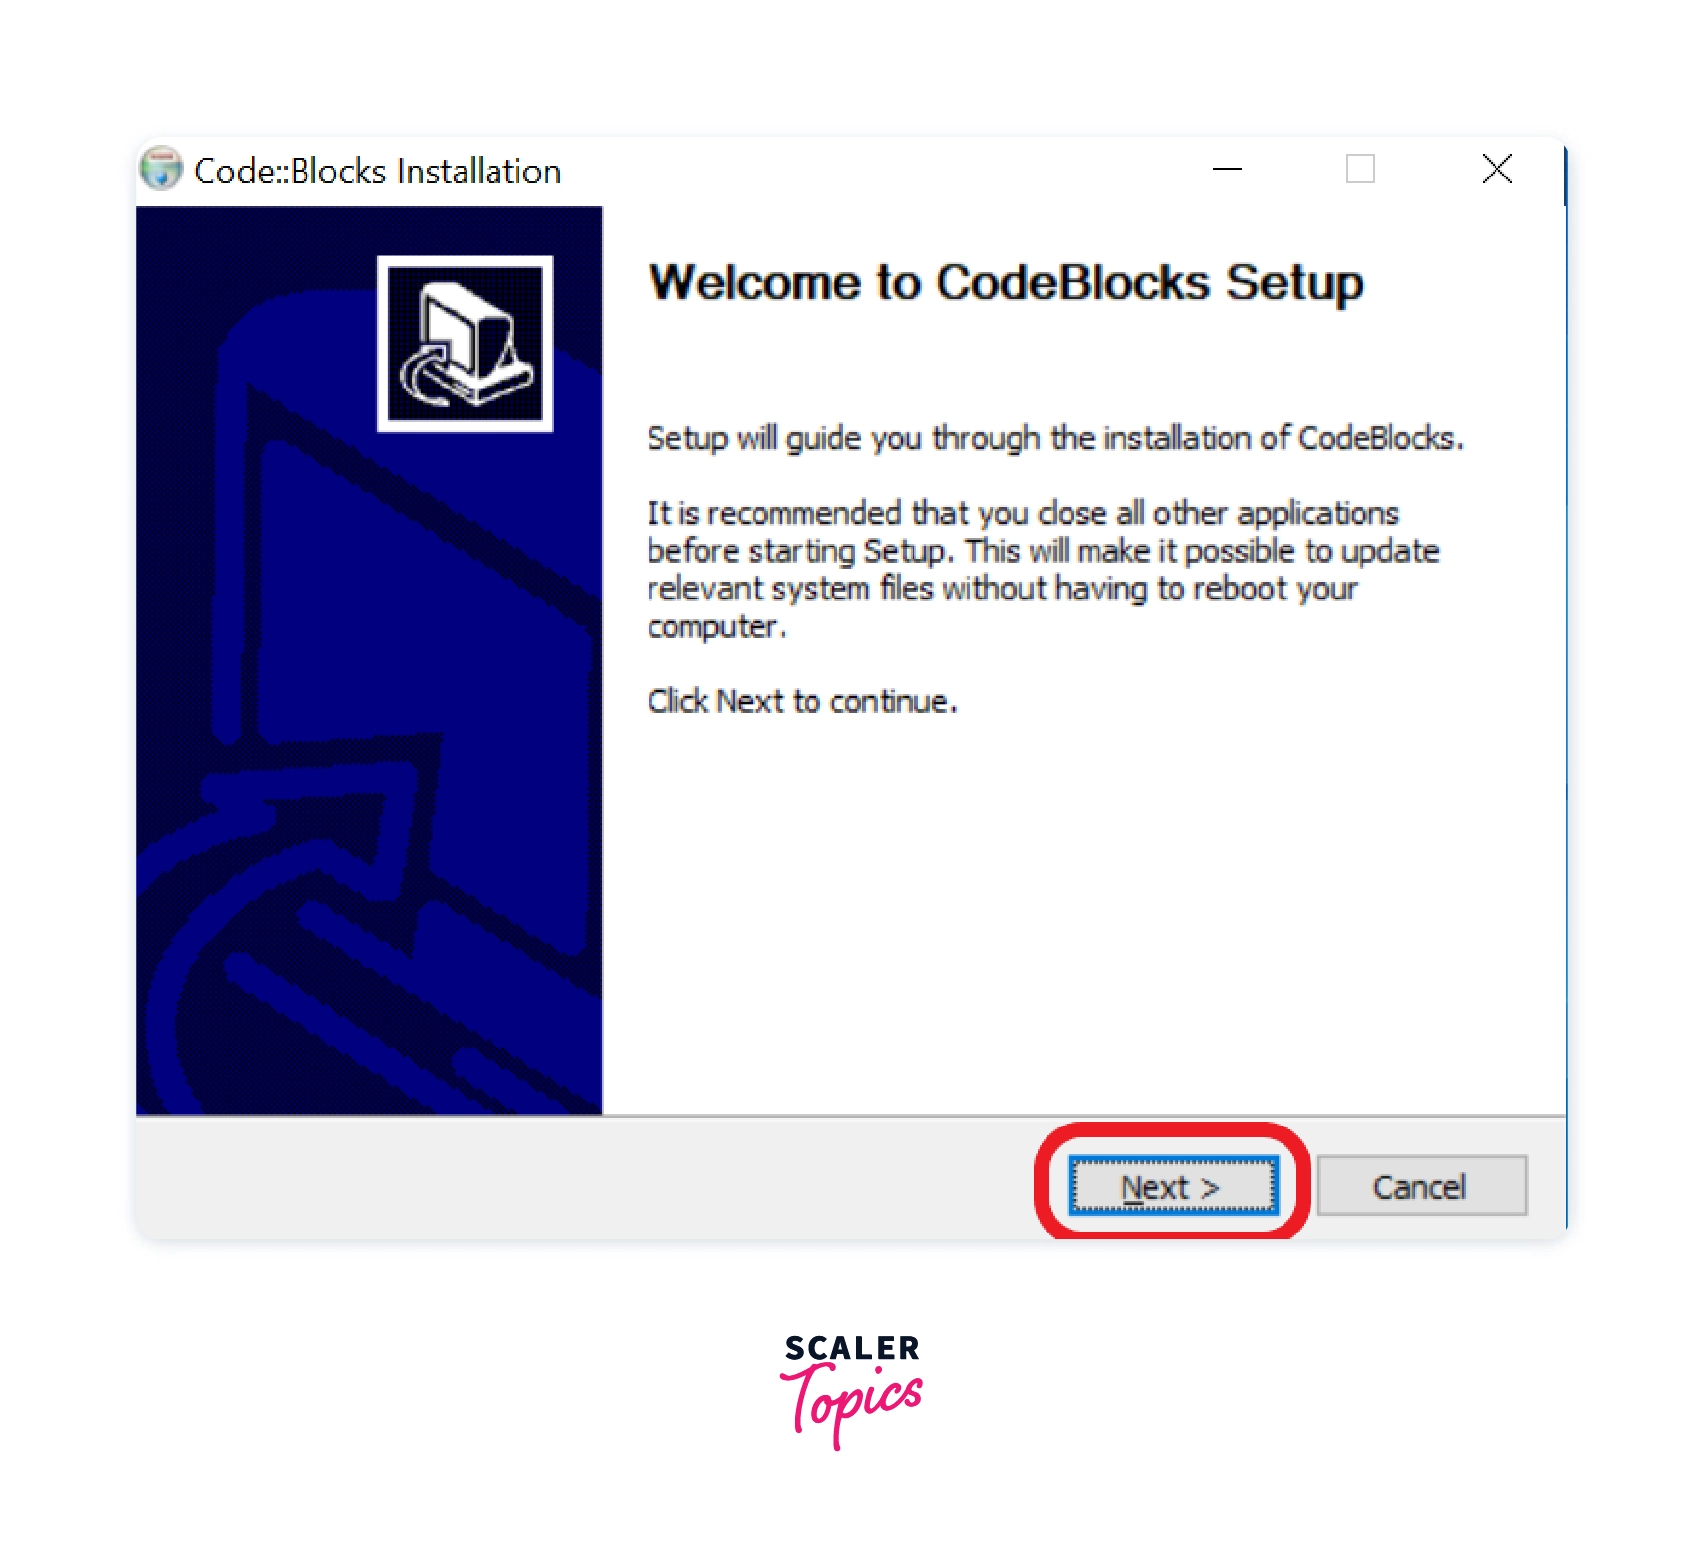
Step 4: Start the installation
Now, the installation file has been downloaded. Double-click on the file and the setup window will appear on the screen. Click on the Next> button and proceed further.
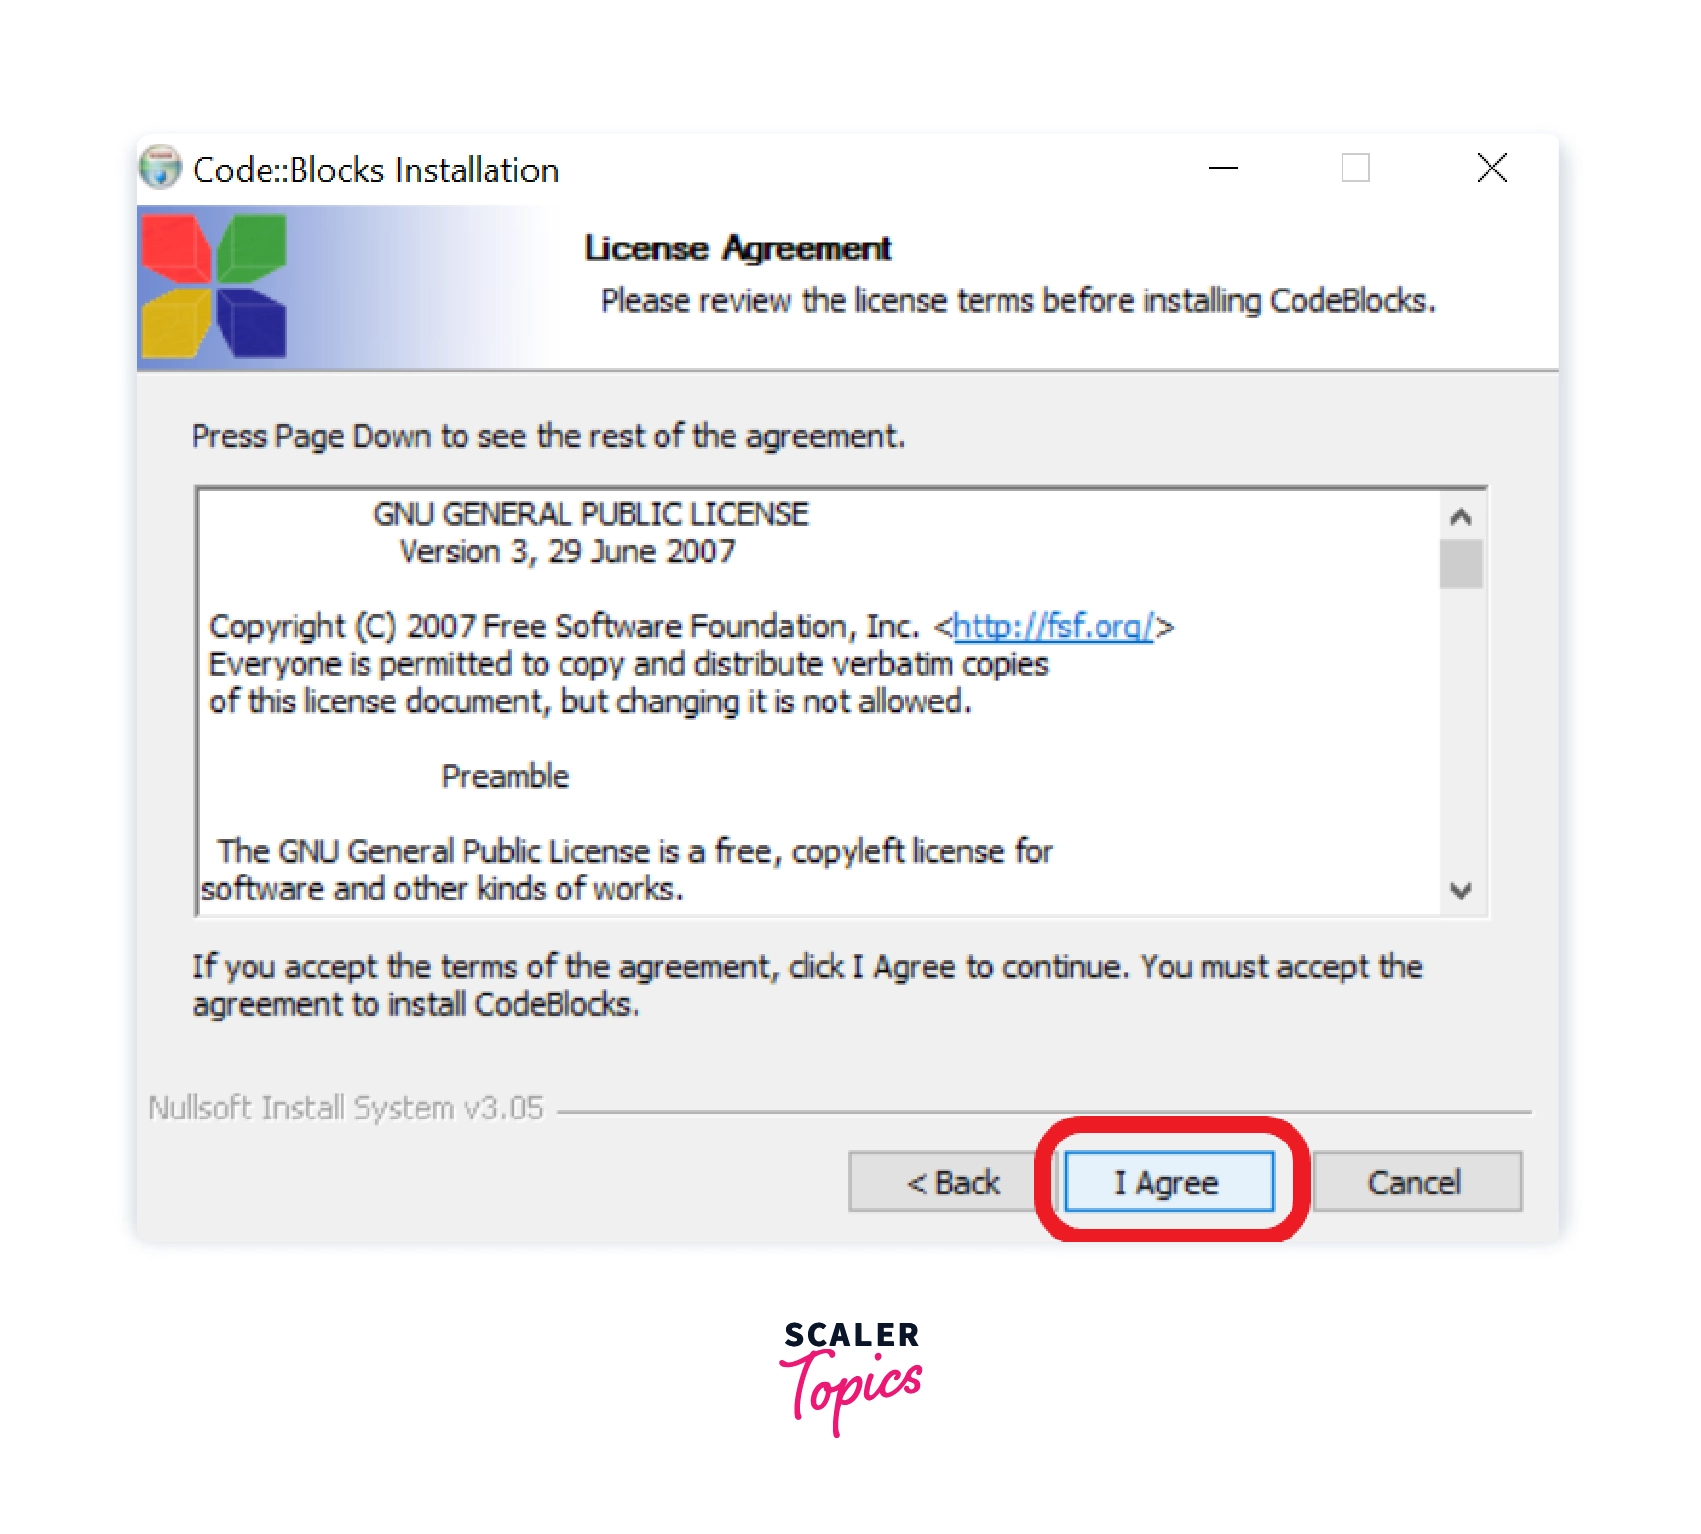
Step 5: Accept the License Agreement
The license agreement for terms and conditions will appear on the screen. Read the license agreement, click on the I Agree button, and proceed further.
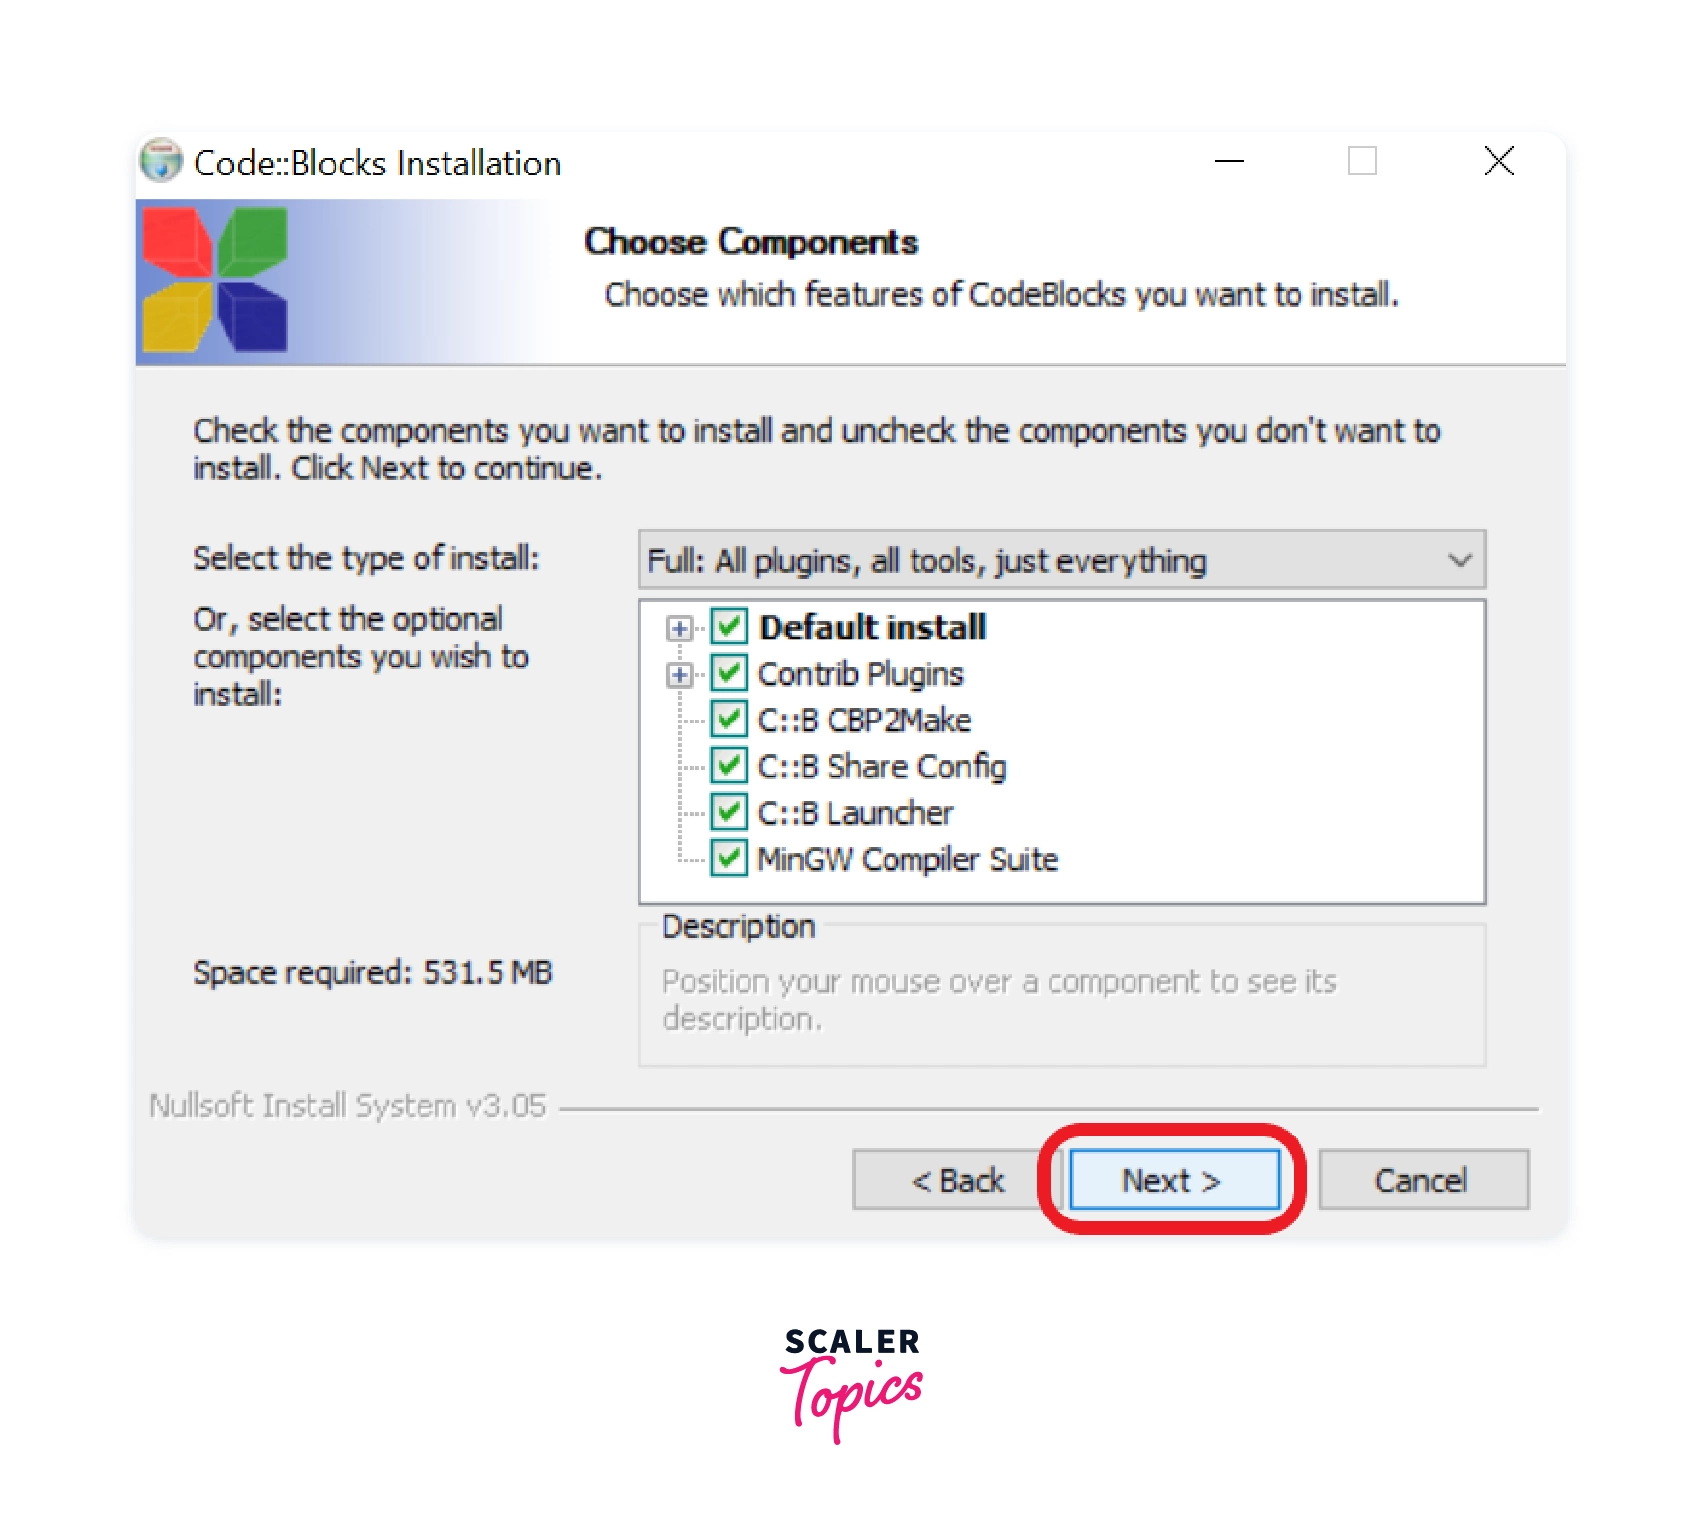
Step 6: Choose Components.
In this step, check whether all the checkboxes are checked or not. For smooth installation, all components should be selected. After that, click on Next to continue.
Step 7: Choose the install location and start installing.
Choose the location on the drive where the application is to be installed. It automatically takes the C: Drive location. To change it, click on browse, choose the location, and click on Next to proceed further.
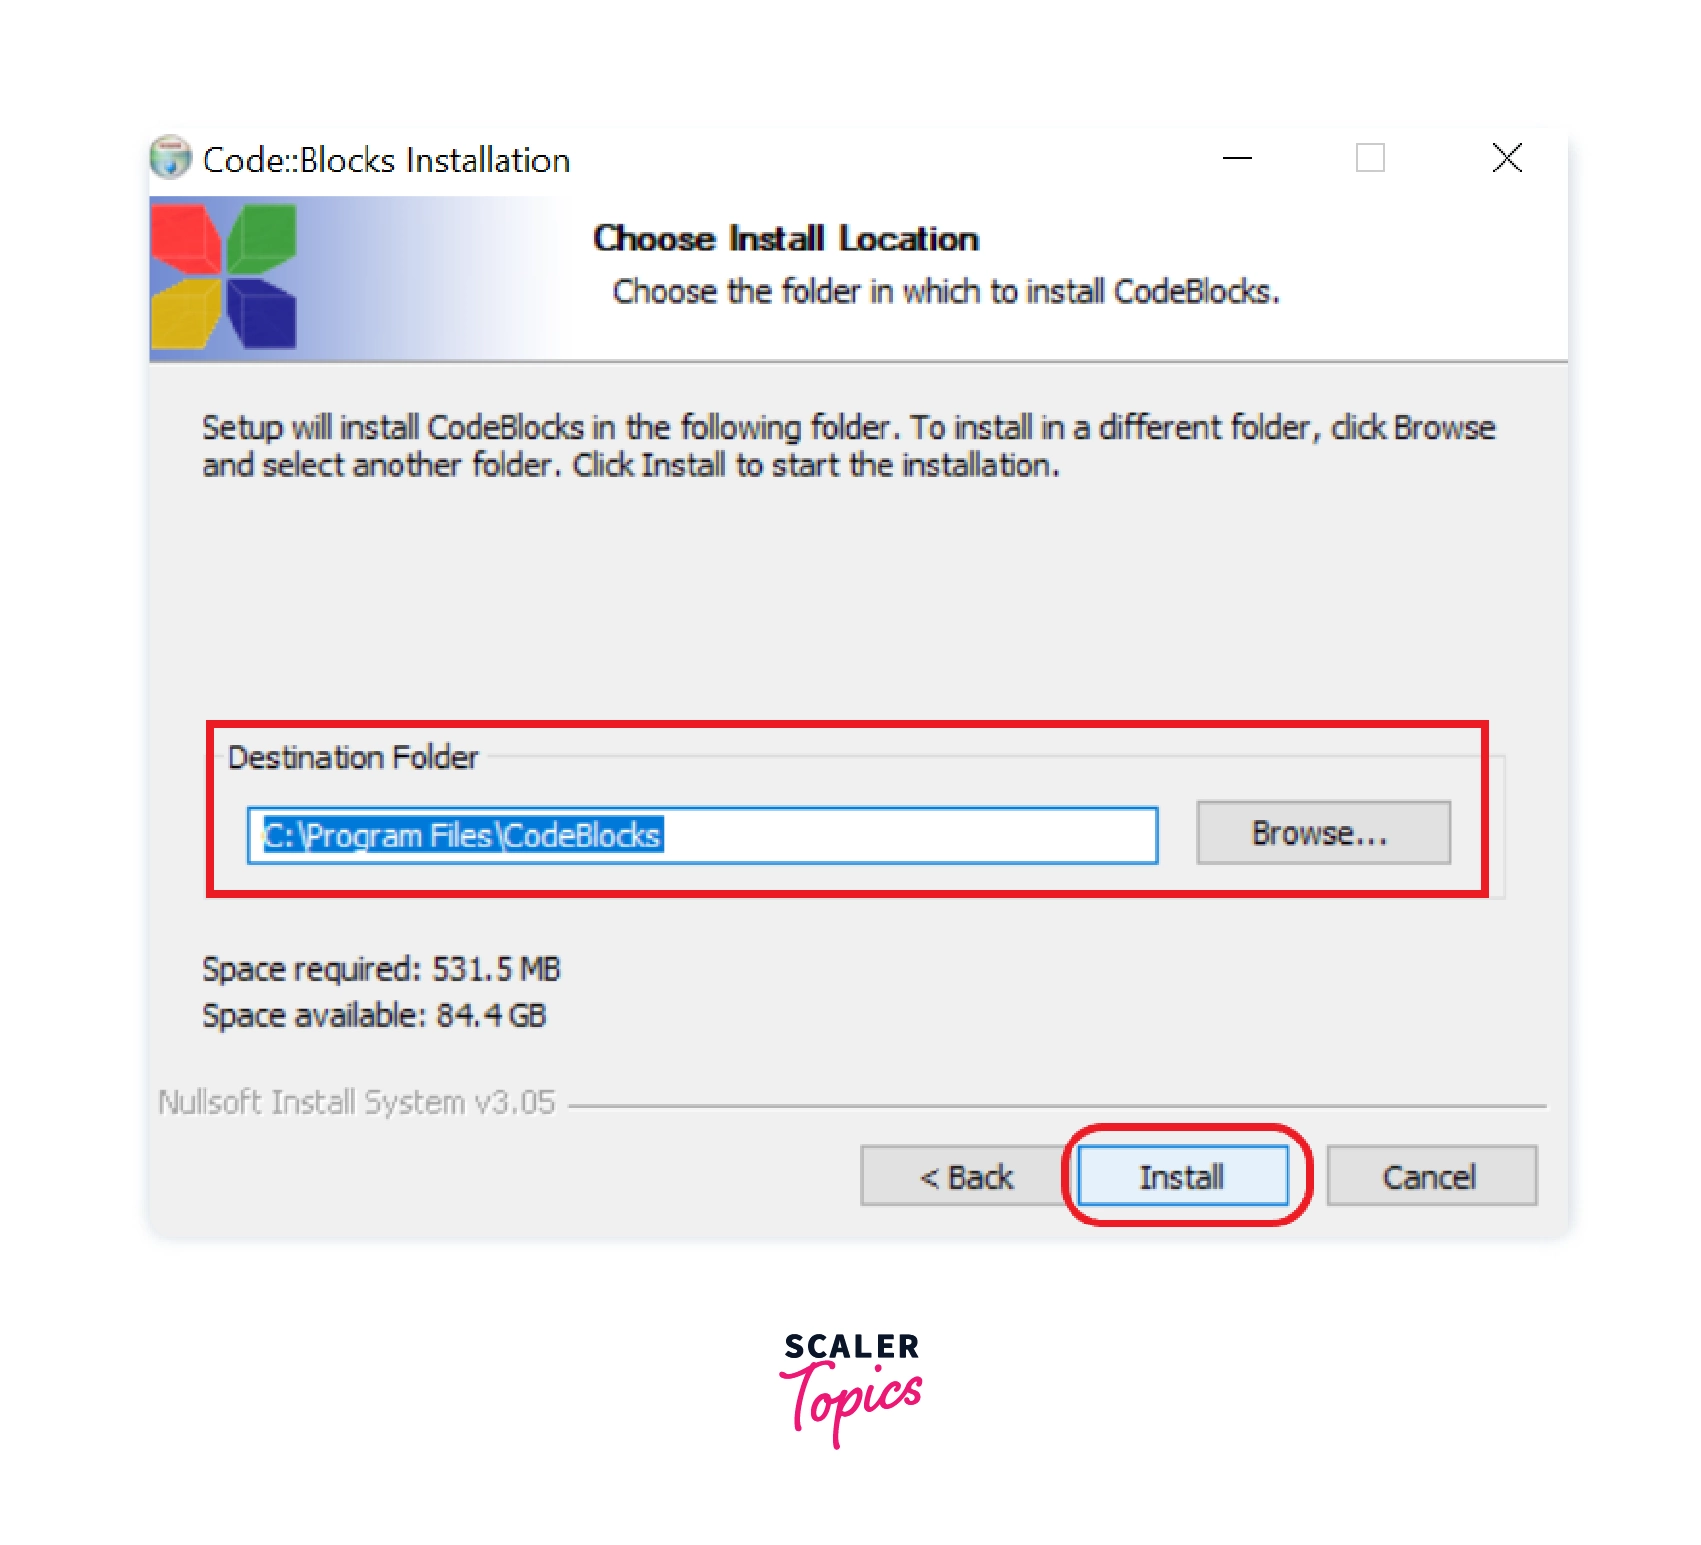
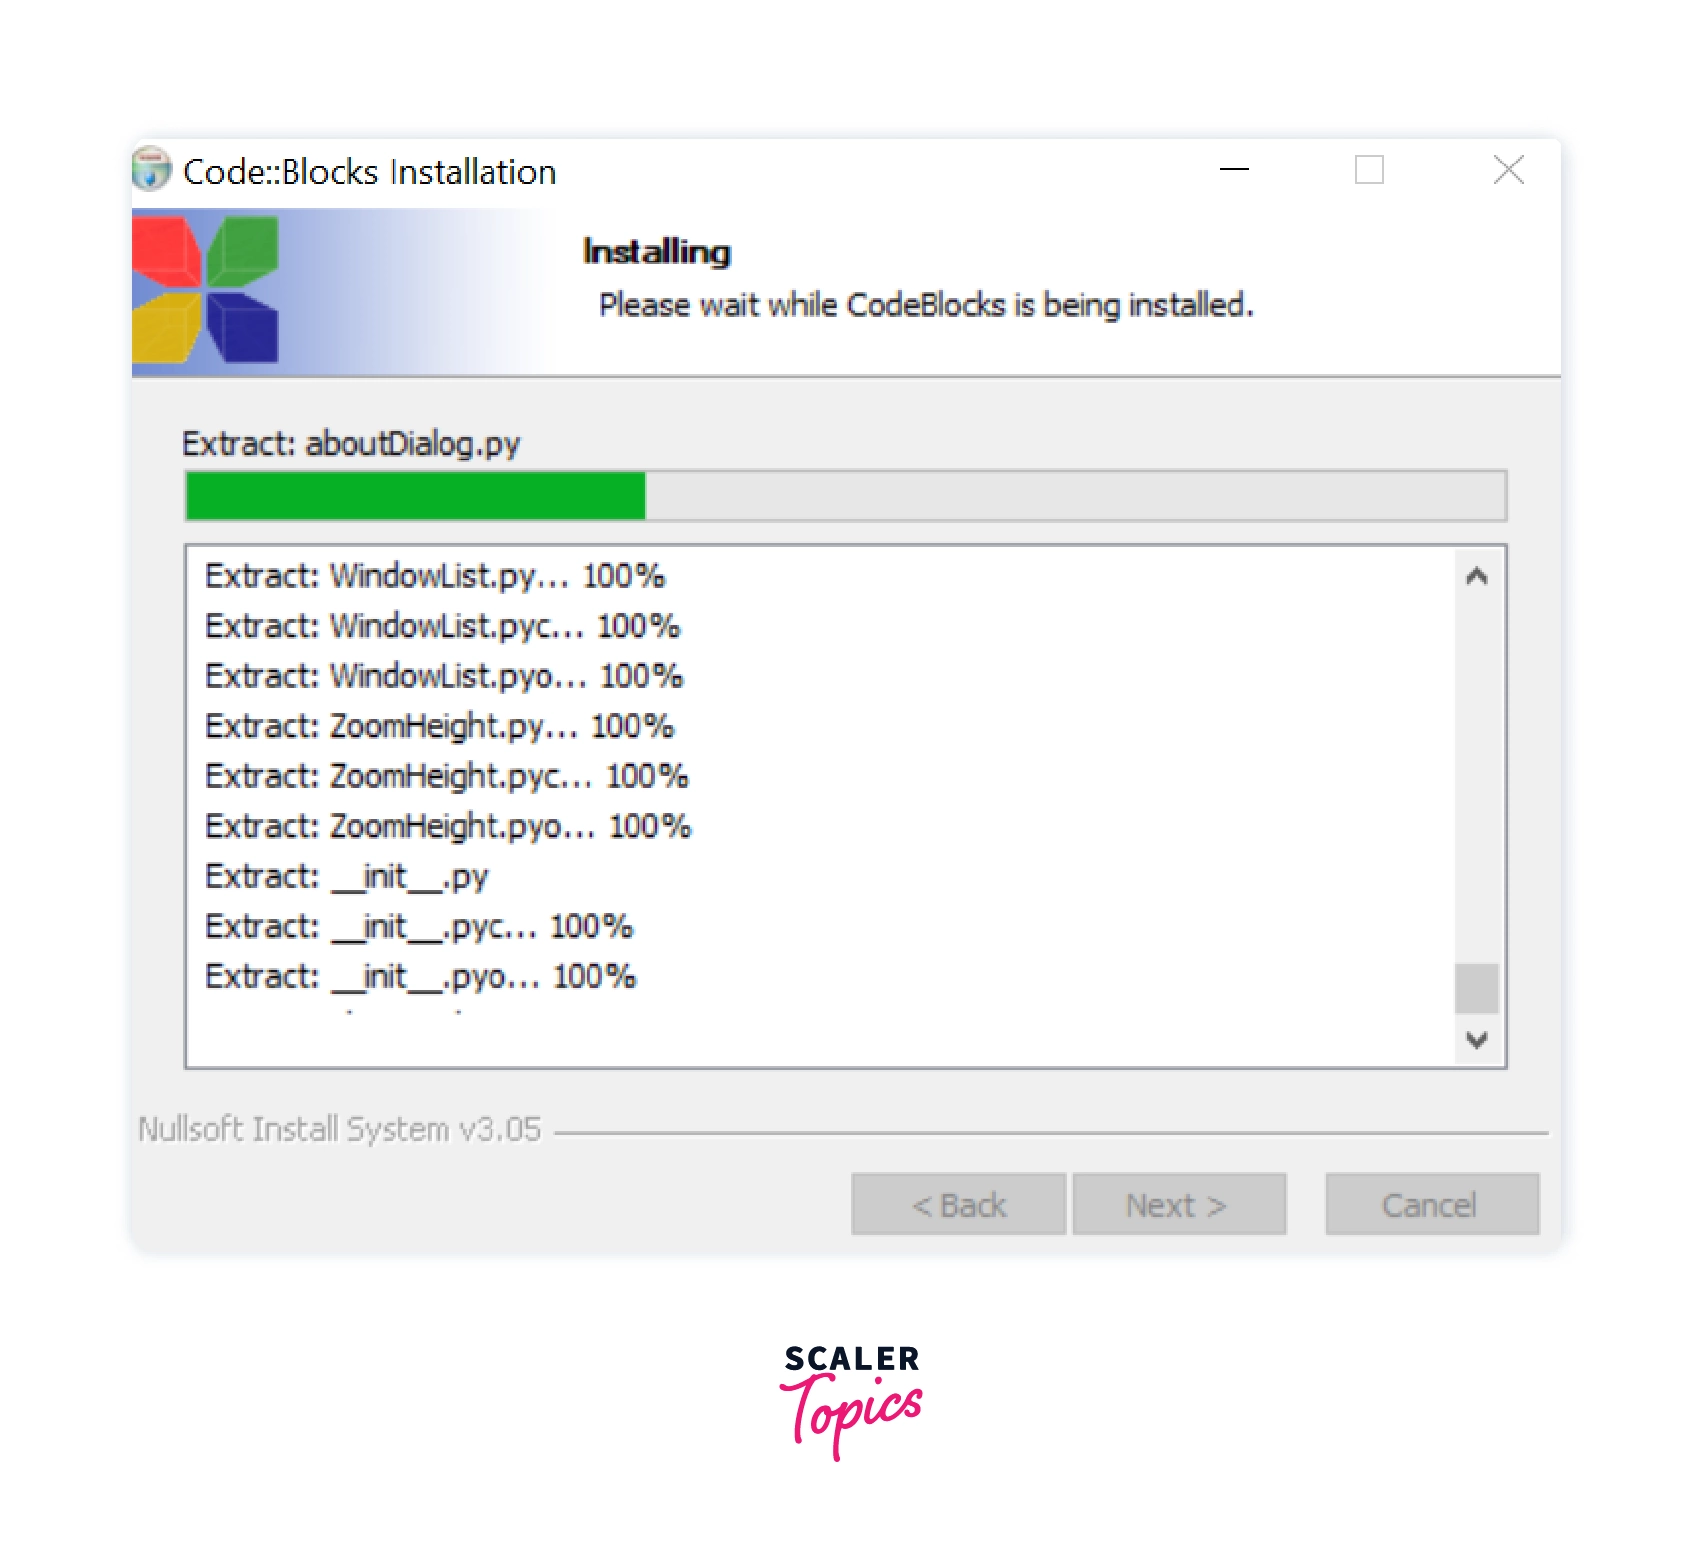
The installer will start to extract the files on the destination folder you chose in the previous step, and installation will begin.
Step 8: Installation complete.
The installation is completed successfully. Once the installation is finished, a pop message saying — Do you want to run Code::Blocks now? Will appear. You may click on the Yes button to start the Code::Blocks IDE.
Now make sure the IDE detects the C compiler for Windows. To do that, follow the steps below.
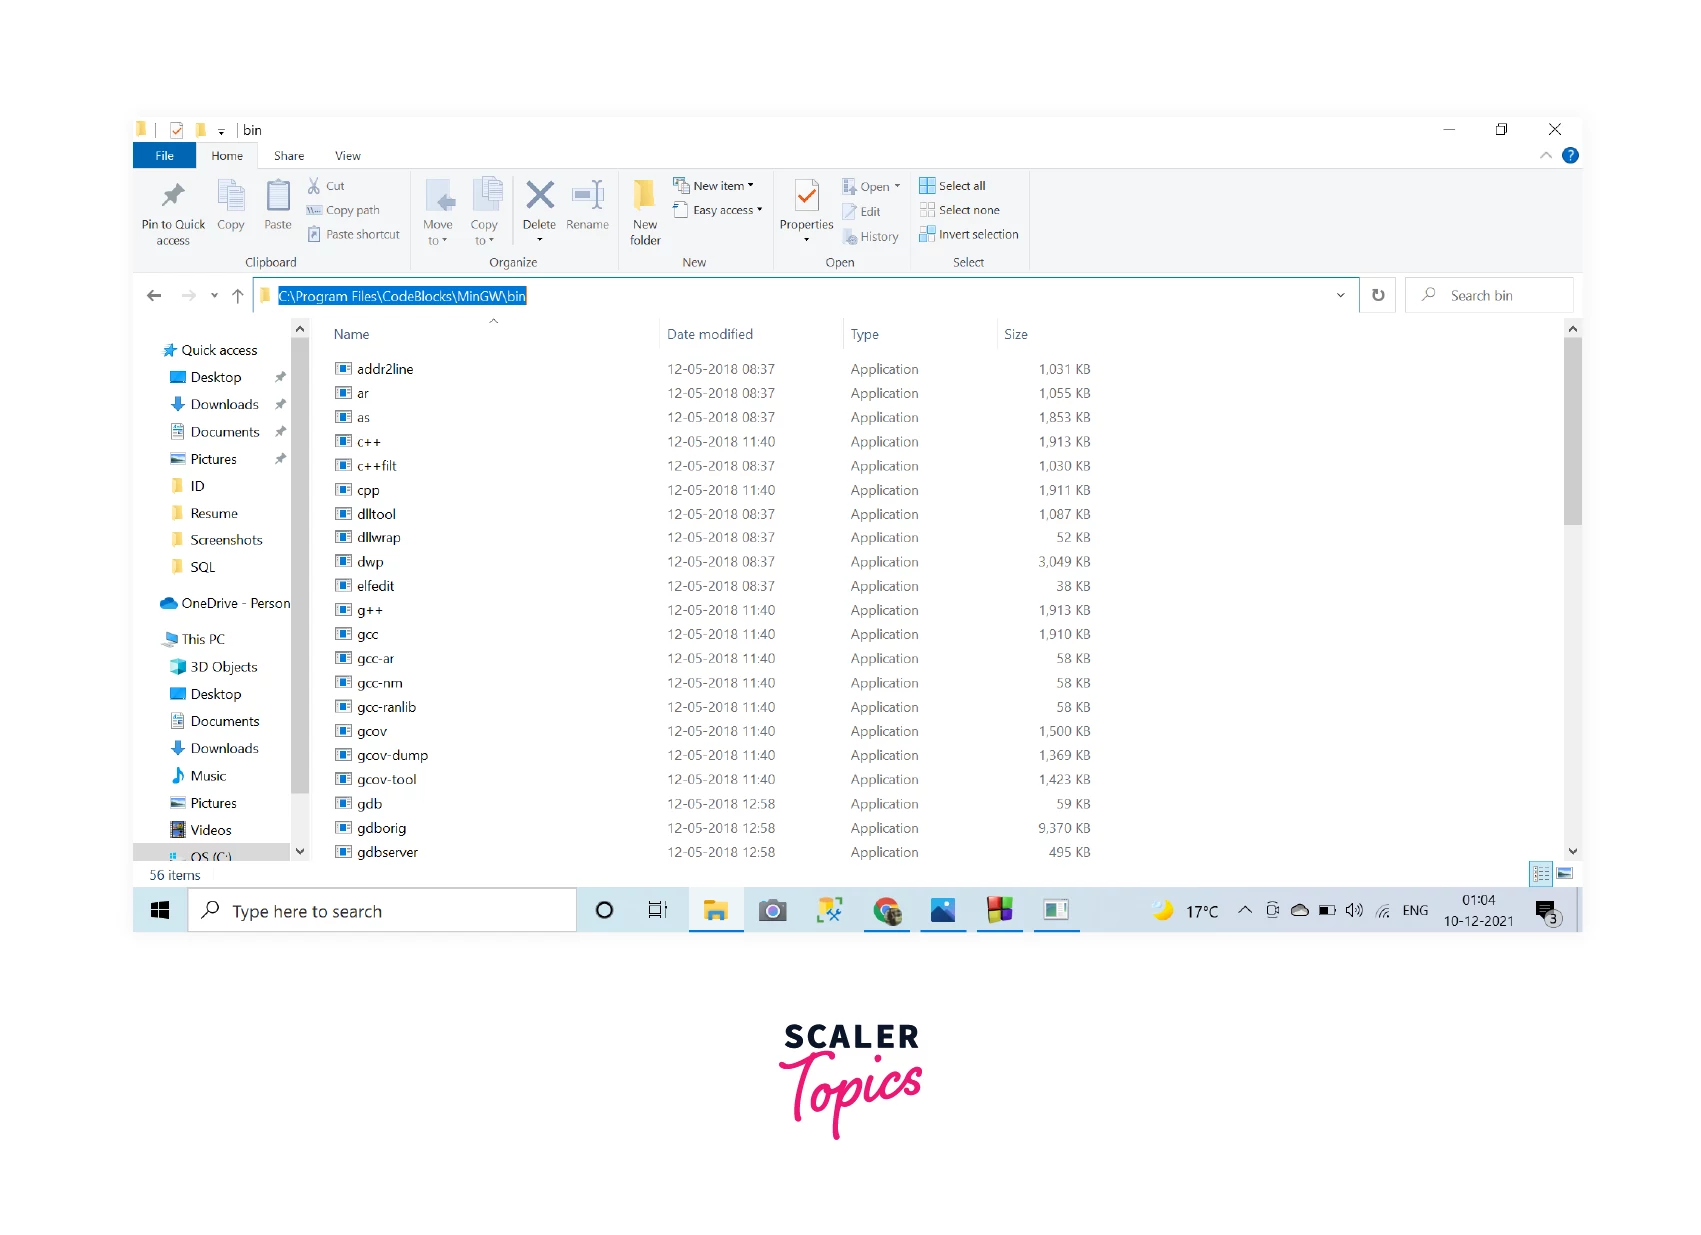
Step 9: Setting up MinGW to PATH.
Go to the Folder of the MinGW on your computer C:\Program Files\CodeBlocks\MinGw\bin.
The following folder will open on your computer. Just copy the path on the address bar.
Now refer to the steps mentioned in the Setting up PATH Variable in the previous section. After setting up the Environment path variable, proceed with the next steps.
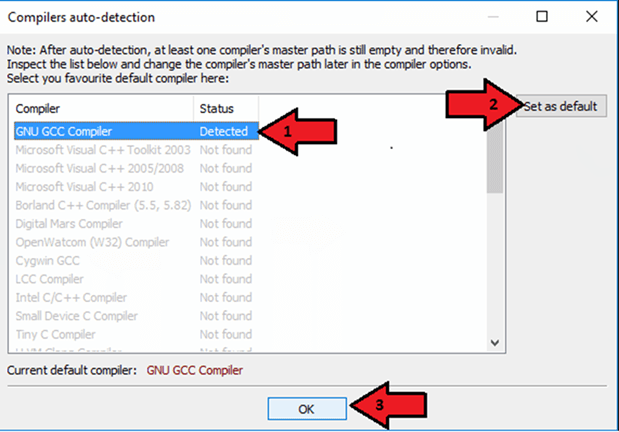
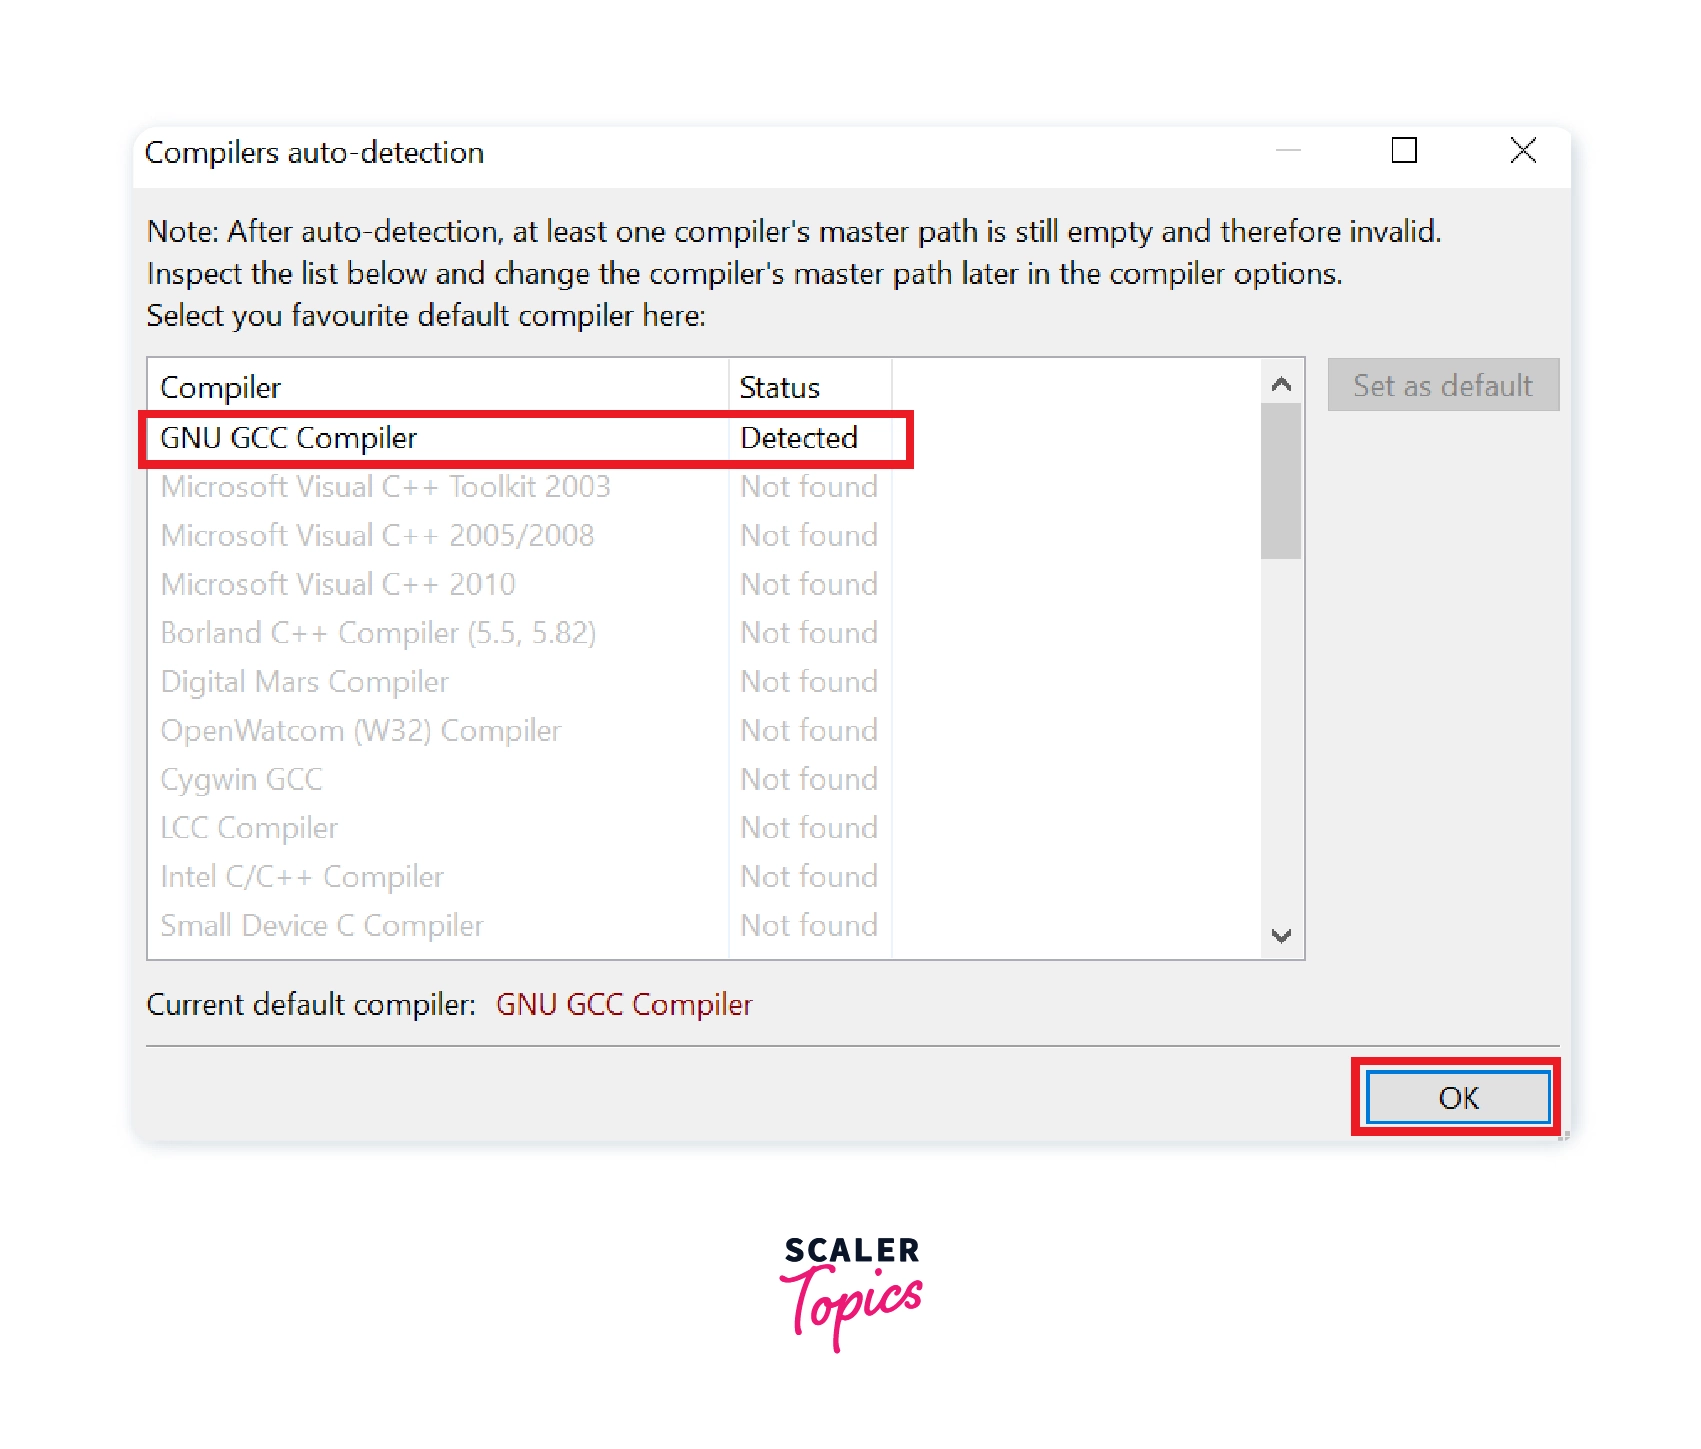
Step 10: Compiler auto-detection.
As soon as you open up the Code::Blocks IDE, the Compilers auto-detection window will appear with the GNU GCC compiler status shown as Detected.
Creating and Running a C Program in Code::Blocks.
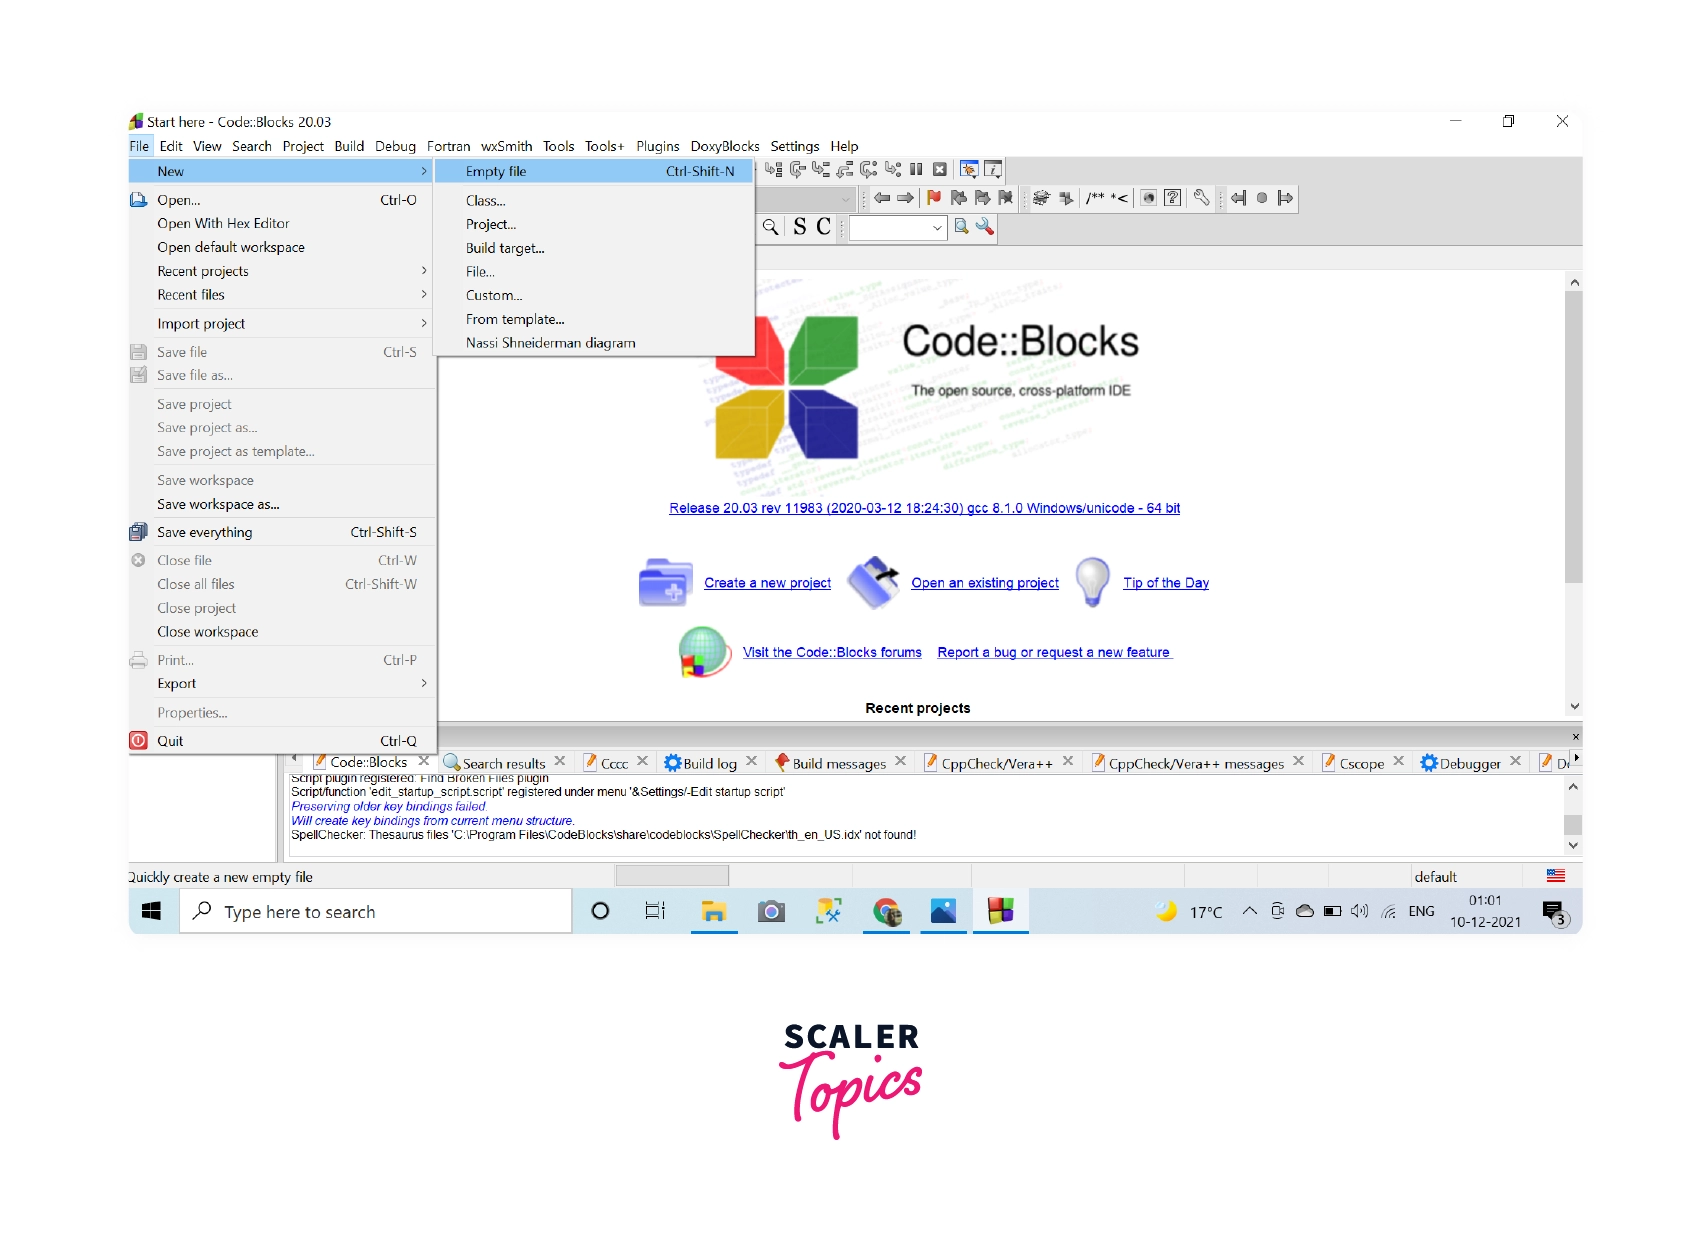
Step 1: Open a New File in Code::Blocks.
Select File>>New>>Empty File and click on it to check whether the IDE is working properly.

Step 2: Write a Hello World program in C.
Make a hello world program in C. Save it with the .c extension.

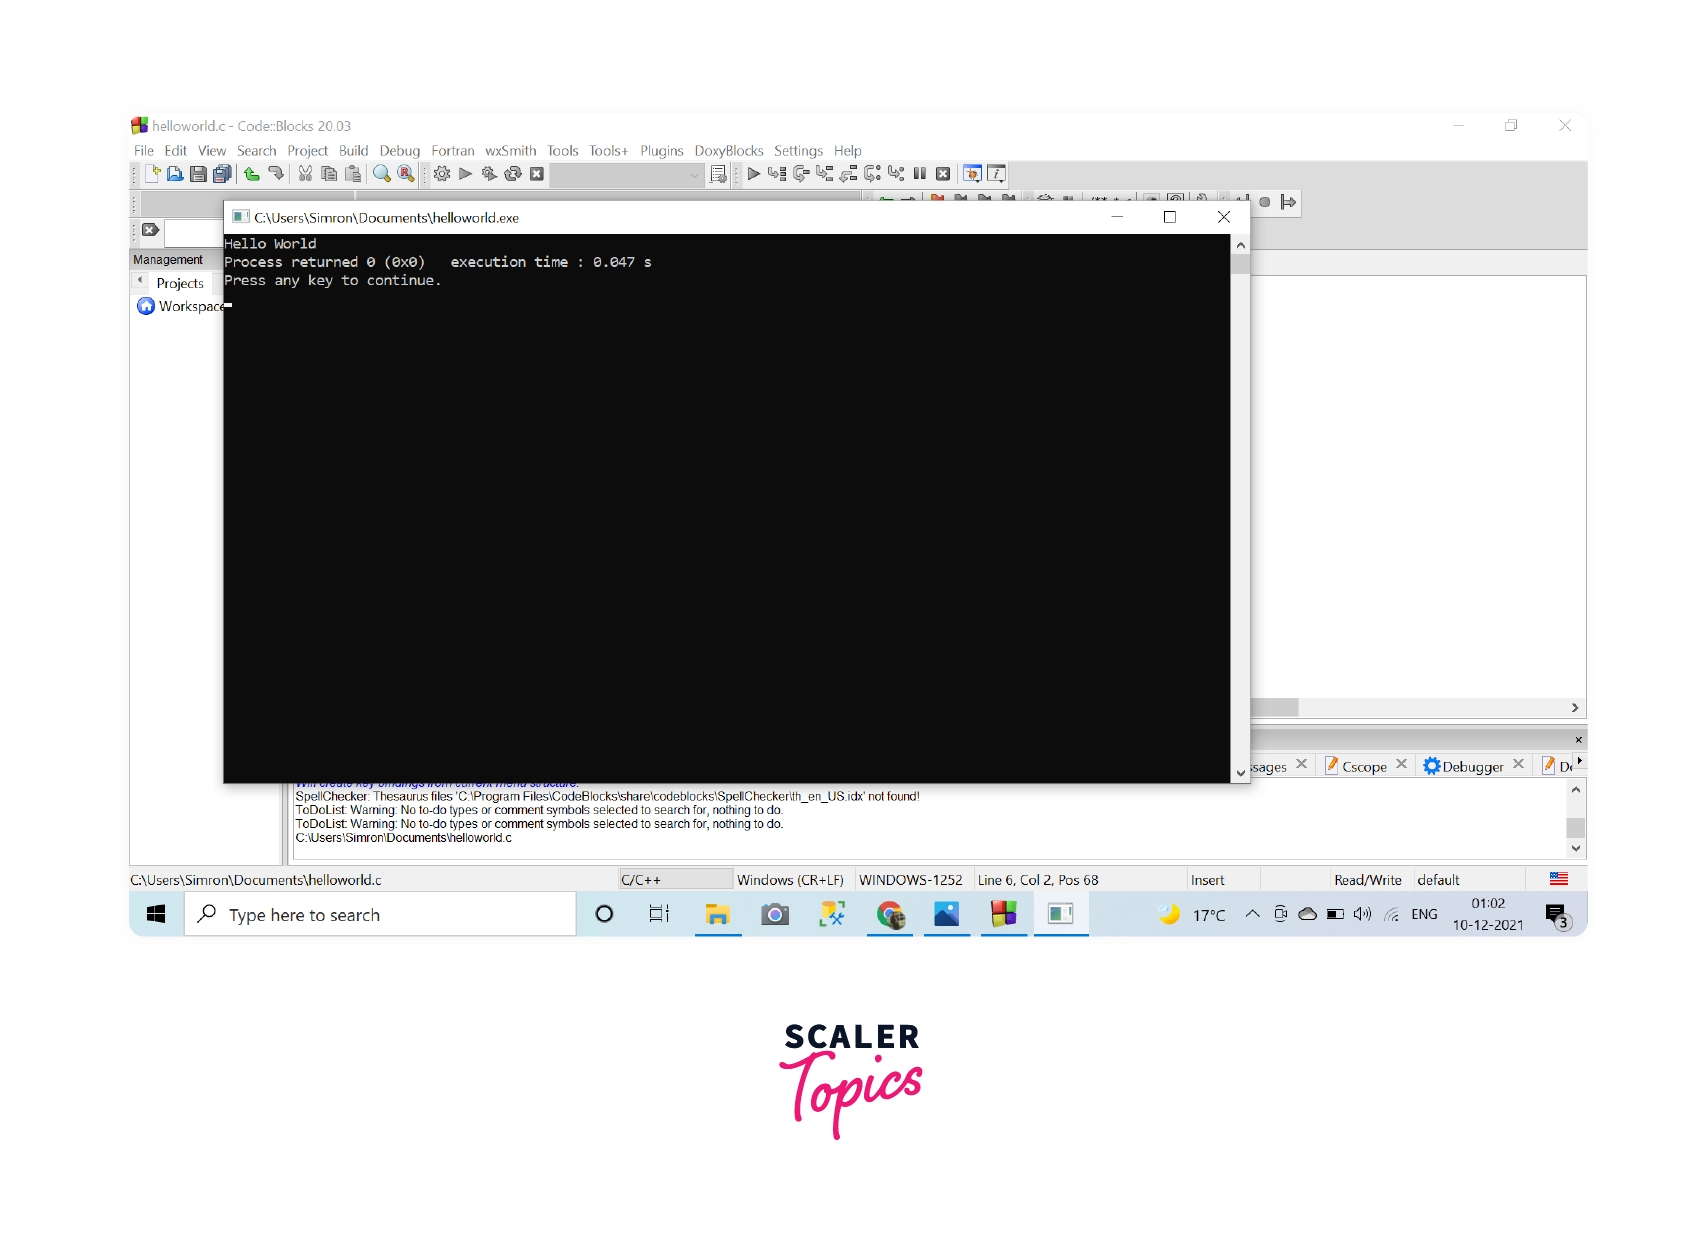
Step 3: Output of C Program.
Once you save, go to Build>>Run and the program will compile and run.
If the command prompt with hello world written on it appears on the screen below, then the code blocks have been successfully installed!
Conclusion
- The source code is compiled using a C compiler for Windows to be understood by the machine (computer).
- The C Compiler for Windows can be installed on a Windows system, first by only installing the compiler and second by installing a compiler with IDE as a plugin.
- The C/GCC is the compiler used by the C language.
- We have to set the path of the compiler in the Environment path variable so that it can be used in any directory.
- To use C Compiler, the program must be saved with .C extension.
See Also:
- Online C Compiler
- Installing C Compiler in Mac
- Difference Between Compiler and Interpreter
- Phases of Compiler

x64 C/C++ compiler for Windows using:
— gmp
— mpfr
— mpc
— isl
— cloog
— mingw-w64
— gcc
— seh
You need at least core2 command set support to run this application.
License
GNU General Public License version 3.0 (GPLv3), GNU Library or Lesser General Public License version 3.0 (LGPLv3)
Jobma’s cloud-based Video Interviewing solution increases your teams productivity, flexibility and creates a great candidate experience which will bring your hiring team and talent closer together by breaking down the barriers of time and location. Using Jobma you can setup Pre-recorded & Live Video Interviews. Our video interviewing increases your recruiter productivity and improves your candidate experience. Jobma offers free ATS Integrations and is available in 14 languages.
User Ratings
2.3
out of 5 stars
★★★★★
★★★★
★★★
★★
★
ease
1 of 5
2 of 5
3 of 5
4 of 5
5 of 5
1 / 5
features
1 of 5
2 of 5
3 of 5
4 of 5
5 of 5
1 / 5
design
1 of 5
2 of 5
3 of 5
4 of 5
5 of 5
1 / 5
support
1 of 5
2 of 5
3 of 5
4 of 5
5 of 5
1 / 5
User Reviews
- All
- ★★★★★
- ★★★★
- ★★★
- ★★
- ★
-
We use Windows because it’s not Linux (where you have to compile and build programs to make them work).
This product is NOT ready to run on Windows. I’m getting a message:
g++: fatal error: cannot execute ‘cc1plus’: CreateProcess: No such file or directory compilation terminated. -
I have just installed GCC 10.2 compiler in my windows 10.
I can Compile but, I can’t able to Run C++ code.
when I try to open application file( .exe) file of c++ code i get error(0xc000007b).
Please Help
Read more reviews >
How do I download GNU GCC compiler for Code::Blocks?
Go to http://www.codeblocks.org/downloads and click Binary Release. Choose the installer with GCC Compiler, e.g., codeblocks-17.12mingw-setup.exe which includes MinGW’s GNU GCC compiler download and GNU GDB debugger with Code::Blocks source files.
How do I download compiler Code::Blocks?
Visit codeblocks.org. Click Download from the menu, then click on download the binary release. Go to your operating platform section (e.g., Windows XP / Vista / 7 / 8. x / 10), then download the installer with GCC Compiler, e.g., codeblocks-17.12mingw-setup.exe or Click here to download.
What compiler does Code::Blocks use?
Compilers. Code::Blocks supports multiple compilers, including GCC, MinGW, Digital Mars, Microsoft Visual C++, Borland C++, LLVM Clang, Watcom, LCC and the Intel C++ compiler. Although the IDE was designed for the C++ language, there is some support for other languages, including Fortran and D.
How do I download Code::Blocks in Linux?
Installing CodeBlocks
- Go to codeblocks.org. Click Download from the menu.
- Then, go to your operating platform section (e.g. Mac OS X). Click on the link opposite to CodeBlocks-13.12-mac.
- Now extract the downloaded file and open a New Finder window.
How do I download gcc on Windows 10?
How to Install the Latest GCC on Windows
- Install Cygwin, which gives us a Unix-like environment running on Windows.
- Install a set of Cygwin packages required for building GCC.
- From within Cygwin, download the GCC source code, build and install it.
- Test the new GCC compiler in C++14 mode using the -std=c++14 option.
How do I fix GNU GCC compiler for code blocks?
On the Code::Blocks menu, go to “Settings”, next click on “Compiler and Debugger…”. This will open the “Compiler and debugger settings dialog”. Under “Selected compiler” select the name of the compiler you are using. For most of you it will be “GNU GCC Compiler”.
How do I download MinGW GCC?
MinGW
- Click MinGW. The following page will appear in your browser (from the SourceForge web site).
- Click the Download mingw-get-setup.exe(86.5 kB) link.
- Move this file to a more permanent location, so that you can install MinGW (and reinstall it later, if necessary).
- Start the Installation instructions directly below.
How do I add GNU compiler to Code::Blocks?
How do I enable compiler in Code::Blocks?
How do I install gcc compiler on Windows 10 64 bit?
- Install Cygwin. First, download and run either the 32- or 64-bit version of the Cygwin installer, depending on your version of Windows.
- Install Required Cygwin Packages. Next, you’ll need to add several packages to Cygwin.
- Download, Build and Install the Latest GCC.
- Test the New Compiler.
How do you install gcc in Windows using CMD?
Select all packages except ada, fortran and objc. Then use Installation>Apply Changes to get the install to proceed. For simple command line use, install MinGW, and add its bin directory to your Path. Then get a new CMD window to see that gcc is now available at the command line.
What is the full form of GCC compiler?
What is the full form of GCC. GCC: GNU Compiler Collection . GCC stands for GNU Compiler Collection . It is a compiler system supporting various Programming languages. It has played an important role in the growth of free software, as both a tool and an example.
How to install GCC on Ubuntu?
Start by updating the packages list: sudo apt update.
How do I install GCC compiler on Linux?
Go to http://www.codeblocks.org/downloads and click Binary Release.
What is GNU Compiler?
The GNU Compiler Collection (GCC) is a compiler system produced by the GNU Project supporting various programming languages.