Windows 10: Global Accounts process
Discus and support Global Accounts process in Windows 10 Software and Apps to solve the problem; Im running the latest version of windows 11. I have noticed a process called Global Accounts running via Task Manager and wanted to know exactly what…
Discussion in ‘Windows 10 Software and Apps’ started by HenryJoppa, Feb 16, 2022.
-
Global Accounts process
Im running the latest version of windows 11. I have noticed a process called Global Accounts running via Task Manager and wanted to know exactly what it is and how to it off.

-
Remove account
I suggest you backup your personalized files first before removing the account.
To delete an account, follow these steps:- Press WIN + X keys and click Command Prompt (Admin) from the menu.
- Type the following command and press Enter. Replace test with the name of your sister’s account. Code:
-
Boot Process
Hi,
Please suggest me a link that can explain the boot process step by step of …
- Windows 7,
- Windows 8.1,
- Windows 10,
- Windows Server 2008 R2 and
- Windows Server 2012 R2
With Regards
InTech
-
Global Accounts process
Edge Search Does Not Permit Change of Region
I got these suggestions from the Microsoft Community forum.No. 1 worked for me:
Thank you for posting the query on Microsoft Community. I am glad to assist you on this.
We have reproduce the issue here and we are able to access non-regional search for google using Microsoft Edge.
I would suggest you to try the below steps and check if it helps.
Step 1:
Clear browsing data option of Microsoft Edge and check if you face the issue. To do so perform the steps below.- Click on the More actions icon next to the feedback icon present on top right corner of the Project Spartan homepage.
- Select Settings and click on Choose what to clear.
- Check the boxes Browsing history, Cookies and saved website data and Cached data and files and click on Clear.
Step 2:
I suggest you to create a new user account and check if the issue occurs.- Go to Settings.
- Choose Accounts and then select Family and other users.
- Select add someone else on this PC.
- Enter a user name and hit next.
- Click on Finish.
- Sign out from the current Account and Log into the new account.
Step 3:
It could also happen because of network issue. I suggest you to try with different network connection and check if it helps.

Global Accounts process
-
Global Accounts process — Similar Threads — Global Accounts process
-
set global preferred gpu
in Windows 10 Ask Insider
set global preferred gpu: Hi,
I know it’s possible to set preferred GPU app by app, but can I set one globally? My intention is to set iGPU as default and I’ll just add «exception» apps that should run dGPU to save battery life. I’ve already set default gpu to igpu in nvidia control panel, but it… -
Global Accounts process
in Windows 10 Gaming
Global Accounts process: Im running the latest version of windows 11. I have noticed a process called Global Accounts running via Task Manager and wanted to know exactly what it is and how to it off…. -
Global Accounts in the Task Manager
in AntiVirus, Firewalls and System Security
Global Accounts in the Task Manager: In my Task Manager Global Accounts shows up and it is impossible to end the task. What is that? There is no information about Global Accounts on the internet. My email has been hacked and my pictures have been used for weird things. Someone puts my face on random people and… -
«Global» ping spikes again
in Windows 10 Gaming
«Global» ping spikes again: Hello. Some time ago I posted a question asking for help on my ping spikes. Well… I didn’t really solve them. It was mainly just a temporary fix.It seems that whenever I launch something like Discord, and more recently Firefox, it starts to happen. This is caused by many,… -
«Global» ping spikes again
in Windows 10 Network and Sharing
«Global» ping spikes again: Hello. Some time ago I posted a question asking for help on my ping spikes. Well… I didn’t really solve them. It was mainly just a temporary fix.It seems that whenever I launch something like Discord, and more recently Firefox, it starts to happen. This is caused by many,… -
disable a global shortcut
in Windows 10 Customization
disable a global shortcut: there is something strangeEverywhere at my Windows 10 when I press Shift Alt Ctrl F9 a dialog box opens saying «Select Replacement Image»
how can I disable that shortcut?…
-
is windows key global
in Windows 10 Updates and Activation
is windows key global: hello just wanted to ask is windows keys global , assume I order a windows activation key from USA but I live in Italy . so will the windows activation key work ?https://answers.microsoft.com/en-us/windows/forum/all/is-windows-key-global/ead7ab72-1fd0-402c-957c-9c8a5e2a8262
-
Remunerative global services
in AntiVirus, Firewalls and System Security
Remunerative global services: I was received an email saying I had purchased a new computer system for over $3000. I did not. I called the number and was told I was speaking with your representative. They said they had o run some diagnostics on my computer. I asked over and over if this was really… -
Global send keys
in Windows 10 Software and Apps
Global send keys: Good day, I am looking for global send keys for the «Windows logo key» like the following can be used to press the PrtScr button: «%({PRTSC})»Would you be able to assist?
Thank you….
Пользователи Windows снова отвлекаются на печально известную раздражающую службу global.iris в Windows 11.
Процесс, который появляется в диспетчере задач, даже если сама служба часто не влияет на систему, может быть очень надоедливой. Хуже всего то, что вы не можете обнаружить или отключить его из меню услуг.
Что вообще делает этот сервис? Вы должны отключить его, или он может безопасно работать в фоновом режиме? Давай выясним.
Что такое глобальная служба IRIS?
Пользователи ищут информацию о сервисе на известных платформах, таких как Reddit, поскольку информации о нем не хватает.
Все, что в настоящее время известно о global.iris, это то, что он является компонентом Windows Spotlight и отвечает за обои дня Bing, рекомендации экрана блокировки и другие вещи.
К сожалению, даже если бы вы захотели, вы не смогли бы отключить эту службу из-под Windows.
По словам пользователей Reddit, которые решили эту проблему, на данный момент лучший вариант — загрузить сторонний блокировщик службы, который позволит вам избавиться от этой бессмысленной службы.
Но когда дело доходит до стороннего ПО, всегда есть вероятность заражения и несанкционированного доступа к системным файлам. Мы также должны упомянуть, что Службы часто не потребляют достаточно ресурсов, чтобы существенно повлиять на производительность системы.
Вы можете загрузить стороннее средство отключения службы для удаления службы global.iris, если у вас есть проблема с компьютером, которая, как вы уверены, вызвана этой службой.
Вам лучше позволить сервису работать в фоновом режиме, если он не создает больших проблем.
Какие службы я могу отключить в Windows 11?
Вот список служб Windows 11, которые можно отключить без ущерба для производительности операционной системы.
- Служба выполнения диагностики
- Служба диагностической политики
- Хост службы диагностики
- Хост диагностической системы
- Клиент отслеживания распределенных ссылок
- Факс
- Служба геолокации
- Служба установки магазина Microsoft
- Брокер сетевых подключений
- Служба сетевого списка
- Осведомленность о сетевом расположении
- Автономные файлы
- Диспетчер очереди печати
- Служба уведомлений о системных событиях
- Служба сенсорной клавиатуры и панели рукописного ввода
- Журнал событий Windows
- Поиск Windows
- Время Windows
- Центр обновления Windows

Стоит отметить, что отключение некоторых из этих служб остановит автоматическое обновление Windows и ваших приложений.
Хотя это не одна из официальных служб Microsoft, она ведет себя как любая другая служба, поскольку не наносит вреда вашему компьютеру и не нарушает настройки конфиденциальности.
Этот сервис заботится только об обоях; у него нет доступа к личным данным или файлам Windows.
Противостояние гораздо большей угрозе, чем позволить сервису работать в фоновом режиме вашей операционной системы, — это попытка загрузить программу, чтобы остановить его.
Программное обеспечение для отключения будет запрашивать доступ к файлам Windows для отключения служб, но если вы предоставите ему это разрешение, оно получит неограниченный доступ к вашей операционной системе.
Выбор за вами, но мы советуем вам позволить файлу global.iris работать в фоновом режиме.
Содержание
- Способ 1: Изменение параметров UAC
- Способ 2: Редактирование реестра
- Способ 3: Консоль Виндовс 11
- Способ 4: Редактор групповой политики
- Способ 5: Winaero Tweaker
Способ 1: Изменение параметров UAC
Как и другие элементы обеспечения безопасности Виндовс, контроль учетных записей (UAC) в основном направлен на снижение воздействия на нее вредоносных программ. Запуск на компьютере приложений или процессов с низким уровнем доверия обычно сопровождается запросом на внесение ими изменений, а это, видимо, не всех устраивает. Компания Microsoft, по понятным причинам, не рекомендует трогать эту функцию, но способы отключить UAC все же оставила.
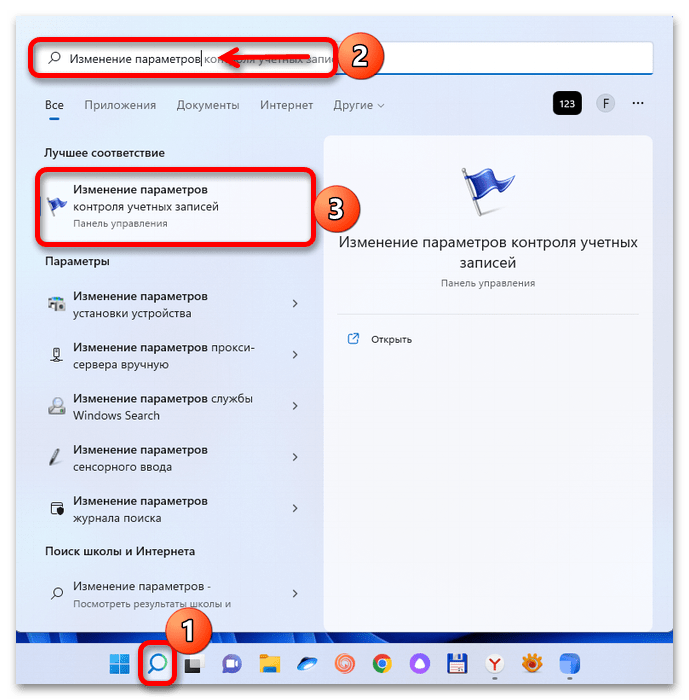
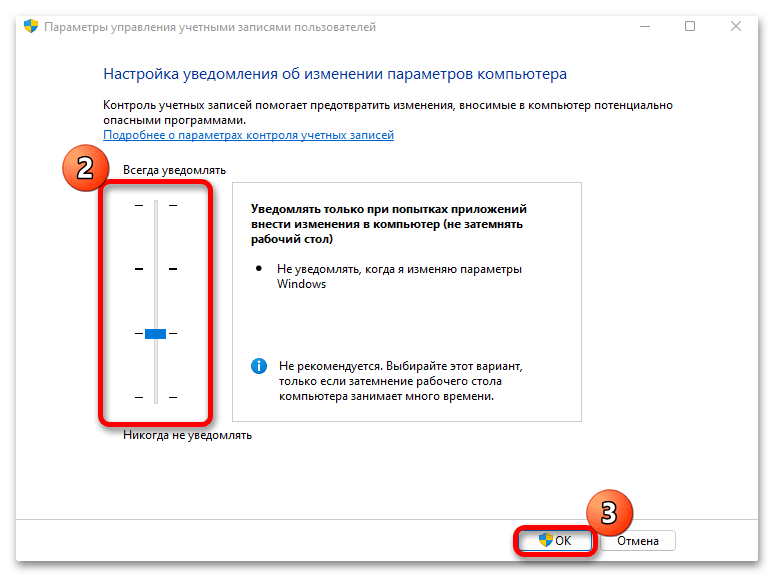
- С помощью поискового поля находим раздел «Изменение параметров контроля учетных записей» и перемещаемся туда.
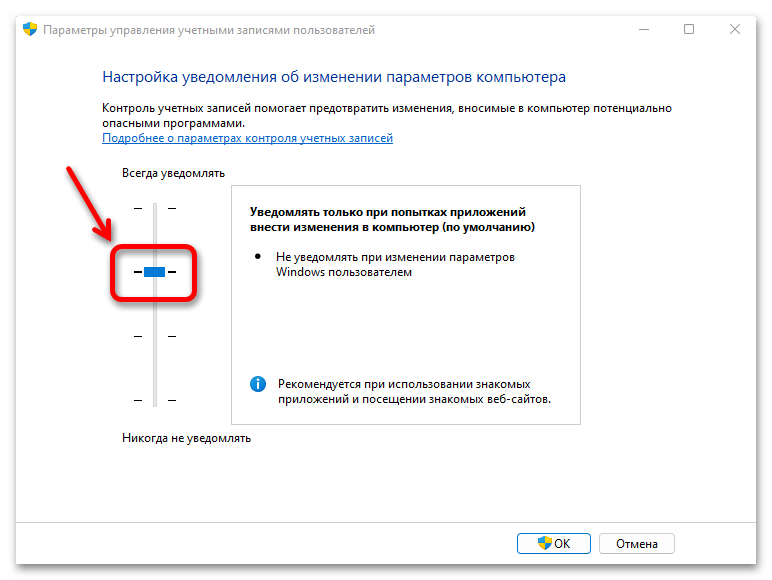
- Из четырех уровней безопасности здесь включен второй, т.е. запросы будут появляться во всех случаях, кроме тех, когда параметры Windows 11 меняет юзер.

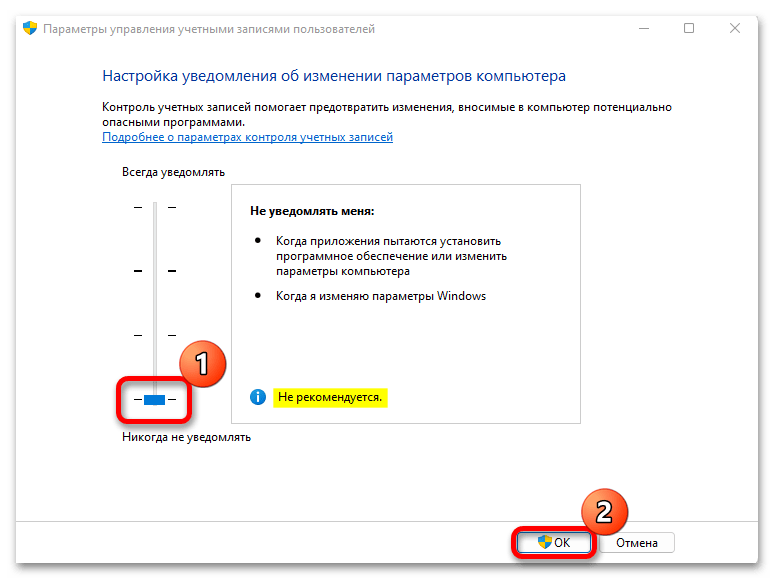
Во время получения запроса затемняется экран и, если это занимает много времени, можно спуститься на уровень ниже, чтобы просто получать уведомления. Нам же нужно полностью отключить UAC, поэтому переключаемся на первый уровень и подтверждаем действие.
Этот вариант удобен тем, что потом можно продолжить работу без перезагрузки компьютера, чего не скажешь о следующих способах.
Способ 2: Редактирование реестра
Если вы ищете другой метод, то отключить функцию можно в системном реестре.
- Жмем на клавиатуре «Windows+R» вызываем окно «Выполнить», вписываем код
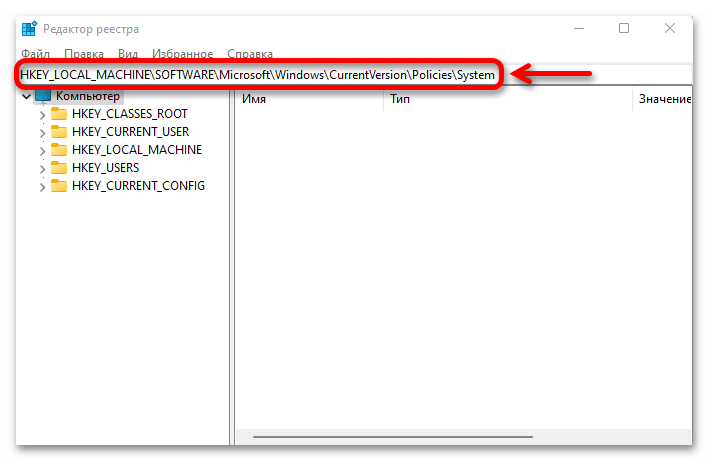
regeditи подтверждаем действие. - В адресное поле вставляем следующий путь и нажимаем «Enter».
HKEY_LOCAL_MACHINESOFTWAREMicrosoftWindowsCurrentVersionPoliciesSystem - Нам нужна запись «EnableLUA» в правой области редактора. Щелкаем по ней дважды,

в поле «Значение» ставим ноль, кликаем «OK» и перезагружаем ПК.


Способ 3: Консоль Виндовс 11
Редактировать реестр можно через консоль операционной системы. Для этого подойдет и «Командная строка», но в данном примере мы воспользуемся PowerShell.
- Кликаем меню «Пуск» правой кнопкой мышки и запускаем Windows PowerShell с повышенными правами. Если искомая оснастка отсутствует в списке, используем поиск.
- Копируем строку ниже и вставляем ее щелчком правой кнопки мышки в окно консоли, а когда операция завершится, перезагружаем устройство.
reg ADD HKLMSOFTWAREMicrosoftWindowsCurrentVersionPoliciesSystem /v EnableLUA /t REG_DWORD /d 0 /f - Чтобы затем включить UAC, делаем то же самое, но в строке меняем «0» на «1».


Используя вышеуказанный код, можно создать ярлыки на включение и отключение UAC. Это, конечно, немного ускорит процесс, но перезагружать систему все равно придется.

- На Рабочем столе создаем ярлык,

копируем и вставляем строку со значением ноль,

придумываем имя и сохраняем настройки.
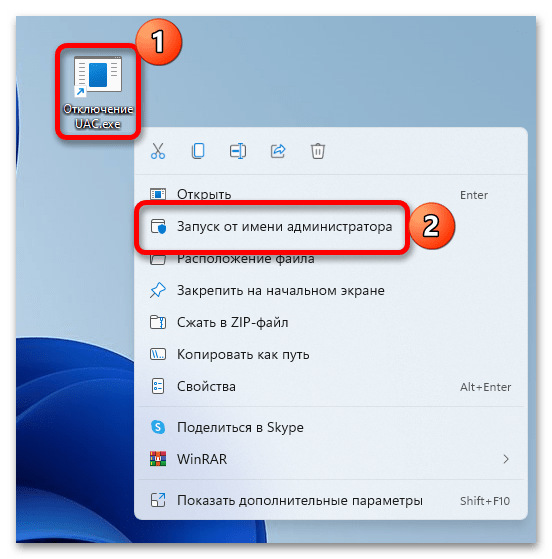
- Теперь открываем контекстное меню ярлыка и запускаем его с правами администратора. Останется только перезагрузить компьютер.
- Для создания второго ярлыка повторяем все действия, используя строку со значением один.
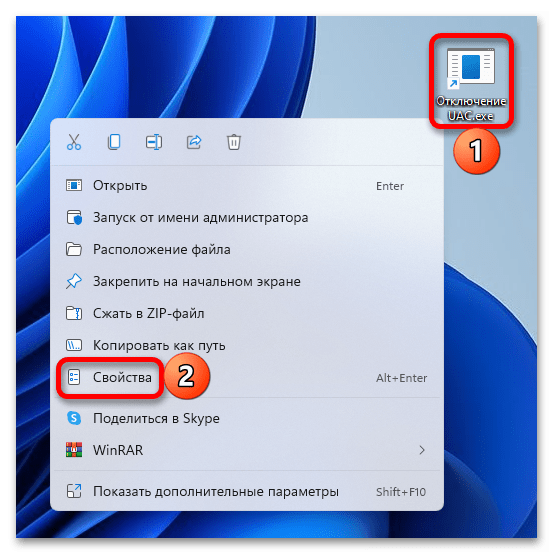
- С виду ярлыки будут одинаковые, поэтому лучше поменять значок хотя бы одного, чтобы было удобнее их различать. Открываем «Свойства» ярлыка,

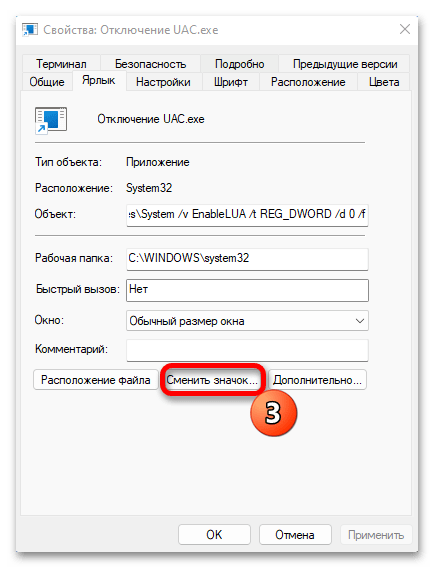
жмем «Сменить значок»,

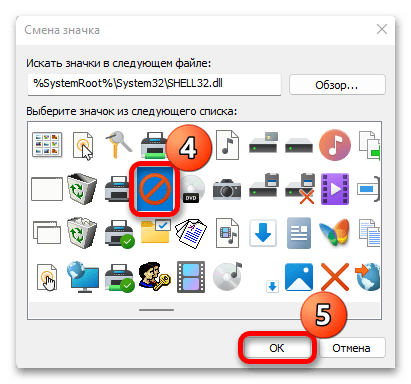
выбираем подходящий из списка доступных

и применяем изменения.


Способ 4: Редактор групповой политики
Этот метод подойдет, только если на компьютере установлена Windows 11 версии «Pro» и выше.
- С помощью утилиты
gpedit.mscвызываем «Редактор групповой политики». - Выбираем папку «Конфигурация компьютера», а затем двойными кликами по очереди открываем все ее подразделы как показано на скриншоте ниже.
- Дважды щелкаем «Контроль учетных записей: все администраторы»,

отключаем опцию, применяем изменения и перезапускаем устройство.

Способ 5: Winaero Tweaker
Существуют сторонние решения, которые помогут выполнить стоящую перед нами задачу, и об одном из них мы собираемся рассказать. Winaero Tweaker – бесплатная программа с широкой функциональностью. Например, она дает возможность настраивать параметры, которые Microsoft тщательно скрывает, а также повышает эффективность некоторых системных инструментов путем расширения контекстного меню, опций, команд и т.д.
Скачать Winaero Tweaker с официального сайта
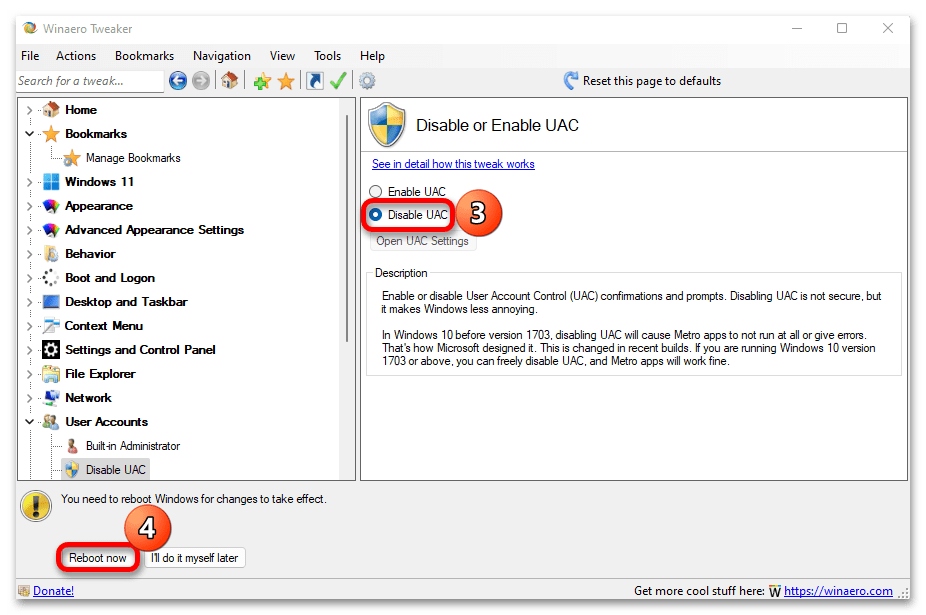
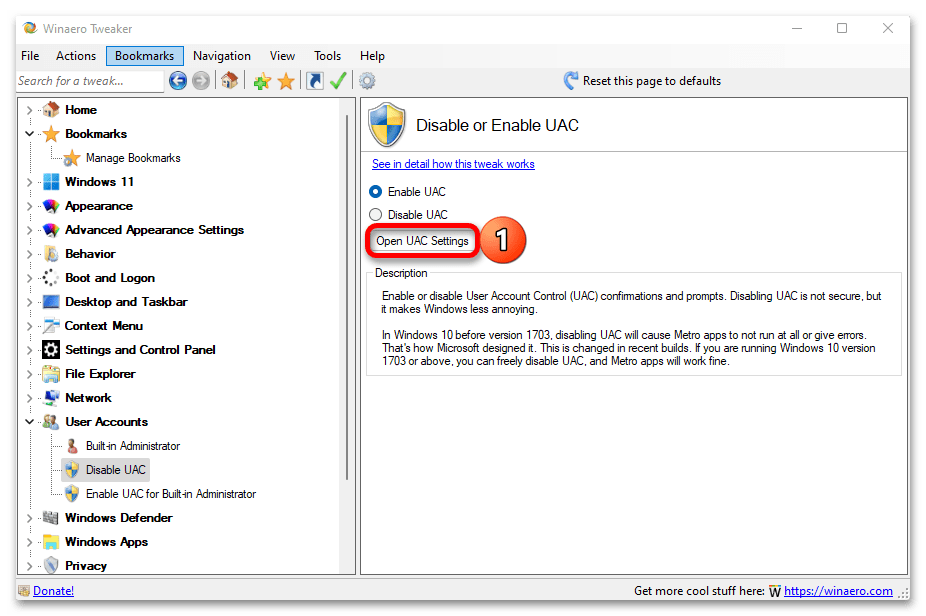
- Запускаем софт, находим и выделяем раздел «User Accounts», дважды кликаем по «Disable UAC»,

отключаем контроль учетных записей и подтверждаем изменения перезагрузкой системы.
- В этом же окне можно открыть настройки UAC,

чтобы отключить функцию без необходимости перезагружать Виндовс 11.

Еще статьи по данной теме:
Помогла ли Вам статья?
Posted by2 years ago
Archived
![]()
I’m currently using Windows 11 build 22000.65, and I just noticed today that there is a processed named «Global.Accounts» and during startup there is a processed that popsup few seconds «Global.IrisService». I couldnt find any information online. Any thoughts?
This thread is archived
New comments cannot be posted and votes cannot be cast
![]()
level 1
wondering this myself, I haven’t found anything else other than your post
level 2
I’m guessing its another piece of MS … stuff.
level 1
same and idk how to remove it or disable it as well
level 1
Same here. I also tried to end task on it and it did nothing. Has anyone found anything on it? It wasn’t in my tasks yesterday.
About Community

Welcome to the largest community for Windows 11, Microsoft’s latest computer operating system!
This is not a tech support subreddit, use r/WindowsHelp or r/TechSupport to get help with your PC
18 Февраля 2022 15:53
18 Фев 2022 15:53
|
Windows 11 не сможет установиться на компьютер, если пользователь откажется регистрировать учетную запись Microsoft. Локальные учетки уйдут в прошлое, хотя в macOS и других альтернативных системах они по-прежнему используются. Все началось с базовой Windows 11 Home, и теперь Microsoft намерена ввести данное ограничение в Pro-версию своей системы.
Microsoft закручивает гайки
Корпорация Microsoft заставит всех пользователей регистрировать учетную запись на своем портале, если они хотят установить Windows 11 на свой компьютер. Как пишет профильный портал Windows Central, без этого система попросту не установится на ПК – процесс будет прерван.
Это напрямую касается желающих работать в среде Windows 11 Pro. А чтобы была возможность создать учетную запись или авторизоваться в ней, нужно активное соединение с интернетом. Это означает, использование локальной учетной запись при установке системы больше не сработает. Отсутствие выхода в интернет тоже лишит пользователя возможности поработать в свежеустановленной системе.
Нововведение реализовано в сборке с индексом 22557, появившемся в свободном доступе для участников программы бета-тестирования. Существует вероятность, что совсем скоро оно может стать частью стабильной версии операционной системы. Единственным вариантом «спасения» может стать установка ранней версии ОС, где столь жесткого ограничения нет.
Home-версия не спасет
Windows 11 вышла в октябре 2021 г. и поставляется в нескольких редакциях, лишь три из которых заточены под обычных пользователей. Это Pro, Pro for Workstations и Home. Оставшиеся предназначены для корпораций, устройств интернета вещей, образовательных учреждений и совсем дешевых компьютеров самого начального уровня (Windows 11 SE).
Возможно, хакеры смогут найти решение данной проблемы
Попытка сбежать от новых требований Microsoft и не создавать ее учетную запись может заставить пользователя отказаться от Pro-версии операционной системы в пользу базовой Home. Однако тут его будет ждать подвох.
На самом деле, обязательное создание или активация учетки Microsoft присутствовало в составе Windows 11 Home сразу после релиза. То есть те, кому нужен был именно локальный пользовательский профиль, были вынуждены или покупать Pro-версию, или прибегать к более популярным в России решениям, а также искать способы обхода ограничений в самой системе. Поначалу они действительно присутствовали в ней, но Microsoft довольно быстро от них избавилась.
Весьма непопулярное решение
Microsoft – пока что единственная компания – разработчик настольных ОС, желающая лишить пользователя возможности работать в локальной учетной записи. Ее прямые конкуренты не спешат следовать ее примеру.
Как в VK создали корпоративный суперапп для 10 тысяч сотрудников
Цифровизация

Так, компания Apple по-прежнему разрешает всем, кто купил ее MacBook, Mac Pro или любой другой Mac работать в локальной учетке без каких-либо жестких ограничений. Профиль создается прямо на этапе установки системы.
Дистрибутивы Linux в большей части тоже не требуют от пользователей отказаться от локальных профилей. В Chrome OS реализована возможность активации гостевой учетной записи, и эта функция могла перекочевать и в Chrome OS Flex. Это особая версия системы Google, которую можно установить на любой Windows-компьютер, выпущенный за последние 15 лет. Анонс ОС состоялся в феврале 2022 г.
В январе 2022 г. доля всех систем Windows на мировом рынке составляла 75,5% (данные StatCounter). Среди них наибольшей популярностью пользовалась Windows 10 – 81,15% глобального рынка.
Второе место занимала Windows 7 (11,92%), поддержку которой Microsoft свернула в январе 2020 г. За ней следовала Windows 8.1 (2,93%), а новая Windows 11 находилась на четвертой строчке с крошечной долей 2,6%.
Электронная подпись для бизнеса: как получить ее быстрее в 2023 году
Документооборот

Пока неизвестно, как новые ограничения для пользователей, которые готовит Microsoft, скажутся на росте популярности Windows 11. Обновления для Windows 10 будут выходить до середины октября 2025 г., то есть еще три с половиной года, и для многих пользователей закручивание гаек со стороны Microsoft может оказаться поводом повременить с переходом на новую платформу. Не исключено, что многие из них захотят попробовать экзотику в виде macOS или даже Linux.
- Подобрать оптимальный виртуальный сервер VPS/VDS на ИТ-маркетплейсе Market.CNews
Microsoft has released the stable version of Windows 11 for all users. The users with Windows 10 Operating system and compatible hardware can upgrade to Windows 11 for free. Soon the PC companies will release pre-loaded Windows 11 computers. Windows 11 operating system comes with a new look along with many new features. Because Windows 11 has a new UI, some users may find it difficult to understand how to personalize their PC using the Windows 11 Settings app. In this post, we will explain Accounts Settings in Windows 11.
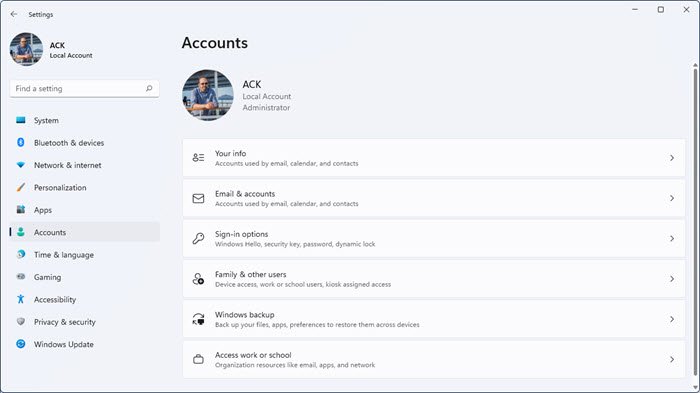
To access the Accounts settings in Windows 11, right-click on the Start Menu and select Settings. Now, in the Settings app, select the Accounts category from the left pane. This will open the Accounts page in Windows 11 Settings app, where you can see your account info, add or delete users to and from your system, change sign-in options, etc. On the Accounts page, the following sub-categories are available:
- Your info
- Emal & Accounts
- Sign-in options
- Family & other users
- Windows backup
- Access work or school
Clicking on each of these sub-categories will open further options to customize your account settings. We will describe each of these sub-categories in detail.
Let’s start.
1] Your info
As the name implies, you can view and manage your account info here. You can add, remove, or change your profile pic. For this, click on the Browse files button next to the Choose a file tab and select an image from your computer hard drive.

You can also upload your image by capturing it via your laptop’s camera or webcam. But make sure that you have granted access to your webcam or laptop’s camera. To check this, open the Privacy & Security settings and click on the Camera tab under the App permissions section. Now, turn on the button next to the Camera app.
Windows 11 also has some default PNG image files stored in the C directory. You can also replace your profile pic with these default PNG image files.
If you don’t want Windows to sign in to all Microsoft apps automatically, you can disable this feature by clicking on the respective link under the Account settings section on the same page.
The Related settings section lets you manage your user account online. When you click on that tab, Windows will open your Microsoft account in your web browser, where you have to sign in by using your account details.
2] Email & Accounts

This section shows all your Microsoft accounts that you have added to your device. Here, you can also add a new account that is used by email, calendar, and contacts. That account can be a Microsoft or a non-Microsoft account, like Office 365, Google, Yahoo, iCloud, etc. If you want to remove these accounts, simply click on the account to expand it, and then click on the Manage button. This will open a pop-up window in which you have to click on the Delete account from this device option.

In the Accounts used by other apps section, you can add a Microsoft account and a work or school account. Like the Your info settings page, the Email & Accounts page also lets you manage your Microsoft account online. For this, click on your Microsoft account to expand it, and then click on the Manage button.
3] Sign-in Options
As the name implies, here you can set up different sign-in opinions for your Windows 11 PC. Windows 11 offers the following six different types of sign-in options:
- Facial recognition (Windows Hello)
- Fingerprint recognition (Windows Hello)
- PIN (Windows Hello)
- Security key
- Password
- Picture password

To set up Facial recognition and Fingerprint recognition, your device should have a compatible camera and fingerprint scanner. Windows Hello PIN is a four-digit numeric code that you can use as one of the sign-in options.
You can also create a Security Key to sign in to Windows 11 apps. A Security Key is a physical device that you can use to sign in instead of your username and password. To set up a Security Key on Windows 11, simply click on it and then click on the Manage button. After that, Windows will ask you to insert a USB device. Insert your pen drive and follow the on-screen instructions.
Similarly, you can create a password for signing into your computer. After creating a password, you have to use it on the login screen. If you want to change your password, click on the Password tab to expand it and then click on the Change button. Password is the most secure way to log into a Windows 11 computer because a password lets you use different combinations of letters, numbers, and special characters.
Windows 11 also offers one more way to sign in, Picture password. In a Picture password, you can use any picture and create gestures on it.

If you scroll down the Sign-in options page in Windows 11 Accounts Settings, you will see the Additional Settings section. Here, you can set up a Dynamic Lock on your system. The Dynamic Lock is a useful feature in Windows 11 that works when you connect your smartphone with your computer via Bluetooth. When you turn off your Bluetooth or your computer goes out of the Bluetooth range of your smartphone, it will lock itself. In addition to this, you can also select whether or not you want to see the login screen every time you wake up your computer from sleep.
4] Family & other users
If you have a shared computer, this sub-category in Windows 11 Account Settings lets you create a separate user profile. You can create a separate profile for your family members and other users. To use this feature, you have to sign in with your administrator account.
You can create different types of user accounts in Windows 11 and each of these accounts is different from one another in some features. Windows 11 stores the data of each user’s account in a separate folder in the C directory. No user can access the other user’s folder in the C directory except the Administrator.
To add a family member, click on the Add account button under the Your family section. After that, you can create a new account for your family member. If your family member already has an Outlook account, you need not create a new one for him/her. Simply enter his Outlook email address and click Next. After that, he/she will receive an invitation link on his/her email ID. When he/she accepts the invitation, his/her account will be added to your computer automatically under the Your Family section.

You can manage your family member’s account settings by clicking on the Manage family settings online or remove an account button. After that, Windows will open your Microsoft account on the web browser, where you have to sign in using your account details. After signing into your account online, you can add or remove restrictions to your family member’s account, like screen time limit, content filters, etc. To remove a member from your Family group, click on the three vertical dots next to the name of your family member and select Remove from family group. After removing a person from your family group online, his/her profile will be removed from your computer automatically.

In the Other users section, you can add those persons who are not your family members. Simply click on the Add account button and enter the email address of that person. Or you can create a new account by clicking on the I don’t have this person sign-in information link.

5] Windows backup

Here, you can back up your files and folders by syncing your OneDrive account. Windows 11 also remembers your passwords, language preferences, and other settings. By default, this setting is enabled, but if you want, you can turn it off in the Windows backup category of your account settings.
6] Access work or school
Here, you can connect your work or school account to your Windows 11 computer. Simply click on the Connect button and then enter your work or school account information. If you are a Windows 11 Pro user, you can create a new school or work account.

The Related Settings section of the Access work or school account setting is for IT administrators. Here, the IT administrators can export the management log files, add or remove the provisioning package, etc. By adding the provisioning packages, IT administrators can easily configure the users’ devices without imaging. By doing this, they can quickly apply the configuration settings to the target devices. This setting is helpful for small-scale to medium-scale businesses.
How do I change user accounts in Windows 11?

You can change the user accounts type in Windows 11 by following the steps below:
- Launch Windows 11 Settings app.
- Go to “Accounts > Family & other users.”
- Select the user account that you want to change and then click on the Change account type button. A popup window will open.
- Now, click on the drop-down menu and select the desired option.
How do I find User settings in Windows?
To open the user account settings in Windows 11, launch the Settings app and then select the Accounts category from the left pane. This will open the Accounts page in WIndows 11 settings where you can manage your info, account settings, add or remove family and other users, etc.
How do I change user settings in Windows 11?
In order to change the user account settings in Windows 11, you need to press Win+I to open the Windows Settings panel first. Following that, switch to the Accounts tab on the left side. From here, it is possible to change various things, including your basic information, such as your profile picture, name, etc. Apart from that, you can also create new user account, change password, etc.
Hope this helps.
При чистой установке Windows 11 и последних билдов Windows 10 на компьютер, мастер настройки предлагает вам использовать облачную учётную запись Microsoft (Microsoft account) для входа в систему. Если ваш компьютер находится в изолированной от Интернета сети, у вас нет учетной записи Microsoft, или вы не хотите ее использовать, вы просто не сможете войти в компьютер.
В Windows 11 21H2 использование Microsoft account было обязательно только для Home редакции Windows (в системных требованиях этой редакции явно указано наличие интернет подключения и аккаунта Microsoft). Но уже в Windows 11 22H2 диалоговое окно для создания локальной учетной записи теперь отсутствует уже и в редакции Pro. В этой статье мы покажем, как установить Windows 11 версии 22H2 с локальной учетной записью (без учётной записи Microsoft).
Локальная учетная запись – классический тип учетной записи в Windows, которая не требует доступа в Интернет. Хэши паролей таких пользователей хранятся локальной в локальной базе данных SAM (Security Accounts Manager).
Если на вашем компьютере доступно интернет подключение, но вы хотите использовать локальную учетную запись Windows 11:
-
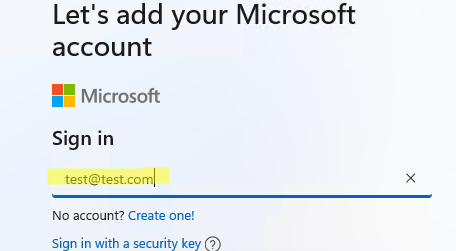
- Когда установщик Windows 11 попросит вас указать учетную запись Microsoft, укажите адрес [email protected]. На следующем шаге укажите пароль test;
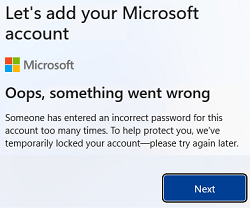
- Должна появиться ошибка:
Кто-то слишком много раз неправильно ввел пароль для этой учетной записи. Чтобы защитить вас, мы временно заблокировали ее. Повторите попытку позднее.
Oops, something went wrong
Someone has entered an incorrect password for this this account too many times. To help protect you, we’ve temporarily locked your account – please try again later.
- Когда установщик Windows 11 попросит вас указать учетную запись Microsoft, укажите адрес [email protected]. На следующем шаге укажите пароль test;
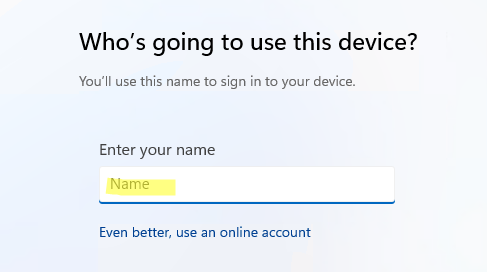
- Нажмите Next и появится окно, в котором вам будет предложено создать локального пользователя Windows
- Это способ позволяет пропустить этап создания учетной записи Microsoft как в Home, так и в Pro редакциях Windows 11.
Если ваш компьютер находится в изолированном сегменте (без подключения к Интернету), вы можете пропустить окно ввода параметров учетной записи Microsoft и сразу перейти к созданию локального пользователя Windows:
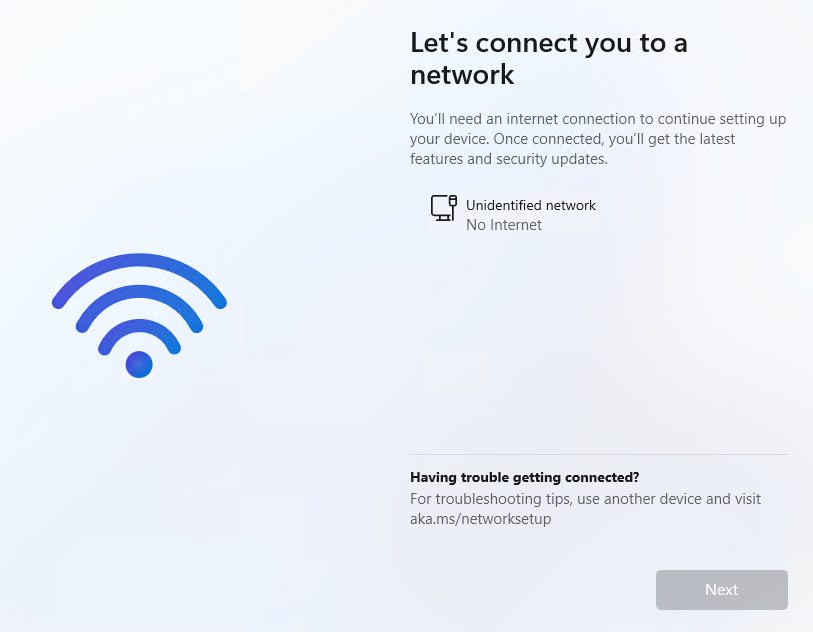
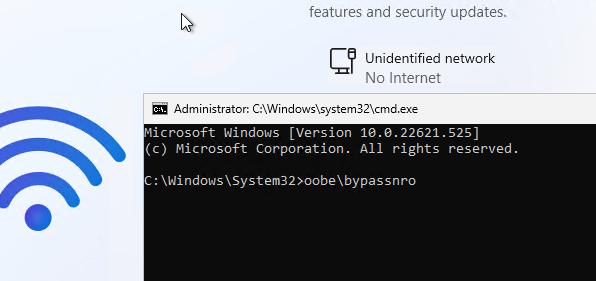
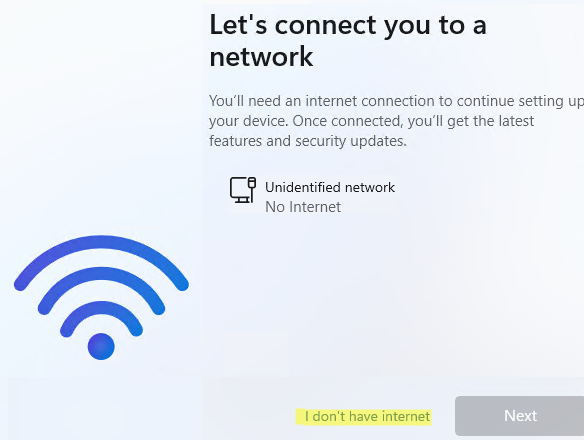
- Если ваш компьютер не подключен к интернету, то мастер первоначальной настройки Windows (Out Of Box Experience, OOBE) не позволит завершить установку Windows 11 22H2 без подключения к сети;

- Чтобы пропустить этот экран, нужно нажать сочетание клавиш Shift+F10, чтобы открыть окно командной строки;
- Выполните команду
oobebypassnro
и ваш компьютер автоматически перезагрузиться;
- Теперь в OOBE появится кнопка «I don’t have Internet». Нажмите ее, нажмите “Continue with limited setup” и вы сможете создать локального пользователя Windows.

Если вы создаете установочную USB флешку с Windows 11 с помощью утилиту Rufus, вы можете сразу отметить опцию Remove requirements for an online Microsoft account. В этом случае вы сразу сможете установить Windows 11 с локальной учетной записью.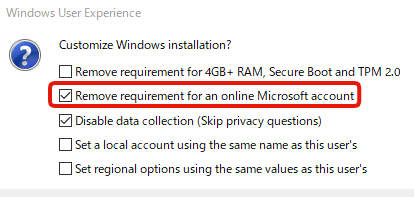
Также вы можете создать файл ответов autounattend.xml и поместить его в корень установочного носителя Windows 11.
<?xml version="1.0" encoding="utf-8"?>
<unattend xmlns="urn:schemas-microsoft-com:unattend">
<settings pass="specialize">
<component name="Microsoft-Windows-Deployment" processorArchitecture="amd64" language="neutral" xmlns:wcm="http://schemas.microsoft.com/WMIConfig/2002/State" xmlns:xsi="http://www.w3.org/2001/XMLSchema-instance" publicKeyToken="31bf3856ad364e35" versionScope="nonSxS">
<RunSynchronous>
<RunSynchronousCommand wcm:action="add">
<Order>1</Order>
<Path>reg add HKLMSOFTWAREMicrosoftWindowsCurrentVersionOOBE /v BypassNRO /t REG_DWORD /d 1 /f</Path>
</RunSynchronousCommand>
</RunSynchronous>
</component>
</settings>
</unattend>
Установщик применит такой файл ответов и сразу предложит создать локального пользователя Windows.
Это стало известно из слитой dev сборки
Ранее при установке Windows 10 вы могли отключить интернет соединение и завести оффлайн аккаунт. Это можно было делать во всех версиях windows xp,vista,7,8,8.1. Но начиная с Win 10 Microsoft решила продвигать свой облачный аккаунт в сервисе outlook.
К сожалению, теперь в домашней редакции даже если вы отключите интернет вы не сможете активировать локальную учетную запись пользователя, такого пункта при установке системы попросту нету
Кнопка Sign-in options ведет так же в окно с входом в онлайн учетную запись, без какого-либо другого выбора
Как выглядит это же окно в про версии системы.
Неизвестно, с чем связано такое решение. Ведь домашняя редакция windows 10 в данный момент устанавливается на большинстве ноутбуков и теперь, что бы использовать локальные учетные записи пользователям придется доплатить за про версию windows 11.
Так же теперь если система не активирована, вы не сможете изменять панель задач пока не активируете систему.
-
Microsoft Operating Systems
-
Windows 11
You should upgrade or use an alternative browser.
Global Accounts process
-
Thread starterHenryJoppa
-
Start date
-
#1
HenryJoppa
Guest
Continue reading…
-
Microsoft Operating Systems
-
Windows 11
-
This site uses cookies to help personalise content, tailor your experience and to keep you logged in if you register.
By continuing to use this site, you are consenting to our use of cookies.
Содержание
- Способ 1: Изменение параметров UAC
- Способ 2: Редактирование реестра
- Способ 3: Консоль Виндовс 11
- Способ 4: Редактор групповой политики
- Способ 5: Winaero Tweaker
- Вопросы и ответы
Способ 1: Изменение параметров UAC
Как и другие элементы обеспечения безопасности Виндовс, контроль учетных записей (UAC) в основном направлен на снижение воздействия на нее вредоносных программ. Запуск на компьютере приложений или процессов с низким уровнем доверия обычно сопровождается запросом на внесение ими изменений, а это, видимо, не всех устраивает. Компания Microsoft, по понятным причинам, не рекомендует трогать эту функцию, но способы отключить UAC все же оставила.
- С помощью поискового поля находим раздел «Изменение параметров контроля учетных записей» и перемещаемся туда.
- Из четырех уровней безопасности здесь включен второй, т.е. запросы будут появляться во всех случаях, кроме тех, когда параметры Windows 11 меняет юзер.
Во время получения запроса затемняется экран и, если это занимает много времени, можно спуститься на уровень ниже, чтобы просто получать уведомления. Нам же нужно полностью отключить UAC, поэтому переключаемся на первый уровень и подтверждаем действие.
Этот вариант удобен тем, что потом можно продолжить работу без перезагрузки компьютера, чего не скажешь о следующих способах.
Способ 2: Редактирование реестра
Если вы ищете другой метод, то отключить функцию можно в системном реестре.
- Жмем на клавиатуре «Windows+R» вызываем окно «Выполнить», вписываем код
regeditи подтверждаем действие. - В адресное поле вставляем следующий путь и нажимаем «Enter».
HKEY_LOCAL_MACHINE\SOFTWARE\Microsoft\Windows\CurrentVersion\Policies\System - Нам нужна запись «EnableLUA» в правой области редактора. Щелкаем по ней дважды,
в поле «Значение» ставим ноль, кликаем «OK» и перезагружаем ПК.
Способ 3: Консоль Виндовс 11
Редактировать реестр можно через консоль операционной системы. Для этого подойдет и «Командная строка», но в данном примере мы воспользуемся PowerShell.
- Кликаем меню «Пуск» правой кнопкой мышки и запускаем Windows PowerShell с повышенными правами. Если искомая оснастка отсутствует в списке, используем поиск.
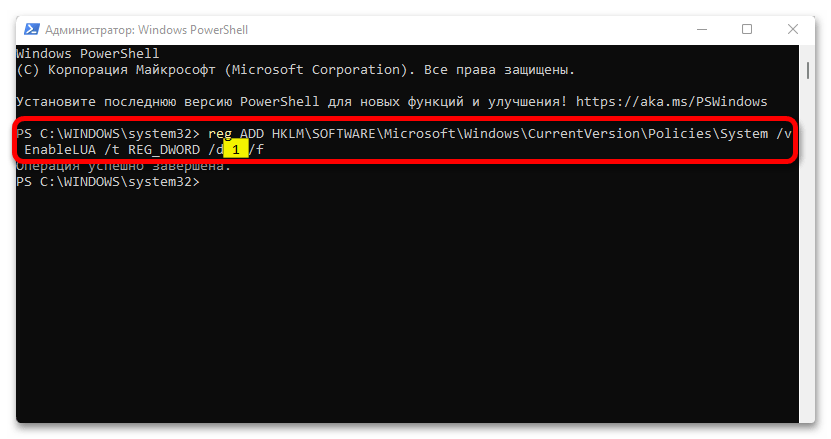
- Копируем строку ниже и вставляем ее щелчком правой кнопки мышки в окно консоли, а когда операция завершится, перезагружаем устройство.
reg ADD HKLM\SOFTWARE\Microsoft\Windows\CurrentVersion\Policies\System /v EnableLUA /t REG_DWORD /d 0 /f - Чтобы затем включить UAC, делаем то же самое, но в строке меняем «0» на «1».
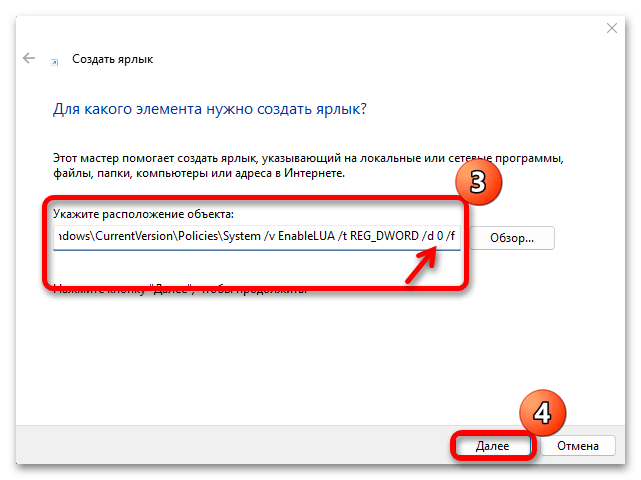
Используя вышеуказанный код, можно создать ярлыки на включение и отключение UAC. Это, конечно, немного ускорит процесс, но перезагружать систему все равно придется.
- На Рабочем столе создаем ярлык,
копируем и вставляем строку со значением ноль,
придумываем имя и сохраняем настройки.
- Теперь открываем контекстное меню ярлыка и запускаем его с правами администратора. Останется только перезагрузить компьютер.
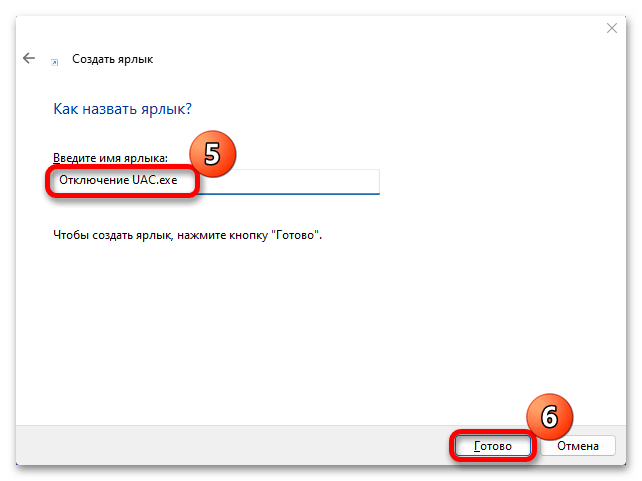
- Для создания второго ярлыка повторяем все действия, используя строку со значением один.
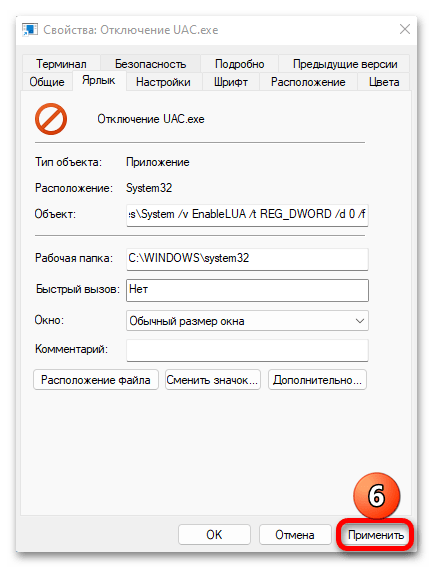
- С виду ярлыки будут одинаковые, поэтому лучше поменять значок хотя бы одного, чтобы было удобнее их различать. Открываем «Свойства» ярлыка,
жмем «Сменить значок»,
выбираем подходящий из списка доступных
и применяем изменения.
Способ 4: Редактор групповой политики
Этот метод подойдет, только если на компьютере установлена Windows 11 версии «Pro» и выше.
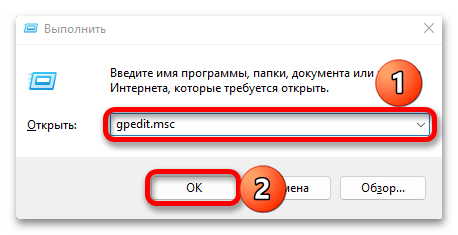
- С помощью утилиты
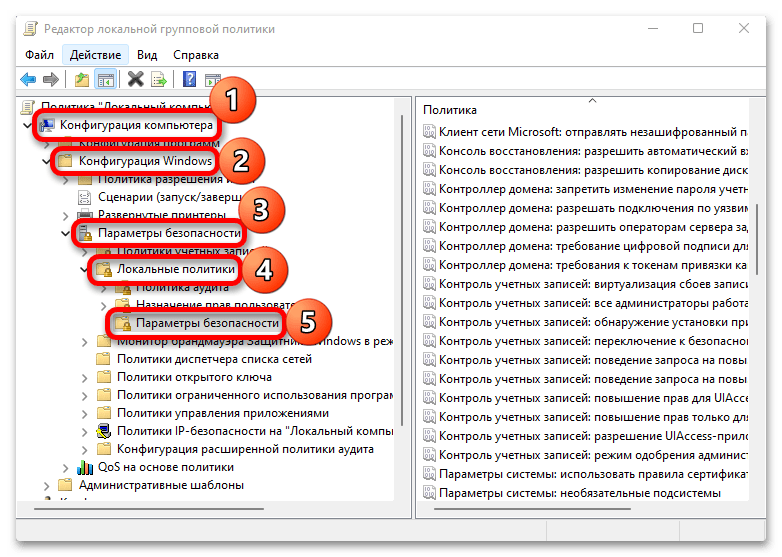
gpedit.mscвызываем «Редактор групповой политики». - Выбираем папку «Конфигурация компьютера», а затем двойными кликами по очереди открываем все ее подразделы как показано на скриншоте ниже.
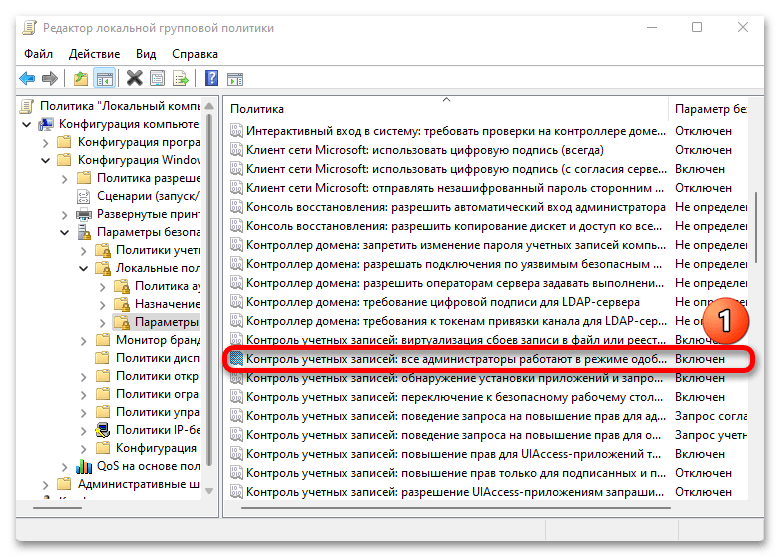
- Дважды щелкаем «Контроль учетных записей: все администраторы»,
отключаем опцию, применяем изменения и перезапускаем устройство.
Способ 5: Winaero Tweaker
Существуют сторонние решения, которые помогут выполнить стоящую перед нами задачу, и об одном из них мы собираемся рассказать. Winaero Tweaker – бесплатная программа с широкой функциональностью. Например, она дает возможность настраивать параметры, которые Microsoft тщательно скрывает, а также повышает эффективность некоторых системных инструментов путем расширения контекстного меню, опций, команд и т.д.
Скачать Winaero Tweaker с официального сайта
- Запускаем софт, находим и выделяем раздел «User Accounts», дважды кликаем по «Disable UAC»,
отключаем контроль учетных записей и подтверждаем изменения перезагрузкой системы.
- В этом же окне можно открыть настройки UAC,
чтобы отключить функцию без необходимости перезагружать Виндовс 11.
Еще статьи по данной теме:
Помогла ли Вам статья?
Microsoft has released the stable version of Windows 11 for all users. The users with Windows 10 Operating system and compatible hardware can upgrade to Windows 11 for free. Soon the PC companies will release pre-loaded Windows 11 computers. Windows 11 operating system comes with a new look along with many new features. Because Windows 11 has a new UI, some users may find it difficult to understand how to personalize their PC using the Windows 11 Settings app. In this post, we will explain Accounts Settings in Windows 11.
To access the Accounts settings in Windows 11, right-click on the Start Menu and select Settings. Now, in the Settings app, select the Accounts category from the left pane. This will open the Accounts page in Windows 11 Settings app, where you can see your account info, add or delete users to and from your system, change sign-in options, etc. On the Accounts page, the following sub-categories are available:
- Your info
- Emal & Accounts
- Sign-in options
- Family & other users
- Windows backup
- Access work or school
Clicking on each of these sub-categories will open further options to customize your account settings. We will describe each of these sub-categories in detail.
Let’s start.
1] Your info
As the name implies, you can view and manage your account info here. You can add, remove, or change your profile pic. For this, click on the Browse files button next to the Choose a file tab and select an image from your computer hard drive.
You can also upload your image by capturing it via your laptop’s camera or webcam. But make sure that you have granted access to your webcam or laptop’s camera. To check this, open the Privacy & Security settings and click on the Camera tab under the App permissions section. Now, turn on the button next to the Camera app.
Windows 11 also has some default PNG image files stored in the C directory. You can also replace your profile pic with these default PNG image files.
If you don’t want Windows to sign in to all Microsoft apps automatically, you can disable this feature by clicking on the respective link under the Account settings section on the same page.
The Related settings section lets you manage your user account online. When you click on that tab, Windows will open your Microsoft account in your web browser, where you have to sign in by using your account details.
2] Email & Accounts
This section shows all your Microsoft accounts that you have added to your device. Here, you can also add a new account that is used by email, calendar, and contacts. That account can be a Microsoft or a non-Microsoft account, like Office 365, Google, Yahoo, iCloud, etc. If you want to remove these accounts, simply click on the account to expand it, and then click on the Manage button. This will open a pop-up window in which you have to click on the Delete account from this device option.
In the Accounts used by other apps section, you can add a Microsoft account and a work or school account. Like the Your info settings page, the Email & Accounts page also lets you manage your Microsoft account online. For this, click on your Microsoft account to expand it, and then click on the Manage button.
3] Sign-in Options
As the name implies, here you can set up different sign-in opinions for your Windows 11 PC. Windows 11 offers the following six different types of sign-in options:
- Facial recognition (Windows Hello)
- Fingerprint recognition (Windows Hello)
- PIN (Windows Hello)
- Security key
- Password
- Picture password
To set up Facial recognition and Fingerprint recognition, your device should have a compatible camera and fingerprint scanner. Windows Hello PIN is a four-digit numeric code that you can use as one of the sign-in options.
You can also create a Security Key to sign in to Windows 11 apps. A Security Key is a physical device that you can use to sign in instead of your username and password. To set up a Security Key on Windows 11, simply click on it and then click on the Manage button. After that, Windows will ask you to insert a USB device. Insert your pen drive and follow the on-screen instructions.
Similarly, you can create a password for signing into your computer. After creating a password, you have to use it on the login screen. If you want to change your password, click on the Password tab to expand it and then click on the Change button. Password is the most secure way to log into a Windows 11 computer because a password lets you use different combinations of letters, numbers, and special characters.
Windows 11 also offers one more way to sign in, Picture password. In a Picture password, you can use any picture and create gestures on it.
If you scroll down the Sign-in options page in Windows 11 Accounts Settings, you will see the Additional Settings section. Here, you can set up a Dynamic Lock on your system. The Dynamic Lock is a useful feature in Windows 11 that works when you connect your smartphone with your computer via Bluetooth. When you turn off your Bluetooth or your computer goes out of the Bluetooth range of your smartphone, it will lock itself. In addition to this, you can also select whether or not you want to see the login screen every time you wake up your computer from sleep.
4] Family & other users
If you have a shared computer, this sub-category in Windows 11 Account Settings lets you create a separate user profile. You can create a separate profile for your family members and other users. To use this feature, you have to sign in with your administrator account.
You can create different types of user accounts in Windows 11 and each of these accounts is different from one another in some features. Windows 11 stores the data of each user’s account in a separate folder in the C directory. No user can access the other user’s folder in the C directory except the Administrator.
To add a family member, click on the Add account button under the Your family section. After that, you can create a new account for your family member. If your family member already has an Outlook account, you need not create a new one for him/her. Simply enter his Outlook email address and click Next. After that, he/she will receive an invitation link on his/her email ID. When he/she accepts the invitation, his/her account will be added to your computer automatically under the Your Family section.
You can manage your family member’s account settings by clicking on the Manage family settings online or remove an account button. After that, Windows will open your Microsoft account on the web browser, where you have to sign in using your account details. After signing into your account online, you can add or remove restrictions to your family member’s account, like screen time limit, content filters, etc. To remove a member from your Family group, click on the three vertical dots next to the name of your family member and select Remove from family group. After removing a person from your family group online, his/her profile will be removed from your computer automatically.
In the Other users section, you can add those persons who are not your family members. Simply click on the Add account button and enter the email address of that person. Or you can create a new account by clicking on the I don’t have this person sign-in information link.
5] Windows backup
Here, you can back up your files and folders by syncing your OneDrive account. Windows 11 also remembers your passwords, language preferences, and other settings. By default, this setting is enabled, but if you want, you can turn it off in the Windows backup category of your account settings.
6] Access work or school
Here, you can connect your work or school account to your Windows 11 computer. Simply click on the Connect button and then enter your work or school account information. If you are a Windows 11 Pro user, you can create a new school or work account.
The Related Settings section of the Access work or school account setting is for IT administrators. Here, the IT administrators can export the management log files, add or remove the provisioning package, etc. By adding the provisioning packages, IT administrators can easily configure the users’ devices without imaging. By doing this, they can quickly apply the configuration settings to the target devices. This setting is helpful for small-scale to medium-scale businesses.
How do I change user accounts in Windows 11?
You can change the user accounts type in Windows 11 by following the steps below:
- Launch Windows 11 Settings app.
- Go to “Accounts > Family & other users.”
- Select the user account that you want to change and then click on the Change account type button. A popup window will open.
- Now, click on the drop-down menu and select the desired option.
How do I find User settings in Windows?
To open the user account settings in Windows 11, launch the Settings app and then select the Accounts category from the left pane. This will open the Accounts page in WIndows 11 settings where you can manage your info, account settings, add or remove family and other users, etc.
How do I change user settings in Windows 11?
In order to change the user account settings in Windows 11, you need to press Win+I to open the Windows Settings panel first. Following that, switch to the Accounts tab on the left side. From here, it is possible to change various things, including your basic information, such as your profile picture, name, etc. Apart from that, you can also create new user account, change password, etc.
Hope this helps.