After you’ve checked for existing SSH keys, you can generate a new SSH key to use for authentication, then add it to the ssh-agent.
About SSH key passphrases
You can access and write data in repositories on GitHub.com using SSH (Secure Shell Protocol). When you connect via SSH, you authenticate using a private key file on your local machine. For more information, see «About SSH.»
When you generate an SSH key, you can add a passphrase to further secure the key. Whenever you use the key, you must enter the passphrase. If your key has a passphrase and you don’t want to enter the passphrase every time you use the key, you can add your key to the SSH agent. The SSH agent manages your SSH keys and remembers your passphrase.
If you don’t already have an SSH key, you must generate a new SSH key to use for authentication. If you’re unsure whether you already have an SSH key, you can check for existing keys. For more information, see «Checking for existing SSH keys.»
If you want to use a hardware security key to authenticate to GitHub, you must generate a new SSH key for your hardware security key. You must connect your hardware security key to your computer when you authenticate with the key pair. For more information, see the OpenSSH 8.2 release notes.
Generating a new SSH key
You can generate a new SSH key on your local machine. After you generate the key, you can add the public key to your account on GitHub.com to enable authentication for Git operations over SSH.
Note: GitHub improved security by dropping older, insecure key types on March 15, 2022.
As of that date, DSA keys (ssh-dss) are no longer supported. You cannot add new DSA keys to your personal account on GitHub.com.
RSA keys (ssh-rsa) with a valid_after before November 2, 2021 may continue to use any signature algorithm. RSA keys generated after that date must use a SHA-2 signature algorithm. Some older clients may need to be upgraded in order to use SHA-2 signatures.
-
Open TerminalTerminalGit Bash.
-
Paste the text below, substituting in your GitHub email address.
ssh-keygen -t ed25519 -C "your_email@example.com"Note: If you are using a legacy system that doesn’t support the Ed25519 algorithm, use:
ssh-keygen -t rsa -b 4096 -C "your_email@example.com"This creates a new SSH key, using the provided email as a label.
> Generating public/private ALGORITHM key pair.When you’re prompted to «Enter a file in which to save the key», you can press Enter to accept the default file location. Please note that if you created SSH keys previously, ssh-keygen may ask you to rewrite another key, in which case we recommend creating a custom-named SSH key. To do so, type the default file location and replace id_ssh_keyname with your custom key name.
-
At the prompt, type a secure passphrase. For more information, see «Working with SSH key passphrases.»
> Enter passphrase (empty for no passphrase): [Type a passphrase]
> Enter same passphrase again: [Type passphrase again]
Adding your SSH key to the ssh-agent
Before adding a new SSH key to the ssh-agent to manage your keys, you should have checked for existing SSH keys and generated a new SSH key. When adding your SSH key to the agent, use the default macOS ssh-add command, and not an application installed by macports, homebrew, or some other external source.
Generating a new SSH key for a hardware security key
If you are using macOS or Linux, you may need to update your SSH client or install a new SSH client prior to generating a new SSH key. For more information, see «Error: Unknown key type.»
-
Insert your hardware security key into your computer.
-
Open TerminalTerminalGit Bash.
-
Paste the text below, substituting in the email address for your account on GitHub.
Note: If the command fails and you receive the error
invalid formatorfeature not supported,you may be using a hardware security key that does not support the Ed25519 algorithm. Enter the following command instead.ssh-keygen -t ecdsa-sk -C "your_email@example.com" -
When you are prompted, touch the button on your hardware security key.
-
When you are prompted to «Enter a file in which to save the key,» press Enter to accept the default file location.
-
When you are prompted to type a passphrase, press Enter.
> Enter passphrase (empty for no passphrase): [Type a passphrase] > Enter same passphrase again: [Type passphrase again] -
Add the SSH public key to your account on GitHub. For more information, see «Adding a new SSH key to your GitHub account.»
Инструменты
Git SSH Windows — пошаговое руководство
Дата размещения статьи 08/12/2019 👁31067
Git SSH Windows — пошаговое руководство
Настроим пошагово Git SSH для Windows 10. Это позволит вам выполнять команды git без ввода пароля от своей учетной записи GitHub.
Порядок действий:
- Генерация ключа SSH.
- Добавление SSH-ключа в ssh-agent.
- Добавление ключа SSH в учетную запись GitHub.
Генерация ключа SSH
Откройте bash/терминал. Добавьте следующий текст, подставив свой адрес электронной почты GitHub.
ssh-keygen -t rsa -b 4096 -C "ваша@почта.com"Будет создан ключ ssh, используя e-mail в качестве метки.
Когда вам будет предложено «Введите файл, в котором вы хотите сохранить ключ», нажмите Enter. Это установит в местоположение по умолчанию.
Enter a file in which to save the key (/c/Users/you/.ssh/id_rsa):[Press enter]
Далее введите безопасную фразу-пароль дважды или просто нажмите Enter.
Enter passphrase (empty for no passphrase): [Type a passphrase]
Enter same passphrase again: [Type passphrase again]
Добавление SSH-ключа в ssh-agent
Чтобы запустить ssh-агент введите следующую команду.
На экране отобразится похожая строка.
Agent pid 31724
Добавим свой закрытый ключ SSH в ssh-agent. Если вы создали свой ключ с другим именем (или добавляете существующий ключ с другим именем), замените в команде id_rsa на имя вашего файла закрытого (приватного) ключа.
Ключ будет успешно добавлен в ssh-агент.
Добавление ключа SSH в учетную запись GitHub
Мы сгенерировали у себя на компьютере закрытый ключ SSH и добавили его в ssh-агент. Теперь нам необходимо добавить SSH ключ в учетную запись GitHub.
Сейчас нам необходимо скопировать SSH ключ в буфер обмена.
Способов есть несколько, но я же вам предлагаю следующее решения для Windows 10: введите команду ниже.
Прямо в терминале вы увидите содержимое необходимого файла с ключем. Скопируйте его в буфер.
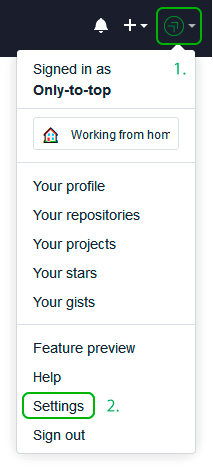
Теперь зайдите на вашу страницу GitHub » Settings.
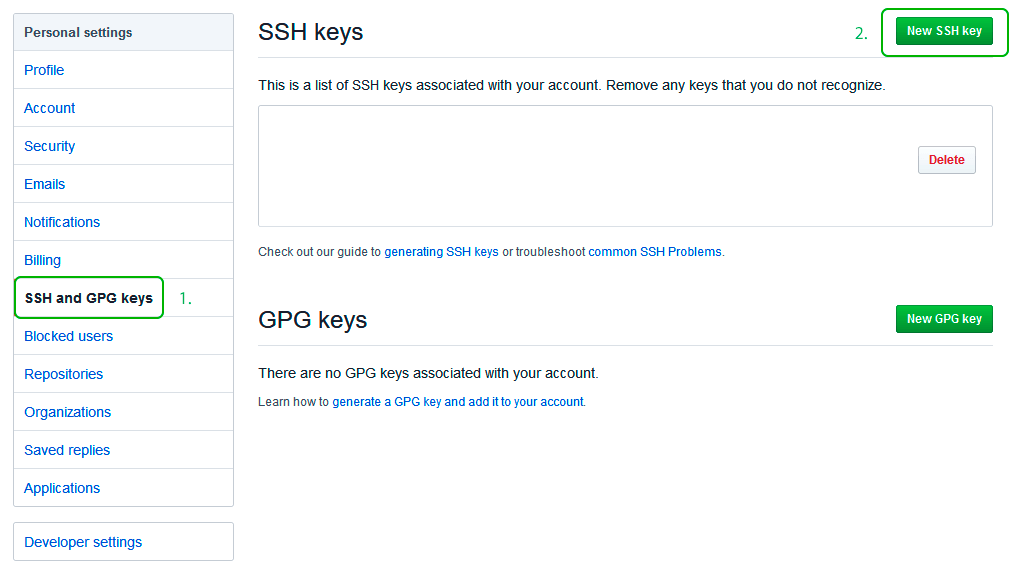
Перейдите во вкладку SSH and GPG keys и нажмите на кнопку New SSH key для добавления SSH ключа в вашу учетную запись GitHub.
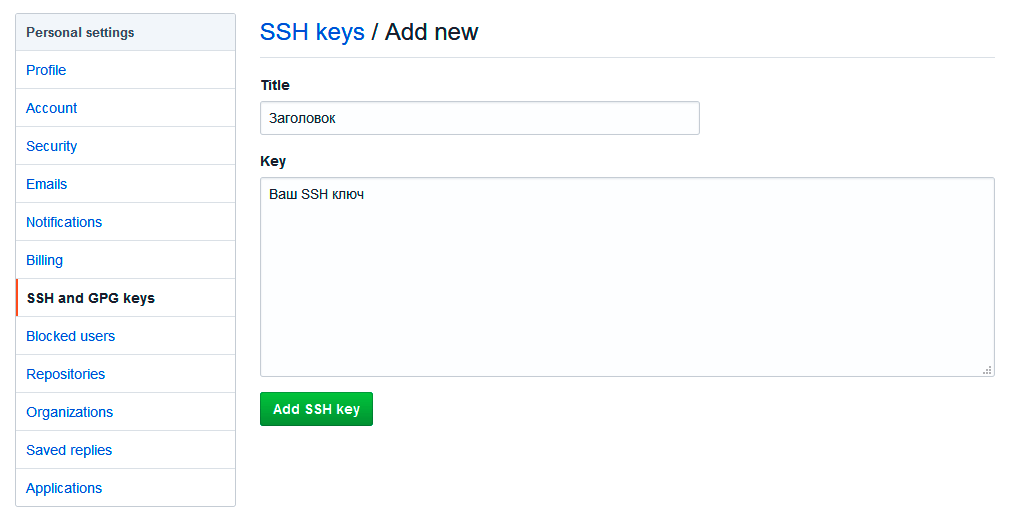
В поле Title добавьте заголовок для данного ключа. Например, если вы захотите настроить SSH доступ на нескольких устройствах, то вы будите понимать какой ключ принадлежит какому устройству.
В поле Key добавьте свой ssh-ключ, который вы скопировали в буфер обмена на предыдущем шаге.
Нажмите Add SSH key.
Для подтверждения вам потребуется ввести свой пароль от учетной записи GitHub.
На этом настройка SSH для вашего устройства завершена, теперь вы можете работать с git без ввода пароля от своей учетной записи.
Если вам понравилась данная статья, можете прочитать как настроить моментальную загрузку сайта на хостинг и синхронизацию файлов.
JavaScript: Window Location Checkbox Checked — Проверка Состояния Чекбокса ✔️
Надеюсь, вам понравилась данная информация. Если вам интересна тема web-разработки,
то можете следить за выходом новых статей в Telegram.
- Настройка Gulp Babel
- Микроразметка сайта
- Как перенести сайт WordPress на хостинг
- Настройте показ всего текста во время загрузки веб-шрифтов
- Сниппеты в VS Code
- Не удается проверить так как не задан исполняемый PHP-файл
OpenSSH, the open source version of the Secure Socket Shell (SSH) tools, is a standard part of the Windows 10 and Windows Server 2019 operating systems. This greatly simplifies how to connect to GitHub with SSH on Windows.
Step-by-step Windows GitHub SSH example
To connect to GitHub with SSH from Windows, follow these steps:
- Open PowerShell
- Run the ssh-keygen command to create SSH keys
- Copy the value of the SSH public key
- Save the public key in your GitHub account settings
- Perform a Git clone operation using your repo’s SSH URL
Create SSH Keys for GitHub
To start, store a public SSH key on GitHub. This is validated against a locally stored private key that Git uses to validate and establish a connection. GitHub SSH keys are created with the ssh-keygen tool that comes prepackaged with updated versions of Windows.
In Windows PowerShell, issue the following ssh-keygen command to create GitHub SSH keys:
PS C:\github\ssh\example> ssh-keygen -o -t rsa -C "[email protected]"
You will be asked for an optional passphrase. It’s permissible to click enter and leave this blank.
| ssh-keygen flags | Purpose | Suggested |
|---|---|---|
| -C | Comments or metadata to add to the public key | Email address |
| -t | The type of GitHub SSH key to create | RSA |
| -o | Use the newest OpenSSH format | Leave blank |
You will also be asked for a location to save the GitHub SSH keys on Windows. Again, just click enter to accept the default location, which is the .ssh folder under the user’s home directory.
The Windows GitHub SSH keys live in the .ssh folder under the current user’s home directory. The following directory listing under the .ssh folder of a user named Cameron shows the two files created by the ssh-keygen tool:
PS C:\Users\Cameron\.ssh> dir
LastWriteTime      Name
-------------      ----
1/1/2022           id_rsa
1/1/2022           id_rsa.pub
GitHub SSH config
Open the SSH public key in a text editor such as Notepad++, perform a Select All, and copy the key.
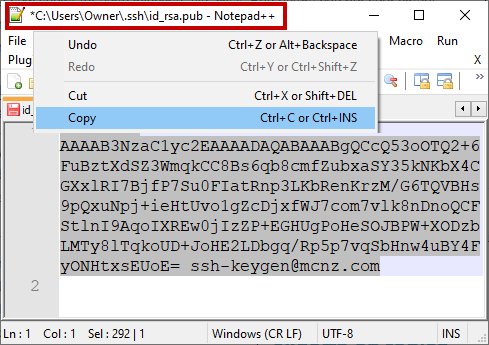
Copy the public GitHub SSH key and store this value as a registered SSH key in your GitHub account.
With the SSH key copied, log into GitHub, navigate to your account settings, and paste the public key as a new SSH key.
To obtain a secure, GitHub SSH Windows connection, you must register the public key in your online account settings.
SSH to GitHub on Windows
With the SSH keys generated, and the public key registered in your GitHub account, you can now use Git to connect to GitHub over SSH on Windows.
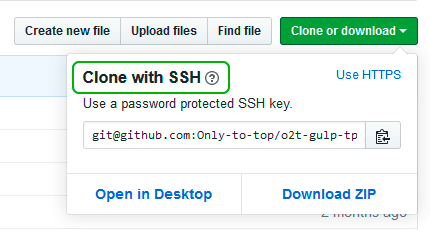
Simply copy the SSH URL from the GitHub page of the repository you wish to clone, and then provide that SSH link to the Git clone command:
PS C:\github\ssh\example> git clone [email protected]:cameronmcnz/java-jakarta-ee.git
Cloning GitHub SSH Windows into ‘java-jakarta-ee’…
Host authenticity cannot be established.
Do you still want to connect(yes or no)? yes
Receiving objects: 100% (55/55),5.78 MiB | 1.32 MiB/s, Windows GitHub SSH done.
Resolving deltas: 100% (66/66), Windows GitHub SSH done.
Notice the initial git clone with GitHub SSH on Windows complains about being unable to establish the host authenticity. That warning message is expected. Just type yes and allow the GitHub SSH clone operation to continue.
Once the remote repository is cloned, you can continue to use Git as you normally would, issue commits, add submodules, rebase branches and push back and forth with GitHub. All operations that use the network will automatically use an SSH connection.
And that’s how easy it is to connect to GitHub over SSH on Windows based machines.
Introduction
Git connects to remotes by default via HTTPS, which requires you to enter your login and password every time you run a command like Git pull or git push, using the SSH protocol. You may connect to servers and authenticate to access their services. The three services listed allow Git to connect through SSH rather than HTTPS. Using public-key encryption eliminates the need to type a login and password for each Git command.
Make sure a Git is installed
Make sure Git is installed before you start. Run the following command in your Windows terminal to see if Git is installed on your computer:
git --version
Enter fullscreen mode
Exit fullscreen mode
Install Git
To install Git, you can download the latest version from the official Git website. You can also install Git using Chocolatey or Winget package manager.
Install Git official website
To install Git from the official website, follow the steps below:
- Go to the official Git website and download the latest version of Git for Windows.
- Run the installer and follow the steps below:
- Click Next on the first two screens to accept the default options.
- Click Next on the Select Components screen.
- Click Next on the Choosing the default editor used by Git screen.
- Click Next on the Choosing the default terminal emulator screen.
- Select the Use Git from the Windows Command Prompt option.
- Select the Checkout Windows-style, commit Unix-style line endings option.
- Select the Use Windows’ default console window option.
- Click Next on the Configuring the line ending conversions screen.
- Click Next on the Configuring the terminal emulator to use with Git Bash screen.
- Click Install on the Choosing HTTPS transport backend screen.
- Click Finish on the Completing the Git Setup screen.
- Open a new command prompt window and verify that Git is installed correctly by typing
git --version.
Install Git using Chocolatey
To install Git using Chocolatey, follow the steps below:
- Open Windows Terminal.
- Run the following command to install Git:
choco install git -y
Enter fullscreen mode
Exit fullscreen mode
- Verify that Git is installed correctly by typing
git --version.
Install Git using Winget
To install Git using Winget, follow the steps below:
- Open Windows Terminal.
- Run the following command to install Git:
winget install --id=Git.Git -e
Enter fullscreen mode
Exit fullscreen mode
- Verify that Git is installed correctly by typing
git --version.
Note: Don’t forget to specify global Git settings using the following command after installing git:
git config --global user.name 'USERNAME'
git config --global user.email 'YOUR_EMAIL@EXAMPLE.COM'
Enter fullscreen mode
Exit fullscreen mode
Generate SSH keys
To generate SSH keys, follow the steps below:
- Open Windows Terminal.
- Run the following command (change your
YOUR_EMAIL@EXAMPLE.COMwith your email address) to establish a new SSH key pair:
ssh-keygen -t rsa -b 4096 -C "YOUR_EMAIL@EXAMPLE.COM"
Enter fullscreen mode
Exit fullscreen mode
- It will ask you where you want to save the private key (id rsa), and you may accept the default location by pressing Enter.
Whether you already have a private key, it will ask if you want to override it:
Overwrite (y/n)?
Enter fullscreen mode
Exit fullscreen mode
- If this happens, hit Enter and type y. Then, enter and re-enter the following passcode (think of it as a password):
Enter a file in which to save the key (/c/Users/you/.ssh/id_rsa): [Press enter]
Enter fullscreen mode
Exit fullscreen mode
- Enter a secure passphrase.
Enter passphrase (empty for no passphrase): [Type a passphrase]
Enter same passphrase again: [Type passphrase again]
Enter fullscreen mode
Exit fullscreen mode
- The SSH key pair is created in ~/.ssh, and the whole interaction should look like this:
Enter fullscreen mode
Exit fullscreen mode
- Verify that the SSH key was created by running the following command:
ls .\.ssh\
Enter fullscreen mode
Exit fullscreen mode
Add SSH key to the ssh-agent to your account
Copy the SSH key to your clipboard by running the following command:
Get-Content .\.ssh\id_rsa.pub | Set-Clipboard
Enter fullscreen mode
Exit fullscreen mode
GitHub
Sign in to your GitHub account using a browser by going to github.com and entering your username and password. Click your profile photo in the upper-right corner of the page, then Settings:

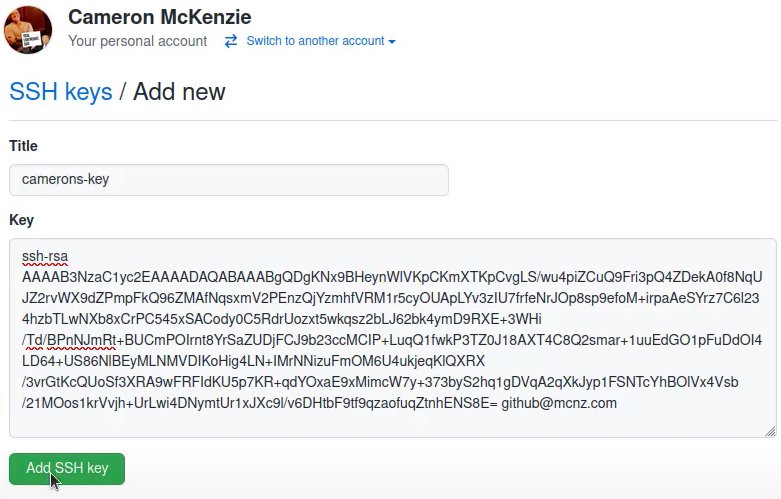
Select SSH and GPG keys from the user settings sidebar. Then select New SSH key from the drop-down menu. Put a descriptive label for the new key in the Title area (for example, your computer’s name) and paste your public key into the Key field. Last but not least, click Add SSH key:

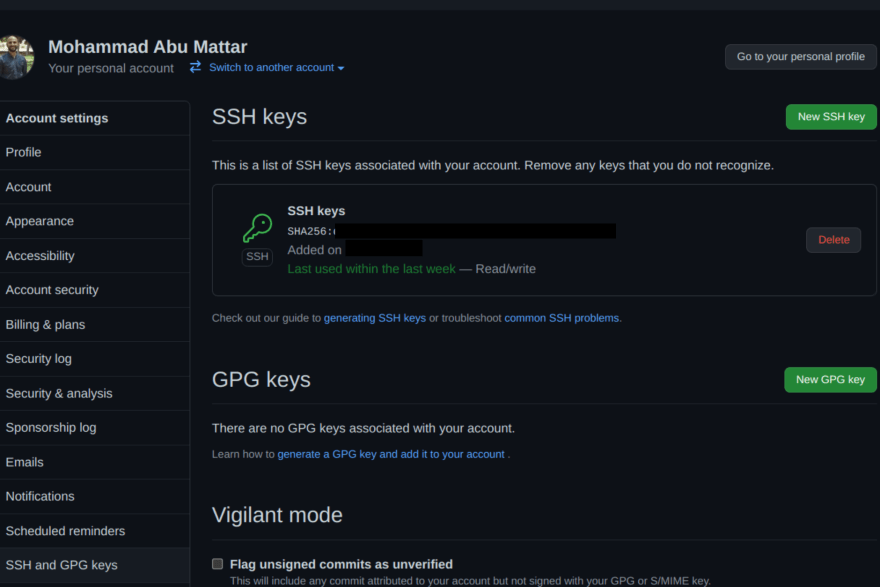
The key is now visible in the list of SSH keys linked to your account:
GitLab
Sign in to your GitLab account using a browser by going to gitlab.com and entering your username and password. Click your profile photo in the upper-right corner of the page, then Settings:

Click SSH Keys in the User Settings sidebar. In the Key area, paste your public key. Fill in the Title area for the new key with a descriptive term (for example, the name of your computer). Finally, click the Add key:

The key is now visible in the list of SSH keys linked to your account:

Bitbucket
Log in to your Bitbucket account using a browser by going to bitbucket.org and entering your username and password. Click your profile photo in the lower-left corner of the website, then Bitbucket settings:

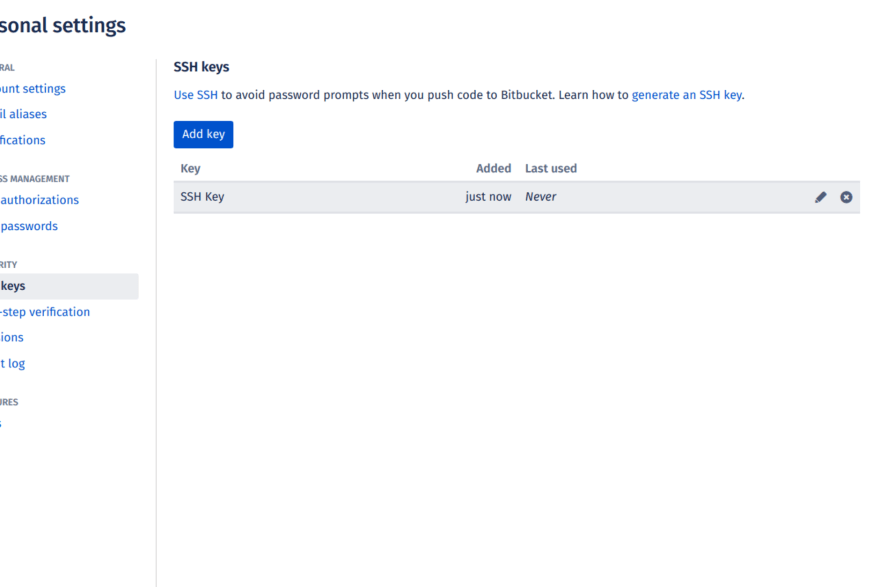
SSH keys may be found in the Settings sidebar’s Security section. After that, select Add key from the drop-down menu. Fill up the Description box with a descriptive label for the new key (such as your computer’s name), and then paste your public key into the Key field. Last but not least, choose to Add key:

The key has now been added to your account’s list of SSH keys:
Test connecting via SSH
Before utilizing SSH with Git, GitHub, GitLab, and Bitbucket allow you to verify whether the connection has been set up successfully.
GitHub Test Connecting via SSH
Open the terminal once you’ve added your SSH key to your GitHub account and type:
ssh -T git@github.com
Enter fullscreen mode
Exit fullscreen mode
If you’re connecting to GitHub over SSH for the first time, the SSH client will ask if you trust the GitHub server’s public key:
The authenticity of host 'github.com (140.82.113.4)' can't be established.
RSA key fingerprint is SHA256:a5d6c20b1790b4c144b9d26c9b201bbee3797aa010f2701c09c1b3a6262d2c02.
Are you sure you want to continue connecting (yes/no)?
Enter fullscreen mode
Exit fullscreen mode
Press Enter after typing yes. GitHub has been added to the list of trustworthy hosts in the SSH client:
Warning: Permanently added 'github.com,140.82.113.4' (RSA) to the list of known hosts.
Enter fullscreen mode
Exit fullscreen mode
You won’t be asked about GitHub’s public key again once you’ve added it to the list of known hosts.
The server notifies you that you have successfully authenticated and ends the connection: Because this remote access through SSH is offered by GitHub only for testing purposes and not for practical usage, the server informs you that you have successfully authenticated and terminates the connection:
Hi YOUR_USER_NAME! You've successfully authenticated, but GitHub does not provide shell access.
Enter fullscreen mode
Exit fullscreen mode
If you passed the test, you may now utilize SSH with GitHub.
The entire interaction should look something like this:
ssh -T git@github.com

The authenticity of host 'github.com (140.82.113.4)' can't be established.
RSA key fingerprint is SHA256:a5d6c20b1790b4c144b9d26c9b201bbee3797aa010f2701c09c1b3a6262d2c02.
Are you sure you want to continue connecting (yes/no)? yes
Warning: Permanently added 'github.com,140.82.113.4' (RSA) to the list of known hosts.
Hi your_user_name! You've successfully authenticated, but GitHub does not provide shell access.
YOUR_USER_NAME@YOUR_HOST_NAME:~>
Enter fullscreen mode
Exit fullscreen mode
GitLab Test Connecting via SSH
The test is pretty similar if you’ve added your SSH key to your GitLab account:
ssh -T git@gitlab.com

The authenticity of host 'gitlab.com (35.231.145.151)' can't be established.
ECDSA key fingerprint is SHA256:4ac7a7fd4296d5e6267c9188346375ff78f6097a802e83c0feaf25277c9e70cc.
Are you sure you want to continue connecting (yes/no)? yes
Warning: Permanently added 'gitlab.com,35.231.145.151' (ECDSA) to the list of known hosts.
Welcome to GitLab, @YOUR_USER_NAME!
Enter fullscreen mode
Exit fullscreen mode
If you passed the test, you may now utilize SSH with GitLab.
Bitbucket Test Connecting via SSH
The test is pretty similar if you’ve added your SSH key to your Bitbucket account:
ssh -T git@bitbucket.org

The authenticity of host 'bitbucket.org (104.192.143.1)' can't be established.
RSA key fingerprint is SHA256:fb7d37d5497c43f73325e0a98638cac8dda3b01a8c31f4ee11e2e953c19e0252.
Are you sure you want to continue connecting (yes/no)? yes
Warning: Permanently added 'bitbucket.org,104.192.143.1' (RSA) to the list of known hosts.
logged in as YOUR_USER_NAME.

You can use git or hg to connect to Bitbucket. Shell access is disabled.
Enter fullscreen mode
Exit fullscreen mode
If you passed the test, you may now utilize SSH with Bitbucket.
References
- GitHub SSH Key Setup
- GitLab SSH Key Setup
- Bitbucket SSH Key Setup
Question: How do I generate ssh private and public keys (to be used in GitHub/GitLab) using command line.
The command below generates the error
sh.exe": syntax error near unexpected token '('
I am using Windows XP.
$ ssh-keygen -t rsa -C "[email protected]"
Generating public/private rsa key pair.
Enter file in which to save the key (/c/Users/xxxx/.ssh/id_rsa):
Enter passphrase (empty for no passphrase):
Enter same passphrase again:
Your identification has been saved in /c/Users/xxxx/.ssh/id_rsa.
Your public key has been saved in /c/Users/xxxx/.ssh/id_rsa.pub.
The key fingerprint is:
01:0f:f4:3b:ca:85:d6:17:a1:7d:f0:68:9d:f0:a2:db [email protected]
![]()
asked Sep 30, 2010 at 8:01
![]()
2
The command to run is only
ssh-keygen -t rsa -C "[email protected]"
All the rest beginning with line 2 of your script is the output of ssh-keygen.
And replace [email protected] with your email address.
Have a look at the manual for ssh-keygen to look for additional options. You should probably use a longer key by adding -b 4096 to the option list.
answered Sep 30, 2010 at 8:08
![]()
ResiduumResiduum
11.9k7 gold badges40 silver badges70 bronze badges
6
Here is the command
ssh-keygen -t rsa -b 4096 -C "[your github's email]"
# Creates a new ssh key
# Generating public/private rsa key pair.
This will generate a key for you. You have to copy that and insert into your Github’s account (just one time).
Steps how to do It
![]()
answered May 6, 2016 at 14:54
![]()
1
Step 1: Generate Your SSH Key
$ ssh-keygen -t rsa -b 4096 -C "[email protected]"
Step 2: Use the Key
$ eval $(ssh-agent -s)
Then add the key we just generated. If you selected a different path than the default, be sure to replace that path in the command.
ssh-add ~/.ssh/id_rsa
Step 3: Add the SSH Key on GitHub
clip < ~/.ssh/id_rsa.pub
if clip not found then add the next command
cat ~/.ssh/id_rsa.pub
Finally Result something like on your cmd
ssh-rsa AAAAB3NzaC1yc2EAAAAD173Oe1kp0Ojnsn7sRWt/XT5nFH3CSTv6VWyxq4YUJ4ZykWa5opyiAJmvtjxOMCmVTuX2r1T4Livn0foHGt7+66FJXrXUQgyJ4RXanufb3bAekxbFPg3S6Gyr2kk+I3TYWcFsLLwjU0VVJwodQkpyygAUzhomx9OQ0FMpfkQa5VrZnaSLjjtNOUSAaq30e7JWYxtoVih2HfVkcmqc53QjY4T3Xb0cmLZF3EmwCeB66dgJtpTNMvM54ceD30INsaMFNqG8XjbJtGUCHYEIR5l/LI20K5F25BRTnCzRV9dB5FUJ8taVMGRHJob9PDUdxpA2HEJYilm8ZbLbRmKJtU+H91WNCG6pvy9Yf9MREkOZQHcWIuAsH8uJvTTbqm1eAY2g34FjarRdqZIpvdxkrErDHqh4k42owNEmHjSaAw53Y8M54fjBdFHTjGDqHBamlKcIzQbin/czFq1a+pgopIANDhZjWZNvMiTak7BjVrVOciKD3Pa/KKy03nSEfEGExLbFEi1Q8QEGd6idtUAjL7fyVPWatRwCnOvGLMPTk73m7t0IAYTm4n7dO0S5OeWTUPTT+8vIfFCmE9OT2aJDIpZY1+f8Q== [email protected]
copy from your cmd and go to your GitHub account
setting find ssh and gpg keys
answered Jul 14, 2021 at 7:47
![]()
Naved KhanNaved Khan
1,70916 silver badges13 bronze badges
Just apply two commands :
ssh-keygen -t rsa -b 4096
cat ~/.ssh/id_rsa.pub
Copy ssh key and paste on browser
Go to home/.ssh folder. Click on config file and add these two line(if config file doesn’t exist then create a file name as «config»)
HostKeyAlgorithms ssh-rsa
PubkeyAcceptedKeyTypes ssh-rsa
answered Jun 2, 2022 at 8:20
![]()
Generate SSH key using below command
ssh-keygen -trsa -C [email protected]
just hit enter to apply the default value for all the inputs it asks
the output will be
Generating public/private rsa key pair.
Enter file in which to save the key (/home/user/.ssh/id_rsa):
/home/user/.ssh/id_rsa already exists.
Overwrite (y/n)? y
Enter passphrase (empty for no passphrase):
Enter same passphrase again:
Your identification has been saved in /home/user/.ssh/id_rsa
Your public key has been saved in /home/user/.ssh/id_rsa.pub
The key fingerprint is:
SHA256:xxxxxxxxxxxxxxxxxxxxxxxxxxxxxxxxxxxxxxxxxxxxxxx [email protected]
The key's randomart image is:
+---[RSA xxxx]----+
| ..++xX*Ox        |
| x..xx/+.x. + .   |
|.. +..*+xx x +    |
|... +x+o x.       |
|x.. + +..x        |
|xx.. x            |
|...               |
|x x               |
|x  x.             |
+----[SHA256]------+
just use the cat command to log the ssh key file contents on the terminal(use your own path here).
cat /home/user/.ssh/id_rsa.pub
the output will be
ssh-rsa xxxxxxxxxxxxxxxxxxxxxxxxxxxxxxxxxxxxxxxxxxxxxxxxxxxxxxxxxxxxxxxxxxxxxxxxxxxxxxxxxxxxxxxxxxxxxxxxxxxxxxxxxxxxxxxxxxxxxxxxxxxxxxxxxxxxxxxxxxxxxxxxxxxxxxxxxxxxxxxxxxxxxxxxxxxxxxxxxxxxxxxxxxxxxxxxxxxxxxxxxxxxxxxxxxxxxxxxxxxxxxxxxxxxxxxxxxxxxxxxxxxxxxxxxxxxxxxxxxxxxxxxxxxxxxxxxxxxxxxxxxxxxxxxxxxxxxxxxxxxxxxxxxxxxxxxxxxx [email protected]
copy the contents and go to your github account go to settings under Account settings>SSH and GPG keys click on New SSH key, provide the name you wish and paste the copied contents in the value and save. that’s it you are ready to commit your changes without using username, password every time.
answered Dec 3, 2021 at 17:12
![]()
Akhil SAkhil S
99511 silver badges16 bronze badges
Solution: ssh-keygen -t rsa
Explanation : ssh-keygen is a tool for creating new authentication key pairs for SSH. Such key pairs are used for automating logins, single sign-on, and for authenticating hosts
(for example cloning project from your private repo on Github straight to your aws machine).
Options: You can perform more complicated operations and using flags in order to generate a tailor-made key according to your use case, extended functionality are more powerful and secured. The basic flags are: bits (Large integers making the the RSA key be less vulnerable and hard to crack), passphrase (similar to password) , type (dsa/ecdsa/ed25519/rsa) , comment for the specific ssh token (email or user name) and output key (default store on ~/.ssh/ path)
Synopsis: ssh-keygen [-q] [-b bits] [-t dsa | ecdsa | ed25519 | rsa] [-N new_passphrase] [-C comment] [-f output_keyfile]
Example:
ssh-keygen -b 4096 -t rsa -n "tHiSiaPasSWoRd" -c "[email protected]" -f ~/.ssh/id_rsa
answered May 24, 2020 at 18:20
![]()
avivamgavivamg
12.4k3 gold badges68 silver badges61 bronze badges