Git сервер для Windows Server
На чтение 4 мин Опубликовано Обновлено
Git – это распределенная система управления версиями, которая широко используется разработчиками по всему миру. Установка Git сервера на Windows сервер позволяет команде разработчиков эффективно работать над проектами, обмениваясь кодом и отслеживая изменения внутри репозитория.
В данной статье мы рассмотрим подробную инструкцию по установке Git сервера на Windows. Мы покроем все шаги, начиная с загрузки необходимого ПО и заканчивая настройкой доступа к серверу для команды разработчиков.
Начнем с загрузки необходимых компонентов для установки Git сервера на Windows сервер. Первым шагом будет загрузка и установка Git for Windows. Git for Windows – это официальная версия Git для Windows, которая включает в себя все необходимые инструменты для работы.
Шаг 1: Загрузите установщик Git for Windows с официального сайта https://gitforwindows.org/. После загрузки запустите установщик и следуйте инструкциям на экране.
Содержание
- Подготовка Windows сервера для установки Git
- Установка зависимостей и активация PowerShell
- Создание системных переменных для Git
Перед началом установки Git сервера на Windows, необходимо выполнить несколько подготовительных шагов:
- Проверьте системные требования: Убедитесь, что ваш сервер соответствует минимальным системным требованиям для установки Git. Необходимо, чтобы на сервере была установлена подходящая версия Windows, а также достаточное количество свободного места на диске.
- Проверьте доступность сервера: Убедитесь, что ваш Windows сервер доступен из сети и имеет статический IP-адрес. Это необходимо для того, чтобы другие разработчики могли подключаться к вашему Git серверу.
- Установите необходимые компоненты: Для работы Git сервера на Windows необходимо установить несколько дополнительных компонентов, таких как Git for Windows, OpenSSH и OpenSSL. Убедитесь, что все эти компоненты установлены и настроены на вашем сервере.
- Настройте брандмауэр: Если на вашем сервере включен брандмауэр, убедитесь, что порты, необходимые для работы Git сервера, открыты и разрешено входящее соединение. Обычно для Git используются порты 22 (для протокола SSH) и 9418 (для протокола Git).
- Настройте аутентификацию: Перед установкой Git сервера необходимо решить, как будет осуществляться аутентификация пользователей. Вы можете использовать различные методы аутентификации, такие как парольная аутентификация, аутентификация по ключу SSH и другие. Убедитесь, что выбранный вами метод настроен и работает корректно на вашем сервере.
После выполнения всех подготовительных шагов ваш Windows сервер будет готов к установке Git сервера и вы сможете перейти к следующему этапу.
Установка зависимостей и активация PowerShell
Перед началом установки Git сервера на Windows сервер необходимо убедиться, что у вас установлены следующие зависимости:
- PowerShell версии 5.1 или выше
- .NET Framework версии 4.5 или выше
Установить и проверить наличие зависимостей можно следующим образом:
Шаг 1: Установите PowerShell версии 5.1 или выше. Для этого выполните следующие действия:
- Откройте Командную строку или PowerShell ISE с правами администратора.
- Введите команду
$PSVersionTable.PSVersionи нажмите Enter. - Если установленная версия PowerShell ниже 5.1, необходимо выполнить обновление. Для этого можно использовать инсталлятор с официального сайта Microsoft.
Шаг 2: Проверьте наличие .NET Framework версии 4.5 или выше. Для этого выполните следующие действия:
- Откройте Командную строку или PowerShell ISE с правами администратора.
- Введите команду
Get-ChildItem 'HKLM:\SOFTWARE\Microsoft\NET Framework Setup\NDP' -Recurse | Get-ItemProperty -name Version -EA 0 | Where-Object { $_.PSChildName -match '^(?!S)\p{L}'} | Select-Object -Property PSChildName, Versionи нажмите Enter. - Если установленная версия .NET Framework ниже 4.5, необходимо выполнить обновление. Для этого можно использовать инсталлятор с официального сайта Microsoft.
После установки и проверки зависимостей можно переходить к установке Git сервера на Windows сервер.
Создание системных переменных для Git
Чтобы Git работал корректно, необходимо создать системные переменные, которые указывают системе, где искать исполняемые файлы программы.
Для создания переменных в Windows:
- Щелкните правой кнопкой мыши по значку «Мой компьютер» на рабочем столе или в меню «Пуск» и выберите «Свойства».
- На странице «Система» выберите вкладку «Дополнительно» и нажмите «Переменные среды».
- В разделе «Системные переменные» нажмите «Создать».
- В поле «Имя переменной» введите «GIT_HOME» (без кавычек).
- В поле «Значение переменной» введите путь к папке, в которой установлен Git (например, «C:\Program Files\Git»).
- Нажмите «ОК», чтобы сохранить переменную.
После создания переменной «GIT_HOME» необходимо добавить путь к исполняемым файлам Git в переменную «Path», чтобы система могла найти их. Для этого:
- В разделе «Системные переменные» найдите переменную «Path» и дважды кликните на ней.
- В поле «Значение переменной» укажите «%GIT_HOME%\bin;%GIT_HOME%\cmd» (без кавычек).
- Нажмите «ОК», чтобы сохранить переменную.
Теперь Git будет доступен из командной строки и других программ.
— Advertisement —
Hello, in this opportunity, we will talk about Windows Server. Specifically, about the installation of server Git. It is a version control software designed by Linus Torvalds, thinking about the efficiency and reliability of maintaining versions of applications when these have a large number of source code files. A version control system is the management of the various changes that are made on the elements of a product or a configuration of the same. This tool is very useful when developing software or a web page. Furthermore, it facilitates the work of the developers, because it allows you to update and edit their projects to improve them. On the other hand, there are free and paid options to host our projects on web servers. In general, free options have space and privacy limitations. So, here I will show you how to install a Git server on Windows Server 2019.
Prerequisites.
- Internet Information Services (IIS) have to be installed on Windows Server. If you don’t know how to do it, please check our post.
- Static ip address
Installing a Git server using bonobo server.
As mentioned above, there are trade options to host Git on web servers. However, it is likely that you want to save costs or may not have limitations. In addition, using Windows Server it is possible to put the server Git within the reach of your organization. For the purpose, We’ll use a software called Bonobo Git Server. It is free and open-source. With that intention, please go to the program page and download the zip file of the application. At the time of writing this article, the version is 6.5.0.

Please note that the file is compressed in ZIP format. So once downloaded, unzip it in the following path: C:inetpubwwwroot. This is the default local path for websites in IIS

Modify folder permissions
In order to guarantee the functioning of the program, it is highly recommended to modify the permissions of the folder. With this in mind, please place the uncompressed folder and right-click on it to enter the properties. Next, select the Security tab and then select Edit.

In the next window navigate to IIS users and grant full permission.

Opens IIS
After you have edited the folder permissions, please open Internet Information Services. Then follow this path: Server>Sites>Default Web Site>Bonobo.Git.Server. Then right-click on the folder and select Convert to Application.

In the pop-up window, there are several elements that you can modify. I recommend leaving them all as they are, and press OK to finish the process.

Configuring the Git server
To start the server, please go to the browser and type the following address: localhost/Bonobo.Git.Server

The default username and password is admin. Entering the credentials will skip the configuration options. The first task will be to create a user. To do this, click on the Users tab

Below you will see the list of users, please click on Add new user. Then enter the data of the user to register. Press Create to finish the process.

It is also possible to create teams. As its name indicates, it is the combination of two or more users to perform jobs. To create it, select the Teams tab. And then in Create New Team. Please assign a name and description to the team. Additionally, choose the team members, and press save to finish.

Now let’s create our first repository. To do this please click on Create new repository. Add the repository name, group, and description. You can also attach a logo. Likewise, set the contributors and administrators of the repository. Finally, press create and the repository will be ready.

At the end of the process, you can enter the description of the repository. The repository address is available for copying. It is now possible to use a git client to access it. Finally, we have seen how to establish a git server in Windows Server 2019. This option will allow sharing the repository to the clients that access the server. If you follow the described steps it is possible to configure it in our server. I hope you liked this post. Thank you very much and see you soon.
Тут я, вкратце, опишу один из возможных вариантов установки сервера Git под Windows Server. Хотя эти рекомендации так же можно применить и для установки сервера Git на обычную рабочую станцию под Windows от XP и выше.
И так скачиваем дистриб от сель. Кстати там же можете почитать и процедуру установки, там все более просто без заморочек на безопасность и обновления Git под винду до текущей версии.
Вообще эти ребята взяли этот проект, довели его чуток до ума, то есть просто автоматизировали весь процесс установки и плюс дописали свои плюшки и стали его продавать. Но для использования этого сервера Git максимум двумя людьми он бесплатен. Ну все это вы можете почитать на сайте от куда скачаете дистриб.
И так скачали. Понеслась установка.


Рекомендую поставить Git в комплекте который идет с инсталлятором, тем более если у вас нет установленного на сервере. Если есть, и если прописаны правильно пути к нему, то заработает и без установки из дистриба.


Ну и все устанавливается. У меня на сервере уже стоит Apache, поэтому его надо было потушить, так как этот Git сервер по умолчанию запускается на портах 80 и 443, но это можно поменять.
И так тушим Apache.

И запускаем GitStack сразу по окончании установки. Просто оставляем галку включённой.

Запустится ваш браузер по умолчанию и выведет вас сразу на страничку сервера

Логинимся с учеткой по умочанию

Сразу же меняем пароль администратора


GitStack по умолчанию запускается под системной учетной записью, что не есть гуд для веб сервиса. Поэтом меняем это дело, на локальную учетку.


И перезапускаем сервис. Идем опять в админку сервера и меняем порты на которых он будет висеть.

Так как у меня сервер находится за файрволом, то я оставил оба и HTTP и HTTPS, развесил их на порты на которых у меня не слушает Apache. Вы можете поставить какие вашей душеньке угодно.
После смены портов естественно в адресной строке надо будет указывать уже порт, чтобы дальше рулить админкой. Рестартуем GitStack


Ну и я стартовал свой Apache. У вас этого может и не быть. То есть по ходу у меня запущено два веб сервера.

Заходим по новому порту и донастраиваем чтобы слушал еще и по HTTPS.

Проверяем работу HTTPS

Все теперь можно высовывать морду сервера наружу в большой мир. Но осторожно ….
И чтобы большой мир увидел эту морду надо открыть порт на локальном файрволе сервера, так как по умолчанию GitStack открывает порт 80

Все, теперь уже можно заходить на сервак удаленно через доменное имя, ну или его внешний IP.
Далее создаем пользователя


Создаем репозиторий

И даем пользователю права на репозиторий


И еще немного настроек безопасности. Если зайти на сервер без указания папки GitStack то увидим такое

Это не есть гуд. Правим указанный файлик настроек

Рестартуем вебсервис GitStack и видим уже такую картину.

Теперь клонируем репозиторий с нашего сервера на локальную машину

Настраиваем локально Git и делаем первый локальный коммит

И далее заливаем его на сервер. Но делаем это по особенному, так как у нас на сервере само подписанный сертификат.

Все залилось
У сервера достаточно приятная и понятная морда для отслеживания коммитов через веб интерфейс

Ну и на последок надо заметить что на момент написания статьи в комплекте с GitStack шла не самая последняя версия Git

Я установил последнюю версию Git, переписал пути в переменной PATH и все заработало на новой версии

Ну и на последок можно сказать что можно вписать в конфиг проекта строку
$ git config —local http.sslVerify false
Чтобы каждый раз не писать в командах отмену проверки валидности сертификата.
P.S. Существует еще несколько вариантов сервера Git под Windows. Но мне этот как то больше приглянулся.
Система контроля версий Git полезна не только для программистов но и для системных администраторов. Рассмотрим процесс установки программного обеспечения, а также настройки подключения к репозиторию GitHub, на сервере под управлением ОС Windows.
Немного теории.
Git — одна из популярных современных систем контроля версий. В основном используется разработчиками программного обеспечения с целью отслеживания изменений в программных продуктах в ходе их разработки. Изначально Git создали для помощи в разработке ядра Linux, однако из-за своих преимуществ, проект ушел в массы.
Приступаем к установке.
Открываем официальный сайт проекта, кликаем по 64-битной версии для Windows.
 .
.
Загрузка начнется автоматически, дожидаемся ее окончания. Запускаем полученный файл.
Программа установки приветствует нас лицензионным соглашением. Кликаем по кнопке “Next”.

На следующем шаге указываем путь установки. Нас устраивает указанный по умолчанию. Кликаем “Next”.

На этапе выбора компонентов, отметим галочкой создание ярлыка Git на рабочем столе и переходим к следующему этапу.

Теперь программа установки предлагает создать ярлык в меню Пуск. Если в этом не видите необходимости, установите соответствующую галку. Кликаем по кнопке “Next”.

На следующем этапе, установщик предложит выбрать редактор для git по умолчанию. Для новичков лучше использовать nano, для тех, кто любит посложнее — Vim. Хотя допускается использование Notepad++ и прочего. Переходим к следующему шагу.

Теперь программа установщик спрашивает как Вы собираетесь использовать командную строку:
- Use Git from Git Bash only — использование только из командной строки Bash.
- Use Git from the Windows Command Prompt — использование командной строки Bash, а также минимальный набор команд Git из командной строки Windows.
- Use Git and optional Unix tools from the Windows Command Prompt — использование Git и утилит Unix из командной строки Windows. При выборе этой опции будут перезаписаны некоторые утилиты ОС Windows, например find и sort.
Оставляем первый вариант и двигаемся дальше.

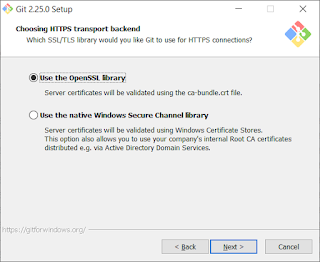
Теперь установщик спрашивает о том, какую библиотеку следует использовать для HTTPS-соединений. Оставляем openssl и переходим к следующему шагу.

Следующий шаг можно назвать самым значимым. Вопрос программы установки в том, какой формат завершения строки использовать. Одной из отличительных особенностей Windows от Unix-подобных систем — символ перехода на новую строку в файлах, а именно, LF и CRLF — управляющие символ для переноса строки в Unix и Windows соответственно.
Мы рекомендуем выбрать параметр предложенный системой — отладка файла в формате Windows, а загрузка файла — в Unix-формате. Кликаем по кнопке “Далее”.

На данном этапе, программа запросит каким терминалом пользоваться далее:
- MinTTY — терминал Unix;
- Windows — стандартный терминал (командная строка) Windows.
В нашем случае оставляем “как есть” и двигаемся дальше.

На следующем шаге, установщик попросит отметить необходимые функции:
- File system caching — кэширование файловой системой.
- Git Credential Manager — включить менеджер учетных данных.
- Symbolic links — разрешить использование символьных ссылок.
Выбираем то, что необходимо и переходим к следующему шагу.

На данном шаге, программа установки предлагает использовать экспериментальную опцию. Использовать ее или нет — решать Вам. Кликаем по кнопке “Install”.

Программа приступает к копированию файлов. Дожидаемся окончания процесса.

По окончании процесса установки нажимаем “Finish”.

Подключаемся к репозиторию.
Предполагается, что у вас уже есть своя учетная запись на github/gitlab. Если нет, то, в случае с github, проходим несложный процесс регистрации на сайте. Затем авторизуемся на нем и создаем репозиторий. Для этого кликаем по кнопке “Start a project”.

Указываем имя репозитория и кликаем по кнопке “Create repository”.

Репозиторий создан.
Добавляем файлы.
Предположим, что у нас есть файл, который необходимо добавить в репозиторий git или gitlab. Открываем папку, где располагается файл, кликаем правой кнопкой мыши по свободному месту и из открывшегося контекстного меню выбираем “Git Bash Here”.

Откроется командная строка. Последовательно выполняем следующие команды:
git config --global user.email "youmail@example.com"
git config --global user.name "Ваше имя"
Таким образом мы указали нашу почту и имя.

Для того, чтобы начать отслеживать изменения в текущей папке, выполняем следующие команды:
git init
git add .

Выполняем свой первый коммит и добавляем изменения на сервер:
git commit -m "Init"
Важно. Чтобы внести изменения на сервер, следует использовать для github:
git remote add origin https://github.com/пользователь/название_репозитория.git
git push -u origin master
Для gitlab:
git remote add gitlab https://server/namespace/project.git
git push -u gitlab master

После запуска команды, откроется окно авторизации. Вводим данные, которые использовали при регистрации.

Настройка аутентификации по SSH-ключам.
Для начала создадим ключ:
ssh-keygen -t rsa -b 4096 -C "<a href="mailto:yourmail@gmail.com">yourmail@gmail.com</a>"
В ходе генерации ключа, программа запросит ввод парольной фразы, которая необходима для защиты самого ключа. Можно ответить на вопрос двойным нажатием на Enter.
Закрытый ключ будет находиться по пути C:Users<Пользователь>.sshid_rsa. Открытый ключ — C:Users<Пользователь>.sshid_rsa.pub

Запускаем SSH-агента:
eval $(ssh-agent -s)
Добавляем ключи к ssh-агенту:
ssh-add ~/.ssh/id_rsa

Добавляем созданный ключ на сервер Git. На сайте github, в верхнем правом углу, кликаем по иконке учетной записи, выбираем “Setting”.

На обновленной странице, в левом меню, выбираем “SSH and PGP keys”, а в основной части окна, напротив SSH keys, кликаем по кнопке “New SSH key”.

Заполняем поле Title. В поле Key вставляем содержимое файла C:Users<Пользователь>.sshid_rsa.pub
Кликаем по кнопке “Add SSH key”.

Если все выполнено правильно, появится примерно такая запись:
Для проверки настроек, выполняем команду:
ssh -T git@<домен или ip-адрес git-сервера>
Например:
ssh -T <a href="mailto:git@github.com">git@github.com</a>
В ходе выполнения команды, программа запросит: “Уверены ли вы в продолжении соединения”. Это стандартный вопрос безопасности. Отвечаем — yes.
Если все выполнено правильно, программа выведет приветственную речь.

220140
Минск
ул. Домбровская, д. 9
+375 (173) 88-72-49
![]()
700
300
ООО «ИТГЛОБАЛКОМ БЕЛ»
220140
Минск
ул. Домбровская, д. 9
+375 (173) 88-72-49
![]()
700
300
ООО «ИТГЛОБАЛКОМ БЕЛ»
You need to download and install:
- Win32_OpenSSH
- Git for Windows, selecting the «Run Git and included Unix tools from the Windows Command Prompt» when prompted. This option will install a bin folder in Program Filesgit that will be placed into your path thus taking possibly taking precedence over other tools.
-
Set system environment variable for sshd to pick up the git commands
$gitPath = Join-Path -Path $env:ProgramFiles -ChildPath "gitmingw64bin"
$machinePath = [Environment]::GetEnvironmentVariable('Path', 'MACHINE')
[Environment]::SetEnvironmentVariable('Path', "$gitPath;$machinePath", 'Machine')
-
Restart sshd so the changes to the
Pathenvironment variable can take effect. -
Create Windows users for all Git users.
-
Create a central Git repository. Go to where you want to create a central repo,
git clone --bare <source dir>. A directory with name<source dir>.gitwill be created. In it will be the .git contents of your source dir repo. for example:git clone --bare c:gitnewrepo.git -
If you already have user private and public keys, copy the user public key to
C:Users{user}.sshand rename it to authorized_keys
On Client
-
Set environment variable for git to use Win32_OpenSSH
$env:GIT_SSH_COMMAND = '"C:Program FilesOpenSSHssh.exe" -T' -
(Optional) For key based authentication to work, generate user private and public key. The generated public key need to copy to C:Users{user}.sshauthorized_keys as indicated in step 5 on Server
ssh-keygen.exe -t ed25519 -f c:testmyprivatekey -
(Optional) Register the user private key for single sign on
ssh-add.exe c:testmyprivatekey -
To check out a repository, go to where you want to put your local repo,
**Note that git clone user@domain@servermachine:C:/test/myrepo.git does not work due to known issue. Work around it to set powershell as default Shell in registry.
Or
by following steps when cmd is default shell:
 cd c:mygitrepros
 # initialize a local repo folder
 git init mylocalrepo
 cd mylocalrepo
 # add the remote repro
 git remote add origin user@domain@servermachine:C:/test/myrepo.git
 # work around the known issue by launching powershell to run the git commands
 git config --local remote.origin.uploadpack "powershell git-upload-pack"
 git config --local remote.origin.receivepack "powershell git-receive-pack"
 git fetch origin
This article is a beginner-friendly guide to Git and can be used as a starting point. It introduces newbies to Git concepts, its terminologies, and a few basic operations with concise examples. After referring to this guide, users will be able to use Git confidently in their projects.
Git is a distributed version control system. It is used for tracking changes in source code during the software development process. It was initially designed and developed by Linus Torvalds for Linux kernel development. It is free software distributed under the terms of the GPLv2 license. It mainly focuses on speed, data integrity, distributed development, and non-linear workflows.
Git is the de facto standard in version control systems. It became popular because of its speed and distributed development model. One might want to know what a distributed version control system is and how it is different from other version control systems.
A centralised version control system uses a central server to store all files and enable collaboration. In this model, every operation requires communication with the central server. However, this design imposes a major limitation. The central server is a single point of failure. If it fails, all collaborators who depend on the server will be affected. This is where distributed version control systems come into the picture. A distributed version control system does not rely on the availability of the central server. Every user gets the entire copy of the repository. Hence, it is possible to work on the repository even when the Git server is unavailable. The connectivity to the server is required only while syncing the changes.
A few salient features of Git are:
- Free and open source
- Inexpensive branching and merging
- Distributed in nature
- Implicit backup
- Small, fast and less resource hungry
Basic terminology
This section discusses the terminology and operations of Git.
Working tree: This is a directory on the local file system where the source code resides.
Repository: Repository is the workspace that contains source code and metadata of its versions. The local repository resides on the local file system, whereas the remote repository resides on the remote Git server.
Commit: This is a Git object that represents the change set within the repository. A unique SHA-1 hash is assigned to each commit.
Clone: This is a Git operation that downloads the entire remote repository to the local file system.
Pull: This syncs the local repository with the remote repository by downloading new files.
Push: This Git operation uploads files (one or more commits) from a local repository to the remote repository.
Installation and configuration
Git is free and open source software. One can download and use it without any restrictions. Follow the steps given below to install Git on a Windows server:
1. Go to https://gitforwindows.org/ and download the latest version of Git.
2. Double click on the installer and follow on-screen instructions.
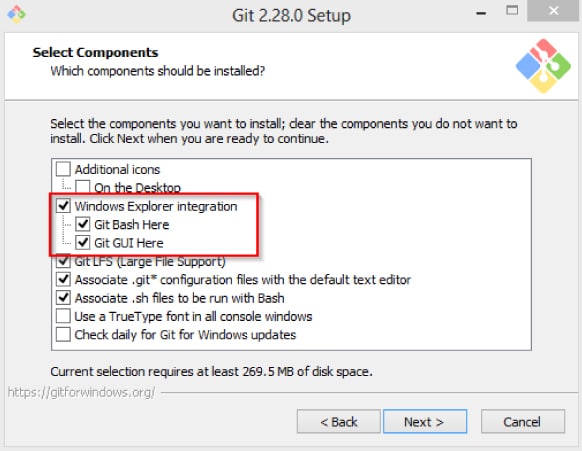
3. Don’t forget to select the ‘Windows Explorer Integration’ option during setup. Please refer to Figure 1.
4. Go to the Start menu and launch ‘Git Bash’. You should see a command prompt, as shown in Figure 2.
We have successfully installed Git on a Windows machine. Let us configure it using CLI. Configure the user name and email by executing the commands given below in a terminal:
$ git config --global user.name “Jarvis”
$ git config --global user.email “jarvis@acme.com”
Note: Use your user name and e-mail address while configuring Git. This information will appear in each commit you perform.
Now, execute the command given below to validate the configuration:
$ git config –list
This command will generate the following output:
diff.astextplain.textconv=astextplain
filter.lfs.clean=git-lfs clean -- %f
filter.lfs.smudge=git-lfs smudge -- %f
filter.lfs.process=git-lfs filter-process
filter.lfs.required=true
http.sslbackend=openssl
http.sslcainfo=C:/Program Files/Git/mingw64/ssl/certs/ca-bundle.crt
core.autocrlf=true
core.fscache=true
core.symlinks=false
pull.rebase=false
user.name=Jarvis
user.email=jarvis@acme.com
Here, we can see the user name and email address, which we configured earlier. Congrats! You have successfully configured Git on your machine.
Basic Git workflow
Most of the times, you will be using the existing repository hosted in your organisation’s network. Hence, we will use a public repository for demonstration. We will walk through the basic Git workflow. As part of this workflow, we will perform the following steps in the order they are listed:
1. Download source code from the remote repository
2. Inspect the repository
3. Modify the repository and check the status of the repository
4. Upload files to the repository
5. Sync local repository to the remote repository
Download source code
Clone is a Git operation that downloads the remote repository to the local file system. For our demonstration, we will use the Redis repository hosted on GitHub. This repository is publicly accessible. To clone this repository, execute the command given below in the terminal:
$ git clone https://github.com/redis/redis.git
In the above command, the clone is Git’s sub-command, and the next argument is the unique URL of the repository. After successful completion, you should see an output similar to this:
Cloning into ‘redis’...
remote: Enumerating objects: 11, done.
remote: Counting objects: 100% (11/11), done.
remote: Compressing objects: 100% (11/11), done.
remote: Total 69075 (delta 1), reused 2 (delta 0), pack-reused 69064
Receiving objects: 100% (69075/69075), 92.93 MiB | 1.65 MiB/s, done.
Resolving deltas: 100% (48902/48902), done.
Updating files: 100% (837/837), done.
Execute the ls command as follows to verify the download of the repository:
$ ls redis/
This command should generate the following output:
00-RELEASENOTES deps/ README.md runtest-moduleapi* tests/
BUGS INSTALL redis.conf runtest-sentinel* TLS.md
CONTRIBUTING Makefile runtest* sentinel.conf utils/
COPYING MANIFESTO runtest-cluster* src/
Inspect the repository
Now that we have a copy of the remote repository on a local file system, let us inspect the repository. First, cd to redis as follows:
$ cd redis
To list all commits from the repository, execute the command:
$ git log
This command will show details of the commit. The output will appear in the UNIX pager (e.g., less). One can use the up and down arrow keys to scroll through the commits. Press q to quit the pager.
The git log command generates a verbose output. Execute the command given below to generate the non-verbose output:
$ git log –oneline
This command should generate the following output:
57b8e0069 support sentinel myid subcommand (#7858)
bea40e6a4 memory reporting of clients argv (#7874)
f87a47dc9 fix new build warning about getGenericCommand (#7882)
6418d767e redis-cli add control on raw format line delimiter (#7841)
66ee45b65 Add GET parameter to SET command (#7852)
In the above command, the first column is a unique SHA-1 hash of the commit. This value is generated and assigned to each commit automatically. In Git terminology, it is called a commit id. The second column is the commit message, which was provided by the user. We can use the commit id to check commit contents. For example, the command given below shows the contents of the ‘57b8e0069’ commit:
$ git show 57b8e0069
This command will show details of commit like SHA-1 hash, the author’s name and e-mail, date and time, commit message, and the actual code changes made. One can use the up and down arrow keys to scroll through the commit and q to quit the UNIX pager.
To see files belonging to the particular commit, use the –name-only option as follows:
$ git show 57b8e0069 --name-only
This command will generate the following output:
commit 57b8e00695d037971 342cbcc43734a990bfaf081
Author: Wen Hui <wen.hui.ware@gmail.com>
Date: Mon Oct 5 06:37:20 2020 -0400
support sentinel myid subcommand (#7858)

src/sentinel.c
The above output shows that the src/sentinel.c file belongs to the 57b8e0069’ commit id.

Modify the repository
We can modify the repository by adding, removing, or editing files from the repository. Each operation will change the status of the repository. Let us verify the status by executing the command:
$ git status -s
This command will not generate any output, as the repository status is clean.
Let us add, remove, and edit a file from the repository, and verify the status:
$ echo “This is sample file” > sample-file.txt
$ echo “Jarvis” >> CONTRIBUTING
$ rm COPYING
$ git status -s
Now the repository status has been changed. The status command will show the following output:
M CONTRIBUTING
D COPYING
?? sample-file.txt
In the above output, the letter ‘M’ in the first column indicates that there has been a modification to the ‘CONTRIBUTING’ file. The letter ‘D’ indicates that the ‘COPYING’ file has been deleted. The ‘??’ indicates that sample-file.txt is the new file and Git doesn’t know anything about it.
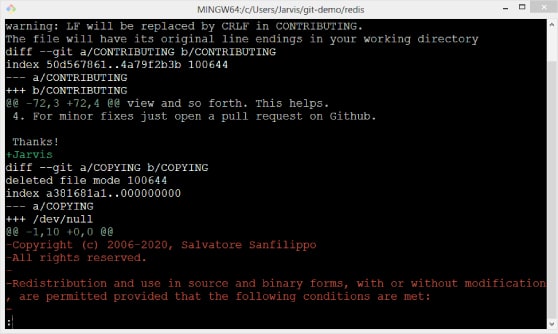
To verify the changes made in the repository, execute the git diff command as follows:
$ git diff
This command will show output in the UNIX pager. The lines in green with the ‘+’ symbol at the beginning represent the new addition to the repository. The lines in red with the ‘-’ symbol at the beginning represent deletion from the repository. Figure 3 is the screenshot of the same.
Upload files to the repository
In the previous section, we made a few changes to the repository. However, those changes are still on the local file system. Let us upload them to the remote repository.
First, create a changeset. We will include all the three files in the changeset as follows:
$ git add CONTRIBUTING COPYING sample-file.txt
$ git status -s
The above command will generate the following output:
M CONTRIBUTING
D COPYING
A sample-file.txt
If you see carefully, there is the letter ‘A’ before the sample-file.txt file, which indicates that it’s a new file in the repository and part of the current changeset. Now, let us create a commit:
$ git commit -m “Sample commit”
This command will generate the following output:
[unstable be159ed3d] Sample commit
3 files changed, 2 insertions(+), 10 deletions(-)
delete mode 100644 COPYING
create mode 100644 sample-file.txt
Let us verify the commit using the log command as follows:
$ git log --oneline
be159ed3d (HEAD -> unstable) Sample commit
Wonderful! Our commit appears in the repository. Also, a unique SHA-1 hash is generated and assigned to it.
However, our changes are still present on the local file system. To send this commit to the remote repository, execute a push command as follows:
$ git push
Note: Connectivity to the remote Git server is needed to perform this operation.
Syncing the repository
In the previous section, we uploaded our changes to the remote repository. Similarly, other developers will upload their changes to the remote repository too. Hence, we should sync our local repository periodically. We can use the pull command for this:
$ git pull
Note: Connectivity to the remote Git server is needed to perform this operation too.
1. What is Git Server?
It is a server installed Git service. In which, Git is a distributed version control system designed to handle everything from small to very large projects with speed and efficiency.
In this article, I will guide you step by step to setup a Git Server on Windows with OpenSSH.
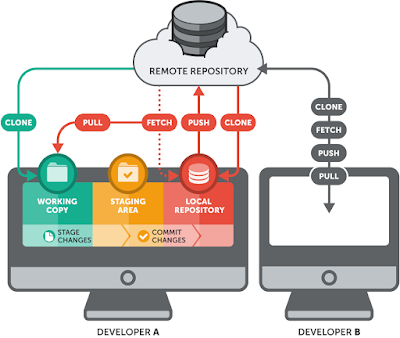
2. What is Remote & Local Repository?
Remote Repository is a repository on a server where source codes from developers are centralized. While Local Repository is a repository cloned (copied) from Remote Repository to developer’s computer (client).
The following picture will illustrate how repositories working.
3. Required tools
+Win32 OpenSSH
+Git for Windows
4. Install Git for Windows
Go to Git for Windows, select & download suitable version for your Windows (32-bit or 64-bit).
Installing it with option «Use Git and optional Unix tools from the Command Prompt» and «Use the OpenSSL library«.

After installing, open Windows cmd or Git bash run below command to check if it is installed ok:
git —version
5. Install OpenSSH
Go to Win32 OpenSSH, select & download a suitable version for your Windows. Unpack it to a folder (e.g. C:OpenSSH).
Run Windows PowerShell as Administrator right, change to the OpenSSH folder, then run below command to install:
powershell -ExecutionPolicy ByPass -File install-sshd.ps1
See the following picture for more details:

Open Windows Services then set OpenSSH SSH Server & OpenSSH Authetication Agent to Automatic and start them.

Because OpenSSH use port 22 by default, so you must open this port on your Windows firewall. You can change the SSH service port value (e.g. Port 1235) in its config file: C:OpenSSHsshd_config_default. If you change the port, remember open the firewall for new port and restart SSH services.
To check if the OpenSSH server is working, on a client computer download PuTTY tool and connect to the SSH server via its IP and a Windows user on the server.
In case your client computer already had ssh client, you can use Windows cmd to connect to the server. If your client doesn’t have, you can install Win32 OpenSSH on the client. See below picture for sample of checking SSH connection.

Every time you connect to the SSH server, it requires to input password. To avoid password, you can use Public & Private keys for authenticating. Let generate these keys on your clients by using ssh-keygen tool, for example:
ssh-keygen -t rsa -b 4096
It will generate 2 files: id_rsa and id_rsa.pub in SSH folder of Windows user on the client (C:Users<username>.ssh). Remember let passphrase as empty (key enter) when it asks you key in, it will help you skip to enter passphrase every time you connect to the server. Copy id_rsa.pub file to the SSH folder of Windows user on the server (C:Users<username>.ssh) and rename it to authorized_keys. Then on the server, right click on this file and make sure removing rights of all users except Administrators and SYSTEM, for example:

On the server, verify if file C:ProgramDatasshsshd_config (file config of SSH service) has below lines uncommented:
PubkeyAuthentication yes
AuthorizedKeysFile .ssh/authorized_keys
If not, let uncomment them then restart OpenSSH SSH Server. Try again with ssh username@computername_or_IP, it will login to SSH Server without entering any password/passphrase.
6. Create Remote Repository (central repo)
On the server, for existing source folder, you can run below commands from Windows cmd:
cd D:mygitmy_central_repo
git init —bare
Or create new central repo by command:
git clone —bare D:mygitmy_central_repo
On the client, create a folder and add remote repository into:
cd E:local_repo
git init
git remote add origin hunglv@192.168.10.101:D:/mygit/my_centro_repo
In which origin is a name standfor remote repo. Next you must run 2 below work arround commands to set powershell as default Shell in registry:
git config —local remote.origin.uploadpack «powershell git-upload-pack»
git config —local remote.origin.receivepack «powershell git-receive-pack»
Now you can fetch remote repo to your local repo for working:
git fetch origin
OK, you have done the setup for Git Server on Windows with OpenSSH, Remote and Local Repository. Next is common Git commands that are often used.
7. Basic Git commands
git fetch <remote name> <branch>: fetching repo versioning data from remote repo to local repo
git pull <remote name> <brannch>: get all (included new files & merge updated files) from remote repo to local
git add <file>: add new file to local repo
git commit -m <«message»>: commit all updates / news to your local repo
git push <remote> <branch>: push all updates / news from your local repo to remote repo
git remote -v: see remote repo linked
git status: check status / changes in local repo
The end for this article. Hope you can start your projects on Git easily.
Any comment is welcome. Bye!
January 05, 2018 | 3 Minute Read
Ну вот наступил 11111100010 год ии у меня появилось свободная минутка, чтобы написать тут что-то полезное:-)
Случилось так, что понадобился приватный git репозиторий, а покупать VIP аккаунт на github не хотелось, да и политика безопасности компании, для которой разрабатывается проект, не позволяет это делать. По этому было принято решение о развертывании собственного git-сервера. Так как я C# developer, то речь пойдет конечно же о Windows Server и IIS Server. Пользователям Linux скажу, что там установка этого «богатства» еще проще и состоит из пары команд в терминале.
Немного о платформе.
Данный git-server был написан на C# на ASP.NET и представляет собой Web приложение. Все исходные коды доступны тут. Все желающие могут ознакомиться и оценить кривизну кода) А мы поехали дальше -)
Как его ставить?
Для успешной установки нам нужны
- Сам сервер на Windows Server 2008 R2/2012/2012 R2/2016 (кто-то сидит на ней?)
- Internet Information Services (IIS) 7 или 8
- .NET Framework 4.6
- visual redist 2012/2015 и CLR
- Server дистрибутив
Быстро пробежимся по основным пунктам. У меня стоит Windows Server 2012 R2. И показывать я буду на ней. Для Windows Server 2008 все примерно также. Предполагается, что Виндасервер у вас сконфигурирован и настроен. Если это не так – идите к документации)
IIS Сервер + .NET Framework.
Запускаем Server Manager (диспетчер серверов) -> Manage (Управление) -> Add Roles and Features (Добавить роли и компоненты) …

Выбрать Role-based or Feature-based Installation (установка ролей или компонентов)
Далее выбираем наш сервер
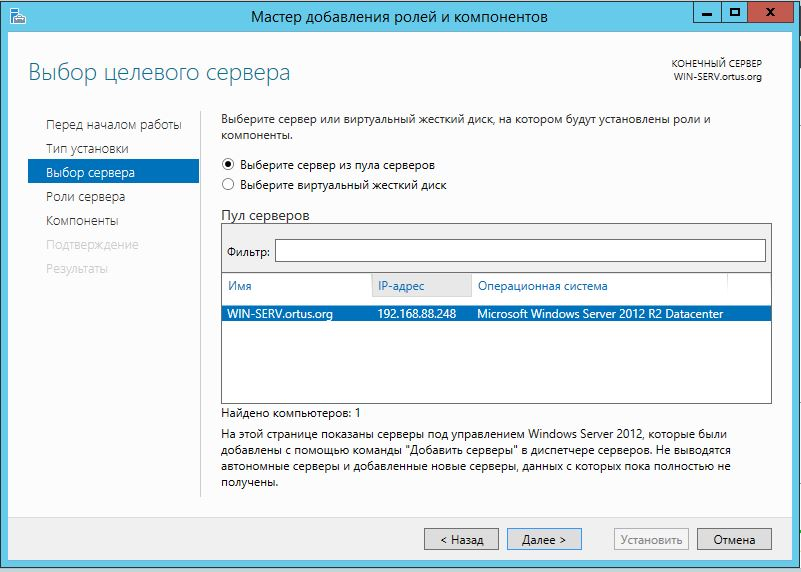
В ролях выбираем Web Server (IIS).
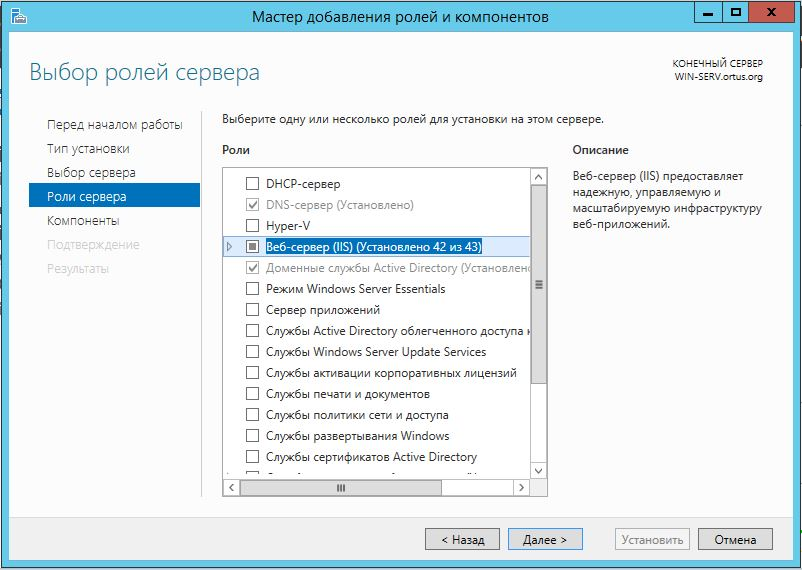
В компонентах жмякаем на .NET framework 4.5 и на последнем шаге выбираем нужные настройки.
Установка… Потребует перезагрузки сервера. Загружаем .NET Framework 4.6 и ставим его. Все теперь можно ребутиться.
Для любителей консоли…
Start /w pkgmgr /iu:IIS-WebServerRole;
IIS-WebServer;
IIS-CommonHttpFeatures;
IIS-StaticContent;
IIS-DefaultDocument;
IIS-DirectoryBrowsing;
IIS-HttpErrors;
IIS-HealthAndDiagnostics;
IIS-HttpLogging;
IIS-LoggingLibraries;
IIS-RequestMonitor;
IIS-Security;
IIS-RequestFiltering;
IIS-HttpCompressionStatic;
IIS-WebServerManagementTools;
IIS-ManagementConsole;
WAS-WindowsActivationService;
WAS-ProcessModel;
WAS-NetFxEnvironment;
WAS-ConfigurationAPI
Git Server
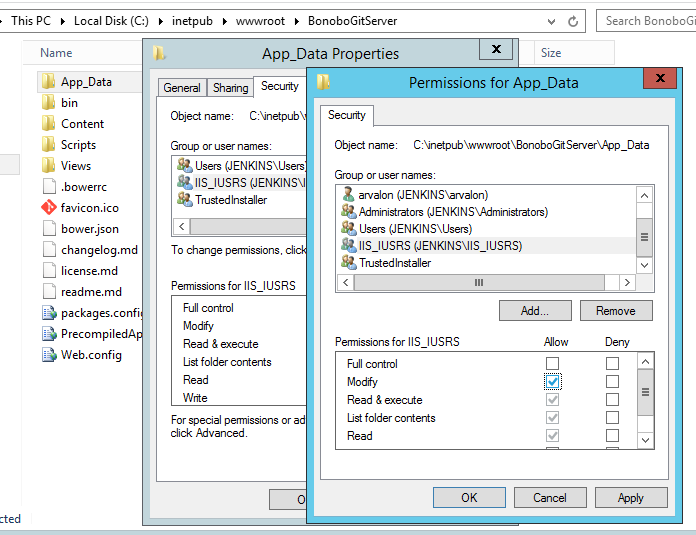
Всё, теперь можно перейти к непосредственно развёртыванию git сервера. Разархивируем содержимое дистрибутива в wwwroot IIS-сервера (C:inetpubwwwroot) и даём права учетной записи IIS_IUSERS на модификацию каталога App_Data.
Запускаем IIS Manager и конвертируем Git в приложение.
После конвертации жмем Action – Browse (Управление приложением – обзор) и у нас должен открыться сайтик с формой для входа. Теперь он доступен по адресу IP сервераgit в локальной сети. При желании его можно вывезти во внешнюю сеть и вообще делать с ним все что душе угодно!
Настройка.
По стандарту логин пароль для входа adminadmin.
В настройках можно указать другой путь для хранения файлов, изменить язык и вообще сделать много полезного)
Можно добавлять новых пользователей и осуществлять контроль видимости репозиториев, выдавать исключительные права пользователям. Также можно объединять пользователей в команды и управлять ими. На пример команде Core Developers будут доступны все ветки в репозитории, а команде Testers только ветка Master.
P.s.
Я надеюсь данная статья была полезна для вас. Ставьте Like за встроенный редактор кода и подсветку синтаксиса))) Приятного кодинга!
— Advertisement —
Hello, in this opportunity, we will talk about Windows Server. Specifically, about the installation of server Git. It is a version control software designed by Linus Torvalds, thinking about the efficiency and reliability of maintaining versions of applications when these have a large number of source code files. A version control system is the management of the various changes that are made on the elements of a product or a configuration of the same. This tool is very useful when developing software or a web page. Furthermore, it facilitates the work of the developers, because it allows you to update and edit their projects to improve them. On the other hand, there are free and paid options to host our projects on web servers. In general, free options have space and privacy limitations. So, here I will show you how to install a Git server on Windows Server 2019.
Prerequisites.
- Internet Information Services (IIS) have to be installed on Windows Server. If you don’t know how to do it, please check our post.
- Static ip address
Installing a Git server using bonobo server.
As mentioned above, there are trade options to host Git on web servers. However, it is likely that you want to save costs or may not have limitations. In addition, using Windows Server it is possible to put the server Git within the reach of your organization. For the purpose, We’ll use a software called Bonobo Git Server. It is free and open-source. With that intention, please go to the program page and download the zip file of the application. At the time of writing this article, the version is 6.5.0.
Please note that the file is compressed in ZIP format. So once downloaded, unzip it in the following path: C:\inetpub\wwwroot. This is the default local path for websites in IIS
Modify folder permissions
In order to guarantee the functioning of the program, it is highly recommended to modify the permissions of the folder. With this in mind, please place the uncompressed folder and right-click on it to enter the properties. Next, select the Security tab and then select Edit.
In the next window navigate to IIS users and grant full permission.
Opens IIS
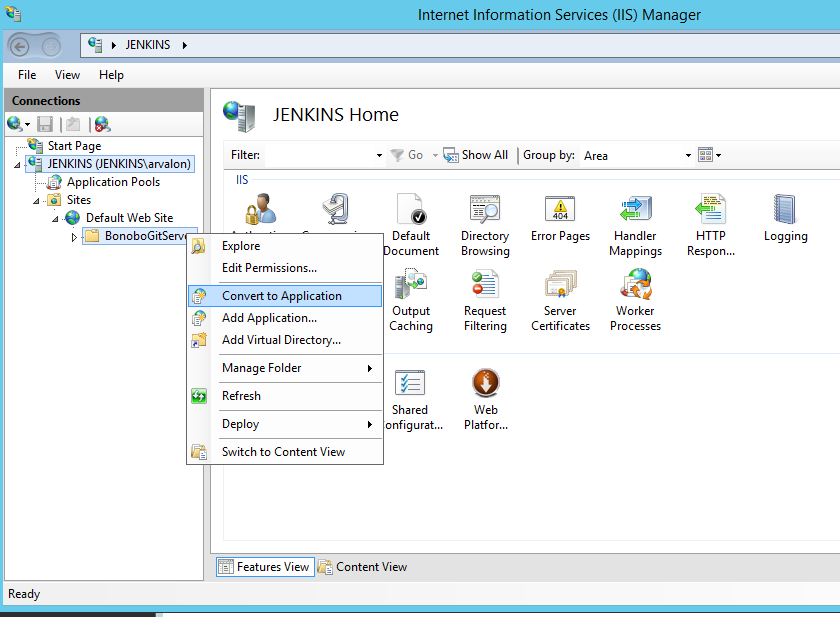
After you have edited the folder permissions, please open Internet Information Services. Then follow this path: Server>Sites>Default Web Site>Bonobo.Git.Server. Then right-click on the folder and select Convert to Application.
In the pop-up window, there are several elements that you can modify. I recommend leaving them all as they are, and press OK to finish the process.
Configuring the Git server
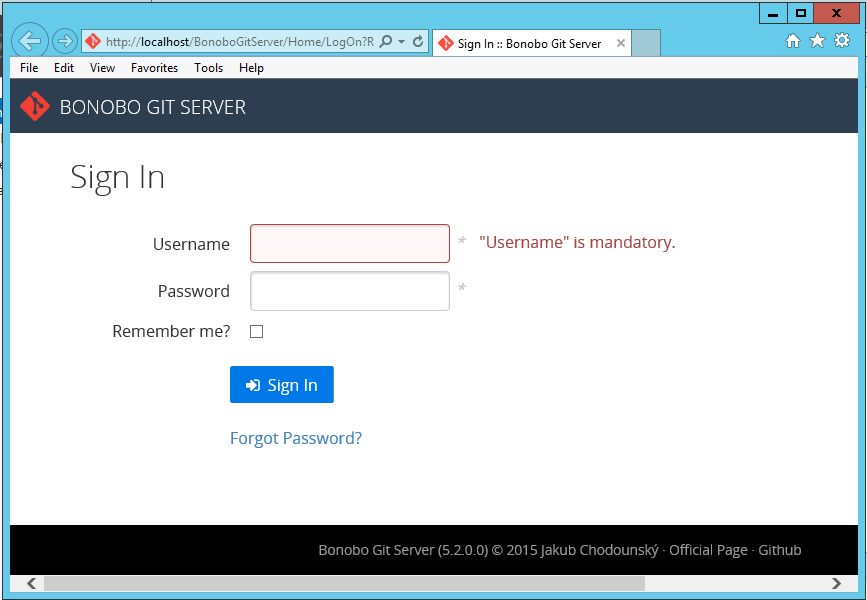
To start the server, please go to the browser and type the following address: localhost/Bonobo.Git.Server
The default username and password is admin. Entering the credentials will skip the configuration options. The first task will be to create a user. To do this, click on the Users tab
Below you will see the list of users, please click on Add new user. Then enter the data of the user to register. Press Create to finish the process.
It is also possible to create teams. As its name indicates, it is the combination of two or more users to perform jobs. To create it, select the Teams tab. And then in Create New Team. Please assign a name and description to the team. Additionally, choose the team members, and press save to finish.
Now let’s create our first repository. To do this please click on Create new repository. Add the repository name, group, and description. You can also attach a logo. Likewise, set the contributors and administrators of the repository. Finally, press create and the repository will be ready.
At the end of the process, you can enter the description of the repository. The repository address is available for copying. It is now possible to use a git client to access it. Finally, we have seen how to establish a git server in Windows Server 2019. This option will allow sharing the repository to the clients that access the server. If you follow the described steps it is possible to configure it in our server. I hope you liked this post. Thank you very much and see you soon.
Время на прочтение
6 мин
Количество просмотров 175K

Предисловие или от куда взялась «бредовая» идея ставить Git на Windows
Я работаю в одной не очень большой IT-компании, которая продает свои и чужие программные решения, занимается проектами внедрения, оказывает клиентскую поддержку, проводит обучение и далее все такое в том же духе. До недавнего времени в моей маленькой команде разработки все было неплохо организовано и у нас даже был свой собственный достаточно мощный сервер. Но случилось непредвиденное и по воле злого рока один из серверов фирмы полетел, а руководство решило вместо него в стойку поставить наш сервер отдела разработки. Нам предложили «временно» переехать на любой из серверов общего назначения.
А теперь внимание! Только мы одни во всей фирме работаем на Линуксе, а все остальные сидят исключительно на Windows и сервера у нас тоже под управлением серверных редакций ОС от Билла Гейтса. И если перенос базы Redmine не вызывает особых вопросов, то задача поднять на сервере Windows сервер для Git меня сразу поставила в тупик. Но несколько часов потраченных на поиски дали мне простое работающее решение.
Изучение матчасти
Первым делом я обратился к документации по Git’у, где вычитал следующее:
Git умеет работать с четырьмя сетевыми протоколами для передачи данных: локальный, Secure Shell (SSH), Git и HTTP.
Первый вариант я не стал рассматривать, так как он подразумевает наличие сетевой шары открытой для общего доступа. Допустим, что с помощью групповых политик домена можно обезопасить данные от случайного удаления продавцем-стажером. Но как работать из дому? Ради нескольких «коммитов выходного дня» поднимать VPN?
Читаем далее и видим:
SSH — единственный из сетевых протоколов, предоставляющий доступ и на чтение, и на запись. Два других сетевых протокола (HTTP и Git) в большинстве случаев дают доступ только на чтение, поэтому даже если они вам доступны, вам всё равно понадобится SSH для записи.
Путь к конечной цели уже стал менее туманным: сначала требуется поставить сервер SSH, а далее установить одну из многочисленных сборок Git для Windows (официальную msysgit, Git Extensions, TortoiseGit, QGit и т.д.)
Выбор сервера SSH для Windows
Воспользовавшись поисковиком по сети Internet, я сделал небольшую подборку текущих реализаций SSH под Windows. Не претендую на то, что смог найти все решения в этой области, но самые популярные точно не пропустил. Итак:
Cygwin. В рамках проекта переноса функциональности Linux на Windows был портирован в том числе и OpenSSH. Библиотека проекта cygwin1.dll с реализацией SSH так же используются в большинстве других решений. Простую инструкцию с картинками по установке и настройке можно посмотреть тут. А так же рекомендую к прочтению статью из журнала «Windows IT Pro» № 7 за 2001 год — SSH в Windows.
freeSSHd. Лидер среди упоминается на форумах. Характеризуется как легкий в использовании. Лицензия позволяет бесплатно использовать в коммерческих целях. Нашел инструкцию по установке и настройке на Win2008.
WInSSHD. Самое богатое по функциональности из увиденных мною реализаций. Это хорошее профессиональное решение для обеспечения безопасности. Но для моего гвоздя — это микроскоп. Если кого-то продукт заинтересовал, то у них есть 30-дневная ознакомительная полная версия и возможность бесплатного частного использования.
KpyM Telnet/SSH Server. Плохих отзывов не заметил. Но меня смущает, что их сайт не обновляется с 2009 года, а так же на официальном форуме как-то безжизненно. С другой стороны, если продукт бесплатный и выполняет свою работу, то нет смысла заниматься развитием. Понравилось наличие в их FAQ списка других решений для SSH под Windows. Рекомендую заглянуть.
Copssh. Продукт от норвежской компании ITeF!X, в котором они к windows-реализации OpenSSH добавили красивый GUI-интерфейс администратора и некие «best practices». Именно это решение, более всего рекомендуется в обсуждении поднятия сервера Git под Windows на StackOverflow.
Случайная находка
Собственно под впечатлением ответов на StackOverflow я уже расслабился и решил было пойти проторенной моими предшественниками дорожкой. Но при изучении сайта компании ITeF!X я обнаружил, что у них есть и более подходящий для моих целей продукт — gitwin. Это оказался тот самый требуемый мне сервер Git под Windows.
Я вначале не поверил глазам — если такой чудо продукт существует, то почему о нем до сих пор не трубят на каждом шагу. Ответ нашелся в новостях компании — как оказалось программный продукт только полмесяца назад (11 октября 2013 года) выложили в общий доступ. Точнее на днях выложили бесплатную для использования версию. Платная существовала и раньше, но видимо не пользовалась особым спросом (с января 2012 года на официальном форуме компании всего две созданные темы в разделе gitwin).
Итак, что же собой представляет этот gitwin? В состав свободной версии входят:
- Cygwin версии 1.7.25
- OpenSSH версии 6.3
- Git версии 1.8.4
- Инсталятор от Itefix
На сайте целый раздел посвящен установке пакета. Кроме описания словами процесса «запуск инсталятора» -> «далее» -> «далее» -> «готово», представители компании не поленились записать все это еще на видео и выложили на YouTube. Не совсем понятно зачем это сделано и самое главное не понятно для кого?
Еще один раздел выделили для описания использования. Тут описали активацию нового пользователя для доступа по SSH, создание пары ключей и пустого репозитория. И так же кроме описания текстом дают записанный обучающий ролик:
Установка, настройка и тестирование сервера Git
Я установил на наш сервер gitwin редакции «free edition» и могу поделится только этим опытом.
1. Начинаем со скачивания инсталятора со странички продукта.
2. Запускаем инсталятор и нас спрашивают куда устанавливать продукт. Я оставил по-умолчанию в «C:\Program Files (x86)\ICW». Зачем может понадобится менять путь? Дело в том, что этот каталог станет корнем для линуксовых утилит и домашний каталог пользователя git тоже будет создан тут же «C:\Program Files (x86)\ICW\home\git\». Если есть предчувствие проблем с правами доступа, то можете поменять на менее проблемный для вас каталог.
3. В процессе установки выводятся сообщения о создании двух пользователе «SvcCOPSSH» и «git». Под первым пользователем будет работать служба «OpenSSHServer», а второй нужен собственно для обслуживания репозиториев. Пароли к этим пользователям можно узнать в конце процесса установки, если нажать на «Show details». Советую по правому щелчку скопировать вывод в буфер и сохранить на всякий случай.
3.1. Перепроверка состава пользователей показала, что инсталятор втихую создал еще одного пользователя — «sshd» с описанием «copSSH privilege separation user» и сам же отключил его. Не понятно и подозрительно…
4. Скорее всего из-за редакции «free edition» дальнейшие шаги отличались от описанных на сайте. Вместо консоли администрирования в меню Пуск/copssh поместили два пункта «01. Activate a user» и «02. Deactivate a user». Но суть процесса от этого не изменилась. Запускаем «01. Activate a user» и указываем пользователя для активации (в моем случае все тот же git), выбираем командную оболочку (выбор из bash, sftponly и false) и ставим опциональные галочки. Тут читаем внимательно:
4.1. Если нам нужна пара ключей, то оставляем включенную по-умолчанию «Create keys for public key authentication». При парольной авторизации можете снять…
4.2. Если у пользователя планируется использование его родного пользовательского каталога из C:\Users\ (или может у кого-то до сих пор C:\Documents and Settings\) тогда оставляем включенные по-умолчанию галочки «remove copssh home directory if it exists» и «Create link to user’s real home directory». Я рискнул их снять и таким образом все репозитории у меня будут запрятаны глубоко в системном каталоге Program Files.
5. После активации пользователя и создания ключей можем протестировать всю систему на работоспособность. Выбираем в меню Пуск/copssh пункт «03. Start a Unix BASH Shell» и создаем пустой репозиторий. Я не стал блистать остроумием и повторил команду с официального сайта:
$ git init —bare /home/git/repo-a
Initialized empty Git repository in /home/git/repo-a/
6. Далее тестирование переехало на мой рабочий ноут. Я успешно склонировал пустой репозиторий, закинул в него несколько файлов и запушил назад. Проблем не возникло. Перешел в другой каталог и снова склонировал репозиторий — на этот раз он был уже не пустой и содержал мой коммит с файликами. Таким образом с моей рабочей станции различия между работой с репозиторием Git на предыдущем сервере Ubuntu и на новом сервере Windows замечено не было!
Заключение
Удачно найденный gitwin оказался именно тем решением, которое я искал — запускается под Windows и создает иллюзию для пользователей, что они работают с полноценным удаленным репозиторием. Глюков пока не заметил. Но если обнаружу, то обязательно дополню данную статью.
Надеюсь, что собранные материалы окажутся кому-нибудь полезными. И хочу пожелать не боятся потратить несколько часов на поиски, если вы не уверены, что в вашей голове наиболее актуальная информация. Ведь если бы я изначально зашел на StackOverflow и выполнил все по детальному пошаговому руководству от Тима Дэвиса, то не узнал бы о существовании более короткого пути, когда вся инфраструктура поднимается и настраивается буквально в десяток кликов мышкой. Успехов!
Послесловие. Истории успехов от хабраюзеров
Я подобно Сократу с каждым новым квантом знаний понимаю как еще много того, чего я все еще не знаю. В комментариях коллеги описывают положительный опыт на заданную мною тему, который грех игнорировать. Итак:
A1lfeG вместе со своей командой далеки от Linux’а, но тем не менее ихняя установка центрального репозитория Git’а была довольно простой. В этом им помог продукт SCM Manager.
dshster делится опытом по успешной установке на сервер исключительно msysgit. Если честно, то я читал это сообщение в Q&A, но это не мой случай. Инструкция больше касается использования Bitbucket и Github. Для общего использования в локальной сети предлагается общая папка, а для просмотра репозитория встроенный веб-сервер. Отмечу, что начиная с релиза 1.8.4 веб-сервер и часть других утилит удалена: «Some commands are not yet supported on Windows and excluded from the installation; namely: git archimport, git cvsexportcommit, git cvsimport, git cvsserver, git instaweb, git shell»
IamKarlson хорошо отзывается о решении Bonobo Git Server, которое используется у него на работе. Как плюс для себя отмечу использование веб-сервера IIS, который у нас уже работает.
Bonobo Git Server

Thank you for downloading Bonobo Git Server. For more information please visit http://bonobogitserver.com.
Prerequisites
- Internet Information Services 7 and higher
- How to Install IIS 8 on Windows 8
- Installing IIS 8 on Windows Server 2012
- Installing IIS 7 on Windows Server 2008 or Windows Server 2008 R2
- Installing IIS 7 on Windows Vista and Windows 7
- .NET Framework 4.6
- Windows Vista SP2, Windows 7, Windows 8 and higher
- Windows Server 2008 R2, Windows Server 2008 SP2, Windows Server 2012 and higher
- Don’t forget to register .NET framework with your IIS
- Run
%windir%\Microsoft.NET\Framework\v4.0.30319\aspnet_regiis.exe -irwith administrator privileges
- Run
Update
Before each update please read carefully the information about compatibility issues between your version and the latest one in changelog.
- Delete all the files in the installation folder except App_Data.
- Default location is
C:\inetpub\wwwroot\Bonobo.Git.Server.
- Default location is
- Copy the files from the downloaded archive to the server location.
Installation
These steps illustrate simple installation with Windows 2008 Server and IIS 7. They are exactly the same for higher platforms (Windows Server 2012 and IIS 8.0).
-
Extract the files from the installation archive to
C:\inetpub\wwwroot -
Allow IIS User to modify
C:\inetpub\wwwroot\Bonobo.Git.Server\App_Datafolder. To do so- select Properties of App_Data folder,
- go to Security tab,
- click edit,
- select IIS user (in my case IIS_IUSRS) and add Modify and Write permission,
- confirm these settings with Apply button.
-
Convert Bonobo.Git.Server to Application in IIS
- Run IIS Manager and navigate to Sites -> Default Web Site. You should see Bonobo.Git.Server.
- Right click on Bonobo Git Server and convert to application.
- Check if the selected application pool runs on .NET 4.0 and convert the site.
-
Launch your browser and go to http://localhost/Bonobo.Git.Server. Now you can see the initial page of Bonobo Git Server and everything is working.
- Default credentials are username: admin password: admin
Frequently Asked Questions
How to clone a repository?
- Go to the Repository Detail.
- Copy the value in the Git Repository Location.
- It should look like
http://servername/projectname.git.
- It should look like
- Go to your command line and run
git clone http://servername/projectname.git.
How do I change my password?
- Click on the account settings in the top right corner.
- Enter new password and confirmation.
- Save.
How to backup data?
- Go to the installation folder of Bonobo Git Server on the server.
- Default location is
C:\inetpub\wwwroot\Bonobo.Git.Server.
- Default location is
- Copy the content of App_Data folder to your backup directory.
- If you changed the location of your repositories, backup them as well.
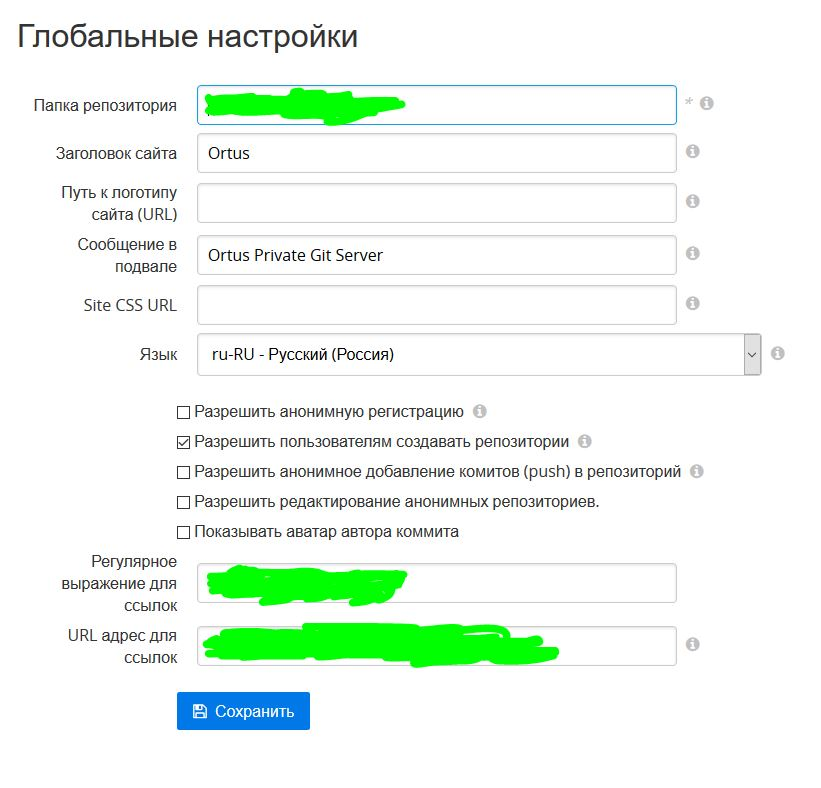
How to change repositories folder?
- Log in as an administrator.
- Go to Global Settings.
- Set the desired value for the Repository Directory.
- Directory must exist on the hard drive.
- IIS User must have proper permissions to modify the folder.
- Save changes.
Can I allow anonymous access to a repository?
- Edit the desired repository (or do this when creating the repository).
- Check Anonymous check box.
- Save.
For allowing anonymous push you have to modify global settings.
- Log in as an administrator.
- Go to Global Settings.
- Check the value Allow push for anonymous repositories
- Save changes.
I’d like to use git hooks to restrict access. How do I access the web frontend usernam?
Bonobo provides the following environment variables:
AUTH_USER: The username used to login. Empty if it was an anonymous operation (clone/push/pull)REMOTE_USER: Same asAUTH_USERAUTH_USER_TEAMS: A comma-separated list containing all the teams the user belongs to. Commas in teams name are escaped with a backslash. Backslashes are also escaped with a\. Example: Teams ‘Editors\ Architects’, ‘Programmers,Testers’ will becomeEditors\\ Architects,Programmers\,Testers.AUTH_USER_ROLES: A comma-separated list containing all the roles the user belongs to. Commas in roles are escaped with a backslash. Backslashes are also escaped with a\.AUTH_USER_DISPLAYNAME: Given Name + Surname if available. Else the username.
Beware that due to the way HTTP basic authentication works, if anonymous operations (push/pull) are enabled the variables above will always be empty!
New release
- update changelog
- update version numbers in appveyor.yml
- add tag so it appears under releases with
git tag -a 6.0.0 -m "Release 6.0.0" - add zipped version to bonobogitserver.com at Bonobo-Git-Server-Web