- THIS PROJECT IS DEPRECATED AND NO LONGER UNDER ACTIVE MAINTENANCE
![]()
ConnectTheDots.io is an open source project created by Microsoft to help you get tiny devices connected to Microsoft Azure IoT and to implement great IoT solutions taking advantage of Microsoft Azure advanced analytic services such as Azure Stream Analytics and Azure Machine Learning.
The project is built with the assumption that the sensors get the raw data and format it into a JSON string. That string is then sent to Azure IoT Hub, from which a Web app gathers the data and displays it as a chart.
Optional other functions of the Azure cloud include detecting and displaying alerts and averages, however this is not required.
The JSON string is sent to Azure IoT Hub whether directly by the sensor device if it is capable of connecting to Azure IoT Hub or through a multi-protocol Gateway, which is how the Getting Started with Pi and Arduino sample does it.
More details on each of those options are below.

In this project there are code samples, configuration scripts and guides that will help you set up devices and sensors, and configure Microsoft Azure services to view and analyze the data produced by those devices. Some of these samples have been provided by Microsoft, others by third parties; we encourage everyone to submit code samples or configuration documentation to grow this project.
This project contains several device samples all aimed at helping you connect your devices to Azure IoT, as well as visualize and gain insight from your data. Check out all the samples below, or follow the getting started walkthrough to learn more. Then, add some of your devices to the project!
We encourage the community to contribute to the project! See Contribute page for details.
What’s new in the V2?
Plenty!
The main change is the use of Azure IoT Hub instead of Event Hubs for connecting devices to the Cloud, but here is a list of what’s new in V2
- Migrated from Event Hubs to Azure IoT Hub for the devices connectivity to Azure IoT: IoT Hub offers a better security with a per device authentication, along with a bidirectional messaging infrastructure.
- Replaced the Azure Prep tool with an ARM Template: you can now deploy the whole solution (including the WebSite) from a command line not only on Windows, but also no a Mac or a Linux machine!
- Updated devices samples
- Updated all the node.js samples to use the Azure IoT Hub SDK
- Removed old devices samples (Galileo, .Net Micro Framework)
- Updated the Gateway code to use Azure IoT Hub device SDK
- Upgraded WP8 samples (Simulated Sensors and MS Band) to Windows 10 UWP apps
- Added Xamarin samples
- Added a sample for ESP8266 chips
Where is the V1 if I still want to use the old fashion way (using Event Hub)?
The V1 has been tagged and you can find the release as a binary here
We also created a branch that we will not make additions to any more but will definitively track to merge your contributions.
Device basics
Data format
ConnectTheDots is built on the assumption that data from sensors is sent to Azure IoT Hub in a prescribed JSON format. The minimum structure, with required attribute names, is
{
    "guid":	"string",
    "organization":	"string",
    "displayname": "string",
    "location": "string",
    "measurename": "string",
    "unitofmeasure": "string",
    "timecreated": "string",
    "value": double/float/integer
}
This should all be sent as one string message to IoT Hub, for example as the following strings:
{"guid":"62X74059-A444-4797-8A7E-526C3EF9D64B","organization":"My Org Name","displayname":"Sensor Name","location":"Sensor Location","measurename":"Temperature","unitofmeasure":"F","timecreated":"1975-09-16T12:00:00Z", "value":74}
or
{"guid":"62X74059-A444-4797-8A7E-526C3EF9D64B","organization":"my org name","displayname":"sensor name","location":"sensor location","measurename":"Temperature","unitofmeasure":"F","timecreated":"1975-09-16T12:00:00Z", "value":74.0001}
Furthermore, the project is built upon the assumption that the sensors create and format this JSON string.
For example, if using a sensor attached to an Arduino, the code running on the Arduino would send successive JSON strings, CRLF ended, out the serial port to a gateway such as a Raspberry Pi or Windows Tablet. The gateway does nothing other than receive the JSON string, package that into the right message format, adds the timecreated time stamp, and send it to Azure.
In the case of a directly connected device, the latest needs to send the JSON package to the IoT Hub leveraging one of the existing Azure IoT Hub device client SDKs.
All the device code included in this project, or submitted for inclusion, must conform to the JSON format requirement above.
Devices and Gateway
ConnectTheDots provides a Multi-protocol Gateway to collect data from devices that cannot, or should not, target the cloud directly. The Gateway code is tested on Mono for Linux and on the .NET Framework on Windows and is located in the source tree under Devices/Gateways/GatewayService, and is a simple system service.
To send data from a device to a gateway, you can just use the same exact data format and a device protocol adapter to implement any transport of your choice. The device protocol adapter is an assembly that implements the DeviceAdapterAbstract type to collect data from the device and enqueue them to the gateway for upload to the cloud. The Gateway automatically loads the device adapters from the Gateway binary directory, so deployment is extremely simple.
You can find some examples under Devices/Gateways/GatewayService/DeviceAdapters, and the matching devices under Devices/GatewayConnectedDevices.
We even have some devices running in separate processes as a Python script, sending data to an adapter Gateway on a socket or a serial port connection. It does not get any easier than that!
Software prerequisites
In order to reproduce one of the ConnectTheDots.io scenarios, you will need the following:
- Microsoft Azure subscription (free trial subscription is sufficient)
- [optional] Visual Studio 2013 or above – Community Edition is sufficient. Note that if you are not planning to use the Gateway nor making changes to the dashboard, you will NOT need Visual Studio.
- [optional] WiX Toolset — if you want to build installer of Gateway for Windows
Getting Started
To get started with ConnectTheDots, you will need to go through the following basic steps:
- Deploying services: this is easily done using the automated deployment script.
- Setup devices: follow these instructions to provision devices in the IoT Hub and modify and deploy code sample
Available Devices
For a full list of devices and code samples check out the ever growing list of supported gateways and sensors.
Git hub — это распределенная система контроля версий, которая широко используется разработчиками по всему миру для работы над проектами и совместного создания кода. Одной из интересных возможностей Git hub является его интеграция с Windows IoT — операционной системой от Microsoft, предназначенной для устройств интернета вещей.
Интеграция Git hub и Windows IoT позволяет разработчикам легко и эффективно работать над своими проектами. С помощью Git hub они могут хранить и контролировать версии своего кода, а также совместно работать с другими разработчиками над одним проектом. Windows IoT, с другой стороны, предоставляет разработчикам мощную операционную систему для устройств интернета вещей, которая позволяет создавать интеллектуальные системы, собирать и анализировать данные, а также управлять различными устройствами.
Использование Git hub вместе с Windows IoT дает разработчикам возможность создавать инновационные решения для различных областей, таких как умный дом, автоматизация производства, здравоохранение и многое другое. Все эти возможности в сочетании с гибкостью и простотой Git hub делают его интеграцию с Windows IoT очень привлекательной для разработчиков, желающих создавать инновационные продукты для интернета вещей.
Содержание
- Интеграция Git Hub Connect the Dots и Windows IoT
- Преимущества интеграции Connect the Dots и Windows IoT
- Возможности интеграции Git Hub Connect the Dots и Windows IoT
Интеграция Git Hub Connect the Dots и Windows IoT
Возможности современных интернет-вещей (IoT) стали невероятно широкими и разнообразными. От домашних устройств до промышленного оборудования, IoT-решения находят свое применение во множестве сфер жизни. Однако, чтобы эффективно использовать данные, собираемые устройствами IoT, необходимо иметь правильные инструменты для управления и анализа этих данных.
Git Hub Connect the Dots — это набор средств разработки и интеграции, предоставляемых Microsoft для управления данными, генерируемыми системами IoT. Данное решение обеспечивает простой и удобный способ захватывать, обрабатывать и анализировать данные, а также связывать устройства IoT с облаком и другими приложениями.
Windows IoT (Internet of Things) — это операционная система, разработанная Microsoft специально для устройств IoT. Она обеспечивает надежность, безопасность и совместимость с широким спектром устройств. Windows IoT позволяет разработчикам создавать приложения для устройств IoT, которые могут работать с данными, собранными Git Hub Connect the Dots.
Интеграция Git Hub Connect the Dots и Windows IoT предоставляет обширные возможности для разработки, управления и анализа данных, собираемых устройствами IoT. Разработчики могут использовать Git Hub Connect the Dots для захвата данных и их обработки, а затем использовать Windows IoT для создания приложений, работающих с этими данными. Такой подход позволяет максимально эффективно использовать данные, собираемые устройствами IoT, и управлять ими.
Интеграция Git Hub Connect the Dots и Windows IoT открывает новые возможности для разработки инновационных IoT-решений. С помощью этих инструментов разработчики могут создавать высокофункциональные приложения для устройств IoT, работающие с данными в режиме реального времени. Такие приложения могут быть использованы в различных сферах — от умных домов и городов до промышленных систем мониторинга и управления.
Преимущества интеграции Connect the Dots и Windows IoT
Windows IoT — это операционная система для устройств Интернета вещей, разработанная Microsoft. Она позволяет создавать различные IoT-устройства и использовать их в различных сферах, таких как производство, здравоохранение, сельское хозяйство и др.
Интеграция Connect the Dots и Windows IoT позволяет получить несколько преимуществ:
- Удобство анализа данных: благодаря интеграции с Connect the Dots, данные, собранные с устройств Windows IoT, могут быть легко визуализированы и исследованы. Connect the Dots предоставляет готовые шаблоны и инструменты для анализа данных, что позволяет пользователю быстро получить ценную информацию.
- Масштабируемость: благодаря открытому характеру проекта Connect the Dots, интеграция с Windows IoT позволяет создавать системы, в которых одновременно работают сотни и тысячи устройств IoT. Благодаря этому, возможно применение таких систем в крупных предприятиях или в решении задач, требующих большого количества данных.
- Гибкость: Connect the Dots поддерживает различные протоколы связи и языки программирования, включая C#, Python и JavaScript. Это позволяет разработчикам использовать любой стек технологий, который им удобен, и интегрировать устройства Windows IoT в существующую инфраструктуру.
- Безопасность: Windows IoT обеспечивает высокий уровень безопасности данных. Интеграция с Connect the Dots позволяет защитить данные, передаваемые и хранящиеся на устройствах, с помощью различных механизмов шифрования и авторизации.
- Доступность ресурсов: Connect the Dots и Windows IoT предоставляют богатый выбор документации, примеров кода и сообществ, которые помогут пользователям освоить интеграцию и получить поддержку при разработке IoT-решений.
В результате, интеграция Connect the Dots и Windows IoT позволяет создавать эффективные, гибкие и масштабируемые системы для сбора, анализа и управления данными из IoT-устройств.
Возможности интеграции Git Hub Connect the Dots и Windows IoT
Интеграция Git Hub Connect the Dots и Windows IoT предоставляет широкий спектр возможностей для разработки и управления устройствами интернета вещей.
С помощью Git Hub Connect the Dots можно создавать и управлять подключенными устройствами на базе Windows IoT. Он предоставляет набор инструментов и функций для регистрации и обработки данных от устройств, а также для взаимодействия с облачными сервисами.
Windows IoT позволяет разрабатывать приложения для различных типов устройств: микрокомпьютеров, планшетов, умных часов и даже промышленных систем. С его помощью можно создавать устройства, которые собирают данные с датчиков и отправляют их в облачные сервисы для дальнейшей обработки.
Интеграция Git Hub Connect the Dots и Windows IoT позволяет:
| 1. Создавать и управлять устройствами интернета вещей. |
| 2. Регистрировать и обрабатывать данные от устройств. |
| 3. Взаимодействовать с облачными сервисами. |
| 4. Разрабатывать приложения для разных типов устройств. |
| 5. Собирать данные с датчиков и отправлять их в облачные сервисы. |
Интеграция Git Hub Connect the Dots и Windows IoT открывает новые возможности для разработки проектов интернета вещей, позволяя создавать инновационные решения и использовать их на практике.
Git hub connect the dots и windows iot
To explore the challenges of building an IoT application, we created a reference implementation called the Drone Delivery application.
Here is the scenario:
Fabrikam, Inc. runs a drone delivery service. The company manages a fleet of drone aircraft, and customers can request a drone to pick up goods for delivery. The drones send two types of telemetry:
- Flight data: Latitude, longitude, altitude, velocity, and acceleration. Each drone sends this data once every 5 seconds.
- Operating status: Engine temperature and battery level. Each drone sends this data once every 20 seconds.
We assume the drones support IP protocol and MQTT, and that the drones are are mostly-connected devices. That is, they send a constant stream of data while in flight, rather than batching data at intervals.
The following diagram shows the design of the application:

The architecture includes several data streaming paths that perform different functions:
Hot path. The hot path monitores the drones’ operating status to detect anomalies in the engine temperature. It uses Azure Stream Analytics to compute the average engine temperature of each drone over a 2-minute window. Anomolous readings are stored in Cosmos DB and also trigger an alert. The sample application includes stub code for the alerts. You could replace this with code to send an SMS message or a push notification to a mobile app.
Warm path. The warm path uses an Azure Function to write the latest position data for each drone to Cosmos DB. The data can then be queried using geo-spatial queries. For example, you can query for all drones within a given area.
Cold path. The cold path captures all of the raw telemetry and then processes it using HDInsight. The sample application includes a Hive query that summarizes the pickup and dropoff times for each delivery, based on the location data from the drones. You can then use Power BI to explore and visualize the results.
Provision and Deploy
Deploy the IoT Hub
On src/CloudGateway/IoTHubDeployment/azuredeploy.parameters.json edit iothub_name parameter value to specify the name of the IoT Hub.
About
Code samples that show best practices for building IoT solutions.
Источник
GitHub для пользователей Windows

Если ваш проект хранится только у вас на диске, то с поломкой диска вас ожидают неприятности. Даже регулярный бэкап не всегда сможет вас спасти.
Некоторые разработчики могут наворотить в проекте столько всего, что сами в шоке. А вспомнить, что и где делалось, затруднительно. Та еще неприятность.
Система контроля версий поможет вам избежать этих проблем. В случае необходимости можно совершить восстановление или откат изменений. Просмотреть и подтвердить или отменить правки. Ну а командная работа без системы контроля версий просто немыслима.
Если вы вдруг не знакомы, то я хочу немного познакомить вас с системой управления версиями по имени Git. Под катом вас ожидает описание того, как использовать GitHub вместе с Visual Studio.
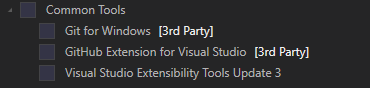
Актуальное расширение называется GitHub Extension for Visual Studio. Оно подходит для Visual Studio 2015 и выше. Скачать vsix можно с github странички или с Visual Studio gallery.
Установить расширение можно и при установке Visual Studio:
Перед тем как продолжить, нужно выучить немного терминов. Если вы их знаете, то проматывайте вниз.
Push – отправка изменений из локального репозитория в удаленный репозиторий (в нашем случае он будет расположен на GitHub).
Fetch – получение изменений из удаленного репозитория для сравнения и возможного последующего слияния.
Merge – слияние. Применение изменений совершенных в другом репозитории текущим репозиторием. Что-то вроде объединения двух репозиториев.
Pull – комбинация fetching и merging. Сперва из удаленного репозитория получается список изменений, а затем изменения применяются к текущему репозиторию.
То есть, если кто-то кроме вас поработал и совершил изменения в репозитории GitHub, то вы можете последовательно совершить 2 действия: Fetch, а затем Merge. Или же вы можете сразу выполнить Pull. После этого в вашем локальном репозитории отобразятся совершенные изменения.
После установки GitHub Extension for Visual Studio, панель Team Explorer будет выглядеть так:

Если панель Team Explorer скрыта, то отобразить ее можно через меню «View» / «Вид». Подключившись к GitHub (нажав Connect… и введя логин с паролем) получим возможность склонировать репозиторий GitHub или создать новый (кнопочки Clone и Create):

При клонировании будут выведен список репозиториев к которым у вас есть доступ:

При создании репозитория, вы сможете ввести его название, описание и выбрать лицензию, в соответствии с которой разрешено использование кода:
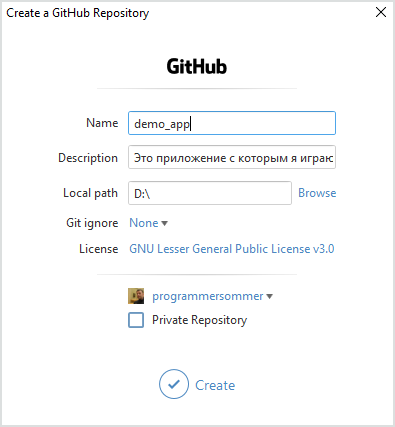
В данном случае Git ignore содержит предустановки для проектов различного типа. А так этот файлик формата .gitignore предназначен для того, чтобы указать в нем какие директории и файлы требуется исключить из системы управления версиями.
На случай, если вы хотите очень хорошо спрятать от посторонних глаз котлету репозиторий, то вы можете пометить его как Private. Но для этого нужна платная подписка.
Для студентов GitHub предлагает специальное предложение — Student Developer Pack, которое в частности включает в себя бесплатное неограниченное количество приватных репозиториев.
После создания репозитория необходимо создать проект. Лично я предпочитаю наоборот, сначала создать проект и только затем его добавить в Git. Можно при создании проекта создать и репозиторий Git. Для этого достаточно поставить галочку.

Если эту галочку при создании проекта не поставить, а просто открыть проект в VS, то в меню Файл станет доступен пункт «Add to Source Control» / «Добавить в систему управления версиями»
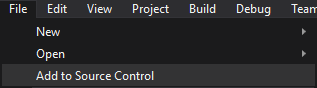
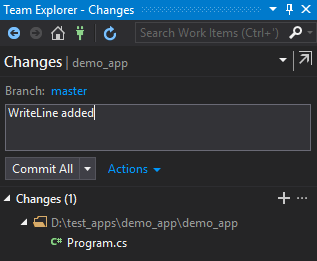
После его нажатия, проект будет добавлен в систему управления версиями Git, и внутри папки с проектом будет создана локальная папка .git. В Team Explorer это будет выглядеть так:

Переключившись между Team Explorer и Solution Explorer можем совершить какие-то изменения в проекте. После любых изменений можно совершить коммит — своеобразную точку восстановления. Для этого вернемся в Team Explorer, в меню которого имеется кнопка с нарисованным на ней домиком. Нажатие на нее приведет вас в главное меню:

Кнопка «Changes» / «Изменения» позволит зафиксировать изменения (при этом обязательно необходимо указать комментарий с описанием изменений). Но все действия пока что будут совершены только с локальным репозиторием git.
При создании проекта иногда создается так называемый «Initial commit», в котором пишется что-то вроде «Проект был создан за три дня». Если вы только что создали проект, то изменений в нем пока что еще нет. А если изменений нет, то коммит создать не получится. Я добавлял строку с текстом, поэтому в комментарии постарался описать это коротко, но понятно:
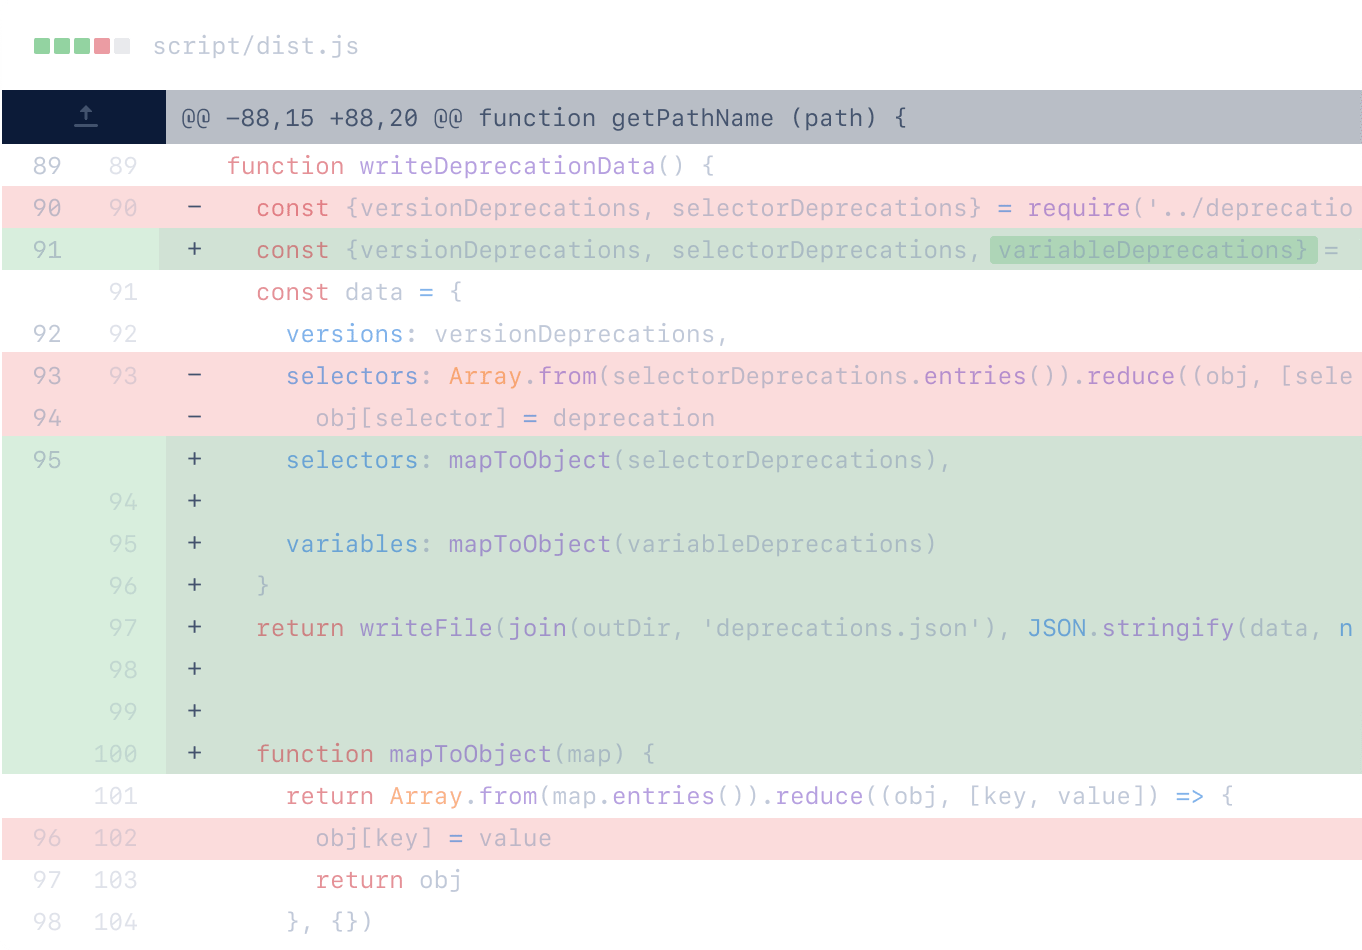
Можно просмотреть совершенные изменения. Для этого на интересующем нас файле нужно вызвать контекстное меню и выбрать «Compare with Unmodified. » / «Сравнить с неизмененной…»

Получим примерно такое вот сравнение:

В данном случае было добавлено всего 2 строки кода. Через то же самое контекстное меню все изменения, произошедшие со времени последнего коммита можно отменить. Очень удобная фича.
Теперь, давайте, опять перейдем в главное меню, нажав домик. Для того чтобы отправить изменения на GitHub необходимо нажать кнопку «Sync» / «Синхронизация».

Так как наш проект еще не был опубликован на GitHub, то нам предложат это сделать:

Кстати, .git вполне можно опубликовать не только на GitHub, но и на Visual Studio Team Services.
Если мы публиковали проект ранее, то в списке исходящих фиксаций будет расположен наш коммит:
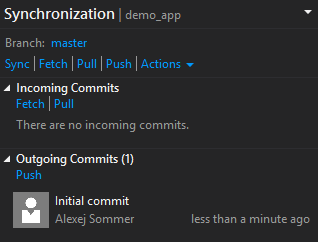
Нажатие Push приведет к отправке изменений в репозиторий, расположенный на сервере GitHub.
Совершив для пробы некоторые изменения прямо через браузер в репозитории, расположенном на GitHub (да, так тоже можно), я снова зашел в синхронизацию и нажал Fetch:
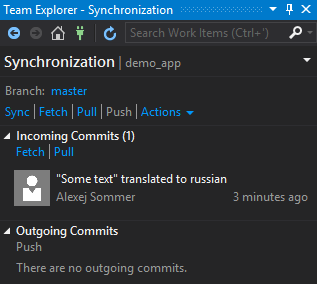
Здесь двойным кликом можно открыть информацию о коммите:
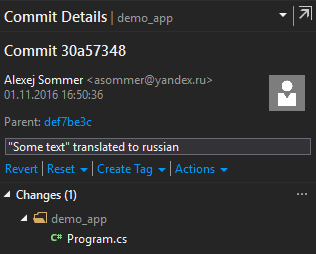
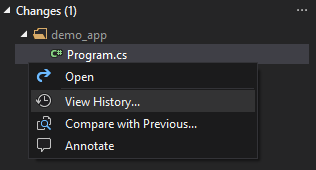
И кликнув уже на файл просмотреть изменения:

В том же самом окне синхронизации можно просмотреть историю:
Историю можно просматривать в простом представлении и в подробном:


Теперь, давайте представим, что мы работаем в команде и кто-то другой уже совершил какие-то изменения в своем локальном репозитории и отправил из в GitHub. И вы тоже совершили изменения в том же самом файле и в той же самой строке. В таком случае при синхронизации с GitHub у вас возникнет конфликт:
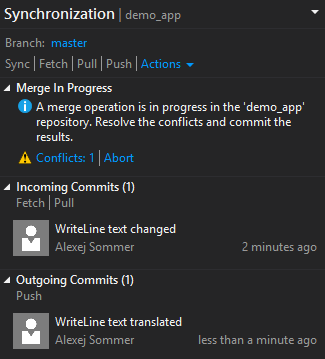
Кликнув на Conflicts получим такое вот окошко в котором после клика на файле откроется меню с кнопкой Merge:

Теперь мы может ставя галочки выбрать изменения, которые мы хотим оставить в окончательной версии. Окончательная версия на следующем скриншоте отображена внизу. Код в ней тоже можно править:

После внесения изменения нужно нажать Accept Merge (в верхнем левом углу), после чего сделать коммит:

Страничка самого расширения на GitHub: github.com/github/visualstudio
Github Desktop и PowerShell environment for Git
Github Desktop — утилита совершенно независимая и с Visual Studio никак не связанная. Скачать можно здесь.

Утилита доступна для пользователей Mac и Windows. Вместе с ней устанавливается и командная строка Git Shell. Фактически это PowerShell с набором скриптов для интеграции с Git. Называется PowerShell environment for Git. Сокращенно posh-git.
На GitHub страничке проекта posh-git можно найти краткую инструкцию о том, как установить командную строку posh для git вручную.
Интерфейс самой утилиты и работу с ней я рассматривать не буду. Думаю, что он не сложный и с ним вы сможете разобраться сами. Давайте лучше немного поиграем с командной строкой. В отличие от GUI командная строка, как правило, предоставляет гораздо больше возможностей. Но мы рассмотрим только основные команды.
Чтобы просмотреть текущую конфигурацию и убедится, что Git присутствует, можно выполнить команду:
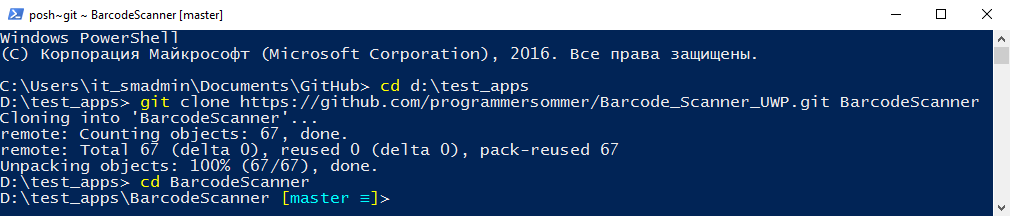
Для того чтобы склонировать репозиторий достаточно выполнить команду git clone. Например:
После выполнения этой команды, в текущей директории появится папка с проектом. Кроме http:// и https:// поддерживаются и протоколы SSH и git://. Если перейти в папку с проектом с помощью команды cd (в случае примера cd BarcodeScanner), то командная строка преобразится:
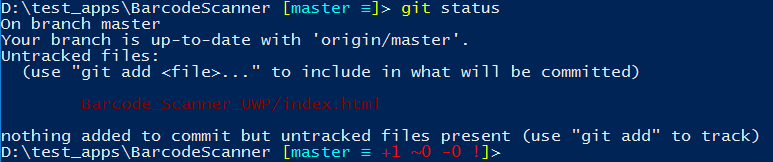
git, что обозначает, что вы попали в среду PowerShell для Git. Можно выполнить команду git status, чтобы узнать, не требуется ли синхронизировать локальный репозиторий. Ответ может быть таким:

Самые популярные команды это те, которые мы уже рассматривали в рамках интерфейса расширения VS: git fetch, git merge, git push. Если вы зайдете в директорию (наименование PortableGit_xxx директории, я так полагаю, может быть несколько иным):
то вы обнаружите в ней множество исполняемых файлов, которые эмулируют команды. Как уже было сказано, справкой git можно пользоваться, но, давайте опробуем несколько команд для примера.
Например, если в директории проекта появится новый файл, то команда git status выдаст:
А значит добавить файл нужно командой git add index.html. Теперь изменения нужно подтвердить с помощью git commit. Эта команда откроет текстовый редактор, который установлен по умолчанию. В нем необходимо в первую строку ввести текст, описывающий совершенные изменения. Если начать строку с символа #, то это будет комментарий. Комментарии можно оставить в строках ниже. Если не оставить никакого текста с описанием коммита, то коммит не произойдет. Можно указать текст коммита сразу в коммандной строке с помощью параметра –m. Например: git commit –m «File index.html added»

Теперь можно с помощью git push отправить изменения в GitHub репозиторий. Если это ваш репозиторий. Чужой репозиторий вы можете скопировать к себе, создав развилку/копию репозитория — Fork. Сделав какие-то изменения, вы сможете предложить их автору оригинального репозитория создав pull request.
На этом позвольте завершить описание возможностей работы с GitHub для пользователей Windows. Если хотите продолжить изучение, то на MVA вы можете посмотреть курс GitHub for Windows Users
Источник
Содержание
- Git hub connect the dots и windows iot
- Launching GitHub Desktop
- Launching GitHub Desktop
- Launching Xcode
- Launching Visual Studio
- Latest commit
- Git stats
- Files
- readme.md
- About
- Git Guides
- Get started with git and GitHub
- Регистрация на Гитхабе. Работа через GitHub Desktop
- Скачивание и установка GitHub Desktop
- Клонирование репозитория в GitHub Desktop
- Git hub connect the dots и windows iot
- Launching GitHub Desktop
- Launching GitHub Desktop
- Launching Xcode
- Launching Visual Studio
- Latest commit
- Git stats
- Files
- README.md
- About
- The tools you need
to build what you want. - Collaborative
Coding - Codespaces
- Pull requests
- Notifications
- Code review
- Code review assignments
- Code owners
- Draft pull requests
- Protected branches
- Team discussions
- Team reviewers
- Multiple assignees
- Multiple reviewers
- Multi-line comments
- Public repositories
- Automation
and CI/CD - Actions
- Packages
- GitHub Pages
- GitHub Marketplace
- Webhooks
- Hosted runners
- Self-hosted runners
- Secrets management
- Environments
- Deployments
- Workflow visualization
- Workflow templates
- Policies
- Security
- Private repos
- Required reviews
- Required status checks
- Code scanning
- Secret scanning
- Dependency graph
- Dependabot alerts
- Dependabot security and
version updates - GitHub Security Advisories
- GitHub Advisory Database
- GPG commit signing verification
- Security audit log
- Enterprise Security:
- IP allow list
- GitHub Connect
- Audit log API
- Client Apps
- GitHub for Mobile
- GitHub CLI
- GitHub Desktop
- Project
Management - Projects
- Labels
- Milestones
- Issues
- Unified Contribution Graph
- Org activity graph
- Org dependency insights
- Repo insights
- Wikis
- Видео
Git hub connect the dots и windows iot
Connect tiny devices to Microsoft Azure services to build IoT solutions
Use Git or checkout with SVN using the web URL.
Work fast with our official CLI. Learn more.
Launching GitHub Desktop
If nothing happens, download GitHub Desktop and try again.
Launching GitHub Desktop
If nothing happens, download GitHub Desktop and try again.
Launching Xcode
If nothing happens, download Xcode and try again.
Launching Visual Studio
Latest commit
Git stats
Files
Failed to load latest commit information.
readme.md
ConnectTheDots.io is an open source project created by Microsoft to help you get tiny devices connected to Microsoft Azure IoT and to implement great IoT solutions taking advantage of Microsoft Azure advanced analytic services such as Azure Stream Analytics and Azure Machine Learning.
The project is built with the assumption that the sensors get the raw data and format it into a JSON string. That string is then sent to Azure IoT Hub, from which a Web app gathers the data and displays it as a chart. Optional other functions of the Azure cloud include detecting and displaying alerts and averages, however this is not required.
The JSON string is sent to Azure IoT Hub whether directly by the sensor device if it is capable of connecting to Azure IoT Hub or through a multi-protocol Gateway, which is how the Getting Started with Pi and Arduino sample does it. More details on each of those options are below.
In this project there are code samples, configuration scripts and guides that will help you set up devices and sensors, and configure Microsoft Azure services to view and analyze the data produced by those devices. Some of these samples have been provided by Microsoft, others by third parties; we encourage everyone to submit code samples or configuration documentation to grow this project.
This project contains several device samples all aimed at helping you connect your devices to Azure IoT, as well as visualize and gain insight from your data. Check out all the samples below, or follow the getting started walkthrough to learn more. Then, add some of your devices to the project!
We encourage the community to contribute to the project! See Contribute page for details.
What’s new in the V2?
Plenty! The main change is the use of Azure IoT Hub instead of Event Hubs for connecting devices to the Cloud, but here is a list of what’s new in V2
Where is the V1 if I still want to use the old fashion way (using Event Hub)?
The V1 has been tagged and you can find the release as a binary here We also created a branch that we will not make additions to any more but will definitively track to merge your contributions.
ConnectTheDots is built on the assumption that data from sensors is sent to Azure IoT Hub in a prescribed JSON format. The minimum structure, with required attribute names, is
This should all be sent as one string message to IoT Hub, for example as the following strings:
Furthermore, the project is built upon the assumption that the sensors create and format this JSON string. For example, if using a sensor attached to an Arduino, the code running on the Arduino would send successive JSON strings, CRLF ended, out the serial port to a gateway such as a Raspberry Pi or Windows Tablet. The gateway does nothing other than receive the JSON string, package that into the right message format, adds the timecreated time stamp, and send it to Azure.
In the case of a directly connected device, the latest needs to send the JSON package to the IoT Hub leveraging one of the existing Azure IoT Hub device client SDKs.
All the device code included in this project, or submitted for inclusion, must conform to the JSON format requirement above.
Devices and Gateway
To send data from a device to a gateway, you can just use the same exact data format and a device protocol adapter to implement any transport of your choice. The device protocol adapter is an assembly that implements the DeviceAdapterAbstract type to collect data from the device and enqueue them to the gateway for upload to the cloud. The Gateway automatically loads the device adapters from the Gateway binary directory, so deployment is extremely simple. You can find some examples under Devices/Gateways/GatewayService/DeviceAdapters, and the matching devices under Devices/GatewayConnectedDevices.
We even have some devices running in separate processes as a Python script, sending data to an adapter Gateway on a socket or a serial port connection. It does not get any easier than that!
In order to reproduce one of the ConnectTheDots.io scenarios, you will need the following:
To get started with ConnectTheDots, you will need to go through the following basic steps:
For a full list of devices and code samples check out the ever growing list of supported gateways and sensors.
About
Connect tiny devices to Microsoft Azure services to build IoT solutions
Источник
Git Guides

Everything you need to know about Git, from getting started to advanced commands and workflows.
Whether or not you’ve worked with version control before, there are a few things you should know before getting started with Git:
Like we mentioned above, Git uses SHA compression, which makes it very fast.
Git can handle merge conflicts, which mean that it’s OK for multiple people to work on the same file at the same time. This opens up the world of development in a way that isn’t possible with centralized version control. You have access to the entire project, and if you’re working on a branch, you can do whatever you need to and know that your changes are safe.
Speaking of branches, Git offers a lot of flexibility and opportunity for collaboration with branches. By using branches, developers can make changes in a safe sandbox.
Instead of only committing code that is 100% sure to succeed, developers can commit code that might still need help. Then, they can push that code to the remote and get fast feedback from integrated tests or peer review.
Without sharing the code through branches, this would never be possible.
If you make a mistake, it’s OK! Commits are immutable, meaning they can’t be changed. (Note: You can change history, but it will create new replacement commits instead of editing the existing commits. More on that later!) This means that if you do make a mistake, even on an important branch like master, it’s OK. You can easily revert that change, or roll back the branch pointer to the commit where everything was fine.
The benefits of this can’t be overstated. Not only does it create a safer environment for the project and code, but it fosters a development environment where developers can be braver, trusting that Git has their back.
Getting Started With Git
Depending on your operating system, you may already have Git installed. But, getting started means more than having the software! To get started, it’s important to know the basics of how Git works. You may choose to do the actual work within a terminal, an app like GitHub Desktop, or through GitHub.com. (Note: while you can interact with Git through GitHub.com, your experience may be limited. Many local tools can give you access to the most widely used Git functionalities, though only the terminal will give you access to them all.)
There are many ways to use Git, which doesn’t necessarily make it easier! But, the fundamental Git workflow has a few main steps. You can practice all of these in the Introduction to GitHub Learning Lab course.
Make change (and make a commit)
Once you’ve created a branch, and moved the HEAD pointer to it by «checking out» to that branch, you’re ready to get to work. Make the changes in your repository using your favorite text editor or IDE.
Next, save your changes. You’re ready to start the commit!
Push your changes to the remote
By default, git push only pushes the branch that you’re currently checked out to.
Sometimes, if there has been a new commit on the branch on the remote, you may be blocked from pushing. Don’t worry! Start with a simple git pull to incorporate the changes on the remote into your own local branch, resolve any conflicts or finish the merge from the remote into the local branch, and then try the push again.
Open a pull request
Pull requests are the powerhouse of GitHub. Integrated tests can automatically run on pull requests, giving you immediate feedback on your code. Peers can give detailed code reviews, letting you know if there are changes to make, or if it’s ready to go.
Make sure you start your pull requests off with the right information. Put yourself in the shoes of your teammates, or even of your future self. Include information about what this change relates to, what prompted it, what is already done, what is left to do, and any specific asks for help or reviews. Include links to relevant work or conversations. Pull request templates can help make this process easy by automating the starting content of the body of pull requests.
Collaborate (get feedback from tests or peers, make more commits locally and then push them up and get more feedback)
Once the pull request is open, then the real fun starts. It’s important to recognize that pull requests aren’t meant to be open when work is finished. Pull requests should be open when work is beginning! The earlier you open a pull request, the more visibility the entire team has to the work that you’re doing. When you’re ready for feedback, you can get it by integrating tests or requesting reviews from teammates.
It’s very likely that you will want to make more changes to your work. That’s great! To do that, make more commits on the same branch. Once the new commits are present on the remote, the pull request will update and show the most recent version of your work.
Once you and your team decide that the pull request looks good, you can merge it. By merging, you integrate the feature branch into the other branch (most typically the master branch). Then, master will be updated with your changes, and your pull request will be closed. Don’t forget to delete your branch! You won’t need it anymore. Remember, branches are lightweight and cheap, and you should create a new one when you need it based on the most recent commit on the master branch.
If you choose not to merge the pull request, you can also close pull requests with unmerged changes.
Learning & Mastering Git Commands
If you’re getting started with Git, a great place to start is the Git Cheat sheet. It’s translated into many languages, open source as a part of the github/training-kit repository, and a great starting place for the fundamentals on the command line.
Some of the most important and most used commands that you’ll find there are:
Getting Started With GitHub
If you’re wondering where Git ends and GitHub begins, you’re not alone. They are tied closely together to make working with them both a seamless experience. While Git takes care of the underlying version control, GitHub is the collaboration platform built on top of it. GitHub is the place for pull requests, comments, reviews, integrated tests, and so much more. Most developers work locally to develop, and use GitHub for collaboration. That ranges from using GitHub to host the shared remote repository, to working with colleagues and capitalizing on features like protected branches, code review, GitHub Actions, and more.
The best place to practice using Git and GitHub is the Introduction to GitHub Learning Lab course.
If you already know Git and need to sign up for a GitHub account, head over to github.com.
Get started with git and GitHub
Review code, manage projects, and build software alongside 40 million developers.
Источник
Регистрация на Гитхабе. Работа через GitHub Desktop

Чтобы начать работать с сервисом Гитхаб, нужно иметь на нём активированный аккаунт.
Если аккаунта нет, то необходимо его создать. Для этого переходим на Гитхаб, находим и нажимаем кнопку «Sign up» (зарегистрироваться).
На странице регистрации вам предложат ввести обязательные данные:
После на указанную ранее почту придёт письмо с просьбой подтвердить электронный адрес. Для завершения регистрации пройдите по полученной ссылке. Аккаунт для Гитхаба создан, всё готово к дальнейшей работе.
Скачивание и установка GitHub Desktop
Переходим на сайт https://desktop.github.com/. На главной странице сайта скачиваем последнюю актуальную версию для своей операционной системы.
 Главная страница сайта.
Устанавливаем и запускаем программу.
При первом запуске вас попросят ввести логин и пароль от Гитхаба, а также имя и почту пользователя, от которого будут идти коммиты. Обратите внимание, что адрес электронной почты должен совпадать с почтой пользователя Гитхаб.
Клонирование репозитория в GitHub Desktop
Чтобы склонировать репозиторий в GitHub Desktop, есть несколько способов.
Первый способ — через интерфейс сайта Гитхаба. Находясь в нужном репозитории, нажимаем кнопку Open with GitHub Desktop.
 Клонирование репозитория через интерфейс сайта.
После этого вам будет предложено выбрать папку, в которую склонируется проект. Далее он автоматически скачается и запустится в GitHub Desktop.
Второй способ — склонировать напрямую из GitHub Desktop. Для этого нужно в интерфейсе нажать кнопку Clone a repository from the Internet
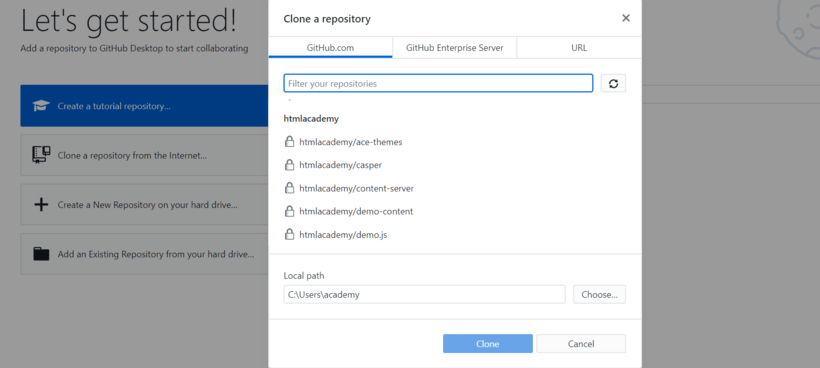 Клонирование репозитория через GitHub Desktop.
Выбираем в списке нужный нам репозиторий и папку, в которую склонируется проект, а затем нажимаем Clone.
Теперь, независимо от выбранного способа клонирования, с репозиторием можно работать.
Без Git веб-разработчику никуда
Но без кода Git не пригодится. Поэтому прокачайте навыки в JavaScript на курсе «Архитектура клиентских приложений».
Источник
Git hub connect the dots и windows iot
A command-line tool that makes git easier to use with GitHub.
Use Git or checkout with SVN using the web URL.
Work fast with our official CLI. Learn more.
Launching GitHub Desktop
If nothing happens, download GitHub Desktop and try again.
Launching GitHub Desktop
If nothing happens, download GitHub Desktop and try again.
Launching Xcode
If nothing happens, download Xcode and try again.
Launching Visual Studio
Latest commit
Git stats
Files
Failed to load latest commit information.
README.md
hub is a command line tool that wraps git in order to extend it with extra features and commands that make working with GitHub easier.
For an official, potentially more user-friendly command-line interface to GitHub, see cli.github.com and this comparison.
This repository and its issue tracker is not for reporting problems with GitHub.com web interface. If you have a problem with GitHub itself, please contact Support.
See usage examples or the full reference documentation to see all available commands and flags.
hub can also be used to make shell scripts that directly interact with the GitHub API.
Packages other than Homebrew are community-maintained (thank you!) and they are not guaranteed to match the latest hub release. Check hub version after installing a community package.
hub can be easily installed as an executable. Download the latest binary for your system and put it anywhere in your executable path.
hub is ready to be used in your GitHub Actions workflows:
Note that the default secrets.GITHUB_TOKEN will only work for API operations scoped to the repository that runs this workflow. If you need to interact with other repositories, generate a Personal Access Token with at least the repo scope and add it to your repository secrets.
Prerequisites for building from source are:
Clone this repository and run make install :
If you’re using PowerShell, you can set an alias for hub by placing the following in your PowerShell profile (usually
A simple way to do this is to run the following from the PowerShell prompt:
Note: You’ll need to restart your PowerShell console in order for the changes to be picked up.
If your PowerShell profile doesn’t exist, you can create it by running the following:
hub repository contains tab-completion scripts for bash, zsh and fish. These scripts complement existing completion scripts that ship with git.
About
A command-line tool that makes git easier to use with GitHub.
Источник

new Dark mode Learn more
new Product Roadmap Learn more
Collaborative
Coding


Codespaces
Code, build, test, debug, and deploy with an instant cloud development environment. Spin up a Codespace in seconds and access from any device.
Pull requests
Allow contributors to easily notify you of changes they’ve pushed to a repository – with access limited to the contributors you specify. Easily merge changes you accept.
Notifications
Get updates on the GitHub activity you’ve subscribed to. Use the notifications inbox to customize, triage, and manage your updates.
Code review
Review new code, see visual code changes, and confidently merge code changes with automated status checks.
Code review assignments
Assign code reviews to make it clear which team members should submit their review for a pull request.
Code owners
Automatically request reviews–or require approval—by selected contributors when changes are made to sections of code that they own.
Draft pull requests
Use a pull request as a way to discuss and collaborate, without submitting to formal review or risking an unwanted merge.
Protected branches
Enforce restrictions on how code branches are merged, including requiring reviews, or allowing only specific contributors to work on a particular branch.
Team discussions
Post and discuss updates within your entire GitHub organization, or just your team. Notify participants with updates, and link from anywhere.
Team reviewers
Request a team on GitHub to review your pull request. Members of the team will get a notification indicating that you’ve asked for their review.
Multiple assignees
Assign up to 10 people to work on a given issue or pull request, letting you more easily track who’s working on what.
Multiple reviewers
Request review from multiple contributors. Requested reviewers will be notified that you’ve asked for their review.
Clarify code reviews by referencing or commenting on multiple lines at once in a pull request diff view.
Public repositories
Work with any GitHub member on code in a public repository you control. Make changes, open a pull request, create an issue, and more.
Automation
and CI/CD


Actions
Automate all your software development workflows. Write tasks and combine them to build, test, and deploy faster from GitHub.
Packages
Host your own software packages or use them as dependencies in other projects. Both private and public hosting available.
Create calls to get all the data and events you need within GitHub, and automatically kick off and advance your software workflows.
GitHub Pages
Create and publish websites about yourself, your organization, or your project directly from a GitHub repository.
GitHub Marketplace
Start with thousands of actions and applications from our community to help you build, improve, and accelerate your automated workflows.
Webhooks
Dozens of events, and a Webhooks API, help you integrate with and automate work for your repository, organization, or application.
Hosted runners
Move automation to the cloud with on-demand Linux, Windows, and MacOS environments for your workflow runs, hosted by GitHub.
Self-hosted runners
More environments and fuller control with labels, groups, and policies to manage runs on your own machines. Plus, the runner application is open source.
Secrets management
Share, update, and automatically sync secrets across multiple repositories to increase security and reduce workflow failures.
Environments
Meet security and compliance requirements for delivery with secrets and protection rules.
Deployments
View which version of your code is running in an environment, including when and why, plus logs for review.
Workflow visualization
Map workflows, track their progression in real time, understand complex workflows, and communicate status with the rest of the team.
Workflow templates
Standardize and scale best practices and processes with preconfigured workflow templates shared across your organization.
Policies
Manage Actions usage and permissions by repository and organizations, with additional policies for fork pull requests.
Security


Private repos
Host code that you don’t want to share with the world in private GitHub repos only accessible to you and people you share them with.
Required reviews
Ensure that pull requests have a specific number of approving reviews before collaborators can make changes to a protected branch.
Required status checks
Ensure that all required CI tests are passing before collaborators can make changes to a protected branch.
Code scanning
Find vulnerabilities in custom code using static analysis. Prevent new vulnerabilities from being introduced by scanning every pull request.
Secret scanning
Find secrets hard-coded in your public and private repositories. Revoke them to keep access to the services you use secure.
Dependency graph
See the packages your project depends on, the repositories that depend on them, and any vulnerabilities detected in their dependencies.
Dependabot alerts
Get notified when there are new vulnerabilities affecting your repositories. GitHub detects and alerts users to vulnerable dependencies in public and private repos.
Dependabot security and
version updates
Keep your supply chain secure and up-to-date by automatically opening pull requests that update vulnerable or out-of-date dependencies.
GitHub Security Advisories
Privately discuss, fix, and publish information about security vulnerabilities found in your repository.
GitHub Advisory Database
Browse or search for the vulnerabilities that GitHub knows about. The database contains all curated CVEs and security advisories on the GitHub dependency graph.
GPG commit signing verification
Use GPG or S/MIME to sign tags and commits locally. These are marked as verified on GitHub so other people know the changes come from a trusted source.
Security audit log
Quickly review the actions performed by members of your organization. Your audit log includes details like who performed an action and when.

Enterprise Security:
Control and secure access to organization resources like repos, issues, and pull requests with SAML. And allow users to authenticate with their existing GitHub usernames.
Centralize repository management. LDAP is one of the most common protocols used to integrate third-party software with large company user directories.
IP allow list
Limit access to enterprise assets to an allowed set of source IPs. The allow list will block access for any IP addresses not included via the web, API, and Git.
GitHub Connect
Share features and workflows between your GitHub Enterprise Server instance and GitHub Enterprise Cloud.
Audit log API
Keep copies of audit log data to ensure secure IP and maintain compliance for your organization.
Client Apps


GitHub for Mobile
Take your GitHub projects, ideas, and code to go with a fully-native mobile and tablet experience. Triage, review, and merge from anywhere.
GitHub CLI
Bring GitHub to the command line. Manage issues and pull requests from the terminal, where you’re already working with Git and your code.
GitHub Desktop
Simplify your development workflow with a GUI. Visualize, commit, and push changes without ever touching the command line.
Project
Management


Projects
Visually track issues, pull requests, and notes as cards that you can arrange to suit your workflow.
Labels
Organize and prioritize your work. Apply labels to issues and pull requests to signify priority, category, or any other information you find useful.
Milestones
Track progress on groups of issues or pull requests in a repository, and map groups to overall project goals.
Issues
Track bugs, enhancements, and other requests, prioritize work, and communicate with stakeholders as changes are proposed and merged.
Unified Contribution Graph
See all of your contributions to GitHub Enterprise and GitHub.com in one place: your profile’s contribution graph.
Org activity graph
See visualizations of your entire organization or specific repositories, including issue and pull request activity, top languages used, and member activity data
Org dependency insights
With dependency insights you can view vulnerabilities, licenses, and other important information for the open source projects your organization depends on.
Repo insights
Use data about activity and contributions within your repositories, including trends, to make data-driven improvements to your development cycle.
Wikis
Host documentation for projects in a wiki within your repository. Contributors can easily edit documentation on the web or locally.
Источник
Видео
Содержание
- Connect the dots in a GitHub repository
- What you’ll learn
- What you’ll build
- Prerequisites
- Projects used
- Audience
- References within issues
- Create a crosslink
- Find a commit
- Find context
- Assign yourself
- Fix the broken build
- Git hub connect the dots и windows iot
- Git hub connect the dots и windows iot
- Latest commit
- Git stats
- Files
- README.md
- About
- Set up Git
- Help us make these docs great!
- Git Guides
- Get started with git and GitHub
Connect the dots in a GitHub repository
This course will teach you skills for finding relevant conversations, commits, and projects in a repository.
Have you ever worked in a repository with a lot of history? Perhaps you’ve had to track down related issues and pull requests in the past, or you’ve had to find who committed a particular change. If you’ve ever found yourself in any of these situations, you’ll know how important it is to navigate your workspace.
What you’ll learn
What you’ll build

Prerequisites
Before you take this course, you may want to go through the Introduction to GitHub course on Learning Lab.
Projects used
Audience
Developers, GitHub users, users new to Git, students, managers, teams
References within issues
Find and close the duplicate cross-linked issue
Create a crosslink
Find the relevant or duplicate issue or pull request, and create a crosslink
Find a commit
Find the commit associated with the creation of the sidebar file
Find context
Create a link to the pull request where the commit was created
Assign yourself
Assign yourself to the pull request with a broken build
Fix the broken build
Fix the broken build in the pull request with a new commit
Источник
Git hub connect the dots и windows iot


EMQ X broker is a fully open source, highly scalable, highly available distributed MQTT messaging broker for IoT, M2M and Mobile applications that can handle tens of millions of concurrent clients.
Starting from 3.0 release, EMQ X broker fully supports MQTT V5.0 protocol specifications and backward compatible with MQTT V3.1 and V3.1.1, as well as other communication protocols such as MQTT-SN, CoAP, LwM2M, WebSocket and STOMP. The 3.0 release of the EMQ X broker can scale to 10+ million concurrent MQTT connections on one cluster.
The EMQ X broker is cross-platform, which supports Linux, Unix, macOS and Windows. It means EMQ X can be deployed on x86_64 architecture servers and ARM devices like Raspberry Pi.
See more details for building and running EMQ X on Windows in Windows.md
Installing via EMQ X Docker Image
Installing via Binary Package
Get the binary package of the corresponding OS from EMQ X Download page.
The EMQ X broker requires Erlang/OTP R21+ to build since 3.0 release.
For 4.3 and later versions.
For earlier versions, release has to be built from another repo.
Источник
Git hub connect the dots и windows iot
A command-line tool that makes git easier to use with GitHub.
Latest commit
Git stats
Files
Failed to load latest commit information.
README.md
hub is a command line tool that wraps git in order to extend it with extra features and commands that make working with GitHub easier.
For an official, potentially more user-friendly command-line interface to GitHub, see cli.github.com and this comparison.
This repository and its issue tracker is not for reporting problems with GitHub.com web interface. If you have a problem with GitHub itself, please contact Support.
See usage examples or the full reference documentation to see all available commands and flags.
hub can also be used to make shell scripts that directly interact with the GitHub API.
Packages other than Homebrew are community-maintained (thank you!) and they are not guaranteed to match the latest hub release. Check hub version after installing a community package.
hub can be easily installed as an executable. Download the latest binary for your system and put it anywhere in your executable path.
hub is ready to be used in your GitHub Actions workflows:
Note that the default secrets.GITHUB_TOKEN will only work for API operations scoped to the repository that runs this workflow. If you need to interact with other repositories, generate a Personal Access Token with at least the repo scope and add it to your repository secrets.
Prerequisites for building from source are:
Clone this repository and run make install :
If you’re using PowerShell, you can set an alias for hub by placing the following in your PowerShell profile (usually
A simple way to do this is to run the following from the PowerShell prompt:
Note: You’ll need to restart your PowerShell console in order for the changes to be picked up.
If your PowerShell profile doesn’t exist, you can create it by running the following:
hub repository contains tab-completion scripts for bash, zsh and fish. These scripts complement existing completion scripts that ship with git.
About
A command-line tool that makes git easier to use with GitHub.
Источник
Set up Git
At the heart of GitHub is an open source version control system (VCS) called Git. Git is responsible for everything GitHub-related that happens locally on your computer.
To use Git on the command line, you’ll need to download, install, and configure Git on your computer. You can also install GitHub CLI to use GitHub from the command line. For more information, see «About GitHub CLI.»
If you want to work with Git locally, but don’t want to use the command line, you can instead download and install the GitHub Desktop client. For more information, see «Installing and configuring GitHub Desktop.»
If you don’t need to work with files locally, GitHub lets you complete many Git-related actions directly in the browser, including:
Next steps: Authenticating with GitHub from Git
When you connect to a GitHub repository from Git, you’ll need to authenticate with GitHub using either HTTPS or SSH.
Connecting over HTTPS (recommended)
Connecting over SSH
If you clone with SSH, you must generate SSH keys on each computer you use to push or pull from GitHub.
Congratulations, you now have Git and GitHub all set up! You may now choose to create a repository where you can put your projects. This is a great way to back up your code and makes it easy to share the code around the world. For more information see «Create a repository».
You can create a copy of a repository by forking it and propose the changes that you want to see without affecting the upstream repository. For more information see «Fork a repository.»
Each repository on GitHub is owned by a person or an organization. You can interact with the people, repositories, and organizations by connecting and following them on GitHub. For more information see «Be social.»
GitHub has a great support community where you can ask for help and talk to people from around the world. Join the conversation on Github Support Community.
Help us make these docs great!
All GitHub docs are open source. See something that’s wrong or unclear? Submit a pull request.
Источник
Git Guides
Everything you need to know about Git, from getting started to advanced commands and workflows.
Whether or not you’ve worked with version control before, there are a few things you should know before getting started with Git:
Like we mentioned above, Git uses SHA compression, which makes it very fast.
Git can handle merge conflicts, which mean that it’s OK for multiple people to work on the same file at the same time. This opens up the world of development in a way that isn’t possible with centralized version control. You have access to the entire project, and if you’re working on a branch, you can do whatever you need to and know that your changes are safe.
Speaking of branches, Git offers a lot of flexibility and opportunity for collaboration with branches. By using branches, developers can make changes in a safe sandbox.
Instead of only committing code that is 100% sure to succeed, developers can commit code that might still need help. Then, they can push that code to the remote and get fast feedback from integrated tests or peer review.
Without sharing the code through branches, this would never be possible.
If you make a mistake, it’s OK! Commits are immutable, meaning they can’t be changed. (Note: You can change history, but it will create new replacement commits instead of editing the existing commits. More on that later!) This means that if you do make a mistake, even on an important branch like master, it’s OK. You can easily revert that change, or roll back the branch pointer to the commit where everything was fine.
The benefits of this can’t be overstated. Not only does it create a safer environment for the project and code, but it fosters a development environment where developers can be braver, trusting that Git has their back.
Getting Started With Git
Depending on your operating system, you may already have Git installed. But, getting started means more than having the software! To get started, it’s important to know the basics of how Git works. You may choose to do the actual work within a terminal, an app like GitHub Desktop, or through GitHub.com. (Note: while you can interact with Git through GitHub.com, your experience may be limited. Many local tools can give you access to the most widely used Git functionalities, though only the terminal will give you access to them all.)
There are many ways to use Git, which doesn’t necessarily make it easier! But, the fundamental Git workflow has a few main steps. You can practice all of these in the Introduction to GitHub Learning Lab course.
Make change (and make a commit)
Once you’ve created a branch, and moved the HEAD pointer to it by «checking out» to that branch, you’re ready to get to work. Make the changes in your repository using your favorite text editor or IDE.
Next, save your changes. You’re ready to start the commit!
Push your changes to the remote
By default, git push only pushes the branch that you’re currently checked out to.
Sometimes, if there has been a new commit on the branch on the remote, you may be blocked from pushing. Don’t worry! Start with a simple git pull to incorporate the changes on the remote into your own local branch, resolve any conflicts or finish the merge from the remote into the local branch, and then try the push again.
Open a pull request
Pull requests are the powerhouse of GitHub. Integrated tests can automatically run on pull requests, giving you immediate feedback on your code. Peers can give detailed code reviews, letting you know if there are changes to make, or if it’s ready to go.
Make sure you start your pull requests off with the right information. Put yourself in the shoes of your teammates, or even of your future self. Include information about what this change relates to, what prompted it, what is already done, what is left to do, and any specific asks for help or reviews. Include links to relevant work or conversations. Pull request templates can help make this process easy by automating the starting content of the body of pull requests.
Collaborate (get feedback from tests or peers, make more commits locally and then push them up and get more feedback)
Once the pull request is open, then the real fun starts. It’s important to recognize that pull requests aren’t meant to be open when work is finished. Pull requests should be open when work is beginning! The earlier you open a pull request, the more visibility the entire team has to the work that you’re doing. When you’re ready for feedback, you can get it by integrating tests or requesting reviews from teammates.
It’s very likely that you will want to make more changes to your work. That’s great! To do that, make more commits on the same branch. Once the new commits are present on the remote, the pull request will update and show the most recent version of your work.
Once you and your team decide that the pull request looks good, you can merge it. By merging, you integrate the feature branch into the other branch (most typically the master branch). Then, master will be updated with your changes, and your pull request will be closed. Don’t forget to delete your branch! You won’t need it anymore. Remember, branches are lightweight and cheap, and you should create a new one when you need it based on the most recent commit on the master branch.
If you choose not to merge the pull request, you can also close pull requests with unmerged changes.
Learning & Mastering Git Commands
If you’re getting started with Git, a great place to start is the Git Cheat sheet. It’s translated into many languages, open source as a part of the github/training-kit repository, and a great starting place for the fundamentals on the command line.
Some of the most important and most used commands that you’ll find there are:
Getting Started With GitHub
If you’re wondering where Git ends and GitHub begins, you’re not alone. They are tied closely together to make working with them both a seamless experience. While Git takes care of the underlying version control, GitHub is the collaboration platform built on top of it. GitHub is the place for pull requests, comments, reviews, integrated tests, and so much more. Most developers work locally to develop, and use GitHub for collaboration. That ranges from using GitHub to host the shared remote repository, to working with colleagues and capitalizing on features like protected branches, code review, GitHub Actions, and more.
The best place to practice using Git and GitHub is the Introduction to GitHub Learning Lab course.
If you already know Git and need to sign up for a GitHub account, head over to github.com.
Get started with git and GitHub
Review code, manage projects, and build software alongside 40 million developers.
Источник