
SSH-Agent and OpenSSH are tools in Windows that can be used to authenticate to remote Git repositories, such as GitLab, GitHub, Azure DevOps, etc. Once set up as a service that stores your various SSH keys, this can facilitate authentication without entering a password each time, removing the irritation of entering a password every time you wish to push/pull/etc. from a Git repository.
Prerequisites
- The OpenSSH Client optional service must be enabled on your machine, and OpenSSH must be added to your PATH environment variable. You can read how to do that here.
- A remote Git repository that you wish to access. We will use a GitLab repository for this article; however, the process will be similar for other Git management providers.
- Git must be installed on your machine.
How to Install the SSH-Agent Service in Windows
Using an elevated PowerShell window (run as admin), execute the following command to install the SSH-Agent service and configure it to start automatically when you log into your machine:
Get-Service ssh-agent | Set-Service -StartupType Automatic -PassThru | Start-Service

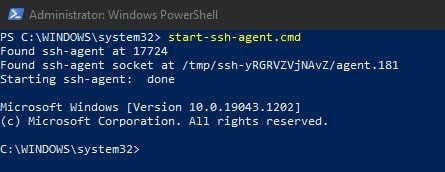
To avoid needing to restart your system to get the service running for the first time, execute this command:
start-ssh-agent.cmd
Setting up an SSH Key Pair to Access a Git Remote Provider
Using a command line tool such as Bash or PowerShell, you should be able to follow these steps to create a local SSH key pair. For our example, we will create an ED25519 key, but you can create other keys such as an RSA.
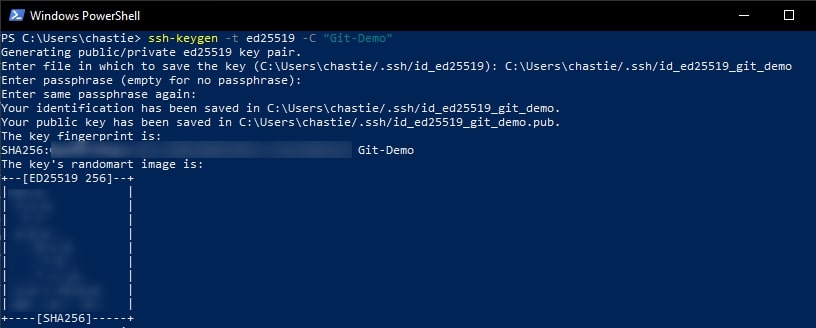
Create a new SSH ED25519 key, giving it a useful comment:
ssh-keygen -t ed25519 -C "Git-Demo"
By default, the file will be stored in your local user’s SSH repository in Windows. You can choose another storage location if you wish or rename the file by entering a new file path to save the key. Leave it blank to stick with the default.
In our example, we rename the file from the default id_ed25519 to id_ed25519_git_demo:

You can also add a password if you like or leave this blank:

You will then be shown the key’s randomart image to confirm creation:
Copy the contents of the public key to your clipboard. You can read this key with the following command:
cat path\to\ssh\key.pub
For example, our code is likely:
cat C:\Users\chastie/.ssh\id_ed25519_git_demo.pub
Note: We access the public key with the .pub suffix.
A sample is shown here. You can then select this and copy it with a right-click of your mouse:

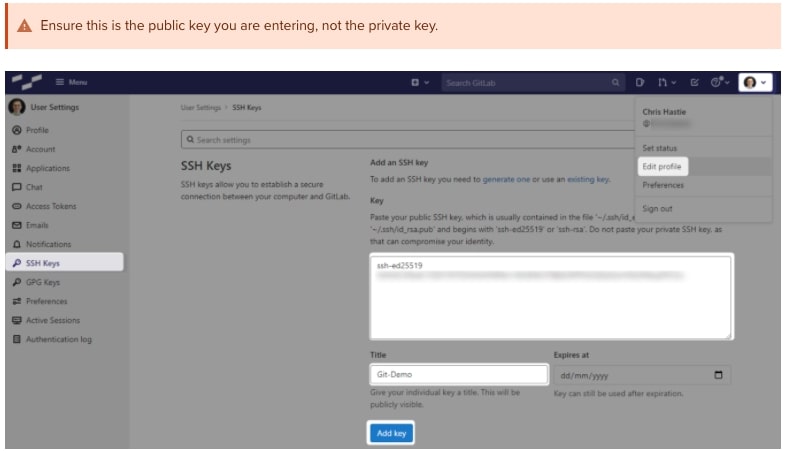
In GitLab (or the appropriate location of your Git remote repository), you can now add this public key to your user profile. In GitLab, you can do this by adding it under the SSH Keys section of your user settings:
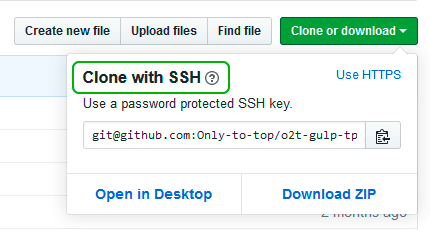
Test that you can connect to the repository when using the SSH private key directly with this command:
ssh -i path/to/ssh/private/key -T git@host
For example, our command could be:
ssh -i C:\Users\chastie/.ssh\id_ed25519_git_demo -T git@gitlab.mycompany.com

or

ssh -i C:\Users\chastie/.ssh\id_ed25519_git_demo -T git@github.com

We have now established an SSH key pair that can authenticate to our Git remote provider. It remains to set this up in the SSH-Agent service to automatically provide access. We can demonstrate the issue by attempting the same connection, but without specifically naming the SSH key, with the command below:
ssh -T git@host
As we can see, if we execute this command without specifying an SSH key, we are prompted for a password:

Adding the SSH Key to the SSH-Agent Service
Our goal is to be able to connect to a Git repository without entering a password. At this stage, we have a working SSH key pair and the SSH-Agent service installed and running.
Execute the following command to add your SSH key to your SSH-Agent service:
ssh-add path/to/ssh/private/key
For our example, our command could be:
ssh-add C:\Users\chastie/.ssh\id_ed25519_git_demo

We can now test our connection to our Git remote provider without specifying a key and connect successfully:
ssh -T git@host

Configuring Git to Leverage the Windows SSH-Agent

In an elevated console (run as admin), execute the following command to modify your existing Git configuration to leverage the windows OpenSSH service as the core SSH command:
git config --global core.sshCommand C:/Windows/System32/OpenSSH/ssh.exe

Congratulations! You have now set up your environment to automatically authenticate to your Git remote provider through an SSH key pair, without using passwords. If you wish to facilitate access to any other Git remote providers, simply follow the same steps to generate a key pair ( as outlined above) and add it to your existing SSH-Agent service.
I am using git bash. I have to use
eval `ssh-agent.exe`
ssh-add /my/ssh/location/
every time when I start a new git bash.
Is there a way to set ssh agent permanently? Or does windows has a good way
to manage the ssh keys?
I’m a new guy, please give me detailed tutorial, thanks!
![]()
Eric Tobias
3,2254 gold badges33 silver badges50 bronze badges
asked Aug 23, 2013 at 13:37
![]()
6
2013: In a git bash session, you can add a script to ~/.profile or ~/.bashrc (with ~ being usually set to %USERPROFILE%), in order for said session to launch automatically the ssh-agent.
If the file doesn’t exist, just create it.
This is what GitHub describes in «Working with SSH key passphrases».
The «Auto-launching ssh-agent on Git for Windows» section of that article has a robust script that checks if the agent is running or not.
Below is just a snippet, see the GitHub article for the full solution.
# This is just a snippet. See the article above.
if ! agent_is_running; then
    agent_start
    ssh-add
elif ! agent_has_keys; then
    ssh-add
fi
Other Resources:
«Getting ssh-agent to work with git run from windows command shell» has a similar script, but I’d refer to the GitHub article above primarily, which is more robust and up to date.
hardsetting adds in the comments (2018):
If you want to enter the passphrase the first time you need it, and not when opening a shell, the cleanest way to me is:
- removing the
ssh-addfrom the.bash_profile, and- adding «
AddKeysToAgent yes» to your.ssh/configfile (see «How to makessh-agentautomatically add the key on demand?»).This way you don’t even have to remember running
ssh-add.
And Tao adds in the comments (2022):
It’s worth noting why this script makes particular sense in Windows, vs (for example) the more standard linuxey script noted by @JigneshGohel in another answer:
By not relying on the
SSH_AGENT_PIDat all, this script works across different msys & cygwin environments.
An agent can be started in msys2, and still used ingit bash, as theSSH_AUTH_SOCKpath can be reached in either environment.
The PID from one environment cannot be queried in the other, so a PID-based approach keeps resetting/creating newssh-agentprocesses on each switch.
answered Aug 23, 2013 at 13:50
![]()
VonCVonC
1.3m530 gold badges4436 silver badges5275 bronze badges
8
P.S: These instructions are in context of a Bash shell opened in Windows 10 Linux Subsystem and doesn’t mention about sym-linking SSH keys generated in Windows with Bash on Ubuntu on Windows
1) Update your .bashrc by adding following in it
# Set up ssh-agent
SSH_ENV="$HOME/.ssh/environment"

function start_agent {
    echo "Initializing new SSH agent..."
    touch $SSH_ENV
    chmod 600 "${SSH_ENV}"
    /usr/bin/ssh-agent | sed 's/^echo/#echo/' >> "${SSH_ENV}"
    . "${SSH_ENV}" > /dev/null
    /usr/bin/ssh-add
}

# Source SSH settings, if applicable
if [ -f "${SSH_ENV}" ]; then
    . "${SSH_ENV}" > /dev/null
    kill -0 $SSH_AGENT_PID 2>/dev/null || {
        start_agent
    }
else
    start_agent
fi
2) Then run $ source ~/.bashrc to reload your config.
The above steps have been taken from https://github.com/abergs/ubuntuonwindows#2-start-an-bash-ssh-agent-on-launch
3) Create a SSH config file, if not present. Use following command for creating a new one: .ssh$ touch config
4) Add following to ~/.ssh/config
Host github.com-<YOUR_GITHUB_USERNAME>
HostName github.com
User git
PreferredAuthentications publickey
IdentityFile ~/.ssh/id_work_gmail # path to your private key
AddKeysToAgent yes


Host csexperimental.abc.com
IdentityFile ~/.ssh/id_work_gmail # path to your private key
AddKeysToAgent yes

<More hosts and github configs can be added in similar manner mentioned above>
5) Add your key to SSH agent using command $ ssh-add ~/.ssh/id_work_gmail and then you should be able to connect to your github account or remote host using ssh. For e.g. in context of above code examples:
$ ssh github.com-<YOUR_GITHUB_USERNAME>
or
$ ssh <USER>@csexperimental.abc.com
This adding of key to the SSH agent should be required to be performed only one-time.
6) Now logout of your Bash session on Windows Linux Subsystem i.e. exit all the Bash consoles again and start a new console again and try to SSH to your Github Host or other host as configured in SSH config file and it should work without needing any extra steps.
Note:
-
If you face
Bad owner or permissions on ~/.ssh/configthen update the permissions using the commandchmod 600 ~/.ssh/config. Reference: https://serverfault.com/a/253314/98910 -
For the above steps to work you will need OpenSSH v 7.2 and newer. If you have older one you can upgrade it using the steps mentioned at https://stackoverflow.com/a/41555393/936494
-
The same details can be found in the gist Windows 10 Linux Subsystem SSH-agent issues
Thanks.
answered Aug 8, 2017 at 8:14
![]()
Jignesh GohelJignesh Gohel
6,2766 gold badges54 silver badges89 bronze badges
5
If the goal is to be able to push to a GitHub repo whenever you want to, then in Windows under C:\Users\tiago\.ssh where the keys are stored (at least in my case), create a file named config and add the following in it
Host github.com
    HostName github.com
    User your_user_name
    IdentityFile ~/.ssh/your_file_name
Then simply open Git Bash and you’ll be able to push without having to manually start the ssh-agent and adding the key.
answered Jan 19, 2021 at 12:26
![]()
1
I found the smoothest way to achieve this was using Pageant as the SSH agent and plink.
You need to have a putty session configured for the hostname that is used in your remote.
You will also need plink.exe which can be downloaded from the same site as putty.
And you need Pageant running with your key loaded. I have a shortcut to pageant in my startup folder that loads my SSH key when I log in.
When you install git-scm you can then specify it to use tortoise/plink rather than OpenSSH.
The net effect is you can open git-bash whenever you like and push/pull without being challenged for passphrases.
Same applies with putty and WinSCP sessions when pageant has your key loaded. It makes life a hell of a lot easier (and secure).
answered Mar 4, 2015 at 0:57
![]()
AlasdairAlasdair
911 silver badge1 bronze badge
I could not get this to work based off the best answer, probably because I’m such a PC noob and missing something obvious. But just FYI in case it helps someone as challenged as me, what has FINALLY worked was through one of the links here (referenced in the answers). This involved simply pasting the following to my .bash_profile:
env=~/.ssh/agent.env

agent_load_env () { test -f "$env" && . "$env" >| /dev/null ; }

agent_start () {
    (umask 077; ssh-agent >| "$env")
    . "$env" >| /dev/null ; }

agent_load_env

# agent_run_state: 0=agent running w/ key; 1=agent w/o key; 2= agent not running
agent_run_state=$(ssh-add -l >| /dev/null 2>&1; echo $?)

if [ ! "$SSH_AUTH_SOCK" ] || [ $agent_run_state = 2 ]; then
    agent_start
    ssh-add
elif [ "$SSH_AUTH_SOCK" ] && [ $agent_run_state = 1 ]; then
    ssh-add
fi

unset env
I probably have something configured weird, but was not successful when I added it to my .profile or .bashrc. The other real challenge I’ve run into is I’m not an admin on this computer and can’t change the environment variables without getting it approved by IT, so this is a solution for those that can’t access that.
You know it’s working if you’re prompted for your ssh password when you open git bash. Hallelujah something finally worked.
answered Feb 19, 2020 at 19:13
![]()
AmbrownAmbrown
3612 silver badges8 bronze badges
Put this in your ~/.bashrc (or a file that’s source’d from it) which will stop it from being run multiple times unnecessarily per shell:
if [ -z "$SSH_AGENT_PID" ]; then
        eval `ssh-agent -s`
fi
And then add «AddKeysToAgent yes» to ~/.ssh/config:
Host *
    AddKeysToAgent yes
ssh to your server (or git pull) normally and you’ll only be asked for password/passphrase once per session.
answered Jun 27, 2020 at 17:02
![]()
mzamza
1112 silver badges4 bronze badges
As I don’t like using putty in Windows as a workaround, I created a very simple utility ssh-agent-wrapper. It scans your .ssh folders and adds all your keys to the agent. You simply need to put it into Windows startup folder for it to work.
Assumptions:
- ssh-agent in path
- shh-add in path (both by choosing the «RED» option when installing git
- private keys are in %USERPROFILE%/.ssh folder
- private keys names start with id (e.g. id_rsa)
answered Jul 28, 2017 at 5:14
![]()
Erez A. KornErez A. Korn
2,7083 gold badges24 silver badges32 bronze badges
3
Create a new .bashrc file in your ~ directory.
There you can put your commands that you want executed everytime you start the bash
answered Aug 23, 2013 at 13:50
![]()
3
I wrote a script and created a git repository, which solves this issue here: https://github.com/Cazaimi/boot-github-shell-win .
The readme contains instructions on how to set the script up, so that each time you open a new window/tab the private key is added to ssh-agent automatically, and you don’t have to worry about this, if you’re working with remote git repositories.
answered Dec 27, 2020 at 13:40
![]()
0
@VonC provided an excellent answer here.
I just want to provide the full script and all instructions in one place.
Reference these instructions here: https://docs.github.com/en/authentication/connecting-to-github-with-ssh/working-with-ssh-key-passphrases?platform=windows
How to get ssh-agent to load your private ssh keys and require their passwords only once per boot in Windows
Tested in Windows 10 with Git For Windows 2.41.0-64-bit.
-
In Git Bash, create your
~/.bashrcfile# Create your `~/.bashrc` file (usually at `/c/Users/myusername/.bashrc`) touch ~/.bashrc -
In your editor of choice, edit that file now, and paste the following into the bottom of it. This script is from here. I only added the top and bottom comments, and the
echocommands:# -------------------------------- START ----------------------------------- # Auto-launch the ssh-agent and load all private keys on Git for Windows # Copied from: https://stackoverflow.com/a/76568760/4561887 env=~/.ssh/agent.env agent_load_env () { test -f "$env" && . "$env" >| /dev/null ; } agent_start () { (umask 077; ssh-agent >| "$env") . "$env" >| /dev/null ; } agent_load_env # agent_run_state: 0=agent running w/ key; 1=agent w/o key; 2=agent not # running agent_run_state=$(ssh-add -l >| /dev/null 2>&1; echo $?) if [ ! "$SSH_AUTH_SOCK" ] || [ $agent_run_state = 2 ]; then echo "Starting ssh-agent and adding your private keys." agent_start ssh-add elif [ "$SSH_AUTH_SOCK" ] && [ $agent_run_state = 1 ]; then echo "Adding your private keys to ssh-agent." ssh-add fi unset env # -------------------------------- END ------------------------------------- -
Make Git Bash re-source the
~/.bashrcfile changes.Either: manually re-source your
~/.bashrcfile with. ~/.bashrc, or:close and re-open all Git Bash terminal windows.
This auto-starts the ssh-agent, due to the script above you just added to your
~/.bashrcfile. -
Add all private keys to your ssh-agent, if needed:
Private keys with standard paths, such as
~/.ssh/id_ed25519or~/.ssh/id_rsa, are automatically added by the script when it callsssh-add. However, if you have private keys with custom names or paths, add them now:ssh-add path/to/my/keys/id_ed25519 ssh-add path/to/my/keys/id_rsa_custom_name # etc. -
That’s it! As the tutorial says:
The
ssh-agentprocess will continue to run until you log out, shut down your computer, or kill the process.Now, you only have to type each ssh key’s private password once per Windows reboot, rather than once per
git pushorgit pull-type operation, or once per Git Bash terminal, both of which were obnoxious options.
See also
- I’d also like to point out an alternative, well-documented solution by Atlassian and Bitbucket, here: https://support.atlassian.com/bitbucket-cloud/docs/set-up-personal-ssh-keys-on-windows/. In this solution, they require explicitly installing the Windows version of OpenSSH, as well as running some commands in the Windows PowerShell, and having Git Bash use the Windows version of OpenSSH. This is significantly different from my solution above, but it also works. I prefer my solution above, however, as I think it’s easier, faster, and more-universal, and it doesn’t require tinkering with Windows executables or PowerShell commands. Instead, it uses just the tools packaged with and provided by Git for Windows.
answered Jun 27 at 21:32
![]()
Gabriel StaplesGabriel Staples
37.7k15 gold badges198 silver badges269 bronze badges
1
Simple two string solution from this answer:
For sh, bash, etc:
# ~/.profile
if ! pgrep -q -U `whoami` -x 'ssh-agent'; then ssh-agent -s > ~/.ssh-agent.sh; fi
. ~/.ssh-agent.sh
For csh, tcsh, etc:
# ~/.schrc
sh -c 'if ! pgrep -q -U `whoami` -x 'ssh-agent'; then ssh-agent -c > ~/.ssh-agent.tcsh; fi'
eval `cat ~/.ssh-agent.tcsh`
answered Oct 13, 2017 at 20:09
![]()
oklasoklas
7,9552 gold badges26 silver badges42 bronze badges
Инструменты
Git SSH Windows — пошаговое руководство
Дата размещения статьи 08/12/2019 👁31067
Git SSH Windows — пошаговое руководство
Настроим пошагово Git SSH для Windows 10. Это позволит вам выполнять команды git без ввода пароля от своей учетной записи GitHub.
Порядок действий:
- Генерация ключа SSH.
- Добавление SSH-ключа в ssh-agent.
- Добавление ключа SSH в учетную запись GitHub.
Генерация ключа SSH
Откройте bash/терминал. Добавьте следующий текст, подставив свой адрес электронной почты GitHub.
ssh-keygen -t rsa -b 4096 -C "ваша@почта.com"Будет создан ключ ssh, используя e-mail в качестве метки.
Когда вам будет предложено «Введите файл, в котором вы хотите сохранить ключ», нажмите Enter. Это установит в местоположение по умолчанию.
Enter a file in which to save the key (/c/Users/you/.ssh/id_rsa):[Press enter]
Далее введите безопасную фразу-пароль дважды или просто нажмите Enter.
Enter passphrase (empty for no passphrase): [Type a passphrase]
Enter same passphrase again: [Type passphrase again]
Добавление SSH-ключа в ssh-agent
Чтобы запустить ssh-агент введите следующую команду.
На экране отобразится похожая строка.
Agent pid 31724
Добавим свой закрытый ключ SSH в ssh-agent. Если вы создали свой ключ с другим именем (или добавляете существующий ключ с другим именем), замените в команде id_rsa на имя вашего файла закрытого (приватного) ключа.
Ключ будет успешно добавлен в ssh-агент.
Добавление ключа SSH в учетную запись GitHub
Мы сгенерировали у себя на компьютере закрытый ключ SSH и добавили его в ssh-агент. Теперь нам необходимо добавить SSH ключ в учетную запись GitHub.
Сейчас нам необходимо скопировать SSH ключ в буфер обмена.
Способов есть несколько, но я же вам предлагаю следующее решения для Windows 10: введите команду ниже.
Прямо в терминале вы увидите содержимое необходимого файла с ключем. Скопируйте его в буфер.
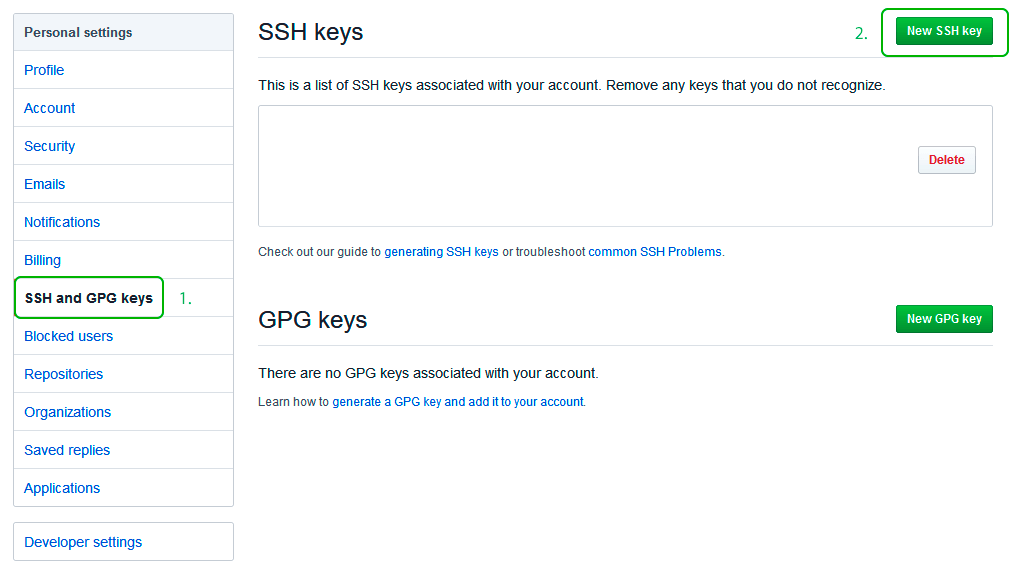
Теперь зайдите на вашу страницу GitHub » Settings.

Перейдите во вкладку SSH and GPG keys и нажмите на кнопку New SSH key для добавления SSH ключа в вашу учетную запись GitHub.
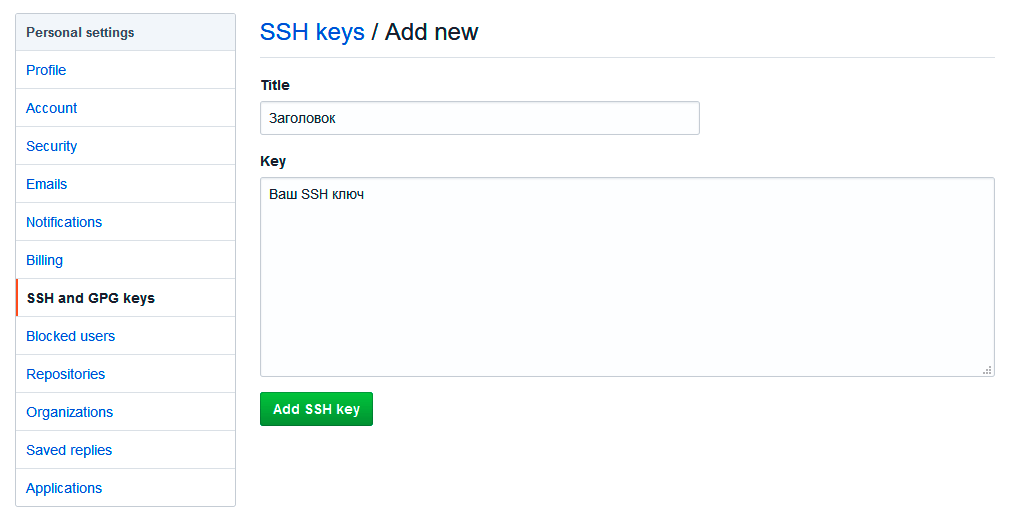
В поле Title добавьте заголовок для данного ключа. Например, если вы захотите настроить SSH доступ на нескольких устройствах, то вы будите понимать какой ключ принадлежит какому устройству.
В поле Key добавьте свой ssh-ключ, который вы скопировали в буфер обмена на предыдущем шаге.
Нажмите Add SSH key.
Для подтверждения вам потребуется ввести свой пароль от учетной записи GitHub.
На этом настройка SSH для вашего устройства завершена, теперь вы можете работать с git без ввода пароля от своей учетной записи.
Если вам понравилась данная статья, можете прочитать как настроить моментальную загрузку сайта на хостинг и синхронизацию файлов.
JavaScript: Window Location Checkbox Checked — Проверка Состояния Чекбокса ✔️
Надеюсь, вам понравилась данная информация. Если вам интересна тема web-разработки,
то можете следить за выходом новых статей в Telegram.
- Настройка Gulp Babel
- Микроразметка сайта
- Как перенести сайт WordPress на хостинг
- Настройте показ всего текста во время загрузки веб-шрифтов
- Сниппеты в VS Code
- Не удается проверить так как не задан исполняемый PHP-файл
Prepararation
- Create a folder at the root of your user home folder
(Example:C:/Users/uname/) called.ssh. - Create the following files if they do not already
exist (paths begin from the root of your user home
folder):.ssh/config.bash_profile.bashrc
Create a New SSH Key
Follow the steps in the section named «Generating a new SSH
Key» found in the following documentation from GitHub:
Generating a new SSH key and adding it to the ssh-agent
Configure SSH for Git Hosting Server
Add the following text to .ssh/config (.ssh should be found
in the root of your user home folder):
Host github.com
 Hostname github.com
 IdentityFile ~/.ssh/id_rsa
Enable SSH Agent Startup Whenever Git Bash is Started
First, ensure that following lines are added to .bash_profile,
which should be found in your root user home folder:
test -f ~/.profile && . ~/.profile
test -f ~/.bashrc && . ~/.bashrc
Now, add the following text to .bashrc, which should be found
in your root user home folder:
# Start SSH Agent
#----------------------------

SSH_ENV="$HOME/.ssh/environment"

function run_ssh_env {
  . "${SSH_ENV}" > /dev/null
}

function start_ssh_agent {
  echo "Initializing new SSH agent..."
  ssh-agent | sed 's/^echo/#echo/' > "${SSH_ENV}"
  echo "succeeded"
  chmod 600 "${SSH_ENV}"

  run_ssh_env;

  ssh-add ~/.ssh/id_rsa;
}

if [ -f "${SSH_ENV}" ]; then
  run_ssh_env;
  ps -ef | grep ${SSH_AGENT_PID} | grep ssh-agent$ > /dev/null || {
    start_ssh_agent;
  }
else
  start_ssh_agent;
fi
I needed to run git natively in windows (no wsl) for a recent project. I use ssh certificates with passphrases to authenticate with my git provider.
Ssh requires the certificate passphrase every time you use a connection. It’s annoying typing this passphrase in to terminal when using a git command.
The Problem
On most *nix systems there is an ssh-agent installed that will store your pass phrases so you don’t have to enter them when using Git with ssh.
Ssh-agent is harder to configure on windows because some of the default settings and paths are different to *nix systems.
I didn’t want to use Git for Windows because it uses GitBash. I couldn’t use WSL because I wanted git to work on any terminal in windows.
These are the steps I had to research to use Git on Windows with the built in Windows ssh-agent.
Note: You must be an administrator to perform the required actions.
Open ssl on Windows
If you use Windows 10 or higher there is a built-in openssl instance. You can turn it on in the Optional Features settings pane.
Microsoft provide more instructions here: https://learn.microsoft.com/en-us/windows-server/administration/openssh/openssh_install_firstuse?tabs=gui
Follow the instructions to install it if you don’t have it.
A note on certificates
I’ll assume that you have ssh certificates available and any ssh aliases are set in the config file
The default location for the config file on windows is
$HOME\.ssh\config
You should create that file if you need ssh aliases. You can read more about this in my article on ssh for git accounts — /2021/05/04/configure-multiple-github-accounts-one-computer/
Enabling Ssh agent
Open a powershell terminal as administrator and run the following to have ssh-agent available.
# Have ssh agent start automatically
Get-Service ssh-agent | Set-Service -StartupType Automatic

# Start ssh agent now
Start-Service ssh-agent

# Should work successfully
Get-Service ssh-agent
Configure git to use Windows ssh
# tell git to use ssh.exe
git config --global core.sshCommand "'C:\Windows\System32\OpenSSH\ssh.exe'"
Load keys into ssh agent
Copy your keys into a folder that ssh-agent can access. Anywhere in the $HOME/.ssh should be ok.
Then add the key to ssh-agent. You will be prompted for a password and ssh agent will remember it for you.
ssh-add "C:\Users\darragh\.ssh\authorized_keys\darraghPersonalGithub"