
How to install Git on any OS
Git can be installed on the most common operating systems like Windows, Mac, and Linux. In fact, Git comes installed by default on most Mac and Linux machines!
Checking for Git
To see if you already have Git installed, open up your terminal application.
- If you’re on a Mac, look for a command prompt application called «Terminal».
- If you’re on a Windows machine, open the windows command prompt or «Git Bash».
Once you’ve opened your terminal application, type git version. The output will either tell you which version of Git is installed, or it will alert you that git is an unknown command. If it’s an unknown command, read further and find out how to install Git.
Install Git Using GitHub Desktop
Installing GitHub Desktop will also install the latest version of Git if you don’t already have it. With GitHub Desktop, you get a command line version of Git with a robust GUI. Regardless of if you have Git installed or not, GitHub Desktop offers a simple collaboration tool for Git. You can learn more here.
Install Git on Windows
- Navigate to the latest Git for Windows installer and download the latest version.
- Once the installer has started, follow the instructions as provided in the Git Setup wizard screen until the installation is complete.
- Open the windows command prompt (or Git Bash if you selected not to use the standard Git Windows Command Prompt during the Git installation).
- Type
git versionto verify Git was installed.
Note: git-scm is a popular and recommended resource for downloading Git for Windows. The advantage of downloading Git from git-scm is that your download automatically starts with the latest version of Git included with the recommended command prompt, Git Bash . The download source is the same Git for Windows installer as referenced in the steps above.
Install Git on Mac
Most versions of MacOS will already have Git installed, and you can activate it through the terminal with git version. However, if you don’t have Git installed for whatever reason, you can install the latest version of Git using one of several popular methods as listed below:
Install Git From an Installer
- Navigate to the latest macOS Git Installer and download the latest version.
- Once the installer has started, follow the instructions as provided until the installation is complete.
- Open the command prompt «terminal» and type
git versionto verify Git was installed.
Note: git-scm is a popular and recommended resource for downloading Git on a Mac. The advantage of downloading Git from git-scm is that your download automatically starts with the latest version of Git. The download source is the same macOS Git Installer as referenced in the steps above.
Install Git from Homebrew
Homebrew is a popular package manager for macOS. If you already have Homwbrew installed, you can follow the below steps to install Git:
- Open up a terminal window and install Git using the following command:
brew install git. - Once the command output has completed, you can verify the installation by typing:
git version.
Install Git on Linux
Fun fact: Git was originally developed to version the Linux operating system! So, it only makes sense that it is easy to configure to run on Linux.
You can install Git on Linux through the package management tool that comes with your distribution.
Debian/Ubuntu
- Git packages are available using
apt. - It’s a good idea to make sure you’re running the latest version. To do so, Navigate to your command prompt shell and run the following command to make sure everything is up-to-date:
sudo apt-get update. - To install Git, run the following command:
sudo apt-get install git-all. - Once the command output has completed, you can verify the installation by typing:
git version.
Fedora
- Git packages are available using
dnf. - To install Git, navigate to your command prompt shell and run the following command:
sudo dnf install git-all. - Once the command output has completed, you can verify the installation by typing:
git version.
Note: You can download the proper Git versions and read more about how to install on specific Linux systems, like installing Git on Ubuntu or Fedora, in git-scm’s documentation.
Other Methods of Installing Git
Looking to install Git via the source code? Learn more here.
Contribute to this article on GitHub.
Get started with git and GitHub
Review code, manage projects, and build software alongside 40 million developers.
Sign up for GitHub
Sign in
Download for Windows
Click here to download the latest (2.42.0) 32-bit version of Git for Windows. This is the most recent maintained build. It was released about 1 month ago, on 2023-08-30.
Other Git for Windows downloads
Standalone Installer
32-bit Git for Windows Setup.
64-bit Git for Windows Setup.
Portable («thumbdrive edition»)
32-bit Git for Windows Portable.
64-bit Git for Windows Portable.
Using winget tool
Install winget tool if you don’t already have it, then type this command in command prompt or Powershell.
winget install --id Git.Git -e --source winget
The current source code release is version 2.42.0. If you want the newer version, you can build it from the source code.
Now What?
Now that you have downloaded Git, it’s time to start using it.
-

Read the Book
Dive into the Pro Git book and learn at your own pace.
-
Download a GUI
Several free and commercial GUI tools are available for the Windows platform.
-
Get Involved
A knowledgeable Git community is available to answer your questions.
Что такое Git, регистрируемся на GitHub, для чего нужен GitHub Desktop, установим и рассмотрим его базовое использование
Так как эти темы довольно обширные, в статье рассмотрим их обзорно, с минимально необходимой информацией, для общего понимания и базовой работы с GitHub Desktop.
Что такое Git
Определение из Wikipedia
Git (произносится «гит») — распределённая система управления версиями.
Система управления версиями — определение из Wikipedia
Система управления версиями (от англ. Version Control System, VCS или Revision Control System) — программное обеспечение для облегчения работы с изменяющейся информацией. Система управления версиями позволяет хранить несколько версий одного и того же документа, при необходимости возвращаться к более ранним версиям, определять, кто и когда сделал то или иное изменение, и многое другое.
Если мы верстаем или программируем, не используя систему Git, то в нашем распоряжении только тот код, который пишем сейчас.
При использовании системы Git мы запоминаем версии кода на нужных нам этапах. Имеем доступ к ранним версиям. Можем смотреть изменения, которые были сделаны между версиями. Можем отменить изменения до любой из версий.
В статье часто будем использовать термин Git, чтобы проще было понять, представим, что Git это условная “записная книжка”, в которую будем записывать, какие изменения происходят в нашем проекте. Добавили файл — записываем, что файл добавлен. Изменили файл — записываем изменения, которые были сделаны в файле. Удалили файл — записываем что файл был удален. И все эти записи храняться в “записной книжке” Git
Технически Git для проекта — это скрытая папка .git в папке вашего проекта. Скрытая папка .git содержит служебные файлы, которые нельзя изменять и удалять
У Git много возможностей, но на данный момент рассматриваем только базовые
Информация из Wikipedia
GitHub — крупнейший веб-сервис для хостинга IT-проектов и их совместной разработки.
Введем еще один термин, который также будет часто встречаться в статье и в работе с GitHub Desktop — репозиторий.
Репозиторий — определение из Wikipedia
Репозито́рий (англ. repository), хранилище — место, где хранятся и поддерживаются какие-либо данные. Чаще всего данные в репозитории хранятся в виде файлов, доступных для дальнейшего распространения по сети.
Если говорить совсем просто, то репозиторий — это наш проект (папка с файлами и системой Git)
Репозиторий может храниться локально на компьютере или чаще всего на таких веб-сервисах, как GitHub
Для чего нужен Github Desktop
Работа с Git подразумевает работу через командную строку, но компания GitHub выпустила приложение, которое сильно упрощает использование Git
Для работы с GitHub Desktop, необходимо зарегистрироваться на GitHub
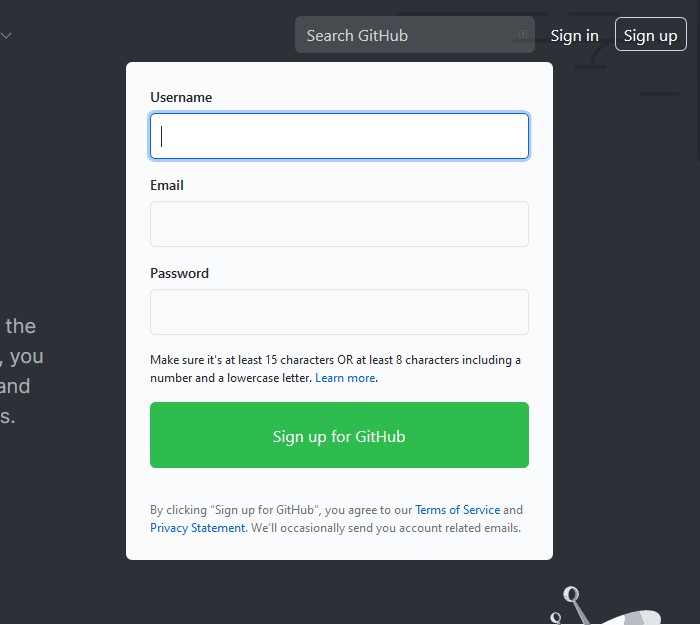
Регистрация на GitHub
Переходим на официальный сайт GitHub
На главной странице заполняем форму справа и нажимаем “Sign up for GitHub”
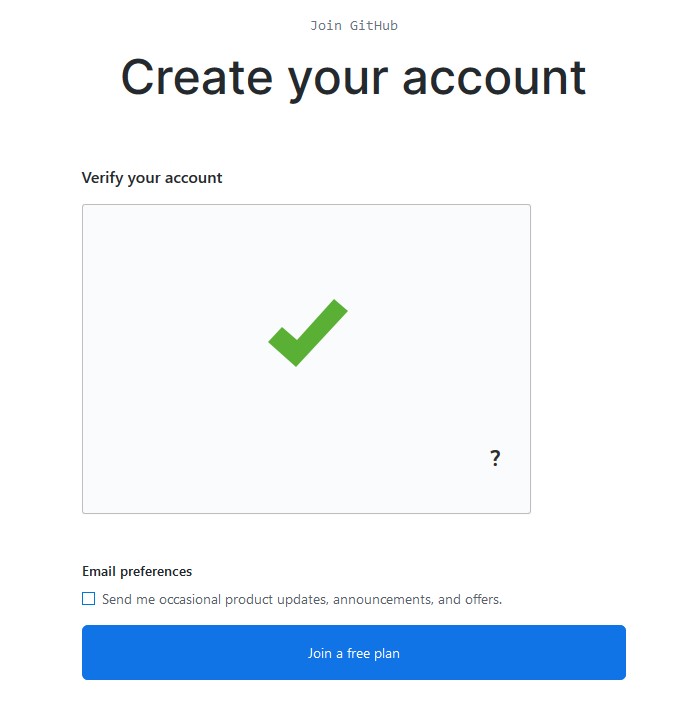
Проходим проверку и нажимаем “Join a free plan”
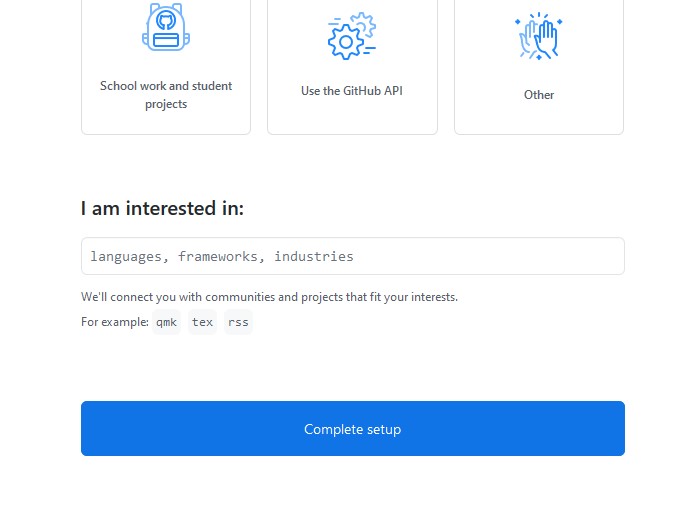
На следующей странице можно заполнить небольшую анкету (можно не заполнять)

На этой же странице спускаемся в самый низ и нажимаем “Complete setup”
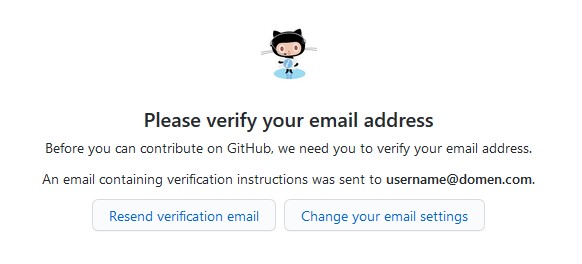
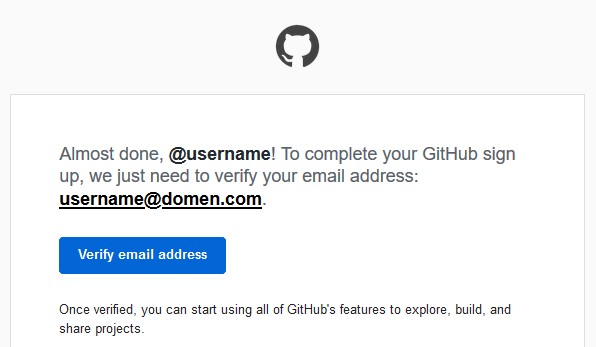
Далее для завершения регистрации просят подтвердить свой email адрес.
Проверяем свою почту. Если письмо пришло, переходим к следующему пункту.
Если письмо не пришло, нажимаем “Resend verification email”.
Если по-прежнему письмо не приходит, можно проверить и изменить настройки — нажимаем “Change your email settings”
В письме от Github нажимаем “Verify email address”
Аккаунт GitHub успешно создан
Установка GitHub Desktop
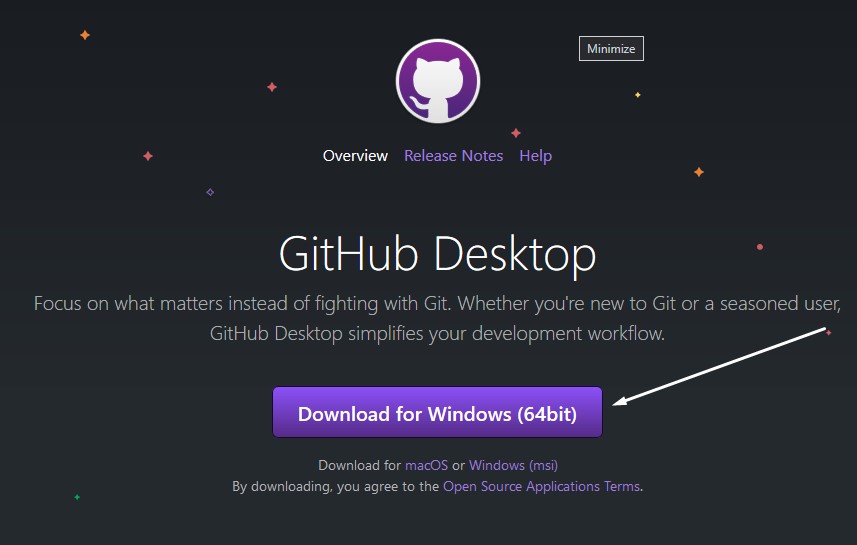
Переходим на официальный сайт GitHub Desktop
Нажимаем “Download for Windows (64bit)” (операционная система может отличаться)
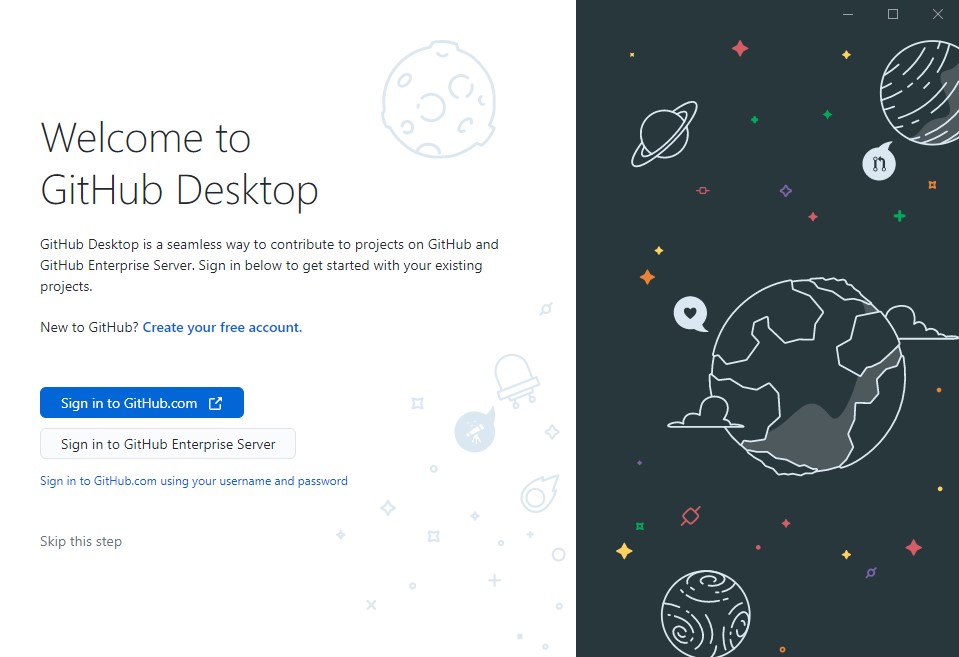
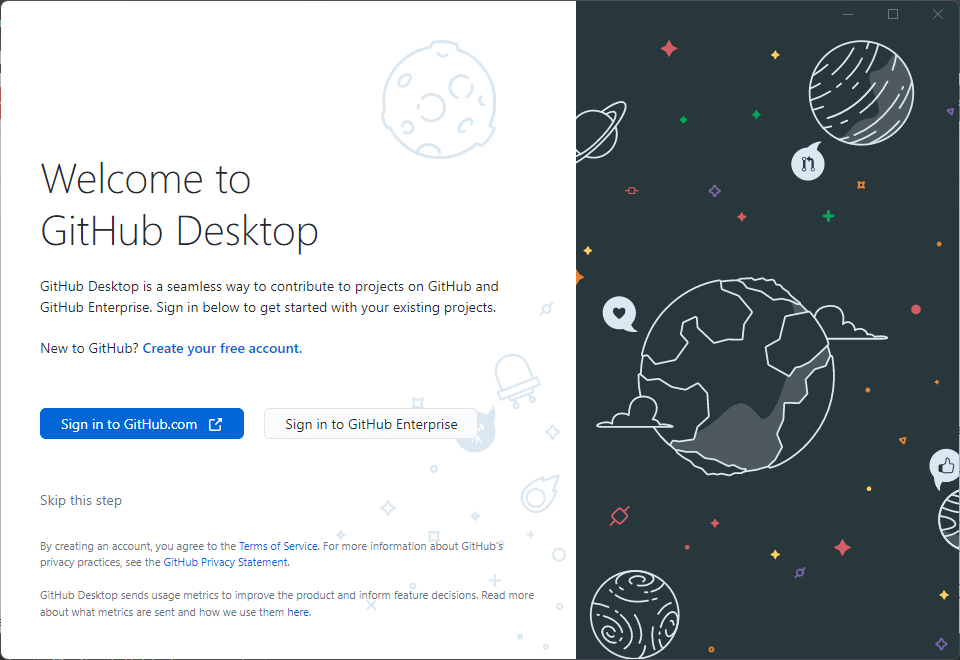
Запускаем скачанный файл. После установки в появившемся окне нажимаем “Sign in to GitHub.com”
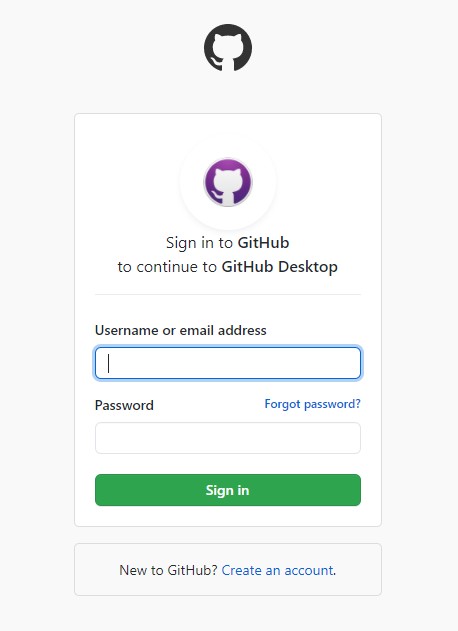
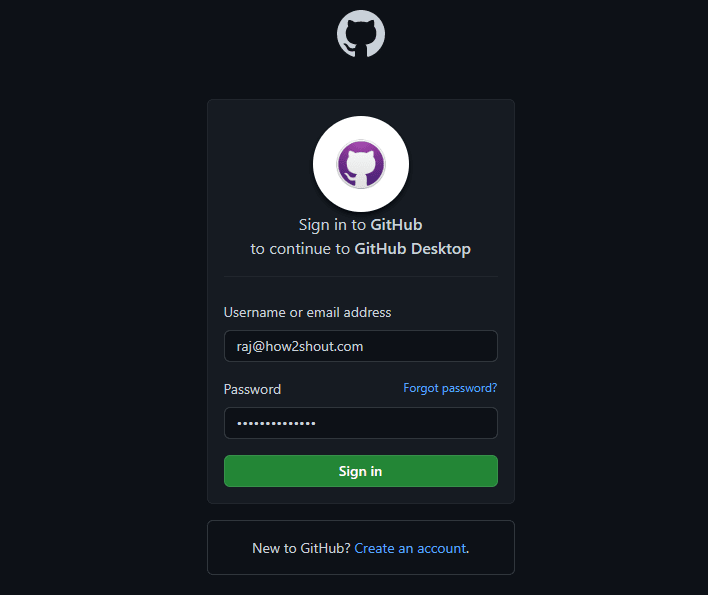
В открывшемся окне браузера вводим в форму свои данные, как при регистрации, и нажимаем “Sign in”
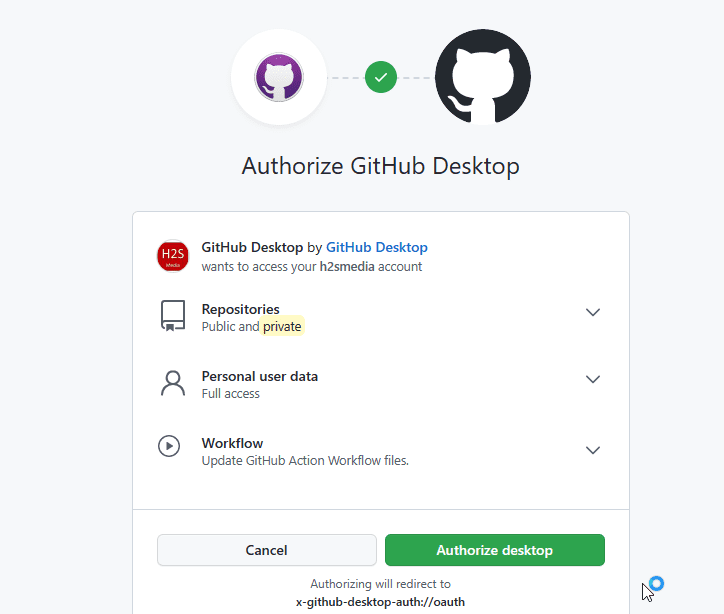
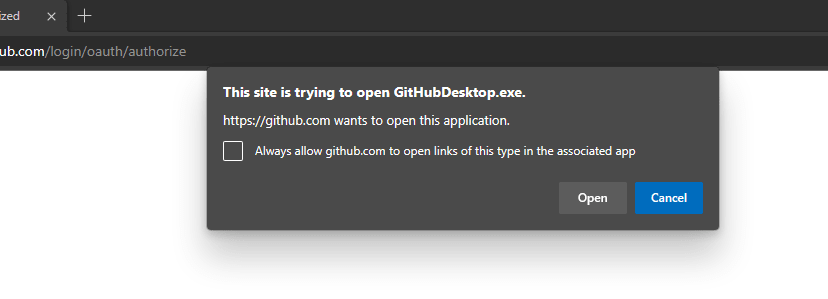
Если браузер запросит, то подтвердить, что нужно “Открыть приложение GitHub Desktop”

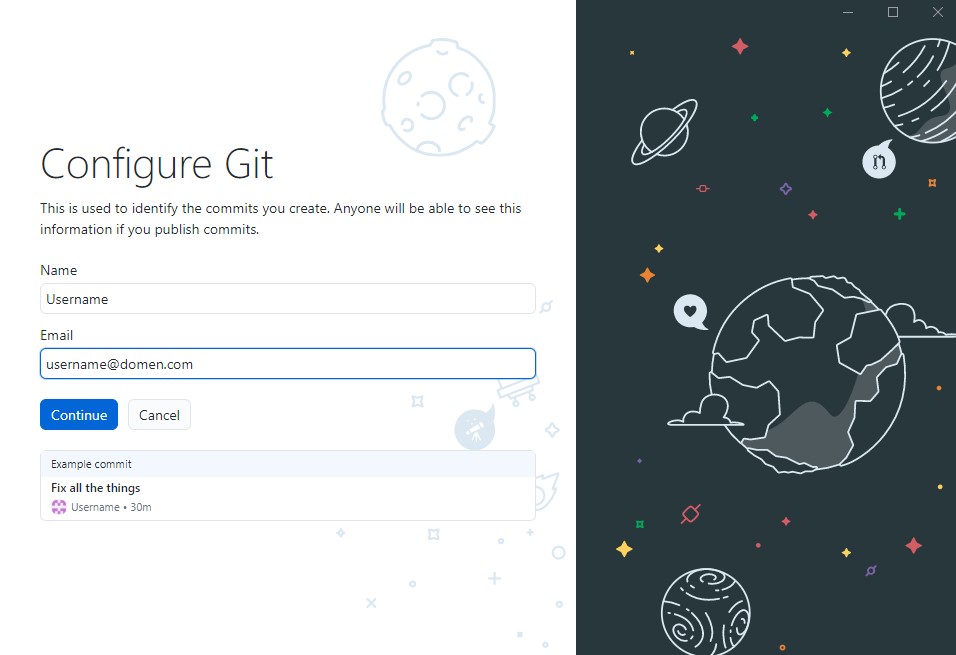
Далее регистрационные данные перенесутся в форму конфигурации (настроек) Git — нажимаем “Continue”
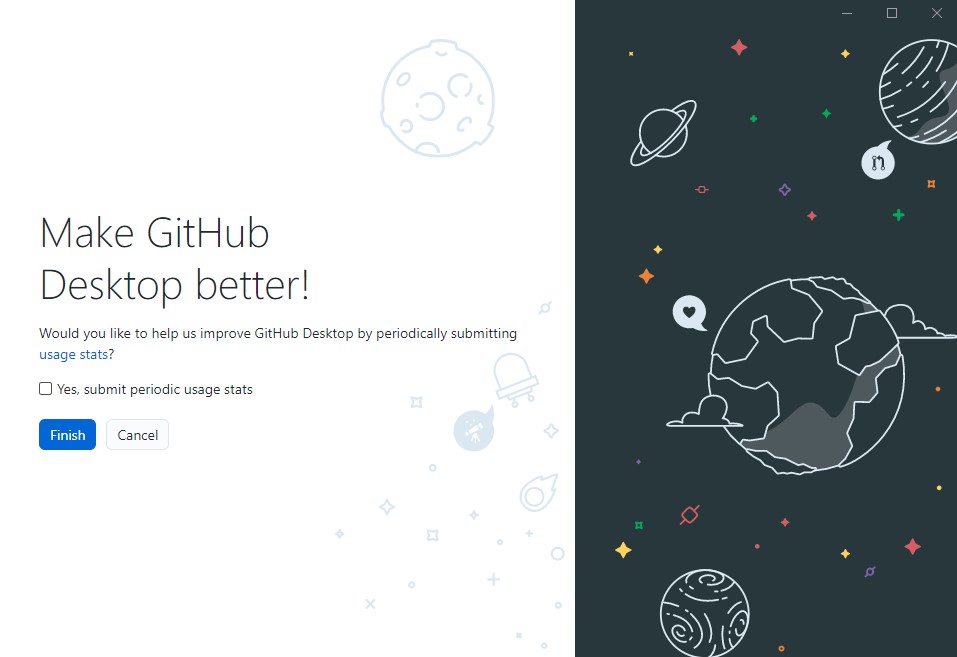
Отключаем пункт “Yes, submit periodic usage stats”, если не хотите периодически передавать статистику работы GitHub Desktop и нажимаем “Finish”
Далее видим начальное окно GitHub Desktop
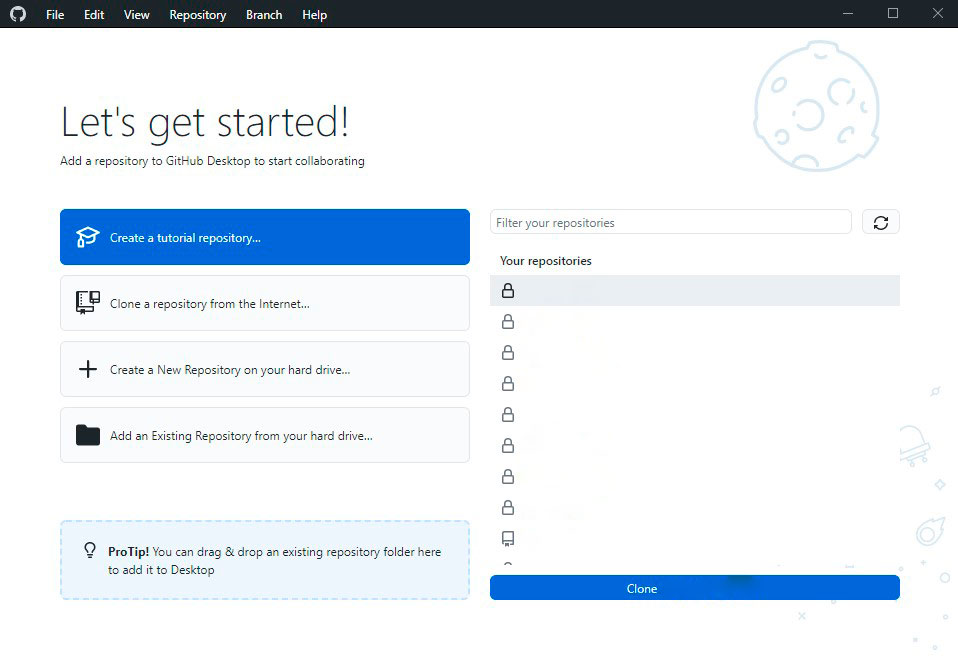
“Create a tutorial repository…“ — создать обучающий репозиторий
“Clone repository from the Internet…“ — клонировать (скопировать/скачать) репозиторий из GitHub к себе на компьютер
“Create a New Repository on your hard drive…“ — создать новый репозиторий на вашем жестком диске (на вашем компьютере) и добавить систему Git в проект
“Add an Existing Repository from your hard drive…“ — добавить на GitHub репозиторий, который уже есть на вашем компьютере и использует Git
Справа будут отображаться ваши репозитории, которые уже загружены на GitHub, но если только что зарегистрировались, то список будет пуст.
Создаём новый репозиторий
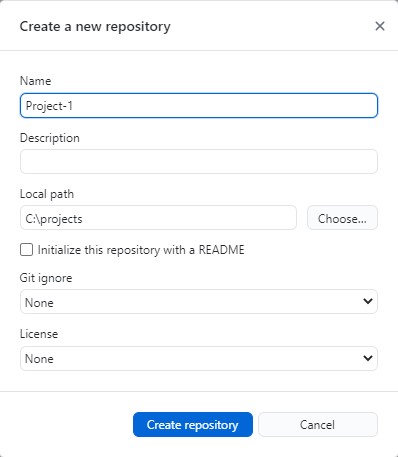
Создаём у себя на компьютере (например, на диске C:) папку projects, где локально будут храниться все наши репозитории.
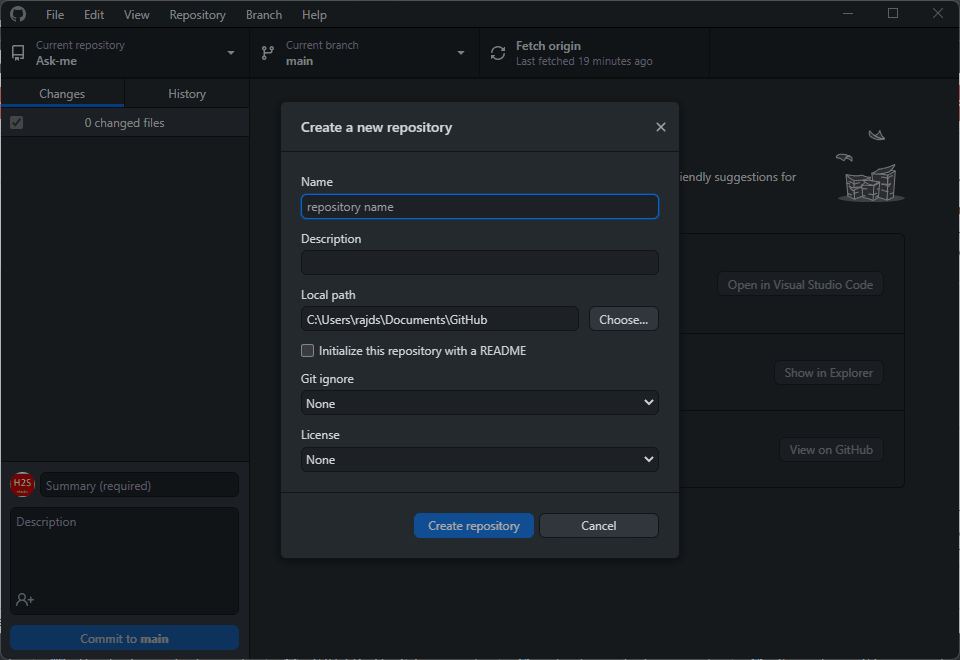
Переходим в Github Desktop, нажимаем на начальном экране “Create a New Repository on your hard drive…“ или File > New Repository
В открывшемся окне в поле Name пишем название репозитория. В поле Description — описание репозитория, если необходимо. В Local Path выбираем созданную на диске C: папку projects, остальное оставляем по-умолчанию и нажимаем “Create repository”
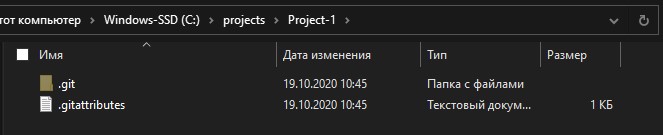
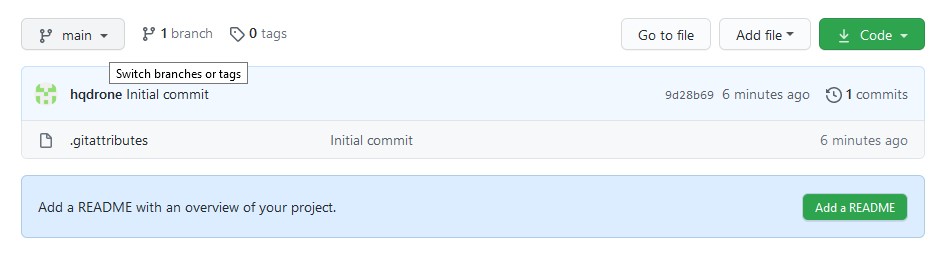
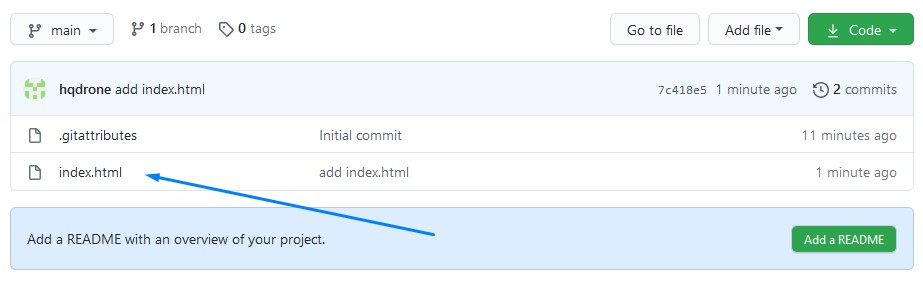
В папке projects появился репозиторий Project-1

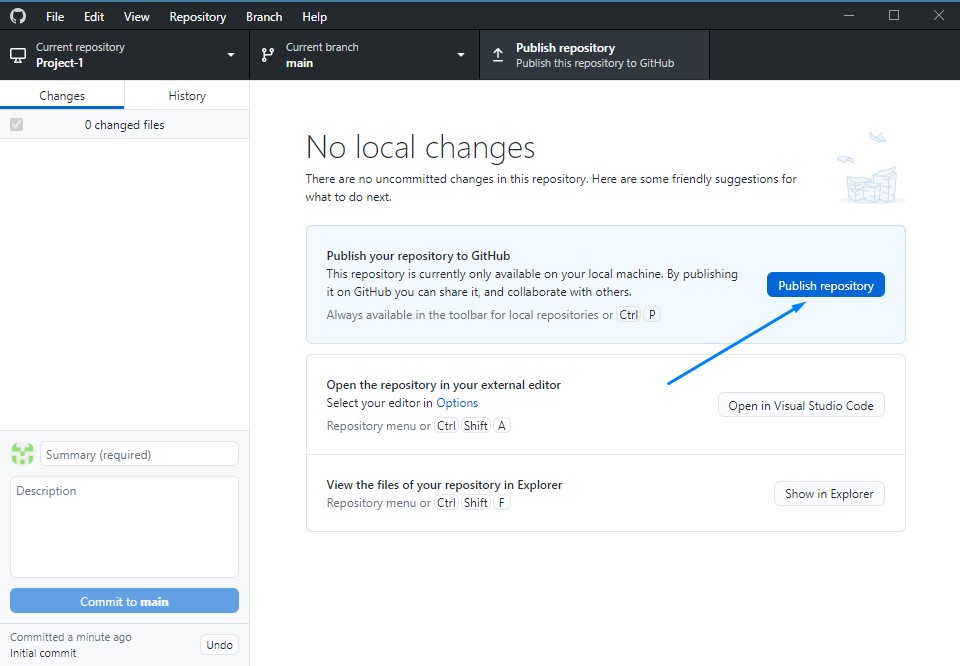
В репозитории Project-1 на данный момент находятся только необходимые служебные файлы Git.
На данный момент репозиторий расположен только локально на компьютере в папке Project-1. Чтобы репозиторий появился в аккаунте GitHub и хранился там, нажимаем “Publish repository”
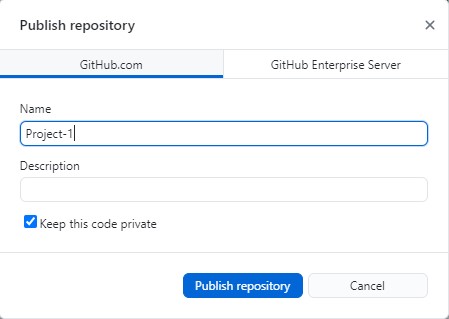
В появившемся окне оставляем все по-умолчанию. Пункт “Keep this code private” оставляем отмеченным, чтобы репозиторий, пока что, был виден только нам, потом в любой момент репозиторий можно будет сделать открытым, чтобы его видели другие пользователи GitHub. Нажимаем “Publish repository”
Теперь репозиторий скопирован в аккаунт GitHub. Переходим в браузере на GitHub. Сверху справа нажимаем на круглую иконку аккаунта и выбираем пункт “Your repositories”
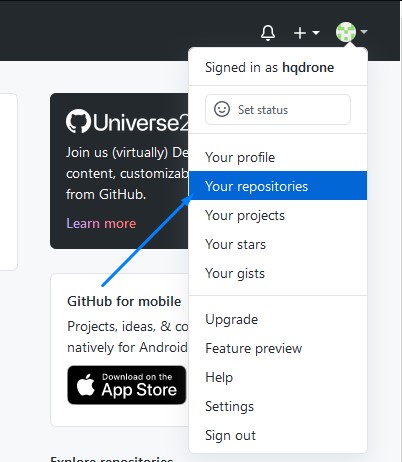
На странице наших репозиториев появился созданный репозиторий Project-1

Откроем страницу репозитория, нажав на название репозитория в списке. На данный момент в репозитории только служебные файлы.
Создадим на компьютере в папке Project-1 файл index.html и напишем в нем минимальную разметку.
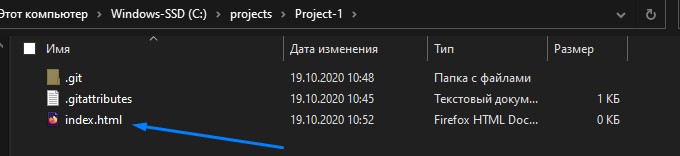
На данный момент файл index.html расположен только локально в папке Project-1. Локальная система Git, которая была создана вместе с репозиторием, об этом файле ничего не знает.
Чтобы Git узнала, что в репозиторий добавился файл, необходимо сообщить это через команду Commit.
Commit — фиксирование текущего состояния файлов, звучит как коммит.
Коммитам необходимо давать названия.
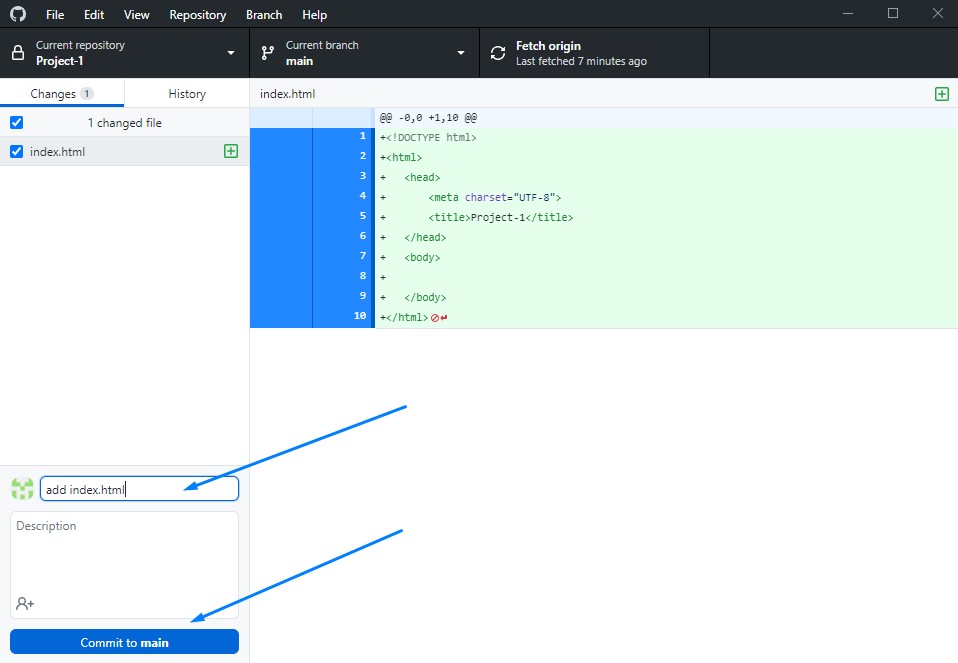
Откроем Github Desktop. Во вкладке Changes видим созданный index.html.
Вводим в поле ниже название коммита — add index.html. Затем нажимаем “Commit to main”, чтобы зафиксировать данное состояние файлов в локальную систему Git. (На данный момент не будем углубляться в ветвление Git)
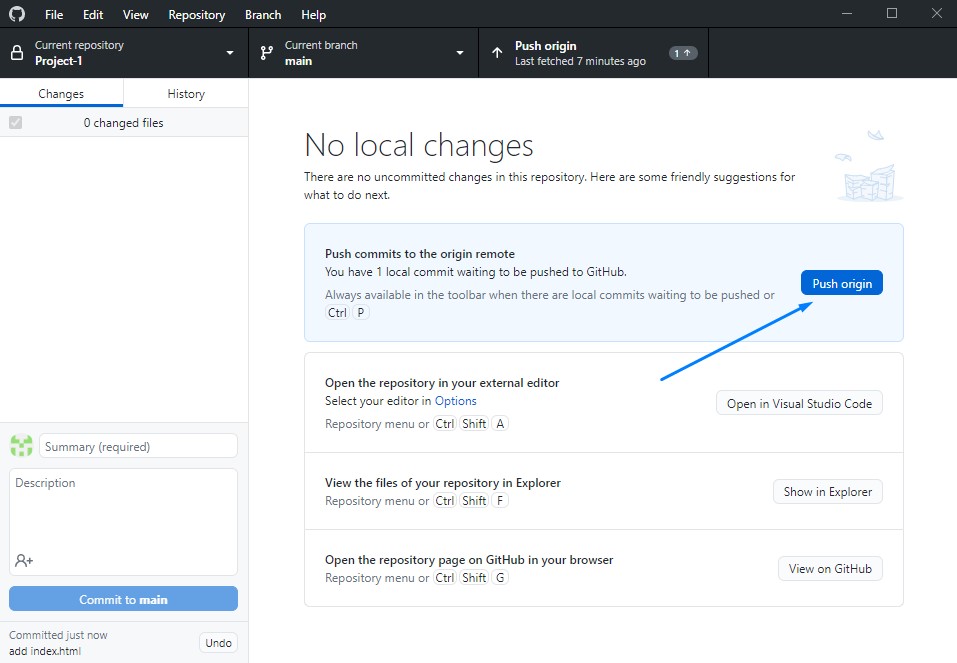
На данный момент мы зафиксировали файлы в текущем состоянии и сделали запись об этом в локальную систему Git.
Далее, чтобы передать изменения в репозиторий на GitHub, нажимаем “Push origin”
Переходим в наш репозиторий на GitHub и убеждаемся, что файл index.html был добавлен
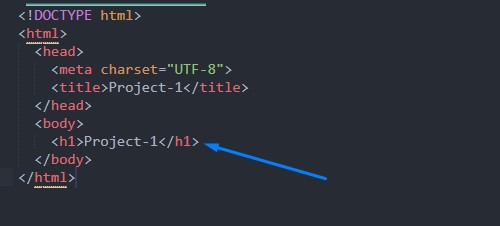
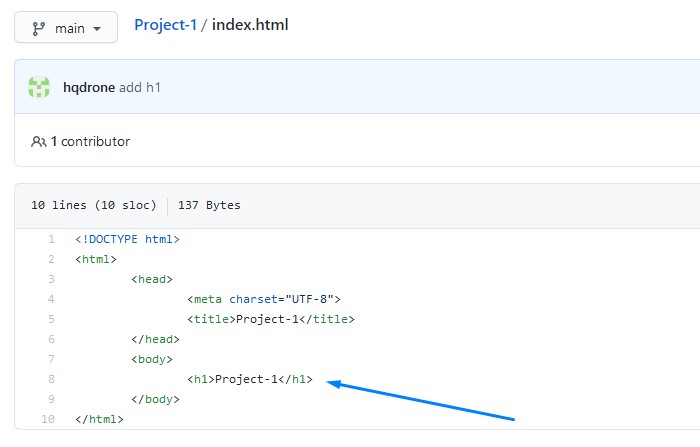
Далее внесем изменения в файл index.html — добавим заголовок <h1>Project-1</h1>
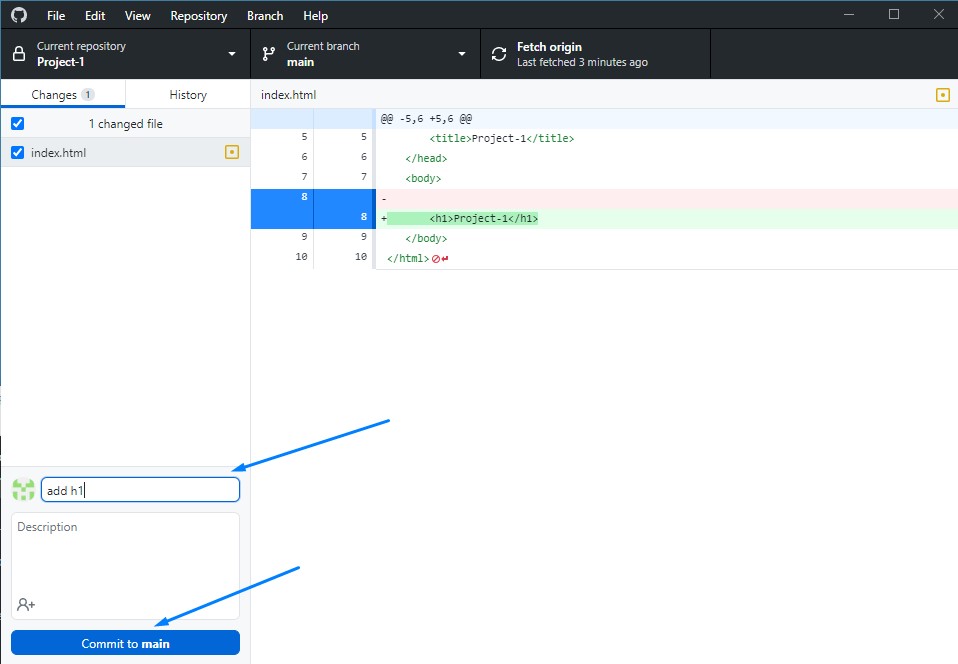
Переходим в GitHub Desktop, видим что index.html был изменен, вводим название нового коммита — add h1 и нажимаем “Commit to main”
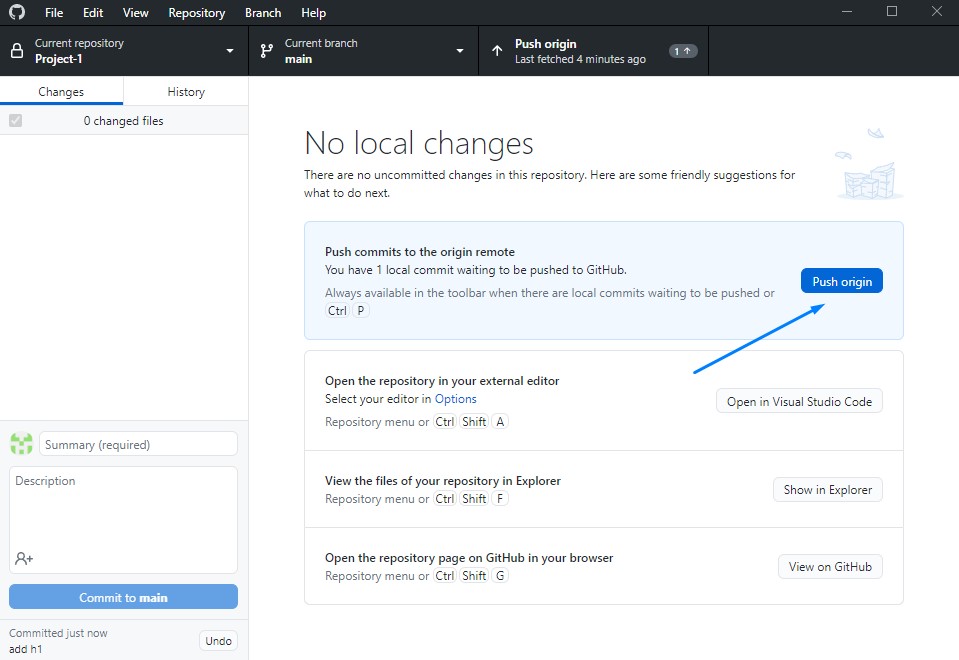
И снова передаем изменения в репозиторий на GitHub — нажимаем “Push origin”
Видим, что index.html был изменен при коммите add h1

Нажав на название файла index.html, убеждаемся что заголовок добавлен
На данный момент умеем создать репозиторий, делать коммиты, и передавать на GitHub
Далее рассмотрим работу с GitHub Desktop с нескольких рабочих мест
Клонирование репозитория
Предположим, мы работаем с проектом дома на компьютере и в офисе на ноутбуке. Чтобы на ноутбуке у нас была актуальная версия проекта, мы должны получить ее из репозитория на GitHub — это действие называется “клонирование”.
Создадим теперь на ноутбуке папку для репозиториев, например notebook projects
Устанавливаем на ноутбук GitHub Desktop, заходим под своим аккаунтом. Нажимаем File > Clone Repository
В списке выбираем необходимый репозиторий
В пункте Local path, нажимаем кнопку “Choose…“ и выбираем созданную папку notebook projects. Далее нажимаем “Clone…“
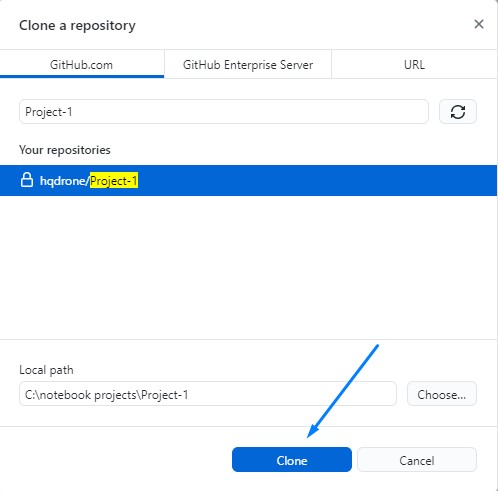
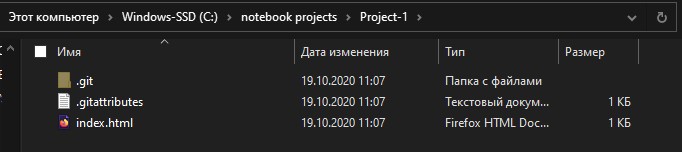
Репозиторий клонирован (скопирован) в папку Project-1.
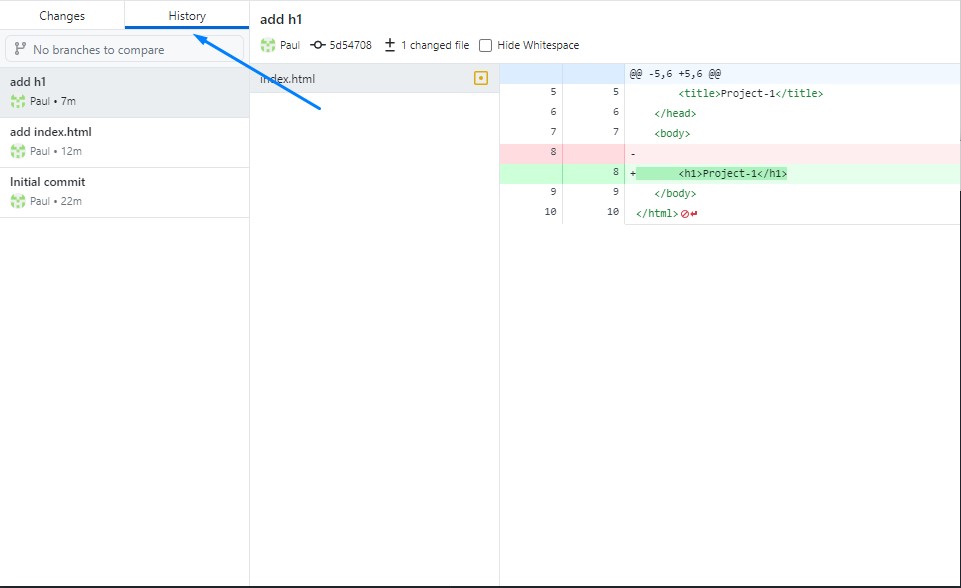
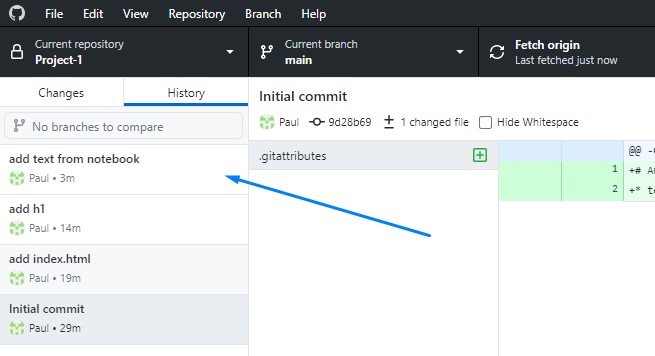
Если в GitHub Desktop посмотреть вкладку History, то увидим всю историю коммитов
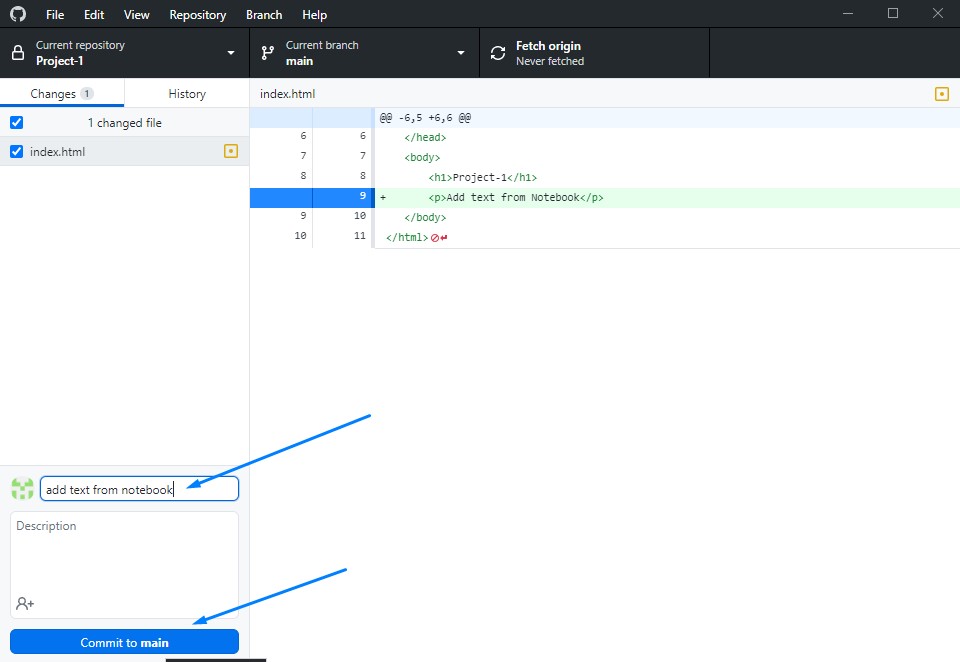
Внесем изменения в index.html на ноутбуке, добавим <p>Add text from Notebook</p> и сделаем коммит c названием add text from notebook, далее нажимаем “Commit to main”
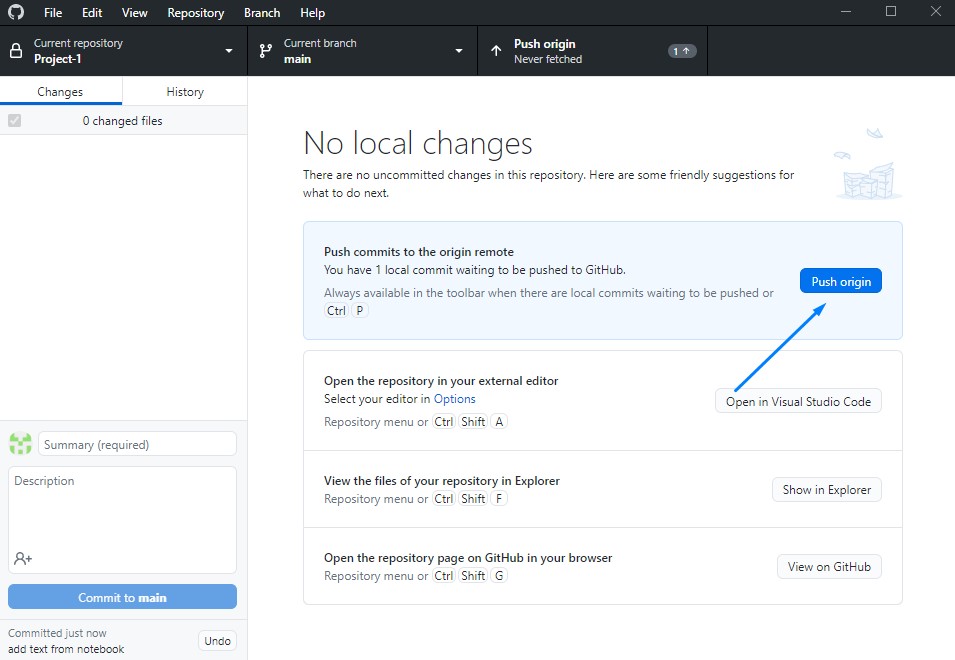
Отправим коммит в репозиторий на GitHub — нажимаем “Push origin”
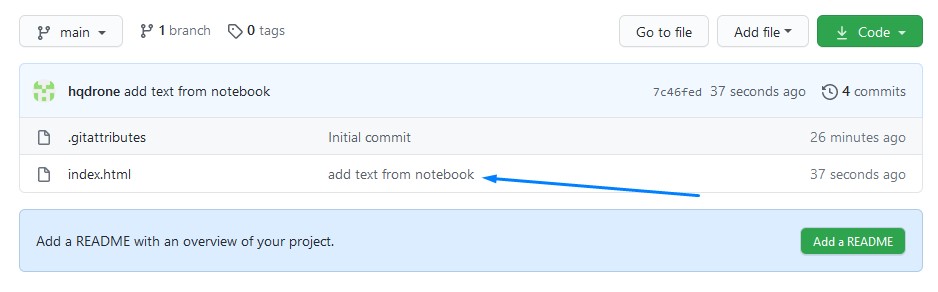
Коммит виден в репозитории на GitHub
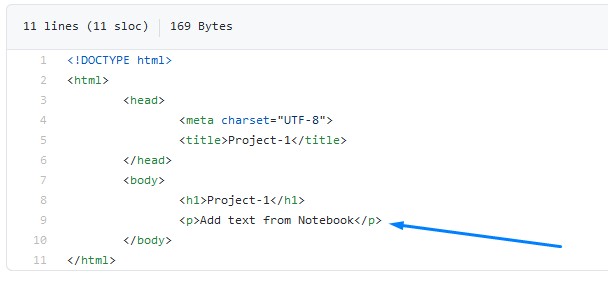
В index.html добавлен <p>Add text from Notebook</p>
Теперь возвращаемся из офиса домой, открываем GitHub Desktop на компьютере, и чтобы получить изменения, сделанные на ноутбуке, нажимаем “Fetch origin” — проверяем, есть ли отличия локального репозитория на компьютере и репозитория на GitHub
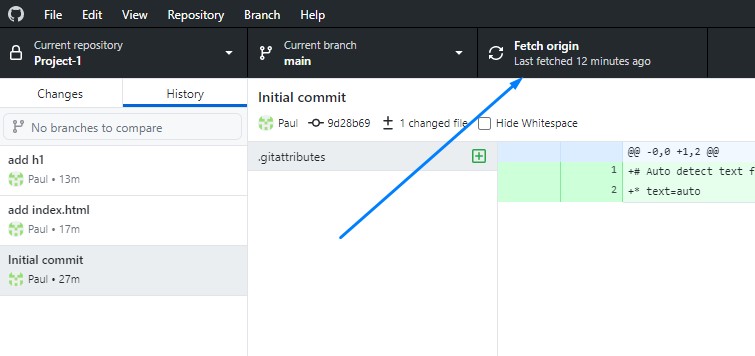
Отличия есть, поэтому далее нажимаем “Pull origin”
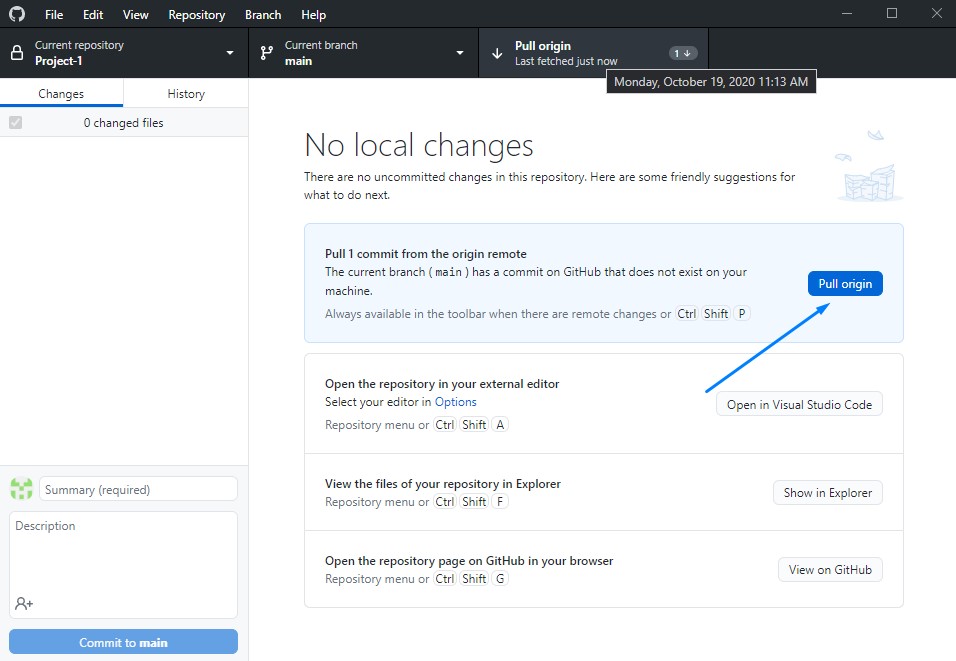
И получаем актуальный проект со всеми изменениями
Преимущества
Мы рассмотрели только базовое использование Git, GitHub, GitHub Desktop, но уже можем выделить достаточно много преимуществ (на самом деле их намного больше, как и возможностей)
- Возможность фиксировать состояния проекта на необходимых этапах, и иметь доступ к ранним версиям
- Умение пользоваться Git очень часто встречается в вакансиях — будет вашим преимуществом
- На любом устройстве, в любой момент можете получить доступ до актуального проекта
- Возможность делиться своим проектом с другими пользователями GitHub
- Иметь проекты на GitHub большой плюс при поиске работы
- Возможность пользоваться всеми преимуществами Git без командной строки
Итоги
Возможно, на первый взгляд, покажется сложным, но после небольшой практики, вся базовая работа с GitHub Desktop на начальном этапе сойдется к тому, что вы поработали с проектом на работе > сделали коммит (“Commit to main”) > отправили на GitHub (“Push origin”). Пришли домой > получили изменения из GitHub (“Pull origin”) и продолжаете работу дома.
- “Commit to main”
- “Push origin”
- “Pull origin”
Возможно, через некоторое время напишу статью про другие возможности GitHub Desktop
Больше информации на официальном сайте GitHub Desktop
Github Desktop Download
Windows , Linux , MacOS , Android , IOS
You can download stable latest version from official websites.
You can also review our previous articles for information about installation.
Windows Install
Linux Install
MacOS Install
What is GitHub
GitHub is considered an important tool for software engineers and its popularity is unrivaled. It currently hosts more than 25 million users. This means a large number of professionals turning to GitHub for workflow and collaboration improvements.
In short, GitHub is a cloud-based service that hosts a version control system called Git. It allows developers to collaborate and make changes to partner projects while following their progress in detail.
To better understand what GitHub is and how it works, we need to dig deeper. First we have to find out what version control is.
Git is an open source project launched in 2005 that has become one of the most popular VCSs on the market. More than 87% of developers use Git for their projects.
It is a distributed version control system. That is, any developer on the team granted access can manage source code and change history using the Git command line tools.
Git offers feature branches, unlike centralized version control systems. This means that each software engineer on the team can reserve a feature branch that provides an isolated local repository to make changes to the code.
Property branches do not affect the parent branch where the original project code is located. Once the changes have been made and the updated code is ready, the property branch can be combined with the major, so that the changes made to the project become active.
If Git is the heart of GitHub, Hub is his soul. The hub on GitHub, like Git, translates the command line into the largest social network for developers.
In addition to contributing to a specific project, GitHub allows users to socialize with people who agree with them. You can track people and watch what they do or who they connect with.
In this tutorial, we find two different ways to install the GitHub Desktop app on Windows 10 or 11 one is using the Command line, and the other is GUI.
GitHub Desktop is a free and open-source Desktop application available to run on Windows. It is developed by GitHub to provide a Git GUI client to manage repositories graphically instead of command line. Users will have an easy-to-use interface for managing and organizing repositories hosted on the GitHub platform. The software is written in TypeScript and uses React. Using it developers of all skill levels can easily collaborate and work together on projects, making it an ideal choice for both beginners and experienced developers alike. However, it seems like the developers of the GitHub Desktop app have ignored Linux users because it is only for Windows and MacOS.
So, in this guide, we discuss the step-by-step process of installing GitHub Desktop on your Windows 10 or 11 systems.
#1st Method using GUI.
Step 1: Download GitHub Desktop
Those who don’t want to use the command line for installing GitHub Desktop can manually download it from the official website. Visit the link to get the executable setup file on your system using the “Download for Windows 64-bit” button. As you click it, a pop-up will appear to save the GitHubDesktopSetup-x64 .exe file.
After finishing the downloading process, the setup file will be on your system. Double-click on it to start the Installation process for GitHub Desktop. Wait for a few seconds, soon the system will launch the software automatically, as it is done with the setup operations. Learn the Advantages of Using GitHub desktop.

#2nd Method using Command prompt or PowerShell
Step 3: Using Command prompt or PowerShell
If you are not interested in the GUI way to install it as shown in Step 2 of this tutorial which involves the manual visit of the website to get the software copy. Then, use the easy-to-use and straightforward command prompt (CMD) or Powershell to install the GitHub Desktop application. For that, here we are using Windows 10 or 11’s inbuilt Package manager called Winget.
The command to follow is:
For Stable version:
winget install GitHub.GitHubDesktop
For Beta Version:
winget install GitHub.GitHubDesktop.Beta
Step 4: Launch GitHub Desktop
We can run the GitHub Desktop app like any other Windows 10 or 11 application, doesn’t matter which method you have used to install it. Click on the Start menu and search for the app, as its icon appears, click to run the same.
However, there are a couple of steps we need to follow further to integrate the GitHub Account into its Desktop app. Here are those.
- Once the installation is completed, click on the “Sign in to Github.com” button or Enterprise as per your plan. If you are not interested in connecting the GitHub Hosting account and want to use the application to manage the local repository then can use the Skip this Step option.
- Enter your GitHub.com Account username and password to log in
- Review the access the app is going to take and click on the Authorize Desktop button.
- Check the box, when a pop-up appears to run GitHub-Desktop.exe and click on the Open button.
- Click on the Finish button and Start cloning your available repositories.

- The final interface of the application.
Step 6: Create a New Repository
To start with the application, let’s create a new repository. For that click on the “File” menu and select “New Repository” or use the keyboard shortcut – Ctrl+N. We have to give some name to the repo we want to create so that we will able to identify it easily. The desktop application will prompt for that.
To save the Repos files, the application will choose the default location configured by it, however, you can choose some other, if required. Further, you can configure Git to ignore some particular language, can initialize it will a README file, or even can select the license for your repository. Once done, just click on the Create button.
Step 6: Clone an Existing Repository
To start with an existing repo on the GitHub Desktop app, we can clone it. Click on the “File” menu and select “Clone Repository” or use the keyboard shortcut – Ctrl+Shift+O. You will be prompted by the software to enter the name of your Repo that needs to be cloned. Alternatively, we can use the GitHub URL of other available code repositories as well.

Step 7: Start Working on Your Project
Existing users of the GitHub web platform will not find any difficulty to use its Desktop app. They immediately can start working on their projects after setting up the app. With the help of a few clicks, a user can create new files, edit the existing ones, push or pull the origin, and a lot more. Further, being a Git version control platform, GitHub Desktop will keep track of the changes and allow you to revert to previous versions if necessary.
Conclusion
Installing GitHub Desktop on a Windows 10 or 11 machine is a quite simple and easy task that can be done in a few minutes. Offering users ample control over their Git repositories, the app makes it effortless to work on projects on Windows PC or laptops. Therefore, if your all repositories are on the GitHub Platform then its Desktop app is an ideal choice for anyone who needs to harness the power of Git on their computer.
FAQs
Do I need a GitHub account to use GitHub Desktop?
Yes, we need a GitHub account to use GitHub Desktop which is free to create by anyone using the web platform of this Git hosting service.
Is GitHub Desktop only available for Windows 10 or 11?
No, GitHub Desktop is also available for macOS.
Can I use GitHub Desktop to work on projects with a team?
Of course, we can use the application to collaborate and work with a team. Along with options to track other users and the changes made by the Team members to code.
Is GitHub Desktop open-source software?
Yes, GitHub Desktop is open-source software, therefore free to use, and its source code is available to review and contribute by anyone.
Does GitHub Desktop support other Git hosting services?
No, this Git Client GUI app is developed to manage the repositories hosted only on GitHub. If you want to work with repositories hosted on another Git hosting service, you’ll need to use a different Git client such as SourceTree.