Search code, repositories, users, issues, pull requests…
Provide feedback
Saved searches
Use saved searches to filter your results more quickly
Sign up
The Visual Studio Tools for Git is an extension for Team Explorer that provides source control integration for Git. This extension enables integration with any local Git repository, and it provides tools to work with third party hosted Git repositories. The extension also enables the use of Team Foundation Service hosted Git projects.
Feedback
If you have feedback about these tools, please let us know! You can use the discussions tab for general feedback and comments, but please consider these sites for more specific feedback:
- Please file bugs through Microsoft Connect
- Feature suggestions can be submitted through theVisual Studio UserVoice page
Features
Integration with Projects and Solutions
Integrates with Visual Studio projects to automatically track changes to your active solution. Shows file status in Solution Explorer, and uses context menus to issue source control commands like Commit, Compare, and Undo.

Team Explorer Integration
Connect page
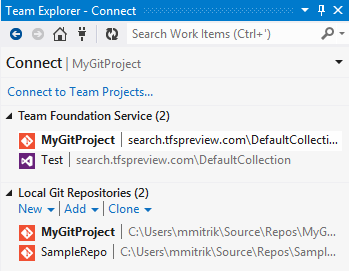
View local Git repos as well as those hosted by Team Foundation Service and other Git hosters via the Connect page.
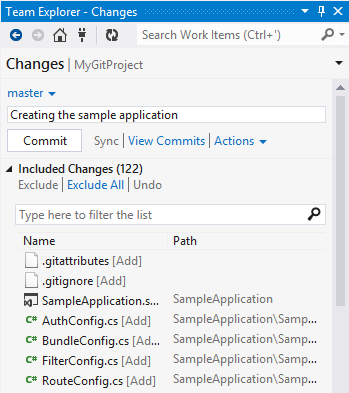
Changes page
Track local changes and commit them using the Changes page.
Commits page
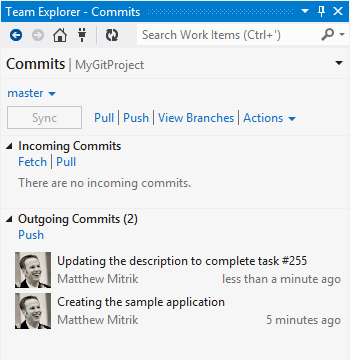
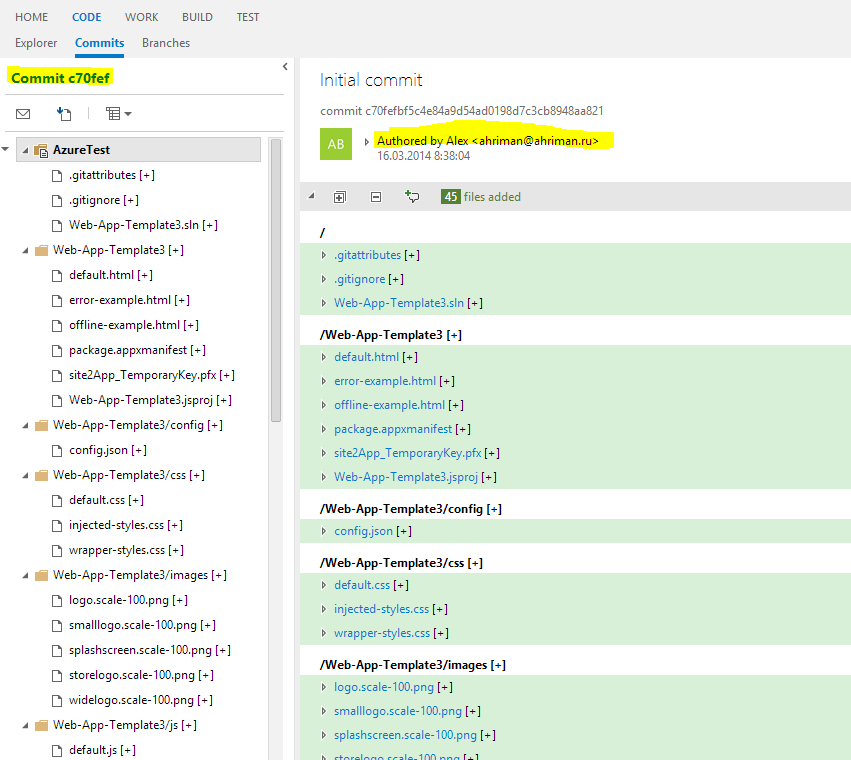
Manage incoming and outgoing commits with fetch, pull, and push operations on the Commits page.
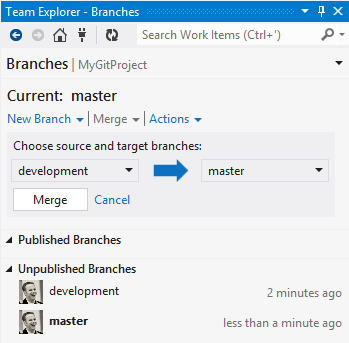
Branches page
Create, merge, and publish branches on the Branches page.
Other features
- Compare files using the integrated diff tool
- Resolve merge conflicts using the integrated 3-way merge tool
- View file and branch history (log)
- View details for commits
Release Notes
Version 1.0.0.0
- Aligns the functionality with the VS 2013 release
- Contains numerous performance and reliability improvements
- Fixes Resharper issues
Version 0.9.5.0 (Preview)
- Fix for «locked files» issues (including Resharper)
- Fix for using repositories under junction points
- Improved rename detection in Changes and Conflicts pages
- Improved error messages seen when switching branches
- Line ending filters are correctly applied when undoing, diffing, and merging files
- Added files are no longer automatically staged in the index
- Continued performance improvements
Version 0.9.0.0 (Preview)
- Fixed «Value was either too large or too small for an Int32» bug that was occurring during Pull operations
- Improved responsiveness of the Changes page by loading WIT queries on demand
- Performance improvements for a number of common scenarios:
- Editing a file without changes
- Editing a file with changes
- Signing in via Git provider after clearing cookies no longer fails with “Error: window.external.notifyToken is not registered»
- Fixed a Null reference in Solution Explorer for Solutions not under source control
- Undoing files that have been renamed and edited correctly reverts the changes
- Previously, a bug in libgit2 incorrectly set «tagopt = —tags» in the local gitconfig when cloning repositories. This bug is fixed in this release, and if a repo with this option set is opened in VS, a prompt to remove the option will be shown.
- If you are working against a Git repository hosted in Team Foundation Service, it is possible to see the following error in the «Sign in» dialog when first authenticating: «To help protect your security, your web browser blocked this site from downloading files to your computer. Click here for options…». This message is benign and can be dismissed by clicking the «X» in the message.
Version 0.8.5.1 (Preview)
- Added support for integrated Windows authentication when receiving a 407 Proxy Authentication Required
- Added support for pushing to Git servers which do not support Transfer-Encoding: Chunked
- Added support for pushing to certain Git servers which require side-band-64k in order to report push status
- The sync branch button on the Commits page is now functional. It does a fetch, merge, and push, in sequence
- Merge and pull now properly prompt the user to save their work before starting
- Merge and pull now allow you to have non-conflicting changes in your working copy
- Merge now properly auto-reloads non-dirty solution items which changed in the working copy
- The push command now sends fewer objects to the server, which is a substantial performance improvement
- Merge and pull now use checkout instead of reset for fast-forward merges, which is a performance improvement
- Fixed CRLF issue that was causing checkout to fail due to conflicts in certain scenarios
- Improved performance of working directory status computation (much less hashing of workdir contents)
- Fixed an issue where CRCRLF line endings would end up in the working copy in certain scenarios
- The Add, Delete, and Ignore actions in the Untracked Items section of the Changes page are now working
- Improved Solution Explorer glyph behavior with JavaScript and other CPS (Common Project System) projects
- Undo merge option added to the Resolve Conflicts page
- Fixed a bug where the user was not prompted for fresh credentials when stored credentials failed to authenticate
- Submodule support from the libgit2 project has arrived in this release, but we haven’t yet finished all the work in our VS plug-in to make them work smoothly.
Version 0.8.0.0 (Preview)
- Updated the installer to an MSI to better handle dependency checks during upgrade/install. As a result, this update requires the Visual Studio Update 2 CTP4 release to be installed.
- Added a new Resolve Conflicts page that can be used to resolve different types of merge conflicts.
- Rename conflicts are not yet supported in this experience and need to be resolved from the command line.
- There is a bug in libgit2 that can cause stale data to accumulate in the Resolved section of the new Resolve Conflicts page. Stale data can be cleared by switching branches from the command line.
- Fixed a large number of bugs in the tools and underlying libraries. Some noteworthy fixes:
- Fixed a corruption issue in Libgit2 related to core.ignorecase
- Cleaned up «sign-up» links on the Home page when working with a local Git repo
- Name of the active Git repo is shown in the Navigation area (following the page name) when working with local Git repos
Version 0.7.0.2 (Preview)
- Fixed an issue experienced by Resharper users
- Added support for all VS Express SKUs
- Improved an issue with global config file resolution
Version 0.7.0.0 (Preview)
- When connecting to a TFS Git project, the Changes page will list the current branch as «unknown» until the repo has been cloned locally.
- Viewing the Commits page for a TFS Git project shows the branch as «unknown». Attempting to publish to a URL is not a valid action and should be disabled. Trying to push may result in an error.
- Several actions in the tools that are not yet implemented show as disabled:
- Sync (Changes and Commits pages)
- Revert (Commit Details page)
- Ignore (Changes page)
- Renaming files in Solution Explorer will display as an Add + Delete in the Changes view and Commit details.
- History for files does not yet follow renames.
- Conflict resolution does not yet support resolving merge conflicts that involve renamed files. Use command line tools to resolve these conflicts.
Privacy Notice
The Visual Studio Tools for Git optionally makes use of theGravatar image service. In the Git Settings page, if you choose to «Enable download of author images from 3rd party source», this will enable the use of the Gravatar image service.
In order to provide author images in the Commit and History views, the tool creates an MD5 hash for the author email addresses stored in the active repository. This hash is then sent to Gravatar to find a matching hash value for users that have previously signed up for the service. If a match is found, the user image will be retrieved from the service and displayed in Visual Studio. Users that have not configured the service will return a randomly generated image. Note, email addresses are not recorded by Microsoft, nor are they every shared with Gravatar or any other third party.
Additional Resources
Announcing Git on Team Foundation Service
Getting Started with Git in Visual Studio and Team Foundation Service
Время на прочтение
3 мин
Количество просмотров 157K
Некоторое время назад мы анонсировали поддержку Git в Visual Studio и TFS. Для того, чтобы научиться правильно готовить все это, я сам прошел весь путь и хочу рассказать вам о нем. Ниже — о том, как использовать Git в VS.
Что нужно:
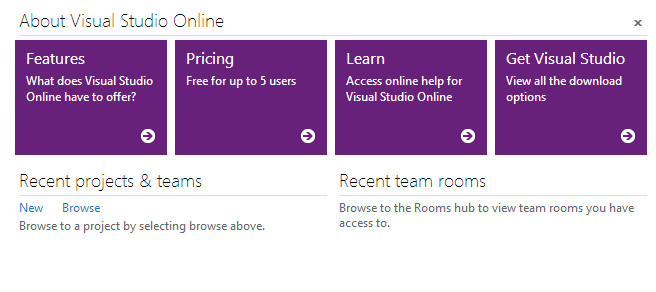
Зарегистрировать бесплатный аккаунт Visual Studio Online
Скачать и установить Visual Studio 2012/2013
На установленную студию поставить Visual Studio Tools for Git
Git и TFS: история дружбы
Git — распределенная система контроля версий, где каждый разработчик имеет копию всего репозитория, что означает отличную поддержку оффлайн-разработки. Еще у Git есть хорошая, понятная модель бранчинга, и разработчику не надо долго думать о том, как создавать локальные или приватные бранчи для удобства работы. В общем, с Git все хорошо, и на MSDN есть посвященный Git бранч.
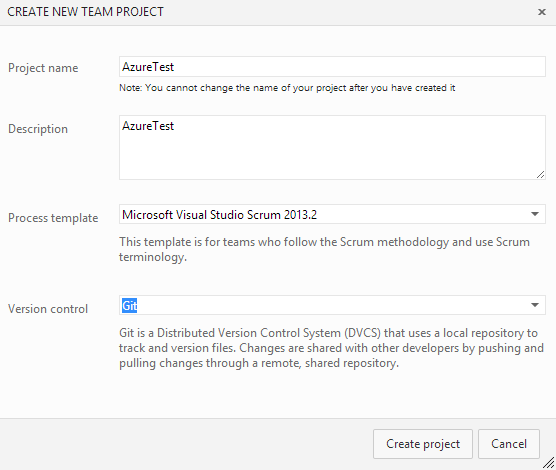
Проект Git в Team Foundation Service
После регистрации в TFS на странице команд есть новая кнопка — New Team Project + Git. Пара кликов — и проект Git готов.
Собственно, на этом все.  Но это — верхушка айсберга, внутри интеграция гораздо сложнее. Дальше — про то, как из Visual Studio подключиться и поманипулировать нашим Git-проектом.
Visual Studio и Git
Делаю сразу оговорку — Visual Studio — не замена существующему UI Git. Visual Studio может быть заменой, но чаще используется в совокупности с другими средствами. Если Git был создан внутри TFS, то у разработчика появляются некоторые фичи, пришедшие из TFS, например, Work Items, но VS спокойно работает с любыми локальными репозиториями и заслуженными Git-деятелями в лице GitHub и BitBucket.
Для подключения к Git-репозиторию достаточно нажать TEAM | Connect to Team Foundation Server.

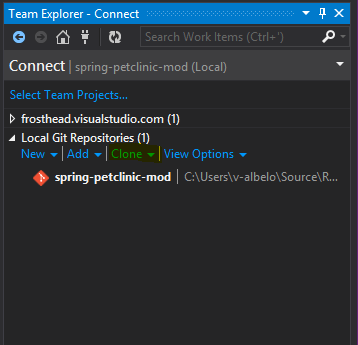
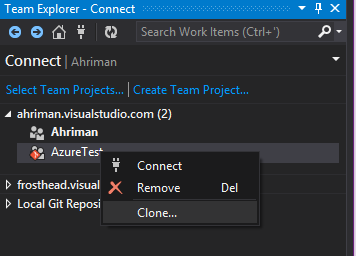
Откроется Team Explorer. Как видите, у меня уже есть склонированный (с GitHub) репозиторий, и тут же — репозиторий TFS. Для клонирования нового репозитория Git можно нажать Clone и ввести данные подключения.
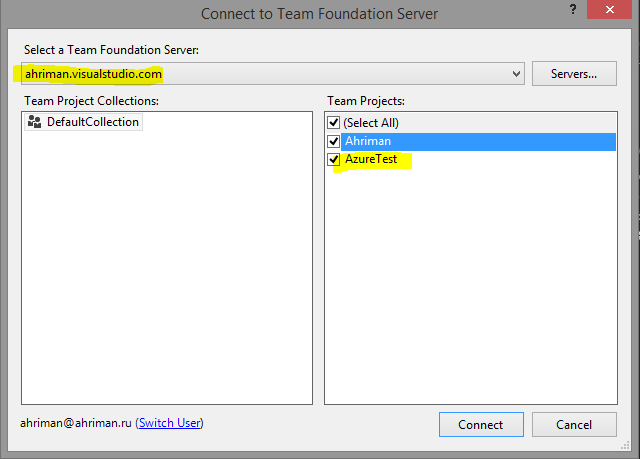
Для подключения аккаунта Visual Studio Online нажмем Select Team Projects, выберем аккаунт и установим, какой репозиторий надо подтянуть к нам в VS.
После подключения проектов выберем нужный и нажмем в контекстном меню кнопку Clone.
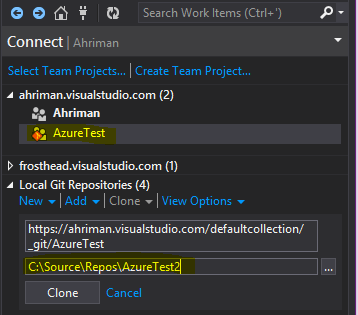
На этом процесс клонирования закончен — в бранче Local Git Repositories в Team Explorer появится склонированный репозиторий. Повторюсь — с помощью Clone можно клонировать любой Git-репозиторий.
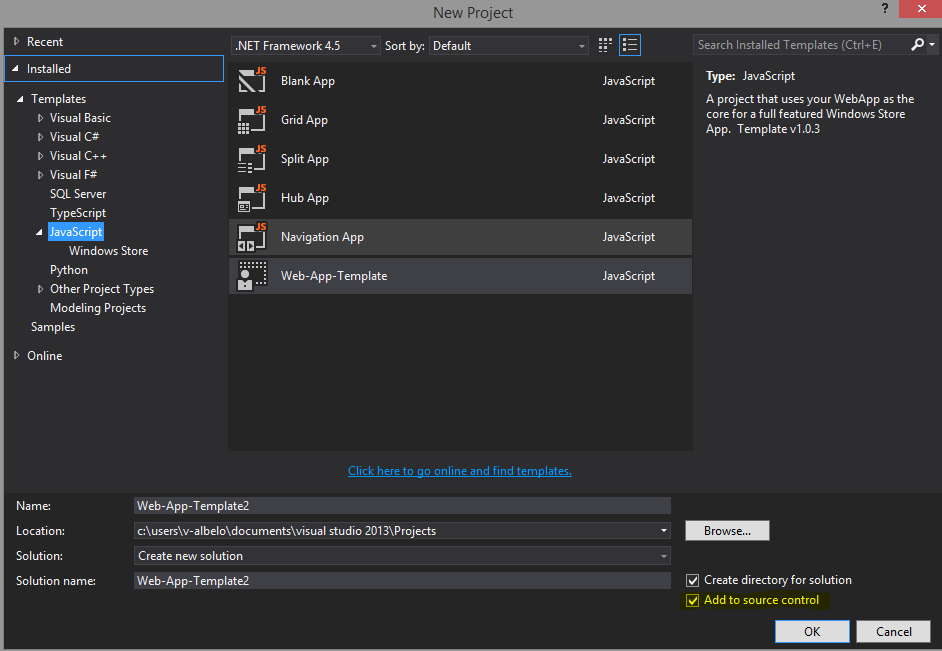
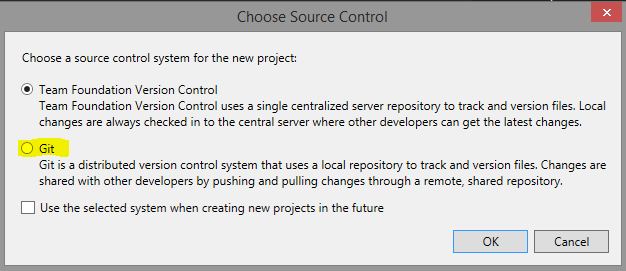
Еще одна интересная фича интеграции Visual Studio и Git — это возможность создать новый проект и сразу добавить его в локальную систему контроля версий. Для этого при создании нового проекта в VS достаточно отметить Add to source control.
Перед тем, когда вы будете коммитить что-то в репозиторий, нужно установить данные для коммитов — нажать на Changes и предупреждение о том, что нужно ввести данные.
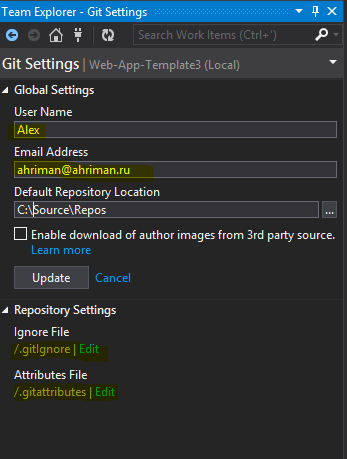
Полезные функции на этой странице есть еще внутри Repository Settings — можно настроить .gitIgnore и .gitattributes.
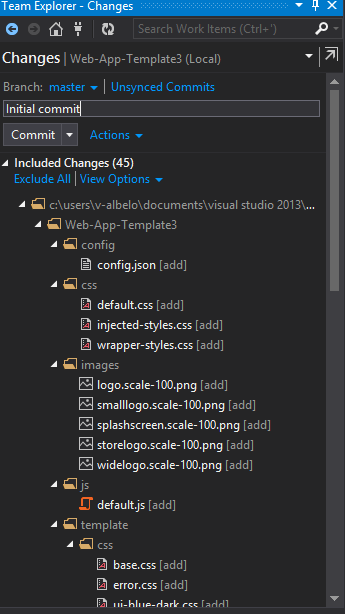
Дальше можно коммитить.
Pull
Чтобы сделать Pull и получить последние апдейты от команды, нужно перейти на Commits и нажать Fetch для того, чтобы сначала посмотреть, что там вообще придет (и есть ли чему придти).

Все хорошо — нажмем Pull и получим последний апдейт. Дополнительные сведения можно найти тут — Pull changes from the team.
Push
C Push все просто — в том же окне Commits нажмем Push. Получим сообщение о том, что все хорошо. Почитать подробнее про Push можно здесь — Push your changes.

Использование бранчей
Для использования бранчей в Team Explorer выделена специальная секци Branches.
После подключения к репозиторию доступна только master.
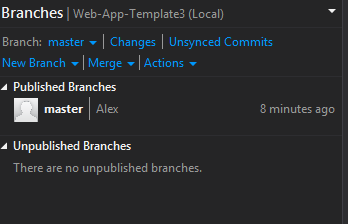
Создадим новый бранч, нажав New Branch.
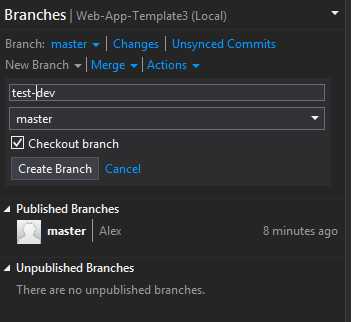
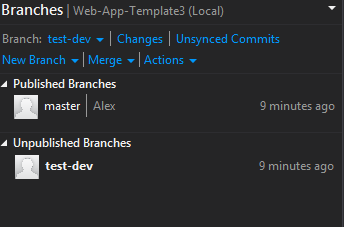
Поскольку бранчи Git локальны до момента Push, новый бранч будет размещен в Unpublished Branches. Поменять бранч для коммитов можно на уже упоминавшейся выше странице Commits.

Замерджить контент можно, нажав Merge и выбрав бранчи. Подробнее про бранчи и мерджи — Git Branching.
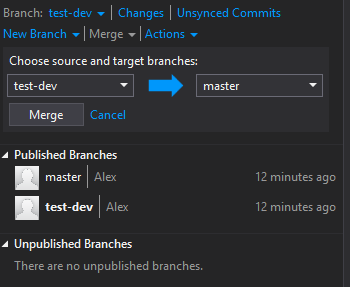
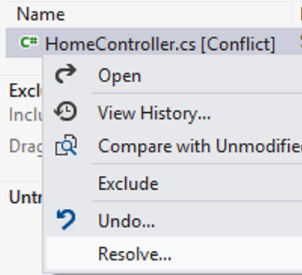
Если в процессе мерджа или пулла возникнут конфликты, они тут же могут быть разрезолвены (самые простые, конечно).
Для просмотра истории достаточно нажать View History в контекстном меню бранча.
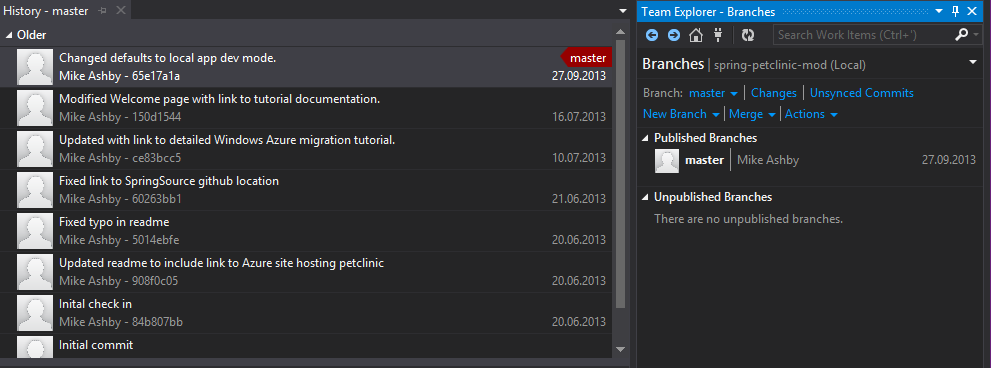
По нажатию на коммит получим подробные сведения о том, что произошло.

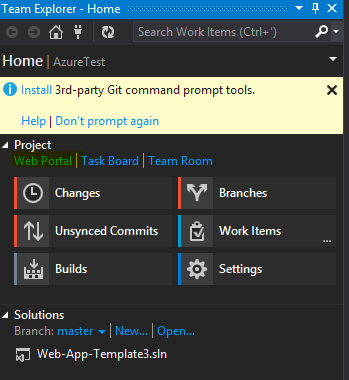
Многое из этого также доступно на портале TFS. Для того, чтобы перейти туда из VS, нужно на странице проекта в Team Explorer нажать Web Portal.
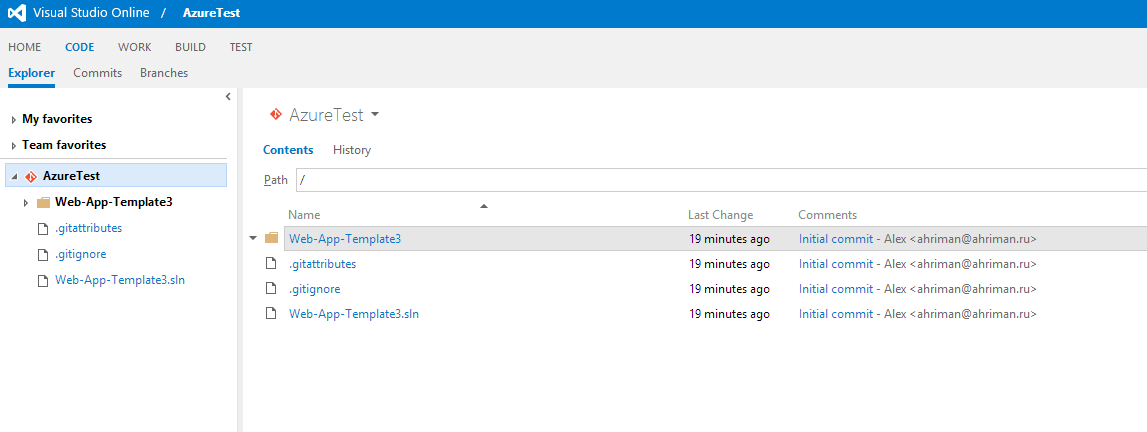
Уже на портале можно изучить общее состояние репозитория…
… отдельные коммиты…
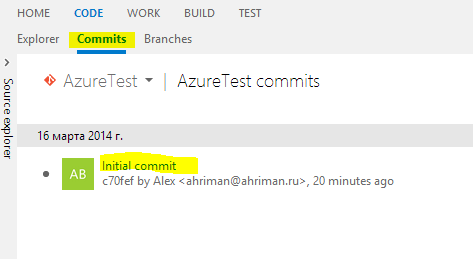
… и подробную информацию об этих коммитах.

Резюме
Мы кратко посмотрели на то, как выглядит очень простой процесс взаимодействия Visual Studio и Git. Как говорилось в самом начале, плод интеграции Git в Visual Studio — это не намек на то, что Visual Studio полностью заменит рабочий процесс. Но то, что одна из самых популярных IDE стала отлично поддерживать одну из самых популярных систем контроля версий — это, на мой взгляд, замечательный факт, и обязательно понравится тем, кто использует и то и другое.
😅
Why did the developer choose Visual Studio Git over other version control systems?
Because it wanted to «branch» out and merge its sense of humor seamlessly into the code!
Embark on a journey to unlock the power of version control and collaboration with «Getting Started with Git in Visual Studio: A Guide for Beginners.» This comprehensive guide is your roadmap to mastering the seamless integration of Git within the dynamic and feature-rich Visual Studio IDE.
Step into the world of Git, where every line of code tells a story and every change is meticulously tracked. Discover the fundamental concepts behind Git and grasp its vital role in modern software development. From solo projects to team collaborations, Git empowers developers to efficiently manage code, effortlessly revert changes, and embrace a seamless workflow.
Visual Studio, a trusted companion for developers worldwide, adds a touch of magic to your Git experience. Unleash the true potential of this powerful combination as you learn how to set up Git in Visual Studio, effortlessly clone repositories, and seamlessly switch between branches. Take your productivity to new heights as you leverage the built-in Git features, empowering you to commit changes, push code to remote repositories, and pull in the latest updates with a single click.
But it doesn’t stop there. Delve into the art of branching and merging, unraveling the secrets of parallel development and code isolation. As you navigate the world of branching, you’ll witness the elegance of creating, switching, and deleting branches right from within Visual Studio. And when it comes time to bring your code together, conquer the art of merging with confidence and finesse.
In this guide, we go beyond the basics and explore advanced Git features that elevate your development process. Discover the art of stashing changes, cherry-picking commits, and interactive rebasing. Dive into the realm of submodules and unlock the ability to include external repositories within your projects effortlessly.
Join us on this adventure as we troubleshoot common Git issues, equip you with expert tips and best practices, and provide additional resources for continuous growth. With «Getting Started with Git in Visual Studio: A Guide for Beginners,» you’ll unlock a world of possibilities, empowering you to become a proficient Git practitioner and forge a path towards becoming a true Visual Studio professional.
Embrace the power of Git, harness the capabilities of Visual Studio, and embark on a transformative journey that propels your coding prowess to new heights. Let this guide be your trusted companion as you embark on a thrilling adventure in the realm of version control and collaboration.
Important disclosure: we’re proud affiliates of some tools mentioned in this guide. If you click an affiliate link and subsequently make a purchase, we will earn a small commission at no additional cost to you (you pay nothing extra). For more information, read our affiliate disclosure.
Understanding The Role Of Git In Visual Studio
Git is a distributed version control system that was created by Linus Torvalds, the same person who created Linux.
It’s a tool that developers use to track changes in their code over time, allowing them to easily revert back to a previous version if necessary. Git is designed to handle everything from small to very large projects with speed and efficiency.
Unlike some other version control systems, Git is distributed, meaning that every developer’s working copy of the codebase is also a repository that can contain the full history of all changes. This not only allows developers to work offline, but also makes it incredibly fast, as most operations are performed locally.
Version control is a critical component of software development. It allows developers to work on different features or bugs simultaneously without interfering with each other’s work. This is especially important in a team setting where multiple developers are working on the same codebase.
Version control systems like Git also keep a history of all changes made to the code. This means that if a bug is introduced, developers can look back through the history to find out when the bug was introduced and who introduced it. This makes it easier to fix the bug and prevent similar ones in the future.
Moreover, version control systems provide a safety net. If something goes wrong, developers can revert back to a previous version of the code. This can save a lot of time and stress when dealing with complex codebases. Visual Studio, a comprehensive integrated development environment (IDE) from Microsoft, has built-in support for Git. This means that developers can perform all the necessary Git operations without leaving the comfort of their IDE.
The integration of Git in Visual Studio simplifies the version control process for developers. They can clone repositories, commit changes, create and switch between branches, merge changes, and more, all from within Visual Studio. This seamless integration enhances productivity and makes it easier for developers, especially those new to Git, to leverage the power of version control in their projects.
In the following sections, we will delve deeper into how to use Git within Visual Studio, providing step-by-step instructions and code examples to help you get started. Whether you’re a beginner just starting out with Visual Studio or an experienced developer looking to improve your Git skills, this guide is designed to help you become more proficient with these powerful tools.
Setting Up Git In Visual Studio
To set up Git in Visual Studio, follow these step-by-step instructions:
Install Git
- Download the Git installer for your operating system from the official Git website.
- Run the installer and follow the instructions. Choose the recommended settings or customize them as desired.
Launch Visual Studio
- Open Visual Studio on your machine.
Enable Git Integration:
- In Visual Studio, go to the Tools menu and select Options.
- In the Options window, navigate to Source Control > Plug-in Selection.
- Choose Git from the drop-down list under «Current source control plug-in».
- Click OK to save the changes.
Configure Git In Visual Studio
- In Visual Studio, go to the Team Explorer window. If you can’t see the Team Explorer window, go to the View menu and select Team Explorer.
- Click on the Manage Connections button (it looks like a plug icon).
- In the «Manage Connections» pane, click on the Clone button to clone a remote Git repository or click on the Create button to create a new Git repository.
1. Clone a Remote Repository (Optional):
- If you want to clone a remote repository, enter the repository URL in the Repository field.
- Choose the desired local directory for the cloned repository in the Local Path field.
- Click on the Clone button to start the cloning process.
2. Create a New Repository (Optional):
- If you want to create a new repository, specify the repository name, local path, and optional description in the respective fields.
- Click on the Create button to create the new Git repository.
Once you have completed these steps, Git is installed and integrated with Visual Studio. You can now perform Git operations directly from the Visual Studio interface, such as cloning repositories, committing changes, switching branches, merging, and more.
Please note that the screenshots mentioned above are not provided in this text-based format. It’s recommended to refer to the official Visual Studio documentation or online tutorials for detailed step-by-step instructions with screenshots specific to your version of Visual Studio.
Basic Git Commands In Visual Studio
Here’s an explanation of basic Git commands like clone, commit, push, pull, and merge, along with code examples for each command:
Clone: The clone command is used to create a local copy of a remote Git repository. Example:
# Clone a remote repository
git clone https://github.com/example/repo.git
Commit: The commit command is used to save changes to the local repository. Example:
# Stage changes
git add .

# Commit changes with a message
git commit -m "Add new feature"
Push: The push command is used to upload local commits to a remote repository. Example:
# Push commits to the remote repository
git push origin main
Pull: The pull command is used to fetch changes from a remote repository and merge them into the current branch. Example:
# Pull changes from the remote repository
git pull origin main
Merge: The merge command is used to combine changes from different branches. Example:
# Switch to the branch where you want to merge changes
git checkout main

# Merge changes from another branch
git merge feature_branch
These are some of the basic Git commands that are commonly used in version control workflows. It’s important to note that these commands assume you are working within a Git repository and have already initialized Git in your project directory.
Please keep in mind that the examples provided here assume a simplified scenario. In real-world situations, there may be additional options or parameters that you can use with these commands. It’s recommended to refer to the official Git documentation or online tutorials for a more comprehensive understanding of each command and its options.

Familiarity with Visual Studio and Git is an essential skill for modern developers. The seamless integration of these powerful tools empowers us to collaborate, manage code efficiently, and unleash our creativity in the world of software development.
Git Integration In Visual Studio
Visual Studio provides a rich set of Git features to streamline your version control workflow. Here are some key Git features available in Visual Studio:
- Team Explorer Window: The Team Explorer window is the central hub for Git operations in Visual Studio. It allows you to view and manage your Git repositories, branches, commits, and more.
- Repository Creation and Cloning: Visual Studio allows you to create a new Git repository or clone an existing repository from popular Git providers like GitHub or Azure DevOps.
- Branching and Merging: Visual Studio makes it easy to create new branches, switch between branches, and merge changes from one branch to another. This enables parallel development and collaboration.
- Committing and Pushing: With Visual Studio, you can easily stage your changes, create commits with meaningful messages, and push your commits to the remote repository.
- Pulling and Fetching: Visual Studio provides options to pull and fetch changes from the remote repository, allowing you to synchronize your local repository with the latest changes.
- Conflict Resolution: When conflicts arise during merging or pulling, Visual Studio provides a visual interface to help you resolve conflicts in a guided manner.
- History and Diffs: Visual Studio allows you to explore the commit history of your repository and view the differences between different versions of your code.
- Annotated Git Blame: You can use the Annotated Git Blame feature in Visual Studio to see the commit details and authorship information for each line of code in a file.
Exploring the Team Explorer Window
The Team Explorer window in Visual Studio is where you can access and manage your Git repositories. Here’s a brief overview of the different sections in the Team Explorer window:
- Home: The Home section provides a summary view of your Git repositories, branches, and recent commits. It also includes quick actions like creating a new repository or cloning an existing repository.
- Changes: The Changes section displays the files that have been modified in your local repository. You can stage files for commit, view the changes made to each file, and easily navigate between different versions of the code.
- Branches: The Branches section shows the branches available in your repository. You can create new branches, switch between branches, and merge changes from one branch to another.
- Sync: The Sync section allows you to fetch changes from the remote repository, pull changes into your local repository, and push your local commits to the remote repository.
- Commits: The Commits section provides a history of the commits made in your repository. You can view commit details, compare different commits, and revert changes if needed.
- Pull Requests: If you’re using a Git provider that supports pull requests (e.g., GitHub or Azure DevOps), the Pull Requests section allows you to create, review, and merge pull requests from within Visual Studio.
These are just some of the features and sections available in the Team Explorer window. Visual Studio provides a user-friendly interface to perform various Git operations and streamline your version control workflow.
💡
By leveraging these Git features in Visual Studio, you can effectively manage your code changes, collaborate with other developers, and ensure the integrity of your projects.
Working With Git Repositories In Visual Studio
Here’s an explanation of how to create a new Git repository and how to clone an existing Git repository in Visual Studio, along with code examples for both:
Creating A New Git Repository In Visual Studio
- Open Visual Studio and go to the Team Explorer window by clicking on «View» in the menu bar and selecting «Team Explorer» or by pressing the shortcut key combination
Ctrl + \,Ctrl + M. - In the Team Explorer window, click on the «Home» icon at the top to go to the Home section.
- Click on the «Create» button under the «Repositories» section.
- In the «Create a new Git repository» dialog, provide the desired repository name, location, and optional description.
- Click on the «Create» button to create the new Git repository.
Example:
# Create a new directory for the repository
mkdir my-repo

# Change to the repository directory
cd my-repo

# Initialize the repository
git init
Cloning An Existing Git Repository In Visual Studio
- Open Visual Studio and go to the Team Explorer window by clicking on «View» in the menu bar and selecting «Team Explorer» or by pressing the shortcut key combination
Ctrl + \,Ctrl + M. - In the Team Explorer window, click on the «Home» icon at the top to go to the Home section.
- Click on the «Clone» button under the «Clone» section.
- Enter the URL of the existing Git repository you want to clone into the «Repository» field.
- Choose the desired local directory to clone the repository into by specifying the «Local Path» field.
- Click on the «Clone» button to start the cloning process.
Example:
# Clone an existing repository
git clone https://github.com/example/repo.git
In both cases, make sure to replace the repository URL (https://github.com/example/repo.git) with the actual URL of the repository you want to clone or create.
Creating a new Git repository allows you to start version controlling a new project, while cloning an existing Git repository lets you make a local copy of an already existing repository to work with.
💡
By following these steps and using the provided code examples, you’ll be able to create new Git repositories and clone existing ones in Visual Studio.
Branching And Merging In Visual Studio
Branching is a fundamental concept in Git that allows you to diverge from the main line of development and create separate lines of development for different features, bug fixes, or experiments. Each branch represents an independent line of development and can have its own commits and changes.
By using branches, you can work on different features or bug fixes simultaneously without affecting the main codebase. It enables parallel development and provides a clean way to manage changes and isolate work-in-progress code.
Creating, Switching, And Deleting Branches in Visual Studio
Visual Studio provides an intuitive interface to create, switch, and delete branches. Here’s how you can perform these operations:
Create a New Branch
- Open Visual Studio and go to the Team Explorer window.
- Click on the «Branches» section in the Team Explorer window.
- Click on the «New Branch» button.
- Enter a name for the new branch in the dialog box and click on the «Create Branch» button.
Example:
# Create a new branch
git branch feature_branch
Switch To A Branch
- Open Visual Studio and go to the Team Explorer window.
- Click on the «Branches» section in the Team Explorer window.
- Double-click on the branch you want to switch to.
Example:
# Switch to a branch
git checkout feature_branch
Delete A Branch
- Open Visual Studio and go to the Team Explorer window.
- Click on the «Branches» section in the Team Explorer window.
- Right-click on the branch you want to delete and select «Delete Branch«.
Example:
# Delete a branch
git branch -d feature_branch
Merging Branches In Visual Studio
Merging combines changes from one branch into another. It allows you to bring the changes made in a feature branch back into the main branch or integrate changes from one branch to another.
To merge branches in Visual Studio:
- Open Visual Studio and go to the Team Explorer window.
- Click on the «Branches» section in the Team Explorer window.
- Right-click on the branch you want to merge into (the target branch) and select «Merge From«.
Example:
# Merge changes from a branch into the current branch
git merge feature_branch
When merging branches, Git will automatically try to combine the changes made in both branches. However, conflicts may occur if the same lines of code were modified differently in the branches. In such cases, Visual Studio provides a conflict resolution interface to help you manually resolve conflicts.
By following these steps and using the provided code examples, you can effectively create, switch, and delete branches in Visual Studio, as well as merge changes between branches in your Git repositories.
❗
Remember to replace feature_branch with the name of the branch you want to create, switch to, or merge.
Resolving Merge Conflicts In Visual Studio
Merge conflicts occur when Git is unable to automatically merge changes from different branches. They happen when the same lines of code have been modified differently in the branches being merged. Git needs your help to resolve these conflicts by choosing which changes to keep or combining them manually.
Merge conflicts are a normal part of the development process, especially when multiple developers are working on the same codebase. Resolving conflicts requires careful examination and decision-making to ensure the final code is correct and functional.
Visual Studio provides a visual and intuitive interface to help you resolve merge conflicts. Here’s how you can resolve merge conflicts in Visual Studio:
- Open Visual Studio and go to the Team Explorer window.
- Click on the «Changes» section in the Team Explorer window.
- Locate the file with merge conflicts. Conflicting sections will be marked with
<<<<<<<,=======, and>>>>>>>markers. - Double-click on the conflicting file to open it in the code editor.
Visual Studio will highlight the conflicting sections and present you with two versions of the conflicting code. You need to decide how to combine or modify the code to resolve the conflicts.
5. Review the conflicting sections and choose the desired changes to keep or modify.
6. Manually edit the code to resolve the conflicts. Remove the conflict markers (<<<<<<<, =======, and >>>>>>>) and make the necessary changes.
Example Of A Merge Conflict And Its Resolution
Let’s consider a simple example where two branches modify the same line of code differently.
// File: example.txt

<<<<<<< HEAD
This is the latest change from the current branch.
=======
This is the conflicting change from the other branch.
>>>>>>> other_branch
In this example, the <<<<<<< HEAD marker indicates the changes made in the current branch (HEAD), while the >>>>>>> other_branch marker indicates the changes made in the other branch (other_branch).
To resolve the conflict, you need to manually modify the code to combine or choose one version over the other. For example, you can resolve the conflict by keeping the changes from the current branch:
// File: example.txt

This is the latest change from the current branch.
Once you have resolved the conflicts in all the files, you can continue with the regular Git flow, such as staging the resolved files, committing the changes, and pushing the merged code.
By using the visual conflict resolution interface in Visual Studio and carefully reviewing and modifying the conflicting code, you can successfully resolve merge conflicts and ensure the smooth merging of branches in your Git repository.
Collaborating With Others Using Git In Visual Studio
The pull request workflow is a common approach for collaborating with others using Git. It allows team members to propose and review changes before merging them into the main codebase. Here’s an overview of the pull request workflow:
- Forking: Each team member forks the main repository to create their own copy.
- Cloning: Team members clone their forked repository to their local machines.
- Branching: Team members create a new branch in their local repository to work on a specific feature or fix.
- Committing and Pushing: Team members make changes, commit them to their local branch, and push the branch to their forked repository.
- Creating a Pull Request: Team members create a pull request from their branch in the forked repository to the main repository.
- Reviewing: Other team members review the changes, provide feedback, and suggest improvements.
- Making Changes: The author of the pull request makes changes based on the feedback received.
- Merging: Once the changes are reviewed and approved, the pull request is merged into the main repository, incorporating the changes into the main codebase.
Making A Pull Request In Visual Studio
Visual Studio provides a seamless interface for creating and managing pull requests. Here’s how you can make a pull request using Visual Studio:
- Open Visual Studio and go to the Team Explorer window.
- Click on the «Home» icon to go to the Home section.
- Under the «Branches» section, select the branch you want to create a pull request from.
- Click on the «New Pull Request» button.
- Fill in the necessary information for the pull request, such as the target branch, title, description, and any related work items.
- Click on the «Create Pull Request» button to submit the pull request.
Reviewing And Accepting A Pull Request In Visual Studio
Visual Studio provides features to review and manage pull requests effectively. Here’s how you can review and accept a pull request using Visual Studio:
- Open Visual Studio and go to the Team Explorer window.
- Click on the «Pull Requests» section in the Team Explorer window.
- Select the pull request you want to review from the list.
- Review the changes made in the pull request by clicking on the files and reviewing the code diffs.
- Add comments, provide feedback, and suggest improvements directly within Visual Studio.
- Once the necessary reviews and discussions are completed, and the changes are approved, the pull request author or a project maintainer can click on the «Complete» button to accept and merge the pull request.
By leveraging the pull request workflow in Visual Studio, team members can collaborate effectively, review each other’s code, and ensure that high-quality changes are incorporated into the main codebase.
💡
Note: While the pull request workflow is commonly associated with Git providers like GitHub or Azure DevOps, Visual Studio integrates seamlessly with these providers to provide a streamlined experience for pull requests.
Advanced Git Features In Visual Studio
Visual Studio offers advanced Git features to enhance your version control workflow. Here are some of the advanced Git features supported by Visual Studio:
Stashing Changes
Stashing changes allows you to temporarily save your local modifications without committing them. This feature is useful when you need to switch to a different branch or work on a different task without committing incomplete changes. Here’s how you can stash changes in Visual Studio:
- Open Visual Studio and go to the Team Explorer window.
- Click on the «Changes» section in the Team Explorer window.
- Click on the «Stash» button.
- Enter a name for the stash and optionally provide a description.
- Click on the «Stash» button to stash your changes.
Cherry-Picking Commits
Cherry-picking is the process of selecting specific commits from one branch and applying them to another branch. It allows you to include only the desired changes in your current branch. Here’s how you can cherry-pick commits in Visual Studio:
- Open Visual Studio and go to the Team Explorer window.
- Click on the «Branches» section in the Team Explorer window.
- Right-click on the commit you want to cherry-pick and select «Cherry-pick«.
Interactive Rebasing
Interactive rebasing provides a way to modify and organize your commit history. It allows you to rewrite commit messages, reorder commits, squash multiple commits into one, or even remove unwanted commits. Here’s how you can perform interactive rebasing in Visual Studio:
- Open Visual Studio and go to the Team Explorer window.
- Click on the «Branches» section in the Team Explorer window.
- Right-click on the commit you want to start the interactive rebase from and select «Interactive Rebase«.
Working With Submodules
Submodules allow you to include other Git repositories within your main repository. They are useful when you want to include external libraries or dependencies in your project. Visual Studio provides support for managing and working with submodules. Here’s how you can work with submodules in Visual Studio:
- Open Visual Studio and go to the Team Explorer window.
- Click on the «Changes» section in the Team Explorer window.
- Expand the submodule section to see the status of the submodules.
- Use the available options to update, initialize, or add submodules.
These advanced Git features in Visual Studio provide you with additional flexibility and control over your version control workflow. They enable you to handle complex scenarios, manage changes more effectively, and ensure the integrity of your codebase.
💡
Note: Some advanced Git operations may require familiarity with Git concepts and workflows. It’s recommended to refer to the official Git documentation or consult relevant resources for a more comprehensive understanding of these features.
Troubleshooting Common Git Issues In Visual Studio
While using Git in Visual Studio, you may encounter some common issues or errors. Here are a few common Git issues and suggestions on how to troubleshoot them:
- Authentication Errors: If you’re experiencing authentication errors when connecting to remote repositories, double-check your credentials and ensure that you have the necessary permissions to access the repository.
- Merge Conflicts: Merge conflicts occur when Git is unable to automatically merge changes. To resolve merge conflicts, carefully review the conflicting code sections, make necessary modifications, and manually resolve the conflicts. Use the Visual Studio merge conflict resolution interface to assist you in this process.
- Committing Errors: If you’re unable to commit changes, ensure that you have staged the necessary files and provided a meaningful commit message. Also, check if there are any uncommitted changes that need to be resolved before committing.
- Pushing Errors: If you encounter errors while pushing your changes, ensure that you have the correct permissions to push to the remote repository. Double-check the repository URL and confirm that you are connected to the correct remote.
- Branching Errors: If you’re unable to create, switch, or delete branches, verify that you are in the correct repository context and have the necessary permissions. Additionally, ensure that you are using the correct branch names and follow any naming conventions set by your team or project.
- Remote Repository Errors: If you’re having issues with remote repositories, such as unable to clone or fetch changes, check your network connectivity and ensure that the repository URL is correct. If you’re using a Git provider like GitHub or Azure DevOps, refer to their documentation or support resources for specific troubleshooting steps.
Remember, Git errors and issues can have various causes, so it’s important to analyze the specific error messages or symptoms you’re encountering to determine the appropriate troubleshooting steps. It can be helpful to search for the specific error message or behavior you’re experiencing to find more targeted solutions.
Happy coding!🙌
Frequently Asked Questions
Why should I use Git in Visual Studio?
Using Git in Visual Studio allows you to seamlessly integrate version control capabilities within the IDE. It enables efficient collaboration, code management, and history tracking, all within a familiar and productive development environment.
What are some common Git commands I should know?
Some common Git commands include clone (to clone a remote repository), commit (to save changes), push (to upload local commits to a remote repository), pull (to fetch changes from a remote repository), and merge (to combine changes from different branches).
What are some advanced Git features in Visual Studio?
Visual Studio supports advanced Git features such as stashing changes (temporarily saving changes without committing), cherry-picking commits (selecting specific commits to apply), interactive rebasing (modifying commit history), and working with submodules (including external repositories within your project).
Can I use Git with other IDEs besides Visual Studio?
Yes, Git is a widely adopted version control system and can be used with various IDEs and text editors. Git commands and workflows are platform-agnostic, allowing you to use Git with different development tools.
Is it necessary to have a remote repository to use Git in Visual Studio?
No, you can use Git locally within your project directory even without a remote repository. However, having a remote repository allows you to collaborate with others, share your code, and take advantage of centralized backup and version control capabilities.
Let’s test your knowledge!
Interactive Quiz
Which Git feature allows you to temporarily save changes without committing them?
A couple of weeks ago I wrote an introductory article “Git Explained for Beginners” which aimed at introducing Git to beginners on the basis of Git’s underlying tree structure. Since that article turned out to be quite popular and since I’m currently planning an introduction for our .Net devs on that topic, I decided to write this article, using a similar approach, but show-casing the use of Git from within Visual Studio.
Terminology
For getting introduced to the Git terminology, please refer to my previous article.
Workstation/Visual Studio Setup
Recently Microsoft seems to recognize Git as a valuable alternative to its proprietary TFS (Team Foundation Server) to what regards version control and as such it started to release its own Visual Studio extension which is currently in “preview” phase. You can find it here: Visual Studio Tools for Git (Microsoft)
Scott Hanselman wrote about it as well. I quickly tried the plugin and although it perfectly integrates with Visual Studio (mostly like TFS), it is still too much beta for my taste.
Currently the best alternative I found is to install Git Extensions for Windows and Git Source Control Provider Visual Studio Plugin. The following sections go through their corresponding installations.
Install Git Extensions for Windows
The first step is to download Git Extensions from the corresponding Google Code Repository.
Its installation wizard will install everything you need to have a complete Git setup, installing Git (from git-scm) to the different Unix tools to the Git Bash.
After you have installed everything, make sure all entries of the Git Extension’s checklist pass for having a trouble-free Git experience.

You find this checklist when opening the Git Extensions application, and then by navigating to Plugins > Settings.
Installing Git Source Control Provider
Git Source Control Provider is an open source extension that uses your machine’s Git installation and integrates it into Visual Studio.
If you have successfully setup Git (following the procedure mentioned before), you can go ahead and install the Git Source Control Provider extension for Visual Studio. The easiest way is probably through its “Extensions and Updates” dialog where you have to simply search for “git source control”.

As one of the next steps you need to correctly set the source code provider within Visual Studio as you might have more of them (i.e TFS). This is done in Visual Studio’s preferences in the “Source Control” section:

You should see an entry saying “Git Source Control Provider”. Choose that one and confirm your setting. After that you should also make sure it references your Git and Git Extensions installations correctly:

Configuring your SSH key
Many Git server repositories allow for different authentication models:
- through https or
- by generating an SSH key.
Personally, I prefer the latter as I hate to continuously enter my credentials.
To get a guide on generating a public SSH key just consult the documentation on GitHub which is quite detailed and well explained.
Well, that’s it for the installation part. You should now be ready to get started.
Let’s get started: Create a new Git Repository
First of all, I simply create a Console project, as the focus here is not on creating something nice and working, but rather to demonstrate Git’s integration into Visual Studio. Once the project is created we can set up the local Git repository.
This is done by right-clicking on the solution and then choose “Create Git Repository”:

After that operation you should see the repository to be setup successfully:

Moreover, you should see some files listed in Git’s pending changes window:

Just click them all, add a meaningful comment and commit them by pressing the “Commit” button

Git SCP (from now on to refer to the Git Source Control Provider extension for VS) provides a very nice and handy mechanism for viewing the actual situation of your Git repository, namely by visualizing its underlying Git tree. Just click the “History” button…

…in the “Pending changes” window and a new window will open, displaying a nice graph:

So far nothing spectacular, but it shows that our initial commit created a note to which (as expected) HEAD and master point to. Clicking on the node reveals further details such as the involved files and according diffs.
.gitignore
An important aspect I didn’t mention in my previous Git tutorial is the concept of the .gitignore file. This file basically contains a set of lines specifying which artifacts should be ignored by Git. Normally these are IDE specific files or compiled binary files.
Out of the box Git SCP already creates one that is suitable for Visual Studio. Otherwise you can refer to the gitignore GitHub project which is a collection of .gitignore files for the different kind of IDEs and programming languages.
Create and commit a new file
Simply add a new file to your Visual Studio project. I added Person.cs with some dummy content. You should immediately see the changes listed in the Pending Changes window.
You can open the Pending Changes window by right-clicking the Visual Studio project or solution file and then choosing «Git (master)» followed by «Pending Changes».
Again, just like before, select the files you want to include, add a meaningful comment and commit them.
Our tree after the commit looks like this:

Create a (feature)branch
To create a new branch, select the Git Extensions button on the pending changes window and then Create branch

This action will open a new dialog window, allowing you to first of all select the point in history from which you’d like to branch and then to specify its name:

Note: we also select the checkbox “Checkout after create” s.t. we immediately switch to the new branch. This would somehow be similar to a
git checkout -b <branch-name>command on the shell.
A confirmation dialog shows the success of the operation and the executed command on the shell.

Moreover, in the Pending Changes window we now see the current branch we’re on, which is the just created “my-feature-branch”.

We can now modify an existing file — say our Person.cs — and commit it. The Pending Changes window exactly shows the diff of the changes before we commit them

After committing the changes, the tree has advanced and note that now master and my-feature-branch point to different locations. HEAD is on our feature branch as it is the current active one.

Merge and resolve conflicts
Let’s switch back to master. We can do this — again — by using the Checkout branch button from the “Git Extensions” menu.

We have to select master as our branch and continue.

Note: there are options on how you’d like to treat any local changes that have not yet been committed, i.e. to stash them.
The Git tree reflects that switch to the master branch as its HEAD now correctly points to master again.

What I’d like to demonstrate in this section is on how to resolve a merge conflict. For that to work, we need to create another commit on master that conflicts with changes on my-feature-branch. As such, let’s modify Person.cs accordingly.
Our tree now reflects the existence of our feature branch more prominently.

Performing the Merge
Consider that we want to merge the changes made in my-feature-branch to master. This process is initiated by using the Merge button from the Git Extensions menu.

A dialog opens, allowing us to specify the details of the merge.

First of all, we choose the branch name which is my-feature-branch. Then, there are two other options:
“Keep a single branch line if possible (fast-forward)” — A fast-forward is explained as follows
[…] To phrase that another way, when you try to merge one commit with a commit that can be reached by following the first commit’s history, Git simplifies things by moving the pointer forward because there is no divergent work to merge together — this is called a “fast forward”. Git SCM: Basic Branching and Merging
Obviously, this only works when there are no conflicts.
“Always create a new merge commit” — This will simply create a new commit message explicitly specifying that something has been merged.
As expected, fast-forwarding fails and we get a merge conflict notification

The Pending Changes window shows the merge conflict

Git SCP will ask you on whether to solve or ignore the conflicts. If you answer positively, a dialog will open, showing all conflicting files.

Click on “Start mergetool” to open your configured merge tool. In my case this openes “kdiff3”. This might vary on your system, depending on how you configured your Git installation.

After you have resolved all conflicts…

…you can continue with the commit procedure.
Again, the Git tree reflects the merge nicely

Jump to a certain commit
Jumping to a certain commit is quite easy and can be done by using the Browse command from the Git Extensions menu. This opens an external GUI visualizing the Git tree.

From there you can use the context menu and click on Checkout a selected revision.

As a result you will transition into a detached head mode. In fact, take a look at the tree:

HEAD doesn’t point to a branch any more, but to a specific commit in history. To go back you can always simply perform a checkout on master or some arbitrary branch.
Rollback
A rollback can be performed in different ways and with different consequences.
Files Not Staged For a Commit
Undoing local changes that have not yet been committed is quite easy and can be done by simply performing a right-click on the changed file and by selecting “Undo File Changes”

Oops, I forgot to Include…
If you have already committed a change to your repository and you recognize that you have forgotten something to include in that same commit (like the comment on that line of code)…

…then Git has a nice and handy functionality: the Amend Last Commit command. Just add your forgotten change and press the button.

As a result, your last commit will include those changes as well, without leaving a trace that you actually made two distinct commits.
“Revert” Already Committed Changes
But now, assume we want to go back entirely, reverting that last change we made. We want, however, to explicitly show that “reverting” of the changes.
Note, reverting changes in this way is highly recommended if you synched your changes already with a remote repository.
To use the “revert” functionality, use “Browse” from the Git Extensions menu, right-click on the commit you’d like to revert and select revert commit:

This will stage the reverted changes which you can then commit back to your Git repo.
The tree after committing the reverted changes:

Discard Already Committed Changes
Let’s have a look on what we did before:
- we added a property to the
Person.cs - we performed a revert of adding the property
Basically, our two override each other. So if we are in our local repository and we have not synched these changes with any remote counterpart, we might think to completely remove both commits from our history. This doesn’t have any kind of benefit other than doing some housekeeping. For this to happen, we can use the reset command. We select the point in time (i.e. the commit) up to which we want to reset and click the “Reset current branch to here”:

You will have different kind of possibilities

In this situation I prefer doing a hard reset as I don’t care to keep the changes in the directory. After the reset, our Git tree has no trace about the previous commits:

Sharing/Synching your Repository
So far we have worked exclusively on our local Git repository. To publish our repository in order to share it with our mates, we need to Push it to some remote location. This can be done from the Git Extensions menu, choosing the Push command.

A new dialog window opens from which you can choose the remote location.

In case you have not yet configured any remote locations you have to do so by using the “Manage remotes”.

Note: By convention, the “Git remote” pointing to the origin repository is named origin.
After the successful configuration of the remotes, you can select one of them and push to it.

…and success!

The files are now on the remote repository, in my case on our company-internal GitLab server:

Cloning
Similarly, your team mate has to do the opposite operation, namely to download (clone) the repository you just shared, to his local workstation.
To clone an existing repository, use the Visual Studio menu and choose the “Clone repository” command

A dialog will open, where you can then enter the Git repository url, the clone destination as well as the branch you want to checkout (normally master).

The tree now also shows the references to the remote counterparts (origin/HEAD and origin/master).

I’d like to Migrate my TFS Project to Git
Check out my post here which goes into the details on how to export your existing TFS repository to Git:
- Migrate from TFS to Git
Resources and Links
- Git Explained: For Beginners
- SO: Git for beginners: The definitive practical guide
- DZone Refcard: Getting Started with Git
- DZone Refcard: Git Patterns and Antipatterns
Questions? Thoughts? Hit me up on Twitter