Git Credential Manager for Windows


NOTICE: This project is no longer being maintained. :warning:
Git Credential Manager for Windows is no longer being maintained. The cross-platform
Git Credential Manager Core (GCM Core) is the official replacement.
GCM Core is included as an optional component of Git for Windows 2.28 and will be made the default credential
helper as of Git for Windows 2.29. GCM Core can also be manually installed from this page.
NOTICE: Experiencing GitHub push/fetch problems?
GitHub will disable password-based authentication
on APIs Git Credential Manager for Windows uses to create tokens. As a result, GCM
for Windows will no longer be able to create new access tokens for GitHub.
Git Credential Manager Core (GCM Core) supports OAuth-based
authentication with GitHub and is the replacement for GCM for Windows.
Please update to Git for Windows 2.28 and select “Git Credential Manager Core” from
the installer when asked to “select a credential helper”, or manually install GCM Core
from here.
As of 22 Feb 2018, GitHub has disabled support for weak encryption which means many users will suddenly find themselves unable to authenticate using a Git for Windows which (impacts versions older than v2.16.0). DO NOT PANIC, there’s a fix. Update Git for Windows to the latest (or at least v2.16.0).
The most common error users see looks like:
fatal: HttpRequestException encountered.
   An error occurred while sending the request.
fatal: HttpRequestException encountered.
   An error occurred while sending the request.
Username for 'https://github.com':
If, after updating Git for Windows, you are still having problems authenticating with GitHub, please read this Developer Community topic which contains additional remedial actions you can take to resolve the problem.
If you are experiencing issue when using Visual Studio, please read Unable to connect to GitHub with Visual Studio.
The Git Credential Manager for Windows (GCM) provides secure Git credential storage for Windows. It’s the successor to the Windows Credential Store for Git (git-credential-winstore), which is no longer maintained. Compared to Git’s built-in credential storage for Windows (wincred), which provides single-factor authentication support working on any HTTP enabled Git repository, GCM provides multi-factor authentication support for Azure DevOps, Team Foundation Server, GitHub, and Bitbucket.
This project includes:
- Secure password storage in the Windows Credential Store.
- Multi-factor authentication support for Azure DevOps.
- Two-factor authentication support for GitHub.
- Two-factor authentication support for Bitbucket.
- Personal Access Token generation and usage support for Azure DevOps, GitHub, and Bitbucket.
- Non-interactive mode support for Azure DevOps backed by Azure Directory.
- NTLM/Kerberos authentication for Team Foundation Server (see notes).
- Optional settings for build agent optimization.
This is a community project so feel free to contribute ideas, submit bugs, fix bugs, or code new features. For detailed information on how the GCM works go to the wiki.
Download and Install
To use the GCM, you can download the latest installer. To install, double-click GCMW-{version}.exe and follow the instructions presented.
When prompted to select your terminal emulator for Git Bash you should choose the Windows’ default console window, or make sure GCM is configured to use modal dialogs. GCM cannot prompt you for credentials, at the console, in a MinTTY setup.
Manual Installation
Note for users with special installation needs, you can still extract the gcm-{version}.zip file and run install.cmd from an administrator command prompt. This allows specification of the installation options explained below.
Installation in an MSYS2 Environment
To use the GCM along with git installed with pacman in an MSYS2 environment, simply download a release zip and extract the contents directly into C:\msys64\usr\lib\git-core (assuming your MSYS2 environment is installed in C:\msys64). Then run:
git config --global credential.helper manager
How to use
You don’t. It magically works when credentials are needed. For example, when pushing to Azure DevOps, it automatically opens a window and initializes an oauth2 flow to get your token.
Build and Install from Sources
To build and install the GCM yourself, clone the sources, open the solution file in Visual Studio, and build the solution. All necessary components will be copied from the build output locations into a .\Deploy folder at the root of the solution. From an elevated command prompt in the .\Deploy folder issue the following command git-credential-manager install. Additional information about development and debugging are available in our documents area.
Various options are available for uniquely configured systems, like automated build systems. For systems with a non-standard placement of Git use the --path <git> parameter to supply where Git is located and thus where the GCM should be deployed to. For systems looking to avoid checking for the Microsoft .NET Framework and other similar prerequisites use the --force option. For systems looking for silent installation without any prompts, use the --passive option.
Additional Resources
- Credential Manager Usage
- Askpass Usage
- Configuration Options
- Build Agent and Automation Support
- Bitbucket Specific Details
- Frequently Asked Questions
- Development and Debugging
Contribute
There are many ways to contribute.
- Submit bugs and help us verify fixes as they are checked in.
- Review code changes.
- Contribute bug fixes and features.
Code Contributions
For code contributions, you will need to complete a Contributor License Agreement (CLA). Briefly, this agreement testifies that you grant us permission to use the submitted change according to the terms of the project’s license, and that the work being submitted is under the appropriate copyright.
Please submit a Contributor License Agreement (CLA) before submitting a pull request. You may visit https://cla.microsoft.com to sign digitally. Alternatively, download the agreement Microsoft Contribution License Agreement.pdf, sign, scan, and email it back to cla@microsoft.com. Be sure to include your GitHub user name along with the agreement. Once we have received the signed CLA, we’ll review the request.
Code of Conduct
This project has adopted the Microsoft Open Source Code of Conduct. For more information see the Code of Conduct FAQ or contact opencode@microsoft.com with any additional questions or comments.
License
This project uses the MIT License.
Git Credential Manager for Windows

NOTICE: This project is no longer being maintained. ⚠️
Git Credential Manager for Windows is no longer being maintained. The cross-platform
Git Credential Manager Core (GCM Core) is the official replacement.
GCM Core is included as an optional component of Git for Windows 2.28 and will be made the default credential
helper as of Git for Windows 2.29. GCM Core can also be manually installed from this page.
NOTICE: Experiencing GitHub push/fetch problems?
GitHub will disable password-based authentication
on APIs Git Credential Manager for Windows uses to create tokens. As a result, GCM
for Windows will no longer be able to create new access tokens for GitHub.
Git Credential Manager Core (GCM Core) supports OAuth-based
authentication with GitHub and is the replacement for GCM for Windows.
Please update to Git for Windows 2.28 and select «Git Credential Manager Core» from
the installer when asked to «select a credential helper», or manually install GCM Core
from here.
As of 22 Feb 2018, GitHub has disabled support for weak encryption which means many users will suddenly find themselves unable to authenticate using a Git for Windows which (impacts versions older than v2.16.0). DO NOT PANIC, there’s a fix. Update Git for Windows to the latest (or at least v2.16.0).
The most common error users see looks like:
fatal: HttpRequestException encountered.
   An error occurred while sending the request.
fatal: HttpRequestException encountered.
   An error occurred while sending the request.
Username for 'https://github.com':
If, after updating Git for Windows, you are still having problems authenticating with GitHub, please read this Developer Community topic which contains additional remedial actions you can take to resolve the problem.
If you are experiencing issue when using Visual Studio, please read Unable to connect to GitHub with Visual Studio.
The Git Credential Manager for Windows (GCM) provides secure Git credential storage for Windows. It’s the successor to the Windows Credential Store for Git (git-credential-winstore), which is no longer maintained. Compared to Git’s built-in credential storage for Windows (wincred), which provides single-factor authentication support working on any HTTP enabled Git repository, GCM provides multi-factor authentication support for Azure DevOps, Team Foundation Server, GitHub, and Bitbucket.
This project includes:
- Secure password storage in the Windows Credential Store.
- Multi-factor authentication support for Azure DevOps.
- Two-factor authentication support for GitHub.
- Two-factor authentication support for Bitbucket.
- Personal Access Token generation and usage support for Azure DevOps, GitHub, and Bitbucket.
- Non-interactive mode support for Azure DevOps backed by Azure Directory.
- NTLM/Kerberos authentication for Team Foundation Server (see notes).
- Optional settings for build agent optimization.
Community
This is a community project so feel free to contribute ideas, submit bugs, fix bugs, or code new features. For detailed information on how the GCM works go to the wiki.
Download and Install
To use the GCM, you can download the latest installer. To install, double-click GCMW-{version}.exe and follow the instructions presented.
When prompted to select your terminal emulator for Git Bash you should choose the Windows’ default console window, or make sure GCM is configured to use modal dialogs. GCM cannot prompt you for credentials, at the console, in a MinTTY setup.
Manual Installation
Note for users with special installation needs, you can still extract the gcm-{version}.zip file and run install.cmd from an administrator command prompt. This allows specification of the installation options explained below.
Installation in an MSYS2 Environment
To use the GCM along with git installed with pacman in an MSYS2 environment, simply download a release zip and extract the contents directly into C:\msys64\usr\lib\git-core (assuming your MSYS2 environment is installed in C:\msys64). Then run:
git config --global credential.helper manager
How to use
You don’t. It magically works when credentials are needed. For example, when pushing to Azure DevOps, it automatically opens a window and initializes an oauth2 flow to get your token.
Build and Install from Sources
To build and install the GCM yourself, clone the sources, open the solution file in Visual Studio, and build the solution. All necessary components will be copied from the build output locations into a .\Deploy folder at the root of the solution. From an elevated command prompt in the .\Deploy folder issue the following command git-credential-manager install. Additional information about development and debugging are available in our documents area.
Various options are available for uniquely configured systems, like automated build systems. For systems with a non-standard placement of Git use the --path <git> parameter to supply where Git is located and thus where the GCM should be deployed to. For systems looking to avoid checking for the Microsoft .NET Framework and other similar prerequisites use the --force option. For systems looking for silent installation without any prompts, use the --passive option.
Additional Resources
- Credential Manager Usage
- Askpass Usage
- Configuration Options
- Build Agent and Automation Support
- Bitbucket Specific Details
- Frequently Asked Questions
- Development and Debugging
Contribute
There are many ways to contribute.
- Submit bugs and help us verify fixes as they are checked in.
- Review code changes.
- Contribute bug fixes and features.
Code Contributions
For code contributions, you will need to complete a Contributor License Agreement (CLA). Briefly, this agreement testifies that you grant us permission to use the submitted change according to the terms of the project’s license, and that the work being submitted is under the appropriate copyright.
Please submit a Contributor License Agreement (CLA) before submitting a pull request. You may visit https://cla.microsoft.com to sign digitally. Alternatively, download the agreement Microsoft Contribution License Agreement.pdf, sign, scan, and email it back to cla@microsoft.com. Be sure to include your GitHub user name along with the agreement. Once we have received the signed CLA, we’ll review the request.
Code of Conduct
This project has adopted the Microsoft Open Source Code of Conduct. For more information see the Code of Conduct FAQ or contact opencode@microsoft.com with any additional questions or comments.
License
This project uses the MIT License.
Universal Git Authentication
“Authentication is hard. Hard to debug, hard to test, hard to get right.” – Me
These words were true when I wrote them back in July 2020, and they’re still true today. The goal of Git Credential Manager (GCM) is to make the task of authenticating to your remote Git repositories easy and secure, no matter where your code is stored or how you choose to work. In short, GCM wants to be Git’s universal authentication experience.
In my last blog post, I talked about the risk of proliferating “universal standards” and how introducing Git Credential Manager Core (GCM Core) would mean yet another credential helper in the wild. I’m therefore pleased to say that we’ve managed to successfully replace both GCM for Windows and GCM for Mac and Linux with the new GCM! The source code of the older projects has been archived, and they are no longer shipped with distributions like Git for Windows!
In order to celebrate and reflect this successful unification, we decided to drop the “Core” moniker from the project’s name to become simply Git Credential Manager or GCM for short.

If you have followed the development of GCM closely, you might have also noticed we have a new home on GitHub in our own organization, github.com/git-ecosystem!
We felt being homed under github.com/microsoft or github.com/github didn’t quite represent the ethos of GCM as an open, universal and agnostic project. All existing issues and pull requests were migrated, and we continue to welcome everyone to contribute to the project.
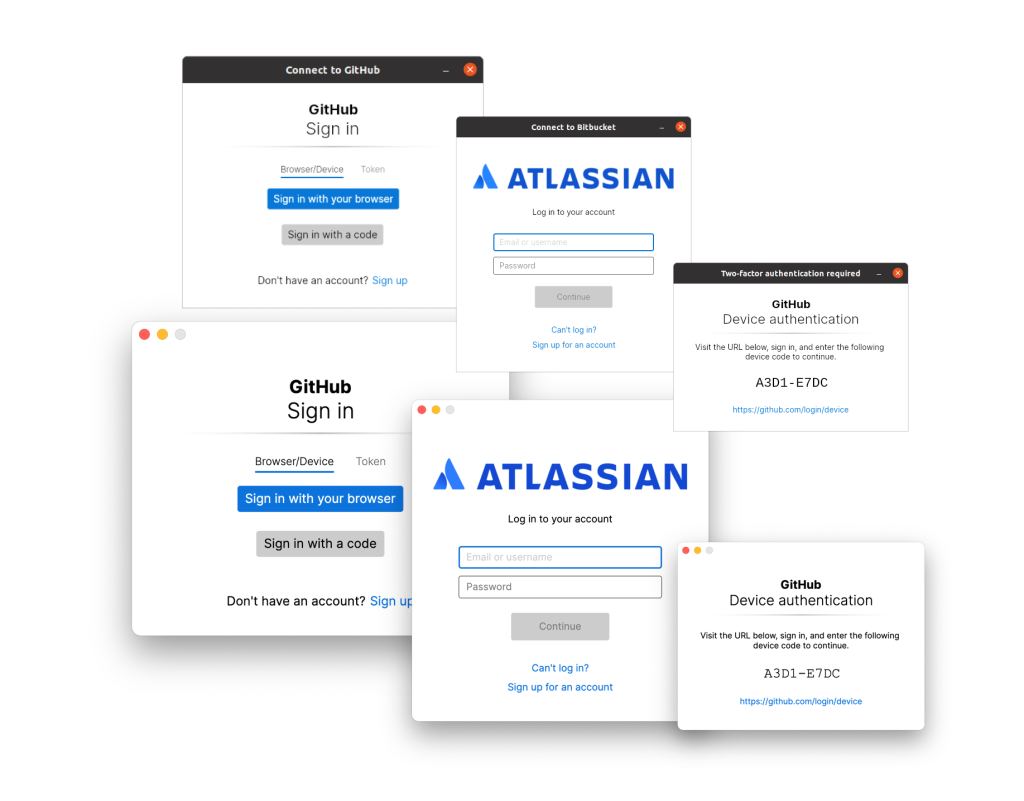
Interacting with HTTP remotes without the help of a credential helper like GCM is becoming more difficult with the removal of username/password authentication at GitHub and Bitbucket. Using GCM makes it easy, and with exciting developments such as using GitHub Mobile for two-factor authentication and OAuth device code flow support, we are making authentication more seamless.
Hello, Linux!

In the quest to become a universal solution for Git authentication, we’ve worked hard on getting GCM to work well on various Linux distributions, with a primary focus on Debian-based distributions.
Today we have Debian packages available to download from our GitHub releases page, as well as tarballs for other distributions (64-bit Intel only). Being built on the .NET platform means there should be a reduced effort to build and run anywhere the .NET runtime runs. Over time, we hope to expand our support matrix of distributions and CPU architectures (by adding ARM64 support, for example).
Due to the broad and varied nature of Linux distributions, it’s important that GCM offers many different credential storage options. In addition to GPG encrypted files, we added support for the Secret Service API via libsecret (also see the GNOME Keyring), which provides a similar experience to what we provide today in GCM on Windows and macOS.
Windows Subsystem for Linux
In addition to Linux distributions, we also have special support for using GCM with Windows Subsystem for Linux (WSL). Using GCM with WSL means that all your WSL installations can share Git credentials with each other and the Windows host, enabling you to easily mix and match your development environments.
You can read more about using GCM inside of your WSL installations here.
Hello, GitLab
Being universal doesn’t just mean we want to run in more places, but also that we can help more users with whatever Git hosting service they choose to use. We are very lucky to have such an engaged community that is constantly working to make GCM better for everyone.
On that note, I am thrilled to share that through a community contribution, GCM now has support for GitLab. Welcome to the family!

Look Ma, no terminals!
We love the terminal and so does GCM. However, we know that not everyone feels comfortable typing in commands and responding to prompts via the keyboard. Also, many popular tools and IDEs that offer Git integration do so by shelling out to the git executable, which means GCM may be called upon to perform authentication from a GUI app where there is no terminal(!)
GCM has always offered full graphical authentication prompts on Windows, but thanks to our adoption of the Avalonia project that provides a cross-platform .NET XAML framework, we can now present graphical prompts on macOS and Linux.
GCM continues to support terminal prompts as a first-class option for all prompts. We detect environments where there is no GUI (such as when connected over SSH without display forwarding) and instead present the equivalent text-based prompts. You can also manually disable the GUI prompts if you wish.
Securing the software supply chain
Keeping your source code secure is a critical step in maintaining trust in software, whether that be keeping commercially sensitive source code away from prying eyes or protecting against malicious actors making changes in both closed and open source projects that underpin much of the modern world.
In 2020, an extensive cyberattack was exposed that impacted parts of the US federal government as well as several major software companies. The US president’s recent executive order in response to this cyberattack brings into focus the importance of mechanisms such as multi-factor authentication, conditional access policies, and generally securing the software supply chain.
Store ALL the credentials
Git Credential Manager creates and stores credentials to access Git repositories on a host of platforms. We hold in the highest regard the need to keep your credentials and access secure. That’s why we always keep your credentials stored using industry standard encryption and storage APIs.
GCM makes use of the Windows Credential Manager on Windows and the login keychain on macOS.
In addition to these existing mechanisms, we also support several alternatives across supported platforms, giving you the choice of how and where you wish to store your generated credentials (such as GPG-encrypted credential files).

GCM can now also use Git’s git-credential-cache helper that is commonly built and available in many Git distributions. This is a great option for cloud shells or ephemeral environments when you don’t want to persist credentials permanently to disk but still want to avoid a prompt for every git fetch or git push.
Modern windows authentication (experimental)
Another way to keep your credentials safe at rest is with hardware-level support through technologies like the Trusted Platform Module (TPM) or Secure Enclave. Additionally, enterprises wishing to make sure your device or credentials have not been compromised may want to enforce conditional access policies.
Integrating with these kinds of security modules or enforcing policies can be tricky and is platform-dependent. It’s often easier for applications to hand over responsibility for the credential acquisition, storage, and policy
enforcement to an authentication broker.
An authentication broker performs credential negotiation on behalf of an app, simplifying many of these problems, and often comes with the added benefit of deeper integration with operating system features such as biometrics.
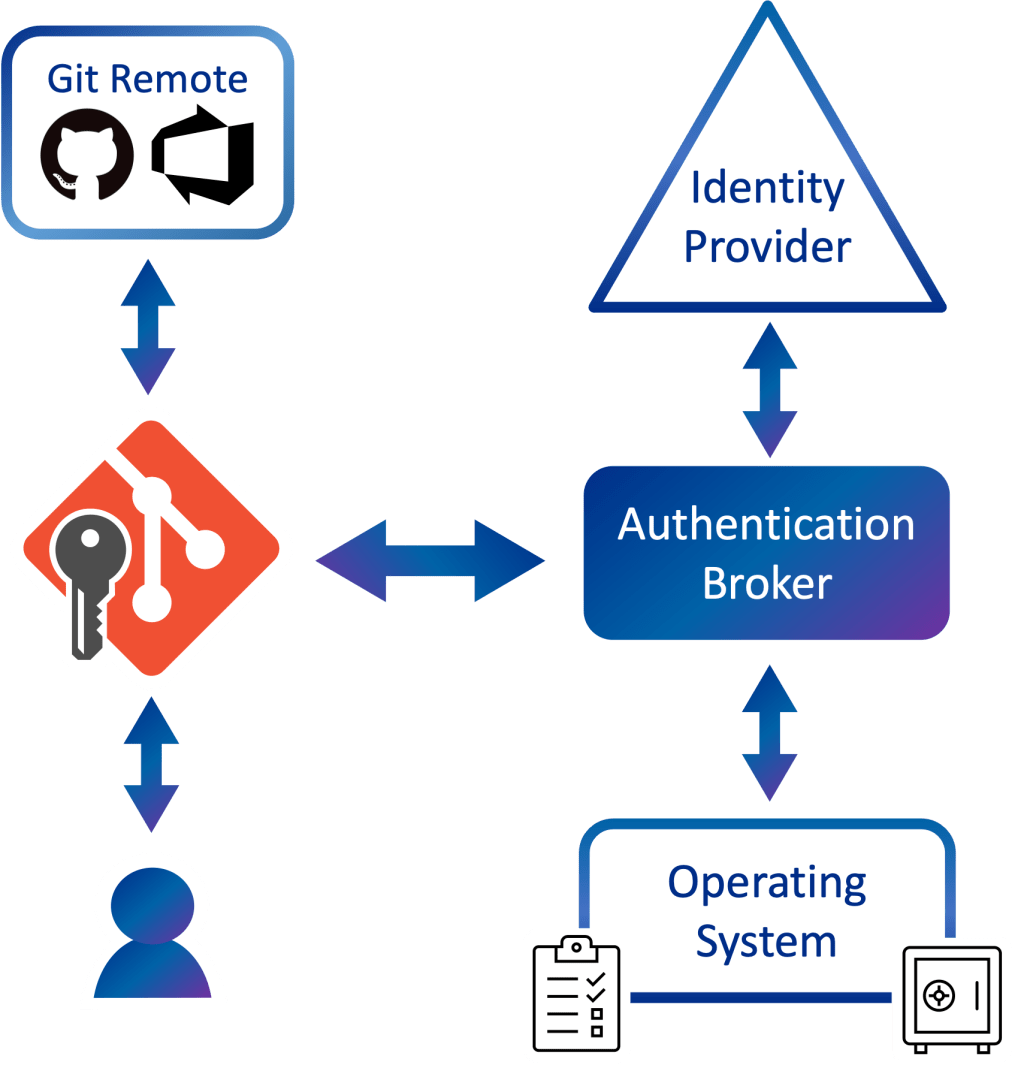
I’m happy to announce that GCM has gained experimental support for brokered authentication (Windows-only at the moment)!
On Windows, the authentication broker is a component that was first introduced in Windows 10 and is known as the Web Account Manager (WAM). WAM enables apps like GCM to support modern authentication experiences such as Windows Hello and will apply conditional access policies set by your work or school.
Please note that support for the Windows broker is currently experimental and limited to authentication of Microsoft work and school accounts against Azure DevOps.
Click here to read more about GCM and WAM, including how to opt-in and current known issues.
Even more improvements
GCM has been a hive of activity in the past 18 months, with too many new features and improvements to talk about in detail! Here’s a quick rundown of additional updates since our July 2020 post:
- Automatic on-premises/self-hosted instance detection
- GitHub Enterprise Server and GitHub AE support
- Shared Microsoft Identity token caches with other developer tools
- Improved network proxy support
- Custom TLS/SSL root certificate support
- Admin-less Windows installer
- Improved command line handling and output
- Enterprise default setting support on Windows
- Multi-user support
- Better diagnostics
Thank you!
The GCM team would also like to personally thank all the people who have made contributions, both large and small, to the project:
@vtbassmatt, @kyle-rader, @mminns, @ldennington, @hickford, @vdye, @AlexanderLanin, @derrickstolee, @NN, @johnemau, @karlhorky, @garvit-joshi, @jeschu1, @WormJim, @nimatt, @parasychic, @cjsimon, @czipperz, @jamill, @jessehouwing, @shegox, @dscho, @dmodena, @geirivarjerstad, @jrbriggs, @Molkree, @4brunu, @julescubtree, @kzu, @sivaraam, @mastercoms, @nightowlengineer
Future work
While we’ve made a great deal of progress toward our universal experience goal, we’re not slowing down anytime soon; we’re still full steam ahead with GCM!
Our focus for the next period will be on iterating and improving our authentication broker support, providing stronger protection of credentials, and looking to increase performance and compatibility with more environments and uses.
Explore more from GitHub
![]()
Engineering
Posts straight from the GitHub engineering team.
Learn more
![]()
The ReadME Project
Stories and voices from the developer community.
Learn more
![]()
GitHub Actions
Native CI/CD alongside code hosted in GitHub.
Learn more
![]()
Work at GitHub!
Check out our current job openings.
Learn more
Хранилище учётных данных
Если для подключения к удалённым серверам вы используете протокол SSH, то вы можете использовать ключ вместо пароля, что позволит вам безопасно передавать данные без ввода логина и пароля.
Однако, это невозможно при использовании HTTP-протоколов — каждое подключение требует пары логин, пароль.
Всё ещё сложнее для систем с двухфакторной аутентификацией, когда выражение, которое вы используете в качестве пароля, генерируется случайно и его сложно воспроизвести.
К счастью, в Git есть система управления учётными данными, которая может помочь в этом.
В Git «из коробки» есть несколько опций:
-
По умолчанию Git не кеширует учётные данные совсем.
Каждое подключение будет запрашивать у вас логин и пароль. -
В режиме «cache» учётные данные сохраняются в памяти в течение определённого периода времени.
Ни один из паролей никогда не сохраняется на диск и все они удаляются из кеша через 15 минут. -
В режиме «store» учётные данные сохраняются на неограниченное время в открытом виде в файле на диске.
Это значит что, до тех пор пока вы не измените пароль к Git-серверу, вам не потребуется больше вводить ваши учётные данные.
Недостатком такого подхода является то, что ваш пароль хранится в открытом виде в файле в вашем домашнем каталоге. -
На случай если вы используете Mac, в Git есть режим «osxkeychain», при использовании которого учётные данные хранятся в защищённом хранилище, привязанному к вашему системному аккаунту.
В этом режиме учётные данные сохраняются на диск на неограниченное время, но они шифруются с использованием той же системы, с помощью которой сохраняются HTTPS-сертификаты и автозаполнения для Safari. -
В случае если вы используете Windows, то можете включить использование «Git Credential Manager» во время установки Git для Windows или установить крайнюю версию GCM как отдельный сервис.
Он похож на «osxkeychain», описанный выше, но для управления секретной информацией использует Windows Credential Store.
Его так же можно использовать в WSL1 и WSL2.
Больше имнформации об установке и настройке GCM можно найти на странице проекта на GitHub.
Вы можете выбрать один из этих методов, изменив настройки Git:
$ git config --global credential.helper cacheНекоторые из этих помощников имеют опции.
Помощник «store» может принимать аргумент --file <path>, который определяет где будет хранится файл с открытыми учётными данный (по умолчанию используется ~/.git-credentials).
Помощник «cache» принимает опцию --timeout <seconds>, которая изменяет промежуток времени, в течение которого демон остаётся запущенным (по умолчанию «900», или 15 минут).
Ниже приведён пример как вы можете настроить помощник «store» на использование определённого файла:
$ git config --global credential.helper 'store --file ~/.my-credentials'Git позволяет настраивать сразу несколько помощников.
При поиске учётных данных для конкретного сервера, Git будет по порядку запрашивать у них учётные данные и остановится при получении первого ответа.
При сохранении учётных данных, Git отправит их всем помощникам в списке, которые уже в свою очередь могут решить, что с этими данными делать.
Ниже приведено как будет выглядеть .gitconfig, если у вас есть файл с учётными данными на флэш-диске, но, на случай его отсутствия, вы хотите дополнительно использовать кеширование в оперативной памяти.
[credential]
    helper = store --file /mnt/thumbdrive/.git-credentials
    helper = cache --timeout 30000
Под капотом
Как же это всё работает?
Корневой командой Git для системы помощников авторизации является git credential, которая принимает команду через аргумент, а все остальные входные данные через стандартный поток ввода.
Возможно, это проще понять на примере.
Допустим, помощник авторизации был настроен и в нём сохранены учётные данные для mygithost.
Ниже приведена рабочая сессия, в которой используется команда «fill», вызываемая Git при попытке найти учётные данные для сервера:
$ git credential fill (1)
protocol=https (2)
host=mygithost
(3)
protocol=https (4)
host=mygithost
username=bob
password=s3cre7
$ git credential fill (5)
protocol=https
host=unknownhost

Username for 'https://unknownhost': bob
Password for 'https://bob@unknownhost':
protocol=https
host=unknownhost
username=bob
password=s3cre7-
Это команда, которая начинает взаимодействие.
-
После этого Git-credential ожидает данные из стандартного потока ввода.
Мы передаём ему то, что знаем: протокол и имя сервера. -
Пустая строка обозначает, что ввод закончен и система управления учётными данными должна ответить, что ей известно.
-
После этого Git-credential выполняет какую-то работу и выводит обнаруженную информацию.
-
Если учётные данные не найдены, Git спрашивает у пользователя логин/пароль, и выводит их обратно в задействованный поток вывода (в данном примере это одна и та же консоль).
В действительности, система управления учётными данными вызывает программы, отделённые от самого Git; какие и как зависит в том числе и от настроек credential.helper.
Существует несколько вариантов вызова:
| Настройки | Поведение |
|---|---|
|
|
Выполняется |
|
|
Выполняется |
|
|
Выполняется |
|
|
Код после символа |
Итак, помощники, описанные выше на самом деле называются git-credential-cache, git-credential-store и т. д. и мы можем настроить их на приём аргументов командной строки.
Общая форма для этого git-credential-foo [args] <action>.
Протокол ввода/вывода такой же как и у git-credential, но они используют немного другой набор операций:
-
getзапрос логина и пароля. -
storeзапрос на сохранение учётных данных в памяти помощника. -
eraseудаляет учётные данные для заданных параметров из памяти используемого помощника.
Для операций store и erase не требуется ответа (в любом случае Git его игнорирует).
Однако, для Git очень важно, что помощник ответит на операцию get.
Если помощник не знает что-либо полезного, он может просто завершить работу не выводя ничего, но если знает — он должен добавить к введённой информации имеющуюся у него информацию.
Вывод обрабатывается как набор операций присваивания; выведенные значения заменят те, что Git знал до этого.
Ниже приведён пример, используемый ранее, но вместо git-credential напрямую вызывается git-credential-store:
$ git credential-store --file ~/git.store store (1)
protocol=https
host=mygithost
username=bob
password=s3cre7
$ git credential-store --file ~/git.store get (2)
protocol=https
host=mygithost

username=bob (3)
password=s3cre7-
Здесь мы просим
git-credential-storeсохранить некоторые учётные данные: логин «bob» и пароль «s3cre7», которые будут использоваться при доступе кhttps://mygithost. -
Теперь мы извлечём эти учётные данные.
Мы передаём часть уже известных нам параметров подключения (https://mygithost) и пустую строку. -
git-credential-storeвозвращает логин и пароль, которые мы сохранили ранее.
Ниже приведено содержимое файла ~/git.store:
https://bob:s3cre7@mygithostЭто просто набор строк, каждая из которых содержит URL, включающий в себя учётные данные.
Помощники osxkeychain и wincred используют форматы, лежащие в основе их хранилищ, а cache использует его собственный формат хранения во внутренней памяти (который другие процессы прочитать не могут).
Собственное хранилище учётных данных
Поскольку git-credential-store и подобные ей утилиты являются отдельными от Git программами, не сложно сделать так, чтобы любая программа могла быть помощником авторизации Git.
Помощники, предоставляемые Git, покрывают наиболее распространённые варианты использования, но не все.
Для примера допустим, что ваша команда имеет некоторые учётные данные, совместно используемые всей командой, например, для развёртывания.
Эти данные хранятся в общедоступном каталоге, но вы не хотите копировать их в ваше собственное хранилище учётных данных, так как они часто изменяются.
Ни один из существующих помощников не покрывает этот случай; давайте посмотрим, что будет стоить написать свой собственный.
Есть несколько ключевых особенностей, которым должна удовлетворять эта программа:
-
Мы должны уделить внимание только одной операции
get;storeиeraseявляются операциями записи, поэтому мы не будем ничего делать при их получении. -
Формат файла с совместно используемыми учётными данными такой же как и у
git-credential-store. -
Расположение этого файла более-менее стандартное, но, на всякий случай, мы должны позволять пользователям передавать свой собственный путь.
Мы снова напишем расширение на Ruby, но подойдет любой язык, так как Git может использовать всё, что сможет запустить на выполнение.
Ниже приведён полный исходный код нашего нового помощника авторизации:
#!/usr/bin/env ruby

require 'optparse'

path = File.expand_path '~/.git-credentials' # (1)
OptionParser.new do |opts|
    opts.banner = 'USAGE: git-credential-read-only [options] <action>'
    opts.on('-f', '--file PATH', 'Specify path for backing store') do |argpath|
        path = File.expand_path argpath
    end
end.parse!

exit(0) unless ARGV[0].downcase == 'get' # (2)
exit(0) unless File.exists? path

known = {} # (3)
while line = STDIN.gets
    break if line.strip == ''
    k,v = line.strip.split '=', 2
    known[k] = v
end

File.readlines(path).each do |fileline| # (4)
    prot,user,pass,host = fileline.scan(/^(.*?):\/\/(.*?):(.*?)@(.*)$/).first
    if prot == known['protocol'] and host == known['host'] and user == known['username'] then
        puts "protocol=#{prot}"
        puts "host=#{host}"
        puts "username=#{user}"
        puts "password=#{pass}"
        exit(0)
    end
end-
Здесь мы разбираем аргументы командной строки, позволяя указывать пользователям входной файл. По умолчанию это
~/.git-credentials. -
Эта программа отвечает только если операцией является
getи файл хранилища существует. -
В цикле считываются данные из стандартного ввода, до тех пор пока не будет прочитана пустая строка.
Введённые данные для дальнейшего использования сохраняются в отображенииknown. -
Этот цикл читает содержимое файла хранилища, выполняя поиск соответствия.
Если протокол и сервер изknownсоответствуют текущей строке, программа выводит результат и завершает работу.
Мы сохраним нашего помощника как git-credential-read-only, поместим его в один из каталогов, содержащихся в списке PATH, а так же сделаем его исполняемым.
Ниже приведено на что будет похож сеанс взаимодействия:
$ git credential-read-only --file=/mnt/shared/creds get
protocol=https
host=mygithost

protocol=https
host=mygithost
username=bob
password=s3cre7
Так как его имя начинается с «git-», мы можем использовать простой синтаксис для настройки:
$ git config --global credential.helper 'read-only --file /mnt/shared/creds'Как вы видите, расширять эту систему довольно просто и это позволяет решить некоторые общие проблемы, которые могут возникнуть у вас и вашей команды.
Overview
Git Credential Manager stores the Git credentials in windows and Linux systems so that the user does not have to enter the credentials every time the user commits. Git credential provides secure storage for the Git credentials.
Pre-requisites
You should have a basic understanding of what is Git and the purpose of using Git.
Introduction to Git Credential Manager
Git credential manager securely stores the Git credentials of the user and provides multi-factor authentication support for Azure DevOps, Github, Gitlab, Bit Bucket, etc.
If you push your commits to a repository you are working on then Git needs to know who is pushing the code changes to the repo. Before pushing the code Git asks for the credentials like username and email for authentication. Instead of providing the credentials every time a push is made, you can store your credentials using Git Credential Manager.
Git Credential Manager is not visible every time a push is made so ideally, the developers forget that he/she is dependent on the Git Credential Manager every time a new push is made to the repo.
Usage
Once the Git Credential Manager for Windows is installed then Git uses the Git Credential Manager to authenticate the user pushing the code to the repository.
Git Credential Manager provides multi-factor authentication. In multi-factor authentication, a user has to provide two or more two verification data to gain access to the resource the user is trying to access.
Commands
In order to interact with the Git Credential Manager the following command is used :
If you are using the newer version of Git then use the following command for Git Credential Manager interactions
Here <command> are the commands used to perform different operations with Git Credential Manager.[<args>] are the other arguments that you need to provide depending upon the command being used.
The different commands used are :
deploy [–path <installation_path>] [–passive] [–force]
This command deploys the Git Credential Manager for the windows package and sets the Git configuration.
-
deploy –path <installation_path> — This command requires the path of the location where Git Credential Manager is to be deployed. If the path is provided then while installing the installer will not ask for any path information from the user.
-
deploy –passive — This command will stop the installer from asking the user for any input while installing the Git Credential Manager. Only error messages can be the output of the installer.
-
deploy –force — This command will neither ask the user for any input nor it will output any error message. It will proceed with the installation even if the prerequisite is not met. Only the return code will be used to validate success.
remove [–path <installation_path>] [–passive] [–force]
This command is used to remove the Git Credential Manager and unset the Git configuration.
-
remove –path <installation_path> -This command requires the path of the location from where the Git Credential Manager is to be removed. If the path is provided then while installing the installer will not ask for any path information from the user.
-
remove –passive — This command will stop the installer from asking the user for any input while removing the Git Credential Manager. Only error messages can be the output of the installer.
-
remove –force — This command will neither ask the user for any input nor it will output any error message. It will proceed with the removal of Git Credential Manager even if the prerequisite is not met. Only the return code will be used to validate success.
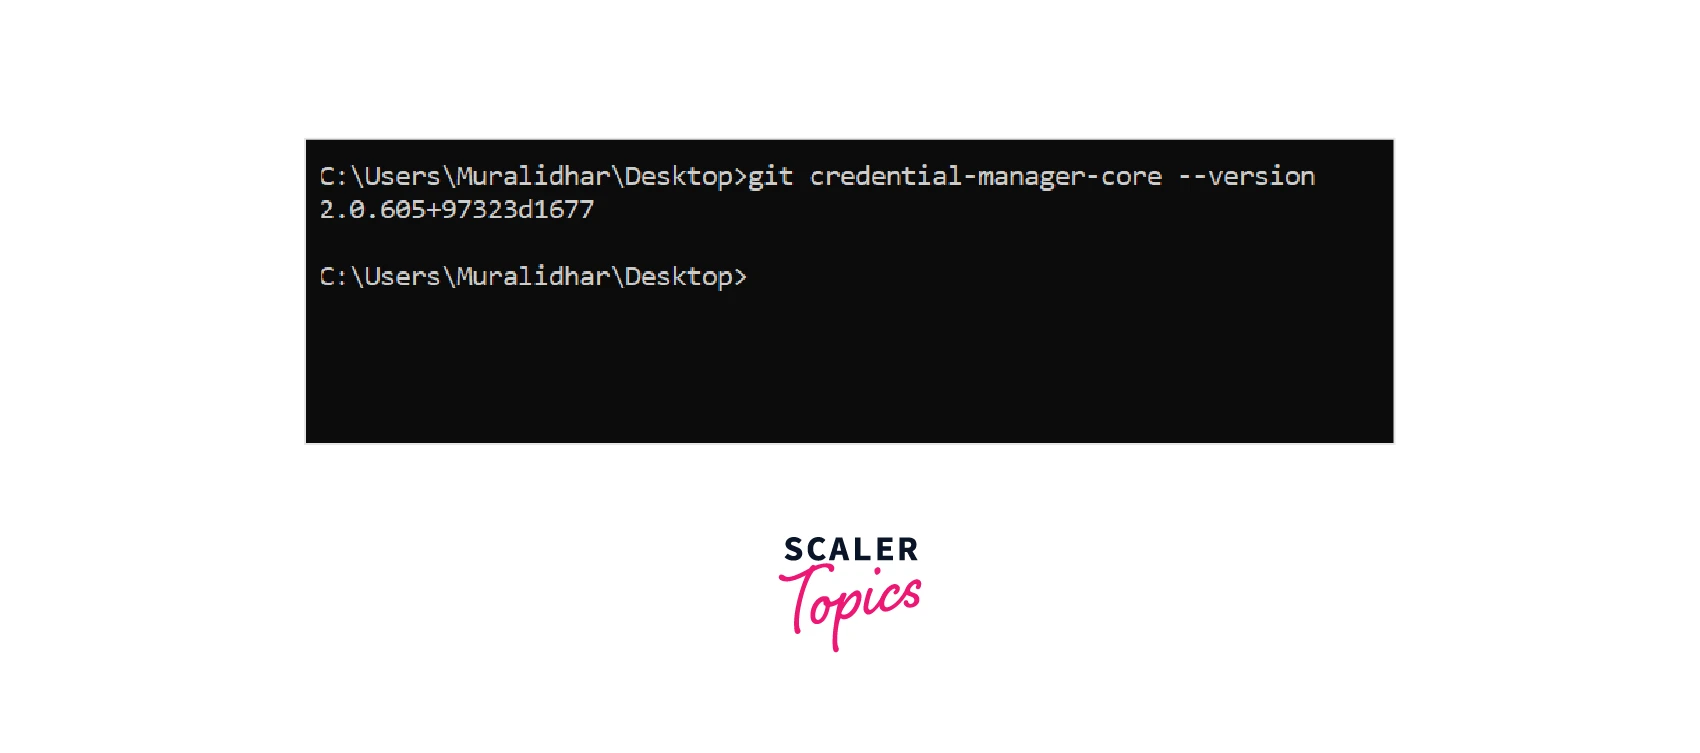
Version
This command shows the current version of the Git Credential Manager.
Install Git Credential Manager
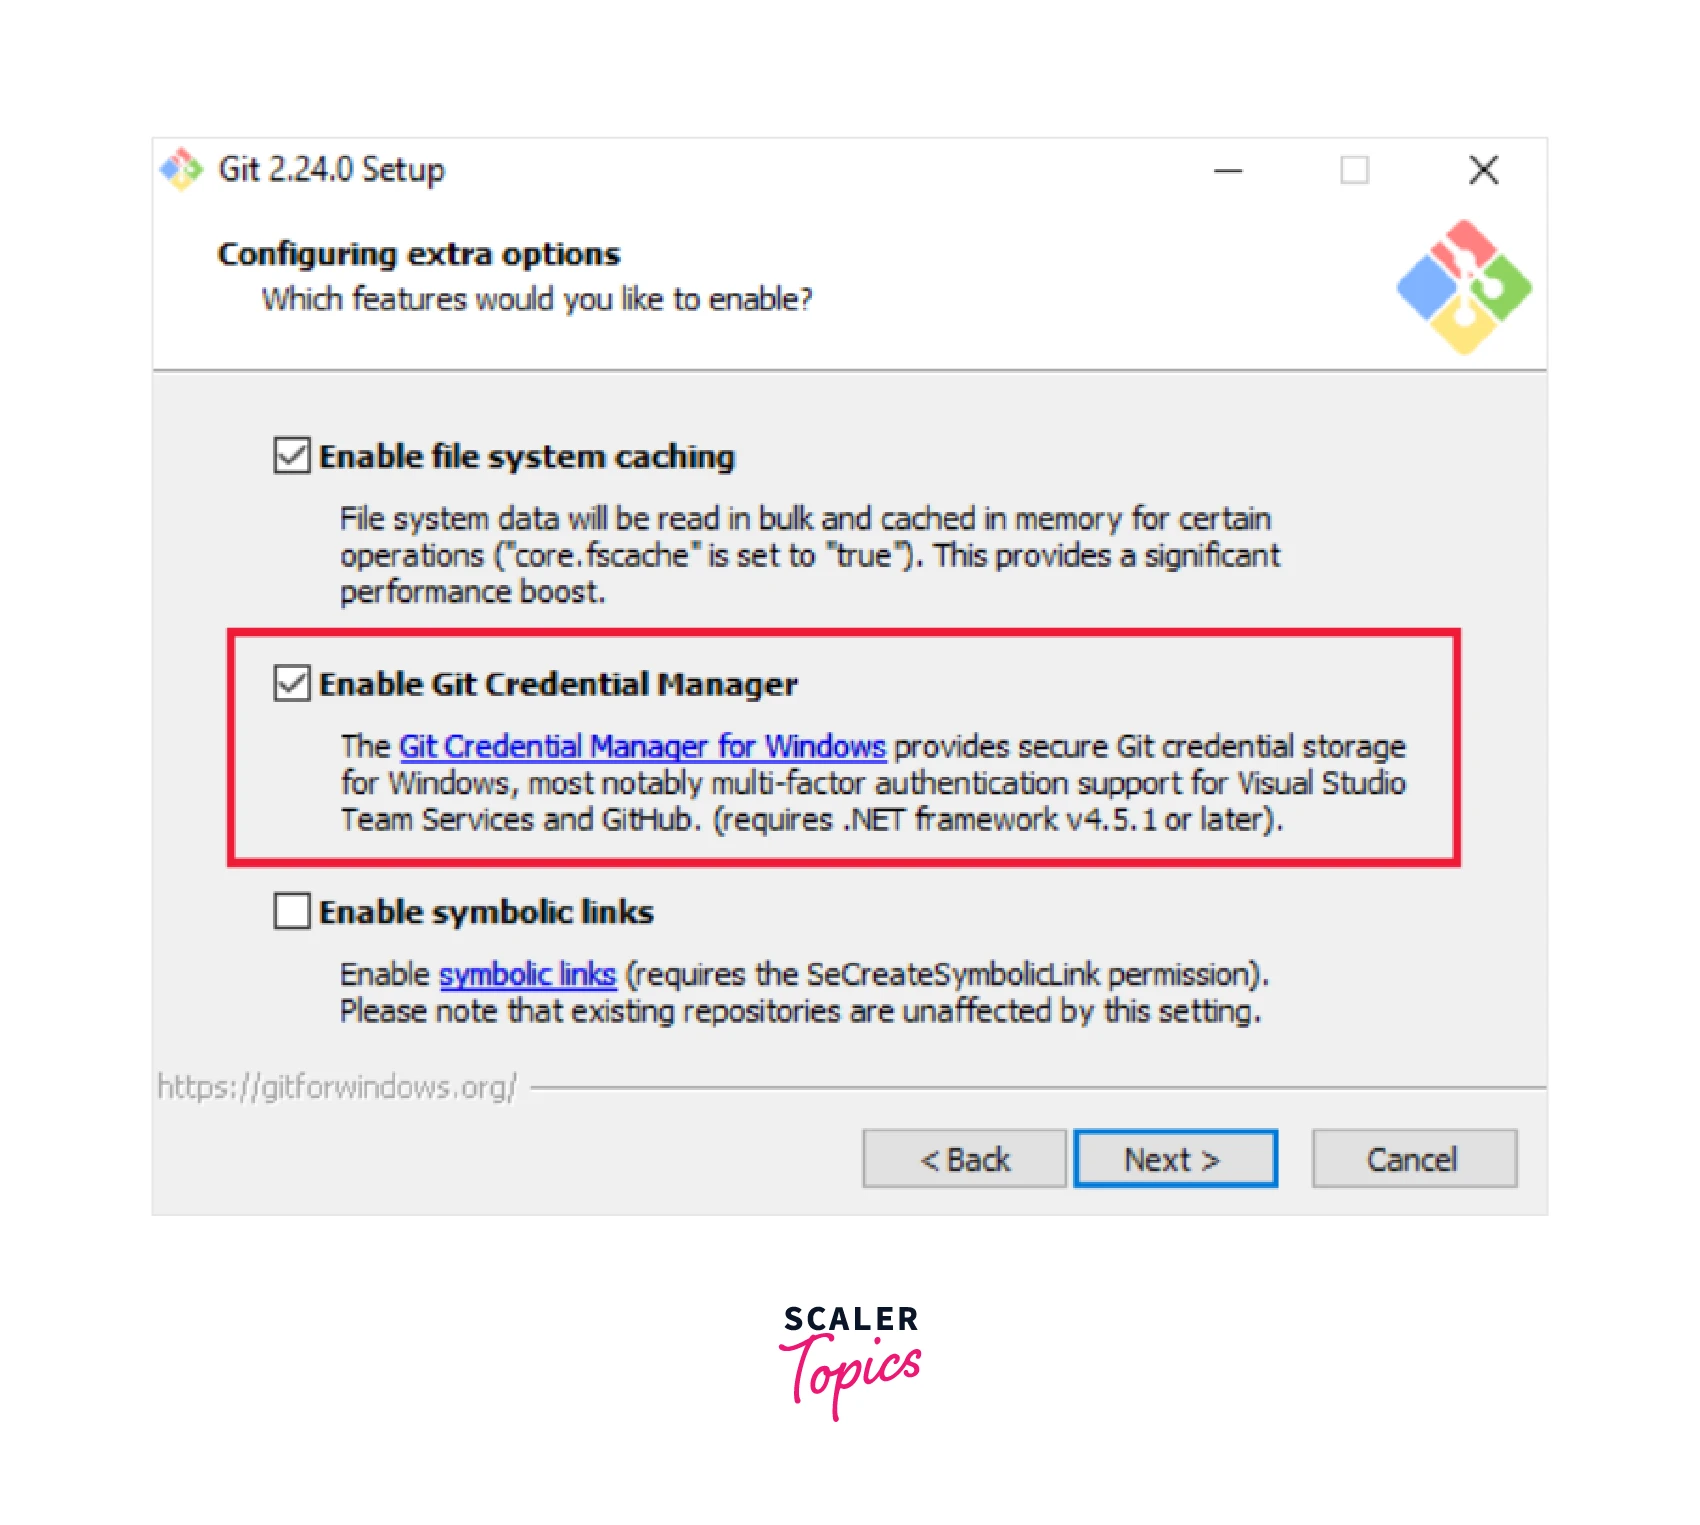
Install Git Credential Manager for Windows
In order to install Git Credential Manager for windows install the latest version of Git for windows which includes the Git Credential Manager with itself.
Make sure to enable Git Credential Manager options if the below dialog box appears while installation.
Install Git Credential Manager for macOS and Linux
On Mac OS X, installing via Homebrew is highly recommended. On Linux, it is recommended to use Linuxbrew or an RPM-based package manager if you can.
You can refer to the Git Credential Manager while installing it on Linux or macOS using the command line.
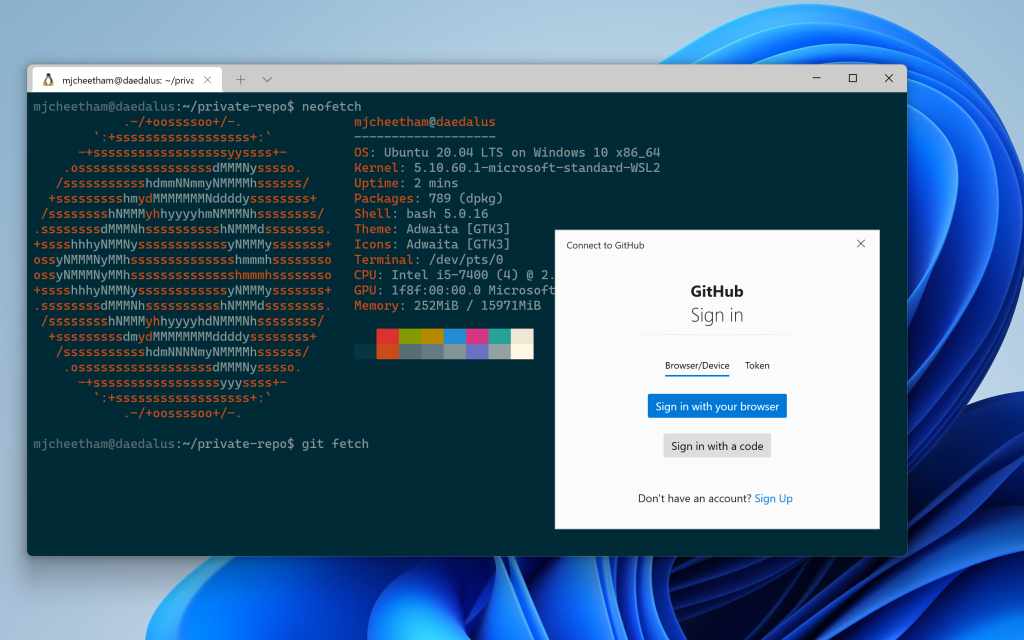
Using the Git Credential Manager
The Git credential manager will ask for the credentials when you connect with the GitHub repo with the Git client for the first time. You can provide your Microsoft account or Azure credentials which the Git Credential Manager will store. If multi-factor authentication is enabled in your account then the Git Credential Manager will go through the process.
Once the user is authenticated with the provided credentials Git Credential Manager creates and catches a personal access token for future connection to the repo. The Git credential will not pop again until the token gets expires.
Example: Add Git Credentials on Windows
Once you have installed the Git and Git Credential Manager in your system you can set up the Git credentials for the remote server like GitHub, GitLab, Bit bucket, etc.
You have to enter the following command to set up the Git credentials configuration for the remote server.
- credential.helper — These are Git programs that help you save the Git credentials that help you store your Git credentials in the Git Credential Manager.
- manager-core — It is the credential manager for Git that helps to authenticate GitHub, GitLab, Bit Bucket, and other remote server access.
To set the user name in the Git Credential Manager run the below command
<username> is the username you have to store in the Git Credential Manager.
To set the email in the Git Credential Manager run the below command
git config –global user.email <email>
eg-// git config –global user.email abc@gmail.com
<email> is the email you have to store in the Git Credential Manager.
You can remove the -global option if you want to set the username and email for a particular repo instead of setting it for all the repos.
Supported Git Versions
Git credential manager is supported in a broader set of Git versions.
All version of Git above 1.9 supports Git Credential Manager.
Conclusion
-
Git Credential Manager securely stores the credential for any remote server like GitHub and bit bucket.
-
Git Credential Manager provides multi-factor authentication support for Azure DevOps, GitHub, GitLab, bit Bucket, etc.
-
To interact with Git Credential Manager git credential-manager-core [<command> [<args>]] command is used.
-
You can store the username in the Git Credential Manager by using the command git config –global user.name <username>
-
You can store the user email in Git Credential Manager by using the command git config –global user.email <email>