Prepararation
- Create a folder at the root of your user home folder
(Example:C:/Users/uname/) called.ssh. - Create the following files if they do not already
exist (paths begin from the root of your user home
folder):.ssh/config.bash_profile.bashrc
Create a New SSH Key
Follow the steps in the section named «Generating a new SSH
Key» found in the following documentation from GitHub:
Generating a new SSH key and adding it to the ssh-agent
Configure SSH for Git Hosting Server
Add the following text to .ssh/config (.ssh should be found
in the root of your user home folder):
Host github.com
 Hostname github.com
 IdentityFile ~/.ssh/id_rsa
Enable SSH Agent Startup Whenever Git Bash is Started
First, ensure that following lines are added to .bash_profile,
which should be found in your root user home folder:
test -f ~/.profile && . ~/.profile
test -f ~/.bashrc && . ~/.bashrc
Now, add the following text to .bashrc, which should be found
in your root user home folder:
# Start SSH Agent
#----------------------------

SSH_ENV="$HOME/.ssh/environment"

function run_ssh_env {
  . "${SSH_ENV}" > /dev/null
}

function start_ssh_agent {
  echo "Initializing new SSH agent..."
  ssh-agent | sed 's/^echo/#echo/' > "${SSH_ENV}"
  echo "succeeded"
  chmod 600 "${SSH_ENV}"

  run_ssh_env;

  ssh-add ~/.ssh/id_rsa;
}

if [ -f "${SSH_ENV}" ]; then
  run_ssh_env;
  ps -ef | grep ${SSH_AGENT_PID} | grep ssh-agent$ > /dev/null || {
    start_ssh_agent;
  }
else
  start_ssh_agent;
fi
4.3 Git на сервере — Генерация открытого SSH ключа
Генерация открытого SSH ключа
Как отмечалось ранее, многие Git-серверы используют аутентификацию по открытым SSH-ключам.
Для того чтобы предоставить открытый ключ, каждый пользователь в системе должен его сгенерировать, если только этого уже не было сделано ранее.
Этот процесс аналогичен во всех операционных системах.
Сначала вам стоит убедиться, что у вас ещё нет ключа.
По умолчанию пользовательские SSH ключи сохраняются в каталоге ~/.ssh домашнем каталоге пользователя.
Вы можете легко проверить наличие ключа перейдя в этот каталог и посмотрев его содержимое:
$ cd ~/.ssh
$ ls
authorized_keys2  id_dsa       known_hosts
config            id_dsa.pub
Ищите файл с именем id_dsa или id_rsa и соответствующий ему файл с расширением .pub.
Файл с расширением .pub — это ваш открытый ключ, а второй файл — ваш приватный ключ.
Если указанные файлы у вас отсутствуют (или даже нет каталога .ssh), вы можете создать их используя программу ssh-keygen, которая входит в состав пакета SSH в системах Linux/Mac, а для Windows поставляется вместе с Git:
$ ssh-keygen -o
Generating public/private rsa key pair.
Enter file in which to save the key (/home/schacon/.ssh/id_rsa):
Created directory '/home/schacon/.ssh'.
Enter passphrase (empty for no passphrase):
Enter same passphrase again:
Your identification has been saved in /home/schacon/.ssh/id_rsa.
Your public key has been saved in /home/schacon/.ssh/id_rsa.pub.
The key fingerprint is:
d0:82:24:8e:d7:f1:bb:9b:33:53:96:93:49:da:9b:e3 schacon@mylaptop.local
Сначала программа попросит указать расположение файла для сохранения ключа (.ssh/id_rsa), затем дважды ввести пароль для шифрования.
Если вы не хотите вводить пароль каждый раз при использовании ключа, то можете оставить его пустым или использовать программу ssh-agent.
Если вы решили использовать пароль для приватного ключа, то настоятельно рекомендуется использовать опцию -o, которая позволяет сохранить ключ в формате, более устойчивом ко взлому методом подбора, чем стандартный формат.
Теперь каждый пользователь должен отправить свой открытый ключ вам или тому, кто администрирует Git-сервер (подразумевается, что ваш SSH-сервер уже настроен на работу с открытыми ключами).
Для этого достаточно скопировать содержимое файла с расширением .pub и отправить его по электронной почте.
Открытый ключ выглядит примерно так:
$ cat ~/.ssh/id_rsa.pub
ssh-rsa AAAAB3NzaC1yc2EAAAABIwAAAQEAklOUpkDHrfHY17SbrmTIpNLTGK9Tjom/BWDSU
GPl+nafzlHDTYW7hdI4yZ5ew18JH4JW9jbhUFrviQzM7xlELEVf4h9lFX5QVkbPppSwg0cda3
Pbv7kOdJ/MTyBlWXFCR+HAo3FXRitBqxiX1nKhXpHAZsMciLq8V6RjsNAQwdsdMFvSlVK/7XA
t3FaoJoAsncM1Q9x5+3V0Ww68/eIFmb1zuUFljQJKprrX88XypNDvjYNby6vw/Pb0rwert/En
mZ+AW4OZPnTPI89ZPmVMLuayrD2cE86Z/il8b+gw3r3+1nKatmIkjn2so1d01QraTlMqVSsbx
NrRFi9wrf+M7Q== schacon@mylaptop.local
Более подробное руководство по созданию SSH-ключей и конфигурации клиента на различных системах вы можете найти в руководстве GitHub.
Инструменты
Git SSH Windows — пошаговое руководство
Дата размещения статьи 08/12/2019 👁31067
Git SSH Windows — пошаговое руководство
Настроим пошагово Git SSH для Windows 10. Это позволит вам выполнять команды git без ввода пароля от своей учетной записи GitHub.
Порядок действий:
- Генерация ключа SSH.
- Добавление SSH-ключа в ssh-agent.
- Добавление ключа SSH в учетную запись GitHub.
Генерация ключа SSH
Откройте bash/терминал. Добавьте следующий текст, подставив свой адрес электронной почты GitHub.
ssh-keygen -t rsa -b 4096 -C "ваша@почта.com"Будет создан ключ ssh, используя e-mail в качестве метки.
Когда вам будет предложено «Введите файл, в котором вы хотите сохранить ключ», нажмите Enter. Это установит в местоположение по умолчанию.
Enter a file in which to save the key (/c/Users/you/.ssh/id_rsa):[Press enter]
Далее введите безопасную фразу-пароль дважды или просто нажмите Enter.
Enter passphrase (empty for no passphrase): [Type a passphrase]
Enter same passphrase again: [Type passphrase again]
Добавление SSH-ключа в ssh-agent
Чтобы запустить ssh-агент введите следующую команду.
На экране отобразится похожая строка.
Agent pid 31724
Добавим свой закрытый ключ SSH в ssh-agent. Если вы создали свой ключ с другим именем (или добавляете существующий ключ с другим именем), замените в команде id_rsa на имя вашего файла закрытого (приватного) ключа.
Ключ будет успешно добавлен в ssh-агент.
Добавление ключа SSH в учетную запись GitHub
Мы сгенерировали у себя на компьютере закрытый ключ SSH и добавили его в ssh-агент. Теперь нам необходимо добавить SSH ключ в учетную запись GitHub.
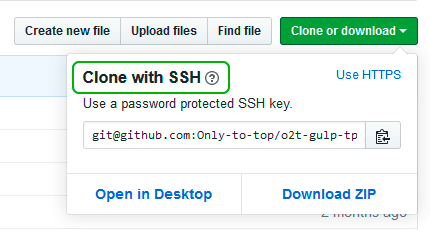
Сейчас нам необходимо скопировать SSH ключ в буфер обмена.
Способов есть несколько, но я же вам предлагаю следующее решения для Windows 10: введите команду ниже.
Прямо в терминале вы увидите содержимое необходимого файла с ключем. Скопируйте его в буфер.
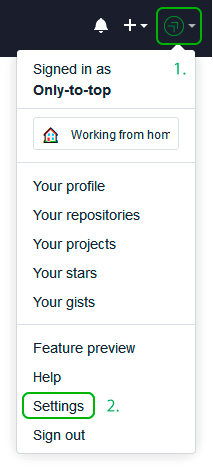
Теперь зайдите на вашу страницу GitHub » Settings.
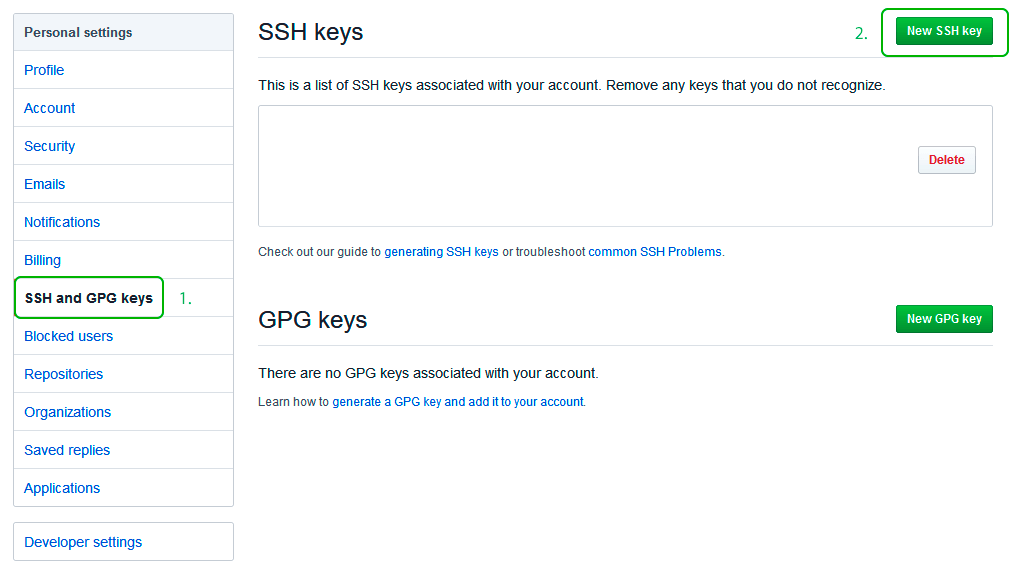
Перейдите во вкладку SSH and GPG keys и нажмите на кнопку New SSH key для добавления SSH ключа в вашу учетную запись GitHub.
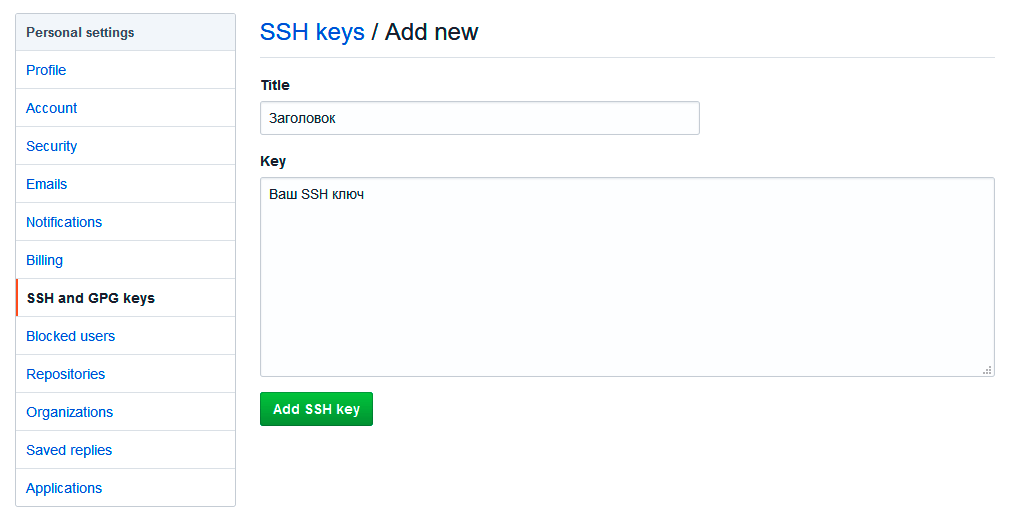
В поле Title добавьте заголовок для данного ключа. Например, если вы захотите настроить SSH доступ на нескольких устройствах, то вы будите понимать какой ключ принадлежит какому устройству.
В поле Key добавьте свой ssh-ключ, который вы скопировали в буфер обмена на предыдущем шаге.
Нажмите Add SSH key.
Для подтверждения вам потребуется ввести свой пароль от учетной записи GitHub.
На этом настройка SSH для вашего устройства завершена, теперь вы можете работать с git без ввода пароля от своей учетной записи.
Если вам понравилась данная статья, можете прочитать как настроить моментальную загрузку сайта на хостинг и синхронизацию файлов.
JavaScript: Window Location Checkbox Checked — Проверка Состояния Чекбокса ✔️
Надеюсь, вам понравилась данная информация. Если вам интересна тема web-разработки,
то можете следить за выходом новых статей в Telegram.
- Настройка Gulp Babel
- Микроразметка сайта
- Как перенести сайт WordPress на хостинг
- Настройте показ всего текста во время загрузки веб-шрифтов
- Сниппеты в VS Code
- Не удается проверить так как не задан исполняемый PHP-файл
22 Sep 2019
Reading time ~4 minutes
Table Of Contents
- Pre-requisites
- When to use SSH keys instead of HTTPS
- Git Bash
- Github Desktop Application
- Generate new SSH key
- Add public SSH key to your GitHub account
- Add private SSH key to the ssh-agent
- Use SSH over HTTPS
- Verification
- References
Pre-requisites
- Git Bash
When to use SSH keys instead of HTTPS
- Your corporate firewall blocks port 22, then even if you have set the remote origin to use HTTPS url, the authentication will fail as it is done via SSH.
Remedy is to set up SSH keys and use SSH over HTTPS port 443.
Below are some of the errors different applications throw when the port is blocked and HTTPS remote url is used.
Git Bash
When you try to push your changes, both Github Login and OpenSSH prompt asking for your username and password will fail with error remote no anonymous write access. fatal authentication failed for github.
Github Desktop Application
You will be able to login to your github desktop application as the authentication is done via HTTPS. However, when you try to push your changes it will result in authentication failure.
Below is the logs captured by the desktop application showing that the git push is trying to authenticate via SSH.
2019-09-22T13:16:46.927Z - info: [ui] Executing push: git -c credential.helper= -c protocol.version=2 push origin master:master --progress (took 21.740s)
2019-09-22T13:16:46.927Z - error: [ui] `git -c credential.helper= -c protocol.version=2 push origin master:master --progress` exited with an unexpected code: 128.
stderr:
ssh: connect to host github.com port 22: Connection timed out
fatal: Could not read from remote repository.

Please make sure you have the correct access rights
and the repository exists.

(The error was parsed as 2: Authentication failed. Some common reasons include:

- You are not logged in to your account: see File > Options.
- You may need to log out and log back in to refresh your token.
- You do not have permission to access this repository.
- The repository is archived on GitHub. Check the repository settings to confirm you are still permitted to push commits.
- If you use SSH authentication, check that your key is added to the ssh-agent and associated with your account.)
Generate new SSH key
-
Run Git Bash.
-
Generate SSH key with your email id as comment.
$ ssh-keygen -t rsa -b 4096 -C "your_email@example.com"
-
When you’re prompted to “Enter a file in which to save the key,” press Enter to save the key in the default location (/c/Users/username/.ssh/id_rsa). Your public key will also get saved here.
-
Copy the public key to clipboard.
$ clip < ~/.ssh/id_rsa.pub
Add public SSH key to your GitHub account
Go to Settings in your Github account to add the SSH public key.
Under SSH keys tab, select New SSH key.
Give a title and paste the key in the text area.

Like the content ?
Add private SSH key to the ssh-agent
Git bash tool comes with a ssh-agent.
Create a new ~/.profile (or) ~/.bashrc file by running below command in git bash.
Paste below script into your ~/.profile (or) ~/.bashrc file to auto launch the ssh-agent whenever you run your git bash shell.
env=~/.ssh/agent.env

agent_load_env () { test -f "$env" && . "$env" >| /dev/null ; }

agent_start () {
    (umask 077; ssh-agent >| "$env")
    . "$env" >| /dev/null ; }

agent_load_env

# agent_run_state: 0=agent running w/ key; 1=agent w/o key; 2= agent not running
agent_run_state=$(ssh-add -l >| /dev/null 2>&1; echo $?)

if [ ! "$SSH_AUTH_SOCK" ] || [ $agent_run_state = 2 ]; then
    agent_start
    ssh-add
elif [ "$SSH_AUTH_SOCK" ] && [ $agent_run_state = 1 ]; then
    ssh-add
fi

unset env
This script will load the identities in the ssh agent from your default location ~/.ssh/id_rsa.
Identity added: /c/Users/username/.ssh/id_rsa (your_email@example.com)
Use SSH over HTTPS
This step is required only if your corporate firewall is blocking port 22.
Create a new config file in your .ssh directory i.e. /c/Users/username/.ssh/config
Paste below contents in the file to use port 443 for SSH connections to host ssh.github.com.
Host github.com
  Hostname ssh.github.com
  Port 443
Run below command in git bash to verify that the configuration is working. Ignore any authentication failures.
$ ssh -vT git@github.com

OpenSSH_8.0p1, OpenSSL 1.1.1c  28 May 2019
debug1: Reading configuration data /c/Users/username/.ssh/config
debug1: /c/Users/username/.ssh/config line 1: Applying options for github.com
debug1: Connecting to ssh.github.com [192.30.253.122] port 443.
debug1: Connection established.
You can see that the SSH connection is now established via port 443.
Verification
To check if everything works as expected perform below steps:
-
Run new git bash shell.
-
Check if the identity has been added to the ssh agent.
- Check that the key is being used by trying to connect to git@github.com.
$ ssh -vT git@github.com

OpenSSH_8.0p1, OpenSSL 1.1.1c  28 May 2019
debug1: Reading configuration data
debug1: Offering public key
debug1: Server accepts key
debug1: Authentication succeeded (publickey).
Authenticated to ssh.github.com
- Clone the repo using the SSH url.
Going forward, every push/pull will use the SSH keys to authenticate with Github.
Like the content ?
References
https://help.github.com/en/articles/connecting-to-github-with-ssh
https://help.github.com/en/articles/using-ssh-over-the-https-port
![]()
Brandon Sarà
Posted on
• Updated on
![]()
![]()
![]()
![]()
![]()
I originally created this as a Gist on GitHub to be shared with some co-workers who were struggling to set up SSH on Windows. It seems to have been helpful to a lot of others as well; so, I’m posting it here so that it can benefit even more people.
Preparation
- Create a folder at the root of your user home folder
(Example:C:/Users/uname/) called.ssh. - Create the following files if they do not already
exist (paths begin from the root of your user home
folder):.ssh/config.bash_profile.bashrc
Create a New SSH Key
Follow the steps in the section named «Generating a new SSH Key» found in the following documentation from GitHub:
Generating a new SSH key and adding it to the ssh-agent
Configure SSH for Git Hosting Server
Add the following text to .ssh/config (.ssh should be found in the root of your user home folder):
Host github.com
 Hostname github.com
 IdentityFile ~/.ssh/id_rsa
Enter fullscreen mode
Exit fullscreen mode
Enable SSH Agent Startup Whenever Git Bash is Started
First, ensure that following lines are added to .bash_profile, which should be found in your root user home folder:
test -f ~/.profile && . ~/.profile
test -f ~/.bashrc && . ~/.bashrc
Enter fullscreen mode
Exit fullscreen mode
Now, add the following text to .bashrc, which should be found in your root user home folder:
# Start SSH Agent
#----------------------------

SSH_ENV="$HOME/.ssh/environment"

function run_ssh_env {
  . "${SSH_ENV}" > /dev/null
}

function start_ssh_agent {
  echo "Initializing new SSH agent..."
  ssh-agent | sed 's/^echo/#echo/' > "${SSH_ENV}"
  echo "succeeded"
  chmod 600 "${SSH_ENV}"

  run_ssh_env;

  ssh-add ~/.ssh/id_rsa;
}

if [ -f "${SSH_ENV}" ]; then
  run_ssh_env;
  ps -ef | grep ${SSH_AGENT_PID} | grep ssh-agent$ > /dev/null || {
    start_ssh_agent;
  }
else
  start_ssh_agent;
fi
Enter fullscreen mode
Exit fullscreen mode
You’re Done!
Please, feel free to ask any questions that you may have in the comments, I’m more than happy to help.