Инструменты
Git SSH Windows — пошаговое руководство
Дата размещения статьи 08/12/2019 👁31067
Git SSH Windows — пошаговое руководство
Настроим пошагово Git SSH для Windows 10. Это позволит вам выполнять команды git без ввода пароля от своей учетной записи GitHub.
Порядок действий:
- Генерация ключа SSH.
- Добавление SSH-ключа в ssh-agent.
- Добавление ключа SSH в учетную запись GitHub.
Генерация ключа SSH
Откройте bash/терминал. Добавьте следующий текст, подставив свой адрес электронной почты GitHub.
ssh-keygen -t rsa -b 4096 -C "ваша@почта.com"Будет создан ключ ssh, используя e-mail в качестве метки.
Когда вам будет предложено «Введите файл, в котором вы хотите сохранить ключ», нажмите Enter. Это установит в местоположение по умолчанию.
Enter a file in which to save the key (/c/Users/you/.ssh/id_rsa):[Press enter]
Далее введите безопасную фразу-пароль дважды или просто нажмите Enter.
Enter passphrase (empty for no passphrase): [Type a passphrase]
Enter same passphrase again: [Type passphrase again]
Добавление SSH-ключа в ssh-agent
Чтобы запустить ssh-агент введите следующую команду.
На экране отобразится похожая строка.
Agent pid 31724
Добавим свой закрытый ключ SSH в ssh-agent. Если вы создали свой ключ с другим именем (или добавляете существующий ключ с другим именем), замените в команде id_rsa на имя вашего файла закрытого (приватного) ключа.
Ключ будет успешно добавлен в ssh-агент.
Добавление ключа SSH в учетную запись GitHub
Мы сгенерировали у себя на компьютере закрытый ключ SSH и добавили его в ssh-агент. Теперь нам необходимо добавить SSH ключ в учетную запись GitHub.
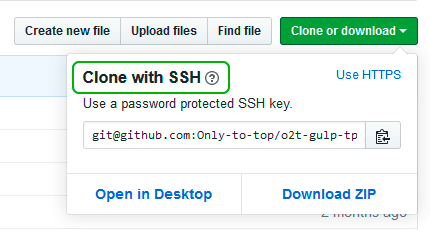
Сейчас нам необходимо скопировать SSH ключ в буфер обмена.
Способов есть несколько, но я же вам предлагаю следующее решения для Windows 10: введите команду ниже.
Прямо в терминале вы увидите содержимое необходимого файла с ключем. Скопируйте его в буфер.
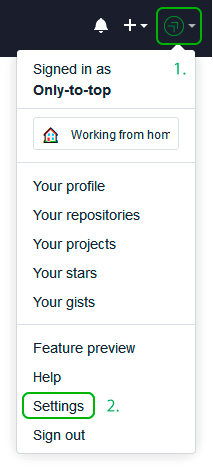
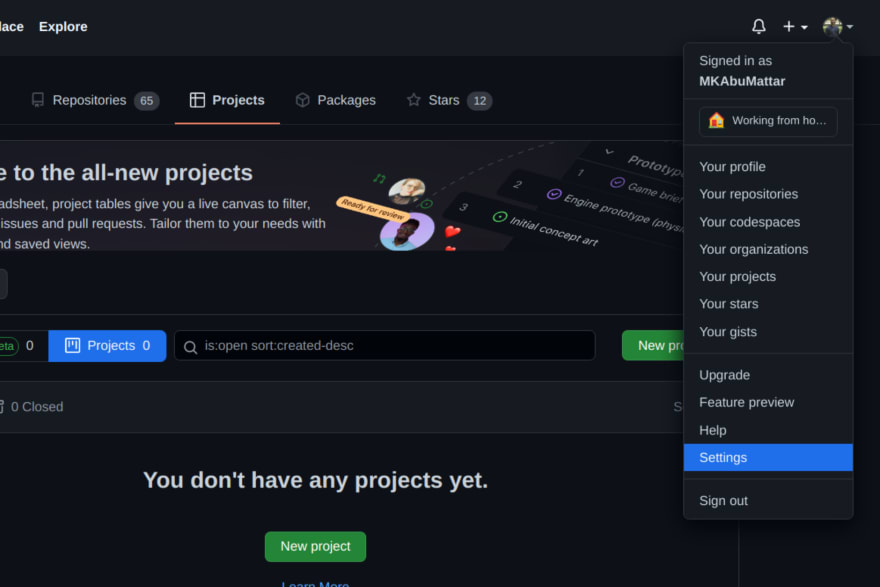
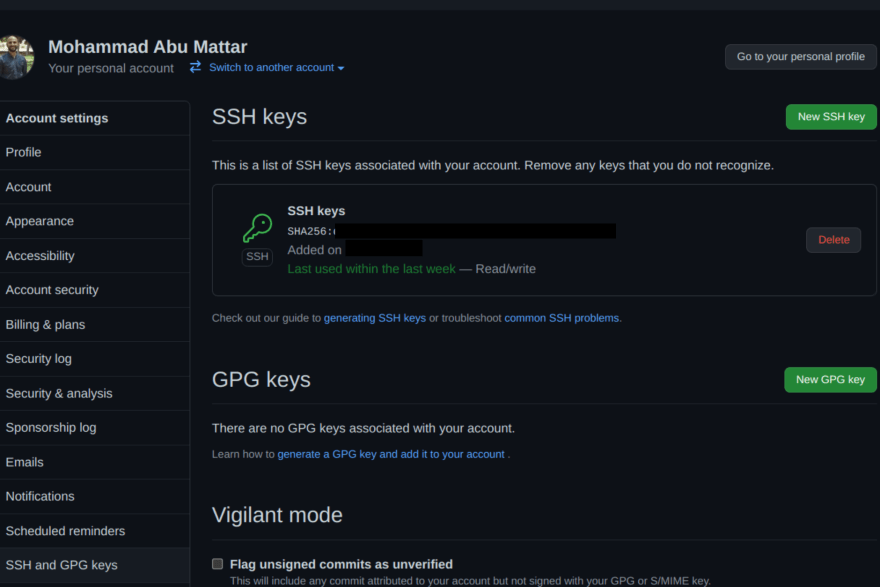
Теперь зайдите на вашу страницу GitHub » Settings.
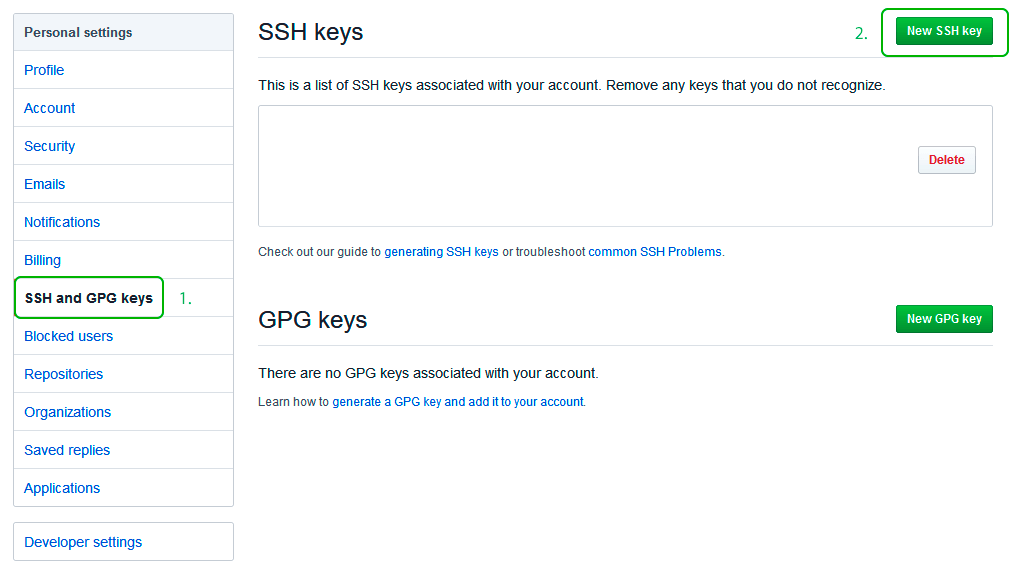
Перейдите во вкладку SSH and GPG keys и нажмите на кнопку New SSH key для добавления SSH ключа в вашу учетную запись GitHub.
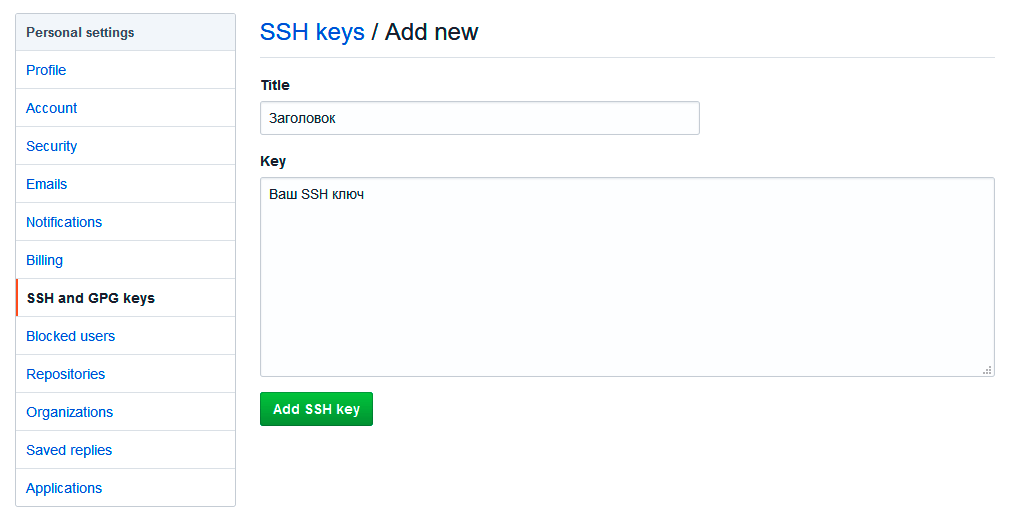
В поле Title добавьте заголовок для данного ключа. Например, если вы захотите настроить SSH доступ на нескольких устройствах, то вы будите понимать какой ключ принадлежит какому устройству.
В поле Key добавьте свой ssh-ключ, который вы скопировали в буфер обмена на предыдущем шаге.
Нажмите Add SSH key.
Для подтверждения вам потребуется ввести свой пароль от учетной записи GitHub.
На этом настройка SSH для вашего устройства завершена, теперь вы можете работать с git без ввода пароля от своей учетной записи.
Если вам понравилась данная статья, можете прочитать как настроить моментальную загрузку сайта на хостинг и синхронизацию файлов.
JavaScript: Window Location Checkbox Checked — Проверка Состояния Чекбокса ✔️
Надеюсь, вам понравилась данная информация. Если вам интересна тема web-разработки,
то можете следить за выходом новых статей в Telegram.
- Настройка Gulp Babel
- Микроразметка сайта
- Как перенести сайт WordPress на хостинг
- Настройте показ всего текста во время загрузки веб-шрифтов
- Сниппеты в VS Code
- Не удается проверить так как не задан исполняемый PHP-файл
The third-party Git Credential Manager (GCM) can be used as alternative method of connecting to Bitbucket Cloud from the Git CLI. If you do not want to configure SSH access for your Bitbucket Cloud account, you can use the GCM, which is installed by default with Git for Windows, or you can download and install it from Git Credential Manager on GitHub. Note that the GCM works over HTTPS, not SSH. Ensure your Git remotes are using HTTPS, such as:
git clone https://{username}@bitbucket.org/{workspace}/{repository}.git
The Secure Shell protocol (SSH) is used to create secure connections between your device and Bitbucket Cloud. The connection is authenticated using public SSH keys, which are derived from a private SSH key (also known as a private/public key pair). The secure (encrypted) connection is used to securely transmit your source code between your local device and Bitbucket Cloud. To set up your device for connecting Bitbucket Cloud using SSH, you need to:
-
Install OpenSSH on your device.
-
Start the SSH service.
-
Create an SSH key pair.
-
Add your key to the SSH agent.
-
Provide Bitbucket Cloud with your public key.
-
Check that your SSH authentication works.
Install OpenSSH on Microsoft Windows
There are 3 methods for installing OpenSSH on Microsoft Windows:
-
Download and run the Git for Windows installer.
-
Use winget to run the Git for Windows installer.
-
Install the Windows version of OpenSSH.
Download and install Git for Windows
-
Download and run the installer from https://gitforwindows.org/. The options at each step should be suitable. When you reach the step about choosing the SSH executable, ensure the bundled OpenSSH is selected.
-
Once the installation is complete, open Git Bash from the Start menu.
In the terminal, check that OpenSSH has been successfully installed by running the following command:
1
ssh -V
The output should show the installed version of OpenSSH.
Install Git for Windows with winget
To install OpenSSH as part of Git for Windows with the Windows package manager winget:
-
Check that winget is installed. Open PowerShell and run:
1
winget -v -
To install Git for Windows using winget install, run:
1
winget install --id Git.Git -e --source winget -
Once the installation is complete, open Git Bash from the Start menu.
In the terminal, check that OpenSSH has been successfully installed by running the following command:
1
ssh -V
The output should show the installed version of OpenSSH.
Install the Windows version of OpenSSH
This procedure assumes Git is already installed and accessible in PowerShell. If Git is installed and not accessible in PowerShell, you may need to add Git to the PATH environmental variable.
To install the Windows version of OpenSSH, follow the instructions in the Microsoft Docs Get Started with OpenSSH for Windows guide. Once OpenSSH is installed, you need to configure Git to use OpenSSH.
In PowerShell, check that OpenSSH has been successfully installed by running the following command:
1
ssh -V
The output should show the installed version of OpenSSH.
To find where ssh was installed, run Get-Command. For example:
1

2

3

4

5
> Get-Command ssh
CommandType Name Version Source
----------- ---- ------- ------
Application ssh.exe 8.1.0.1 C:\Windows\System32\OpenSSH\ssh.exe
To configure Git to use the Windows version of OpenSSH, update the SSH command with git config, such as:
1
git config --global core.sshCommand C:/Windows/System32/OpenSSH/ssh.exe
Start the SSH agent
To allow git to use your SSH key, an SSH agent needs to be running on your device. The method for starting the SSH agent depends on how OpenSSH was installed.
Git for Windows users (including Winget-based Git installations)
From a git bash terminal, check if the SSH agent is running using the ps command. If the ssh-agent is already running, it should appear in the output, such as:
1

2
$ ps -a | grep ssh-agent

tkelly      3291  0.0  0.0   6028   464 ?        Ss   07:29   0:00 ssh-agent
To start the agent:
1
eval $(ssh-agent)
You may need to add this command to your ~/.bashrc to ensure the agent starts when you open a Git Bash terminal.
Windows OpenSSH users
From a PowerShell, check if the SSH Agent is running using the Get-Service command. For example:
1

2

3

4

5
> Get-Service ssh-agent
Status Name DisplayName
------ ---- -----------
Stopped ssh-agent OpenSSH Authentication Agent
To start the agent:
1
> Start-Service ssh-agent
To configure the SSH agent to start each time the device is started, use the Set-Service command, such as:
1
> Set-Service -Name sshd -StartupType 'Automatic'
Create an SSH key pair
To create an SSH key pair:
-
Open a terminal and navigate to your home or user directory using cd, for example:
1
cd ~ -
Generate a SSH key pair using ssh-keygen, such as:
1
ssh-keygen -t ed25519 -b 4096 -C "{username@emaildomain.com}" -f {ssh-key-name}Where:
-
{username@emaildomain.com} is the email address associated with the Bitbucket Cloud account, such as your work email account.
-
{ssh-key-name} is the output filename for the keys. We recommend using a identifiable name such as bitbucket_work.
-
-
When prompted to Enter passphrase, you can either provide a password or leave the password empty. If you input a password, you will be prompted for this password each time SSH is used, such as using Git command that contact Bitbucket Cloud (such as git push, git pull, and git fetch). Providing a password will prevent other users with access to the device from using your keys.
Once complete, ssh-keygen will output two files:
-
{ssh-key-name} — the private key.
-
{ssh-key-name}.pub — the public key.
These files will be stored in your user folder, such as C:\Users\<username>\<ssh-key-name>.
Add your key to the SSH agent
To add the SSH key to your SSH agent (ssh-agent):
-
Run the following command, replacing the {ssh-key-name} with the name of the private key:
1
ssh-add ~/{ssh-key-name} -
To ensure the correct SSH key is used when connecting to Bitbucket, update or create your SSH configuration file (~/.ssh/config) with the following settings:
1

2

3
Host bitbucket.org

  AddKeysToAgent yes

  IdentityFile ~/.ssh/{ssh-key-name}
Where {ssh-key-name} is the location of the private key file once it has been added to the ssh-agent.
Provide Bitbucket Cloud with your public key
To add an SSH key to your user account:
-
Select the Settings cog on the top navigation bar.
-
From the Settings dropdown menu, select Personal Bitbucket settings.
-
Under Security, select SSH keys.
-
Select Add key.
-
In the Add SSH key dialog, provide a Label to help you identify which key you are adding. For example, Work Laptop <Manufacturer> <Model>. A meaning full label will help you identify old or unwanted keys in the future.
-
Open the public SSH key file (public keys have the .pub file extension) in a text editor. The public key should be in the .ssh/ directory of your user (or home) directory. The contents will be similar to:
1
ssh-ed25529 LLoWYaPswHzVqQ7L7B07LzIJbntgmHqrE40t17nGXL71QX9IoFGKYoF5pJKUMvR+DZotTm user@example.com -
Copy the contents of the public key file and paste the key into the Key field of the Add SSH key dialog.
-
Select Add key.
-
If the key is added successfully, the dialog will close and the key will be listed on the SSH keys page.
-
If you receive the error That SSH key is invalid, check that you copied the entire contents of the public key (.pub file).
-
Check that your SSH authentication works
To test that the SSH key was added successfully, open a terminal on your device and run the following command:
1
ssh -T git@bitbucket.org
If SSH can successfully connect with Bitbucket using your SSH keys, the command will produce output similar to:
1

2

3
authenticated via ssh key.
You can use git to connect to Bitbucket. Shell access is disabled
Prepararation
- Create a folder at the root of your user home folder
(Example:C:/Users/uname/) called.ssh. - Create the following files if they do not already
exist (paths begin from the root of your user home
folder):.ssh/config.bash_profile.bashrc
Create a New SSH Key
Follow the steps in the section named «Generating a new SSH
Key» found in the following documentation from GitHub:
Generating a new SSH key and adding it to the ssh-agent
Configure SSH for Git Hosting Server
Add the following text to .ssh/config (.ssh should be found
in the root of your user home folder):
Host github.com
 Hostname github.com
 IdentityFile ~/.ssh/id_rsa
Enable SSH Agent Startup Whenever Git Bash is Started
First, ensure that following lines are added to .bash_profile,
which should be found in your root user home folder:
test -f ~/.profile && . ~/.profile
test -f ~/.bashrc && . ~/.bashrc
Now, add the following text to .bashrc, which should be found
in your root user home folder:
# Start SSH Agent
#----------------------------

SSH_ENV="$HOME/.ssh/environment"

function run_ssh_env {
  . "${SSH_ENV}" > /dev/null
}

function start_ssh_agent {
  echo "Initializing new SSH agent..."
  ssh-agent | sed 's/^echo/#echo/' > "${SSH_ENV}"
  echo "succeeded"
  chmod 600 "${SSH_ENV}"

  run_ssh_env;

  ssh-add ~/.ssh/id_rsa;
}

if [ -f "${SSH_ENV}" ]; then
  run_ssh_env;
  ps -ef | grep ${SSH_AGENT_PID} | grep ssh-agent$ > /dev/null || {
    start_ssh_agent;
  }
else
  start_ssh_agent;
fi
Introduction
Git connects to remotes by default via HTTPS, which requires you to enter your login and password every time you run a command like Git pull or git push, using the SSH protocol. You may connect to servers and authenticate to access their services. The three services listed allow Git to connect through SSH rather than HTTPS. Using public-key encryption eliminates the need to type a login and password for each Git command.
Make sure a Git is installed
Make sure Git is installed before you start. Run the following command in your Windows terminal to see if Git is installed on your computer:
git --version
Enter fullscreen mode
Exit fullscreen mode
Install Git
To install Git, you can download the latest version from the official Git website. You can also install Git using Chocolatey or Winget package manager.
Install Git official website
To install Git from the official website, follow the steps below:
- Go to the official Git website and download the latest version of Git for Windows.
- Run the installer and follow the steps below:
- Click Next on the first two screens to accept the default options.
- Click Next on the Select Components screen.
- Click Next on the Choosing the default editor used by Git screen.
- Click Next on the Choosing the default terminal emulator screen.
- Select the Use Git from the Windows Command Prompt option.
- Select the Checkout Windows-style, commit Unix-style line endings option.
- Select the Use Windows’ default console window option.
- Click Next on the Configuring the line ending conversions screen.
- Click Next on the Configuring the terminal emulator to use with Git Bash screen.
- Click Install on the Choosing HTTPS transport backend screen.
- Click Finish on the Completing the Git Setup screen.
- Open a new command prompt window and verify that Git is installed correctly by typing
git --version.
Install Git using Chocolatey
To install Git using Chocolatey, follow the steps below:
- Open Windows Terminal.
- Run the following command to install Git:
choco install git -y
Enter fullscreen mode
Exit fullscreen mode
- Verify that Git is installed correctly by typing
git --version.
Install Git using Winget
To install Git using Winget, follow the steps below:
- Open Windows Terminal.
- Run the following command to install Git:
winget install --id=Git.Git -e
Enter fullscreen mode
Exit fullscreen mode
- Verify that Git is installed correctly by typing
git --version.
Note: Don’t forget to specify global Git settings using the following command after installing git:
git config --global user.name 'USERNAME'
git config --global user.email 'YOUR_EMAIL@EXAMPLE.COM'
Enter fullscreen mode
Exit fullscreen mode
Generate SSH keys
To generate SSH keys, follow the steps below:
- Open Windows Terminal.
- Run the following command (change your
YOUR_EMAIL@EXAMPLE.COMwith your email address) to establish a new SSH key pair:
ssh-keygen -t rsa -b 4096 -C "YOUR_EMAIL@EXAMPLE.COM"
Enter fullscreen mode
Exit fullscreen mode
- It will ask you where you want to save the private key (id rsa), and you may accept the default location by pressing Enter.
Whether you already have a private key, it will ask if you want to override it:
Overwrite (y/n)?
Enter fullscreen mode
Exit fullscreen mode
- If this happens, hit Enter and type y. Then, enter and re-enter the following passcode (think of it as a password):
Enter a file in which to save the key (/c/Users/you/.ssh/id_rsa): [Press enter]
Enter fullscreen mode
Exit fullscreen mode
- Enter a secure passphrase.
Enter passphrase (empty for no passphrase): [Type a passphrase]
Enter same passphrase again: [Type passphrase again]
Enter fullscreen mode
Exit fullscreen mode
- The SSH key pair is created in ~/.ssh, and the whole interaction should look like this:
Enter fullscreen mode
Exit fullscreen mode
- Verify that the SSH key was created by running the following command:
ls .\.ssh\
Enter fullscreen mode
Exit fullscreen mode
Add SSH key to the ssh-agent to your account
Copy the SSH key to your clipboard by running the following command:
Get-Content .\.ssh\id_rsa.pub | Set-Clipboard
Enter fullscreen mode
Exit fullscreen mode
GitHub
Sign in to your GitHub account using a browser by going to github.com and entering your username and password. Click your profile photo in the upper-right corner of the page, then Settings:
Select SSH and GPG keys from the user settings sidebar. Then select New SSH key from the drop-down menu. Put a descriptive label for the new key in the Title area (for example, your computer’s name) and paste your public key into the Key field. Last but not least, click Add SSH key:

The key is now visible in the list of SSH keys linked to your account:
GitLab
Sign in to your GitLab account using a browser by going to gitlab.com and entering your username and password. Click your profile photo in the upper-right corner of the page, then Settings:

Click SSH Keys in the User Settings sidebar. In the Key area, paste your public key. Fill in the Title area for the new key with a descriptive term (for example, the name of your computer). Finally, click the Add key:

The key is now visible in the list of SSH keys linked to your account:

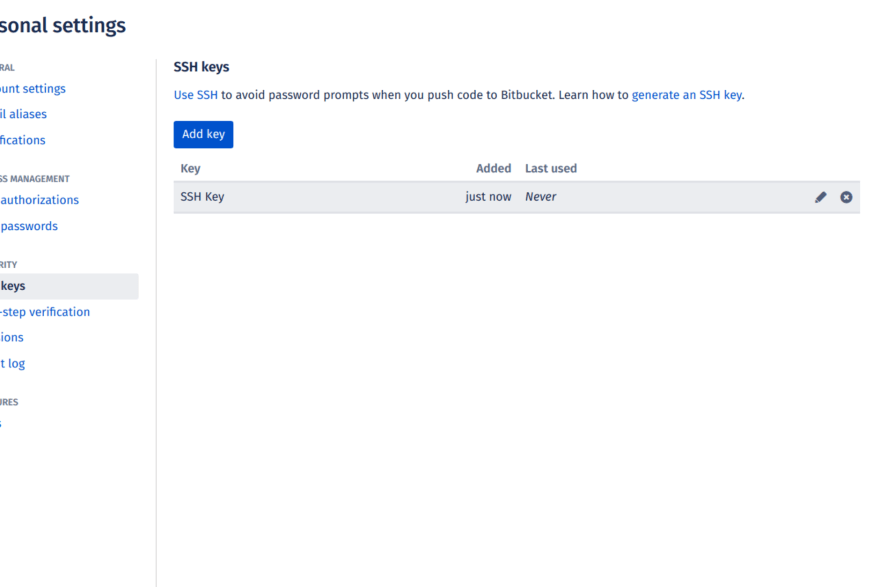
Bitbucket
Log in to your Bitbucket account using a browser by going to bitbucket.org and entering your username and password. Click your profile photo in the lower-left corner of the website, then Bitbucket settings:

SSH keys may be found in the Settings sidebar’s Security section. After that, select Add key from the drop-down menu. Fill up the Description box with a descriptive label for the new key (such as your computer’s name), and then paste your public key into the Key field. Last but not least, choose to Add key:

The key has now been added to your account’s list of SSH keys:
Test connecting via SSH
Before utilizing SSH with Git, GitHub, GitLab, and Bitbucket allow you to verify whether the connection has been set up successfully.
GitHub Test Connecting via SSH
Open the terminal once you’ve added your SSH key to your GitHub account and type:
ssh -T git@github.com
Enter fullscreen mode
Exit fullscreen mode
If you’re connecting to GitHub over SSH for the first time, the SSH client will ask if you trust the GitHub server’s public key:
The authenticity of host 'github.com (140.82.113.4)' can't be established.
RSA key fingerprint is SHA256:a5d6c20b1790b4c144b9d26c9b201bbee3797aa010f2701c09c1b3a6262d2c02.
Are you sure you want to continue connecting (yes/no)?
Enter fullscreen mode
Exit fullscreen mode
Press Enter after typing yes. GitHub has been added to the list of trustworthy hosts in the SSH client:
Warning: Permanently added 'github.com,140.82.113.4' (RSA) to the list of known hosts.
Enter fullscreen mode
Exit fullscreen mode
You won’t be asked about GitHub’s public key again once you’ve added it to the list of known hosts.
The server notifies you that you have successfully authenticated and ends the connection: Because this remote access through SSH is offered by GitHub only for testing purposes and not for practical usage, the server informs you that you have successfully authenticated and terminates the connection:
Hi YOUR_USER_NAME! You've successfully authenticated, but GitHub does not provide shell access.
Enter fullscreen mode
Exit fullscreen mode
If you passed the test, you may now utilize SSH with GitHub.
The entire interaction should look something like this:
ssh -T git@github.com

The authenticity of host 'github.com (140.82.113.4)' can't be established.
RSA key fingerprint is SHA256:a5d6c20b1790b4c144b9d26c9b201bbee3797aa010f2701c09c1b3a6262d2c02.
Are you sure you want to continue connecting (yes/no)? yes
Warning: Permanently added 'github.com,140.82.113.4' (RSA) to the list of known hosts.
Hi your_user_name! You've successfully authenticated, but GitHub does not provide shell access.
YOUR_USER_NAME@YOUR_HOST_NAME:~>
Enter fullscreen mode
Exit fullscreen mode
GitLab Test Connecting via SSH
The test is pretty similar if you’ve added your SSH key to your GitLab account:
ssh -T git@gitlab.com

The authenticity of host 'gitlab.com (35.231.145.151)' can't be established.
ECDSA key fingerprint is SHA256:4ac7a7fd4296d5e6267c9188346375ff78f6097a802e83c0feaf25277c9e70cc.
Are you sure you want to continue connecting (yes/no)? yes
Warning: Permanently added 'gitlab.com,35.231.145.151' (ECDSA) to the list of known hosts.
Welcome to GitLab, @YOUR_USER_NAME!
Enter fullscreen mode
Exit fullscreen mode
If you passed the test, you may now utilize SSH with GitLab.
Bitbucket Test Connecting via SSH
The test is pretty similar if you’ve added your SSH key to your Bitbucket account:
ssh -T git@bitbucket.org

The authenticity of host 'bitbucket.org (104.192.143.1)' can't be established.
RSA key fingerprint is SHA256:fb7d37d5497c43f73325e0a98638cac8dda3b01a8c31f4ee11e2e953c19e0252.
Are you sure you want to continue connecting (yes/no)? yes
Warning: Permanently added 'bitbucket.org,104.192.143.1' (RSA) to the list of known hosts.
logged in as YOUR_USER_NAME.

You can use git or hg to connect to Bitbucket. Shell access is disabled.
Enter fullscreen mode
Exit fullscreen mode
If you passed the test, you may now utilize SSH with Bitbucket.
References
- GitHub SSH Key Setup
- GitLab SSH Key Setup
- Bitbucket SSH Key Setup
На практике мне когда-то помогла эта статья — лучший пример из всего что я видел:
http://habrahabr.ru/sandbox/37865/
В ней полностью показаны клиентские программы для работы с push-ом и pull-ом. У меня лично Windows недолюбливал родной Git клиент, но всегда прекрасно работает с Tortoise (есть в статье).
В ней есть полное руководство по подключению. Не уверен правильная ли это аналогия, но вы можете поставить себе программу Composer и ей подобные, после чего можно через консоль Windows полностью клонировать себе репозиторий с Git-а.
Если же касается более специфичного подключения именно к Git, то эта страница будет полезной: http://webhamster.ru/site/page/index/articles/comp/171
Добавил, как попросили, кратко содержимое статьи:
Идем на официальную страницу Git http://git-scm.com, кликаем на Download for Windows. В открывшемся окне кликаем на Full installer for official Git. Запускаем полученный exe-шник.
Я рекомендую выбрать «Run Git from the Windows Command Prompt». Все остальные опции можно оставлять по-умолчанию. После установки Git нужно перегрузиться или завершить сеанс пользователя и снова войти, чтобы применились изменения в системной переменной PATH.
Далее нужно проверить, доступен ли Git для работы. В любом каталоге даем команду:
git --version
Если получаем информацию о версии, то Git установлен и работает. Если получаем информацию что программа git не найдена, разбираемся что сделали не так.
Настройка SSH-ключей в Windows
В операционной системе Windows генератор SSH-ключей включен в комплект поставки Git. Для генерации ключей необходимо запустить на выполнение файл C:\Program Files\Git\Git bash.vbs. Его можно запустить как обычный exe-шник. Откроется программа «Консоль git». В ней надо дать команду:
ssh-keygen -t rsa -C "[email protected]"
Будьте внимательны, в этой консоли подглючивает копи-паст, проще ввести команду вручную. В качестве email указываем свой почтовый ящик. На запрос «Enter file in which to save the key» просто нажимаем Enter. При запросе пароля «Enter passphrase» и «Enter same passphrase again» просто нажимаем Enter. В процессе генерации ключей в консоли будет выдаваться примерно следующая информация:
Generating public/private rsa key pair.
Enter file in which to save the key (/c/Documents and Settings/username/.ssh/id_rsa):
Enter passphrase (empty for no passphrase):
Enter same passphrase again:
Your identification has been saved in /c/Documents and Settings/username/.ssh/id_rsa.
Your public key has been saved in /c/Documents and Settings/username/.ssh/id_rsa.pub.
The key fingerprint is:
51:db:73:e9:31:9f:51:a6:7a:c5:3d:da:9c:35:8f:95 [email protected]
После выполнения этой программы, в каталоге C:\Documents and Settings\username.ssh будут лежать файлы id_rsa и id_rsa.pub, они нам пригодятся в дальнейшем.
Установка SSH-ключа в GitHub
Нас колько я помню, эта часть ответа несколько изменилась в современном дизайне GitHub-а, но интуитивно можо найти.
Сразу после регистрации необходимо прописать в системе GutHub свой публичный ключ шифрования (открытый SSH-ключ). Для добавления ключа, надо в правом верхнем углу нажать «Account Settings».
В открывшемся окне нужно кликнуть на пункт меню «SSH Public Keys», и нажать «Add Another Public Key». Появится два поля — название ключа (Title) и содержимое ключа (Key).
В поле Title можно написать название компьютера, на котором сгенерирован публичный ключ. Можно писать по-русски.
В поле Key надо вставить содержимое файла id_rsa.pub. Помните, в каком каталоге они находятся? Переходим в этот каталог, открываем любым текстовым редактором файл id_rsa.pub (именно с расширением .pub, не перепутайте). Выделяем весь текст, копируем, и вставляем на странице GitHub в поле Key.
После добавления ключа, компьютер может соединяться с GitHub через программу git, и никаких ошибок не должно возникать.
Работа с репозитарием на GitHub через программу Git
Начиная с этого момента, пляски вокруг web-интерфейса GitHub можно считать законченными. Далее можно работать только используя программу git.
Вначале нужно сделать небольшую настройку программы git: указать локальной системе git имя пользователя и email. Это делается следующими командами, которые можно выполнить, находясь в любом каталоге:
git config --global user.name "YourFullName"
git config --global user.email [email protected]
где вместо YourFullName нужно написать свое имя, а вместо [email protected] — свой email. Эти значения используются для логина на GitHub. Поэтому на месте YourFullName нужно указать ваш логин на GitHub-е, а на месте [email protected] нужно указать email, который вы вводили при генерации ключей шифрования.
После этих настроек, можно заливать свои файлы в репозитарий. Переходим в каталог со своим проектом, и даем команды:
git init
git add .
git commit -a -m 'first commit'
git remote add origin [email protected]:username/reponame.git
git push -u origin master
После этих команд на сервере GitHub образуется копии файлов того каталога, в котором были выполнены данные команды. Далее можно уже делать коммиты, заливки на сервер GitHub изменений, считывания изменений с сервера. Но это уже совсем другая история.