На чтение 4 мин Просмотров 12.5к. Опубликовано
![]() По умолчанию операционная система Windows разрешает устанавливать в качестве обоев рабочего стола исключительно статичные изображения. Тем не менее, некоторым пользователям иногда хочется разнообразить внешний вид системы, установив на фон видео или анимацию. В этой статье мы расскажем, как поставить «гифку» на рабочий стол в Windows 10.
По умолчанию операционная система Windows разрешает устанавливать в качестве обоев рабочего стола исключительно статичные изображения. Тем не менее, некоторым пользователям иногда хочется разнообразить внешний вид системы, установив на фон видео или анимацию. В этой статье мы расскажем, как поставить «гифку» на рабочий стол в Windows 10.
Содержание
- Как поставить гифку на рабочий стол
- PUSH Video Wallpaper
- DeskScapes
- DisplayFusion
- Видеоинструкция
- Заключение
Как поставить гифку на рабочий стол
Поскольку в Windows 10 интересующая нас функция разработчиками встроена не была, для реализации задумки придётся пользоваться сторонним ПО. Одни приложения могут работать только с файлами формата GIF (что нам и нужно), другие поддерживают и видеоролики в формате AVI и MP4. Рассмотрим несколько популярных бесплатных программ, максимально простых в настройке.
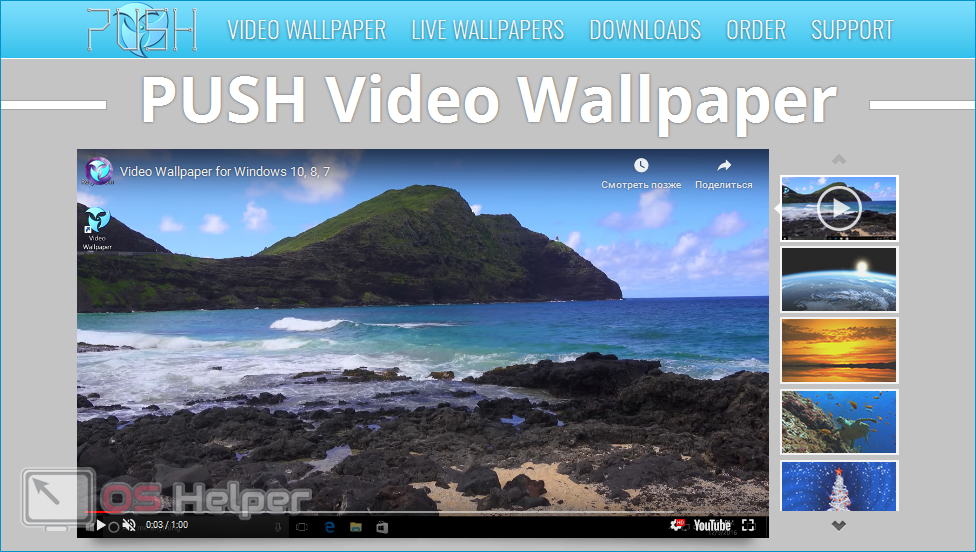
PUSH Video Wallpaper
Взять утилиту можно с официального сайта разработчика. Поддерживает работу со всеми версиями Windows, начиная с Windows 7. Позволяет установить на фон как гифку, так и видео.
Инструкция по установке анимированных обоев при помощи приложения PUSH Video Wallpaper выглядит следующим образом:
- Устанавливаем программу, следуя указаниям мастера. После завершения процедуры активируем пункт «Set as Screensaver», а также ставим галочку напротив «Launch Video Wallpaper», если хотим сразу же запустить утилиту.
- В открывшемся окне «Параметры экранной заставки» разворачиваем список и выбираем пункт «PUSH Video Screensaver». Нажимаем на «Параметры», чтобы перейти к выбору обоев.
- Во вкладке «Main» нажимаем на кнопку «Add», чтобы добавить будущий фон.
- Находим нужный GIF-файл или видео через «Проводник», добавляем в программу.
- Выбираем добавленную гифку (она появится в списке «Playlist»). Закрываем утилиту.
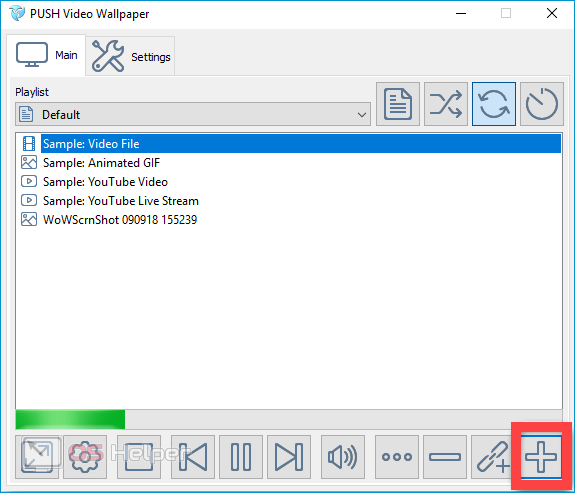
Если возникнет необходимость, можно добавить ещё несколько файлов. Все объекты, находящиеся в списке, будут постепенно сменять друг друга. Параметры заполнения и скорости воспроизведения также можно настроить в главном окне.
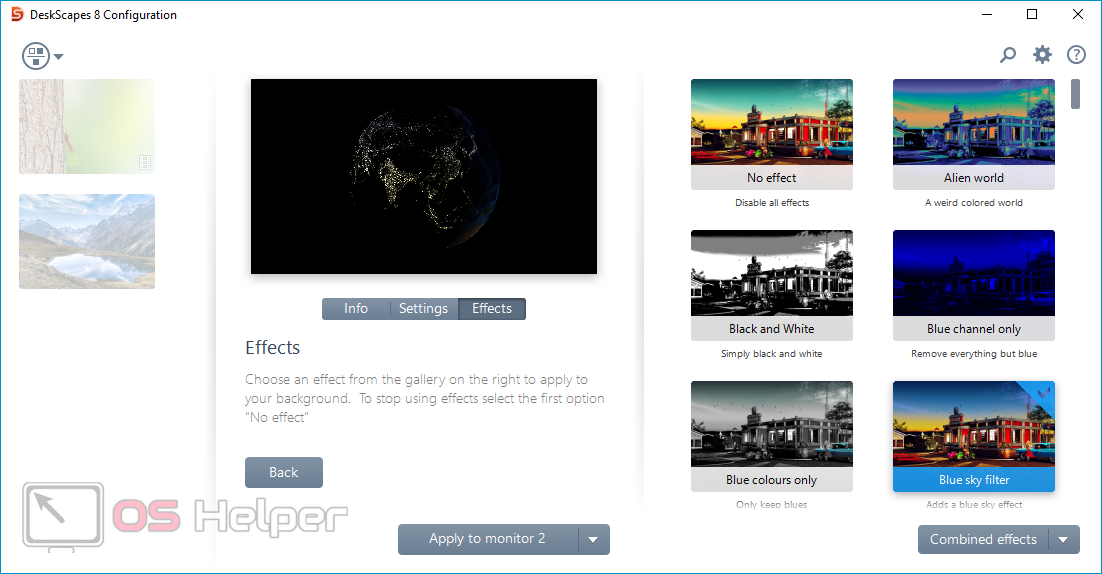
DeskScapes
DeskScapes можно назвать «старшим братом» предыдущей утилиты – отличие состоит в том, что этот инструмент позволяет не только изменять обои, но и редактировать существующие, а также поддерживает работу сразу с несколькими мониторами.

Загрузить утилиту можно абсолютно бесплатно с официального сайта. Завершив установку, выполните пункты руководства, представленного ниже:
- Запустить программу, нажать на «Start 30 Day Trial» — это позволит начать 30-дневный пробный период.
- Кликаем по иконке в верхнем левом углу, переходим в раздел «Folder», нажимаем на «Add / Remove», чтобы добавить собственный вариант обоев.
- Указываем путь к нужной анимации, вставляем её в программу.
Мнение эксперта
Дарья Ступникова
Специалист по WEB-программированию и компьютерным системам. Редактор PHP/HTML/CSS сайта os-helper.ru.
Спросить у Дарьи
После установки фона рабочего стола можно воспользоваться рядом настроек – отрегулировать параметры цветности, применить различные эффекты и т. п.
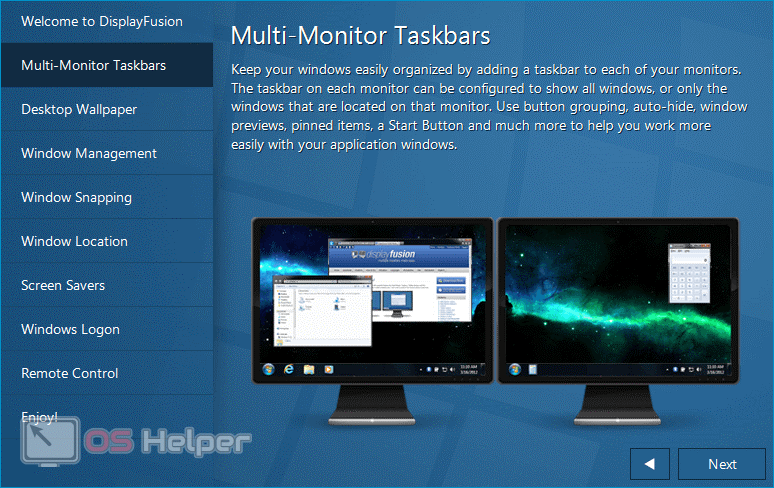
DisplayFusion
Ключевое преимущество этой утилиты перед предыдущими заключается в том, что она предоставляет расширенный набор настроек. Загрузить приложение можно по этой ссылке.
Чтобы заменить обои с обычного статичного изображения на гифку, нужно следовать простой инструкции:
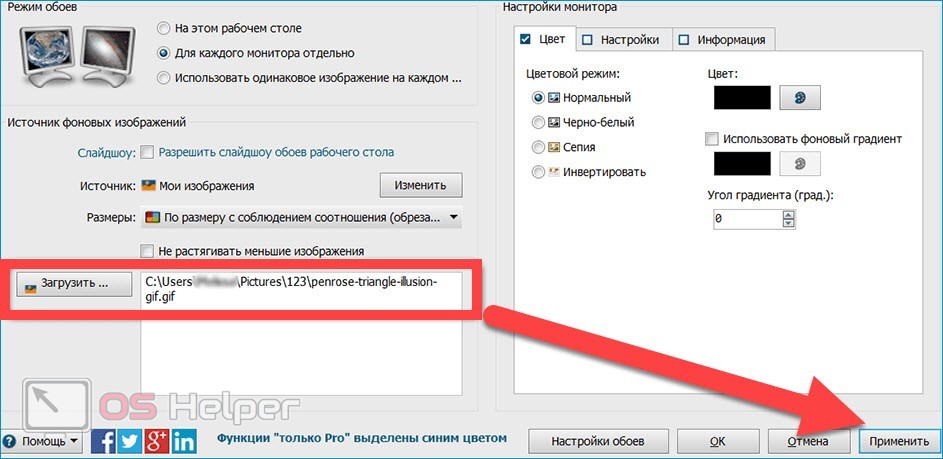
- Открываем программу, активируем пункт «Разрешить управлять обоями». Нажимаем на кнопку «Изменить», расположенную в графе «Источник».
- Выбираем вариант «Мои изображения», указываем путь к нужному файлу.
- Активируем добавленную анимацию, нажимаем на «Применить».
При желании можно добавить сразу несколько файлов, которые будут сменять друг друга с выбранной скоростью.
Видеоинструкция
Предлагаем ознакомиться с небольшим видео, автор которого предлагает свои варианты приложений, предназначенных для замены статичных обоев рабочего стола на анимированные изображения.
Заключение
Мы предложили самые популярные утилиты, функционала которых хватит для решения поставленной задачи. Выбирайте первый вариант, если хотите менять фон не только на гифку, но и на видео; второй – если вам важен простой интерфейс и наличие встроенной библиотеки обоев; третий – если ищите максимально гибкий инструмент, который позволяет не только менять фон, но и настраивать некоторые параметры работы монитора.
Hey everyone! As part of our ongoing series on Windows 10 hacks, today we are going to show how to get rid of your typical static wallpapers. From now on, you will learn how to set a gif as a wallpaper and you will be able to have animated GIFs as your wallpapers. It’s so nice to view.
If you’re here, you may have already realized that Windows 10 itself doesn’t support GIFs as desktop wallpapers. Therefore, we will download a third-party program to do this for us. We will be introducing two different programs: BioniX and Plastuer. They do almost the same thing but BioniX is free while Plastuer costs a small amount of money. (you pay any amount you want with a minimum of 2 USD). If you pay that sum you get a friendlier interface and software that’s a little easier to use. Let’s start with our Free choice, Bionix.
You can also click here to jump directly to the Plastuer method.
What is BioniX?
BioniX is a pretty cool free program which manages your wallpapers. In it you can learn how to set a gif as a wallpaper without problems:
- Create a playlist of wallpapers (which can include GIFs) to change between.
- Decide how often the change will be made.
- Decide whether the order of wallpapers will be decided randomly or whether they switched according to the order you decided.
- Plus many other features, but we’ll focus on the features above for this article. We encourage you to play with the program, it’s fun and pretty easy to use.
How to download BioniX?
Go to https://www.bionixwallpaper.com/downloads/Animated_GIF_Wallpaper/gif_wallpaper.html and click on Download it now.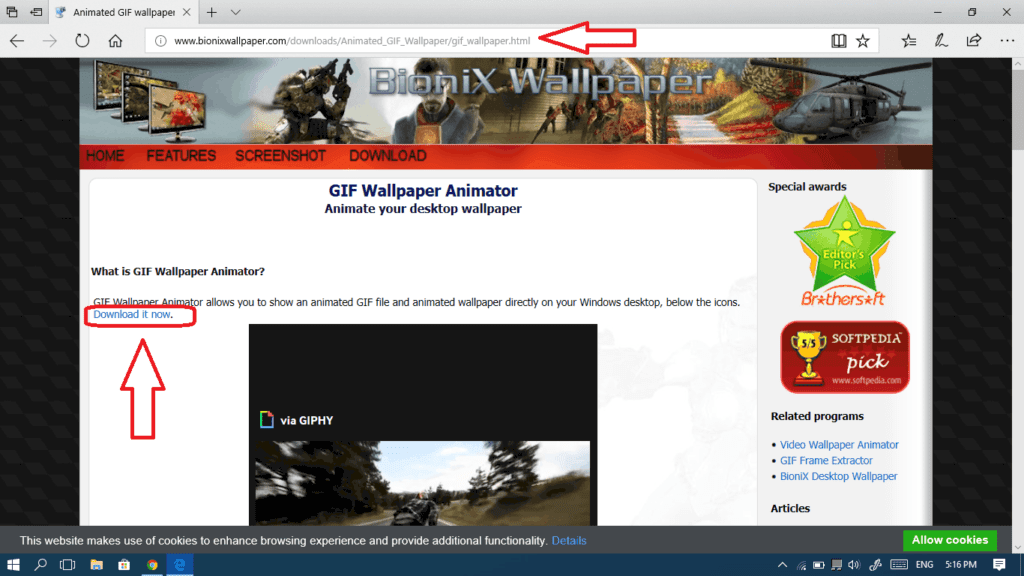
How to install and use BioniX?
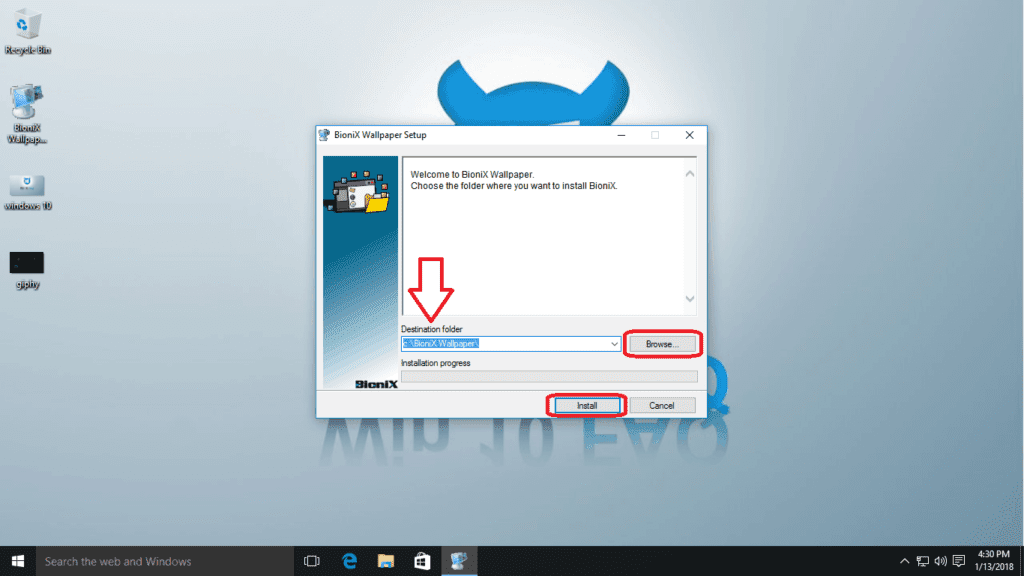
- When you finish downloading the program, double-click on the setup file to start installing it.

- Set your installation directory from Browse (The default location is C:\BioniX Wallpaper\), you can leave the default if you’re not sure what to do here and then click Install.
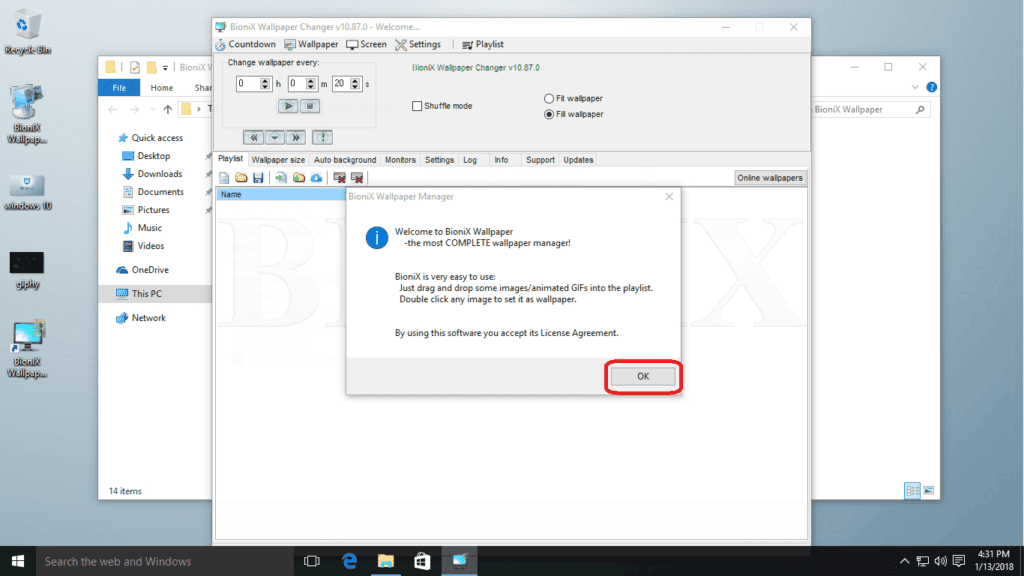
- After the installation is done, click Ok to accept the License Agreement.
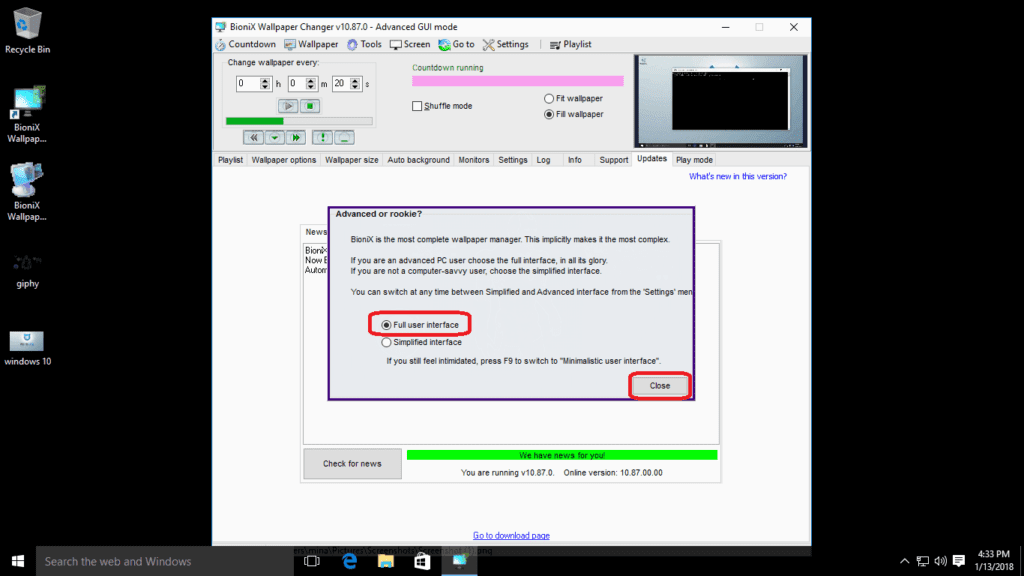
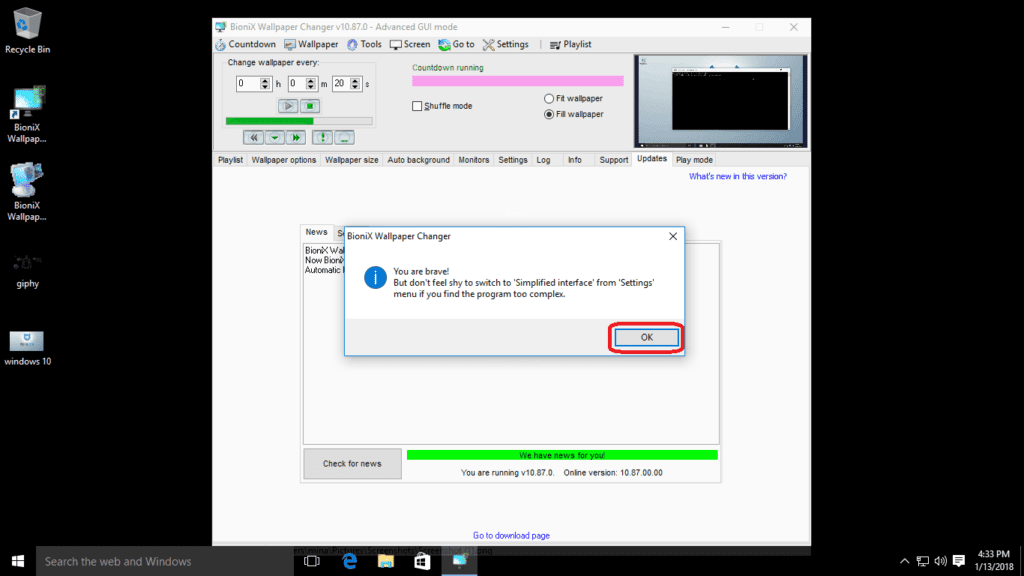
- Choose the Full user interface and then click Close (You will be able to change that later so no worries).
- Click Ok.
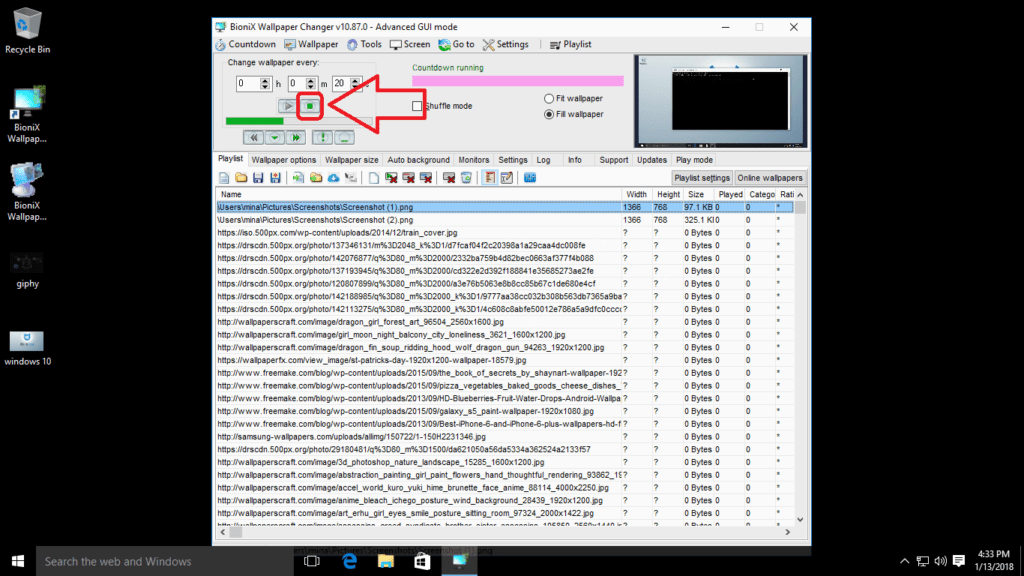
- Now to focus on adjusting your settings, you should click the Stop button to stop any automatic wallpaper changes for the moment.
- In the Playlist tab, click the Clear playlist button in order to remove all the imported media files from you computer.
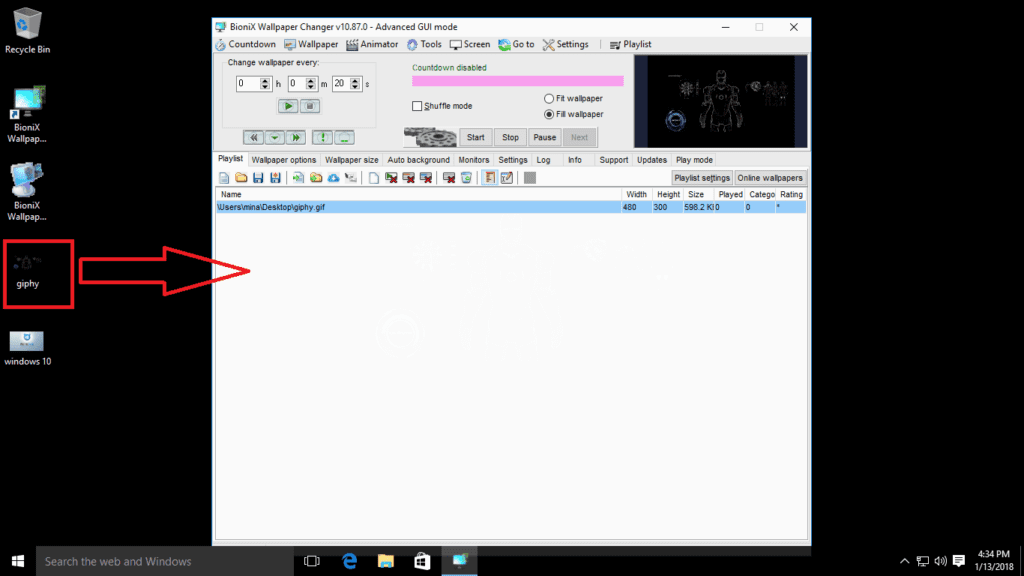
- Now you have a clean playlist, drag and drop the GIF wallpaper into the blank playlist (you can actually add more than one and the program will switch between them automatically – see next step).
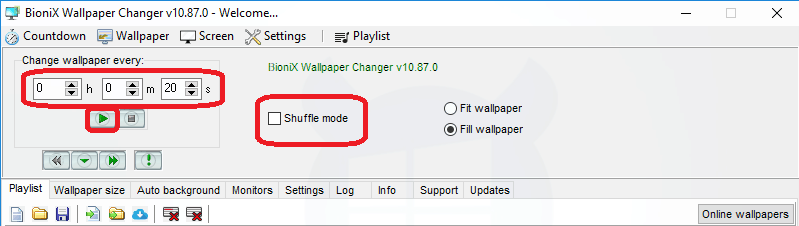
- Adjust the timing in case you have more than one wallpaper in your playlist and then click on the Play button to start the wallpaper timer. If you don’t press the play button then it won’t automatically change the backgrounds. Click on the ‘Shuffle mode‘ checkbox if you want to be surprised by the order of the background changes.

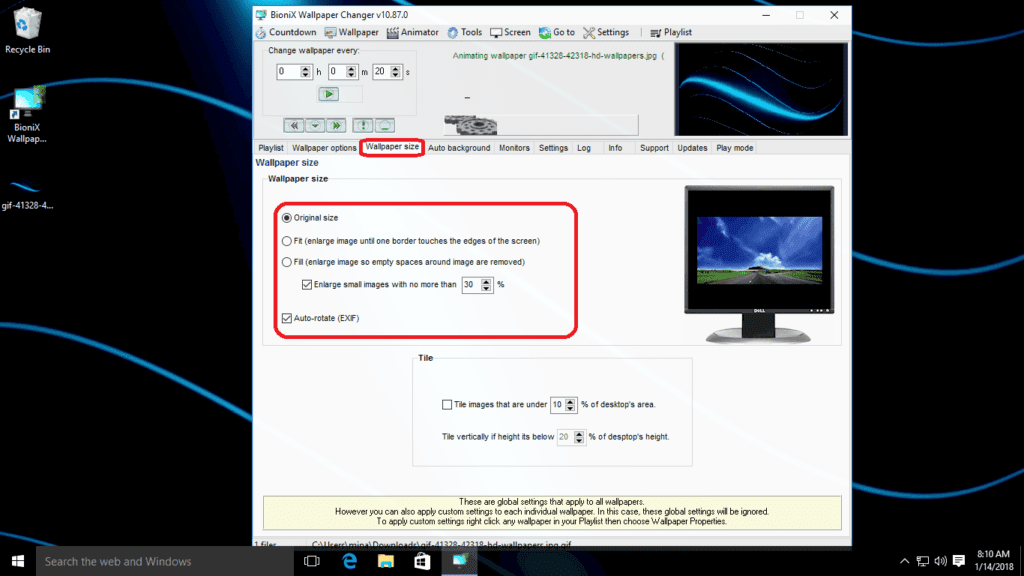
- Also let’s adjust the wallpaper size from its tab. Many choices are available there: you can use the original size of the wallpaper, you can also choose to fit and fill it. If you plan to use the fill option then you can adjust the maximum enlargement you want. Beware that small GIFs can get pixelated when enlarged.
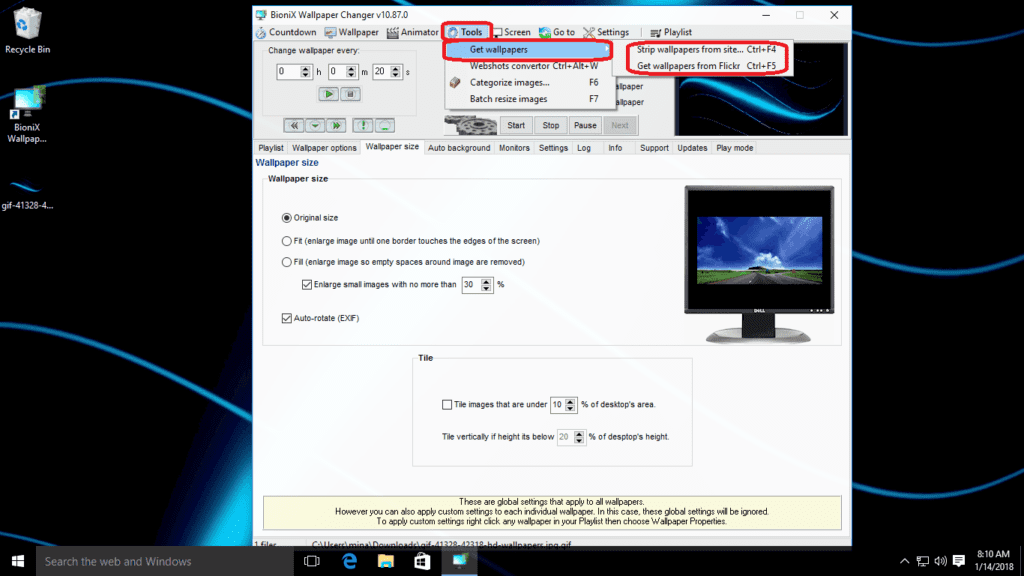
- If you would like to add some online wallpaper/s from a specific website, there’s a way to do so. Also there is a special tool to get wallpapers from Flickr. You can do both of these things from the Tools menu as shown below.
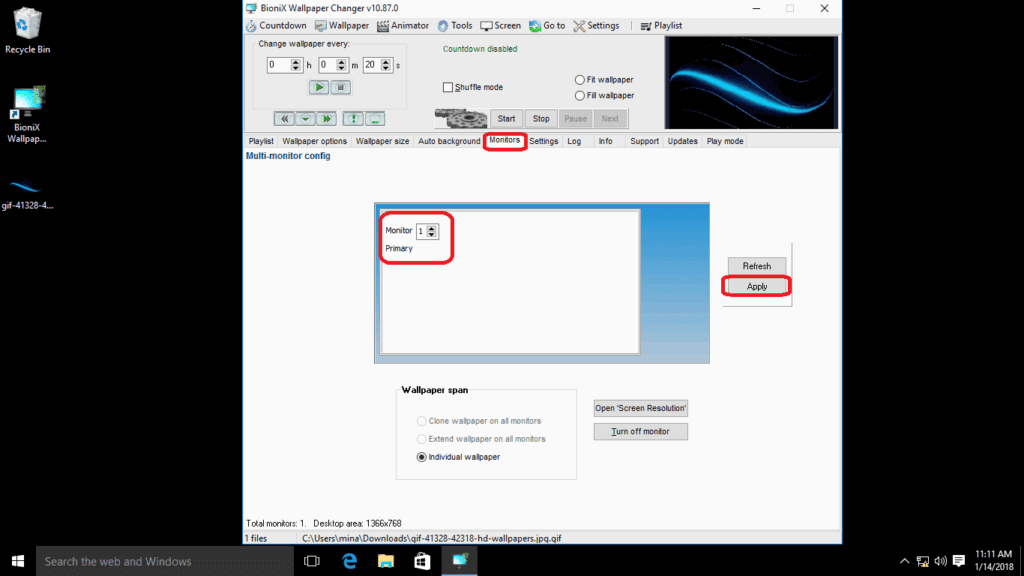
- Also if you want to control which monitor(s) you want to manage using the program, open the Monitor tab, set each monitor by number and then click Apply.
- Click on the Start button to start the whole thing.

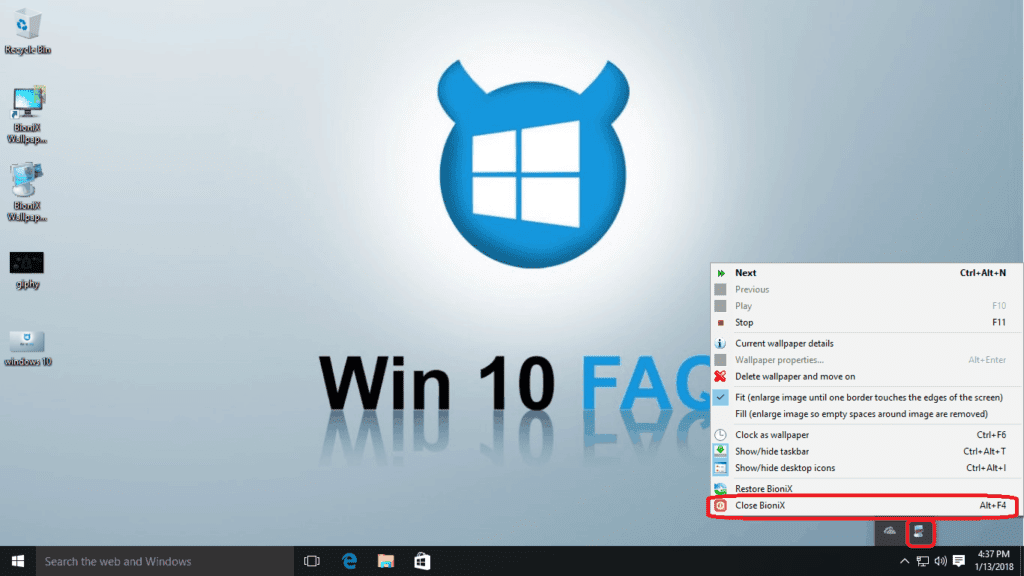
- Here you are. Your GIF wallpapers will now work perfectly as long as the application is running. Note that minimizing the application will not exit it while Close will.

- If you want to stop your GIF wallpaper’s animation or maybe return control of the wallpapers to Windows, right-click on the BioniX icon and choose Close BioniX.


Bonus Read: Guides For Everything Windows 10
What’s Plastuer?
Plastuer is another solution that will help you make your GIF wallpaper work, it’s available as PWYW (Pay What You Want) with a minimum of 2 USD. We have tried it ourselves and it’s almost the same as BioniX but we found its interface more friendly and elegant, and with it, you don’t really have to learn how to set a gif as a wallpaper.
How to download Plastuer?
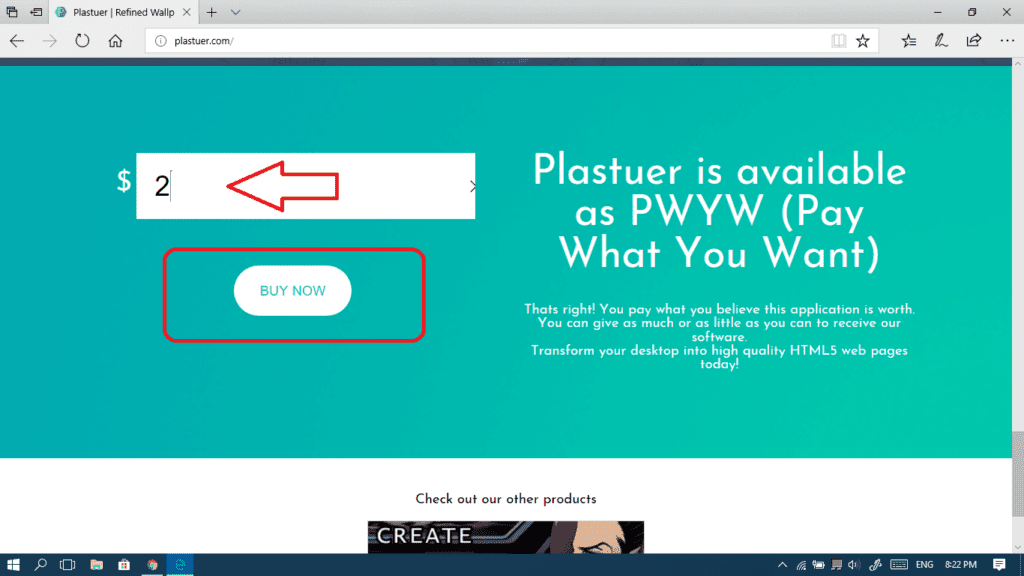
- Go to https://plastuer.com/ and scroll down until you reach the bottom of the webpage and input the amount of money you would like to pay with a minimum of 2 USD and then click on the Buy now button.
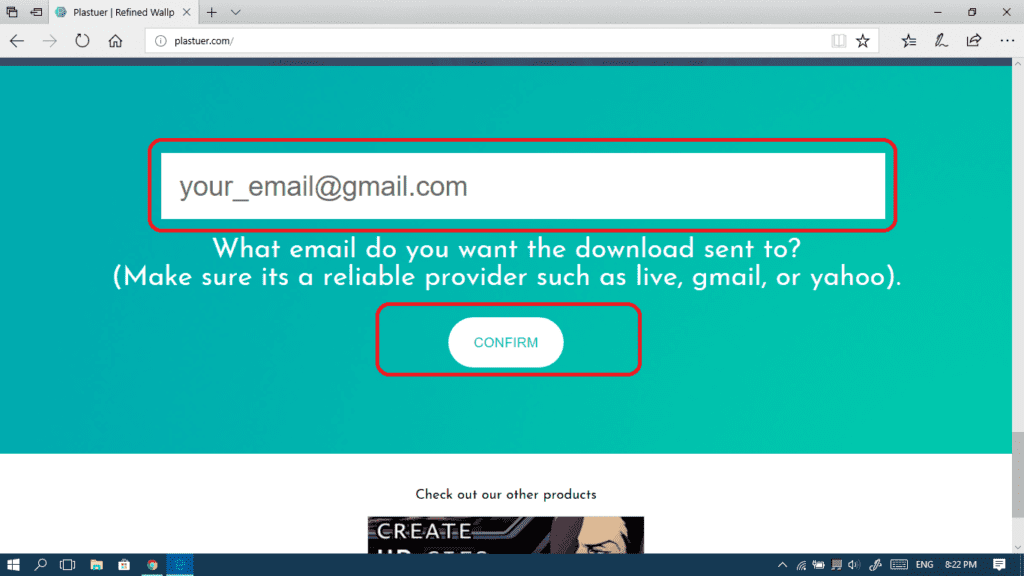
- Now enter your personal email because after you finish the PayPal transaction, they will send you the download link. Click Confirm.
How to run and use Plastuer?
If you noticed, we said “run and use” without mentioning installing, and that’s because Plastuer doesn’t need any installation, it’s a portable program which requires no installations to work.
In general, the user interface is pretty easy and it takes you step-by-step. We really liked how smoothly it went. Let’s take a look and learn how to set a gif as a wallpaper:
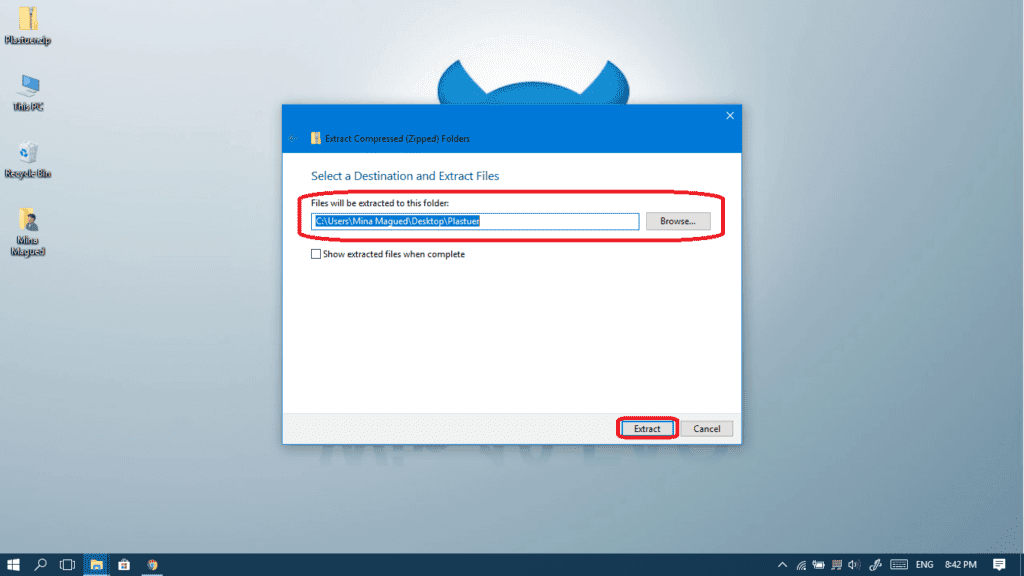
- Right-click on the downloaded zip file and choose Extract all.
- Choose the location where you want to extract this file and then click Extract.
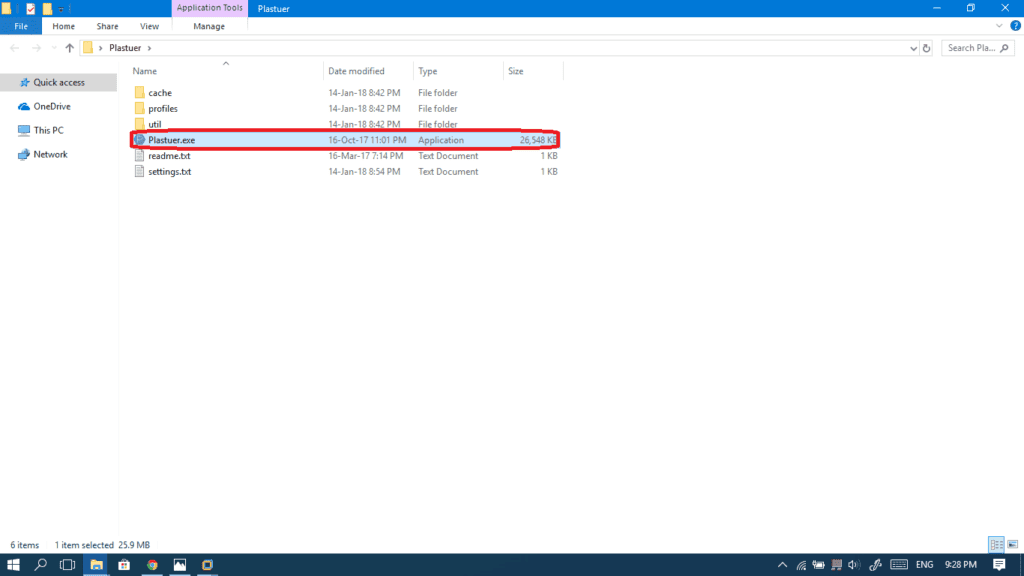
- In the extracted folder, double-click on Plastuer.exe to launch the program.
- We will begin by selecting the monitors we would like to control via Plastuer.
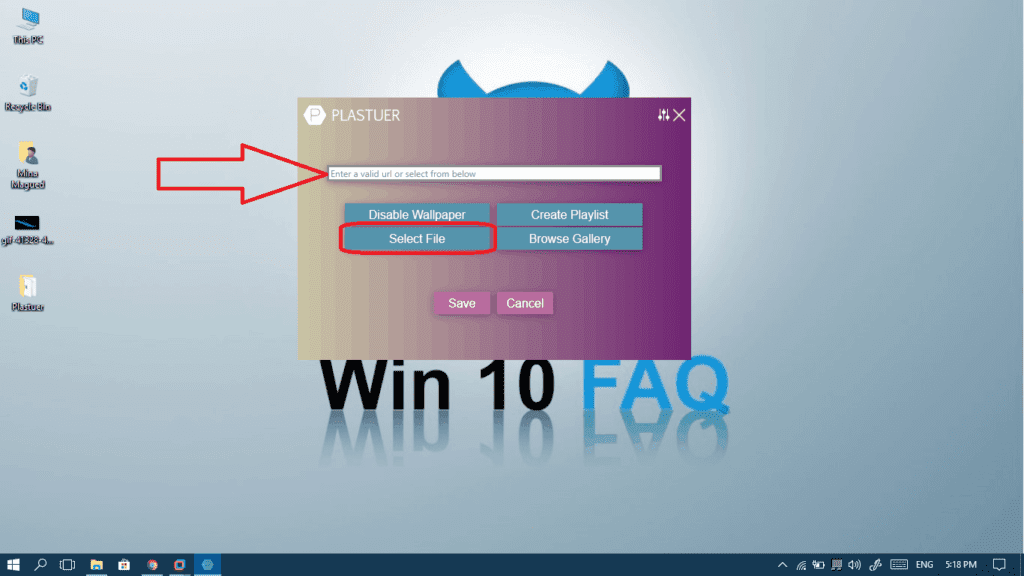
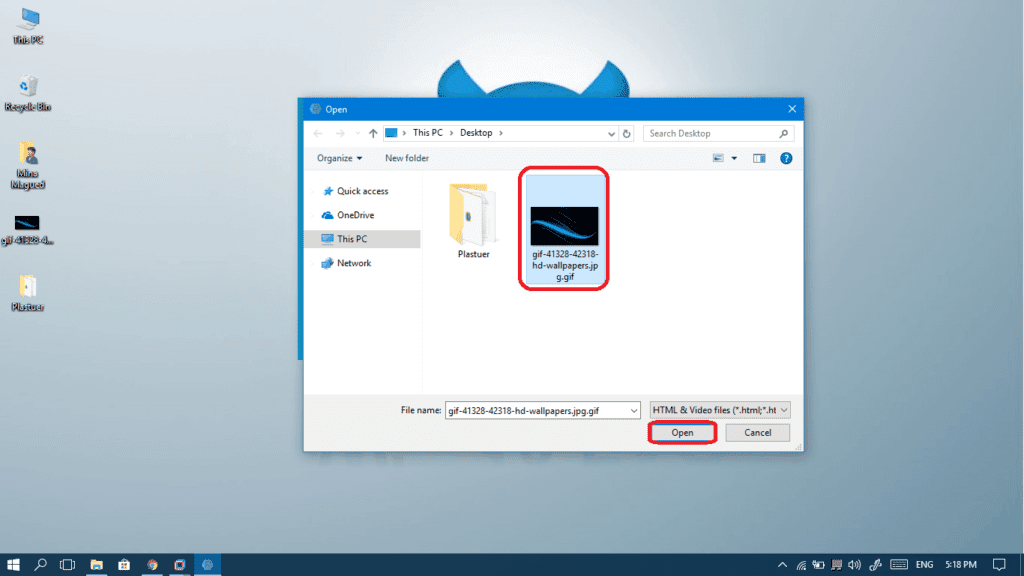
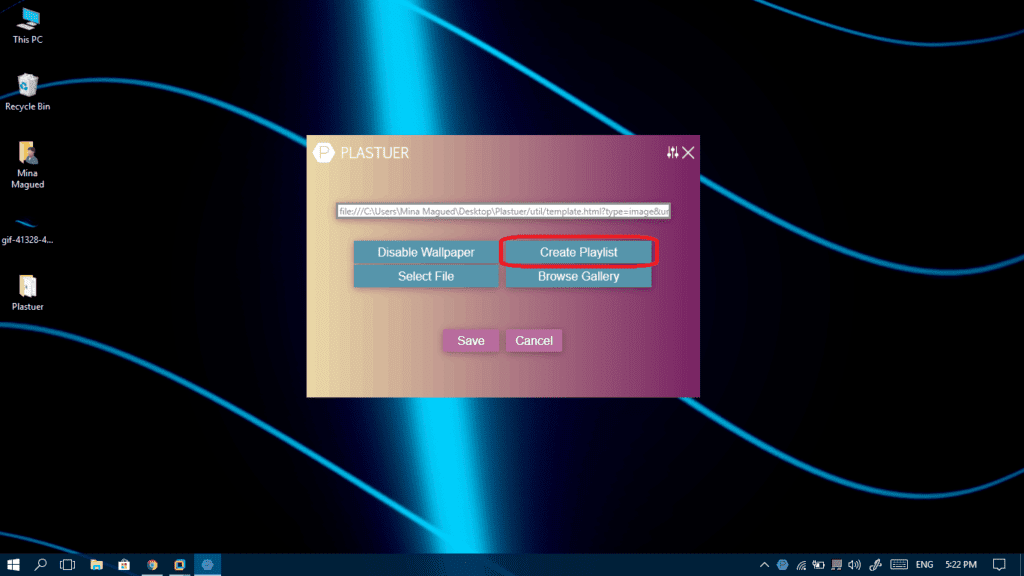
- Click Select File to choose the GIF you want to set as your desktop wallpaper. If you want to add the GIF URL directly because you don’t have it on your local computer, just paste it in the top bar and go so step 7.
- Browse to the GIF’s location, select the wanted GIF and then click Open.
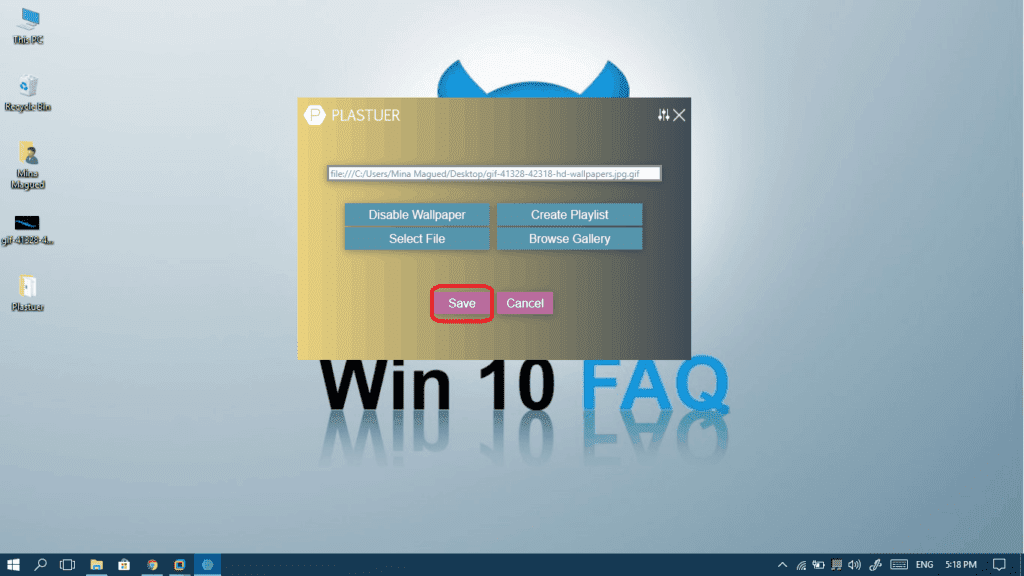
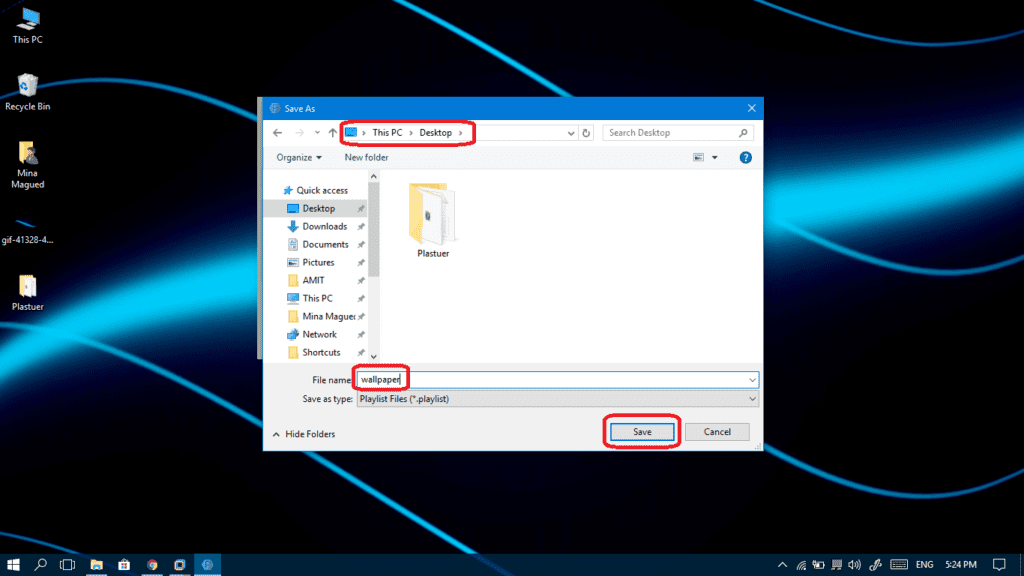
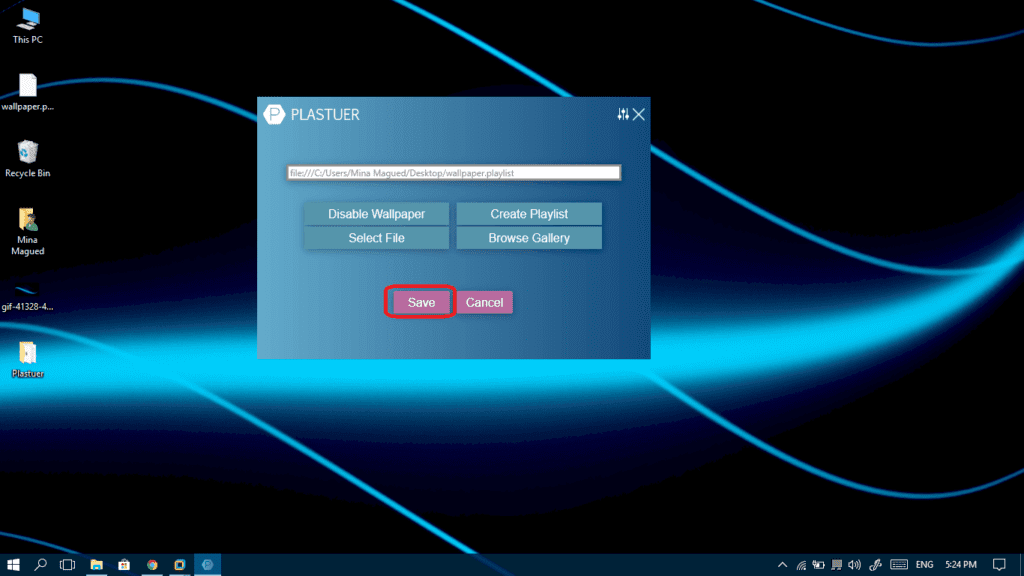
- Now, click Save.
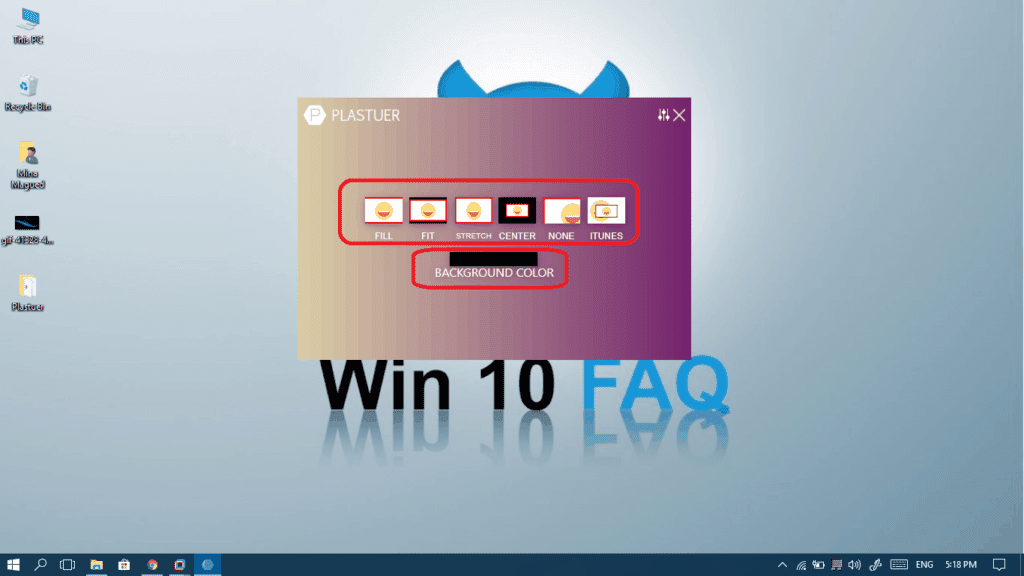
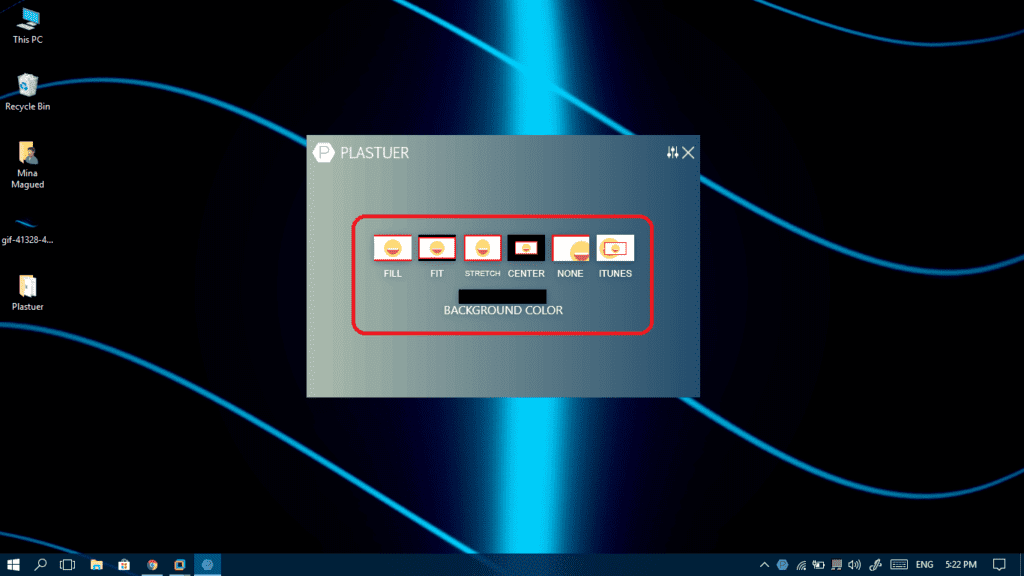
- Choose the wallpaper layout and the background color that might appear behind the GIF.
- Now you have set your wallpaper, but back to step 5 and let’s Create a Playlist.
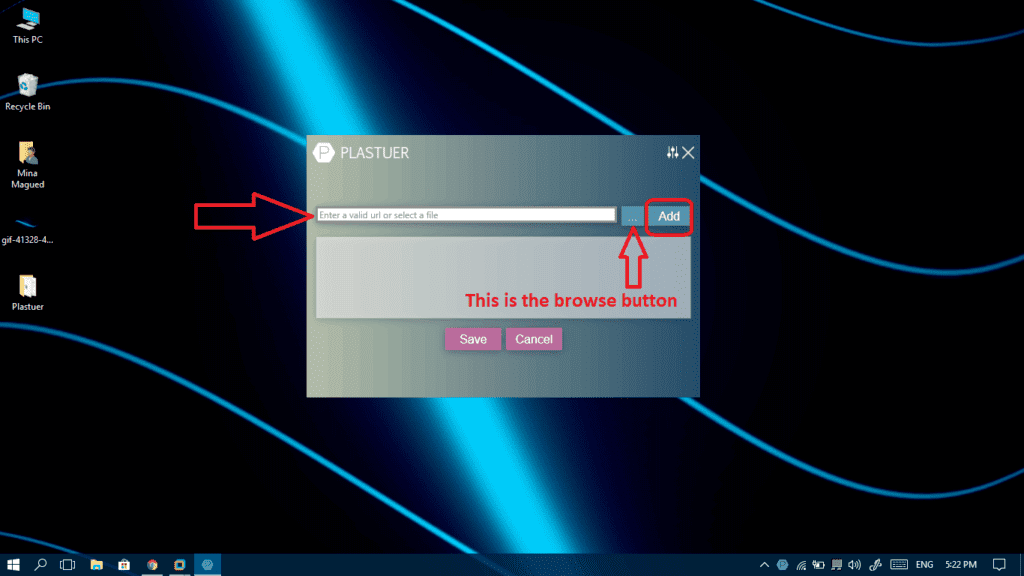
- You can now browse and select the wallpapers you want to add to your playlist and you can past a URL and the program will add the online wallpaper to the playlist immediately.
- Don’t forget that you will have to choose the layout and the background color for every wallpaper you add.
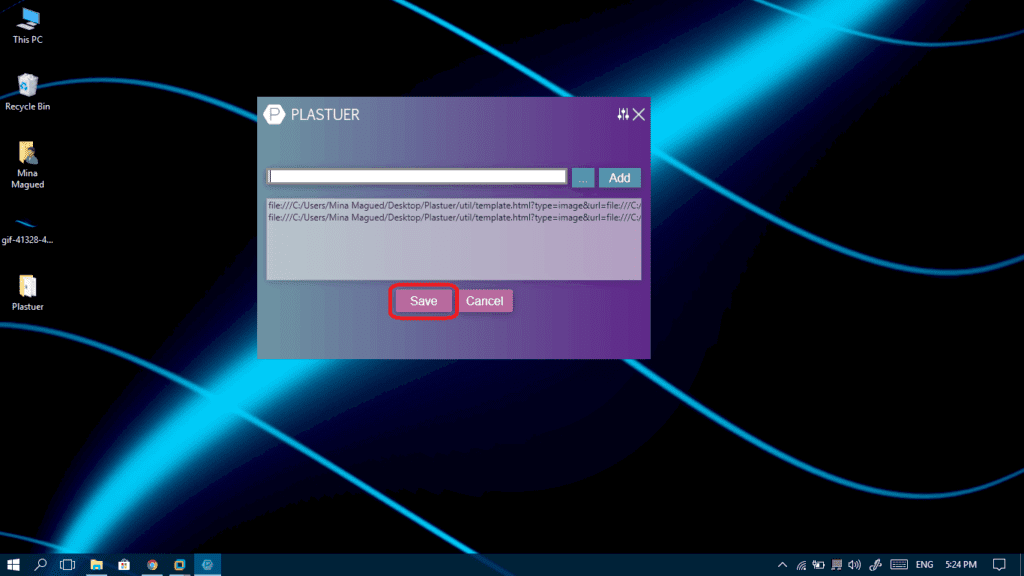
- After your playlist is ready, click Save.
- Choose the location where the playlist will be saved, give it a name and then click Save.
- Click Save to start working using your playlist.
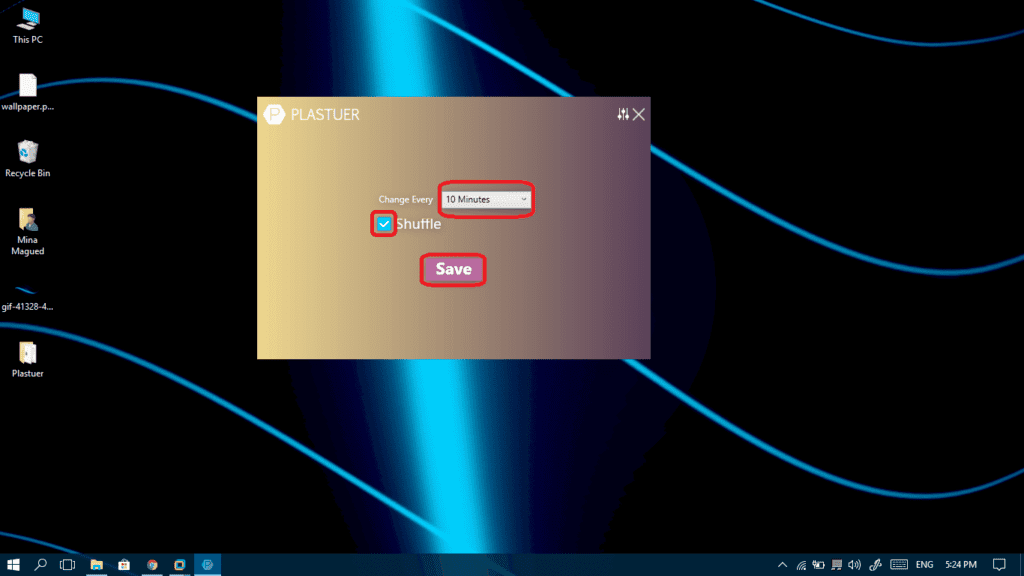
- Determine the duration of each wallpaper in the playlist and whether to shuffle or to stick to the order. This can be done through the checkbox. Now click Save.
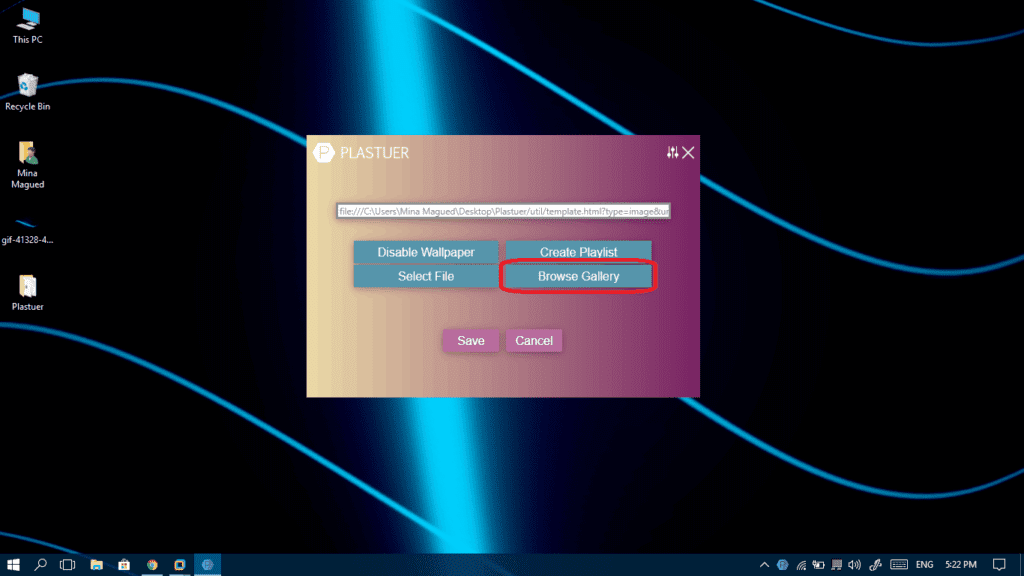
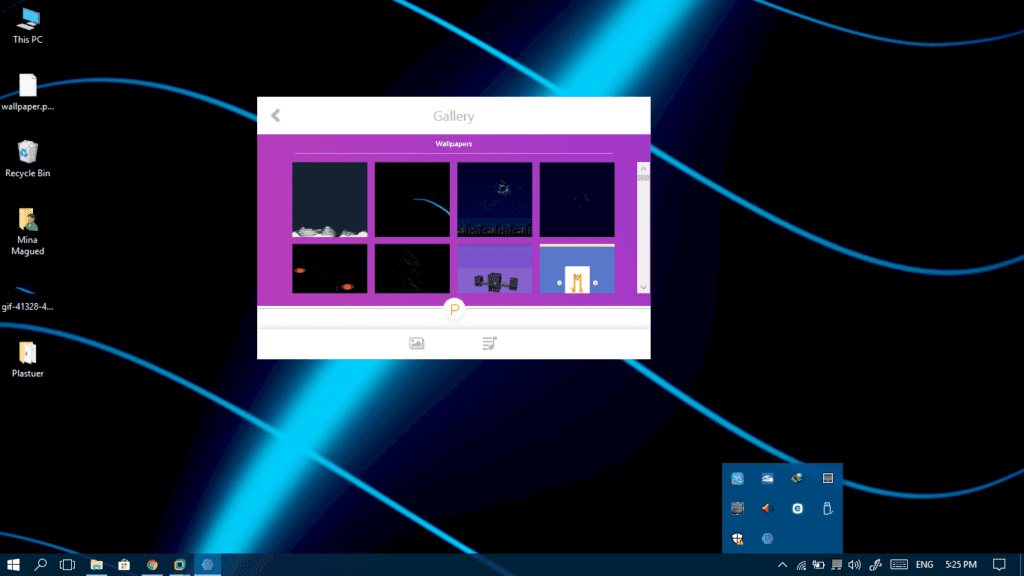
- Finally the program offers some free wallpapers in its gallery, if you want to choose among them, go to the main menu and click Browse Gallery.
- You can now choose from a variety of wallpapers.
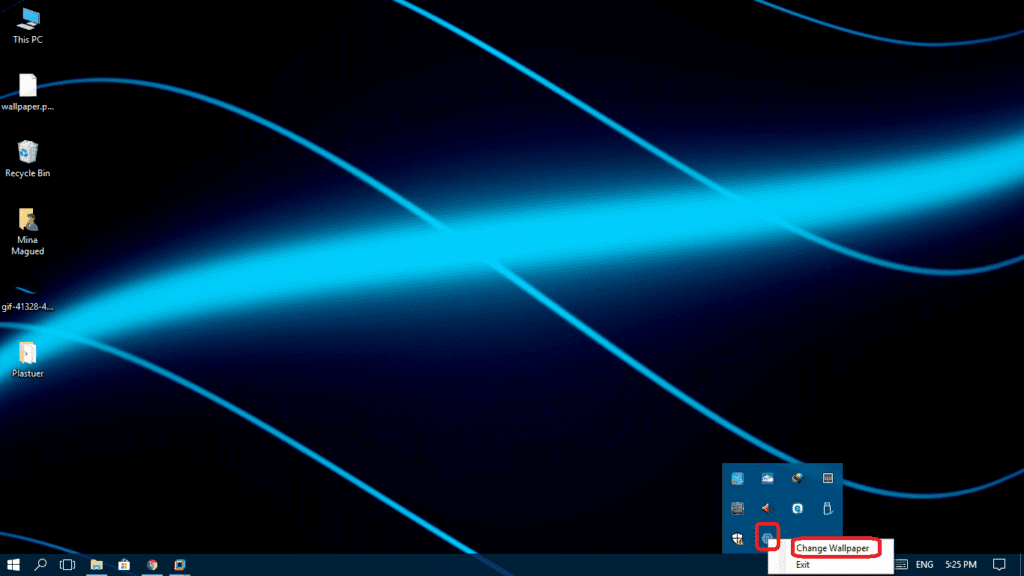
- That’s it on how to set a gif as a wallpaper. Your GIF wallpapers will now work perfectly as long as the application is running. You can make sure it’s running in the bottom-right corner of your screen. You can also skip the current wallpaper to the following one by right-clicking on the icon and choosing Change wallpaper.


Frequently Asked Questions
How do I fix Windows 10 and 11’s common microphone issues?
There are multiple things that can affect your microphone from functioning as it should in Windows 10 and 11 alike. If you want to get the best possible fix, whatever the situation might be, then you should read our comprehensive guide. (See Fix Microphone Settings)
If all else fails, then your microphone might not be working or your laptop’s internal microphone might need a replacement. Make sure to contact an expert in these cases to avoid spending money on other unnecessary fixes. (See How To Install A Microphone)
How to set a GIF as a wallpaper on a Chromebook
Right-click your screen. Select Set wallpaper & Style then select Wallpaper. Select one of the images you choose to be your wallpaper.
What can I do if my Windows 10 or 11 OS won’t shut down?
Just like many other similar situations, this problem can be caused by a multitude of reasons. You’ll never know which one it is until you’ve tested everything out in this detailed problem-solving walkthrough.
Whatever the case may be, something is not right with your OS, so you’ll have to go through all the options before settling on one that seems to be working for you. If, for whatever reason, you still can’t find a solution, then you might want to try this forum.
Can I remove the Xbox app from Windows?
The short answer is yes. However, the method through which you can achieve this might not be as obvious as others. Learn how to do this here.
Wallpaper Engine Usages
The resources used by the wallpaper engine are not a problem that you should worry about in general, however, they use around 512 MB of Ram memory. Also, don’t worry about the GPU usage it is usually calibrated in a way that it won’t affect your system too much. Exceptions are the High-Resolution 4k Wallpapers which are able to use a bit more of your system’s resources to function and you should monitor them accordingly.
Suggested Read: Your Windows License Will Expire Soon’ – Step-by-Step Fix Guide
The Bottom Line
In closing, setting a GIF as your background in Windows 10 is easy as long as you know the necessary programs that enable this feature. While there are multiple similar programs out there, these should do just fine for now.
How did it go? Feel free to let us know in the comment section below. If none of these worked out for you, then what did? Let us know in the comments below. We’re always happy to start a discussion with our community.
Every day, we encounter different problems on our computers and other devices that require immediate response so that our work won’t be put on hold. From typical system errors and installation of various devices to simple information about technical terms, our website offers most of your computer-related questions, especially for Windows 10. Check us out now and you may find helpful tutorials. Or you may directly ask about How to Move the System Tray to a Different Screen.
Customizing your desktop background is one of the best ways of making Windows 10 feel more personal. You’ve heard about gorgeous static backgrounds, but have you ever considered animating your wallpaper? Learn how to set an animated GIF as your desktop background on Windows 10 to liven up the scene.
Unfortunately, Windows 10 does not natively support the use of animated desktop wallpaper. However, many third-party options are available to safely customize your background without having to sacrifice any CPU resources or spend a large amount of money.
In this article, you’ll learn how to use third-party solutions to set an animated GIF or a video for your desktop wallpaper on Windows 10.
Use an Animated GIF wallpaper as your desktop background on Windows 10
Here are 4 methods that you can use to enable animated GIFs as your desktop background in Windows 10:
Method 1. Wallpaper Engine
Wallpaper Engine — Tutorial & Review
Wallpaper Engine is one of the most advanced solutions when it comes to customizing your desktop background. It allows you to create your backgrounds, or import other people’s videos, websites, and more. The application will cost you a one-time USD 3.99 charge.
Download: Purchase Wallpaper Engine from the official website for USD 3.99.
After downloading and installing Wallpaper Engine, start customizing your desktop. What we love about this software is the low cost, as well as the low resource consumption.
- Launch Wallpaper Engine. If you purchased the application through Steam, you need to download the Steam launcher as well.
- Choose which monitor you want to customize. If you want to use both monitors, select the option to clone your wallpaper.
- Use the Discover and Workshop tabs to find new desktop backgrounds. The extensive search tools make it easy to locate animated backgrounds you like.
- Select the background you want to use, and then click on the Subscribe button. This will allow you to use the animated background on your computer.
- Each theme has some settings you can play around with, such as animation speed, audio, and more. Play around to customize your desktop more and cultivate an environment that matches your setup.
Method 2. Plastuer
Plastuer is an application that allows you to set GIFs as your desktop background with ease. Additional functionality lets you set even HTML5 websites as your setup’s wallpaper, opening up the possibilities with powerful WebGL support.
This allows you to create interactive, animated desktops for the low price of USD 2.00. The developers of Plastuer allow you to pay your price for the software.
Download: Purchase Plastuer from the official website for a minimum of USD 2.00 to cover the necessary PayPal fees.
Method 3. BioniX Wallpaper
BioniX GIF Wallpaper Animator is your free solution for achieving the animated GIF background look. It’s handy software capable of setting any GIF or video as your desktop wallpaper. It’s extremely intuitive and makes the otherwise complicated process much easier.
Download: Get the latest version of BioniX from the official website for free.
Method 4. VLC Media Player
While VLC is primarily a media player, it has tons of hidden functions you probably don’t even know of. One of these functions is the ability to set a video as your desktop wallpaper.
Download: Get the latest version of VLC Media Player from the official website for free.
After downloading and installing the VLC Media Player, launch the application and find a video you want to set as your desktop background. We recommend finding an endless loop from one of the following sources:
- Videvo
- Pexels
- Adobe Stock
- Pixabay
After acquiring a looping video you want to use for your desktop background, follow the tutorial below.
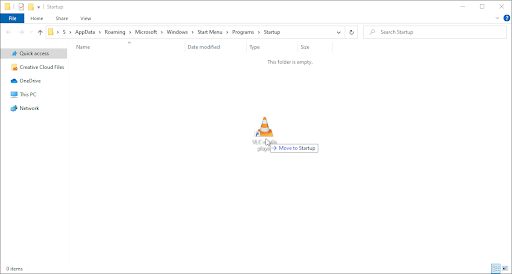
- Press the Windows + R keys on your keyboard at the same time to launch the Run application.
- Paste in the following path, then click on the OK button:
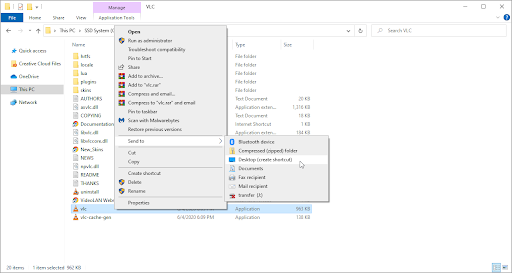
%appdata%\Microsoft\Windows\Start Menu\Programs\Startup - Next, open a separate File Explorer window and navigate to C:\Program Files\VideoLAN\VLC, then locate the vlc.exe file.

- Right-click on vlc.exe and click on Send to > Desktop (create shortcut).

- Go to your desktop, then drag and drop the VLC Media Player shortcut into the previously opened Startup folder.
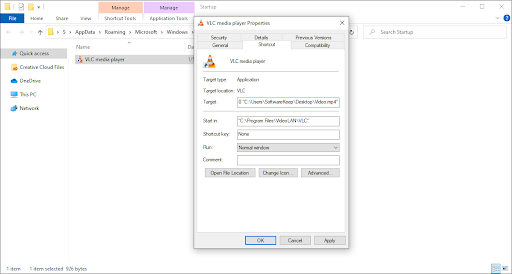
- Right-click on the shortcut, then choose Properties.

- Modify the Target field to the following paths, replacing the highlighted information with your username and the location of the video you want to use for your background:
«C:\Program Files\VideoLAN\VLC\vlc.exe» —video-wallpaper —qt-start-minimized —no-qt-fs-controller —repeat —no-video-title-show —qt-notification=0 «C:\Users\SoftwareKeep\Desktop\Video.mp4» - Click Apply, then close the window. If prompted, give the administrator permission for the shortcut.
- Double-click on the shortcut you just modified. Your animated wallpaper should immediately display on the desktop.
Need help? Check out our How to make a local user an administrator in Windows 10 guide.
Final thoughts
We believe these methods have helped you make a great gif wallpaper for your destop. How does it look?
If you need further help with Windows 10, don’t hesitate to contact the SoftwareKeep customer service team, available 24/7 to assist you. Return to us for more informative articles all related to productivity and modern-day technology!
Would you like to receive promotions, deals, and discounts to get our products for the best price? Don’t forget to subscribe to our newsletter by entering your email address below! Receive the latest technology news in your inbox and be the first to read our tips to become more productive.
Recommended articles
> Free Expense Tracking Worksheet Templates (Excel)
> 5+ Templates for Excel to Keep Track of Your Fitness
> Microsoft Visio: Complete Guide
You are here:
Home » Windows 10 » How To Set Animated GIF As Wallpaper In Windows 10/11
Windows 10 and 11 let you customize the desktop in various ways. For example, you can change the default desktop background, create and use themes to automatically change wallpaper at specified time intervals, and automatically set Bing picture (Windows Spotlight) as the desktop background.
Most PC users are happy with the available options to customize the desktop. However, some users, like me, would like to make the desktop more interesting by setting an animated GIF picture as the desktop background.
As you might already know, Windows 10 and 11 do not support setting GIF (Graphics Interchange Format) or live wallpaper as desktop background. You need to use third-party tools for this job.
While many apps are available to help you set animated GIF as your Windows 10/11 desktop wallpaper, Lively Wallpaper is one of the best free software available for this job.
Lively Wallpaper helps you set a GIF photo as your desktop background in no time. In fact, setting a GIF as wallpaper is as easy as changing the desktop wallpaper via the Settings app in Windows 10/11. In addition to the GIF, it can also set a webpage as your desktop background!
This guide will show you how to use the Lively Wallpaper to set GIF as wallpaper in Windows 10/11. Once again, it’s a free app.
Set GIF as desktop background in Windows 10/11
Step 1: Open the Microsoft Store app and search for Lively Wallpaper. Click on the Install button to download and install it.
Step 2: Launch the Lively Wallpaper app. If the Lively Wallpaper app does not show its window, right-click on its icon in the system tray and click Open Lively.
Step 3: Click on the Add Wallpaper option.
Step 4: In the resulting dialog, click the Open button next to the Choose a file option, select your GIF file and then click the Open button.
Step 5: Now, you will see the following dialog where you need to click the OK button.
Step 6: That’s it! Your GIF picture should now appear as your desktop background. If you prefer to return to the default wallpaper, right-click on the Lively Wallpaper app and click the Exit option.
Tip: Lively Wallpaper includes options to change the opacity of the taskbar. Go to Lively Wallpaper Settings > System tab and select a taskbar theme to change the taskbar transparency.
Сделать рабочий стол уникальным и динамичным можно с помощью установки в качестве фона анимации. Разработчики из «Майкрософт» оставили такую возможность на съедение конкурентов, решив не встраивать никаких соответствующих приложений в систему. Перед тем как поставить гифку на рабочий стол в Windows 10, пользователю понадобится скачать утилиту DisplayFusion.
Ещё иногда требуется сделать небольшую видео инструкцию, записав свои действия на ПК с экрана. Это удобно тогда, когда проще показать наглядно, чем долго и нудно рассказывать, что и как делать. Для этих целей пригодится простая, понятная и очень эффективная утилита Gif Screen Recorder. Можно ли установить, где скачать программы, как устанавливать и пользоваться? Расскажет данная статья.
Содержание
- Установить с помощью DisplayFusion
- Gif Screen Recorder анимация из записи действий пользователя
- Итоги
Установить с помощью DisplayFusion
Одна из самых удобных утилит, позволяющих анимировать десктоп — это DisplayFusion, установщик которой можно загрузить с официального сайта разработчика по ссылке https://www.displayfusion.com/Download/. Создатель предупреждает пользователя, что продукт платный, но познакомиться со всеми его возможностями без оплаты можно в тридцатидневный срок.
Первый шаг сделать обои в формате гиф на рабочем столе — установить DisplayFusion на ПК, для этого:
- Нажать на зелёную кнопку на сайте с надписью «Скачать установщик сейчас»;
- Запустить скаченный файл.exe и следовать инструкциям мастера, параллельно знакомясь с возможностями программы из подготовленной создателями презентации;
- Подождать окончания процесса и нажать на кнопку «Готово».
Чтобы установить на десктоп анимированное изображение, нужно:
1. Запустить DisplayFusion, пользуясь появившимся ярлыком или из меню «Пуск».

3. Разрешить утилите управлять фоном рабочего стола постановкой галочки возле соответствующей команды в верхней левой части окна.

3. Выбрать источник изображения, нажав на кнопку «Изменить» чуть ниже — это может быть «Сплошной цвет», папка «Мои изображения», сторонний URL-адрес или сайт изображений.

4. При выборе «Мои изображения» откроется проводник, через который необходимо найти на ПК желаемые гифки (можно выбрать несколько файлов), нажать кнопку «Открыть».

5.Среди списка доступных гифок, прописанных в левой части окна как адресный путь, следует выбрать одну, выделить её и нажать на «Применить» в правом нижнем углу.

6. Нажимаем по кнопке «Переменить» снизу в правом углу, чтобы картинка стала фоном рабочего стола.

В предыдущем окне выбора гифки можно настроить варианты её отображения — использовать на каждом мониторе отдельную анимацию, на всех сразу одну и ту же или только на одном рабочем столе.
Gif Screen Recorder анимация из записи действий пользователя
Объяснять неопытному пользователю, например, как поменять фон рабочего стола, куда для этого нажимать на словах — занятие долгое. Гораздо проще скинуть ему видеофайл с пошаговым наглядным алгоритмом, записанным с экрана в формате gif.
Приложений для записи с экрана существует превеликое множество, но наиболее простой и понятной является Gif Screen Recorder. Она имеет ряд весомых преимуществ перед конкурирующими аналогами:
- бесплатность;
- отсутствие рекламы;
- простота в использовании;
- масса возможностей записи и редактирования анимации.
Скачивать Gif Screen Recorder лучше по ссылке http://gifrecorder.com/ — это официальный источник. Для перехода на страницу скачивания нужно нажать на кнопку Visit the download page. Там можно прочитать инструкцию, а также проверить, есть ли на ПК NET Framework 4.0 (должен быть обязательно иначе программа работать не будет). Для скачивания инсталлятора нужно нажать на активную ссылку gifrecordersetup.exe. Установка рекордера заключается в следующем:
- Запустить gifrecordersetup.exe;
- Нажать «Next»;
- Принять условия лицензии, поставив точку на пункте «I Agree…»;
- Указать папку для размещения установочных файлов (лучше оставлять путь по умолчанию), нажать «Next»;
- Для завершения процесса нажать «Close».
Для записи анимированной инструкции с экрана собственного компьютера, следует:
1. Запустить Gif Screen Recorder, что приведёт к появлению на рабочем столе красной прямоугольной рамки.

2. Её можно увеличивать и уменьшать, а также перемещать в нужную область экрана, регулируя область съёмки.

3. Для начала записи надо нажать на зелёную кнопку с белым треугольником, для паузы — жёлтую с двумя вертикальными полосками, для остановки — красную с белым квадратом. Все кнопки находятся в верхней части рамки.
4. Там же есть значок вопроса, раскрывающий при нажатии окошко со справочной информацией.

5. Ещё чуть дальше перечень стандартных размеров.

6. С другой стороны рамки есть кнопочки, отвечающие за частоту кадров и глубину цвета. Их выбор обусловит качество анимации и её «вес» на выходе.

7. После того как настройки выставлены, следует нажать «Запись», проделать действия, требующие запечатления в анимацию и нажать «Стоп».

8. Выбрать место сохранения, задать имя и «Сохранить».

Анимация готова, но программа предложит выбрать один из дальнейших шагов:
- Open the gif animation in the editor — редактировать полученную гифку;
- Open the gif animation in a browser — просмотреть запись;
- Open the folder containing the gif file — перейти в папку с полученным файлом;
- Start new recording — начать запись новой анимации;
- Nothing — отсутствие действия, то есть закрыть программу.

Выбор первого пункта вызовет открытие окна редактора, поделенного на две части:
- Левая — список всех кадров по времени;
- Правая — просмотр конкретного кадра.

В этом окне можно удалить ненужные кадры (кнопка с красным крестиком), добавить картинки (кнопка с зелёным плюсиком) или отредактировать выборочные, открыв их через Paint (кнопка Edit image справа от красного крестика), конвертировать в avi (кнопка «Экспорт» с зелёной стрелкой вправо), просмотреть то, что получилось после редактирования (значок Show Animation слева от плюсика) и сохранить (дискетки).
Итоги
Программы DisplayFusion и Gif Screen Recorder — легко скачиваются, безопасно устанавливаются и предоставляют пользователям массу интересных возможностей, таких как установка анимации в качестве фона рабочего стола или запись своих действий на ПК прямо с экрана. Они достойны внимания, так как просты и понятны в использовании, эффективны для достижения поставленных целей и не захламляют компьютер нежелательной рекламой.