Любые зависания компьютера в части работы его операционной системы, вне зависимости от их продолжительности, всегда вызывают обоснованную негативную реакцию пользователей и множество вопросов, касающихся вариантов устранения данной проблемы. В настоящей статье речь пойдёт о довольно проблематичной ситуации, в которой пользователь при установке/обновлении операционной системы «Windows» сталкивается с зависанием работы ОС на шаге с надписью «Getting Windows ready».

Решение проблемы с зависанием при установке Windows на надписи Getting ready.
Причины и решения
Итак, как многим наверняка известно, надпись «Getting Windows ready» говорит о завершающей стадии подготовки функционирования установленной/обновлённой операционной системе. Соответственно, следует понимать, что процесс этот может действительно отнять много времени, в особенности если сама установка заняла не один десяток минут. «Getting Windows ready» при активном индикаторе рабочего процесса может занять и час, и два, и три, поэтому первый вариант – это банально подождать.

Аппаратно или программно
Статистика поисковых запросов наглядно демонстрирует, что в подавляющем большинстве случаев с рассматриваемой проблемой сталкиваются пользователи из других стран, а с чем это может быть связано, так до сих пор конкретно и неизвестно. Основными причинами зависания работы подготовительного процесса могут быть следующие моменты:
- неисправность загрузчика;
- неисправность используемого образа операционной системы;
- проблемы в кабельном соединении, в том числе и нестабильное электропитание;
- активные сетевые процессы;
- неисправность компонентов компьютера.
Исходя из приведённых причин, можно выделить следующий алгоритм действий, который при определённых обстоятельствах позволит решить проблему с зависанием.

Вариант 1
- завершите работу компьютера, но учитывайте, что аварийное выключение может привести к дополнительным ошибкам в работе операционной системе;
- отключите все внешние устройства ввода/выводы информации, сторонние накопители, колонки/наушники и т. д.;
- отключите кабель питания системного блока или извлеките аккумуляторную батарею ноутбука;
- оставьте обесточенный компьютер на некоторое время, буквально 1-2 минуты;
- снова подключите кабель питания/вставьте аккумуляторную батарею и верните при необходимости внешнюю периферию, кроме кабеля интернет-соединения.
Многим известен данный метод обесточивания в решении схожих проблем, что и в рассматриваемой теме.

Вариант 2
При возникновении зависаний на надписи «Getting Windows ready» в процессе установки операционной системы следует принимать во внимание и возможные ошибки в используемом образе ОС, а также в самом физическом носителе. Следовательно, в качестве второго варианта решения проблемы необходимо проверить качество программного обеспечения. Это можно сделать при попытке установить операционную систему на другое устройство, а также сменить загрузочный образ ОС со «сборочного материла» на чистый образ или наоборот. По сути, основываясь на том, что рассматриваемая проблема не имеет какой-либо конкретной причины и может в принципе отсутствовать или решиться сама собой, не существует стопроцентно рабочего алгоритма действий, который бы привёл к моментальному завершению установки/обновлению операционной системы.
Заключение
Последнее, что стоит отметить, — это наличие нескольких советов от пользователей на англоязычных тематических форумах, которые заключались в предложении отключить внешние USB-устройства, в частности мышь, и запустить установку/обновление ОС.
This process shouldn’t take too long, but if it does, try out our solutions
by Ivan Jenic
Passionate about all elements related to Windows and combined with his innate curiosity, Ivan has delved deep into understanding this operating system, with a specialization in drivers and… read more
Updated on
- When you are stuck on a Getting Windows ready. Don’t turn off your PC screen, you should wait for a couple of minutes.
- This issue can occur after performing updates or after a restart and for some, it also triggers a reboot loop.
- A startup repair or accessing the Safe Mode can also help you fix the problem in no time.
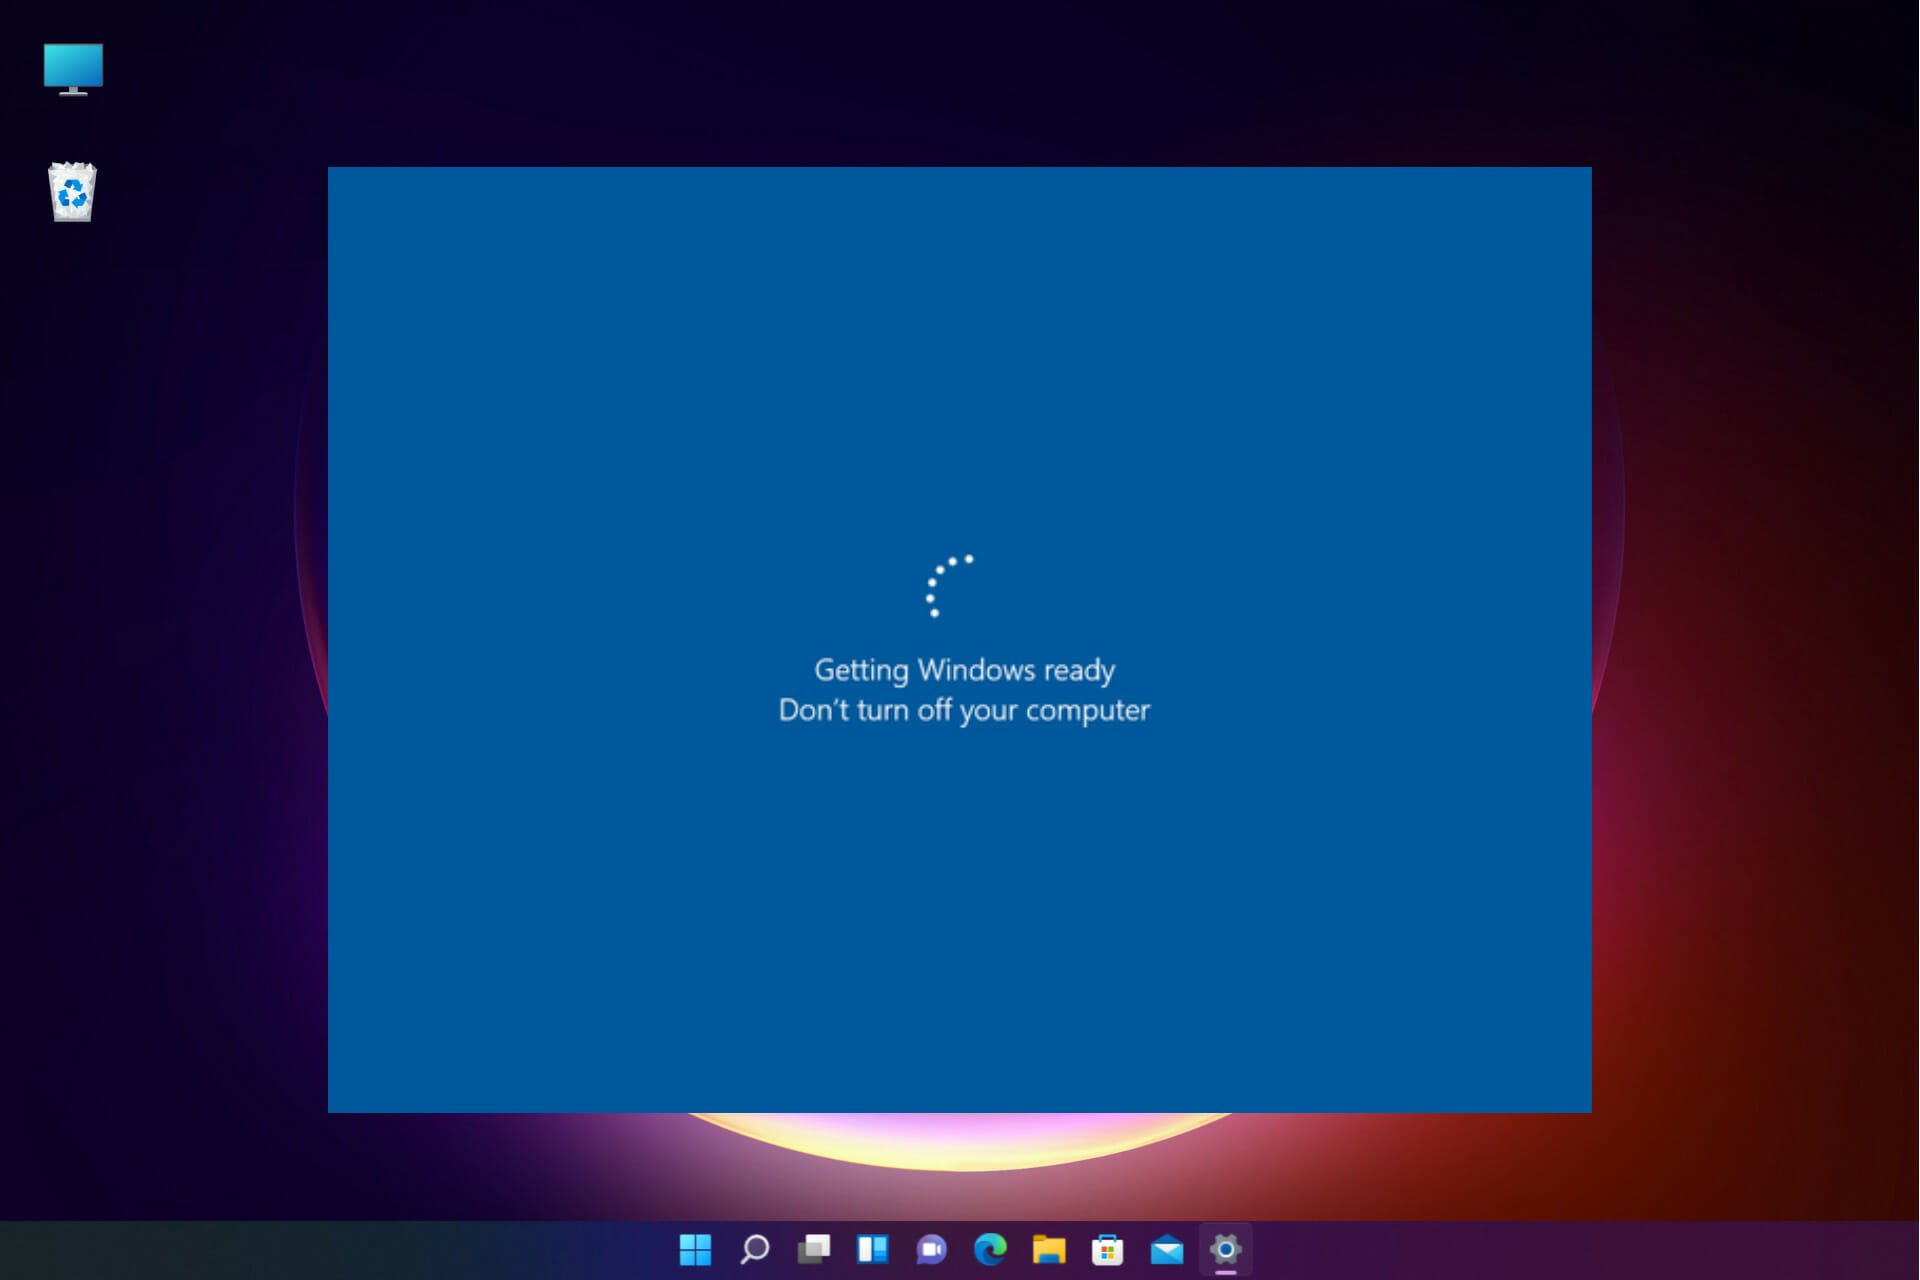
One of the problems that troubled a lot of PC users is that the screen gets stuck on the following message: Getting Windows ready. Don’t turn off your computer.
The message is displayed so you understand that some optimization and configuration processes are working and you shouldn’t disrupt them by turning off your machine.
If your computer is stuck on getting Windows ready, then read on to find out how long to wait for and when to take action and fix the issue.
- Getting Windows ready — how long to wait for?
- Why is my computer stuck at the Getting Windows ready screen?
- How can I fix Getting Windows Ready stuck?
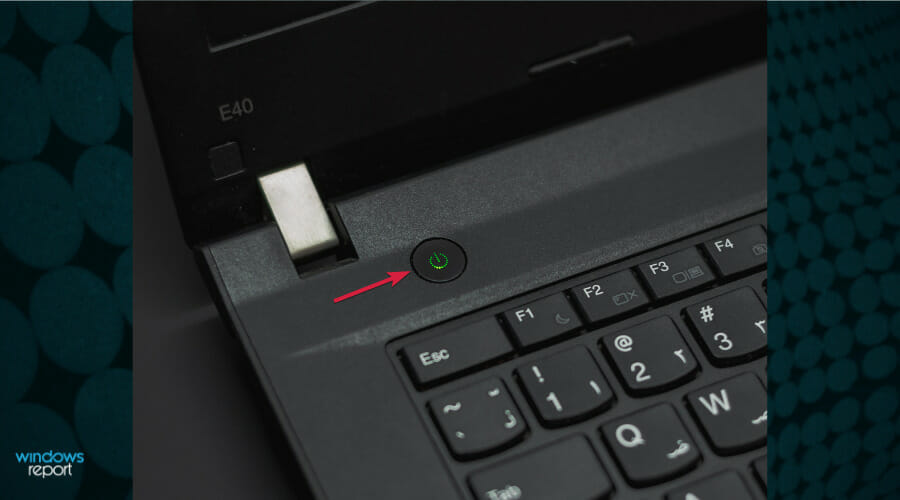
- 1. Hard shut down your PC
- 2. Perform a Startup Repair
- 3. Perform a clean reinstallation
- 4. Uninstall recently installed software
- How to fix Getting Windows ready restarting loop?
Getting Windows ready – how long to wait for?
Note that the estimated waiting time is around 5 minutes or so. However, some users were waiting for ages, and it seems that this issue is more prone to HP, DELL, and Lenovo PC and laptop users.
You can usually figure out if the process is stuck if there is no animation on the Getting Windows ready screen.
Why is my computer stuck at the Getting Windows ready screen?
There are various issues that can occur with Windows updates, and in this article, we’re going to focus on the following problems:
- Getting Windows ready infinite loop/ update loop/ boot loop/ restarting loop – Many users reported that they are stuck in a restart loop that prevents them from accessing Windows
- Getting Windows ready after a restart – This issue is most likely caused by an incomplete update, and Windows will try to finish its installation every time you restart your PC
- Getting Windows ready working on updates – This is a variation of this message that appears usually after a major Windows update. To fix this problem, be sure to try some of the solutions from this article
- Getting Windows ready stuck after update – In certain cases, this can appear after installing an update; sometimes the installation process isn’t finished and that causes this message to show up
It’s hard to address this issue, though, since you’re unable to reach your system and perform troubleshooting. Here are some workarounds you can try out below.
How can I fix Getting Windows Ready stuck?
1. Hard shut down your PC
After some time, you should hard shut down your PC. Keep in mind that this isn’t as dangerous as some would say. The procedure may be finished after a while, but the screen will remain in an idle state.
The best way to determine the right time for the hard restart/shutdown is to look at the HDD activity lamp. If the lamp isn’t blinking, that means that the procedure is over, and you should shut down your PC.
How we test, review and rate?
We have worked for the past 6 months on building a new review system on how we produce content. Using it, we have subsequently redone most of our articles to provide actual hands-on expertise on the guides we made.
For more details you can read how we test, review, and rate at WindowsReport.
If the system starts as intended, you should be good to go. If that’s not the case, your only viable option is to start the reinstallation procedure from scratch.
But this time we advise you to perform a clean reinstall. There’s a grave danger that your system won’t perform like it’s supposed to after this kind of failure.
2. Perform a Startup Repair
- Hold the Shift key down and press the Power button at the same time.

- Continue holding the Shift key, while the machine is powering on.
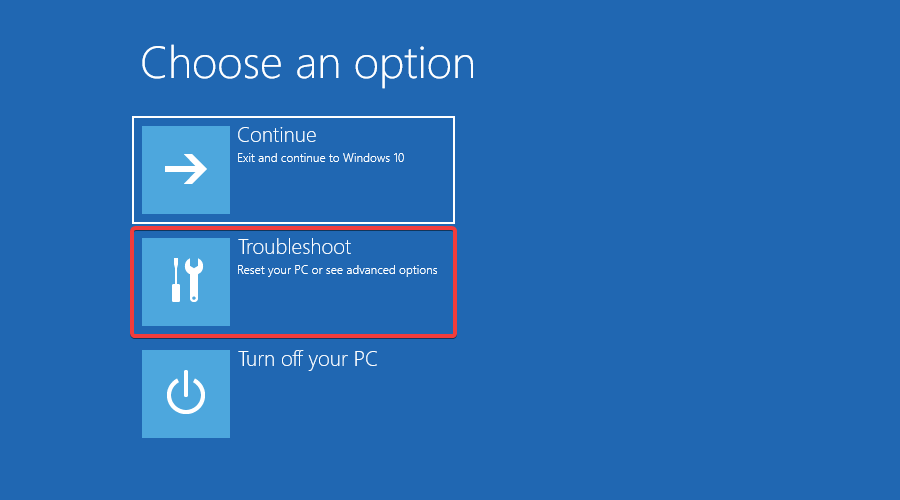
- When the PC restarts, you’ll see a screen with a few options. Click Troubleshoot.
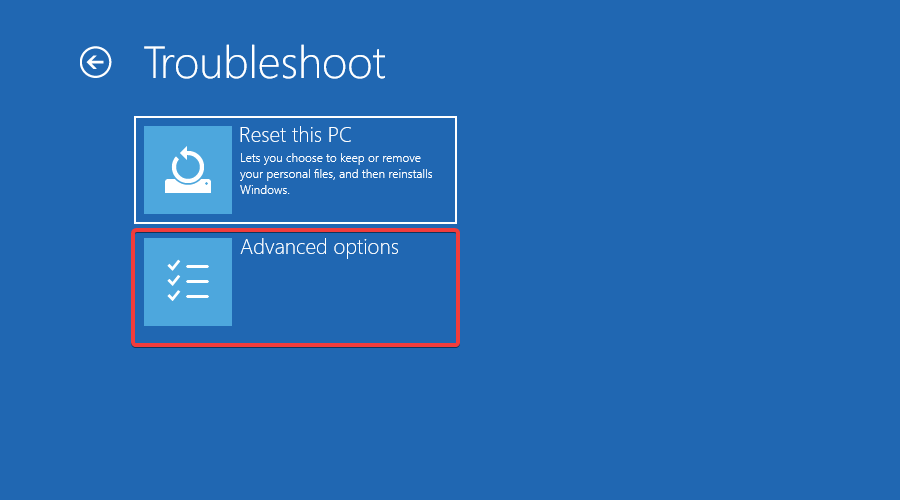
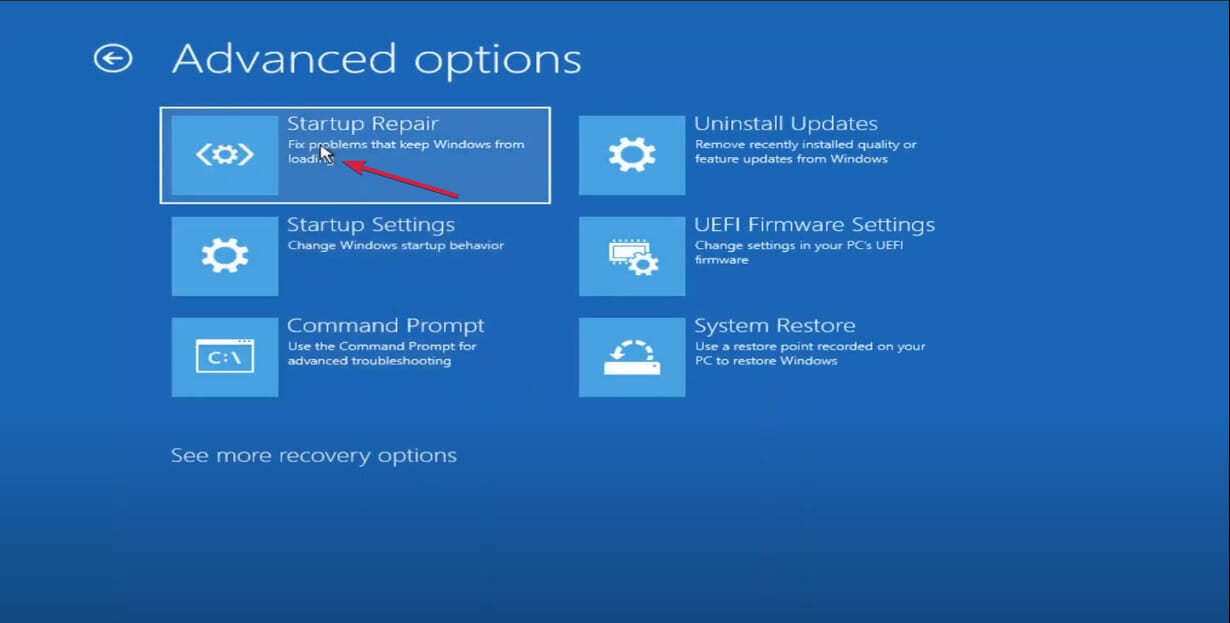
- Click on Advanced options.
- In the Advanced options menu, choose Startup Repair.

- In the Startup Repair screen, choose an account. You’ll need an account with Administrator privileges to continue.
- After entering the password, click Continue.
- Wait for the process to finish and restart your PC afterward.
3. Perform a clean reinstallation
A clean reinstallation should get you going and fix the Getting Windows Ready stuck issue. Make sure you back up sensitive data from the system partition and have your license key ready because otherwise, you’ll be in a lot of trouble.
Moreover, the reinstallation process is not as lengthy and you should be able to finish it in less than one hour or so, including driver check-up and customization of the system to your liking.
To perform a clean installation of Windows 10, you’ll need to create a Windows 10 installation media using the Media Creation Tool. Since you can’t access your PC, you’ll have to create installation media on another PC. After doing that you need to follow these steps:
- Connect the Windows 10 installation media to your PC and boot from it. Keep in mind that you might have to press the appropriate key or change your boot priority in BIOS in order to boot from Windows 10 installation media.
- Choose the desired language and click on Next.
- Click on Install Now and follow the instructions on your screen. Keep in mind that clean install will remove all files from the selected drive, so be sure to back up important files beforehand.
In addition, you must select the correct drive in order to perform a clean install. If you accidentally select the wrong drive, you’ll remove all files from that drive, so be extra cautious.
After the setup process is completed, the problem should be completely resolved. For more information, our guide on how to perform a clean reinstallation will provide you with a detailed explanation.
- Windows Update is not working in Windows 10/11
- How to fix Windows Update errors
- Windows Update Service is not running
Since clean install can be a complicated procedure, many users are suggesting resetting Windows 10 instead.
To do that, you need to do the following:
- Follow Steps 1 and 2 from above.
- Now click on Repair your computer.
- Select Troubleshoot, then Reset this PC, and finally click on Remove everything.
- Select your Windows installation and choose Only the drive where Windows is installed, then Just remove my files.
- Now click on the Reset button to start resetting your Windows 10 installation.
Both reset and clean install will remove all files from your system drive and reinstall Windows 10, so feel free to use any of these methods.
If you need more details, we have a complete guide on how to reset your PC that will help you all through the process.
4. Uninstall recently installed software
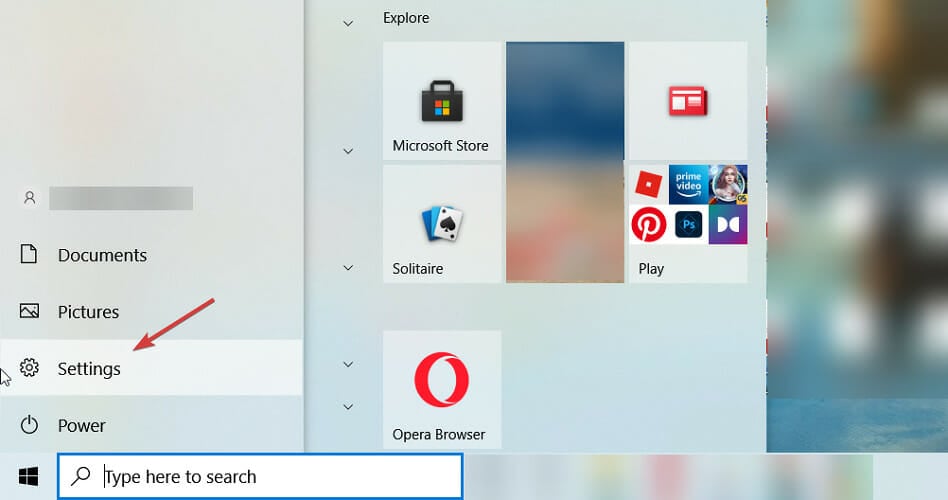
- Click the Start button and select Settings.

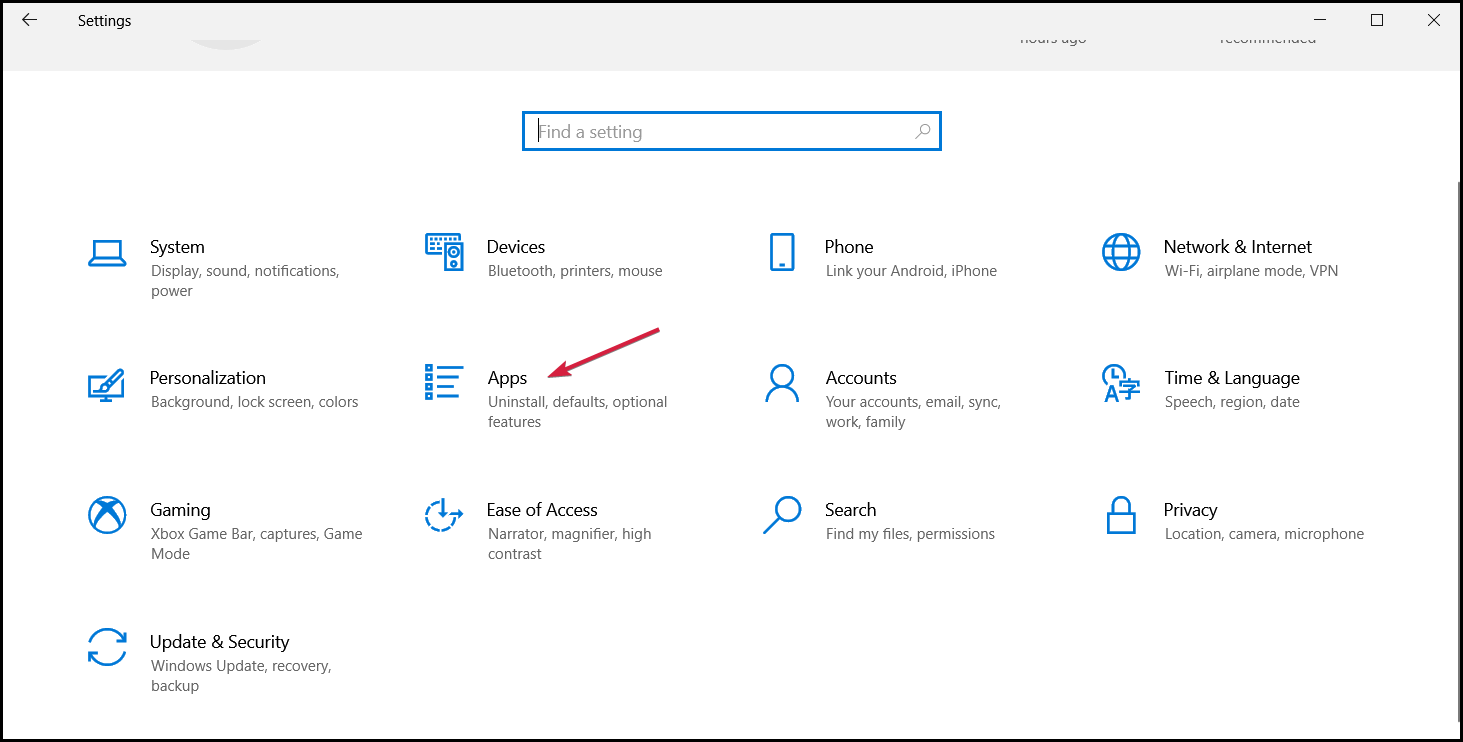
- Now click on Apps.

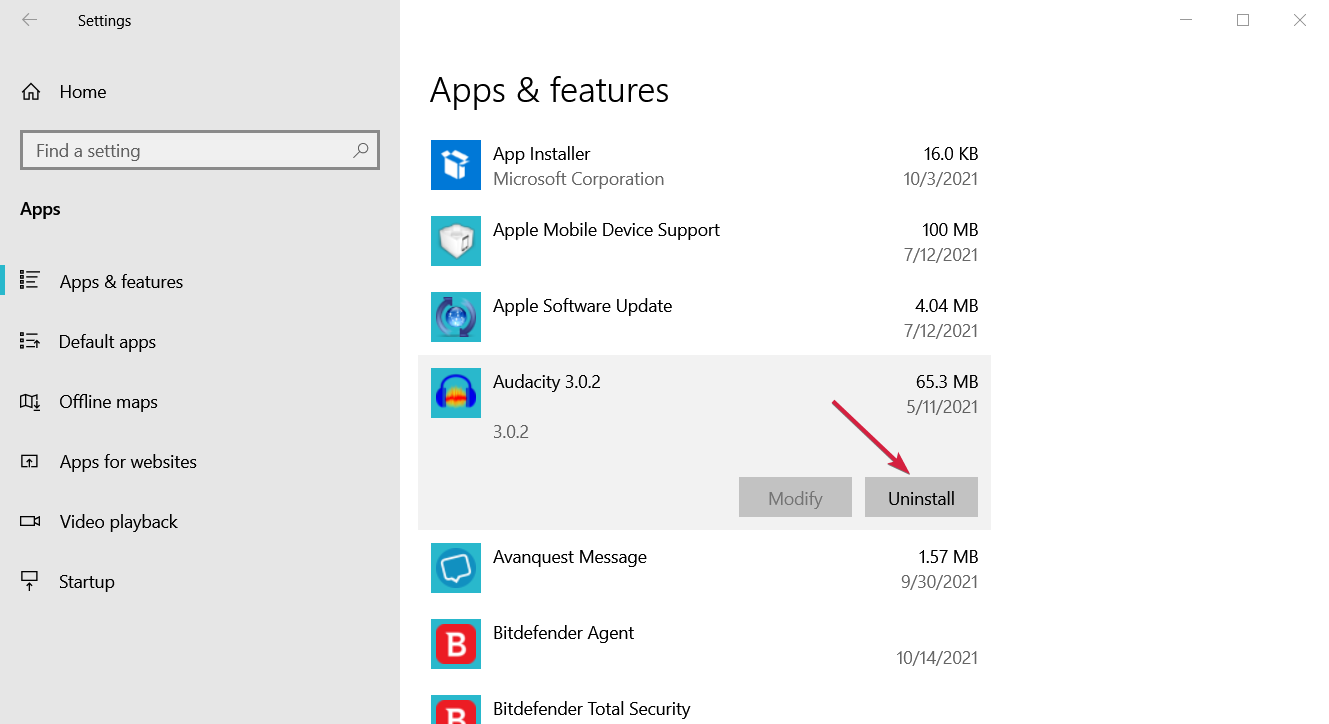
- Just select the recently installed app and select Uninstall.

If your Windows update process went smoothly prior to installing particular software on your computer, then we may have found the culprit.
That means that probably, the respective software solutions are not fully compatible with the latest Windows 10 OS version, you may encounter update errors.
So, before downloading any software on your PC, make sure it’s fully compatible with your OS.
In this case, use the Power button to turn off your computer, power it back on, and uninstall any recently installed apps and programs. Then restart your machine and check for updates again.
- Windows 11 23H2: How to Download the Official ISO
- A 64-bit Windows 12 ISO is out, theoretically. Here’s all you need to know
How to fix Getting Windows ready restarting loop?
Some of our readers experienced a boot loop with the Getting Windows ready window every time and that can be extremely frustrating.
However, the solution to this problem is to start the PC in Safe Mode and then use some of the troubleshooting methode described above.
We actually have an extensive guide on what to do if your PC is stuck into a boot loop and you will find a lot more information.
The installation process of Windows gradually becomes easier with every new system introduction. Most of us remember the lengthy installation procedure of XP, with all the buzz about drivers and initial setup. Luckily, that’s not the case with Windows 10.
But there’s good reasoning why users detest oversimplified installation processes. Firstly, most of your drivers are auto installed through the setup.
Secondly, there’s something that may go wrong with the installation. And when that happens, you may run back to Windows 7 or even good old Windows XP.
Another common issue encountered by users is Preparing Windows is Stuck. Learn to fix it by following our solutions in the dedicated guide.
We certainly hope this will help you upgrade to the latest Windows edition and unblock the computer stuck on Getting Windows ready.
If you have any comments or questions about your Getting Windows Ready stuck issue experience, make sure to post them below.
![]()
“Я только что выключил компьютер, а теперь на экране написано «подготовка Windows не выключайте компьютер». Это длится уже около 30 минут, и я не знаю, что делать. Мог бы кто-нибудь помочь?”
— Из Reddit
С годами Windows сделала значительные прорывы и стала предпочтительным выбором миллионов пользователей по всему миру. Однако пользователи Windows 8, 10 и 11 часто сталкиваются с непредвиденными проблемами в их операционных системах. Одной из распространенных проблем является появление сообщения «Подготовка Windows не Выключайте Компьютер» на их экранах. Эта проблема была замечена пользователями на различных платформах, и она часто происходит при включении/выключении компьютера или при выполнении перезагрузки системы. В некоторых случаях этот процесс может занимать несколько часов. Если вы в настоящее время столкнулись с проблемой, когда Windows 8/10/11 «зависает» на экране «Подготовка Windows», мы составили список эффективных решений, которые помогут вам её решить.

Часть 1: Почему Мой Компьютер Застревает на Сообщении «Подготовка Windows»?
Сообщение об ошибке «Подготовка Windows не выключайте компьютер» обычно указывает на проблему во время процесса обновления Windows. Существует несколько факторов, которые могут способствовать этой проблеме, включая:
- Проблемы с сетью: Плохое интернет-соединение или перебои в сети могут затруднить загрузку и установку обновлений, что приводит к появлению сообщения об ошибке.
- Проблемы с установкой обновлений: Иногда обновления Windows могут не устанавливаться корректно или встречать ошибки в процессе установки, заставляя компьютер «зависать» на экране «Подготовка Windows».
- Конфликты программного обеспечения или драйверов: Несовместимость между приложениями, драйверами устройств и обновлениями Windows может прервать процесс обновления, вызывая сообщение об ошибке.
- Повреждение файловой системы: Если файловая система повреждается, например, из-за внезапных сбоев питания или неправильного выключения, это может помешать процессу обновления и привести к «зависанию» системы.
- Устаревшая операционная система: Если ваша операционная система не обновлялась длительное время, во время процесса обновления могут потребоваться множественные обновления. Это может привести к задержкам или сложностям.
Часть 2: Что Делать, если Мой Компьютер Завис на «Подготовка Windows»?
Ситуация, когда ваш компьютер «зависает» на экране «Подготовка Windows» во время процесса обновления, является обычной проблемой, с которой сталкиваются многие пользователи. К счастью, существуют эффективные методы решения этой проблемы.
Решение 1: Просто Подождите Некоторое Время
Время от времени, лучшее, что можно сделать, — это терпеливо подождать, если у вас достаточно времени и вы не торопитесь. Когда требуется установить множество обновлений старых версий, процесс может занять значительное количество времени. Кроме того, если ваше интернет-соединение слабое, процесс обновления может затянуться. Поэтому рассмотрите возможность оставить ваш компьютер на час или больше, чтобы процесс обновления завершился. Если прогресса все еще нет, вероятно, проблема где-то в другом месте и требует дополнительного устранения неполадок.
Решение 2: Проверьте Интернет-соединение
Как мы уже упоминали выше, стабильное и надежное интернет-соединение является необходимым условием успешного обновления Windows. Если ваше интернет-соединение слабое или нестабильное, это может привести к «зависанию» экрана «Подготовка Windows». Если вы используете LAN-соединение, проверьте кабели и коммутаторы, попробуйте подключить кабель к другому коммутатору, чтобы убедиться в его исправности. Если вы используете Wi-Fi, проверьте роутер на наличие проблем. Убедитесь, что он работает без сбоев, и, при необходимости, перезагрузите его. Если вы подозреваете, что проблема в роутере, вы можете выполнить его диагностику или попробовать использовать кабель Ethernet.
Решение 3: Выключите Компьютер и Выполните Сброс Питания
Если экран «Подготовка Windows» сохраняется в течение продолжительного времени, вы можете попробовать выключить компьютер и выполнить сброс питания. Это может помочь устранить временные проблемы или сбои, которые могут вызывать зависание системы. Вот что вы можете сделать:
Шаг 1: Отключите любые внешние устройства или периферийные устройства, такие как USB-накопители, принтеры или внешние жесткие диски, от компьютера.
Шаг 2: Нажмите и удерживайте кнопку питания на вашем компьютере, пока он полностью не выключится. Когда компьютер выключится, отключите шнур питания от задней панели компьютера или от розетки. Если у вашего компьютера есть съемная батарея, то также снимите её.
Шаг 3: Оставьте компьютер в этом выключенном состоянии на пару минут. Затем вставьте обратно аккумулятор и подключите шнур питания к вашему устройству.
Шаг 4: Нажмите кнопку питания, чтобы включить компьютер, и наблюдайте, преодолеет ли он экран «Подготовка Windows».
Решение 4: Используйте Инструмент решения для загрузки Windows
Когда вышеупомянутые базовые методы не могут решить проблему, когда Windows 10 «зависает» на экране «Подготовка Windows», вашим итоговым решением будет поиск дополнительной помощи у надежного инструмента для загрузки Windows, такого как 4DDiG Windows Boot Genius. Этот инструмент предназначен для автоматического устранения различных проблем Windows, включая синий, черный или белый экран на компьютере с Windows, Windows 10 не загружается, системные сбои Windows и другие проблемы, связанные с загрузкой, такие как зависание компьютера на экране «Подготовка Windows».
Давайте посмотрим, как вы можете использовать 4DDiG Windows Boot Genius для решения проблем, которые мешают правильной загрузке вашего компьютера, и запустить компьютер за несколько минут. Прежде чем продолжить следующие шаги, убедитесь, что вы создали резервные копии всех ваших важных файлов и данных на внешнем устройстве хранения или в облаке.
- Шаг 1:Создайте загрузочный диск
- Шаг 2:Загрузка Windows с USB/CD/DVD
- Шаг 3:Начните восстановление вашего компьютера
Скачайте и запустите 4DDiG Windows Boot Genius на другом компьютере. Подключите USB-накопитель или вставьте пустой CD/DVD в рабочий компьютер, а затем нажмите «Создать загрузочный диск сейчас», чтобы начать запись диска восстановления.
Выберите ОС, которую хотите восстановить, и выберите диск с загрузочными данными. Затем нажмите «Далее», чтобы начать загрузку образа восстановления ISO и дождитесь, пока Windows Boot Genius загрузит образ восстановления ISO и создаст загрузочный диск.
Когда загрузочный диск создан, извлеките его из рабочего компьютера и вставьте в проблемный компьютер. Перезагрузите проблемный компьютер и войдите в меню загрузки, нажав соответствующую клавишу в процессе запуска.
Выберите загрузочный диск, созданный с помощью 4DDiG Windows Boot Genius, в меню загрузки.
Когда ваш проблемный компьютер успешно загружается, 4DDiG Windows Boot Genius запустится автоматически. Нажмите на опцию «Автоматическое восстановление» для диагностики и исправления любых проблем с Windows, вызывающих «зависание» процесса обновления.
После завершения процесса восстановления, извлеките загрузочный диск и перезагрузите ваш компьютер.
Решение 5: Запустите Инструмент для Восстановления при Запуске Windows
Когда ваш компьютер «зависает» на экране «Подготовка Windows», вы также можете попробовать запустить инструмент для восстановления при запуске Windows. Этот инструмент предназначен для диагностики и исправления проблем, которые могут мешать нормальной загрузке вашего компьютера. Следуйте инструкциям ниже, чтобы начать:
Шаг 1: Перезагрузите ваш компьютер и нажмите необходимую клавишу (обычно F8, F11 или Del), чтобы получить доступ к меню загрузки. Выберите опцию загрузки в среду восстановления Windows.
Шаг 2: В меню дополнительных параметров загрузки выберите «Устранение неполадок», а затем выберите «Дополнительные параметры».
Шаг 3: Теперь выберите «Восстановление при запуске» и дождитесь, пока инструмент не проанализирует вашу систему и не попытается исправить обнаруженные проблемы.
Шаг 4: Следуйте инструкциям на экране, предоставленным инструментом восстановления при запуске.
Шаг 5: После завершения процесса восстановления перезагрузите компьютер и проверьте, была ли решена проблема с «зависанием» на экране «Подготовка Windows».
Решение 6: Удалите Недавно Установленное Обновление в Безопасном Режиме
Сбойное обновление может прервать работу Windows. Если вы подозреваете, что недавно установленное обновление вызывает ошибку «Подготовка Windows», попробуйте удалить его в безопасном режиме — это может помочь исправить проблему. Безопасный режим позволяет запустить компьютер с минимальными драйверами и службами, что упрощает устранение проблем и удаление проблемных обновлений. Вот как удалить недавно установленное обновление в безопасном режиме:
Шаг 1: Откройте страницу «Дополнительные параметры», затем нажмите «Настройки запуска» и нажмите «F4», чтобы получить доступ к безопасному режиму.
Шаг 2: В безопасном режиме Windows 10 щелкните правой кнопкой мыши на «Пуск» > «Панель управления» > «Программы и компоненты».
Шаг 3: С левой панели выберите недавние обновления и удалите их, чтобы исправить проблему «зависания» ноутбука на экране «Подготовка Windows». В конце концов, перезагрузите Windows 10/11, чтобы увидеть, решена ли проблема.
Совет: При сбросе заводских настроек будут удалены файлы на вашем жестком диске. Для восстановления потерянных или удаленных данных с компьютеров вы можете использовать инструмент для восстановления данных с жесткого диска. И вы можете перейти к Части 3 для получения подробной информации.
Решение 7: Выполните Восстановление или Сброс Системы
Еще один метод, который может помочь устранить постоянную ошибку «Подготовка Windows», — это восстановление или сброс системы. Это вернет ваш компьютер к предыдущему стабильному состоянию или выполнит чистую установку Windows. Но не забудьте сделать резервную копию ваших важных файлов перед применением этого метода, чтобы избежать потери данных. Вот как можно продолжить после резервного копирования данных:
Шаг 1: Перезагрузите компьютер и нажимайте клавишу F8 (или Shift + F8) во время загрузки, чтобы получить доступ к меню «Дополнительные параметры загрузки».
Шаг 2: В меню загрузки Windows перейдите к «Устранение неполадок» > «Дополнительные параметры» > «Восстановление системы».
Шаг 3: Выберите точку восстановления, которая предшествует появлению ошибки «Подготовка Windows». Следуйте инструкциям на экране, чтобы начать процесс восстановления системы.
Решение 8: Выполните Чистую Установку Windows
Если ошибка подготовка windows не выключайте компьютер продолжает сохраняться, вероятно, в операционной системе есть неисправимые проблемы. В этом случае эффективным решением может быть чистая установка Windows . Этот процесс включает переустановку операционной системы с нуля, что помогает устранить любые конфликты программного обеспечения или поврежденные файлы, вызывающие проблему. Однако перед этим важно сделать резервную копию ваших важных данных, так как этот процесс стирает все данные на системном диске.
Часть 4: Часто Задаваемые Вопросы о Зависании Windows
1. Как исправить зависший компьютер при загрузке?
Если ваш ПК застрял на экране загрузки, вы можете:
- Попробовать безопасный режим Windows.
- Отключите вашу батарею.
- Отключите все внешние устройства.
- Попробуйте выполнить антивирусную проверку.
- Воспользуйтесь восстановлением системы или восстановлением при запуске.
2. Что делать, если Windows застряла при перезагрузке?
Если Windows долго перезагружается, попробуйте отключить все внешние устройства и батарею (в случае ноутбука) от вашего компьютера. Это принудительно выключит ваш ПК.
3. Как исправить зависание Windows 10/11 при готовности?
Выключите его и подождите 20 секунд. В случае с ноутбуком, извлеките батарею, отключите его от Интернета (выключите Wi-Fi). Теперь подключите его снова, чтобы увидеть, запустится ли ПК.
4. Сколько мне следует ждать «Подготовка Windows»?
Лучше всего терпеливо подождать около 2-3 часов. Если после этого времени проблема сохраняется, не нужно продолжать ожидание, начните действовать, используя предложенные решения.
Заключение:
Задержка на экране «подготовка windows не выключайте компьютер» – это, безусловно, непростая проблема. Однако, следуя предложенным решениям, таким как сброс питания, запуск инструмента для исправления ошибок при запуске Windows, или использование профессиональных инструментов, таких как 4DDiG Windows Boot Genius, вы можете преодолеть это препятствие и обеспечить гладкий запуск Windows.
(Нажмите, чтобы оценить этот пост)
Вы оценили 4.5 ( участвовали)
Вам Также Может Понравиться
-
Home>>
- Исправления Windows >>
- Как Исправить Сообщение Подготовка Windows не Выключайте Компьютер в Windows 10/11
One of the most annoying issues with Windows 10/11 is when it freezes for a long time at the «Getting Windows Ready – Don’t turn off your computer» screen.
The message «Getting Windows ready» appears during the installation of important updates, and in most cases after 4-5 minutes the message disappears, the computer restarts and you can continue your work. But in some cases the message stays for a long time and users do not know how long they have to wait until Windows is ready.

In this article, you will find detailed instructions to troubleshoot the «endless» issue of Getting Windows Ready in Windows 10/11. 
How to FIX: Getting Windows Ready, Don’t Turn off Your Computer in Windows 10/11,
- Wait longer.
- Force Shut down.
- Repair Startup.
- Uninstall Recent Updates.
- Restore PC to a Previous State.
- Reset Windows 10/11.
- Clean Install Windows 10/11.
Method 1. Wait for an Extended Period of Time.
If the computer has been stuck on the «Getting Windows Ready» screen for too long, don’t despair and keep waiting until the process is complete. Personally I have had to wait from 1 to 4 hours (yes you read that right) for an old computer to come out of the «Getting Windows Ready» screen.
Some users even reported that their computer was stalled on the «Getting Windows Ready» page for about 8 hours before it successfully booted into Windows. It is therefore recommended that you leave your computer for a longer period of time, especially if there are a large number of updates that need to be installed. Also in such a case I suggest to replace your hard disk with an SSD.
Method 2. Hard Shut Down.
If you have been waiting too long or if you are in a hurry to continue working and the message on the screen still appears, then forcibly shutting down your computer can solve the problem. To do that:
1. Press and hold down the power button for at least 10 seconds to completely turn off your computer.
2. Disconnect all USB peripherals [e.g. USB flash drives, USB printers, etc. (except of course the mouse and keyboard).
3. Disconnect the power cord from the computer and also disconnect the battery if it is a laptop and if it is removable.
4. After 5 minutes connect the power cable. (Reattach the battery first if you own a laptop).
5. Turn on your computer and check if it starts normally without getting stuck in the «Getting Windows Ready» message.
Method 3. Repair Startup Problems.
If the above methods failed to resolve the issue, the next step is to try to resolve it using the options in the Windows Recovery Environment (WinRE).
Step 1. Force Windows to Boot in Windows Recovery Environment (WinRE).
1. Press and hold down the power button for at least 10 seconds to completely turn off your PC.
2. Turn On your PC, and when the manufacturer’s logo appears (or when you see the spinning dots), hold down the power button for 10 seconds to turn off your computer again.
3. Repeat the above process 2 more times and then leave your PC to boot.
4. When the «Automatic Repair» screen appears, click Advanced Options, and continue to the next step. *

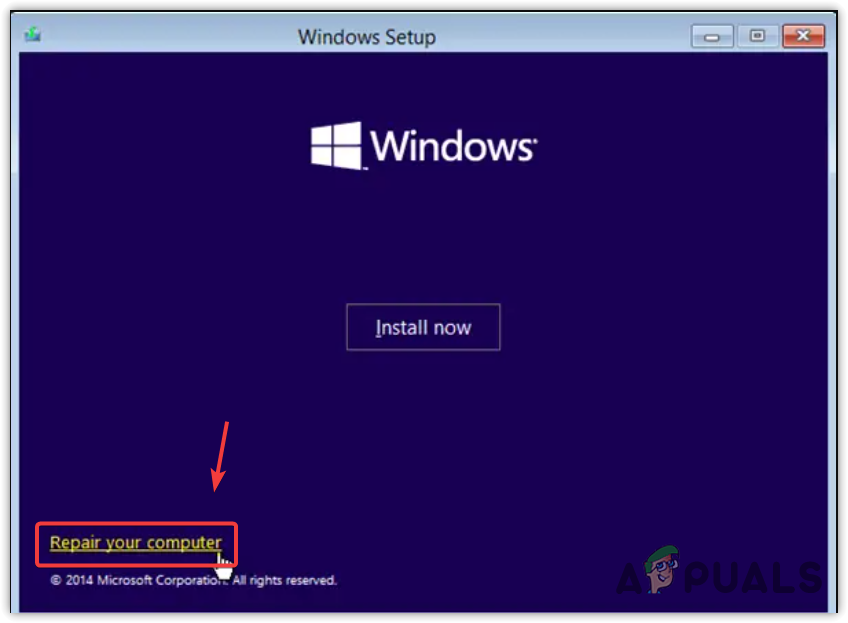
* Note: If your PC doesn’t start in WinRE, create a Windows 10/11 USB installation media from another functional PC and then start the affected computer from the installation media.** Then click Next at the first screen and then click Repair your Computer > Troubleshoot.
** To Start your computer from the installation media, turn on the computer and depending on the PC manufacturer, press one of these keys repeatedly (F9, F8, ESC, Del) to access the boot options and select the USB installation media as the boot device.
Step 2: Run Startup Repair.
1. From the Windows Recovery Environment, select Troubleshoot > Advanced options.
2. Click the Startup Repair option and then select the target OS (e.g. Windows 10)

3. Let Windows to repair the startup components and then to restart.
4. Boot to Windows normally and proceed to install updates again.
Method 4: Uninstall Recent Update.
Because this problem usually occurs during the unsuccessful installation of an update, proceed to remove the latest update from the WinRE.
1. Boot into WINRE using the instructions on step-1 on method 3 above.
2. in Advanced options choose Uninstall Updates.

3. Choose an account with administrative privileges, type in the password, and click Continue.

4. First choose Uninstall latest Quality update and follow the on-screen instructions to uninstall it. *
* Note. If the problem is not fixed after uninstalling the latest quality update, repeat the same steps but this time Uninstall latest feature update and see if that fixes the problem.

Method 5: Perform System Restore.
Your next option to prevent Windows to stuck at «Getting Windows Ready», is to restore your PC to a previous working state from the WinRE.
1. Boot into WINRE using the instructions on step-1 on method 3 above.
2. On WinRE Advanced options –> System Restore.

3. If prompted, select an account with administrative privileges, type a password for that account and click Continue.

4. At System Restore screen, click Next. *
* Note: If you receive the message that «no restore points have been created on your computer…» skip to next method.

5. Select Show more restore points and select a date that you know your computer was working correctly, and then click Next.

6. Click Finish and Yes again to start to restore process.
7. Now wait until the restore process is completed. During the restore process, your computer will restart several times and when it’s done, you should enter in Windows without problems.
Method 6. Reset Windows to Default State by keeping your files.
Another method to repair Windows 10, if your PC doesn’t start normally, is to reinstall Windows by using the Reset this PC option in WinRE. *
* Important: The ‘Reset this PC’ option, keeps your files, BUT removes all your programs and settings. Use this option only if the above methods do not solve the problem.
1. Follow the instructions on step-1 above to enter in WinRE.
2. Click Reset this PC in Troubleshoot screen. *
* Note: Keep in mind that the Reset this PC option is not available if you started from a USB Windows installation Media. At this case, skip to next method.

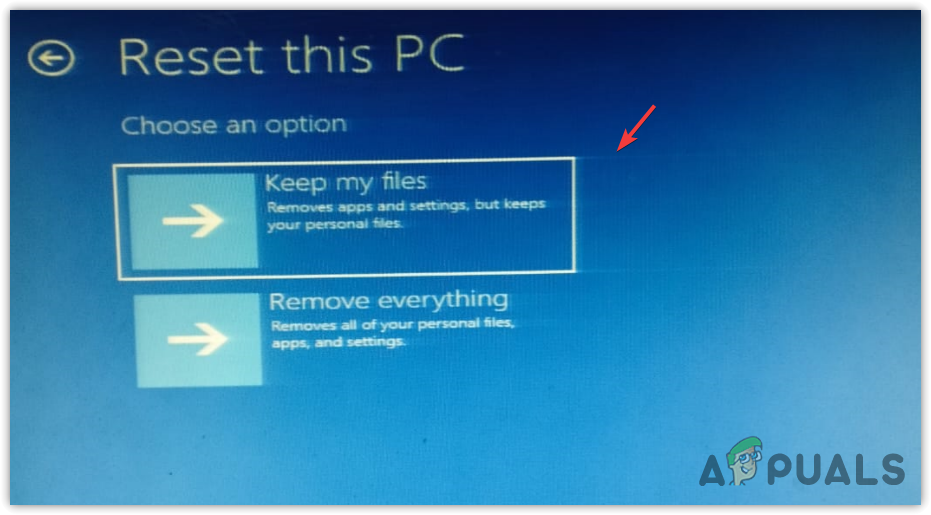
3. At the next screen choose Keep my files. *
* Please Note: All applications and settings will be removed if you continue and you will need to reinstall your programs when the process is complete.

4. If prompted, select an account with administrative privileges, type a password for that account and click Continue.
5. If you PC is connected to Internet, select Cloud download, otherwise choose Local reinstall. *
*Note: If your PC has a reliable internet connection, choose cloud download; otherwise, choose Local reinstall – which does not require an internet connection.

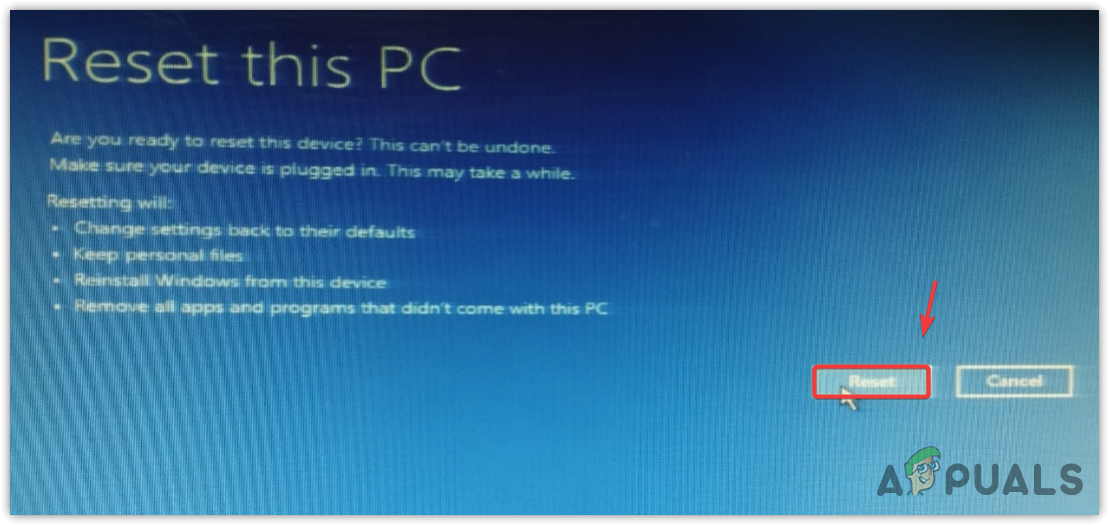
6. Finally, let the Reset this PC tool to reinstall Windows.
Method 7. Clean Install Windows 10 & Check Hardware.
If none of the above methods doesn’t resolve your problem, then your final option is to backup your files and to perform a clean installation of Windows 10.
That’s it! Which method worked for you?
Let me know if this guide has helped you by leaving your comment about your experience. Please like and share this guide to help others.
Is your computer or laptop stuck on ‘Getting Windows Ready. Don’t turn off your computer’ screen every time your turn it on? This issue mostly occurs when you try to update your Windows or fresh install it. Don’t worry though! because this issue can be fixed. Below we have plenty of solutions for ‘Getting Windows Ready’ boot loop issue.
This issue is reported on all Windows versions (Including Windows Server and VMWare as well). HP, Dell and Microsoft Surface laptops are getting stuck on ‘Getting Windows Ready’ screen often than other brands.
What causes computer to get stuck on Getting Windows Ready?
Windows installs updates using the downloaded update files located in the software distribution folder. If these files get corrupted for some reason, such as a weak internet connection, you will get stuck on a Getting Windows Ready screen.
How long should you wait if stuck on ‘Getting Windows Ready’?
According to Official Microsoft Support troubleshooting article on “Trouble installing Surface updates?” If the “Getting Windows Ready” screen just doesn’t seem to go away after 20 minutes, something might be up with the update installation.
Therefore, before you jump into troubleshooting, give it at least 20 minutes to make sure Windows has enough time to finish the update.
You could even try disconnecting from the internet to see if that speeds things up a bit. If it’s still stuck after half an hour, then it might be time to start looking into what’s going on and follow the troubleshooting steps in your content.
We have listed our most working solutions for you down below, try each method and check if it works for you. Here are all the solutions:
Solution 1: Power cycle your computer
The first solution is to force restart your system because it is the only way to cancel the installation of the Windows update without applying any solution. Force restarting the system closes all the processes immediately and restarts the essential services that allow the system to take a fresh start.
- To force restart the system, hold the Power button until the laptop turns off.
- Once it is turned off, wait for 10 to 15 seconds, then turn on your system by pressing the power button. This can take up to several minutes to continue the Window with the previous Windows update. So be patient.
- Once done, now the problem should be fixed.
Solution 2: Disable Windows Modules Installer service
Windows Module installer is a background service that ensures the installation, modification, and removal of Windows updates.
If this service gets disabled, the process of installation or uninstallation will be terminated from the background. So to get rid of getting Windows ready screen, try disabling the Windows Modules Installer using the Registry Editor.
To disable the Windows module installer, you need to go to Windows Recovery Environment. For that, you need to boot your Windows installation disc.
- Click Repair your computer, and select Troubleshoot.

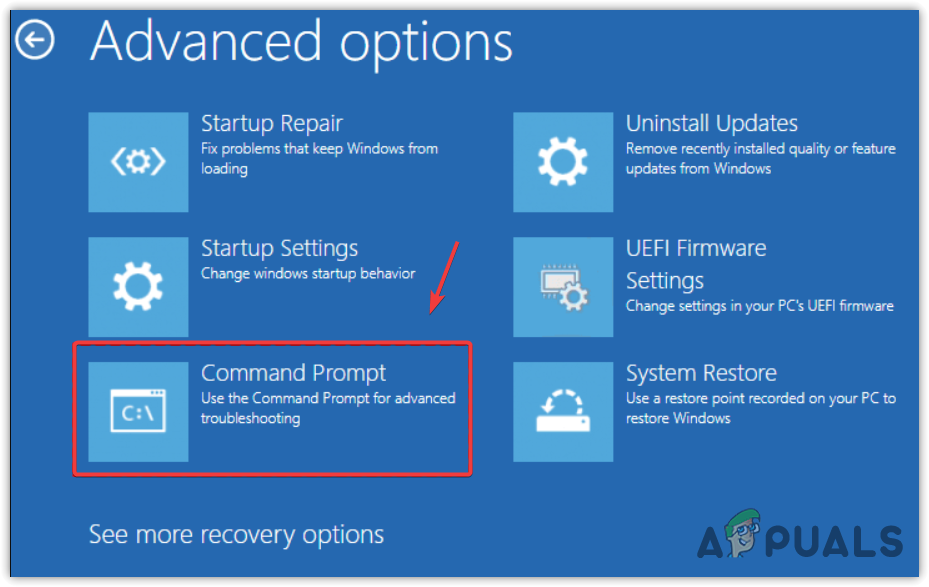
- Then, select Advanced Options > Command Prompt.

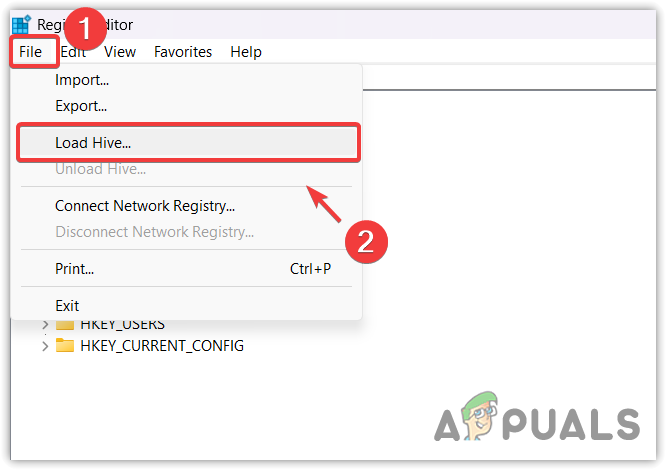
- Once the command prompt is opened, type regedit and hit Enter to open the registry editor.

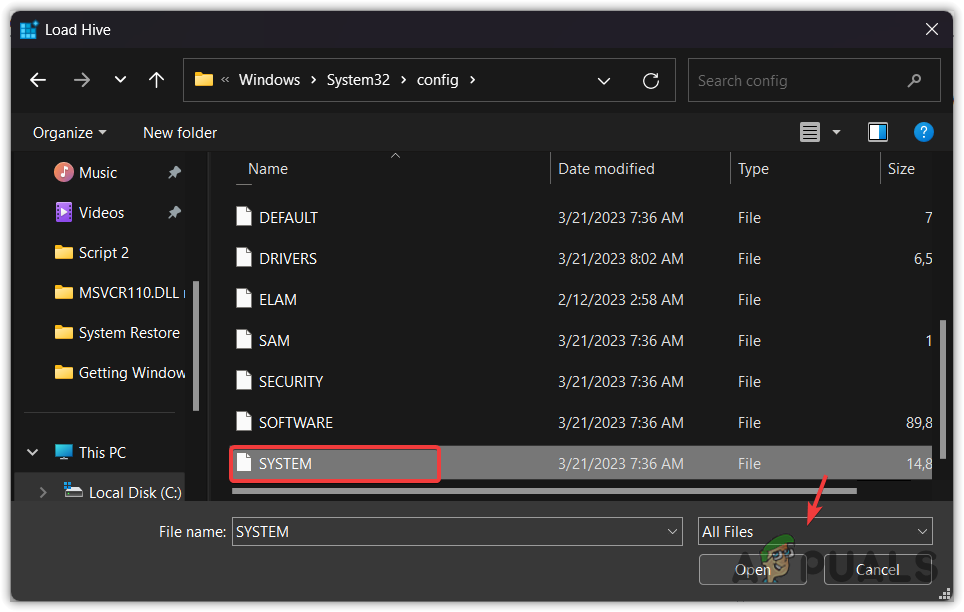
- Once it is opened, select HKEY_LOCAL_MACHINE and click Load Hive from the File Menu.

- Navigate to the following path and select the SYSTEM and click Open.
C:\Windows\System32\config

- Now browse the following path in the registry editor.
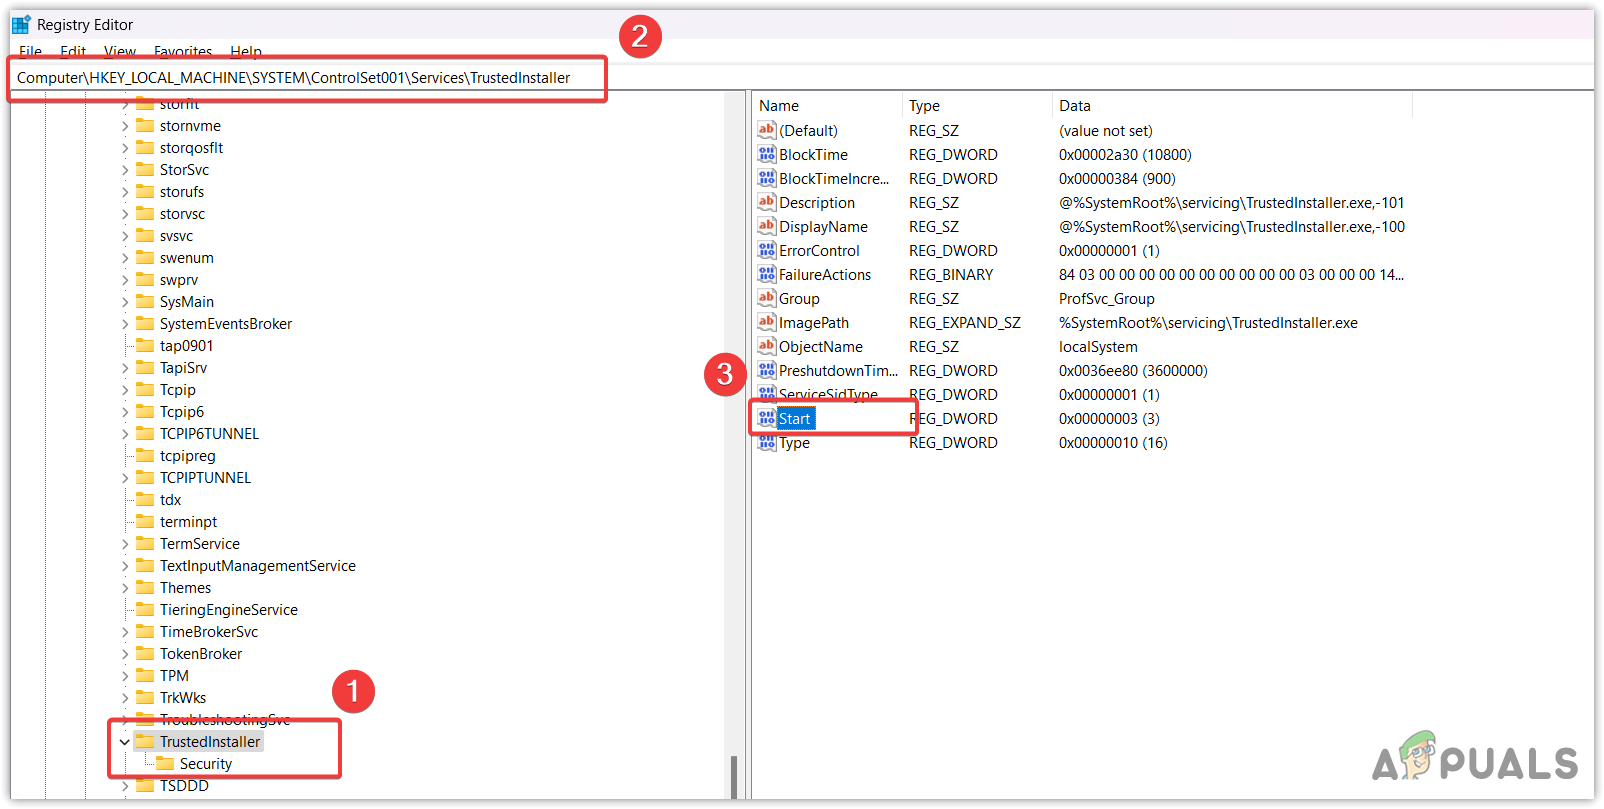
Computer\HKEY_LOCAL_MACHINE\SYSTEM\ControlSet001\Services\TrustedInstaller

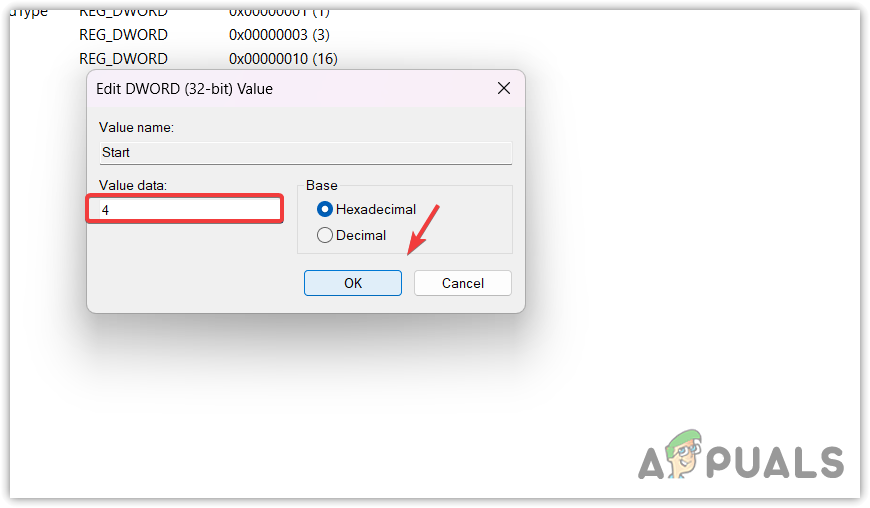
- Change the value of Start to 4, which means you want to disable the Windows Modules installer service.

- Once done, click OK, and close the registry editor.
- Then, simply restart your computer for the changes to take effect then check if the issue is fixed or not.

Solution 3: Use a System Restore utility
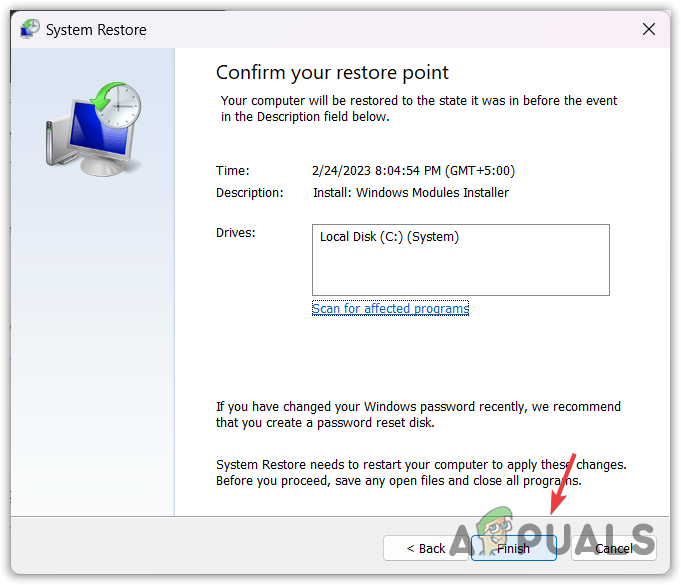
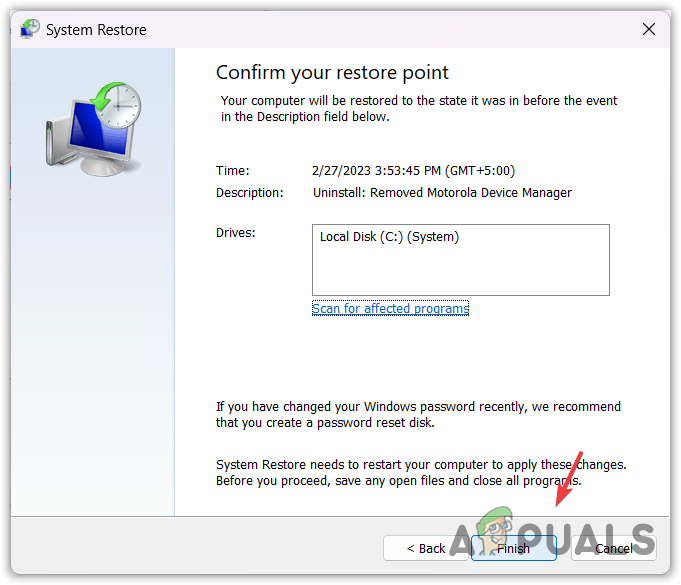
System Restore is a utility that is used to restore Windows to a previous state, so if the Windows update is continuously failing and getting stuck on getting Windows ready, you can use a system restore utility to roll back to a previous Windows update. But this utility requires a restore point created before you encounter this issue.
- To use a system restore utility, boot the Windows installation disc. You can boot your disc by selecting the USB from the boot options.
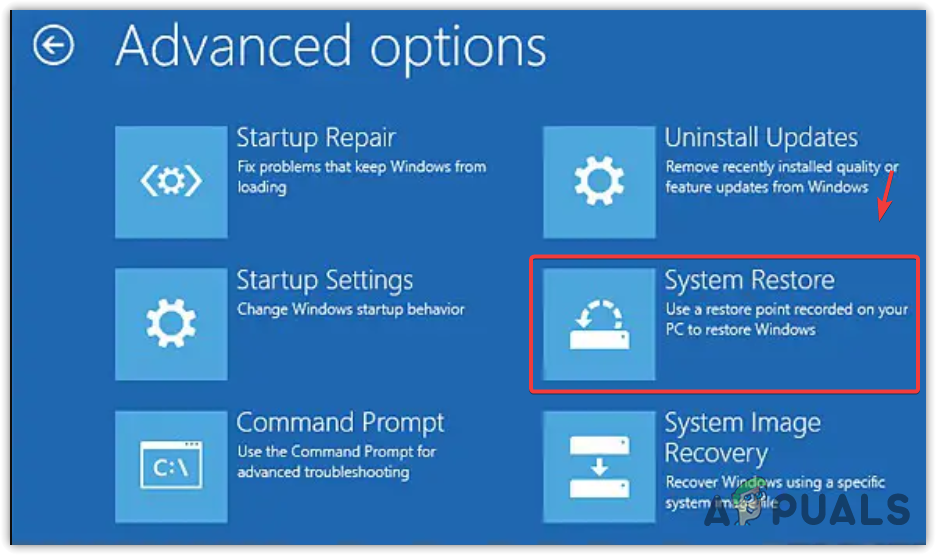
- Once done, click Repair your computer and select Troubleshoot > Advanced Options > System Restore.

- Wait for your Windows to run the system restore utility, then click Next and select a restore point.

- Finally, click Next and click Finish to restore Windows to its previous state.
Solution 4: Enable Safe Mode to uninstall Windows updates
Safe Mode is a state where the drivers and third-party application services do not work. It is a troubleshooting utility that is used to determine which program or service is interfering and causing the issue.
Even though you can uninstall Windows updates from the Windows recovery environment, you won’t be able to reset the Windows update component unless you enter all the commands one by one, which is a lengthy process.
By accessing the safe mode, you will be able to uninstall Windows update along with running a batch file that contains all the commands to reset the Windows update component. To do so, follow the steps.
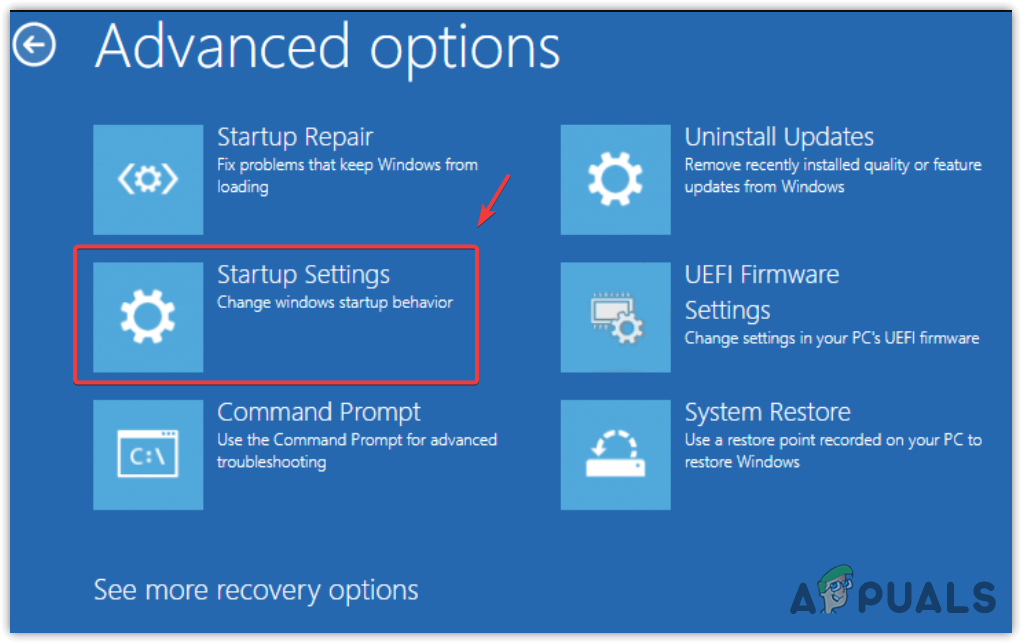
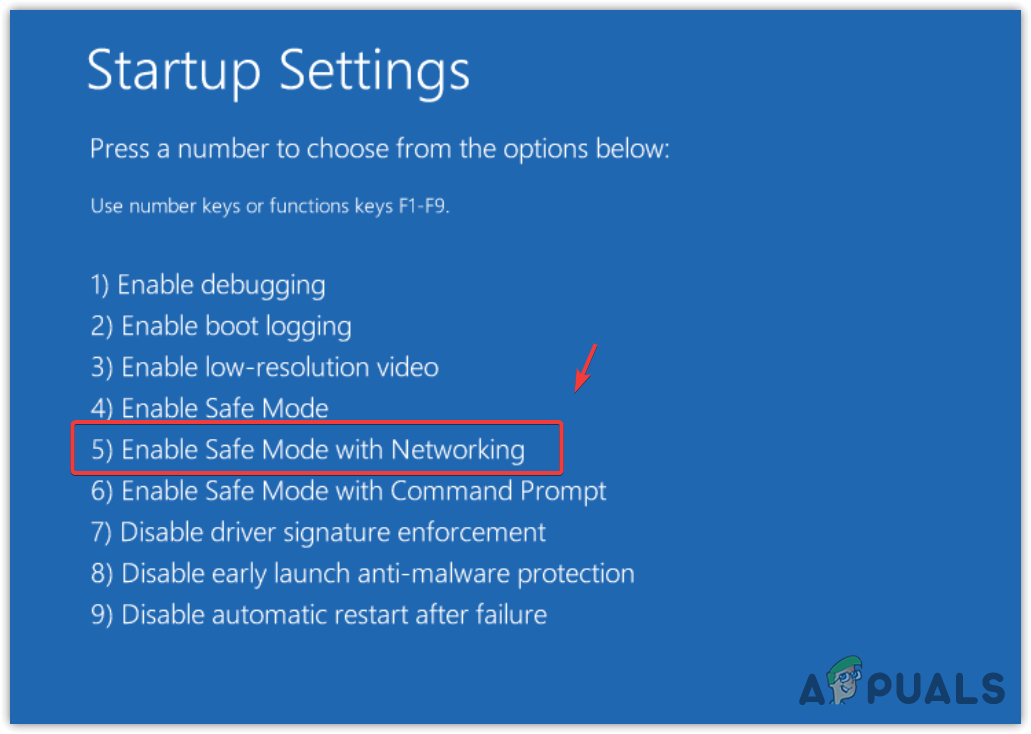
- Once you are there, just simply select Troubleshoot > Advanced Options > Startup Settings.

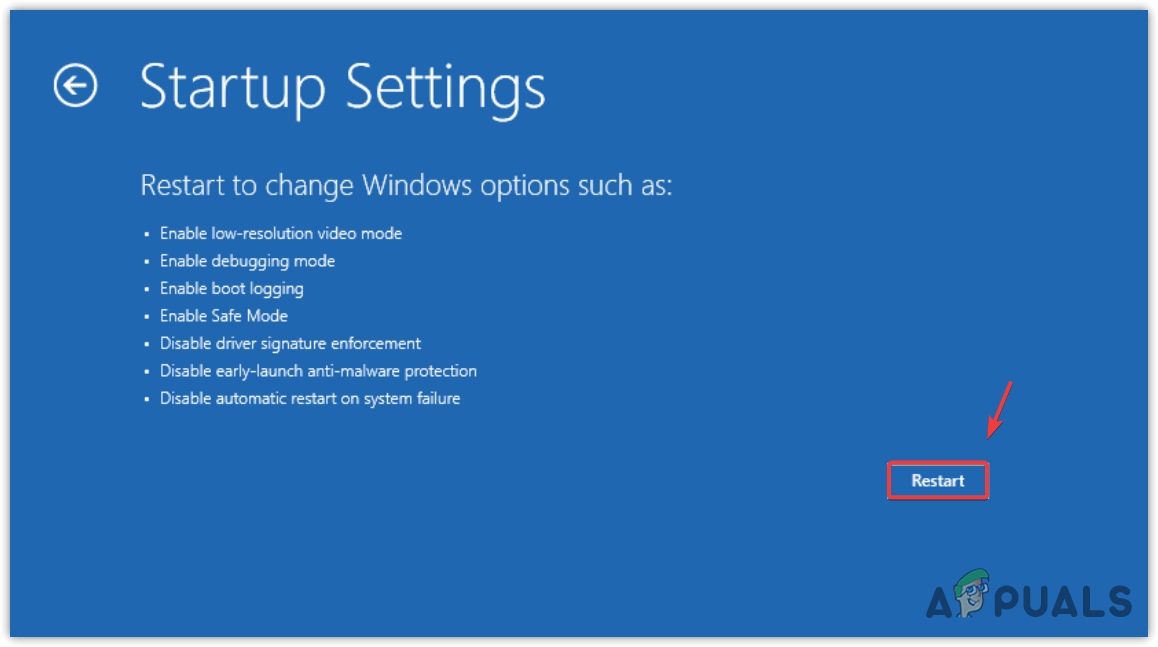
- Click Restart from the right.

- Wait for your Windows to restart, then press 5 or F5 to enable the safe mode.

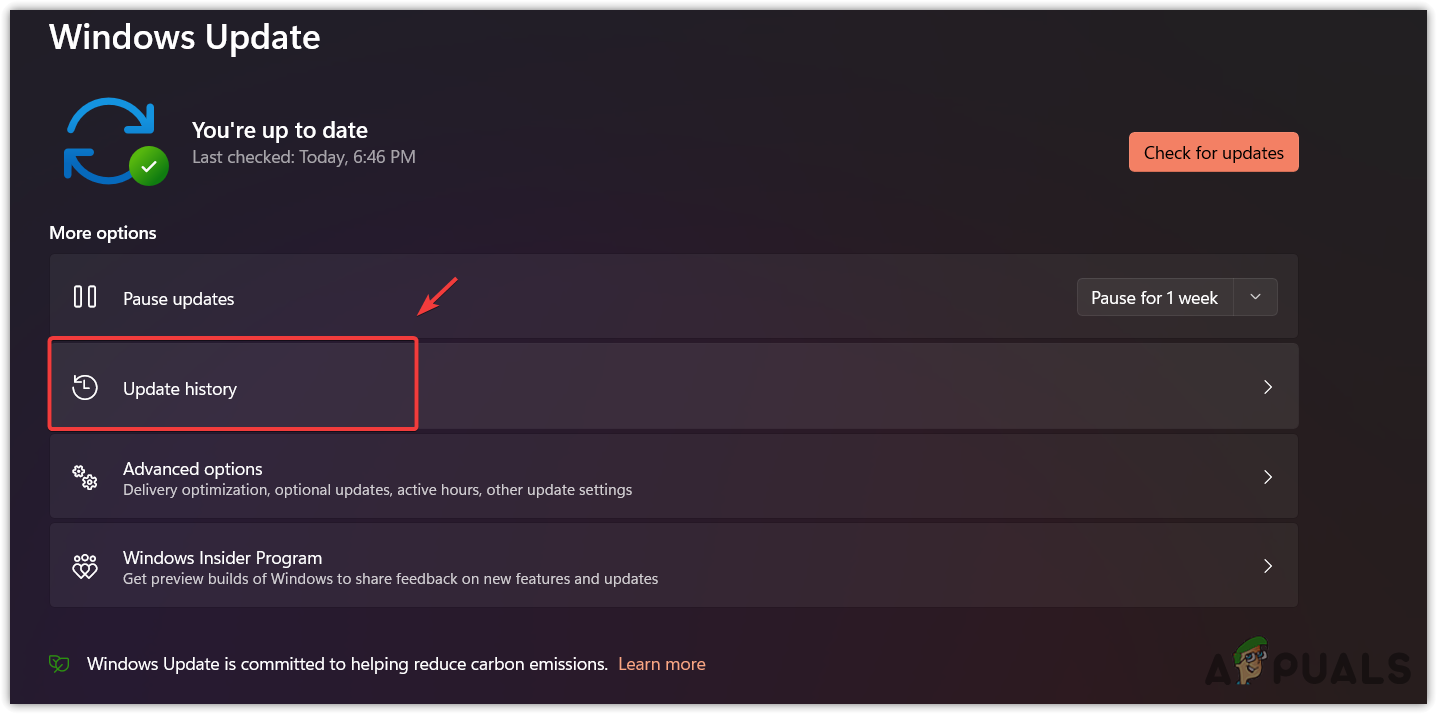
- Once the Windows is booted in safe mode, go to settings by pressing Win + I.
- Go to Update and security from the left pane.
- Then, go to update history.

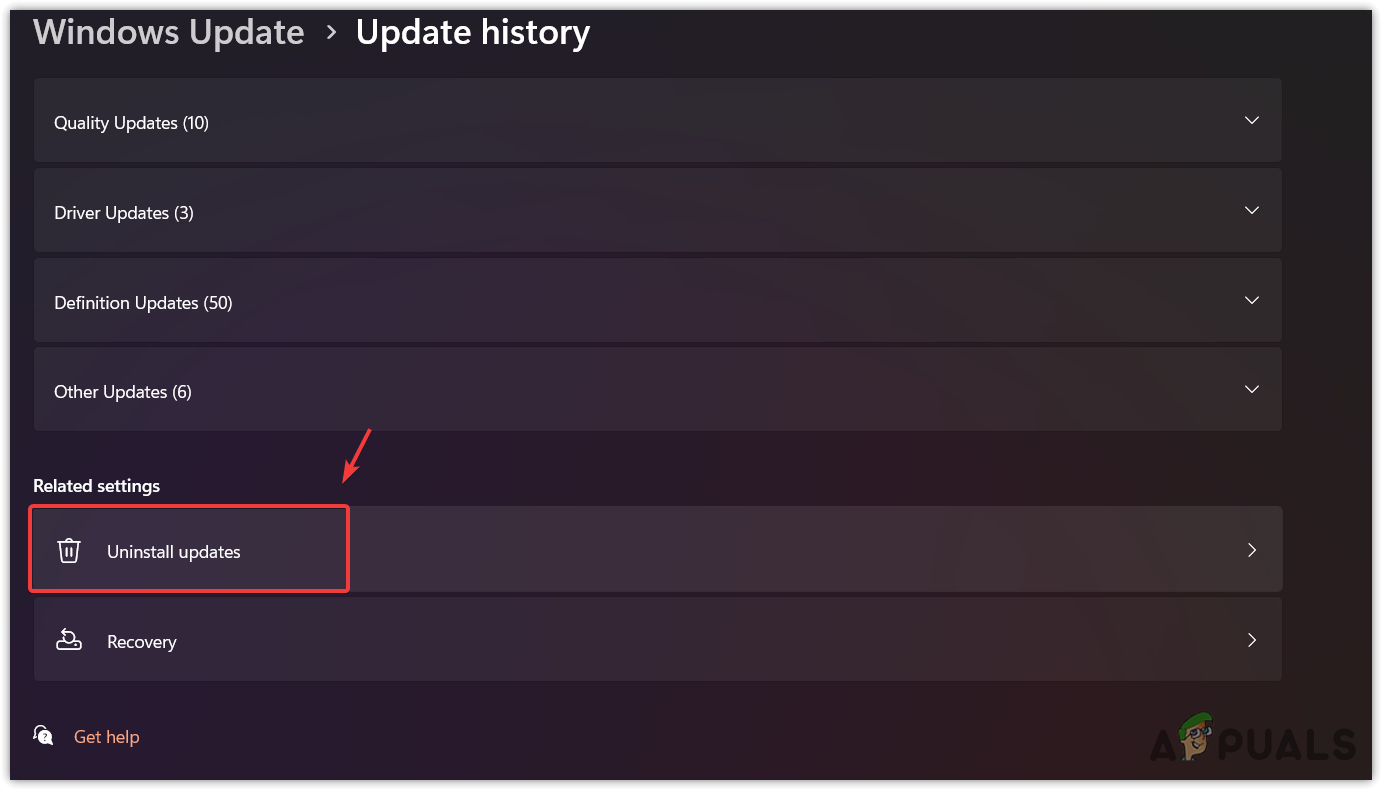
- Scroll down to the bottom and click Uninstall updates.

- Uninstall the recent Windows update.

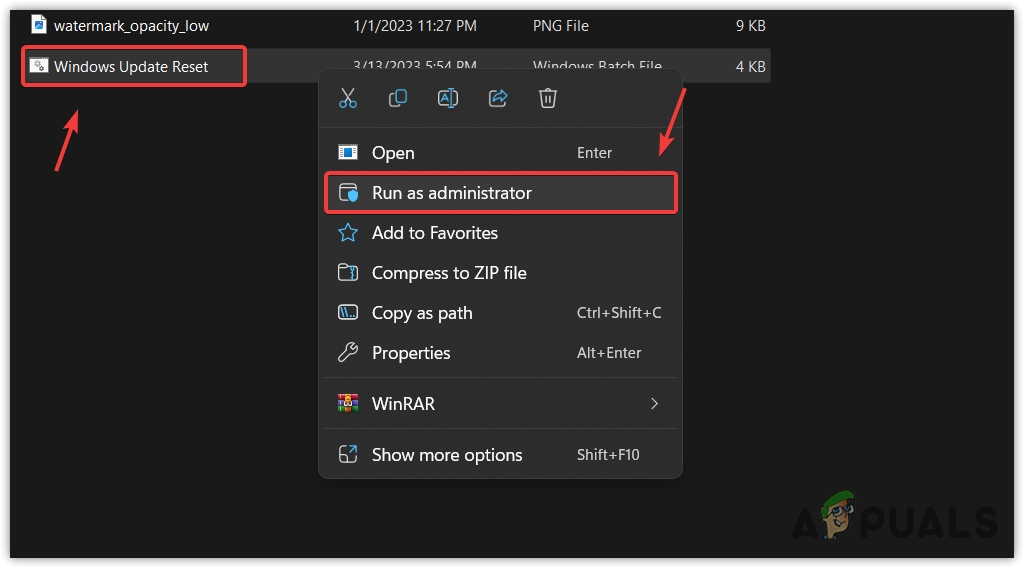
- Once done, download the bat file that contains all the commands to reset the Windows update component.
- Right-click the batch file and select Run as administrator.

- Once done, now simply restart your computer, and your issue should be fixed.

Solution 5: Remove peripheral devices
In some cases, Windows fails to install drivers for the peripherals devices such as keyboards, headphones, pen drives, etc. As a result, it gets stuck on the getting Windows ready screen. Therefore, try disconnecting all the peripheral devices, so the Windows won’t focus on installing peripheral device drivers.
Solution 6: Reinstall or reset Your Windows
In case all the mentioned solutions have failed to fix getting Windows ready screen. In this case, you can try resetting or reinstalling Windows. Both methods will install fresh Windows with new system files, which will fix this issue.
If you want to reinstall Windows, you can visit the article, but if you want to reset Windows, follow the steps:
- Boot the Windows installation disc and click Repair your computer to navigate into the Windows recovery environment.
- Then, click Troubleshoot > Reset this PC.
- Select Keep my files > Local Reinstall.

- Now click Reset and wait for Windows to restart with new settings.

. Remember, this won’t delete your documents and pictures but will delete drivers and programs installed on the system disk.
- Once done, now your issue should be resolved.
Conclusion
Being stuck on ‘Getting Windows Ready’ can be frustrating and anxious, in this article we explained multiple solutions you can get your computer fixed. If for some reason these fixes doesn’t work for you make sure to leave a comment down below so our technician can help you get your computer up and running in no time. Thanks for reading!