
As we increasingly rely on technology in our daily lives, protecting our devices and data from cyber threats has become more important than ever. One of the most critical components of a comprehensive cybersecurity strategy is antivirus and threat protection software. However, even the best antivirus software can experience issues, and one common problem is when Virus & threat protection gets stuck on “Getting protection info.“

What Causes Virus and Threat Protection to Get Stuck on Windows 11?
There can be several reasons why your virus and threat protection is stuck on “Getting protection info” on Windows 11, including:
- Outdated software: If your operating system or antivirus software is outdated, it may not be able to keep up with the latest threats and cause problems.
- Conflict with other software: If you have multiple security programs installed on your computer, they may be conflicting with each other, causing the issue.
- Technical glitches: Antivirus software is complex, and there may be bugs or other technical issues that cause it to become stuck.
Attention Windows Users!!
Facing issues on your Windows PC every now and then? We would recommend you use the Restoro PC Repair tool.
It is a one-stop solution to repair common computer errors, protect your Windows PC from data loss, malware, hardware failure, Registry issues, BSOD errors, etc. and optimize your PC for maximum performance in just three simple steps:
- Download Restoro Tool that comes with Patented Technologies (see patents here).
- Install and click on Start Scan to find the issues on your Windows PC.
- Finally, click on Repair All to fix the issues.
if you encounter the issue of your antivirus software getting stuck on “Getting protection info,” don’t panic. By following these steps, you can resolve the issue and get back to protecting your computer against the latest threats.
But before moving on to the actual fixes, here are some tips you should try in order to resolve this issue.
- Restart your PC: Rebooting your computer is the simplest solution and often resolves the issue.
- Update Windows 11: Make sure your operating system is up-to-date. Outdated systems can cause compatibility issues with your antivirus software.
- Disable other security software temporarily: If you have other security software installed, try disabling it temporarily to see if it is causing the issue.
- Check your date and time setting:
- Check for antivirus updates: Make sure your antivirus software is up-to-date and has the latest virus definitions.
Fix 1. Repair / Reset Windows Security App
Because Virus & threat protection is a feature of the Windows Security app it may also be responsible for this issue.
Repairing and resetting the Windows Security app may resolve the issue of Virus & threat protection getting stuck on “Getting protection info.” Here is how you can Repair and Reset Windows Security:
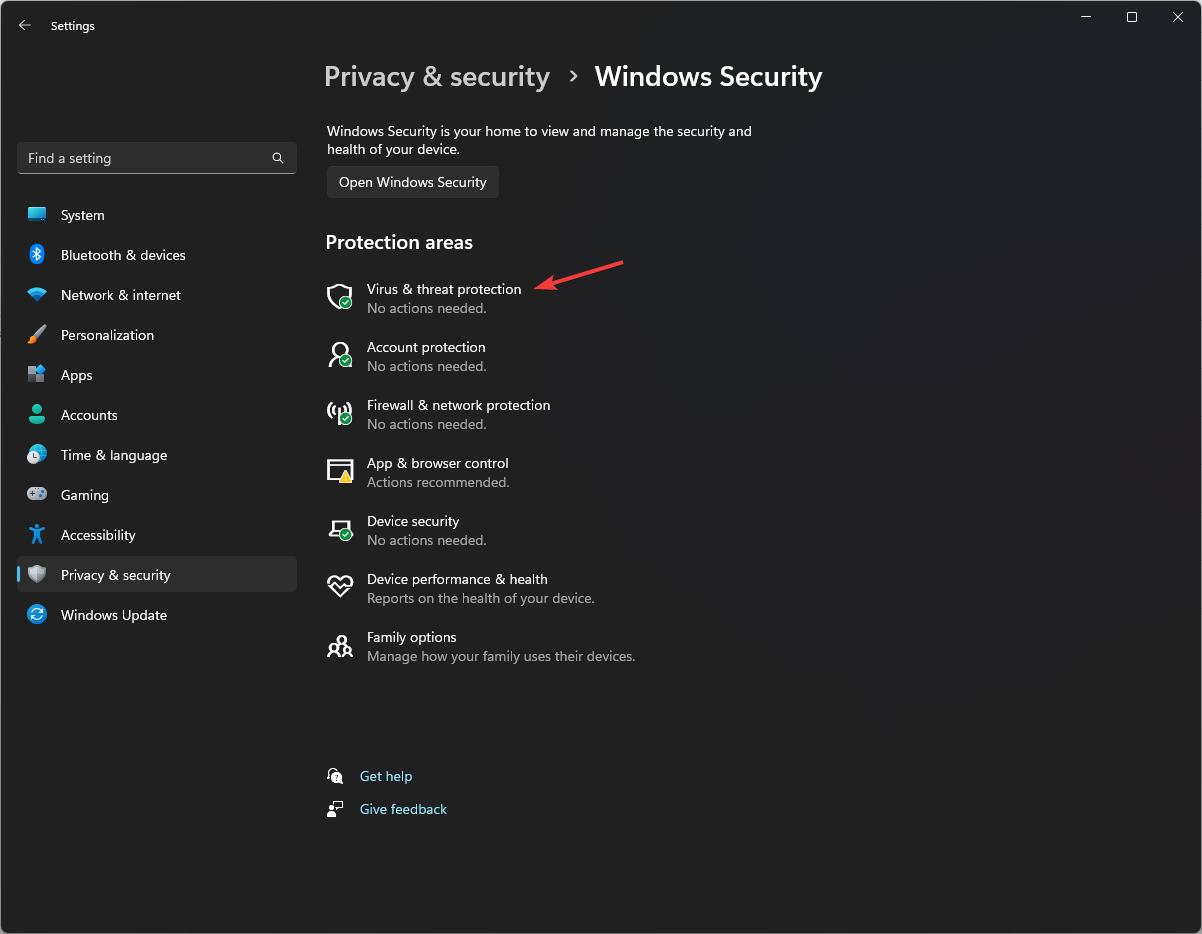
- Open the Settings app (Win + I).
- Go to Apps > Installed apps.

- Click the three dots next to the Windows Security app and select Advanced options.
- Scroll down and click the “Repair” button under the Reset section.
- Wait for the reset to complete and check if the app is now functioning.
- If still causing issues, click “Reset” to completely reset the Intel Unison app.

Fix 2. Restart Windows Security Service
If repairing and resetting the Windows Security app doesn’t work, then you can try Restarting the Windows Security Service and see if it helps. to do so, you can use the below steps:
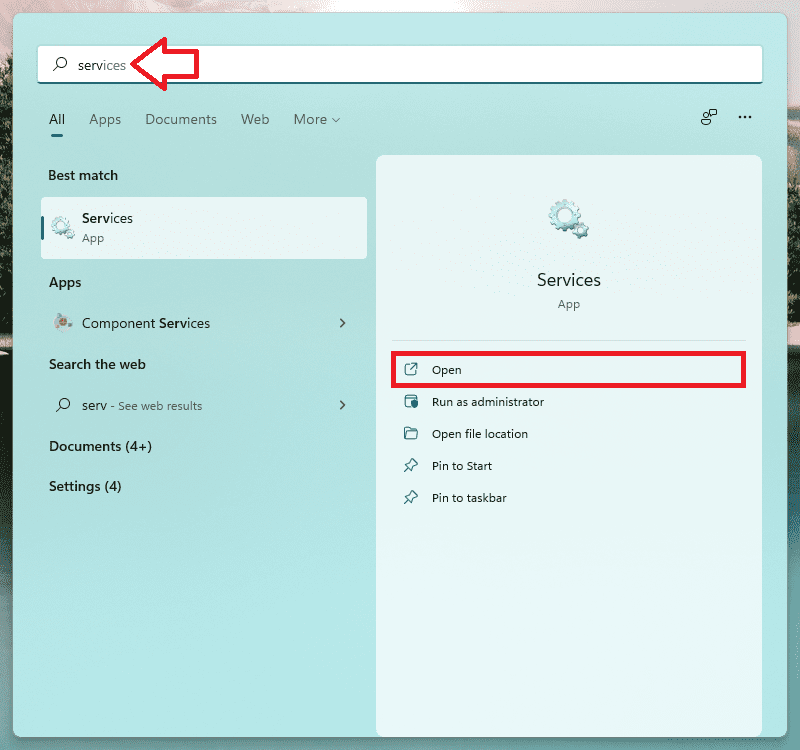
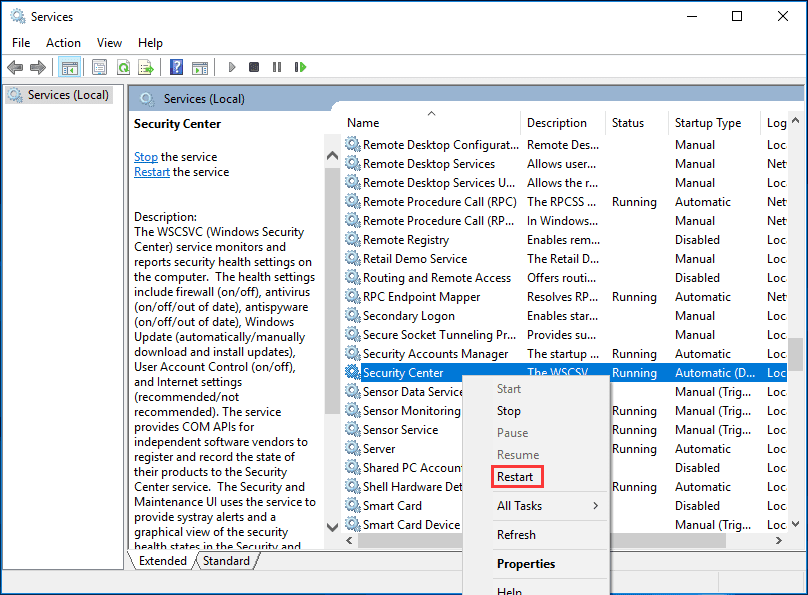
- Open the Services windows, by searching for the Services in the search bar and pressing Enter.

- Scroll down until you find Windows Security Service( or Security Center) and double-click on it.
- If the Service status is Stopped, click on the Start button.
- If the service is already running, stop it and then restart it again.
- Restart your PC and open Virus & Threat Protection and see if the message is gone.
Fix 3. The Ultimate Fix
If none of the tips above solves the issue, then it is time to try a more complex solution:
- Firstly, Uninstall any 3rd party antivirus if installed, go to Settings > Apps > Apps & Features and by running its uninstall tool to clean up leftovers. After that, restart your computer
- Run a full system scan with more powerful on-demand free scanners Malwarebytes and AdwCleaner. Make sure to download the latest versions from their respective websites and perform full scans with both.
- If they find anything suspicious, make sure to clean it up and then run the scan again until both come up clean. After that, restart your computer and check if the issue has been resolved.
- Then check for damaged System Files using SFC /scannow and repair them. Here’s a detailed guide for it: A complete guide to Windows Check Disk, DISM & SFC Scan
Bottom Line
I hope that if your virus and threat protection is stuck on “Getting protection info” on Windows 11, the aforementioned tips and solutions helped you resolve the issue.
In conclusion, if your virus and threat protection is stuck on “Getting protection info” on Windows 11, there are several potential causes and fixes. To resolve the issue, try restarting your computer, updating Windows 11, disabling other security software temporarily, checking your date and time settings, and checking for antivirus updates. If these tips don’t work, try repairing or resetting the Windows Security app, restarting the Windows Security Service, or using a more complex solution such as, running a full system scan with Malwarebytes and AdwCleaner, and checking for damaged system files using SFC/scannow.
The importance of protecting our devices and data from cyber threats has grown significantly as technology plays a larger role in our daily lives. A comprehensive cybersecurity strategy must include antivirus and threat protection software as one of its key components.
Also read:
- Intel Unison Not Working in Windows 11: A Comprehensive Guide to Fixing the Issue
- Best CPU Coolers For AMD Ryzen 9 7950X3D and 7900X3D In 2023
- List of Best GPUs For AMD Ryzen 9 7950X3D and 7900X3D
- How To Properly Restart Windows Audio Service On Windows 11 and Windows 10
- Best Motherboards For AMD Ryzen 9 7950X3D, 7900X3D and 7800XD In 2023
Are you also facing the issue, of “Getting protection info” stuck whenever you restart your PC and open Virus & threat protection as shown in the image below:

Also, different forums are flooded with the same question and people are sharing this problem to find a good solution.
One person spotted saying:
my virus and threat protection is off and I need to turn it on when I click on it, it just says getting protection info and never loads is there any fix for this?
In another query, another person says,
Whenever I restart my PC, windows defender starts “Getting protection info” for ages, and during that time I can’t scan for viruses or check for updates either. This only happens after I restart my PC, but it’s still really weird and annoying. I scanned with Malwarebytes and found nothing, but my PC was working fine just 30 minutes ago. Has anyone else got this?
If you are also one who is facing the same issue then you are at the right place. In this fixing guide, I am going to show you all the fixes using which you can solve this issue.
If you are getting this Getting protection info message while opening Virus & Threat Protection in Windows 11 then this happens mainly when the virus definition is getting updated. So it is a background process and should get disappear in a while.
But if it is not disappearing even after shutting down the PC again and again then there could be the following reasons as to why this might happen:
- Conflict with third-party antivirus installed on the PC
- Corrupted Registry
- System infected with malware
- Corrupted system files
- Bug in the current version of Windows 11
How to fix Getting protection info stuck on Windows 11
To solve this issue follow the following fixes shown below:
1. Uninstall any third-party antivirus software
If you have installed any third-party software on your software, the Windows operating system will automatically detect it and turn itself down but in most cases, it may stuck on this Getting protection info.. process as it will think it needs to update itself. Thus, the first thing you can try is to disable your other security programs.
See if the problem is solved, If Windows defender is still stuck at the same message then remove the third-party antivirus altogether. To do so follow the steps given below:
- Search for Control Panel in the search bar of Windows 11.

- Switch to the Small icon in View As.
- Click on Programs & Features.

- Look for the Antivirus program click on it and press Uninstall.


the antivirus will get uninstalled. Now Restart your PC and see for yourself if the problem is still there or if it got solved.
2. Check your date and time setting
Correct date and time are very important when it comes to real-time protection, if your PC is operating on working date and time then the antivirus software will think that you are running on an outdated definition and it will keep looking for new definitions thinking that your PC is out of date.
Setting the correct date and time on your Windows PC will resolve this issue. Here is how you can set the correct date and time:
- Right-click the Time and Date widget in the Windows taskbar and select Adjust date and time.

- Select the Set Time Automatically toggle to turn it Off.

- Select Change in the Set Date and Time manually section.

- Set the date and time, then select Change to Confirm.


After setting the correct time, Restart your PC and see if Virus & threat Protection is still behaving in the same way.
3. Repair and Reset Windows Security
Repairing and resetting windows’ security app may also resolve the issue of Getting Protection info… Stuck problem. Here is how you can Repair and Reset Windows Security:
- Press the Windows + X to open the Power user menu.
- From the menu list, select Apps & Features.

- In the right pane, scroll down to Windows security.
- Then click on the three dots and select Advanced options.

- Scroll down and click on the Repair button in the Reset section.

- After clicking on the Repair option Restart your PC.
- If Repairing does not help then follow steps 1 to 5 and click on the Reset button instead of Repair.
- Restart your PC and see if the problem is solved.


4. Restart Windows Security Service
Next, you can try Restarting the Windows Security Service and see if it helps. to do so, you can use the below steps:
- Open the Services windows, by searching for the Services in the search bar and pressing Enter.
- Scroll down until you find Windows Security Service( or Security Center) and double-click on it.
- If the Service status is Stopped, click on the Start button.
- If the service is already running, stop it and then restart it again.

- Restart your PC and open Virus & Threat Protection and see if the message is gone.


To learn more about how to Restart, Stop & Start and Windows services follow our Windows Services Guide.
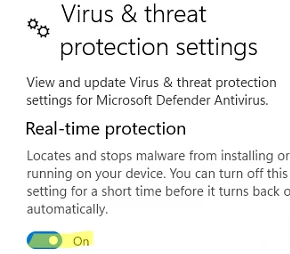
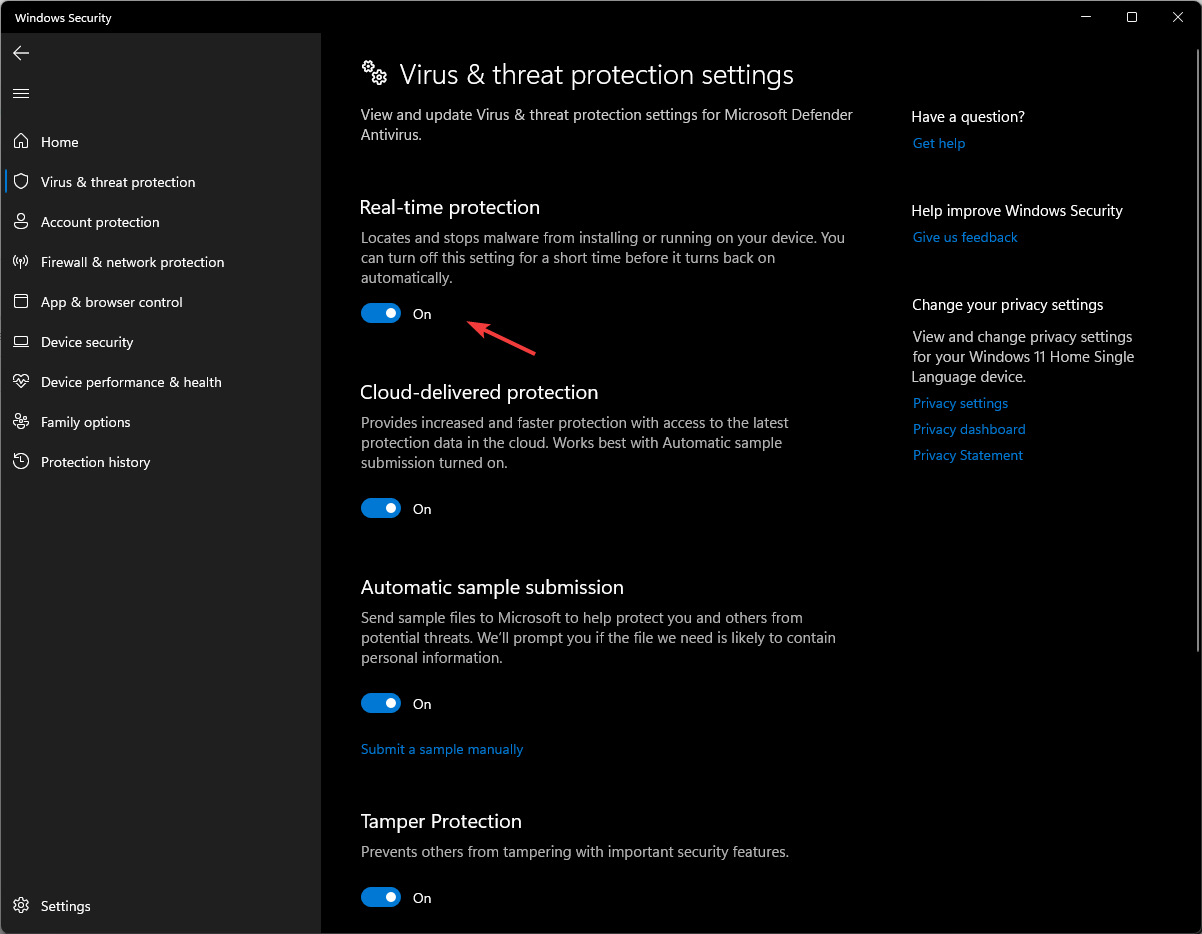
5. Turn on virus and Threat Protection settings.
It may happen that the Real-time protection is turned off because of any reason. You must enable it as soon as possible to protect your PC from malware and threats.
Since you cannot go beyond this message “Getting Protection info…”, the only way is to enable it using Powershell or Command Prompt. Here is how you can do it:
- Search for Windows PowerShell in the Start menu and click on Run as Administrator.
- In the PowerShell Windows type the following command:
Set-MpPreference -DisableRealtimeMonitoring $falseAfter typing the command hit enter and the real-time protection will be turned on thereafter.
- Then search for Virus & Threat Protection in the Start menu and hit open.
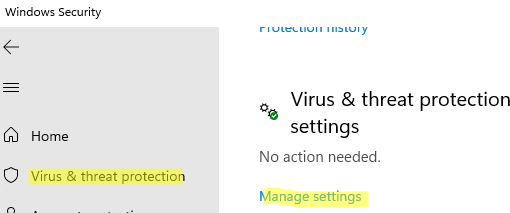
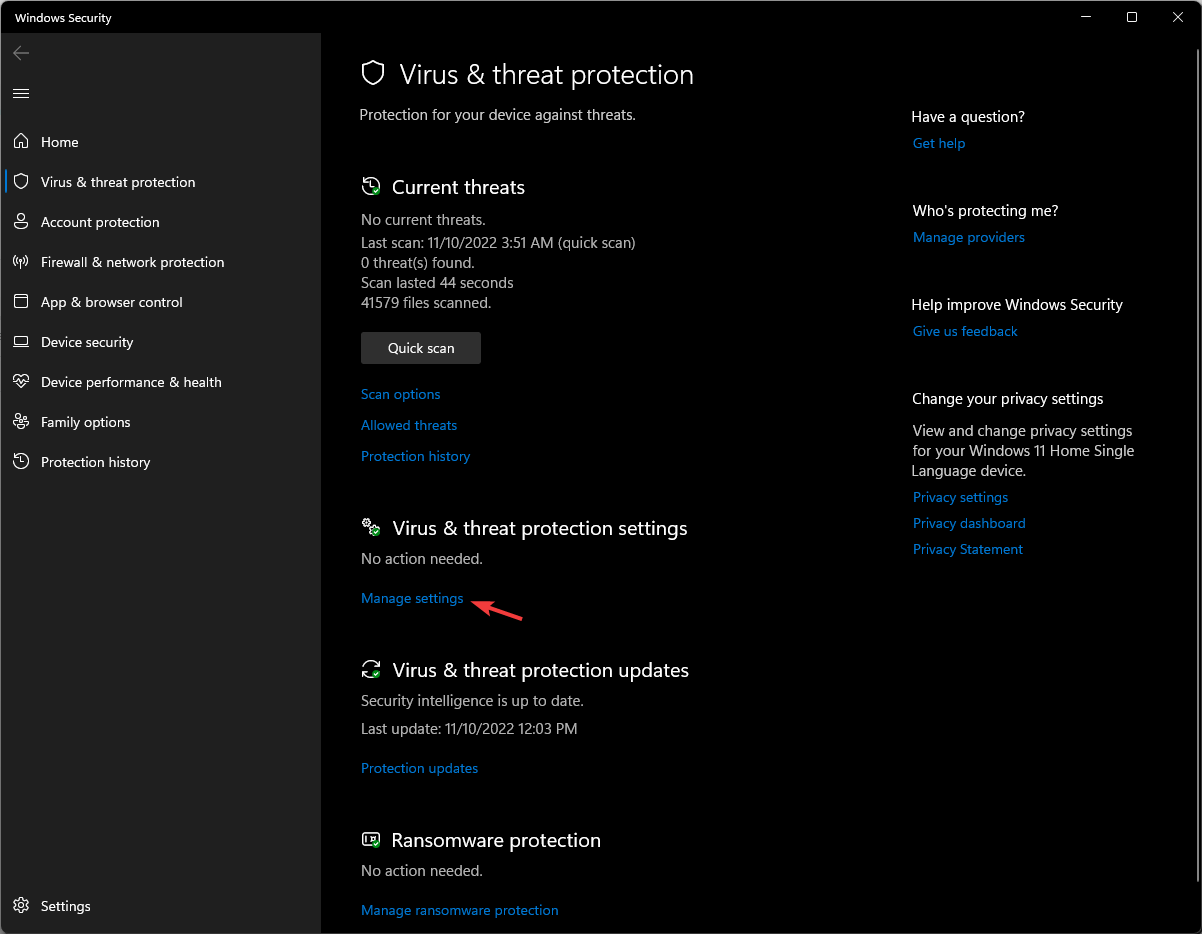
- In the Virus & threat protection Click on Manage settings Under Virus & threat protection settings.
- Look for Temper protection and toggle the Switch on so that any other process cannot hinder any security feature in the future.
- Restart the computer and check if Virus & threat protection is stuck again.
There is a whole guide on how to enable and disable Windows Defender. To know everything step-by-step, follow the guide on How to Disable and Enable Windows Defender.
6. Update the Windows to the latest version
Virus & threat detection is a part of Windows 11 so it needs updated windows to function properly with all the latest features. So it is necessary to keep your Windows updated to the latest version.
If you have any pending Windows updates then please consider installing it by following the steps described below:
- In the search bar of the Start Menu search for Check for updates and hit Open.

- Windows Update page opens up and windows will start looking for updates. If any updates are available then the Download now Button will appear. Click on it.

- After Updating restart the computer and try to open Virus & threat protection.


7. Run SFC and DISM Scans
Many times it happens that some program corrupts the system files, especially those which need access to a firewall or which require disabling the Virus & threat protection to get installed in the system.
Such programs hamper the normal functioning of the Windows Defender and cause it to behave normally. So it is necessary to repair these files by running the Windows Disk error-checking tools like windows DISM and SFC Scans.
These scans will make sure to restore and repair any missing or corrupted system files. Please refer to our DISM, SFC & Disk Check scans guide.
Bottom Line
This is it. All the possible ways to solve Windows Defender stuck on Getting Protection Info… has been shown to you. Just try them one by one to fix Windows this problem in Windows 11. If you felt these ways were helpful and worked for you then you can share with the needy ones. If you would like to suggest any other fix that we might have missed feel free to tell us in the comment section below. Thank you so much for being with us.
Also Read:
- 10 Best Notepad++ Dark Themes
- How to Use Intel Unison in Dark Mode on Windows 11
- How to Fix Intel Unison Not Working on Windows 11
- Fix: Wsappx High Disk & CPU Usage on Windows
- Fix: This snapin may not be used with this edition of Windows
- Fix Windows Modules Installer Worker High Disk, CPU & Memory Usage on Windows
- List Services to disable to improve Windows gaming performance
- Fix the “Interactive Sign-In Process Initialization Has Failed” Error on Windows
- Fix: Xbox Accessories App Not Working or Detecting the Xbox Controller on Windows
- How to Factory reset Windows PC
В Windows 10 и Windows 11 есть встроенный (и довольно неплохой) антивирус Microsoft Defender Antivirus (Защитник Windows), управляемый через панель Безопасность Windows. В некоторых случаях Windows Defender или панель управления Безопасность в Windows перестают открываться, вместо диалогового интерфейса показывается пустое белое окно, приложение не запускается при вызове через панель Settings или командой быстрого доступа
ms-settings:windowsdefender
. В этой статье мы рассмотрим, как исправить типовые ошибки, когда не удается открыть окно службы безопасности Windows Defender.
В первую очередь проверьте, не уставлен ли в Windows сторонний антивирус. Windows Defender в панели безопасности Windows автоматически отключается при использовании не-Microsoft антивируса. Решите какой антивирус вы хотите использовать в дальнейшем, если нужно оставить защитник Windows, удалите сторонний антивирус.
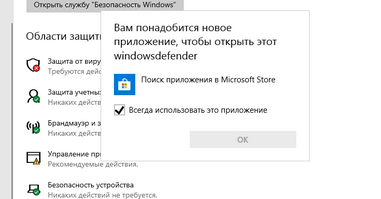
Если при запуске Windows Security (Windows Defender) через меню Параметры (Settings -> Update & Security -> Windows Security), появляется окно с предложением выбрать программы для открытия ссылки “
You’ll need a new app to open this Windowsdefender link
”, проверьте что UWP приложение Microsoft.SecHealthU установлено. Именно UWP приложение Windows Security (Windows Defender) отвечает за отображение окна Безопасность Windows.
Если нужно сбросьте его настройки. Подробно это описывалось в статье Вам понадобится новое приложение, чтобы открыть эту ссылку WindowsDefender.
Get-AppxPackage Microsoft.SecHealthUI -AllUsers | Reset-AppxPackage
Убедились, что в Windows запущены все службы Microsoft Defender. В Windows должны быть запущены следующие службы:
- Microsoft Defender Antivirus Service (
WinDefend
) - Windows Security Service (
SecurityHealthService
) - Security Center (
wscsvc
)
Можно проверить список запущенных служб Защитника Windows через панель управления services.msc или с помощью PowerShell:
get-service WinDefend, SecurityHealthService, wscsvc | select name,status,starttype
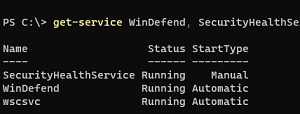
Если службы отключены, измените тип запуска на Automatic и перезагрузите компьютер.
Службы Windows Defender Firewall (mpssvc), Microsoft Defender Antivirus Network Inspection Service (WdNisSvc) и Windows Defender Advanced Threat Protection Service (Sense) не являются обязательными для работы панели управления Security.
В панели управления безопасностью Windows может висеть надпись “Cлужба работы с угрозами остановлена, перезапустите ее”. Чтобы исправить такую ошибку Defender, следуйте этой инструкции.
В Windows 10 и 11 Microsoft Defender автоматически выключается, если на устройстве установлен сторонний антивирус. Если стороннего антивируса, нет, а Microsoft Defender отключен, значит кто-то очень сильно постарался, чтобы его отключить.
Начиная с Windows 10 2004 (в том числе в Windows 11) вы не можете просто отключить Microsoft Defender с помощью:
- ключей реестра DisableAntiVirus=1 и DisableAntiSpyware = 1 (HKEY_LOCAL_MACHINE\SOFTWARE\Policies\Microsoft\Windows Defender);
- или параметра GPO Turn off Microsoft Defender Antivirus в Computer Configuration -> Administrative Templates -> Windows Components -> Microsoft Defender Antivirus.
Для отключения Защитника Windows сначала придется отключить функцию защиты Microsoft Defender Tamper Protection в настройках Microsoft Defender.
Можно проверить, отключена ли защита антивируса Defender с помощью PowerShell:
Get-MpComputerStatus | select IsTamperProtected
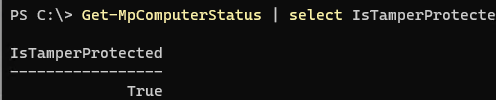
В данном примере
IsTamperProtected=True
, это значит, что защита Windows блокирует отключение Microsoft Defender.
В более ранних версиях Windows 10, проверьте значение указанного выше параметра локальной групповой политики с помощью редактора gpedit.msc (параметр должен быть установлен в Не задано или Отключено) или с помощью PowerShell:
Get-ItemProperty -Path 'HKLM:\SOFTWARE\Policies\Microsoft\Windows Defender' -Name DisableAntiSpyware
Get-ItemProperty -Path 'HKLM:\SOFTWARE\Policies\Microsoft\Windows Defender' -Name DisableAntiVirus
Если команда вернет значение параметров =1, значит Microsot Defender отключен. Чтобы включить Защитник Windows, удалите параметр или измените значение на 0.
Проверьте и установите последние обновления Windows Settings -> Update & Security -> Windows Update -> Check for updates или с помощью PowerShell.
Если ничего не помогло, проверьте и исправьте целостность образа Windows командами:
sfc /scannow
и
DISM /Online /Cleanup-Image /RestoreHealth
Инструкции из этой статье должны восстановить работу службы Безопасность Windows.
Windows OS Hub / Windows 11 / How to Permanently Disable Microsoft Defender Antivirus on Windows 11 and 10
Microsoft Defender is the built-in antivirus program on Windows 10/11 and Windows Server that is enabled and configured by default. In this article, we’ll look at how to turn off Microsoft Defender on Windows 11 completely or suspend it.
When you install a third-party antivirus in Windows 10 or 11, the built-in Microsoft Defender Antivirus is automatically disabled. In some cases, it doesn’t happen and you may need to disable Microsoft Defender manually.
Contents:
- Turn off Defender Antivirus Protection on Windows 11 and 10
- How to Disable Microsoft Defender Antivirus in Windows 11 Permanently?
Turn off Defender Antivirus Protection on Windows 11 and 10
In some cases, you may need to suspend Microsoft Defender Antivirus protection without affecting important system services. For example, when Microsoft Defender prevents a system program or tool from running or installing. To run such an app, you have to stop Windows Defender Real-time Protection.
- Open Settings -> Privacy and Security -> Windows Security (or run a quick access URI command:
ms-settings:windowsdefender) in Windows 11; - Open Virus and threat protection and click Manage Settings;
- Move the Real-time protection toggle to Off.
- Confirm that you want to stop antivirus protection in the UAC prompt.
To resume Windows Defender protection, move the toggle to On. Also, Microsoft Defender Real-time Protection is enabled automatically after you restart the computer.
You can use the following PowerShell command to disable real-time protection (see how to manage Windows Defender settings using PowerShell):
Set-MpPreference -DisableRealtimeMonitoring $true
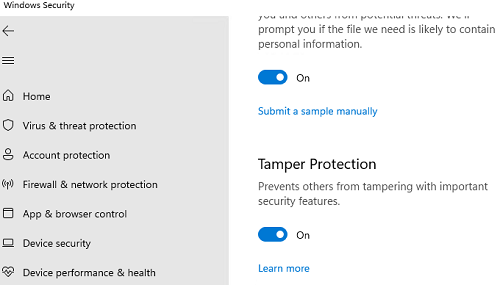
However, this command doesn’t work as expected in Windows 11 and the latest Windows 10 builds. The matter is that in Windows 10 1903 or later, a new Microsoft Defender feature is enabled by default: Microsoft Defender Tamper Protection.
Tamper protection provides additional protection for core Microsoft Defender security features. In particular, it prevents unauthorized changes of antivirus settings, suspension of real-time protection, and disabling of cloud protection. If the Tamper Protection is enabled, you won’t be able to disable Real-Time Protection in Microsoft Defender using PowerShell.
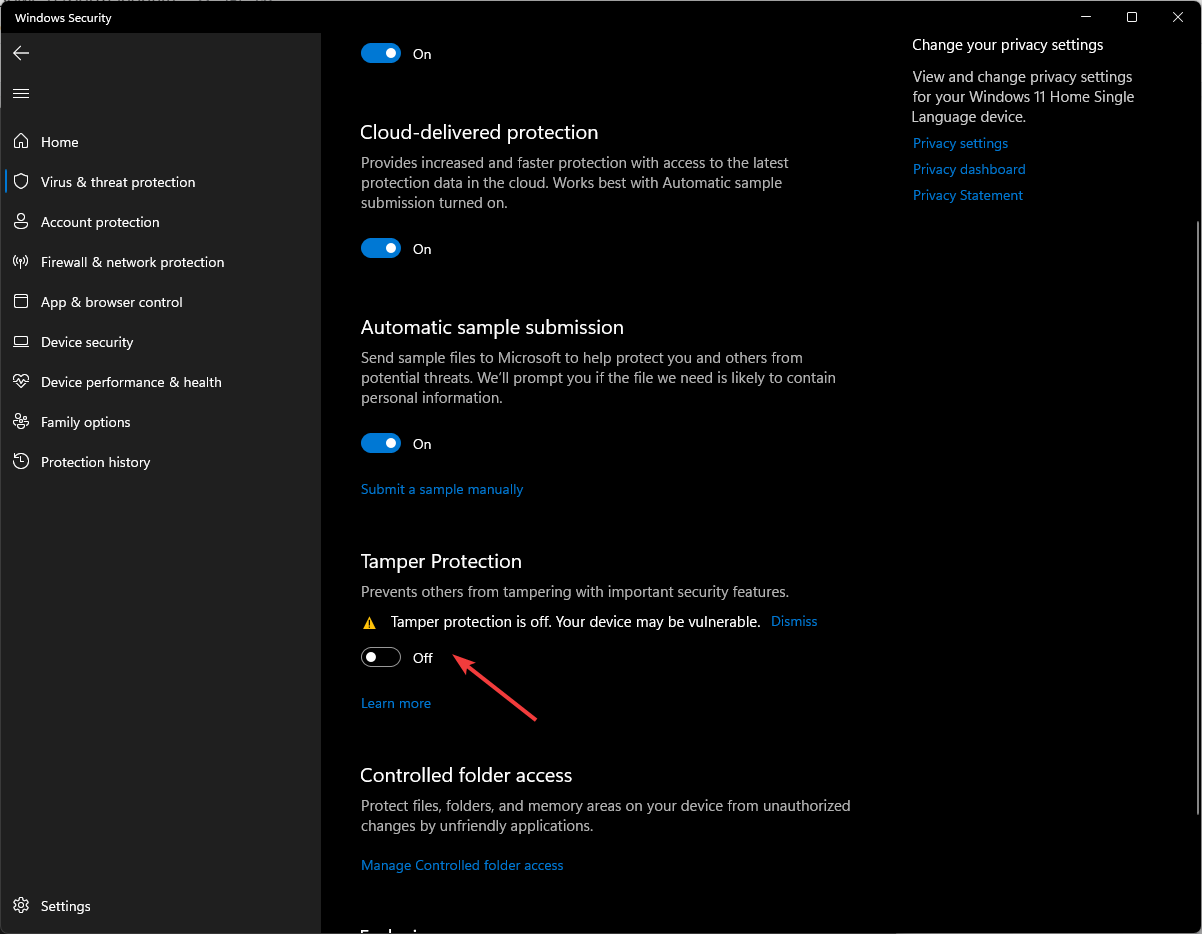
You can only disable Tamper Protection manually from Windows Security GUI. Navigate to Virus and threat protection section, scroll down and switch the Tamper Protection toggle to Off.
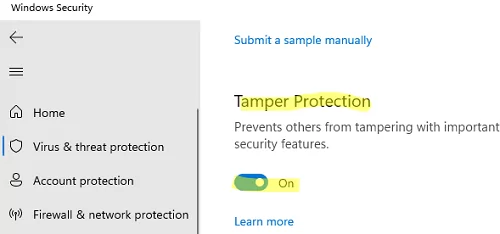
After disabling Tamper Protection, you will be able to disable Microsoft Defender Real-time Protection using the PowerShell command shown above.
How to Disable Microsoft Defender Antivirus in Windows 11 Permanently?
In earlier Windows 10 builds and in Windows Server 2016, you could completely disable Windows Defender using the Turn off Windows Defender Antivirus GPO option located in Computer Configurations -> Administrative Template -> Windows Component -> Windows Defender Antivirus section of the Local Group Policy Editor (gpedit.msc) or using the DisableAntiSpyware registry parameter under HKEY_LOCAL_MACHINE\SOFTWARE\Policies\Microsoft\Windows Defender:
New-ItemProperty -Path “HKLM:\SOFTWARE\Policies\Microsoft\Windows Defender” -Name DisableAntiSpyware -Value 1 -PropertyType DWORD -Force
Also, you can disable Real-Time Protection using the GPO option Turn on behavior monitoring or with the registry parameter DisableBehaviorMonitoring =1.
Starting from Windows 10 1903 release, you cannot use these GPO options or registry parameters to disable Microsoft Defender, because these settings are shielded by Tamper Protection. The methods previously used to disable Microsoft Defender Antivirus don’t work on Windows 11.
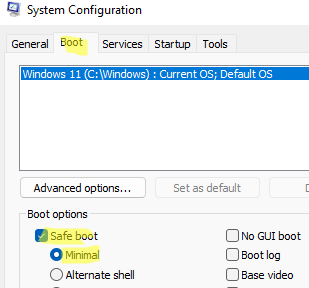
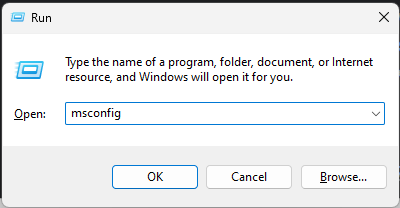
To completely disable Windows Defender Antivirus on Windows 11, you need to boot your computer to Safe Mode.
- Run
msconfig; - Go to the Boot tab;
- Select Safe boot -> Minimal in the boot options section;
- Click OK and restart your computer.
- Your computer will boot into Safe Mode;
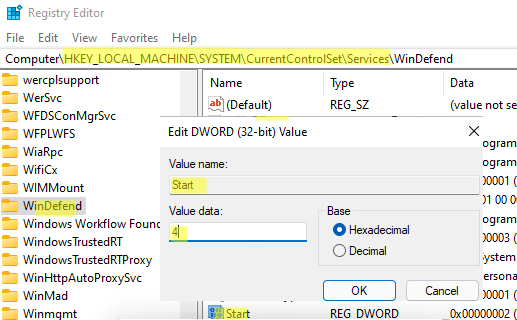
- Then open the Registry Editor (
regedit.exe), go to the reg key HKEY_LOCAL_MACHINE\SYSTEM\CurrentControlSet\Services and disable the startup of the following services:- Sense
- WdBoot
- WdFilter
- WdNisDrv
- WdNisSvc
- WinDefend
To do it, change the Start parameter value to 4.
Change the Start value for all services specified above manually or using the following PowerShell script:
$regpath='HKLM:\SYSTEM\CurrentControlSet\Services'
 Set-ItemProperty -Path ($regpath+"\WinDefend") -Name Start -Value 4
 Set-ItemProperty -Path ($regpath+"\Sense") -Name Start -Value 4
 Set-ItemProperty -Path ($regpath+"\WdFilter") -Name Start -Value 4
 Set-ItemProperty -Path ($regpath+"\WdNisDrv") -Name Start -Value 4
 Set-ItemProperty -Path ($regpath+"\WdNisSvc”) -Name Start -Value 4
 Set-ItemProperty -Path ($regpath+"\WdBoot") -Name Start -Value 4
To re-enable Microsoft Defender in Windows, set the following default values of the Start registry entry for services:
- Sense — 3
- WdBoot — 0
- WdFilter — 0
- WdNisDrv — 3
- WdNisSvc — 3
- WinDefend — 2
- Run msconfig and disable the Safe Mode. Then restart your computer and boot as usual;
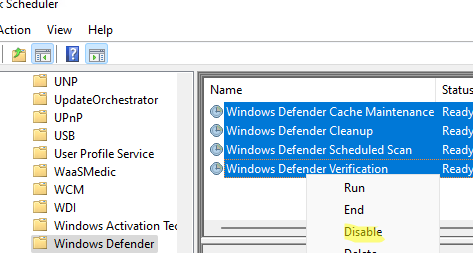
- Disable the following four tasks in Task Scheduler (
taskschd.msc): Microsoft –> Windows –> Windows Defender.
Get-ScheduledTask “Windows Defender Cache Maintenance” | Disable-ScheduledTask
 Get-ScheduledTask “Windows Defender Cleanup” | Disable-ScheduledTask
 Get-ScheduledTask “Windows Defender Scheduled Scan” | Disable-ScheduledTask
 Get-ScheduledTask “Windows Defender Verification” | Disable-ScheduledTask
Run the Windows Security app and make sure that Microsoft Defender Antivirus is now disabled. You should see the message: Threat service has stopped. Restart it now. 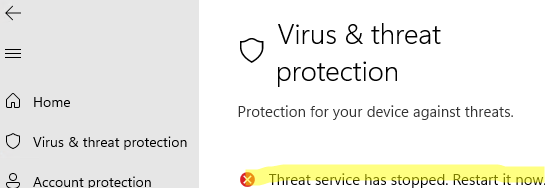
So we have looked at how to disable Microsoft Defender Antivirus on Windows 10 and 11.
Turn off Windows Security app with these easy methods
by Vladimir Popescu
Being an artist his entire life while also playing handball at a professional level, Vladimir has also developed a passion for all things computer-related. With an innate fascination… read more
Updated on
- Windows Defender is a resource-intensive application that can run to slow down your computer.
- You must permanently turn it off if you want to disable Windows Defender due to privacy concerns.
- However, disabling the service might leave you vulnerable to security threats.
Disabling Windows Defender permanently can be tricky since it involves modifying the integral settings of Windows. A wrong step while making the changes might result in the malfunction of your computer.
In this guide, we will discuss all the methods that can help you turn off Windows Defender on your Windows 11 computer for good.
How to temporarily disable Windows Defender on Windows 11?
If you want to disable Windows Defender for a while to make some changes to your computer, follow these steps:
- Press Windows + I to open Settings.
- Go to Privacy & Security and click Windows Security.

- Now go to Virus & threat protection.
- Click Manage Settings.
- Now toggle off the switch underneath Real-time protection.

Note: Real-time protection will be active after you restart your computer.
Now that we covered the situation in which you want to disable the Windows Defender app on Windows 11 for a limited amount of time, we can also look into how to do it permanently.
How we test, review and rate?
We have worked for the past 6 months on building a new review system on how we produce content. Using it, we have subsequently redone most of our articles to provide actual hands-on expertise on the guides we made.
For more details you can read how we test, review, and rate at WindowsReport.
How do I permanently disable Windows Defender on Windows 11?
Before making changes, turn off the Real-time protection of Windows Defender so that it doesn’t hinder the process.
1. Change Folder Ownership
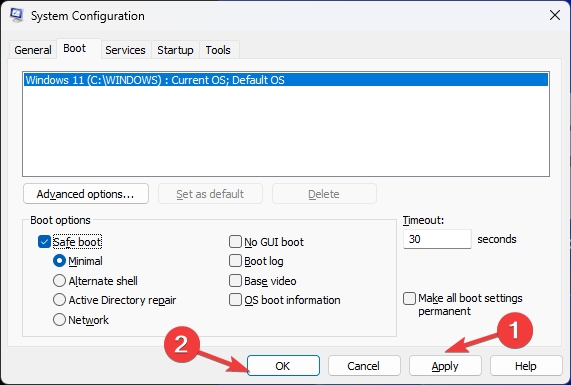
1.1 Boot your computer in Safe Mode
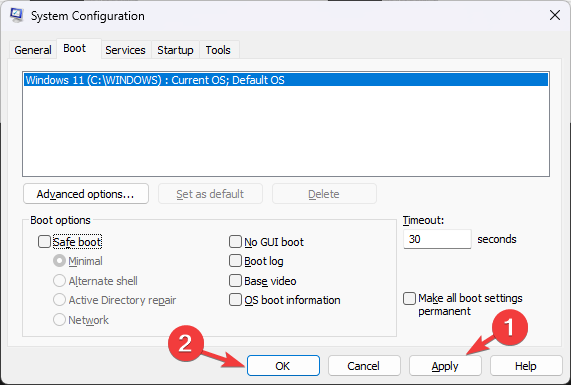
- Press Windows + R to get the Run console.
- Type msconfig to open System Configuration.

- Go to Boot. Under Boot options, put a checkmark to select Safe boot and Minimal.

- Click Apply and OK.

- Your computer will restart in Safe mode.
1.2 Modify Permissions
- Press Windows + E to open Windows Explorer.
- Now copy and paste the below-mentioned path and hit Enter.
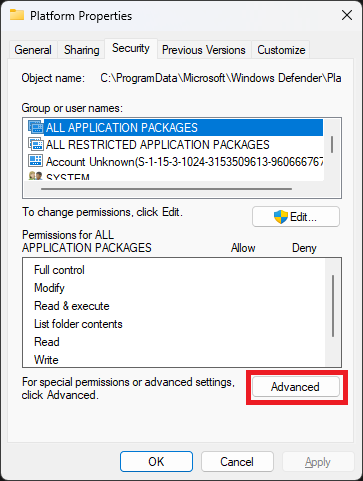
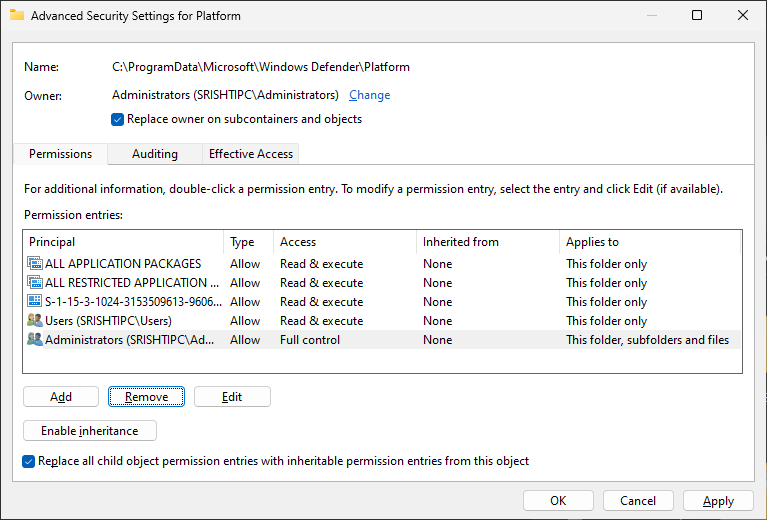
C:\ProgramData\Microsoft\Windows Defender - Navigate to the Platform folder and right-click on it to select Properties.

- Go to the Security tab, then click Advanced.

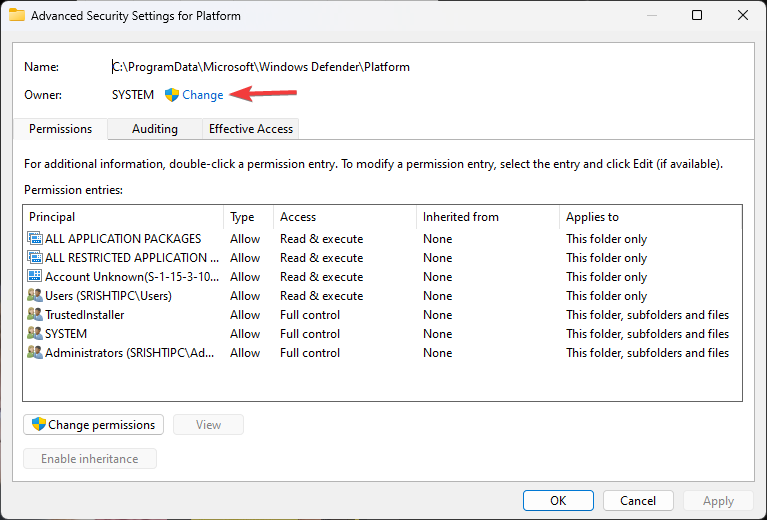
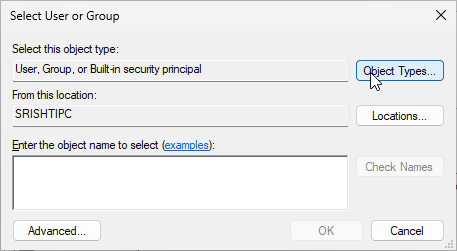
- On Advanced Security Settings for Platform, locate Owner and click Change.

- In the Enter the object name to select box, type the Owner name and click OK.

- Under Permission Entries, select System and click Remove.
- Head to Trusted Installer and click Remove.
- Checkmark Replace owner on subcontainers and objects.
- Now put a checkmark on Replace all child object permission entries with inheritable permissions from this object.
- Click Apply and then OK.

1.3 Disable Safe Boot
- Press Windows + R to open the Run window.
- Type msconfig and hit Enter.
- Go to boot and select Boot options.
- Uncheck the Safe boot option.
- Click Apply and OK.
- Restart your computer.
2. Using Regedit

Editor’s tip
Before making any changes to Registry Editor values, make sure you take a backup. To do that, on the Registry Editor window, click File, then select Export. Now save the .reg file to a desirable location.
- Boot your computer to Safe Mode by following the steps mentioned above.
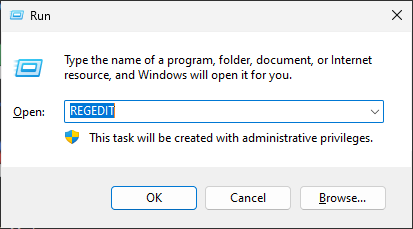
- Press Windows + R to open the Run window.

- Type regedit and hit Enter.
- Copy and paste these paths to the address bar of Registry Editor one by one and for the DWORD Start, change the Value data to 4
Computer\HKEY_LOCAL_MACHINE\SYSTEM\CurrentControlSet\Services\Sense
Computer\HKEY_LOCAL_MACHINE\SYSTEM\CurrentControlSet\Services\WdNisDrv
Computer\HKEY_LOCAL_MACHINE\SYSTEM\CurrentControlSet\Services\WdNisSvc
Computer\HKEY_LOCAL_MACHINE\SYSTEM\CurrentControlSet\Services\WdBoot
Computer\HKEY_LOCAL_MACHINE\SYSTEM\CurrentControlSet\Services\WinDefend
Computer\HKEY_LOCAL_MACHINE\SYSTEM\CurrentControlSet\Services\WdFilter
Next, follow Disable Safe Boot steps to get your computer to normal mode.
- How to Type Accents on Windows 11
- How to Disable the Insert Your Security Key Into the USB Port popup
- DTS Sound Unbound for Windows 11: Download & Install
- How to Remove Windows Copilot on Windows 11
3. Using Group Policy Editor
3.1 Disable Tamper Protection
- Press Windows + I to get Settings.
- Go to Privacy & Security and click Windows Security.
- Click Virus & threat protection.
- Now click Manage Settings.
- Toggle off the switch under Tamper Protection and press OK to confirm.
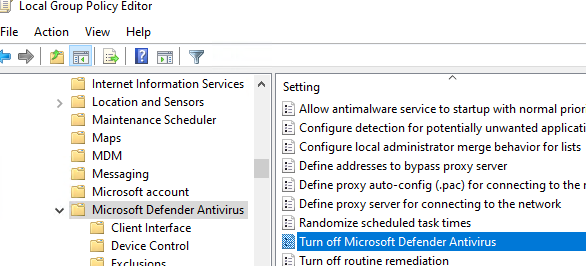
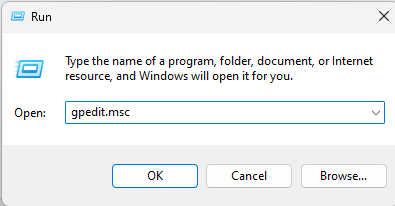
3.2 Make changes in Group Policy Editor
- Press Windows + R to open the Run console.
- Type gpedit.msc and hit Enter to open Group Policy Editor.

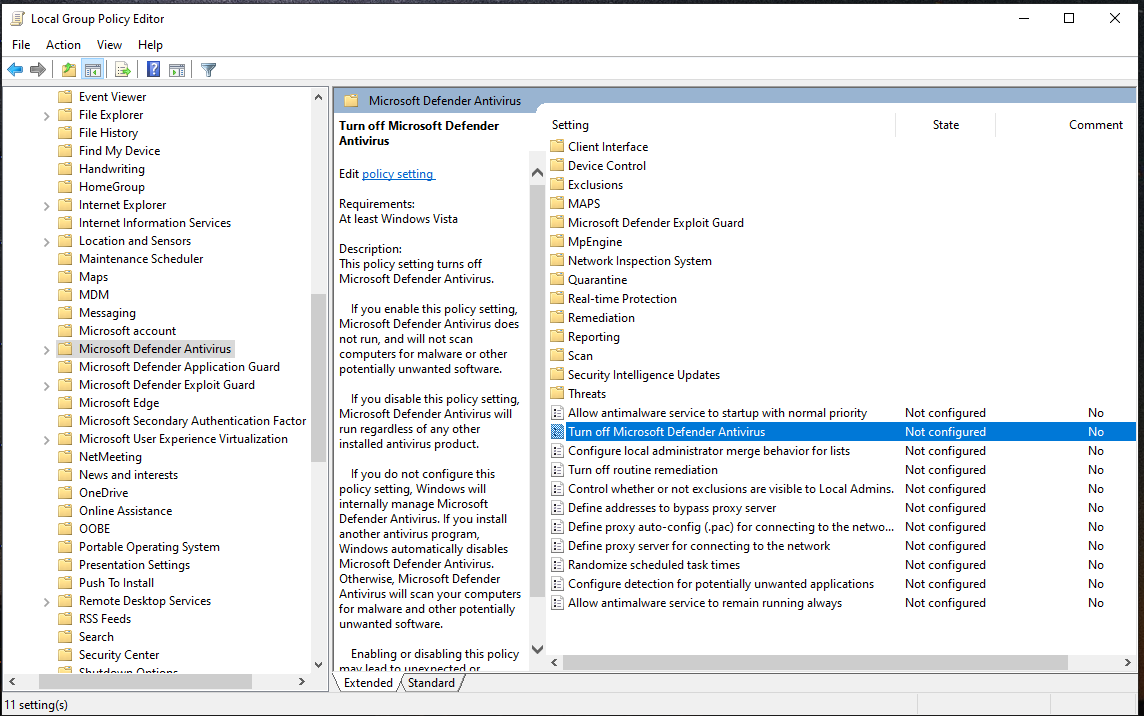
- Follow this path to get to Microsoft Defender Antivirus.
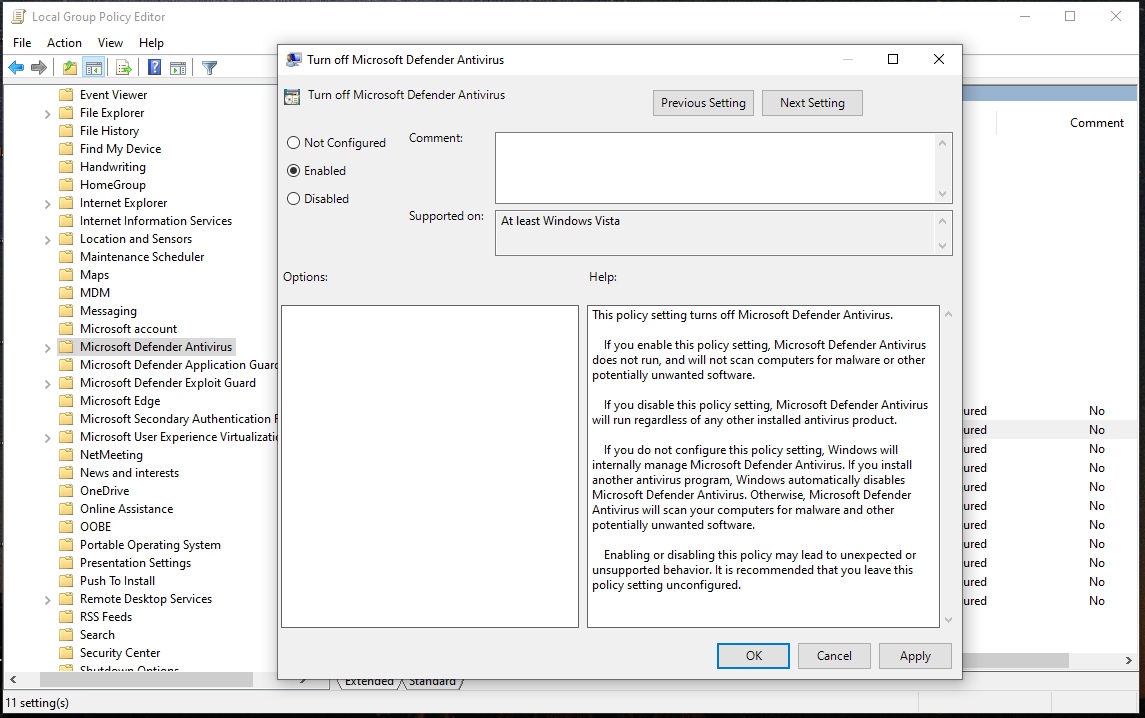
Computer Configuration\ Administrative Templates\ Windows Components\Microsoft Defender Antivirus - On the right pane, double-click on Turn off Microsoft Defender Antivirus.

- Now click on the radio button beside Enabled to disable Windows Defender permanently.

- Click Apply and then OK.
- Restart your computer for changes to take effect.
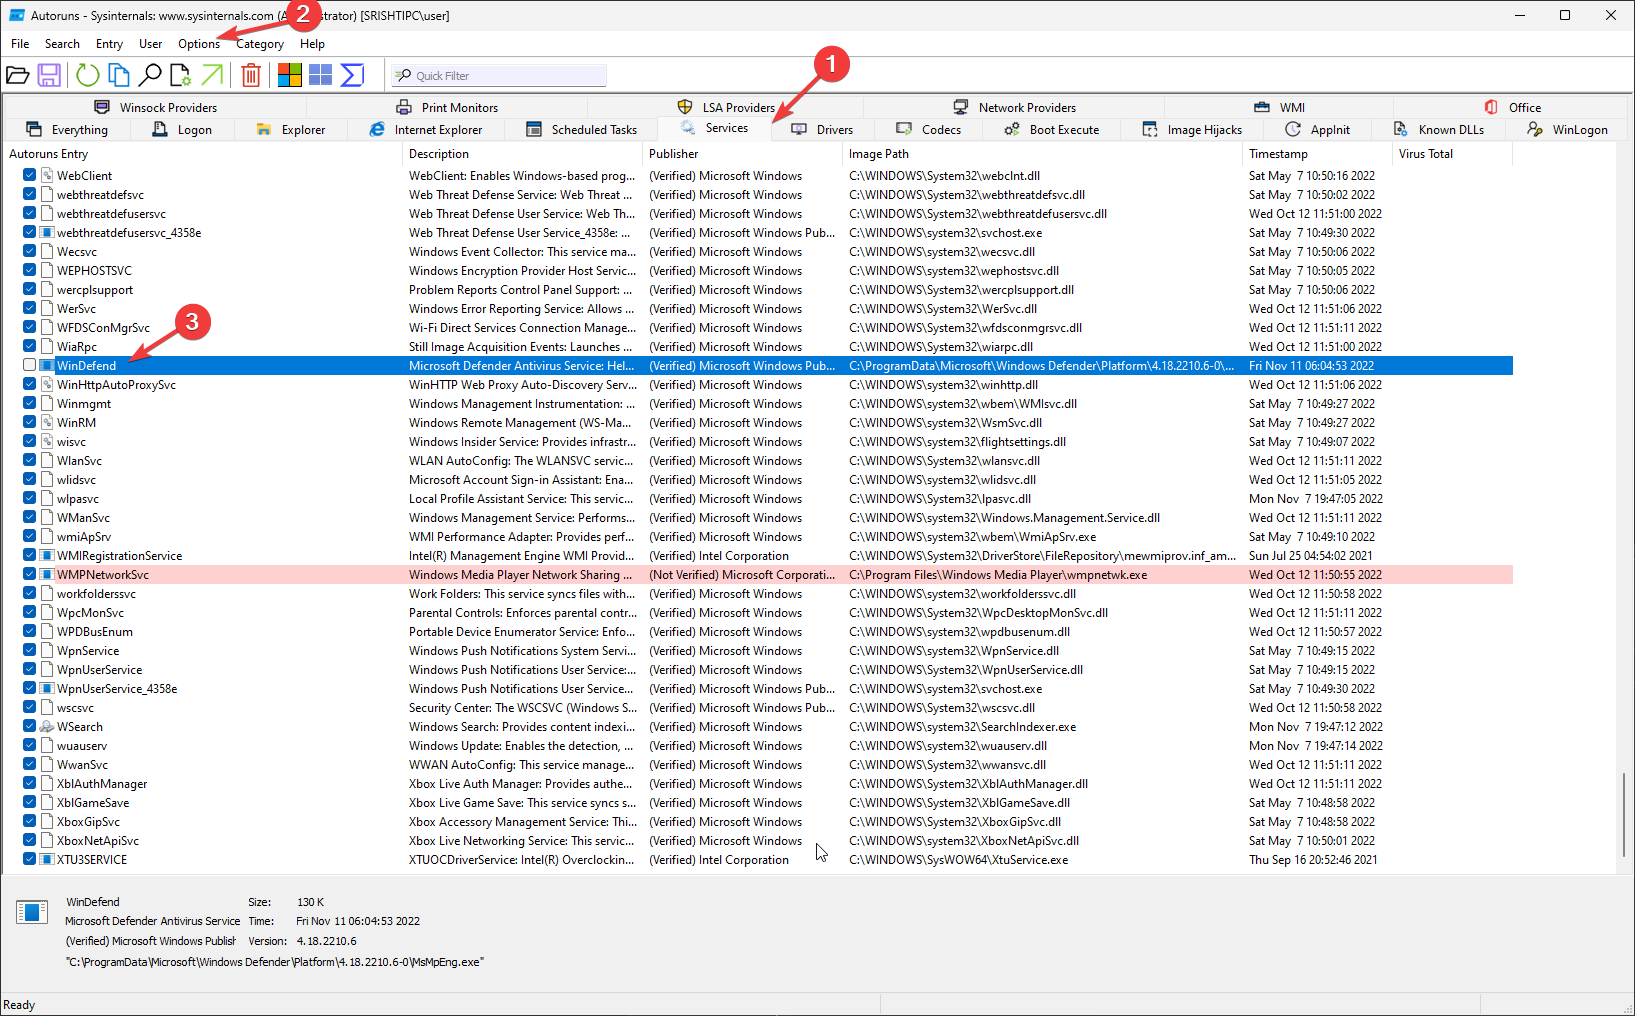
4. Use Autoruns
- Download Autoruns and extract the zip file to the desired location.
- Use the above-mentioned method to go into Safe Mode and restart your computer.
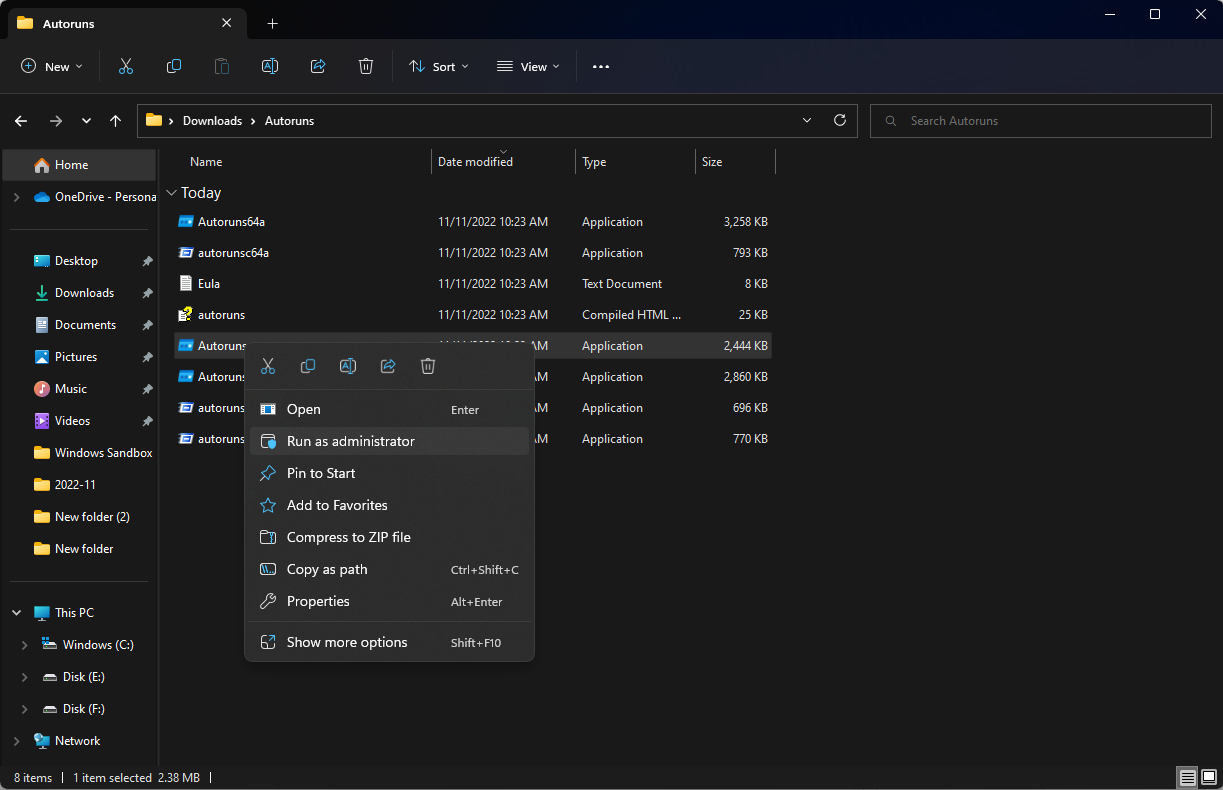
- In Safe mode, right-click on the Autoruns.exe file and choose Run as administrator.

- Navigate to the Services tab.
- Now click on Options from the menu bar and remove the checkmark from Hide Windows Entries.

- Locate and remove the checkmark beside the WinDefend service to turn off Windows Defender.
- Now, disable the Safe Boot mentioned above and restart your PC.
So, these are the ways to disable Windows Defender permanently on your Windows 11 computer. To ensure Windows Defender is disabled, you can open Windows Security. Then, on Virus & threat protection page, you will see the Getting protection info message implying that Windows Defender is turned off.
Try them and let us know what worked for you in the comments below.
![]()