Windows 10 comes with a set of bundled apps which are installed for all users by default. Some of them like Calculator or Photos are intended to replace classic Windows apps. Others are new to Windows 10 and provide various online and offline services. One such app is the Get Help app. If you found no use for this app, you might want to delete it. In this article, we will see how it can be done.
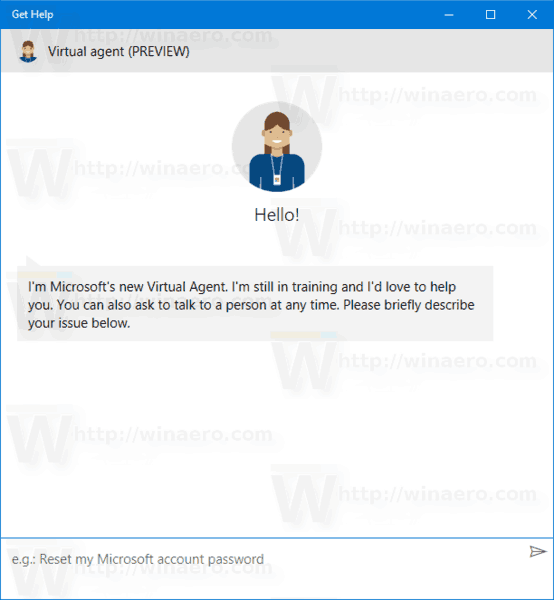 Microsoft has included a new app which allows customers to contact tech support quickly when they run into problems. It is a Store app named «Get Help» that is available for both Windows 10 and Windows 10 Phones. The app is a web wrapper to a special web resource for communicating with the appropriate support service to solve a problem that you are facing.
The app comes bundled with Windows 10. It can be found in the Start menu.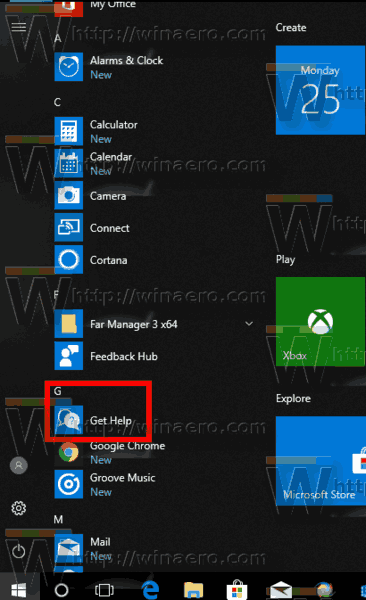
You can use Get Help to resolve your upgrade issues, ask and track questions related to your billing and Microsoft Account, along with asking for more information and topics.
The app is formerly know as «Contact Support».
Recently, I have covered how to get rid of the Contact Support app in Windows versions prior to Windows 10 version 1709 «Fall Creators Update». A number of users report that the trick doesn’t work for the Get Help app . Here is a new option for the recent builds of the OS.
To uninstall Get Help in Windows 10, do the following.
- Open PowerShell as administrator.
- Type or copy-paste the following command:
Get-AppxPackage *Microsoft.GetHelp* -AllUsers | Remove-AppxPackage
- Hit the Enter key. The app will be removed!


That’s it.
With PowerShell, you can remove other apps which come bundled with the OS. These include Calendar and Mail, Calculator, Facebook, and many more. The procedure is covered in detail in the following article:
How to Uninstall Apps in Windows 10
Thanks to my friend Nick for this tip.
Support us
Winaero greatly relies on your support. You can help the site keep bringing you interesting and useful content and software by using these options:
If you like this article, please share it using the buttons below. It won’t take a lot from you, but it will help us grow. Thanks for your support!

- Описание
- Способ
- Вывод
Приветствую друзья! Данная заметка опишет способ удаления одного приложения, которое может содержать операционная система Windows 10.
Описание
Удалить Техническую поддержку можно путем использования инструмента PowerShell: Get-AppxPackage *Microsoft.GetHelp* -AllUsers | Remove-AppxPackage
PS: консоль необходимо запускать с администраторскими правами. Перед удалением рекомендуется создать контрольную точку восстановления.
Разбираемся
Приложение Техническая поддержка позволяет получить доступ к сотрудникам Microsoft для оказания помощи при появлении проблем с Windows:


Для удаления данного приложения можно воспользоваться данной небольшой инструкцией:
- Нажмите правой кнопкой по значку Пуск > выберите пункт PowerShell (Администратор).
- Далее укажите команду удаления: Get-AppxPackage *Microsoft.GetHelp* -AllUsers | Remove-AppxPackage
- Нажмите энтер. Спустя несколько секунд программа должна удалиться.

PowerShell — инструмент, включающий в себя командную строку, скриптовый язык, платформу управления конфигурацией. Интересно, что данный инструмент присутствует не только в Windows, но и в Линуксе, Маке. Скрипты могут помочь автоматизировать многие задачи, однако нужно знать скриптовый язык — можно изменять параметры системы, останавливать/запускать сервисы, удалять программы.
Заключение
Выяснили:
- Деинсталляция программы Техническая поддержка возможна используя команду консоли PowerShell, запущенной от имени администратора.
Удачи и добра.
На главную!
02.09.2021
На чтение 3 мин Опубликовано Обновлено
Windows 10 поставляется с большим количеством предустановленных приложений, и некоторые из них могут быть не нужны или даже раздражающими. Одно из таких приложений — Get Help, которое поставляется с операционной системой. Если вам не нужно это приложение и вы хотите освободить место на диске или просто избавиться от него, мы предоставим вам подробную инструкцию по удалению Get Help.
Перед тем, как мы начнем, хочу предупредить вас, что удаление предустановленных приложений может иметь следствием неправильную работу операционной системы или вызвать проблемы с обновлениями. Будьте внимательны и следуйте инструкциям внимательно. Всегда рекомендуется создать точку восстановления перед удалением любого приложения.
Вот пошаговая инструкция по удалению Get Help:
- Щелкните правой кнопкой мыши на кнопке «Пуск» в левом нижнем углу экрана и выберите «Windows PowerShell (администратор)».
- Появится окно Windows PowerShell. Введите следующую команду и нажмите клавишу «Enter»:
Get-AppxPackage *GetHelp* | Remove-AppxPackage
Подождите несколько секунд, пока PowerShell удалит приложение Get Help с вашего компьютера. Когда процесс завершится, вы увидите командную строку снова. Get Help более не будет установлен на вашем компьютере!
Это все! Теперь вы знаете, как удалить приложение Windows 10 Get Help. Удачи!
Удаление приложения Windows 10 Get Help
Шаг 1: Нажмите на кнопку «Пуск» в левом нижнем углу экрана и выберите «Настройки».
Шаг 2: В окне «Настройки» выберите раздел «Приложения».
Шаг 3: В левой части окна «Приложения» выберите «Приложения и компоненты».
Шаг 4: Прокрутите список приложений, пока не найдете «Get Help».
Шаг 5: Выберите «Get Help» и нажмите на кнопку «Удалить».
Шаг 6: Подтвердите удаление приложения, нажав на кнопку «Да».
Шаг 7: Дождитесь завершения процесса удаления. После этого приложение «Get Help» будет полностью удалено с вашего компьютера.
Обратите внимание, что приложение «Get Help» является частью операционной системы Windows 10, поэтому, возможно, не все версии Windows 10 позволяют его удаление.
Откройте Параметры Windows
Чтобы удалить приложение Get Help в Windows 10, вы должны открыть раздел «Параметры» в системе. Следуйте этим шагам:
| Шаг 1: | Нажмите на кнопку «Пуск» в левом нижнем углу экрана или нажмите клавишу «Windows» на клавиатуре. Меню «Пуск» будет открыто. |
| Шаг 2: | В меню «Пуск» найдите и нажмите на значок «Параметры». Он обозначен иконкой шестеренки. Откроется окно «Параметры». |
| Шаг 3: | В окне «Параметры» найдите и нажмите на раздел «Приложения». |
Теперь вы находитесь в разделе «Приложения» параметров Windows и можете приступить к удалению приложения Get Help. Продолжайте чтение статьи, чтобы узнать, как удалить приложение Get Help.
There are many useful apps included with Windows 10, but there are some you might want to remove. In this guide, we look at how to remove the Get Help App.
The Get Help App is different than other included apps from Microsoft in that you can’t use search and uninstall it, nor can you uninstall it from Apps & Features. But, there are other ways.
1: Uninstall With PowerShell
When all else fails, we can remove it from the Command Prompt.
Open PowerShell as admin and type in Get-AppxPackage *Microsoft.GetHelp* -AllUsers | Remove-AppxPackage. You might see some text flash briefly, but otherwise, this process only takes seconds to complete.
You can also Remove Windows 10 Apps Using PowerShell individually.
2: Uninstall With a Third-Party App
One excellent choice is O&O AppBuster. O&O AppBuster has the advantage of letting you pick from different apps you want to remove and the ability to restore them should you change your mind later.
Similar:
comments powered by Disqus

“How to get help in Windows 10/11” Bing search pop up opens in the browser when the user presses the F1 key. This happened to at least everyone once! This tutorial shows you how to remove it for good!
Some of the users have been seen stating on forums that it comes up on their windows desktop automatically and on regular basis.
Now, why does this keep on happening?
- At times the help key might get stuck which triggers the get help alerts.
- Incorrect system settings.
Remove apps not needed from starting up
Keyboard macro programs can press the F1 keys automatically with their macros. Do keep checking that you have any software that may be opening this pop-up.
For this:
- In the first step open the Win + X menu using the windows key + X hotkey.
- Choose to open task manager.
- Select the start-up tab.
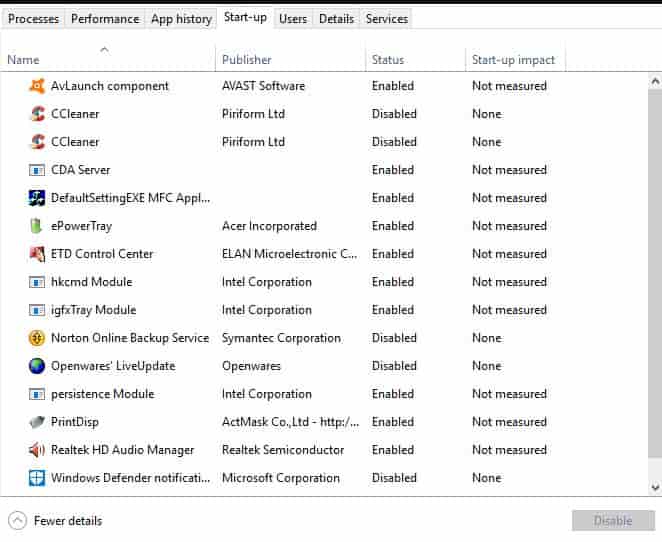
- Disable any program by selecting it and hitting the disable button.
SEE ALSO: Free Programs that are specifically created for keyboard typers.
Is your F1 Key Stuck – A common issue
It might be the time that you need to your keyboard. The underlying issue occurs if the specific key is stuck in any way. So you need to check it. this may not automatically pop up with an alternative keyboard. Just unplug it to see if the pop-up still opens.
SEE ALSO: Become a faster typer by creating Keyboard Macros.
Disable F1 Key
This ensures that the search pop-up does not open. With the help of keyboard mapping software users can deactivate the specific key. SharpKeys is yet another freeware mapping software that is used to turn off most keyboard keys with.
For this:
- Click on browse in order to select a folder to extract it to and hit the extract button.
- Then open its windows and select F1.
- Press turn key off in from the To this key list, press OK.
- After this select write to registry open and restart your device.
SEE ALSO: How to Remove Microsoft Office 2016 Installation from PC.
Sticky Key and Filter Key Settings
This may open up if the user has set F1 as a filter or sticky key. To deselect this, press the “type here to search” Cortana button on the taskbar.
- In the search box, you need to type sticky key.
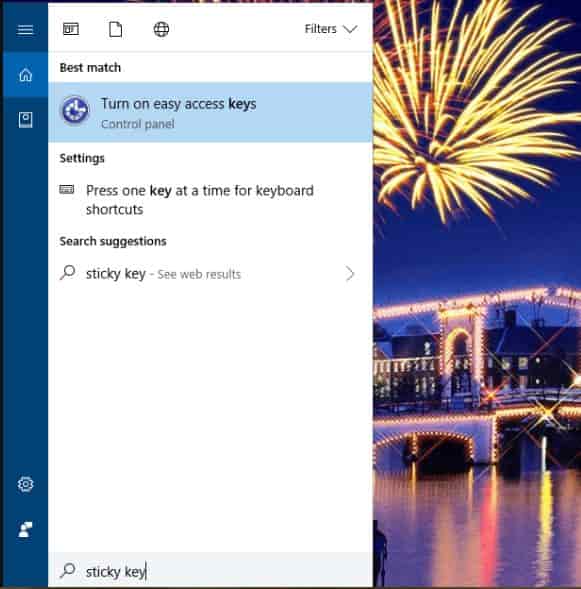
- Choose turn on easy access keys in order to open the Control Panel.
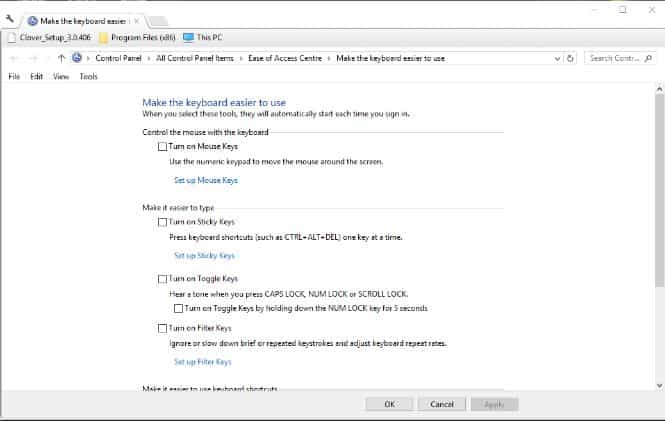
- If the turn-on sticky keys option is selected, deselect it.
- Then un-check turn on filter keys setting.
- Select apply.
- Press OK for the new changes to take place and close the window.
SEE ALSO: Find out what happens If a system restore is interrupted in Windows 10.
Start looking at your Registry files
Some users have fixed the issue by editing the EnableactiveProbing DWORD value with the help of the Registry editor.
- To open it you need to press Windows Key + R keyboard shortcut.
For this:
- In the run, type in Regedit, press Ok.
- Then open to the following registry key in it:
HKEY_LOCAL_MACHINE\SYSTEM\CurrentControlSet\
Services\NlaSvc\Parameters\Internet.
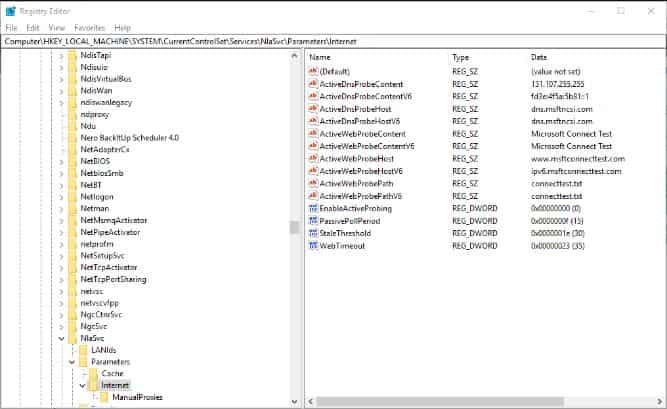
- After this you need to double click EnableActiveProbing to open the following window:
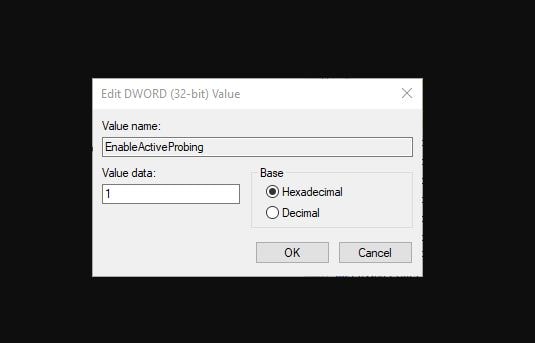
- In the Value data box enter 0 to replace the current 1 value.
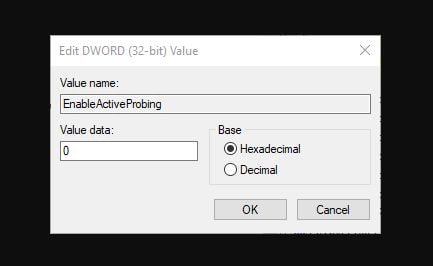
- Press Ok.
- Close it down.
- Choose Restart to restart your windows.
SEE ALSO: Download Windows Registry Editor Utility.
Rename or Remove HelpPane.exe
As this is the main culprit which launches the underlying problem then what we can do is rename or delete the executable file and whenever the specific key is pressed windows will not be able to find the file and you shall not get the Binge search page.
For this:
- In the first step open up the file explorer.
- Then go to C:\Windows\ folder.
- Lookup for this file, you shall not be able to delete or rename it directly as you need to take ownership and full control of the file.
- Once done, delete it or rename it like HelpPane_BAK.exe etc.
Note: If you are still not able to do this, just open the task manager and from there end the task.
Are you infected with a virus or malware? Check it!
You can opt for this option as well. Most of the time problem occurs due to some third-party app that is being infected. If you do not carry any anti-virus software then you don’t need to worry as you can use the in-built malware scanning tool known as windows defender.
For this:
- To open settings press Windows Key + I, click on updates and security.
- On the left-hand side choose windows security.
- Click open windows defender or security button.
- Select the virus and threat section.
- Choose the advanced section and highlight windows defender offline scan.
- Click scan now.
- Once it is completed, if any virus or malware is there then it shall be removed automatically.
- Reboot the system to check to see if the issue is resolved or not.
SEE ALSO: How to Fix Most Common RSOD Red Screen Issues.
Tip: If you need help in need from Microsoft visit this link.
Conclusion
So this was how you can get rid of the “Get help in Windows 10/11” pop-up that occurs. I have shared the most common fix which is editing the Registry files and removing it from there. Let me know if you are aware of an alternate method below in the comments.