Hashing means taking an input string of any length and giving out an output of a fixed length. Using the cryptographic hashing algorithm — e.g., MD5, SHA-256, SHA-384, you can verify if two files are identical or not. The checksum is a hash value used for performing data integrity checks on files. It’s a kind of signature for a file.
When you download large files from the internet such as the Windows 10 ISO images, there are chances that the file gets corrupt or a few bits lost due to inconsistent connection or other factors. Hash verification is the best way to compare the two hashes – source file on a website or server versus the downloaded copy.
Many software vendors put up the hash for file downloads on their site. You might have seen in torrent sites that a hash value usually accompanies the download link.
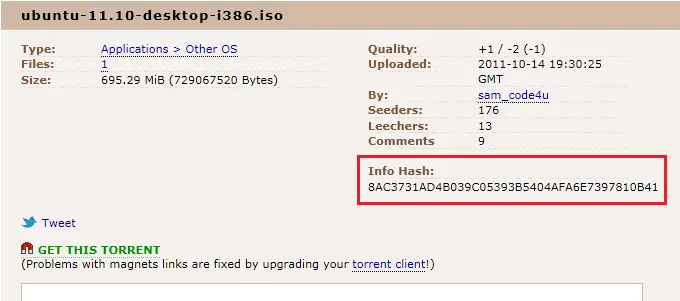
Also, the hash checksum comparison is an excellent way to identify duplicate files in a computer or compare two folders.
In this article, let’s see how to get the cryptographic hash using MD5, SHA-256, SHA-384 algorithms using various methods, and how to integrate the functionality into the context menu.
Using PowerShell
Using Windows PowerShell (powershell.exe), you can quickly get the file hash with a single command-line. Here is the command-line example:
get-filehash -path "C:\Users\ramesh\Desktop\reinstall-preinstalledApps.zip" | format-list
This outputs the file hash (by default, it uses the SHA256 algorithm) as shown below:
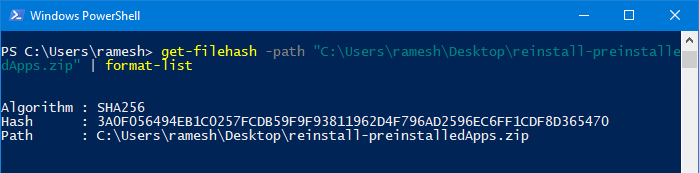
Algorithm : SHA256
Hash      : 3A0F056494EB1C0257FCDB59F9F93811962D4F796AD2596EC6FF1CDF8D365470
Path      : C:\Users\ramesh\Desktop\reinstall-preinstalledApps.zip
To use any other algorithm — e.g., SHA384, you can add the -Algorithm SHA384 parameter to the above command-line.
Example:
get-filehash -path "C:\Users\ramesh\Desktop\reinstall-preinstalledApps.zip" -Algorithm SHA384 | format-list
The acceptable values for the -Algorithm parameter are:
- SHA1
- SHA256
- SHA384
- SHA512
- MD5
Copy to the clipboard
To copy the output to the clipboard, pipe the output to the clip command, as below:
get-filehash -path "C:\Users\ramesh\Desktop\reinstall-preinstalledApps.zip" | format-list | clip
Integrate the command to the right-click menu
To add the PowerShell command to the right-click menu for files, here is a .reg file:
Windows Registry Editor Version 5.00

[HKEY_CURRENT_USER\Software\Classes\*\shell\gethash]
@="Get File Hash"

[HKEY_CURRENT_USER\Software\Classes\*\shell\gethash\command]
@="powershell -WindowStyle Minimized -command get-filehash -literalpath '%1' -algorithm SHA256 | fl | clip"
- Copy the above lines to Notepad and make a .reg file. For more information, see the article How to create and use .reg files.
- Double-click the .reg file to apply the contents to the registry.
- Now, right-click on a file and click Get File Hash command in the context menu.

The command launches PowerShell, which in turn generates the file hash and copies it to the clipboard automatically.
To remove the context menu option you added, use this undo .reg file
Windows Registry Editor Version 5.00

[-HKEY_CURRENT_USER\Software\Classes\*\shell\gethash]
Using Certutil.exe with VBScript
Certutil.exe is a built-in command-line program that is installed as part of Certificate Services. You can use Certutil.exe to compute file checksum using various hashing algorithms. The following command-line syntax is to be used to calculate the SHA256 checksum of a file using Certutil.exe from a Command Prompt window.
certutil.exe -hashfile file_name SHA256
If you want to implement Certutil.exe in your right-click menu, here is a VBScript that exactly does it.
- Copy the following VBScript code to Notepad.
- Save the file with .vbs extension – e.g.,
get-hash-certutil.vbsin a permanent folder.'Get File hash via the right-click menu 'SHA256 hash for the file is copied to the clipboard automatically 'Created: June 4, 2019 by Ramesh Srinivasan - winhelponline.com Option Explicit Dim WshShell, sOut, sFileName, sCmd, oExec, strInput Set WshShell = WScript.CreateObject("WScript.Shell") If WScript.Arguments.Count = 0 Then strInput = InputBox("Type ADD to add the Get File Hash context menu item, or REMOVE to remove the item", "ADD") If ucase(strInput) = "ADD" Then sCmd = "wscript.exe " & chr(34) & WScript.ScriptFullName & Chr(34) & " " & """" & "%1" & """" WshShell.RegWrite "HKCU\Software\Classes\*\shell\gethash\", "Get File Hash", "REG_SZ" WshShell.RegWrite "HKCU\Software\Classes\*\shell\gethash\command\", sCmd, "REG_SZ" WScript.Quit ElseIf ucase(strInput) = "REMOVE" Then sCmd = "reg.exe delete HKCU\Software\Classes\*\shell\gethash" & " /f" WshShell.Run sCmd, 0 WScript.Quit End If Else sFileName = """" & WScript.Arguments(0) & """" sCmd = "cmd.exe /c certutil.exe -hashfile " & sFileName & " SHA256" & _ " | findstr /v " & chr(34) & "completed successfully" & Chr(34) & " | clip" WshShell.Run sCmd, 0 End If - Double-click the file to run it.
- In the input box that appears, type
ADDand click OK.
It adds the Get File Hash command in the context menu.
Clicking on the menu item computes the SHA256 hash and copies it to the Clipboard automatically.
Open Notepad and paste the file hash stored in the clipboard.

Note: To remove the context menu entry, double-click the file to run it. Then, type REMOVE and click OK.
The above script uses the built-in certutil.exe to generate file hash, by running the command and redirecting its output to the clipboard using Clip.exe:
certutil -hashfile file_name SHA256
This is how the output will look like when running it from Command Prompt.

Certutil.exe supports the MD2 MD4 MD5 SHA1 SHA256 SHA384 SHA512 hashing algorithms.
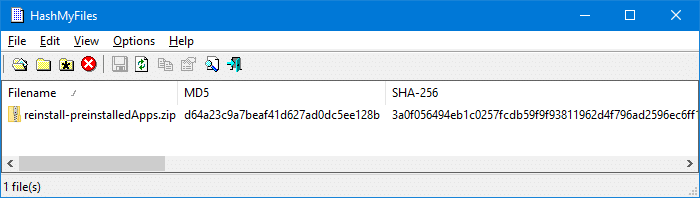
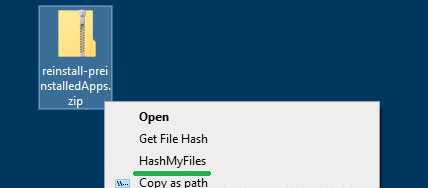
Another way to get the file hash via context menu is by using a third-party utility like HashMyFiles.
HashMyFiles utility from NirSoft
HashMyFiles is small utility from Nirsoft that allows you to calculate the MD5 and SHA1 hashes of one or more files in your system. You can easily copy the MD5/SHA1 hashes list into the clipboard, or save them into text/HTML/XML file. HashMyFiles can also be launched from the context menu of Windows Explorer, and display the MD5, SHA256, SHA384, SHA512 hashes of the selected file or folder.
From the Options menu, click Enable Explorer Context Menu option to enable it. It adds the HashMyFiles option to the context menu for files and folders.
Download HashMyFiles from Nirsoft.net
Using 7-Zip
The popular compression utility 7-Zip has a feature that can compute the CRC or SHA checksums via the right-click menu. 7-Zip is a widely used software and it’s most likely that you may have installed it on your computer.
In 7-Zip setup doesn’t enable the option already, you can turn it on by clicking the Tools menu, clicking Options and enabling the CRC SHA > option under the Context menu items: listing. Click OK to save your setting.
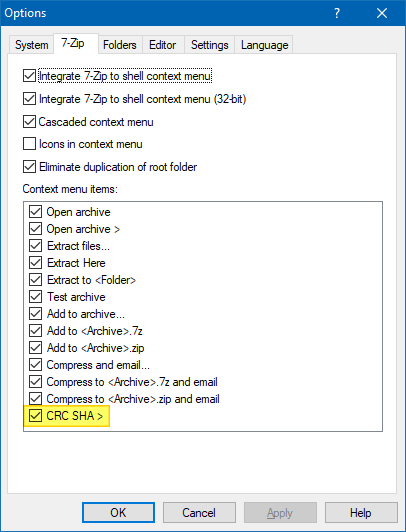
Then, all you need to do is right-click on a file, click CRC SHA and then select a hashing algorithm such as CRC-32, CRC-64, SHA-1, SHA-256 from the sub-menu. To select all of the above hashing algorithms (and BLAKE2 algorithm in addition), click the asterisk (*) option.

The checksum information is presented in a separate dialog.
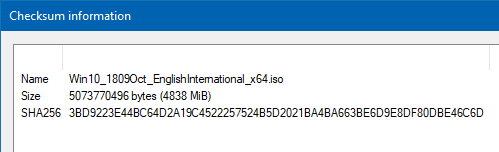
You can select the items and press Ctrl + C on your keyboard to copy it to the clipboard.
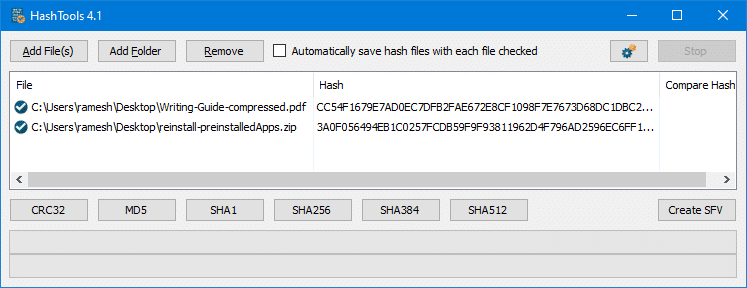
Using HashTools from Binary Fortress
HashTools by Binary Fortress Software computes and checks hashes with just one click! Supports CRC32, MD5, SHA1, SHA256, SHA384, SHA512 and SFV’s, as well as integration into the Windows Explorer context menu for one-click access.
Install HashTools or run the portable edition or the tool. Click on the Options button shown with the gears icon, and click Add to Windows Context Menus.
Right-click on a file or a set of files, and click Hash with HashTools in the context menu.
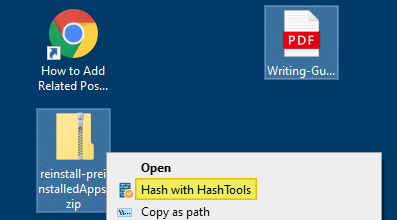
This launches the HashTools program and adds the selected file(s) to the list. Next, click on a hashing algorithm (e.g., CRC, MD5, SHA1, SHA256, etc) to generate the hash checksum for the files.
Do you know any other tool or method to calculate file hash? Let’s know in the Comments section below.
One small request: If you liked this post, please share this?
One «tiny» share from you would seriously help a lot with the growth of this blog.
Some great suggestions:
- Pin it!
- Share it to your favorite blog + Facebook, Reddit
- Tweet it!
So thank you so much for your support. It won’t take more than 10 seconds of your time. The share buttons are right below. 
There’s a built-in PowerShell tool:
CertUtil -hashfile yourFileName MD5
The following rules are as of Windows 7 SP1, Windows Server 2012, and beyond. If they are known to work in older versions, they will be noted with: (independent of Windows version)
-
You will need to open a Command Prompt OR Powershell to run this command
** a quick guide to open CMD/Powershell is at the bottom of the answer -
You can find the checksum for a file using ANY of the following hashing algorithms, not JUST MD5:
MD2 MD4 MD5 SHA1 SHA256 SHA384 SHA512 -
To get the current list of supported Hash Algorithms on your specific windows machine (independent of Windows version), run
CertUtil -hashfile -? -
The full Format is below, optional parameters are in braces — just replace [HashAlgorithm] with your desired hash from above:
CertUtil -hashfile InFile [HashAlgorithm] -
You can do the command line operation for ANY files, whether they provide a certificate or not (independent of Windows version)
-
If you leave off the [HashAlgorithm], it will default to the SHA1 checksum of your chosen file
-
Its HELPFUL to note that [HashAlgorithm] is case INsensitive in both CMD and Powershell meaning you can do any of the following (for example):
 CertUtil -hashfile md5
 certutil -hashfile MD5
 CertUtil -hashfile sHa1
 certutil -hashfile SHA256
Quick: How to Open Command Prompt or Powershell
In case you do not know how to open the Command Prompt or Powershell and you got here by search engine, the following is a quick guide that will work for Windows XP and beyond:
- Press [Windows]+[R]
- Then, type cmd (or powershell if Windows 8+)
- Press [OK] or hit enter
A cryptographic hash is a fixed size string (or text) that is used as an identifier/fingerprint of some data. These are particularly useful in determining the integrity of files after they are transferred over a communication channel. Hashes are even utilized by certain OS-level processes for their working. The command processor of Windows OS (cmd.exe) provides the user with the ability to compute hashes on files/Directories via an utility command named Certutil. In this article we would learn about computing hashes on command prompt (cmd).
Description of command :
The command Certutil is primarily used for working with digital certificates and not hashes. The ability to hash files is due to the presence of a -hashfile switch in it.
> Certutil -hashfile
-hashfile  -- Generate and display cryptographic hash over a file
Where certutil is the command, and -hashfile is a switch provided to it.
Syntax :
The -hashfile switch takes in two arguments. Firstly, the path to the file in which we are interested in getting the hash. And then the hash algorithm that we are interested in.
Creating a syntax :
Certutil -hashfile (Path_to_file) [HashAlgo]
Where Path_to_file is mandatory(should be provided) argument and HashAlgo is optional argument (If not provided, defaults to SHA1). If HashAlgo is provided it should either be from SHA (Secure Hash Algorithms) or from MD (Message Digest) Cryptographic Hash families. Some of the hash algorithms allowed in the command are MD4, MD5, SHA1, SHA256, SHA512.
Usage of the command :
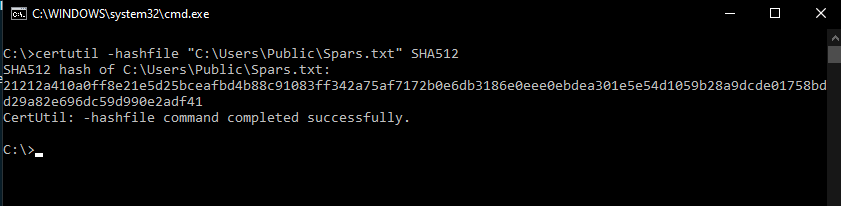
To demonstrate the usage of the command, we would be running the command on a file. Our example file will be at the location “C:\Users\Public\spars.txt” .

That contains some text data. So to get the MD5 (Message Digest 5) hash of the file, we would have to execute the command.
certutil -hashfile "C:\Users\Public\spars.txt" MD5
The command upon execution would produce an output similar to this.
MD5 hash of spars.txt:
cb21e6741817a2d3020e02bb94301ae4
CertUtil: -hashfile command completed successfully.
To get SHA512 hash of the above file the command and the output would appear as following :
Last Updated :
23 Oct, 2020
Like Article
Save Article
Why would someone want to know the hash of a file on Windows?
Software developers sometimes list the hash of a file when distributing it over the Internet to help others verify the file’s integrity.

The purpose of publishing the hash is to help you verify that the file you are downloading is the actual file the developer is distributing.
If the file is manipulated some way then the hash will change. For example, perhaps the file is actually malware or perhaps some other change has been made to the file to make it malicious in some way. Or maybe it’s the completely wrong file that was mistakenly uploaded to the wrong place.
How can I check a file’s hash on Windows?
One super quick and easy way to check a file is to upload the file to VirusTotal.com. VirusTotal is a free file analysis service created for the information security community. You can upload the file there and it will automatically show you the hash of the file. Then on top of this it will also show how the file is analyzed by many different antivirus engines. Please note that VirusTotal is not an antivirus, and some engines may incorrectly analyze a file as malware. This false analysis is called a false positive.
Please also note that you’ll be uploading this file to a third party server so you should not upload any files that should be kept private.
A second more private way to check a file’s hash is to open the Windows command prompt and use the certutil command for Windows.
An example of this simple command is below:
certutil -hashfile c:\Users\YourUserName\Desktop\wire.exe SHA256
This Windows command example would return the SHA256 hash of the file located at the specified path. You should update the command to show the correct path, user name, and file name for your file integrity check.
You can also use other values after SHA, such as 1 or 256, to produce the corresponding hash. With GlassWire’s example above we have chosen to use a SHA256 hash for our file.
A third easy way to find the hash of a file is to use the Windows 10 Power Shell. First open the Windows Powershell (click “Start” then type “Powershell” then click it), then use the command below checking the file “wire.exe” as an example. Of course YourUserName should be your user name, and you should use the correct path to the file you want to check.
Get-FileHash -Path c:\Users\YourUserName\Desktop\wire.exe -Algorithm SHA256.

I hope this guide helped you easily find and verify the hash of a file on Windows!
The reason we made this guide is because we make a popular network security monitoring software for Windows called GlassWire. You can download GlassWire and try it free if you’d like.
Looking for GlassWire’s installer hash? Just click “change list” on our download page to verify the hash for every installer we have ever released.
Wikipedia also has a great page if you are looking to learn even more about file verification methods.
If you haven’t downloaded the best firewall yet use one of the two buttons below. Need help?
Contact us, or join our forum.
We look forward to hearing about how you have joined our firewall community and we’d like to
hear how you use the best firewall software to protect your device and network.


![]()
Join our Internet security newsletter!
Learn how to protect and monitor your network with GlassWire.
In cryptography, the hash of a message or a file is calculated using one way algorithm ms like MD5, SHA256, BLAKE3 etc. The hash is number calculated using these algorithms and it stays unique for the message. A change in the hash value indicates that the original message has also changed. Even a single letter changed in the original message will cause the hash to completely change.
Checking file integrity with hashes
We can use hash value for a file to see if the file has been modified. For example, if you download Mozilla Firefox installer package from https://ftp.mozilla.org/pub/firefox/releases/ and the calculated hash does not match the provided hash, then the file could have become corrupted in some way. We can do the same with downloaded Windows 11 ISO images.
Finding hashes using PowerShell
There are two easy ways to calculate file hashes on a Windows 11 PC. Both of these methods use Terminal. The first method uses the pre-installed Windows PowerShell which is now integrated with the Terminal. You have to start by right-clicking on the desktop and choosing to launch Terminal there. In the Terminal you have to give a command: Get-FileHash followed by full path name of the file. It calculates SHA256 hash for the given file by default but we can also specify an algorithm such as SHA512, MD5 etc.

Finding hashes using DirHash
While Get-FileHash does the job, it supports only a limited number of hashing algorithms namely SHA1, SHA256, SHA384, SHA512, and MD5 . Instead, you can use an open-source and very fast tool called DirHash. It is written using C language and offers many more algorithms such as SHA1, SHA256, SHA384, SHA512, MD5, Blake2s, Blake2b, Blake3, Streebog. The command line of DirHash is almost the same as that of Get-FileHash.

So these are two very fast methods of calculating file hashes on Windows 11. In my personal opinion, DirHash is superior in performance (at least on my Intel Core i5 PC) of the two tools.