Learn how to check, understand, and filter error logs on your PC
by Kazim Ali Alvi
Kazim has always been fond of technology, be it scrolling through the settings on his iPhone, Android device, or Windows. And at times, unscrewing the device to take… read more
Updated on
- If you have been facing issues with the computer, like an application crashing frequently, the Windows 11 error logs could help find the underlying cause.
- In the Event Viewer, you can easily check error logs, filter them, and create custom views.
- Also, find out how easy it really is to create a log file in Windows 11.
XINSTALL BY CLICKING THE DOWNLOAD
FILE
Whenever you encounter an error in Windows, it certainly is a cause for concern. But, we often do not bother discovering what caused it or don’t know how to
Error logs, as the name suggests, are the log files that store all the information as to why the error happened, the program or process that lead to it, along the exact date and time of it.
But it’s certainly not easy to decipher the information listed there. Therefore, we have dedicated this guide to help you understand how to check the error logs in Windows 11, the various types, add filters, and clear them.
Why do I need to check Windows 11 error logs?
Checking error logs on Windows 11 allows you to find the underlying cause of an issue.
For example, if Windows 11 is unstable and crashes frequently or encounters a BSOD (Blue Screen of Death) error, you can go to the event logs, check for the one created at the time of the crash, and find out what caused it.
Though do remember that you are likely to come across a lot of errors and warnings here, and there’s nothing to panic about. If you don’t notice any problem with the system, simply ignore these.
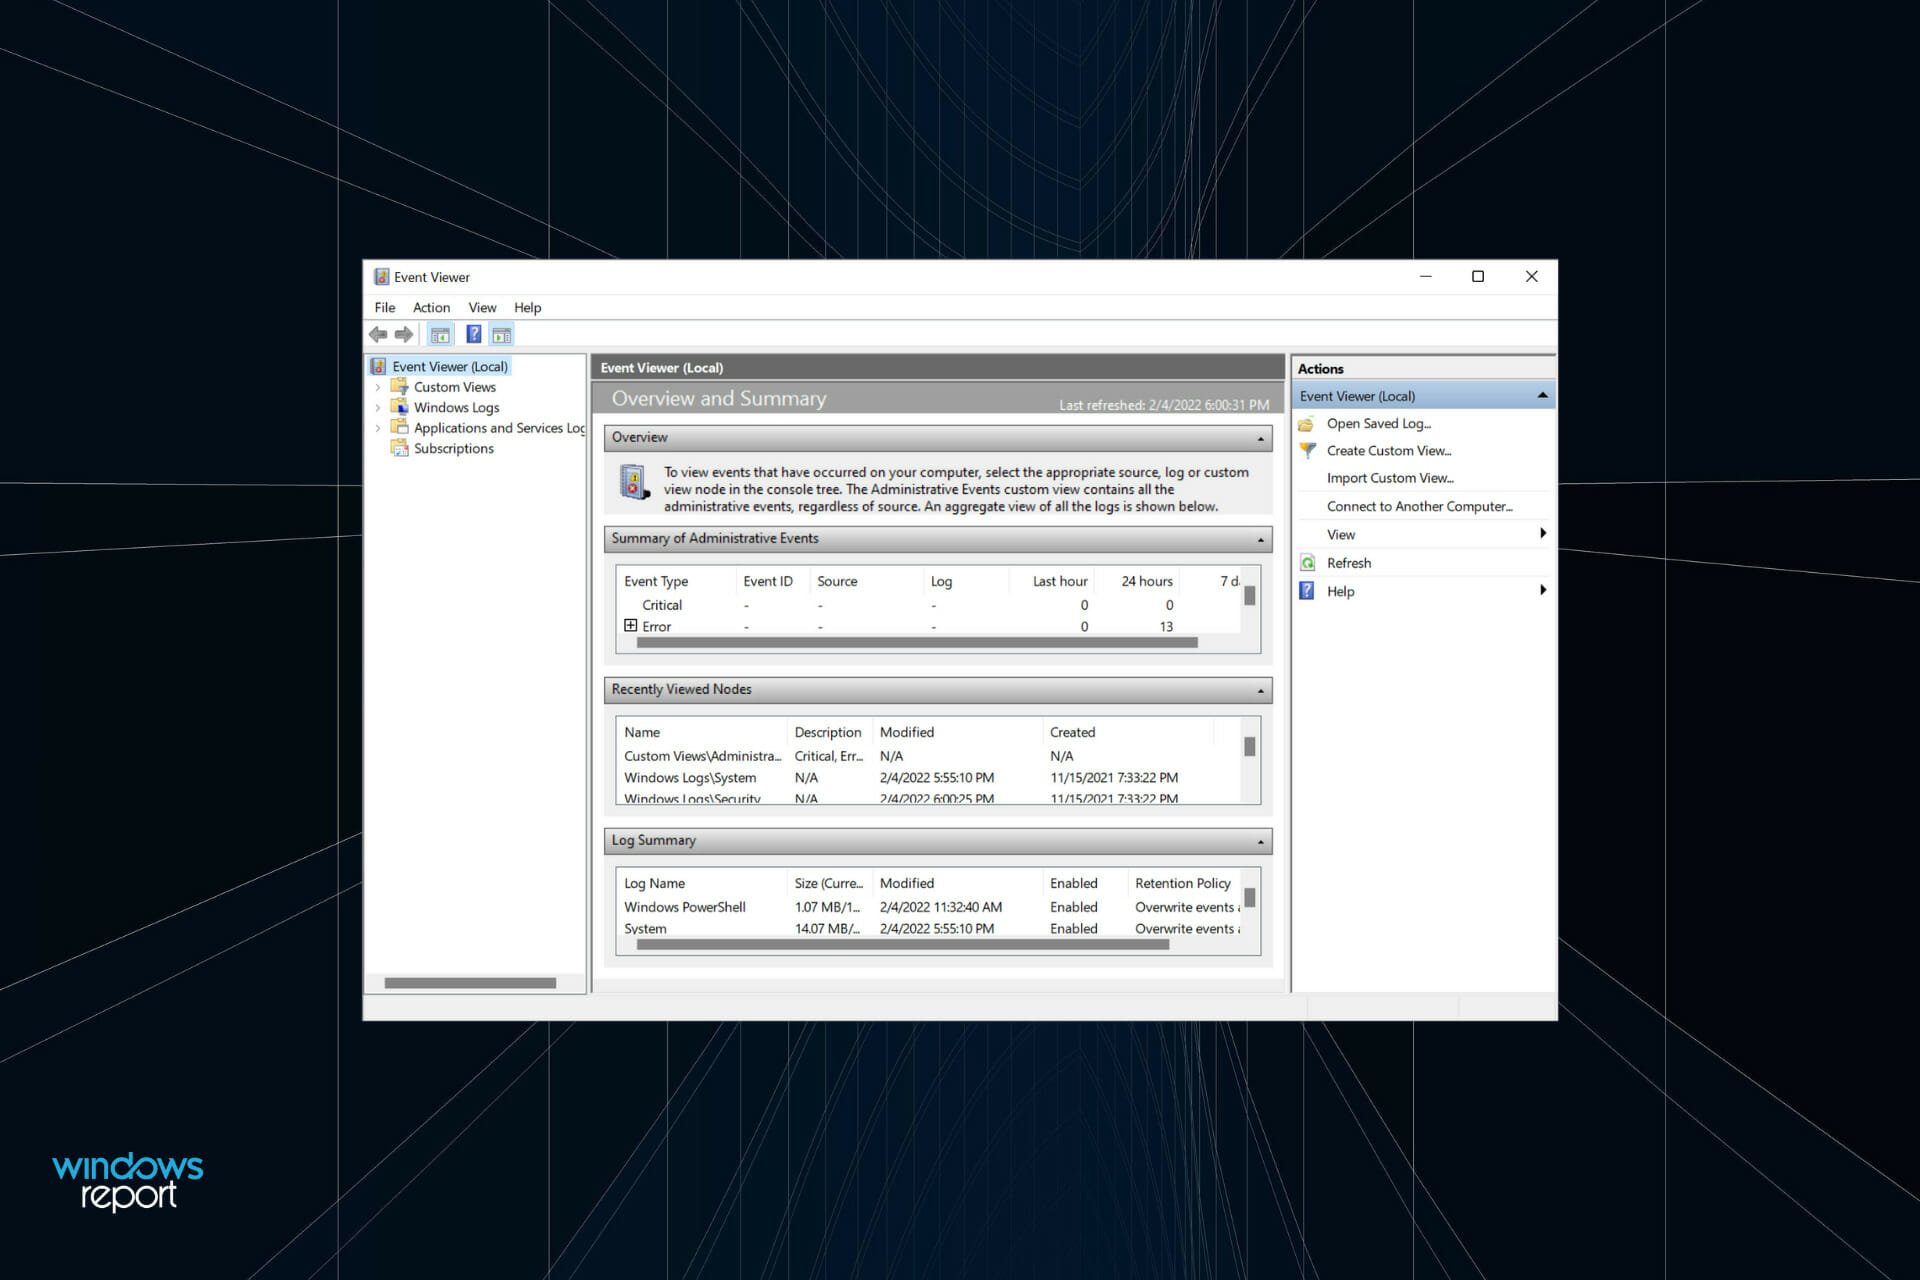
Where can I find error logs?
Error logs on Windows 11 can be found in the event log in Event Viewer. This feature contains the unexpected issues your PC encounters, the exact date and time, and the cause.
Does Windows Keep an error log?
How we test, review and rate?
We have worked for the past 6 months on building a new review system on how we produce content. Using it, we have subsequently redone most of our articles to provide actual hands-on expertise on the guides we made.
For more details you can read how we test, review, and rate at WindowsReport.
One of the advantages of the Windows operating system is that it keeps a log of the important happenings on your PC. This includes a log of the errors that occur.
As mentioned earlier, this can be found in the Event Viewer.
How do I check error logs in Windows 11?
- Why do I need to check Windows 11 error logs?
- How do I check error logs in Windows 11?
- How to understand Windows 11 error logs?
- What are the different types of error logs?
- How can I filter error logs?
- How to create a custom view to check a particular category and level of logs in Windows 11?
- How can I clear error logs in Windows 11?
- How do I create my own log file in Windows 11?
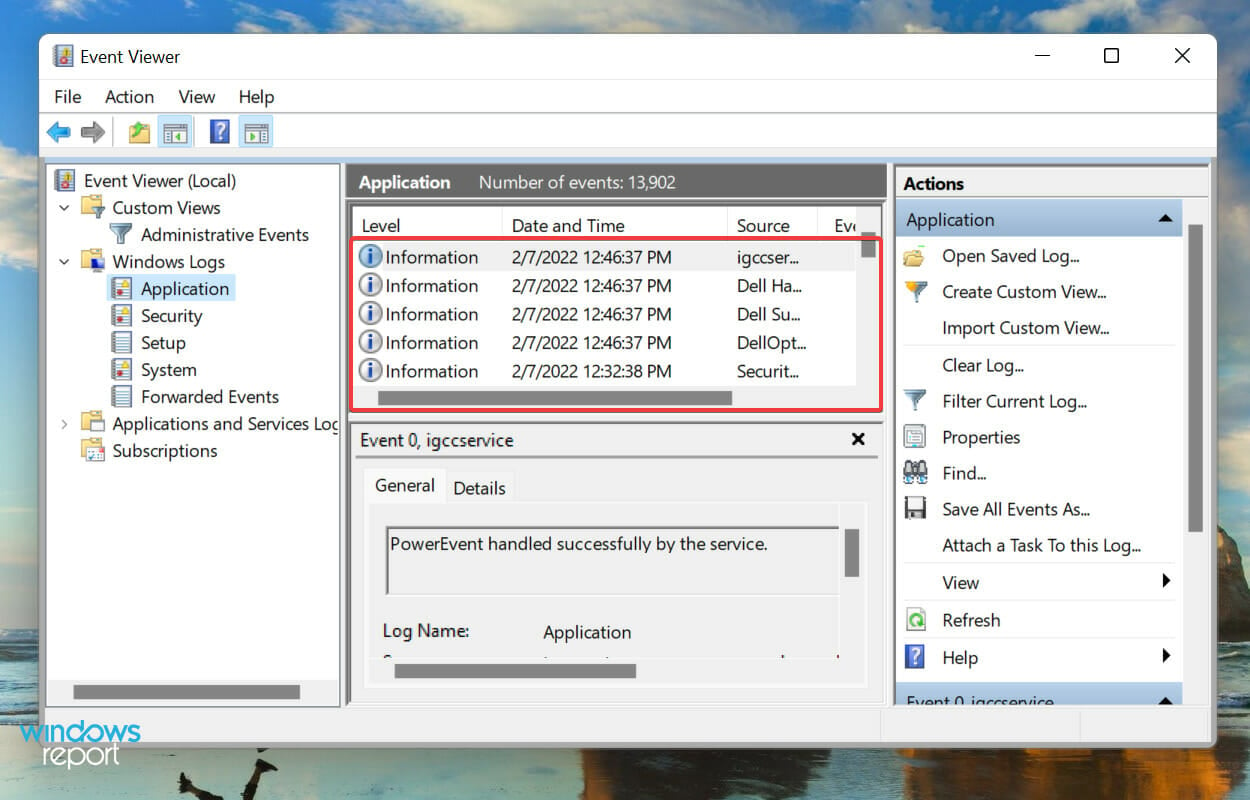
It’s pretty simple and quick to access the error logs on your Windows 11 OS, but in case you didn’t used before, the steps below will surely help you find them.
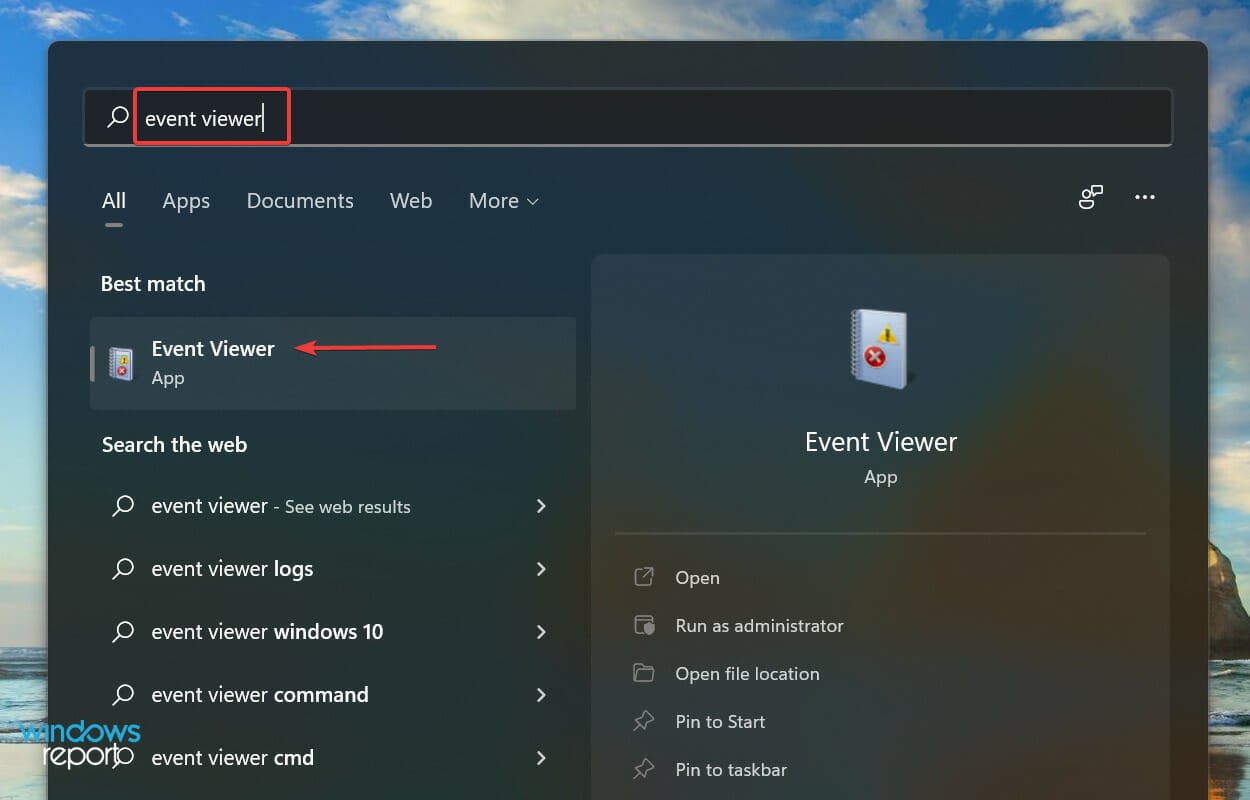
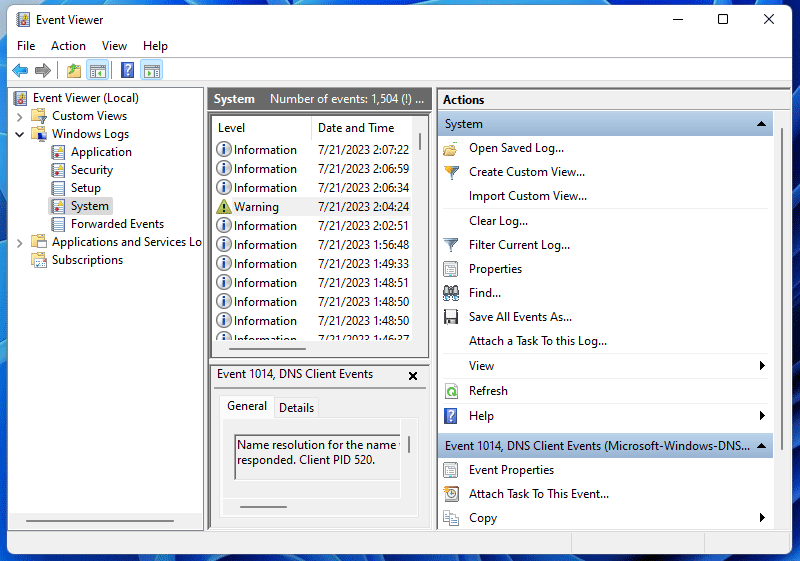
1. Press Windows + S to launch the Search menu, enter Event Viewer in the text field at the top, and click on the relevant search result.
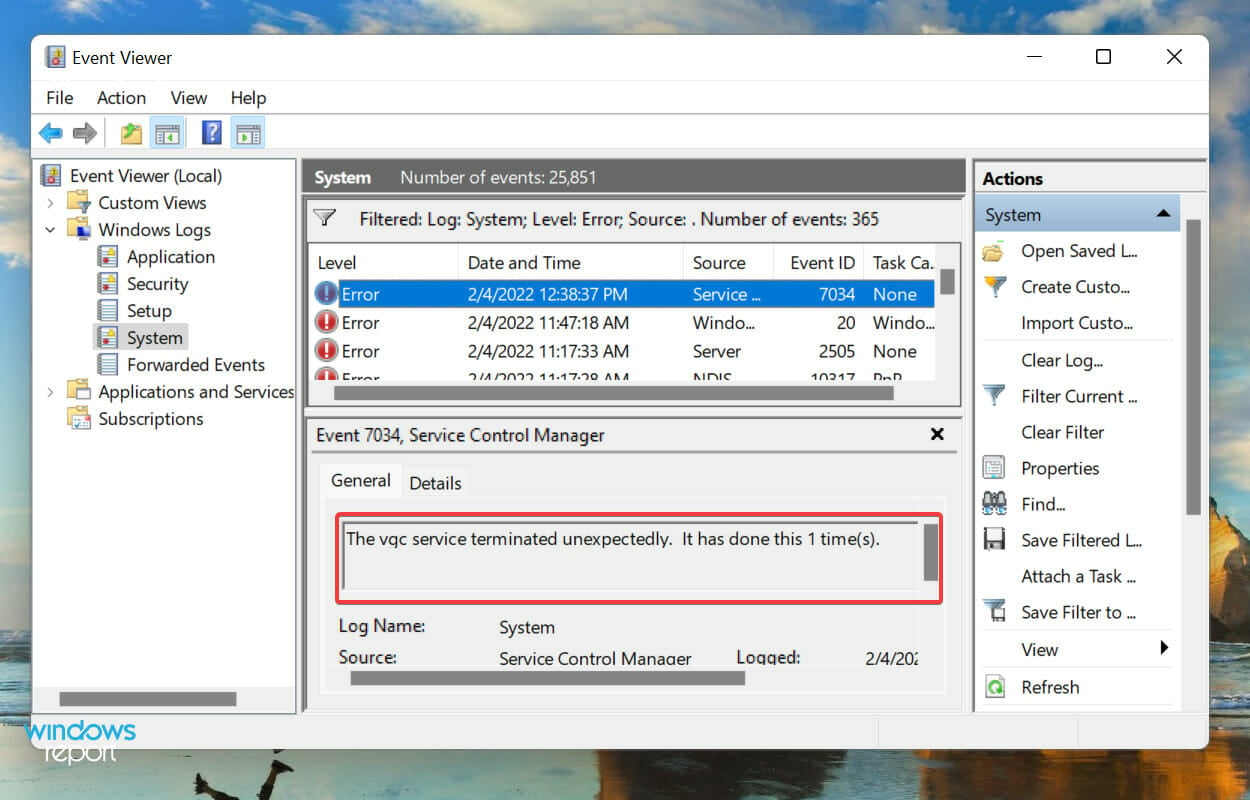
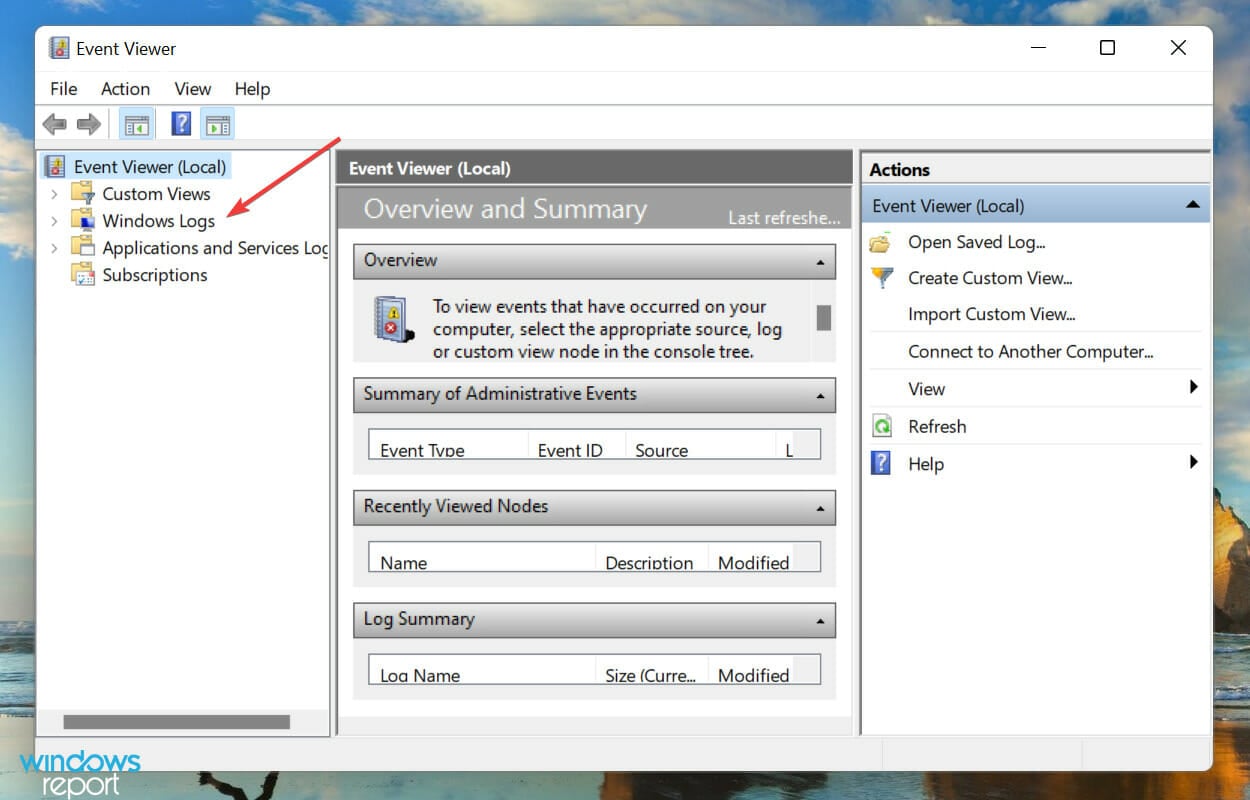
2. Double-click on Windows Logs in the navigation pane on the left.
3. You will now find the five different categories. Select any of these, and all the error logs under it will be listed on the right.

4. Now, click on any of the error logs to view all the relevant information about them.
You now know how to check the Windows 11 error logs, but just knowing that won’t suffice. There’s still a lot out there to understand before you can actually make some sense out of these logs, and use them to your advantage.
How to understand Windows 11 error logs?
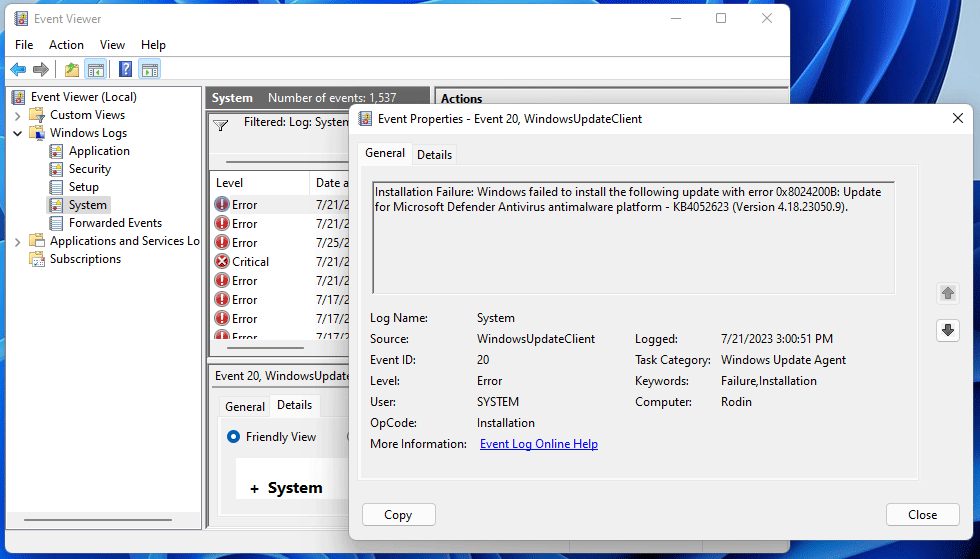
When you view a log, the general details and the Event ID is critical in identifying and eliminating the error. Apart from that, there’s an Event Log Online Help link at the bottom, which may provide some valuable insights.
For instance, here’s a Windows 11 error log when the relevant driver for a device failed to load.
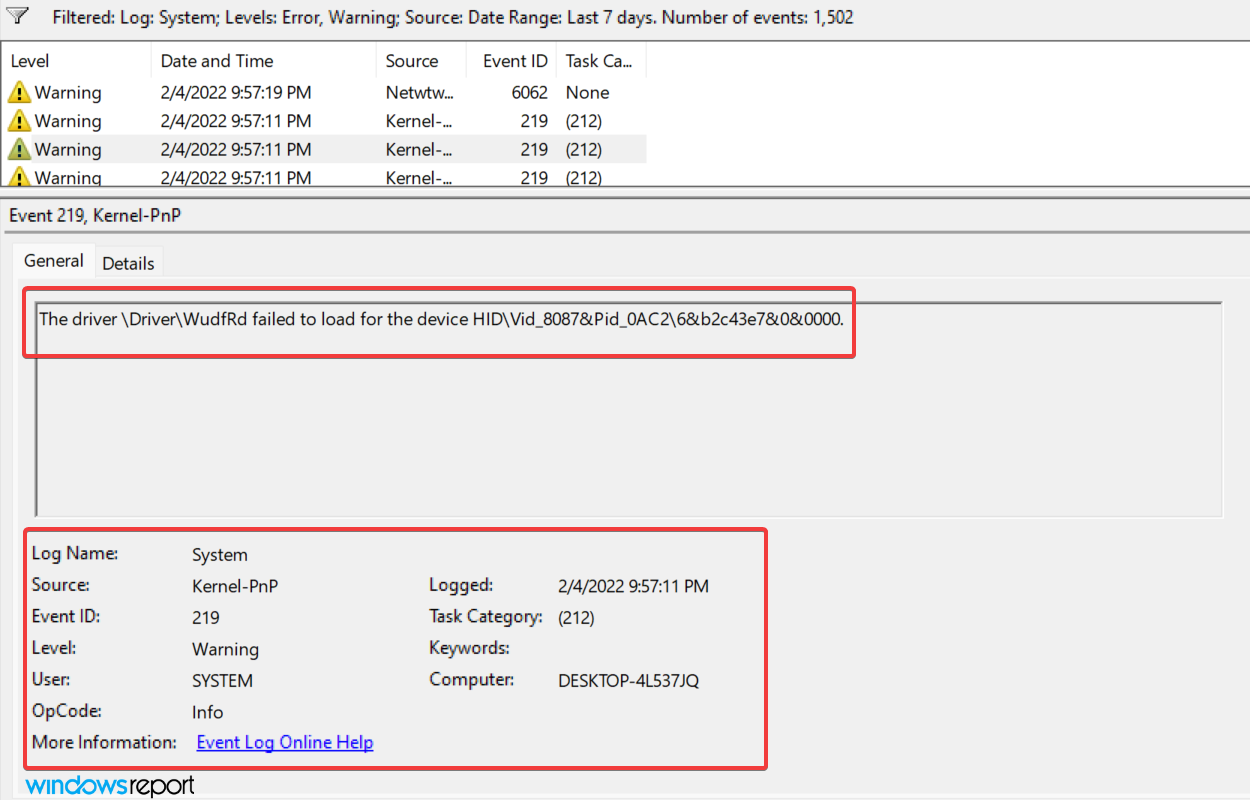
The 219 Event ID helped find out a lot of information along with the relevant fixes for the problem.
We just did a Google search for this Event ID and there were a plethora of results. But this requires a proper understanding of Windows 11 error logs.
But, it’s important to mention here that not all error logs will be as descriptive. Some might have things that you wouldn’t be able to comprehend or use jargon excessively. No matter the case, a simple Google search would suffice.
What are the different types of error logs?
When you go through the Windows 11 error logs, there are basically three important categories, referred to as Event Level, under which these are placed. And, the categories define the severity of the event for which the log is created. The three categories are as follows:
- Information: These are created when an operation goes through successfully. For instance, when a driver is loaded or an application is launched without encountering any issues.
- Warning: These are created when the OS finds an issue with the system. These issues do not pose an imminent risk, but could be problematic in the future. For instance, if you are running low on disk space, a log will be created.
- Error: These indicate a major problem, though most of the time, Windows takes care of these as well. As an example, if a driver or service does not load, an error log will be created. But, these are the most critical ones of all.
If you are identifying problems with the PC, ignore the Information logs, go through the Warning logs, but pay special attention to the ones categorized as Error, since these are most likely to record the problem you are looking for.
When you open the Event Viewer in Windows 11, it will list out all three. The view will remain the same if you have not changed the Windows 11 Error Reporting logs location in the in the Group Policy.
But identifying all logs for one of these levels will take up a lot of your time. This is where filtering error logs comes to your aid. Check the next section to find out how you can do that.
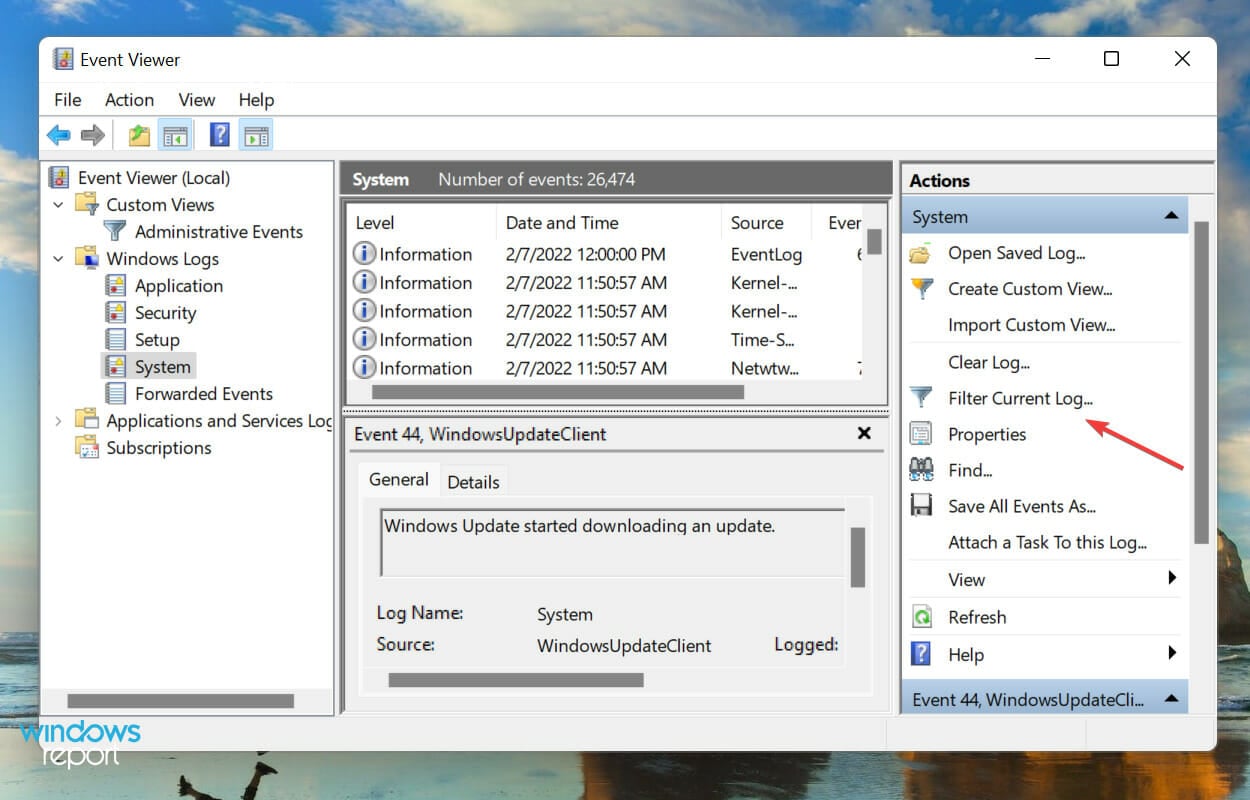
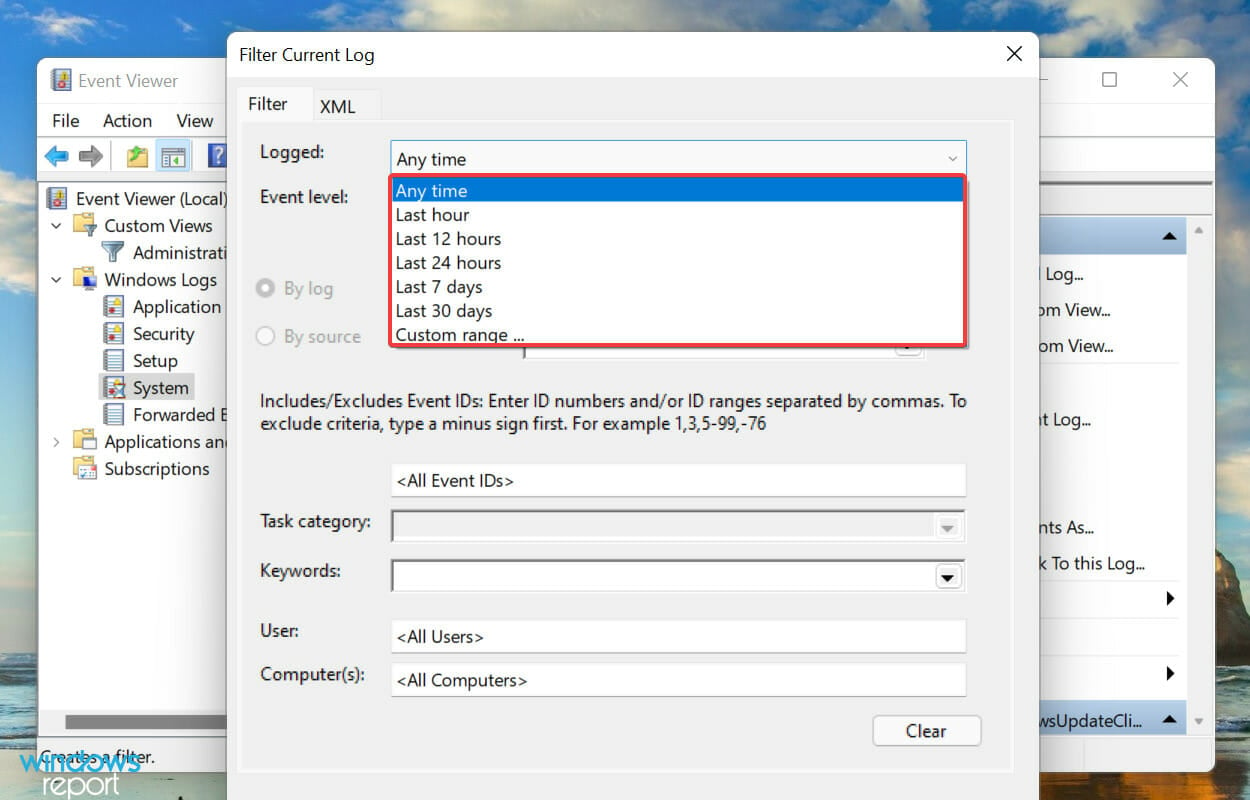
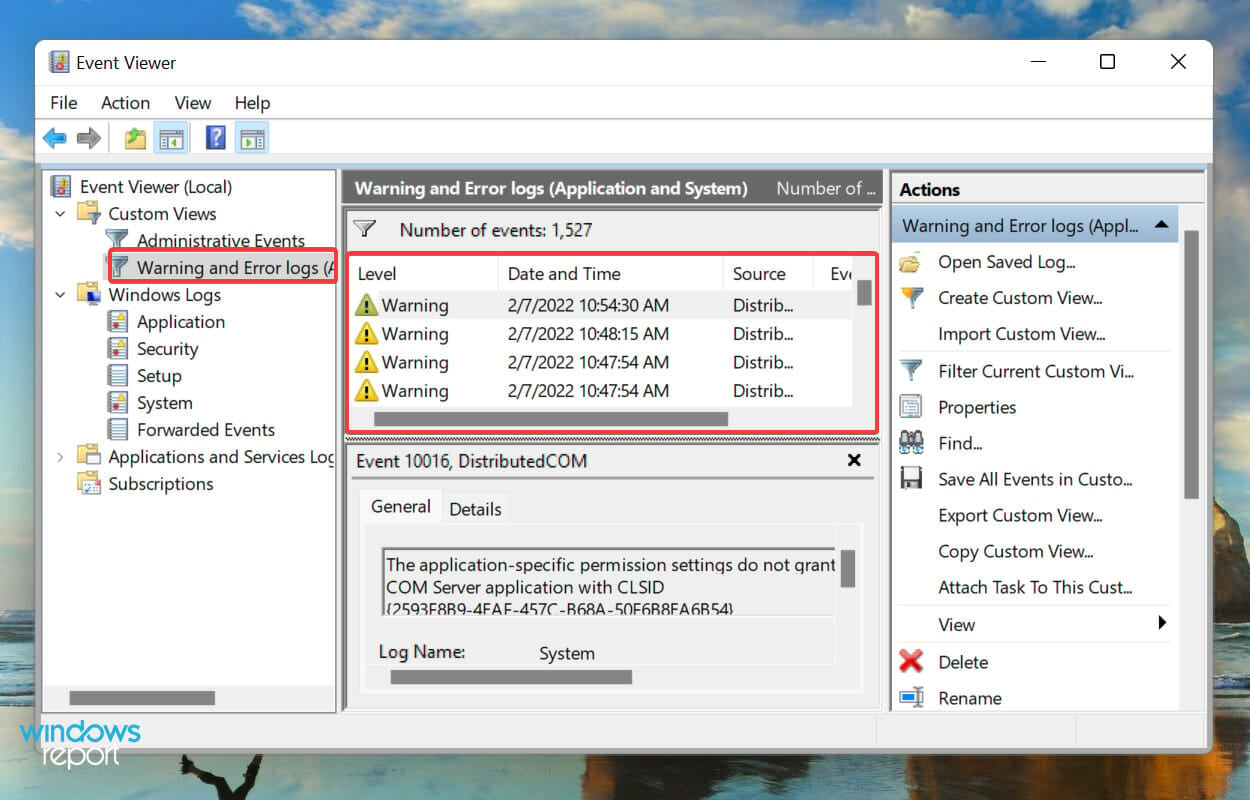
How can I filter error logs?
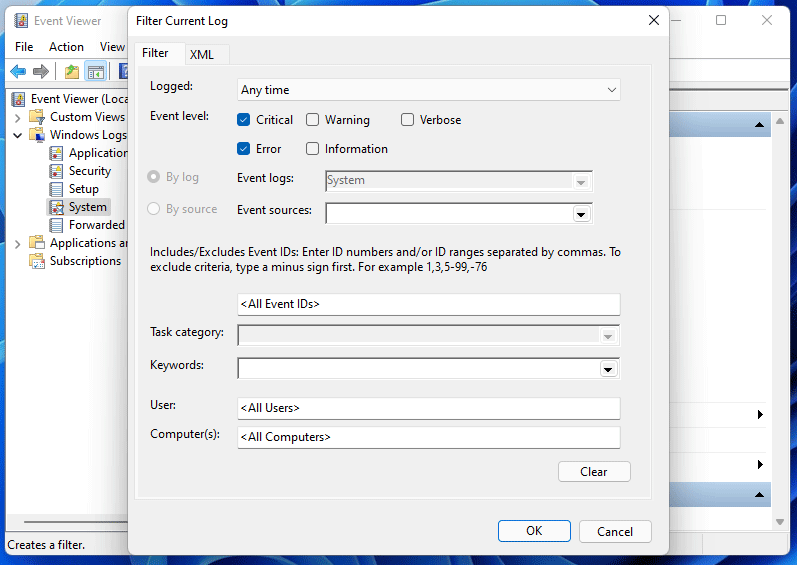
- Open the Event Viewer, navigate to the particular category of logs from the left, and then click on Filter Current Log on the right.

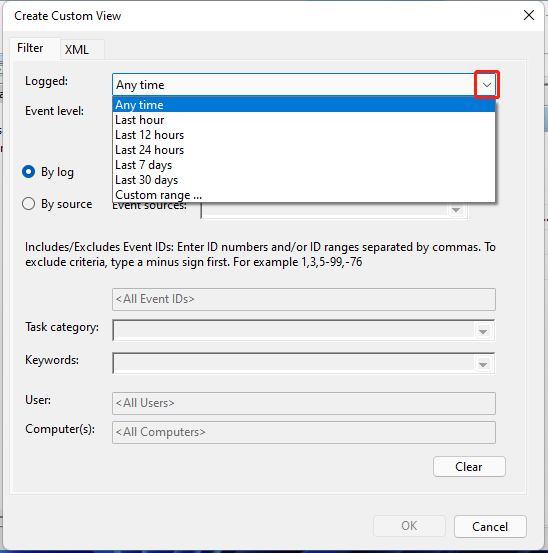
- Next, click on the Logged dropdown menu to select the duration for which you want to check the logs.
- Now, select a time duration from the list of options. You can also choose the last option to create a custom range.
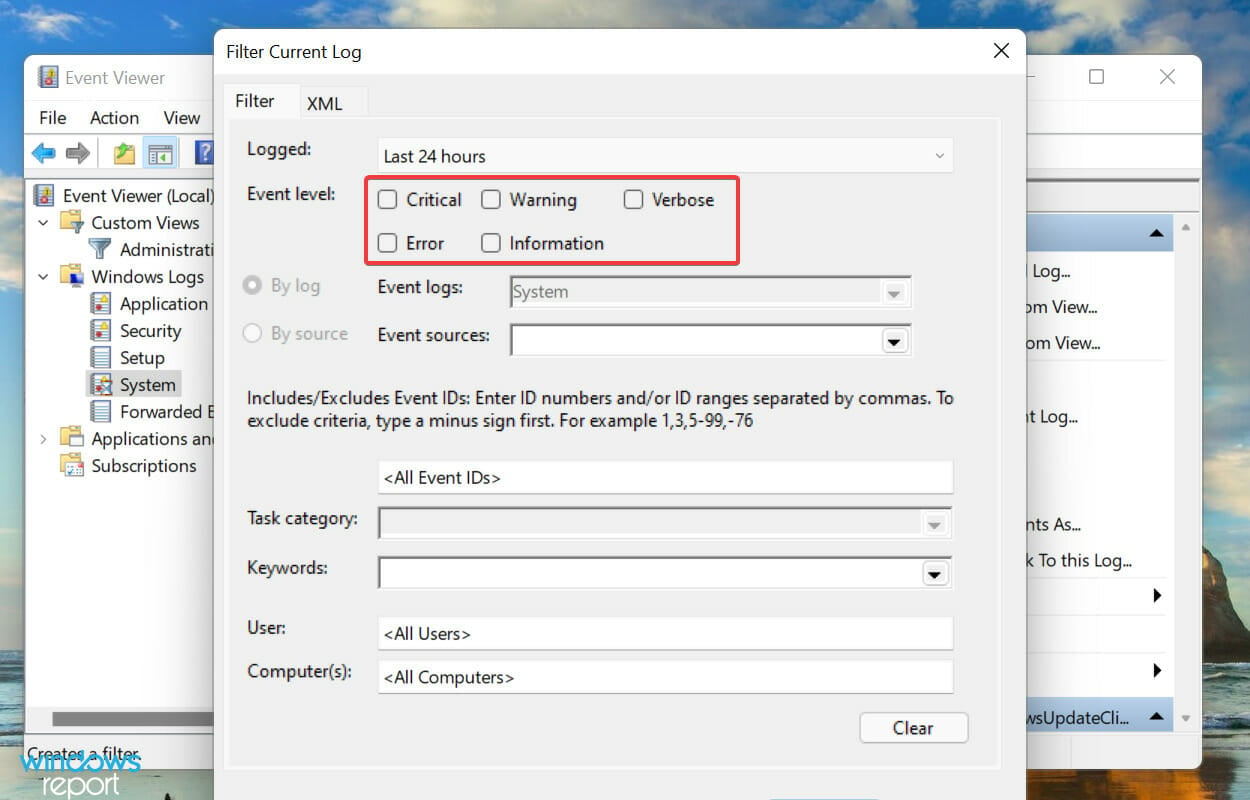
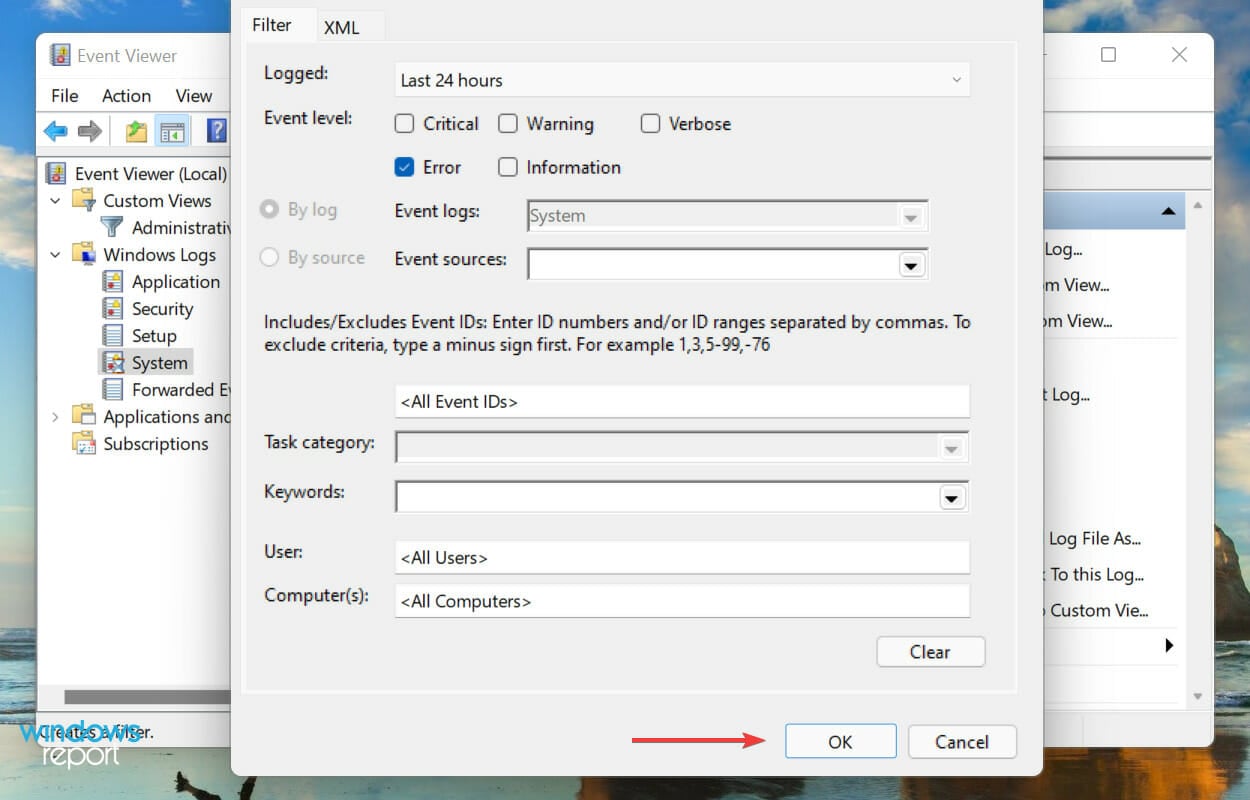
- Once done, tick the checkboxes for the Event Levels that you want to filter.
- Finally, click on OK at the bottom to filter the error logs.
- All the errors logs that fall under the choosen filters will now be listed.
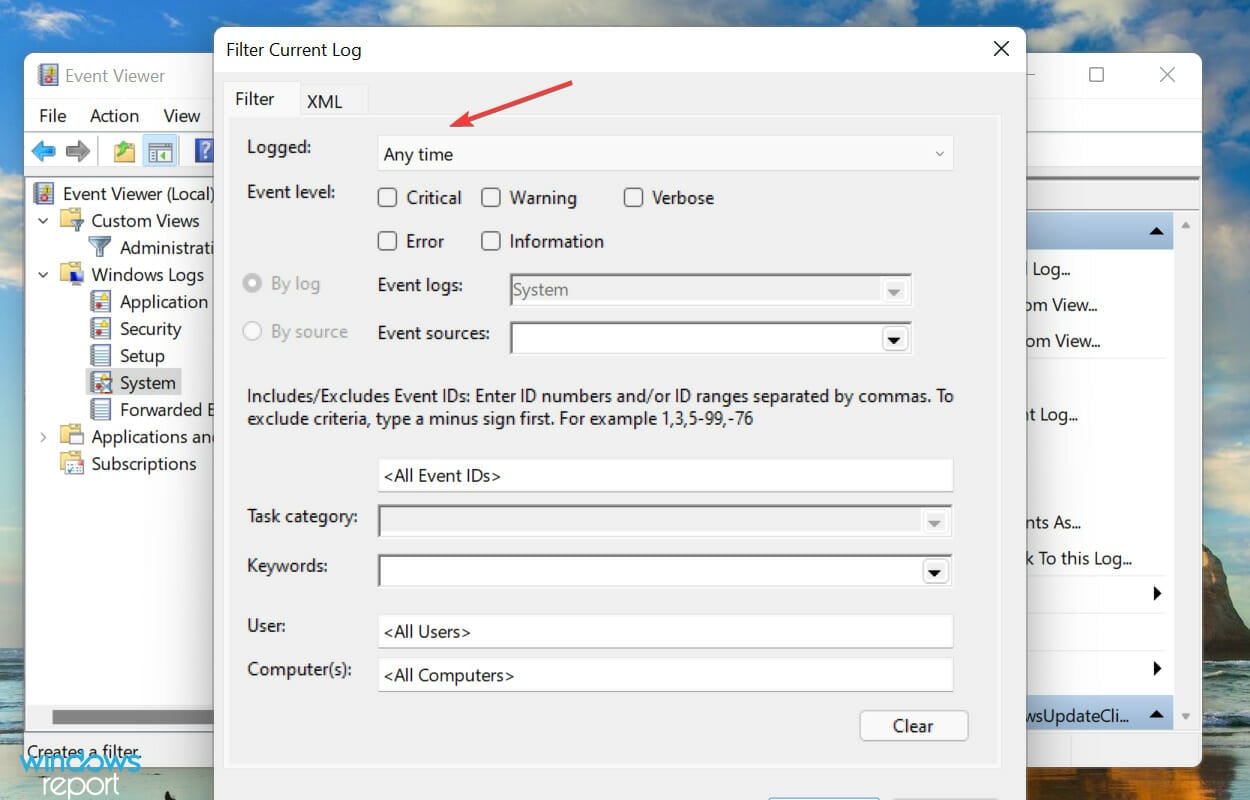
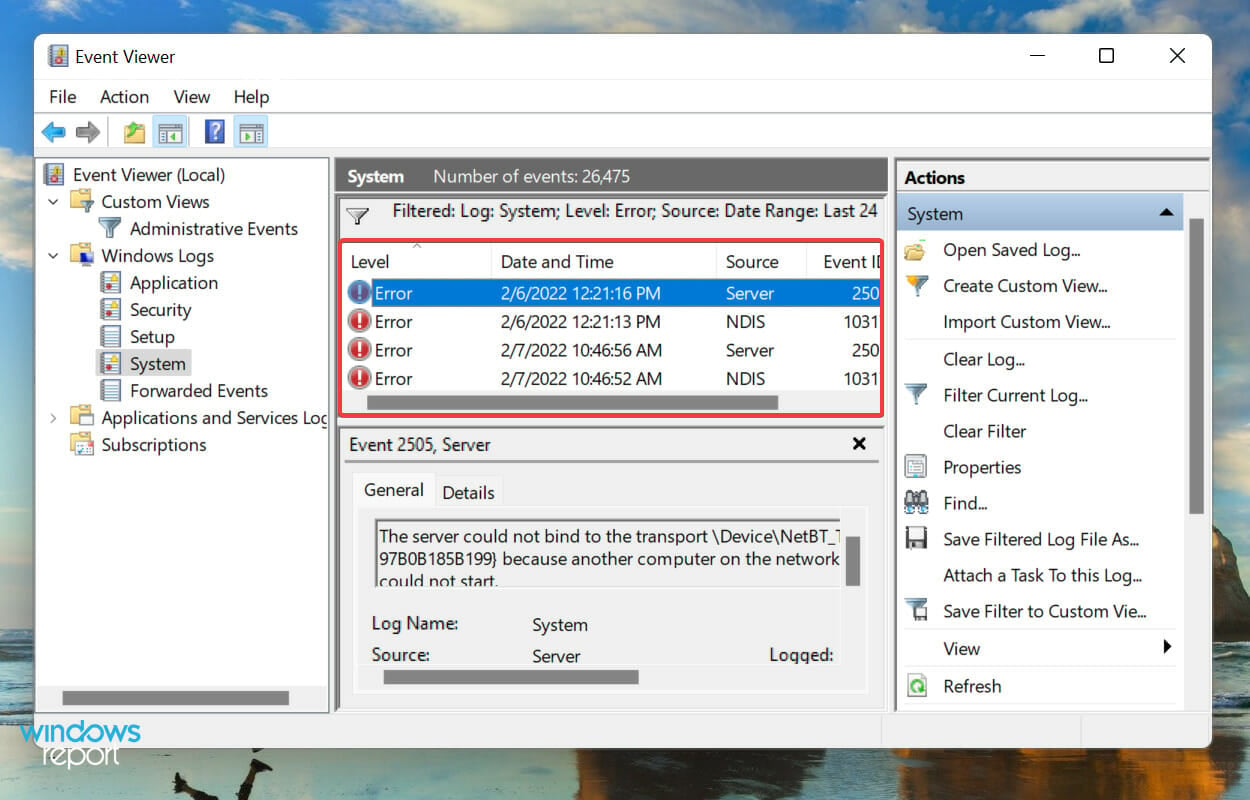
We selected the duration as 24 hours, and level as Error, and filtered the logs. Event Viewer then listed the four Windows 11 error logs that were created during that time.
- How to Disable the Insert Your Security Key Into the USB Port popup
- DTS Sound Unbound for Windows 11: Download & Install
- Fix: EXCEPTION_ILLEGAL_INSTRUCTION Error on Windows 11
- Delayed Write Failed Error on Windows 11: How to Fix it
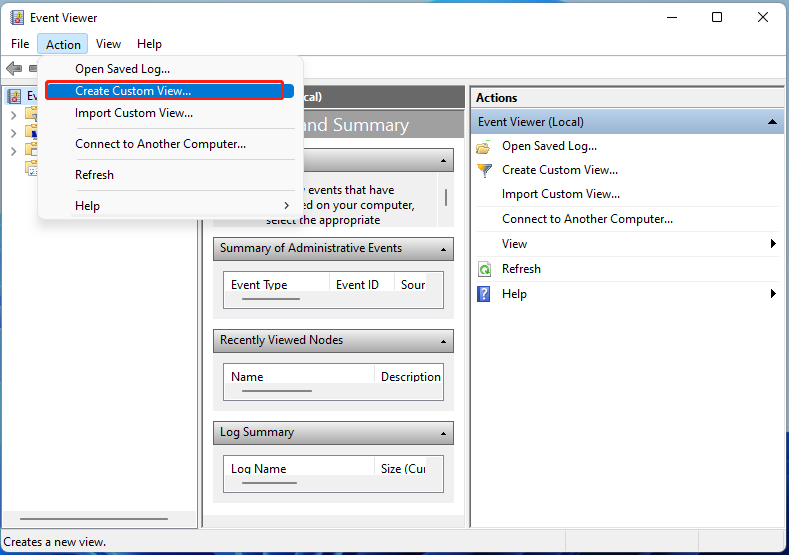
How to create a custom view to check a particular category and level of logs in Windows 11?
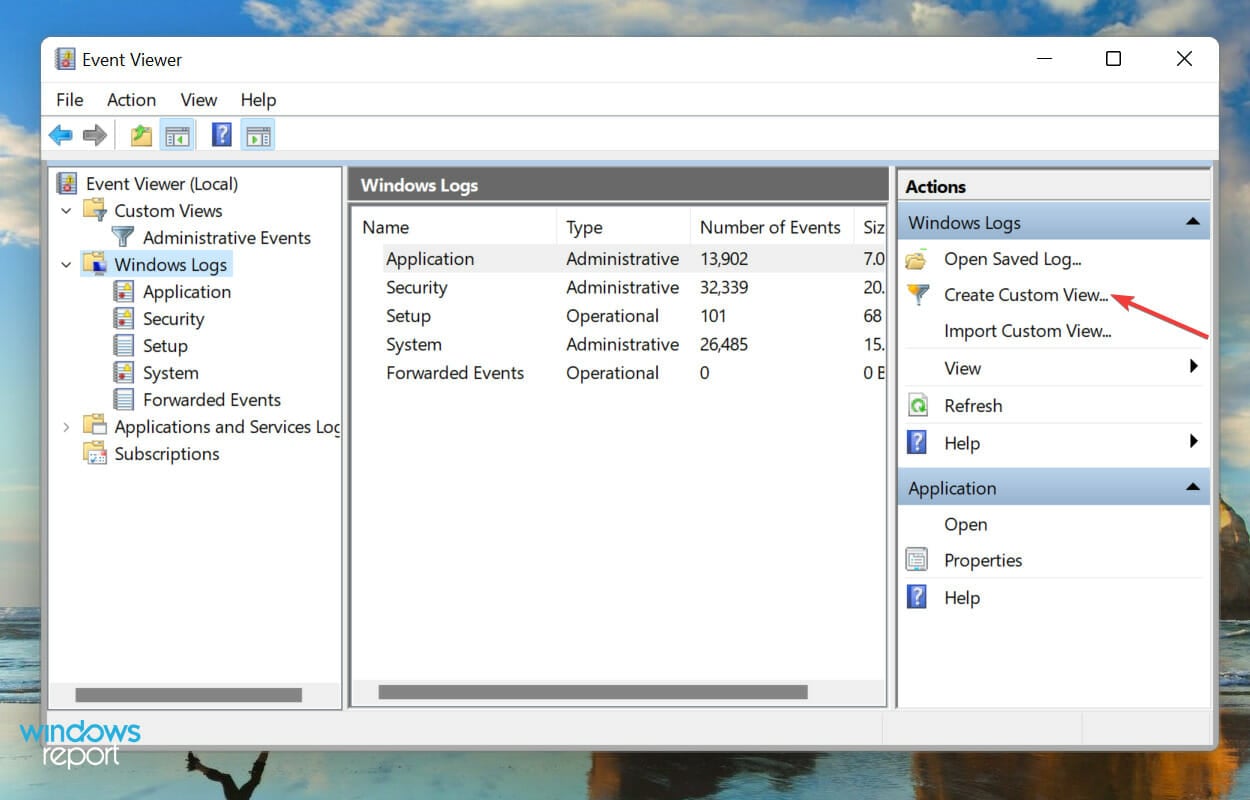
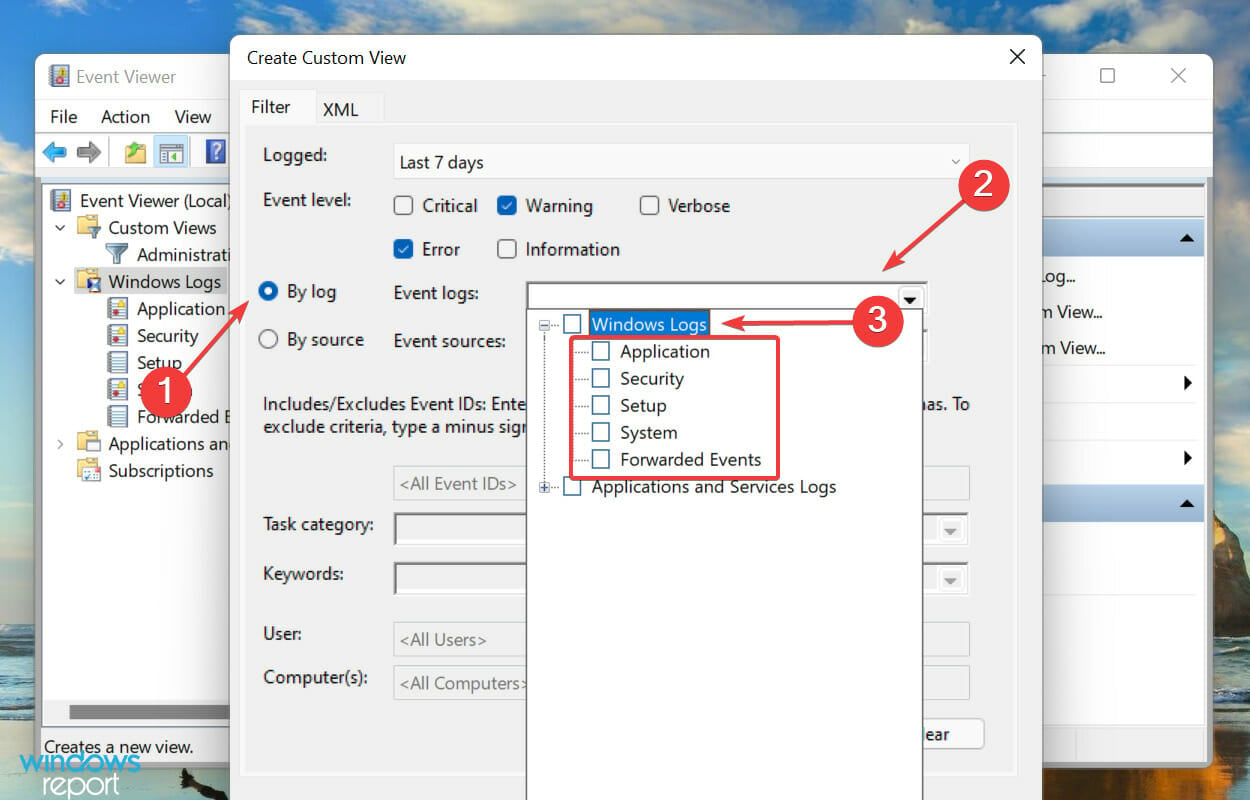
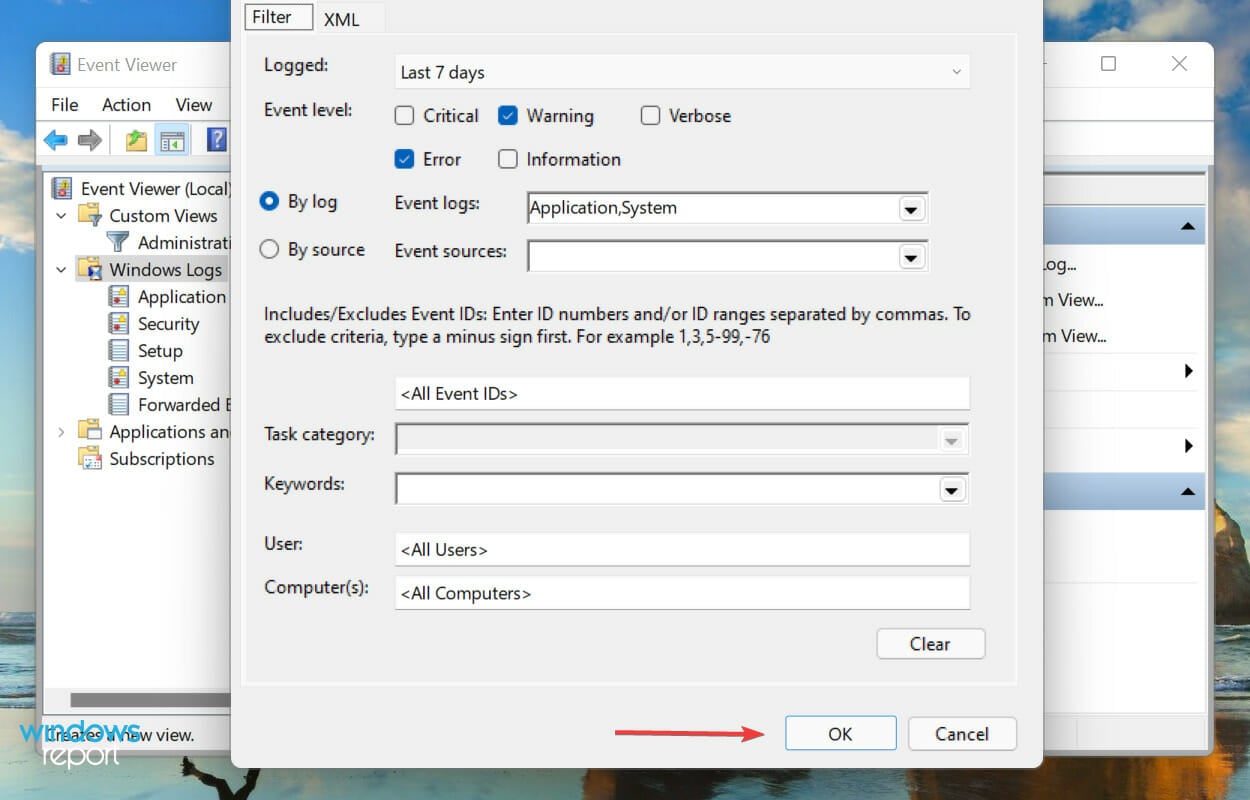
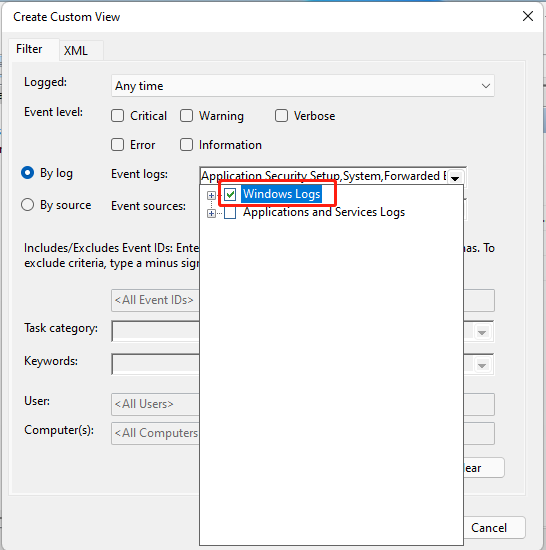
- Open the Event Viewer and click on Create Custom View on the right.
- Next, select the duration and Event Level, as you did earlier when creating a filter.
- With the By logs option selected, click on the Event logs dropdown menu, double-click on the Windows Logs entry to expand and view the various categories, and tick the checkboxes for the desired ones.
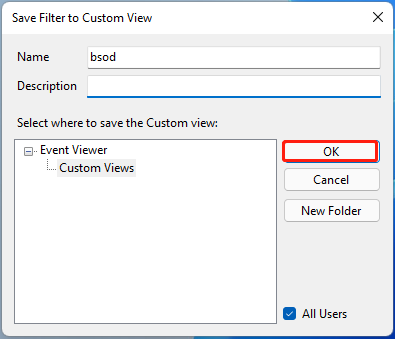
- Now, click on OK at the bottom to set filters for the new custom view.
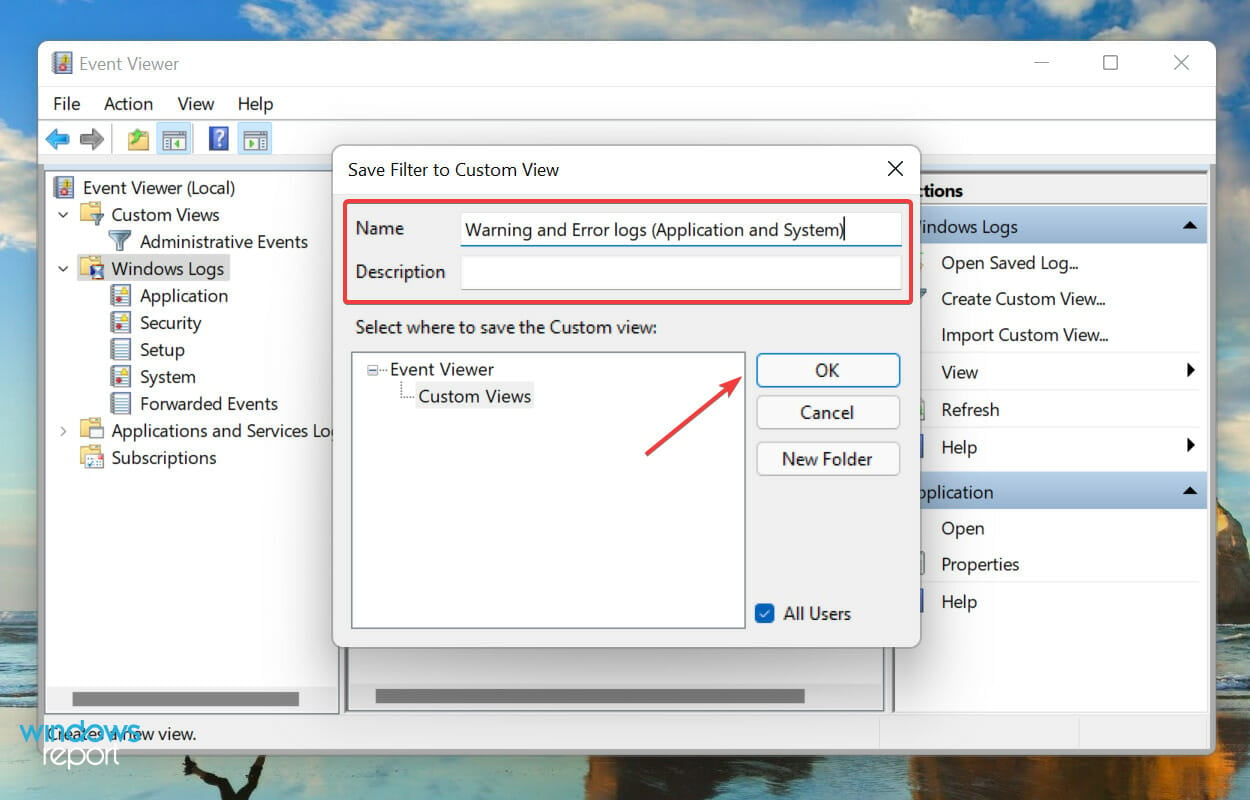
- Enter a Name and Description for the custom view and click on OK.
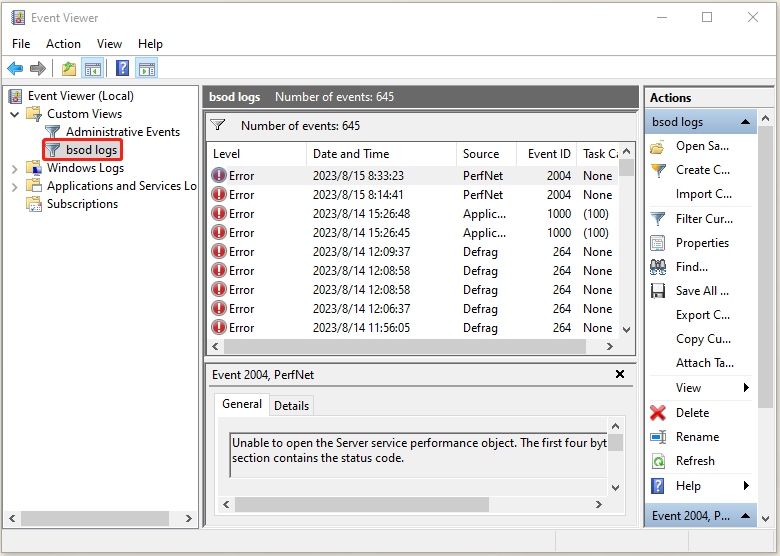
- The new custom view will now be listed on the left, and all logs falling under it on the right.

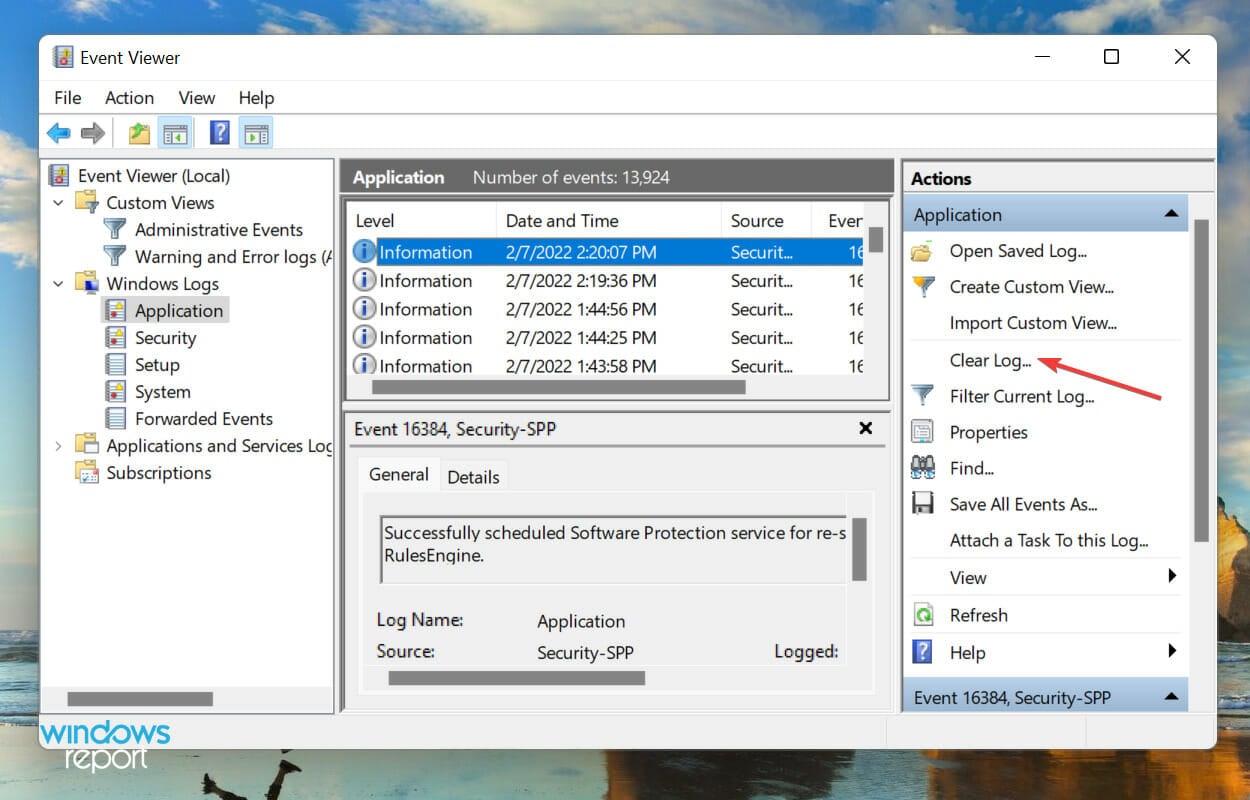
How can I clear error logs in Windows 11?
- Launch the Event Viewer, navigate to the relevant category, and click on Clear Log from the list of options on the right.
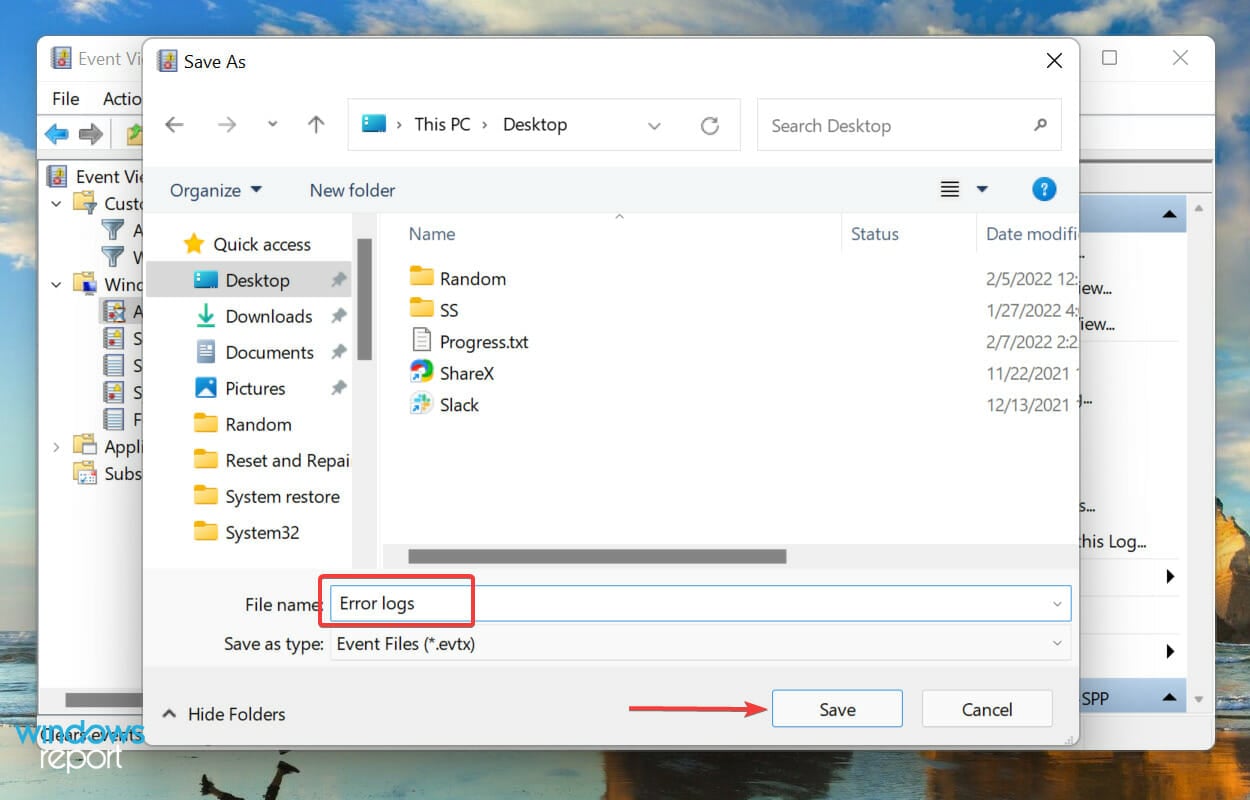
- You now have two options, either Save and Clear the error logs or directly Clear them. Choose the desired option.
- If you selected Save and clear, choose the location for the file, add a name for it and click on Save.
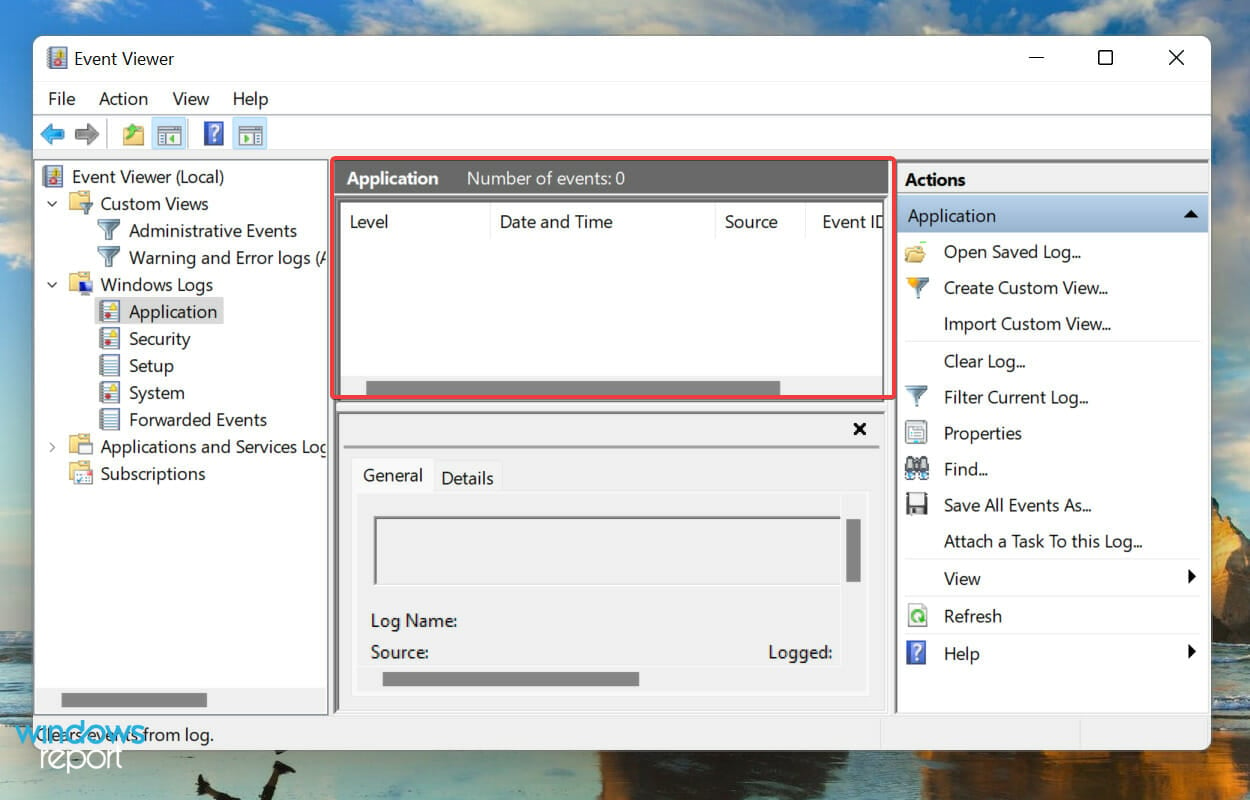
- Once saved, they error logs will be cleared right away and there will be none listed under that particular category.
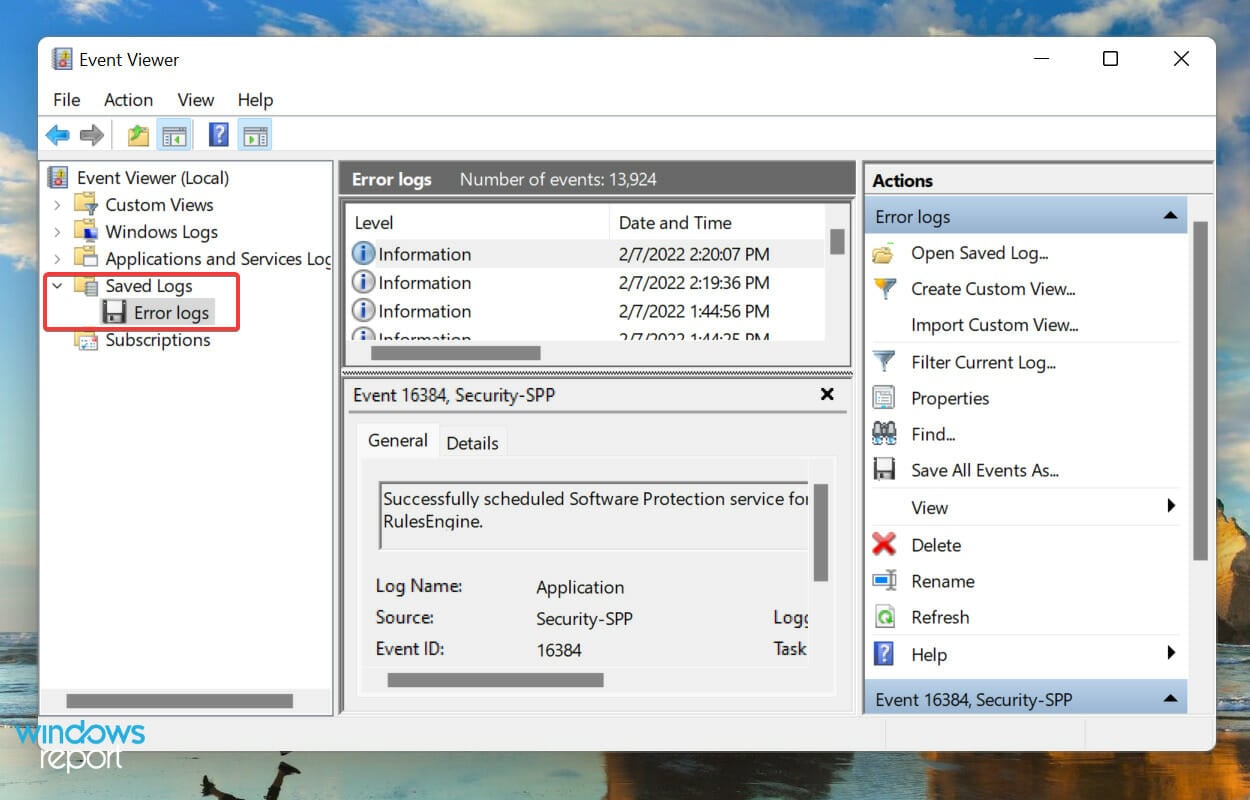
- In case you saved the error logs before deleting them, these can be found under Saved Logs in the navigation pane on the left.

The OS creates thousands of logs for each type of event, be it the successful launch of a driver and service or the most fatal errors. Like any other file, these too consume space on your hard disk, no matter how small it is.
So, if you are running out of space, or just want a more organized Event Viewer, clearing the Windows 11 error logs may help.
How do I create my own log file in Windows 11?
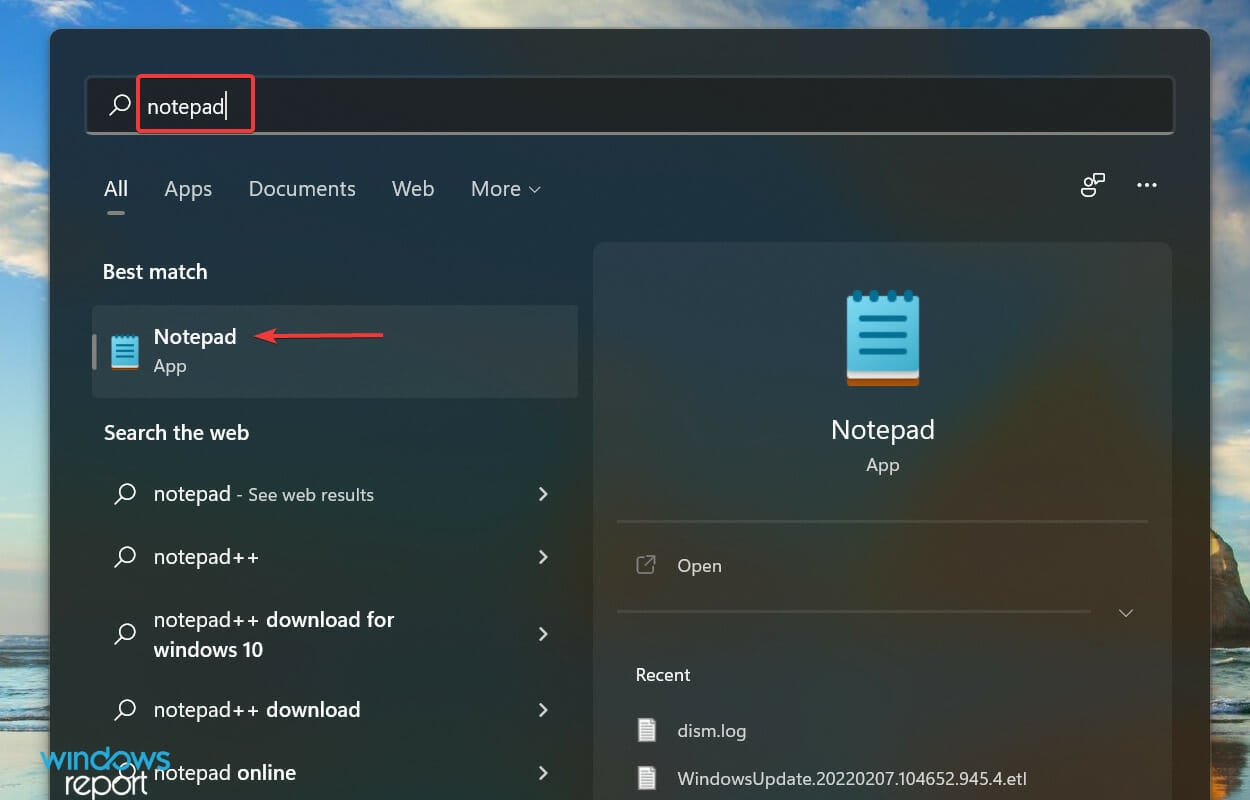
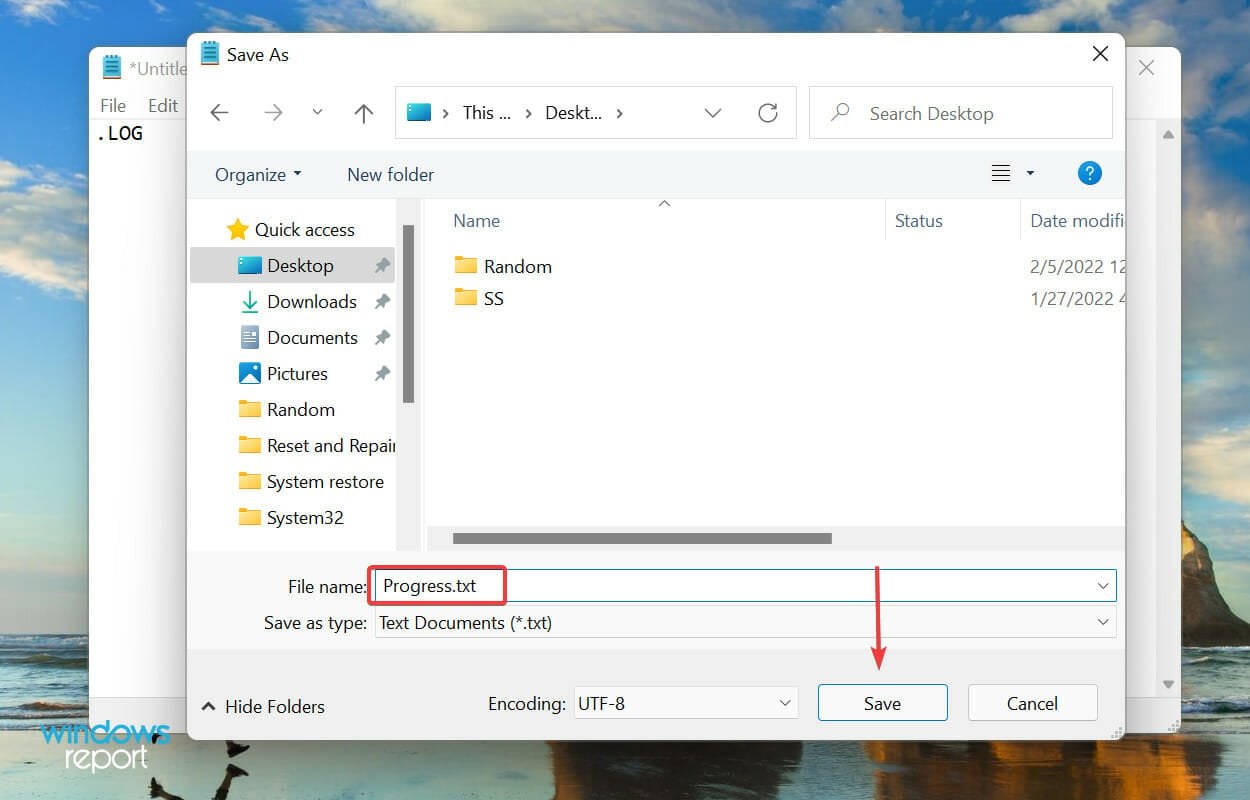
- Press Windows + S to launch the Search menu, enter Notepad in the text field at the top, and click on the relevant search result that appears.
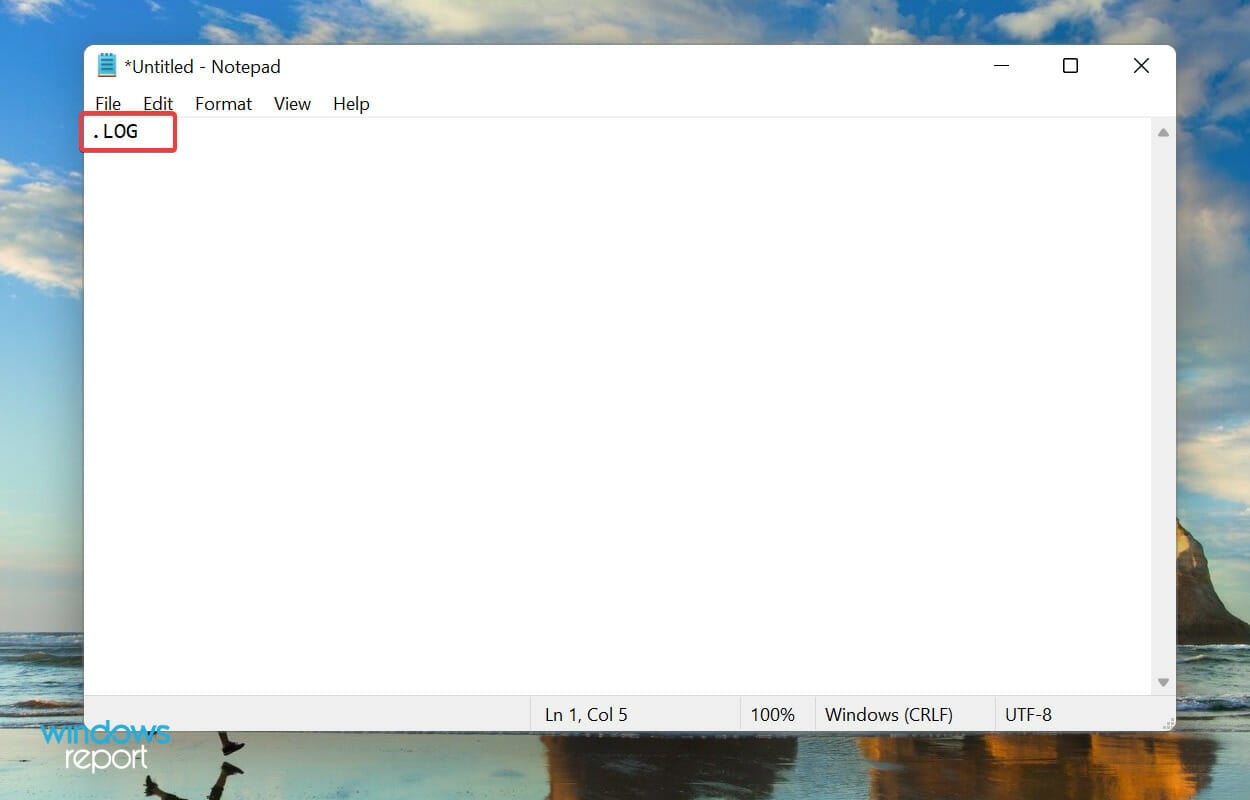
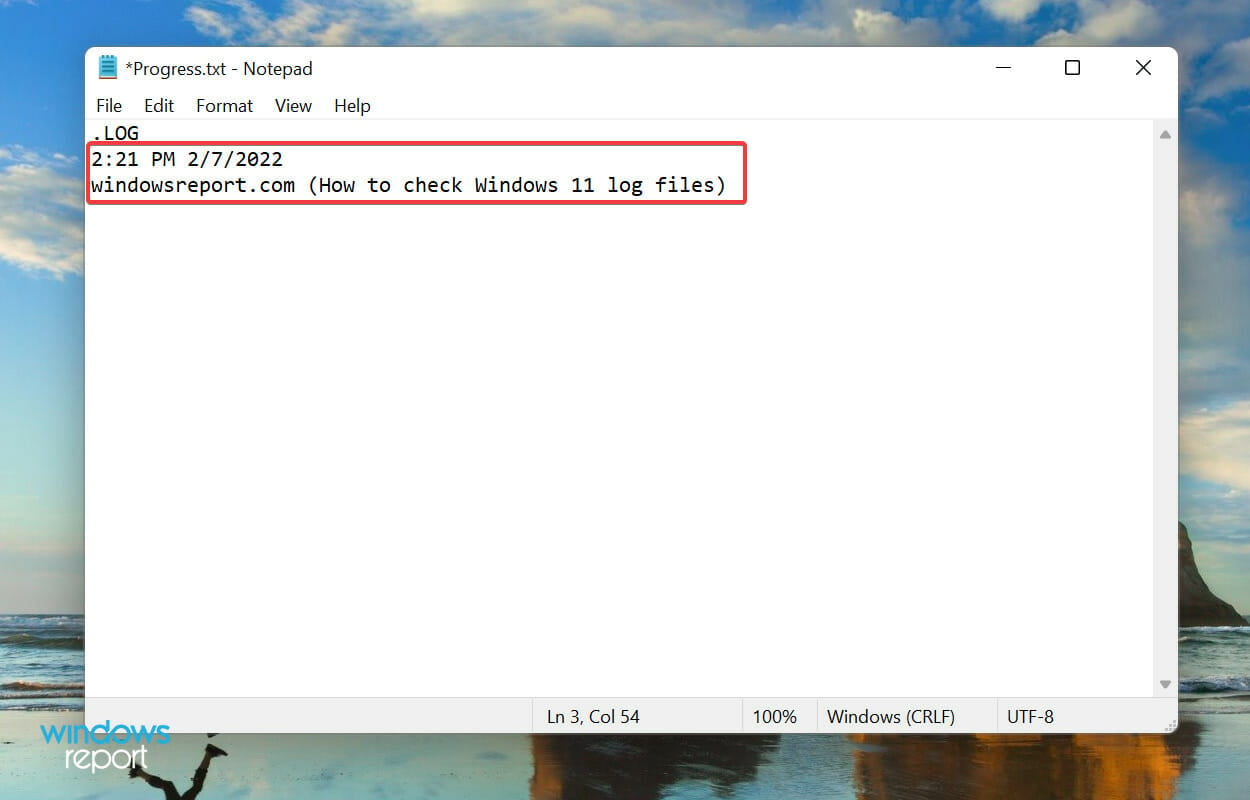
- Enter .LOG in the very first line of the Notepad.
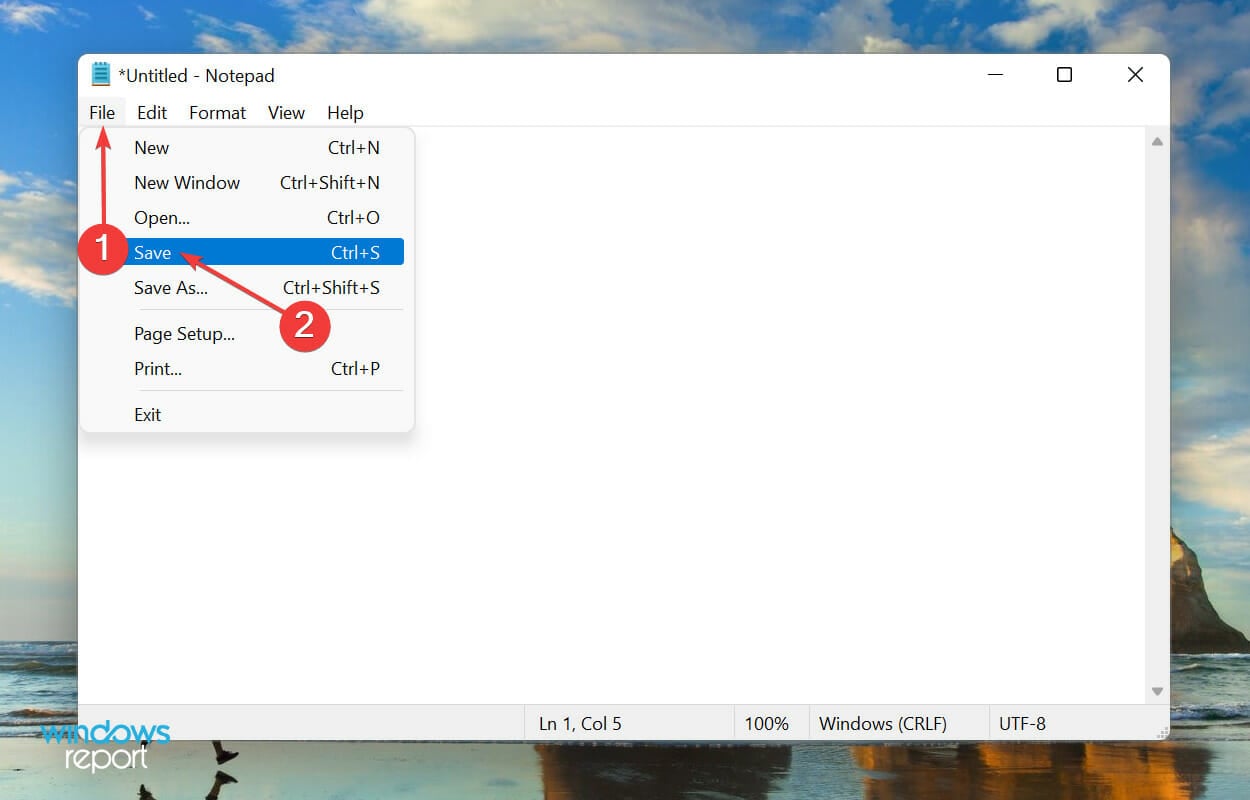
- Click on the File menu, and select Save from the list of options.
- Next, choose the location and name for the file, and click on Save at the bottom. Now, close the Notepad.
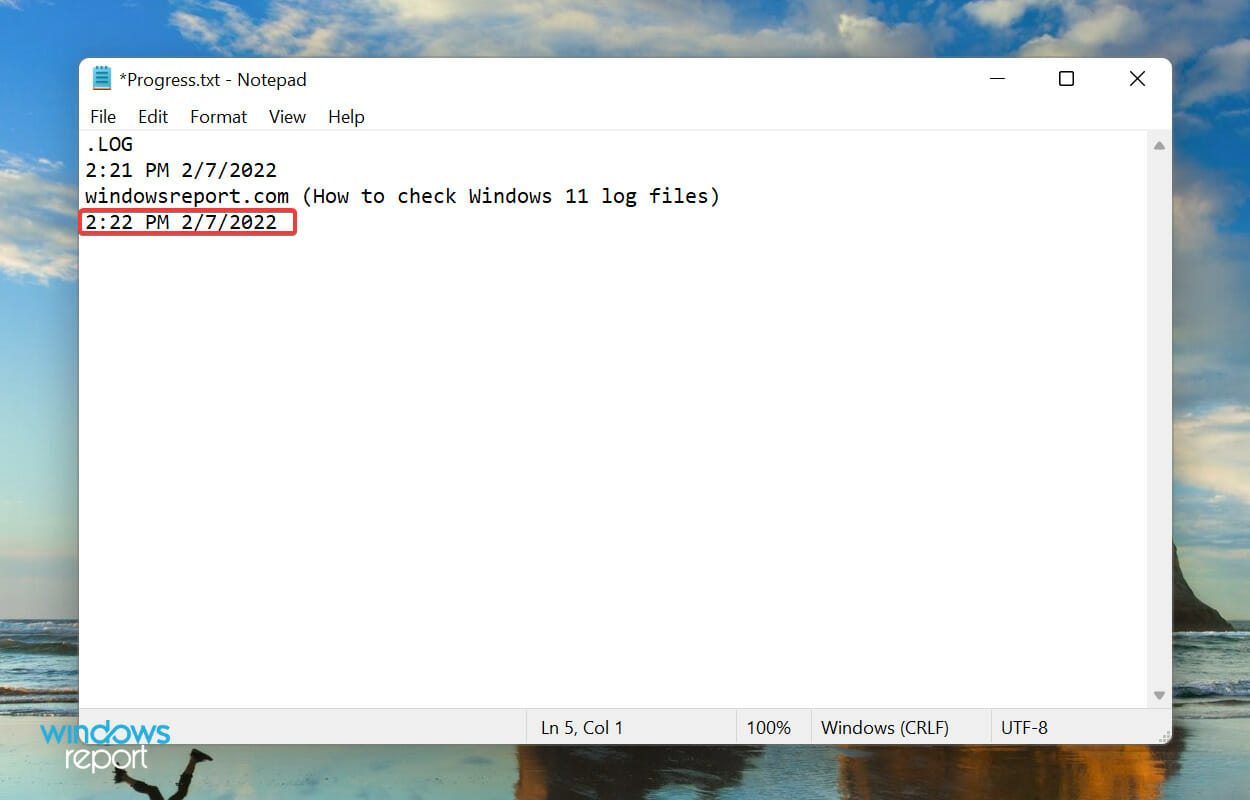
- Once the log file is created, the current date and time will be mentioned everytime you open it, and you can enter whatever you want to and hit Ctrl + S to save it.
- Now, when you open the same log file the next time, the previously added entry will be listed under that date and time, and the current date and time will again be mentioned below the last entry.
A log file is used to basically record data. Windows uses it for errors, warnings, and information, while you can use it for other purposes.
Creating a log file is simple, and so is maintaining it. Say, you want to record the progress for a book that you are reading, just create a log file, and enter the number of pages you read each day, or as you may please.
That’s all you need to know about Windows 11 error logs. From now on, identifying the underlying cause and troubleshooting both trivial and intricate errors should not be a problem anymore.
Also, if you feel that Event Viewer does not meet all your requirements, check the best apps to view errors logs in Windows 11. And if Event Viewer is not working in Windows 10 and 11, rest assured that our detailed guide will help you.
Do not hesitate to drop a comment if you have any queries or would like us to add a related topic.
![]()

Утилита журнал ошибок в операционной системе Windows 11 позволяет просматривать внутренние сбои и коды на персональном компьютере – стационарном или лэптопе. Системная программа используется для формирования отчетов о прошедших операциях, как правило, неудачных. Служба журналов интегрирована в последнюю редакцию Windows 11. Рассмотрим различные способы для открытия журнала ошибок.
Меню панели задач
В главное меню ОС Виндоус 11 интегрирован подраздел, открывающийся горячими клавишами «Win+X» или кликом ПКМ по кнопке «Пуск». В перечне доступных функций нужно найти раздел «Просмотр событий». После его открытия, система начнет мониторинг произошедших событий и, при наличии, отобразит актуальные ошибки операционной системы.
Другой способ открыть журнал ошибок в ОС Виндоус 11 – воспользоваться параметром «Инструменты Windows». Функционал этого параметра аналогичен средствам «Администрирования» из Виндоус 10 от корпорации Майкрософт. Чтобы воспользоваться способом, сделайте следующее:
- Откройте левой кнопкой мыши «Пуск» и нажмите по разделу «Все приложения».
- Прокрутите вниз список компонентов – отыщите «Инструменты Windows» и войдите в них.

- Активируйте «Просмотр событий».

Альтернативный вариант:
- Откройте «Панель управления», например, используя встроенный поиск.

- В правом верхнем углу выберите режим просмотра «Категория».
- Далее перейдите в пункт «Система и безопасность».

- Кликните по разделу «Просмотр журналов событий». Также вы можете перейти в «Инструменты Windows» и отыскать ссылку «Просмотр событий».

Через встроенный поиск
На панели задач Виндоус 11 интегрирован удобный инструмент – «Поиск». Этот встроенный элемент позволяет быстро запускать большинство системных утилит.
Для того чтобы посмотреть журнал ошибок, воспользуйтесь горячей комбинацией «Win+S» или просто кликните на строку поиска на панели задач и введите в строке «просмотр событий». Вверху в перечне «Лучшее соответствие» отобразится нужная программа. Чтобы открыть ее, кликните по иконке утилиты или активируйте надпись-ссылку, расположенную справа. Откроется элемент «Просмотр событий (Локальный)».
Когда вам требуется посмотреть список ошибок, откройте «Журналы Windows» и перейдите в подраздел «Система». Здесь в верхней части меню вы увидите блок со всеми необходимыми сведениями.

Использование консольной команды
Специальные запросы позволяют быстро и без лишних действий вызывать встроенные в ОС Windows 11 элементы. При этом команды можно вводить в несколько системных компонентов. Для того чтобы вызвать журнал ошибок, нужно вбить в строку: eventvwr.msc. Разберем три распространенных способа с помощью консольной команды найти журнал, где хранятся ошибки системы.
- Через меню «Поиск». Для этого в поле ввода запроса строки поиска нужно ввести команду: eventvwr.msc.

- Через окно «Выполнить». С помощью быстрого меню или горячей комбинации «Win+R» активируйте окошко «Выполнить». Далее напишите в строке ту же команду и жмите «Ввод».

- Через утилиту «Диспетчер задач». К этому компоненту ОС Виндоус пользователи часто обращаются, чтобы деактивировать задачи. Но через него также запускаются нужные элементы ОС. Для этого:
- Используя удобный способ, откройте «Диспетчер задач»: например, через поиск, горячие клавиши «Ctrl+Alt+Del» или «Ctrl+Shift+Esc».

- Откройте раздел «Файл» в верхнем левом углу и жмите «Запустить новую задачу».

- В открывшемся окне введите команду «eventvwr.msc» без кавычек и жмите «Ок» или «Ввод» на клавиатуре.

Открытие файла программы
Практически у всех встроенных компонентов в Виндовс 11 и предыдущих версиях операционной системы от Майкрософт есть исполнимые модули, или по-другому – исполняемые файлы. С их помощью пользователь способен запускать нужные ему для работы утилиты, в том числе «Просмотр событий». Рассмотрим два способа это сделать.
- Откройте меню «Пуска» и нажмите «Все приложения».
- Прокрутите список отображаемых компонентов до низа, отыщите «Инструменты Windows» и войдите в этот раздел.
- Кликните ПКМ по «Просмотру событий» и в открывшемся меню выберите раздел «Перейти к расположению файла». Откройте найденный файл.

Существует также альтернативный – второй способ самостоятельно открыть искомое средство, где отображается журнал актуальных ошибок операционной системы Виндоус 11 от корпорации Майкрософт. Для этого скопируйте и вставьте в поисковую строку проводника – этот путь:
C:\ProgramData\Microsoft\Windows\Start Menu\Programs\Administrative Tools
А для того, чтобы активировать утилиту «Проводник», воспользуйтесь ярлыком на Панели задач или используйте горячую комбинацию на клавиатуре персонального компьютера «Win+E». Этот пусть откроет доступ к ярлыку, который закреплен в главном меню и в утилите «Панель управления». Исполняемый основной файл расположен по адресу:
C:\Windows\System32

Войдите в эту папку, прокрутите перечень элементов вниз и отыщите компонент с типом «Приложение» и наименованием «eventvwr.msc». Стоит отметить, что в некоторых случаях не отображается расширение данного элемента. Готово, вы нашли нужную утилиту «Просмотр событий» – можете ее запускать и изучить журнал ошибок.
Создание ярлыка
Когда пользователь достаточно активно пользуется системной утилитой по мониторингу журнала ошибок, то удобнее и логичнее будет активировать способ для быстрого перехода в данную программу. Это упростит и ускорит работу пользователя с приложением новейшей на момент написания данного гайда операционной системы Windows 11 от компании-разработчика Microsoft. Для этого существует как минимум два варианта: закрепить утилиту на панели задач или создать одноименный ярлык на главном экране рабочего стола. Для создания ярлыка выполните следующий алгоритм:
- Откройте папку с исполняемым файлом под названием «Просмотр событий» любым удобным для вас способом. Кликните ПКМ по файлу и далее «Показать дополнительные параметры».

- Затем поочередно нужно открыть пункты «Отправить» → «Рабочий стол (создать ярлык)».
- После этого нужный ярлык исполняемого файла отобразится на главном экране рабочего стола ОС Виндоус 11.

Чтобы закрепить утилиту «Просмотр событий» – кликните правой кнопкой мыши по иконке нужного файла и далее выберите соответствующую опцию с предложением закрепить программу на панели задач.
Запуск через MMC
Также достаточно быстрый и удобный способ открыть журнал ошибок Виндоус 11 – воспользоваться консолью управления, притом любым доступным в операционной системе вариантом: «Терминал», «Командная строка» или «PowerShell». Для этого выполните следующие шаги:
- Активируйте подходящий тип консоли любым удобным способом.

- Скопируйте и вставьте или напишите самостоятельно текстовую команду без кавычек «eventvwr.msc» и жмите на клавиатуре «Ввод».

В журнале событий записываются происходящие события и ошибки в операционной системе Windows 11 от Microsoft. Здесь же пользователь может видеть предупреждения и информационные сообщения от системы персонального компьютера. Система журнала ошибок не претерпела особых изменений по сравнению с предыдущими версиями ОС Windows.
Журнал поможет посмотреть коды и ошибки на ноутбуке или компьютере, как локально, так и удаленно.
Это централизованная системная служба журналов, использующая для отчетов о произошедших ситуациях, обычно неудачных.
Он интегрирован в последнюю версию ОС виндовс 11 11. Далее увидите, как открыть его различными способами.
Метод 1. Откройте, полагаясь на поиск. Для этого просто начните писать «просмо…» и когда появится самый подходящий результат выберите его.
Метод 2. Запустите средство просмотра событий Windows 11 с помощью меню ссылок. Для этого жмите пуск не левой, а правой КМ, чтобы вызвать меню «Быстрая ссылка». Во всплывающем меню щелкните Просмотр событий, чтобы посмотреть его.
Метод 3. Запустите просмотр событий с помощью команды. Откройте Run PowerShell или CMD введите eventvwr.msc или eventvwr.exe или просто eventvwr и нажмите Enter.
Метод 4. Через инструменты Windows 11. Откройте панель управления виндовс 11 просмотрите ее элементы с помощью значков (больших или малых), поищите «Инструменты» и откройте события.
Метод 5. Запустите в разделе «Управление компьютером». Затем вы можете перейти к приложению «Просмотр событий» из «Управление компьютером».
Найдите и откройте Управление компьютером». Затем в программном обеспечении «Управление компьютером» щелкните опцию в левом меню на службу.
Метод 6. Через проводник. В System32 выполните поиск eventvwr в адресной строке или напрямую найдите eventvwr.exe или eventvwr.msc.
Метод 7. Откройте средство используя конфигурацию из утилиты настройки системы. Просто в «Конфигурация системы» поищите вкладку «Инструменты» и выберите требуемый элемент просмотра.
Можно ли отключить журнал. Да, при желании события можно на windows 11 отключить, а вот удалить навряд ли у вас получится.
Ходят слухи что служба грузит процессор. Если замети тогда почему бы не отключить. Вам нужно перейти в службы и перевести в режим «отключена» и выбрать «остановить».
Почистить журнал событий виндовс 11 можно, запустив файл батник. Скачать его можете прямо здесь ниже.
Официальный сайт:
нет
Операционка:
windows 11
Интерфейс:
русский
Лицензия:
бесплатно
It’s important to find blue screen logs to fix the BSOD error. However, a great many people don’t know where to find the blue screen logs on Windows 11/10. Are you also trying to figure it out? This post from MiniTool provides 3 simple ways.
Why Need to View Blue Screen Logs
As it’s well known to us all, the blue screen of death (BSOD) is one of the most common errors that often occurs on Windows. There are many different BSOD errors, such as exFAT FILE SYSTEM, Hidparse.sys BSOD, etc. Besides, different BSOD errors might be caused by different reasons. To fix these blue screen errors, it’s necessary to get the root reasons by checking the blue screen logs.
However, a lot of people are unclear about how to check blue screen logs on Windows 11/10. To know more details, please keep reading the following part.
Where to Find the Blue Screen Logs on Windows 11/10
Where to find the blue screen logs on Windows 11/10? After investigating extensive user reports and references, we summarize 3 simple and free ways to find blue screen logs. Let’s start trying.
# 1. View Blue Screen Logs via Event Viewer
The first and simplest way how to check blue screen logs on Windows 11 is to use the event viewer.
Step 1. Press Win + X keys and select Event Viewer from the right context menu.
Step 2. Go to the Action tab from the top menu and select Create Custom View.
Step 3. Expand the Logged drop-down menu and select the time range when you encounter the BSOD error.
Step 4. Select the checkbox beside Windows Logs from the Event Logs drop-down menu. Tick the box of Error under the Event Level section.
Step 5. Click on OK. Then you will be prompted to enter a name and description for the BSOD log. Enter the information and click OK.
Step 6. Once created, you should see a list of errors that occurred during the selected time. You can sort the BSOD logs in the date and time section. To check more details, check both the General and Details tab.
# 2. View Blue Screen Logs via Registry Editor
Windows Registry Editor is an advanced utility that allows you to view some important information about your hardware and software, including the blue screen of death logs. Here’s how to find blue screen of death logs using Registry Editor.
Step 1. Press Win + R keys to open the Run box, and then type regedit in it and press Enter. Click on Yes in the UAC window to further confirm it.
Step 2. In the Registry Editor window, go to the following path via the left navigation panel.
HKEY_LOCAL_MACHINE\System\CurrentControlSet\Control\CrashControl
Step 3. With the CrashControl folder selected at the left panel, right-click an empty space at the right panel and select New > DWORD (32-bit) Value.
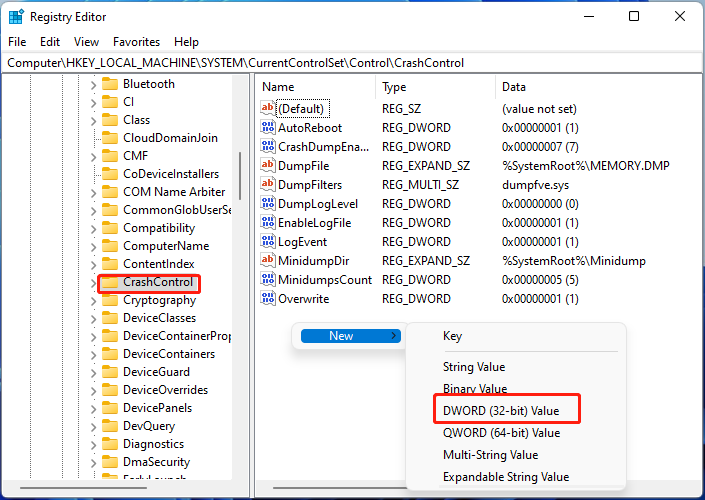
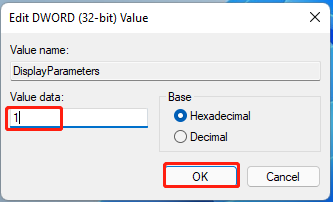
Step 4. Name the DWORD Value as DisplayParameters. Double-click to open it and change the Value data to 1 and click on OK to save the change.
Step 5. Once done, restart your PC and you should be able to check BSOD logs.
# 3. View Blue Screen Logs via Reliability Monitor
There is a utility called Reliability Monitor in Control Panel, which can be used to find blue screen logs. Let’s see how to check BSOD log using the tool.
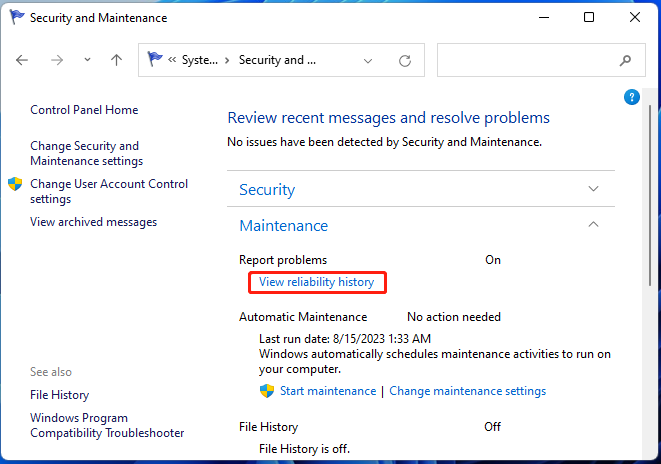
Step 1. Open the Run box again, type Control in it, and hit Enter to open Control Panel.
Step 2. Click on System and Security > System and Maintenance in order.
Step 3. Expand the Maintenance category and click View reliability history.
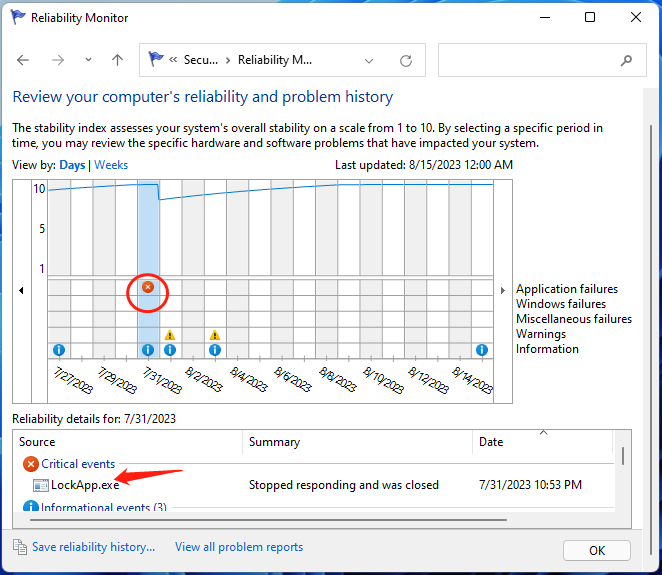
Step 4. Now, you should see a graph displaying the reliability information. Look for the red cross icons because they are critical errors like BSOD. To check blue screen logs, simply click on the event at the bottom.
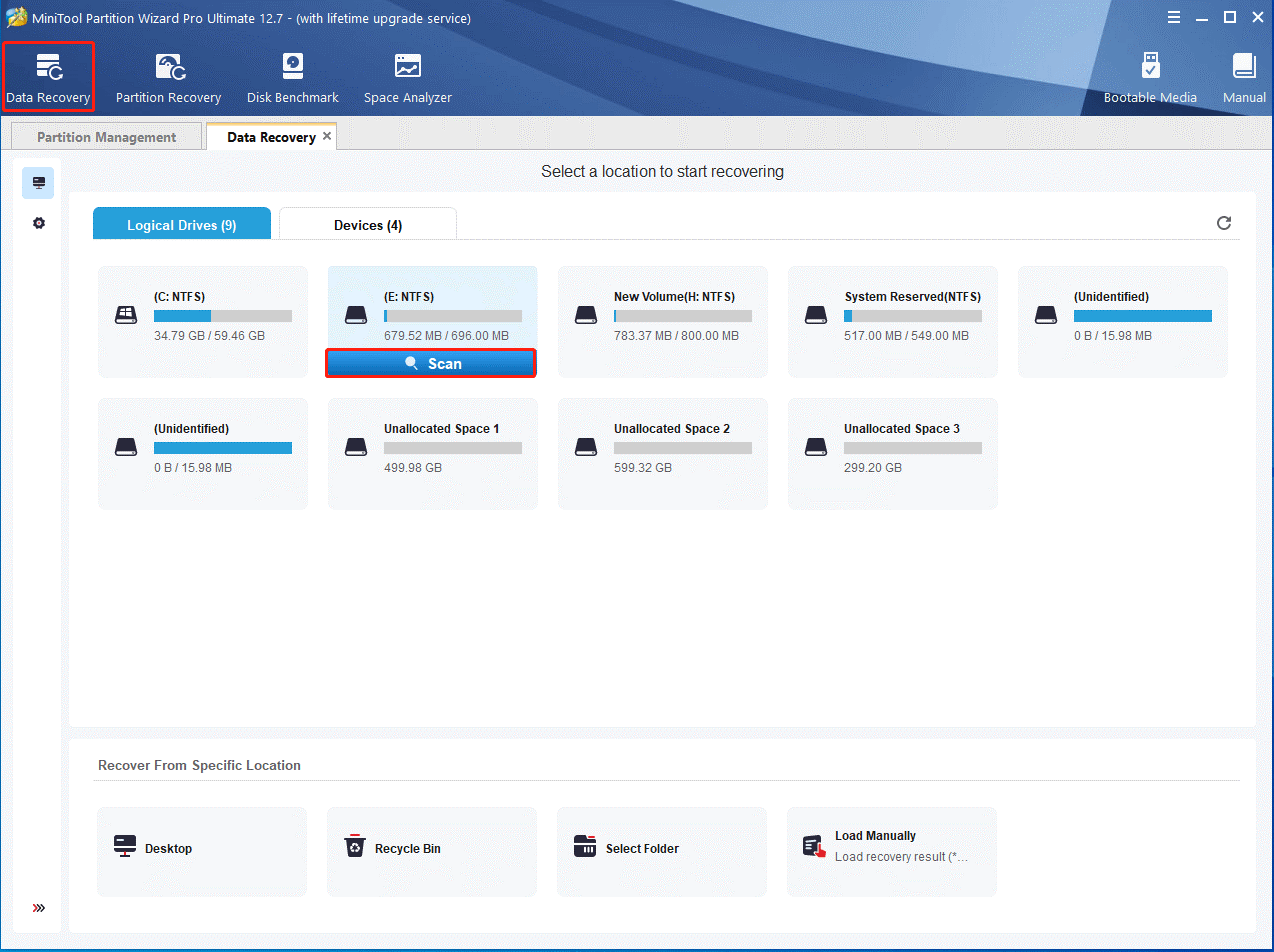
Bonus Tip: How to Recover Lost Data Due to BSOD Errors
According to user reports, lots of people experience data loss due to the annoying blue screen of death. Sometimes users may need to reformat their hard drive to fix the BSOD error, which also causes data loss. How to recover data from a hard drive on Windows 10/11? MiniTool Partition Wizard can help you do that easily and even search for your desired files when recovering.
Moreover, it is a powerful disk clone and partition manager that can migrate OS to SSD, extend/resize/copy partitions, convert MBR to GPT without data loss, change cluster size, check hard drive errors, etc.
MiniTool Partition Wizard DemoClick to Download100%Clean & Safe
Where to find the blue screen logs on Windows 11/10? Now, I believe that you already have known the answer. If you have better ways to find BSOD logs, please share them with us in the following comment zone.
-
Home
-
News
- How to Check Windows 11 Crash Logs – 2 Ways
By Linda | Follow |
Last Updated
Sometimes, you may need to check Windows 11 crash log This post from MiniTool Partition Wizard offers you 2 easy ways and tells you how to display error details on the BSOD.
Why Do You Need to Check Windows 11 Crash Log?
Sometimes, Windows 11 may crash suddenly and display a blue screen. To solve the blue screen, you need to know what causes the error. The Windows 11 crash log is what tells the causes of the Windows errors. Checking blue screen logs can help you solve the issue more easily.
How to Check Windows 11 Crash Log
How to get details on a computer crash? Here is the guide:
Step 1: Click the magnifier icon. The Search window will open. In the Search bar at the top, type “Event Viewer” and then click the best-matched app to open it.
Step 2: On the left navigation pane, click Windows Logs > System. The Windows crash logs are usually classified into the System category. In the middle pane, system events are listed. There are 5 types of events.
- Information: It is created once an operation goes through successfully. Logs with this entry usually mean the event occurred without incident or issue.
- Verbose: It represents a progress or success message for a specific event.
- Warning: It is created when Windows finds a potential issue with the system, but this issue usually does not pose an imminent risk.
- Error: It indicates a major problem and means that a device may have failed to load or operate expectedly. Windows crashing belongs to this type.
- Critical: It indicates the most severe problems.
Step 3: Now, you need to find the Windows crash events. You can use the Filter Current Log tool on the right pane. When this tool opens, on the Filter tab, expand the Logged drop-down menu to select a time range, select the Event level (Critical and Error are recommended), and then click OK.
Step 4: Now, select a system error event to double-click it. The Event Properties window will open. You can see the General and Details of this event to know why this error occurs and get the error code. Then, you can take corresponding measures to solve this error.
Tips:
You can also create a custom view to check a particular category and level of logs. You just need to click the Create Custom View tool on the right pane and then follow the wizard to complete the creation operation. Once a custom view is created, you can find it under Custom Views.
How to View Error Logs Using PowerShell
You can also view Windows crash logs using PowerShell. Here is the guide:
- Search for PowerShell and open it.
- Copy and paste the following command into the PowerShell: Get-EventLog -Log system | where {$_.entryType -match “Error”}. The command will retrieve the entire event log to fetch system events that were categorized as an Error.
- If you only want to see the latest 30 entries, use the following command: Get-EventLog -LogName System -Newest 15 -EntryType Error.
How to Make Windows 11 Display Error Details on the BSOD
When Windows 11 crashes, it doesn’t display any information that can help you deal with the issue. It only shows a sad smiley and nothing much of value. Fortunately, you can make Windows 11 display more useful information on the BSOD by adding an entry to your PC’s registry. Here is the guide:
- Press Windows + R keys to open the Run dialog box.
- In the box, type “regedit” and press Enter to open Registry Editor.
- Go to Computer\HKEY_LOCAL_MACHINE\SYSTEM\CurrentControlSet\Control\CrashControl.
- On the right pane, right-click anywhere blank and choose New > DWORD (32-bit) Value.
- Rename the new entry DisplayParameters. Then, double-click this entry.
- Change the Value data to 1 and then click OK.
- Exit Registry Editor and reboot your PC.
Bottom Line
When Windows crashes, your data is likely to be lost. Then, you can use MiniTool Partition Wizard to recover data from hard drive. This software can also do other things like OS migration, disk management, etc. Download it to have a try.
MiniTool Partition Wizard DemoClick to Download100%Clean & Safe
About The Author

Position: Columnist
Linda has been working as an editor at MiniTool for 5 years. She is always curious about computer knowledge and learns it crazily. Her articles are simple and easy to understand. Even people who do not understand computer can gain something. By the way, her special focuses are disk management, data recovery and PDF editing.