The NVIDIA Control Panel is essential for tweaking your graphical settings, so if it decides to hide from you, here’s how to bring it back.
The NVIDIA Control Panel includes a slew of settings for NVIDIA graphics cards. Users can configure graphical settings for games and software from there. So, it’s a pretty important app for users with PCs that have NVIDIA GPUs.
Some users have reported a curious issue in which the NVIDIA Control Panel disappears in Windows 11/10. Users can’t find that app on the desktop context menu, within the system tray, or in the Windows Control Panel when that issue arises. Consequently, they can’t access that app. This is how you can fix a missing NVIDIA Control Panel in Windows 11/10.
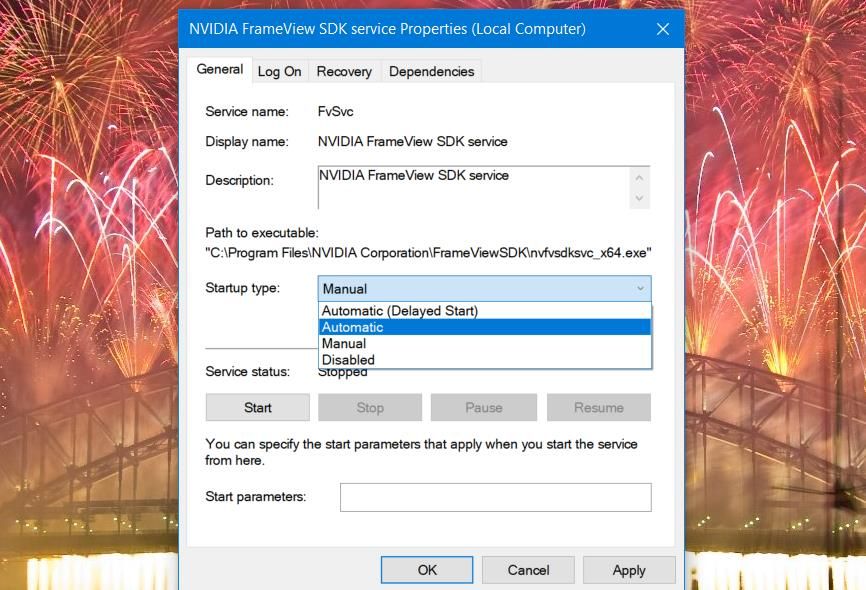
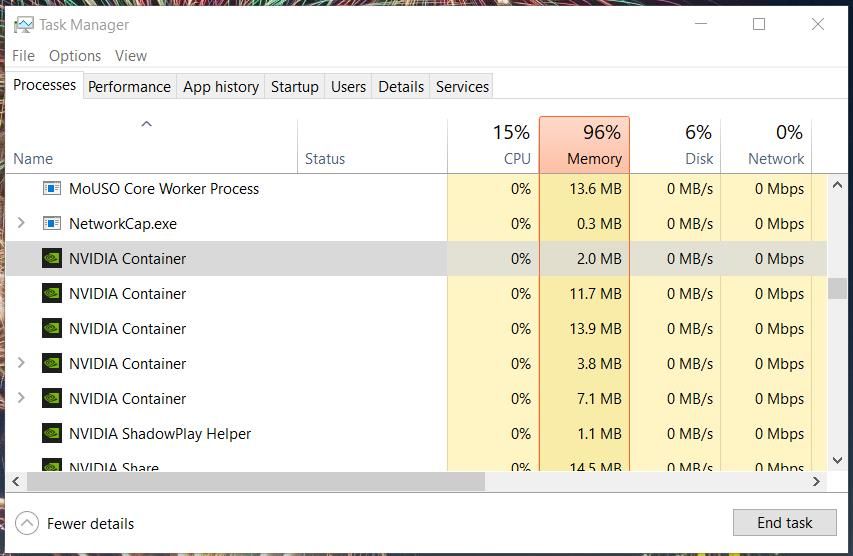
1. Check and Enable all NVIDIA Services
The missing NVIDIA Control Panel issue can arise because certain NVIDIA services are disabled. Thus, enabling and starting all NVIDIA services is one way you might be able to restore the missing graphics panel in Windows 11/10.
Here is how to enable NVIDIA’s services:
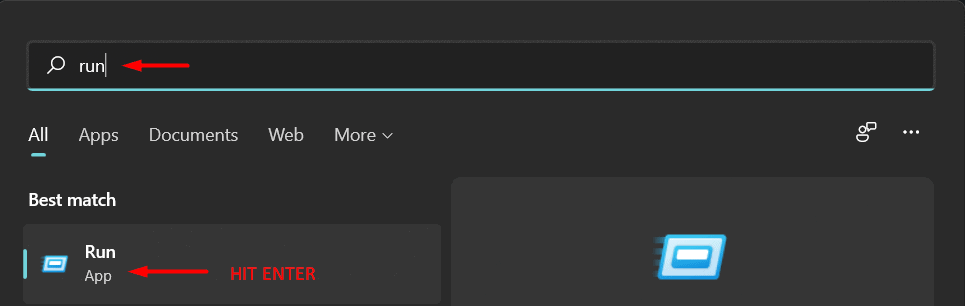
- Right-click the Start menu button to open a Power User menu, and select the Run shortcut there.
- Type services.msc in the Open box and click OK to bring up a Services window.
- Scroll down the window to the NVIDIA services as in the snapshot directly below.

- Then double-click any NVIDIA service listed there.
- Select the Automatic option on the Startup type drop-down menu for the service.

- If the service isn’t running, click the Start button.
- Select the Apply option to save the NVIDIA service settings.
- Click OK to close the service properties window.
- Repeat steps four to eight for all listed NVIDIA services.
- Restart your PC after changing NVIDIA service settings.

2. Update Your NVIDIA Graphics Card’s Driver
As the NVIDIA Control Panel is intimately linked with its graphics card, it can go missing because of an outdated or incompatible NVIDIA driver. Therefore, it’s recommended that you update your NVIDIA graphics card’s driver if it’s outdated. You can do that manually or with third-party driver updater software.
This is how you can manually update a driver for an NVIDIA graphics card.
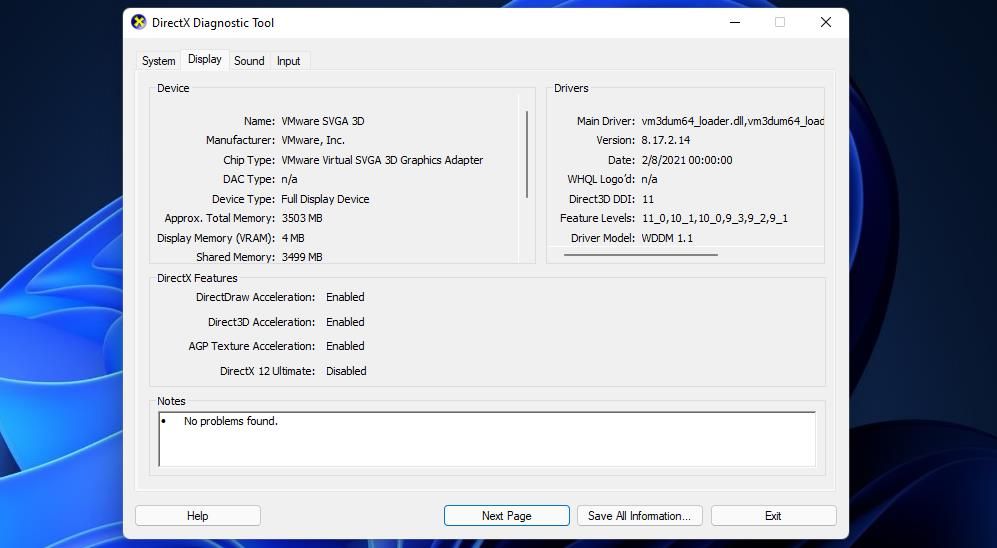
- Open the DirectX Diagnostic Tool.
- Click the Display tab there to view details for your NVIDIA graphics card. There you can see the date and version details for the driver to check if it needs updating.

- Note down the graphics card model detail on the Display tab.
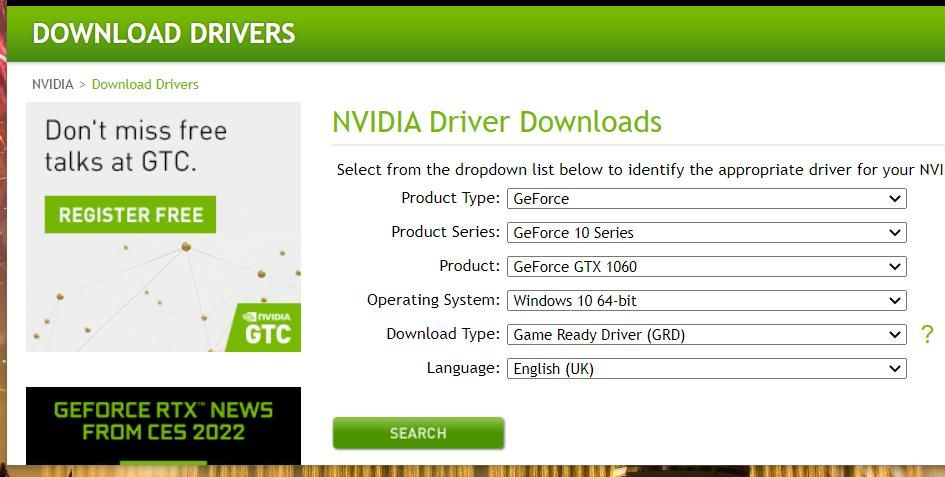
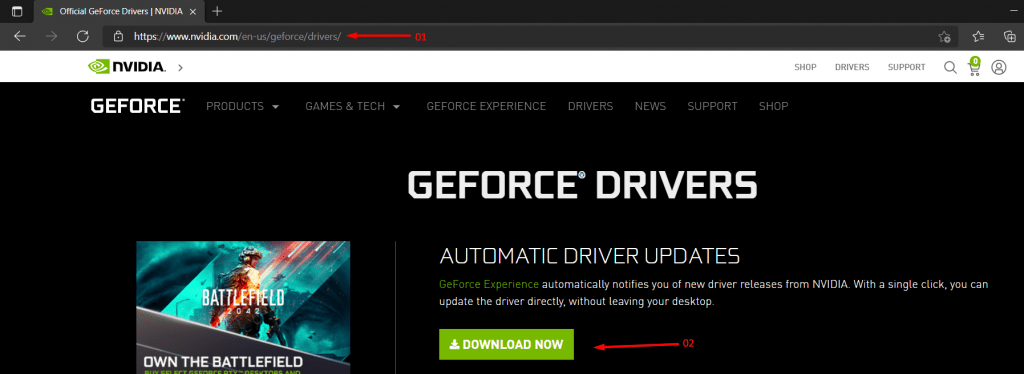
- Open the NVIDIA driver download page in a browser.

- Select your graphics card’s series and model on the drop-down menu.
- Then select your PC’s platform in the Operating System drop-down menu.
- Press the Search button.
- Click the Download button for the latest NVIDIA driver package.
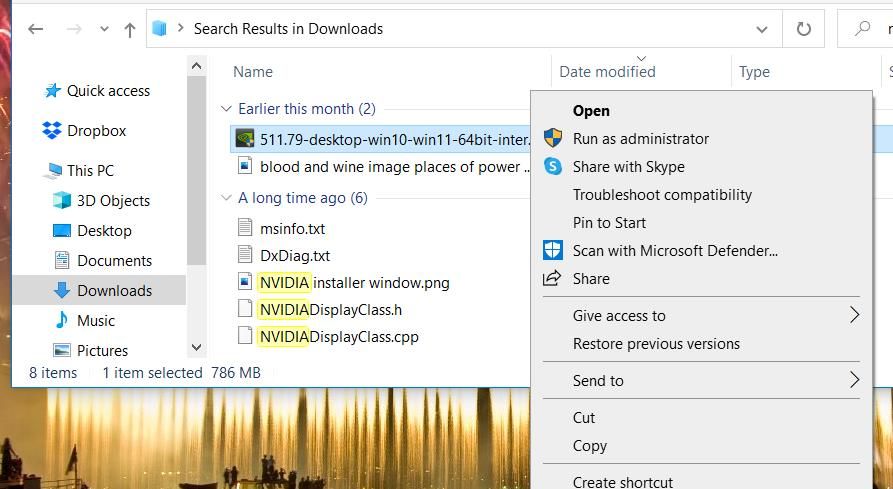
- Open File Explorer and the folder that includes the downloaded driver package.
- Right-click the NVIDIA driver package to select Run as administrator.

- Click OK on the Extraction path window that opens.
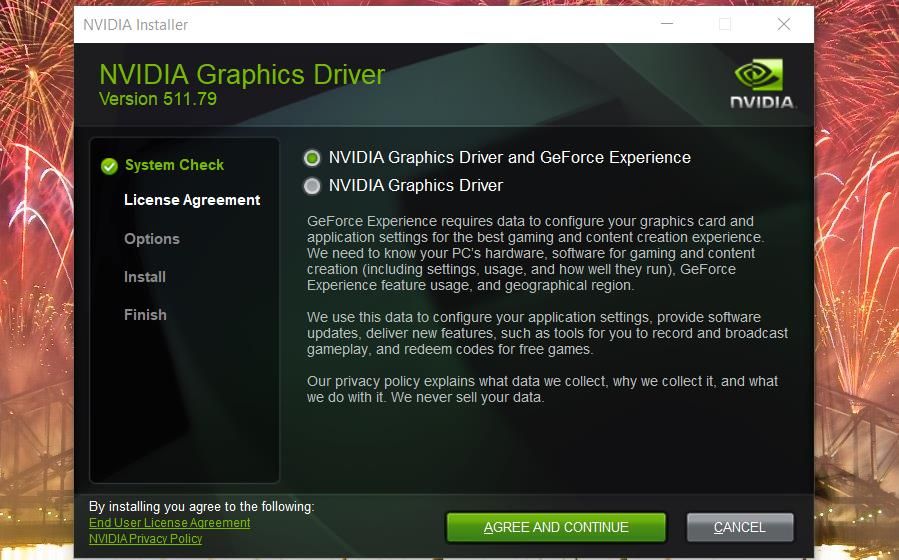
- Select the NVIDIA Graphics Driver radio button in the NVIDIA Installer window that opens.

- Press the Agree and Continue button.
- Select the Express (Recommended) option, and click Next to install.
- Click the Restart Now option to finish.
3. Reinstall Your NVIDIA Graphics Card’s Driver
If your NVIDIA graphics card already has the latest driver, try reinstalling its driver instead. This is how you can reinstall an NVIDIA GPU’s driver.
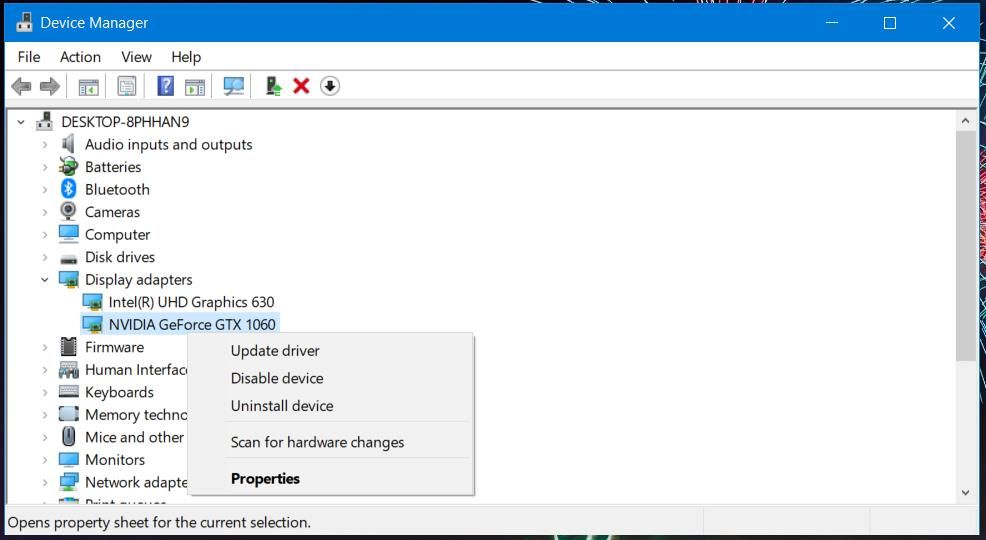
- Open the Power User menu, and select the Device Manager option on it.
- Double-click the Display adapters category to view its devices.

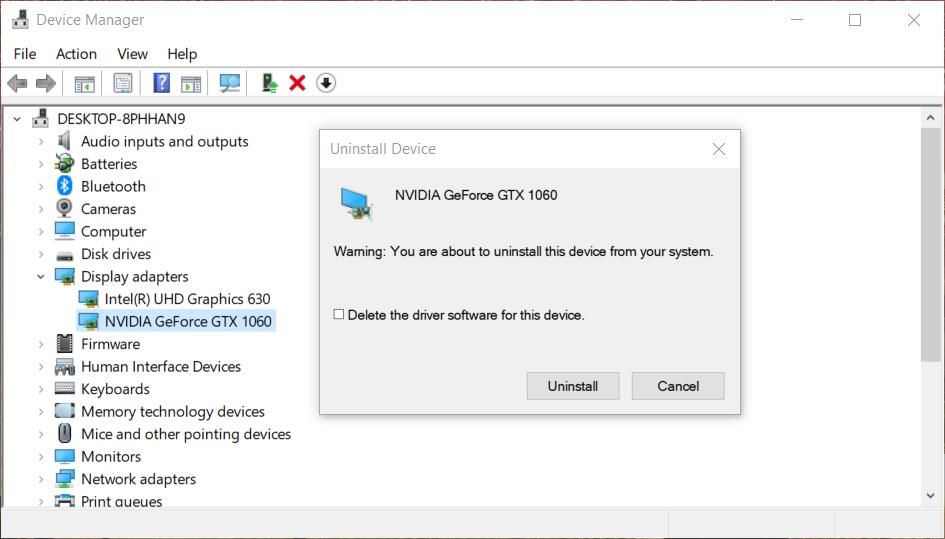
- Right-click your NVIDIA graphics card there to select an Uninstall device option for it.

- Select the Delete the driver software for this device option on the confirmation prompt that pops up.

- Click the Uninstall button there to provide confirmation.
- Restart your PC.
- Download and install the latest NVIDIA driver package for your graphics card as outlined for the previous resolution.

4. Try Opening NVIDIA Control Panel From File Explorer
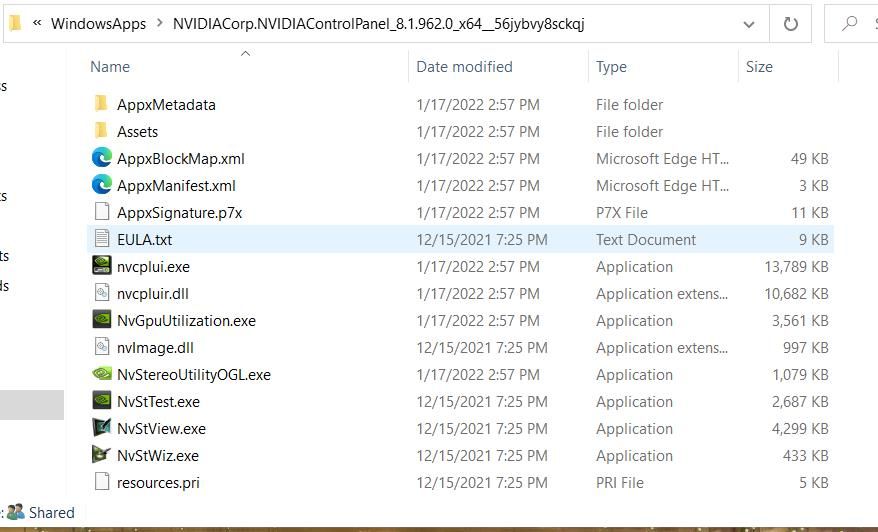
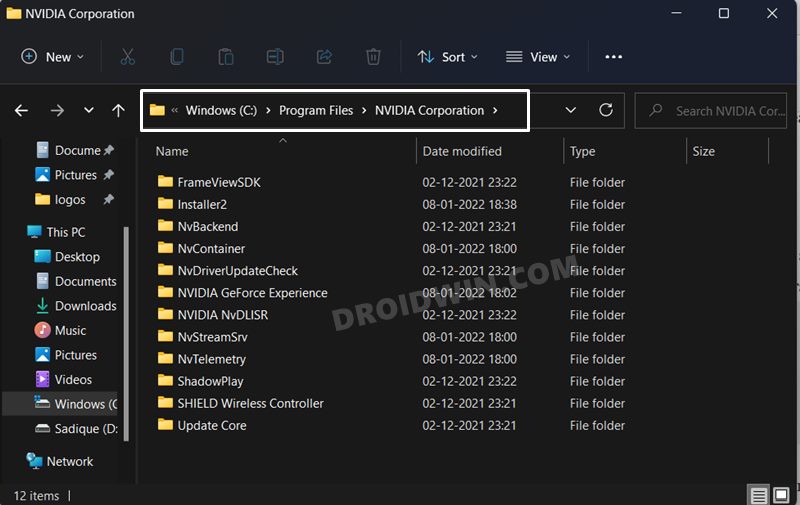
Try looking for the NVIDIA Control Panel within File Explorer. The specific file for opening the Control Panel to look for there is nvcplui.exe. If you can find nvcplui.exe in Explorer, you can then try opening it from there. These are different folder paths you’ll need to look for the nvcplui.exe file in:
- C:\Program Files\NVIDIA Corporation\Control Panel Client
- C:\Program Files\WindowsApps\NVIDIACorp.NVIDIAControlPanel_8.1.962.0_x64__56jybvy8sckqj
If you can’t find the Control Panel Client folder, then nvcplui.exe is probably within the WindowsApps folder path specified above. However, WindowsApps is not a readily accessible folder. You’ll need to take ownership of that folder to open it. You can take ownership of that folder with one of the software packages in MUO’s «Take Ownership of Windows 10 Files and Folders» guide.
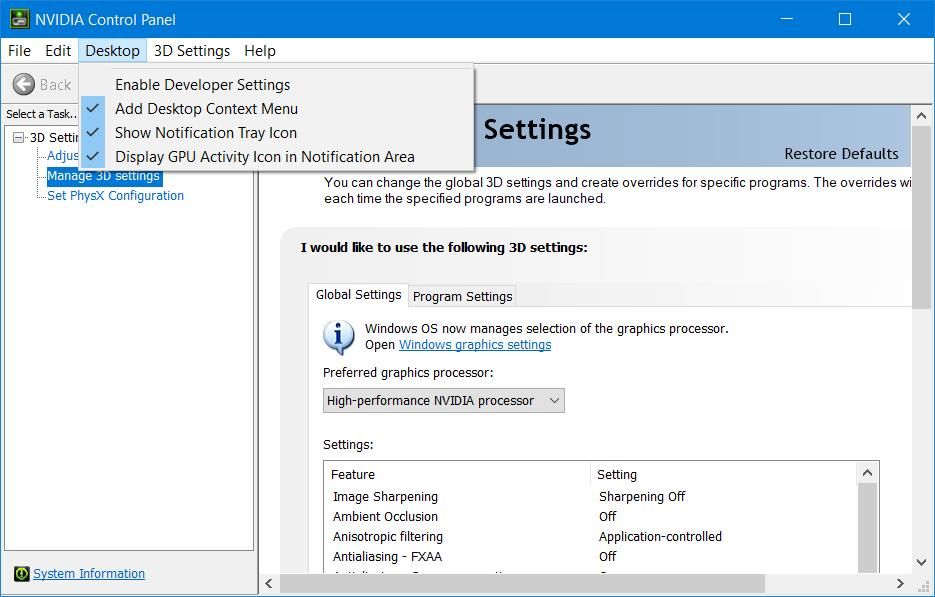
If you find the nvcplui.exe file in Explorer, right-click it to select Run as administrator to open NVIDIA Control Panel. Then click Desktop at the top of its window. Select the Add Desktop Context Menu and Show Notification Tray Icons options to restore it on the system tray and desktop context menu.
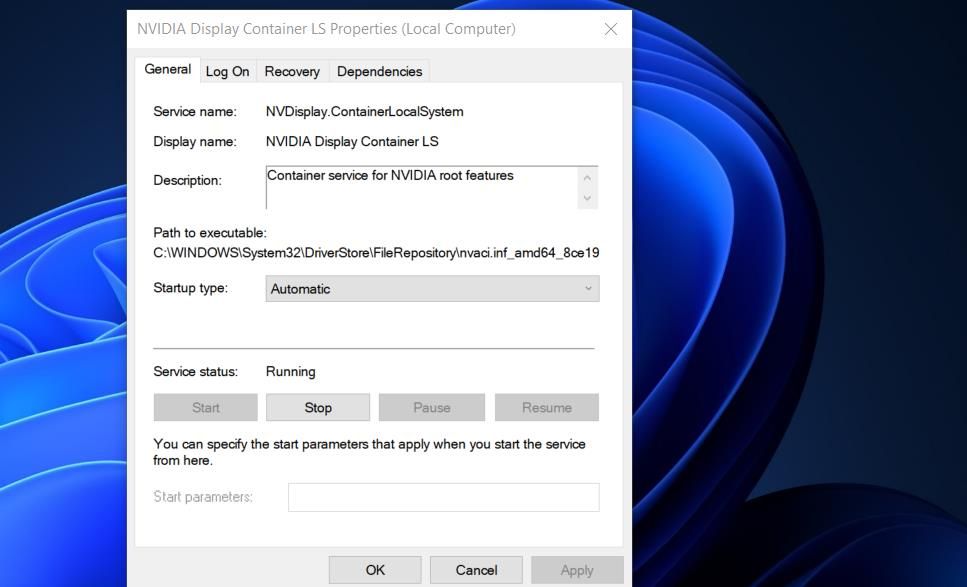
5. Copy the NVDisplay.Container file Into the Startup Folder
«NVDisplay.Container» is the NVIDIA Display Container LS service’s file. Adding that file to the Windows Startup folder can also fix a missing NVIDIA Control Panel. Here is how you can copy that file into the Startup folder:
- Open the Services window as outlined in steps one and two of the first resolution.
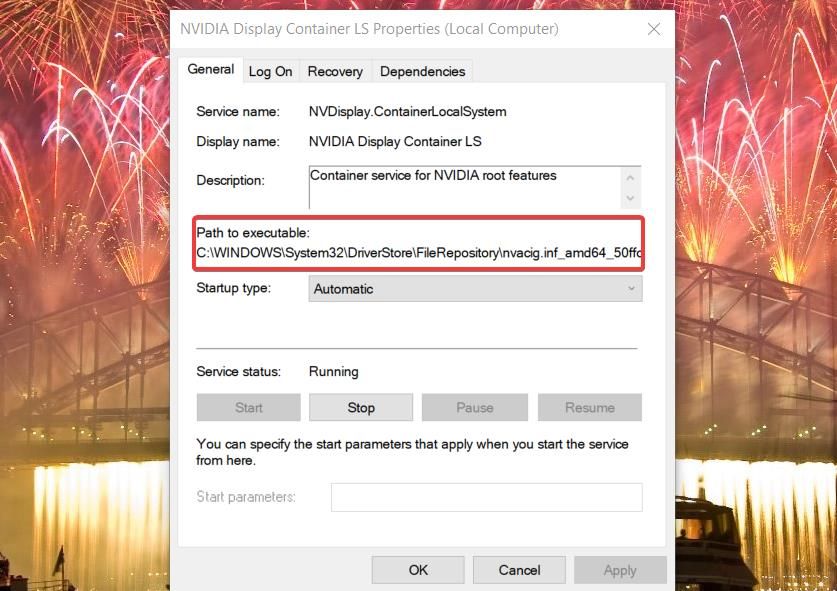
- Double-click the NVIDIA Display Container LS service to open its window.
- Copy the path to the executable specified in that window with the Ctrl + C hotkey.

- Click OK to exit the properties window, and close the Services app.
- Bring up File Explorer, and select the C: drive.
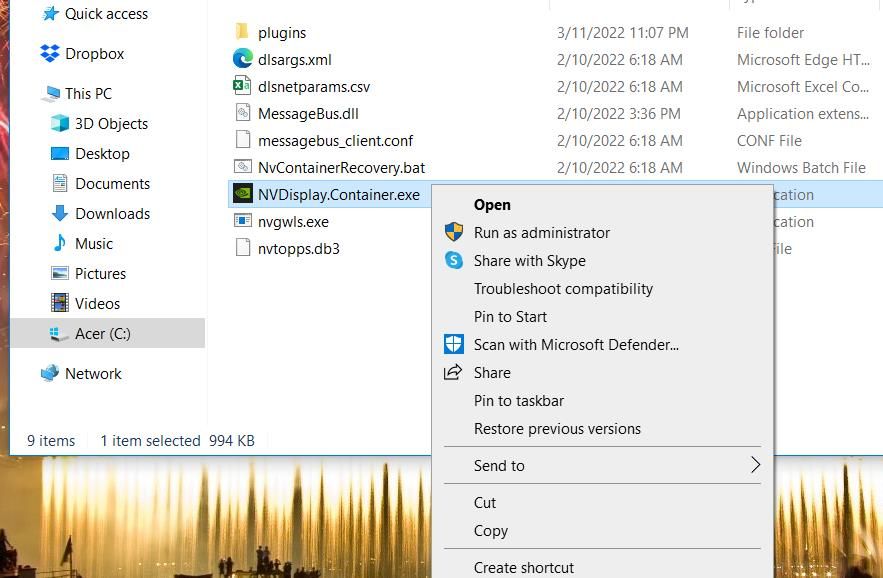
- Paste the copied path into the folder address bar with the Ctrl + V hotkey, and press the Enter key.
- Then right-click the Display.NvContainer file to select the Copy option on its context menu.

- Open the Run accessory, and type shell:startup in its Open box.
- Right-click inside the Startup folder to select the Paste shortcut option.

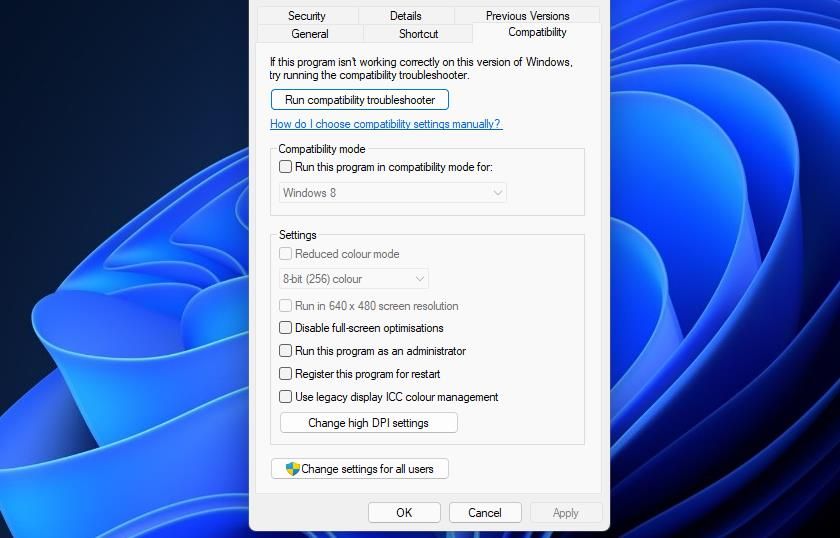
- Next, click Display.NvContainer file with your right mouse button and select Properties.
- Select Run as administrator on the Compatibility tab shown directly below, and click the Apply button.

- Finally, restart your laptop or desktop.

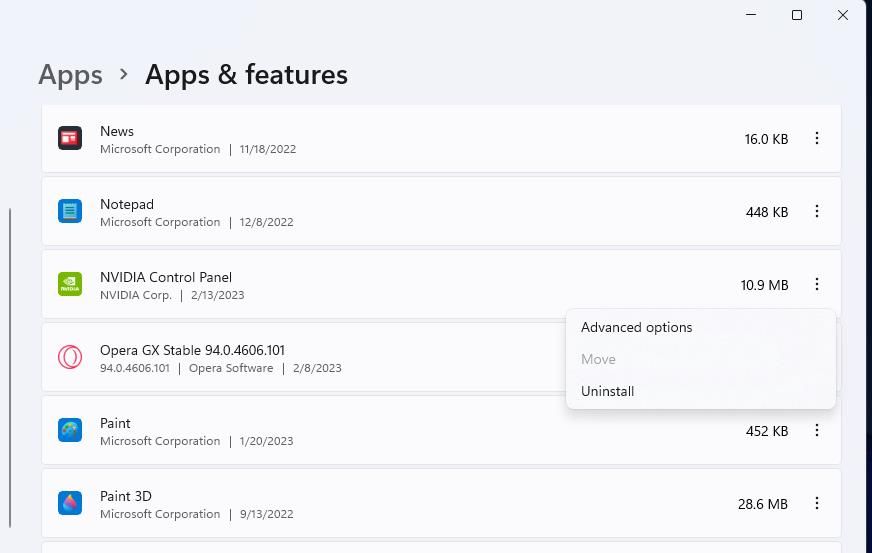
6. Reinstall the NVIDIA Control Panel
As a last resort, try reinstalling NVIDIA Control Panel. You can reinstall the NVIDIA Control Panel by uninstalling it via Settings as follows.
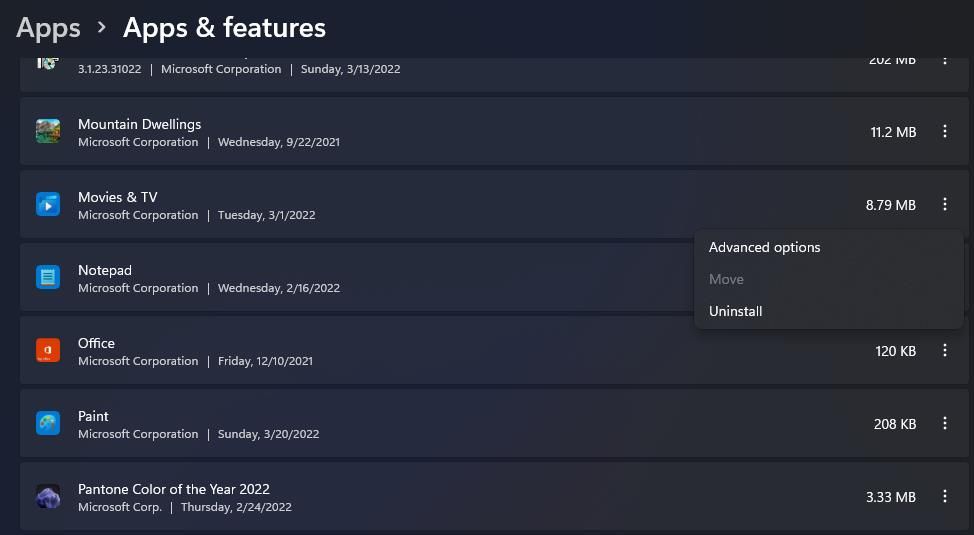
- Open Settings in Windows.
- Then select Apps > Apps & features to bring up a list of installed software.
- Find the NVIDIA Control Panel app listed there, and click its three-dot button.
- Select the Uninstall option for NVIDIA Control Panel.

- Restart your PC after uninstalling the NVIDIA Control Panel app.
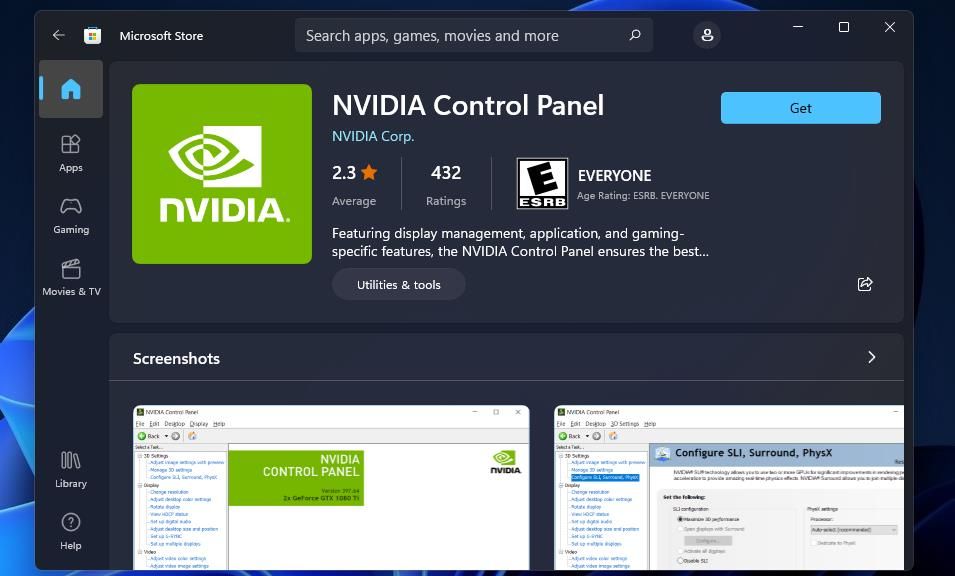
- Click the pinned Microsoft Store app shortcut from the Start menu.
- Type NVIDIA Control Panel in MS Store’s search box.
- Select NVIDIA Control Panel in the search results.

- Press the Get button to reinstall the app.
Restore Your NVIDIA Control Panel With Those Fixes
Although you can configure graphical options in games, it’s better to apply universal settings via the NVIDIA Control Panel. You can restore your missing NVIDIA Control Panel in Windows 11 and 10 by applying the potential fixes above. Then you’ll be able to access and change the graphical settings there as required once again.
The NVIDIA Control Panel is great for tweaking graphical settings, but sometimes it doesn’t want to open on Windows 11.
![]()
The NVIDIA Control Panel is an important app for managing your NVIDIA GPU, but sometimes it won’t open. In many such reported cases, nothing happens when users select to open the NVIDIA Control Panel; however, sometimes an error message will pop up.
If the NVIDIA Control Panel is not opening in Windows 11, don’t fret. Here’s how to get it working again.
1. Run the NVIDIA Control Panel With Admin Rights
Most users usually select to open the NVIDIA Control Panel from Windows 11’s desktop context menu. However, you can select to run that app as an administrator in the following steps:
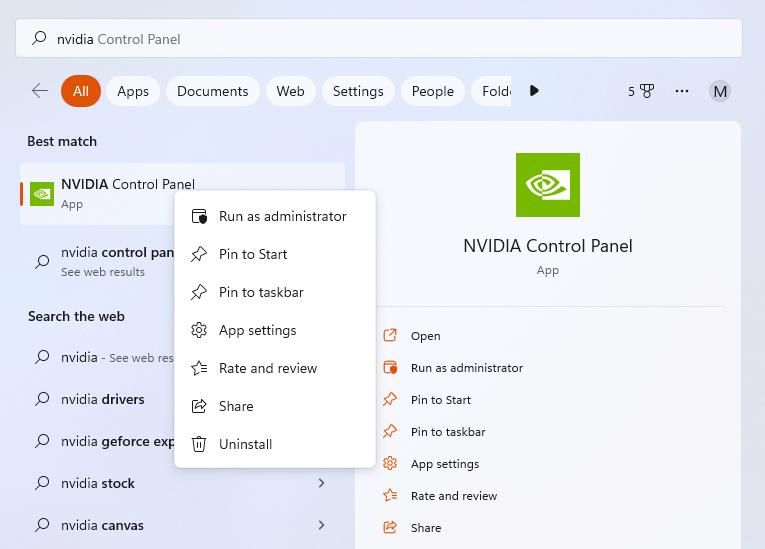
- Right-click your taskbar’s Start menu button and select the Search shortcut.
- Type NVIDIA Control Panel in the search box.
- Right-click the NVIDIA Control Panel result to select a Run as administrator on that app’s context menu.

Setting NVIDIA Control Panel to always run as administrator is tricky because that UWP app is installed within a restricted access folder. You’ll need to take ownership of the WindowsApps folder to open that directory. Then select the «Run as administrator» option for the nvcplui.exe file. The default path for the file is:
C:\Program Files\WindowsApps\NVIDIACorp.NVIDIAControlPanel_8.1.963.0_x64__56jybvy8sckqj\nvcplui.exe
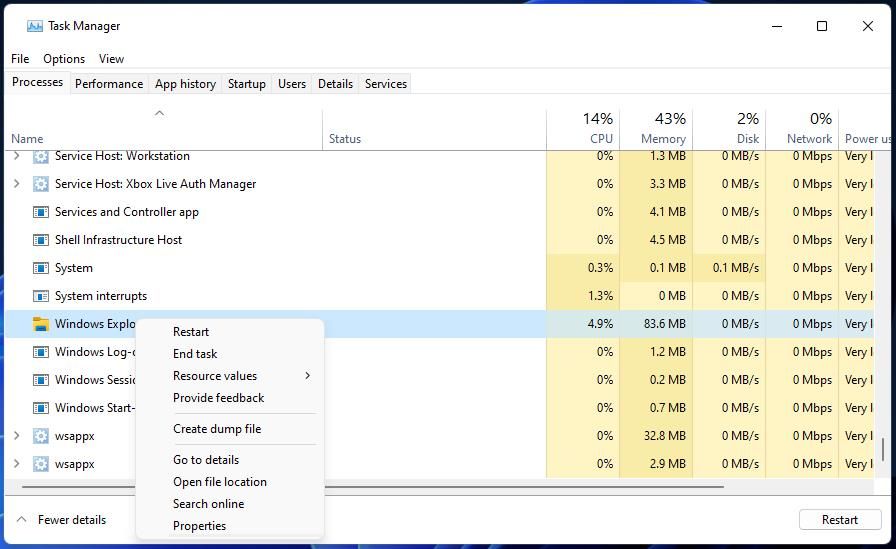
2. End NVIDIA Background Processes
Sometimes you can’t see NVIDIA Control Panel when multiple instances of it are already running. Ending NVIDIA background processes will enable you to restart the app. This is how you terminate background NVIDIA background processes:
- Bring up the Task Manager tool (pressing Ctrl + Shift + Esc) is the quickest method for opening it).
- Select Processes if a different tab opens with Task Manager.
- Next, scroll down the Processes tab to find NVIDIA processes.
- Select all NVIDIA processes and click their End task buttons.

- Click the Windows Explorer process with the right mouse button and select Restart.

- Try opening the NVIDIA Control Panel again.
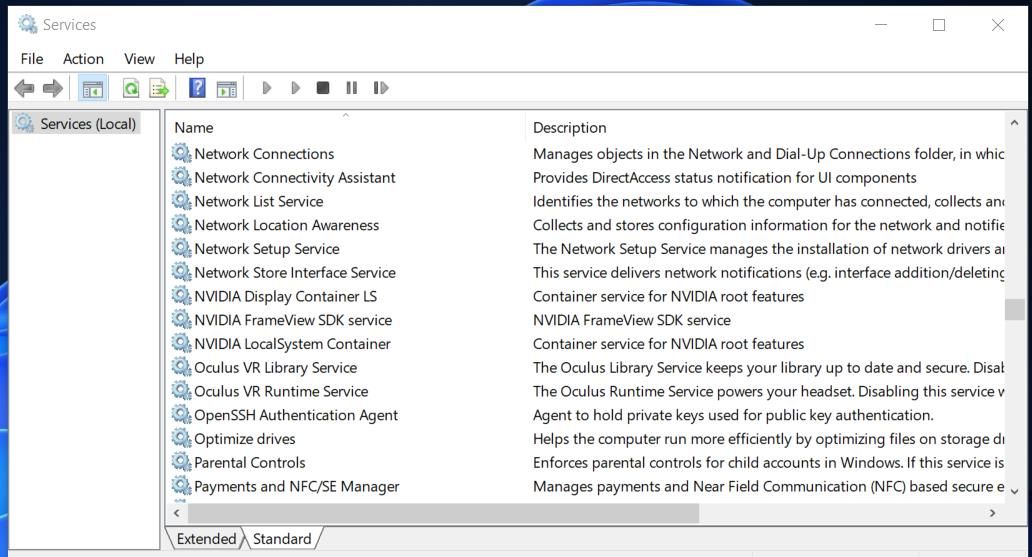
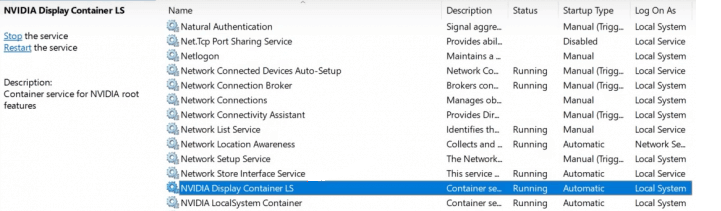
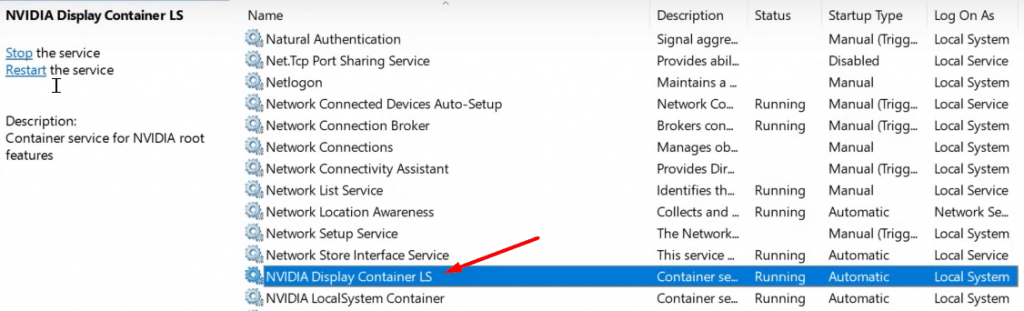
3. Start (or Restart) the NVIDIA Display Container Service
A common reason for the NVIDIA Control Panel not opening is a disabled NVIDIA Display Container service. Other NVIDIA services also need to be enabled for the app to work right. So, you should check that service and others are enabled and running like this:
- Bring up Windows 11’s file search utility.
- Type Services into the file search box and select to run that app from there.
- Scroll to and double-click NVIDIA Display Container LS.

- Next, select the Automatic option if the Startup menu setting is set to anything else.

- Select Start (in the properties window) to run the service if it’s stopped.
- Make sure you click Apply for saving the settings.
- Select OK to exit the NVIDIA Display Container LS Properties window.
- Repeat steps three to seven for the NVIDIA LocalSystem and NetworkService Container services.
4. Repair the NVIDIA Control Panel App
Windows 11’s standard Repair and Reset app options are available for NVIDIA Control Panel. So, those troubleshooting options might help you fix that app not opening. You can select the Reset and Repair options in the same place within the NVIDIA Control Panel settings. Our guide on about resetting Windows 11s apps includes step-by-step instructions for how to apply do this.
5. Update Your PC’s NVIDIA Graphics Driver
Updating the NVIDIA graphics driver on your PC will also update the control panel app for it. So, that’s a potential solution worth trying if your graphics card’s driver is outdated. You can apply this potential fix by following the instructions within our guide to updating NVIDIA GPUs.
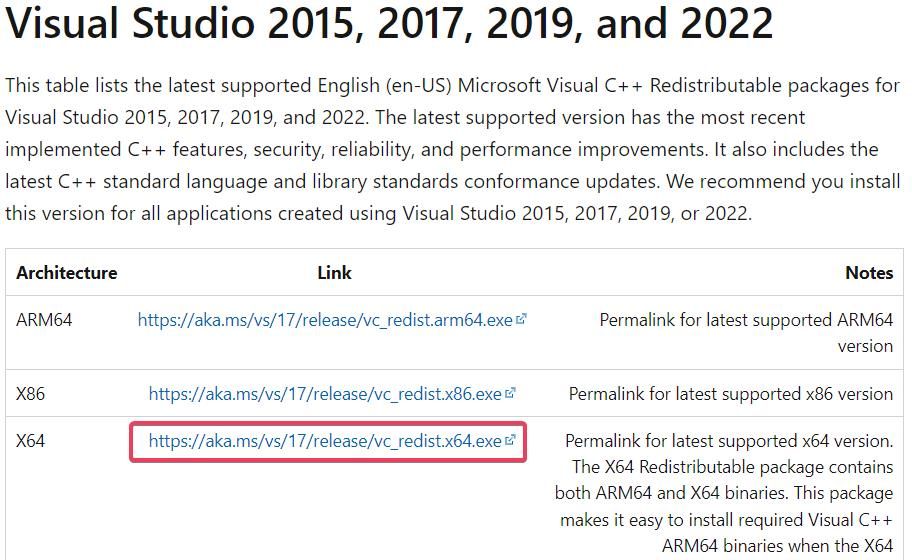
6. Install Missing Visual C++ Redistribute Packages
Another possibility is that the NVIDIA Control Panel doesn’t open because your PC is missing a required Visual C++ Redistributable package to run it. You can eliminate this possible cause by updating Visual C++ packages on your PC if needed. This is how to install a missing Visual C++ Redistributable in Windows:
- Open up the Microsoft Visual C++ download page in your browser software.
- Click the X64 link for the latest Visual Studio 2015, 2017, 2019, and 2022 packs.

- Double-click the VC_redist.arm64.exe (Visual C++ installer) file once it’s downloaded.
- Go through the install process.
7. Edit the Windows Registry
This Windows Registry tweak creates a new context menu option for opening the NVIDIA Control Panel. As this solution involves deleting a key, we recommend you learn how to back up the Windows Registry before proceeding.
To apply this fix, edit the Registry as follows:
- Open Registry Editor by pressing the Win + R keyboard shortcut, typing regedit in the Run dialog, and clicking OK.
- Input this key location in the registry address bar and press Return:
Computer\HKEY_LOCAL_MACHINE\SOFTWARE\Classes\Directory\background\shellex\ContextMenuHandlers - Click the NvCplDesktopContext subkey with the right mouse button and select Delete.
- Select Yes to confirm that you’re sure about deleting the NvCplDesktopContext key.
- Erase the path currently in the registry bar, and input this different location:
Computer\HKEY_CLASSES_ROOT\Directory\Background\shell - Next, right-click Shell and select New.
- Click Key to add a new subkey to Shell.
- Type Nvidia Control Panel to be the new key’s name.
- Then right-click the Nvidia Control Panel subkey and select its New and Key context menu options.
- Input command for the subkey’s title.
- Select command and double-click its (Default) string.
- Next, input the following path in the Value data box:
C:\Windows\System32\nvcplui.exe - Select OK to save the string value.
- Now select to reboot your Windows 11/10 PC.
8. Reinstall the NVIDIA Control Panel
The NVIDIA Control Panel is a UWP app you can uninstall, download, and reinstall. If none of the other fixes in this guide work for you, that app might have corrupted or missing files. To do so, remove the NVIDIA Control Panel in Settings, as outlined in our guide for how to uninstall apps on Windows.
When you’ve uninstalled NVIDIA Control Panel, restart your PC. Then click Get in Store app on the NVIDIA Control Panel Microsoft Store page. Select Open Microsoft Store, and click Get to reinstall the app.
Tweak Graphics Settings in the NVIDIA Control Panel Again
Those potential solutions will usually fix the NVIDIA Control Panel not opening in Windows. However, there are many potential causes for the NVIDIA Control Panel not opening; and it is not guaranteed those resolutions will resolve that issue in all scenarios. If you need any more resolutions for fixing that app not starting, consider submitting a help ticket on the NVIDIA support page.
This article commented by MiniTool Software Ltd mainly helps you fix various Nvidia Control Panel problems like not opening, not finding, not working, not showing, etc. Read the below details for the best solution.
What Is NVIDIA Control Panel?
Nvidia Control Panel is a software developed by NVIDIA designed to manage Nvidia graphics card settings on computers. It is especially useful for gamers or other computer enthusiasts to overclock their GPU for better performance.
However, you may encounter some problems while using Nvidia Control Panel. This article provides some common fixes for some common errors related to Nvidia Control Panel.
Nvidia Control Panel on Windows 11 Shows Windows 10
While running Windows 11 operating system (OS) and updated to the latest version of the Nvidia GeForce driver, some users may find that the system information in NVIDIA Control Panel displays Windows 10.
For this conflict, you do not have to worry. Windows 11 and Windows 10 drivers are included in the same installation package and you don’t install the wrong driver. Microsoft usually makes OS versions tricky to determine in code.
Just check your DirectX Diagnostic Tool or winver details for system information. If they all say your OS is Windows 11, nothing needs to be worried about. Technically, Windows 11 is just a feature update of Windows 10.

NVIDIA Control Panel Not Opening Windows 11
You may also come across a problem that you can’t see the Nvidia control panel when you right-click on your desktop. If so, you can try the following methods.
#1 Restart NVIDIA Display Container LS
To start/restart the Nvidia Display Container LS service, just follow the below steps.
- Open Windows 11 Services app.
- Scroll down the list to find Nvidia Display Container LS, right-click on it and select Start.
- If the Nvidia Display Container service is already started, choose Restart.
- Then, right-click on it again and select Properties.
- In its Properties window, under the default General tab, set the Startup type to Automatic and click Apply > OK.
#2 Copy Nvcontainer File to the Startup Folder
If the above method fails to deal with can’t open the Nvidia control panel Windows 11 problem, you can manually move the Nvidia Container file to the system startup folder.
- Navigate to C:\Program Files(x86)\NVIDIA Corporation\Display.NvContainer. If you can’t find the NVIDIA folder in the Program Files (x86) folder, just switch to the Program Files folder to look for it.
- Copy Container file.
- Open Windows 11 Startup folder. Usually, its location in Windows 11 is C:\Users\Username\AppData\Roaming\Microsoft\Windows\Start Menu\Programs\Startup.
- Paste Container file into the Startup folder.
- Right-click on the Container file in the Startup folder and set the file to run as administrator.
- Restart your PC.
#3 Dive Deep the Context Menu or Start Menu
The context menu of Windows 11 is a little bit different from that of Windows 10. When you right-click, there are fewer options in the Win11 context menu than that of Win10. To see more complete options in Win 11 context menu, just click Show more options and you will see your graphics card manager panel.
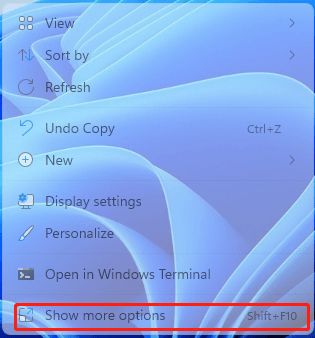
If you still can’t find Nvidia Control Panel there, just seek it in Windows 11 Start Menu or search it in Windows Search.
If Nvidia Control Panel does be installed on your computer and you just can’t see it in your context menu, then, you can add it there.
- Go to Windows 11 Control Panel to find and open Nvidia Control Panel.
- In Nvidia Control Panel, click on the Desktop menu and select Add Desktop Context Menu option.
- Close Nvidia Control Panel and restart the machine.

Then, you should see the Nvidia Control Panel in your right-click context menu.
#4 Update NVIDIA Graphics Drivers
Nvidia control panel not found Windows 11 problem may be caused by GPU driver issues. Thus, you can try to solve it by updating the graphics card driver. To achieve that, do as below.
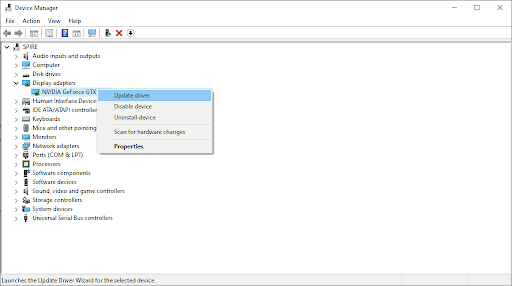
- Open Windows 11 Device Manager.
- Expand the Display adapters section.
- Right-click your Nvidia graphics driver and select Update driver.
- Then, follow the on-screen instruction to complete the task.

You can also receive the possible GPU card driver by directly updating your system.
#5 Reinstall NVIDIA Graphics Drivers
If updating the GPU driver can’t handle your problem or your current driver is the newest. You may try to uninstall the current driver and reinstall it to fix the Nvidia control panel not showing Windows 11 issue. To do that, just choose Uninstall device in the above picture and restart the PC to let Windows automatically reinstall the missing Nvidia control panel driver.
Or, you can directly go to NVIDIA’s official website to manually search and download the Nvidia graphics driver package for Windows 11. Then, extract the downloaded executable file to install the driver.
#6 Remove Certain Files
Some users claimed that removing “nvdrsdb0.bin” and “nvdrsdb1.bin” from the Nvidia folder and restarting the computer fix the issue. Maybe you can have a try.
Nvidia Control Panel Not Working Windows 11
If your problem is Windows 11 Nvidia control panel crashing instead of no Nvidia control panel Windows 11, in addition to most of the above solutions, you can also try these ways.
#1 Update the .NET Framework and VC++ Redistributable
Both the .net framework and Visual C++ play are important to the security of Windows and compatibility for other apps to run. So, it is vital to keep them up-to-date. If you don’t know whether those files on your computer are of the latest version or not, just check for the system update. If there is a new update, just install the Windows update.
#2 Manually Open Nvidia Control Panel
Just go to the installation folder of the Nvidia Control Panel and double-click on its loader .exe file to launch the Nvidia Control Panel.
#3 Reinstall Nvidia Control Panel
If none of the above methods work, your last resort should be reinstalling the Nvidia Control Panel app. Just uninstall the current program. Then, go to Microsoft Store or the NVIDIA official website to download the application and reinstall it on your computer.
Nvidia Control Panel Windows 11 downlaod >>
Windows 11 Assistant Software Recommended
The new and powerful Windows 11 will bring you many benefits. At the same time, it will also bring you some unexpected damages such as data loss. Thus, it is strongly recommended that you back up your crucial files before or after upgrading to Win11 with a robust and reliable program like MiniTool ShadowMaker, which will assist you to protect your increasing data automatically on schedules!
MiniTool ShadowMaker TrialClick to Download100%Clean & Safe
In this guide, we will show you various methods to fix the Nvidia Control Panel not opening on your Windows 11 PC. This application is used to efficiently manage display settings and gaming-specific features. Along the same lines, it also beholds quite a few nifty features. These include the ability to tweak 3D settings, adjust image settings, configure surround sound, change resolution, adjust desktop color settings, set up G-Sync, adjust the video color and image settings, among others.
However, not many users are able to make full use of these features. This is because the app is refusing to open on their latest iteration of the OS build. While all the app’s data are still present in their default place and the app still shows up in the Start menu, clicking on it doesn’t do any good. If you are also currently getting bugged with this issue, then this guide is here to help you out. In this tutorial, we will show you various methods to fix the Nvidia Control Panel not opening in Windows 11.
Do note that there’s no universal fix as such. You will have to try out each of the below-mentioned workarounds and see which one works best in your favor. So with that in mind, let’s get started.
Update Graphics Drivers
Your first course of action should be to verify that you are using the latest graphics drivers. If that is not the case, then you should update these drivers to the latest build right away. Here’s how:
- Right-click on the Start Menu and select Device Manager.
- Then expand the Display Adapter section.
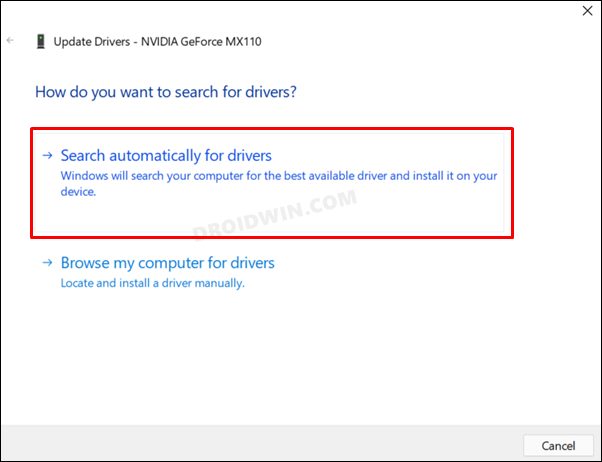
- After that, right-click on your graphics drivers and select Update Drivers.

- Now select Search automatically for drivers.

- Windows will now search for the latest drivers and will subsequently install them.
- Once done, restart your PC and then check if it fixes the Nvidia Control Panel not opening in Windows 11.

Restart NVIDIA Container Processes
The NVIDIA Container and NVIDIADisplay Container are the two processes that are constantly running in the background for the efficient running of the app. Any issues with either of these processes and their repercussions would directly be faced with the Nvidia app. Therefore, you should consider restarting both these processes and then let it start off from a fresh instance. Here’s how it could be done:
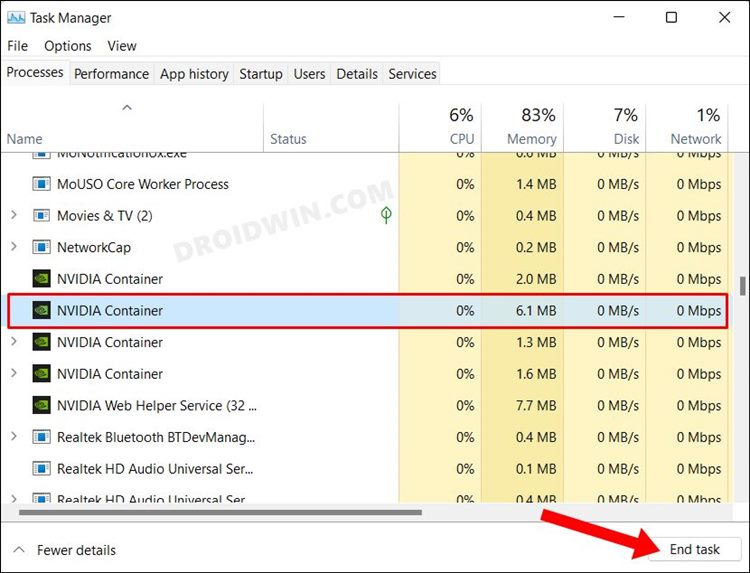
- Use the Ctrl+Shift+Esc shortcut keys to bring up the Task Manager.
- Then go to the Background Process section and select NVIDIA Container.

- After that, hit the End Task button situated at the bottom right.
- Then go to the Details tab and select NVDisplay Container.

- Again click on the End Task button. Now wait for a few seconds and let both these processes restart.
- Once that happens, verify if the Nvidia Control Panel not opening in Windows 11 has been fixed or not.

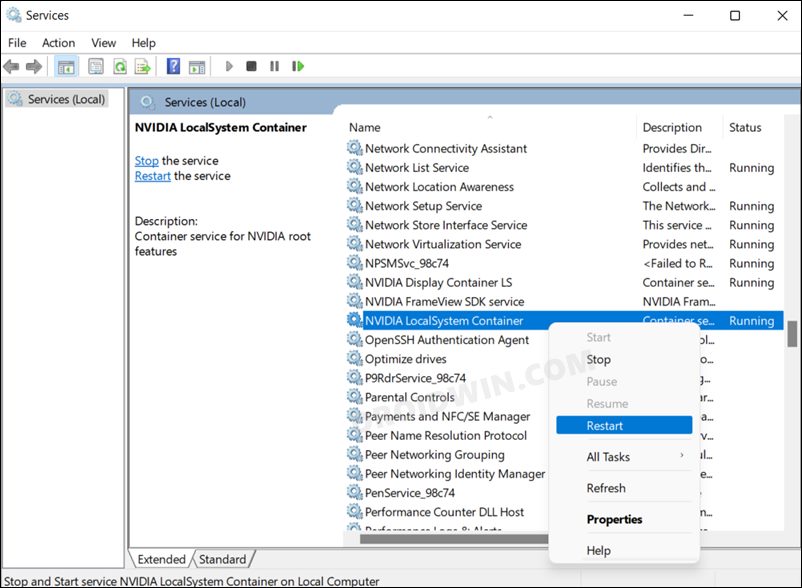
Restart Nvidia Services
Similar to the processes, Nvidia also has a few important services running in the backend and handling all the important stuff round the clock. If for some reason it isn’t functioning along the expected lines, then its negative consequences will be faced by the Nvidia app itself. Therefore, you should consider giving these services a fresh restart, using the instructions given below.
- Bring up the Run dialog box via Windows+R shortcut keys.
- Then type in the below command and hit Enter to open the Services menu:
services.msc
- Now scroll to NVIDIA Display Container LS, right-click on it and select Restart.

- Likewise, restart the NVIDIA LocalSystem Container service as well.

- Once done, check if it fixes the Nvidia Control Panel not opening in Windows 11
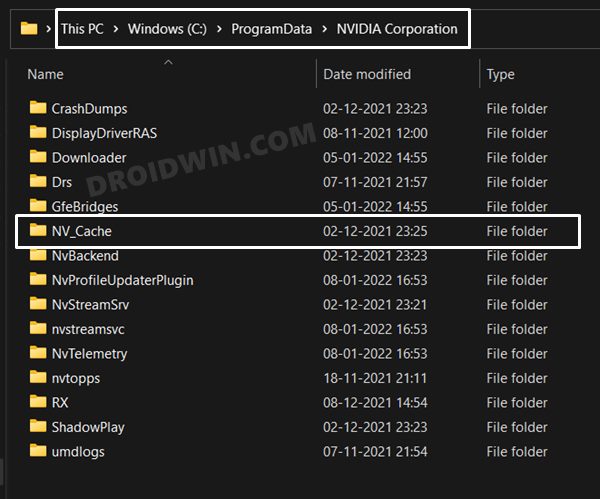
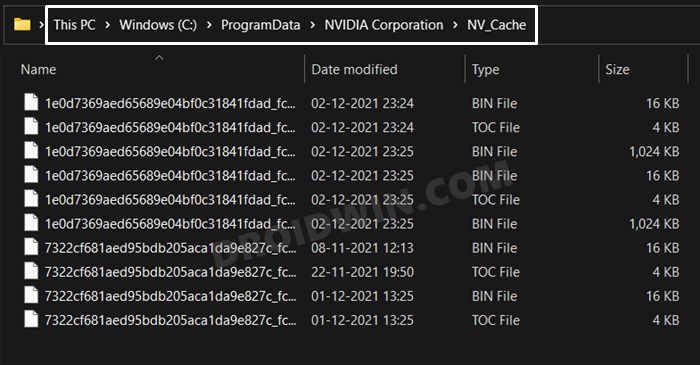
Delete Nvidia Cache
If a lot of temporary data gets accrued over the due course of time, then it might conflict with the proper functioning of the app. Therefore, you should consider deleting these cached files at regular intervals, and now could be the perfect time for that. So refer to the below instructions steps to try it out:
- Bring up the File Explorer via Windows+E shortcut keys.
- Then head over to the Nvidia’s cache folder using the below address:
C:\ProgramData\NVIDIA Corporation\NV_Cache

- If the NV_Cache folder is not present there, then check out this directory (replace UserName accordingly):
C:\Users\UserName\AppData\Local\NVIDIA Corporation
- Once you reach the NV_Cache folder, select all the files via Ctrl+A and hit Shift+Del to permanently delete them.

- Now check if you are able to open the Nvidia Control Panel on your Windows 11 PC or not.
Manually Start Nvidia Control Panel
Your next course of action should be to manually start the Nvidia Control Panel app using its executable file. Here’s how it could be done:
- Launch File Explorer via Windows+E shortcut and go to the below location:
C:\Program Files\NVIDIA Corporation\Control Panel Client
- There you should see the nvcplui.exe file, double click to open it.
- It shall open the Nvidia Control Panel app on your Windows 11 PC.
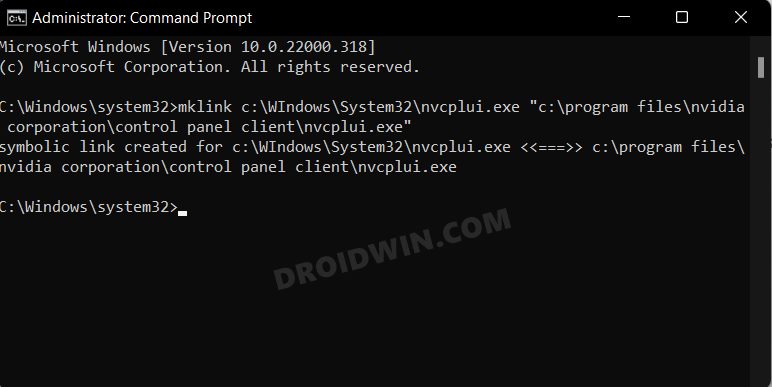
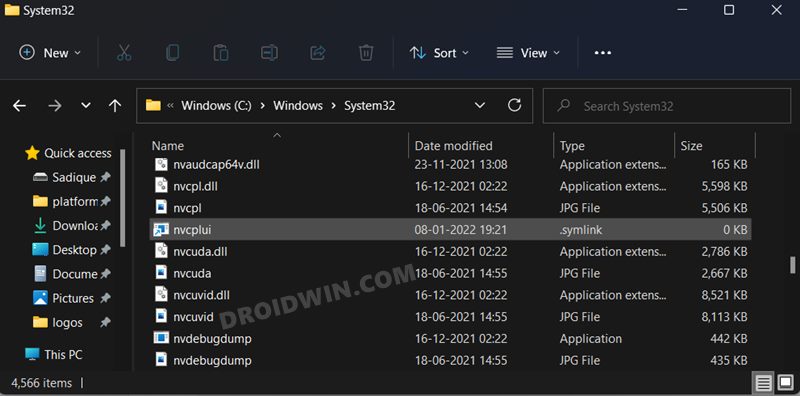
Create Symbolic Link for nvcplui.exe
If the nvcplui.exe is missing from the Control Panel Client directory or it isn’t able to invoke the Nvidia app, then you could also manually create a symbolic link for that file and then access Nvidia via that link. Here’s how:
- Head over to the Start Menu, search CMD, and launch it as an administrator.
- Then type in the below command and hit Enter:
mklink c:\WIndows\System32\nvcplui.exe "c:\program files\nvidia corporation\control panel client\nvcplui.exe"

- If you have installed Nvidia in any directory (other than the default one), then make sure to replace its address under double quotes accordingly.
- Once the command has been executed successfully, you will be notified that the symbolic link for nvcplui has been created. So let’s access it now by heading over to the below location:
C:\Windows\System32

- Now double click on the nvcplui.exe file and check it is able to open Nvidia Control Panel on your Windows 11 PC or not.
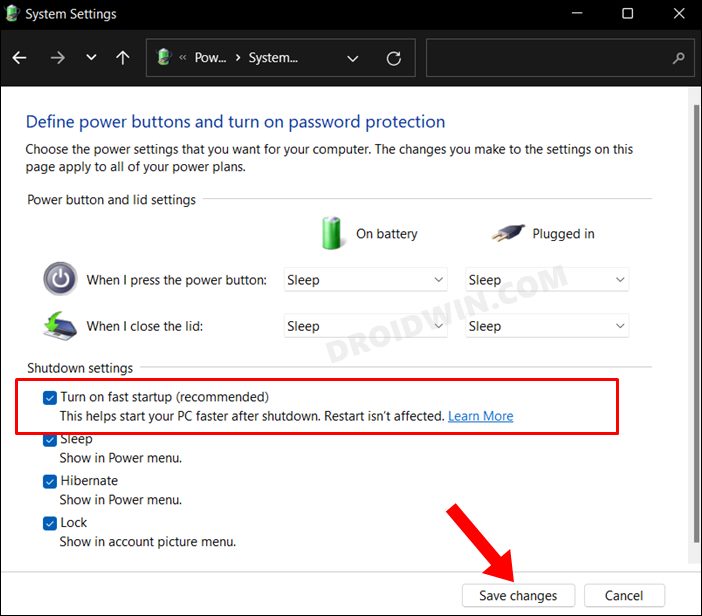
Disable Fast Startup
For some users, it was disabling the Fast Startup that did the trick. So let’s put this tweak to test and see if it gives out the desired results or not:
- Launch Control Panel and go to Hardware and Sound > Power Options.
- After that, click on Choose what the Power button does from the left menu bar.
- Then click on Change Settings that are currently unavailable.

- Now uncheck Turn on fast startup (recommended) and click on Save changes.
- Check if it fixes the Nvidia Control Panel not opening on your Windows 11 PC or not.
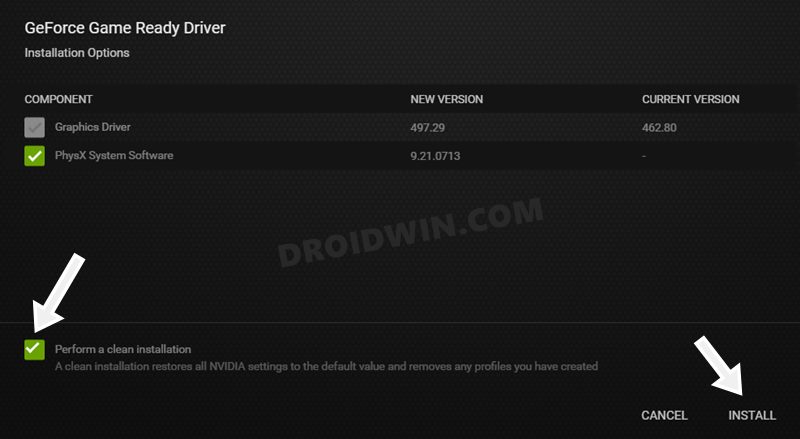
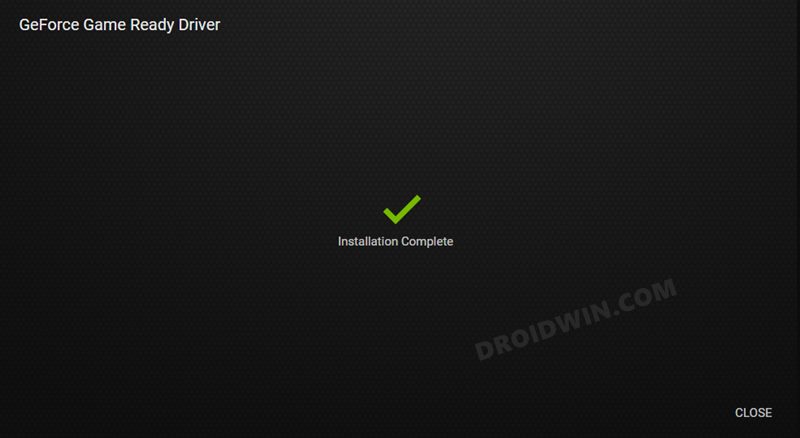
Install Nvidia GeForce Game Ready Driver
For me, it was performing a clean install of the Nvidia GeForce Game Ready Driver that worked out, so I decided to document it here as well. Doing so will restore all Nvidia settings to the factory default state and will remove all the profiles that you have created. For me, it was a small sacrifice to make and if you echo this thought as well, then let’s get started with the steps:
- To begin with, download the GeForce Game Ready Driver from the official site.
- Then launch the setup and checkmark the Perform a Clean Install option situated at the bottom.

- Hit the Install button and wait for the process to complete.

- Once done, check whether it fixes the Nvidia Control Panel not opening on your Windows 11 PC
Reinstall Nvidia Control Panel
If none of the aforementioned methods did the job, then you will have to opt for the nuclear route of uninstalling the currently installed build and then reinstalling its latest version. Here’s how it could be done:
- Head over to the Start Menu, search Nvidia Control Panel, and hit Uninstall.

- Again click Uninstall in the confirmation dialog box that appears.
- Wait for the process to complete. Once done, launch File Explorer via Windows+E shortcut.
- Then go to the following locations and delete the Nvidia Corporation/Nvidia folders, if you find any:
C:\Program Files\NVIDIA Corporation
C:\Program Files (x86)\NVIDIA Corporation
C:\NVIDIA

- Now that all the old traces of Nvidia has been removed, it is recommended to restart your PC.
- Then go to the official site and download the latest version of the Nvidia Control Panel.

- Launch the setup and proceed with the on-screen instructions to install it. That’s it, the underlying issue should now have been resolved.

With this, we round off the guide on how you could fix the Nvidia Control Panel not opening on your Windows 11 PC. We have listed different methods for the same. Do let us know in the comments section which one spelled out success for you. Likewise, all your queries are welcomed in the comments section below.
- Nvidia GeForce Experience not working in Windows 11 [Fixed]
- How to Delete and Disable Shader Cache in Windows 11
- How to Remove Ads on Nvidia Shield and other Android TVs
- Install a Third-Party Custom Launcher on Nvidia Shield TV
About Chief Editor

Sadique Hassan
administrator
A technical geek by birth, he always has a keen interest in the Android platform right since the birth of the HTC Dream. The open-source environment always seems to intrigue him with the plethora of options available at his fingertips. “MBA by profession, blogger by choice!”
Almost every Nvidia GPU user has faced a missing control panel including myself. Most PC users don’t need the control panel because the default configuration is more than enough to juice the machine for optimal performance. However, I’m a gamer, and I need access to the dashboard to tweak the settings for maximum output.
Why does the Nvidia control panel not showing in Windows 11?
I installed fresh graphics drivers downloaded from the official site and yet, Windows PC couldn’t find the control panel. Several users have reported that the Nvidia didn’t open when the icon was showing up in the search results.
- It’s an Nvidia package bug or glitch that is causing it.
- PC Threats.
- Something must have gone wrong during the installation.
- Windows latest build version
Nonetheless, I have to say that it’s not your fault if the control panel isn’t showing up after installing it correctly. I was able to solve it multiple times by re-installing the entire package completely.
Download Manual Drivers Package
The ultimate solution is to re-install Nvidia GPU drivers manually. You have to uninstall the driver’s Display Driver Uninstaller (DDU) that will remove all remnants from the PC. Let me show you how you uninstall the GPU drivers completely from the PC, and I have done this several times in the past.
ALSO CHECK: How To Update Drivers In Windows 11
Download Drivers:
- Open the browser.
- Go to Nvidia’s official site and download the package locally

- Extract the files in the local folder.

You are halfway to re-install the GPU drivers.
Remove GPU Drivers:
- Open the browser.
- Go to the DDU site and download it.

A. Extract the ZIP folder.
B. Go to Windows Safe Mode, and you can watch YouTube for visual instructions.
C. Launch DDU as administrator.
- Select GPU and Nvidia in the options.

- Click on “Clean & Restart” to finish the process.

Your PC will reboot, and Nvidia GPU drivers is removed from the machine.
Now, install GPU drivers as usual, and no further instructions are needed. Display Driver Uninstaller is my go-to GPU and Audio uninstaller because it won’t leave a single remnant behind and that eliminates shortcomings of Nvidia package manager.
Update Display Adapter Drivers Automatically
Older drivers cause a lot of problems in the newer Windows to build version. Microsoft is forcing the users to update the software frequently, and it includes the build version. I have installed Windows 2004 build version and it was a disaster, to be frank.
I encountered several problems with the FiveM application and other stability issues. The American GPU manufacturer releases newer software updates when they think it’s necessary to fix known problems. Use Windows Update, and keep the system video drivers up-to-date.
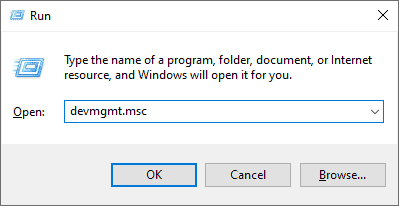
- Click on the “Windows” icon.
- Type “Run” and press the “Enter” key to open the application.
- Type “devmgmt.msc” in the run option then hit “OK”.
- Search and right-click on “Display adapters” then choose “Update driver”.
- A window will pop up on the screen and select “Search automatically for drivers”.
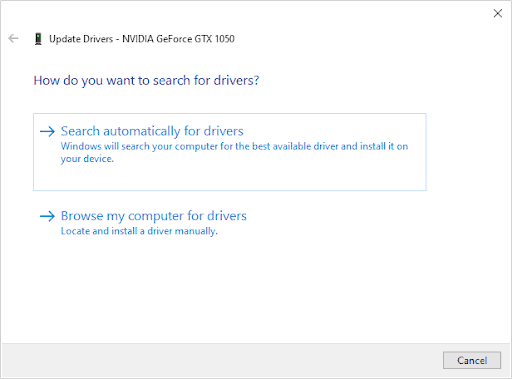
- Let Windows look for suitable drivers.
The scanning and installation process takes a few minutes, so be patient and do not close the window. Restart the Windows 11 PC after the updated graphics drivers are installed.
Restart your NVIDIA Services
Windows software is not perfect and has shortcomings that we have to live with it. Nonetheless, you can force restart Nvidia services and that may fix the GUI issue.
- Click on the “Windows” icon.
- Type “Run” and click to open the application.

- Type “services.msc” in the run option then click “OK”.

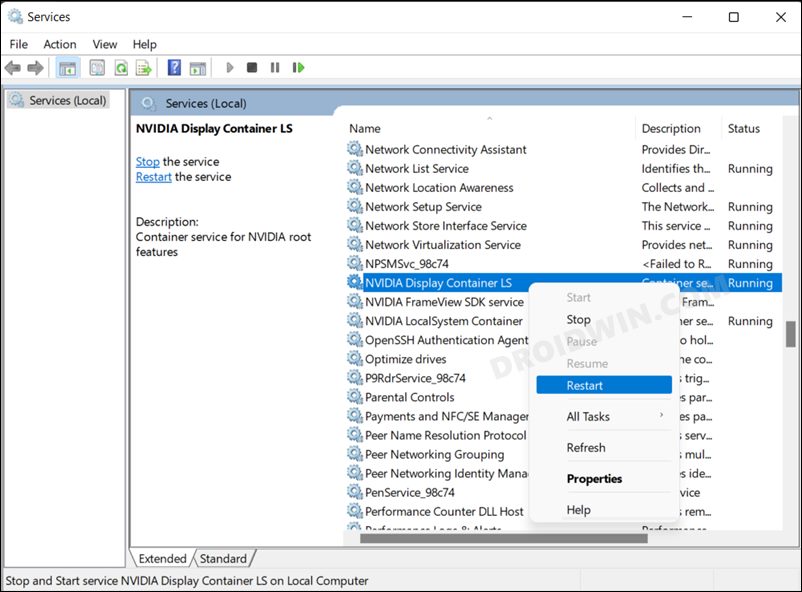
- Search for “NVIDIA Display Container LS” and right-click to view more options and then choose “Properties”.
- You have to perform three actions.

- A. Change the Startup type to “Automatic”.
- B. Click on “Stop” then click on “Start”.
Click on “OK” to save changes.
Reboot the Windows machine to force restart all services again and new changes will kick in while the PC is booting.
How do you access the “Refresh” button in Windows? Yes, that’s what Context Menu stands for.
- Click on the “Windows” icon.

- Search for “Control panel” and click on “Open”.

- Change the “View by Category” to “Large icons.”

- Click on the Nvidia control panel.
- Click on “Desktop” located at the top menu and then choose “Add Desktop Context Menu”.

Now, close the control panel and restart the machine to end the session. Turn on the machine and check if the Nvidia Control Panel appears in the Context Menu.
RELATED GUIDES:
- How to Fix WiFi Not Working in Windows 11
- How to Fix Nvidia GeForce Experience Error Code 0x0003
- Best Nvidia Tesla V100 Volta VS Nvidia Tesla T4 GPU
- How to Fix TranslucentTB Not Working on Windows 11
- How To Display Nintendo 3Ds On TV
Conclusion
I have fixed the missing Nvidia control panel by uninstalling the GPU drivers using DDU and re-installing it manually. Display Driver Uninstaller solved the problem multiple times, and it has worked for several others, who approached me with similar situations. Let us know which solution worked to resolve the control panel issue in the comment section below.
