![]()
Download Article
The complete guide to compiling C code with GCC on Linux and Windows
![]()
Download Article
- Using Linux
- Using Windows Subsystem for Linux
- Using MinGW for Windows
- Q&A
- Tips
|
|
|
|
Are you ready to turn your C code into an executable program? The GNU C compiler, also known as GCC, is a simple Linux-based C compiler that’s easy to use from the command line. If you’re using Linux, including Ubuntu, Fedora, and Linux Mint, you can install GCC from your distribution’s package manager. On Windows 10 and 11, you can use GCC in a Windows Subsystem for Linux (WSL) shell, or by installing an open source tool called MinGW. This wikiHow guide will teach you the easiest ways to compile a C program from source code using GCC.
Things You Should Know
- To make sure GCC is installed, run the command gcc —version.
- Type gcc source_file.c -o program_name and press Enter to compile your source code.
- Replace source_file with the name of your source code file, and program_name with the name you’d like to give your compiled program.
-

1
Install your distribution’s build tools. Most versions of Linux don’t come with GCC already installed. Fortunately, it’s easy to install GCC and other required tools (including make, G++, and general development libraries) for compiling software on any version of Linux:
-
Ubuntu, Debian, & Linux Mint:
- In a terminal window, type sudo apt update and press Enter.
- Type sudo apt install build-essential and press Enter.[1]
- Type gcc --version and press Enter to verify your installation.
-
CentOS, Fedora, and Red Hat:
- In a terminal window, type sudo dnf group install "Development Tools" and press Enter.[2]
- Type gcc --version and press Enter to verify your installation.
- In a terminal window, type sudo dnf group install "Development Tools" and press Enter.[2]
-
Ubuntu, Debian, & Linux Mint:
-
2
Go to the directory that contains your source code. Use the cd command to change to the directory in which you’ve saved the source code you want to compile.
- For example, if your source code is in a folder called Documents that’s inside your home directory, use cd ~/Documents.
Advertisement
-
3
Type gcc -o [executable_name] [source_file].c and press ↵ Enter. Replace “[source_file].c” with the name of your source code file, and “[executable_name]” with the name you’d like to give your compiled program.
- If you need to compile a program from multiple source files, use the syntax gcc -o [executable_name] sourcefile1.c sourcefile2.c sourcefile3.c.
- If you see errors and want to see more information about them, use gcc -Wall -o errorlog file1.c.[3]
Then, view the “errorlog” file in the current directory with cat errorlog. - To compile multiple programs at once with multiple source code files, use gcc -c file1.c file2.c file3.c.
-
4
Run your newly-compiled program. Type ./[executable_name] but replace “[executable_name]” with the name of your program.


Advertisement
-
1
Open a bash shell in Windows Subsystem for Linux. If you’re using Windows 10 or Windows 11 with Windows Subsystem for Linux installed, you can easily compile software with the GCC compiler. However, you’ll need to install GCC first, as it isn’t installed automatically.
- If you haven’t already enabled Windows Subsystem for Linux (WSL), you can install it with a single command from the command prompt or PowerShell. Start Command Prompt or PowerShell as an administrator, and then run this command to install Ubuntu: wsl --install.[4]
- If you see the WSL help text when running the command, you may have already enabled WSL. Instead, run the command wsl --list –online to see a list of Linux distributions, then use wsl --install -d <DistroName> (e.g., Ubuntu) to install Ubuntu.
- Once installed, you can open an Ubuntu bash shell by typing ubuntu into the Windows Search bar and clicking Ubuntu in the search results.[5]
- If you haven’t already enabled Windows Subsystem for Linux (WSL), you can install it with a single command from the command prompt or PowerShell. Start Command Prompt or PowerShell as an administrator, and then run this command to install Ubuntu: wsl --install.[4]
-
2
Install the build tools for Ubuntu. These tools include the GCC compiler, as well as all of the libraries you’ll need to compile and debug C and C++ code.
- Type sudo apt update and press Enter.
- Type sudo apt-get install build-essential gdb and press Enter.[6]
-
3
Go to the directory that contains your source code. Use the cd commanad to change to the directory in which you’ve saved the source code you want to compile.
-
4
Type gcc -o [executable_name] [source_file].c and press ↵ Enter. Replace “[source_file].c” with the name of your source code file, and “[executable_name]” with the name you’d like to give your compiled program.
- If you need to compile a program from multiple source files, use the syntax gcc -o [executable_name] sourcefile1.c sourcefile2.c sourcefile3.c.
- If you see errors and want to see more information about them, use gcc -Wall -o errorlog file1.c.[7]
Then, view the “errorlog” file in the current directory with cat errorlog. - To compile multiple programs at once with multiple source code files, use gcc -c file1.c file2.c file3.c.
-
5
Run your newly-compiled program. Type ./[executable_name] but replace “[executable_name]” with the name of your program.


Advertisement
-
1
Download Minimalist GNU for Windows (MinGW). This is an easy-to-install version of GCC for Windows. You can download the installer from https://osdn.net/projects/mingw.[8]
- To get the latest version of the installer, click the mingw-get-setup.exe link.
- If the download doesn’t begin automatically, click Save or Download when prompted.
- MinGW can only compile 32-bit versions of software. However, all 32-bit software compiled with MinGW will execute properly on a 64-bit system.[9]
- If you need to compile 64-bit software, try MinGW-w64, a port of MinGW. You can download it from https://www.mingw-w64.org.[10]
Alternatively, you can use Windows Subsystem for Linux.
-
2
Install MinGW. Once you’ve downloaded the installer, double-click it to install MinGW.
-
- MinGW recommends using the default installation folder (C:\MinGW). If you must change the folder, don’t use a folder with spaces in the name (e.g. “Program Files”).
-
-
3
Select Basic Setup to view the basic C compiling tools. If you want more options, you can select All Packages to see all available libraries and build tools.
-
4
Right-click each package and click Mark for Installation. The Basic Setup has about 7 packages listed in the box at the top. Right-click each one of them (or just the ones you want) and click Mark for Installation. This adds an icon with an arrow next to each one and marks it for installation.
- At the very least, you will want to install MinGW32-base and MinGW32-gcc-g++. If you need to compile code written in objective C, you should also mark MinGW32-gcc-objc for installation.
-
5
Install the selected packages. It may take your computer several minutes to install all packages. Use the following steps to install the packages that are marked for installation.
- Click the Installation menu in the upper-left corner.
- Click Apply Changes.
- Click Apply.
- Click Close once the installation is done.
-
6
Add the path to MinGW to system environment variables. Use the following steps to add the path to MinGW to system environment variables:
- Type environment in the search bar next to the Start menu.
- Click Edit the system environment variables in the search results.
- Click Environment Variables…
- Select the Path variable in the «System variables» section.
- Click Edit beneath the top box (under “User Variables”)
- Click New.
- Type C:\MinGW\bin in the new space. Note that if you installed MinGW to a different directory, enter C:\path-to-that-directory\bin.
- Click OK, and then OK again. Click the one remaining OK button to close the window.
-
7
Open the command prompt as an administrator. You must be signed in to a Windows account with administrative privileges to open the Command Prompt as an administrator. Use the following steps to open the Command Prompt as an administrator:
- Type cmd in the search bar next to the Start menu.
- Right-click Command Prompt in the search results, then select Run as Administrator.
- Click Yes to allow changes.
-
8
Go to the folder where your source code is saved. For example, if your source code file called helloworld.c is located in C:\Source\Programs, type cd C:\Source\Programs and press Enter.
-
9
Type gcc c –o [program_name].exe [program_name].c and press ↵ Enter. Replace “[program_name]” with the name of your source code and application. Once the program is compiled, you’ll return to the command prompt without errors.
- Any coding errors that appear must be corrected before the program will compile.
-
10
Type the name of your program to run it. If it’s called hello_world.exe, type that in the command prompt and press Enter to start your program.
- If you receive an «Access is denied» or «Permission denied» error message when compiling a program or running the output executable file, check the folder permissions and make sure you have full read/write access to the folder that contains the source code. If that doesn’t work, try temporarily disabling your virus software.[11]
- If you receive an «Access is denied» or «Permission denied» error message when compiling a program or running the output executable file, check the folder permissions and make sure you have full read/write access to the folder that contains the source code. If that doesn’t work, try temporarily disabling your virus software.[11]


Advertisement
Add New Question
-
Question
What do I do if there are two tables in the environmental variables window? In which table and directory should I add an environmental variable?

Use the upper table entitled «User Variables for» and select the «Path» directory.
-
Question
What is a good compiler for C language?
The MinGW GCC compiler will work well.
-
Question
Is the extension .exe necessary in a compiling program?
Theoretically, as long as a file contains the necessary binary machine code, it could be run by a processor. One example is how on Windows, a screensaver is simply a program (just like a .exe) but with the .scr extension. However, as far as I know, most modern operating systems will not attempt to execute a file if it does not identify the file type as being executable, so you would need to somehow trick the operating system into actually starting a new process using the code from the file.
See more answers
Ask a Question
200 characters left
Include your email address to get a message when this question is answered.
Submit
Advertisement
-
Building your code with a -g flag will produce debugging information which the corresponding debugger program, GDB, can use to make debugging work better.
-
Makefiles can be created to make it easier to compile large programs.
-
If you use optimizations heavily, be aware that optimization for speed may come with a trade off in size and sometimes accuracy, and vice versa.
Show More Tips
Thanks for submitting a tip for review!
Advertisement
About This Article
Article SummaryX
1. Open the Terminal in Linux.
2. Type «sudo apt update» and press Enter.
3. Type «sudo apt install build-essential» and press Enter to install GCC and other packages.
4. Type «gcc —version» to verify the GCC installation.
5. Use the «CD» command to navigate to the folder with your source code.
6. Type «gcc [program_name].c –o [executable_name]» to compile the program.
7. Type «»./[executable_name]» to run the newly compiled program.
Did this summary help you?
Thanks to all authors for creating a page that has been read 1,033,299 times.
Is this article up to date?
Последнее обновление: 01.01.2023
Установка компилятора
Рассмотрим создание первой простейшей программы на языке Си с помощью компилятора GCC, который на сегодняшний день является одим из
наиболее популярных компиляторов для Cи и который доступен для разных платформ. Более подобному информацию о GCC можно получить на официальном сайте проекта https://gcc.gnu.org/.
Набор компиляторов GCC распространяется в различных версиях. Для Windows одной из наиболее популярных версий является пакет средств для разработки от
некоммерческого проекта MSYS2. Следует отметить, что для MSYS2 требуется 64-битная версия Windows 7 и выше (то есть Vista, XP и более ранние версии не подходят)
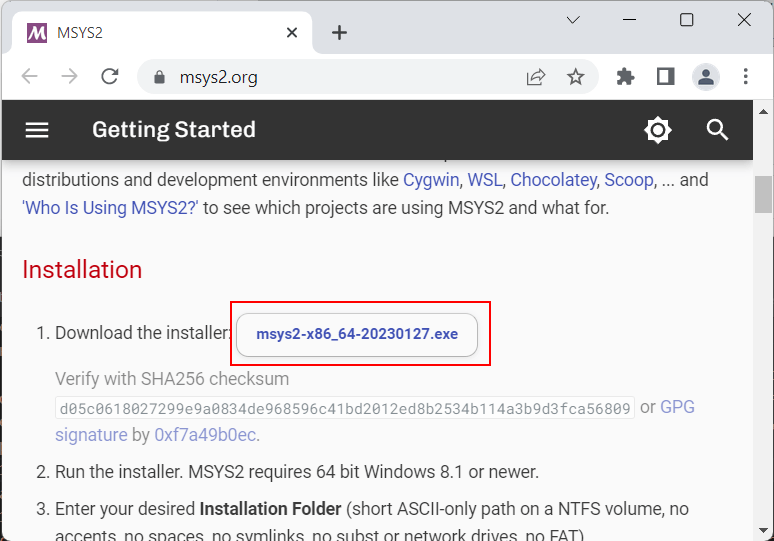
Итак, загрузим программу установки MSYS2 с официального сайта MSYS2:
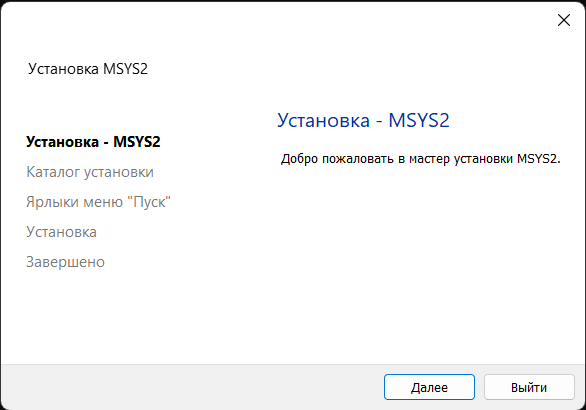
После загрузки запустим программу установки:
На первом шаге установки будет предложено установить каталог для установки. По умолчанию это каталог C:\msys64:
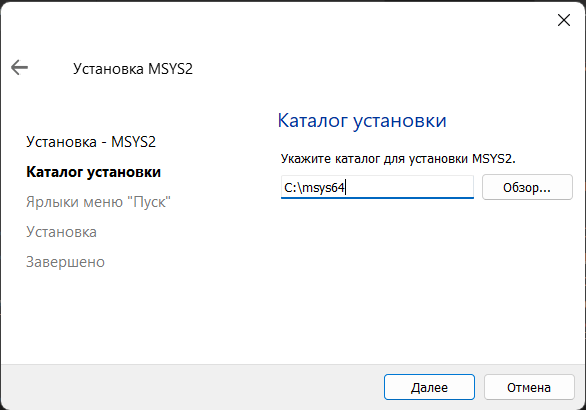
Оставим каталог установки по умолчанию (при желании можно изменить). На следующем шаге устанавливаются настройки для ярлыка для меню Пуск, и затем собственно будет произведена установка.
После завершения установки нам отобразить финальное окно, в котором нажмем на кнопку Завершить
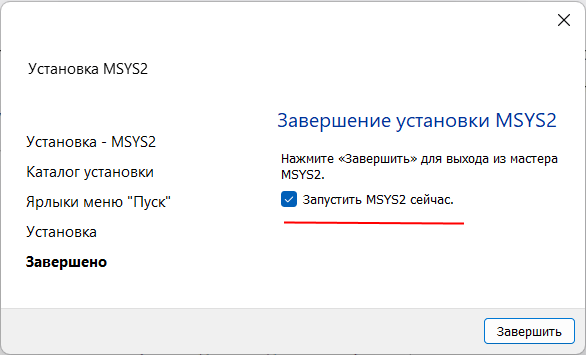
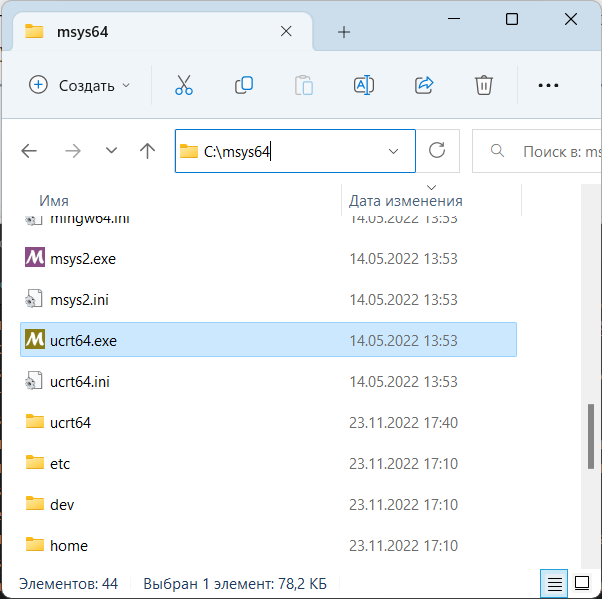
После завершения установки запустится консольное приложение MSYS2.exe. Если по каким-то причинам оно не запустилось,
то в папке установки C:/msys64 надо найти файл usrt_64.exe:
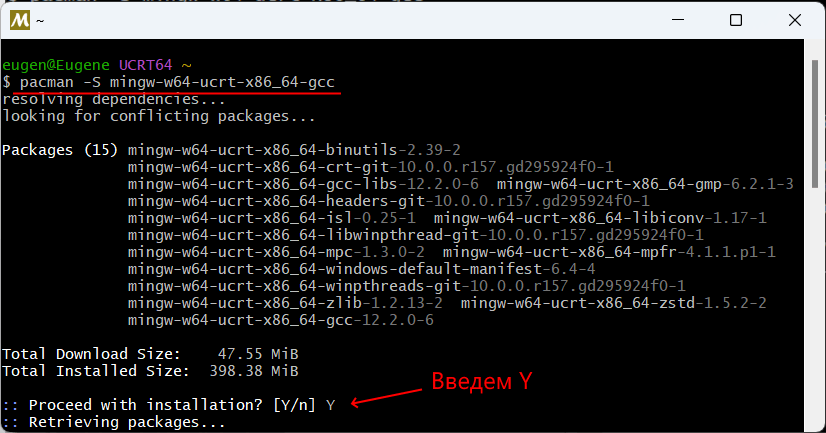
Теперь нам надо установить собственно набор компиляторов GCC. Для этого введем в этом приложении следующую команду:
pacman -S mingw-w64-ucrt-x86_64-gcc
Для управления пакетами MSYS2 использует пакетный менеджер Packman. И данная команда говорит пакетному менелжеру packman установить пакет mingw-w64-ucrt-x86_64-gcc,
который представляет набор компиляторов GCC (название устанавливаемого пакета указывается после параметра -S).
и после завершения установки мы можем приступать к программированию на языке Си. Если мы откроем каталог установки и зайдем в нем в папку C:\msys64\ucrt64\bin,
то найдем там все необходимые файлы компиляторов:
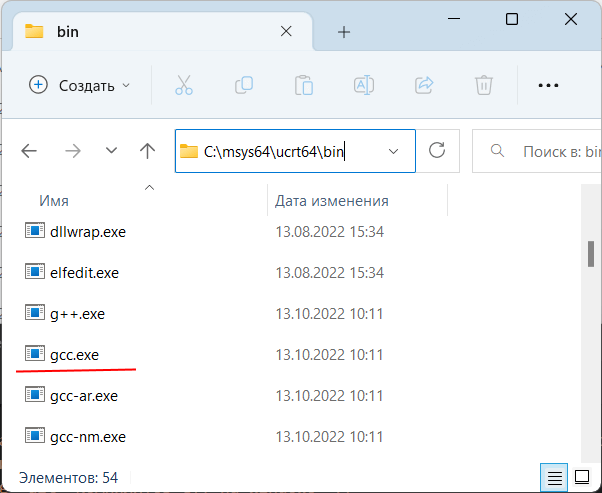
В частности, файл gcc.exe как раз и будет представлять компилятор для языка Си.
Далее для упрощения запуска компилятора мы можем добавить путь к нему в Переменные среды. Для этого можно в окне поиска в Windows ввести «изменение переменных среды текущего пользователя»:
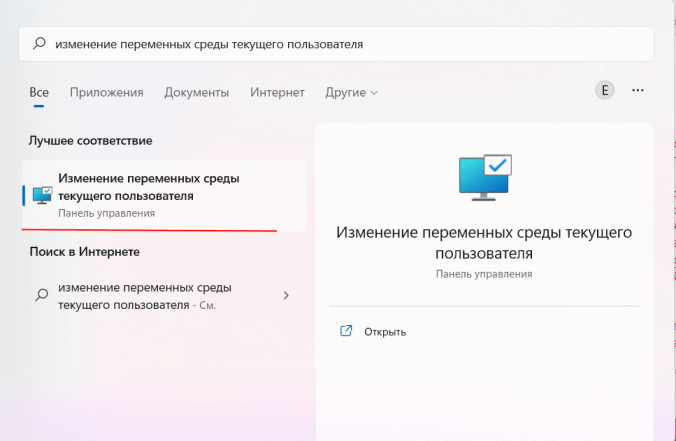
Нам откроется окно Переменныех среды:
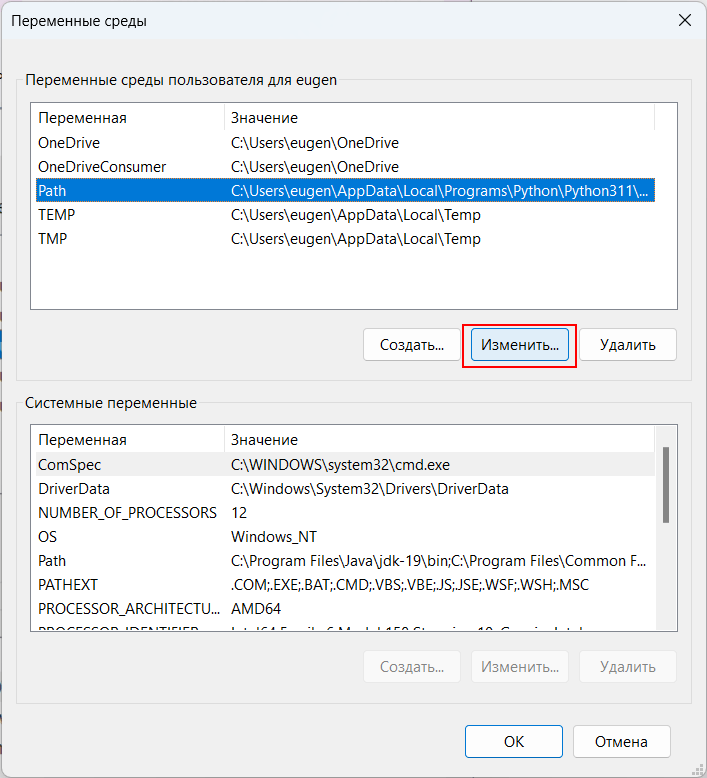
И добавим путь к компилятору C:\msys64\ucrt64\bin:

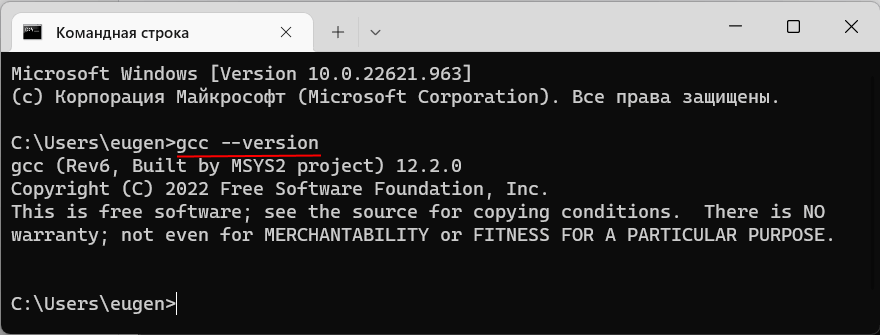
Чтобы убедиться, что набор компиляторов GCC успешно установлен, введем следующую команду:
В этом случае нам должна отобразиться версия компиляторов
Создание первой программы
Итак, компилятор установлен, и теперь мы можем написать первую программу. Для этого потребуется любой текстовый редактор для набора исходного кода.
Можно взять распространенный редактор Visual Studio Code или даже обычный встроенный Блокнот.
Итак, создадим на жестком диске папку для исходных файлов. А в этой папке создадим новый файл, который назовем hello.c.
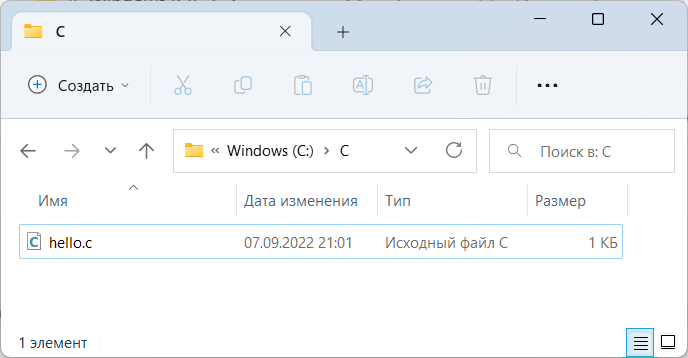
В моем случае файл hello.c находится в папке C:\c.
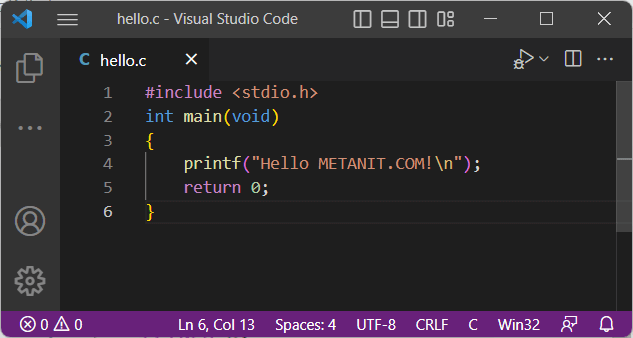
Теперь определим в файле hello.c простейший код, который будет выводить строку на консоль:
#include <stdio.h>			// подключаем заголовочный файл stdio.h
int main(void)						// определяем функцию main
{									// начало функции
	printf("Hello METANIT.COM!\n");	// выводим строку на консоль
	return 0;						// выходим из функции
}									// конец функции
Для вывода строки на консоль необходимо подключить нужный функционал. Для этого в начале файла идет строка
#include <stdio.h>
Директива include подключает заголовочный файл stdio.h, который содержит определение функции printf, которая нужна для вывода строки на консоль.
Далее идет определение функции int main(void). Функция main должна присутствовать в любой программе на Си, с нее собственно и начинается
выполнение приложения.
Ключевое слово int в определении функции int main(void) говорит о том, что функция возвращает целое число.
А слово void в скобках указывает, что функция не принимает параметров.
Тело функции main заключено в фигурные скобки {}. В теле функции происходит вывод строки на консоль с помощью функции printf, в которую передается выводимая строка «Hello METANIT.COM!».
В конце осуществляем выход из функции с помощью оператора return. Так как функция должна возвращать целое число, то после return указывается число 0.
Ноль используется в качестве индикатора успешного завершения программы.
После каждого действия в функции ставятся точка с запятой.
Теперь скомпилируем этот файл. Для этого откроем командную строку Windows и вначале с помощью команды cd перейдем к папке с исходным файлом:
Чтобы скомпилировать исходный код, необходимо компилятору gcc передать в качестве параметра файл hello.c:
После этого будет скомпилирован исполняемый файл, который в Windows по умолчанию называется a.exe. И мы можем обратиться к этому файлу
и в этом случае консоль выведет строку «Hello METANIT.COM!», собственно как и прописано в коде.
Стоит отметить, что мы можем переопределить имя компилируемого файла с помощью флага -o и передав ему имя файла, в который будет компилироваться программа.
Например:
В этом случае программа будет компилироваться в файл hello.exe, который мы также запустить.
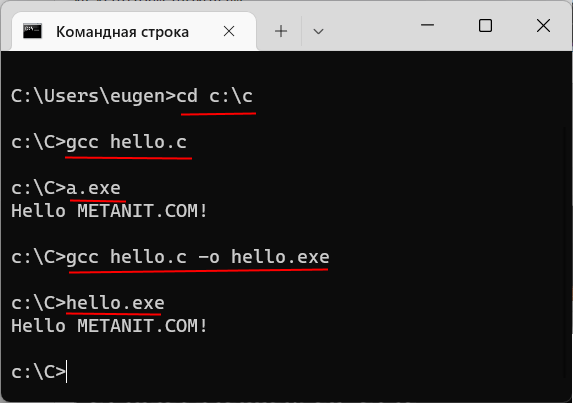
Чтобы не приходилось вводить две команды: одну для компиляции программы и другую для ее запуска, мы можем объединить команды:
gcc hello.c -o hello.exe & hello
Эта команда сначала компилирует код в файл hello.exe, а потом сразу запускает его.
Для того, чтобы писать программы на C/C++ обычно достаточно установить какую-нибудь интерактивную среду разработки (IDE), например, Visual Studio или Eclipse, однако иногда (обычно в целях обучения студентов) требуется создавать программы в обыкновенном текстовом редакторе и компилировать приложение, используя консоль и компилятор gcc. В Unix системах он обычно установлен прямо «из коробки», а вот на Windows системах такой роскоши не наблюдается. Более того, у многих пользователей возникает множество проблем при установке компилятора. Поэтому нами было принято решение написать данную статью, чтобы помочь всем тем, кому пришлось или приходится мучаться с установкой этого компилятора на Windows.
Кстати, если вдруг на вашей Unix системе не установлен GCC, то поставить его можно командой sudo apt install gcc, введя свой пароль и согласившись на установку.
0. Прежде чем поставить компилятор GCC
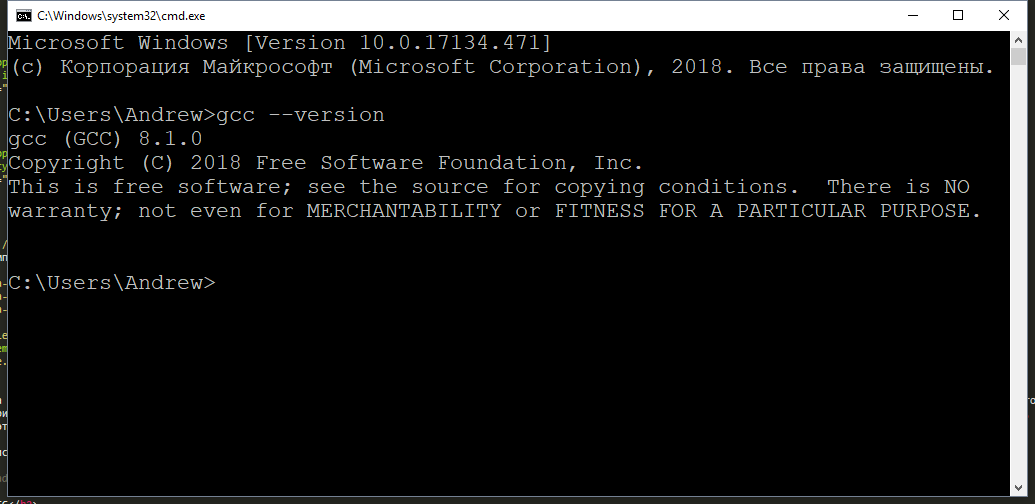
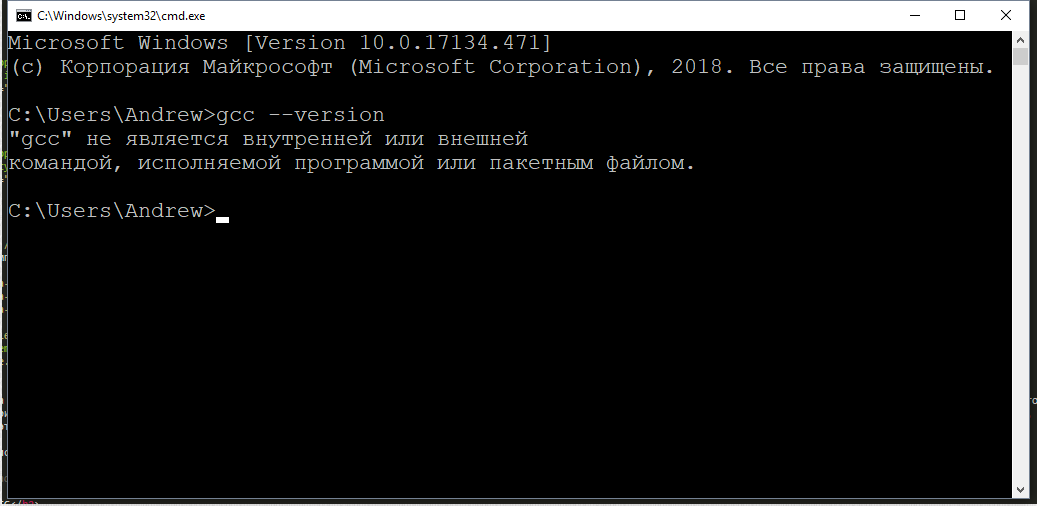
Перед тем как приступить к установке этого компилятора на ваш компьютер, убедитесь в том, что GCC ещё не установлен на нём. Для этого откройте консоль (нажмите Win + R, введите в появившемся окне cmd и нажмите клавишу Enter) и введите следующую команду: gcc --version и нажмите Enter. Если компилятор уже установлен, то выполненная команда выдаст примерно следующую информацию:
gcc (GCC) 8.1.0
Copyright (C) 2018 Free Software Foundation, Inc.
This is free software; see the source for copying conditions.  There is NO
warranty; not even for MERCHANTABILITY or FITNESS FOR A PARTICULAR PURPOSE.
Если в окне консоли появилось сообщение с версией компилятора и другая информация о GCC (второй скриншот), значит компилятор уже установлен и больше дополнительно ничего делать не нужно. А вот если вывод командной строки такой:
"gcc" не является внутренней или внешней
командой, исполняемой программой или пакетным файлом
— значит GCC ещё не установлен в системе, поэтому двигаемся дальше.

Появившееся окно консоли
GCC уже установлен
GCC не установлен
1. Скачиваем установщик компилятора
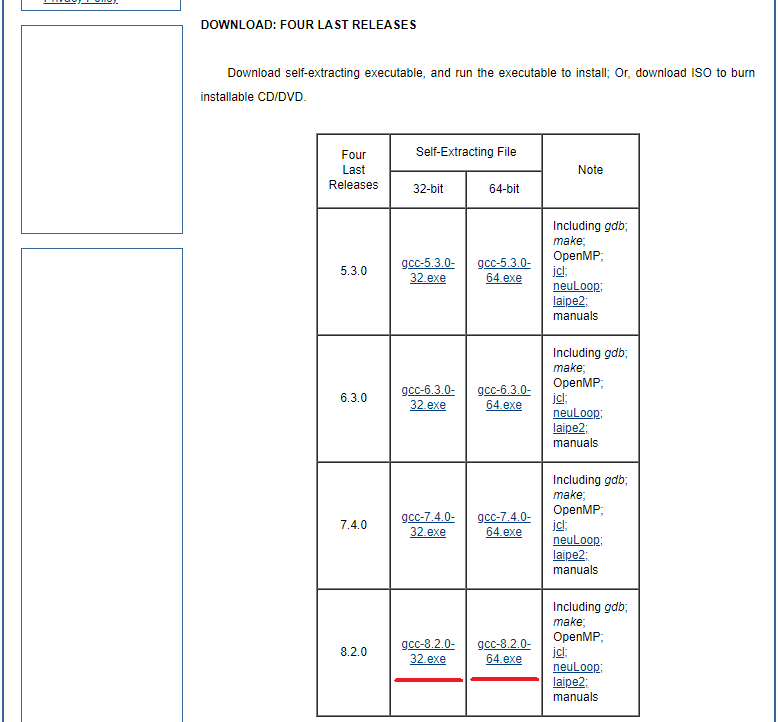
Чтобы поставить GCC на операционную систему Windows, необходимо скачать установочный файл для него. Сделать это можно здесь: equation.com/servlet/equation.cmd?fa=fortran. Найдите в таблице версию компилятора, которая вам больше нравится (мы рекомендуем скачивать самую последнюю, на текущий момент — это версия 8.2.0) и скачайте установщик для вашей системы (32 или 64 бит).
Выбор установочного файла
2. Установка GCC
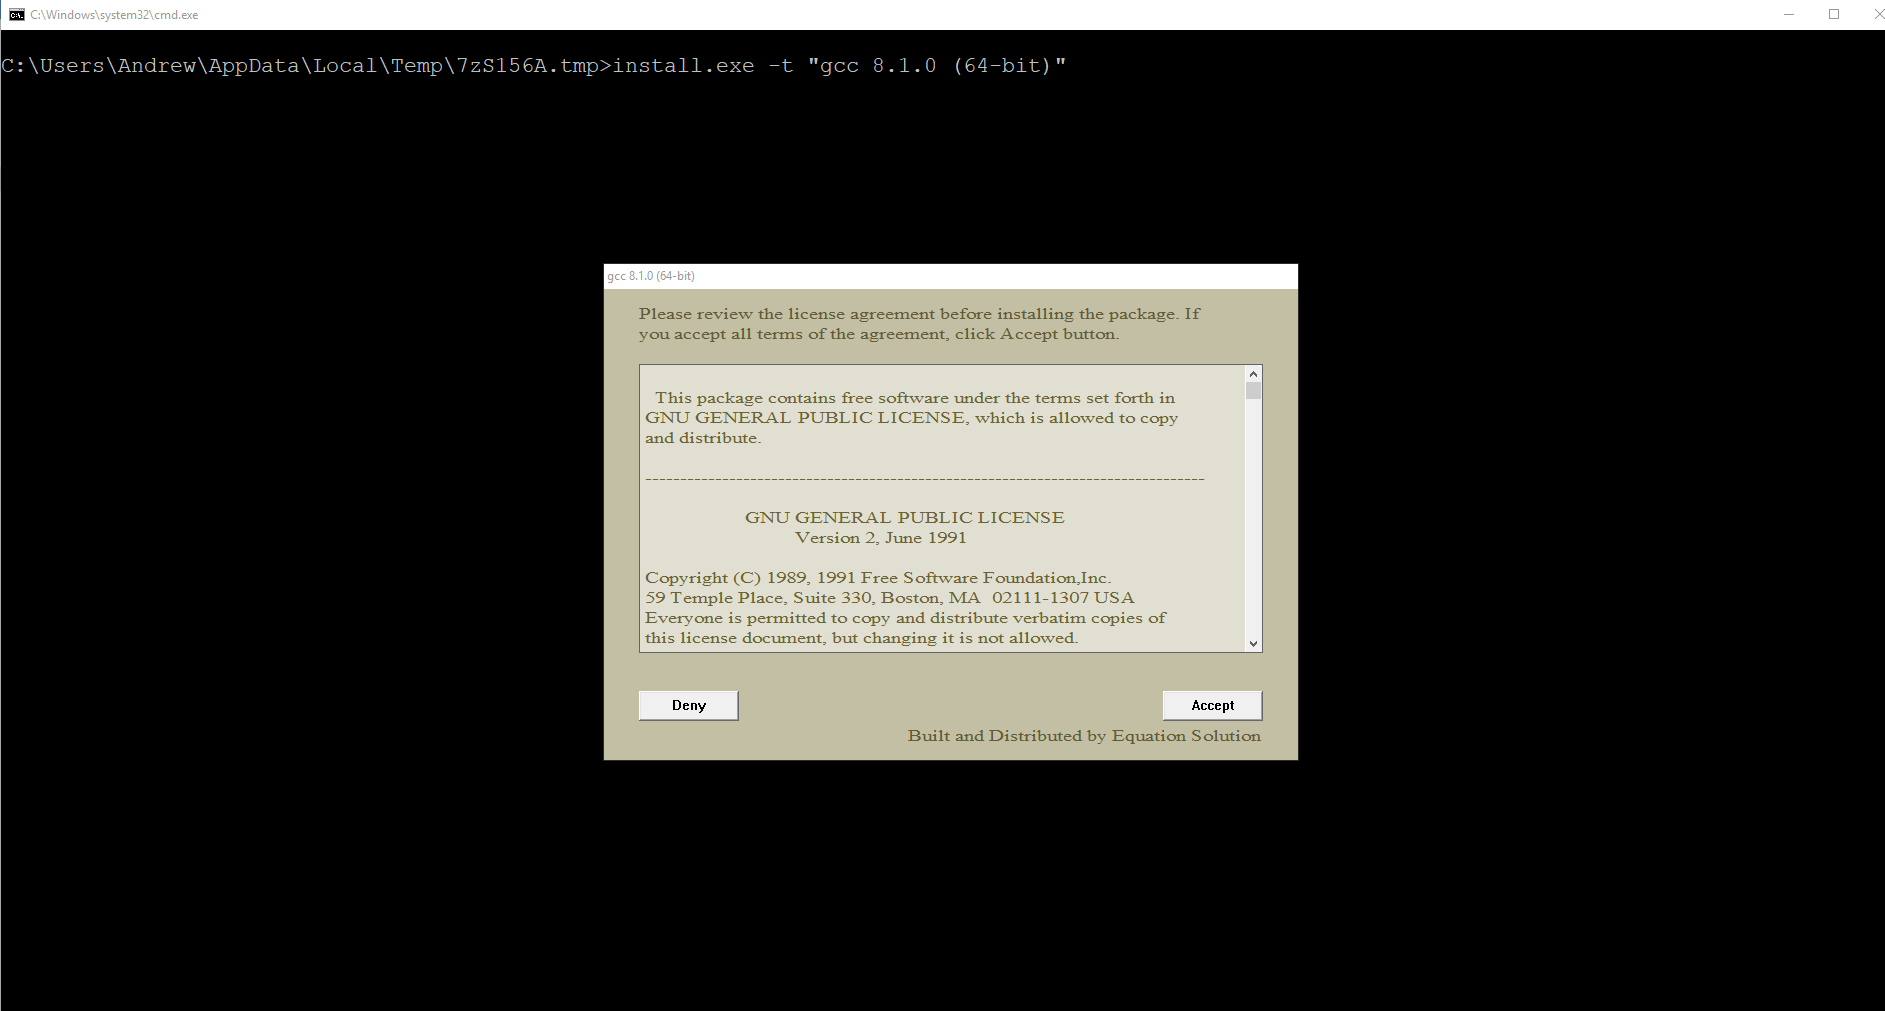
После того, как файл был скачан, откройте в проводнике папку, в которую был скачан установщик и запустите его, кликнув по файлу дважды левой кнопкой мыши. Появится окно, требующее подтверждения действия. В нём нужно выбрать да (иначе ничего ставиться не будет).
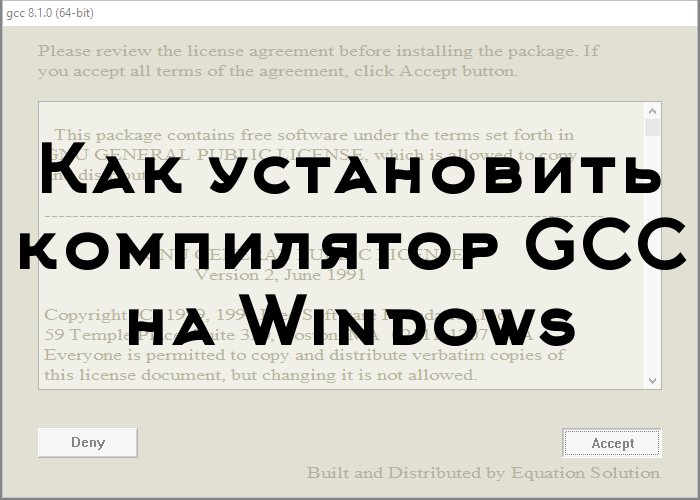
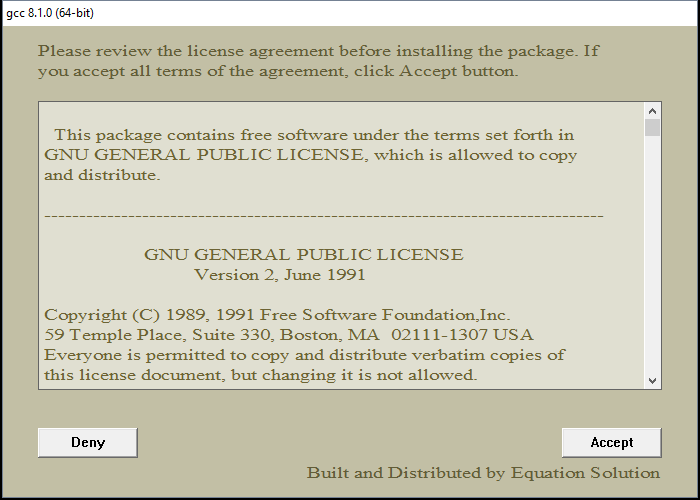
Установщик начнёт работу и отобразит окно с консолью, а также окно с бежевым фоном, в котором попросит прочесть и принять (или отклонить) лицензионное соглашение. Нажимаем Accept.
Открывшееся окно с установщиком
Принимаем лицензионное соглашение
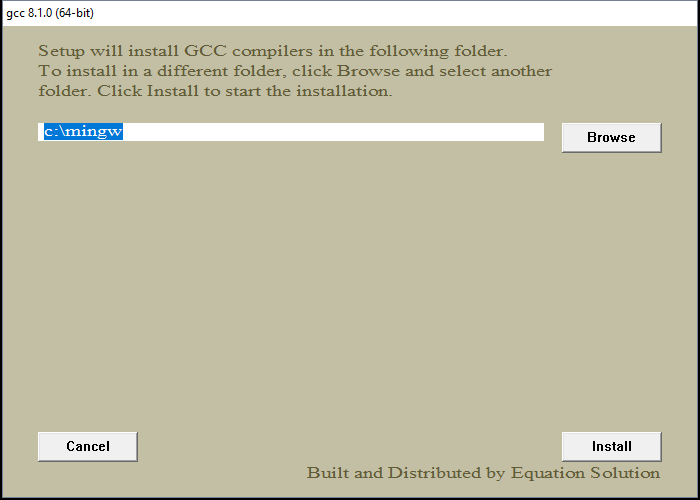
После этого установщик попросит выбрать путь для установки, предложив по умолчанию путь C:\mingw. Если вам категорически не нравится этот путь — измените его на более подходящий на ваш взгляд, в противном же случае просто нажмите Install.
Выбор папки для установки
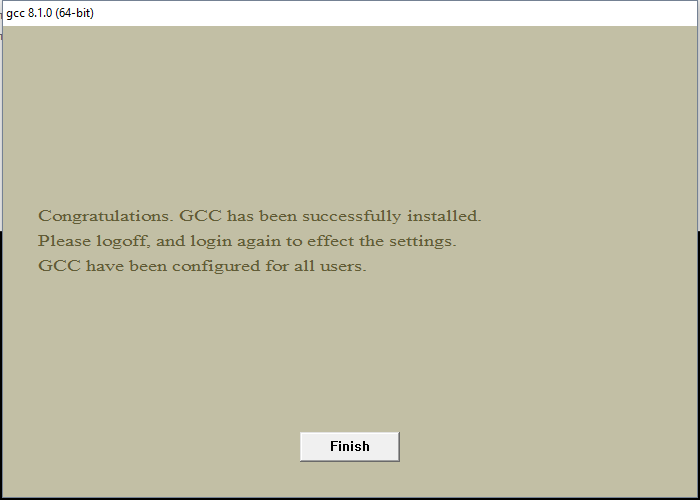
Теперь остаётся только дождаться окончания распаковки архивов и установки их на компьютер. Как только все файлы будут установлены, инсталятор сообщит об этом, после чего нужно будет нажать на кнопку Finish.
Распаковка файлов и установка
Окончание установки
3. Проверка установки
По завершении работы установщика перезагрузите компьютер и вновь откройте окно командной строки, введите команду gcc --version и нажмите Enter. На этот раз ответ от этой команды должен будет совпадать со вторым скриншотом из пункта 0. Если это не так, то скорее всего работа установщика была некорректно или преждевременно завершена, так что просто начните установку заново.
GCC установлен
Поздравляем! Теперь на вашем компьютере установлен компилятор GCC и вы можете писать программы на языках C и C++, а компилировать их через командную строку!
4. Бонус. Компиляция программ с помощью GCC
Теперь, когда у вас установлен компилятор GCC, вы можете создавать программы на C/C++, используя только текстовый редактор и консоль. Для этого создайте новый файл и назовите его как угодно (например, hello_world). Задайте ему расширение .c вместо .txt. Напишите (или скопируйте) текст программы на С в этот файл. Откройте командную строку (Win + R, cmd) и введите следующую команду gcc hello_world.c и нажмите Enter. Если код не содержит ошибок, то результатом команды будет пустота. В противном же случае вы увидите все ошибки, который нашёл компилятор в программе с указанием места этой ошибки. При этом в проводнике появится файл a.out.exe, который будет являться исполняемым файлом для написанной программы. Чтобы запустить его введите в консоли a.out (для Unix-систем нужно писать ./a.out) и нажмите Enter.
Что ещё за a.out? Непонятно!
По умолчанию при компиляции программ GCC в качестве результата создаём исполняемый файл с именем a.out (если такой уже есть, то b.out и т.д.). Это может быть не очень удобно, если у вас в папке лежит сразу много программ, которые нужно скомпилировать и затем запустить. Неудобно хотя бы тем, что разобраться, что такое a.out, а что такое b.out и c.out может быть непросто. Именно поэтому мы рекомендуем компилировать программы с явным указанием имени выходного файла. делается это так: gcc имя_файла.c -o имя_программы.
В результате выполнения такой программы вместо a.out будет создаваться файл с именем, заданным в имя_программы. Например, если для файла hello_world.c мы хотим получить программу hello, то компилировать нужно такой командой: gcc hello_world.c -o hello.
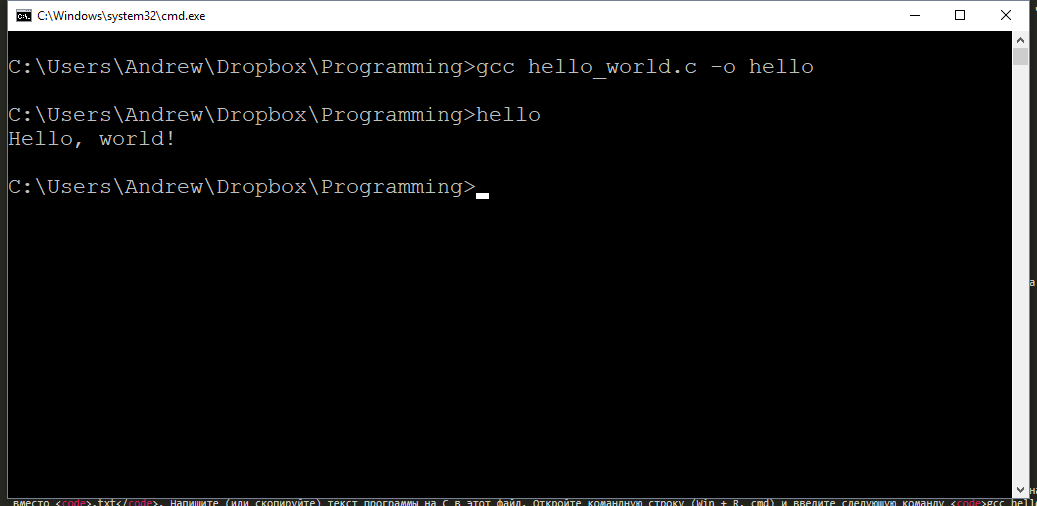
Результат компиляции и запуска программы
Используя понятные имена выходных программ (исполняемых файлов), вы гарантируете себе простоту работы и сокращение времени на разбирательство спустя долгое время.
Возможно, также будет интересно: как установить Sublime Text для работы с C/C++.

Программист, сооснователь programforyou.ru, в постоянном поиске новых задач и алгоритмов
Языки программирования: Python, C, C++, Pascal, C#, Javascript
Выпускник МГУ им. М.В. Ломоносова
2 Answers
Please read Compile Programs with MinGW — A Guide for New Users.
To make gcc produce assembler code, use -S option:
   -S  Stop after the stage of compilation proper; do not assemble. The output is in the form of an assembler code file for each non-assembler input file specified.

       By default, the assembler file name for a source file is made by replacing the suffix .c, .i, etc., with .s.

       Input files that don't require compilation are ignored.
Good luck!
answered Jun 8, 2011 at 15:46
1
-
Thanks, needed to set PATH for MinGW\bin in enviroment variables before commands would work.
Jun 8, 2011 at 16:37
if you have codeblocks installed with mingw as the gcc compiler then follow these steps
- Right click on my computer -> go to properties -> advance system settings
- Then make an environment variable named PATH and paste the complete url like program file (x86)/codeblocks/mingw/bin.
- now open cmd
- go to the directory where your program is saved.
- type gcc program_name.c -o program_name.exe to compile the program.
- run the program by typing program_name
![]()
Toby Allen
11k11 gold badges74 silver badges124 bronze badges
answered Nov 4, 2015 at 18:42
![]()
We’re Earthly. We make building software simpler and therefore faster using containerization. This article covers GNU’s gcc compiler. If you’re interested in an approach to builds that allows you to keep gcc and build everywhere then check us out.
C++ is one of the most dominant programming languages. Although there are many compilers available, GCC still ranks as one of the most popular choices for C++. GCC is part of the GNU toolchain, which comes with utilities like GNU make, GNU bison, and GNU AutoTools.
What Is GCC?
GNU Compiler Collection, also known as GCC, started as a C compiler, created by Richard Stallman in 1984 as a part of his GNU project. GCC now supports many languages, including C++, Objective C, Java, Fortran, and Go. The latest version as of writing this article is GCC 11.1, released April 27, 2021.
The C++ compiler of GCC is known as g++. The g++ utility supports almost all mainstream C++ standards, including c++98, c++03, c++11, c++14, c++17, and experimentally c++20 and c++23. It also provides some GNU extensions to the standard to enable more useful features. You can check out the detailed standard support on gnu.org.
In this tutorial, you will learn how to compile C++ programs with the g++ compiler provided by GCC, and how to use Make to automate the compilation process.
Installing GCC
I’ll touch briefly on installing for Linux, Mac, and Windows.
Linux
GCC is one of the most common tools in the unix world, and is available in every single Linux distribution. Here, I show you how to install the GNU toolchain for some famous distributions.
For Ubuntu, you need to run the following command:
sudo apt update && sudo apt install build-essentialsFor Arch Linux, run:
sudo pacman -S base-develFor Fedora, run:
dnf groupinstall 'Development Tools'For other distributions, consult the official wiki of your distribution.
Mac
To install GCC on Mac, run brew install gcc which will place g++-11 in /usr/local/bin. Then create an alias to g++: alias g++='g++-11'.
Windows
To use GCC in Windows, use WSL2. You can install GCC inside the Windows Subsystem for Linux (WSL) and use it from there.
Compiling With G++
Let’s take a look at how the compilation with G++ works. You will compile a simple Hello, World! program. Save the following file as hello.cpp:
#include<iostream>

int main() {
    std::cout << "Hello, World!" << std::endl;

    return 0;
}
To compile this file, simply pass this file to g++:
By default, g++ will create an executable file named a.out. You can change the output file name by passing the name to the -o flag.
This will compile hello.cpp to an executable named hello. You can run the executable and see the output:
The Compilation Process
Although the compilation can be done with one command, the compilation process can be divided into four distinct phases:
- Preprocessing
- Compilation
- Assembly
- Linking
In the preprocessing part, the GNU preprocessor (cpp) is invoked, which copies the header files included via #include, and expands all macros defined with #define. You can perform this step manually by running the cpp command.
The file hello.i contains the preprocessed source code.
In the next phase, the g++ compiler compiles the preprocessed source code to assembly language. You can run this step manually with the following command:
The -S flag creates a file hello.s, which contains the assembly code.
In the next step, the assembler as converts the assembly to machine code.
Finally, the linker ld links the object code with the library code to produce an executable.
ld -o hello hello.o ...libraries...The libraries argument above is a long list of libraries that you need to find out. I omitted the exact arguments because the list is really long and complicated, and depends on which libraries g++ is using on your system. If you are interested to find out, you can run the command g++ -Q -v -o hello hello.cpp and take a look at the last line where g++ invokes collect2

Thankfully, you do not have to perform these steps manually, as invoking g++ itself will take care of all these steps.
Using the make Utility
Even though the compilation commands have been simple so far, this is not necessarily the case when you have multiple source files. As an example, consider this program:
#include "func.h"

int main() {
    func(10);
    func(100);

    return 0;
}hello.cppThis file includes func.h, which contains the declaration for a simple function:
#ifndef MAKE_GPP_FUNC
#define MAKE_GPP_FUNC

#include<iostream>

void func(int i);

#endiffunc.hFinally, the definition of func resides in func.cpp:
#include "func.h"

void func(int i) {
    std::cout << "You passed: " << i << std::endl;
}func.cIn order to compile your program, you need to compile both hello.cpp and func.cpp, since the former depends on the latter.
g++ -o hello hello.cpp func.cppIf you have more files, then you need to list all of them, while taking care to set the correct include paths and library paths. Moreover, if your code uses any library, you need to list those libraries, too. The resultant command is likely massive and difficult to remember and type. Also, the compilation command will compile all of the source files every time it is executed. But if some of the source files haven’t been modified since the last compilation, it’s a waste of time and resources to compile all the files. But keeping track of what has changed manually is also a difficult task.
This is where the make utility helps. make lets you define your target, and how to reach the target and what are the dependencies. Then it automatically keeps track of which dependencies have changed and recompiles only the necessary parts.
So let’s see how you can utilize make.
The Makefile
In order to let make know what to do, you need to create a file named Makefile in the root of your project. This file can also be named makefile but is traditionally named Makefile so that it appears near other important files such as README.
Create an empty Makefile in the project root and run the command make from the project directory. You should see the following output:
make: *** No targets. Stop.It means make has found the Makefile, but since it is empty, it doesn’t know what to do.
Now let’s see how you can utilize Makefile to tell make what to do. The Makefile consists of a set of rules. Each rule has three parts—a target, a list of prerequisites, and a recipe—like this:
target: pre-req1 pre-req2 pre-req3 ...
    recipes
    ...
Note that there are tabs before the recipe lists. You can’t use any other whitespace character. You must use tabs.
When make executes a target, it looks at its prerequisites. If those prerequisites have their own recipes, make executes them and when all the prerequisites are ready for a target, it executes the corresponding recipe for the current target. For each target, the recipes are executed only if the target doesn’t exist or the prerequisites are newer than the target.
Let’s update the Makefile for the example program:
all: hello

hello: hello.o func.o
 g++ -o hello hello.o func.o

func.o: func.cpp func.h
 g++ -c func.cpp

hello.o: hello.cpp
 g++ -c hello.cpp
Now, run the make command again. You should see the commands being run by make:
g++ -c hello.cpp
g++ -c func.cpp
g++ -o hello hello.o func.o
And you’ll notice that an executable called hello has been created in the directory. So, how did make do that? Let’s analyze.
When you run make without any arguments, it executes the first target. In the Makefile, the all target has a prerequisite hello. So, make looks for a rule to create hello. The rule hello has two prerequisites hello.o and func.o. Now, the target hello.o depends on hello.cpp which exists and is newer than the target hello.o (which does not exist). So, make now executes the recipe for hello.o and runs the command g++ -c hello.cpp. This creates the hello.o file.
Now make starts resolving func.o. Both of its pre-requisites exist and are newer than the target. So make executes the command g++ -c func.cpp. Now that the target hello has both the prerequisites satisfied, its recipe can be executed and the hello file is created.
Now what happens if one of the files is changed? Let’s change the hello.cpp file and change the func(10) line to func(20):
#include "func.h"

int main() {
    func(20);
    func(100);

    return 0;
}
Now if you run make, you’ll notice that it does not execute all the steps:
g++ -c hello.cpp
g++ -o hello hello.o func.o
This time, make does not compile func.c because the file func.o exists, and its prerequisites are not newer than itself. This is because you have not changed func.cpp or func.h.
On the other hand, the file hello.cpp is newer than hello.o. So it needs to be recompiled, and when hello.o is re-created, the target hello needs to be executed, since it depends on hello.o.
You can also call make with the name of a specific rule. For example, running make func.o will only run the rule for func.o
You can have comments in Makefile, which start with a # and last till the end of the line.
all: hello # This is a comment

hello: hello.o
...
Using Variables
Observe that in your Makefile, there are quite a lot of repetitions. For example:
func.o: func.cpp func.h
 g++ -c func.cpp
In this rule, we have the string func repeated four times. Since here the base name of the source file and the compiled file are the same (func), we can use variables to tidy up the rules. The variables not only make the Makefile cleaner, they can be overridden by the user so that they can customize the Makefile without editing it.
A variable in Makefile starts with a $ and is enclosed in parentheses ()or braces {}, unless it’s a single character variable.
To set a variable, write a line starting with a variable name followed by =, := or ::=, followed by the value of the variable:
Here the variable objects is set to hello.o func.o. Now whenever you use this variable in a rule, it will be replaced by its value.
objects = hello.o func.o

all: hello

hello: $(objects)
    g++ -o hello $(objects)
This is the same as writing:
hello: hello.o func.o
    g++ -o hello hello.o func.o
There is another way of defining variables using the ?= operator. This defines the variable only if it has not been defined before.
When you invoke make, it converts all the environment variables available to it with a make variable with the same name and value. This means you can set variables using environment variables. Also, you can override any variable by passing them while invoking make. For example, the g++ command can be invoked through a variable.
CXX = g++
objects = hello.o func.o

all: hello

hello: $(objects)
    $(CXX) -o $(objects)
Now running make will compile the files with g++. However, the user can now substitute alternative if they want to.
Now the files will be compiled by clang++ since CXX=clang++ overrides the variable CXX defined in the Makefile.
Phony Target
So far, you have only created files, but make can also “clean” files. Usually it’s a good idea to have a clean target to delete all the generated files, basically returning the project to a clean slate.
Here is an example for your Makefile:
You can run it via make clean. This cleans all the .o files and the hello file. Because the rm command does not create a file named clean, the rm command will be executed every time you invoke make clean.
But if you ever create a file called clean in the directory, make will get confused. Since the clean file is there, and the clean target has no prerequisites, it is always considered to be newer than its prerequisites. Therefore, the recipe will not run.
The same problem will arise with the all target if there is ever a file named all. To fix this, you can declare the targets to be “phony”.
.PHONY: all clean

clean:
    rm *.o hello
Conclusion
Makefile is one of the most important components of compiling C++ using g++. It makes compilation easy and predictable and also saves time and resources by compiling only the necessary files. In this tutorial you learned how to install g++, and compile C++ programs with g++. You also learned how to write Makefiles and utilize make for increased productivity and automation.
Because make is a feature rich utility and supports a wide range of systems, it has a steep learning curve. As your project grows in size, the Makefile also grows in complexity.
If you are looking for a solution to avoid the complexities of Makefile, check out Earthly. Earthly takes the best ideas from Makefile and Dockerfile, and provides understandable and repeatable build scripts, minus the head-scratching parts of the Makefile.