Nowadays, many users migrate Windows OS to SSD to improve computer running speed. However, some users reported that their SSDs freeze up frequently. How to fix? This article will show you how to fix SSD freeze-up issue with top 4 methods.
Nowadays, solid-state drives (SSDs) have become the preferred option for most PC users as many users migrate their Windows OS to SSD for a pursuit of high-speed performance. Although the SSD speed is fast enough, sometimes it is inevitable that you will encounter SSD freeze-up problem. This type of issue can be quite troublesome as there are so many causes.
Windows 10 freeze SSD could be caused by connecting wrong SATA port, ACHI mode not enabled, 4K not aligned and so on. If you find that SSD freezes for a few seconds on your computer sometimes, then you may try the following methods to see if this can be solved.
4 Solutions Help You Quickly Resolve SSD freezing Windows 10
Solution 1.Check If the SSD Is Connected to the SATA 3 Port
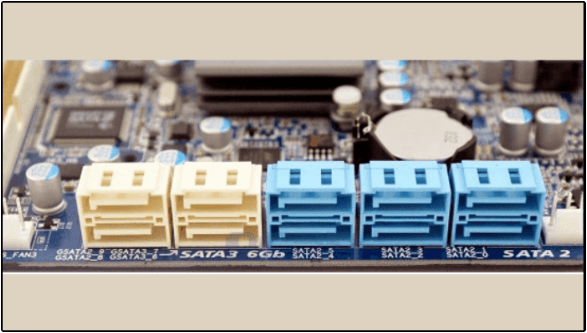
Windows 10 SSD freeze may be caused by connecting the SSD to the wrong SATA port. SATA 3 has transfer cap of 6 Gbps and SATA 2 has transfer cap of 3 Gbps. SATA 3 devices can be used with SATA 2 port. But when you connect a HDD or SSD from SATA 3 to SATA 2, the read-write speed will reduce and your SSD won’t work up to its potential, which may lead to the annoying SSD freezing up.
So you need to make sure that your SSD is connected to the SATA 3.0 interface of the motherboard (except M.2 SSD). If the previous generation of SATA 2.0 interface is still connected, the performance of SSD will be severely limited. You may replug your SSD into the SATA3 port to see if that works.
Solution 2. Enable the ACHI Mode
AHCI (Advanced Host Controller Interface) is a new mode for memory devices, in which a computer can use all SATA advantages such as higher speed of data exchange with SSD and HDD as well as hot swapping of hard disks. When you enable AHCI mode, the speed of access to files in memory devices will be increased and overall performance of your computer could be improved.
The current mainstream motherboards basically enable the ACHI mode by default. However, for a few motherboards, as well as the previous old motherboard, the default IDE option should be manually changed to ACHI option through BIOS settings, otherwise it will affect the speed of SSD.
To enable AHCI, you’ll have to enter the BIOS of your computer and enable it somewhere within its settings. It’s most recommended that you enable this feature before installing the operating system, but in this case, your SSD freeze may be caused by AHCI mode not enabled, which indicates that you may not enable ACHI mode before installing the operating system to your SSD.
Indeed, it is quite possible that AHCI mode is already enabled in your PC. You might wonder: how do I know which mode the computer’s controller is using? No need to worry. Here I will offer you a method to help you find out.
Step 1. Right-click Window Start menu and choose Device Manager.
Step 2. Open the section IDE ATA/ATAPI controllers.
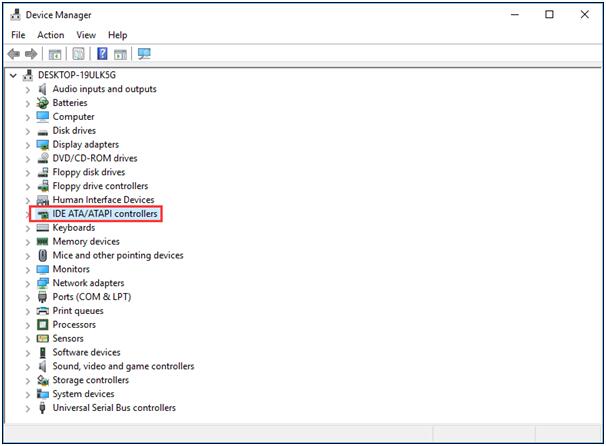
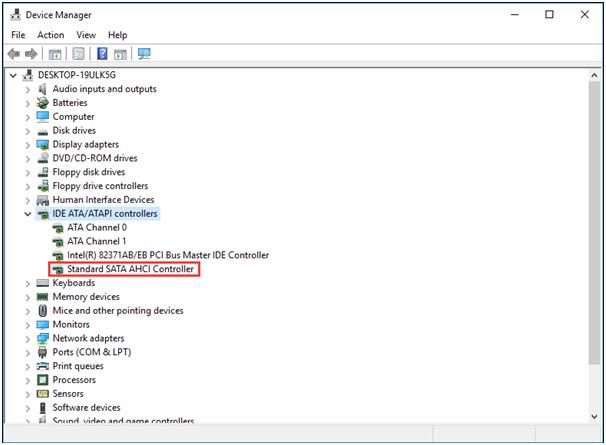
Step3. If there is a device containing AHCI in its name as you can see in the following picture, it means that AHCI mode is used in this computer.
Warning: What you need to pay attention to is that if you just enable AHCI mode in the BIOS setting after Windows installation, your system might refuse to boot, getting stuck in a series of restarts. That is why it is recommended to enable AHCI before installing Windows.
If you do forget to enable AHCI mode for SATA on a computer where Windows is already installed, then it could be a reason for Windows 10 SSD freeze. In this case, you may follow the steps as below to enable ACHI and Windows will work normally. But you would better backup important files and data in case of any unexpected mistakes causing data loss during these operations. Now follow me to learn how to enable ACHI mode for SATA when Windows is already installed.
Step 1. Right-click Windows Start menu and choose Run. Then type in the command regedit to Registry Editor.
Step 2. Open the section HKEY_LOCAL_MACHINE SYSTEM CurrentControlSet Services iaStorV
Step 3. Double-click on Start element and set its value to 0 (zero).
Step 4. Open the section HKEY_LOCAL_MACHINE SYSTEM CurrentControlSet Services iaStorAV StartOverride and set the zero value for the element 0.
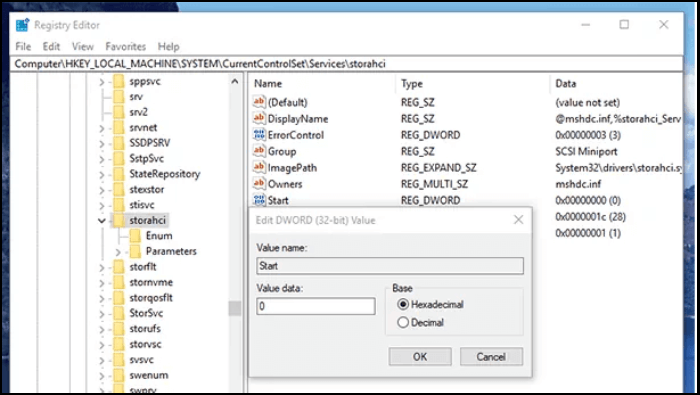
Step 5. Open section HKEY_LOCAL_MACHINE SYSTEM CurrentControlSet Services storahci. Then double-click the Start element and set the value to 0 (zero).
Step 6. In the subsection, HKEY_LOCAL_MACHINE SYSTEM CurrentControlSet Services storahci StartOverride set the zero value for the element 0. You may see nothing if you has enabled ACHI. But if AHCI has not been enabled yet, you will see it.
Step 7. Close Registry Editor.
Step 8. Restart the computer and enter UEFI or BIOS. In UEFI or BIOS, find SATA settings to select the mode for memory devices. Switch them to AHCI, save settings and restart the computer. For the first time after the restart, it is recommended to boot Windows in safe mode.
After the restart, Windows will start installation of SATA drivers, and when it is over, it will ask you for another restart. Do it, and AHCI mode in Windows will be enabled.
Solution3. SSD Freezing Fix by Checking 4K Alignment
4K alignment is one of the important factors that impact the read-write speed of an SSD. If SSDs are not aligned at 4K, the speed of the SSDs will be seriously affected, and the extreme switching and fluency experience will not be experienced. This could be a reason causing SSD freeze-up.
When you migrate your Windows OS from a mechanical hard drive to a solid state drive, your partitions may not be correctly aligned. This will lead to SSD freezing, slowing down your computer performance. But don’t worry, to make 4K alignment of an SSD is very simple by using an third-party software MiniTool Partition Wizard.
MiniTool Partition Wizard is an all-in-one partition management tool that helps you manage disks and partitions in an effortless way. For example, with the assistance of MiniTool Partition Wizard, you can not only align partitions on an SSD, but also format partition, move or resize a partition, convert MBR disk to GPT disk and so on.
Now read the following contents to align your SSD and resolve SSD freezing with MiniTool Partition Wizard.
Step 1. Download MiniTool Partition Wizard Free Edition and install it on computer. Then, launch it to get its main interface.
MiniTool Partition Wizard FreeClick to Download100%Clean & Safe
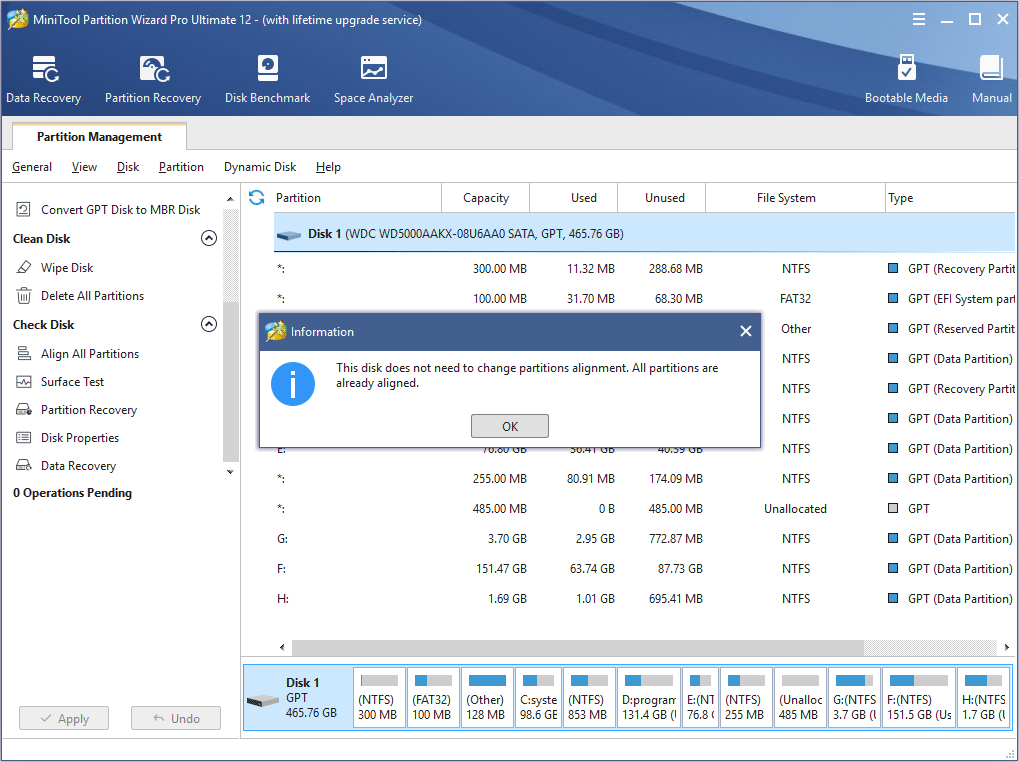
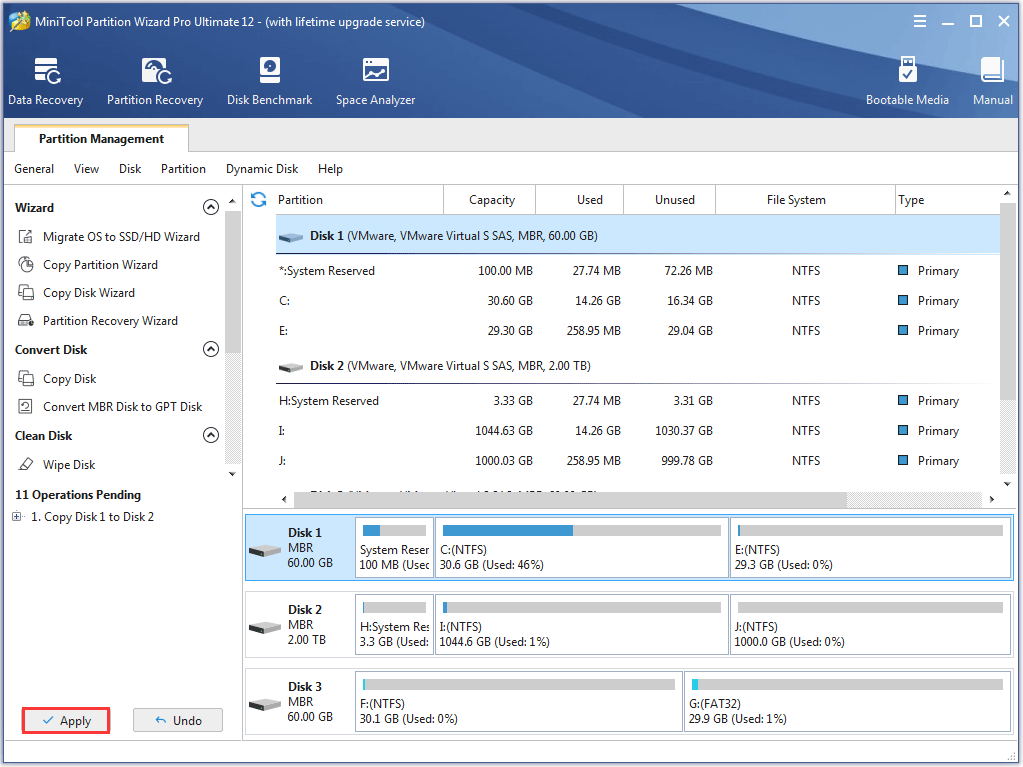
Step 2. After selecting the SSD which needs to be aligned, you can see the function Align All Partitions from the action panel. You may click this function to get the following interface:
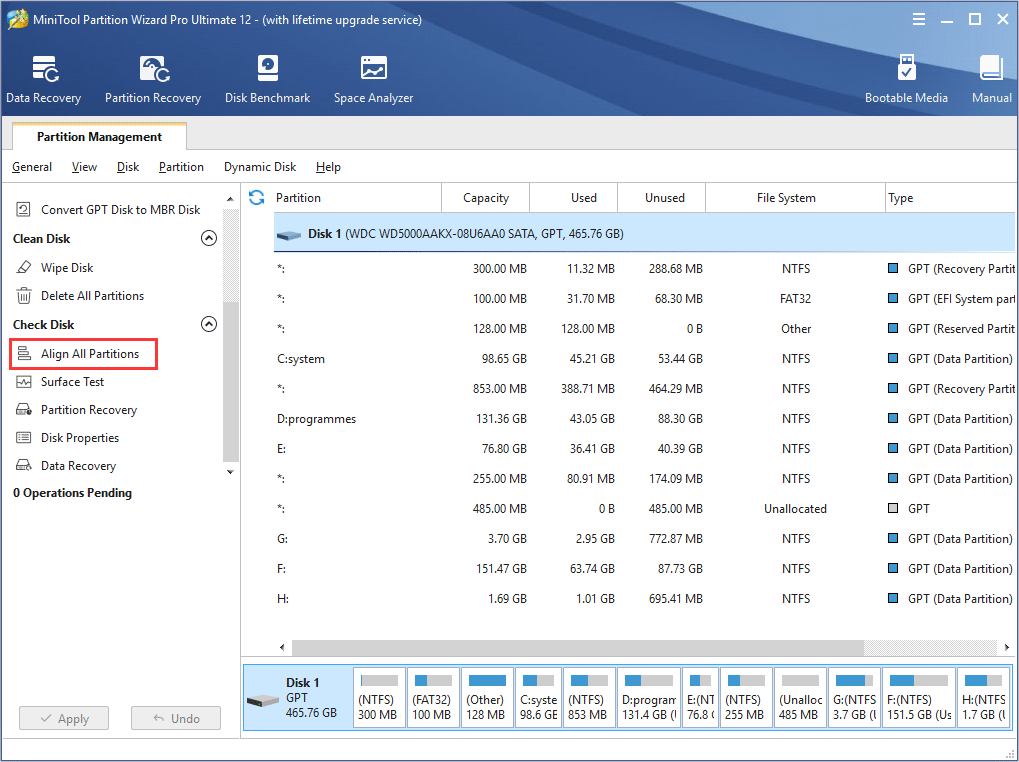
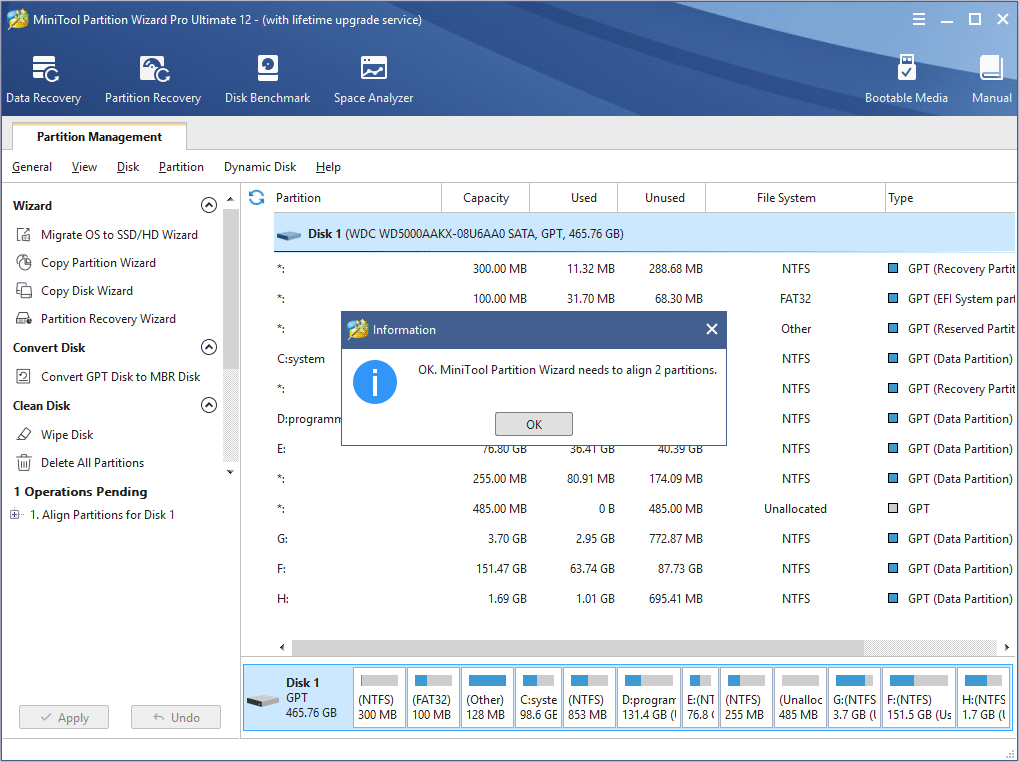
Step 3. MiniTool Partition Wizard will tell you how many partitions need to be aligned. Click Yesto continue.
Step 4. Click Apply button on the upper left corner to allow changes.
If the partitions on your disk are already aligned, you may see the following pop-up window.
Solution 4. Replace Your Computer with a New SSD
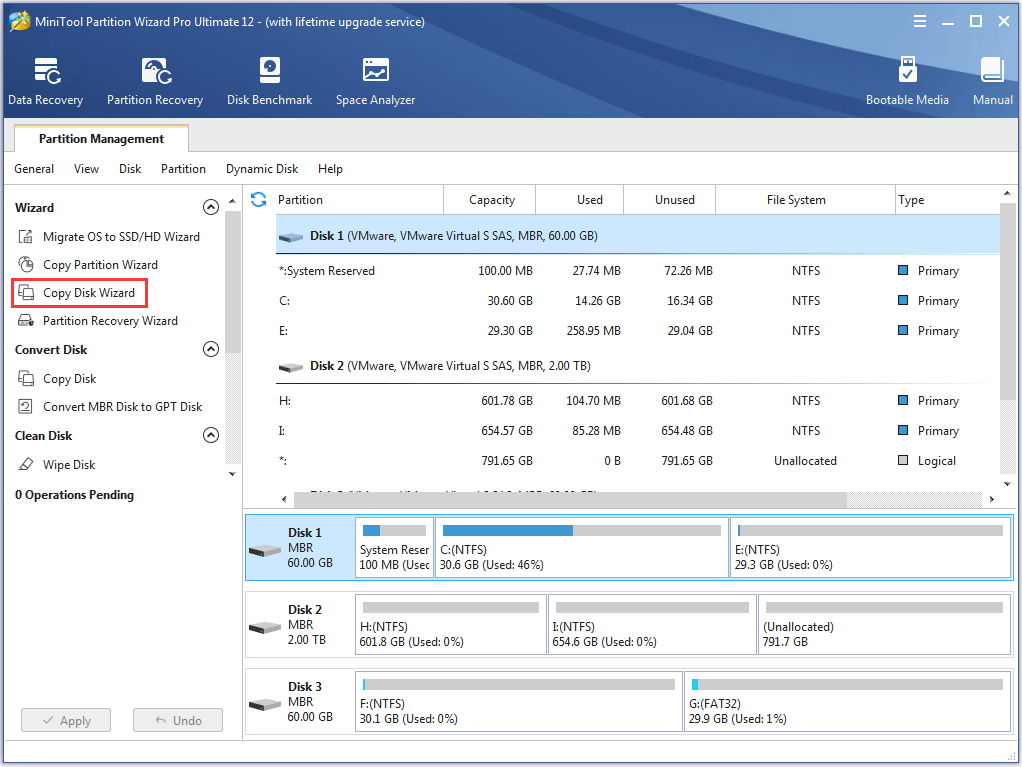
If the above methods do not work for your SSD, there is a possibility that it might be a bad or problematic SSD. Then you may replace the SSD with a new one to see if Windows 10 SSD freeze can be solved. By using MiniTool Partition Wizard’s Copy Disk feature, you don’t need to reinstall system, and all files and data on the old SSD will be copied to the new SDD, which will save you much time. Now you may follow the steps as follows to copy everything on the problematic disk to a new SSD.
Step 1. Download MiniTool Partition Wizard and install it on your computer to get everything ready. You may click the following button to get the free disk cloning software.
MiniTool Partition Wizard FreeClick to Download100%Clean & Safe
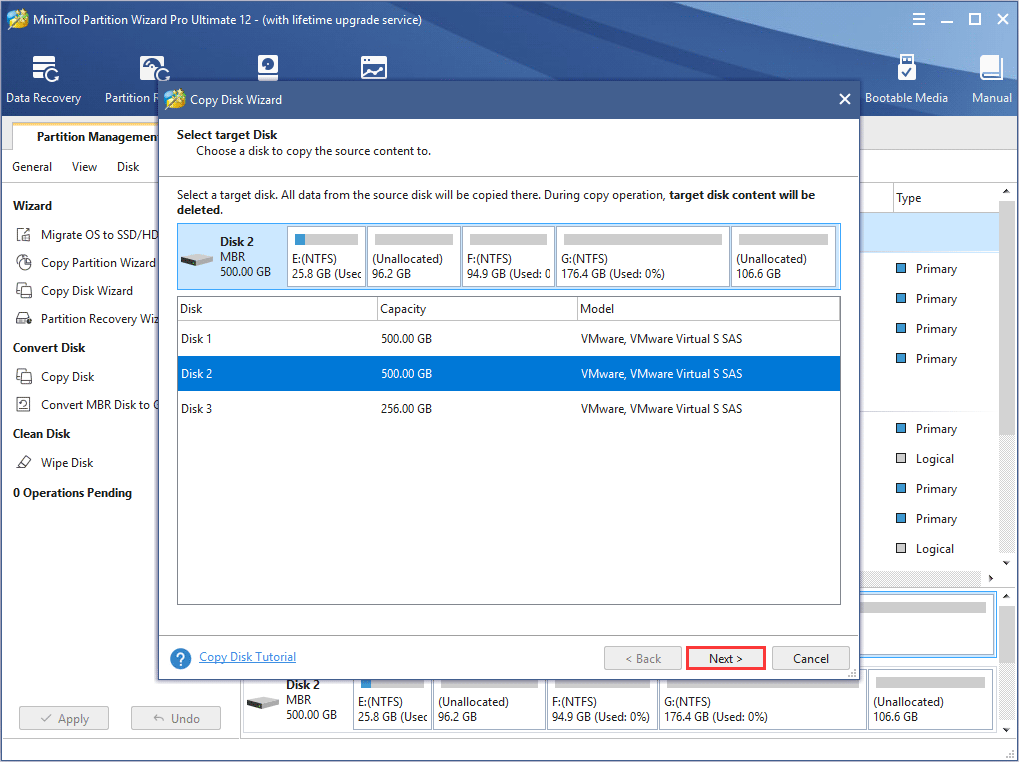
Step 2. Connect the new SSD to computer (via SATA for desktop or USB to SATA adapter cable for laptop) and launch MiniTool Partition Wizard Free Edition to get the main interface. Then choose Copy Disk.
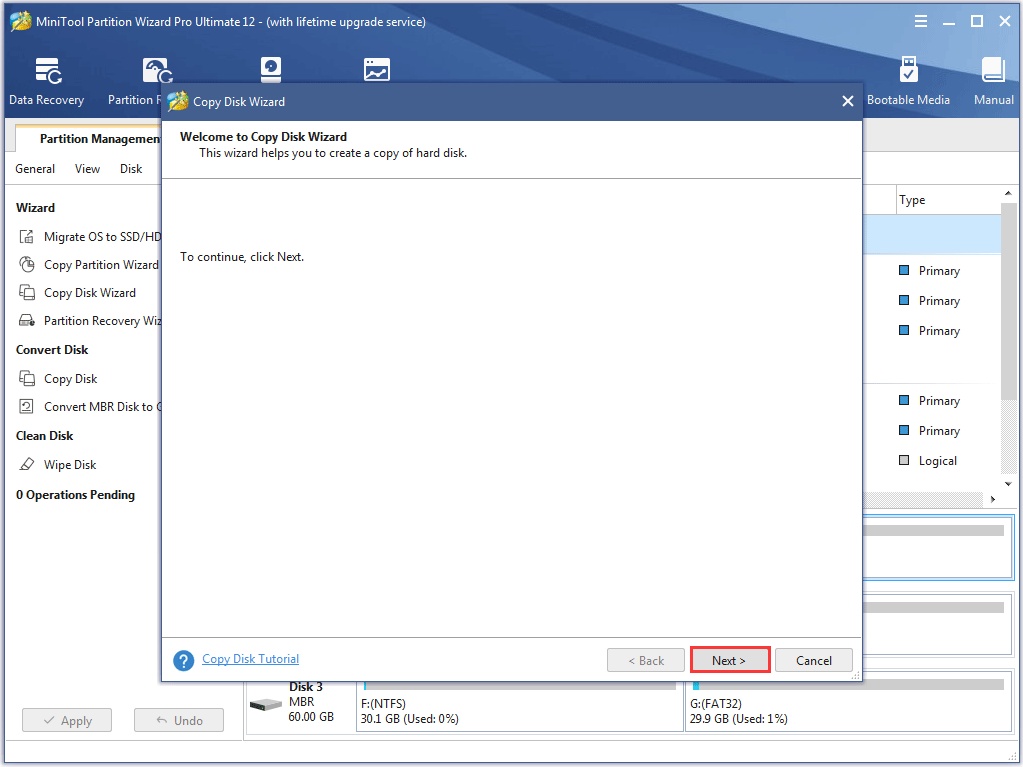
Step 3. Click Next to continue.
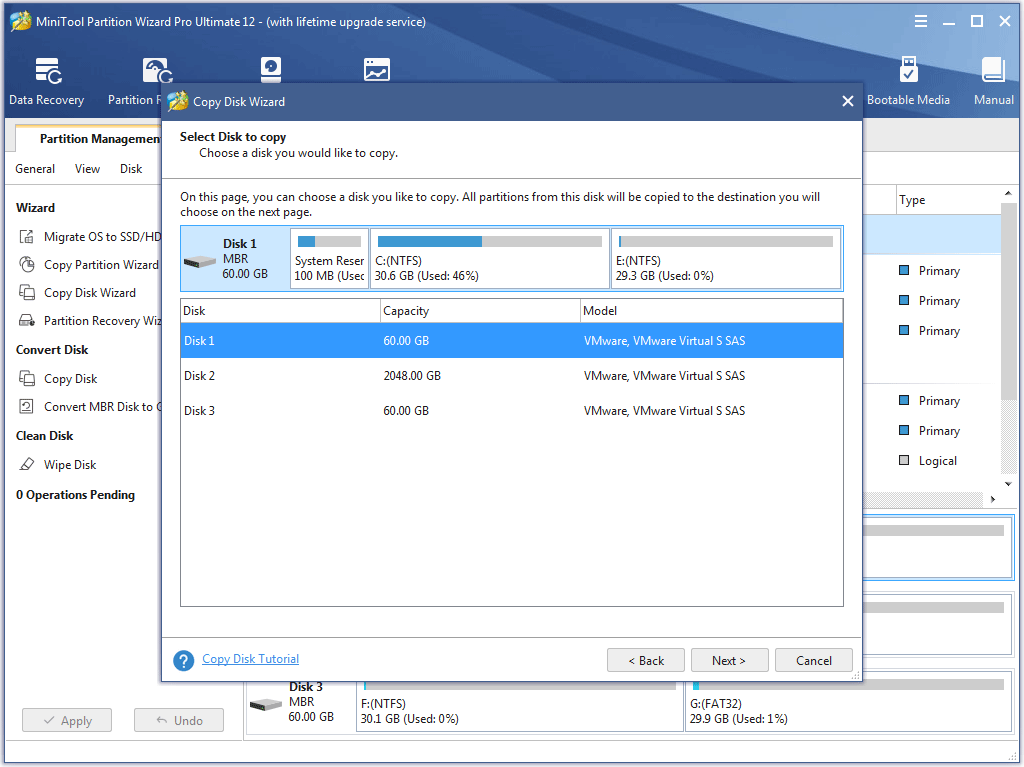
Step 4. Select the system disk and click Next.
Step 5. Select a target disk and click Next to continue. Here, you should choose the new SSD as the target disk.
Step 6. Read the warning and click Yes.
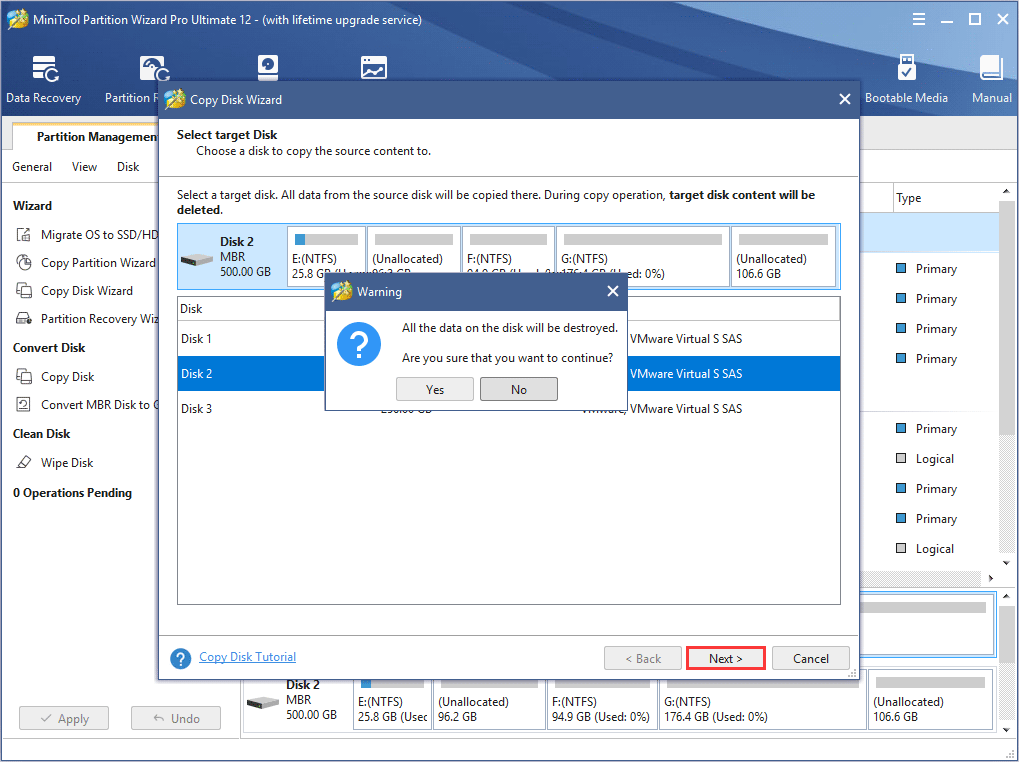
Tip: Please note that all the data on the SSD will be destroyed, so make sure you have made backups in advance if some important files are saved on the SSD. If it s a brand new SSD and it can hold all data in the source disk, then you can use it directly without backing up anything.
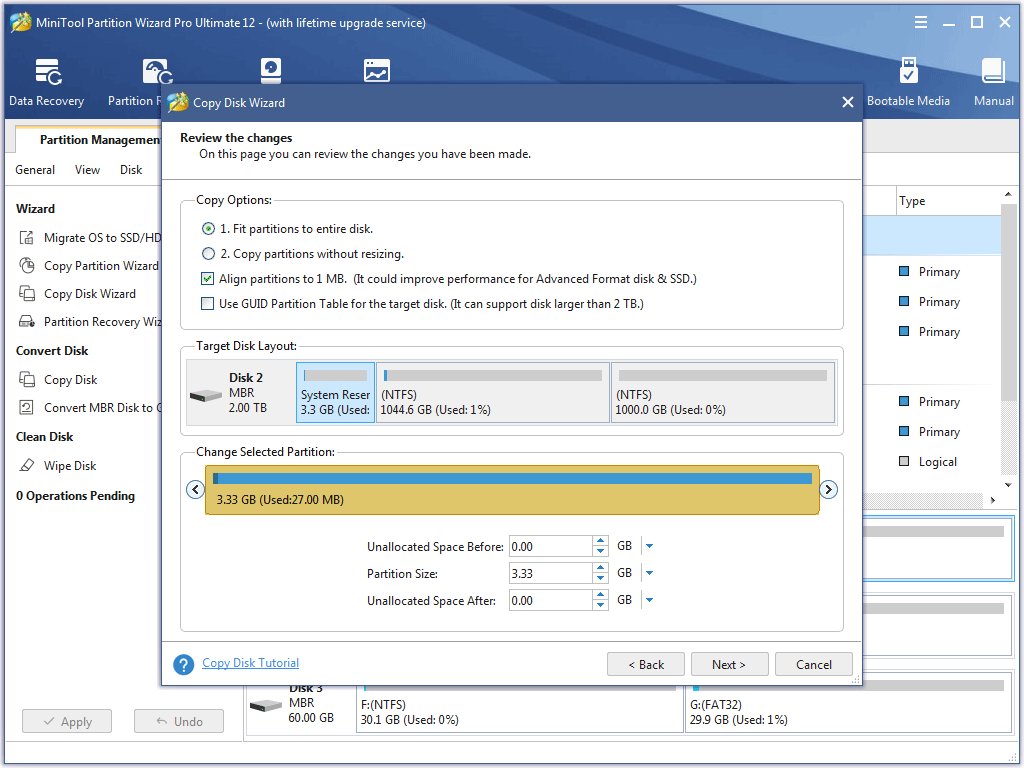
Step 7. Review the changes you are going to make on the SSD. You may also change the copy options by yourself if necessary. And you can also change the partition size by dragging the handle bar. Then click Next to continue.
Note: 1. Fit partitions to entire disk: the whole SSD will be taken up proportionally by the partitions to be copied.
2. Copy partitions without resize: each partition size will be kept as they are on the source disk. This option works only when the target disk is large enough to hold all partitions on the source drive.
3. Align partitions to 1 MB: when the target disk is an SSD, checking this option helps to enhance SSD performance.
4. Use GUID Partition Table for the target disk: this option will turn the target disk into a GPT disk. If you want to clone MBR disk to GPT disk, you check this option. But what you need to know is that this feature is only available on a paid edition if you want to convert the system disk to GPT disk.
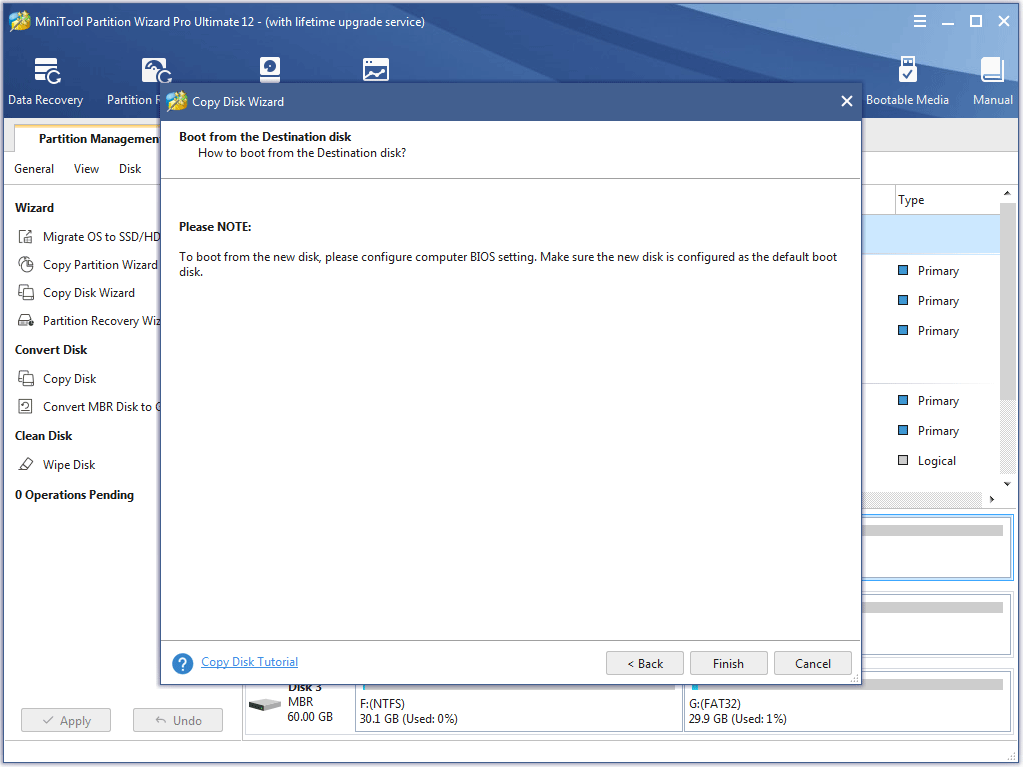
Step 8. In this page, MiniTool Partition Wizard will tell you how to boot from the destination hard drives if you are cloning a system disk. Remember to conp the new disk as the default boot disk after cloning. Then click Finish.
Step 9. In this page, you can preview the changes to be made on the target SSD. As you can see, disk 2 has the same disk layout with disk 1. At last, you need to click Apply to allow the pending operations.
MiniTool Partition Wizard will ask for a reboot if you are copying the system disk or if some programs are still running. Please allow its rebooting. When MiniTool Partition Wizard has finished, you may set computer to boot from the SSD. After changing to a new SSD, SSD freeze-up issue could be possibly solved.
“By following the steps in this post, I successfully resolved SSD freeze-up issue. And now my SSD is running so smoothly! Hope more people could find out a suitable solution for their SSD freezing issue by reading this post.”Click to Tweet
Verdict
Fixing Windows 10 SSD freeze seems to be a little complicated to ordinary people, but it still could be solved by following the above methods. If you have tried all the former methods in this post but they don’t work out, the direct way is to change a new SSD.
By using MiniTool Partition Wizard, you may copy everything, including Windows 10, to your new SSD and the Copy Disk feature is absolutely free. It is so convenient, even if it’s not the SSD’s problem, you just want to change a new SSD, it could help you a lot.
In addition, if you have good solutions on SSD freezing fix, you can leave a message on the following comment zone and we will response as soon as possible. If you need any help when using MiniTool software, you can contact us via [email protected].
Привет, друзья!
Помогите пожалуйста. Windows 10 20H2, интернет 200+ мбит.
Все игры и приложения работают нормально, но как только начинаю качать игру в Steam или GOG винда начинает фризить, например мышь зависает на секунду, звук и видео на ютубе тоже.
Анивирь наверно не причём т.к. на чистой виртуалке тоже самое. При закачке из торента никаких проблем нет.
Конфигурация компьютера:
MSI MPG Z490 GAMING EDGE WIFI, INTEL Core i7 10700K, 32 GB RAM, NVIDIA RTX 2070S 8GB, Samsung 970 EVO Plus 250 GB [MZ-V7S250BW], WD Blue 1TB [WD10EZEX], WD Green 1TB [WDS100T2G0A], Seagate BarraCuda 2 TB [ST2000DM008].
Как это исправить?
—————————————————
Друзья, всем огромное спасибо за помощь!
Виновником оказался cfosspeed который ставится вместе с MSI SDK, удалив обе программы (иначе cfosspeed снова ставится) лаги и фризы прекратились!
Содержание
- Способ 1: Проверка соответствия требованиям системы
- Вариант 1: Файл подкачки
- Вариант 2: Увеличение производительности компонентов
- Способ 2: Сканирование на вирусы
- Способ 3: Откат обновления Windows
- Способ 4: Оптимизация автозагрузки
- Способ 5: Обновление драйверов
- Способ 6: Работа с жестким диском
- Вариант 1: Очистка системного раздела
- Вариант 2: Дефрагментация (только HDD)
- Способ 7: Устранение перегрева
- Способ 8: Отключение визуальных эффектов
- Вопросы и ответы

Способ 1: Проверка соответствия требованиям системы
Если компьютер начал подвисать после установки «десятки», а с предыдущими ОС он работал без фризов, то, вероятно, проблема заключается в несоответствии с системными требованиями Windows 10. Операционная система не слишком требовательна к ресурсам, но некоторые маломощные ПК не способны справиться с ней.
В нашем отдельном материале подробно описаны минимальные системные требования операционной системы Windows 10. Также в статье есть дополнительная информация о различных поддерживаемых функциях.
Подробнее: Системные требования для установки Windows 10
После того как вы ознакомитесь с системными требованиями, сопоставьте их с возможностями вашего компьютера. Характеристики устройства можно посмотреть с помощью штатных средств, а более детальные данные доступны в интерфейсе специализированного софта. Обо всех способах читайте в отдельной инструкции на нашем сайте.
Подробнее: Узнаём характеристики компьютера на Windows 10
Если ПК не «тянет» Windows 10 именно по причине несоответствия системным требованиям, лучше вернуться к предыдущей ОС. Но есть несколько способов, позволяющих улучшить производительность компьютера, не прибегая к аппаратному апгрейду.
Вариант 1: Файл подкачки
Одним из самых простых методов избавиться от нехватки оперативной памяти (если именно ее недостаток влияет на возникновение рассматриваемой проблемы) – это добавить файл подкачки, или виртуальную память. Он снижает нагрузку на ОЗУ, если возможностей компонента не хватает для обеспечения бесперебойной работы системы. Создать файл подкачки в Windows 10 можно с помощью «Параметров быстродействия». Попробуйте добавить виртуальную память, поскольку это может помочь решить проблему с зависаниями ПК.
Подробнее: Включение файла подкачки на компьютере с Windows 10
Читайте также: Увеличиваем объем ОЗУ на компьютере с Windows 10
Вариант 2: Увеличение производительности компонентов
Если компьютер позволяет, то некоторые его компоненты можно разогнать, чтобы увеличить производительность системы. Такой способ поможет не только приблизиться к системным требованиям Windows 10, но и улучшить работу ОС в целом, а также, возможно, убрать фризы. Обычно разгоняют центральный процессор и видеокарту. Для этого используются фирменные утилиты от производителей, либо возможности BIOS, либо сторонний софт. Об этом более подробно можно узнать из наших инструкций.
Подробнее: Ускоряем работу видеокарты / процессора
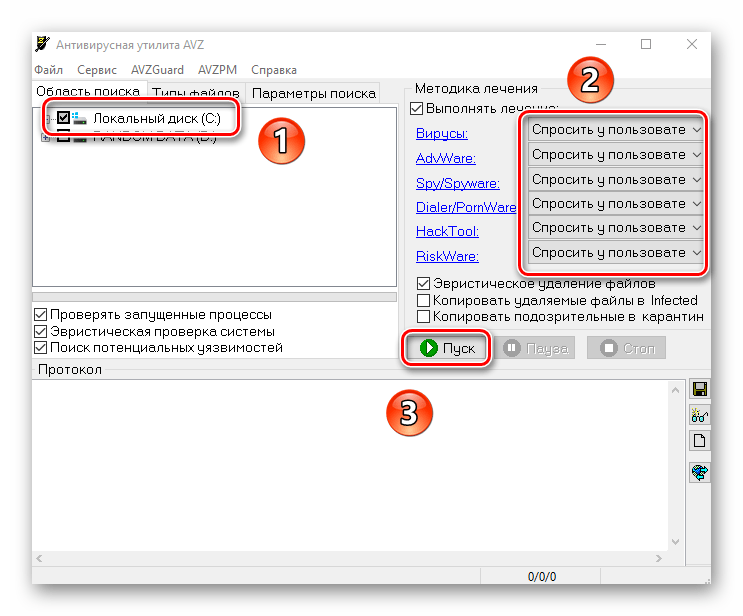
Способ 2: Сканирование на вирусы
Еще одна распространенная причина появившихся фризов в Windows 10 – это попавшее вредоносное ПО, которое замедляет работу системы. Чтобы решить проблему, проверьте компьютер на наличие вирусов с помощью специализированных программ или встроенных средств защиты. Также можно использовать портативные утилиты, которые не требуют установки и предназначены для быстрой проверки и удаления подозрительных файлов и софта. В нашей отдельной статье описаны все варианты сканирования Windows 10 с последующим устранением вирусов.
Подробнее: Методы удаления вируса с компьютера под управлением Windows 10
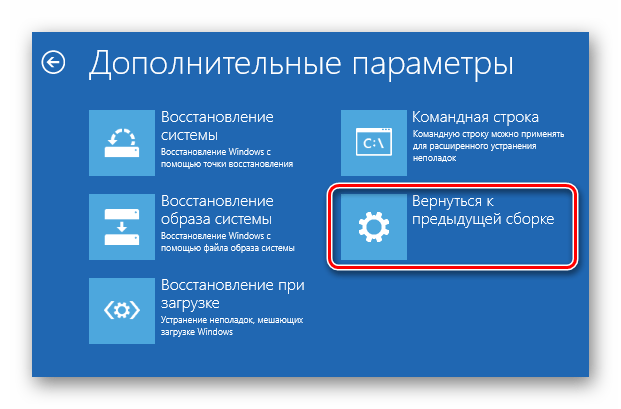
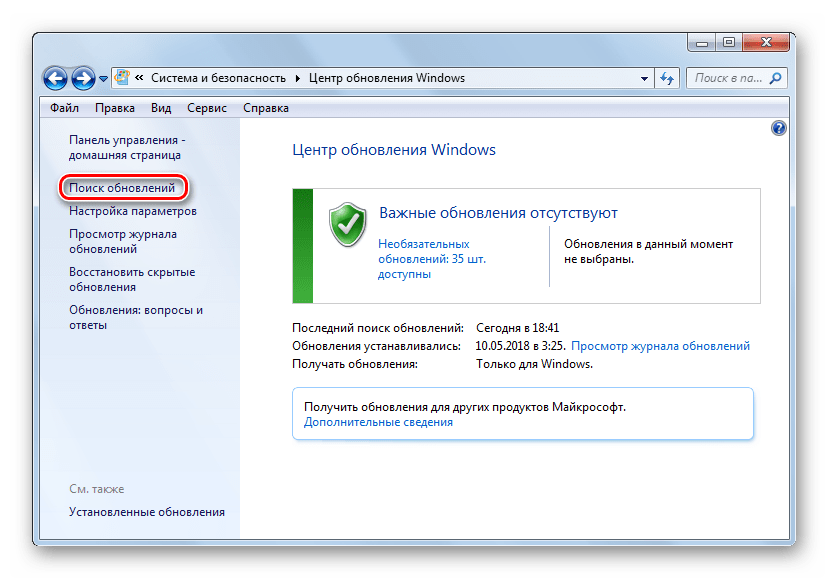
Нередко пользователи замечают, что фризы появляются после установки обновлений Windows 10. Это может значить, что либо в самих апдейтах есть проблема, которая будет со временем решена разработчиками, либо во время инсталляции произошел сбой. Если неполадка появилась именно после обновления, есть смысл попробовать удалить накопительные обновления или откатиться к предыдущей сборке. Перейдите по ссылке ниже, чтобы узнать, как это сделать.
Подробнее: Методы отката обновления в ОС Windows 10
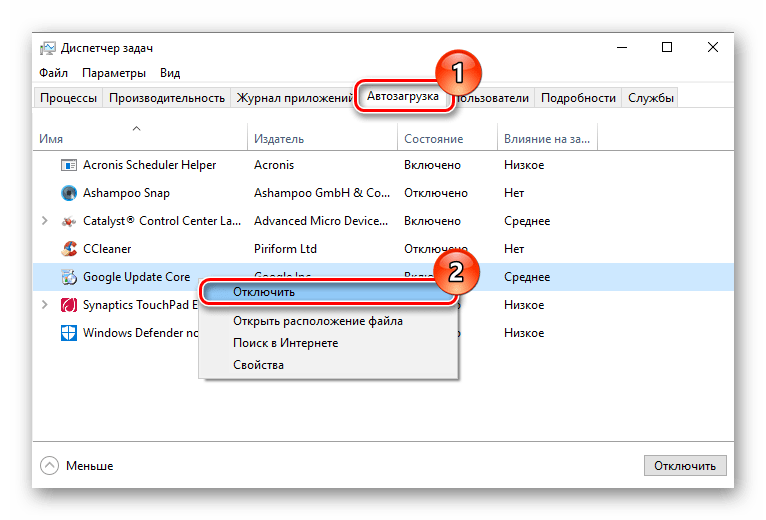
Способ 4: Оптимизация автозагрузки
Бывает, компьютер начинает фризить сразу после запуска системы. Чаще всего это происходит из-за того, что активно работает автозагрузка программ, то есть вместе с Windows открывается в фоновом режиме разный пользовательский софт. Это нагружает компоненты ПК, что вызывает зависания и лаги. Через некоторое время работы ОС проблемы могут пройти, но в итоге перезапуск растягивается на долгое время.
Попробуйте оптимизировать автозагрузку, убрав лишние процессы и программы. Для этого используется штатное средство «Диспетчер задач», а также программы или специализированные утилиты.
Подробнее: Отключение автозапуска программ в Виндовс 10
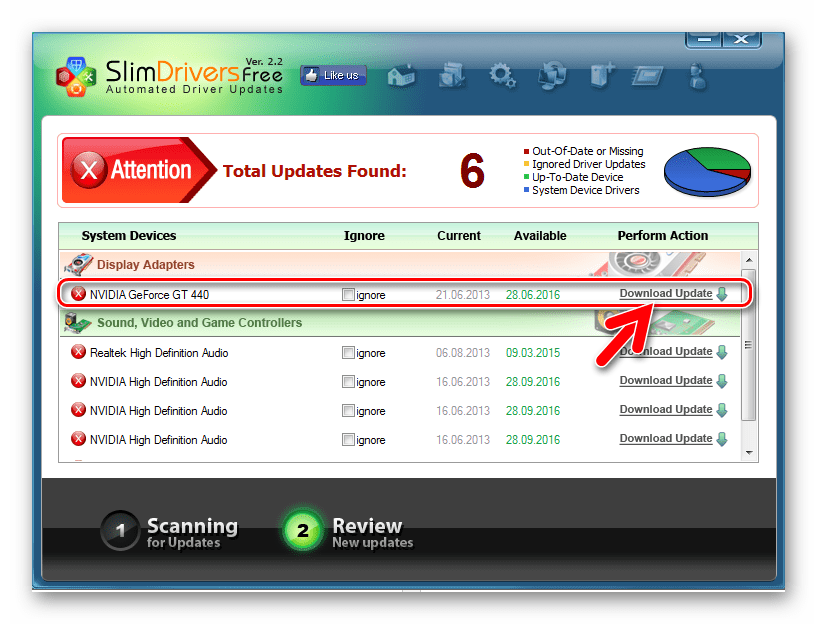
Способ 5: Обновление драйверов
Комплектующие нуждаются в актуальном ПО для стабильной и корректной работы, поэтому из-за устаревших драйверов вполне могут появиться проблемы. В Windows 10 предусмотрены встроенные возможности для обновления драйверов, а также для этого можно воспользоваться сторонним софтом или найти их на официальных сайтах производителей. У нас есть пошаговое руководство, которое поможет актуализировать программное обеспечение для различных компонентов ПК.
Подробнее: Обновляем драйверы в Windows 10
Способ 6: Работа с жестким диском
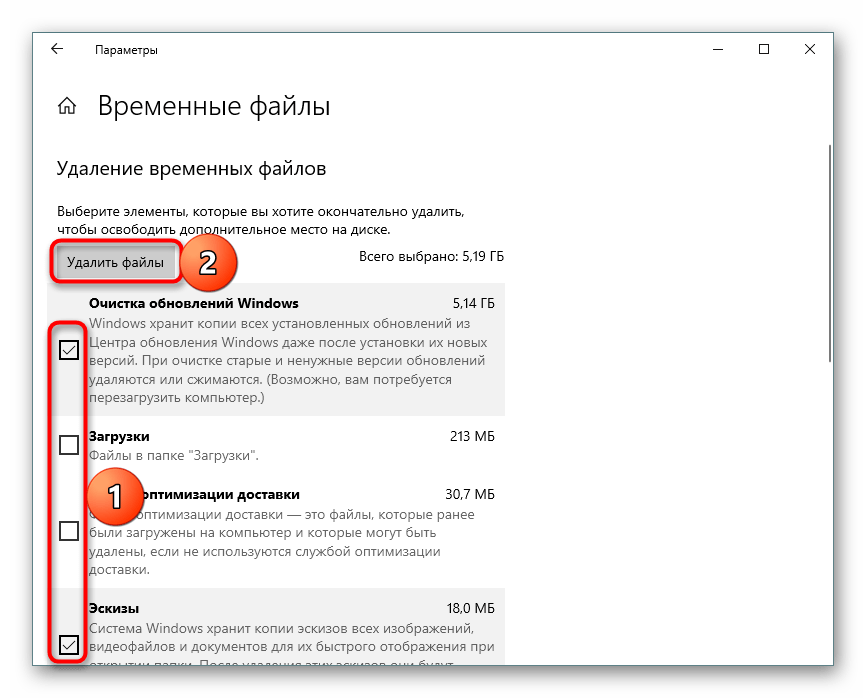
Неполадки в системе, вызывающие фризы компьютера, появляются из-за проблем в работе жесткого диска. Система может начать работать медленнее из-за битых секторов или недостаточного свободного пространства, которое необходимо для стабильного функционирования Windows 10. Прежде чем думать о замене винчестера, попробуйте его очистить или дефрагментировать.
Вариант 1: Очистка системного раздела
Как правило, системный диск помечается литерой «C», поэтому для того, чтобы избавиться от фризов на ПК, попробуйте очистить его от мусорных и ненужных файлов. Не существует единого способа, позволяющего быстро и тщательно избавиться от данных и настроек, не повредив систему, поэтому придется пошагово выполнять инструкции, которые есть на нашем сайте, начиная от базовой очистки «Корзины», папки с загрузками и заканчивая анализом и проверкой диска на ошибки. Переходите по ссылке ниже и следуйте приведенному алгоритму действий, чтобы избавиться от зависаний.
Подробнее: Освобождаем место на диске C в Windows 10
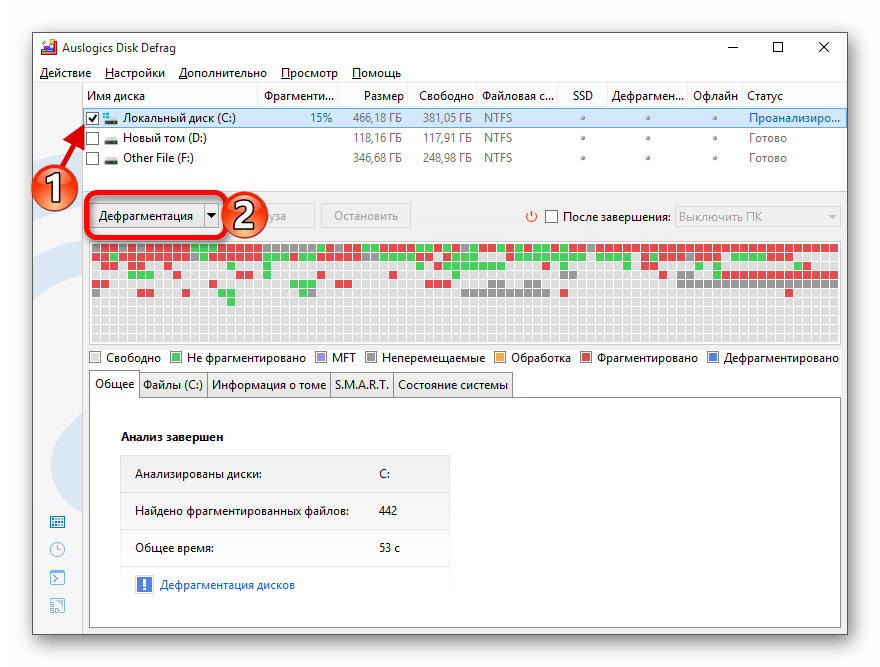
Вариант 2: Дефрагментация (только HDD)
Ускорить работу диска можно, если провести его дефрагментацию. Особенно это актуально для тех пользователей, которые активно используют компонент, записывая и удаляя данные. На накопителе хранится информация, разделенная по различным секторам диска, и когда в результате различных изменений размер определенного файла увеличивается, система старается оставить его фрагменты рядом с изначальным вариантом. Если непрерывное свободное пространство ограничено, то файл разобьется на отдельные части, которые будут размещены в разных секторах.
В итоге, когда пользователь начинает открывать такие данные или запускать приложение, ему приходится ждать, пока система «соберет» их. Чтобы решить проблему, попробуйте дефрагментировать диск, поскольку после процедуры все части одного файла собираются в один ряд беспрерывного свободного пространства. Выполнить операцию можно с помощью как штатных средств системы, так и стороннего софта. Наш автор разбирал алгоритм действий в отдельной статье.
Подробнее: Дефрагментация диска в Windows 10
Способ 7: Устранение перегрева
Перегрев какого-либо аппаратного компонента ПК также влечет за собой снижение производительности, которое пользователь может списать на тормоза в операционной системе. Советуем проверить температуры комплектующих компьютера, и на основании полученной информации делать вывод. Если какое-то комплектующее перегревается — искать причину, приобретать замену или обраться в сервисный центр. Если все температуры в норме, значит, пытаться найти неполадку в другом месте. У нас есть несколько вспомогательных материалов, которые помогут, во-первых, измерить температуру. Кликайте на нужное название и читайте материал.
Подробнее:
Как узнать температуру процессора / видеокарты / блока питания
Программы для проверки температуры компьютера
Во-вторых, узнать возможные причины перегрева того или иного устройства.
Подробнее: Что делать при перегреве процессора / видеокарты / материнской платы
В-третьих, сравнить полученные показатели с рабочими нормами.
Подробнее: Рабочие температуры процессоров / видеокарт / жестких дисков
Обладателям ноутбуков можно почитать другое руководство.
Подробнее: Решаем проблему с перегревом ноутбука
Способ 8: Отключение визуальных эффектов
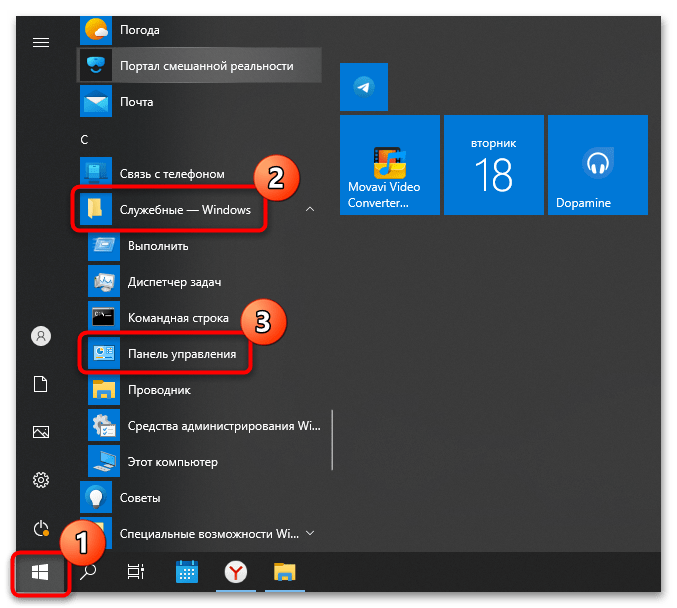
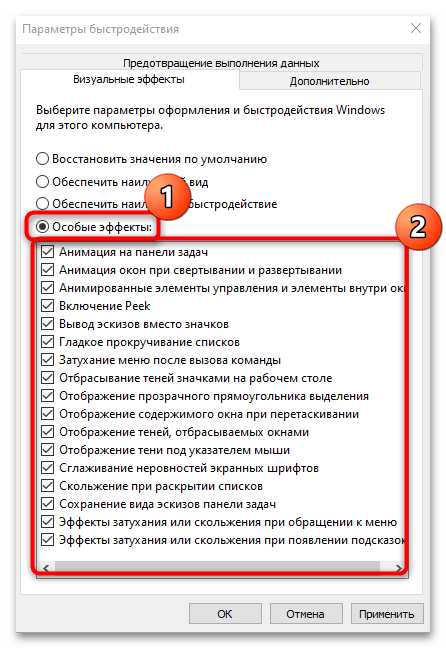
Визуальные эффекты интерфейса Windows 10 нагружают систему, отчего у маломощных компьютеров возникают фризы при работе. С помощью раздела с дополнительными свойствами ОС их можно отключить все или выборочно:
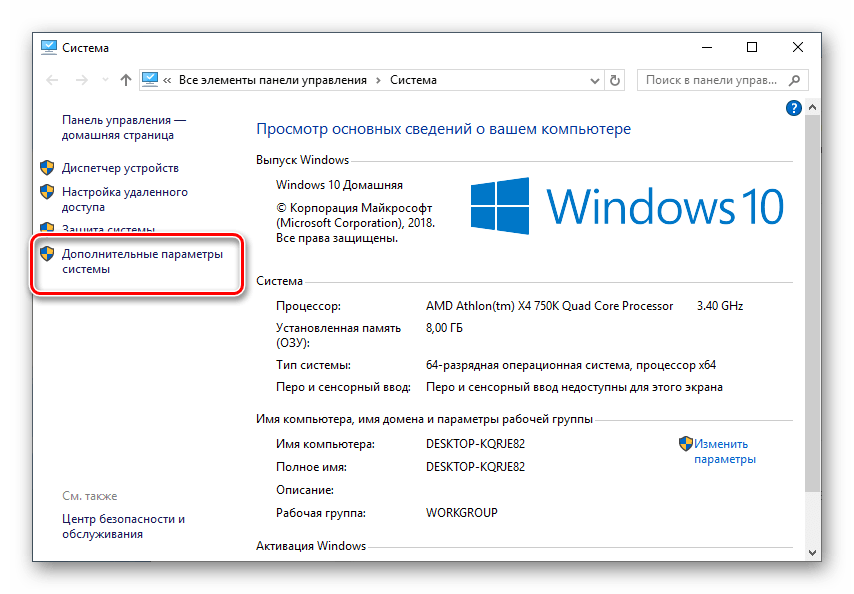
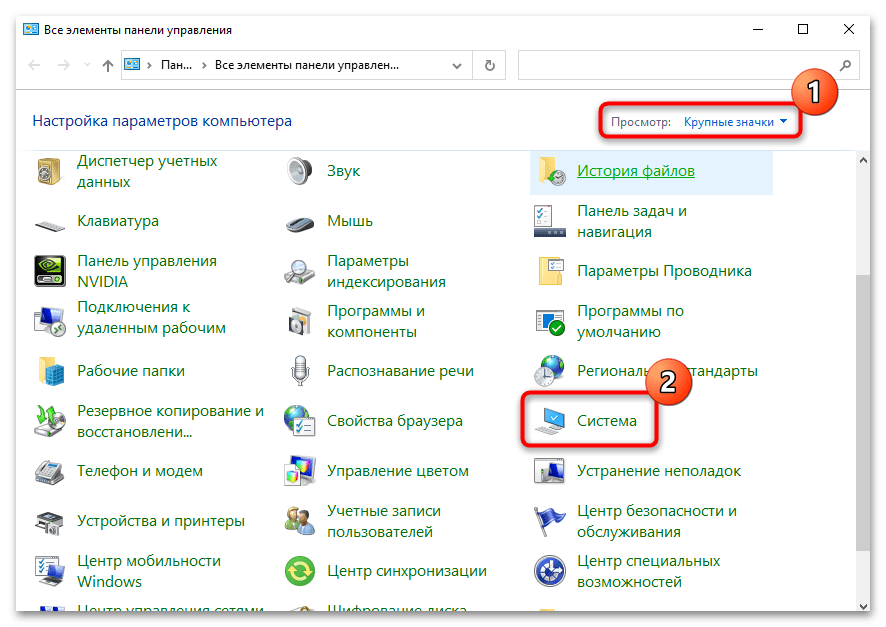
- Откройте «Панель управления», отыскав приложение в главном меню в каталоге «Служебные – Windows».
- В новом окне выберите отображение разделов как мелкие или крупные значки. Нажмите на «Система».
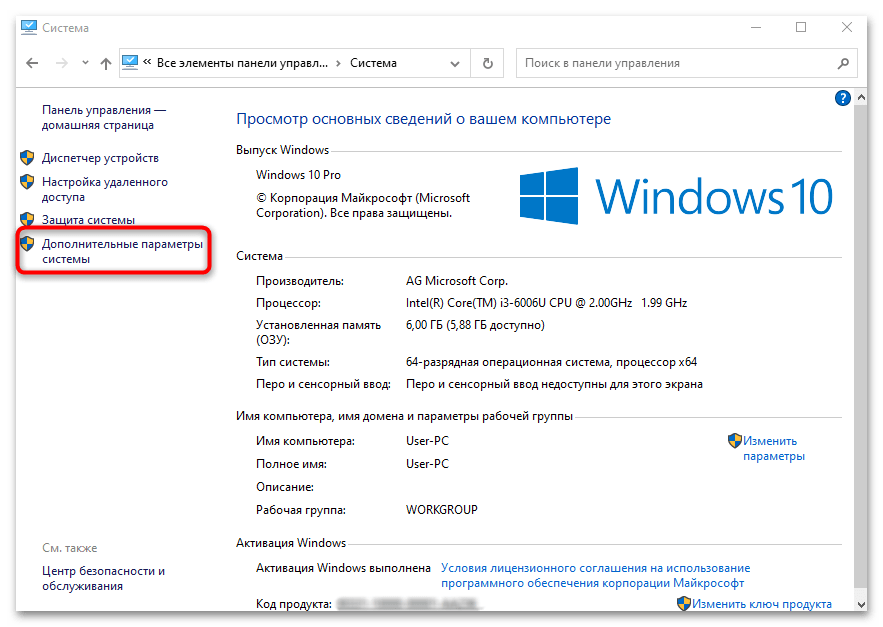
- На панели слева кликните по строке «Дополнительные параметры системы».
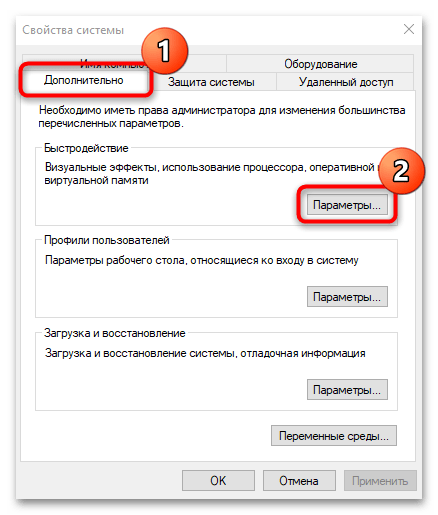
- Перейдите на вкладку «Дополнительно» и щелкните по кнопке «Параметры».
- В новом окне нажмите на вкладку «Визуальные эффекты». При выборе пункта «Обеспечить наилучшее быстродействие» все эффекты визуализации будут отключены.
- Чтобы самостоятельно выбрать параметры, которые нужно отключить, отметьте пункт «Особые эффекты», затем уберите галочки с пунктов в списке ниже.
- Примените, затем сохраните настройки.
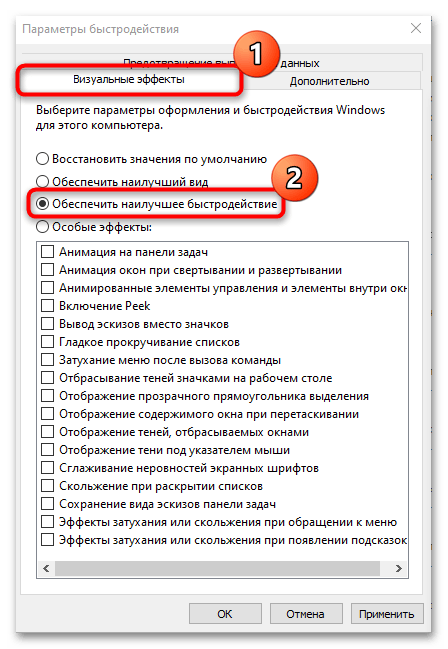
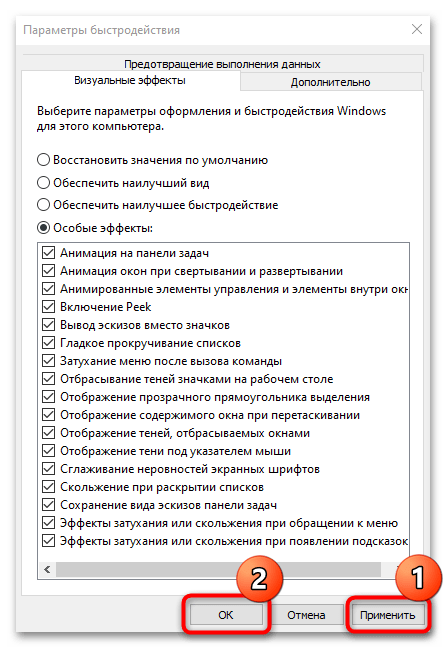
После этого интерфейс лишится различных эффектов и анимации, что негативно повлияет на внешний вид и восприятие, но при этом производительность системы увеличится, что поможет избавиться от фризов.
Updated by
Sherly on Aug 21, 2023
What you should do when your SSD freezes up on Windows 10/11. Does change cluster size without formatting can fix this issue? Do you know the reasons why SSDs freeze up? Four common factors can lead your SSDs to freeze up. You may have connected with the wrong SATA port, as your PC contains different SATA ports. Another reason could be AHCI mode is not enabled. The third reason is the lack of 4K alignment, as well as if your SSD is physically damaged, it can cause this issue. In this article, EaseUS Software will unfreeze and fix the SSD in four different ways.
In this section, we present four different solutions to liberate your SSD from the clutches of freezing-up errors on Windows 10/11 systems. Each method contains a specific aspect of the problem and proper instructional steps, ensuring a tailored resolution to your SSD’s issue.
Solution 1. Check If the SSD Is Connected Proper Port
SATA ports facilitate data transfer, with three types available: SATA I, SATA II, and SATA III. To optimize SSDs’ high-speed capabilities, connect them to SATA III ports, transferring up to 600MB per second. Mismatched connections, like SSDs on SATA II ports, can cause speed issues and glitches. To address «SSD freezes up,» verify the SSD’s connection to the correct port.
Read Also:
Solution 2. Enable the AHCI Mode
AHCI is the modern mode for memory devices, unlocking SATA benefits like faster data exchange with SSDs and HDDs and hot swapping. Activating AHCI enhances file access speed and overall PC performance significantly.
Follow the steps to enable the AHCI Mode:
Step 1. Launch Registry Editor. Simply type «regedit» in the «Run» box and hit «Enter.»
Step 2. When you see a popup, click «Yes.»
Step 3. Navigate to «HKEY_LOCAL_MACHINE\SYSTEM\CurrentControlSet\Services\iaStorV.» Once you’re in the «iaStorV» section, double-click the «Start» entry and modify its value to 0.
Step 4. Access «HKEY_LOCAL_MACHINE\SYSTEM\CurrentControlSet\Services\iaStorAV\StartOverride,» then open the «0» entry and change its value to 0.
Step 5. Proceed to «HKEY_LOCAL_MACHINE\SYSTEM\CurrentControlSet\Services\storahci» and edit the «Start» entry by changing its value to 0.
Step 6. In the «HKEY_LOCAL_MACHINE\SYSTEM\CurrentControlSet\Services\storahci\StartOverride» section, open the «0» entry and set its value to 0.
Step 7. Exit the Registry Editor, restart your PC, and access the BIOS. For the initial restart, consider booting Windows in safe mode.
Step 8. Inside the BIOS, locate the SATA settings and find the memory device mode. Switch this to AHCI mode, save your changes, and reboot your PC.
Step 9. After your PC reboots, Windows will commence the installation of SATA drivers. Once the installation completes, a further restart will be prompted. Complete that step to enable AHCI mode on Windows.
Solution 3. 4K Align SSD
Lack of 4K alignment, SSD will also freeze up. In this part, we’ll help you check if your SSD is 4K aligned or not. If not, we’ll give tools and a guide on how to 4K align an SSD.
Stage 1. Check Whether the SSD Is 4K Aligned
You have to check whether the SSD is 4K aligned or not. If the SSD hard drive isn’t correctly aligned to the 4K standard, its performance may suffer, potentially leading to the SSD freezes-up issue.
Follow the steps:
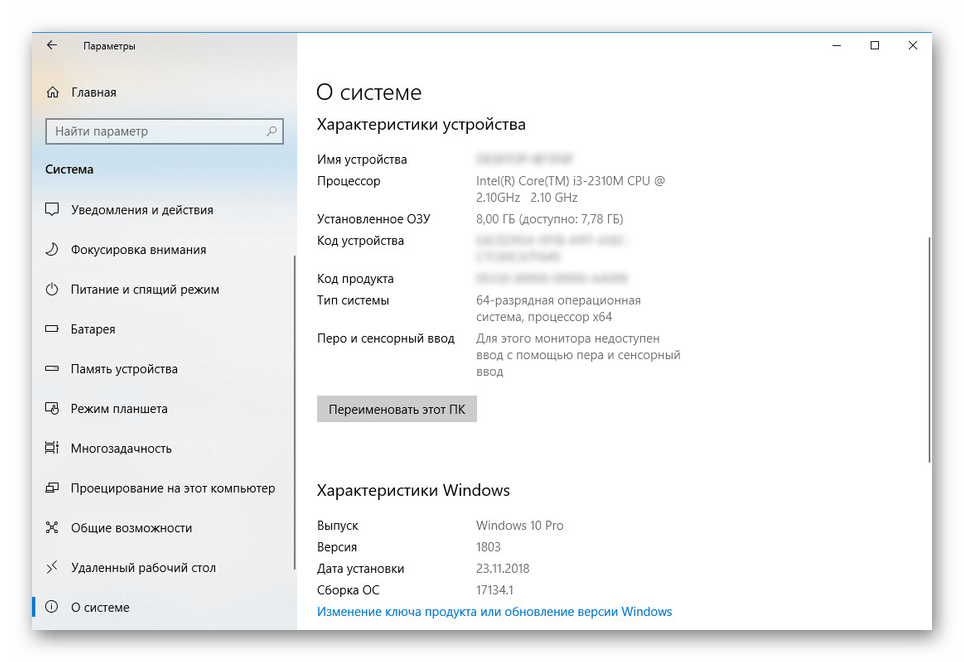
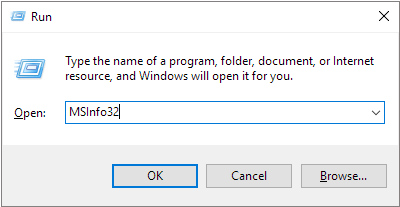
Step 1. Hit the Windows+R buttons to open the «Run» box. Type «msinfo32» and press «Enter.»
Step 2. Under the «System Summary» menu, click «Components.» Under its menu, click «Storage» and then choose «Disk.»
Step 3. Locate the «Partition Starting Offset» on the right-hand side and check if the value is divisible by 4096. Then the disk is 4K aligned.
If you find your SSD is not 4K aligned, please apply the below solution in stage 2.
Stage 2. Run 4K Alignment
Welcome to the critical phase of 4K alignment. This process can significantly enhance your SSD’s performance. Meet EaseUS Partition Master, a vital asset for effortless alignment. This tool contains a user-friendly interface and impeccable compatibility. This tool caters to users of varying technical proficiency levels, ensuring a smooth experience for beginners and experts alike. Its interface is designed to guide you through the alignment process seamlessly.
So, download EaseUS Partition Master and follow the steps below:
Step 1. Go to «Toolkit» and choose «4K Alignment».
Step 2. Select the disk you want to align. Click the «Start» button.
Solution 4. Replace SSD with a New One
If, unfortunately, all solutions fail or your SSD is physically damaged. There is no way except to replace an SSD with a new one. So, after acquiring a new SSD, your first concern would be saving data and programs. No worries, in this situation, EaseUS Partition Master can help you replace the freezing SSD with the new SSD without any data loss because EaseUS Partition Master has a disk cloning feature that can breathe new life into your system by saving and transferring all your data from your old SSD/HDD to new one.
Let’s explore how this essential tool and its cloning feature can be used to clone disks:
Step 1. Select the source disk.
- Click the «Clone» from the left menu. Select the «Clone OS Disk» or «Clone Data Disk» and click «Next».
- Choose the source disk and click «Next».
Step 2. Select the target disk.
- Choose the wanted HDD/SSD as your destination and click «Next» to continue.
- Read Warning message and confirm «Yes» button.
Step 3. View the disk layout and edit the target disk partition size.
Then click «Continue» when the program warns it will wipe out all data on the target disk. (If you have valuable data on the target disk, back up it in advance.)
You can select «Autofit the disk», «Clone as the source» or «Edit disk layout» to customize your disk layout. (Select the last one if you want to leave more space for C drive.)
Step 4. Click «Start» to start the disk cloning process.
This tool has other functions. See them from the list below:
- Check SSD health and temperature
- Clone SSD to larger SSD
- Clone SSD with bad sectors
- Upgrade HDD to SSD
- Test SSD read/write speed
Don’t hesitate to download this tool to approve the performance of your SSD and manage your SSD well.
Why Does an SSD Freeze Up Windows 10
If you experience the frustration of an SSD freezing up on Windows 10/11, understanding the root causes can pave the way for effective solutions. In this section, explore possible reasons that lead to this mysterious issue:
Misplaced SATA connection: If your SSD is connected to the wrong SATA port, it can lead to freezing up.
AHCI mode is not enabled: The absence of AHCI mode activation can slow your SSD’s performance.
Your SSD is not 4K aligned: If your SSD is not properly 4K aligned, it could also cause it to freeze.
Physical SSD damage: Physical damage can also bring about the dreaded freezing issue.
Please don’t forget to share this article with others in order to help them and they can quickly get rid of this frustrating and irritating issue.
Conclusion
When you face the SSD freezing issue on Windows 10/11, you can apply the above four solutions to unfreeze your SSD. Simultaneously, learning about freezing causes is also important to apply the right and relevant solutions. With this article’s help, you will now understand its freezing causes and solutions. Kindly share this article with others, as this can help them tackle this issue.
SSD Freezes Up FAQs
SSD freezing up can be annoying, especially when you are busy with a project or game. Read the FAQs below if you have more queries/questions about SSD freezes.
1. Why does my SSD keep freezing?
Your SSD can be frozen due to incorrect SATA connections, disabled AHCI mode, or improper 4K alignment. Identifying the root cause is essential for applying the right solution.
2. Can a faulty SSD cause freezing?
Yes, a malfunctioning SSD, whether due to physical damage or internal issues, can lead to freezing problems.
3. How do I fix my SSD from crashing?
First, analyze the underlying issue. It could be 4K alignment, AHCI mode, or connection errors to fix a crashing SSD. Follow the steps outlined in our guide to apply appropriate solutions.
Поставил SSD на 240Gb, переустановил Windows 10 Pro на SSD чистую, скачал все драйвера, библиотеки. Но заметил, что при выполнения каких-либо задач он подгрузжает 1-2 секунды и потом открывает. И в играх как-будто рванная картинка появилась фризы кому-то. Не знаете в чем проблема?
 Maks Morozov
19.09.2021
В диспетчер устройств зайди, посмотри нет ли жёлтых воскл. Знаков напротив подкл устройств, возможно драйвера криво встали, или некоторые вообще не встали
 MsWakeUp ml
19.09.2021
Вырубить все лишнее надо
- Фризы на Windows 7 после установки Сегодня установил Винду и накатал драйвера и даже после этого компьютер фризит, что делать?
- В кс появились микрофризы.купил SSD, поставил на него Винду, кс установил на жесткй как и было и появились фризы Иногда прям скачет вар почему то, а когда картинка более менее нормальная выглядит как 30hz всего, с чем-то связано и как это решить?
- После установки Windows 10 c флешки на ssd, Windows не запускается с ssd Просто кидает бут меню в котором я выбираю данный SSD но экран моргнет и ничего не происходит.
- Фризы и 70-80 фпс в CS: GO после установки Windows 10 pro Не давно установил винду, такую же которая была в прошлый раз, но тогда было от 200 до 250 фпс в CS, а сейчас максимум скачет до 100, и то на долю секунды. Хотел бы спросить, как это можно решить? ( И да, 70-80 фпс это конечно тоже не плохо, но бывают дикие просадки, это все равно мешает. )