Get started for free
Please select your product experience:
Description
Microsoft Hyper-V Server is a free product that delivers enterprise-class virtualization for your datacenter and hybrid cloud. Microsoft Hyper-V Server 2019 provides new and enhanced features that can help you deliver the scale and performance needs of your mission-critical workloads.
The Windows hypervisor technology in Microsoft Hyper-V Server 2019 is the same as what’s in the Microsoft Hyper-V role on Windows Server 2019. It is a stand-alone product that contains only the Windows hypervisor, a Windows Server driver model, and virtualization components. It provides a simple and reliable virtualization solution to help you improve your server utilization and reduce costs.
Languages
- Chinese (Simplified), Chinese (Traditional), English, French, German, Italian, Japanese, Korean, Portuguese (Brazil), Russian, Spanish
Editions
- Microsoft Hyper-V Server 2019 | 64-bit ISO
Prerequisites
Prior to installing Hyper-V Server 2019, follow these steps:
- Review Hyper-V Server 2019 system requirements.
- Register, then download and install full-featured software.
- Receive emails with resources to guide you through your deployment.
Installation Guidelines
- Upon installation you will be prompted to activate.
- A product key is not required.
Resources
Supporting products
-
Windows Server is the platform for building an infrastructure of connected applications, networks, and web services, from the workgroup to the data center. It bridges on-premises environments with Azure, adding additional layers of security while helping you modernize your applications and infrastructure.
Get started with Windows Server: 2022 | 2019 | 2016 | 2012 R2
-
Windows Server Essentials edition is a cloud-connected first server designed for small businesses with up to 25 users and 50 devices. If you are considering installing any version of Windows Server Essentials, we would encourage you to consider Microsoft 365.
Get started with Windows Server Essentials: 2019 | 2016 | 2012 R2
Learn more about Microsoft 365 for business -
Hyper-V Server provides a simple and reliable virtualization solution to help organizations improve their server utilization and reduce costs. The latest release of Hyper-V Server provides new and enhanced features that can help you deliver the scale and performance needs of your mission-critical workloads.
Get started with Hyper-V Server: 2019 | 2016 | 2012 R2 | 2012
-
Windows Admin Center is a locally deployed, browser-based app for managing Windows servers, clusters, hyper-converged infrastructure, as well as Windows 10 PCs. Giving you full control over all aspects of your server infrastructure, Windows Admin Center is particularly useful for managing servers on private networks that are not connected to the Internet
Get started with Windows Admin Center
Windows Hyper-V Server — это бесплатная серверная версия гипервизора от Microsoft, которую можно использовать для запуска виртуальных машин. В этой статье мы рассмотрим, как установить и настроить версию Windows Hyper-V Server 2019 (инструкция также применима и к Hyper-V Server 2016).
Содержание:
- Что нового в Hyper-V Server 2019?
- Установка Hyper-V Server 2019/2016
- Утилита Sconfig: базовая настройка Hyper-V Server 2019/2016
- Удаленное управление Hyper-V Server 2019/2016
- Настройка Hyper-V Server 2019 с помощью PowerShell
Microsoft анонсировала, что не будет выпускать отдельную версию Hyper-V Server 2022. Связано с тем, что сейчас они сфокусированы на другом стратегическим продуктов Azure Stack HCI.
Hyper-V Server 2019 подходит специально для тех, кто не хочет платить за систему аппаратной виртуализации. В нем доступны все функции Hyper-V и при этом он абсолютно бесплатный. Основные преимущества Windows Hyper-V Server:
- Поддержка всех популярных ОС – совместим со всеми операционными системами. Поддержка Hyper-V присутствует во всех Windows системах, в ядре всех современных систем Linux и FreeBSD;
- Поддерживаются много способов бекапа виртуальных машин — простые скрипты, бесплатные программы, платные версии популярных программ для бекапа;
- Несмотря на то, что в Hyper-V Server отсутствует графический интерфейс управления Windows Server, вы можете управлять им удаленно через стандартную консоль управления гипервизором Hyper-V Manager или веб консоль Windows Admin Center;
- В основе Hyper-V Server популярная платформа Windows Server, с которой привычно и просто работать;
- Hyper-V можно установить на псевдоRAID – например, RAID контроллер Intel, программный RAID Windows;
- Не нужно лицензировать гипервизор – подходит для запуска VDI и виртуальных машин с Linux;
- Нетребовательность к железу – x64 процессор с поддержкой аппаратную виртуализацию (у Intel — Intel-VT или VMX, у AMD — AMD-V (SVM ) и трансляцию адресов второго уровня SLAT (Intel EPT или AMD RV). Эти опции процессора должны быть включены в BIOS/UEFI/nested host. Полные системные требования можно найти на сайте Microsoft;
- Рекомендуется устанавливать на хосты с минимум 4 Гб памяти.
Не нужно путать полноценный Windows Server 2016/2019/2022 с установленной ролью Hyper-V с Free Hyper-V Server 2019/2016. Это разные продукты.
Также отметим, что использование бесплатного гипервизора не освобождает вас от обязанности лицензировать виртуальные машин. Вы можете запустить неограниченное количество ВМ с opensource ОС типа Linux, но виртуальные машины с Windows придется лицензировать. Десктопные редакции Windows лицензируются с помощью ключа продукта. Если вы используете Windows Server в качестве гостевой ОС, его нужно лицензировать по физическим ядрам вашего хоста. Подробнее о лицензировании Windows Server при запуске в среде виртуализации смотрите здесь.
Что нового в Hyper-V Server 2019?
Вкратце пробежимся по объявленным новшествам в Hyper-V Server 2019:
- Появилась поддержка Shielded Virtual Machines для Linux;
- Версия VM конфигурации 9.0 (поддержка гибернации);
- Поддержка дедупликации для ReFS;
- Core App Compatibility – возможность запуска дополнительных графических панелей управления в консоли сервера Hyper-V;
- Поддержка 2-node Hyper-V cluster, кросс-доменной миграция кластеров.
Установка Hyper-V Server 2019/2016
Скачать ISO образ гипервизора Hyper-V Server 2019 можно https://www.microsoft.com/en-us/evalcenter/evaluate-hyper-v-server-2019.

После нажатия на кнопку “Continue” откроется небольшая форма регистрации для ввода ваших данных. Заполняете, затем выбираете язык устанавливаемой системы. Настоятельно рекомендую выбрать английский. И ждете, когда закончится скачивание образа Hyper- V. Размер .iso файла около 3 ГБ.
Установка Microsoft Hyper-V Server идентична установки Windows 10/11 на компьютер. Просто загрузите ваш сервер (компьютер) с установочной USB флешки с установочным образом Microsoft Hyper-V Server (для записи ISO образа на USB накопитель проще всего использовать утилиту Rufus) и следуйте инструкциям мастера установки ОС.
Утилита Sconfig: базовая настройка Hyper-V Server 2019/2016
После завершения установки Hyper-V Server потребует задать пароль администратора.
После этого перед вами откроется консоль гипервизора.
Обратите внимание, что у Hyper-V Server нет привычного графического интерфейса Windows. Большинство настроек сервера придется выполнять через командную строку.
На рабочем столе два окна – стандартная командная строка и окно скрипта sconfig.cmd. С помощью данного скрипта можно выполнить первоначальную настройку сервера Hyper-V. В строке “Enter number to select an option:” введите номер пункта меню, с которым будете работать.
- Первый пункт меню позволяет ввести сервер в домен AD или в рабочую группу;

- Затем задайте имя хоста (сервера);
- Добавьте локального администратора (дополнительную учетную запись, помимо встроенного administrator). Обратите внимание, что при вводе пароля курсор остается на одном месте, тем не менее, пароль и его подтверждение успешно вносятся в систему;
- Включите удаленный доступ к серверу. Это позволить управлять им с помощью Server Manager, консолей MMC, PowerShell, проверить доступность с помощью ping или tracert;
- Настройте Windows Update. Выберите один из трех режимов:
- Automatic (автоматическая загрузка и установка обновлений)
- DownloadOnly (только загрузка без установки)
- Manual (решение о загрузке и установке обновлений принимает администратор)
- Загрузите и установите последние обновления Windows;
- Включите RDP доступ с или без NLA (Network Level Authentication);
- Настройки параметры сетевых адаптеров. По умолчанию сервер получает адрес от DHCP. Обычно тут стоит указать статический IP адрес;

- Установите дату и время системы;
- Настройте телеметрию. Полностью ее отключить система не позволит. Выберите режим, который вам больше нравится
Дату, время и часовой пояс можно также настроить с помощью команды:
control timedate.cpl
Региональные параметры:
control intl.cpl
При этом открываются стандартные консоли Windows.
Внимание! Если вы закрыли все окна и оказались перед черным экраном, то нажмите Ctrl+Shift+Esc, чтобы запустить диспетчер задач данное сочетание клавиш работает в том числе и в RDP-сессии). С помощью Task Manager вы можете запустить командную строку или утилиту конфигурации Hyper-V (нажмите File -> Run Task ->
cmd.exe
или
sconfig.cmd
).
Удаленное управление Hyper-V Server 2019/2016
Для удобного управления Free Hyper-V Server 2019 из графического интерфейса вы можете использовать:
- Веб консоль Windows Admin Center (см. статью Windows Admin Center: веб-интерфейс управления серверами Windows Server);
- Стандартную консоль Hyper-V Manager – можно установить, как на Windows Server, так и на десктопных версиях Windows 10/11.
Для работы с Hyper-V Server 2016/2019 вам потребуется ПК с операционной системой Windows 10 версий Pro или Enteprise х64.
Удаленное управление Hyper-V Server с помощью Hyper-V Manager
Рассмотрим, как удаленно подключиться к хосту Hyper-V сервер с другого компьютера с помощью консоли Hyper-V Manager. В этой статье мы подразумеваем, что у вас сервер Hyper-V и компьютер с Windows 10 находятся в одной рабочей группе (WORKGROUP).
Cначала выполните настройки на сервере Hyper-V. Запустите консоль PowerShell (powershell.exe) и выполните следующие команды:
Enable-PSRemoting
Enable-WSManCredSSP -Role server
Утвердительно отвечаете на все вопросы, при этом будет настроен автоматический запуск службы WinRM и созданы разрешающие правила в брандмауэре.
Теперь переходит к настройке клиентского компьютера с Win 10.
Сервер Hyper-V должен быть доступен по своему сетевому имени, в доменной сети ему должна соответствовать A-запись на DNS-сервере. В рабочей группе такую запись потребуется нужно создать вручную на локальном DNS, либо добавить нужную запись в файл hosts (C:\Windows\System32\drivers\etc\hosts) клиентской машины. В нашем случае она выглядит следующим образом:
192.168.13.55 hv19
Можно добавить запись в файл hosts с помощью PowerShell:
Add-Content -Path "C:\Windows\System32\drivers\etc\hosts" -Value "192.168.13.55 hv19"
Добавьте Hyper-V сервер в доверенные узлы:
Set-Item WSMan:\localhost\Client\TrustedHosts -Value "hv19"
Если учетная запись, под которой вы работаете на клиентском ПК, отличается от учетных данных администратора Hyper-V, нужно явно сохранить учетные данные для соединений с сервером в диспетчер учетных записей Windows командой:
cmdkey /add:hv19 /user:Administrator /pass:MyPa$$word
Проверьте используемый профиль сети на клиенте Windows 10. Если используется тип сети Public, ее нужно сменить на Private:
Get-NetConnectionProfile|select InterfaceAlias,NetworkCategory

Set-NetConnectionProfile -InterfaceAlias "EthernetLAN2" -NetworkCategory Private
Выполите команду:
Enable-WSManCredSSP -Role client -DelegateComputer "hv19"
Теперь выполните команду
gpedit.msc
чтобы открыть редактор локальной GPO.
- Перейдите в раздел Local Computer Policy -> Computer Configuration -> Administrative Templates -> System -> Credentials Delegation;
- Включите параметр Allow Delegating Fresh Credentials with NTLM-only Server Authentication.
- Затем нажмите кнопку Show и добавьте два значения
wsman/hv19
и
wsman/hv19.local - Закройте консоль редактора и обновите настройки локальной групповой политики командой
gpupdate /force
Теперь нужно установить в Windows консоль Диспетчер Hyper-V. Откройте оснастку Programs and Features и перейдите в Turn Windows Features on or off. В открывшемся окне найдите пункт Hyper-V и отметьте для установки Hyper-V GUI Management Tools.
Или вы можете установить клиент Hyper-V Manager с помощью PowerShell:
Enable-WindowsOptionalFeature -Online –FeatureName Microsoft-Hyper-V-Management-Clients
Запустите оснастку Hyper-V Manager (
virtmgmt.msc
), щелкните правой кнопкой по Hyper-V Manager и выберите Connect to Server. Укажите имя вашего сервера Hyper-V.
Теперь вы можете управлять настройками Hyper-V Server, создавать виртуальный машины и управлять ими из графической консоли.
Управление Hyper-V с помощью Windows Admin Center
Для удаленного управления хостом Hyper-V можно использовать Windows Admin Center (WAC). WAC это веб консоли и дашбоард для полноценного управления Windows Server, Server Core и Hyper-V Server.
На стороне Hyper-V нужно включить разрешающие правила для SMB подключений в Windows Defender Firewall:
Set-NetFirewallRule -DisplayGroup "File and Printer Sharing" -Enabled true -PassThru
Теперь нужно скачать (https://aka.ms/WACDownload) и установить агент Windows Admin Center на ваш хост Hyper-V. Скачайте WindowsAdminCenter2110.2.msi на любом компьютере Windows с доступом в интернет. Можно скопировать установочный MSI файл на Hyper-V сервер через подключение к административной шаре C$. Для этого выполните команду:
Win+R ->
\\192.168.13.55\C$
и введите пароль администратора Hyper-V
Создайте папку и скопируйте в нее MSI файл.
Теперь запустите установку WAC из консоли Hyper-V:
c:\distr\WindowsAdminCenter2110.2.msi
Установите WAC с настройками по-умолчанию.
После окончания установки вы можете подключиться к вашему Hyper-V Server из браузера, простой перейдите по адресу
https:\\192.168.13.55:443
Перед вами откроется дашбоард вашего Hyper-V Server хоста. Вы увидите базовую информацию о сервере, используемых ресурсах и т.д.
Настройки хоста Hyper-V можно задать в разделе WAC -> Settings -> Hyper-V Host Settings. Доступны следующие разделы:
- General
- Enhanced Session Mode
- NUMA Spanning
- Live Migration
- Storage Migration

Для управления Hyper-V вы будете преимущественно использовать две секции в консоли WAC:
- Virtual Switches – нужно создать как минимум один виртуальный коммутатор, чтобы предоставить сетевой доступ для ВМ;
- Virtual Machines – в этом разделе вы можете создать, настроить, включить/выключить, импортировать/экспортировать виртуальную машину Hyper-V.
Далее я рассмотрю некоторые способы управления Hyper-V Server из PowerShell
Настройка Hyper-V Server 2019 с помощью PowerShell
Для настройки сервера рекомендую использовать PowerShell. В модуле Module Hyper-V доступно более 238 командлетов для управления сервером Hyper-V.
Get-Command –Module Hyper-V | Measure-Object
Настройте автоматический запуск консоли PowerShell (вместо cmd.exe) при входе в систему.
New-ItemProperty -path HKLM:\SOFTWARE\Microsoft\Windows\CurrentVersion\run -Name PowerShell -Value "cmd /c start /max C:\Windows\system32\WindowsPowerShell\v1.0\powershell.exe -noExit" -Type string
Теперь при входе в сеанс будет запускаться окно PowerShell.
Настройка параметров сети Hyper-V Server 2019 из PowerShell
Если вы не настраивали сетевые параметры в окне sconfig.cmd, то настройте их через PowerShell. С помощью командлета Get-NetIPConfiguration можно увидеть текущую конфигурацию IP сетевых интерфейсов.
Через PowerShell назначьте статический IP адрес, маску сети, шлюз по умолчанию и адреса DNS серверов. Индекс (InterfaceIndex) сетевого адаптера берем из вывода предыдущего командлета.
New-NetIPAddress -InterfaceIndex 4 -IPAddress 192.168.1.2 -DefaultGateway 192.168.1.1 -PrefixLength 24
Set-DnsClientServerAddress -InterfaceIndex 4 -ServerAddresses 192.168.1.3,192.168.1.4
Для настройки IPV6 смотрим имя интерфейса командлетом Get-NetAdapter из PowerShell модуля управления сетью NetTCPIP:

Проверьте текущую настройку IPv6 следующей командой:
Get-NetAdapterBinding -InterfaceDescription "Intel(R) PRO/1000 MT Network Connection" | Where-Object -Property DisplayName -Match IPv6 | Format-Table –AutoSize

Отключить IPV6 можно так:
Disable-NetAdapterBinding -InterfaceDescription " Intel(R) PRO/1000 MT Network Connection " -ComponentID ms_tcpip6
Настройка правил Windows Defender Firewall для управления Hyper-V Server 2019
Просмотреть список командлетов для управления файерволом Windows можно с помощью Get-Command.
Get-Command -Noun *Firewall* -Module NetSecurity
Для полноценного удаленного управления сервером выполните последовательно следующие команды для включения разрешающих правил Windows Firewall из PoSh:
Enable-NetFireWallRule -DisplayName "Windows Management Instrumentation (DCOM-In)"
Enable-NetFireWallRule -DisplayGroup "Remote Event Log Management"
Enable-NetFireWallRule -DisplayGroup "Remote Service Management"
Enable-NetFireWallRule -DisplayGroup "Remote Volume Management"
Enable-NetFireWallRule -DisplayGroup "Windows Defender Firewall Remote Management"
Enable-NetFireWallRule -DisplayGroup "Remote Scheduled Tasks Management"
Создание дискового хранилища для виртуальных машин
Для хранения данных (файлов виртуальных машин и дистрибутивов) будем использовать отдельный раздел на физическом диске. Просмотрите список физических дисков на сервере.
Get-Disk
Создайте новый раздел на диске максимально возможного размера и назначьте ему букву D. Используйте DiskNumber из Get-Disk.
New-Partition -DiskNumber 0 -DriveLetter D –UseMaximumSize
После этого отформатируйте раздел в NTFS и укажите его метку.
Format-Volume -DriveLetter D -FileSystem NTFS -NewFileSystemLabel "HVStore"
Подробнее о командлетах управления дисками и разделами из PowerShell здесь.
Создайте каталог, где будете хранить настройки и файлы дисков виртуальных машин. Командлет New-Item позволяет создавать вложенные пути:
New-Item -Path "D:\Hyper-V\Virtual Hard Disks" -Type Directory
Создайте папку D:\Distrib для хранения установоых ISO образов ОС:
New-Item -Path D:\Distr -ItemType Directory
Для создания общей сетевой папки (шары) используйте командлет New-SmbShare, с помощью которого предоставьте полный доступ по сети для группы локальных администраторов сервера:
New-SmbShare -Path D:\Distr -Name Distr -Description "OS Distributives" -FullAccess "BUILTIN\Administrators"
Более подробно о базовой настройке Hyper-V Server и Windows Server Core из командой строки рассказано в этой статье.
Настройка параметров хоста в Hyper-V Server 2016/2019
Откроем параметры сервера командой:
Get-VMHost | Format-List

Пути виртуальных машин и виртуальных дисков находятся на одном разделе с операционной системой, что неправильно. Пропишите путь к созданным ранее папкам с помощью команды:
Set-VMHost -VirtualMachinePath D:\Hyper-V -VirtualHardDiskPath 'D:\Hyper-V\Virtual Hard Disks'
Создание виртуального коммутатора Hyper-V
Создайте External Switch, который привязывается к сетевой карте Hyper-V Server и организует взаимодействие ВМ с физической сетью.
Проверьте поддержку SR-IOV (Single-Root Input/Output (I/O) Virtualization):
Get-NetAdapterSriov
Получите список подключенных сетевых адаптеров:
Get-NetAdapter | Where-Object -PropertyStatus –eqUp
Привяжите виртуальный свитч к сетевому адаптеру и при наличии SR-IOV включите его поддержку.
Внимание! Включить или отключить поддержку SR-IOV после создания свитча будет невозможно, для изменения этого параметра необходимо будет пересоздавать коммутатор.
New-VMSwitch -Name "Extenal_network" -NetAdapterName "Ethernet 2" -EnableIov 1
Проверить настройки виртуального коммутатора можно с помощью командлетов:
Get-VMSwitch
Get-NetIPConfiguration –Detailed
На этом первоначальная настройка Hyper-V Server 2016/2019 закончена. Можно переходить к созданию и настройке виртуальных машин.
Более подробно команды PowerShell для управления Hyper-V и виртуальными машинами описаны в этой статье.
Microsoft Hyper-V Server is a free version of Windows hypervisor that can be used to run virtual machines. In this guide, we’ll look at how to install and configure Microsoft Hyper-V Server 2019 (this guide also applies to Hyper-V Server 2016).
Contents:
- What’s New in Microsoft Hyper-V Server 2019?
- How to Install Hyper-V Server 2019/2016?
- Manage Hyper-V Server Basic Settings Using Sconfig
- How to Remotely Manage Hyper-V Server 2019?
- Configuring Hyper-V Server 2019 Host with PowerShell
Microsoft announced that they won’t not be releasing a Hyper-V Server 2022 version. This is because they are currently focusing on another strategic product, Azure Stack HCI.
Hyper-V Server 2019 is suitable for those who don’t want to pay for a hardware virtualization operating system. The Hyper-V has no restrictions and is completely free. Key benefits of Microsoft Hyper-V Server:
- Support of all popular OSs. There are no compatibility problems. All Windows and modern Linux and FreeBSD operating systems support Hyper-V;
- A lot of different ways to backup virtual machines: simple scripts, open-source software, free and commercial versions of popular backup programs;
- Although Hyper-V Server doesn’t have a Windows Server GUI (graphical management interface), you can manage it remotely using a standard Hyper-V Manager console or Windows Admin Center web interface;
- Hyper-V Server is based on a popular Windows Server platform, familiar and easy to work with;
- You can install Hyper-V on a pseudoRAID, for example, Inter RAID controller, or Windows software RAID;
- You do not need to license your hypervisor, it is suitable for VDI or Linux VMs;
- Low hardware requirements. Your processor must support software virtualization (Intel-VT or VMX by Intel, AMD-V/ SVM by AMD) and second-level address translation (SLAT) (Intel EPT or AMD RV). These processor options must be enabled in BIOS/UEFI/nested host. You can find full system requirements on the Microsoft website;
- It is recommended to install Hyper-V on hosts with at least 4 GB RAM.
Do not confuse a Windows Server 2022/2019/2016 (Full GUI or Server Core edition) with the Hyper-V role installed with Free Microsoft Hyper-V Server 2019/2016. These are different products.
It is worth to note that if you are using a free hypervisor, you are still responsible for licensing your virtual machines. You can run any number of VMs running any open-source OS, like Linux, but you have to license your Windows virtual machines. If you are using Windows Server as a guest OS, you must license it by the number of physical cores on your Hyper-V host. See more details on Windows Server licensing in a virtual environment.
What’s New in Microsoft Hyper-V Server 2019?
Let’s consider the new Hyper-V Server 2019 features in brief:
- Added support for Shielded Virtual Machines for Linux;
- VM configuration version 9.0 (with hibernation support);
- ReFS deduplication support;
- Core App Compatibility: the ability to run additional graphic management panels in the Hyper-V server console;
- Support for 2-node Hyper-V cluster and cross-domain cluster migration
How to Install Hyper-V Server 2019/2016?
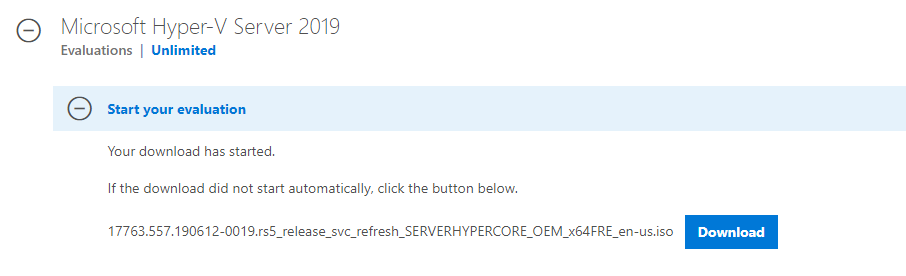
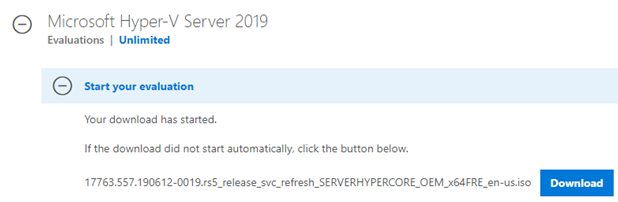
You can download Hyper-V Server 2019 ISO install image here: https://www.microsoft.com/en-us/evalcenter/evaluate-hyper-v-server-2019.
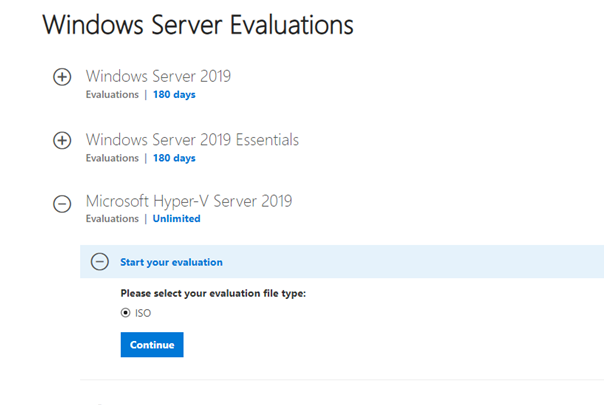
After clicking on the “Continue” button, a short registration form will appear. Fill in your data and select the language of the OS to be installed. Wait till the Hyper-V image download is over. The .iso file size is about 3 GB.

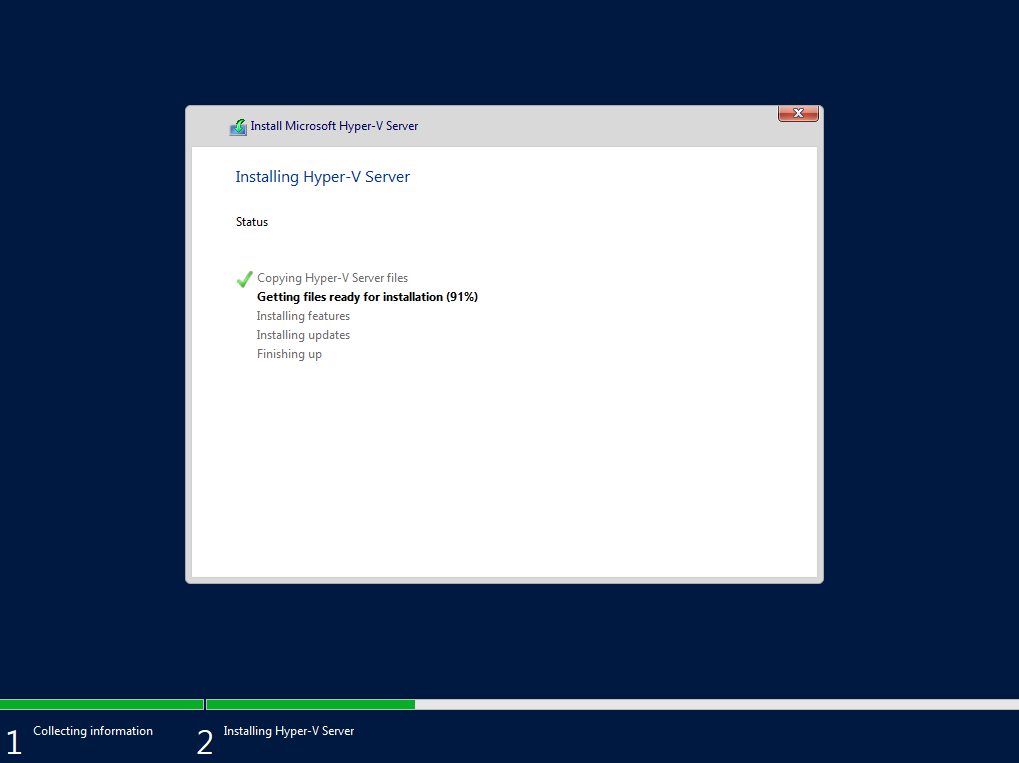
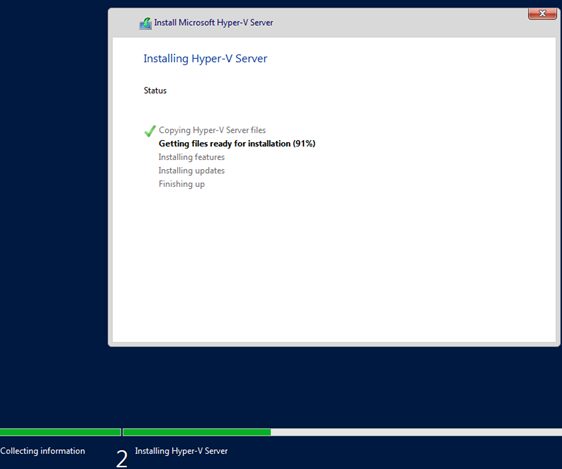
Installing Microsoft Hyper-V Server is identical to installing Windows 10/11 on a desktop computer. Just boot your server (computer) from the bootable USB flash drive with the Microsoft Hyper-V Server installation image (the easiest way to burn the ISO image to a USB drive is to use the Rufus tool). Then follow the instructions of the Windows setup wizard.

Manage Hyper-V Server Basic Settings Using Sconfig
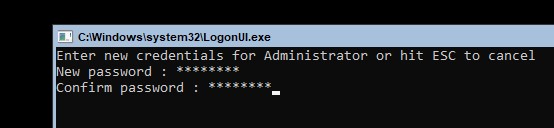
After the installation, the system will prompt you to change the administrator password. Change it, and you will get to the hypervisor console.

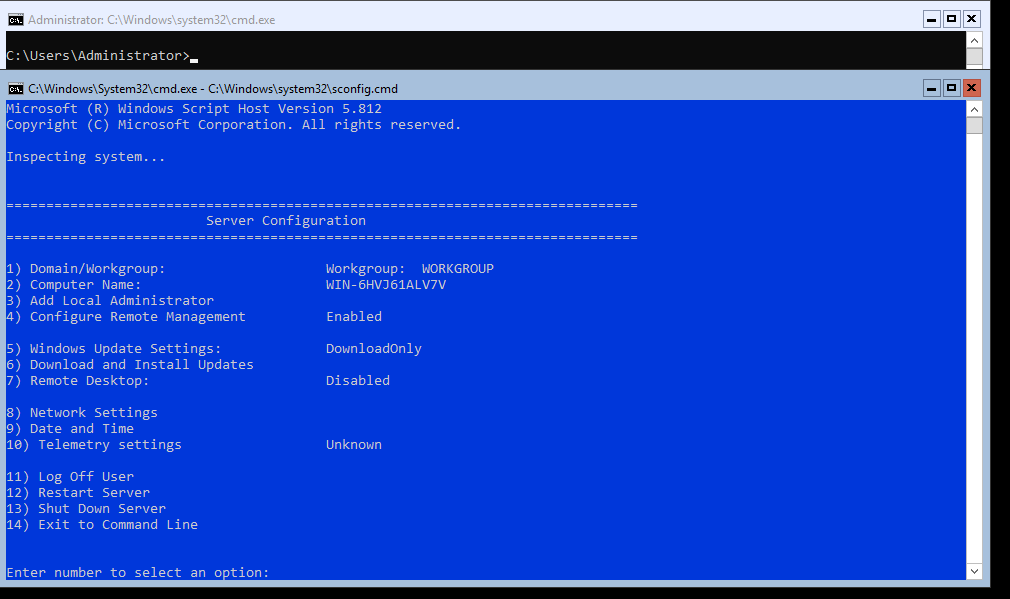
Please note that Hyper-V Server does not have a familiar Windows GUI. You will have to configure most settings through the command line.

There are two windows on the desktop — the standard command prompt and the sconfig.cmd script window. You can use this script to perform the initial configuration of your Hyper-V server. Enter the number of the menu item you are going to work with in the “Enter number to select an option:” line.
- The first menu item allows you to join your server to an AD domain or a workgroup;
- Set a hostname for your Hyper-V Server;
- Create a local administrator user (another account, besides the built-in administrator account). I’d like to note that when you enter the local administrator password, the cursor stays in the same place. However, the password and its confirmation are successfully entered;
- Enable remote access to your server. Thus, you will be able to manage it using Server Manager, MMC consoles, and PowerShell, connect via RDP, check its availability using ping or tracert;
- Configure Windows Update. Select one of the three modes:
- Automatic (automatic update download and installation)
- DownloadOnly (only download without installation)
- Manual (the administrator decides whether to download or install the updates)
- Download and install the latest Windows security updates.
- Enable RDP access with/without NLA.
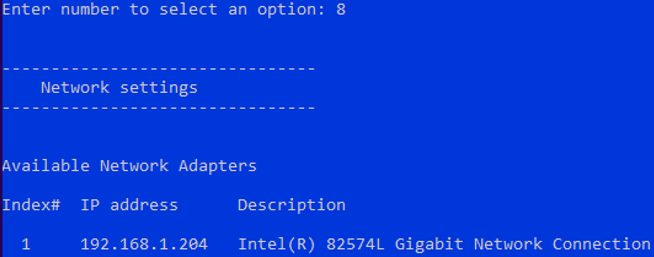
- Configure your network adapter settings. By default, your server receives the IP address from the DHCP server. It is better to configure the static IP address here;
- Set the date and time of your system.
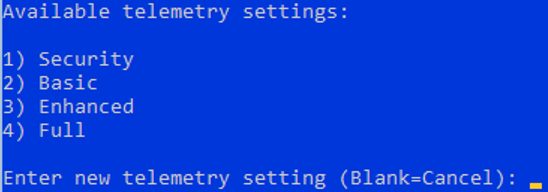
- Configure the telemetry. The Hyper-V won’t allow you to disable it completely. Select the mode you want.

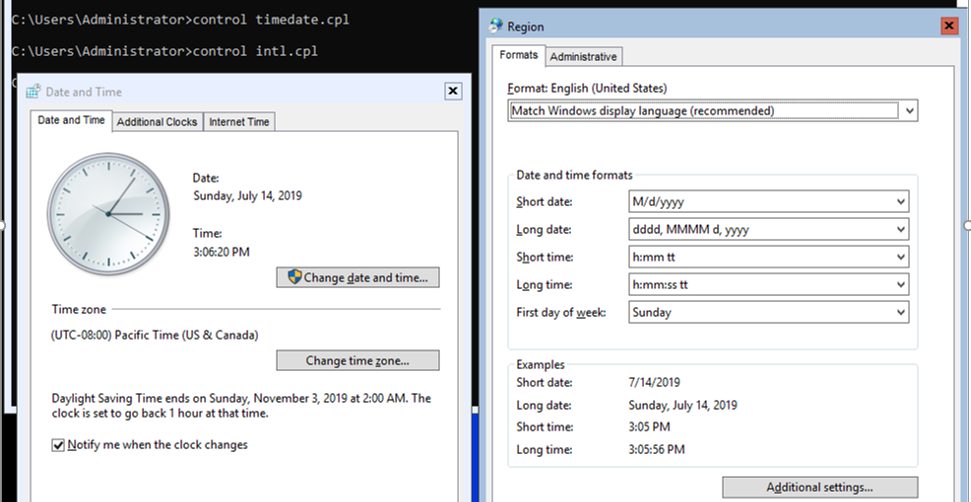
You can also configure the date, time, and time zone using the following command:
control timedate.cpl
Regional settings:
control intl.cpl
These commands will open standard Windows consoles.
Note! If you accidentally close all windows and see the black Hyper-V screen, press Ctrl+Shift+Esc to start the Task Manager (this keyboard shortcut works in an RDP session as well). You can use Task Manager to start the command prompt or the Hyper-V configuration tool (click File -> Run Task -> cmd.exe or sconfig.cmd).
How to Remotely Manage Hyper-V Server 2019?
To conveniently manage Free Hyper-V Server 2019 from the graphic interface, you can use:
- Windows Admin Center – a web-based console;
- Hyper-V Manager — can be installed both on Windows Server and Windows 10/11 desktop computers.
To manage the Hyper-V Server 2016/2019, you will need a computer running x64 Windows 10/11 Pro or Enterprise edition.
Remotely Manage a Non-Domain Hyper-V Server with Hyper-V Manager
Let’s look at how to remotely connect to a Hyper-V Server host from another Windows computer using the Hyper-V Manager console. In this article, we assume that you have a Hyper-V Server and a Windows 10 computer in the same workgroup.
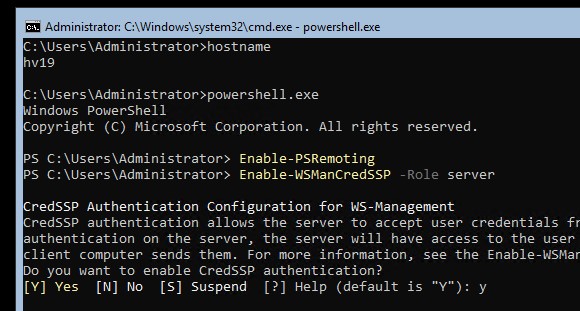
First, make settings on the Hyper-V Server. Start the PowerShell console (powershell.exe) and run the following commands:
Enable-PSRemoting
 Enable-WSManCredSSP -Role server
Answer YES to all questions. Thus you will configure the automatic startup of the WinRM service and enable remote management rules in your firewall.

Now let’s move on to setting up the Windows 10 or 11 client computer that you will use to manage your Hyper-V Server host.
The Hyper-V server must be accessible by its hostname. In the domain network, it must correspond to the A-record on the DNS server. In a workgroup environment, you will have to create the A record manually on your local DNS or add it to the hosts file (C:\Windows\System32\drivers\etc\hosts) on a client computer. In our case, it looks like this:
192.168.13.55 HV19
You can add an entry to the hosts file using PowerShell:
Add-Content -Path "C:\Windows\System32\drivers\etc\hosts" -Value "192.168.13.55 hv19"
Add your Hyper-V server to the trusted host list:
Set-Item WSMan:\localhost\Client\TrustedHosts -Value "hv19"
If the account you are using on a client computer differs from the Hyper-V administrator account (and it should be so), you will have to explicitly save your credentials used to connect to the Hyper-V server to the Windows Credential Manager. To do it, run this command:
cmdkey /add:hv19 /user:Administrator /pass:HV1Pa$$w0drd
Check the network profile you are using on the Windows 10 client. If the network type is Public, you need to change the location to Private:
Get-NetConnectionProfile|select InterfaceAlias,NetworkCategory
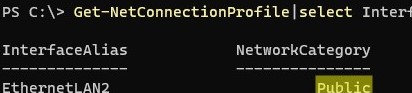
Set-NetConnectionProfile -InterfaceAlias "EthernetLAN2" -NetworkCategory Private
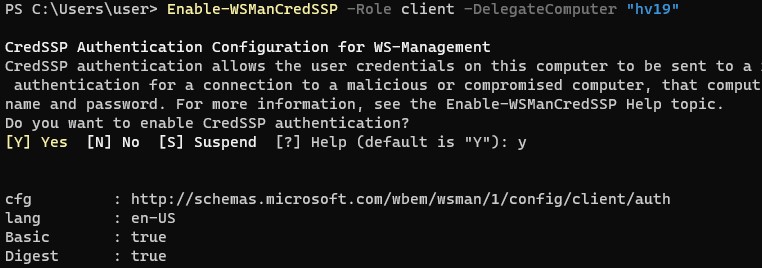
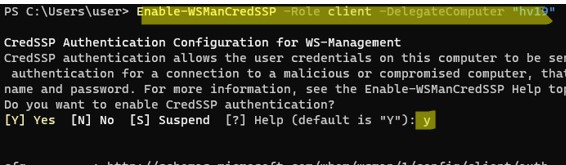
Run the command:
Enable-WSManCredSSP -Role client -DelegateComputer "hv19"
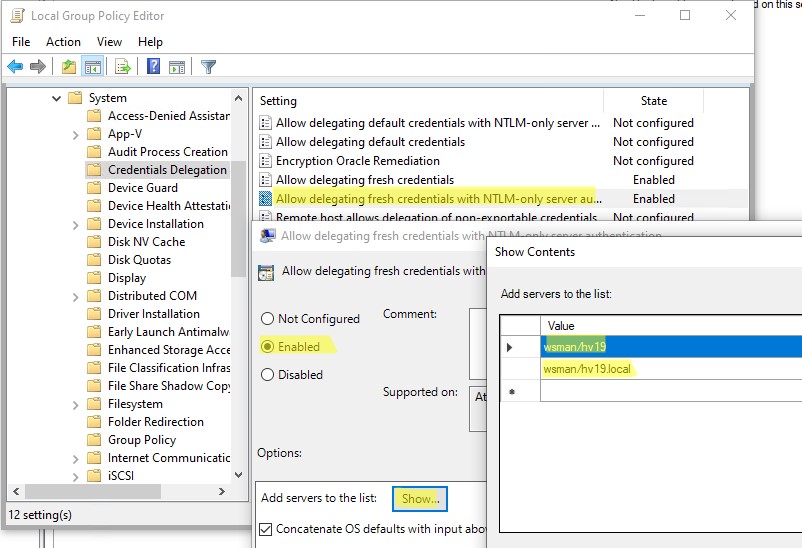
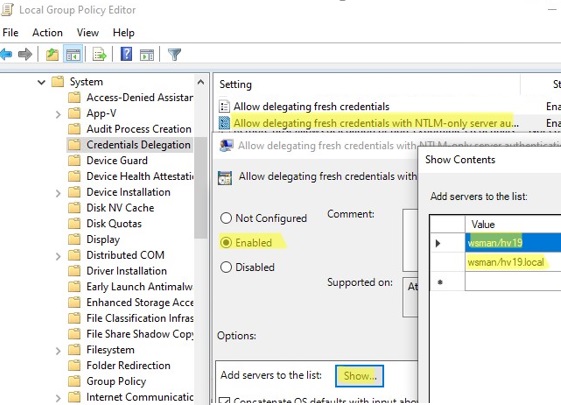
Now run the gpedit.msc command to open the Local Group Policy Editor.
- Navigate to Local Computer Policy -> Computer Configuration -> Administrative Templates -> System -> Credentials Delegation;
- Enable the parameter Allow Delegating Fresh Credentials with NTLM-only Server Authentication;
- Click the Show button and add two string values:
wsman/hv19andwsman/hv19.local - Close the GPO editor console and update your local group policy settings using the command
gpupdate /force
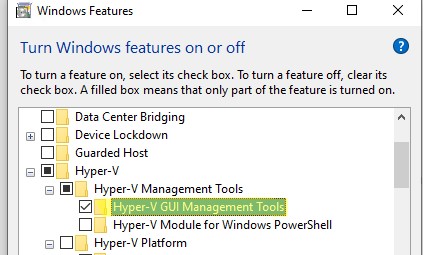
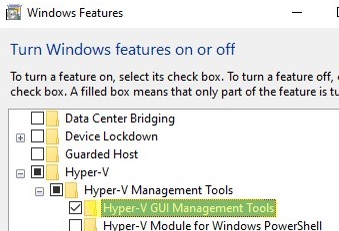
Now you need to install the Hyper-V Manager console in Windows. Open the Programs and Features snap-in and go to Turn Windows Features on or off. In the next window, find Hyper-V, and check Hyper-V GUI Management Tools to install it.
Also, you can install the Hyper-V Manager snap-in on Windows 10/11 using PowerShell:
Enable-WindowsOptionalFeature -Online –FeatureName Microsoft-Hyper-V-Management-Clients
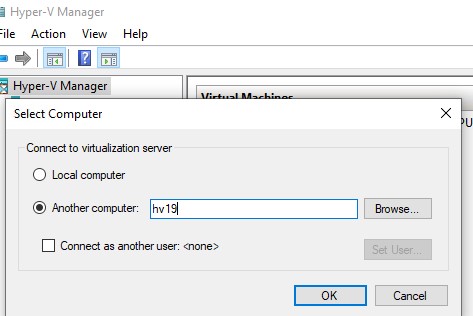
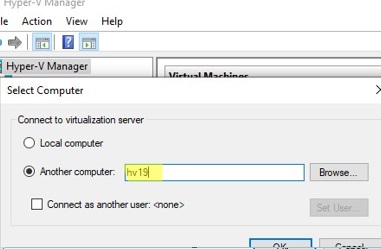
Run the Hyper-V Manager snap-in (virtmgmt.msc), right-click Hyper-V Manager and select Connect to Server. Specify the name of your Hyper-V Server.
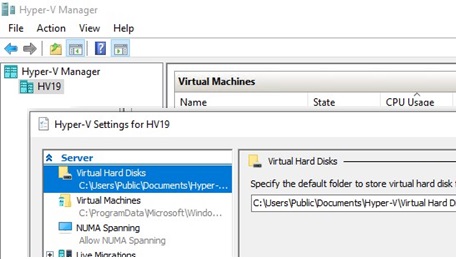
Now you can manage Hyper-V Server settings, and create and manage virtual machines from the graphical console.
Managing Hyper-V Server with Windows Admin Center
You can use the Windows Admin Center (WAC) to remotely manage a Hyper-V Server host. WAC is a web-based console and dashboard to manage Windows Server, Server Core, and Hyper-V Server hosts.
Enable the rules to allow SMB connections in Windows Defender Firewall on the Hyper-V Server:
Set-NetFirewallRule -DisplayGroup "File and Printer Sharing" -Enabled true -PassThru
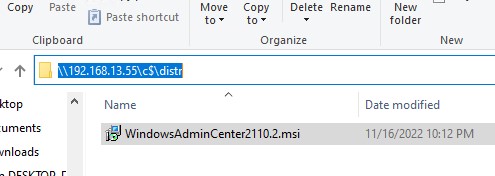
Now you need to download (https://aka.ms/WACDownload) and install the Windows Admin Center agent on your Hyper-V host. Download WindowsAdminCenter2110.2.msi on any Windows computer. You can copy the installation MSI file to the Hyper-V Server using a remote SMB connection to the administrative share C$. Run the following command on your Windows client device:
Win+R -> \\192.168.13.55\C$ and enter the Hyper-V administrator password. Create a folder and copy the MSI file to the Hyper-V Server host.
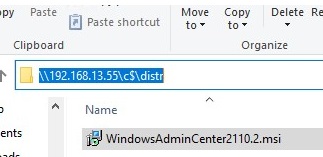
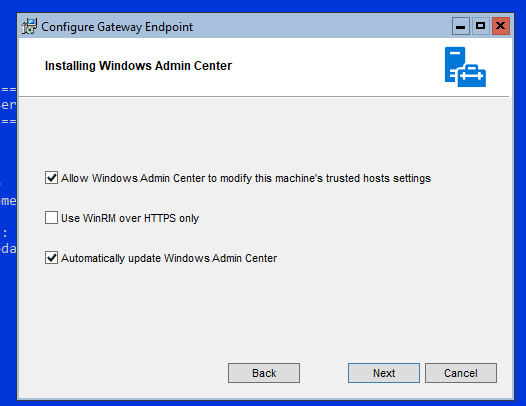
Now run the WAC installation from the Hyper-V console:
c:\distr\WindowsAdminCenter2110.2.msi
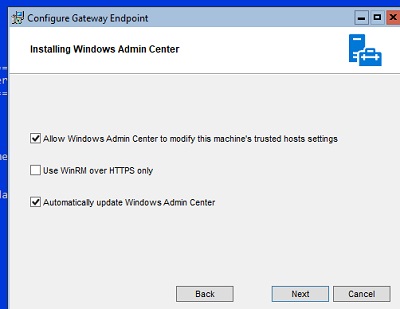
Install WAC with default settings.
After the installation is complete, you can connect to your Hyper-V Server from a browser, just go to the URL https:\\192.168.13.55:443
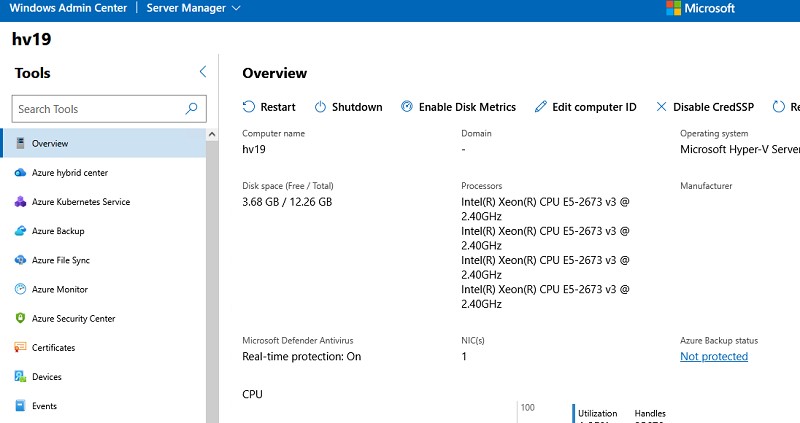
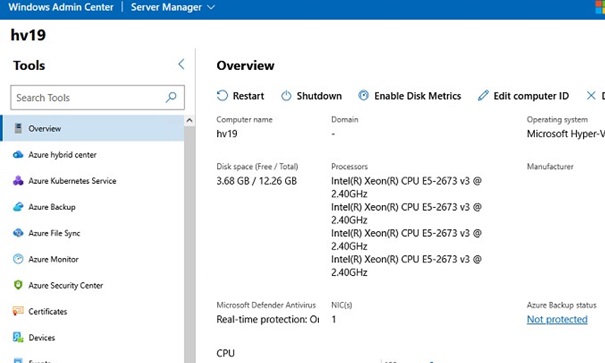
You will see the dashboard of your Hyper-V Server host. Here you can check basic information about the server, resources used, etc.
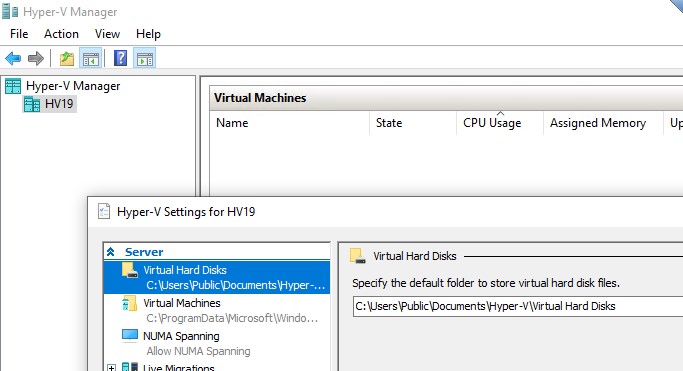
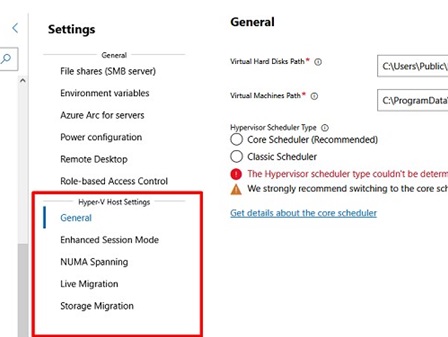
Hyper-V host settings can be configured under WAC -> Settings -> Hyper-V Host Settings. The following sections are available:
- General
- Enhanced Session Mode
- NUMA Spanning
- Live Migration
- Storage Migration
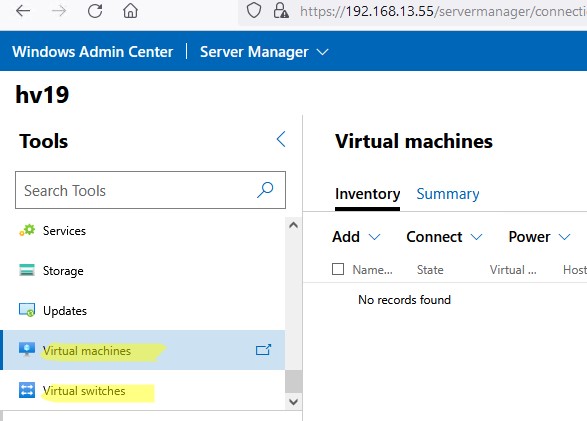
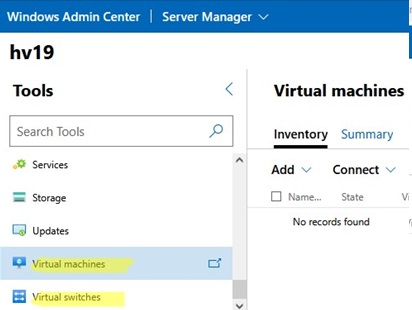
You will primarily use two sections in the WAC console to manage Hyper-V:
- Virtual Switches – you need to create at least one virtual switch to provide network access for the VM;
- Virtual Machines – here you can create, configure, start/stop, enable automatic startup, and import/export Hyper-V virtual machines.
Next, I will look at some ways to manage Hyper-V Server settings using PowerShell
Configuring Hyper-V Server 2019 Host with PowerShell
You can configure Hyper-V Server settings using PowerShell. There are over 238 cmdlets available in the Hyper-V module for managing Hyper-V hosts and VMs.
Get-Command –Module Hyper-V | Measure-Object
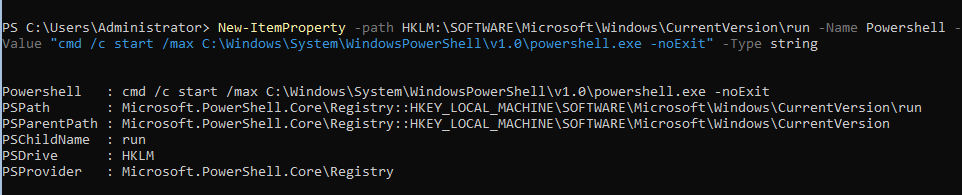
Configure the automatic start of the PowerShell console (instead of cmd.exe) after logon.
New-ItemProperty -path HKLM:\SOFTWARE\Microsoft\Windows\CurrentVersion\run -Name PowerShell -Value "cmd /c start /max C:\Windows\system32\WindowsPowerShell\v1.0\powershell.exe -noExit" -Type string

Now, when you log into the server, a PowerShell prompt will appear.
How to Configure Hyper-V Server 2019 Network Settings with PowerShell?
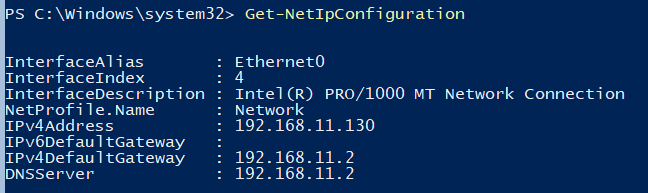
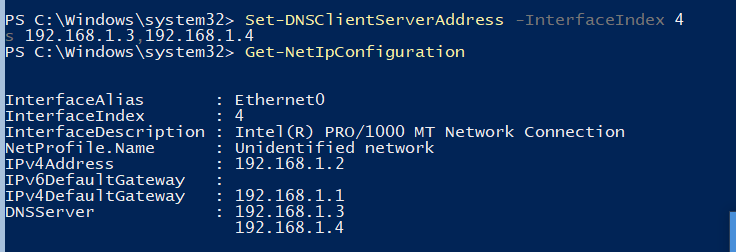
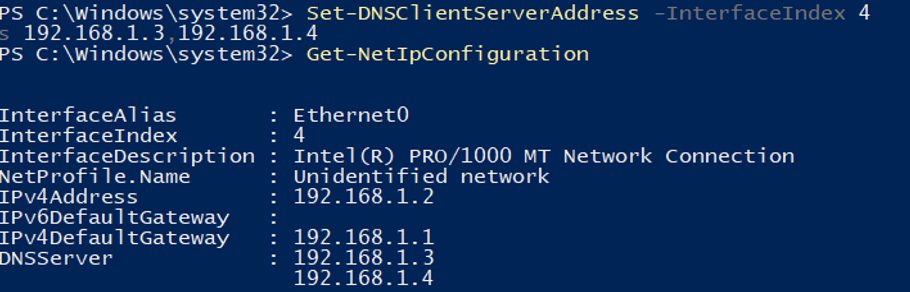
If you have not set the network settings using sconfig.cmd, you configure them through PowerShell. Using Get-NetIPConfiguration cmdlet, you can view the current IP configuration of network interfaces.
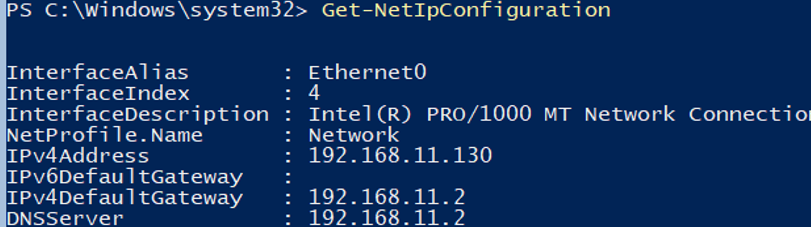
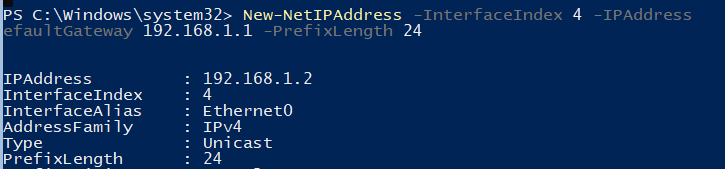
Use PowerShell to assign a static IP address, netmask, default gateway, and DNS server addresses. You can get the network adapter index (InterfaceIndex) from the output of the previous cmdlet.
New-NetIPAddress -InterfaceIndex 4 -IPAddress 192.168.1.2 -DefaultGateway 192.168.1.1 -PrefixLength 24
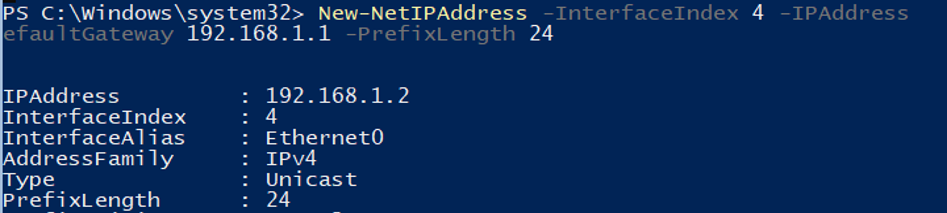
Set-DnsClientServerAddress -InterfaceIndex 4 -ServerAddresses 192.168.1.3,192.168.1.4

To configure IPv6, get the interface name using the Get-NetAdapter cmdlet from the PowerShell NetTCPIP module.

Check the current IPv6 setting using the following command:
Get-NetAdapterBinding -InterfaceDescription "Intel(R) PRO/1000 MT Network Connection" | Where-Object -Property DisplayName -Match IPv6 | Format-Table –AutoSize

You can disable IPv6 as follows:
Disable-NetAdapterBinding -InterfaceDescription "Intel(R) PRO/1000 MT Network Connection " -ComponentID ms_tcpip6
Enable Hyper-V Remote Management Firewall Rules
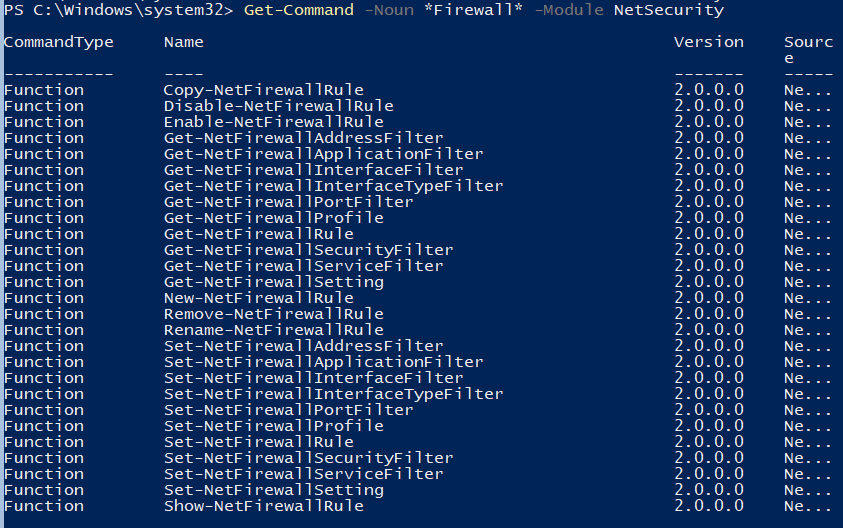
You can view the list of cmdlets to manage Windows Firewall using Get-Command:
Get-Command -Noun *Firewall* -Module NetSecurity

To allow full remote management of your server, run the following commands one by one to enable Windows Firewall rules using PowerShell:
Enable-NetFireWallRule -DisplayName "Windows Management Instrumentation (DCOM-In)"
 Enable-NetFireWallRule -DisplayGroup "Remote Event Log Management"
 Enable-NetFireWallRule -DisplayGroup "Remote Service Management"
 Enable-NetFireWallRule -DisplayGroup "Remote Volume Management"
 Enable-NetFireWallRule -DisplayGroup "Windows Defender Firewall Remote Management"
 Enable-NetFireWallRule -DisplayGroup "Remote Scheduled Tasks Management"
Configuring Hyper-V Storage for Virtual Machines
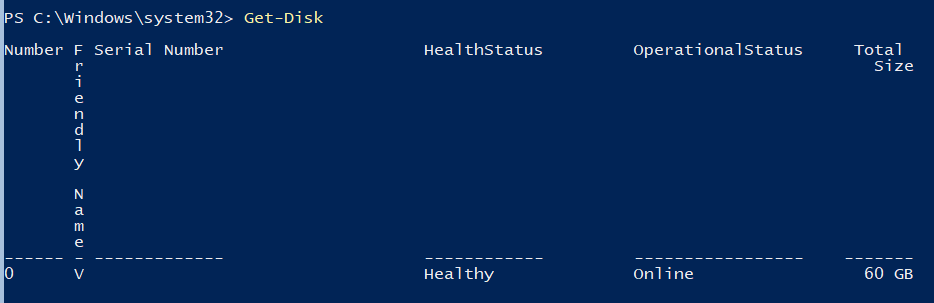
We will use a separate partition on a physical disk to store Hyper-V files (virtual machine files and iso files). View the list of physical disks on your server.
Get-Disk

Create a new partition of the largest possible size on the drive and assign the drive letter D: to it. Use the DiskNumber from Get-Disk results.
New-Partition -DiskNumber 0 -DriveLetter D –UseMaximumSize
Then format the partition to NTFS and specify its label:
Format-Volume -DriveLetter D -FileSystem NTFS -NewFileSystemLabel "VMStorage"
Create a directory where you will store virtual machine settings and vhdx files using the New-Item cmdlet:
New-Item -Path "D:\HyperV\VHD" -Type Directory
Create D:\ISO folder to store OS installation ISO images (distros):
New-Item -Path D:\ISO -ItemType Directory
In order to create a shared network folder, use the New-SmbShare cmdlet. Grant full access permissions to the local server administrators group:
New-SmbShare -Path D:\ISO -Name ISO -Description "OS Distributives" -FullAccess "BUILTIN\Administrators"
For more information on the basic configuration of Hyper-V Server and Windows Server Core from the command line, see this article.
Configure Hyper-V Server Host Settings with PowerShell
List current Hyper-V Server host settings using this command:
Get-VMHost | Format-List

By default, Hyper-V stores virtual machine configuration files and virtual disks on the same partition where your operating system is installed. It is recommended to store VM files on a separate drive (partition). You can change the default VM folder path with this command:
Set-VMHost -VirtualMachinePath D:\Hyper-V -VirtualHardDiskPath 'D:\HyperV\VHD'
Creating a Virtual Switch for Hyper-V VMs
Create an external switch connected to the physical NIC of the Hyper-V server. Your virtual machines will access the physical network through this network adapter.
Check the SR-IOV (Single-Root Input/Output (I/O) Virtualization) support:
Get-NetAdapterSriov
Get the list of connected network adapters:
Get-NetAdapter | where {$_.status -eq "up"}
Bind your virtual switch to the network adapter and enable SR-IOV support if it is available.
Hint. You won’t be able to enable or disable SR-IOV support after creating the vswitch. You will have to recreate the switch to change this parameter.
New-VMSwitch -Name "Extenal_network" -NetAdapterName "Ethernet 2" -EnableIov 1
Use these cmdlets to check your virtual switch settings:
Get-VMSwitch
 Get-NetIPConfiguration –Detailed
This completes the initial setup of Microsoft Hyper-V Server 2016/2019. You can move on to creating and configuring your virtual machines.
After about a seven-month delay, Microsoft finally published the free Hyper-V Server 2019. As usual, the new version benefits from some innovations of the full product as well as add-ons for Windows Server. These include the Admin Center and Core App Compatibility, which allows Microsoft Management Console (MMC) execution.
Contents
- Not the latest VM configuration version
- General improvements to Windows Server
- MMC-based admin tools in the console
- No Hyper-V Manager
- Remote management with Admin Center
- Availability and installation
- Author
- Recent Posts

Wolfgang Sommergut has over 20 years of experience in IT journalism. He has also worked as a system administrator and as a tech consultant. Today he runs the German publication WindowsPro.de.
Since the hypervisor innovations in Server 2019 were relatively few, the free Hyper-V Server core functions have seen hardly any improvements. One of them are shielded virtual machines (VMs) for Linux. In addition, updating to VM configuration version 9.0 achieves some improvements, including hibernation support.
Not the latest VM configuration version
However, Microsoft did not use the long break between releasing Windows Server 2019 and Hyper-V Server 2019 to update the latter’s virtual hardware support. This command displays 9.0 as the maximum version:
Get-VMHostSupportedVersion

Hyper V Server supports a maximum VM configuration version of 9.0
The recently released Server 1903 in the semi-annual channel and the Windows 10 May update already support VM configuration 9.1. Therefore, this command results in an error on Hyper-V Server 2019:
New-VM -Name MyVM -Version 9.1
However, the minor update to VM version 9.1 does not include any new features. In addition, the risk of compatibility problems is low because virtual hardware 9.0 is still the default for the two latest OS versions.
General improvements to Windows Server
As with version 2016, which had significantly more new features, Hyper-V Server 2019 also benefits from several general improvements in Windows Server. These include, for example, Microsoft now also supporting data deduplication with Resilient File System (ReFS).
In addition, there are some improvements in the cluster feature, such as cross-domain cluster migration. This allows moving server clusters between domains in Active Directory (AD). Another new feature is the option to use a file share witness on a machine that is not an AD member.
MMC-based admin tools in the console
Essentially, Hyper-V Server is Server Core reduced to the role of Hyper-V. Thus, it benefits from an innovation Microsoft introduced specifically for this installation option.
This new feature on demand (FOD) is Core App Compatibility, which allows executing additional GUI applications. Basically, Hyper-V Server also supports graphical programs without this FOD, but their number is very limited. These include some applets from the Control Panel, Task Manager, or Notepad.
Thanks to Core App Compatibility, you can execute various MMC snap ins in the console
Core App Compatibility significantly increases the number of graphical management tools admins can run in the console. This applies in particular to mmc.exe with a number of snap-ins, including those for Event Viewer, Disk Management, or Failover Cluster Management.
No Hyper-V Manager
However, Hyper-V Manager is missing, although it would be most needed on a virtualization host. A look into the %windir%\system32 directory shows that the required file virtmgmt.msc has not been installed.
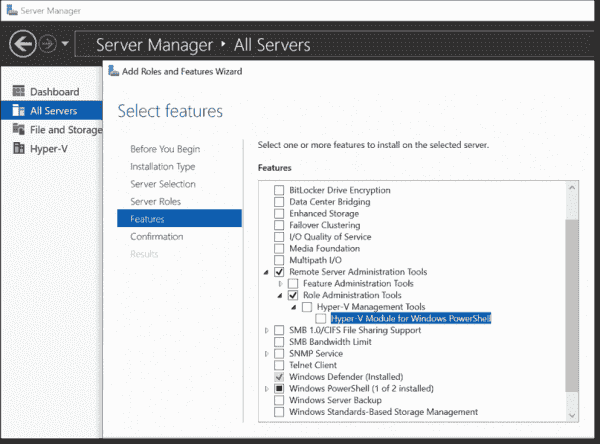
You can use the Server Manager to add Hyper V tools, but Hyper V Manager is not available with it
By adding roles and features, you can install the hypervisor management tools with Server Manager, but these are limited to the PowerShell module.
Remote management with Admin Center
Thanks to Core App Compatibility, the management options for Hyper-V 2019 have been extended by adding local tools to the console. They complement remote management using Remote Server Administration Tools (RSAT) or PowerShell.
But that’s not all. Windows Admin Center (WAC) is now also available, which did not exist when Hyper-V Manager 2016 appeared (nevertheless, it is now also manageable via WAC).
The browser-based tools offer all the essential functions for configuring the host, virtual switches, and VMs. They are particularly suitable for simple tasks such as changing VM power states because you can perform them from any computer without having to install any software. Other activities such as creating VMs are relatively cumbersome with the web tools.
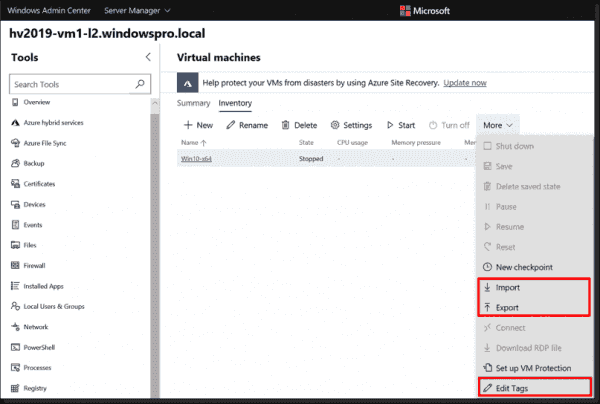
Windows Admin Center 1906 allows importing, exporting, and tagging VMs
In Preview 1906, WAC received additional Hyper-V management functions also available for Hyper-V Server 2019. These include VM importing and exporting, both of which are limited to local drives on the host.
Another new feature is the ability to tag VMs. Don’t confuse this feature with the VM notes assignable in Hyper-V Manager.
Availability and installation
As usual, Microsoft provides Hyper-V Server 2019 as an .iso file for free download in the Evaluation Center. Due to the license conditions for Windows Server, the free Hyper-V Server’s primary application is to provision virtual desktops or Linux in the VMs.
If you want to operate Windows Server in VMs, you must acquire the required virtualization rights via the Standard or Datacenter Edition, which also allow the bare-metal installation of the full operating system including the hypervisor.
While Microsoft supports an in-place upgrade from Server 2012 R2 or 2016 to 2019, this does not apply to Hyper-V servers.
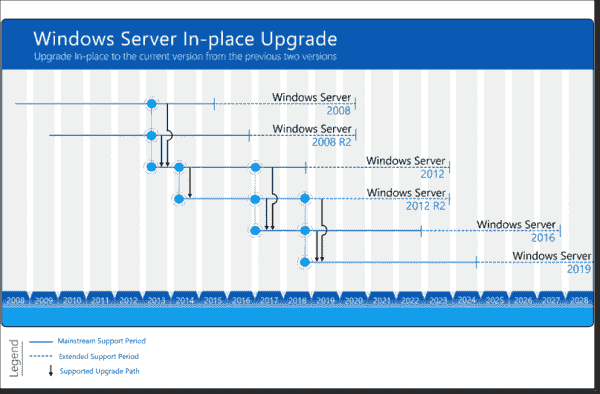
Microsoft supports n + 2 in place upgrades for Windows Server
Nevertheless, a direct upgrade has been popular in the past, especially in lab environments, because it saves some work. If you start the setup of version 2019 in Hyper-V 2016, you can run through all dialogs and get no indication of possible problems.
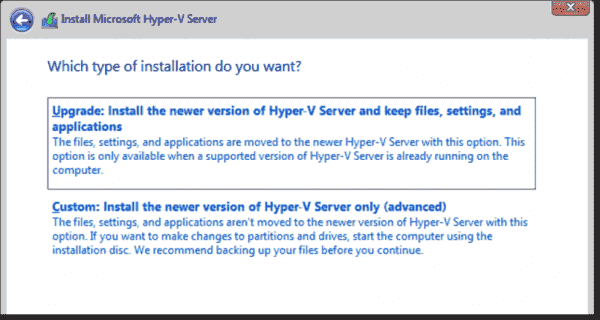
The setup of Hyper V Server 2019 will offer you an in place upgrade that, however, will fail
At the very end, the installation fails with this message:
0x80070490 — 0x2000e «The installation failed in the SAFE_OS phase with an error during SET_PRODUCT_KEY operation.»
This does not seem to be strictly an upgrade problem but a bug of the sloppily adopted Windows setup for Hyper-V servers.
![]()
![]()
Windows Hyper-V Server is a free hypervisor platform by Microsoft to run virtual machines. In this post we’ll look at how to install and configure the latest version of Windows Hyper-V Server 2019 released in summer 2019 (this guide also applies to Windows Hyper-V Server 2016).
Hyper-V Server 2019 is suitable for those who don’t want to pay for hardware virtualization operating system. Hyper-V has no restrictions and is free. Windows Hyper-V Server has the following benefits:
- Support of all popular OSs. There are no compatibility problems. All Windows and modern Linux and FreeBSD operating systems have Hyper-V support.
- A lot of different ways to backup virtual machines: simple scripts, open-source software, free and commercial versions of popular backup programs.
- Although Hyper-V Server does not have a GUI Windows Server (graphical management interface), you can manage it remotely using standard Hyper-V Manager that you can install on any computer running Windows, It also has a web access using the Windows Admin Center.
- Hyper-V Server is based on a popular server platform, familiar and easy to work with.
- You can install Hyper-V on a pseudoRAID, e. g., Inter RAID controller, Windows software RAID.
- You do not need to license your hypervisor, it is suitable for VDI or Linux VMs.
- Low hardware requirements. Your processor must support software virtualization (Intel-VT or VMX by Intel, AMD-V (SVM) by AMD) and second-level address translation (SLAT) (Intel EPT or AMD RV). These processor options must be enabled in BIOS/UEFI/nested host. You can find full system requirements on Microsoft website.
You should distinguish between Windows Server 2016/2019 with the standard Hyper-V role and Free Hyper-V Server 2019/2016. These are different products.
It is worth to note that if you are using a free hypervisor, you are still responsible for licensing your virtual machines. You can run any number of VMs running any opensource OS, like Linux, but you have to license your Windows virtual machines. Desktop Windows editions are licensed with a product key, and if you are using Windows Server as a guest OS, you must license it by the nuber of physical cores on your host. See more details on Windows Server licensing in virtual environment here.
What’s New in Hyper-V Server 2019?
Let’s consider new Hyper-V Server 2019 features in brief:
- Shielded Virtual Machines support for Linux appeared;
- VM configuration version 9.0 (with hibernation support);
- ReFS deduplication support;
- Core App Compatibility: the ability to run additional graphic management panels in the Hyper-V server console;
- Support of 2-node Hyper-V cluster and cross-domain cluster migration
How to Install Hyper-V Server 2019/2016?
You can download Hyper-V Server 2019 ISO install image here: https://www.microsoft.com/en-us/evalcenter/evaluate-hyper-v-server-2019.

After you click Continue, a short registration form will appear. Fill in your data and select the language of the OS to be installed. Wait till the Hyper-V image download is over. The .iso file size is about 2.81GB.
Microsoft Hyper-V Server installation is standard and intuitive. It goes like in Windows 10. Just boot your server (computer) from the ISO image and follow the instructions of the installation wizard.
Using Sconfig Tool for Hyper-V Server Basic Configuration
After the installation, the system will prompt you to change the administrator password. Change it, and you will get to the hypervisor console.
Please note that Hyper-V Server does not have a familiar Windows GUI. You will have to configure most settings through the command line.

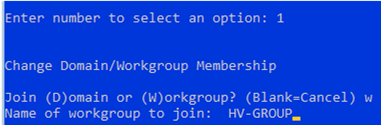
There are two windows on the desktop — the standard command prompt and the sconfig.cmd script window. You can use this script to perform the initial configuration of your Hyper-V server. Enter the number of the menu item you are going to work with in the “Enter number to select an option:” line.
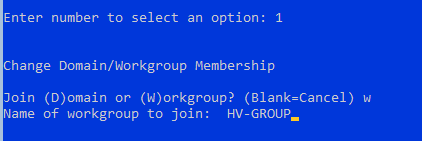
- The first menu item allows you to join your server to an AD domain or a workgroup. In this example, we’ll join the server to the workgroup called HV-GROUP.
- Change a hostname of your server.
- Create a local administrator user (another account, besides the built-in administrator account). I’d like to note that when you enter the local administrator password, the cursor stays in the same place. However, the password and its confirmation are successfully entered.
- Enable the remote access to your server. Thus, you will be able to manage it using Server Manager, MMC and PowerShell consoles, connect via RDP, check its availability using ping or tracert.
- Configure Windows Update. Select one of the three modes:
- Automatic (automatic update download and installation)
- DownloadOnly (only download without installation)
- Manual (the administrator decides whether to download or install the updates)
- Download and install the latest security updates.
- Enable RDP access with or without NLA.
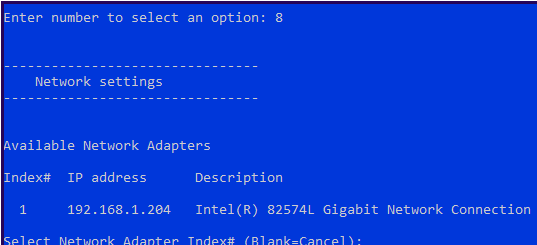
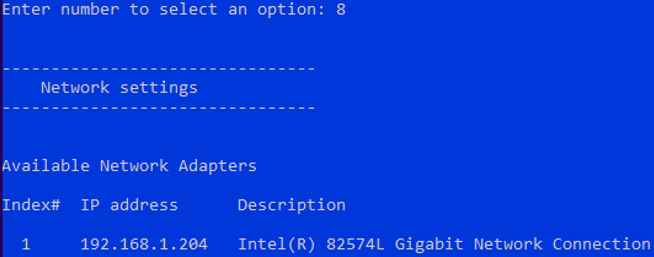
- Configure your network adapter settings. By default, your server receives the IP address from DHCP server. It is better to configure the static IP address here.
- Set the date and time of your system.
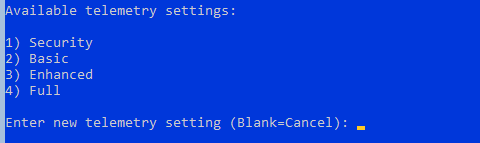
- Configure the telemetry. The Hyper-V won’t allow you to disable it completely. Select the mode you want.

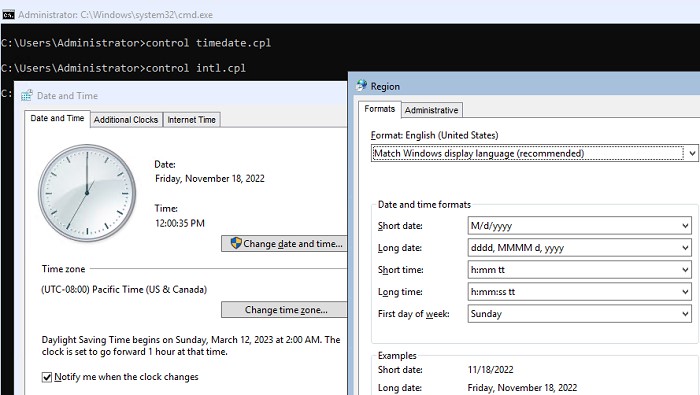
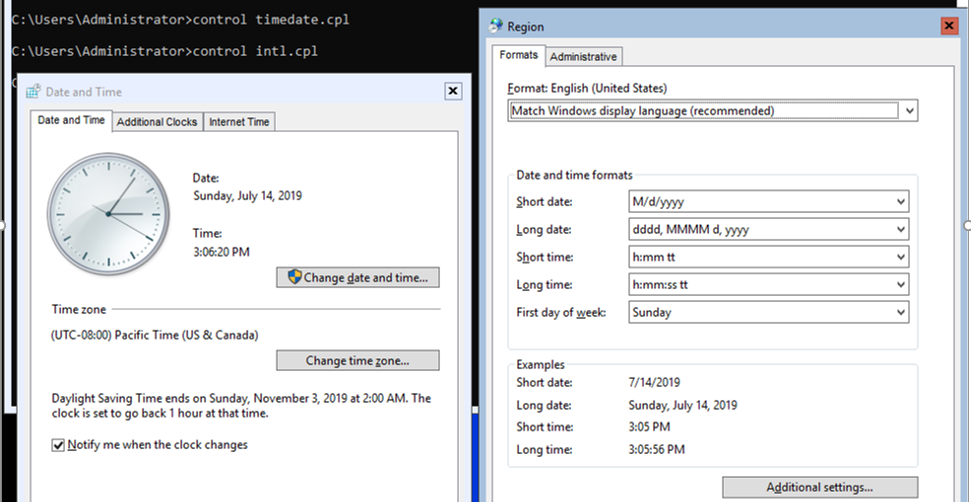
You can also configure the date, time and time zone using the following command:
control timedate.cpl
Regional parameters:
control intl.cpl
These commands open standard consoles.
If you have closed all windows and seen the black screen, press Ctrl+Shift+Esc. This key combination works in an RDP session as well and runs the Task Manager. You can use it to start the command prompt or the Hyper-V configuration tool (click File -> Run Task -> cmd.exe or sconfig.cmd).
Hyper-V Server 2019 Remote Management
To conveniently manage Free Hyper-V Server 2019 from the graphic interface, you can use:
- Windows Admin Center
- Hyper-V Manager — this is the method we’ll consider further (as for me, it is more convenient than WAC, at least so far)
To manage the Hyper-V Server 2016/2019, you will need a computer running Windows 10 Pro or Enterprise x64 edition.
Your Hyper-V server must be accessible by its hostname; and the A record must correspond to it on the DNS server in your domain network. In a workgroup, you will have to create the A record manually on your local DNS or add it to the hosts file on a client computer. In our case, it looks like this:
192.168.2.50 SERVERHV
If the account you are using on a client computer differs from the Hyper-V administrator account (and it should be so), you will have to explicitly save your credentials used to connect to the Hyper-V server. To do it, run this command:
cmdkey /add: SERVERHV /user:hvadmin /pass:HVPa$$word
We have specified the host and the credentials to access Hyper-V. If you have more than one server, do it for each of them.
Then start PowerShell prompt as administrator and run the following command:
winrm quickconfig
Answer YES to all questions, thus you will configure automatic startup of WinRM service and enable remote control rules in your firewall.
Add your Hyper-V server to the trusted hosts list:
Set-Item WSMan:\localhost\Client\TrustedHosts -Value "SERVERHV"
If you have multiple servers, add each of them to trusted hosts.
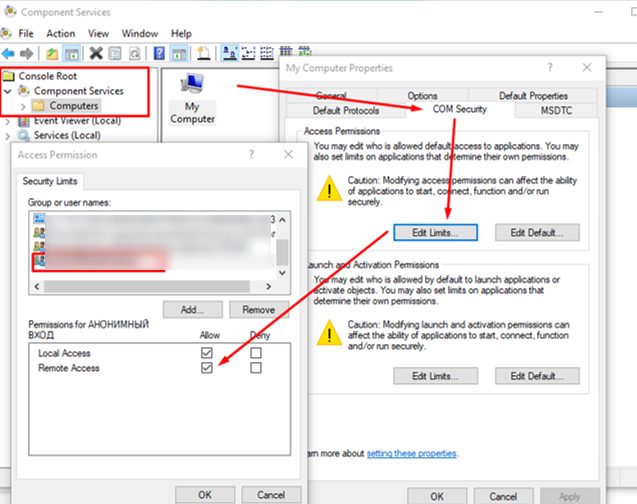
Run the dcomcnfg from the command prompt, and expand the Component Services -> Computers -> My Computer in it. Right-click here, select Properties and go to COM Security -> Access Permissions -> Edit Limits. In the next window check Remote Access permissions for ANONYMOUS ACCESS user.
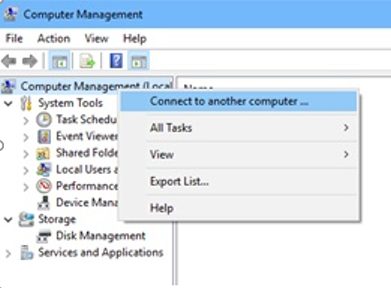
Then let’s try to connect to the remote server. Run the Computer Management console (compmgmt.msc), right-click on the console root and select Connect to another computer.
Now you can manage the Task Scheduler, disks, services and view the event log using standard MMC consoles.
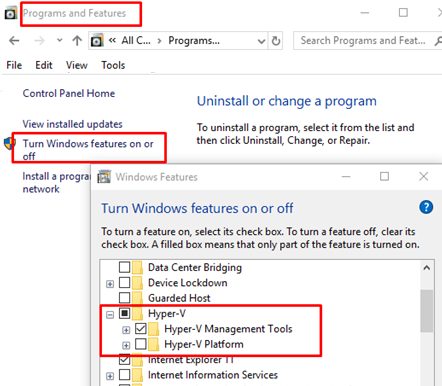
Install Hyper-V Manager on Windows 10. Open Programs and Features (optionalfeatures.exe) and go to Turn Windows Features on or off. In the next window, find Hyper-V and check Hyper-V Management Tools to install it.
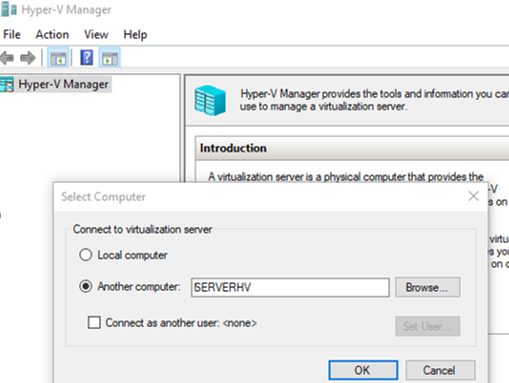
The Hyper-V Manager snap-in will be installed. Start it and connect to your Hyper-V server.
Using the Hyper-V Manager to manage the hypervisor is generally known. I’ll show some ways to manage a Hyper-V Server from PowerShell.
Using PowerShell to Configure Hyper-V Server 2019
I recommend using PowerShell to configure your Hyper-V Server. Hyper-V module provides over 1,641 cmdlets to manage a Hyper-V server.
Get-Command –ModuleHyper-V | Measure-Object

Configure the automatic start of the PowerShell console after logon.
New-ItemProperty -path HKLM:\SOFTWARE\Microsoft\Windows\CurrentVersion\run -Name PowerShell -Value "cmd /c start /max C:\Windows\system32\WindowsPowerShell\v1.0\powershell.exe -noExit" -Type string

After logging into the server, a PowerShell window will appear.
How to Configure Hyper-V Server 2019 Network Settings from PowerShell
If you have not configured the network settings using sconfig.cmd, you configure them through PowerShell. Using Get-NetIPConfiguration cmdlet, you can view the current IPs configuration of network interface.
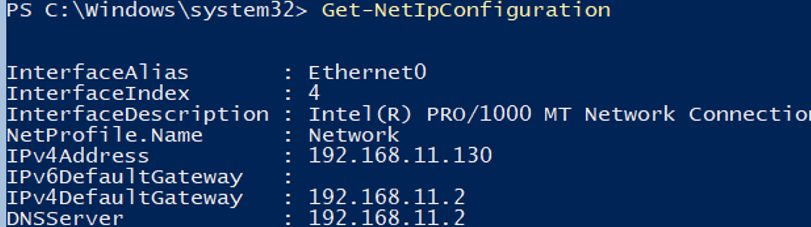
Assign a static IP address, network mask, default gateway and DNS server addresses. You can get the network adapter index (InterfaceIndex) from the results of the previous cmdlet.
New-NetIPAddress -InterfaceIndex 4 -IPAddress 192.168.1.2 -DefaultGateway 192.168.1.1 -PrefixLength 24

Set-DnsClientServerAddress -InterfaceIndex 4 -ServerAddresses 192.168.1.3,192.168.1.4
To configure IPv6, get the interface name using the Get-NetAdapter cmdlet from the PowerShell NetTCPIP module.

Check the current IPv6 setting using the following command:
Get-NetAdapterBinding -InterfaceDescription "Intel(R) PRO/1000 MT Network Connection" | Where-Object -Property DisplayName -Match IPv6 | Format-Table –AutoSize

You can disable IPv6 as follows:
Disable-NetAdapterBinding -InterfaceDescription "Intel(R) PRO/1000 MT Network Connection " -ComponentID ms_tcpip6
Hyper-V Server Remote Management Firewall Configuration
You can view the list of cmdlets to manage Windows Firewall using Get-Command:
Get-Command -Noun *Firewall* -Module NetSecurity

To fully manage your server remotely, run the following commands one by one to enable Windows Firewall allow rules :
Enable-NetFireWallRule -DisplayName "Windows Management Instrumentation (DCOM-In)"
Enable-NetFireWallRule -DisplayGroup "Remote Event Log Management"
Enable-NetFireWallRule -DisplayGroup "Remote Service Management"
Enable-NetFireWallRule -DisplayGroup "Remote Volume Management"
Enable-NetFireWallRule -DisplayGroup "Windows Firewall Defender Remote Management"
Enable-NetFireWallRule -DisplayGroup "Remote Scheduled Tasks Management"
Configuring Hyper-V Storage for Virtual Machines
We will use a separate partition on a physical disk to store data (virtual machine files and iso files). View the list of physical disks on your server.
Get-Disk

Create a new partition of the largest possible size on the drive and assign the drive letter D: to it. Use the DiskNumber from Get-Disk results.
New-Partition -DiskNumber 0 -DriveLetter D –UseMaximumSize
Then format the partition as NTFS and specify its label:
Format-Volume -DriveLetter D -FileSystem NTFS -NewFileSystemLabel "VMStorage" For more information about disk and partition management cmdlets in PowerShell, check out the post PowerShell Disks and Partitions Management.
Create a directory where you will store virtual machine settings and vhdx files. The New-Item cmdlet allows you to create nested folders:
New-Item -Path "D:\HyperV\VHD" -Type Directory
Create D:\ISO folder to store OS distributions images (iso files):
New-Item -Path D:\ISO -ItemType Directory
To create a shared network folder, use the New-SmbShare cmdlet and grant full access permissions to the group of local administrators of your server:
New-SmbShare -Path D:\ISO -Name ISO -Description "OS Distributives" -FullAccess "BUILTIN\Administrators"
How to Configure Hyper-V Server Host Settings via PowerShell?
Open the Hyper-V Server host settings using this command:
Get-VMHost | Format-List

The paths of virtual machines and virtual disks are located on the same partition as your operation system. It is not correct. Specify the path to the folders created earlier using this command:
Set-VMHost -VirtualMachinePath D:\Hyper-V -VirtualHardDiskPath 'D:\HyperV\VHD'
Creating Hyper-V Virtual Switch
Create the External Switch that is connected to the Hyper-V Server phisical NIC and enable VM interaction with the physical network.
Check the SR-IOV (Single-Root Input/Output (I/O) Virtualization) support:
Get-NetAdapterSriov
Get the list of connected network adapters:
Get-NetAdapter | where {$_.status -eq "up"}
Connect your virtual switch to the network adapter and enable SR-IOV support if it is available.
You won’t be able to enable or disable SR-IOV support after you create the vswitch, and you will have to re-create the switch to change this parameter.
New-VMSwitch -Name "Extenal_network" -NetAdapterName "Ethernet 2" -EnableIov 1
Use these cmdlets to check your virtual switch settings:
Get-VMSwitch
Get-NetIPConfiguration –Detailed
This completes the initial setup of Windows Hyper-V Server 2016/2019. You can move on to create and configure your virtual machines.