Как отформатировать флешку или SD-карту в файловую систему Ext4? Чтобы, к примеру, иметь возможность хранить на внешнем флеш-носителе, подключаемом к Android-устройству, файлы весом более 4 Гб, если такой носитель изначально форматирован в FAT32. Ext4 – прекрасная альтернатива неподдерживаемой нативно Android’ом файловой системе NTFS и старой, ограниченной FAT32. Ext4 используется в системах Linux, она современная, стабильная, производительная, не подвержена фрагментации данных.
И позволяет хранить файлы с максимальным весом 16 Тб. Отформатировать любой носитель данных в Ext4 легко можно с помощью любого дистрибутива Linux. Загружаемся с диска установки Linux, работаем с установочным носителем как с LiveDisk, запускаем программу GParted. И с её помощью форматируем флеш-носитель в Ext4.
А как форматировать устройства информации в Ext4 в среде Windows?
***
Windows не то, что не умеет форматировать в Ext4, система от Microsoft не поддерживает Ext4, т.е. не отображает форматированные в ней носители. Получить доступ к таким носителям можно либо с помощью сторонних файловых менеджеров, которые реализуют доступ к носителям, форматированным в файловых системах Linux, либо с помощью специального драйвера, внедряющего, в частности, поддержку Ext4 на системном уровне. К этому вопросу мы ещё вернёмся. Для форматирования же в Ext4 носителей в среде Windows необходимо прибегнуть к стороннему софту – менеджерам дисков. Но далеко не всем таковым под силу справиться с этой задачей. К, примеру, известные программы для работы с дисками от Acronis и AOME могут форматировать только в Ext2 и Ext3. С Ext4 работают дисковые менеджеры от Paragon и MiniTool.
Рассмотрим их.
1. Paragon Hard Disk Manager
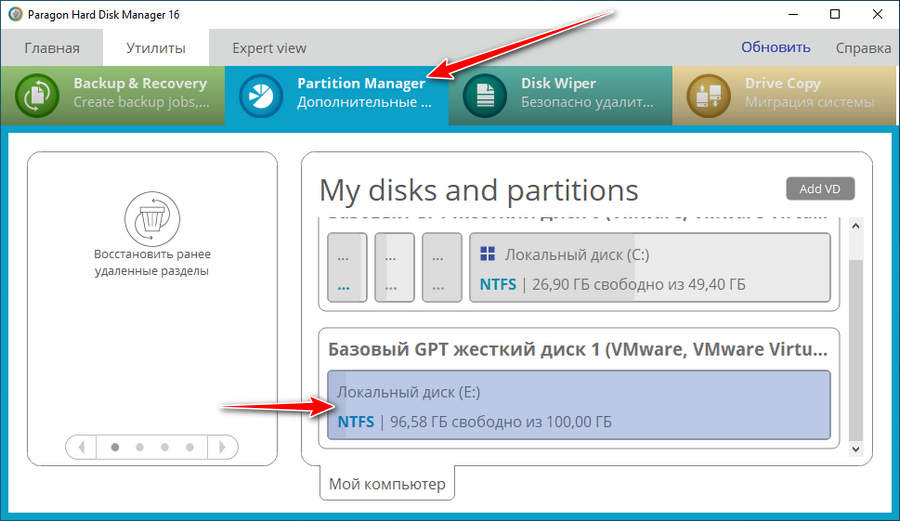
Дисковый менеджер Paragon Hard Disk Manager – платный продукт, к нему есть смысл прибегать, если он уже установлен на компьютере. Можно использовать как предыдущую версию программы 15, так и новую 16. Работая с последней, переключаемся на вкладку «Partition Manager», кликаем оперируемый носитель, в нашем случае это виртуальный жёсткий диск.
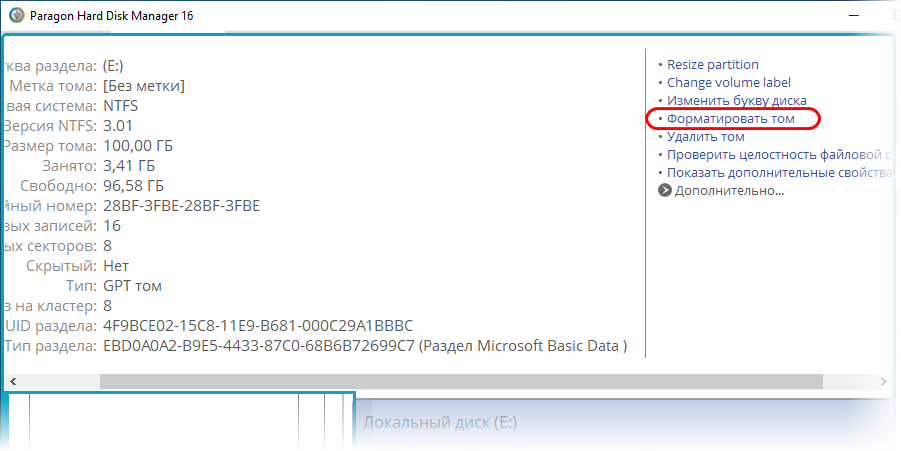
Появится дополнительное окно с возможными опциями. Выбираем «Форматировать том».
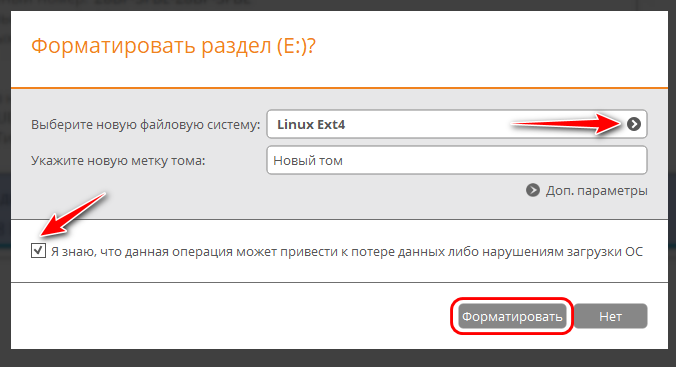
Далее указываем «Linux Ext4» в графе выбора файловой системы. Ставим подтверждающую галочку внизу, мол, мы понимаем, что операция ведёт к потере данных на носителе. И жмём «Форматировать».
Применяем операцию кнопкой «Apply».

Всё.
2. MiniTool Partition Wizard
Программа MiniTool Partition Wizard также умеет форматировать носители информации в Ext4, причём это возможность из числа предусмотренных в бесплатной редакции Free.
Скачать её можно здесь:
https://www.partitionwizard.com/download.html
Запускаем программу, кликаем нужный носитель, вызываем контекстное меню, жмём «Format».
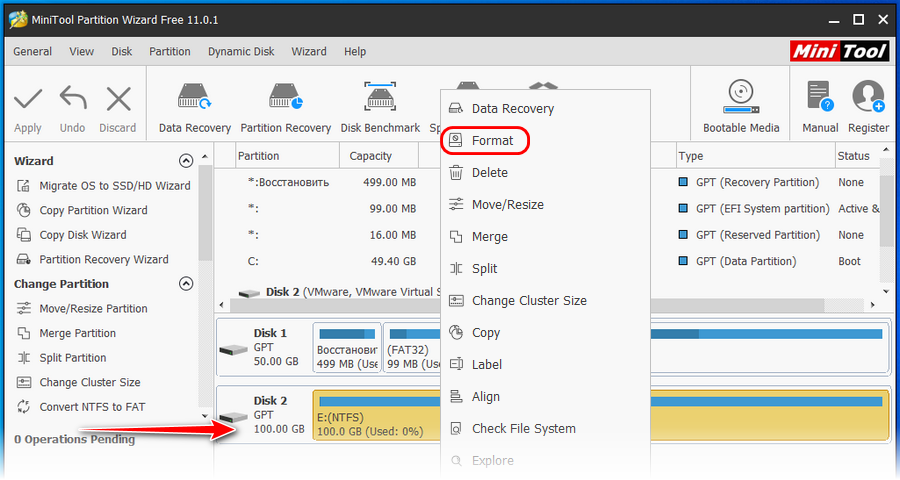
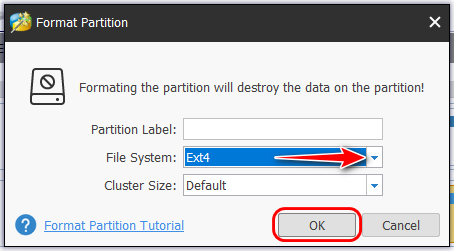
В графе «File System» указываем Ext4. Жмём «Ок».
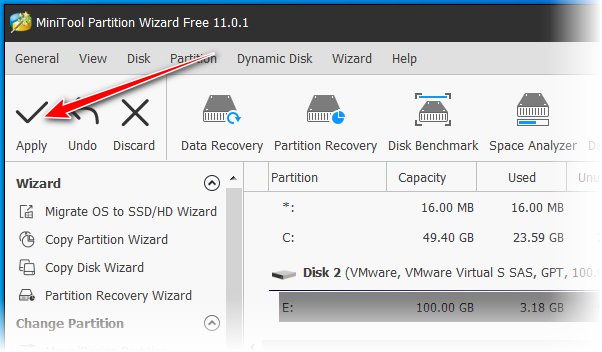
Применяем операцию кнопкой «Apply».
Всё.
3. Отображение накопителя с Ext4 в среде Windows
Итак, Windows нативно не «дружит» с файловыми системами других операционных систем. Чтобы в дальнейшем с флеш-носителем, форматированным в Ext4, можно было работать и на Android, и на Linux, и в среде Windows, в последнюю нужно внедрить упомянутый выше драйвер поддержки файловых систем Linux. Он называется Ext2Fsd, распространяется свершено бесплатно, его сайт — www.ext2fsd.com.(Скачать файл) На сайте есть ссылка загрузки драйвера, проходим по ней и скачиваем EXE-файл. На момент написания этой статьи актуальна версия 0.69 драйвера, и файл для скачивания называется, соответственно, Ext2Fsd-0.69.exe.
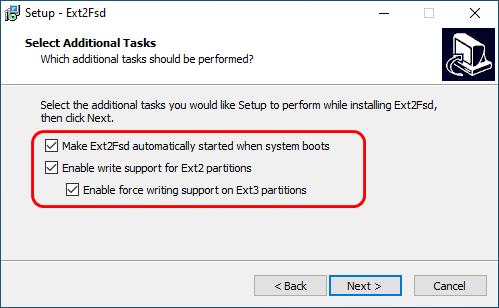
Далее просто устанавливаем драйвер. В процессе установки нам будет предложена автоматическая настройка файловых систем Linux для отображения в среде Windows. Нужно просто не трогать галочки на этапе «Select Additional Tasks».
После установки Ext2Fsd носители с Ext4 будут видны в проводнике Windows.
![]() Загрузка…
Загрузка…
Updated by
Daisy on Sep 22, 2023
Written by
Jean
«I’m trying to format an NTFS drive to EXT4, to use it for Linux. The problem is, I find nowhere to format EXT4 in Windows 10 File Explorer and Windows 10 Disk Management. Can Windows format EXT4 or not?»
No, Windows cannot read EX4 partition nor format a partition to EXT4 format. For Windows, NTFS is the most used file system, also the default one. Besides NTFS, Windows also supports REFS (Now it has been removed from Windows 10 Pro), exFAT and FAT32. For Mac, it doesn’t recognize an EXT4 partition as well. Its default file system is APFS, and the other compatible file systems are HFS+, FAT32, and exFAT.
To be able to format EXT4 in Windows, you’ll need to download the best free EXT4 format software called EaseUS Partition Master. Read on to learn more.
What’s the EXT4 File System?
The EXT4, or fourth extended file system, is a widely-used journaling file system for the Linux operating system. EXT4 is a deeper improvement over EXT3 & EXT2, including better performance, reliability, security, and new features.
EXT4 is commonly adopted by large hard drives, but it can also be used on removable disks like USB flash drives, pen drives, and memory cards.
How to Format EXT4 in Windows 10/8/7
As aforementioned, both the Windows computer and Mac are unable to utilize a Linux EXT4 partition. You can find no «EXT4» option during the course of formatting a disk there.
But many times, you’ll need to format an EXT4 partition on Windows. For example, you decided to use a Windows hard drive on a Linux computer. And the other common case is that you’re dual booting Windows and Linux, you need to access files on your Windows system from the Linux environment. How to format hard drive to EXT4 when the «Format» option is not even available?
Take it easy. Third-party partition manager like EaseUS Partition Master can do you a favor. You can read, create, and format the hard drive partition with the EXT4 file system under its help.
Best EXT4 Format Freeware — EaseUS Partition Master
No matter it’s about formatting a Windows supported NTFS/exFAT/FAT32 to EXT4, or format the Linux EXT4 hard drive to a Windows-compatible file system, EaseUS free partition manager software can easily get the job done. It’s developed to manage Windows 10, 8,7, XP, Vista and Windows Server hard drives & partitions in every way, such as adjust a volume size, delete partition, format partition, wipe partition, merge partitions, etc.
What makes it stand out among rivals and native Windows programs is the 100% support for Linux EXT2, EXT3 as well as the default EXT4 file systems. With EaseUS EXT formatting software, you can manage an EXT2/3/4 drive on Windows in these ways:
- Resize/move an EXT4 partition
- Create an EXT4 partition
- Convert EXT4 to NTFS without data loss
- Format EXT4 to EXT2/3, NTFS, FAT32
- Format NTFS, FAT32, EXT2/3 to EXT4
Yet powerful, using EaseUS EXT4 formatter to format the hard drive is straightforward, with only a few clicks. Only notice that the formatting itself will erase data on the current drive, so make sure that you’ve copied the important data files to the other drive for a backup. If the hard drive data is huge and the transfer is too slow, use the copy partition function in EaseUS Partition Master to accelerate the data transfer time.
Download EaseUS Partition Master and follow the simple steps to format EXT4 in Windows:
Step 1. Launch EaseUS Partition Master, right-click the partition you intend to format and choose «Format».
Step 2. In the new window, enter the Partition label, choose the FAT32/EXT2/EXT3/EXT4 file system, and set the cluster size according to your needs, then click «OK».
Step 3. Then you will see a warning window, click «Yes» in it to continue.
Step 4. Click the «Execute 1 Task(s)» button in the top-left corner to review the changes, then click «Apply» to start formatting the partition to FAT32/EXT2/EXT3/EXT4.
Updated on May 13th, 2021
This post talks about methods to format EXT4/3/2 in Windows, read data in EXT4 partition and create EXT4 partition under Windows. If your computer is dual booting Windows and Linux, you may need to access data on Linux system from Windows. Windows does not support create or format EXT file system nor read EXT data. This guide is focused on methods to deal with operations about EXT4/3/2 file system.
It is easy to format a partition to ext4, ext3 or ext2 with the help of Eassos PartitionGuru, and the formatting speed is fast. Please note formatting wipes all data from the volume; you should make sure important files have been backed up. Let’s see have a look at the formatting steps.
Step 1: Install and launch Eassos PartitionGuru from computer and you can see all partitions on the disk.
Step 2: Select the partition you want to format and click “Format” button from toolbar.
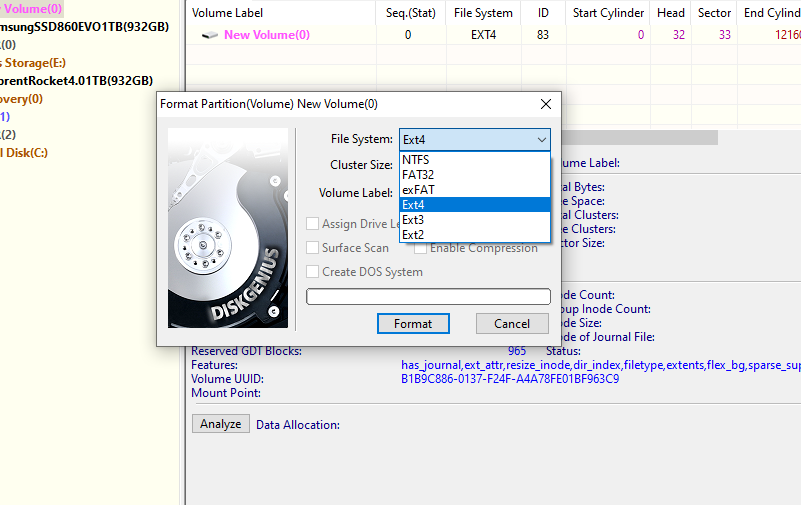
Step 3: Choose file system type you need from the Format Partition window and click “Format” button. To format ext4, you should choose Ext4 from the drop-down list.

Step 4: Wait several seconds and the formatting will complete.
Here is video guide you can follow to format ext4 in Windows
How to create EXT4/3/2 Linux partition in Windows?
Windows uses NTFS, FAT32 or exFAT file system and Linux uses extended file system like ext3, ext4. Windows does not support to read, write or access Linux file system without the help of third party partition tools. As we all known, Windows users can create partitions with these file system easily in Disk Management. How to create an Ext4/3/2 Linux partition under Windows?
Here, we recommend a free partition tool – PartitionGuru to fulfill the task. PartitionGuru can be used under any Windows platform, and it provides a bunch of useful features like data recovery, disk & partition management, data backup, repair bad sectors, edit hex data, etc. The recently released version adds support to create, format, read or access ext4 / ext3/ ext2. So we can use this partition tool to create an ext4 /3/2 partition in Windows.
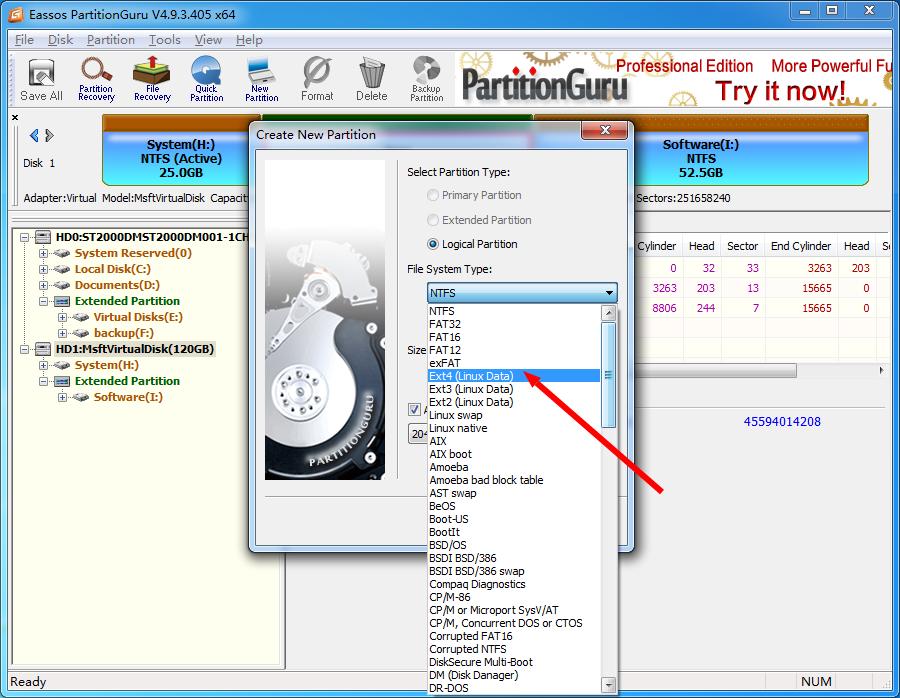
Step 1: Select free / unallocated disk space and click “New Partition” button from toolbar, as follows:

Step 2: The “Create New Partition” box comes up, and you can select file system type now. To create ext4 partition, you should select “Ext4 (Linux Data)”. Then click “OK” button.
Step 3: Click “Save All” button on the upper-left panel to save the new partition to partition table. Then you’ll be prompted to format the newly created partition.
Step 4: Click “Format” button and PartitionGuru formats the partition quickly.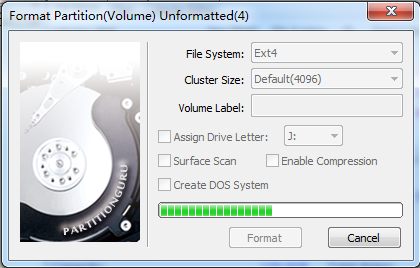
More about Ext4, ext3 and ext2 files system
File system is the method by which files are named and placed logically to store, retrieve and update data and also used to manage space on available storage devices. Without file system, files stored on a device would be one large body of data, as data does not know where to stop or when to begin. Information on device media is split into two pieces, which are usually called metadata and user data. The structure and logic rule used by system to manage data is called a file system.
There are many different types of files system, and each has its own structure and logic rules, speed, size, etc. File system is widely used on various storages devices such as hard drive, flash memory, virtual disk, etc. As a Windows user, you must be family with FAT32, exFAT and NTFS. In this section, we’ll talk about file systems Ext2, Ext3 and Ext4, which belong to Linux operating system.
Ext2: Second Extended File System
Ext2 file system was first introduced by Remy Card in 1993 and it was the first default file system in several Linux distro. This file system was developed for the purpose of overcoming limitations on previous Ext file system. Ext2 does not support journaling feature, thus it is recommended to be used on flash drives or SD cards which do not need the overhead of journaling. The maximum individual file size it can be 16GB-2TB.
Ext3: Second Extended File System
- Ext3 file system was introduced by Stephen Tweedie in 2001 and it is available starting from Kernel 2.4.15.
- Journaling feature is available in Ex3.
- Maximum individual file size is 15GB -2TB
- Provide solution to convert Ext2 to Ext3 file system directly without backing up / restoring data.
Ext4: Second Extended File System
- Ext4 file system was introduced in 2008, starting from Linux Kernel 2.6.19.
- Provide option to disable journaling feature.
- Backward compatibility is supported. You can mount Ext3 file system as Ext4 without upgrading it.
- The maximum individual file size 16GB – 16TB.
- Some new features are included such as multiblock allocation, fast fsck, journal checksum, etc.
Conclusion
In this guide you can learn how to format partition to EXT4/3/2 file system in Windows 10/8/7 as well as how to create EXT4/3/2 partition in Windows with the help of free partition manager PartitionGuru. If you want to write data to EXT4/3/2 partition in Windows, you can upgrade it to Pro edition.
More guides
How to access ext4 partition in Windows 10/8/7?
How to read ext4 partition in Windows 10/8/7?
How to clone ext4/ext3/ext2 partition in Windows 10/8/7?
Форматирование диска или раздела в файловой системе ext4 – задача, которую часто приходится решать пользователям операционных систем Windows. Несмотря на то, что Windows по умолчанию поддерживает только фаловые системы NTFS и FAT, существует несколько способов форматировать диск в ext4 на Windows. В этом руководстве мы рассмотрим несколько методов, которые помогут вам выполнить это важное действие.
Первый метод, который мы рассмотрим, – использование программы DiskGenius. Это удобная и простая в использовании утилита, которая позволяет форматировать диск или раздел в файловой системе ext4. Для этого скачайте и установите DiskGenius на ваш компьютер. Запустите программу и выберите диск или раздел, который хотите отформатировать в ext4. Затем нажмите правой кнопкой мыши на выбранный диск или раздел и выберите пункт «Форматировать» из контекстного меню. В появившемся окне выберите ext4 в качестве типа файловой системы и нажмите кнопку «Форматировать». После завершения процесса форматирования, выбранный диск или раздел будет готов к использованию в файловой системе ext4.
Если вы не хотите устанавливать дополнительное программное обеспечение на свой компьютер, вы можете воспользоваться командной строкой Windows для форматирования диска в ext4. Для этого откройте командную строку с правами администратора. Введите команду «diskpart» и нажмите Enter. Затем введите команду «list disk» для просмотра списка доступных дисков на вашем компьютере. Выберите номер диска, который хотите отформатировать, с помощью команды «select disk <номер диска>«. Затем выполните команду «clean» для удаления всех разделов на выбранном диске. После этого введите команду «create partition primary» для создания нового раздела на диске. Затем выполните команду «format fs=ext4 quick» для форматирования созданного раздела в файловую систему ext4. После завершения процесса форматирования, выбранный диск или раздел будет готов к использованию в файловой системе ext4.
Содержание
- Необходимое программное обеспечение
- Подготовка жесткого диска для форматирования
- Форматирование ext4 на Windows с помощью программы
- Завершение форматирования и проверка результатов
Необходимое программное обеспечение
Для форматирования ext4 на Windows вам понадобятся следующие инструменты:
- Драйвер ext2fsd: Этот драйвер позволяет Windows распознавать и работать с файловыми системами ext2, ext3 и ext4.
- Утилита GParted: GParted предоставляет инструменты для управления разделами на жестком диске, включая создание и форматирование разделов.
- Live-версия Linux: Чтобы использовать GParted, вам нужно запустить его из среды Linux. Вы можете воспользоваться live-версией Linux, например, Ubuntu, чтобы загрузиться с USB-накопителя или DVD.
Пожалуйста, убедитесь, что вы загрузили и установили все необходимые программы перед началом процесса форматирования ext4 на Windows.
Подготовка жесткого диска для форматирования
Перед тем, как приступить к форматированию жесткого диска в формате ext4 на Windows, необходимо выполнить несколько подготовительных шагов:
1. Сделайте резервную копию всех важных данных, сохраненных на диске. Форматирование приведет к полной потере информации, поэтому важно предварительно сохранить все данные на других носителях.
2. Проверьте, отсоединен ли диск от всех других устройств и имеет ли он свободное пространство для форматирования. Убедитесь, что на диске нет активной операционной системы или других активных процессов, которые могут привести к неудачному форматированию.
3. Убедитесь, что у вас есть права администратора на компьютере. Форматирование диска часто требует особых разрешений, поэтому убедитесь, что вы вошли под учетной записью с административными правами.
После выполнения этих подготовительных шагов, вы готовы приступить к форматированию жесткого диска в формате ext4 с помощью соответствующего программного обеспечения на Windows.
Форматирование ext4 на Windows с помощью программы
Ext2Fsd – это бесплатное программное обеспечение, которое позволяет работать с файловыми системами Linux, такими как ext2, ext3 и ext4, на операционной системе Windows. С помощью этой программы вы сможете отформатировать раздел в формате ext4, а также монтировать и управлять файлами на этой файловой системе.
Чтобы начать использовать Ext2Fsd для форматирования раздела в формате ext4, вам потребуется выполнить следующие шаги:
- Скачайте и установите программу Ext2Fsd с официального сайта разработчика.
- Запустите программу и выберите нужный раздел, который вы хотите отформатировать в формате ext4.
- Нажмите правой кнопкой мыши на выбранном разделе и выберите опцию «Форматировать».
- В появившемся окне выберите форматирование в формате ext4 и нажмите кнопку «ОК».
- Дождитесь завершения процесса форматирования раздела.
После завершения процесса форматирования вы сможете использовать отформатированный раздел в формате ext4 на вашей операционной системе Windows.
Обратите внимание, что форматирование раздела приведет к потере всех данных на нем. Поэтому перед форматированием обязательно создайте резервную копию всех важных файлов.
Завершение форматирования и проверка результатов
После завершения форматирования ext4 на Windows, необходимо провести проверку результатов, чтобы убедиться в успешной операции. Вот несколько шагов, которые помогут вам завершить эту задачу:
- Откройте проводник Windows и найдите отформатированный диск ext4.
- Щелкните правой кнопкой мыши на диске и выберите «Свойства».
- В открывшемся окне «Свойства» проверьте, что тип файловой системы указан как «ext4». Также вы можете проверить доступное пространство и другие атрибуты диска.
- Откройте проводник Windows или любую другую программу, которая позволяет работать с файлами, и убедитесь, что вы можете свободно создавать, изменять и удалять файлы на отформатированном диске.
- Если все функции работают корректно, значит, форматирование ext4 на Windows прошло успешно.
Важно отметить, что форматирование любого диска приведет к полной потере данных на нем. Убедитесь, что вы создали резервные копии всех важных данных до начала операции форматирования. Также обратите внимание, что форматирование ext4 на Windows является мощным инструментом и требует внимательности и следования инструкциям.
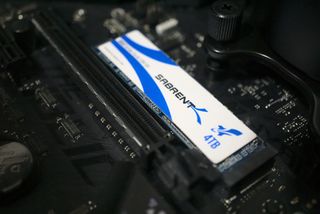
(Image credit: Rich Edmonds / Windows Central)
Which file system you have set up on your PC’s drives isn’t something many of us pay much attention to. In most cases, we’ll be using NTFS, which is totally fine and works across different operating systems.
But if you’ve been using Linux on a drive it could well be formatted in the Ext4 file system, which will make it completely impossible to use with Windows 10.
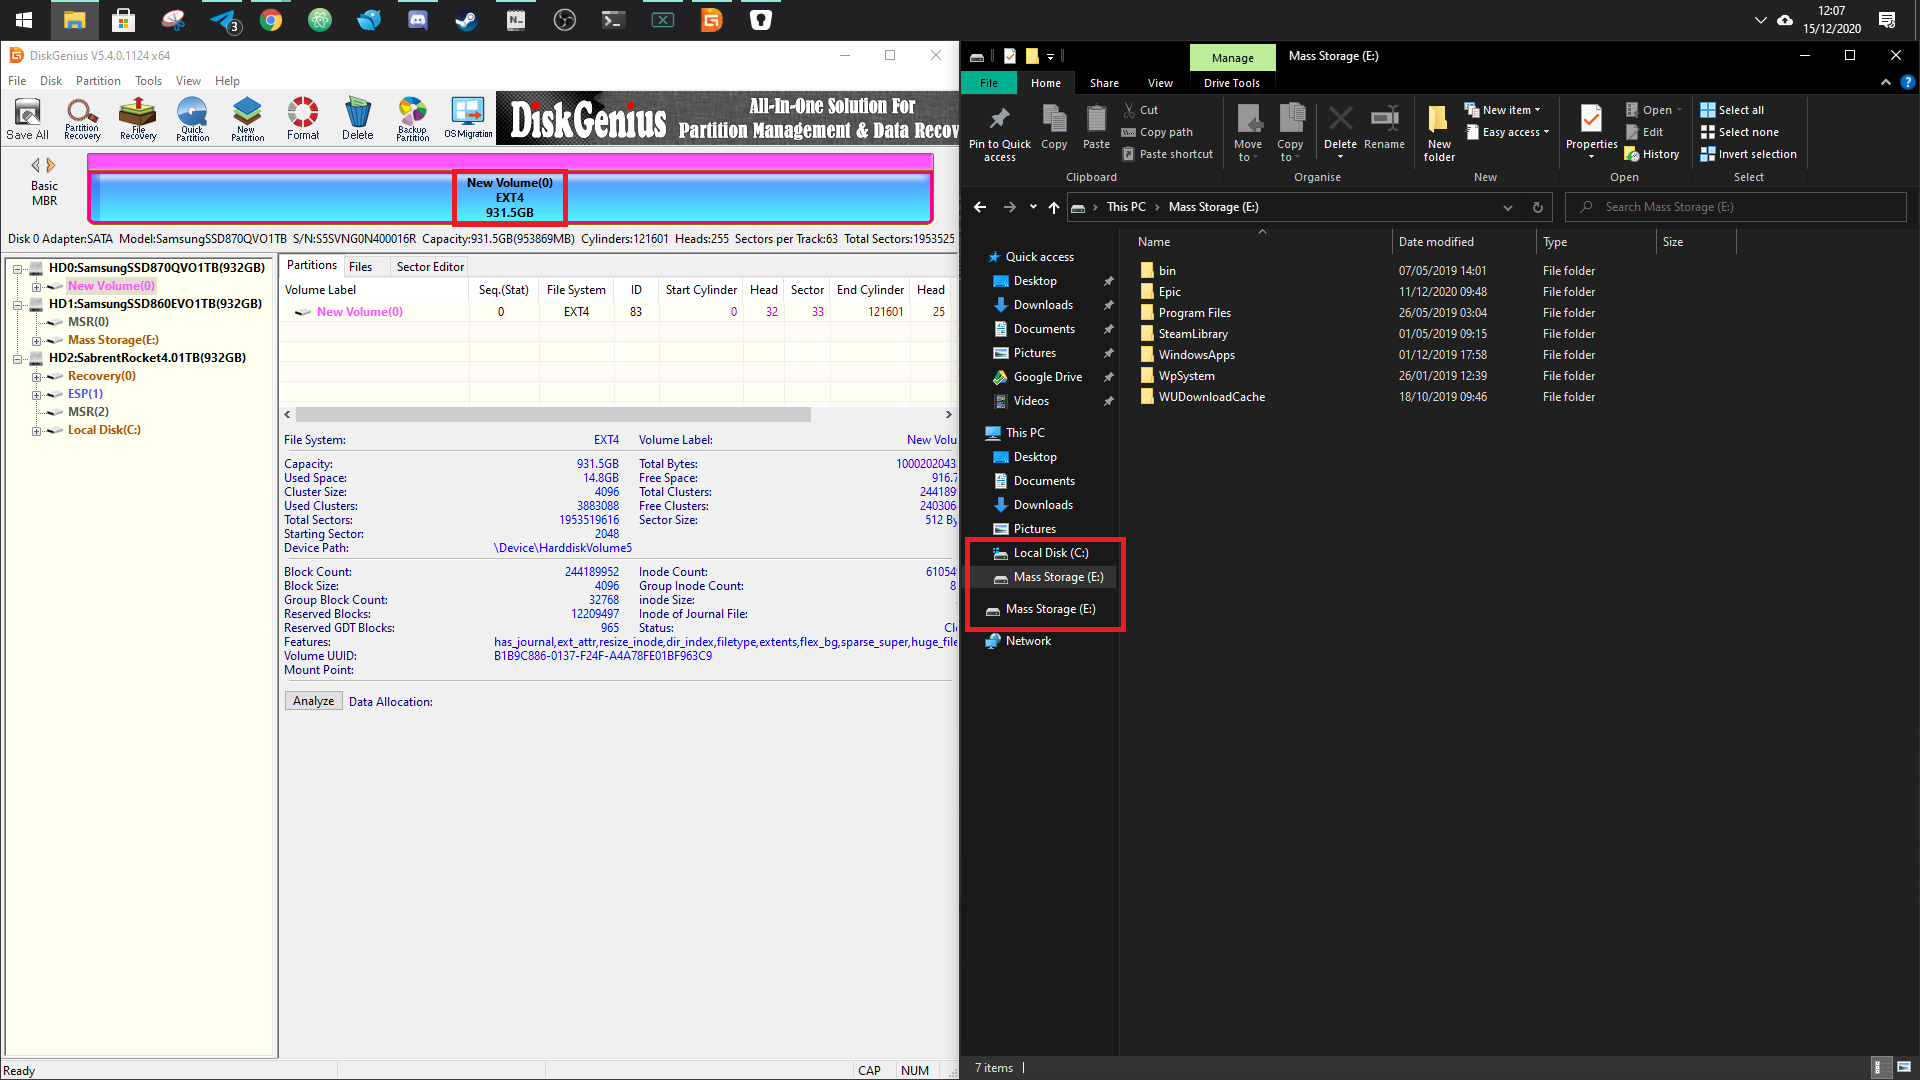
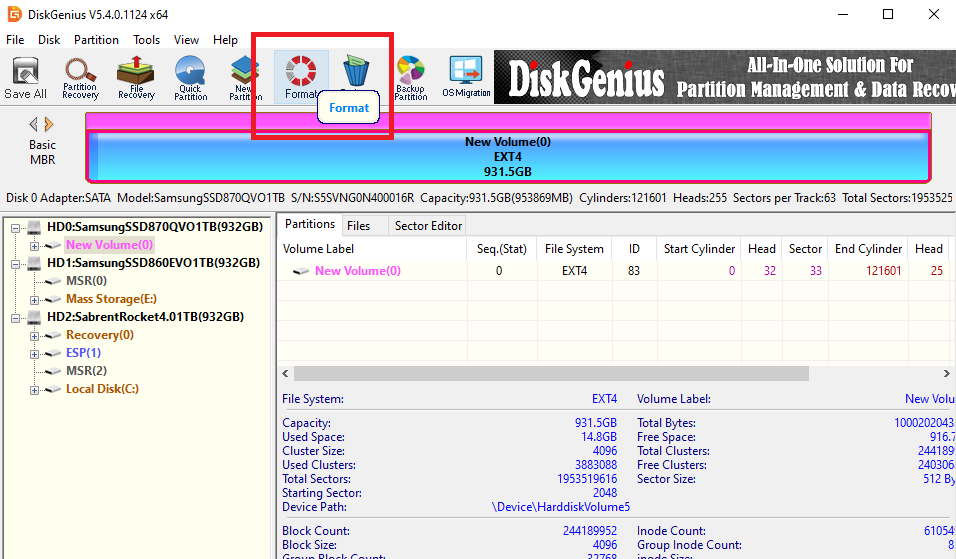
As you can see here, we have an Ext4 SSD in a PC running Windows 10, but it’s not visible in File Explorer. To use it you’ll need to reformat it to something more Windows-friendly, but it’s not entirely straightforward. If you open the Disk Management app on Windows 10 you’ll see the drive exists, but you can’t do anything with it.
But fear not, there’s a simple solution.
How to reformat an Ext4 drive in Windows 10
The first step is having the right tool for the job. In this case, we’re using a piece of software called DiskGenius, which can be used for free. You can install it if you like, but I just use the 64-bit portable version instead. Download this first from their site and install or open it ready to get started.
Then follow these steps.
- Select your Ext4 drive from the pane on the left.
- Click the format button along the top bar.
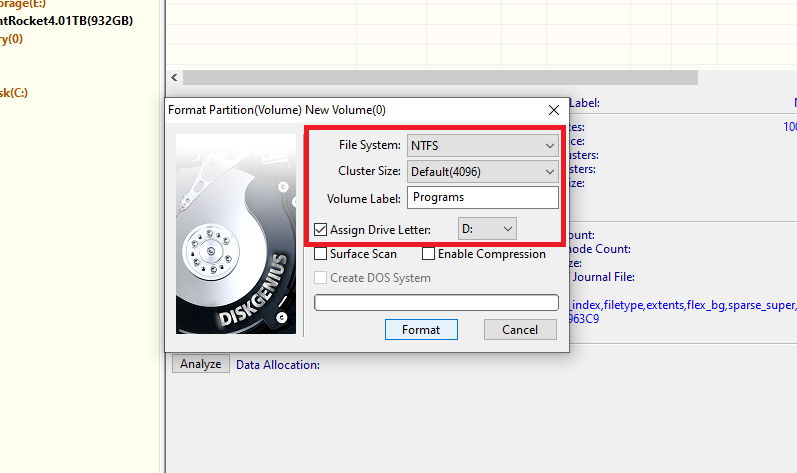
- Use the dropdown box to choose your preferred file system, in this case, NTFS.
- If you wish give your drive a name and letter.
- Click format.
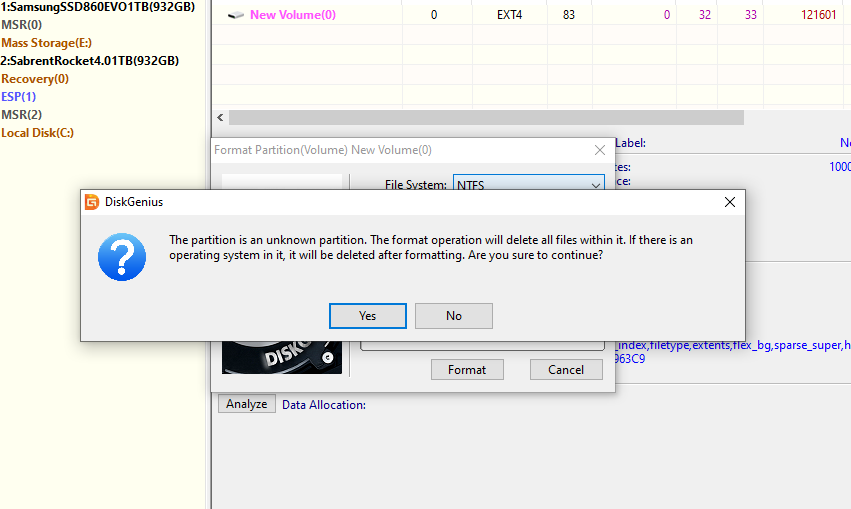
- Click yes if you’re happy.
- Wait for it to complete.
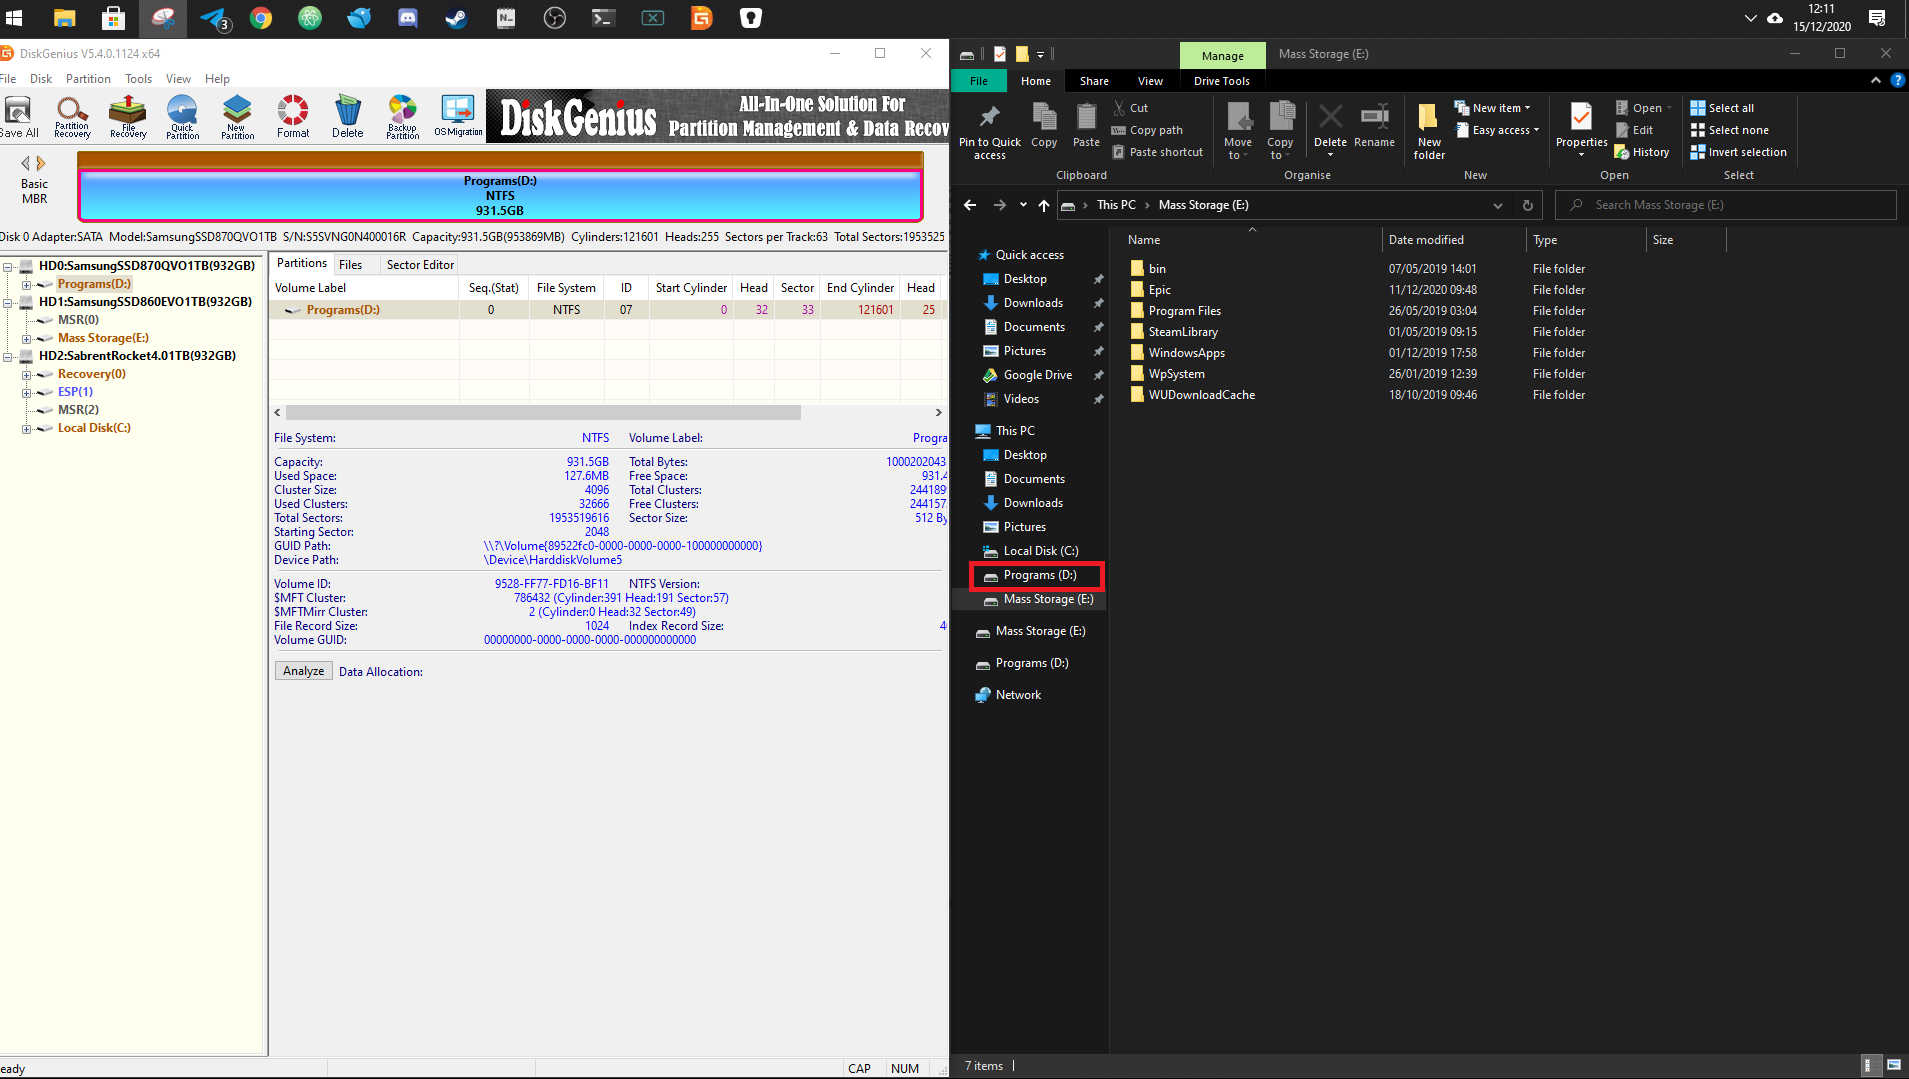
Now, when you go back to File Explorer you’ll see your newly formatted drive available to you to do with as you please.
All the latest news, reviews, and guides for Windows and Xbox diehards.
Richard Devine is a Managing Editor at Windows Central with over a decade of experience. A former Project Manager and long-term tech addict, he joined Mobile Nations in 2011 and has been found on Android Central and iMore as well as Windows Central. Currently, you’ll find him steering the site’s coverage of all manner of PC hardware and reviews. Find him on Mastodon at mstdn.social/@richdevine