Deleting files or folders in Windows 10 is something we do all the time. Regular file deleting simply requires you to right-click on the item and select the Delete option from the context menu, or after selecting the file, press the Delete key on your keyboard directly.
You can also permanently delete a file or folder using the Shift + Delete keys combination. But some files or folders are so stubborn that you can’t delete them no matter what you do, only get the error message «Cannot delete [filename]: Access is denied».
There are many reasons why a file or folder cannot be deleted. For example, the file or folder is in use by a program and you cannot delete it until the program using the file is closed. Or the folder is read-only, the disk on which the files are stored is write-protected, the Recycle Bin is full, and so on. Whatever the reason, if you are sure that the file or folder is useless, you can try the following four methods to force delete folders or files on Windows 11/10/8/7.
| Workable Solutions | Step-by-step Troubleshooting |
|---|---|
| Fix 1. Force delete folder in CMD | If you can’t regularly delete some folders or files, you can apply the DEL command in CMD…Full steps |
| Fix 2. Force delete folder with software | Using force delete folder software to learn files that can’t be deleted is a useful and simple way…Full steps |
| Fix 3. Delete files with ownership | To delete files or folders on Windows, you need to have user ownership. Gain or change the ownership…Full steps |
| Fix 4. Force delete a folder or file in Safe Mode | In Safe Mode, problematic applications or features won’t start, you can delete folders…Full steps |
1. Force Delete Folder Windows 10 Using Del Command in CMD
Windows’ Command Prompt can be used to perform advanced operations, including forcing delete folders or files, whether or not a program is using them. If you’re a computer expert, Command Prompt is a great disk and file management tool for you.
Here’s how to force delete a folder on Windows 10.
Step 1. Press Win + E to open File Explorer. Find the file or folder that is to be deleted. Copy the location of the file or folder.
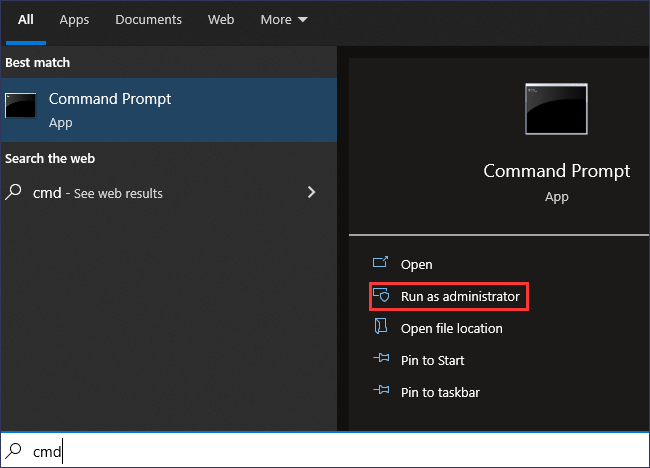
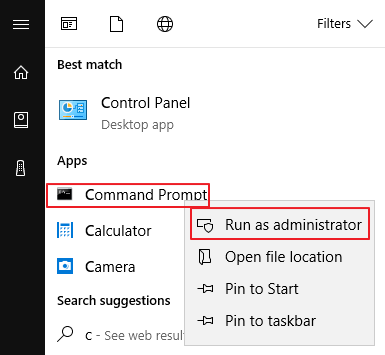
Step 2. Click the Search button and type in cmd. Click on «Run as administrator» on the right panel to open it with admin rights.
Step 3. Type the following command and press Enter.
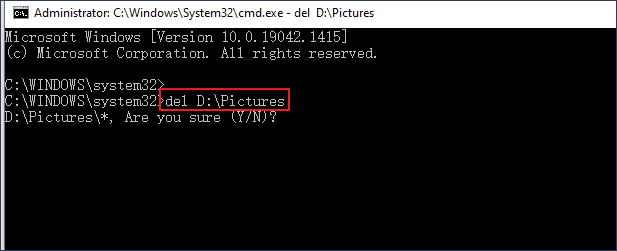
del (FilePath)
e.g. del D:\Pictures. Replace the FilePath with the file or folder address copied in Step 1.
Step 4. Type Y for «Are you sure (Y/N)?» and press Enter. Then, the folder will be deleted fast.
- Warning
- The DEL command will permanently delete a folder or file bypass the Recycle Bin on your Windows PC, and you can’t restore it unless using a professional file recovery tool.
How to Recover Permanently Deleted Folders or Files on Windows 10/11
You may permanently lose files by accidental deletion/formatting, hard drive corruption, virus attack, or OS crash. In any case, you can use EaseUS data recovery software to retrieve lost or deleted files safely and efficiently.
EaseUS Data Recovery Wizard is one of the top-notch data recovery software that you can use to recover lost and deleted files stored on HDD, SSD, SD card, USB flash drive, pen drive, and many more devices without hassle.
What’s more, it’s also good at repairing corrupted files after data recovery. You can repair corrupted videos (MOV/MP4/GIF), photos(JPEG/JPG/BMP/PNG), and documents (DOC/DOCX/XLS/XLSX) effortlessly.
Now, free download this reliable file recovery program to restore more than 1000 kinds of files like video, audio, documents, graphics, emails, and other files.
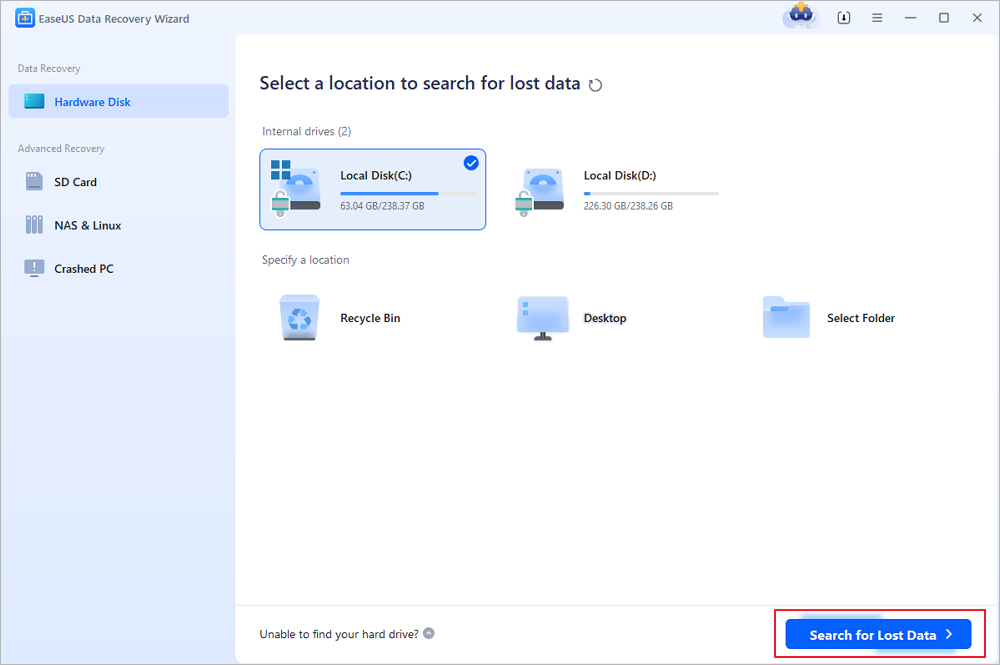
Step 1. Select the location to scan
Choose the specific device and drive where you have permanently deleted files using Shift delete or emptying recycle bin. Then, click the «Scan» button to find lost files.
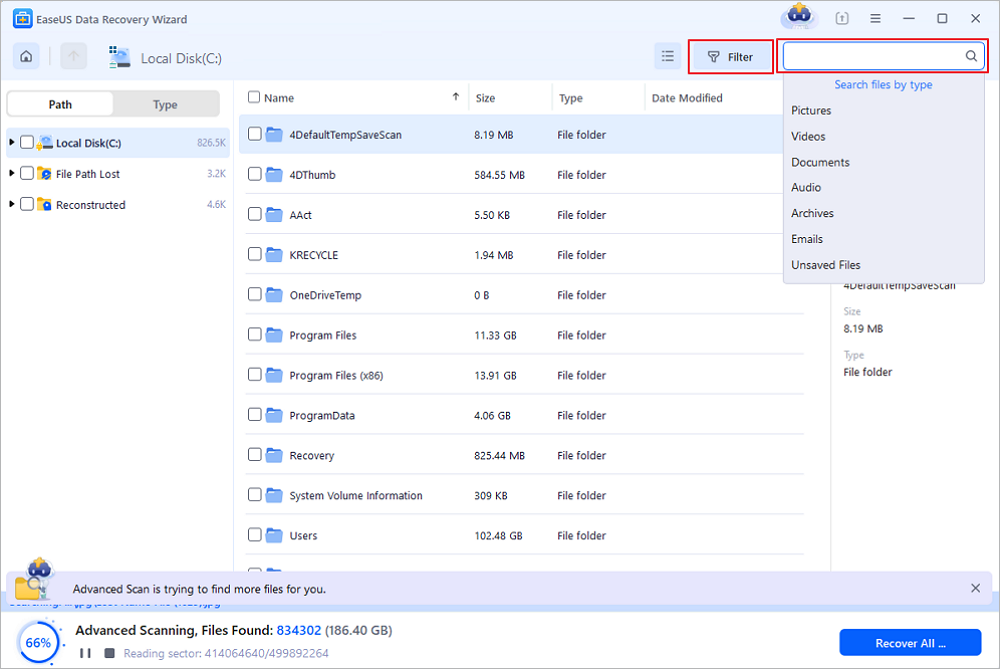
Step 2. Check the results
The software will automatically start scanning all over the selected drive. When the scan completes, select the «Deleted Files» and «Other Lost Files» folders in the left panel. Then, apply the «Filter» feature or click the «Search files or folders» button to quickly find the deleted files.
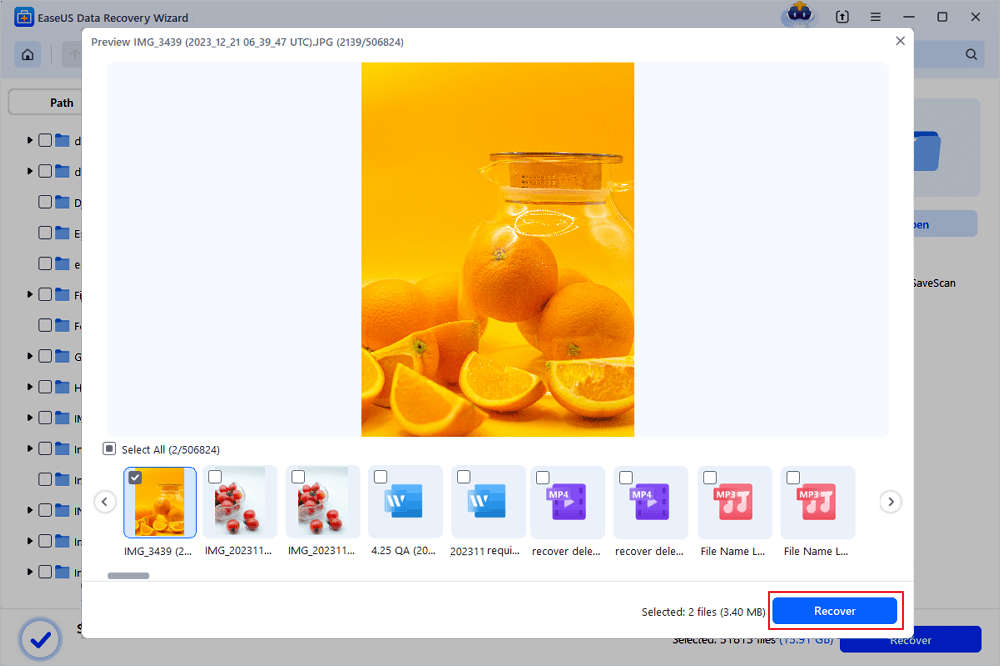
Step 3. Recover deleted files
Select the deleted files and click «Preview». Next, click «Recover» to save them to another secure location or device.
2. Use a File Shredder Tool to Force Delete a Folder or File
Another useful way to remove folders or files that cannot be deleted is using a simple file shredder. EaseUS LockMyFile is an easy-to-use file management tool that can help you delete and shred files or folders from your computer completely with its File Shredder feature.
Step 1. Download and launch EaseUS LockMyFile.
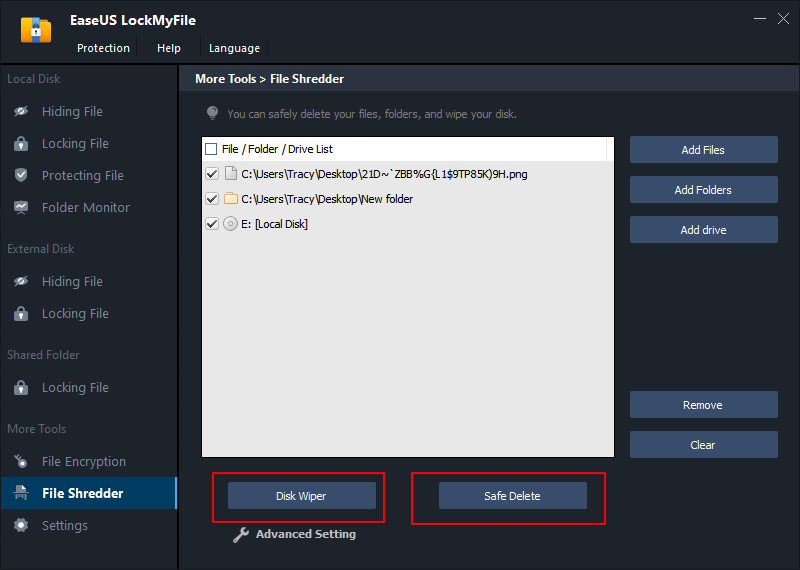
Step 2. Click «File Shredder» under More Tools, click «Add Files, Add Folders, or Add drive» to select files, folders, or a disk that you need to shred.
Step 3. Confirm the files, folder, or drive that you need to shred, click «Safe Delete» or «Disk Wiper» to shred the selected items.
These are for removing unwanted folders or files. The software is best known for file/folder protection, including file encryption, file locking, file hiding, and so on. If you need maximum protection for your important data, try this tool.
3. Force Delete Folders Windows 10 by Changing File Ownership
To delete a file or folder, you need to have ownership of that folder/file. If you are trying to remove folders created by another user, learn how to get ownership on Windows 11/10/8 with the steps below.
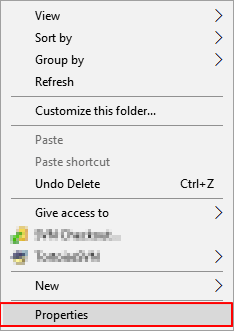
Step 1. Go to Windows File Explorer and find the file/folder you need to delete. Right-click it and select «Properties».
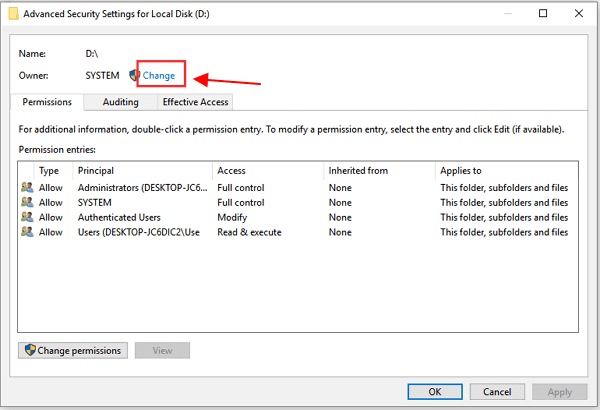
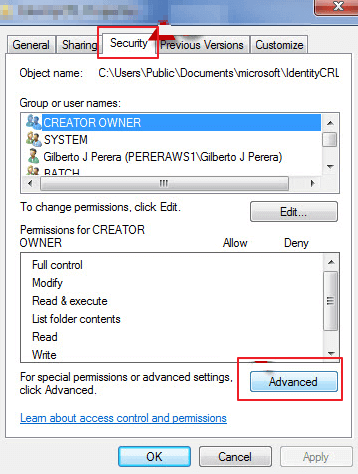
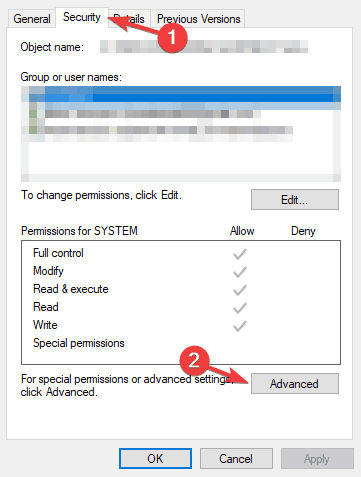
Step 2. Click «Security» > «Advanced» as shown in the screenshot below.
Step 3. To change a user or a group that already existed: click «Change», choose the target user account, and click «OK» to save changes.
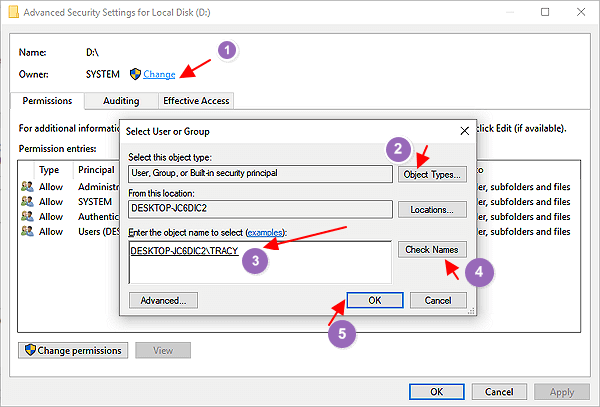
If you want to change the ownership to a user or group that does not exist: Click «Change» > «Object Types…», and type the name of the user or group under «Enter the object name to select», then click «Check Names» > «OK».
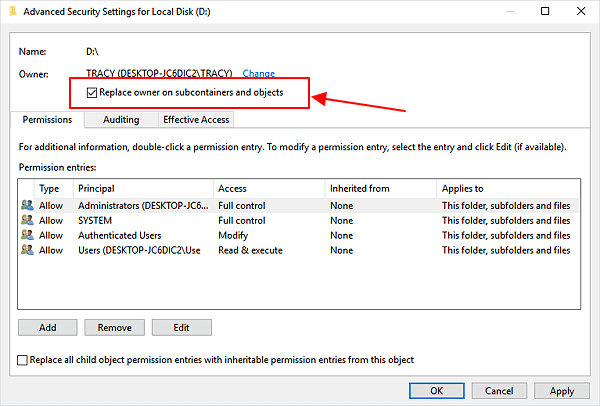
Step 4. If you want to change the owner of all sub-containers and objects, tick the «Replace owner on sub-containers and objects» box.
Then, try again to see if you can delete folders or files that cannot be deleted.
Gain ownership to force delete folder on Windows 7:
Step 1. Right-click the target folder or file and choose «Properties».
Step 2. Click the «Security» >»Advanced».
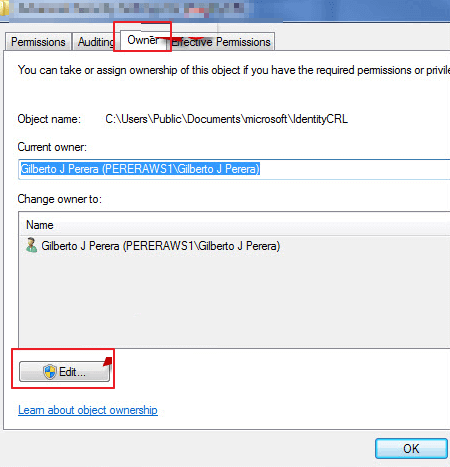
Step 3. Click the «Owner» > «Edit» to change the owner.
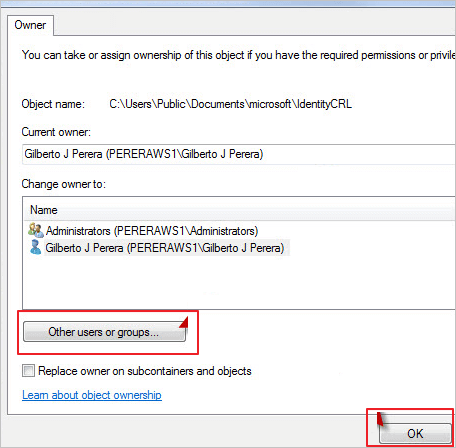
Step 4. Click «Other users or groups» to choose the user manually.
Step 5. Follow the on-screen instructions to change the ownership like the above Step 3 on Windows 10.
4. Force Delete a Folder or File Using Safe Mode
If the above methods failed, you still have the last chance to force delete folders on Windows 10 or Windows 11 in Safe Mode. In safe mode, most applications will not start, so there is a very simple environment to delete a file/folder.
Step 1. Click the Windows button and choose «Power». Hold the «shift» key and click «Restart».
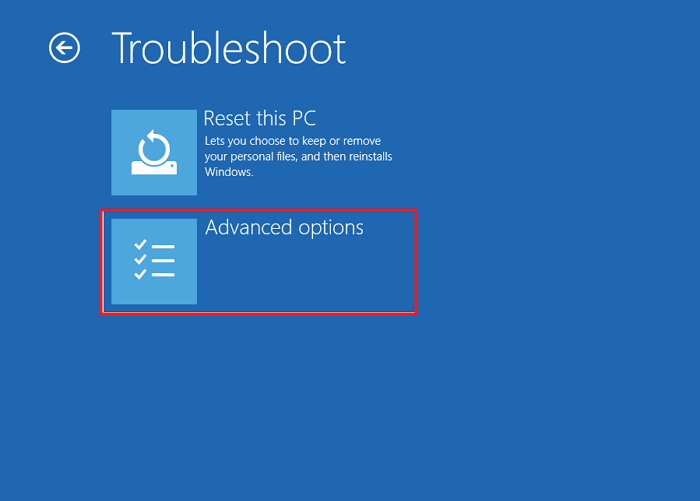
Step 2. Click the «Troubleshoot» > «Advanced options».
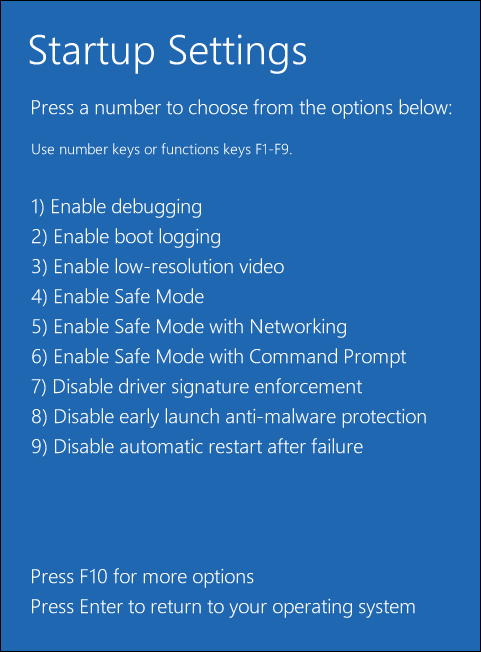
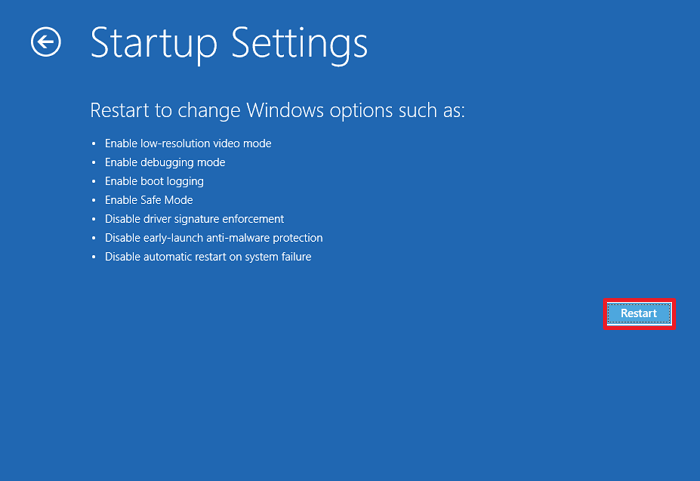
Step 3. Click «Startup Settings» on the following screen. Then, click «Restart».
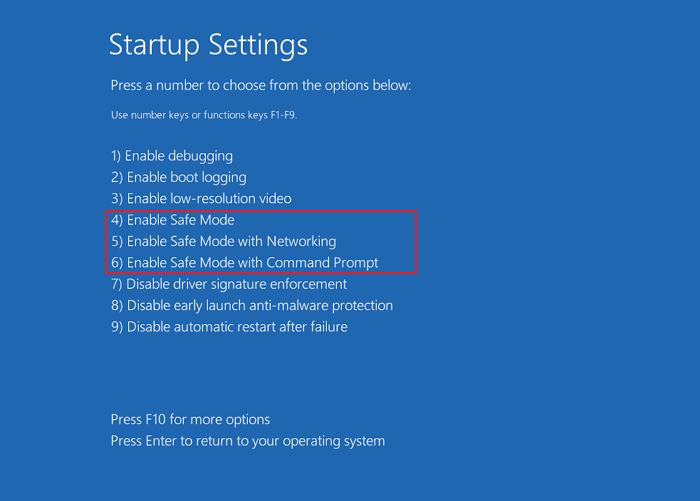
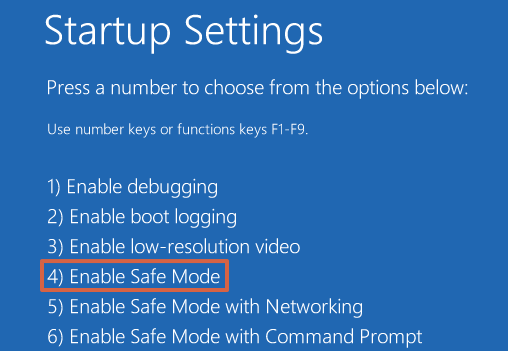
Step 4. From the startup settings, choose one way to enable Safe Mode as listed in numbers 4, 5, and 6.
Then, your Windows computer will start in Safe Mode. You can try to delete folders or files again.
Concluding Words and FAQs
We covered these four working solutions to help you force delete a folder or file in Windows 10 or Windows 11. Other quick tips you can try to remove an undeletable folder or folder are checking your antivirus, which protects your files from being deleted, rebooting your system, uninstalling some third-party applications, and more.
Before performing force delete, make sure that the data you are going to clear is the target folder or file. If an error occurs, stop using your computer or external device and use EaseUS data recovery software to retrieve your data immediately.
More Force Delete Folder FAQs
1. How to force delete folder Windows 10 open in another program?
To overcome the File in Use error when deleting folders, you can:
- Close the program via the Task Manager
- Restart your computer
- Force delete folder using CMD
- Force delete folder with software
2. Force delete folder software
Try the following two force delete folder software on Windows 10/8/7
- EaseUS LockMyFile: its File Shredder feature allows you to completely delete folders, files, or even wipe the whole disk
- EaseUS Partition Master Free: its Wipe Data feature enables you to clean partition data permanently
3. How to force delete folder Windows 10 PowerShell
Step 1. Search for PowerShell and run it as administrator.
Step 2. In the Command Prompt window, type remove-item D:\Pictures and hit Enter key.
Tip: Replace D:\Pictures with the location of the file or folder you need to delete.
Trying to delete a stubborn file or folder from your Windows PC can be frustrating. For example, you could be pressing delete and thinking the file or folder is gone, only to find it in the exact location you removed it from.
There are several reasons why you can’t delete a file or folder, including:
- The file may be in use by another program, background process, or application.
- The file’s unlock process may not have been completed.
- Disk failure or corruption.
- The folder or file is read-only or corrupted.
- You may be trying to delete a system file.
- The Recycle Bin is either full or corrupted.
- The file or folder is infected with malware or a virus.
- The disk is write-protected or full.
- You get the Access Denied warning when you try deleting files or folders from a mounted external drive.
This guide explains how to force delete a file or folder in Windows 10 and get rid of it for good.
You can force delete a file or folder in Windows via Command Prompt, Safe Mode, using a keyboard shortcut, or using a third-party app. Before trying any of these methods, here are a few basic steps to help you get around the issue:
- Close any running applications or programs on your computer, and then delete the file or folder again.
- Use Task Manager to close the file or folder and then try deleting it again.
- Restart Windows and see if you can delete the file or folder successfully once your computer reboots.
- Run a virus or malware scan to check for threats that may lurk within your PC.
- Check whether the file or drive is marked as read-only, otherwise you may not be able to delete the file or folder. You can do this by right-clicking on the file or folder and selecting Properties.
- Update Windows and then try to delete the problematic file or folder.
If the above basic steps didn’t help resolve the issue, use the methods below to force delete a file or folder in Windows.
Force Delete a File or Folder in Windows Using Command Prompt
Command Prompt in Windows PCs can perform advanced administrative functions, automate tasks via batch files and scripts, and troubleshoot issues in Windows.
How to Force Delete a File Through Command Prompt
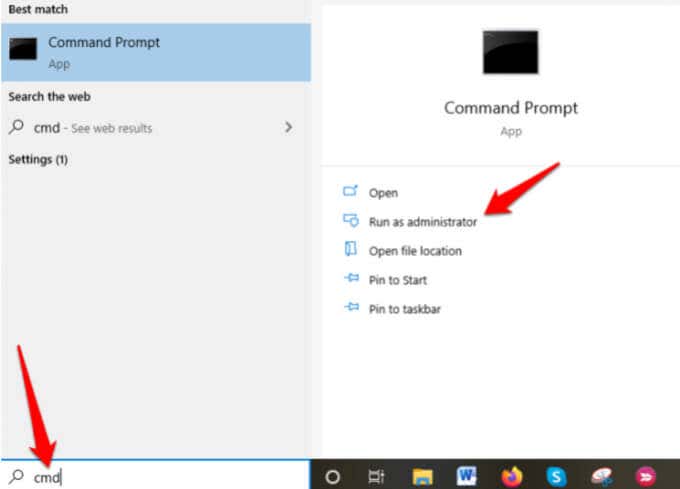
- Type CMD in the search box and select Run as administrator.
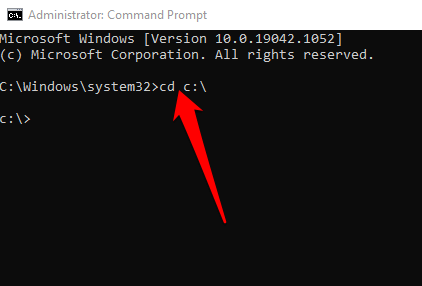
- Type cd x:\ and press Enter. In this case, x represents the name of the drive letter, where the folder containing the file you want to force delete resides.
- Type del filename and press Enter. Make sure you replace the filename with the name of the file you want to delete in Windows.
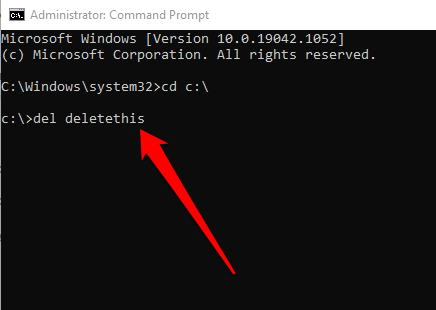
Alternatively, type the command as del /F c:\users\thispc\desktop\filename to force delete the file if it is read-only. In this case, you’ll enter del plus your the /F parameter, the file’s location, and the filename, which would look something like this: del /F c:\admin\thispc\desktop\deletethis.
Note: If you use del to delete a file in Windows, you can’t retrieve the file later.
How to Force Delete a Folder Through Command Prompt
If the folder has a file in it, you can use the steps above to force delete the file and then use Command Prompt to delete the folder. This process can be tedious and time-consuming if you have many nested files and folders, but here’s how to do it quickly.
- Open Command Prompt > Run as administrator.
- Use the /s flag with rmdir to force delete the folder along with subfolders and files in it. For example, if you want to remove a folder called “Test Folder”, enter rmdir /s test folder.
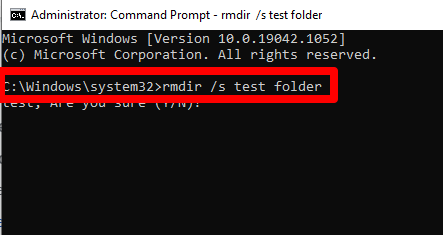
- If you get a prompt to confirm the deletion, select Y and press Enter.
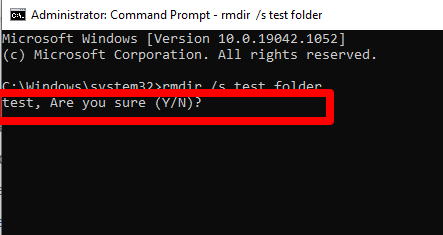
Note: Any folder you delete using the rmdir command cannot be retrieved.
Delete a File or Folder in Windows Using Safe Mode
Safe Mode is a diagnostics mode that starts Windows in a basic state with a limited set of drivers and files. You can delete files or folders in Safe Mode, which you’d otherwise not be able to delete before.
Enter Safe Mode, find the file or folder you want to delete, and then reboot your PC to exit Safe Mode.
Use a Third-Party Program to Force Delete a File or Folder in Windows
If you still cannot force delete a file or folder after trying the steps above, you can use a third-party program to simplify the deletion of the files and folders.
Unlocker is one of the best file or folder deletion programs that allows you to regain control over your data by unlocking files and killing unresponsive processes.
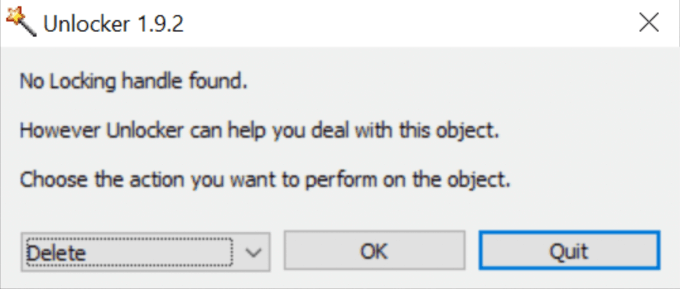
The app can kill processes, unload DLLs, unlock, delete, rename or move locked files without restarting your computer and deleting index.dat files. However, Unlocker can kill important processes and delete critical files from Windows, so you need to be cautious when using the app.
Other similar tools that you can use include File Assassin and Long Path Tool.
Remove Stubborn Files and Folders from Your PC
Trying to remove undeletable files and folders from your computer can be stressful. However, with the solutions here, you should get around this problem and delete the files or folders for good.
Let us know what worked for you by leaving a comment in the section below.
If you want to force delete a file in Windows 10 and delete it permanently then simply follow the steps given below. You can right click on any file and try to delete it. The system will show you the confirmation dialog and ask you to confirm the file deletion. If you confirm it, the file will be deleted but only till next time you restart your system. The files are marked as deleted but really they are not deleted. They are still in your drive partition waiting for recovery. If you don’t want to risk your files from getting recovered just follow the steps given below and force delete any file permanently.
The Windows 10 operating system allows users to force delete a file. This is done by checking a box that does not allow the file or folder to be recovered. The file or folder that is deleted using this method cannot be recovered using tools such as those found in File Explorer or Data Recovery Software. This article will show you how to force delete a file in Windows 10 without affecting any files that you want to keep on your computer.
Windows 10 has two major interfaces. One is the new Windows Store app introduced with Windows 8. The other one is very familiar to Windows 7 and XP users, called the “Traditional” interface. Lets not get into all that. Just remember that these interfaces have different ways of deleting files and folders. In this article we will show you different methods on how to Force Delete a file or folder in Windows 10.
Are you encountering a problem deleting a file in Windows 10 no matter how many times you try? Well, this happens from time to time especially if the file is being utilized by another program. If you are stuck with a file that you don’t want, the good news is that you can force delete.
In this article, we will look at simple ways to force delete a file in Windows 10.
Method 1: Force Delete a File Using Command Prompt
One way to force delete a file in Windows 10 is through the command prompt. Here is a step-by-step guide:
- On the keyboard, input Windows + R keys to open Run command.
- Input cmd to open the Command Prompt. Alternatively, you can search for the command prompt from the start menu.
- To run the Command Prompt as administrator, press Ctrl, Shift and Enter simultaneously.
- Then, enter the command line of the file you want to delete. To do this, enter del then the location of the file. For example, del c:usersjanedesktoptest.txt and hit Enter.
Method 2: Using Safe Mode
Starting Windows 10 in safe mode can help unlock and force delete files. This is because this diagnostic mode makes it possible to troubleshoot Windows OS.
- Go to the start menu and choose the Settings option.
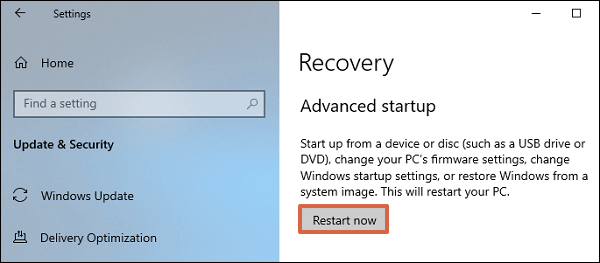
- Then go to Update & Security, then Recovery. Click Restart Now under the Recovery tab.
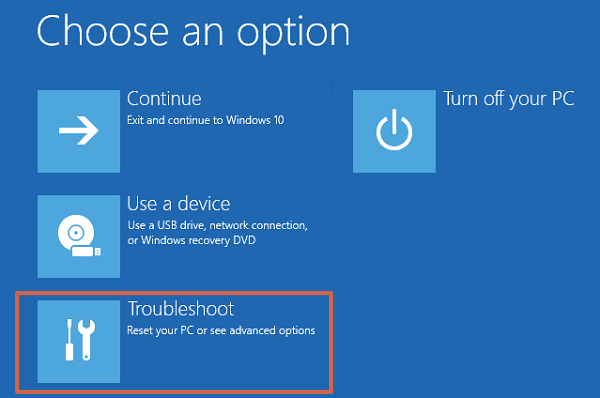
- Choose an Option window will open. Navigate to Troubleshoot and click on it.
- Then click Advanced Options then Startup Settings then Restart. This will prompt your Windows 10 computer to restart.
- When it restarts, press 4 or F4 to enter safe mode.
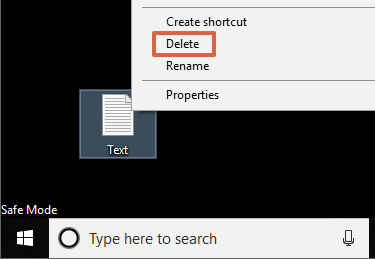
- When safe mode opens, force delete the file that cannot be deleted.
- Lastly, exit safe mode by restarting your PC.
Method 3: Use Unlocker
If a file can’t seem to get deleted on your PC, opt to use unlocker. This a third-party tool that removes files, including those that can’t be deleted by Windows. To delete these files:
- Download and install unlocker in your PC.
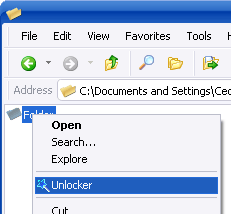
- Once installed, go to the file that you want deleted and right-click on it.
- Select Unlocker from the options provided.
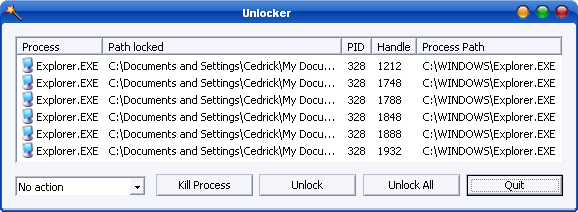
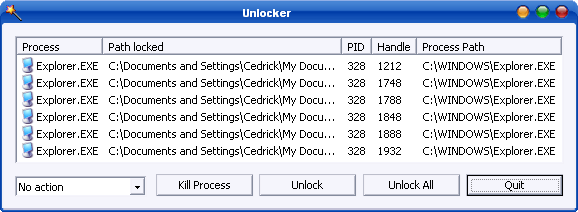
- Doing this will open a list of processes connected to a particular file.
- To unlock the file that you want to delete, click Unlock All. If this doesn’t free the file, click Kill Process.
Method 4: Change File Ownership
Changing the ownership can help delete a file that cannot be deleted. Follow these steps:
- Go to the file that you want to delete and right-click on it. Then choose Properties from the options provided.
- On the top menu, go to the Security tab and click or tap on the Advanced button.
- This will open the Advanced Security Settings window. On it, locate Owner or Trustedinstaller.
- Click on the Change button next to it.
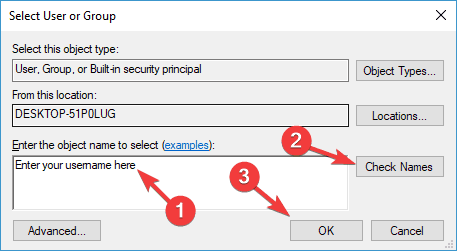
- Input the username of your choice and the press Check Names to verify if the name is okay. Then press OK. This will change the name of owner of the file.
- On the Advanced Security Settings window, you will see an option Replace owner on subcontainers and objects. Click on the checkbox and then click Apply. Afterwards, close this window.
- Then, right-click on the file to open the Properties tab once again.
- Go to Security then Advanced.
- Below the Permissions tab, you will see the Replace all child object permission entries with inheritable permission entries from this object option. Check that checkbox.
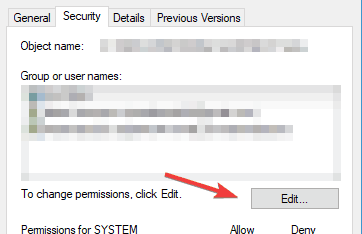
- Then, click Edit
.
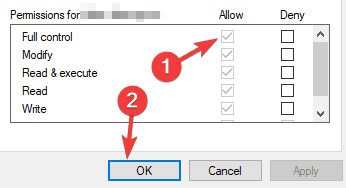
- The Permission Entry window will open. Check Full Control and click OK.
- Try deleting the file once again.
Summary: Force delete a file in Windows 10
- Search for the file by its name.
- Long-press on the file to select it, then click the trash can icon at the bottom of the screen.
- Again, long-press on the file and in the menu that appears, tap «Delete.»
Conclusion
These are some of the best options for getting rid of a stubborn file. With this detailed step-by-step guide, you should be able to force delete the file in your Windows 10 computer.
If you can’t delete a file or folder in Windows 10, check the 3 ways in this post for how to delete files that cannot be deleted in your Windows 10 computer. Detailed step-by-step guide is provided. To recover mistakenly deleted files or lost data from Windows 10 computer or other storage devices, MiniTool offers the professional free data recovery software.
Can’t Delete a File or Folder in Windows 10?
Sometimes you may face this problem: you can’t delete a file or folder in Windows 10 no matter how many times you conduct the delete operation. How to delete files that cannot be deleted? How to force delete a file in Windows 10 computer?
Generally if a file is being opened or used by another application or program, Windows 10 computer will mark the file in a locked state, and you can’t delete, edit or move this file. When you are not using this tile, then it will be unlocked. But sometimes the file unlock process may be not successfully completed, which may cause the file delete operation can’t be accomplished, along with a warning showing that the file is opened by another program.
If you insist to delete the file or want to force to delete it, you may try these three methods in this post to unlock and delete the file.
How to Force Delete a File/Folder That Cannot Be Deleted Windows 10
How to delete a file/folder that that won’t delete in Windows 10? Normally you can take the basic steps below at first.
- Close all apps and programs on your Windows 10 computer, and try to delete the file again to see if it can be deleted.
- Close File Explorer. You can click Start -> Type Task Manager and choose Task Manager to open it -> Find Windows Explorer and right-click on it and choose End task to close it.
- Restarting Windows 10 can sometimes fix many issues. You can try to reboot your Windows 10 computer and delete the file again to see if it can be deleted successfully.
- You can also conduct a virus scan to see if there is a virus in your Windows 10 computer.
- Check the file property. Make sure the file or drive is not read-only. Related: how to remove write protection on SD card, USB, disk drive, etc.
If all the five measures above don’t make any difference, then you can continue to try the three ways below to force delete files or folders that can’t be deleted.
Method 1. Force Delete Files/Folders Using CMD
Can’t delete file? You can try to use Command Prompt to delete files or folders that cannot be deleted in Windows 10.
How to force delete a file with “DEL” command:
Step 1. You can press Windows + R keys on the keyboard, type cmd, and press Ctrl + Shift + Enter to run Windows Command Prompt as administrator.
Step 2. Then input the command line and hit Enter to force delete the file in Windows 10 with CMD. The command line is like this: del c:\users\alisa\desktop\test.txt. Replace “c:\users\alisa\desktop\test.txt” with the path of the target file. And do remember to include the file extension in the command.
To check the path of the file, you can right-click the file and click Properties.
Force delete folder in Windows 10 with ““RMDIR /S /Q” command:
To delete a folder that won’t delete in Windows 10, you can type rmdir /s /q E:\test command in Command Prompt window. Replace “E:\test” with the path of the folder.
Method 2. Use Safe Mode to Unlock and Delete Files
To delete a file that can’t be deleted, you can also try to start Windows 10 in safe mode to unlock and delete the file.
Step 1. Click Start -> Settings -> Update & Security -> Recovery -> Restart now (under Advanced Startup), to enter into Windows recovery environment.
Step 2. Click Troubleshoot -> Advanced options -> Startup Settings -> Restart.
Step 3. In Startup Settings window, you can press F4 or F5 to boot into safe mode in Windows 10.
Step 4. Delete the file or folder in Windows 10 Safe Mode.
Step 5. Restart Windows 10 and your computer will auto exit Safe Mode.
Method 3. Use Shift + Delete to Force Delete File/Folder
You can select the target file or folder and press Shift + Delete keyboard shortcut to delete the file/folder permanently. This file deletion method won’t pass the Recycle Bin.
Note: Need to mention that this post is not talking about deleting Windows system files. Windows system files are usually protected against deletion. Deleting system files can cause issues of your Windows 10 computer OS. So please do not delete system files randomly.
If the file is corrupted or your Windows 10 computer reports that it can’t find the file, you may take some measures to conduct the disk repair process to see if it can fix this error and fix corrupted system files.
Quick Video Guide:
How to Recover Mistakenly Deleted Files from Windows 10 Computer
As for how to force delete a file/folder that cannot be deleted in Windows 10, hope the above solutions in this post help.
In case sometimes you may mistakenly deleted a needed file on your Windows 10 computer, here we also attach an easy file undelete method, namely, use the professional data recovery software to easily recover deleted files from your Windows 10 computer.
MiniTool Power Data Recovery is an easy data recovery program for Windows. It allows you to easily recover deleted/lost files from Windows 10 computer, external hard drive, SSD, USB flash drive (pen drive data recovery), SD card, etc. in 2 simple steps. You can use MiniTool Power Data Recovery to recover data under various data loss situations.
Download and install MiniTool Power Data Recovery on your Windows computer and follow the simple operation below to recover mistakenly deleted files.
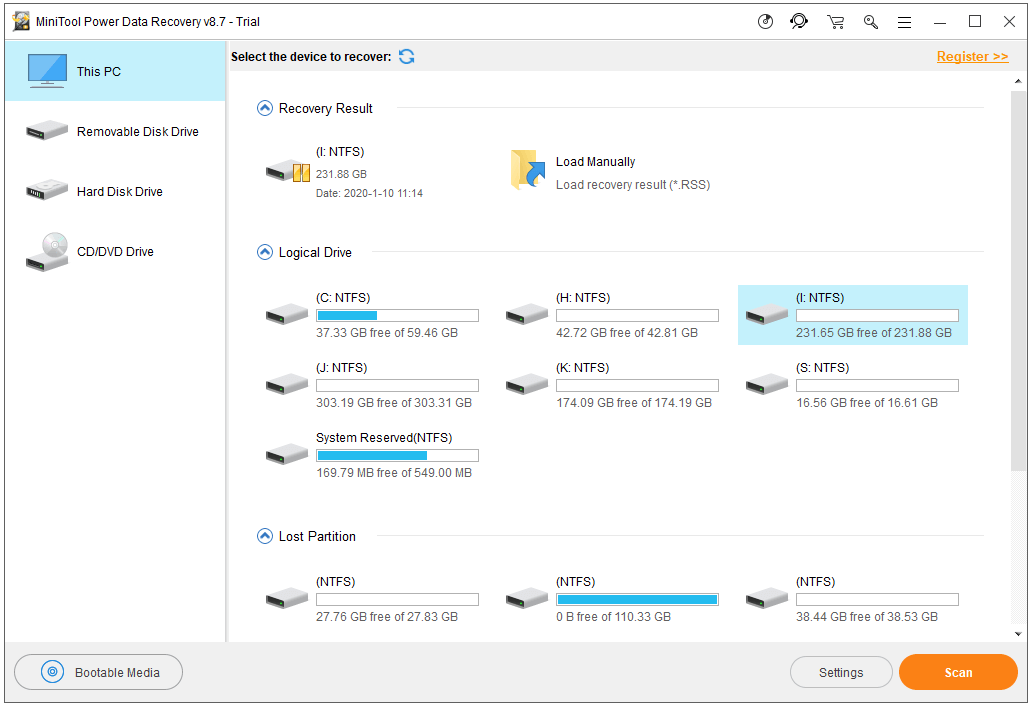
Step 1. Launch MiniTool Power Data Recovery, and choose This PC from the left pane. Then you can choose the specific partition in the right window where your deleted files located. Click Scan button.
If you want to scan and recover specific type of files, you can click Settings to choose the file type before you click Scan button.
Step 2. After the scan process is completed, you can check the scan result to find your mistakenly deleted files, check them and click Save button to set a new destination path to store them.
How to Force Delete a File FAQ
How do I delete a file that cannot be deleted?
You can follow the operation in this post to force delete the file that cannot be deleted in Windows 10 using Command Prompt.
How do I force delete a folder?
You can use the del command in CMD to force delete a folder in Windows 10. The detailed instructions for CMD delete folder are included in this tutorial.
How do I delete a file that won’t delete Windows 10?
Check the solutions in this post above to delete the undeletable files or folders in Windows 10.
Why can’t I delete folders?
If the folders are currently used by other applications or are locked, then you cannot delete the folders. You can close all applications and try again. If it doesn’t work, you can try the 3 methods in this tutorial to force delete the folder in Windows 10.
Не зависимо от уровня владения ПК будь то начинающий или же продвинутый пользователь с такой процедурой как удаление файлов всем приходится сталкиваться регулярно. И, казалось бы, что может быть проще чем удалить ненужный документ, картинку или прочее. Но и в таком вопросе у пользователей могут возникнуть некоторые сложности. В настоящей инструкции мы поможем пошагово научиться выполнять эту операцию разными способами.
Содержание
- Удалить файлы с компьютера
- Принудительно удалить файл
- Удалить файл навсегда
- Удалить файл через командную строку
- Удалить файлPowerShell
Удалить файлы с компьютера
Стандартная процедура удаления файла в корзину выглядит следующим образом: выделите файл, который необходимо удалить (нажатием по нему ЛКМ) затем на клавиатуре нажмите кнопку Del или сочетание клавиш Ctrl+D. Можно воспользоваться контекстным меню, вызвав его можно нажатием на файле ПКМ и затем выбрать действие Удалить.
Если система потребует подтверждения удаления нажмите кнопку «Да».
Также можно воспользоваться строкой меню в папке.
Откройте папку, где расположен ненужный файл. Выделите его щелчком мыши, перейдите ко вкладке Главная и выберите действие Удалить. Вы можете открыть выпадающий список и выбрать удалить в корзину или же безвозвратно с ПК.
Принудительно удалить файл
Рассмотрим и такую ситуацию, когда вы любым удобным способом хотите удалить файл и в это время на монитор выводится сообщение о невозможности выполнения этого действия.
Причинами, по которым это могло случиться являются следующие:
- Отсутствие у вас прав администратора на удаление этого файла;
- Удаляемый файл открыт и используется каким-то приложением.
И если для первой ситуации вам достаточно зайти в систему под учетной записью администратора и попробовать вновь удалить файл. То во втором случае необходимо закрыть этот файл. Если вы видите, что файл открыт как в нашем случае в Word, вы можете его закрыть и завершить удаление. Если же программа, которая использует файл не отображается на панели задач, используйте Диспетчер задач.
Щелкните ПКМ по кнопке Пуск → Диспетчер задач (или воспользуйтесь горячими клавишами Ctrl+Shift+Esc) → во вкладке Процессы найдите приложение или процесс использующее файл (как правило, указывается в уведомлении как приведено выше) → щелкните по нему ПКМ → выберите действие Снять задачу.
В уведомлении нажмите кнопку Повторить попытку, после чего файл будет удален в Корзину.
Удалить файл навсегда
Если вы уверены, что файл вам больше никогда не понадобится, то можно сразу его удалить без предварительного перемещения в корзину. Для этого выберите файл, подлежащий удалению и нажмите на клавиатуре комбинацию Shift+Del. После чего подтвердите свое желание безвозвратно удалить файл нажав кнопку «Да».
Удалить файл через командную строку
Откройте командную строку от имени администратора (например, кнопка Пуск на панели задач → щелчок по ней ПКМ → выбрать из раскрывшегося списка Командная строка (администратор)).
Далее необходимо определить путь к файлу. В нашем примере файл под названием «Новый документ для winnote.ru» располагается на рабочем столе и путь к нему будет выглядеть следующим образом:
C:\Users\*имя пользователя*\Desktop\Новый документ для winnote.ru.txt
В окне командной строки введите команду del /f /s /q /a и затем путь к файлу в кавычках “C:\Users\*имя пользователя*\Desktop\Новый документ для winnote.ru.txt”.
Нажмите на клавиатуре клавишу Enter. На экран будет выведено сообщение об удалении фала.
Обратите внимание, что с помощью этого способа файл будет полностью удален с компьютера, без предварительного перемещения в Корзину.
Удалить файл PowerShell
Удалим текстовый документ, который располагается в папке на Рабочем столе. Определяем его путь (например, скопировав в адресной строке папки).
C:\Users\*имя пользователя*\Desktop\winnote\Новый документ для winnote.ru.txt
Запустите Windows PowerShell любым известным вам способом. Мы воспользуемся Поиском. На Панели задач щелкните значок в виде лупы и введите Windows PowerShell. Система предложит вам найденные варианты. Среди них выберите классическое приложение и запустите его от имени администратора.
Введите команду Remove-Item –Pathи далее в кавычках путь к удаляемому файлу “C:\Users\*имя пользователя*\Desktop\winnote\Новый документ для winnote.ru.txt”.
Нажмите Enter.
Файл успешно был удален из папки.
Надеемся, что описанные в статье способы помогут очистить ваш компьютер от ненужных файлов.




 .
.