 Одно из частых действий, необходимых при решении проблем с работой Интернета (таких как ошибка ERR_NAME_NOT_RESOLVED и других) или при смене адресов DNS серверов в Windows 10, 8 или Windows 7 — очистка кэша DNS (кэш DNS содержит соответствия между адресами сайтов в «человеческом формате» и их фактическим IP-адресом в интернете).
В этой инструкции подробно о том, как очистить (сбросить) кэш DNS в Windows, а также некоторые дополнительные сведения по очистке данных DNS, которые могут оказаться полезными.
Очистка (сброс) кэша DNS в командной строке
Стандартный и очень простой способ сброса кэша DNS в Windows — использовать соответствующие команды в командной строке.
Шаги, чтобы очистить кэш DNS при этом будут следующими.
- Запустите командную строку от имени администратора (в Windows 10 для этого можно начать набирать «Командная строка» в поиске на панели задач, затем нажать правой кнопкой мыши по найденному результату и выбрать «Запуск от имени администратора» в контекстном меню (см. Как запустить командную строку от имени администратора в Windows).
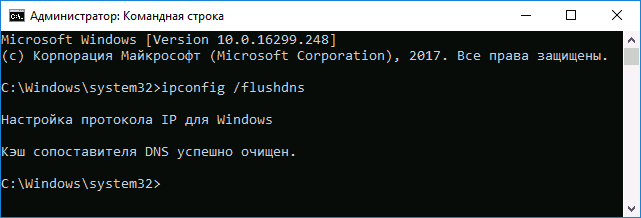
- Введите простую команду ipconfig /flushdns и нажмите Enter.
- Если всё прошло успешно, в результате вы увидите сообщение о том, что «Кэш сопоставителя DNS успешно очищен».

- В Windows 7 дополнительно можно выполнить перезапуск службы DNS-клиент, для этого там же в командной строке по порядку выполните следующие команды
- net stop dnscache
- net start dnscache
После выполнения описанных действий сброс кэша DNS Windows будет завершена, однако в некоторых случаях могут возникнуть проблемы, вызванные тем, что и у браузеров есть собственная база данных соответствий адресов, которую также можно очистить.
Очистка внутреннего кэша DNS Google Chrome, Яндекс Браузера, Opera
В браузерах на базе Chromium — Google Chrome, Opera, Яндекс Браузер присутствует собственный кэш DNS, который также можно очистить.
Для этого в браузере введите в адресную строку:
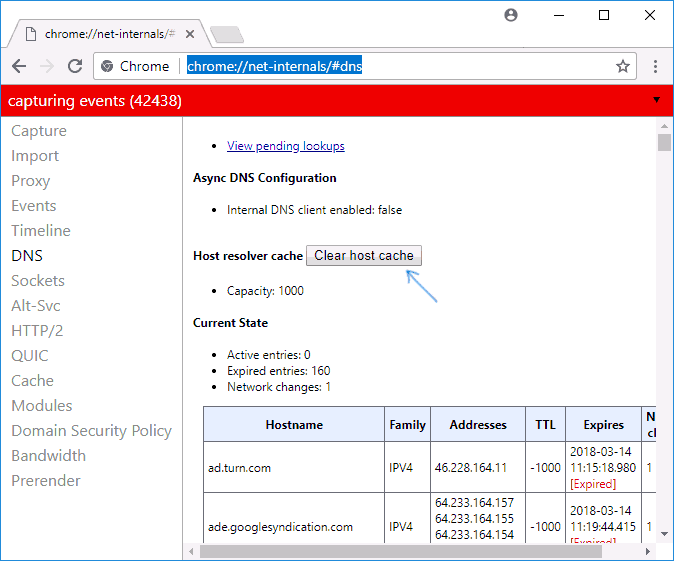
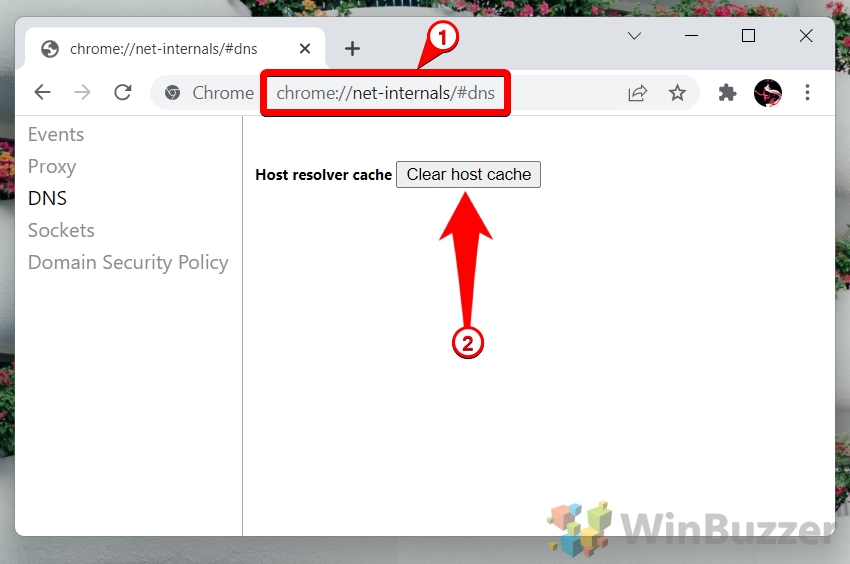
- chrome://net-internals/#dns — для Google Chrome
- browser://net-internals/#dns — для Яндекс Браузера
- opera://net-internals/#dns — для Оперы
На открывшейся странице вы можете посмотреть содержимое кэша DNS браузера и очистить его, нажав кнопку «Clear host cache».
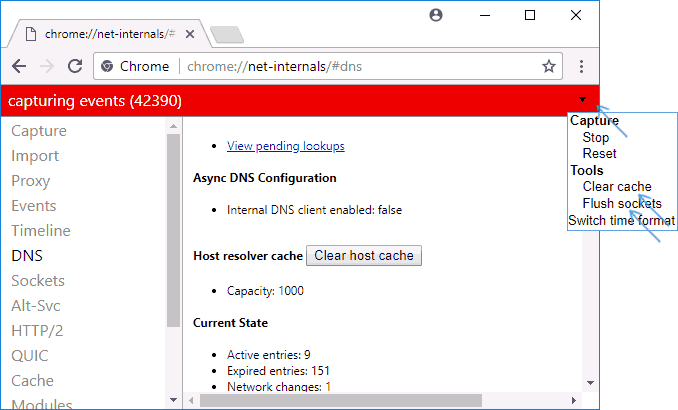
Дополнительно (при проблемах с соединениями в конкретном браузере) может помочь очистка сокетов в разделе Sockets (кнопка Flush socket pools).
Также, оба этих действия — сброс кэша DNS и очистку сокетов можно быстро выполнить, открыв меню действий в правом верхнем углу страницы, как на скриншоте ниже.
Дополнительная информация
Существуют и дополнительные способы сброса кэша DNS в Windows, например,
- В Windows 10 присутствует опция автоматического сброса всех параметров подключений, см. Как сбросить настройки сети и Интернета в Windows 10.
- Многие программы для исправления ошибок Windows имеют встроенные функции для очистки кэша DNS, одна из таких программ, направленная именно на решение проблем с сетевыми подключениями — NetAdapter Repair All In One (в программе присутствует отдельная кнопка Flush DNS Cache для сброса кэша DNS).


Если простая очистка не срабатывает в вашем случае, при этом вы уверены, что сайт, к которому вы пробуете получить доступ работает, попробуйте описать ситуацию в комментариях, возможно, у меня получится вам помочь.

You’ve probably noticed that, after visiting a website for the first time, the website loads much quicker the next time you visit.
This is because your operating system, or browser in the case of Google Chrome, cache IP addresses and DNS (Domain Name System) information of any website you visit. The DNS cache contains:
- the website address or hostname, technically called the resource data (rdata)
- the domain name of the website
- record type (IPv4 or IPv6)
- the validity of the cache or TTL (time to live)
When the TTL expires, the cache will be cleared, and the DNS is flushed for you automatically. But there are times when you don’t want to wait hours or days for the TTL to expire, and want to flush your DNS manually.
In this article, I’ll go over why you should flush your DNS, and how to do that in Windows 10 and Chrome.
So, Why Should You Flush (or Clear) Your DNS?
Flushing your DNS has several advantages, such as:
- hiding your search behavior from data collectors who might show you ads based on your search history
- requesting that an updated version of a website or web app is loaded. This can help resolve 404 issues if a website or web app was migrated to a new domain
- preventing DNS cache poisoning – a security situation in which black hat hackers gain maliciously gain access to your DNS cache and alter them so you get redirected to a website where sensitive information might be collected from you
To flush your DNS records on Windows 10, follow the steps below:
Step 1: Click on Start or hit the Windows [logo] key on your keyboard
Step 2: Type «cmd», then select «Run as Administrator» on the right
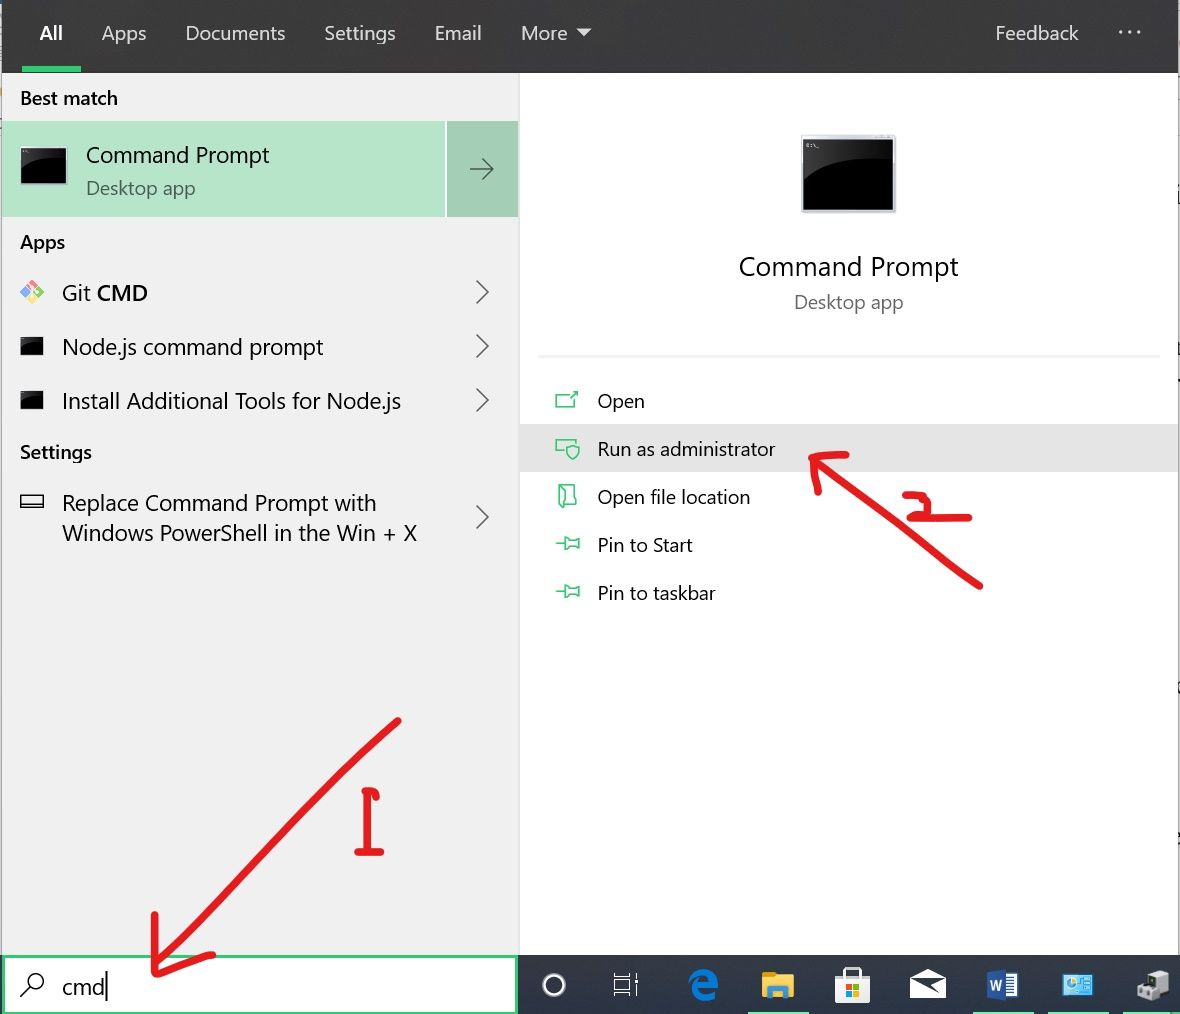
Step 3: Type in «ipconfig /flushdns» and hit ENTER
You should get a response that the DNS cache has been flushed like the one below:
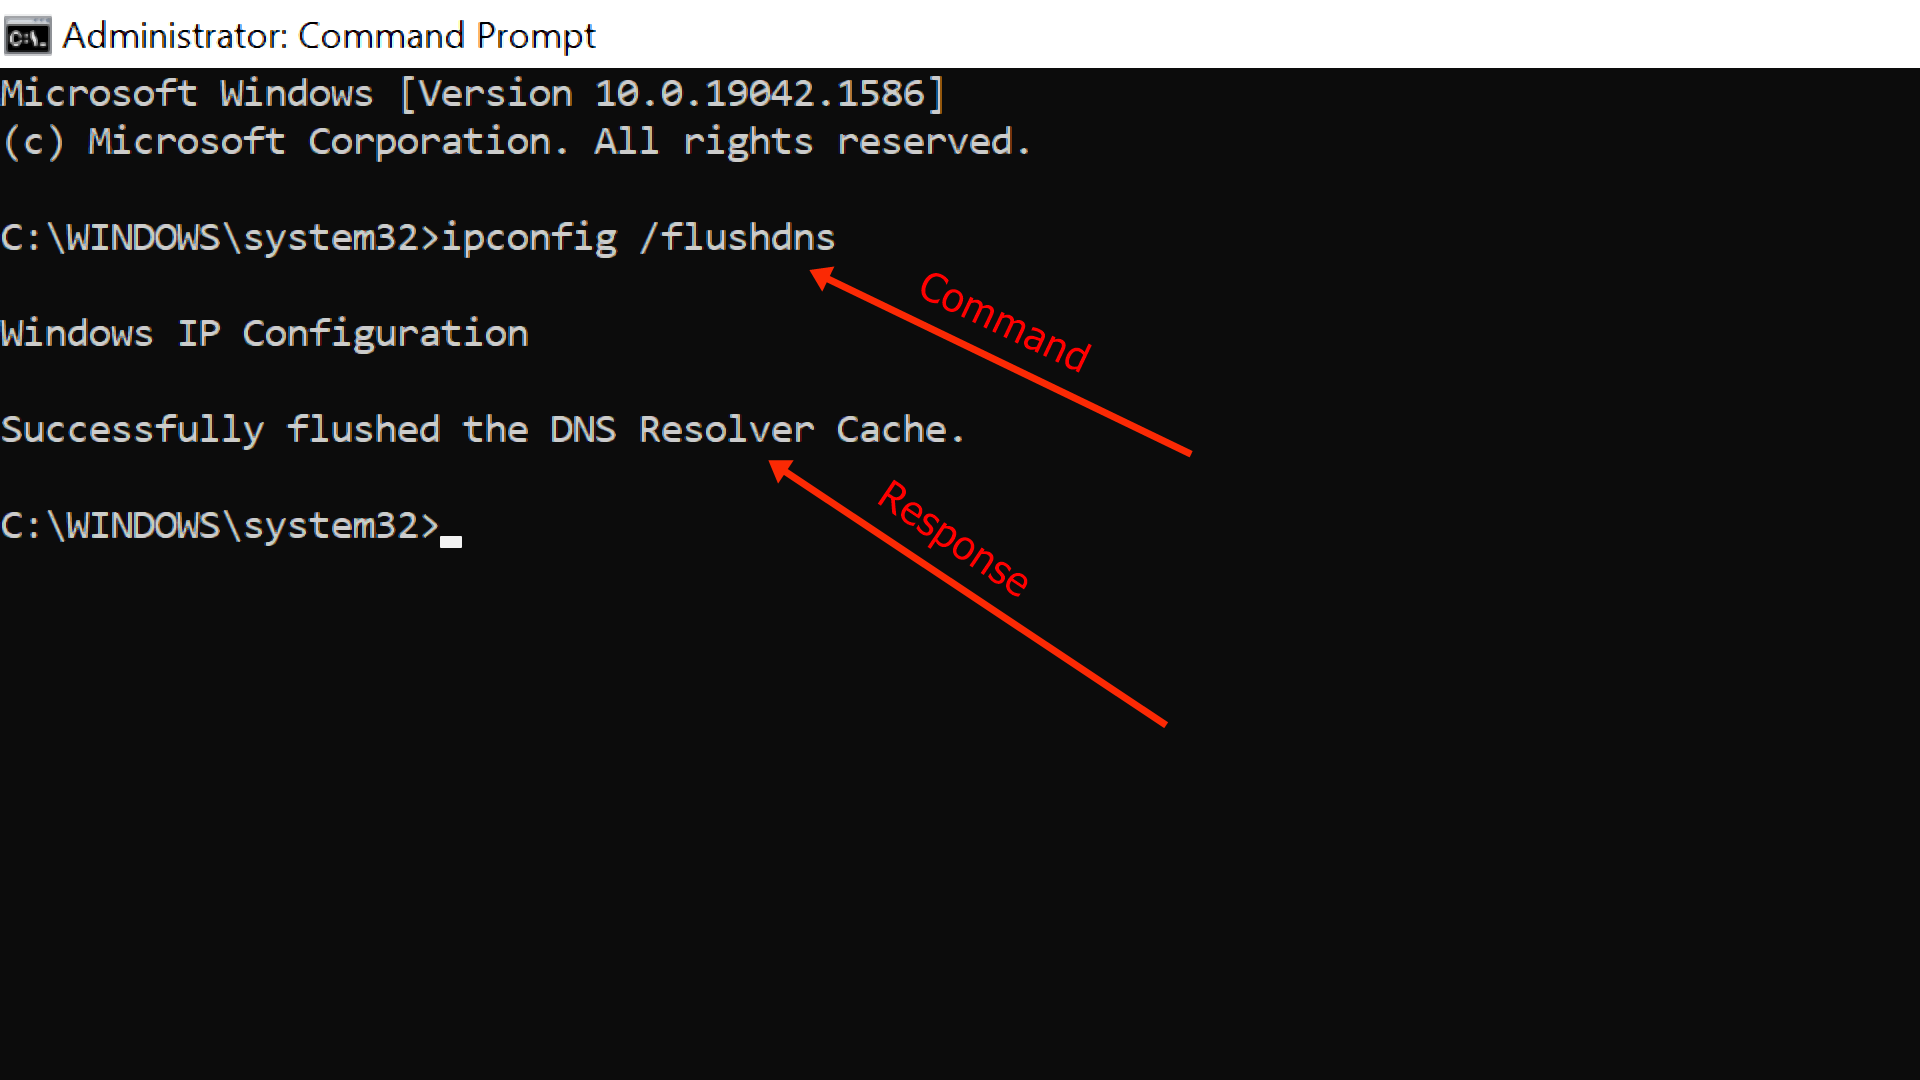
This means that your cache has been completely cleared, and fresh versions of any website you visit will be loaded.
How to Clear the DNS Cache on Google Chrome
Despite not being an operating system, Chrome keeps a DNS cache of its own to help personalize your browsing experience.
To flush Chrome’s DNS, all you need to do is type chrome://net-internals/#dns in the address bar and hit ENTER.
Then click “Clear host cache”:

Conclusion
As you’ve learned in this article, flushing your DNS gives you a lot of advantages that can make your internet experience safer.
Even though the cache gets cleared after the TTL expires, you should flush your DNS as often as possible so you can get these advantages.
Thank you for reading!
Learn to code for free. freeCodeCamp’s open source curriculum has helped more than 40,000 people get jobs as developers. Get started

Contents
- 1 How to Flush the DNS Cache in Windows 11 or Windows 10 in Command Prompt
- 2 How to Clear the DNS Cache in Windows 11 or Windows 10 in PowerShell
- 3 How to Reset DNS in Windows 11 or Windows 10 via Microsoft Edge
- 4 How to Flush the DNS Resolver Cache in Google Chrome
- 5 Extra: How to Clear Browser History in Chrome, Edge, and Firefox
- 6 Extra: How to Reset your Network
This guide will show you how to flush DNS in Windows 11 or Windows 10 using four different methods: CMD, PowerShell, Microsoft Edge, and Google Chrome.
The primary goal is to resolve issues that result in “Page Not Found” errors, but you can also use it to improve your security or privacy.
What does flushing DNS do?
To understand what flushing the DNS resolver cache is, you first need to understand what DNS does and the purpose of the cache. DNS stands for domain name system, the mechanism by which the internet translates the URL you type into your browser (winbuzzer.com) into an IP address a computer can understand (92.204.43.156).
The DNS cache helps with this domain name resolution process by storing a temporary database of your recent website visits and their associated IP addresses. This way, name resolution can be handled locally on your PC rather than having to send a request to a server and wait for the response.
Flushing the DNS cache removes the database of sites and IP addresses on your PC. This is useful in cases where the website or service has changed its IP address and your cache has not updated, causing your browser to direct you to the wrong place.
It can also help to protect you against a type of attack called DNS spoofing, where an attacker modifies your DNS cache to direct you to malicious sites. Finally, it removes records about the sites you have visited from your PC.
⚠️ Please note: The process described below is the same in Windows 11 as it is in Windows 10. However, bear in mind that we’ll be using screenshots from Windows 11, so your UI may look a little different. We’ll point out any changes you need to be aware of as they come up.
How to Flush the DNS Cache in Windows 11 or Windows 10 in Command Prompt
Command Prompt is the most popular method to clear DNS in Windows, and it’s easy to understand why. The flush dns command is short, sweet, and easy to remember:
- Press Start and type “Command Prompt”, then click the top result

- Type “ipconfig /flushdns” in Command Prompt and press Enter
Once complete, you’ll see the message:
Windows IP Configuration
Successfully flushed the DNS Resolver Cache
Try loading your website again to see if flushing the DNS cache solved the issue.


How to Clear the DNS Cache in Windows 11 or Windows 10 in PowerShell
If you prefer to use PowerShell as your command line, no worries! The command is even more intuitive there:
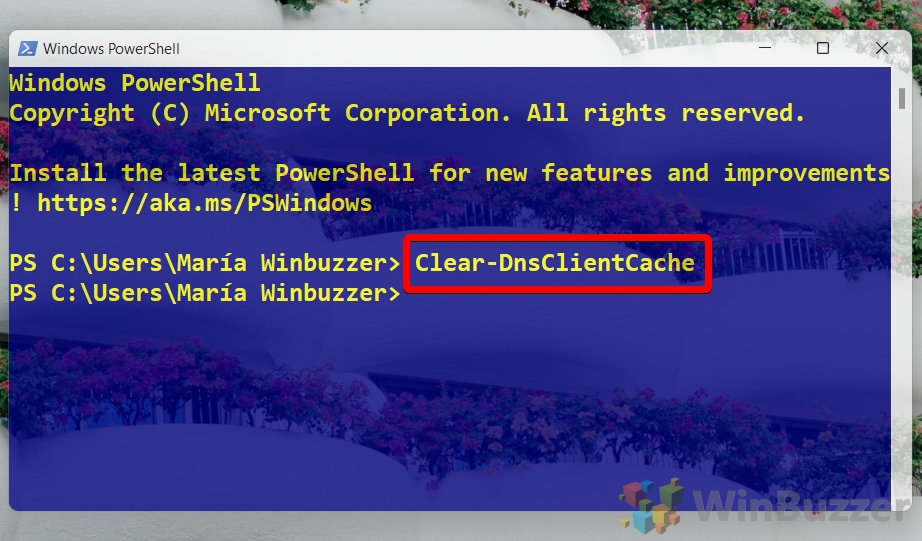
- Press Start and type “PowerShell”, then click the top result

- Type “Clear-DnsClientCache” in PowerShell and press Enter
Do note that this command won’t work unless you have the correct capitalization. It also won’t give an output, so you’ll just have to take its word that it worked.


How to Reset DNS in Windows 11 or Windows 10 via Microsoft Edge
If you don’t like using the command line then you can use your Edge browser to flush DNS in Windows instead. The first we’ll be looking at is the Chromium version of Microsoft’s Edge browser:
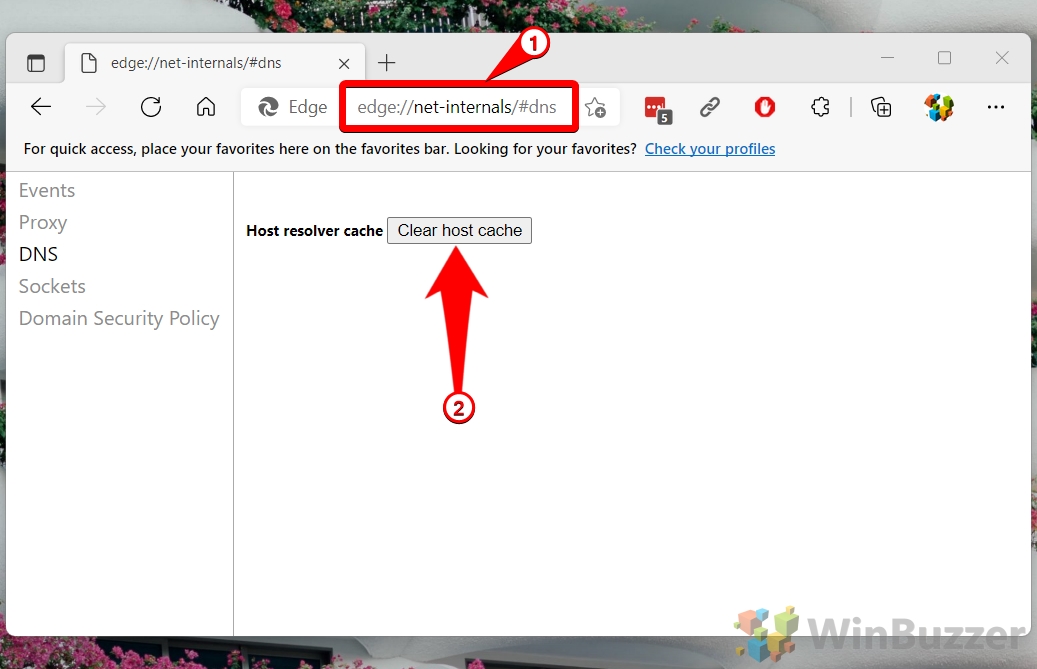
- Open your browser and enter “edge://net-internals/#dns” in the address bar
Click “Clear host cache” to flush DNS in Windows 11 or Windows 10.

How to Flush the DNS Resolver Cache in Google Chrome
Google Chrome works identically to Microsoft Edge due them being based on the same browser engine:
- Open Chrome and enter “chrome://net-internals/#dns” in the address bar
Click “Clear host cache” to reset your DNS in Windows 10 or Windows 11.

Extra: How to Clear Browser History in Chrome, Edge, and Firefox
If it’s the privacy aspect of the DNS cache you’re worried about, you’ll probably want to follow our guide on clearing your browser history, too. Your browser history provides a much more accessible way to see the sites you’ve visited.
![]()
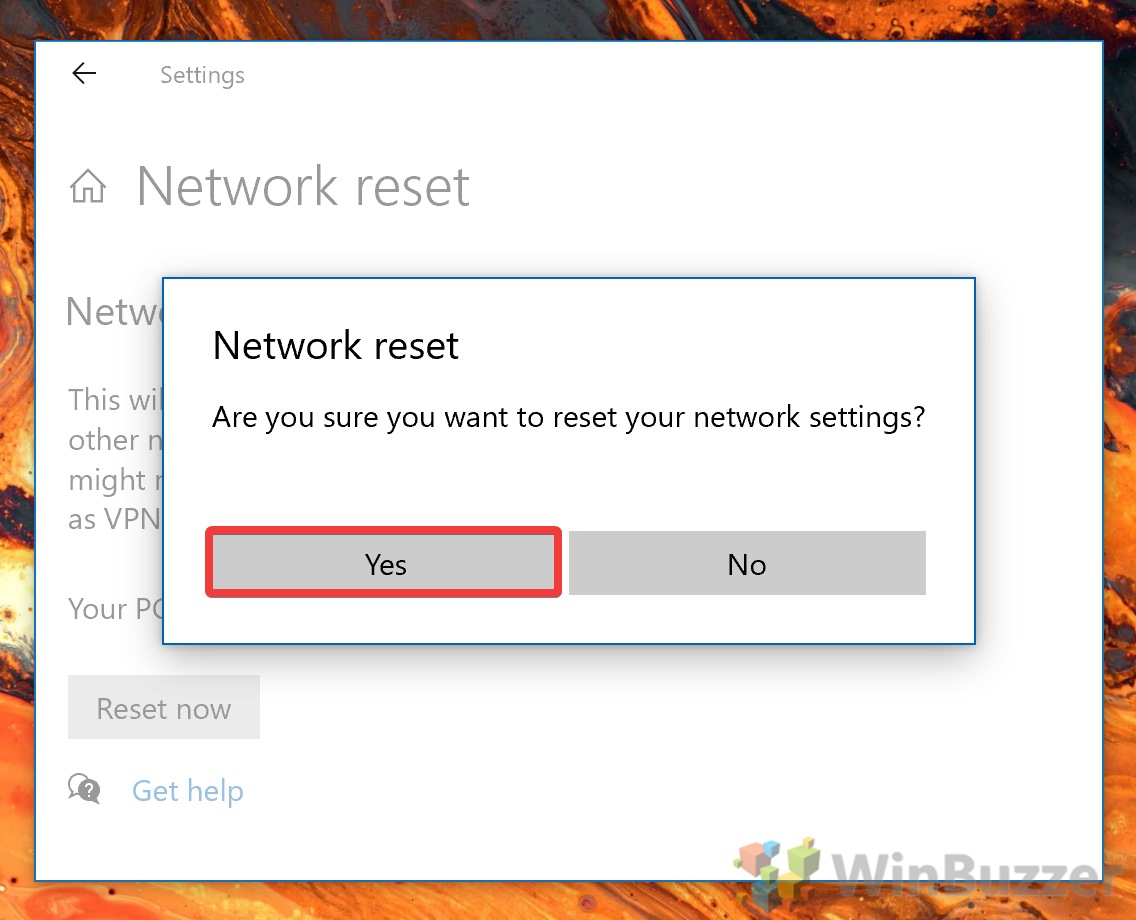
If your pages still aren’t loading, following our tutorial on how to perform a network reset might help. It’s designed for Windows 10 but will work on Windows 11, too.

If you’re looking for an easy way to speed up Web browsing and improve your browser’s performance, you should flush DNS cache in Windows 10 or Windows 11 on a regular basis. This simple maintenance task could help to improve browsing speed quite a bit. In this article, we’ll show you how to do it and get rid of useless DNS cache clutter.
What Is the DNS Cache?
Windows 10 or Windows 11 is a pretty efficient operating system all-around. To improve your Web browsing experience, it stores essential domain name information in a file called DNS cache. This file makes sure your browser finds the website you’re looking for quicker and opens it faster. However, there’s a problem: the DNS cache file gets cluttered with time and, instead of making browsing faster, can slow you down.
Things can get especially bad if the DNS cache file becomes corrupted as it will prevent Windows from accessing the correct information quickly. Instead, your operating system will waste time by waiting and then making a new request to a DNS server, which will affect your browsing experience.
In this article, we’ll teach you how to flush DNS cache in Windows 10 or Windows 11 and perform some simple network maintenance.
Why Do You Need to Flush DNS Cache?
As you continue to browse the Internet on your Windows 10 or Windows 11 PC, information is accumulated in the temporary DNS cache file to help speed up navigation across different websites. It is inevitable for websites to change, however, and this can leave incorrect, invalid, or incomprehensible info in your DNS cache. Finding the required information from this cluttered cache file can slow down your network performance.
Flushing DNS cache on Windows 10 or Windows 11 is the way out of this trouble. This way, you’ll be able to get rid of the unnecessary clutter, and a new cache file is established with useful information only. The simplest option to do this is through the command prompt in Windows 10 or Windows 11.
Flush Windows 10 or Windows 11 DNS Cache and Improve Network Performance
If you’re handy with advanced Windows 10 or Windows 11 tools, then the quickest way to flush DNS cache is to use the Command Prompt.
There are several ways to open the Command Prompt but we find it best to use a keyboard shortcut:
- Press the Windows key + R on your keyboard
- Type cmd in the box
- Press Enter and the Command Prompt will open
You may need to use the Command Prompt with admin credentials to make any changes to the system. If you discover that’s the case, follow these steps to open the Command Prompt as administrator:
- RIght-click on the Start button
- Select the Admin version of the Command Prompt
Type the following command in the prompt and hit Enter:
ipconfig/flushdns
When done successfully, you’ll see a success message on the command prompt. Once you’ve successfully flushed the DNS cache, you may initially notice that it’s taking a little longer to navigate to the website you regularly browse on your PC. Don’t lose patience! You’ll experience improved network and Internet speeds soon enough as your DNS cache is populated again with valid information.
If you’re not comfortable using the Command Prompt, NetOptimizer can flush DNS cache for you and optimize other hidden network settings too. You can choose to optimize everything at once or optimize individual Internet settings.
So, the next you experience network performance issues on your Windows 10 or Windows 11 PC, try flushing DNS cache using the simple process described above. It will definitely help sort things out for you.
The Windows operating system holds onto a cache of DNS data called DNS resolver cache, so it does not have to reach out to the DNS server for every single name resolution request.
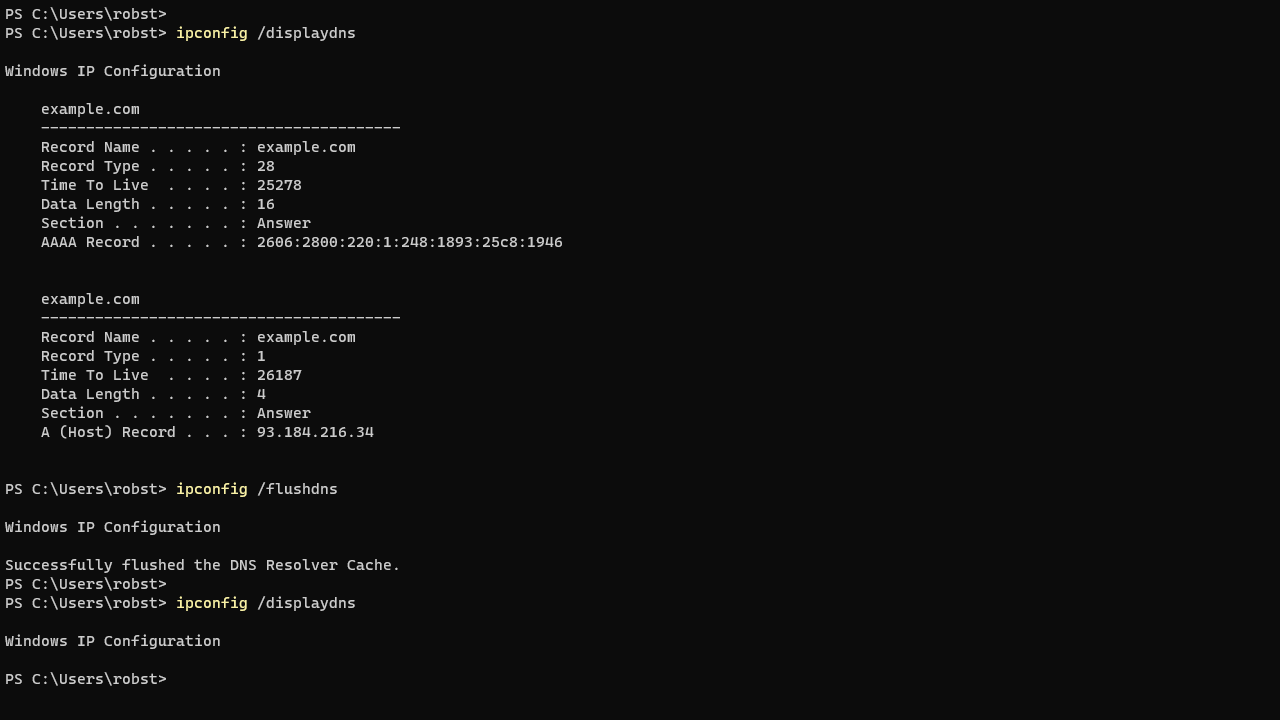
One can check the current DNS cache using the following CMD command:
ipconfig /displaydnsIf you experience problems with name resolution on your Windows 10 PC, you can flush the DNS cache with the following command:
ipconfig /flushdnsThe flushdns command removes locally cached copies of the DNS resolver and forces Windows to request a new record from the DNS server.
Using PowerShell
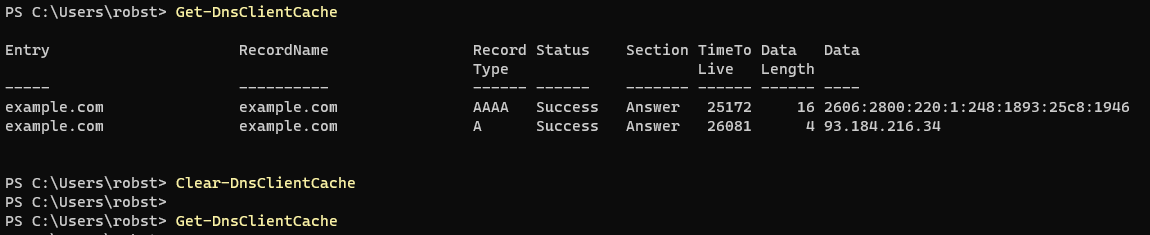
On a PowerShell prompt, you can display and flush DNS with Get-DnsClientCache and Clear-DnsClientCache commands, respectively.
Check the DNS client cache:
Get-DnsClientCacheFlush the DNS client cache:
Clear-DnsClientCacheThe Get-DnsClientCache command is run in the following screenshot, and it shows the DNS cache on a Windows 10/11 computer.
Troubleshooting Name Resolution
A powerful tool for troubleshooting name resolution on Windows is nslookup which allows us to perform manual DNS queries from the command prompt.
The following screenshot shows a simple example of the use of nslookup.
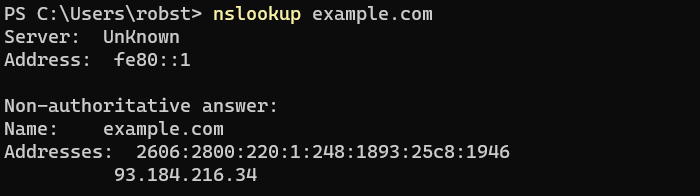
The first two lines show the name and IP address of the DNS server that has responded. The answer section contains the actual response to the lookup, which is IPv4 and IPv6 addresses for the domain name.
Resolve-DnsName is the PowerShell equivalent to the nslookup command.

The Resolve-DnsName command is run in the above screenshot. It shows the IPv4 (A record) and IPv6 (AAAA record) addresses of the domain name.