С помощью описанных ниже методов можно исправить большинство ошибок, когда обновления в Центре обновлений не скачиваются или сообщается, что произошли ошибки при установке обновления. Дополнительную информацию по возможным решениям можно найти в конце руководства.
Использование средства устранения неполадок обновлений в Windows 11 и Windows 10
В Windows предусмотрено встроенное средство устранения неполадок при установке обновлений, это же средство можно скачать и с официального сайта Майкрософт.
При возникновении проблем с обновлениями рекомендую начать именно с этого варианта: он не самый результативный, но самый простой и безопасный:
- В Windows 11 зайдите в Параметры — Система — Устранение неполадок — Другие средства устранения неполадок — Центр обновления Windows и нажмите кнопку «Запуск».
- В Windows 10 средство устранения неполадок находится в Параметры — Обновление и безопасность — Устранение неполадок — Дополнительные средства устранения неполадок — Центр обновления Windows.
- Если доступа к Параметрам нет, вы можете скачать средство устранения неполадок обновлений Windows с официального сайта https://aka.ms/wudiag и запустить файл.
При использовании инструмента «Диагностики и предотвращения неполадок на компьютере» будет автоматически выполнен поиск возможных проблем со службами, отвечающих за установку обновлений и сброс некоторых параметров Центра обновлений.
После выполнения проверки и устранения неполадок можно попробовать установить обновления снова.
Очистка кэша обновлений Windows вручную
Этот способ срабатывает для большого количества ошибок при скачивании и установке обновлений в Windows 11, Windows 10 и Windows 8.1. Порядок действий следующий:
- Запустите командную строку от имени администратора. Для этого можно использовать поиск на панели задач: начните вводить «Командная строка», нажмите правой кнопкой мыши по результату и выберите пункт «Запуск от имени администратора».
- По порядку введите следующие команды, нажимая Enter после каждой:
net stop wuauserv
net stop cryptSvc
net stop bits
net stop msiserver
ren C:\Windows\System32\catroot2 catroot2.old
ren C:\Windows\SoftwareDistribution SoftwareDistribution.old
net start wuauserv
net start cryptSvc
net start bits
net start msiserver
- Закройте командную строку и попробуйте повторить поиск, скачивание и установку обновлений через Центр обновлений. Если проблема была решена, удалите папки catroot2.old в C:\Windows\System32 и SoftwareDistribution.old в C:\Windows.
Утилита Reset Windows Update Tool
Ранее на сайте Microsoft TechNet была доступна специальная утилита для полного сброса параметров центра обновлений Windows 10, 8.1 и Windows 7 — Reset Windows Update Tool, выполняющая полный набор действий, каждое из которых направлено на исправление различных моментов, способных мешать скачиванию и установке обновлений через Центр обновлений. Сейчас официальный сайт инструмента изменился, но эффективность — нет.Перед использованием утилиты рекомендую создать точку восстановления системы. Следующие шаги будут выглядеть следующим образом:
- Скачайте Reset Windows Update Tool в нужной разрядности с сайта https://wureset.com/downloads
- После установки, запустите Reset Windows Update Tool от имени администратора (правый клик — запуск от имени администратора) и выберите нужный язык, русский в наличии, но в моем случае отображается в неправильной кодировке, поэтому далее показаны действия на английском языке.
- Вам будет предложено согласиться с тем, что гарантий исправной работы утилиты не дается и ввести «Y», если вы согласны.
- Вы увидите меню, в котором можно выбрать, какие действия следует выполнить для исправления работы центра обновлений. Рекомендую следующий порядок: 2, 3, 6, 11, 12, 13 с последующей перезагрузкой компьютера.
Полный список доступных опций в утилите текущей версии:
- Открыть параметры защиты системы.
- Сброс компонентов Центра обновлений Windows.
- Удаление временных файлов.
- Открыть параметры Internet Explorer.
- Запуск chkdsk на системном разделе (проверка диска на ошибки).
- Запуск проверки целостности системных файлов.
- Проверка целостности хранилища компонентов.
- Проверка образа на наличие отметки «поврежденный».
- Автоматическое восстановление хранилища компонентов с помощью dism.exe
- Очистка устаревших компонентов.
- Удаление записей реестра с ошибками.
- Сброс и исправление параметров Winsock.
- Принудительное обновление локальных групповых политик.
- Запуск поиска обновлений Windows.
- Поиск ключа продукта Windows.
- Поиск других локальных исправлений (открывает устранение неполадок Windows).
- Поиск дополнительных способов исправления онлайн (открывает справку на сайте Майкрософт в браузере).
- Перезапуск ПК.
Подробно об использовании утилиты в отдельной статье: Как исправить ошибки обновлений с помощью Reset Windows Update Tool.
Сброс центра обновлений Windows для исправления ошибок с помощью bat-файла
Для того, чтобы исправить многие ошибки при установке и загрузке обновлений Windows 10, 8.1 и Windows 7, бывает достаточно полностью сбросить параметры центра обновлений. Я покажу, как сделать это автоматически. В дополнение к сбросу, предложенный скрипт запустит необходимую службу, если вы получаете сообщение о том, что Центр обновления не запущен.
Кратко о том, что происходит при выполнении нижеследующих команд:
- Останавливаются службы: Центр обновления Windows, Фоновая интеллектуальная служба передачи BITS, Службы криптографии.
- Служебные папки центра обновления catroot2, SoftwareDistribution, downloader переименовываются в catroot2.old и т.д. (которые, если что-то пошло не так, можно использовать как резервные копии).
- Все ранее остановленные службы снова запускаются.
Для того, чтобы использовать скрипт, откройте блокнот Windows и скопируйте в него команды, представленные ниже. После этого сохраните файл с расширением .bat — это и будет сценарий для остановки, сброса и перезапуска Центра обновлений Windows (подробнее: Как создать BAT-файл).
@ECHO OFF
echo Sbros Windows Update
echo.
PAUSE
echo.
attrib -h -r -s %windir%\system32\catroot2
attrib -h -r -s %windir%\system32\catroot2\*.*
net stop wuauserv
net stop CryptSvc
net stop BITS
ren %windir%\system32\catroot2 catroot2.old
ren %windir%\SoftwareDistribution SoftwareDistribution.old
ren "%ALLUSERSPROFILE%\application data\Microsoft\Network\downloader" downloader.old
net Start BITS
net start CryptSvc
net start wuauserv
echo.
echo Gotovo
echo.
PAUSE
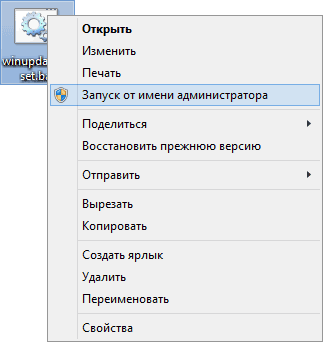
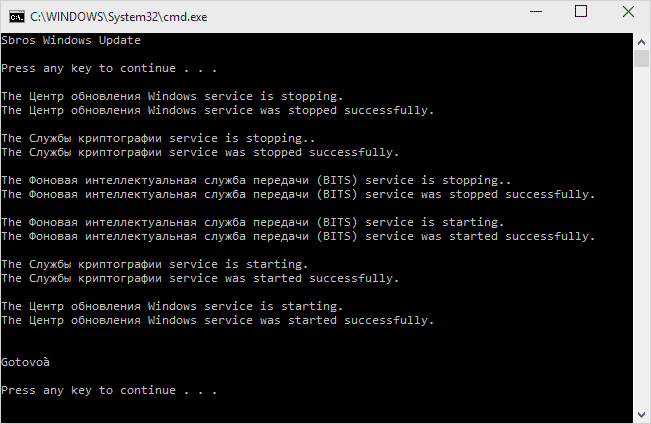
После того, как файл создан, кликните по нему правой кнопкой мыши и выберите пункт «Запуск от имени администратора», вам будет предложено нажать любую клавишу для начала, после чего по порядку будут выполнены все необходимые действия (еще раз нажимаем любую клавишу и закрываем командную строку).
И, наконец, обязательно перезагрузите компьютер. Сразу после перезагрузки снова зайдите в Центр обновления и посмотрите, исчезли ли ошибки при поиске, скачивании и установке обновлений Windows.
На сайте Майкрософт также приводятся шаги для выполнения всех необходимых действий по сбросу вручную: Сброс центра обновлений Windows вручную.
Скачивание и установка обновлений вручную
Если ошибки возникают при установке какого-то одного обновления, вы можете попробовать вручную скачать его из каталога центра обновления Майкрософт:
- Перейдите на страницу https://www.catalog.update.microsoft.com/Home.aspx
- В поле поиска на странице введите номер обновления, отображаемый в центре обновлений в формате: KB1234567
- Посмотрите, есть ли в результатах поиска доступное для загрузки обновление с этим номером для вашей версии операционной системы. При наличии — скачайте и установите его.
Быстрая переустановка системы с исправлением системных файлов и параметров, но без удаления программ и данных
Если простые способы не помогают, вы можете выполнить быструю переустановку системы с исправлением всех системных файлов и параметров, при этом все ваши программы и данные останутся на месте. Способ подходит для Windows 11 и Windows 10:
- Если у вас имеется ISO-файл с образом текущей ОС, просто смонтируйте его в системе и запустите файл setup.exe, а затем пройдите все этапы установки.
- Если файла образа нет, то для Windows 11 — скачайте оригинальный ISO Windows 11, смонтируйте в системе и запустите файл setup.exe с него. Для Windows 10 — зайдите на страницу https://www.microsoft.com/ru-ru/software-download/windows10 и нажмите кнопку «Скачать средство сейчас». Запустите скачанную программу и на экране «Что вы хотите сделать?» нажмите «Обновить этот компьютер сейчас», далее пройдите все необходимые шаги для установки системы.
К сожалению, не все возможные ошибки обновления Windows можно решить вышеописанным способом (хотя и многие). Если способ вам не помог, то обратите внимание на следующие возможные варианты:
- Попробуйте использовать сторонние программы управления обновлениями Windows для их загрузки и установки.
- Если ранее для отключения обновлений вы использовали какую-то стороннюю программу, попробуйте с помощью неё же вновь включить их.
- Если вы использовали какие-то утилиты для отключения слежки Windows 10, они могли заблокировать доступ к серверам Майкрософт, например, в файле hosts и брандмауэре.
- При наличии сторонних антивирусов на компьютере, попробуйте отключить антивирус и проверить, решило ли это проблему.
- Попробуйте установить DNS 8.8.8.8 и 8.8.4.4 в параметры Интернет-соединения. О том как это сделать: Как изменить адрес DNS-сервера в Windows.
- Отсутствие свободного места (или малое его количество) на системном разделе жесткого диска или SSD также может приводить к ошибкам при скачивании и установке обновлений. Здесь может быть полезным: Как очистить диск C от ненужных файлов.
- Проверьте, запущены ли все необходимые службы (их список приводился ранее).
- Выполните поиск в Интернете по сообщаемому коду ошибки, чтобы узнать о возможных причинах появления ошибки.
- Выполните проверку и восстановление целостности системных файлов Windows. Подробные инструкции: для Windows 11 и для Windows 10.
- Использование VPN или прокси также может влиять на возможность скачивания и установки обновлений.
- Попробуйте выполнить чистую загрузку Windows. Если при чистой загрузке ошибки пропадают, можно сделать вывод, что ошибки вызваны каким-либо сторонним ПО на компьютере.
На самом деле, разных причин, по которым не ищутся, не загружаются и не устанавливаются обновления, может быть множество, но, по моему опыту, представленная информация сможет помочь в большинстве случаев.
Windows Update Loop Fix
An automated script to fix the «Checking for Updates» loop on Windows 7 SP1
Overview
After installing a fresh copy of Windows 7, Windows Update will hang when trying to check for updates. This problem occurs because a fresh copy of Windows 7 doesn’t have the required updates to interface with Microsoft’s servers. The fix is to download and install the following updates:
- April 2015 servicing stack update for Windows 7 and Windows Server 2008 R2 (KB3020369)
- July 2016 update rollup for Windows 7 SP1 and Windows Server 2008 R2 SP1 (KB3172605)
- The latest Windows Update Agent for Windows 7 (v7.6.7600.256)
This script was written to automate the process. It is divided into three stages:
- Downloads the updates and resets all Windows Update components
- Installs the latest Windows Update Agent
- Installs KB3020369 and KB3172605
You can download and install the updates yourself, but running the script ensures that any previous Windows Update issues are cleared out before the updates are applied, and that the packages are installed in the correct order.
Compatibility
To install these updates or run this script, you should have Windows 7 with Service Pack 1 installed.
Instructions
- Download the latest release from here
- Exit any running applications
- Double-click the UpdateFix.exe file and follow the instructions
-
The «Custom (Advanced Users Only)» option allows you to skip to a specific stage of the fix
-
For the best results, choose «Express Fix (Recommended)» to run through all the stages in order
An Internet Connection is required to download the updates, however, it is recommended to disconnect from the Internet once the updates have been downloaded. Doing so prevents Windows Update from attempting to connect while it is being serviced.
Package Safety
This script is comprised of three (3) individual batch files. The batch files were archived into .7z format and then the archive was used to create a 7-Zip Self-Extracting Archive using the official modules provided by Igor Pavlov. The .exe file was scanned with Windows Defender using the latest definitions available at the time of upload to GitHub.
How The Script Works
When it is double-clicked, the self-extracting .exe file extracts three batch files to the Windows TEMP directory:
- master.cmd
- updates.cmd
- cleanup.cmd
As its name suggests, «master.cmd» is the main batch file. It:
- Downloads the updates from Microsoft and stores them in C:\packages
- Copies «updates.cmd» and «cleanup.cmd» to C:\packages
- Resets Windows Update Components
- Installs the Windows Update Agent
- Sets the RunOnce registry key to run the next file, «updates.cmd» after the restart
After the restart, updates.cmd unpacks the .msu files for KB3020369 and KB3172605 and installs them using DISM. A log file is created at C:\install.log. It also sets the RunOnce registry key to run the final file, «cleanup.cmd».
After the final restart, «cleanup.cmd» deletes the files in the C:\packages folder, provides the user a summary of the operations, and then deletes itself.
Help
-
With the sunset of Windows 7, version 5.0 is likely the last version, unless a bug needs to be fixed.
-
See FAQ.md for a list of frequently encountered problems and solutions.
-
See CHANGELOG.md for development history.
-
For all other feedback, please open an issue on the GitHub repository. Include error codes, screen-shots, and system details.
Terms of Use
This script will modify sensitive system files. Please ensure that your files are backed up before running this script. This script has been tested extensively. The author is not responsible for any data loss.
This tutorial contains several methods to fix Windows Update Problems in Windows 7/8/8.1 & Server 2008/2012 OS. In many cases, even in fresh Windows installations, the Windows Update is not working as expected, or it stuck when checking for updates or it displays several errors whenever you try to search for the available updates.
In such cases your system may become slow or unresponsive, because the Windows Update service (svchost.exe) causes high CPU usage. The Windows Update service is an essential feature in all Windows versions, because it is needed to provide all the available important and optional updates needed for the proper Windows operation and security.
The Windows Update problems often occur on Windows 7 or Vista based computers and in most cases, the errors are caused without any obvious reason and without a permanent solution to fix them from Microsoft. For all these reasons, I decided to write this troubleshooting guide, with the most efficient methods to resolve Windows Update problems on Windows 8.1, 8, 7 & Server 2008 or Server 2012.
Problems-Symptoms that are solved with this guide:
Windows Update is checking for updates forever.
Windows Update stuck/freezes.
Windows Update cannot find new updates.
Windows Update cannot currently check for updates because the service is not running.
Windows Update occurred an Unknown error: Code 8007000E
How to Solve Windows Update Issues on Windows 7/8/8.1 & Server 2008/2012
Important:
1. Before proceeding to apply the methods below, in order to troubleshoot Window Update problems, make sure that the Date and Time settings are correct on your system.
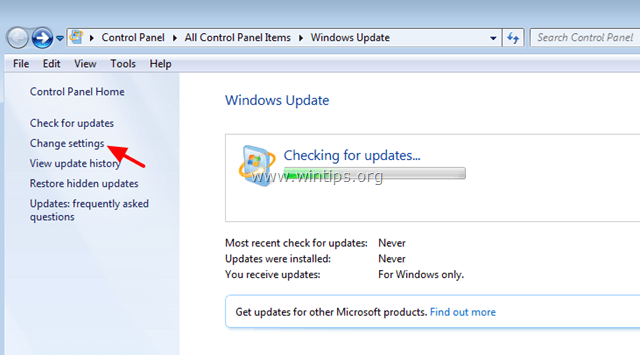
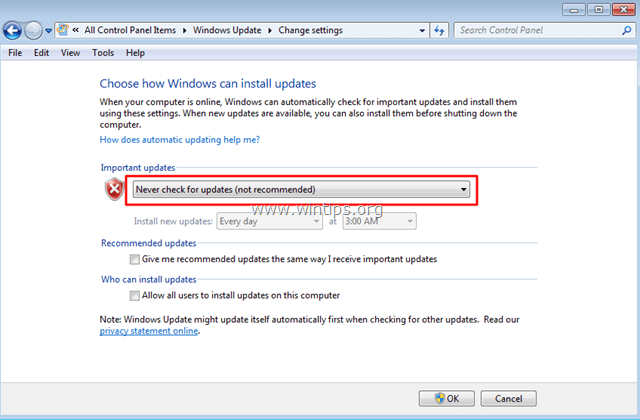
2. Try the following trick: Change the Windows Update settings from «Install updates automatically» to «Never check for updates (not recommended)» & restart your system, After restart set the update settings back to «Install updates automatically« and then check for updates. If this trick fails then set the Windows Update Settings to «Check for updates but let me choose whether to download and install them» and then check for updates again.
3. If you have performed a fresh Windows 7 or Server 2008 installation, install Service Pack 1 for Windows 7 or Windows Server 2008 R2, before you continue.
4. Make sure that your computer is clean from viruses and malware. To accomplish this task you can use this Malware Scan and Removal Guide to check and remove viruses or/and malicious programs that may be running on your computer.
Method 1. Force Windows to re-create the Windows Update Store folder.
Method 2. Install the KB3102810 security Update.
Method 3. Install the latest Update Rollup.
Method 4. Run the Windows Update Troubleshooter.
Method 5. FIX Corrupted System Files and Services (SFC).
Method 6: FIX Windows corruption errors with the System Update Readiness tool (DISM).
Method 7: Update Windows by using the WSUS Offline Update tool.
Method 1. Force Windows to re-create the Windows Update Store folder
The Windows Update Store folder (commonly known as «SoftwareDistribution» folder), is the location where Windows stores the downloaded updates.
-If the SoftwareDistribution folder becomes corrupted then it causes problems with Windows Update. So, one of the most efficient solutions to resolve problems with Windows Update, is to recreate the SoftwareDistribution folder. To do that:
1. Simultaneously press the Windows + R keys to open run command box.
2. In run command box, type: services.msc and press Enter.
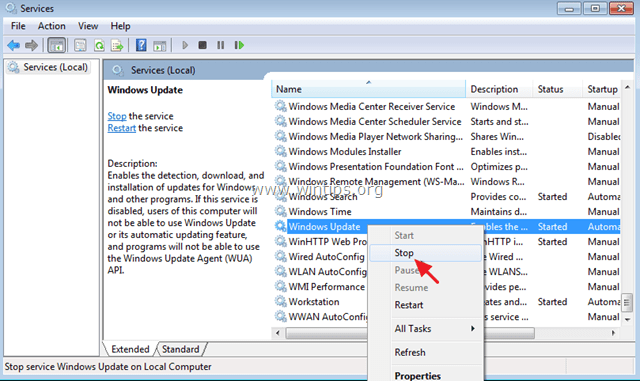
3. Right click on Windows Update service and select Stop.
4. Open Windows Explorer and navigate to C:\Windows folder.
5. Select and Delete the “SoftwareDistribution” folder.*
(Click Continue at «Folder Access Denied» window).
* Note: The next time that the Windows Update will run, a new empty SoftwareDistribution folder will be automatically created by Windows to store updates.
6. Restart your computer and then try to check for updates.
Method 2. Install the KB3102810 (KB3102812) security Update.
I have seen many times, that Windows Update is checking for updates forever (stuck) without finding updates, even in fresh Windows 8, 7 or Vista installations. Thankfully, Microsoft has released a security update to resolve the «Installing and searching for updates is slow and CPU utilization is high» issue. To apply the fix:
Step 1. Install Internet Explorer 11. *
* Note: This step is applied only to a fresh Windows 7 or Windows 2008 installation. If Internet Explorer 11 is already installed on your system, then skip this step and continue to step 2 below.
1. Download and install Internet Explorer 11 according to your OS version.
2. Restart your computer.
Step 2. Install the KB3102810 Update.
1. Download – but do not install it yet – the following security update according to your OS version, to your computer:
- Windows 7 & Server 2008: KB3102810
- Windows 8.1 & Server 2012: KB31028102
2. After the download, restart your computer.
3. After the restart, immediately install the security update, otherwise the installation hangs.
4. After the installation, restart your computer.
Step 3. Delete the SoftwareDistribution folder.
1. Follow the steps in Method-1 and delete the «SoftwareDistribution» folder.
2. Restart your computer.
2. Navigate to Windows Update and check for updates. Then, let it run at-least half to one hour. If you ‘re lucky, Windows will find all available updates.
Method 3. Install the latest Update Rollup to fix Windows Update issues.
The Windows Update Rollups, in most cases can fix issues with Windows Update. But before installing the latest Windows update rollup, first change the way that Windows install updates to «Never check for updates (not recommended«. To do that:
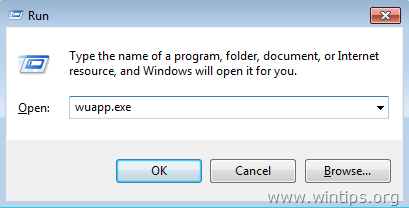
1. Simultaneously press the Windows + R keys to open run command box.
2. In run command box, type: wuapp.exe and press Enter.
3. Select Change settings on the left.
4. Set Never check for updates (not recommended).
6. Proceed and download the latest Windows Update rollup for your system, but don’t install it (yet).
July 2016 update rollup for Windows 7 SP1 and Windows Server 2008 R2 SP1
July 2016 update rollup for Windows 8.1 and Windows Server 2012 R2
September 2016 update rollup for Windows 7 SP1 and Windows Server 2008 R2 SP1
September 2016 update rollup for Windows 8.1 and Windows Server 2012 R2
7. After the download, restart your computer.
8. After restart, then proceed and install the downloaded rollup.
9. Check for updates.
Method 4. Run the Windows Update Troubleshooter.
Microsoft offered the Windows Update Troubleshooter tool, in order to fix problems with Windows Update.
1. Navigate to Control Panel > All Control Panel Items > Troubleshooting > Fix Problems with Windows Update.
2. Click Next and let Windows to try to fix the update problems.
3. When the repair is completed, restart you PC and check for updates again.
Method 5. FIX Corrupted System Files and Services (SFC).
The next method to solve Windows Update problems is to run the System File Checker (SFC) tool in order to fix Windows’ corrupted files and services. To do that:
1. Open an elevated command prompt:
- Right click at Windows start button
and select Command Prompt (Admin)
2. In the command window, type the following command and press Enter.
- SFC /SCANNOW
3. Wait and do not use your computer until SFC tool checks and fixes the corrupted system files or services.
4. When SFC tool finishes, reboot your computer and check for Updates.
Method 6: FIX Windows corruption errors with the System Update Readiness tool (DISM).
The System Update Readiness tool is a Microsoft tool that can fix Windows corruption errors.
Windows 7, Vista & Server 2008:
1. Download and save to your desktop the System Update Readiness tool according to your Windows version.
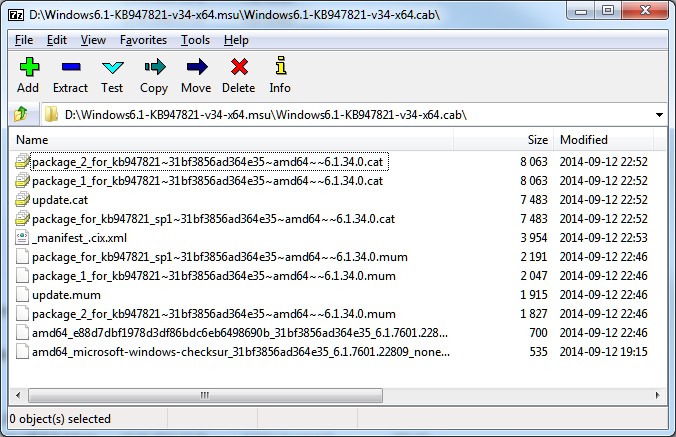
2. Double click to install the downloaded file (e.g. Windows6.1-KB947821-v34-x86.msu).
3. When the installation is completed, restart your computer and try to install Windows Updates.
Windows 8, 8.1 & Server 2012:
1. Right click at Windows start button and select Command Prompt (Admin).
2. At the command prompt window, type the following command & press Enter:
- Dism.exe /Online /Cleanup-Image /Restorehealth
3. Be patient until DISM repairs component store.
4. When the operation is completed, you should be informed that the component store corruption was repaired.
5. Close command prompt window and restart your computer.
6. Check for updates.
Method 7: Update Windows by using the WSUS Offline Update tool. (Windows 10, 8.1, 8 or 7)
1. Download the latest version of WSUS Offline Update utility.
2. After the download, extract the «wsusoffline.zip» file.
3. From the «wususoffline» folder, double click at UpdateGenerator.exe application.
4. At Windows tab, select the Windows Edition, that you are using.
5. Press the Start button.
6. Be patient until the WSUS Offline Update utility downloads all the available updates.
7. When the download is completed, open the client folder (wsusoffline\client) and double click at «UpdateInstaller.exe» application.
8. Place a check at «Automatic reboot and recall» checkbox.
9. Finally press the Start button and be patient until the WSUS Offline Update installer, installs the downloaded updates to your system.
That’s it! Which method worked for you?
Let me know if this guide has helped you by leaving your comment about your experience. Please like and share this guide to help others.
Время на прочтение
6 мин
Количество просмотров 256K

Существует правило – если есть обновления, то есть и проблемы с их установкой. Давайте разберем, какие основные проблемы возникают при обновлении Windows 7 через Windows Server Update Services (WSUS) и как их исправить с наименьшими затратами.
Ошибка #1. Failed to find updates with error code 80244010
Эту ошибку вы практически гарантированно будете наблюдать на любой системе, впервые обратившейся к серверу WSUS. В WindowsUpdate.log также встретится предупреждение:
WARNING: Exceeded max server round trips
Причина проблемы в том, что список обновлений стал слишком большим, и клиент не может принять его за один заход. Подробности — blogs.technet.microsoft.com/sus/2008/09/18/wsus-clients-fail-with-warning-syncserverupdatesinternal-failed-0x80244010
Какое решение предлагает Microsoft? Если после ошибки запустить повторный поиск обновлений, то процесс загрузки метаданных продолжится с момента возникновения ошибки. Терпение господа, терпение. Три, пять попыток wuauclt /detectnow – и все образуется. Не забудьте при повторном поиске дождаться окончания предыдущего цикла поиска, иначе магия не сработает!
Ошибка #2. Не устанавливаются обновления Windows с ошибкой 0x80070308
Встречается эпизодически, и в одном случае из 100 у нее есть единственное и очень специфическое решение — удалить ключ
HKLM\Components\PendingRequired=1
Перезагрузиться. Здесь важно не переусердствовать, не следует удалять никакие другие ключи в этом разделе, даже если они вам очень не нравятся, потому что после этого обновления прекратят ставиться навсегда.
Ошибка #3. Все другие ошибки
Практически 100% других ошибок может решить System Update Readiness Tool (SURT) из статьи support.microsoft.com/en-us/kb/947821
Скачиваете пакет для вашей системы, устанавливаете, читаете лог %windir%\Logs\CBS\CheckSUR.log и если он заканчивается примерно так:
Summary:
Seconds executed: 1164
Found 16 errors
Fixed 4 errors
то вы наш клиент.
Проблема заключается в том, что во время установки обновлений в системе могут появиться битые файлы. Что является причиной — неисправная сеть, диск, оперативная память, сам Windows Update – выяснить не получится, а исправить ошибки для установки последующих обновлений придется.
Как правило, повреждаются *.cat, *.mum, *.manifest файлы. У кого-то повреждаются *.dll, но я на практике не сталкивался. И вроде бы средство SURT должно само исправить ошибки, поскольку внутри него есть огромный каталог эталонных файлов. Только в последний раз SURT обновлялся в октябре 2014 года, а исправлений на операционную систему с тех пор вышло бесчисленное множество, и многих файлов в каталоге не хватает.
Ниже я опишу последовательность действий, необходимых для исправления ошибок установки обновлений на Windows 7 x64 с использованием SURT. Для редакции x86 просто потребуется другой пакет SURT из KB947821.
Последовательность действий будет следующая.
1. Запустить первый проход Windows6.1-KB947821-v34-x64.msu
Пользователя от работы отвлекать не потребуется, все сделаем удаленно. Создаем следующий командный файл и запускаем его:
set machine=BUHWKS02
xcopy Windows6.1-KB947821-v34-x64.msu \\%machine%\admin$\temp
psexec -s \\%machine% wusa "c:\windows\temp\Windows6.1-KB947821-v34-x64.msu" /quiet /norestart
pause
где BUHWKS02 – целевая машина.
Когда скрипт отработает и встанет на паузу, проверяем %windir%\Logs\CBS\CheckSUR.log
Если ошибок не найдено – дело не в битых обновлениях.
Если он заканчивается
Summary:
Seconds executed: 1164
Found 16 errors
Fixed 4 errors
CSI Manifest All Zeros Total count: 6
CSI Catalog Corrupt Total count: 3
Fixed: CSI Catalog Corrupt. Total count: 3
CBS MUM Corrupt Total count: 3
CBS Catalog Corrupt Total count: 3
CSI Catalog Thumbprint Invalid Total count: 1
Fixed: CSI Catalog Thumbprint Invalid. Total count: 1
Unavailable repair files:
winsxs\manifests\wow64_microsoft-windows-gdi32_31bf3856ad364e35_6.1.7601.19091_none_c19fa2719495aca9.manifest
winsxs\manifests\amd64_microsoft-windows-capi2-weakcrypto_31bf3856ad364e35_6.1.7601.23290_none_5e936c9c5ce2e8e6.manifest
winsxs\manifests\wow64_microsoft-windows-gdi32_31bf3856ad364e35_6.1.7601.23290_none_c22840d8adb43043.manifest
winsxs\manifests\amd64_microsoft-windows-gdi32_31bf3856ad364e35_6.1.7601.19091_none_b74af81f6034eaae.manifest
winsxs\manifests\amd64_microsoft-windows-capi2-weakcrypto_31bf3856ad364e35_6.1.7601.19091_none_5e0ace3543c4654c.manifest
winsxs\manifests\amd64_microsoft-windows-gdi32_31bf3856ad364e35_6.1.7601.23290_none_b7d3968679536e48.manifest
servicing\packages\Package_2_for_KB3123479~31bf3856ad364e35~amd64~~6.1.1.0.mum
servicing\packages\Package_2_for_KB3123479~31bf3856ad364e35~amd64~~6.1.1.0.mum
servicing\packages\Package_for_KB3123479_SP1~31bf3856ad364e35~amd64~~6.1.1.0.mum
то будем исправлять.
2. Копируем эталонные файлы на целевую машину
Microsoft предлагает нам длинную, путанную процедуру с извлечением хороших файлов из обновлений и размещением их в определенные каталоги средства SURT. При этом пути в статьях неверные. Где-то и вовсе рекомендуют подкладывать оригинальные msu файлы.
Самый простой и правильный вариант следующий — скопировать эталонные файлы с рабочей системы:
*.mum and *.cat из C:\Windows\servicing\Packages складываются в %windir%\Temp\CheckSUR\servicing\packages
*.manifest из C:\Windows\winsxs\Manifests складываются в %windir%\Temp\CheckSUR\winsxs\manifests\
Проблема в том, что битых файлов обычно десятки, и их очень сложно выбрать и скопировать. Тогда на помощь приходит следующий скрипт PowerShell (эталонной считается машина, с которой вы запускаете скрипт)
cls
$flag = $false
$destPC = "\\BUHWKS02"
$log=get-content $($destPC + "\admin$\Logs\CBS\CheckSUR.log")
$MUMCATSource = "C:\Windows\servicing\Packages\"
$MUMCATDest = $destpc + "\admin$\Temp\CheckSUR\servicing\Packages\"
$MANIFESTSource = "C:\Windows\winsxs\Manifests\"
$MANIFESTDest = $destpc + "\admin$\Temp\CheckSUR\winsxs\Manifests\"
If ((Test-Path -Path $MUMCATDest -PathType Container) -eq $false) {New-Item -Path $MUMCATDest -ItemType directory }
If ((Test-Path -Path $MANIFESTDest -PathType Container) -eq $false) {New-Item -Path $MANIFESTDest -ItemType directory}
foreach ($line in $log) {
    if ($flag -eq $True){
        if ($line.trim().Length -ne 0) {
            $fileArray=$($line.Split("\"))
            $file = $FileArray[$FileArray.Length-1]
            $extArray = $file.split(".")
            $ext = $extArray[$extArray.length-1]
            if ($ext -eq "manifest") {
                Write-Warning $("Copying " + $($MANIFESTSource+$file)+" to " + $MANIFESTDest)
                Copy-Item $($MANIFESTSource+$file) $($MANIFESTDest+$file)
            }
            if (($ext -eq "mum") -or ($ext -eq "cat") ) {
                Write-Warning $("Copying " + $($MUMCATSource+$file)+" to " + $MUMCATDest)
                Copy-Item $($MUMCATSource+$file) $($MUMCATDest+$file)
            }
        }
    }
    if ($line -eq "Unavailable repair files:") {$flag = $true}
}
Как видите, скрипт прост и может быть легко заточен напильником под вашу инфраструктуру.
3. Запускаем второй проход Windows6.1-KB947821-v34-x64.msu
После копирования файлов мы повторно запускаем SURT, используя командный файл из первого шага. При повторном запуске средство сможет подхватить скопированные нами эталонные файлы из %windir%\Temp\CheckSUR и заменить ими испорченные.
Если мы сделали все правильно, то %windir%\Logs\CBS\CheckSUR.log примет следующий вид:
=================================
Checking System Update Readiness.
Binary Version 6.1.7601.22471
Package Version 26.0
2016-03-03 09:15
Checking Windows Servicing Packages
Checking Package Manifests and Catalogs
Checking Package Watchlist
Checking Component Watchlist
Checking Packages
Checking Component Store
Summary:
Seconds executed: 1435
No errors detected
Теперь можно продолжить установку обновлений на целевую машину, например, следующими командными файлами:
set machine= BUHWKS02

psexec -i -s \\%machine% wuauclt /detectnow

pause
set machine= BUHWKS02
psexec -i -s \\%machine% wuauclt /updatenow
pause
Ошибка #4. Если SURT отработал нормально, а обновления все равно не ставятся
Попробуйте прибегнуть к старому приему – сбросить службу Windows Update в исходное состояние. Для этого необходимо удалить каталог %windir%\SoftwareDistribution.
Создаем файл WU-cleanupCMD.cmd:
net stop wuauserv

rmdir /s /q %windir%\SoftwareDistribution

net start wuauserv

wuauclt /detectnow
Запускаем:
set machine= BUHWKS02

psexec -c -s \\%machine% WU-cleanupCMD.cmd

pause
После этого возникнет Ошибка #1, но как бороться с ней мы уже знаем.
Ошибка #5
Клиент исчезает из консоли WSUS. Любопытная ошибка, связанная с неправильным клонированием машин и задвоением (затроением и т.д.) идентификаторов клиентов. Решается так:
net stop wuauserv
REG DELETE "HKLM\SOFTWARE\Microsoft\Windows\CurrentVersion\WindowsUpdate" /v SusClientId /f
REG DELETE "HKLM\SOFTWARE\Microsoft\Windows\CurrentVersion\WindowsUpdate" /v SusClientIdValidation /f
net start wuauserv
wuauclt /resetauthorization /detectnow /reportnow
Ошибка #6
GetCookie failure, error = 0x8024400D, soap client error = 7, soap error code = 300, HTTP status code = 200
SyncUpdates failure, error = 0x80072EE2, soap client error = 5, soap error code = 0, HTTP status code = 200
Windows Update Client failed to detect with error 0x80072ee2
Ошибка связана с нехваткой ресурсов в AppPool WSUS. Решение — снять лимит на потребляемую память. Как это сделать — статья.
Коротко: Открываем IIS, Application Pools, WsusPool, Advanced Settings.
Параметр Private Memory Limit устанавливаем в 0.
Продолжение темы настройки WSUS — в моей следующей статье: https://habrahabr.ru/post/329440/
PS:
Многие ошибки решены в новом клиенте WSUS:
1. KB3125574 «Windows 7 post SP1 Convenience Rollup Update». Внимательно ознакомьтесь с разделом Known issues!
Предварительно необходимо установить KB3020369 «April 2015 servicing stack update for Windows 7 and Windows Server 2008 R2».
Удачного администрирования!
Even after Windows 11, some people prefer to use Windows 7 on their PCs and avoid upgrading Windows as they are accustomed to how Windows 7 works.
The common issue that most users have reported on online forums is that Windows often pause updates at 0% downloaded when downloading updates.
Since Microsoft has stopped providing the support for Windows 7, here is a list of steps when the windows 7 update failed.

Before moving ahead, the internet connection you are using mustn’t be labeled as metered connection. Additionally, ensure that downloading over a metered connection is turned on.
Apart from that, if the system is currently updating, leave it be for one or two hours and then check if the size of the Software Distribution folder has increased or not. If it has, then waits till the updates are completed.
Why Aren’t Windows Updates Getting Installed?
Windows updates need enough disk space to be installed fully. If adequate space is not provided to them, they will be stuck. Try adding more space on your hard disk if the space is running out. Alternatively, you can use disk cleanup software to clean the disks of temporary files and cache.
Another possible reason is corrupted or deleted system files that cause Windows updates to fail. Outdated drivers such as network cards, graphic cards, etc., cause incompatibility issues and cause Windows updates to fail.
Windows 7 Update Failed To Install
While Windows 7 updates have become harder, Microsoft has completely removed its attention from Windows 7 operating system.
But don’t worry. We understand your love for Windows 7 and are here with seven methods to help you download updates on your operating system.
- Prepare the Prerequisites for Windows 7 Updates
- Manually Download and Install the Updates
- Use the Microsoft Update Diagnostic Troubleshooting Tool
- Modify the Permissions for the SoftwareDistribution Folder
- Run the Update in Clean Boot
- Disable Your Windows Firewall
- Try and Install Updates Automatically
Fix 1: Arrange the Prerequisites for Windows 7 Updates
There are certain prerequisites for downloading Windows 7 updates, without which the Operating System will be unable to update.
Your system must have Internet Explorer 11 (IE 11) and Microsoft .NET 4.6.1 framework. Sometimes the operating system might update itself without needing the above software. However, this software is necessary to ensure that the update process is completed in the usual way.
You can download the recent version of the Microsoft .NET framework from this link here. Once the file is downloaded, you need to follow the on-screen instructions and install it. Make sure that you have constant internet access.

Microsoft .NET Framework should be updated, and the integrity should be verified. Even if you have recently installed the framework or have its latest version, the framework’s integrity doesn’t need to be intact. You might need to repair it.
Microsoft .NET Framework integrity
- Simultaneously press Windows and R keys and open the Run dialog box to verify the framework’s integrity.
- In the Open-label box, type Control Panel and click OK to open the control panel.
- On the top left corner of the control panel, click on View by category and navigate to the Programs and Features section. Tap Uninstall a program option and click on the Turn Windows features on or off option.
- Look for .NET Framework 4.6.1 in the list of features and ensure that it is enabled. If it’s not, click on the checkbox next to it to enable it. If the .NET framework checkbox is already enabled, uncheck the checkbox, reboot the system, and re-enable it.
- Restart the computer to apply the changes.
Set up Internet Explorer 11
- Navigate to this link to download Internet Explorer 11 and download the browser. Based on your operating system, choose either the 32-bit version or the 64-bit version.

- Once IE 11 is downloaded, please navigate to the location where it is stored and double-click on it to launch its installation wizard.
- Please follow the on-screen specifications to complete the installation.
Once you have authenticated the integrity of your system and downloaded Internet Explorer 11, check if you can update Windows 7.
Fix 2: Manually Download and Install the Windows Updates
Instead of waiting for Microsoft to fix your problem or for Windows to show a solution, you can update Windows 7 manually.
Manually updating Windows is less error-prone as you can verify which update you want. However, they are a bit complicated as you will have to verify system requirements.
Don’t worry, as we have provided easy-to-understand steps through which you can end up with an updated Windows 7 in no time.
- Follow this link to the latest Servicing Stack for Windows 7 updates. The current version will be shown in bold. Download the latest Servicing Stack Update, and then download the latest rollup. Choose x64 or x86 versions depending on your system requirements.

- It is mandatory to download these updates as they contain upgraded versions of the Update Agent that will help you skip the endless search for new updates and provide future updates readily.
- Download the service agent and rollup files on your system and follow the on-screen instructions to complete the update process. Start installing the Servicing Stack file and then move on to the rollup.
Once completed, check to see if the updates are successfully downloaded.
Fix 3: Apply the Microsoft Update Diagnostic Troubleshooting Tool
Microsoft offers a FixIt tool that allows users to fix Windows 7 update issues. The tool is useful, especially if your update is stuck at 0% downloaded. The FixIt tool is specifically designed to fix any Windows Update errors.
- Navigate to the link and download the FixIt tool. Since Microsoft has abandoned the tool, you won’t be able to find it on Microsoft’s official website.

- After the file is downloaded, please install it following the on-screen instructions.
The FixIt tool will help you automatically identify the problems Windows 7 update and resolve it. Additionally, you can also use the Windows Update Troubleshooter for this purpose.

Fix 4: Change the Permissions for the SoftwareDistribution Folder
Windows contains a SoftwareDistribution folder in which C:\WINDOWS\WindowsUpdate.log writes update information. However, due to no insufficient access, the update file cannot do that and gets stuck.
- Navigate to and open File Explorer and go to the C:\Windows\SoftwareDistribution folder.
- Right-click on the folder and choose the Properties option from the context menu.
- Please navigate to the Security tab and click on the Advanced button.
- Now go to Owner: label and click on the Change button next.
- Choose your user account in the Select User or Group button by clicking on the Advanced button. Alternatively, enter the user account in the object name to select. Once done, click OK.
- Right-click on the SoftwareDistribution folder again and go to Properties -> Security tab.
- Tap the Edit… button, choose the group or user name and check the Full control checkbox.
- Please click the Apply button. After that, click OK.
Once done, the Windows update will gain edit access to the SoftwareDistribution folder and will be able to install the updates.
Fix 5: Run the Update in Clean Boot
A background service may be interfering with the Windows update process. You can try to clean and boot your system to stop any unnecessary services.
- Simultaneously press Windows and R keys on your keyboard to open the Run dialog box.
- In the Open: label box, type
msconfigand hit enter or click OK. - In the System Configuration window, please switch to the Services tab, tap the Hide all Microsoft Services checkbox, and select Disable all.
- Next, please switch to the Startup tab and click on Disable all to disable all startup services.
- Click OK and restart your computer.
It will restart your computer with a clean boot. Check whether Windows 7 can update or not. Once the update is complete, exit the clean boot mode.
Fix 6: Disable Your Windows Firewall
Often Windows Firewall interrupts the Windows update service and causes Windows 7 update issues. You can turn off your firewall and check if this allows you to install updates.
- Simultaneously press Windows and R keys and open the Run dialog box.
- In the Open-label box, type Control Panel and click OK to open the control panel.
- On the top left corner of the Control Panel window, click on View by Small Icons and navigate to Windows Firewall.
- Please click on the Turn Windows Firewall on or off option on the left side.
- Under Home and private network, click on the Turn off Windows Firewall (not recommended) radio button.
- Click OK to disable the firewall.
Once disabled, check to see if Windows 7 updates can download or not.
Fix 7: Try and Install Updates Automatically
It isn’t recommended that you install automatic updates without warning users as it can slow down your computer. You can make the following changes to Update settings.
- Launch the control panel and navigate to the System and Security section.
- Navigate to Windows Update and click on the Important updates dropdown.
- Choose the Never check for updates (not recommended) option and click OK.
Following this, you will be able to download the updates for Windows 7. Hopefully, the methods listed in our guide would have helped you install the Windows 7 updates that were stuck.


