Содержание
- Advanced troubleshooting for Windows boot problems
- Summary
- BIOS phase
- Boot loader phase
- Method 1: Startup Repair tool
- Method 2: Repair Boot Codes
- Method 3: Fix BCD errors
- Method 4: Replace Bootmgr
- Method 5: Restore System Hive
- Kernel Phase
- Clean boot
Advanced troubleshooting for Windows boot problems
This article is intended for use by support agents and IT professionals. If you’re looking for more general information about recovery options, see Recovery options in Windows 10.
Summary
There are several reasons why a Windows-based computer may have problems during startup. To troubleshoot boot problems, first determine in which of the following phases the computer gets stuck:
| Phase | Boot Process | BIOS | UEFI |
|---|---|---|---|
| 1 | PreBoot | MBR/PBR (Bootstrap Code) | UEFI Firmware |
| 2 | Windows Boot Manager | %SystemDrive%bootmgr | EFIMicrosoftBootbootmgfw.efi |
| 3 | Windows OS Loader | %SystemRoot%system32winload.exe | %SystemRoot%system32winload.efi |
| 4 | Windows NT OS Kernel | %SystemRoot%system32ntoskrnl.exe |
1. PreBoot
The PC’s firmware initiates a Power-On Self Test (POST) and loads firmware settings. This pre-boot process ends when a valid system disk is detected. Firmware reads the master boot record (MBR), and then starts Windows Boot Manager.
2. Windows Boot Manager
Windows Boot Manager finds and starts the Windows loader (Winload.exe) on the Windows boot partition.
3. Windows operating system loader
Essential drivers required to start the Windows kernel are loaded and the kernel starts to run.
4. Windows NT OS Kernel
The kernel loads into memory the system registry hive and additional drivers that are marked as BOOT_START.
The kernel passes control to the session manager process (Smss.exe) which initializes the system session, and loads and starts the devices and drivers that are not marked BOOT_START.
Here is a summary of the boot sequence, what will be seen on the display, and typical boot problems at that point in the sequence. Before starting troubleshooting, you have to understand the outline of the boot process and display status to ensure that the issue is properly identified at the beginning of the engagement.

Click to enlarge
Each phase has a different approach to troubleshooting. This article provides troubleshooting techniques for problems that occur during the first three phases.
If the computer repeatedly boots to the recovery options, run the following command at a command prompt to break the cycle:
Bcdedit /set recoveryenabled no
If the F8 options don’t work, run the following command:
Bcdedit /set bootmenupolicy legacy
BIOS phase
To determine whether the system has passed the BIOS phase, follow these steps:
- If there are any external peripherals connected to the computer, disconnect them.
- Check whether the hard disk drive light on the physical computer is working. If it is not working, this indicates that the startup process is stuck at the BIOS phase.
- Press the NumLock key to see whether the indicator light toggles on and off. If it does not, this indicates that the startup process is stuck at BIOS.
If the system is stuck at the BIOS phase, there may be a hardware problem.
Boot loader phase
If the screen is completely black except for a blinking cursor, or if you receive one of the following error codes, this indicates that the boot process is stuck in the Boot Loader phase:
- Boot Configuration Data (BCD) missing or corrupted
- Boot file or MBR corrupted
- Operating system Missing
- Boot sector missing or corrupted
- Bootmgr missing or corrupted
- Unable to boot due to system hive missing or corrupted
To troubleshoot this problem, use Windows installation media to start the computer, press Shift+F10 for a command prompt, and then use any of the following methods.
Method 1: Startup Repair tool
The Startup Repair tool automatically fixes many common problems. The tool also lets you quickly diagnose and repair more complex startup problems. When the computer detects a startup problem, the computer starts the Startup Repair tool. When the tool starts, it performs diagnostics. These diagnostics include analyzing startup log files to determine the cause of the problem. When the Startup Repair tool determines the cause, the tool tries to fix the problem automatically.
To do this, follow theseВ steps.
For additional methods to start WinRE, see Windows Recovery Environment (Windows RE).
Start the system to the installation media for the installed version of Windows. For more information, see Create installation media for Windows.
On the Install Windows screen, select Next > Repair your computer.
On the System Recovery Options screen, select Next > Command Prompt.
After Startup Repair, select Shutdown, then turn on your PC to see if Windows can boot properly.
The Startup Repair tool generates a log file to help you understand the startup problems and the repairs that were made. You can find the log file in the following location:
%windir%System32LogFilesSrtSrttrail.txt
Method 2: Repair Boot Codes
To repair boot codes, run the following command:
To repair the boot sector, run the following command:
Running BOOTREC together with Fixmbr overwrites only the master boot code. If the corruption in the MBR affects the partition table, running Fixmbr may not fix the problem.
Method 3: Fix BCD errors
If you receive BCD-related errors, follow these steps:
Scan for all the systems that are installed. To do this, run the following command:
Restart the computer to check whether the problem is fixed.
If the problem is not fixed, run the following command:
You might receive one of the following outputs:
If the output shows windows installation: 0, run the following commands:
After you run the command, you receive the following output:
- Try restarting the system.
Method 4: Replace Bootmgr
If methods 1, 2 and 3 do not fix the problem, replace the Bootmgr file from drive C to the System Reserved partition. To do this, follow these steps:
At a command prompt, change the directory to the System Reserved partition.
Run the attrib command to unhide the file:
Run the same attrib command on the Windows (system drive):
Rename the Bootmgr file as Bootmgr.old:
Navigate to the system drive.
Copy the Bootmgr file, and then paste it to the System Reserved partition.
Restart the computer.
Method 5: Restore System Hive
If Windows cannot load the system registry hive into memory, you must restore the system hive. To do this, use the Windows Recovery Environment or use Emergency Repair Disk (ERD) to copy the files from the C:WindowsSystem32configRegBack to C:WindowsSystem32config.
If the problem persists, you may want to restore the system state backup to an alternative location, and then retrieve the registry hives to be replaced.
Starting in Windows 10, version 1803, Windows no longer automatically backs up the system registry to the RegBack folder.This change is by design, and is intended to help reduce the overall disk footprint size of Windows. To recover a system with a corrupt registry hive, Microsoft recommends that you use a system restore point. For more details, check this article.
Kernel Phase
If the system gets stuck during the kernel phase, you experience multiple symptoms or receive multiple error messages. These include, but are not limited to, the following:
A Stop error appears after the splash screen (Windows Logo screen).
Specific error code is displayed. For example, «0x00000C2» , «0x0000007B» , «inaccessible boot device» and so on.
The screen is stuck at the «spinning wheel» (rolling dots) «system busy» icon.
A black screen appears after the splash screen.
To troubleshoot these problems, try the following recovery boot options one at a time.
Scenario 1: Try to start the computer in Safe mode or Last Known Good Configuration
On the Advanced Boot Options screen, try to start the computer in Safe Mode or Safe Mode with Networking. If either of these options works, use Event Viewer to help identify and diagnose the cause of the boot problem. To view events that are recorded in the event logs, follow these steps:
Use one of the following methods to open Event Viewer:
Click Start, point to Administrative Tools, and then click Event Viewer.
Start the Event Viewer snap-in in Microsoft Management Console (MMC).
In the console tree, expand Event Viewer, and then click the log that you want to view. For example, click System log or Application log.
In the details pane, double-click the event that you want to view.
On the Edit menu, click Copy, open a new document in the program in which you want to paste the event (for example, Microsoft Word), and then click Paste.
Use the Up Arrow or Down Arrow keyВ to view the descriptionВ of the previous or next event.
Clean boot
To troubleshoot problems that affect services, do a clean boot by using System Configuration (msconfig). Select Selective startup to test the services one at a time to determine which one is causing the problem. If you cannot find the cause, try including system services. However, in most cases, the problematic service is third-party.
Disable any service that you find to be faulty, and try to start the computer again by selecting Normal startup.
If the computer starts in Disable Driver Signature mode, start the computer in Disable Driver Signature Enforcement mode, and then follow the steps that are documented in the following article to determine which drivers or files require driver signature enforcement: Troubleshooting boot problem caused byВ missing driver signature (x64)
If the computer is a domain controller, try Directory Services Restore mode (DSRM).
This method is an important step if you encounter Stop error «0xC00002E1» or «0xC00002E2»
Examples
Serious problems might occur if you modify the registry incorrectly by using Registry Editor or by using another method. These problems might require that you reinstall the operating system. Microsoft cannot guarantee that these problems can be solved. Modify the registry at your own risk.
Error code INACCESSIBLE_BOOT_DEVICE (STOP 0x7B)
To troubleshoot this Stop error, follow these steps to filter the drivers:
Go to Window Recovery Environment (WinRE) by putting an ISO disk of the system in the disk drive. The ISO should be of same version of Windows or a later version.
Open the registry.
Load the system hive, and name it as «test.»
Under the following registry subkey, check for lower filter and upper filter items for Non-Microsoft Drivers:
HKEY_LOCAL_MACHINESYSTEMControlSet001ControlClass
For each third-party driver that you locate, click the upper or lower filter, and then delete the value data.
Search through the whole registry for similar items. Process as an appropriate, and then unload the registry hive.
Restart the server in Normal mode.
For additional troubleshooting steps, see the following articles:
To fix problems that occur after you install Windows updates, check for pending updates by using these steps:
Open a Command Prompt window in WinRE.
Run the command:
If there are any pending updates, uninstall them by running the following commands:
Try to start the computer.
If the computer does not start, follow these steps:
Open A Command Prompt window in WinRE, and start a text editor, such as Notepad.
Navigate to the system drive, and search for windowswinsxspending.xml.
If the Pending.xml file is found, rename the file as Pending.xml.old.
Open the registry, and then load the component hive in HKEY_LOCAL_MACHINE as a test.
Highlight the loaded test hive, and then search for the pendingxmlidentifier value.
If the pendingxmlidentifier value exists, delete the value.
Unload the test hive.
Load the system hive, name it as «test».
Navigate to the following subkey:
HKEY_LOCAL_MACHINESYSTEMControlSet001ServicesTrustedInstaller
Change the Start value from 1 to 4
Unload the hive.
Try to start the computer.
If the Stop error occurs late in the startup process, or if the Stop error is still being generated, you can capture a memory dump. A good memory dump can help determine the root cause of the Stop error. For details, see the following articles:
For more information about page file problems in Windows 10 or Windows Server 2016, see the following:
For more information about Stop errors, see the following Knowledge Base article:
If the dump file shows an error that is related to a driver (for example, windowssystem32driversstcvsm.sys is missing or corrupted), follow these guidelines:
Check the functionality that is provided by the driver. If the driver is a third-party boot driver, make sure that you understand what it does.
If the driver is not important and has no dependencies, load the system hive, and then disable the driver.
If the stop error indicates system file corruption, run the system file checker in offline mode.
To do this, open WinRE, open a command prompt, and then run the following command:
If there is disk corruption, run the check disk command:
If the Stop error indicates general registry corruption, or if you believe that new drivers or services were installed, follow these steps:
- Start WinRE, and open a Command Prompt window.
- Start a text editor, such as Notepad.
- Navigate to C:WindowsSystem32Config.
- Rename the all five hives by appending «.old» to the name.
- Copy all the hives from the Regback folder, paste them in the Config folder, and then try to start the computer in Normal mode.
Что делает Microsoft Software Repair Tool для Windows 10

Фото: @futurecomputers
Инструмент Microsoft Software Repair Tool (или Windows Self-Healing Tool) стал доступен сравнительно недавно. При этом пока нет официальной страницы с описанием утилиты, и сама программа предоставляет мало информации о своей работе.
Как работает Software Repair Tool
Попробуем вместе с порталами Ghacks и Winhelponline разобраться, что она делает.
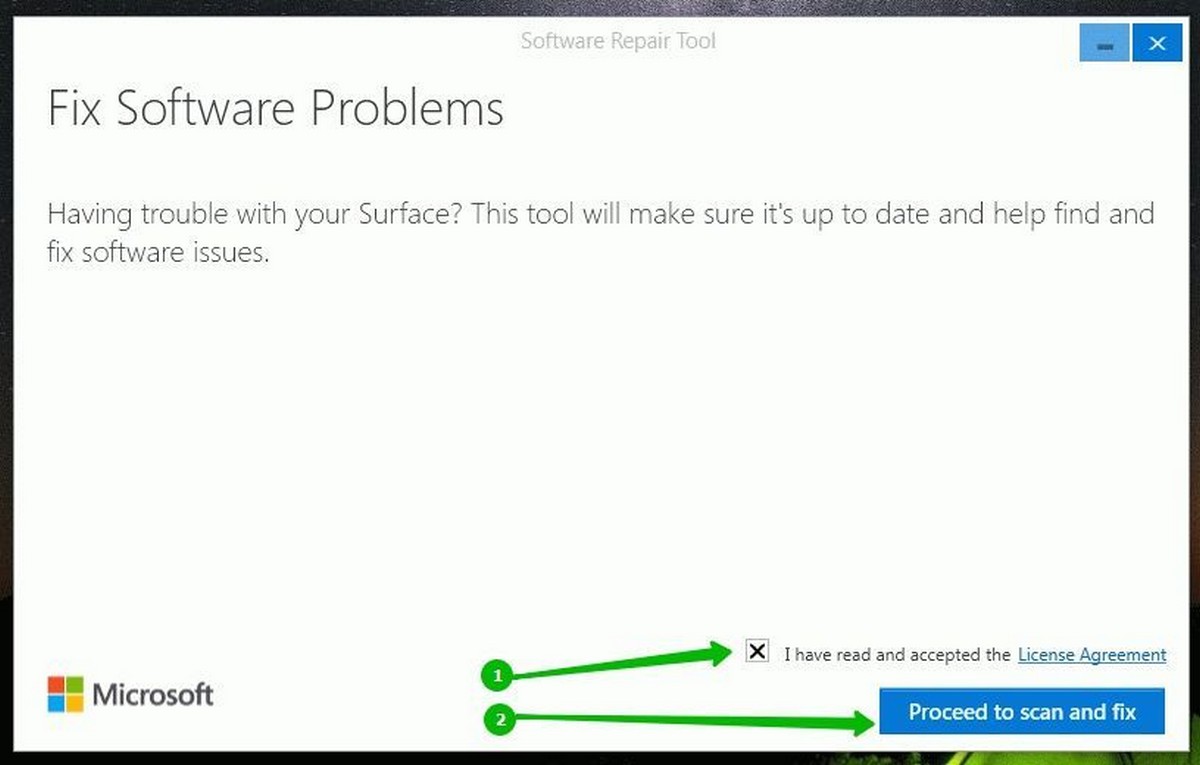
Первый экран является практически бесполезным с точки зрения информации о функциональности — на нем выводится сообщение: “Появились проблемы с вашим устройством Surface? Данный инструмент позволит обновить устройство и устранить программные проблемы”. Тем не менее, запускать инструмент устранения неполадок можно на любых устройствах Windows 10, а не только на планшетных компьютерах Surface.

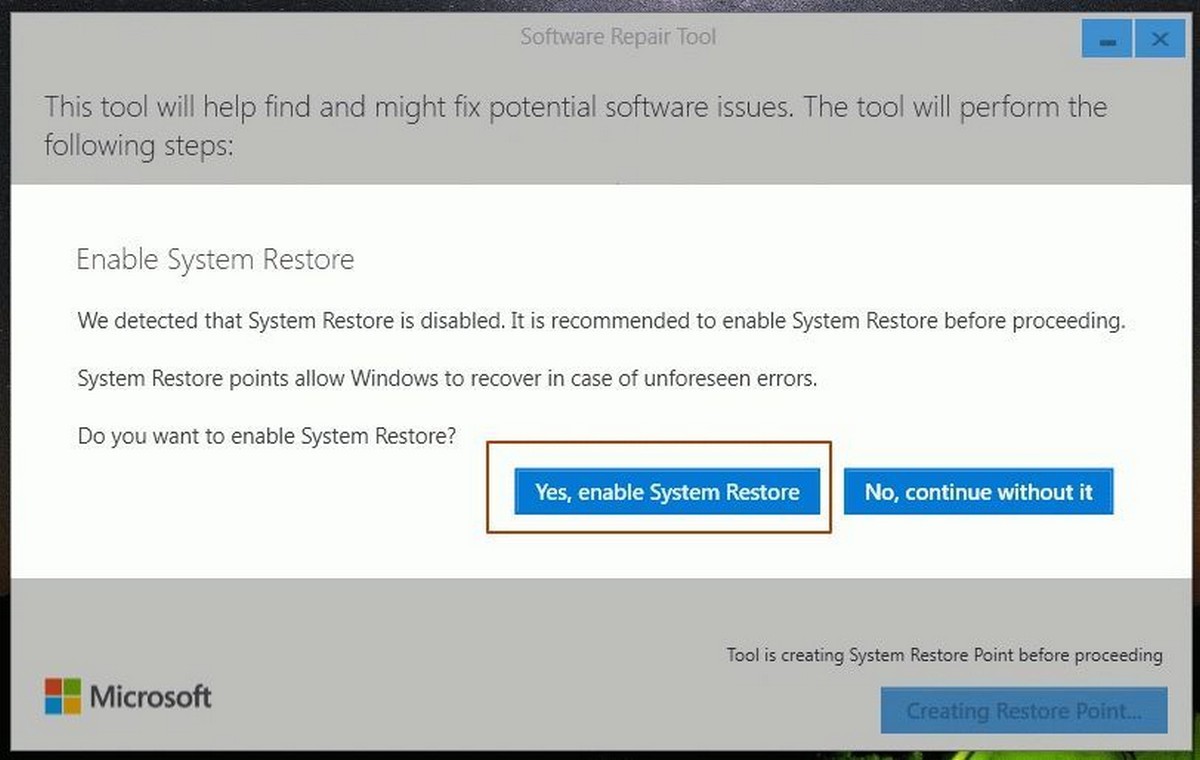
После того, как вы примите лицензионное соглашение (конечно, после его детального прочтения) и нажмете кнопку “Proceed to scan and fix”, если в системе отключена функция восстановление системы, утилита предложит включить ее. Таким образом, вы сможете восстановить состояние операционной системы, если инструмент устранения неполадок не сможет справиться с проблемами.

Далее процесс устранения неполадок запустится автоматически без возможности остановить его с помощью элементов интерфейса.
Открывшийся экран сообщает о некоторых операциях, которые будут выполнены программой:

- 1. Восстановление системных компонентов и обнаружение поврежденных файлов (Repair System Components and detect corrupt files)
- Создание точки восстановления системы (Create System Restore Point)
- b. Принудительная синхронизация системного времени и даты (Resync System Date and Time)
- с. Сброс системных настроек (Reset System Settings)
- d. Переустановка системных приложений (Reinstall System Applications)
- 2. Восстановление поврежденных компонентов системы (Repair system corruption)
- 3. Обновление Windows (Windows Update)
Предоставляемая информация дает общее представление о работе Software Repair Tool, но не содержит подробной информации, а сама утилита не позволяет запускать только отдельные опции восстановления.
Очевидно, что многие пользователи могут не захотеть переустанавливать все системные приложения или сбрасывать все настройки системы, например, если ранее в конфигурацию вносились изменения.
Под капотом
На сайте Winhelponline сделали подробный анализ выполняемых Software Repair Tool операций. Среди действий, не упомянутых на стартовом экране утилиты, можно отметить:
- Сброс Winsock, настроек прокси и фаервола.
- Переустановка всех встроенных приложений с помощью PowerShell.
- Очистка куки и файлов авторизации WSUS.
- Сброс Магазина Windows с помощью wsreset.exe.
- Запуск заданий обновления Windows и автоматического обновления приложений.
- Регистрация нескольких dll файлов.
- Очистка компонентов с помощью DISM.
- Восстановление образа Windows с помощью PowerShell/DISM.
- Восстановления стандартной схемы электропитания.
Software Repair Tool выполняет что-то среднее между полным сбросом системы и ручным запуском отдельных операций восстановления и устранения неполадок.
Несмотря на то, что утилита может быть привлекательной для пользователей из-за своей простоты, ее использование может быть лишним, в зависимости от испытываемой проблемы. Однако, если вы не можете определить зависимость проблемы от определенного компонента Windows 10, тогда имеет смысл выполнить задачи восстановления для возвращения нормальной функциональности системы.
Отметим, что если вы вносили изменения в настройки системы или удаляли встроенные приложения (например, изменяли настройки конфиденциальности Windows 10), то вам придется повторить эти действия после работы Software Repair Tool.
Нами была проверена работа Microsoft Software Repair Tool на системах Windows 64-bit версий 1511 (Threshold 2) и 1607 (Anniversary Update), при этом не было выявлено каких-либо проблем после применения.
Нашли опечатку? Выделите и нажмите Ctrl + Enter
Windows Software Repair Tool поможет вам исправить Проблемы Windows 10
Существует инструмент Windows Software Repair Tool от Microsoft , который поможет вам исправить проблемы Windows 10. Программное обеспечение доступно в качестве автономного приложения с серверов Microsoft.
Средство восстановления программного обеспечения Windows 10
После загрузки инструмента, запустите исполняемый файл. Вам будет предложено принять условия лицензирования.
После этого вы увидите следующий экран, здесь вы можете создать точку восстановления, (Рекомендуем создать точку восстановления системы).
Иструмент автоматически будет выполнять сканирование и исправление возможных проблем Windows:
- Создание точки восстановления системы
- Проверка компонентов системы и обнаружение поврежденных файлов
- Синхронизация Даты и времени системы
- Сброс настроек системы
- Переустановка системных приложений
- Запуск инструмента DISM для, восстановления работоспособности системы, и проверки целостности системных файлов.
- Обновление системы с помощью Центра обновления Windows
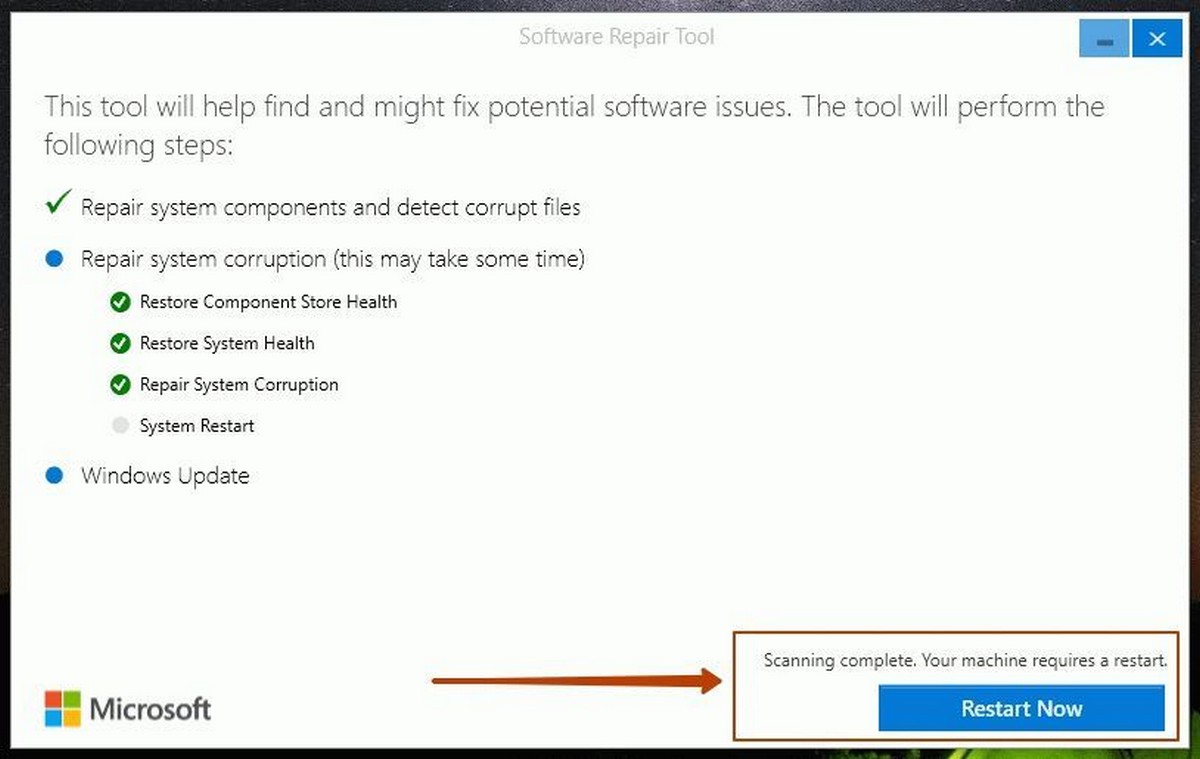
По окончании работы утилиты перезагрузите компьютер.
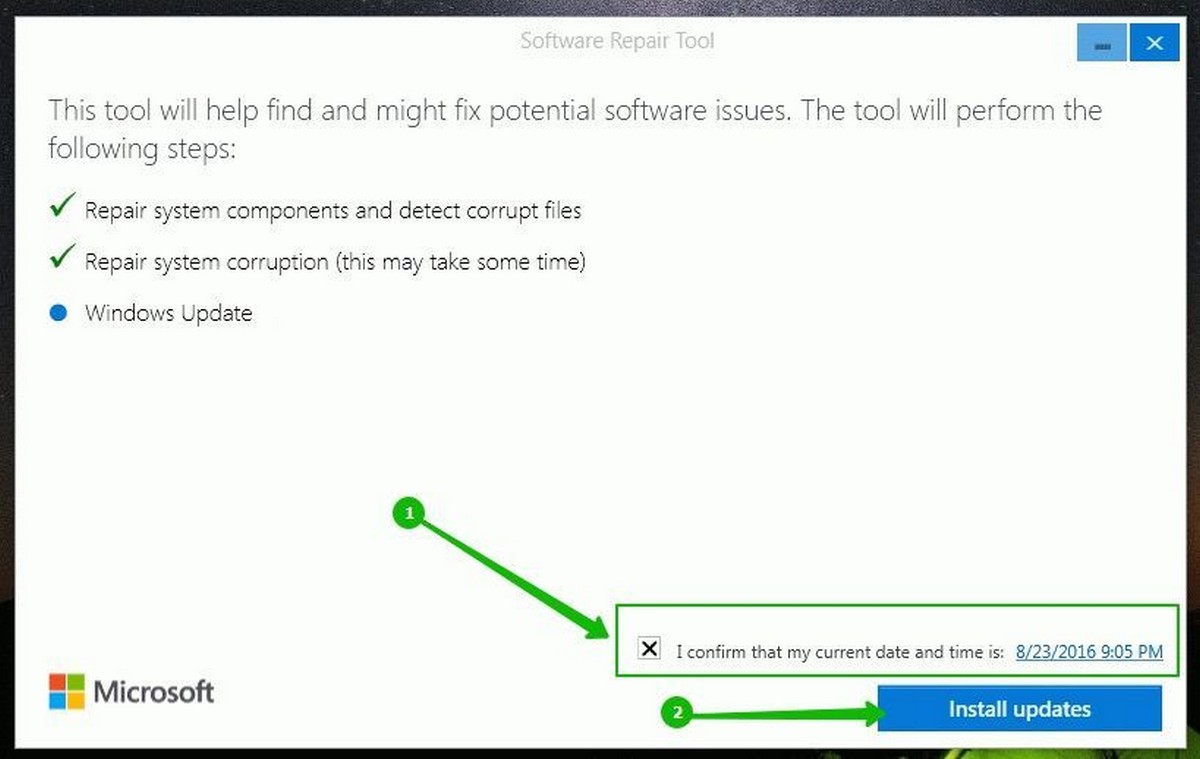
После перезагрузки системы запустится Repair Tool и предложит вам проверить обновления для Windows 10 а также, подтвердить текущую дату и время.
Инструмент, изначально выпущен для планшетных устройств, но работает на всех Windows 10 ПК. Цифровая подпись имеет временную метку 9 — го августа 2016 года, а также инструмент показывает дату их изменения в 20.08.2016 — поэтому он, по всей видимости, был обновлен совсем недавно.
Энтузиасты проанализировали, что делает программное обеспечение Software Repair Tool при запуске. Среди многих операций, большинство не упоминается на стартовой странице инструмента:
- Сброс настроек Winsock, прокси-сервера и настроек брандмауэра.
- Переустановка всех встроенных пакетов приложений с помощью PowerShell.
- Сброс WSUS cookie / авторизации.
- Сброс Магазина Windows с помощью wsreset.exe.
- Запуск Центра обновления Windows / Автоматическое запланированное задание.
- Регистрация DLL файлов.
- atl.dll, urlmon.dll, mshtml.dll, shdocvw.dll
- browseui.dll jscript.dll vbscript.dll scrrun.dll
- msxml.dll msxml3.dll Msxml6.dll actxprxy.dll
- softpub.dll wintrust.dll dssenh.dll rsaenh.dll
- gpkcsp.dll sccbase.dll slbcsp.dll Cryptdlg.dll
- oleaut32.dll ole32.dll shell32.dll initpki.dll
- wuapi.dll Wuaueng.dll wuaueng1.dll wucltui.dll
- wups.dll Wups2.dll wuweb.dll qmgr.dll qmgrprxy.dll
- wucltux.dll muweb.dll wuwebv.dll usocore.dll
- Очистка компонентов с помощью DISM.
- Сброс Дескриптора безопасности для обновления Windows и BITS услуг
- Удаление QMGR * .dat файлов из папки «Network Downloader «
- Запуск SFC / SCANNOW
- Ремонт образа Windows с помощью PowerShell / DISM.
- Восстанавливает по умолчанию параметры электропитания.
Инструмент, понравиться пользователям из-за своей простоты, но он может быть излишним в зависимости от проблем, который вы испытываете в своей системе.
Если вы изменяли настройки системы или удаляли приложения, то, возможно, вы должны будете сделать эти изменения снова после запуска программного обеспечения Software Repair Tool.
Вы можете скачать softwarerepairtool.exe файл с сервера Microsoft, нажав здесь .
Если инструмент не поможет или если вам не понравились изменения, которые он сделал, у вас есть возможность вернуться к созданной точке восстановления системы.
Это видео недоступно.
Очередь просмотра
Очередь
- Удалить все
- Отключить
YouTube Premium
How To Repair Windows 10 using Automatic Repair ✔️
![]()
Хотите сохраните это видео?
- Пожаловаться
Пожаловаться на видео?
Выполните вход, чтобы сообщить о неприемлемом контенте.
Понравилось?
Не понравилось?
Текст видео
Repair Windows 10 using automatic repair
This video shows how the use the Automatic Repair Tool built into Windows 10. This tool can solve various problems including corrupt files, system partitions, boot sectors and drivers automatically. This tutorial also applies to users of Windows 8/8.1
If you are unable to boot into Windows to run this tool, check out my start-up repair video (which is basically a work around to get to the troubleshooting options): https://goo.gl/71jhyr
Repair Windows 10 using Automatic Repair
If your having computer problems like reboot loop or corrupt windows files using Automatic Repair to repair Windows 10 is a good start. Automatic repair or Start up repair can fix, resolve and help recovery of some common issues in windows 10. This solution may not fix all of your PC Boot up problems, but is a good starting point. It can resolve corrupt registry keys and Windows update related issue. Another common computer problem is having a corrupt software driver or program. Running Start-up Repair on your computer can fix problems that keep windows from loading on your computer or laptop. Remember this tool is not a one fix for all tool, it has its limitations, but all is not lost, you have other options open to you like, system restore, System image recovery, Refresh your pc and Reset your PC.
Step 1: Place the CD or USB in your drive and proceed to boot from it
Step 2: When the install screen pops up, look to the bottom left and select «Repair Your Computer».
Step 3: You will now see a screen that says «Choose an option». Select «Troubleshoot», then «Advanced Options», and then «Start-up repair».
Remember backing up you’re data on a regular basis can save you a lot of hassle in the long run.
Additional (Optional) Steps If The Tutorial Does Not Work For You:
Windows 8 and 10’s advanced startup tools function differently than the tools on previous versions of Windows. If your Windows 8 or 10 system can’t boot properly, the tools will appear automatically so you can fix the problem.
Once you’ve accessed the advanced startup options, you’ll need to click (or tap) the Troubleshoot option to access the troubleshooting and repair options. The Continue and Turn off your PC options will continue booting to Windows (assuming there isn’t a problem) or power off your computer.
The Troubleshoot screen provides easy access to the Refresh and Reset your PC options. This is particularly useful if you want to refresh or reset your PC, but can’t get into Windows.
Refresh your PC: Refreshing your PC restores its system software to its factory state without deleting your files or installed Modern apps. However, any installed desktop apps will be removed.
Reset your PC: Resetting your PC (not to be confused with rebooting your PC) resets it to its factory state. Any personal files and settings on your computer will be deleted.
If you just want to fix your computer and you’re not sure which option to pick, try Refreshing your PC so you don’t lose all your files.
For more advanced troubleshooting and repair tools, click (or tap) Advanced options.
The Advanced options screen holds the advanced troubleshooting and repair options.
System Restore: Restore your computer to an earlier restore point. This is the same as using System Restore within Windows. However, if Windows 8 can’t boot, it may boot properly after you restore your PC to a working state.
System Image Recovery: Restore your computer using a system image file. The system image overwrites your computer’s state and files. You’ll need to use Windows 7’s backup tools in Windows 8 to create a system image.
Automatic Repair: Try to automatically repair issues that can prevent Windows from booting properly. If your computer can’t boot into Windows, this option is worth a try.
Command Prompt: Open a Recovery Environment Command Prompt. This will allow you to run a variety of commands to troubleshoot and fix your computer. This option should only be used by advanced users who know what they’re doing.
Startup Settings: The Startup Settings option allows you to modify a number of startup options. For example, you can enable Safe Mode from here. You can also disable automatic restart after failure – this option will allow you to see the error message if your PC is constantly blue-screening and rebooting.
The advanced options here may allow you to fix the problem – the Automatic Repair option is particularly useful, and the System Restore or Safe Mode options may help you boot your computer. If none of these options work, you’ll need to perform a refresh (or a full reset.)
This tutorial will apply for computers, laptops, desktops,and tablets running the Windows 10 operating system (Home, Professional, Enterprise, Education) from all supported hardware manufactures, like Dell, HP, Acer, Asus, Toshiba,Lenovo, and Samsung).
Лучшие бесплатные программы для исправления ошибок ОС Windows 7, 8, 10 и XP
 Вредоносные программы, неправильная установка/удаление приложений, неграмотное редактирование реестра и другое приводит к критическим ошибкам и сбоям в операционной системе Windows 7, 8, 10 и XP. Но даже если пользователь знает, какой «косяк» привел к ошибке, он не всегда сможет самостоятельно это исправить.
Исправление ошибок системы в таком случае необходимо доверить сторонним утилитам и программам. Мы выбрали пятерку наиболее известных и эффективных программ, которые помогут исправить ошибки операционной системы.
Microsoft Fix it
Fix it — целый набор программ, разработанные корпорацией Майкрософт. С помощью этого средства можно устранить отдельные неполадки ОС Windows 7, 8, 10 и XP. Как универсальный продукт их применять нельзя. Утилиты работают точечно, исправляя отдельные ошибки системы. Например, Fix it поможет с проблемами, возникшими после очистки корзины, программ, которые запустились в автоматическом режиме. Также устранит проблемы с DVD-приводом, копированием файлов и целый ряд других.
Скачиваются утилиты Fix it на ОС Windows 7 автоматически и абсолютно бесплатно.
Как исправлять системные ошибки в операционных системах от корпорации Майкрософт (все версии) с помощью набора утилит Fix it:
- Откройте страницу Центра решений Майкрософт .
- Свяжите ошибку, возникшую в системе, с темой (IE, ОС, проигрыватель, Office и так далее).
- Укажите, какого типа ваша неисправность.
- Скачайте на компьютер ту утилиту из набора программ (загрузка произойдёт автоматически), которая соответствует неполадке.

Установите ее и откройте (если не открывается, то пробуйте запускать от имени администратора).
Когда Fix it выполнит работу, перезагрузите систему.

Поскольку набор утилит создан разработчиками ОС, они безопасны и выполняют только санкционированные действия. Программа не сделает ничего такого, что вывело бы компьютер из строя.
Утилиту Fix it можно смело отнести к лучшей бесплатной программе для исправления ошибок в Windows 7, 8, 10 и XP, а использовать её просто, быстро и надежно, но только не всегда эффективно.
NetAdapter Repair All In One
Эту программу, разработанную Conner Bernhard, можно назвать универсальным решением. Воспользовавшись ею, можно сделать диагностику и устранить любые неисправности, касающиеся сетевых подключений и адаптеров. Новая «десятка» не поддерживает программу, а в XP, 7 и 8 работает отлично.
Скачать NetAdapter (бесплатно) можно на странице .
Главная особенность NetAdapter Repair (все утилиты в одной программе) заключается в том, что она диагностирует проблемы, а решение об устранении неисправностей принимает сам пользователь. Запускается работа кнопкой «Advanced Repair». То есть в автоматическом режиме программа не работает. В утилите есть отдельное меню, с помощью которого можно настроить параметры сетевых подключений, установив галки ниже. Можно выбрать все области выбрав «Run All Selected».

Программа быстро исправит все имеющиеся ошибки.

Диагностировать систему на предмет ошибок утилита позволяет каждому пользователю, а вот принимать решения об устранении неисправностей может только администратор.
Новичков может напугать отсутствие русскоязычной поддержки, а подготовленные пользователи легко разберутся и сделают все необходимые настройки.
С помощью NetAdapter Repair можно исправлять:
- Настройки сетевого протокола, отвечающего за автоматическое получение компьютером IP-адреса (Dynamic Host Configuration Protocol).
- Текстовый hosts-файл.
- Электронный файл маршрутизации.
- Адреса системы доменных имен.
- Протокол работы в локальных сетях (Network Basic Input/Output System).
- Параметры обеспечения конфиденциальности, аутентичности данных, приватности в сети.
- Параметры сетевых служб операционной системы.
NetAdapter Repair — идеальное средство для подготовленных пользователей, и новичкам оно не рекомендуется.
Kerish Doctor
Kerish — настоящий доктор Айболит для «проблемного» компьютера. Это универсальная утилита, которая одновременно устранит все возникшие в операционной системе неполадки. Мало того, Kerish Doctor решит и проблему низкой производительности компьютера.
Что умеет утилита:
- Исправлять ошибки реестра;
- Оптимизировать работу служб ОС;
- Увеличивать скорость сетевого соединения;
- Контролировать системные события;
- Защищать от вредоносных программ;
- Предотвращать сбои ОС;
- Защищать компьютер от перегревания;
- Удалять ненужные файлы приложений, недействительные ярлыки, временные ссылки и прочее;
- Закрывать уязвимости системы и приложений;
- Создавать оптимальный режим для игроков.

Программа хоть и универсальна, но подготовленных пользователей она может напугать своей «вседозволенностью». А вот новички, предпочитающие ни в какие процессы не вникать, а получить в конечном результате «летающую» операционную систему, наверняка, ею воспользуются.
Kerish Doctor имеет условно-бесплатную версию длительностью в полмесяца, а полный функционал можно приобрести за 380 руб.
Скачать Kerish Doctor можно бесплатно по ссылке .
Anvisoft PC PLUS
Anvisoft — универсальный и бесплатный вариант, с помощью которого можно исправить различные неполадки.
Anvisoft PC PLUS умеет:
- Устранять проблемы с графическими файлами на рабочем столе, связанные с перемещением, копированием, выделением цвета;
- Исправлять ошибки системы, например, когда отсутствует динамически подключаемая библиотека;
- Исправлять ошибки сетевых подключений;
- Чистить временные файлы;
- Устранять ошибки в играх;
- Выявлять ошибки ОС и предупреждать о них;
- Поддерживать пользователей 24 часа в сутки (правда, менеджеры говорят на английском языке).
Скачать Anvisoft PC PLUS (бесплатно) можно на странице официального сайта разработчика .

Хоть программа и не поддерживает русский язык, но пользуется популярностью у отечественных пользователей, особенно активных игроков.

Выбрав область поиска ошибок, можно запускать проверку компьютера.

Registry Repair
Специальная утилита, занимающаяся проблемами реестра. Почти 20 типов ошибок умеет распознавать и исправлять Registry Repair, и поэтому будет незаменима для любителей редактировать реестры на свой страх и риск. Утилита найдет все ошибки и в автоматическом режиме исправит. Работает аккуратно и не грузит оперативку и процессор.
Registry Repair умеет:
- Проверять весь реестр на наличие ошибок или отдельные его разделы. С помощью утилиты можно проверить расширения файлов и историю,
- Пользовательские элементы и службы, запускаемые операционной системой, шрифты, директории приложений, меню «Пуск» и многое другое;
- Найти и уничтожить все, что оставили после себя шпионские и рекламные приложения;
- Просканировать весь системный раздел и проверить всех пользователей на этом компьютере;
- Создать список событий, которые не надо проверять;
- Отменить все ранее внесенные исправления (перед каждым изменением создается резервная копия);
- Создание текстового файла всех внесенных в реестр изменений.
Registry Repair — хорошее решение для новичков и опытных пользователей. Утилита бесплатна, а разработчики гарантируют корректную работу.
Для скачивания Registry Repair переходим по ссылке .

При запуске программы она автоматически просканирует систему на наличие ошибок, после чего можно запустить исправление кнопкой «Исправить реестр».

Все имеющиеся ошибки в windows xp, 7, 8, 10 будут исправлены.

Что выбирать?
Все представленные утилиты относятся к лучшим бесплатным программам для исправления ошибок в Windows 7, 8, 10 и XP, в то время как каждая хороша по-своему. Но самую большую функциональность имеет Kerish Doctor, правда, чтобы воспользоваться всем инструментарием, ее необходимо купить.
NetAdapter Repair — профессиональное решение, но только для подготовленных пользователей. Registry Repair отлично сканирует реестр и устраняет найденные проблемы. Anvisoft универсален. А Fix it — лучший выбор на наш взгляд. Утилиты от разработчика ОС Windows работают точечно, безопасно и быстро.
|
The Xbox 360 Kinect audio tuner can find and fix problems with sound. |
Аудиотюнер Kinect для консоли Xbox 360 способен обнаруживать и исправлять проблемы со звуком. |
|
Or, learn how to fix problems installing Chrome. |
Подробнее о том, как решить проблемы при установке Chrome. |
|
Read more on how to fix OneDrive sync problems , how to fix problems uploading files, or what to do if you’re over your OneDrive storage limit. |
Ознакомьтесь со статьями о том, как решать проблемы синхронизации с OneDrive, устранять проблемы при отправке файлов и что делать, если превышен размер хранилища OneDrive. |
|
You can also re-install Chrome to fix problems with Flash, plug-ins, your search engine, pop-ups, or Chrome updates. |
Вы также можете переустановить его, чтобы устранить неполадки с Flash, плагинами, поисковой системой, всплывающими окнами или обновлениями Chrome. |
|
It also turns on advanced diagnostic features that can collect additional data from your device, which helps us further troubleshoot and fix problems . |
К этому уровню относятся также расширенные функции диагностики, собирающие дополнительные данные с устройства, что помогает нам в дальнейшем диагностировать и устранять неполадки. |
|
Fix problems if you can, flag or remove them if you can’t. |
Исправьте проблемы, если можете, отметьте или удалите их, если не можете. |
|
Not only that, but apparently I’m reluctant to fix problems despite numerous complaints. |
И не только это, но, по — видимому, я неохотно решаю проблемы, несмотря на многочисленные жалобы. |
|
A scarf joint may also be used to fix problems caused when a board is cut too short for the application. |
Соединение шарфа может также использоваться для устранения проблем, вызванных тем, что доска обрезана слишком коротко для применения. |
|
As the program continued, there were numerous redesigns to save weight, improve safety, and fix problems . |
По мере того как программа продолжалась, были многочисленные изменения, чтобы сэкономить вес, повысить безопасность и устранить проблемы. |
|
That gives the Talk page the place to hammer out new additions and fix problems . |
Это дает странице разговора место, чтобы выколачивать новые дополнения и исправлять проблемы. |
|
Wikis like ours develop faster when everybody helps to fix problems , correct grammar, add facts, make sure wording is accurate, etc. |
Такие Вики, как наша, развиваются быстрее, когда все помогают исправить проблемы, исправить грамматику, добавить факты, убедиться в точности формулировок и т. д. |
|
Now in theory, this should be an easy problem to fix. |
Теоретически, эта проблема должна решаться просто. |
|
A feminist is a man or a woman who says, Yes, there’s a problem with gender as it is today, and we must fix it. |
Это мужчина или женщина, кто говорит так: Да, в наши дни есть проблемы, связанные с гендером, и нам следует их исправить. |
|
The fix for this problem is to take this child immediately to the operating room, bring those intestines back into the abdomen, let the lungs expand and allow this child to breathe again. |
Чтобы решить эту проблему, ребёнка надо немедленно оперировать, вернуть кишечник в брюшную полость, дать лёгким расшириться, и девочка сможет нормально дышать. |
|
But there was a crack in the wall, a problem with our industry, that I felt we needed to fix. |
Но не всё было идеально, в нашей отрасли была проблема, которую, мне казалось, нам нужно решить. |
|
Are you worried that it won’t fix the problem ? |
Тебя волнует, сумеют ли они решить нашу проблему? |
|
He promised he’d fix the problems on the line if I kept quiet. |
Он обещал, что исправит эту проблему на конвейере, если я промолчу. |
|
Our relationship never recovered, and no amount of ignoring the problem could ever fix it. |
Наши отношения так и не улучшились и никакое игнорирование проблемы не поможет решить её. |
|
Once its docked, we’ll diagnose its problems , and hopefully fix them |
Тогда мы сможем выяснить причину неполадок и устранить их. |
|
I look at the feedback, try to fix any problems that people point out. |
Я отслеживаю отзывы, стараюсь исправить все проблемы, на которые указывают люди. |
|
If we can fix these problems Without anyone knowing what we’re doing, We will finish on time. |
Если мы сможем исправить эти проблемы так, чтобы никто не узнал, что мы делаем, мы закончим вовремя. |
|
Nature has been treated as a commodity that exists largely for the benefit of people, and all environmental problems as solvable with a technological fix. |
Природа стала рассматриваться как товар, существующий в основном для удовлетворения потребностей людей, а все экологические проблемы считаются разрешимыми с помощью технических средств. |
|
We believe there is no quick fix for the Council’s serious problems and flaws. |
Мы считаем, что не может быть незамедлительных решений серьезных проблем и недостатков в работе Совета. |
|
Nonetheless, there are limits to microfinance as a quick fix to solve the deep problems of poverty in rural areas. |
В то же время существуют ограничения для микрофинасирования как быстрого способа решения глубинных проблем нищеты в сельских районах. |
|
In essence, we cannot expect the PBC to be an institutional quick fix to what is essentially a problem of inadequate political will and attention. |
По сути, мы не можем надеяться, что Комиссия по миростроительству обеспечит институциональный быстрый выход из тупиковой ситуации, которая в целом является следствием недостаточной политической воли и внимания. |
|
We can also look at, at a grander scale, what creates problems , what creates disease, and how we may be able to fix them. |
Мы также можем посмотреть в более широком масштабе, что является причиной проблем, порождает заболевания, и как мы могли бы их устранить. |
|
Fix USB bandwidth exceeded and USB connection problem errors with Kinect on Xbox 360 |
Устранение ошибок Ширина полосы пропускания USB превышена и Ошибка USB — подключения сенсора Kinect на консоли Xbox 360 |
|
For more info about the network report and how to analyze it, see Analyze the wireless network report in Fix Wi-Fi problems in Windows 10. |
Дополнительные сведения о сетевом отчете и его анализе см. в разделе Анализ отчета о беспроводной сети в статье Устранение проблем беспроводной сети в Windows 10. |
|
Find out why you’re repeatedly prompted to sign in when playing an Xbox 360 Kinect game and how to fix the problem . |
Почему возникает постоянный запрос пароля к профилю при запуске игры с поддержкой сенсора Kinect на консоли Xbox 360 и что делать в этом случае. |
|
Technology – and its promise of being able to fix all problems – is, it seems, king. |
Похоже, что неоспоримым лидером здесь являются технологии, которые дают надежду на решение любых проблем. |
|
Learn how to fix installation problems with Chrome. Or, fix websites that aren’t loading. |
Подробнее о том, как решить проблемы при установке Chrome и что делать, если Google Chrome не запускается или работает с ошибками. |
|
If you see a status code (such as 69-C00D36C4 or 80-C00DF242) when you try to play a video, see Fix Xbox 360 video problems . |
Если при воспроизведении видео возникает ошибка (например, с кодом состояния 69 — C00D36C4 или 80 — C00DF242), см. раздел Устранение проблем с видео на консоли Xbox 360. |
|
If the settings menu doesn’t open or isn’t there, Chrome might have a problem . To fix, uninstall Chrome then download Chrome again from google.com/chrome and reinstall it. |
Если меню настроек отсутствует или не открывается, удалите браузер, скачайте его со страницы google.com/chrome и установите ещё раз. |
|
Go to Fix OneDrive sync problems and select Reset OneDrive or Reinstall OneDrive for whichever version of OneDrive you are using. |
Откройте статью Решение проблем с синхронизацией OneDrive и перейдите в раздел Выполните сброс OneDrive или Повторная установка OneDrive для используемой версии OneDrive. |
|
If the solutions above did not fix the problem , copy the console update from your computer to a USB flash drive or CD/DVD, and then install the update on your console. |
Если вышеперечисленные решения не помогли решить проблему, скопируйте обновление с компьютера на USB — устройство флэш — памяти или диск CD/DVD, а затем установите обновление на консоль. |
|
If you see a sync error or if new changes aren’t showing up on your other devices, you can take steps to fix the problem . |
Если изменения, внесенные на одном устройстве, не отражаются на остальных, либо появляется сообщение об ошибке синхронизации, воспользуйтесь приведенными ниже советами. |
|
On the one hand, he promises to fix all the world’s problems , and to show China, Russia, the Islamic State, or anyone else who is boss. |
С одной стороны, он обещает исправить все мировые проблемы, и показать Китаю, России, ИГИЛ, или кому либо другому, кто в доме хозяин. |
|
Neither Ukraine’s chaotic democracy-like system or Russia’s autocracy have found a lasting fix to a problem that originates in their shared Communist past. |
Ни охваченная хаосом и вроде как демократическая страна Украина, ни автократическая Россия не нашли способа окончательно решить проблему, истоки которой уходят в их общее коммунистическое прошлое. |
|
diagnose or fix technology problems |
диагностировать или исправлять технические неполадки; |
|
To try to troubleshoot and fix the problem , do one or more of the following. |
Чтобы попробовать выявить и устранить проблему, выполните одно или несколько следующих действий. |
|
Uninstall and reinstall Chrome to fix most problems with Flash, plug-ins, default search engines, pop-ups, or Chrome updates. |
Чтобы устранить неполадки с плагинами (в том числе с Flash), поисковой системой, всплывающими окнами и обновлениями браузера, попробуйте переустановить Chrome. |
|
Feedback from the people who use Facebook has helped us redesign our products, improve our policies and fix technical problems . |
Отзывы пользователей Facebook помогают нам менять дизайн наших продуктов, улучшать наши политики и устранять технические проблемы. |
|
Feedback from people who use Facebook helps us in many ways, including helping us redesign our products, improve our policies and fix technical problems . |
Отзывы людей на Facebook помогают нам совершенствовать наши продукты, улучшать правила и устранять технические проблемы. |
|
So what’s the problem , why has this chasm opened up, and what can we do to fix it? |
В чем же проблема, почему вдруг открылась такая пропасть, и что можно сделать, чтобы это исправить? |
|
We try to fix all problems in a timely manner, but there are inevitably some problems that require a greater level of investigation and investment. |
Мы стараемся быстро устранять проблемы, но некоторые из них требуют большего изучения и усилий. |
|
But neither these recommendations nor those expressed at the forum will do much to fix the developing world’s problems . |
Однако эти рекомендации и те рекомендации, которые прозвучали на саммите, вряд ли смогут помочь в решении проблем развивающегося мира. |
|
Follow the instructions to fix any problems with the network. |
Следуйте инструкциям, чтобы устранить проблемы с сетью. |
|
Even if we were to fix every problem in the development pipeline today, it would be at least another ten years before the first new antibiotics became commercially available. |
Даже если бы мы решили проблему по разработке лекарств сегодня, пройдет как минимум десять лет до того момента, когда такие новые антибиотики станут коммерчески доступными. |
|
If resetting your homepage doesn’t fix the issue, the problem may be due to malicious software called malware that’s imitating the Google site. |
Если перечисленные выше действия не помогли исправить проблему, возможно, она вызвана вредоносным ПО, которое открывает страницу, имитирующую сайт Google. |
|
Learn what to do if you’re experiencing problems with apps and how you may be able to fix them yourself. |
Что делать, если возникают проблемы с приложением, и как можно устранить их самостоятельно. |
|
But for as much as clinical medicine agonizes over behavior change, there’s not a lot of work done in terms of trying to fix that problem . |
Но несмотря на то, что клиническая медицина давно мучается над изменением поведения, не так уж много сделано для решения этой проблемы. |
|
Visit the ICANN webpage for more information to help you fix any problems . |
Дополнительную информацию по этой теме вы найдете на сайте ICANN. |
|
If we don’t have a good way to fix a problem , it might be better to focus on something else first. |
При отсутствии хорошего решения проблемы может быть лучше сначала сосредоточиться на чем — то другом. |
|
It might be able to fix audio problems automatically. |
Возможно, оно устранит проблему со звуком автоматически. |
|
As friends continue to pile up, it’s hard to tell how Facebook can fix this problem . |
И пока таких «друзей» становится все больше, сложно сказать, как Facebook может решить эту проблему. |
|
It can automatically identify and fix some problems with apps and the Store. |
Оно позволяет автоматически определить и устранить определенные проблемы с приложениями и Магазином. |
|
Try running the Network troubleshooter to see if it can diagnose and fix the problem . |
Прежде всего, запустите средство устранения сетевых неполадок, чтобы с его помощью найти и устранить проблему. |
|
If you own the web page that’s having the problem , learn more about why this is happening and how to fix it below. |
Ниже вы найдете полезную информацию о конфликтах доменов. |
|
If you’re having one of the following problems , updating your console software might fix it. |
Если возникла одна из следующих проблем, попробуйте обновить программное обеспечение консоли для ее устранения. |
|
It’s unlikely that replacing the battery will fix the problem . |
Замена батареи едва — ли решит эту проблему. |
Устранение ошибки «Startup Repair Offline» при загрузке Windows 7
Исправляем ошибку «Startup Repair Offline»
Буквально данная неисправность означает – «восстановление запуска не в сети». После перезапуска компьютера, система предприняла попытку по восстановлению работы (не подключаясь к сети), но попытка оказалась неудачной.
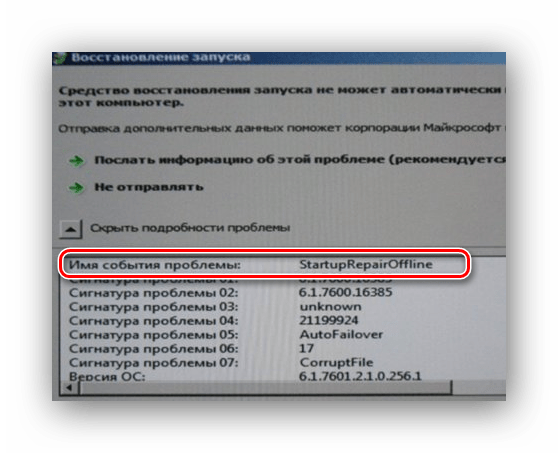
Неисправность «Startup Repair Offline» зачастую появляется из-за проблем с жестким диском, а именно из-за повреждения сектора, на котором находятся системные данные, отвечающие за правильный запуск Windows 7. Также возможны проблемы с поврежденными разделами реестра системы. Перейдем к способам исправления этой неполадки.
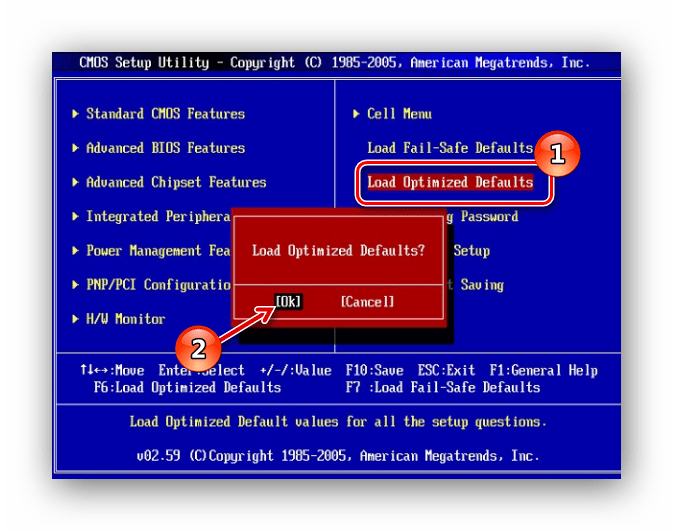
Способ 1: Сброс настроек BIOS
Переходим в БИОС (при помощи клавиш F2 или Del при загрузке компьютера). Производим загрузку настроек по умолчанию (пункт «Load optimized defaults»). Сохраняем сделанные изменения (нажав клавишу F10) и перезапускаем Виндовс.
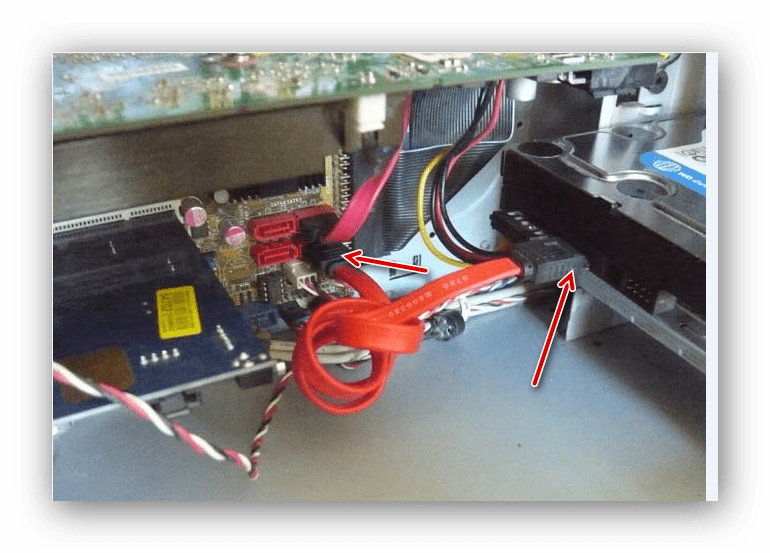
Способ 2: Подключение шлейфов
Необходимо произвести проверку целостности разъемов и плотность подключения шлейфов жесткого диска и материнской платы. Убедитесь, что все контакты подключены качественно и плотно. После проверки перезапускаем систему и проверяем на наличие неисправности.
Способ 3: Восстановление запуска
Так как обычный запуск операционной системы невозможен, рекомендуем воспользоваться загрузочным диском или флешкой с системой, которая является идентичной установленной.
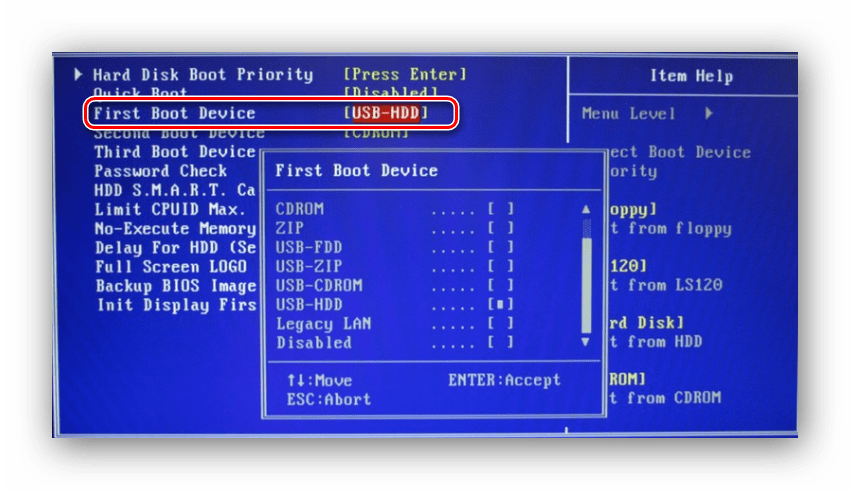
- Выполняем запуск с загрузочной флешки или диска. В БИОСе устанавливаем опцию запуска с диска или флеш-накопителя (устанавливаем в пункте «First Boot Device USB-HDD» параметр «USB-HDD«). Как это сделать на различных версиях BIOS, подробно описано в уроке, который представлен ниже.
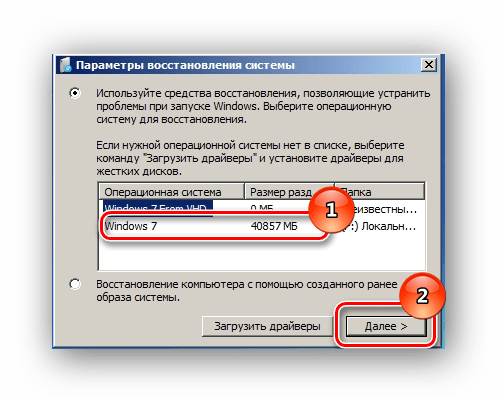
Системой будет произведён поиск неполадок в автоматическом режиме. Жмём на кнопочку «Далее» в открывшемся окне, выбрав необходимую ОС.
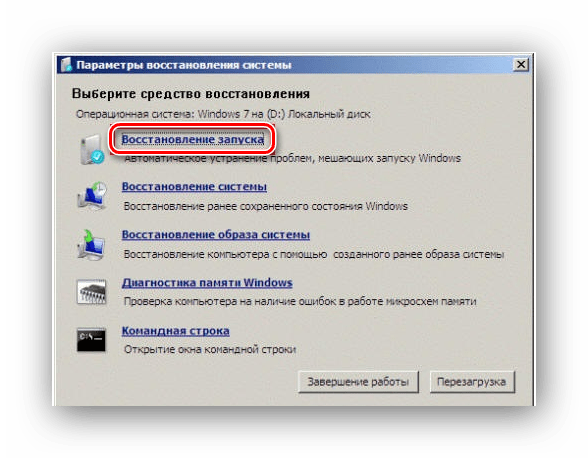
В окошке «Параметры восстановления системы» щелкаем по пункту «Восстановление запуска» и дожидаемся завершения проверочных действий и корректного запуска компьютера. После окончания проверки перезагружаем ПК.
Способ 4: «Командная строка»
Если приведенные выше способы не помогли устранить неполадку, тогда вновь запускаем систему с флешки или установочного диска.
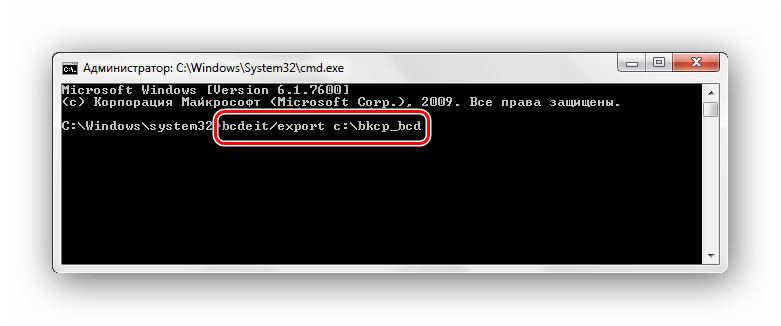
Нажимаем клавиши Shift+F10 в самом начале установочного процесса. Попадаем в меню «Командной строки», где необходимо набрать поочередно определенные команды (после ввода каждой из них нажимаем Enter).
bcdedit /export c:\bckp_bcd
attrib c:\boot\bcd -h -r –s

ren c:\boot\bcd bcd.old


После того, как ввели все команды, перезапускаем ПК. Если Виндовс 7 не запустилась в работоспособном режиме, тогда в данных о неисправности может быть имя проблемного файла (например, библиотеки расширения .dll). Если было указано название файла, то необходимо попробовать совершить поиска данного файла в интернете и поместить его на ваш винчестер в необходимую директорию (в большинстве случаев, это папка windowds\system 32 ).
Заключение
Итак, что же делать с неполадкой «Startup Repair Offline»? Самый простой и эффективный способ – это использование восстановления запуска ОС, применяя загрузочный диск или флеш-накопитель. Если способ с восстановлением системы не исправил проблему, то воспользуйтесь командной строкой. Также проверьте целостность всех соединений компьютера и настройки BIOS. Применение этих методов позволит устранить ошибку запуска Windows 7.
Источник
Проблемы с ноутбуком
На ноутбуке появилось сообщение об ошибке
Windows Boot Manager
Windows failed to start. A recent hardware or software change might be the cause. To fix the problem:
1. Insert your windows installation disc and restart your computer.
2. Choose your language settings, and then click »Next.»
3. Click »Repair your computer.»
If you do not have this disc, contact your system administrator or computer manufacturer for assistance.
File: \Boot\BCD
Status: 0xc000000f
Info: An error occurred while attempting to read the boot configuration data.
Или в переводе на русский
Диспетчер загрузки Windows
ОС Windows не удалось запустить. Последние аппаратные или программные изменения могут быть причиной. Для решения этой проблемы:
1. Вставьте установочный диск Windows, и перезагрузите компьютер.
2. Выберите параметры языка, а затем нажмите кнопку» Далее. »
3. Нажмите» ремонтом вашего компьютера. »
Если у вас нет этого диска, обратитесь к системному администратору или изготовителю компьютера для получения помощи.
Файл: \ Boot \ BCD
Статус: 0xc000000f
Информация: Произошла ошибка при попытке чтения данных конфигурации загрузки.
Нашла установочный диск Windows 7. Безрезультатно.
А вот установочный диск Windows 8 помог. Хотя и установлен на ноутбуке был Windows 7.
- Перезагрузила компьютер.
- Зашла в BIOS при помощи специальной клавиши, которая для каждой материнской платы своя, у меня F2.
- Открыла раздел биоса Main. Установила F12 Boot Menu Enabled. Далее нажала F10 для сохранения изменений меню и выхода из него.
- Установила установочный диск в CD ROM, который сделала первым в загрузочной иерархии. По умолчанию загрузка производится из жесткого диска.
- Перезагрузила компьютер и нажала F12 для входа в Boot Menu.
- При появлении на экране строки «Press any kay from CD or DVD» нажала любую из клавиш, чтобы запустилась загрузка с CD ROM и началась установка Windows.
- После того, как появится меню установки нажимаем «Далее».
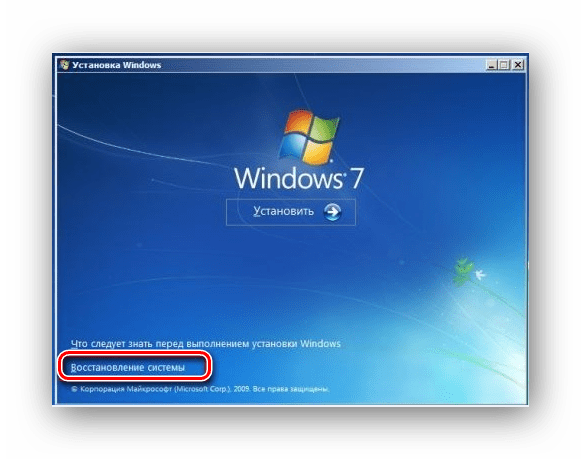
- Теперь необходимо в левом нижнем углу найти «Восстановление».
После нажатия на поле » Восстановить» у меня появилась строка Диск заблокирован. По этой причине пришлось все предыдущие операции проделать повторно и отправится в меню «Диагностика» и «Дополнительные параметры» там «Командная строка».
Теперь займемся открытием доступа к диску, на котором находится Windows.
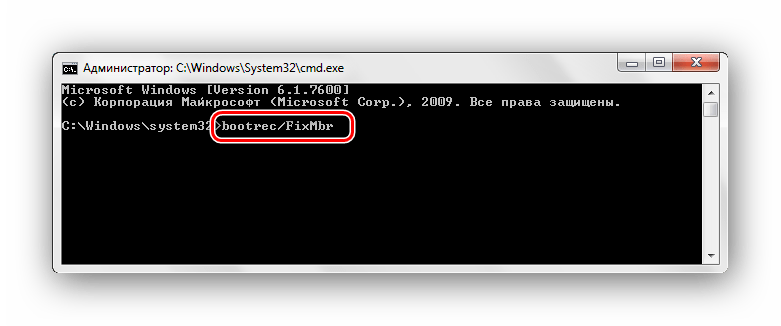
Необходимо прописать простую команду «Bootrec /fixmbr». Нажимаем «Enter».
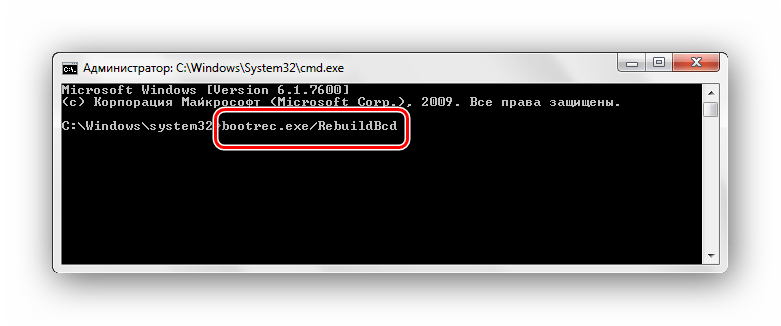
- Ключ меняем на «/rebuildbcd». Опять же подтверждаем «Enter».
- Перезагружаем компьютер.
- Теперь появляется доступ к диску.
Главное, что для процедуры необходимо использовать дистрибутив Windows. И даже может понадобиться ключ активации, с помощью которого ранее и была установлена текущая система. В противном случае команда может не сработать, а значит все останется, как есть.
У меня на удивление сработало при запуске диска с Windows 8, и система с Windows 7 восстановилась.
В моем случае думаю что все проблемы связаны с тем, что первоначально на ноут буке была установлена Windows Vista. Возможно аппаратно мой ACER не тянет Windows 7 и поэтому у меня частенько происходит перезагрузка или загорается синий экран.
Источник
Windows7 не запускается! Помогите! каждый раз когда включаю комп, пишет «BOOTMRG is missing» и Виндовс не запускается!
Слетел загрузчик.
Читайте статью по восстановлению:
Восстановление загрузчика Windows 7 с помощью опции Восстановление запуска:
– установите в лоток привода загрузочный диск Windows 7 (или диск восстановления системы) ;
– во время перезагрузки нажмите Delete для входа в CMOS Setup Utility;
– установите загрузку ПК с CD/DVD-ROM, нажмите F10, санкционируйте сделанные изменения, начнется перезагрузка;
– после перезагрузки, если появится сообщение «Press any key to boot from CD or DVD…», нажмите любую клавишу;
– в окне Windows Boot Manager выберите Windows Setup [EMS Enabled]/Установка Windows –> нажмите Enter;
– появится строка состояния с сообщением Windows is loading files…;
– когда программа установки загрузит установочные файлы в оперативную память, появится окно выбора раскладки клавиатуры (можете выбрать русскую, а можете оставить US), нажмите Next;
– в следующем окне выберите операционную систему (если на вашем ПК их установлено 2 или более) ;
– установите переключатель Use recovery tools that can help fix problems starting Windows –> Next;
– в следующем окне – System Recovery Options (Параметры восстановления системы) – доступны опции:
· Startup Repair (Automatically fix problems that are preventing Windows from starting);
· System Restore (Restore Windows to an earlier point in time);
· System Image Recovery (Recover your computer using a system image you created earlier);
· Windows Memory Diagnostic (Check your computer for memory hardware errors);
· Command Prompt (Open a command prompt window);
– выберите Startup Repair;
– средство восстановления запуска Startup Repair проведет диагностику и устранение неполадок;
– (если проблемы не будут выявлены, появится сообщение «Startup Repair could not detect a problem»);
– нажмите Finish –> Restart;
– во время перезагрузки нажмите Delete для входа в CMOS Setup Utility;
– установите загрузку ПК с жесткого диска, нажмите F10;
– санкционируйте сделанные изменения, начнется перезагрузка.
Восстановление загрузчика Windows 7 с помощью командной строки
– установите в лоток привода загрузочный диск Windows 7 (или диск восстановления системы) ;
– во время перезагрузки нажмите Delete для входа в CMOS Setup Utility;
– установите загрузку ПК с CD/DVD-ROM, нажмите F10, санкционируйте сделанные изменения, начнется перезагрузка;
– после перезагрузки, если появится сообщение «Press any key to boot from CD or DVD…», нажмите любую клавишу;
– в окне Windows Boot Manager выберите Windows Setup [EMS Enabled]/Установка Windows –> нажмите Enter;
– появится строка состояния с сообщением Windows is loading files…;
– когда программа установки загрузит установочные файлы в оперативную память, появится окно выбора раскладки клавиатуры (можете выбрать русскую, а можете оставить US), нажмите Next;
– в следующем окне выберите операционную систему (если на вашем ПК их установлено 2 или более) ;
– установите переключатель Use recovery tools that can help fix problems starting Windows –> Next;
– в окне System Recovery Options (Параметры восстановления системы) выберите Command Prompt;
– в окне Интерпретатора команд после приглашения системы X:\windows\system32>
введите bootsect /nt60 All
Microsoft Windows [Version 6.1.7600]
X:\windows\system32>bootsect /nt60 All
Target volumes will be updated with BOOTMGR compatible bootcode.
Successfully updated NTFS filesystem bootcode.
Successfully updated NTFS filesystem bootcode.
Bootcode was successfully updated on all targeted volumes.
– на приглашение системы X:\windows\system32> введите exit –> Enter (или просто закройте окно Интерпретатора команд) ;
– в окне System Recovery Options (Параметры восстановления системы)
Источник
How-To Geek
What to do when windows won’t boot.
You turn on your computer one day and Windows refuses to boot—what do you do? «Windows won’t boot» is a common symptom with a variety of causes, so you’ll need to perform some troubleshooting.

Quick Links
First things first: has anything changed, if the computer won’t power on at all, the computer powers on and says no bootable device, if windows freezes or crashes during boot, if windows starts and blue screens or freezes, how to recover files when windows won’t boot.
Modern versions of Windows are better at recovering from this sort of thing. Where Windows XP might have stopped in its tracks when faced with this problem, modern versions of Windows will try to automatically run Startup Repair.
Be sure to think about changes you’ve made recently—did you recently install a new hardware driver, connect a new hardware component to your computer, or open your computer’s case and do something? It’s possible the hardware driver is buggy, the new hardware is incompatible, or that you accidentally unplugged something while working inside your computer.
If your computer won’t power on at all, ensure it’s plugged into a power outlet and that the power connector isn’t loose. If it’s a desktop PC, ensure the power switch on the back of its case—on the power supply—is set to the On position. If it still won’t power on at all, it’s possible you disconnected a power cable inside its case. If you haven’t been messing around inside the case, it’s possible the power supply is dead. In this case, you’ll have to get your computer’s hardware fixed or get a new computer.
Be sure to check your computer monitor—if your computer seems to power on but your screen stays black, ensure your monitor is powered on and that the cable connecting it to your computer’s case is plugged in securely at both ends.
Related: How to Boot Your Computer From a Disc or USB Drive
If your computer is powering on but you get a black screen that says something like «no bootable device» or another sort of «disk error» message, your computer can’t seem to boot from the hard drive that Windows was installed on. Enter your computer’s BIOS or UEFI firmware setup screen and check its boot order setting , ensuring that it’s set to boot from the correct hard drive.
If the hard drive doesn’t appear in the list at all, it’s possible your hard drive has failed and can no longer be booted from.
If everything looks fine in the BIOS, you may want to insert Windows installation or recovery media and run the Startup Repair operation . This will attempt to make Windows bootable again. For example, if something overwrote your Windows drive’s boot sector, this will repair the boot sector. If the recovery environment won’t load or doesn’t see your hard drive, you likely have a hardware problem. Be sure to check your BIOS or UEFI’s boot order first if the recovery environment won’t load.
You can also attempt to manually fix Windows bootloader problems using the fixmbr and fixboot commands . Modern versions of Windows should be able to fix this problem for you with the Startup Repair wizard, so you shouldn’t actually have to run these commands yourself.
Related: How to Fix Startup Problems with the Windows Startup Repair Tool
If Windows seems to start booting but fails partway through, you may be facing either a software or hardware problem. If it’s a software problem, you may be able to fix it by performing a Startup Repair operation . If you can’t do this from the boot menu, insert a Windows installation disc or recovery disk and use the startup repair tool from there. If this doesn’t help at all, you may want to reinstall Windows or perform a Refresh or Reset on Windows 8 or 10 .
If the computer encounters errors while attempting to perform startup repair or reinstall Windows, or the reinstall process works properly and you encounter the same errors afterwards, you likely have a hardware problem.
If Windows crashes or blue screens on you every time it boots, you may be facing a hardware or software problem. For example, malware or a buggy driver may be loading at boot and causing the crash, or your computer’s hardware may be malfunctioning.
Related: How to Use Safe Mode to Fix Your Windows PC (and When You Should)
To test this, boot your Windows computer in safe mode . In safe mode, Windows won’t load typical hardware drivers or any software that starts automatically at startup. If the computer is stable in safe mode, try uninstalling any recently installed hardware drivers, performing a system restore, and scanning for malware. If you’re lucky, one of these steps may fix your software problem and allow you to boot Windows normally.
If your problem isn’t fixed, try reinstalling Windows or performing a Refresh or Reset on Windows 8 or 10 . This will reset your computer back to its clean, factory-default state. If you’re still experiencing crashes, your computer likely has a hardware problem.
Related: Everything You Need to Know About «Reset This PC» in Windows 10 and Windows 11
Related: How to Recover Files From a Dead Computer
If you have important files that will be lost and want to back them up before reinstalling Windows, you can use a Windows installer disc or Linux live media to recover the files . These run entirely from a CD, DVD, or USB drive and allow you to copy your files to another external media, such as another USB stick or an external hard drive.
If you’re incapable of booting a Windows installer disc or Linux live CD, you may need to go into your BIOS or UEFI and change the boot order setting.
If even this doesn’t work—or if you can boot from the devices and your computer freezes or you can’t access your hard drive—you likely have a hardware problem. You can try pulling the computer’s hard drive, inserting it into another computer, and recovering your files that way.
Following these steps should fix the vast majority of Windows boot issues—at least the ones that are actually fixable. The dark cloud that always hangs over such issues is the possibility that the hard drive or another component in the computer may be failing.
Image Credit: Karl-Ludwig G. Poggemann on Flickr , Tzuhsun Hsu on Flickr
Windows 11 problems: how to fix the most common issues
From installation issues to snail-like Internet speeds, your Windows 11 problems will be a thing of the past thanks to our simple solutions

Windows 11 installation problems
How to fix general windows 11 problems.
It may be the latest and greatest desktop OS on the blocks, but Windows 11 problems are still being reported as this new OS goes through the usual teething issues we’d expect to see in the initial few months post-release. The good news is, almost all of the problems cropping up are easily solvable and we’ll show you exactly how to do that in this guide.
Although Windows 11 was released back in October, that’s still early days in the life of any OS and so we’re seeing a range of problems being encountered by users as they attempt to upgrade from Windows 10 . While some users are experiencing ongoing issues since they upgraded, this tends to be rare, with most people encountering Windows 11 problems that are fairly quick to sort out.
If you’re not already on this OS, you can check out our easy to follow instructions on how to download and install Windows 11 . We’ve been monitoring this system since it arrived, so we’re well versed in both the problems and the solutions. If, after downloading and installing Windows 11 you experience any issues, you’ll find our troubleshooting tips and tricks below to be super helpful in getting you up and running.
One of the most common issues people are experiencing is not being able to upgrade to Windows 11 because of the strict new set of system requirements. This OS requires a modern processor that is likely going to need to have been purchased post-2018. If your laptop is older than that, we recommend you invest in one of the best Windows laptops or, for those of you who prefer to use a PC, our guide to the best computers will help you find a model that will support Windows 11.
Other fairly routine Windows 11 problems include the OS being incredibly slow or freezing, memory issues, the startup menu being unresponsive and PCs with modern AMD processors suffering from a noticeable dip in performance, especially when gaming. The good news is that there are fixes for all of these things and explain those in detail below.
If you’re suffering from a Windows 11 problem that we haven’t covered, follow us on Twitter and let us know and we’ll do what we can to find a solution. We’ll also continue to update this article with all the latest problems and fixes when we hear about them.
How to fix Windows 11 installation problems
If you’re encountering problems installing Windows 11 via Windows 10 ‘s update tool, don’t panic. Windows 10 has a built-in troubleshooter that can help identify any problems. This can also reset the Windows Update app, which can help kickstart the installation.
To do this, click the Start menu, then click the cog icon on the left, which will open up the Settings window. Click ‘Update & Security’ then ‘Troubleshoot’. Click on ‘Windows Update’ then ‘Run the troubleshooter’ and follow the instructions, and click ‘Apply this fix’ if the troubleshooter finds a solution.
Check the Windows 11 system requirements
To install Windows 11, or to ensure that it runs correctly, you’ll need to make sure that your PC matches the following Windows 11 minimum system requirements:
- Processor: 1 gigahertz (GHz) or faster with at least two cores on a compatible 64-bit processor or SoC
- Storage: 64GB
- System Firmware: UEFI, Secure Boot capable
- TPM: Trusted Platform Module 2.0
- Graphics Card: DirectX 12 or later with WDDM 2.0 driver
- Display: 720p, 8-bit per color channel, at least 9-inch diagonal
- Internet Connection and Microsoft Account: Windows 11 Home requires an active internet connection and a Microsoft Account to complete initial, first-use setup of the operating system, or when switching a device out of Windows 11 Home in S-mode.
For a complete list of additional, non-essential requirements, check out Microsoft ‘s Windows 11 specification page .
These are the minimum specs required for running Windows 11, but for the best Windows 11 experience, we recommend you install it on a device that’s more powerful. The 4GB RAM requirement is especially low – we wouldn’t recommend trying to run Windows 11 on anything with less than 8GB of RAM.
Windows 11 compatibility check
In case your system meets the above-mentioned criteria, you need to run a health check to keep your system ready to install Windows 11.
- To run the health check you need to first download and install Microsoft’s PC Health Check app
- Once installed, run the program
- Click on the blue coloured “Check Now” button on the Windows 11 banner
- If your system is compatible, you’ll get a pop-up stating “This PC will run Windows 11″
Windows 11 won’t run due to TPM
In case Microsoft’s Windows 11 upgrade checker tells you that your PC isn’t supported but it meets all the other requirements then you need to check your BIOS to enable TPM .
Almost every modern CPU comes with TPM support. In case you have an Intel CPU then you need to switch to TPM and for AMD you need to check PSP fTPM in the BIOS. Once done, you can run Microsoft’s health checker app to confirm the status. This should allow Windows 11 to install.
You can check the status of TPM support in your PC buy doing the following:
- Press Windows key + R
- When the box appears, type tpm.msc to open the Trusted Platform Module Management window
- Look for a sub-window titled TPM Manufacturer Information and check under Specification Version to see what TPM version your device has
How to upgrade to Windows 11 without TPM 2.0
If you cannot install Windows 11 because your PC does not have TPM 2.0 , then you’ll get an error message when trying to install it that says your PC doesn’t meet Windows 11 system requirements.
If this happens and you still want to install Windows 11, there is a way to get around the TPM requirement, but this should only be done by people who are confident about the risks it involves.
It’s a complex process, so read our how to upgrade to Windows 11 without TPM 2.0 guide for the full rundown, including a look at the risks involved.
Free up disk space
As with previous operating systems , Windows 11 requires a certain amount of hard drive space to successfully download and install. If your main hard drive (where Windows 10 is installed, usually the C: drive), is almost full, then you’ll encounter problems when trying to install Windows 11.
The Windows 11 requires 64GB of storage.
So, the first thing you should do if Windows 11 install fails is to check your drive space in Windows Explorer. If it is running out of space, try typing in «Disk Clean-up» in the search box on the taskbar and select the system disk (usually the C: drive).
Click ‘OK’ then select the tick boxes of the files you want to delete. These should be safe to remove, but remember you can’t retrieve them once they’re gone. You’ll be told how much space you’ll save. Click ‘OK’ then ‘Delete files’ to remove the files. If you want to create more space, click ‘Clean up system files’.
Once that’s done, try downloading and installing Windows 11 again.
Disable anti-virus software
Antivirus software is certainly helpful to have, but it can sometimes cause problems when trying to install Windows 11.
If you have antivirus software installed, try disabling that before trying to install Windows 11, as that may fix the problem. You should then enable it and use it normally once the installation has completed.
You may even need to uninstall the software temporarily. Just make sure that you reinstall it once the update installs successfully.
Internet is slow after upgrading to Windows 11
We issued a warning back in October that Windows 11 issues could slow down your internet and that’s exactly what some people are reporting post-installation.
It seems streaming movies, using VPNs, and general internet browsing may be slow, and it seems to be affecting people using Intel Killer hardware.
Microsoft is aware of this issue, and will release a Windows 11 cumulative update on October 12 to hopefully fix the problem.
Until then, you could try using an external USB Wi-Fi dongle if you have one.
Unable to search in Windows 11 Start Menu
There’s currently an issue with the new Start Menu search bar that prevents it from being typed into. There are other ways to perform a search on Windows 11, but for anyone bringing this habit with them over from a previous OS it’s a nuisance to change. Microsoft has also acknowledged the problem, stating that opening the Run window will enable you to type into the search bar again. You can do this by hitting Win+R on your keyboard, and when it appears you can close it as you don’t actually need to type or run anything. Simply opening and closing the program seems to resolve the search box issue. It isn’t clear when we can expect a patch to officially correct the bug, but given this is a rather funky workaround it’s likely something more permanent is currently being worked on.
File Explorer still looks like Windows 10
Some people have been complaining that since upgrading to Windows 11, the File Explorer still looks the same as Windows 10.
This is actually a skin that replicated the older Windows 10 layout, but it’s unclear why some users are getting this as a default. Thankfully, there is a simple fix:
- On the top of the File Explorer taskbar, select ‘View’
- Select ‘Options’ on the far right, and head into the next ‘View’
- You should now see a list. Look for the option that reads ‘Launch folder windows in a separate process’. Ensure the box next to it is unchecked
- Apply the changes. File Explorer should now initiate a restart
After File Explorer has restarted you should now see the redesigned layout for Windows 11.
The Widgets board looks empty
The Widgets board is a new part of Windows 11 that holds small apps, known as ‘Widgets’ that give you quick access to information, such as news and events in your calendar.
However, some people have found that the Widget board appears empty (it can be brought up be swiping from the left-hand side of the screen or pressing Windows + W on your keyboard).
To fix this, click the icon in the top right-hand corner of the Widgets board, then click ‘Sign out’.
Next, sign in again and the Widgets should appear.
Windows 11 memory issues
There are reports that a Windows 11 memory leak problem causes File Explorer to eat RAM , which, after a while, can cause memory issues that slow down the operating system.
Microsoft hasn’t acknowledged this problem yet, but there is a workaround. Restart File Explorer (in the Task Manager, you’ll find Windows Explorer listed as a process, and if you click on it, there’s a ‘Restart’ button bottom-right), or just reboot your PC.
In the Task Manager you can also see how much memory that File Explorer is consuming.
Windows 11 Start menu is unresponsive
Some readers have contacted us about their Start menus no longer working after upgrading to Windows 11.
If this happens when using Windows 11, try restarting your PC. With the Start menu out of action, you can do this by switching to the Windows 11 desktop by pressing the Windows Key + D on your keyboard, then pressing Alt + F4. A window will appear and you can select ‘Restart’ and click ‘OK’.
If the Start menu remains unresponsive after a restart, then you may need to use the DISM (Deployment Image Servicing and Management) and SFC (System File Checker) tools.
To do so, press Windows Key + R to open the Run box, and type in:
Then, press Ctril + Shift + Enter to open the Command Prompt in with Administrator privileges (which you’ll need to run these tools).
In the Command Prompt, enter the following:
This should clean up any corrupt files from the Windows 11 upgrade, and may take some time.
Once it has finished, enter the following text into the Command Prompt:
Press Enter on your keyboard and the tool will scan to check all the files are correct. Once done, your Start menu should work again.
If that doesn’t work, some people have found by creating a new user account on the PC, and using that, has fixed the issue. It’s not ideal, however, so hopefully Microsoft will release a fix for this Windows 11 problem soon.
Poor Windows 11 performance with AMD processors
Windows 11 is killing game performance for some PCs with AMD processors , with people complaining that they have seen as much as a 15% drop in gaming performance after installing the new operating system.
This is obviously a big concern, especially as Microsoft was touting how good Windows 11 will be for gaming. The good news is that there’s a fix for AMD Windows 11 performance bugs available now – here’s how to download it .
There are two fixes listed on AMD’s website . The first addresses the issue where functional L3 cache latency increases in some applications. For this problem, Microsoft has released a new Windows 11 software update, KB5006746 , which you should download and install. You can do this via the Windows Update app in Windows 11.
AMD has also released a Chipset Driver package that fixes an issue where 8-core AMD processors and higher were seeing reduced performance due to incorrectly scheduled threads.
If you have a modern AMD CPU and have found your PC’s performance to have been impacted by installing Windows 11, then make sure you apply both these updates, which will hopefully fix the issue.
TechRadar Newsletter
Sign up to receive daily breaking news, reviews, opinion, analysis, deals and more from the world of tech.

Matt is TechRadar’s Managing Editor for Core Tech, looking after computing and mobile technology. Having written for a number of publications such as PC Plus, PC Format, T3 and Linux Format, there’s no aspect of technology that Matt isn’t passionate about, especially computing and PC gaming. Ever since he got an Amiga A500+ for Christmas in 1991, he’s loved using (and playing on) computers, and will talk endlessly about how The Secret of Monkey Island is the best game ever made.
Microsoft Paint is getting its biggest upgrade in over a decade thanks to Windows Copilot
How to install Windows 11 September 2023 Update and get Copilot
Apple TV Plus is getting two wildly different movies I simply cannot wait for
Most Popular
By Steve Paris September 22, 2023
By Daniel Pateman September 22, 2023
By Mo Harber-Lamond September 22, 2023
By Alex Walker-Todd September 21, 2023
By Adam Marshall September 21, 2023
By Jake Green September 20, 2023
By Adam Marshall September 19, 2023
By Mark Wilson September 19, 2023
By Allisa James September 18, 2023
By Steve Paris September 18, 2023
- 2 Nvidia 5000 series GPUs might use multi-chiplet design—and it could help get Nvidia back on the performance track
- 3 We tried out Final Fantasy 7 Rebirth’s chocobos, they’re everything we wanted, but director Naoki Hamaguchi confirms that there won’t be chocobo breeding
- 4 The world’s most famous magician invests in data storage startup that wants to send 100GB disks to the Moon for future humanoids
- 5 Final Fantasy 7 Rebirth’s creative director and producer are in disagreement over the use of the term «JRPG»
- 2 9 great movies that inspired John Wick spin-off The Continental, according to its directors
- 3 Loved Netflix’s Narcos? Check out the trailer for a new crime thriller from the team behind it
- 4 Apple Trade In: how does it work and is it a good deal for your old iPhone?
- 5 I bought an iPhone 14 last year, and now I feel like an idiot
Use the ASO menu to troubleshoot problems in Windows 11, 10, and 8
Updated on March 29, 2023
What to Know
- Hold Shift while restarting your PC to start ASO, or if you can log in to Windows, find the option in Settings.
- Advanced Startup Options is just a menu of options; select a tool from the menu to use it.
- Options include reinstalling Windows, uninstalling Windows updates, running commands, and more.
This article shows how to use the Advanced Startup Options in Windows 11, 10, and 8.
How to Access the Advanced Startup Options Menu
There are a number of ways to get to the Advanced Startup Options menu. The easiest method depends on the situation you’re in that’s prompting the need to use one of these tools.
If you can access Windows normally, the quickest way to start Advanced Startup Options is through Settings:
- Windows 11: Settings > System > Recovery
- Windows 10: Settings > Update & Security > Recovery
- Windows 8: PC Settings > Update and Recovery > Recovery.
Take a look at the tutorial we linked to above if that’s not possible or if you need more help.
How to Use the Advanced Startup Options Menu
ASO is just a menu of tools—it doesn’t, itself, do anything. Choosing one of the available tools or other menus from Advanced Startup Options will open that tool or menu.
In other words, using Advanced Startup Options means using one of the available repair or recovery tools.
Some items available through this menu are nested inside other menus. If you need to back up, use the left arrow with the circle around it, which you’ll find to the left of the menu heading at the top of the screen.
What Is the Advanced Startup Options Menu Used For?
The tools available from the Advanced Startup Options menu can be used to run almost all of the repair, refresh/reset, and diagnostic tools available in Windows 11, 10, and 8 operating systems, even if Windows won’t start.
It also contains the Startup Settings menu which, among other things, is used to start Windows in Safe Mode.
The Advanced Startup Options Menu
Below is every icon or button you’ll see on this menu in Windows 11, Windows 10, and Windows 8. We’ll call out any differences between these versions of Windows.
If the menu item leads to another area of the menu, we’ll explain that. If it starts some recovery or repair feature, we’ll give a short description and link to more detailed information on that feature if we have it.
If you’ve configured a dual-boot system, you may also see Use another operating system (not shown here) on the main Advanced Startup Options menu.
Continue
Continue is available on the main Choose an option screen and says Exit and continue to Windows 11 (or Windows 10/8.1/8).
When you choose Continue, Advanced Startup Options will close, your computer will restart, and Windows will start in normal mode.
Obviously, if Windows isn’t starting properly, the very fact that brought you to Advanced Startup Options, then heading right back into Windows probably won’t be helpful.
However, if you found yourself on the ASO menu some other way, or are done with some other repair or diagnostic process, Continue is the quickest way out of Advanced Startup Options and back into Windows.
Use a Device
Use a device is available on the main Choose an option screen and says Use a USB drive, network connection, or Windows recovery DVD.
When you choose Use a device, a menu by that name appears, allowing you to boot from the various sources on your computer that are shown.
On most computers, you’ll see options for USB storage devices, DVD or BD drives, network boot sources (even if you don’t really have one of those set up), etc.
Only UEFI systems will have a Use a device option on Advanced Startup Options.
Troubleshoot
Troubleshoot is available on the main Choose an option screen and says Reset your PC or see advanced options.
In Windows 8, it says Refresh or reset your PC, or use advanced tools.
The Troubleshoot option opens up yet another menu, containing the Reset this PC and Advanced options items, both of which we discuss below.
The Troubleshoot menu is where all the repair and recovery features found in Advanced Startup Options are located, and is what you’ll want to choose if you want to do anything other than exit the ASO menu.
On some UEFI systems, you may also have a UEFI Firmware Settings option (not shown here) on the Troubleshoot menu.
Turn Off Your PC
Turn off your PC is available on the main Choose an option screen.
This option is pretty self-explanatory: it completely powers off your PC or device.
Reset This PC
Reset this PC is available from the Troubleshoot screen and says Lets you choose to keep or remove your files, and then reinstalls Windows.
Select Reset this PC to start the Reset This PC process, where you’re given two additional options, Keep my files or Remove everything.
The first option, great for when your computer is running slow or is buggy, removes all installed software and apps and resets all Windows settings, but nothing personal will be removed, like documents, music, etc.
The second option, much like a «factory reset» and great for starting over completely or before getting rid of your computer, removes everything, including installed apps and programs, settings, personal files, etc.
Reboot vs. Reset: What’s the Difference?
There is a complete walkthrough of the reset process available, including more on which choice is best.
In Windows 8, the first option above is called Refresh your PC and the second Reset your PC, both of which are available directly from the Troubleshoot screen.
Advanced Options
Advanced options is available from the Troubleshoot screen.
The Advanced options option opens up yet another menu which contains the following items: System Restore, System Image Recovery, Startup Repair, Command Prompt, and Startup Settings, all of which we explain below in their own sections.
In Windows 10, if you’re part of the Insider testing program, you’ll also see a Go back to the previous build option.
The Advanced options menu is most similar to the System Recovery Options menu found in earlier versions of Windows.
System Restore
System Restore is available from the Advanced options screen and says Use a restore point recorded on your PC to restore Windows.
The System Restore option starts System Restore, the same time-machine-like «undo» tool you may have used or seen from within Windows.
A huge advantage of having the ability to use System Restore from the Advanced Startup Options menu is that you’re doing so from outside of Windows 11/10/8.
For example, if you suspect some driver or registry issue is preventing Windows from starting properly, but find yourself in the unfortunate situation of not being able to start Windows so that you can then start System Restore, this option becomes very valuable.
System Image Recovery
System Image Recovery is available from the Advanced options screen and says Recover Windows using a specific system image file.
The System Image Recovery option starts the Re-image your computer feature of System Image Recovery, which is used to restore a previously-saved complete image of your computer.
This is a great option if you’ve unsuccessfully tried other tools available on the Advanced Startup Options menu. Of course, to use this, you or your computer maker must have proactively created a system image to re-image from.
Startup Repair
Startup Repair is available from the Advanced options screen and says Fix problems that keep Windows from loading.
The Startup Repair option starts, you guessed it, an automated startup repair procedure. If Windows 11, 10, or 8 isn’t starting properly, like due to a BSOD or a serious «missing file» error, Startup Repair is an excellent first troubleshooting step.
Early versions of Windows 8 referred to Startup Repair as Automatic Repair.
Command Prompt
Command Prompt is available from the Advanced options screen and says Use the Command Prompt for advanced troubleshooting.
The Command Prompt option starts Command Prompt, the command-line tool you may be familiar with from within Windows.
Most commands that are available from the Command Prompt in Windows are also available in the Command Prompt included here as part of Advanced Startup Options.
When using the Command Prompt from Advanced Startup Options, be sure to verify the correct drive you’re executing commands on. In most Windows installations, the drive Windows is installed on is designated as C while inside Windows, but as D while in the ASO menu.
This is because the C drive letter is given to a 350 MB system reserved partition that’s normally hidden when you’re in Windows, leaving D to be assigned to the drive Windows is installed on. If you’re not sure, use the dir command to inspect the folders.
Startup Settings
Startup Settings is available from the Advanced options screen and says Change Windows startup behavior.
Choosing the Startup Settings option will restart your computer and bring up Startup Settings, a menu full of various special ways to boot to Windows, including Safe Mode.
The Startup Settings menu is most similar to the Advanced Boot Options menu in previous versions of Windows.
Startup Settings isn’t available from Advanced Startup Options when accessed in certain ways. If you don’t see Startup Settings but need access to the startup modes on that menu, see How Do I Start Windows in Safe Mode? for help.
Advanced Startup Options Menu Availability
The Advanced Startup Options menu is available in Windows 11, Windows 10, and Windows 8.
Some of the diagnostic and repair options available from Advanced Startup Options are also available in Windows 7 and Windows Vista from System Recovery Options.
In Windows XP, few of these tools are available, but what are can be reached from Recovery Console or via a Repair Install.
FAQ
-
How do I fix the endless reboot loop in Windows 10?
If Windows is stuck in an automatic repair loop and keeps restarting, make sure you’re booting to the correct drive, boot into Safe Mode, run the Fixboot and Chkdsk commands, or run Startup Repair from USB/DVD. If you still have problems, perform a System Restore, reset your PC, reinstall Windows, or replace your hard drive.
-
How do I boot into Advanced Startup on Windows 10?
Press and hold F8 on your keyboard as your computer starts up (before the Windows logo appears) to boot directly into the Advanced Startup Options menu.
Thanks for letting us know!
Get the Latest Tech News Delivered Every Day
Subscribe
You get 0xc000000e error code on Windows 10 when there is a problem with boot loader or wrong Boot configuration data.
If you have multiple disks, only one of them is the boot disk.
So, the boot configuration data is stored on one disk of all the related settings to boot different Windows OS.
Even though you use bootrec commands to fix the boot loading options, it is important you change the order of the boot disk. You can have Metro bootloader or Windows 7 type, but the cause of the problem is the same.
The typical error message for 0xc000000e will be like this –
Recovery
You’re PC/Device needs to be repaired…….
File: \Windows\system32\winload.efi
Error Code: 0xc000000e
This can appear when your Windows 10 OS was deleted on one HDD, which is the boot drive. The boot order options could also have changed.

For example, having two disks like Samsung 850 Evo 1TB and Samsung SM951 m.2 NVME 128GB, can complicate the issues.
You may get confused that the problem is with the hardware or some software. But many-a-times the real problem is with the boot loader configuration stored on your disk.
- How to Fix Error Code 0xc000000e in Windows 10
- Change the Boot Order in BIOS
- Use Startup Repair in Windows 10 Installation Disk
- Rebuild BCD manually
- Make the Boot Disk Online and Scan Disks
- Use EasyBCD kind of repair software
- My Final Thoughts
There are different causes which can cause this Windows 10 error code issue.
- A required device isn’t connected or cannot be accessed
- Required device is inaccessible
- The selected entry could not be loaded
- The selected entry could not be loaded because the application is missing or corrupt
- The boot selection failed because a required device is inaccessible.
Source : thewindowsclub.com
As you can see above, the real cause for this error code 0xc000000e is either winload.exe file is not accessible or is corrupt or the boot loader location of Windows 10 is not accessible.

How to Fix Error Code 0xc000000e in Windows 10
The following solutions may be tried to fix this problem.
- Change the boot order of the disk, if you have multiple disks like HDD and SSD.
- Use Windows 10 Startup Repair feature using Installation Disk
- Apply BCD command to rebuild it manually
- Make your Disk Online
- Try third-party software
Most-of-the-times, the above fixes will show you the way to solve error code 0xc000000e in Windows 10.
-
Change the Boot Order in BIOS
The first preliminary fix is to check, whether the boot disk is the first disk loading during booting.
This can be done, by changing the options in BIOS.
Most of the times, pressing F2 or F2 or F10 or ESC or DEL keys during booting will take you to BIOS settings.
This depends on your PC manufacturer model and the BIOS software you are using.

For example on Phoenix AwardBIOS CMOS setup utility, under “Advanced BIOS features” you have the following options.
- Hard Disk Boot Priority
- First Boot Device
You can have multiple devices like USB, DVD, HDD etc connected to your PC.
- First make sure your HDD is the First Boot Device.
- If you have multiple hard disks or solid state drives on the same system, then you have to use Hard Disk Boot Priority.
- Go to the first option and press Enter. Then select the disk which is your boot disk and press F10.
It will save your changes and Restart. If nothing is corrupt, you should be able to fix error code 0xc000000e and enter Windows 10.
-
Use Startup Repair in Windows 10 Installation Disk
Create a bootable Windows 10 installation disc. This could be either a DVD or USB. You can use an utility like Rufus to boot from USB. Otherwise, you can use software like MagicISO to boot from DVD.
Insert the appropriate hardware and change the BOOT options to load from it, as mentioned above.
Source : https://www.laptopmag.com/articles/windows-10-advanced-startup-options-menu
The installation disc will boot up and select language and keyboard layout. Click Next. You will be taken to the next screen. On this screen, at the bottom you see, “Repair your Computer”.

Then click “Troubleshoot” > “Advanced Options” > Startup Repair.

If it’s a small issue, this will fix problems that keep Windows from loading. This will also automatically solve the 0xc000000e error, as startup problem is the main cause for this issue.
-
Rebuild BCD manually
This solution is appropriate if the problem is due to corrupt boot loader. If the boot configuration data has been erred by some hardware change, then the BCD commands will fix this. This is the most common solution for error code 0xc000000e and in many-a-times solve the problem.
- Boot using the Windows 10 Installation dsic.
- Then go to “Advanced options”.
- But this time select “Command Prompt”.
- Enter the following commands one by one.
bootrec /fixboot
bootrec /scanos
bootrec /fixmbr
bootrec /rebuildb--
Upon completion of each command, you will get a successful message. If you get any other error message then you can try these troubleshooting steps.
-
Access is denied while apply the fixboot command.

Then you have to type the following commands in the Command Prompt.
Step 1: Type diskpart and press Enter key.
Step 2. Type list disk and press Enter. Now check disk number to identify boot disk, this is usually Disk 0. if not, use the correct boot disk number.
Step 3. Type select disk 0 (or your boot disk number) and press Enter.
Step 4. Type list volume and press Enter. Now look for the volume number of EFI partition.
Step 5. Type select volume 1 and press Enter. (Change volume to your number)
Step 6. Type assign letter=V: and press Enter. V: can be replaced by any drive letter that is not in use by any partition.
Step 7. Type exit and press Enter.
Step 8. Now type V: (or the drive letter you just assigned) and hit Enter.
Step 9. Type md \efi\microsoft\boot\ and hit Enter.
Step 10. Type — /d V:\efi\microsoft\boot\ and hit Enter.
Step 11. Now type bootrec /fixboot command, the problem should be solved now.
Step 12. b–boot c:\windows /l en-us /s V: /f all
The below YouTube video will show how to fix the Access is denied error while using the Fix MBR command.
If you have multiple OS on the same PC, you can add all of them to the new boot configuration. A prompt with different options is displayed during the /scanos command.
If this still fails to boot your computer, then the correct order of the boot disc is the problem.
So using the BIOS settings, you have to do trial and error of the correct disc on which the boot loader is situated.
This happens when you have multiple disks.
-
Make the Boot Disk Online and Scan Disks
Sometimes, the boot drive can go offline and is not added to the boot loader settings. Then you have to apply the following commands.
In the Command Prompt of your Repair Disc or Installation disc, as mentioned before, enter the following commands.
- diskpart
- list disk
- list volume
- select disk # (or) select volume #
- online disk # (or) online volume #
Press Enter and restart the computer.
-
Use EasyBCD kind of repair software
There are several third-party software that will recover your corrupted boot loader. They will also scan the disks and do other functions. They are kind of repair software. You just have to boot them using an USB or DVD and make the disc bootable.

Once loaded, find the right options to regain your old boot order. This can check your hard disk for bad sectors and also make the correct drive bootable. The following are some of the software.
- Easy Recovery Essentials
- AOMEI Partition Assistant
- EasyBCD
Some of the case-studies of the above error code can be like this.
I just upgraded to Windows 10 on my laptop from windows 7 on a solid drive, All seemed to work fine at first, then I had this boot failure problem.
“Recovery
Your PC need to be repaired
File: \Windows\system32\winload.exe
Error Code: 0xc000000e
You’ll need to use the recovery tools on your installation media, etc……
Press Enter to try again
Press F8 for Start-Up Settings”
https://answers.microsoft.com/en-us/windows/forum/all/windows-10-needs-to-be-repaired-error-code/b510c535-0c4f-4c72-adfe-dbbaf54a086f
I updated my Windows 10 OS few days back due to the forcible prompts to update.
My laptop went out of power completely yesterday and after that I get the error Error Code 0xc000000e during startup.
Tried many options like below :
– bootrec /fixmbr
– bootrec /fixboot –> Got Access is denied at this step
– bootrec /rebuildb– –> Total identified Windows installations: 0The 2 TB SATA drive is not being recognized. I have important data in the hard drive, any ideas how to recover the data by a repair?
https://answers.microsoft.com/en-us/windows/forum/all/windows-10-error-code-0xc000000e-during-startup/a0d73d2a-551d-4904-bf0f-9802aca1c878
My Final Thoughts
As you can see, the main cause of this error code 0xc000000e is to install the winload.exe on each OS and repair the boot configuration data. Then load the correct boot hard drive and you are back to normal.
Sometimes, you have to try 2 to 3 different solutions mentioned above to solve your problem. Otherwise, you can use any of the software told above to repair your startup problems caused by the above error code.
Applying the commands in the Command Prompt properly is also important.
If you can rebuild MBR using the bootrec commands, then this error code will disappear. But sometimes, you may get error like access is denied, which can be fixed as mentioned above.
If you have solved your error, mention your experience in the below comment section.

Palla Sridhar is the writer and admin for WindowsTechIt.com. His primary focus is to write comprehensive how-tos and solutions guides for Windows 11, 10, Skype, Outlook, HDMI, Redmi, Facebook, Google, Tech Apps and LinkedIn.