You can use either File Sharing wizard or a third-party tool
by Sagar Naresh
Sagar is a web developer and technology journalist. Currently associated with WindowsReport and SamMobile. When not writing, he is either at the gym sweating it out or playing… read more
Updated on
- Transferring files from Windows to a Mac is often deemed a pretty troublesome task.
- However, you can easily transfer files using an external hard disk or a USB stick.
- Else, you can set up a remote device and then transfer files without any issues between the two OSs.
![]()
Have you moved on from a Windows PC to a Mac or used both and want to know the best ways to transfer files from Windows to Mac?
If so, then you are in the right place. Because in this guide, we will show you all the methods you can follow to transfer files from Windows 10 or Windows 11 PC to Mac.
Not only using Migration Assistant but there are several other ways, including using third-party apps to transfer your files from Windows to Mac or vice versa. If you are interested, you can learn how to transfer files from a PC to an iPhone as well. Let us get right through it.
How can I transfer files from Windows to Mac?
- How can I transfer files from Windows to Mac?
- 1. Use Windows Migration Assistant
- 2. Via USB
- 3. Use WiFi
- 4. Use cloud storage
- 5. Use an external hard drive
- 6. Use a third-party tool
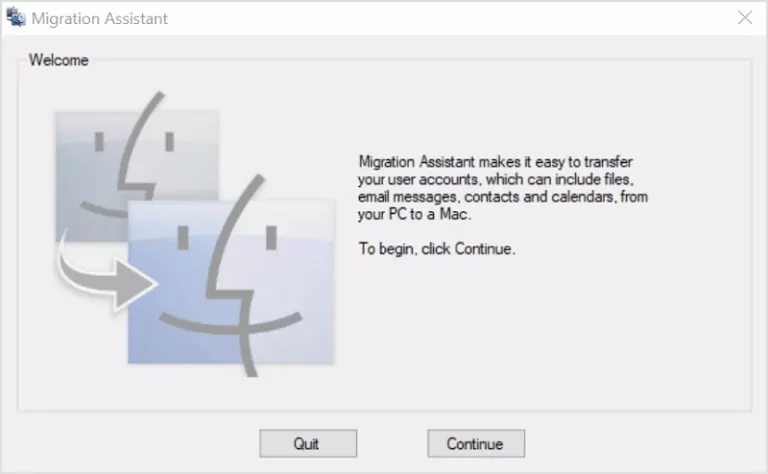
1. Use Windows Migration Assistant
- Download the appropriate version of Migration Assistant on your PC.
- Windows Migration Assistant for macOS Ventura and macOS Monterey
- Migration Assistant for macOS Big Sur
- Windows Migration Assistant for macOS Catalina and macOS Mojave
- Migration Assistant for macOS High Sierra and macOS Sierra
- Windows Migration Assistant for OS X El Capitan or earlier
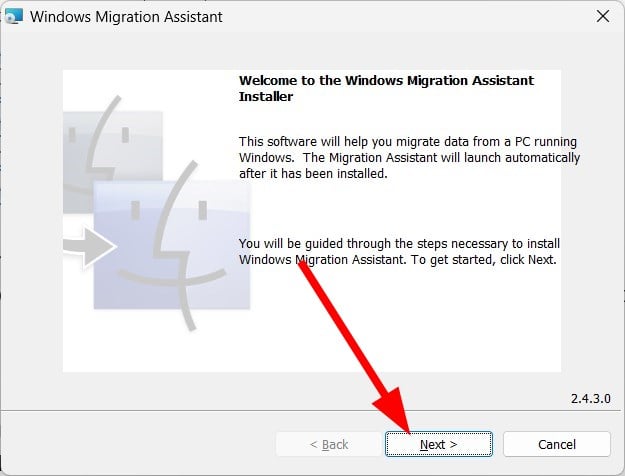
- Launch the Migration Assistant EXE file and hit the Next button.

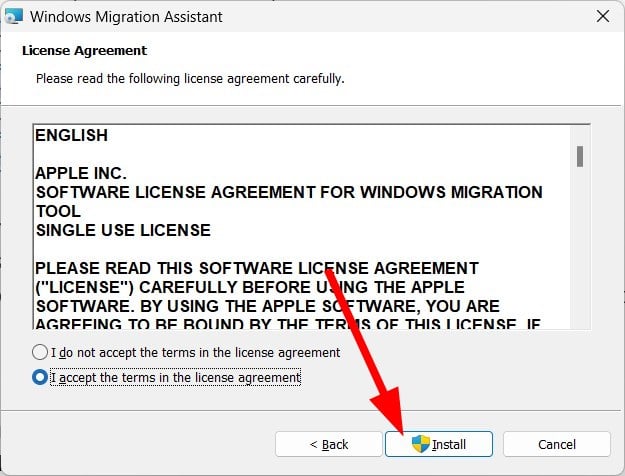
- Accept the terms and agreements and click Install.
- Click Finish.
- You will be asked to quit all other background programs.
- You will be asked whether you would like to send app usage data to Apple. Choose from the below two options:
- Automatically Send
- Don’t Send
- Migration Assistant will begin searching for a Mac.
- Open Migration Assistant on your Mac.
- Follow the on-screen steps.
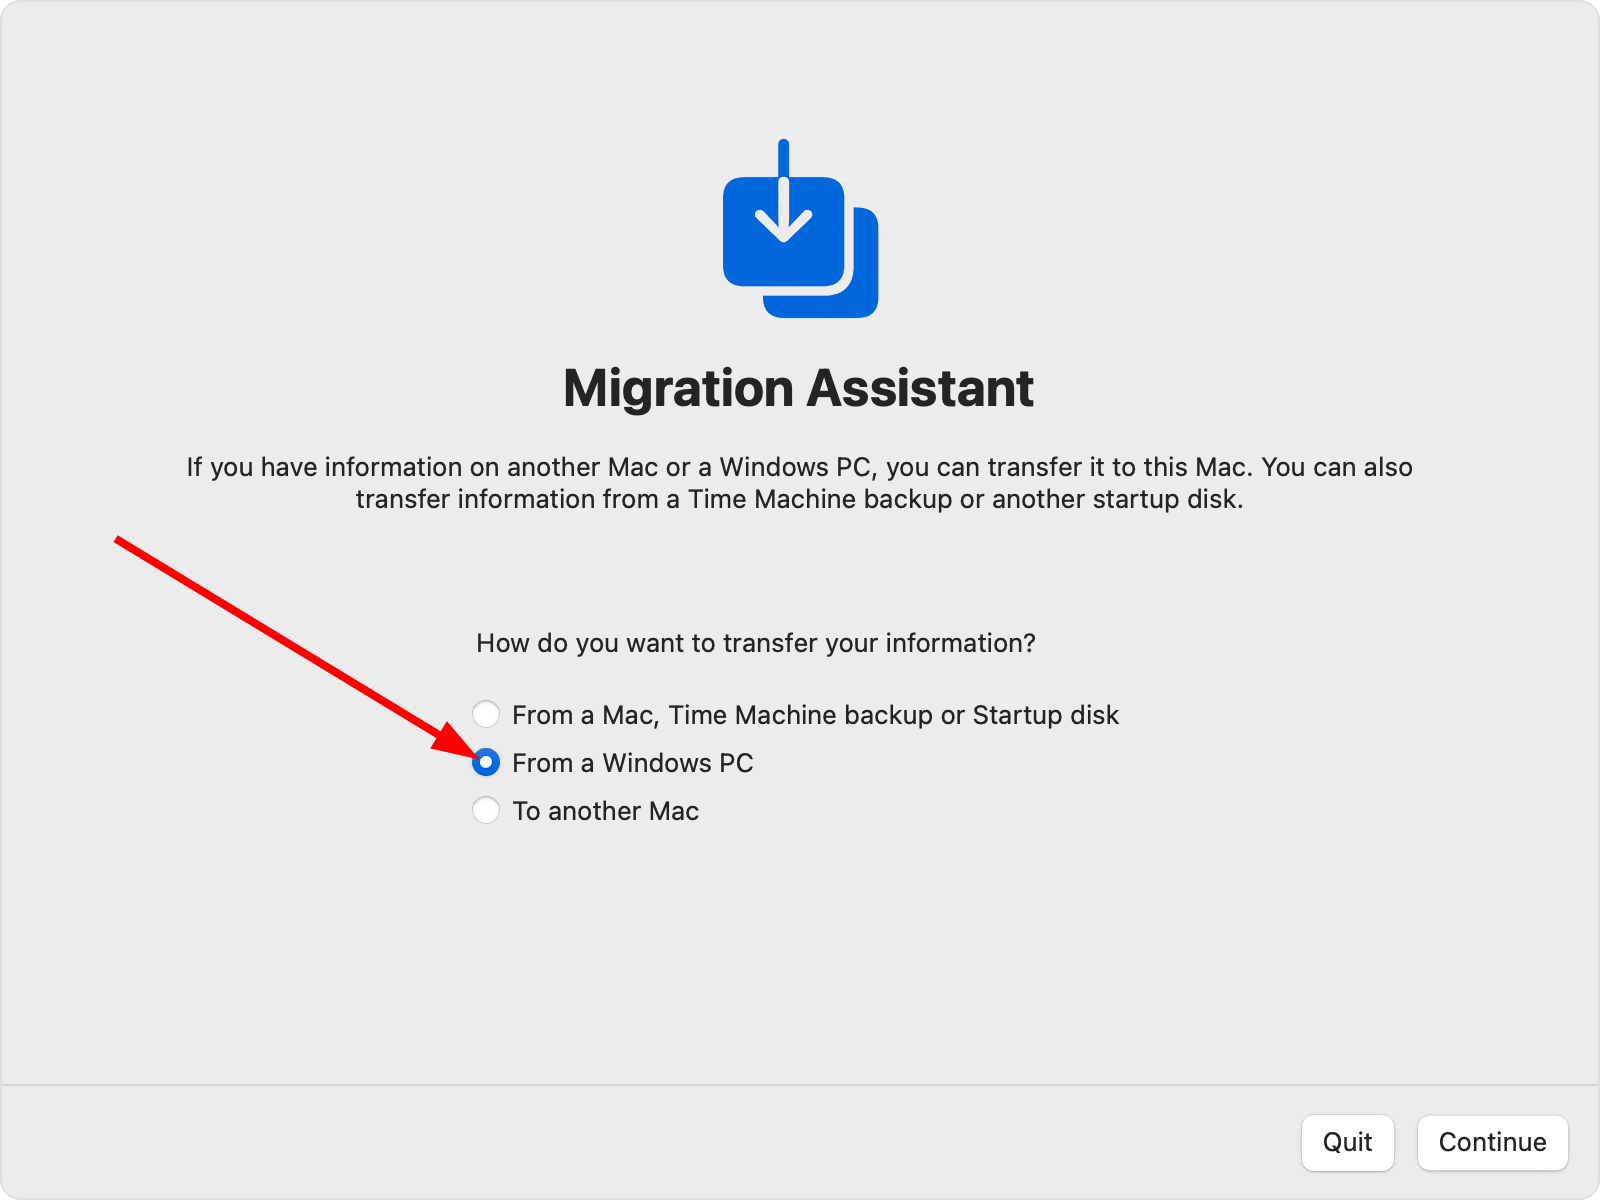
- Select the option From a Windows PC and click Continue.

- Click on your Windows PC icon and click Continue.
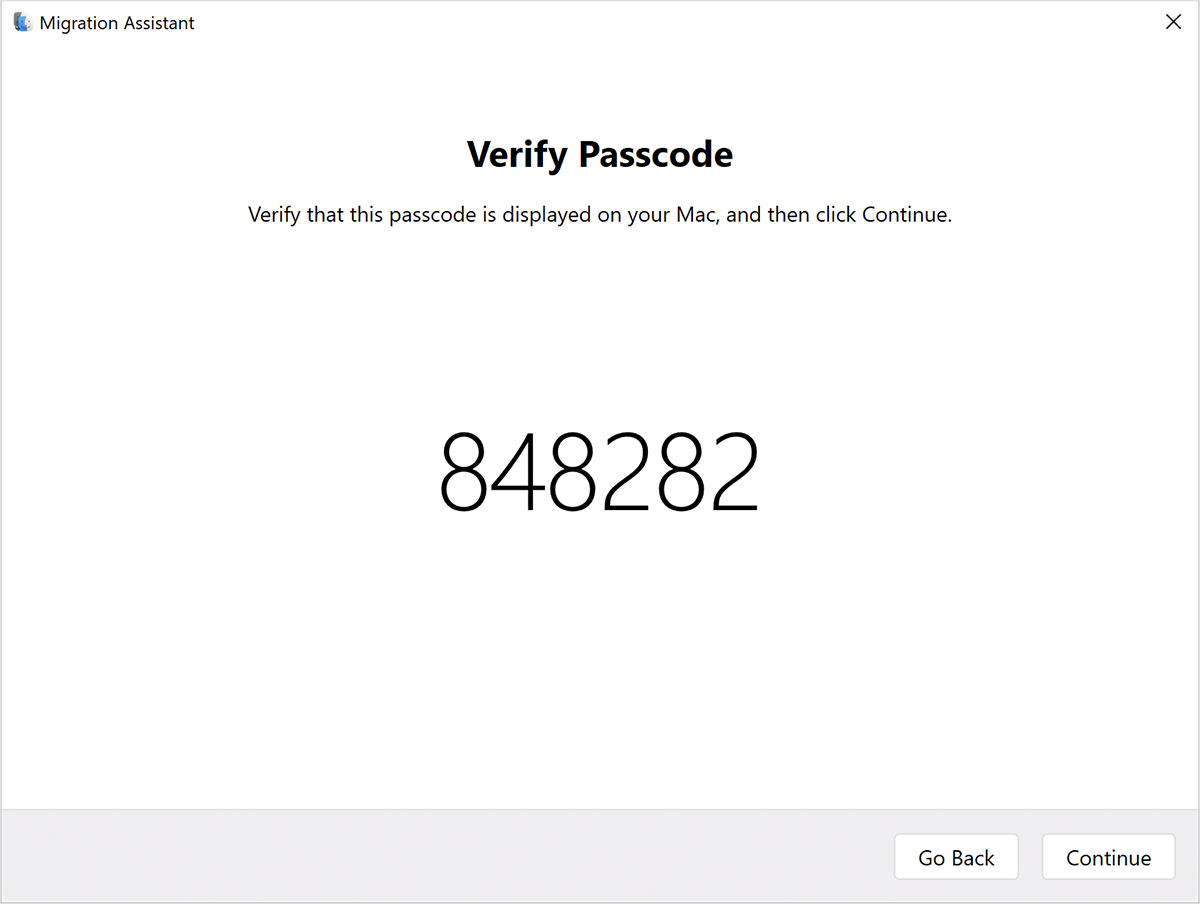
- On your Windows PC and Mac, check if the passcode appearing is the same and click Continue.

- Your Mac will begin scanning files on your Windows PC.
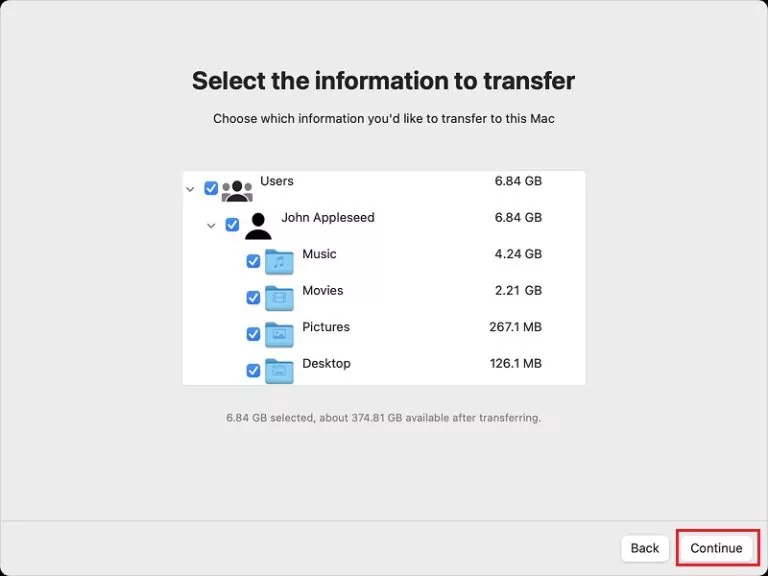
- Select the files that you wish to transfer to the Mac and click Continue.

- The transfer will begin.

The Windows Migration Assistant for Windows is a nice tool that will help you migrate all your Windows files to a Mac pretty quickly. The setup process may take a while, but using Migration Assistant to transfer files from Windows to Mac is smooth.
2. Via USB
A USB is a pretty effective tool if you wish are looking to transfer files from your PC to a Mac. It is portable, comes in various storage variants, and is simply plug-and-play.
How we test, review and rate?
We have worked for the past 6 months on building a new review system on how we produce content. Using it, we have subsequently redone most of our articles to provide actual hands-on expertise on the guides we made.
For more details you can read how we test, review, and rate at WindowsReport.
All you need to do is copy all the files from your Windows PC that you wish to be moved over to a Mac inside the USB. Then plug the USB into your Mac and copy and paste the files that you moved from your Windows onto your USB to your Mac.
One important thing to note is that you should format your USB drive to exFAT file format since it is compatible with both operating systems to accomplish transferring files from PC to Mac via USB.
- How to Type Accents on Windows 11
- Fix: EXCEPTION_ILLEGAL_INSTRUCTION Error on Windows 11
- Delayed Write Failed Error on Windows 11: How to Fix it
- How to Remove Windows Copilot on Windows 11
- How to Pin a Batch File to Taskbar on Windows 11
3. Use WiFi
- Open the Start menu by pressing the Win key.
- Open Control Panel.

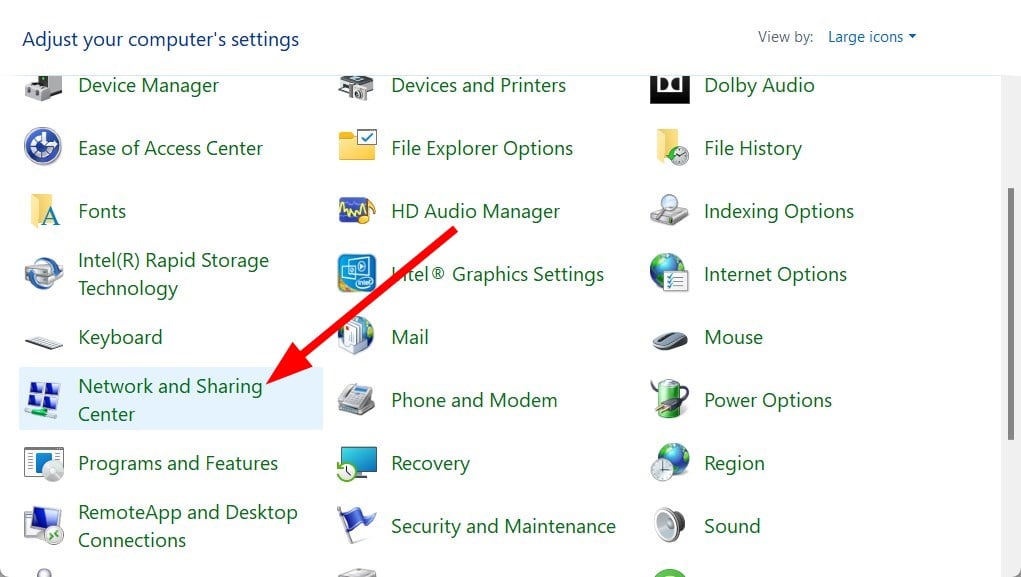
- Click on Network and Sharing Center.

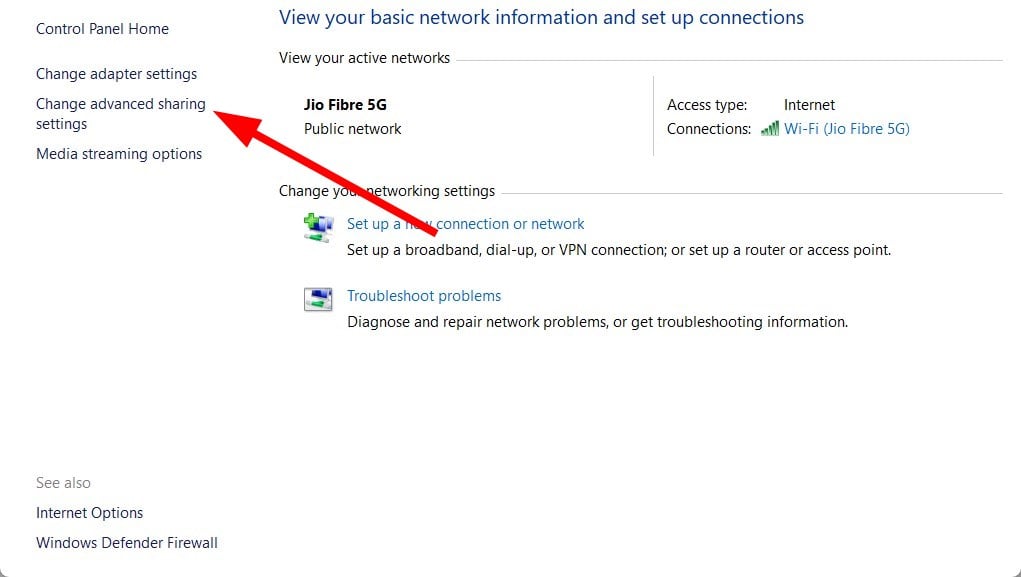
- Select the Change advanced sharing settings option from the left.
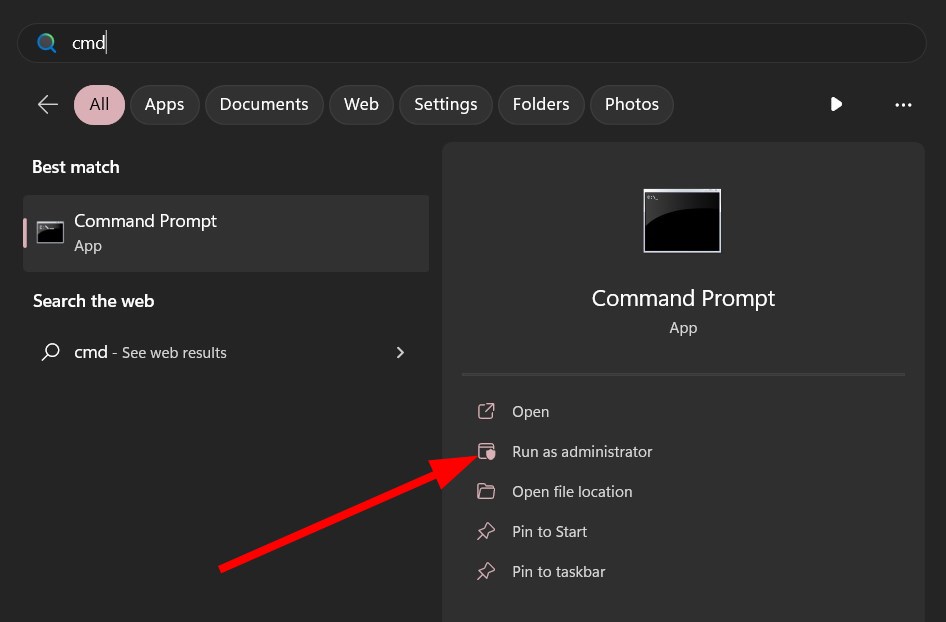
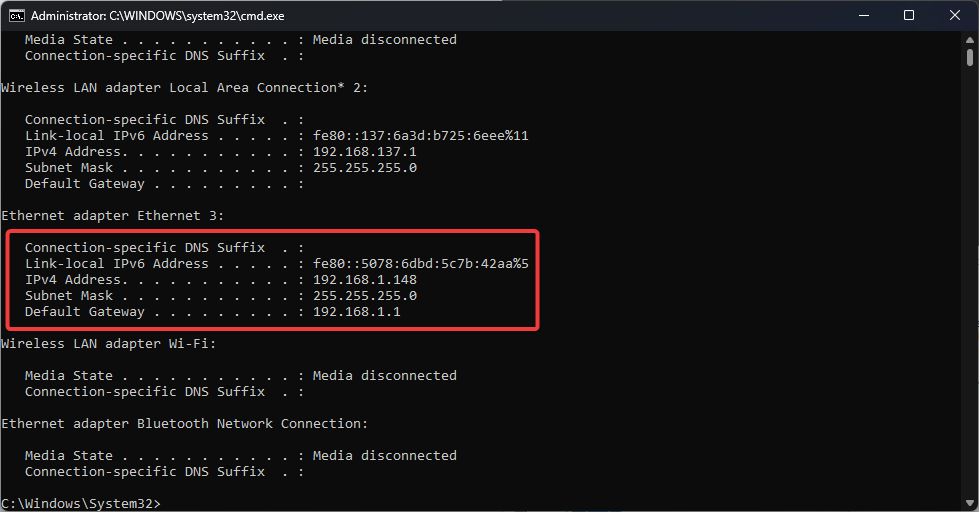
- Run command prompt as an admin.

- Type the below command and press Enter.
ipconfig
- Note down the value next to IPV4 Address.
- On your Mac open Finder.
- Press Command + K keys.
- Type the below command followed by the IP address of your Windows PC (noted in step 7) and press Enter.
- Enter the credentials to log in to your Windows PC.
- You will be asked which folders would you like to copy to your Mac. Select those folders and press OK.
Following the above steps will help you transfer files from a Windows PC to Mac over Wi-Fi. You need to ensure that both your Mac and Windows PCs are connected to the same Wi-Fi network.
4. Use cloud storage
Another convenient way of transferring files from a Windows PC to a Mac is to make use of the different cloud storage services available.
Using cloud storage service is pretty easy. All you need to do is create an account in any cloud storage such as Dropbox, OneDrive, Google Drive, etc. You can check out the best free cloud storages that you can use in 2023 in our dedicated guide.
Upload all the files you wish to transfer to your Mac from your Windows PC. Now, log in to the cloud storage service on your Mac and download the files. Simple and easy.
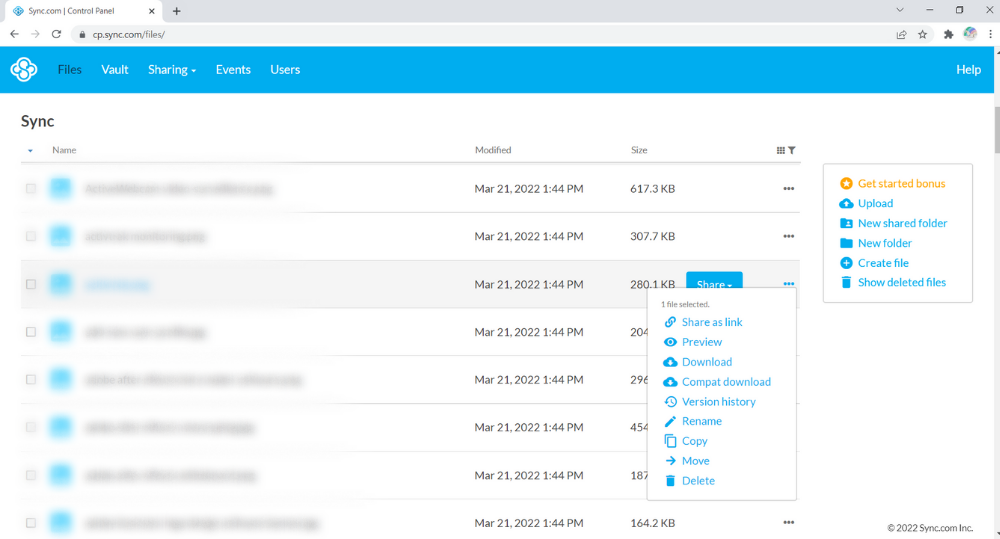
More exactly, it’s possible to perform this action with a file-sharing tailored solution that can sync both devices simply and fast.
All you have to do is select the files you need to transfer, no attachment required, and press on the Share button to complete it.
Sync.com
Add your files to the cloud or transfer them quickly cross-platform with this method.
5. Use an external hard drive
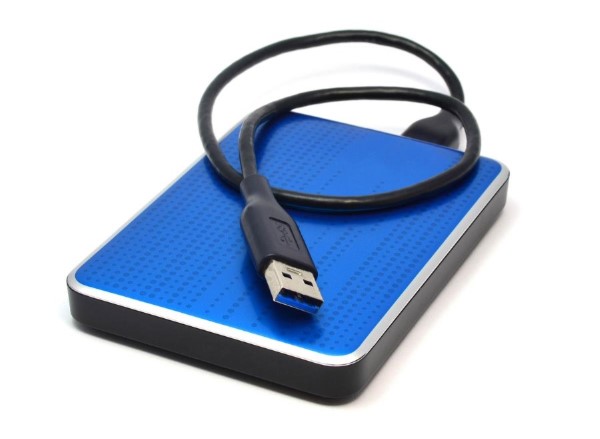
If the USB drive storage isn’t sufficient for you, you can also opt for an external hard drive. There are so many options available for external hard drives to choose from, and you can pick the best one for you, upload your files and transfer them to your Mac.
6. Use a third-party tool
- Download and install Syncthing on both of your PCs.
- Windows: 64-bit (x86-64), 32-bit (x86-32), ARM, ARM64
- Mac: 64-bit (Universal)
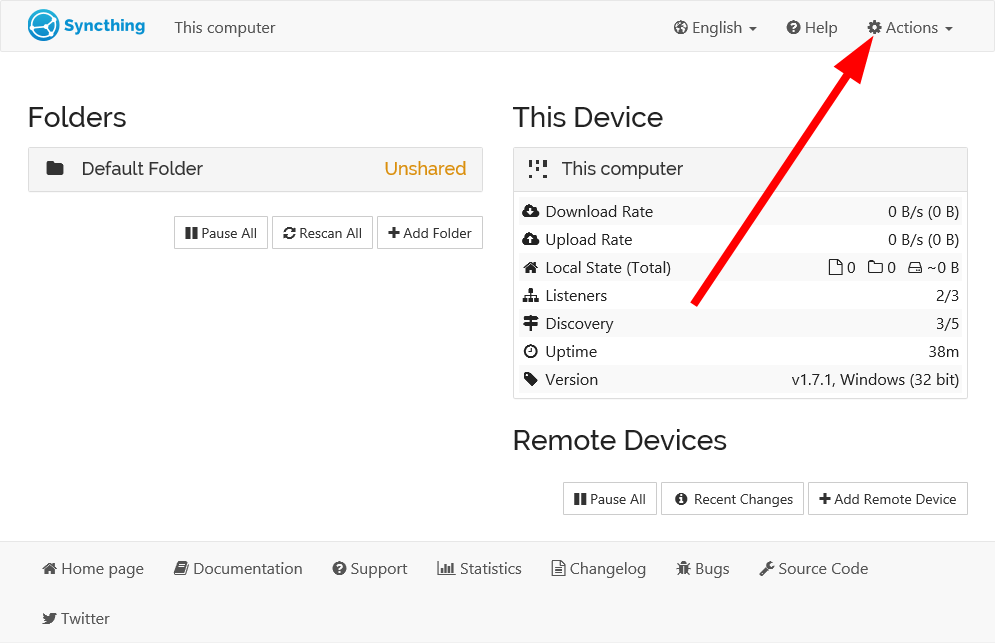
- Launch Syncthing on your Windows PC.
- Syncthing will set up a Default Folder for you in your home directory.

- Your Windows PC will remain available on http://localhost:8384/.
- Click on Actions and then select Show ID to view your unique ID which you will use to connect with your Mac.
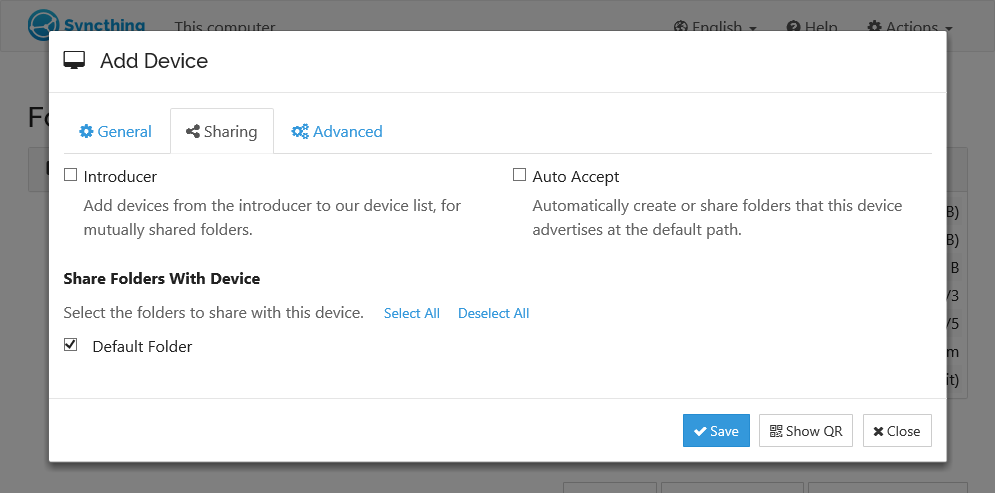
- Click on Add remote device at the bottom right.
- Enter the unique ID on your Mac.

- Select the folders that you want to share.

- Clicking on Save will make the remote device appear on the bottom right of the interface.

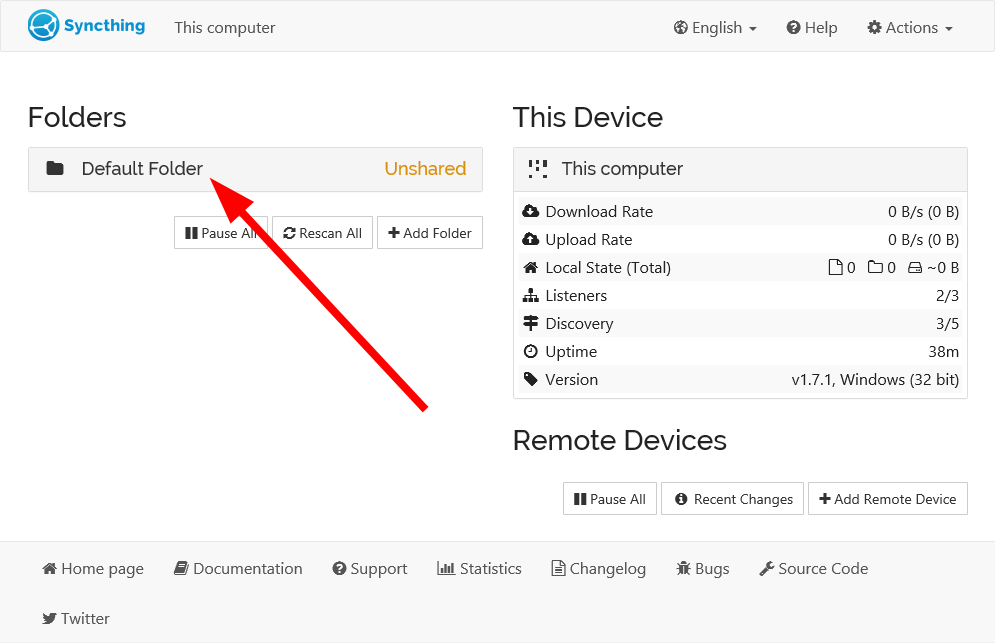


When you add files to this Default Folder, the files will get synced with the connected remote device, allowing you to transfer files from Windows to Mac.
That is it from us in this guide. We have listed some of the best tools that you can use to transfer files from PC to iPhone.
Feel free to let us know in the comments below which one of the above solutions you utilized to transfer files from Windows to Mac.
![]()
If you’re getting a new computer and decide to switch from PC to Mac, or you have both types on your home network or at work, you may be wondering how to transfer files from the PC to the Mac. Follow this guide for several easy methods that will allow you to transfer your data.
-

1
Download Windows Migration Assistant on your Windows PC. This program is run on both the Windows computer and the Mac, and transfers files and settings to the Mac. During this process, it will create a new user on the Mac computer, and all information will be transferred to that new user.
- Out of all the methods listed here, this is the only one that will transfer personal information such as bookmarks, calendar information, contacts, and preferences.
- Macs come with the Assistant already installed.
- The program can be downloaded directly from the Apple website. Once it is downloaded, run the program to install it. After installation, the Migration Assistant will automatically open.
-
2
Disable other programs. To ensure that the transfer happens without interruption, disable any anti-virus and firewall software on the PC.
-
3
Know the administrator password. Depending on what you are transferring and where you may need the administrator information for both the PC and the mac.
-
4
Connect the computers. In order for Windows Migration Assistant to work, both computers must be on the same network. The most stable way to do this is to connect both computers directly with a CAT6 Ethernet cable. Both computers can also be connected to a home network through a router. You can also connect with wireless, but this is not recommended due to the amount of data that may be transferred and the potential to get disconnected.
-
5
Run the Migration Assistant. Once you’ve opened the Assistant in Windows, click Continue to begin searching for the Mac. On the Mac, open the Migration Assistant in the Utilities folder. Open the Finder, then click Go then utilities. Double-click on the Migration Assistant.
- Select “From another Mac, PC, Time Machine backup, or other disk” then click Continue. After entering the administrator password, select “From another Mac or PC” and click Continue.
-
6
Shut down other programs. The Assistant on the Mac will ask your permission to shut down other running programs. It will not function properly if other programs are running.
-
7
Select your PC. In the Mac Assistant, select your PC from the list and wait for the passcode to appear. You should see the same passcode on both your Mac and your PC’s screen. Once you have verified that they are showing the same code, click Continue on the PC assistant to move on.
-
8
Select the information you want to move. After your Mac has scanned your PC for data, a list will appear showing you the data that can be transferred. You can select and deselect the data you prefer to transfer. Once you are satisfied, click Continue on the Mac. The transfer process will start, and a window will show the progress.
-
9
Log in to your new account. Once the transfer is complete, you can log in to your newly created account and adjust your settings. You will be prompted to enter a new password when you log in to the new account for the first time.


-
1
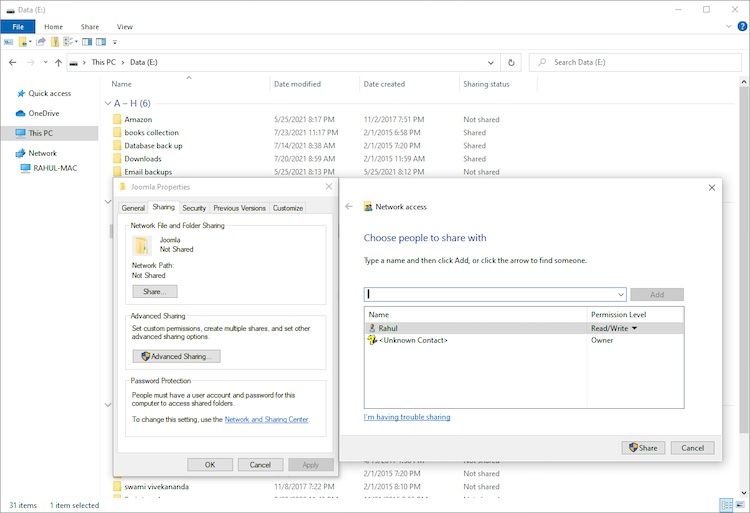
Set the folders that you want to share. Browse for folders that you want to transfer to the Mac. When you have found one, right-click on it and select Properties from the menu. In the Properties window, click the Sharing tab.
-
2
Click Advanced Sharing to open the Advanced Sharing window. Check the “Share this folder” box. You can rename the folder to appear differently when it is opened on the Mac.
-
3
Attach the computers. Take a CAT6 Ethernet cable and plug one end into the Mac and the other into the PC. Make sure that you are plugging the cable into the Ethernet port.
-
4
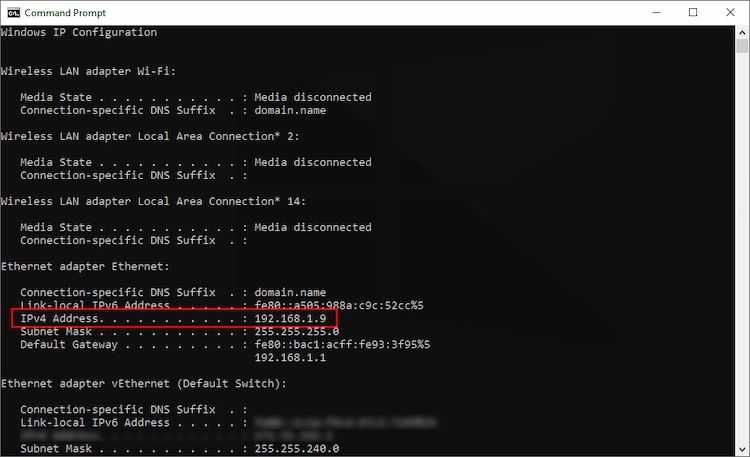
Find your PC’s IP address. Press the Windows key + R to open the Run dialog. Enter “cmd” into the field and press Enter. This will open the command prompt. Type “ipconfig” and press enter to display your PC’s network information. Look for the IP or IPv4 address; it will be 4 sets of digits separated by “.”. For example: 192.168.1.5
-
5
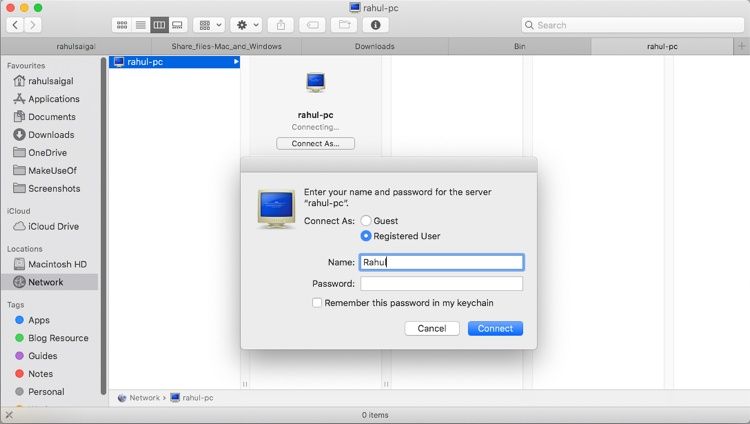
Open the server connection on the Mac. Open Finder, then click Go in the menu bar. Select Connect to Server. A dialog will open, asking for the server address. In the field, type “smb://” followed by the IP address for the PC. Using the above example, the entry would look like “smb://192.168.1.5”. Press connect.
-
6
Enter your login information. You may need the user name and password for your PC in order to connect to it. The server will appear on the desktop and you can browse and copy over any files that you have shared.


-
1
Format the drive. There are two major filesystem formats for external drives that both Mac and PC can use. NTFS is the native filesystem for Windows. FAT32 is a filesystem that works on all operating systems.
- NTFS drives can be read by Macs but not written to. This means that data can be copied off of an NTFS drive onto a Mac, but data cannot be written on to it from a Mac. FAT32 supports reading and writing from both Mac and PC.
-
2
FAT32 has a 4GB file size limit. This means that if you are transferring larger files from the PC, you will need to use NTFS. This will make your drive read-only for Macs until you reformat it, but you can still use it to transfer files from the PC to the Mac.
-
3
Plug the drive into the PC. Once the drive is connected, you can copy files and folders onto it. Wait until the files are finished copying, then disconnect the drive.
-
4
Plug the drive into the Mac. Once the drive is connected, you can copy files and folders off of it. Wait until the files are finished copying, then disconnect the drive.


-
1
Make sure that you have the proper hardware. In order to burn a CD or DVD you need a drive capable of burning. Most current drives have this capability. In addition to hardware, you will need to have the proper software. Windows Vista and later come with DVD burning support natively built-in to the OS. Windows XP can burn CD’s but not DVDs; you will need third-party software to burn data DVDs in Windows XP.
-
2
Insert a blank disc. Autoplay should open, giving you the option to add files to the disc to be burnt. If Autoplay does not start, open Computer and then open the disc drive. You can drag and drop files here, and click the Burn button when you are ready.
- CDs typically hold around 750MBs, while DVDs typically hold around 4.7GB.
-
3
Wait for the burn process to complete. Depending on the amount you are burning and the speed of your drive, this could take up to several minutes.
-
4
Insert the disc in your Mac. The disc will appear on the desktop, allowing you to open it and copy files to your computer.


-
1
Decide if the files are small enough. If you only have a few small files to transfer, using email will be the simplest option. Many email providers limit file sizes to 25MB or less.
-
2
Open your email on your PC. Compose a new email, with yourself as the recipient. Add files by attaching them to the email. When you are finished attaching files, send the email.
- Depending on how your email service operates, and how large the files are, it may take a few minutes for your email to arrive.
-
3
Open your email on your Mac. Open the email that you sent to yourself. Download the attached files to your Mac.


Add New Question
-
Question
While sharing on a network, what is the username and password in the 6th step?

It would be the username and password of your computer’s admin account. If you’re not the admin of your computer, you will not be able to connect remotely.
-
Question
How come a file became larger when transferred from PC to Mac?
This probably happens when the code of the file is converted to a mac file. It’s nothing to worry about, though.
-
Question
Can I use a flash drive to transfer my pictures from my PC to my MAC as my MAC does not have a CD drive.
Mastermind91
Community Answer
Yes, you can use a flash drive to transfer your pictures from your PC to your MAC even though your MAC does not have a CD drive.

Ask a Question
200 characters left
Include your email address to get a message when this question is answered.
Submit
Video
-
There are certain Windows-only files, such as .exe files, that will not work on Macs.
-
Programs cannot be copied over, only documents and data.
Things You’ll Need
- A Windows-based PC
- A Mac
- An Ethernet Cable
About this article
Article SummaryX
1. Install Windows Migration Assistant on the PC.
2. Disable your antivirus and firewall.
3. Connect the two computers via Ethernet.
4. Run Migration Assistant on the Mac.
5. Select the PC on the Mac.
6. Select information to move.
7. Follow the on-screen instructions.
Did this summary help you?
Thanks to all authors for creating a page that has been read 637,401 times.
Is this article up to date?
Once you switch from a PC to a MAC, you will likely want to transfer the files from one to the other. The easiest method to transfer these files is over WiFi. There is no need for additional cables or hardware required to transfer larger files between Mac and Windows as long as both computers are on the same network or have access to the internet.
This article describes the methods for transfer large files between Mac and Windows over WiFi using free Cloud Services, a WiFi network, and a Flash drive or Hard Disk.
Transfer Files between Windows and Mac with Cloud Drives
The best and free solution to transfer files as is to use a Cloud service. If you are not tech-savvy, rather than going through the network setup, these cloud apps are easy to use. Most of the cloud services like Dropbox, Google Drive, SkyDrive, etc., are available for both the MAC and PC. These Cloud Drive transfer is the most reliable method and does not require additional hardware.
When using the cloud services to transfer files, you can install the Windows and MAC applications in your system and copy files from your hard disk (Windows System hard disk) to the cloud drive. Once you drag or copy and paste the files onto the cloud drive, these files will then sync with your second system. In the second system (MAC), you can copy synced files from cloud drive to your system hard disk to make sure a local copy on your system hard disk.
Related: 6 Easy Methods to transfer files between Android and Windows
Dropbox is one of the best drive solutions available with multip platform support both for PCs and Smartphones. Dropbox is offering 2GB free space and most of the time you can delete the files after transferring to free up space on the cloud drive. You can earn up to 18GB by referral and available on almost all platforms, that can download from DropBox website.
Google Drive, direct from Google also supports and sync files between Windows PC and Mac. Google Drive store files up to 10GB size and offers 15GB free space. You need only a valid Gmail account, and you can install the applications on your PC and MAC system to share files. You can download the Google Drive Application from Google Drive website.
SkyDrive is a cloud service from Microsoft that offers the software for MAC and Windows to install and share files. You can share photos, documents, and other important files between MAC and PC using SkyDrive. This drive offers a 7GB free space and downloads from SkyDrive website.
Transfer Files between Windows and Mac through Network
The next solution as long as you have a home network is to transfer files between Windows and Mac through the network. Before you start, make sure both systems are on the same network. You can’t transfer files remotely from one machine to another one. Both machines should be on the same network to transfer files with each other.
The example below demonstrates Windows PC as the host and the first step is to Enable File Sharing on Windows. This process may be slightly different based on the Windows operating system you are using.
- Windows 10: Control Panel > Network and Internet > Network and Sharing Center > Advanced Sharing Settings > File and Printer Sharing > Turn on File and Printer Sharing.
- Windows 7: Control Panel > Network and Sharing Center > Choose Homegroup and Sharing options > Change Advanced Sharing Settings > click “Turn on File and Printer Sharing.”
- Windows Vista: Control Panel > Network and Sharing Center > Expand the File Sharing drop-down > click on “Turn on File and Printer Sharing.”
- Windows XP: Control Panel > double-click Network Setup Wizard and run it.
Once your Windows PC is ready for file sharing, then the next step is to connect Mac to Windows. Before you start, make sure that followed all the setting on Windows PC as we specified above. Also, please make sure both machines are connected to the same network.
Now open the Finder window on MAC, on the left pane under the “Shared” you can see shared machines. Select the name of the windows machine and click to open up the folder. You can drag and drop files into this folder to share between MAC and Windows.
If you are unable to see the Windows machine on MAC finder, then Click on Finder > Go > Connect to Server (Command+K). Type in the prefix smb:// followed by the IP address or hostname of the windows machine. (like smb://192.168.1.101 or smb://windowspc ).
Related: How to Transfer Photos Without Losing Quality-A Complete Guide
USB Flash Drives to Transfer Files between Mac and Windows
Since USB drives are an easy and portable solution, we can start with the USB drives to transfer files. Flash drives are available in the range of 16GB to 256GB for a very low price. Please see the fast transfer USB 3 USB SanDisk flash drive from Amazon that supports to transfer up to 5 times faster (90MB/s) than standard USB 2.0 drives.
USB drives, by default formatted into FAT32, which is compatible with both Mac and Windows. Two drawbacks on this format are that FAT32 supports maximum file size into 4GB and FAT 32 format is more susceptible to disk errors and offers no security. We strongly recommend this method for a temporary purpose file transfer.
Use Portable Hard Disks to Transfer Files
Even though the hard drives are a one-time investment, you can rely upon these drives to transfer large files between PC and Mac. You can have portable Hard disks with a USB port to transfer files between Mac and Windows.
The portable drives are coming in different storage capacity in Terabytes as regular hard disk and also Solid State Drives. SSDs are fast compared to regular hard drives and we already listed a couple of best external SSDs. When you use a portable Hard Drive, please make sure to format hard disk FAT32 to get access for both Mac and Windows OS system.
The hard drives are readily available in the market that offers compatibility with both OS with some additional software. You can get a Seagate Slim USB 3 2TB hard drive from Amazon for $69.99.
NAS Enabled Hard Drives to Transfer Files
Now you can connect your external Hard Disk as a part of your Home Network. The Hard Disk price is coming down, and the storage capacity is growing in terabytes in the market. There are two smart solutions to use the hard disk to transfer filer. The first one is to depend on NAS (Network Attached Storage) devices that are a little bit expensive, but very reliable solution.
There is one WD 4TB My Cloud Personal Network Attached Storage from Amazon with 4TB size and can buy from Amazon for $167.00. Hard drives are coming with a built-in network card and directly connect to a home network and transfer files between all devices on the same network.
The second low-cost solution is to buy a WiFi router with USB Port (Asus Dual-Band Router with USB from Amazon for $69.00). This router USB port can be used to connect the external hard disk to the home network. You can use this guide to Connect External Hard Disk to Home Network over WiFi.
Transfer Files between Mac and Windows by Email
Email file transfer doesn’t need any additional setup or knowledge. However, we recommend this as the least solution to transfer files. You can send the email attachment from one machine and open the email in the second machine and download the attached file.
Emails are capable of attaching large files size in GBs. However, emails are still not offering large file transferring like cloud dives or SMTP transfer. Please refer to our solution to email LARGE file attachment for those who want to transfer large file attachments.
Smartphones as Flash Drives to Transfer Files
Even you can use your iPhone as a portable drive to transfer the files in between MAC and PC. Please see the post here iPhone as a portable hard disk for your Mac and for the PC please see iPhone as a portable hard disk for your Windows.
Transfer Files between Windows and MAC over WiFi
There are plenty of methods to transfer files between Mac and Windows. If you are not tech-savvy and don’t have large files, then the best choice is Cloud Drives or USB Flash Drives.
Use a Portable Hard Drive or USB drive to transfer your files, if you are ready to spend money on external discs. Transfer files via your network, if you have large size files to transfer. The alternative choice is to use NAS based drives and use as local cloud storage for the entire home network.
Disclosure: Mashtips is supported by its audience. As an Amazon Associate I earn from qualifying purchases.
Do you need to transfer files from Mac to Windows and vice-versa? You can take a few different approaches, but you can easily do a Mac to Windows or PC to Mac file transfer using both operating systems’ native tools.
Alternatively, there are a few third-party solutions worth checking out. Below, we’ll explain how to transfer files from Mac to Windows and vice-versa.
How to Transfer Files From Mac to Windows PC
The most obvious way to transfer files from Mac to Windows is to use the built-in functions that both operating systems offer.
However, this has one significant drawback. The process will only work if both the Mac and Windows computers are on the same local network. If they aren’t, you can skip ahead to the section on third-party solutions below.
Set Up File Sharing on a Mac
You’ll need to tweak some settings to share files between a Mac and PC. First, you need to allow your Mac to share its files. Follow these steps to do this:
Click on the Apple icon in the upper-left corner of the screen. Choose System Preferences > Sharing. Then, enable the checkbox next to File Sharing in the left panel.
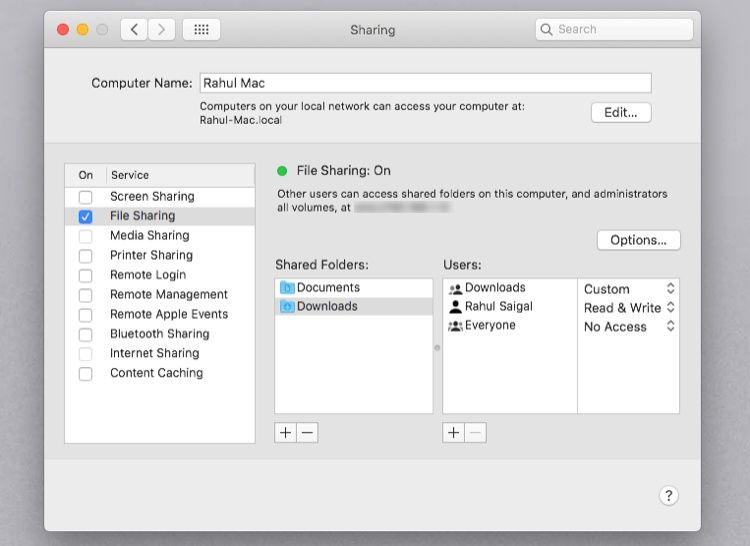
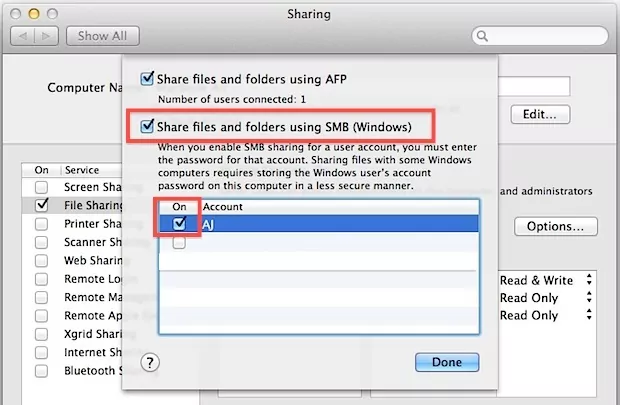
Click on the Options button and, from the window that appears, enable the checkbox next to Share files and folders using SMB. In macOS Big Sur, Apple dropped the ability to share volumes via AFP. Although Catalina retained this ability, you could not share APFS-formatted volumes over AFP.
In the Windows File Sharing section below, enable the checkbox alongside each user whose files you want to share. Enter the users’ passwords and click Done.
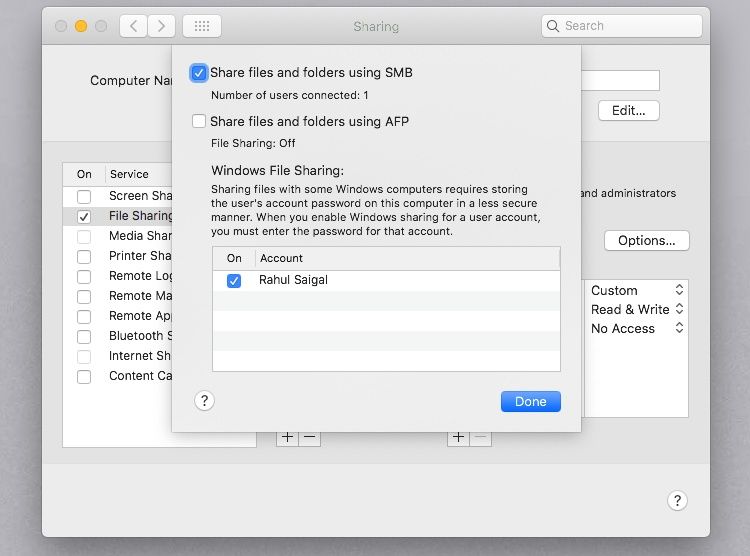
When you’re sharing files with Windows computers, your Mac stores the users’ passwords less securely. Upon completion, we recommend you deselect the user checkboxes.
You’ll now be back on the Sharing window. Next, you need to choose which folders and users you’re going to share with your Windows computer. Click the Plus (+) and Minus (–) buttons below Shared Folders to adjust your preferences.
Once you have shared a folder, review the users’ permissions and groups that should have access to the data in the Shared Folders list.
Remember that all network access is controlled by the computer with the shared resources (in this case, it’s your Mac); therefore, you must understand what Mac permissions have been applied to a folder. Finally, you need to note your Mac’s IP address. You will see this below the File Sharing: On message.
Access Mac Files on Windows
Now it’s time to head to your Windows computer. Follow the instructions below to transfer files from Mac to Windows:
Open File Explorer. In the address bar at the top of the window, type \\ followed by your Mac’s IP address. When you’re done, it should look something like this: \\192.168.1.68. A new window will pop up asking for a username and password. Enter the user credentials exactly as they appear on your Mac.

File Explorer will display any folders and users you’ve added to your Mac’s Shared Folders and Shared Users lists. You can map that folder as a network drive to move, edit, and copy folders like any other Windows folder.
Map Network Drive
Mapping a network folder makes it appear to other apps that the folder is part of your computer. Windows assigns a drive to the mapped folder, and you’ll see it as a drive in the File Explorer.
Right-click the shared folder and click Map network drive. Select a drive from the Drive list. You can choose any letter that’s not already in use.
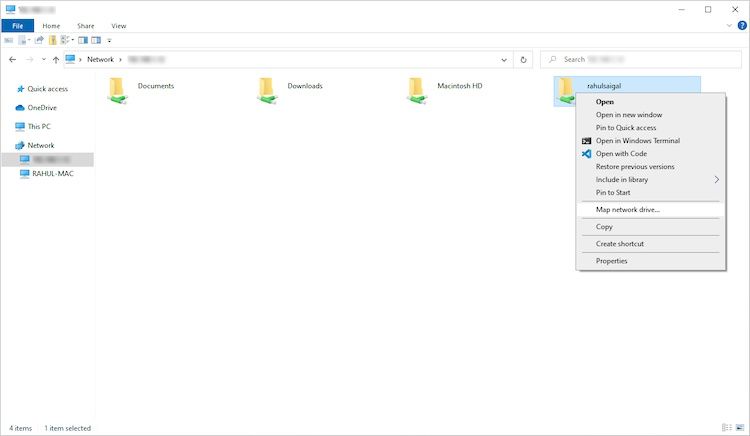
The Folder box contains all the pre-filled information. Don’t forget to check Reconnect at sign-in if you want Windows to connect to this shared folder at the start of each login session automatically.

Once you’re done, drag-and-drop files into one of your local folders to transfer files from your Mac to your Windows PC.
How to Transfer Files From PC to Mac
That wasn’t too tough, right? Now let’s look at the reverse process: how to transfer files from Windows to Mac.
Set Up File Sharing on Windows
To begin, you need to make sure that Network Discovery is turned on in Windows. Fire up your Windows PC and work through the following steps:
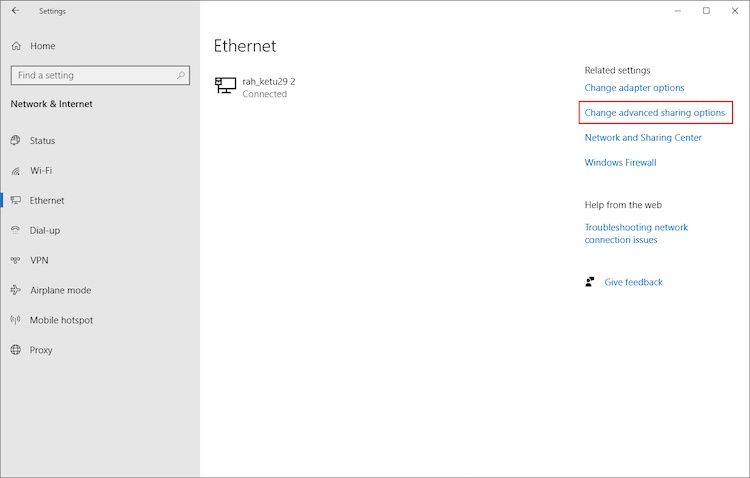
Open the Settings app and go to Network & Internet. On the left panel, click on Ethernet or Wi-Fi and then Change advanced sharing options located under Related settings.
Expand the Private Network menu and enable the checkboxes next to Turn on network discovery and Turn on file and printer sharing. Then, click on Save changes. Follow these steps to fix network discovery-related issues in Windows 10.
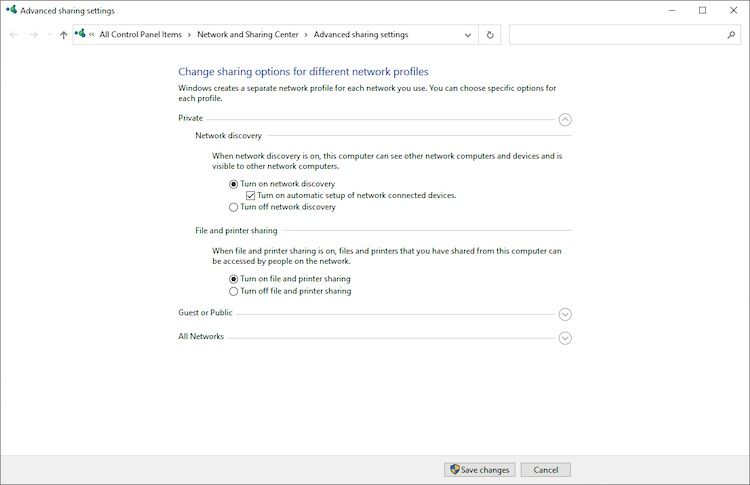
We don’t recommend enabling network discovery or file sharing on public networks. They are typically far less secure than private networks.
To share folders on a case-by-case basis, right-click on the folder’s name and go to Properties > Sharing > Network File and Folder Sharing > Share. Alternatively, you can use advanced sharing settings if you need to or if you prefer to have full control over sharing.
You’ll also need to note your Windows PC’s IP address. Press Win + X and choose Command Prompt or Windows Powershell. Type in ipconfig and note down the IPv4 address.
Access Windows Files on Mac
Once you’re happy with your sharing options, it’s time to transfer your files from Windows PC to Mac. Follow the steps below on your Mac to do this:
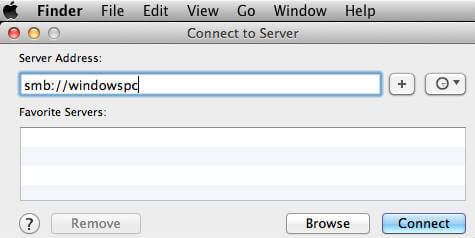
Open the Finder app. In the menu bar at the top of the screen, select Go > Connect to Server. Type either smb://[IP address] or smb://[computer name] and press Enter. You will be prompted to enter your Windows username and password. Click on Connect.
Your shared Windows content will be available in the Shared section of Finder. To transfer files from your PC to your Mac, just drag and drop as needed.
The above methods work great if both Mac and Windows PC are on the same network. However, if they’re not, try these methods and choose the ones that fit best for you.
1. Use a Cloud Storage Service
Dropbox, Google Drive, and OneDrive have dedicated apps available for Windows and macOS. Just install them on the two systems and upload or download your files as needed. Be aware of the space taken up by these apps, and if you’re running low on disk space, follow our guide on how to sync only specific files in Dropbox or Google Drive.
2. Use a USB Stick
A simple-but-effective solution for anyone who needs to transfer files from Mac to Windows quickly is to use a USB flash drive. Remember to choose the exFAT file format since it’s compatible with both operating systems and easily lets you share huge files. Here are our recommendations on the best USB 3.0 flash drives available online.
Resilio Sync and Syncthing are file-syncing apps that let you share files between Windows and Mac. They use an encrypted key to manage the connection between devices. All you have to do is set up a sync folder and create a key. Share the key with your other machine and nominate a folder. Both the apps allow you to set up the read/write permissions.
There are plenty of security challenges we face regarding cloud storage. This author has been using Resilio Sync for many years. If you set up permissions, configure sync to force LAN syncing, and use Archive for file versioning, you ensure that the data transfers happen through your network and save money.

Transfer Files Between Computer and Mobile
Hopefully, the various methods we’ve discussed will help you share files between a Mac and a PC with ease. If you also need to do this with your phone, check out the easiest ways to transfer files between computers and mobile devices.
When you work with Windows and Mac systems, you will encounter practical issues to transfer files between the devices. Since they work in unique platforms with different levels of compatibility compels the users to hunt for better techniques in the transfer process. Here, in this article, you will learn the best ways to transfer files from Windows to Mac.
Choosing the correct technique and tools is essential to ensure successful transfer from one device to another. Migration of data seems to be a tedious process while handling a large number of files in the transfer. Connecting with sophisticated tools enhances the transfer procedure. There are in-built features and third-party applications to move the data from Windows and Mac systems effortlessly.
- Method 1 : Migrate Data from Windows PC to a New Mac
- Method 2 : Enable and Set Up File Sharing on Windows and Mac — Without Software
- Method 3 : Easy Share Files between Mac and Windows wirelessly – AirDroid Personal
- Method 4 : Via Cloud Service
- Method 5 : Via Email
- Method 6 : Copy Files from PC to Mac
- Use USB Stick
- via External Hard Drive
1Migrate Data from Windows PC to a New Mac
Soon after you purchase a Mac system, the next step is to migrate the data from your old Windows to the new laptop for future access. Moving the data files in this cross-platform is quite challenging but you can perform it using the Migration Assistant application provided by the Apple store. Follow up the below instructions carefully to migrate data from Windows to Mac precisely.
- Step 1: Place the Windows and Mac laptops nearby and configure the Mac system. First, choose your country from the dropdown list and select your keyboard.
- Step 2: Next, choose a Wi-Fi network like that of the Windows PC. Ensure Windows and Mac systems are connected to the same network.
- Step 3: Proceed with the Data and privacy module and then choose the option ‘transfer data from Windows PC’ from the list. Then, tap the ‘Continue’ button.
- Step 4: The Mac system automatically searches for the sources in the connected device. You must wait for a few minutes until the Mac discovers the Windows PC. Ensure there is adequate power in both the systems and uninterrupted network connectivity.
- Step 5: Now, download the migration assistant app from the Apple website on the Windows PC. Next, launch the migration assistant app and close the applications running in the background if any. Tap the Continue button in the Migration Assistant window to establish a connection between the Mac and Windows PC.
- Step 6: Select the Windows PC name on the Mac screen and pair it with the generated passcode. Then, hit the Continue button on the Windows PC to proceed with the data transfer process.
- Step 7: The Mac displays the data files that are available on the Windows PC. Select the desired data from the list and proceed by tapping the Continue button.
The chosen data starts to transfer from Windows to macOS and you must wait until the process completes successfully. Then, sign into your Apple account in the macOS to finish the basic settings. Finally, check the transferred files in the macOS and ensure it is received without any data loss.
2Enable and Set Up File Sharing on Windows and Mac — Without Software
Try the in-built file-sharing modules in the PC to trigger the data transfer between devices. Enabling this module assists in file transfer without any third-party software.
- Step 1: Go to the macOS, hit the Apple menu, and then tap System Settings, next press General which appears in the side panel of the screen. Then, scroll down and press Sharing option from the displayed list.
- Step 2: Enable the File Sharing item and hit the info button available at the right. Then, press Options and choose ‘Share File and Folders using SMB’.
- Step 3: Now, choose the user account listed in the Windows File Sharing module and type in the password followed by the OK button. Finally, hit the Done option.
- Step 4: Select View -> Network and choose the active connection to ensure both devices are connected to the same network.
- Step 5: Press WINS on the side panel of the screen and type in the Windows PC-created workgroup name.
Tip : To find the workgroup name, on your Windows PC navigate Control Panel-> System and Security -> System (Workgroup or MShome).
Lastly, click the OK button to complete the file-sharing setup process successfully. Some of the newbie users do not know how to handle this setup efficiently. Changes in the settings affect the successful transfer of the files.
3Easy Share Files between Mac and Windows wirelessly – AirDroid Personal
The third-party applications ease the file-sharing process between macOS and Windows wirelessly. It is the perfect method for both novices and professionals to carry out the file transfer process between devices. The AirDroid Personal is a stunning tool with loads of features that enhances file transfers cross-platform. It has surplus functionalities and serves as a complete solution for your needs.
The additional features of the AirDroid Personal application
- Monitor the other gadgets remotely
- Use this app to remote control other devices effortlessly.
- Screen mirror the device display to get bigger images.
- Manage SMS and Notifications on your device professionally.
- Lossless file transfers at a faster rate despite file size.
These are the salient functionalities of the AirDroid Personal tool that makes it stand unique from the crowd.

3.1 Via File Transfer (local network and Remote network)
To meet both the requirements of the local network and remote file-sharing process, AirDroid Personal tool provides users with a File Transfer module. This feature permits the users to carry out file transfers flawlessly despite the device’s location. Initial setup in both devices is essential to perform the file transfers. For the local network, ensure both devices are connected to the same Wi-Fi network. In case of remote file transfers, enable the remote features in the receiver device. During the setup process, log into the same AirDroid account on both devices to avoid unnecessary interruptions. After completing the initial setup process successfully, follow the below instructions.
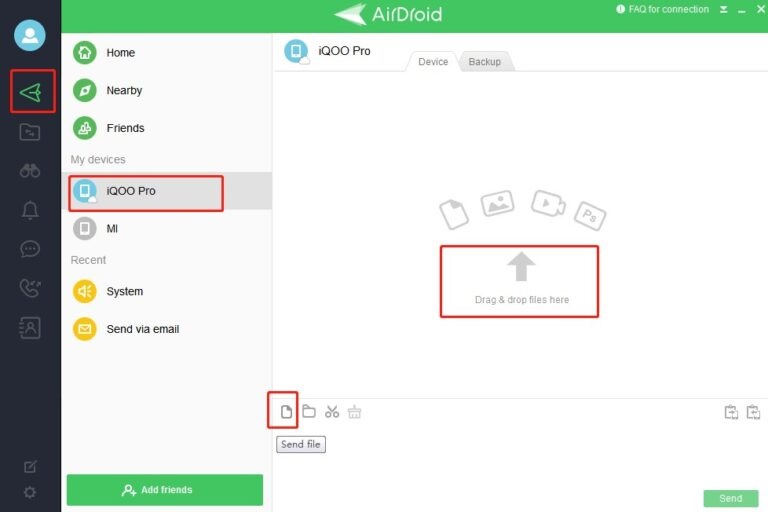
- Step 1: In the sender device, launch the AirDroid Personal Desktop client app and sign into your AirDroid account. In the dashboard, tap the File Transfer icon in the left menu of the screen.
- Step 2: Select the receiver device name from the displayed list under the My Devices section.
- Step 3: Then, navigate the folders and choose the desired files. Drag and drop into the right side of the screen of the AirDroid Personal interface. Finally, hit the Send button to start the file-sharing procedure.
The above steps explain the file-sharing process satisfying both the local and remote networks using the incredible application AirDroid Personal application.
3.2 Nearby Share (local network)
The Nearby Share method is applicable when both devices are separated a few meters. Like Bluetooth connectivity, this feature works only when both devices are placed in the same environment for a flawless transfer process.
- Step 1: Download the AirDroid Personal app on both devices and proceed with the installation and setup process. Tap the Nearby tab and hit the Search button on the right side of the sender device’s screen.
- Step 2: Turn on the location settings in the receiver device and hit the receiver device name on the sender device’s screen after the scanning process of the AirDroid Personal app completes.
- Step 3: Now, accept the process and start transferring the desired files by navigating to the folders of the sender device.

4Via Cloud Service
Cloud services play a vital role in the storage and file-sharing operations. It serves as a virtual space for the files to stay in a protected format even for decades hassle-free. The Android platform opts for Google Drives as its cloud service. You can also go for other third-party applications like Dropbox to store and access the files based on the requirements. Excellent access control highlights the Cloud Service despite its downfalls related to security features. The Cloud Service platforms provide users with high-end compatibility so that they can use any gadgets and devices to access the stored files flawlessly. It supports cross-platform operations and enables a smooth flow of data between devices.
5Via Email
Another storage space with good accessibility features is widely used by many users globally. You can send the required files to your email and move them to the respective folders for better access. Use your email and structure it by creating folders for quick access to the desired data. The Email platform allows the users to organize their data and connect to it by simple login. The major drawback of this method is that it has restrictions on memory space allocations. Limited memory space is available and you can store and access only a few files and data.

6Copy Files from PC to Mac
There are different versions of copying files from PC to Mac using a USB stick, cable, and external hard drives.
6.1 Via USB Stick
Connect the USB device to any one of the ports of Windows and copy the files into this external storage. Then, unplug it from the PC and plug it in with the macOS. Next, copy the files from the USB to the Mac system. Wait until all the files copy into the desired storage drives in Mac and finally remove the USB from the macOS.
6.2 Via External Hard Drive
Use an external hard drive to copy the files from the PC to Mac. Connect the drive to the system and then navigate the folders to copy the files into the hard drive. Remove the hard drive and connect it with macOS to get those copied files into this system.
Conclusion
Thus, you had an enlightening discussion about how to transfer files from Windows to Mac. Choose the best method that suits your needs efficiently. Connect with the AirDroid Personal application to satisfy your device requirements beyond expectations. Stay tuned to discover more about file transfer techniques between devices.
FAQs
1. Why do you want to share files from PC to Mac?
When you purchase a new macOS, there is a need to share files from your old Windows PC to the Mac system. There are scenarios while working on a project as a team, the members who work remotely use Mac systems. Sharing of project data and files between these two cross-platform devices becomes an essential part of the process.
2. Is it possible to share files from PC to Mac without any data loss?
Yes, you can share a file from PC to Mac using sophisticated tools available in the digital market. The AirDroid Personal app is one of the file transfer programs that enables users to cross-platform file sharing efficiently.
3. What are the advantages of using a third-party application in the file transfer process from PC to Mac?
The major advantage of using a third-party application in the file transfer process is that there are no restrictions on the file count and size. Moreover, the efficiency of the sharing process is appreciable. The transfer takes place at a faster rate without any data loss.