Часто при реализации структуры на базе Windows Server возникают задачи связанные с настройкой сервера для файлов и распределением прав на пользователей\группы.
В нашем случае мы будем настраивать файловый сервер на Windows Server 2019.
1. Подготовка.
Для того чтобы настроить файловый сервер на Windows Server 2019, требуется установить операционную систему на виртуальную или физическую машину. Активировать операционную систему и подключиться на сервер с правами администратора.
2. Установка роли файлового сервера.
Чтобы установить роль файлового сервера, требуется:
- Зайти в диспетчер серверов.
- Управление => Добавить роли и компоненты.
- В мастере добавления ролей нажимаем “Далее” до Ролей сервера.
- Устанавливаем роль “Файловый сервер” и нажимаем “Далее”.
- Нажимаем “Установить”Нажимаем “Установить”.
3. Настройка файлового сервера.
- Заходим в Диспетчер Серверов => Файловые службы и службы хранилища => Общие ресурсы.
- Нажимаем “Задачи” и выбираем “Новый общий ресурс”.
- Выбираем подходящий нам профиль общего файлового сервера. В нашем случае мы выбираем “Общий ресурс SMB — быстрый профиль” и нажимаем “Далее”.
- Выбираем том на котором будет располагаться папка для доступа по сети, нажимаем “Далее”.
- Создаем имя общего ресурса, нажимаем “Далее”.
- В следующем окне выбираем требуемые параметры и нажимаем “Далее”.
- В окне “Распределения разрешение для управления доступом” мы настраиваем параметры безопасности на сетевую папку. А именно распределяем правами разрешения для определенных пользователей или групп, нажимаем “Далее”.
- В подтверждающем окне мы видим какие параметры будут сделаны и нажимаем “Создать”.

Рисунок 1 — Подтверждение выбора в мастере создания ресурсов
Убеждаемся в правильной настройки общей папки.
4. Проверка работоспособности файлового сервера.
Заходим на рабочую машину расположенную внутри локальной сеть. Подключаемся через проводник на сервер в нашем случае мы подключаемся к \\10.15.73.38\ так же можно вводить адрес сервера \\domain.site.ru\ или по имени сервера \\file-server\
После авторизации мы подключились на сервере и видим нашу общую папку:

Рисунок 2 — Созданная общая папка
Мы провели настройку файлового сервера, чтобы можно было пользоваться общими папками и распределять права на определенные файлы. В дальнейшем можно увеличивать количество папок и строить файловую структуру по нуждам компании.
Эти и другие настройки для наших клиентов мы осуществляем в рамках ИТ-аутсорсинга.
In today’s digital age, storage and file management are fundamental for any company or organization. Windows Server 2019 offers a robust and reliable solution for configuring a file server that can meet your company’s data storage needs. In this article, we will explore how to set up a file server in Windows Server 2019, taking advantage of the powerful capabilities of this platform.
Why Windows Server 2019?
Windows Server 2019 is one of the most recent and advanced versions of Microsoft’s server operating system. It offers numerous advantages in terms of security, performance and functionality for configuring a file server. Some of the key reasons to choose Windows Server 2019 include:
-
Improved Security. Windows Server 2019 comes with enhanced security features, such as Windows Defender Advanced Threat Protection (ATP), which helps protect your data against cyber threats.
-
Optimized Performance. This version of the operating system has been designed to offer better performance and efficiency, which makes it an ideal choice for file servers with high resource demands.
-
Continuous Support. Microsoft provides ongoing support for Windows Server 2019, ensuring that your file server is up-to-date and secure.

Basic Configuration of the File Server
Now, let’s dive into setting up a file server in Windows Server 2019. Follow these steps to get started:
Step 1: Installing Windows Server 2019
The first thing you need to do is install Windows Server 2019 on your server hardware. Be sure to follow the installation and configuration best practices recommended by Microsoft.
Step 2: Add the File Server Role
Once you have installed Windows Server 2019, you need to add the file server role. Follow these steps:
-
Log in to your server with an administrator account.
-
Open the «Server Manager» from the «Start» menu.
-
In the Server Manager, click «Manage» and select «Add Roles and Features».
-
In the Add roles and features wizard, select «File Server» and follow the instructions to complete the installation.
Step 3: Set Up File Sharing
Once the file server role is installed, you can start configuring file shares so that users can access them. Follow these steps:
-
Open the «Server Manager» and click on «File and Storage services».
-
Under «File and Storage Services», select «Shares» to view existing file shares or create a new one.
-
Click on «Task» and select «New Sharing».
-
Follow the wizard to create a new file sharing, define the folders you want to share, configure permissions and sharing options according to your needs.
Step 4: Set Up Folder Access
After setting up file shares, it is essential to establish who can access them and with what level of permissions. Follow these steps:
-
Right click on the shared folder you want to configure and select «Properties».
-
On the «Security» tab, configure the folder access permissions for users or groups that need access.
-
On the «Sharing» tab, configure the sharing options, such as the name of the share and the specific sharing permissions.
Step 5: Set Up Disk Quotas
To prevent disk space depletion and control storage usage, you can configure disk quotas in Windows Server 2019. Follow these steps:
-
In the «Server Manager», go to «File and Storage Services» and select «Disk Quotas».
-
Click on «Task» and select «New Disk quota».
-
Follow the wizard to configure quota limits and notifications according to your requirements.
Advanced Features
In addition to the basic configuration, Windows Server 2019 offers several advanced features that can improve the management and performance of your file server:
-
Detection of Duplicate Data. Windows Server 2019 includes a duplicate data detection feature that helps identify and delete duplicate files in your file shares, saving storage space.
-
Data Encryption. You can use data encryption to protect the files stored on your file server. Windows Server 2019 supports BitLocker drive encryption to protect data at rest.
-
Audit of Files. File auditing allows you to keep track of who accesses your files and what actions they perform. You can configure audit policies to get detailed information about file activity.

Ongoing Maintenance and Administration
Once your file server is configured and up and running, it is important to perform regular maintenance and ongoing management to ensure optimal performance and data security.
-
Software updates. Make sure your file server is up to date with the latest security updates and software patches. Keeping the system up to date is essential to protect it against known vulnerabilities.
-
Backup copies. Make regular backups of the data stored on your file server to protect against data loss. You can use built-in backup tools or third-party solutions for this purpose.
-
Performance monitoring. Use performance monitoring tools to monitor resource usage on your server and take proactive steps to address potential issues.
You already know how to improve the efficiency of your organization in today’s digital world!
We hope this article has provided you with a solid insight on how to set up a file server in Windows Server 2019. By following these steps and taking advantage of the advanced features of this platform, you can establish an efficient and secure data storage environment for your organization.
Remember that the security of your data is a priority, so it is essential to keep your file server up to date with the latest software updates and perform regular backups. File auditing can also help track activity and ensure access requirements are met.
Windows Server 2019 is a powerful tool to manage and protect your business information. As your organization grows and evolves, this platform can scale to meet your ever-changing data warehousing needs.
 Обновлено:
Опубликовано:
В качестве примера используется Windows Server 2012 R2 (2016, 2019). Инструкция разбита на несколько шагов и представляет из себя полный цикл настройки файлового хранилища для использования в малых и средних компаниях.
Выбор оборудования и подготовка сервера
Установка Windows и настройка системы
Базовые настройки файлового сервера
Тюнинг файлового сервера или профессиональные советы
Настройка средств обслуживания
Тестирование
Шаг 1. Выбор оборудования и подготовка сервера
В качестве сервера, желательно, выбрать профессиональное оборудование. Системные требования для файлового сервера не высокие:
- Процессор может быть самый простой;
- Оперативная память также не сильно используется;
- Дисковая система — самый основной компонент. Ее объем зависит от специфики бизнеса. Примерная формула — не менее 15 Гб на пользователя и не менее 1 Тб на сервер. До 50 пользователей можно рассматривать диски SATA, после — SAS или SSD.
Например, для компании в 300 пользователей подойдет сервер с процессором Xeon E3, 8 Гб ОЗУ и 5 Тб дискового пространства на дисках SAS 10K.
Дополнительные требования
- Для обеспечения сохранности информации при выходе из строя жесткого диска, необходим RAID-контроллер. Настройка последнего выполняется из специального встроенного программного обеспечения, которое запускается при загрузке сервера;
- Сервер должен быть подключен к источнику бесперебойного питания;
- Необходимо предусмотреть резервное копирование. Для этого нужен дисковый накопитель (внешний жесткий диск) или другой сервер.
Подробнее о выборе оборудования читайте статью Как выбрать сервер.
Шаг 2. Установка Windows и настройка системы
Установка системы
На этом шаге все стандартно, за исключением одного нюанса: разбивая во время установки Windows жесткий диск, стараемся выделить небольшую часть (70 — 120 Гб) для системы и все остальное под данные. Если выделить много дискового пространства для системного раздела, увеличится время его обслуживания и фрагментация, что негативно скажется на производительности и надежности системы в целом.
Настройка системы
- Проверяем правильность настройки времени и часового пояса;
- Задаем понятное имя для сервера и, при необходимости, вводим его в домен;
- Если сервер не подключен напрямую к сети Интернет, стоит отключить брандмауэр;
- Для удаленного администрирования, включаем удаленный рабочий стол;
- Устанавливаем все обновления системы.
Шаг 3. Базовые настройки файлового сервера
Это стандартные действия, которые выполняются при настройке обычного файлового сервера.
Установка роли и вспомогательных компонентов
Как правило, данная роль устанавливается вместе с Windows. Остается только это проверить и доустановить компоненты, которые нужны для полноценной эксплуатации сервиса.
Открываем Диспетчер серверов. Он может быть запущен из панели быстрого запуска.

Нажимаем Управление — Добавить роли и компоненты.

В открывшемся окне оставляем Установка ролей и компонентов и нажимаем Далее.

В следующем окне выбираем нужный сервер (выбран по умолчанию, если работаем на сервере, а не через удаленную консоль) и нажимаем Далее.
Среди ролей находим Файловые службы и службы хранилища, раскрываем ее и проверяем, что установлены галочки напротив следующих компонентов:
- Службы хранения;
- Файловый сервер;

Если данные службы не установлены, выбираем их и нажимаем Далее.
В окне Выбор компонентов просто нажимаем Далее.
Откроется окно Подтверждение установки компонентов. Нажимаем Установить и после окончания процесса перезагружаем сервер.
Настройка шары (общей папки)
Создаем первую папку, которую хотим предоставить в общее использование. Затем кликаем по ней правой кнопкой мыши и нажимаем Свойства:

В открывшемся окне переходим на вкладку Доступ и нажимаем Расширенная настройка:

Ставим галочку Открыть общий доступ к этой папке и нажимаем кнопку Разрешения:

Предоставляем полный доступ всем пользователям:

* конечно же, мы не будем давать доступ всем пользователям, но для этого есть вкладка безопасность (см. ниже).
Нажимаем OK и еще раз OK.
Теперь переходим на вкладку Безопасность и нажимаем Дополнительно:

В открывшемся окне нажимаем Отключение наследования и Преобразовать унаследованные разрешения в явные разрешения этого объекта.

Нажимаем OK и Изменить.

Выставляем необходимые права на папку, например:

Совет: старайтесь управлять правами на ресурсы только при помощи групп. Даже если доступ необходимо предоставить только одному человеку!
Теперь нажимаем OK два раза. Папка настроена для общего использования и в нашем примере доступна по сетевому пути \\fs1\Общая папка.
Шаг 4. Тюнинг файлового сервера или профессиональные советы
Данные настройки, по сути, представляют секреты того, как сделать файловый сервер лучше, надежнее и безопаснее. Применяя их, администраторы создают более правильную и профессиональную среду ИТ.
DFS
С самого начала стоит создавать общие папки в пространстве имен DFS. На это есть две основные причины:
- При наличии или появлении нескольких файловых серверов пользователям будет удобнее находить общие папки в одном месте.
- Администратор легко сможет создать отказоустойчивую систему при необходимости.
Как создать и настроить DFS читайте в статьях Как установить и настроить DFS и Как установить и настроить DFS с помощью Powershell.
Теневые копии
Позволят вернуться к предыдущим версиям файлов. Это очень полезная функция позволит не только восстановить некорректно отредактированный документ, но и вернуть случайно удаленный файл или папку.
Как настроить и пользоваться данной возможностью, читайте подробнее в инструкции Как включить и настроить теневые копии.
Аудит
Аудит позволит вести протокол доступа к данным — понять, кто и когда удалил важные данные или внес в них изменения.
О том, как настроить данную возможность читайте статью Как включить аудит доступа к файлам Windows.
Анализатор соответствия рекомендациям
В диспетчер управления серверами Windows встроен инструмент для проверки конфигурации сервера — анализатор соответствия рекомендациям. Чтобы им воспользоваться переходим в диспетчере в Локальный сервер:

Находим раздел «Анализатор соответствия рекомендациям» и справа кликаем по ЗАДАЧИ — Начать проверку BPA:

Рассмотрим решения некоторых рекомендаций.
1. Для XXX должно быть задано рекомендованное значение.
Это набор однотипных рекомендаций, для выполнения которых нужно обратить внимание на описание и задать значение параметро, которое в нем указано. Например, для CachedOpenLimit в описании проблемы есть описание решения — «Задайте для CachedOpenLimit рекомендуемое значение 5». Чтобы это сделать, открываем Powershell от администратора и вводим команду:
Set-SmbServerConfiguration -CachedOpenLimit 5
* мы задаем параметру CachedOpenLimit значение 5, как это и рекомендовано анализатором.
На запрос, уверены ли мы, что хотим выполнить команду, отвечаем утвердительно.
Остальные параметры задаем аналогичными действиями.
2. Файл Srv.sys должен быть настроен на запуск по требованию.
В командной строке от имени администратора вводим:
sc config srv start= demand
3. Создание коротких имен файлов должно быть отключено.
В командной строке от имени администратора вводим:
fsutil 8dot3name set 1
Шаг 5. Настройка средств обслуживания
Ни одна инфраструктура не может полноценно существовать без мониторинга и резервного копирования. Предупредить о возможной проблеме, узнать о последней раньше пользователей или иметь возможность восстановить данные — показатели высокой ответственности и профессионализма системного администратора.
Резервное копирование
Для файлового сервера все просто — необходимо резервировать все рабочие папки и файлы. Лучшим решением будет ежедневное копирование новых данных, и с определенной периодичностью (например, раз в месяц), создавать полный архив.
Мониторинг
Мониторить стоит:
- Сетевую доступность сервера;
- Свободное дисковое пространство;
- Состояние жестких дисков.
Шаг 6. Тестирование
Тестирование состоит из 3-х основных действий:
- Проверить журналы Windows и убедиться в отсутствие ошибок. В случае их обнаружения, необходимо устранить все проблемы.
- Выполнить действия анализатора соответствий рекомендациям.
- Провести живой тест работы сервиса с компьютера пользователя.
— Advertisement —
Hello, in this opportunity, we are going to talk a little about Windows Server 2019. Specifically about the file server and how to enable it. This is a server that is configured to provide a central location in the local network. The goal is to store files and share them with domain users. In this way, users can have access to files and applications. In other words, the file server is a simple and effective solution for sharing data. For that reason, let’s see how to enable the file server in Windows Server 2019
How to create a shared folder in Windows Server 2019
The first thing we have to do is create a new folder inside the server. This folder will function as a file server. Once created, you need to enter its properties. Next, go to the Sharing tab. Additionally, click on Advanced Sharing

In the next window, check the box corresponding to Share this folder. It is also possible to limit the number of simultaneous users in the folder. Press accept to continue.

From the same window, click on the Permissions menu. In this way, we will modify the access permissions of the folder. In the first place, remove the Everyone user group. This is done for security. In addition, click on the Add menu.

Then choose the group of users you want to have access to the folder:

For the purposes of this example, we have selected the Domain Users. Then give it read and write permission in the folder. This guarantees full access to the files by the selected users.

After applying the changes, press OK to set them. In the same way, the access path for the client machines is shown. With these steps, the folder for the file server has already been correctly configured. To check its functionality, simply log in from any client computer. Then access the newly created folder.

Configuring the file server in Windows Server 2019.
Next, we will manage the file server in Windows Server 2019. With this in mind, please enter the Server Dashboard and from the left menu select File and Storage Services.

In the next window click on Shares. Immediately view the shared folder:

Then double click on the folder to enter the properties of the folder. In this menu go to the Settings section. Additionally, click on the first option corresponding to Enable acces-based enumeration. This option allows users to only see the folders that have permission to be edited, the ones that are read-only will be hidden. This configuration is very useful to protect the privacy of the folders.

Adding the File Server Resource Manager
This function is enabled from the Server Dashboard. Specifically with the Add roles and features wizard. If you want to know how to do it, I invite you to check our post about IIS in Windows Server 2019. In this case, choose Server Roles. Then scroll down to File and Storage Services. Then check the box File Server Resources Manager.

Press next and wait while the wizard enables the resource.

Access to the File Server Resources Manager.
To access the recently created tool, please open the Server Dashboard. Now open the Tools menu and select it.

Immediately the menu will be displayed with the different options.

Some options shown in the window are as follows:
- Quota manager: this option allows you to define a space limit for users to add files to the shared folder. Consequently, the capacity of the disk on the server is not affected.
- File Screening Manager: This option allows access to a series of templates where elements such as executable files, video, audio, etc. are blocked.
Conclusion
Ultimately we have seen how to enable the file server in Windows Server 2019. With this option we give the ability to the clients of the server, to enter the desired data. In addition, it is possible to control the quota, size and amount of information available. All right, that’s it for the moment. See you later.
Skip to content

Scale Out File Server Implementation in Windows Server 2019

Table of Contents
- What is Scale-Out File Server?
- Benefits provided by Scale-Out File Server
- How Scale-Out File Server Works
- New Scale-Out File Server Features in Windows Server 2019
- Configuring Scale-Out File Server in Windows Server 2019
- Storing Virtual Machines in an SOFS File Share
- Windows Admin Center
- When To Use And When not To Use A Scale-Out File Server
- Concluding Thoughts
There have been many new advancements in Windows Server technologies in the past few Windows Server releases. Many of these have improved upon the core features of Windows Server, including the resiliency and high-availability features it offers. One of the newer features found in Windows Server is Scale-Out File Server (SOFS).
Scale-Out File Server is a great feature that provides highly available file-based storage that can be used for a number of different use cases.
In this post, we will take a deeper look at Scale-Out File Server.
- What is it?
- How does it work and how is it configured?
- What improvements have been made with SOFS in Windows Server 2019?
These and other topics will be discussed.
What is Scale-Out File Server?
Windows Server Failover Clustering has been a good general clustering technology for hosting access to files and folders. However, as new technologies came along such as virtualization (Hyper-V) that required more robust features such as the ability to handle open files, general file-server clustering came up a bit short.

In the case of virtual disks backing guest operating systems housed on Hyper-V hosts, there was a need for a more robust and capable clustering technology. Virtual disk files are a great example of resources on which you want to have even greater redundancy and resiliency. Scale-Out File Server (SOFS) was designed to provide resiliency to resources such as backing Hyper-V virtual machines.
With Scale-Out File Server, you can effectively satisfy the requirement of continuous availability as opposed to high-availability. In other words, you want the resource housed on the Scale-Out File Server to be available no matter what, even when you have a failure.
Scale-Out File Server (SOFS) provides a robust infrastructure platform on which to support highly-available virtual machines running in a Hyper-V environment. SOFS provides the underlying storage to Hyper-V with the capability to have multiple nodes online in an active-active configuration with persistent connections between the nodes.
The tremendous benefit to this is if a server providing storage to the Hyper-V environment goes down, the others immediately take over providing storage for the virtual disk files. This does not involve a cutover or migration process to get the data to the other servers. With SOFS backing Hyper-V storage, the virtual machines are able to stay online after a failed storage server with the backing of Scale-Out File Server.
Benefits provided by Scale-Out File Server
What are the benefits you gain by using Scale-Out File Server (SOFS)? These include the following:
- File shares are active-active – This means that all cluster nodes can accept and serve SMB client requests. A tremendous benefit of the active-active topology of the SOFS cluster Is failovers are transparent to alternate cluster nodes that assume the file share. This means if you have a Hyper-V cluster using SOFS, the VM stays online during a failover
- Increased bandwidth and performance – The bandwidth and by extension the amount of performance you get out of your SOFS backed file shares are linear to the number of nodes that are added to the cluster. In a traditional file cluster, the total bandwidth is no longer constrained to the bandwidth of a single cluster node. You can increase bandwidth by simply adding hosts to the cluster
- CHKDSK does not require downtime – CHKDSK general requires having exclusive access to the file system. However, the Cluster Shared Volume aspect of SOFS eliminates the downtime by no longer needing the offline phase. The Cluster Shared Volume File System (CSVFS) can use CHKDSK without impacting applications with open handles on the file system
- CSV Cache – Cluster Shared Volume cache is read-cache introduced in Windows Server 2012 that significantly improves performance in certain scenarios like VDI infrastructures
- Easier management – Management has been simplified. You need not create multiple clustered file servers, with separate cluster disks and then develop placement policies. Now you can create the SOFS and then add the CSVs and file shares
- Automatic Rebalancing of the Scale-Out File Server clients – With Windows Server 2012 R2 automatic rebalancing improves the scalability and manageability for SOFS. SMB connections are tracked per file share and then clients are redirected to the cluster node with the best access to the volume used by the file share. This helps to improve efficiency
How Scale-Out File Server Works
Scale-Out File Server allows creating shares that allow the same folder or file to be shared from multiple cluster nodes. If setup to use SOFS and SMB 3.0, the VMs housed therein can be accessed with a simple UNC pathname.
SMB 3.0 manages the load-balancing of the solution as well as the redundancy and management of the network for fault tolerance. These technologies allow the solution to be an active/active solution so performance is linear to the number of servers backing the SOFS share name.
As already mentioned, continuous availability is afforded by SOFS and ensures the integrity of your data by using synchronous writes. It allows you to have up to 8 nodes backing the SOFS share.
Prerequisites
There isn’t a long list of prerequisites for implementing Scale-Out File Server. However, the following are ones to note.
- Windows Server Failover Cluster compatible storage
- File Server Role installed on your SOFS hosts
- SMB 3.0 (Must be Windows Server 2012 or higher so SMB 3.0 is available)
- Active Directory infrastructure
- If you are using pre-Windows Server 2019 version of Windows Server, loopback configurations are not supported. This means housing Hyper-V and the SOFS file server on the same server
Architecture Overview
Below, a simple view of Hyper-V accessing a SOFS file share hosted between two SOFS nodes.
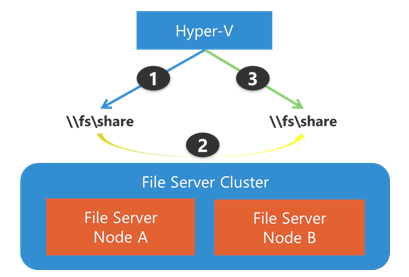
Simple overview of Hyper-V connected to SOFS (image courtesy of Microsoft)
Another view of an extended configuration of Hyper-V connected to SOFS.
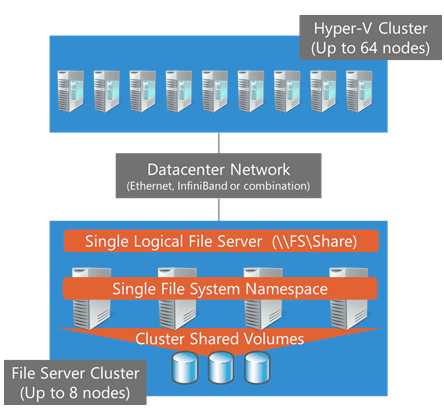
Multiple Hyper-V nodes connected to SOFS (Image courtesy of Microsoft)
New Scale-Out File Server Features in Windows Server 2019
Windows Server 2019 has brought about many enhancements to Scale-Out File Server. These make SOFS in Windows Server 2019 the most resilient and performant SOFS version to date. What enhancements are found in Windows Server 2019 SOFS?
Traditionally, SOFS is heavily reliant on DNS round robin for the connections coming inbound to cluster nodes. This can result in a few inefficient operations. For instance, if a connection is routed to a failover cluster node that is not the owner of a Cluster Shared Volume (CSV), data is redirected over the network to another node before returning to the client. The SMB Witness service detects the lack of direct I/O and moves the connection to a coordinator node (CSV owner) which can lead to delays in returning data.
Windows Server 2019 provides a much more efficient behavior when it comes to returning data. The SMB Server service determines if direct I/O on the volume is possible. If it is, it passes the connection on. If it isn’t (redirected I/O) it will move the connection to the coordinator before I/O begins. There is a limitation in which clients/Server connections can use this new functionality. Currently, it is limited to Windows Server 2019 and Windows 10 Fall 2017 clients.
A new SOFS role in Windows Server 2019 is called the Infrastructure File Server. When created, the Infrastructure File Server creates a single namespace share automatically for the CSV drive. In hyper-converged configurations, the Infrastructure SOFS role allows SMB clients such as a Hyper-V host to communicate with Continuous Available (CA) to the Infrastructure SOFS SMB server.
Another enhancement in Windows Server 2019 with the SMB Loopback where SMB can now work properly with SMB local loopback to itself. This was not supported previously. hyper-converged SMB loopback CA is achieved via Virtual Machines accessing their virtual disk (VHDx) files where the owning VM identity is forwarded between the client and server.
Cluster Sets are able to take advantage of this where the path to the VHD/VHDX is placed as a single namespace share which means the path can be utilized regardless of whether the path is local or remote.
With Windows Server 2016, Hyper-V compute hosts have to be granted permission to access the VHD/VHDX files on the SOFS share. However, with Windows Server 2019, a new capability called Identity Tunneling has been introduced to allow permissions to be serialized and tunneled through to the server. This greatly reduces the complexity of the permissions for accessing the SOFS share for each Hyper-V host.
Let’s take a look at configuring Scale-Out File Server in a Windows Server 2019 Hyper-V cluster.
Configuring Scale-Out File Server in Windows Server 2019
The process to configure the Scale-Out File Server is found in the Failover Cluster Manager. Currently, Windows Admin Center does not contain the ability to manage SOFS as detailed here, however, it most likely will be added as a functional feature in an upcoming release. We will look at what you can currently see regarding SOFS in Windows Admin Center below.
To get started configuring Scale-Out File Server in Failover Cluster Manager, right-click Roles and select Configure Role. This will launch the High Availability Wizard where you select role you want to add as a clustered role. Select File Server. For our walkthrough, we are configuring SOFS for the purpose of backing Hyper-V VMs.
Keep in mind, this will not automatically add the Windows Role (File Server) to your Windows Failover cluster hosts. You will need to add the underlying Windows Role to your hosts before running the High Availability Wizard for your cluster.
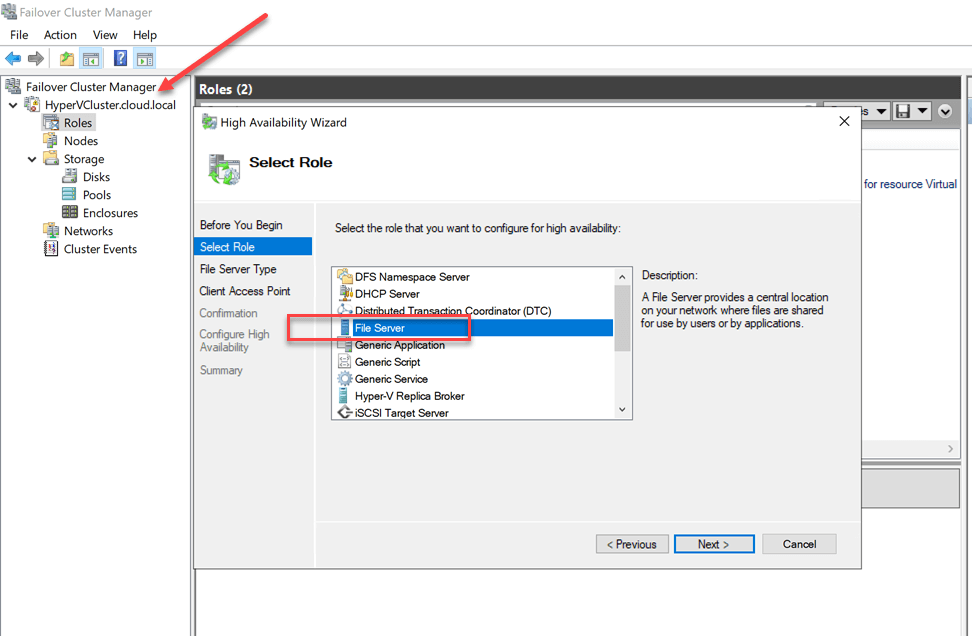
Beginning the Select Role wizard
After selecting the File Server role, you will need to choose the File Server Type. The options for your File Server configuration are:
- File Server for general use
- Scale-Out File Server for application data
We are interested in the second option which is Scale-Out File Server for application data. As per the description notes, you will want to use this option to provide storage for server applications or virtual machines that leave files open for extended periods of time. Scale-Out File Server client connections are distributed across nodes in the cluster for better throughput. This option supports the SMB protocol. It does not support the NFS protocol, DFS Replication, or File Server Resource Manager.
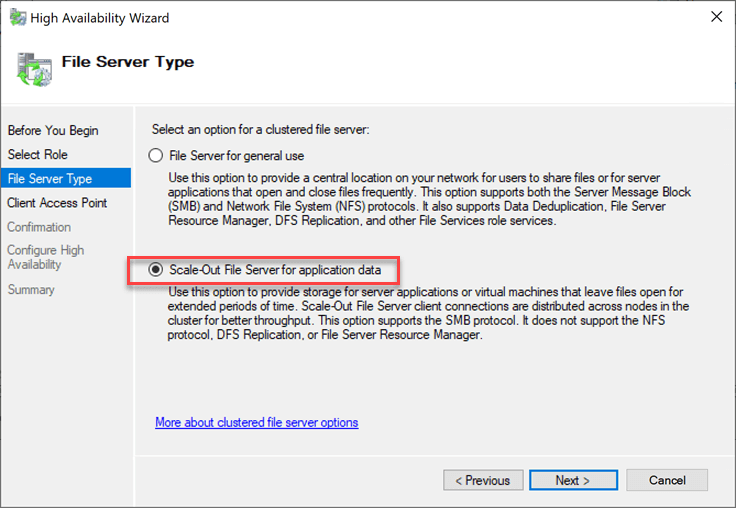
Choosing Scale-Out File Server for application data
After choosing the SOFS file server option, you will choose a name for what is referred to as the Client Access Point. This will be reflected in the cluster resource as well as the SOFS file share.
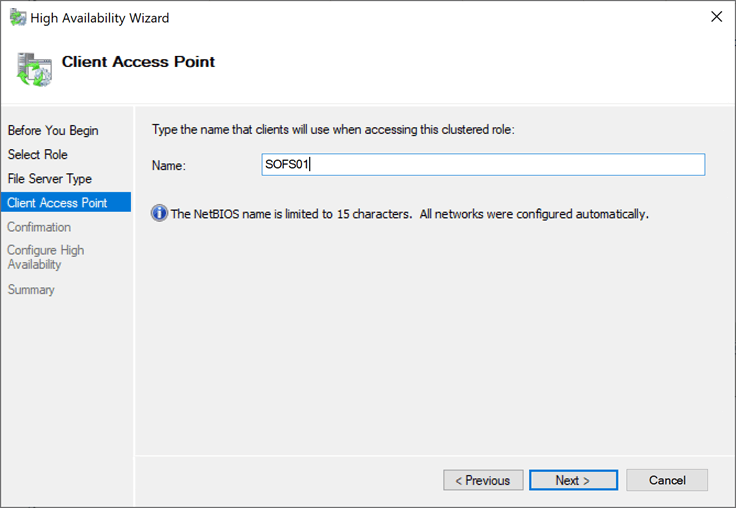
Configuring the Client Access Point
Confirming the options configured in the High Availability Wizard with the Scale-Out File Server configuration.

Confirming the addition of the Scale-Out File server clustered role
The summary screen will detail the options configured.
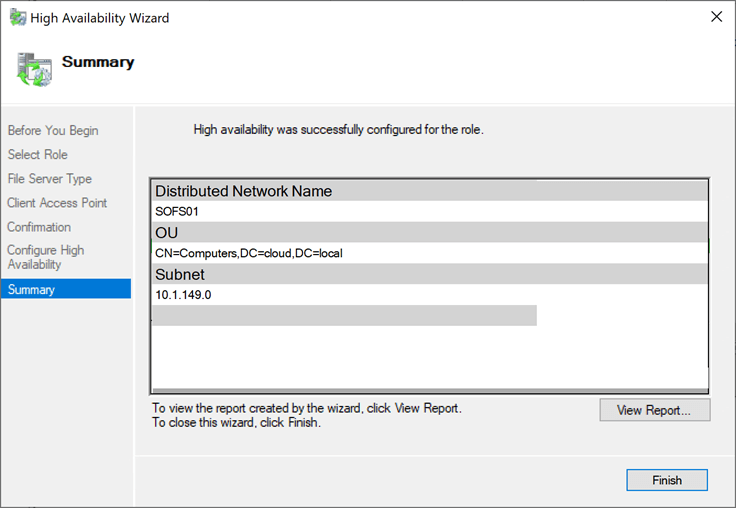
SOFS is successfully configured as a clustered role
Adding an IP Address Resource to the SOFS Role
Adding an IP Address Resource to the SOFS Role is a straightforward process. Simply right-click on the SOFS role name in Failover Cluster Manager, choose Add Resource > More Resources > IP Address.
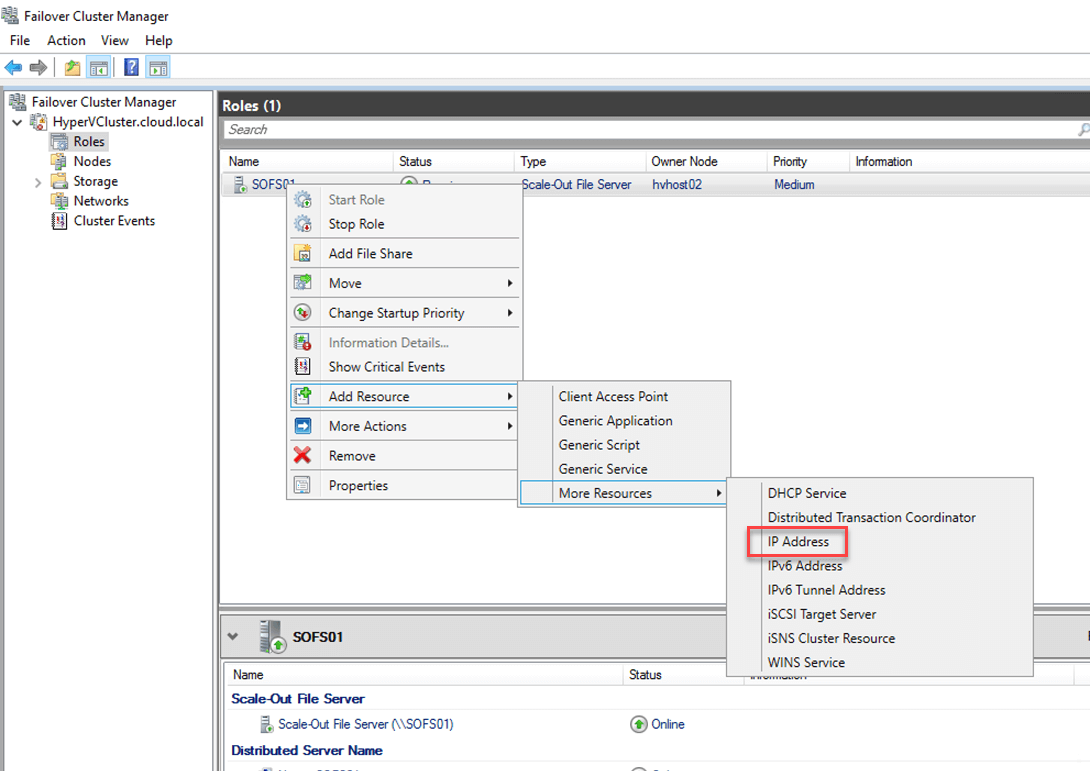
Adding an IP Address resource to the Scale-Out File Server
There are a couple of additional steps to get the IP Address resource for the SOFS role configured. First, you need to actually assign the IP Address you want to use as well as the Network associated with the IP Address.
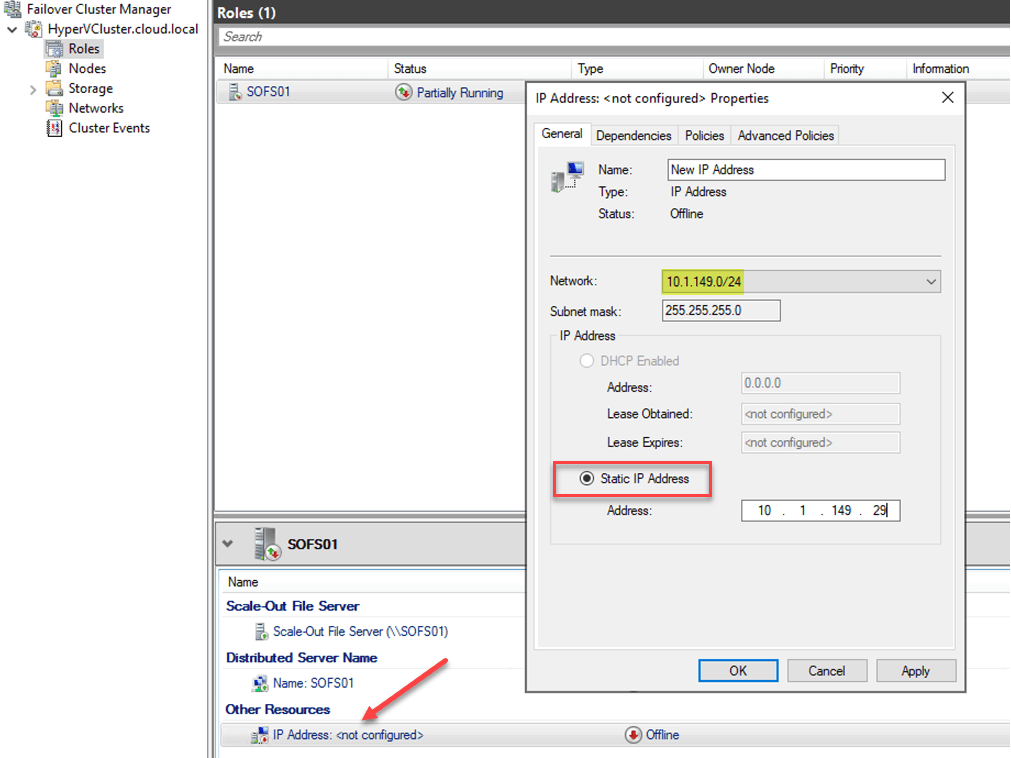
Configuring the IP Address and Network for the new IP Address resource
After you configure the IP Address resource for the SOFS role along with the network it belongs to, you will need to Bring Online the IP Address resource. Simply right-click the IP Address and choose Bring Online.
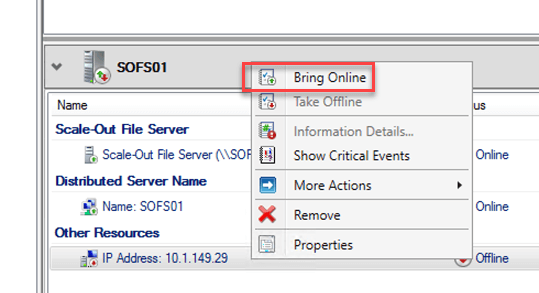
Bringing the SOFS IP Address resource online after configuration
Adding a File Share to Scale-Out File Server
After you have configured the SOFS role as well as added the IP Address resource, you need to configure the File Share that will be made continuously available. To do this, right-click your Scale-Out File Server role name in Failover Cluster Manager and choose Add File Share.
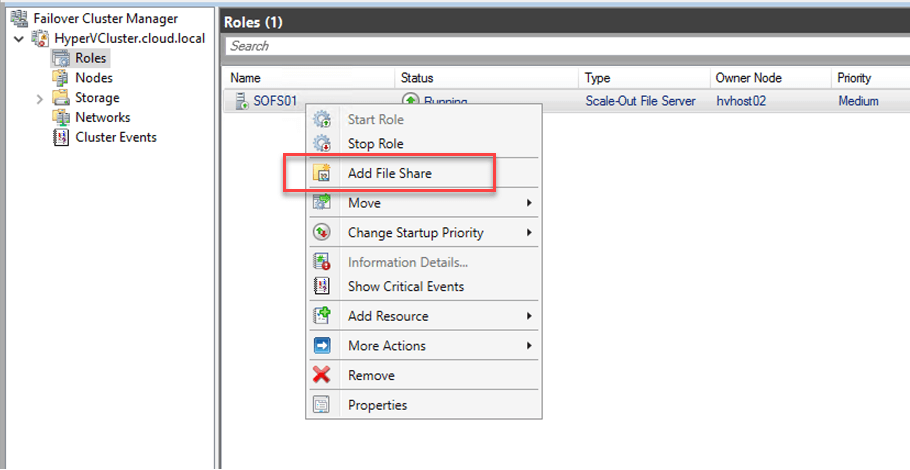
Beginning to Add File Share to the Scale-Out File Server
This launches the New File Share wizard. The first part of the configuration for the Scale-Out File Server share is to select the profile for this share. The options include:
- SMB Share – Quick
- SMB Share – Advanced
- SMB Share – Applications
- NFS Share – Quick
- NFS Share – Advanced
For use with Hyper-V and database applications, here we are selecting SMB Share – Applications. This profile creates the SMB file share with settings appropriate for Hyper-V and database applications.

Selecting a file share profile for creating the new SOFS file share
Select the server and path for this share.
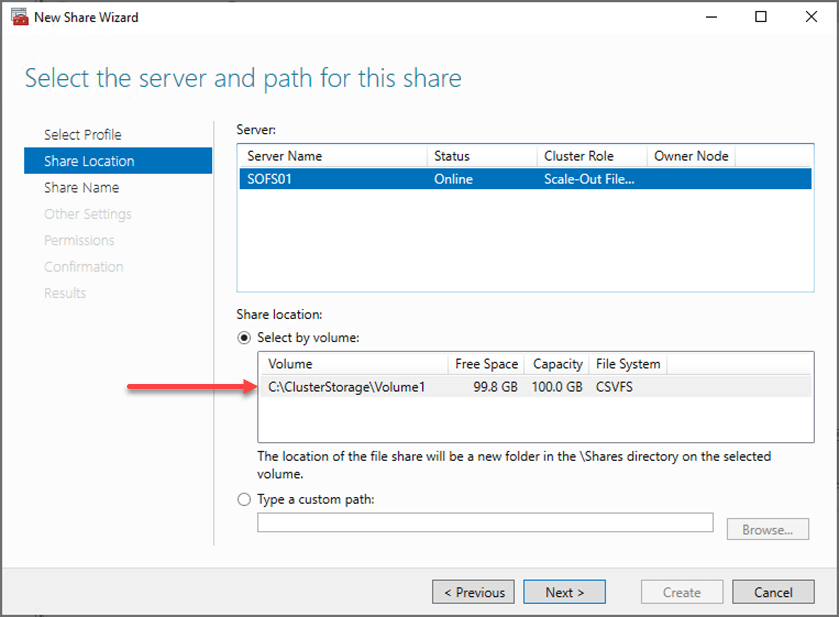
Select the server and path for the SOFS file share
Next, you need to specify the share name. The share name you choose is reflected in the remote path to share.
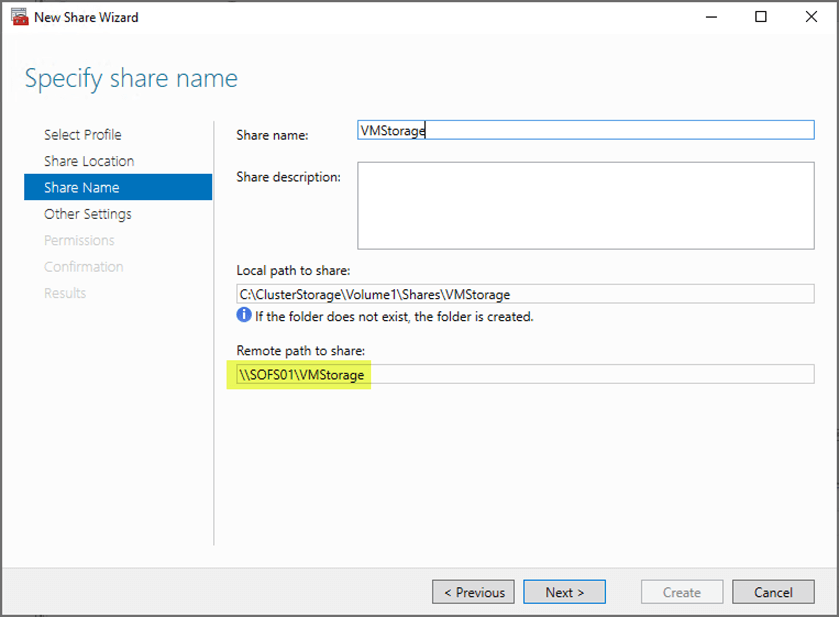
Specifying the share name for the SOFS file share
On the Configure share settings screen, you will see a number of configuration settings related to share configuration. By default, the SMB Share – Applications will have the Enable continuous availability selected. This allows continuous availability features to track file operations on a highly available file share so that clients can failover to another node of the cluster without interruption.
As mentioned earlier, this means virtual machines can continue operating without interruption despite a host failure in the Scale-Out File Server storage nodes. As you will see below, there are many other options that can be selected as well, including encrypt data access.
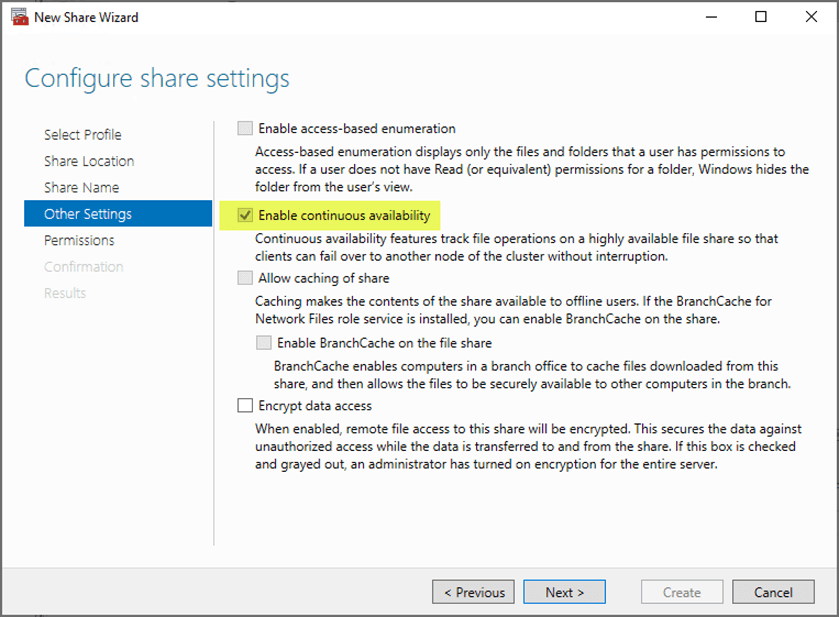
Enabling continuous availability for the new SOFS file share
Next you can specify permissions to control access to your SOFS share.
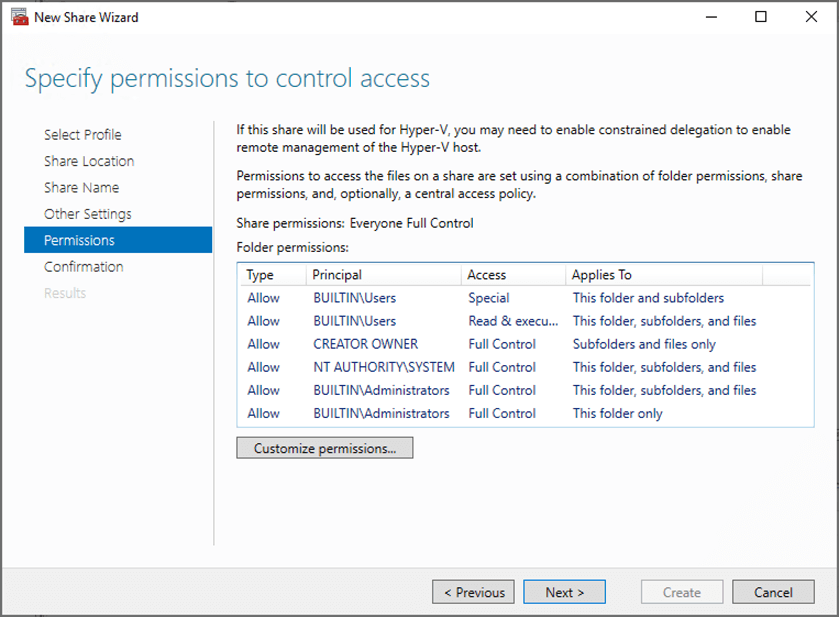
Configuring permissions to control access
Lastly, confirm the selections made in the New Share Wizard.

Confirm selections for creating the SOFS file share
The new share wizard completes with the SOFS file share created successfully.
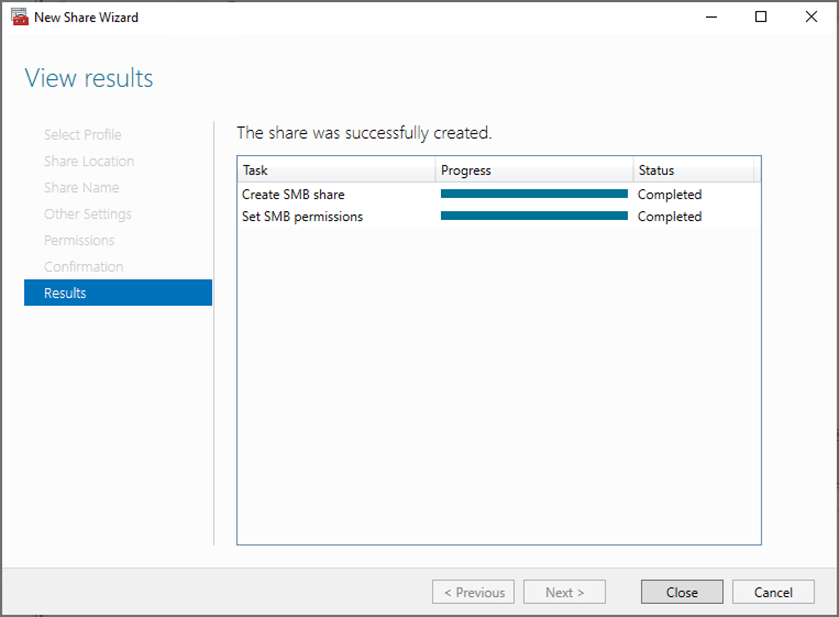
SOFS share created successfully
Now, in Failover Cluster Manager, you can look at your SOFS resource Shares tab and see the new file share created and listed.
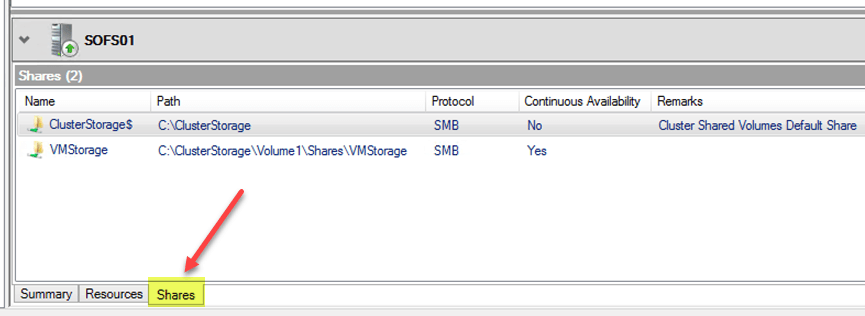
Confirming SOFS shares in Failover Cluster Manager
Storing Virtual Machines in an SOFS File Share
When creating a new Hyper-V virtual machine, you can store the virtual machine on an SOFS file share simply by specifying the file share in the Location box in the Specify Name and Location step of the New Virtual Machine Wizard. This is in the form of a UNC path.
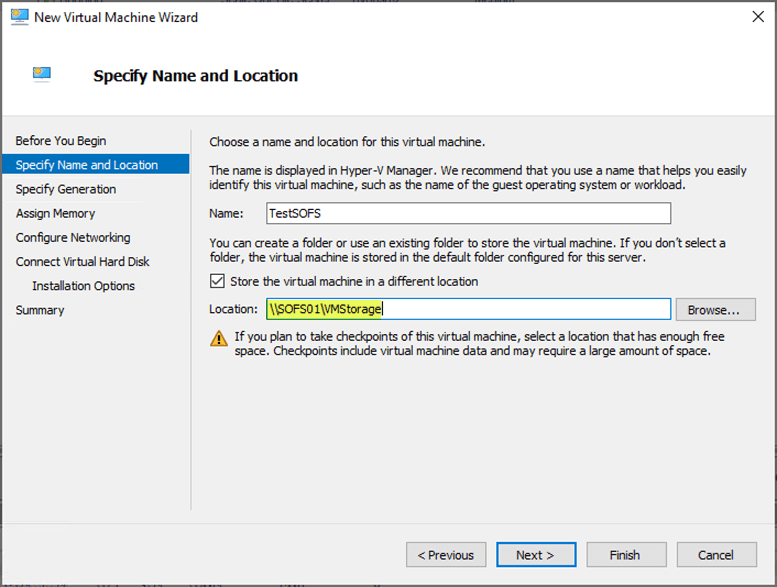
Creating a new virtual machine using the SOFS file share location
As you can see, after specifying the UNC path for the SOFS share in the Location, you will see the full path created for your individual virtual machine on the SOFS share.

Location of virtual machine disks reflected in the New Virtual Machine Wizard
Windows Admin Center
We had touched on this a bit earlier. What about the Windows Admin Center configuration? At this point, Windows Admin Center does not allow the configuration of SOFS that is needed. However, you can view your cluster roles as well as the details of your SOFS role inside of Windows Admin Center.
Like many other Windows technologies, Microsoft is no doubt working on getting SOFS configuration as well as many other configuration tools inside of Windows Admin Center. It will only be a matter of time before you will be able to fully configure SOFS inside of Windows Admin Center.
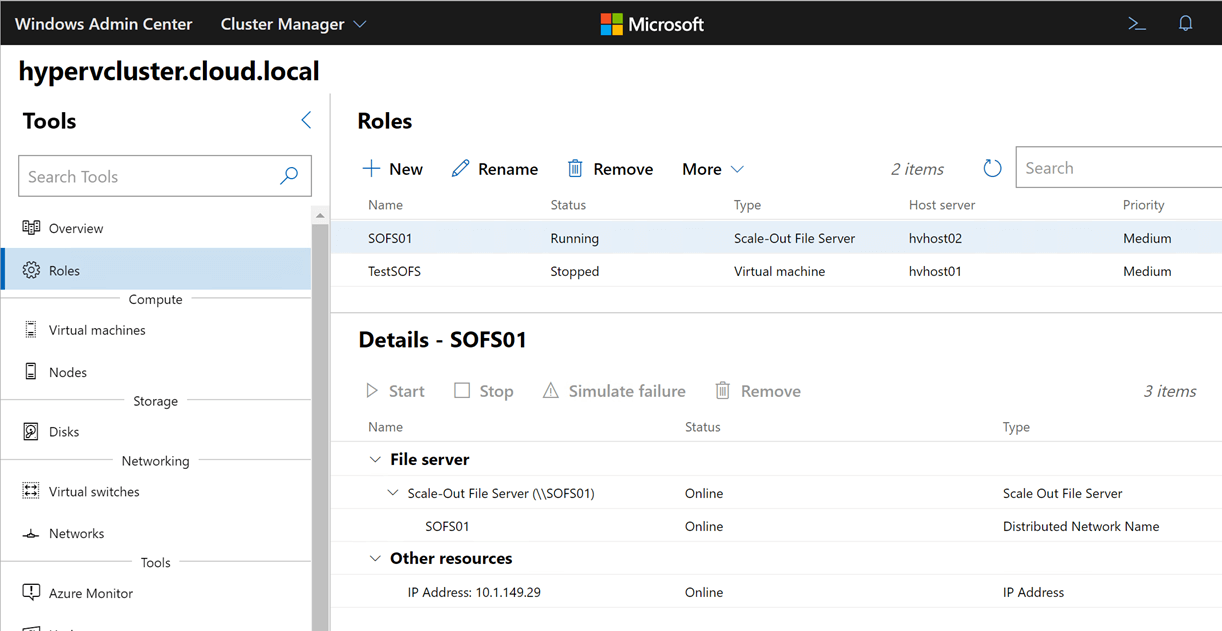
Viewing your SOFS role information inside of Windows Admin Center
When To Use And When not To Use A Scale-Out File Server
Scale-Out File Server is extremely powerful and can satisfy many use cases. What are some typical use cases where SOFS is a good fit, and also where might it not be a good choice for a backend storage technology? Let’s consider this topic.
So, when is a good use case for Scale-Out File Server? Well, the screen in the High Availability Wizard gives the clue to where SOFS fits best – application data. This includes Hyper-V and SQL Server.
SOFS adds the ability to have active-active, highly available storage via SMB 3.0. With SOFS, the server synchronously writes through to the disk for data integrity which provides resiliency in the event of a host failure. If you were to “pull the plug” on your SOFS server, it helps to ensure that your files will be consistent.
With Hyper-V and SQL workloads, the file operations are not very metadata intensive. This means the extra overhead of the synchronous writes that comes with Scale-Out File Server does not really impact the performance of your Hyper-V or SQL workloads.
This helps to highlight when you would not want to use the Scale-Out File Server. In typical end-user environments where there are a tremendous number of file operations including the normal “file opens, file deletes, editing”, and so on. According to Microsoft, this can lead to frequent VDL extension which can mean quite a bit of disk operation overhead, via SMB operations.
As we already know, continuous availability (CA) requires that data write-through to the disk to ensure integrity in the event of a host failure backing SOFS. These synchronous file writes mean there is an impact on write performance. A large VHDX or SQL Server database file also experiences the overhead on file creation time, however, generally, the space for these types of applications is preallocated so disk I/O is comparatively much lower for these.
Another important thing to note is, you can’t use DFS replication to replicate a library share hosted on a scale-out file share.
Concluding Thoughts
Scale-Out File Server provides a really great way to have active-active storage high-availability along with resiliency without expensive storage hardware. Performance scales along with the number of nodes that are added to the SOFS-backing servers. Creating a SOFS infrastructure configuration is easily achieved with only a few clicks in the Failover Cluster Manager with Windows Admin Center functionality soon to come.
As discussed, SOFS is not for every workload. It is best suited for Hyper-V and SQL application data. General file I/O as is the case with normal file opens, edits, deletes and such as is experienced with general-purpose end user file activity is not well-suited for the synchronous write overhead of SOFS. With these types of workloads you will most likely want to house these on traditional file server infrastructure.
Follow our Twitter and Facebook feeds for new releases, updates, insightful posts and more.
