 В Windows 11 по умолчанию расширения зарегистрированных типов файлов не показываются — для кого-то это может быть удобно, но иногда полезно видеть конкретное расширение: например, так меньше вероятность запустить вредоносный exe файл с иконкой как у файла фото или документа.
В этой пошаговой инструкции для начинающих два способа включить показ расширений файлов в проводнике Windows 11. На близкую тему: Как показать или скрыть скрытые и системные файлы Windows 11.
Как показать расширения файлов в меню Проводника
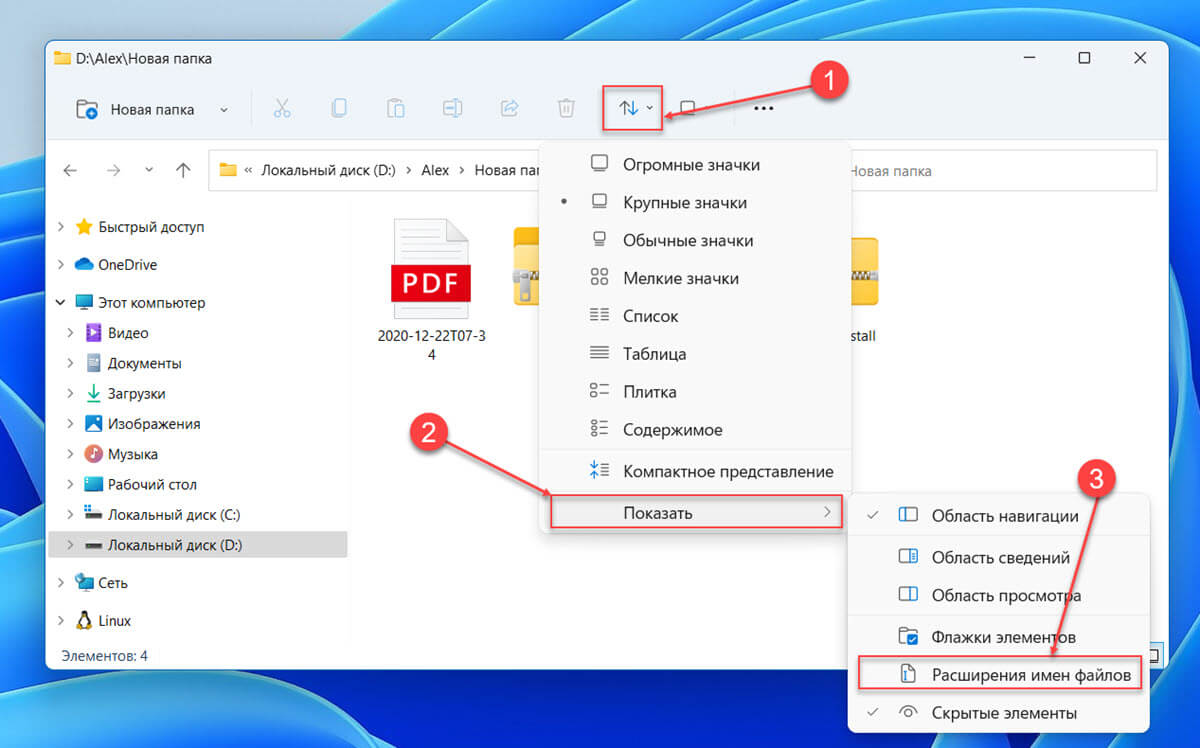
Самый быстрый способ включить отображение расширений — использовать соответствующую опцию в меню нового Проводника.
Шаги будут следующими:
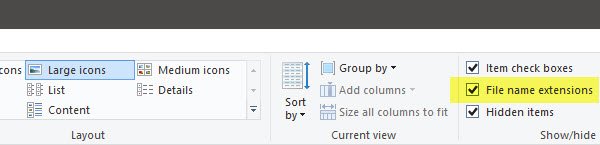
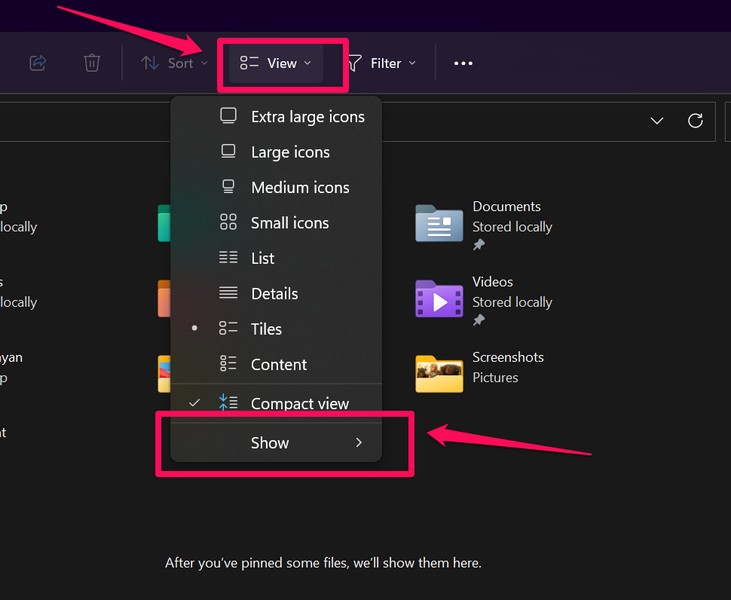
- Откройте проводник. В верхней строчке нажмите кнопку «Просмотреть». Если такой кнопки нет, нажмите по трём точкам, а затем — «Просмотреть».

- Перейдите в раздел «Показать»
- Отметьте пункт «Расширения имен файлов».


С этого момента расширения файлов начнут показываться в Проводнике и на рабочем столе.
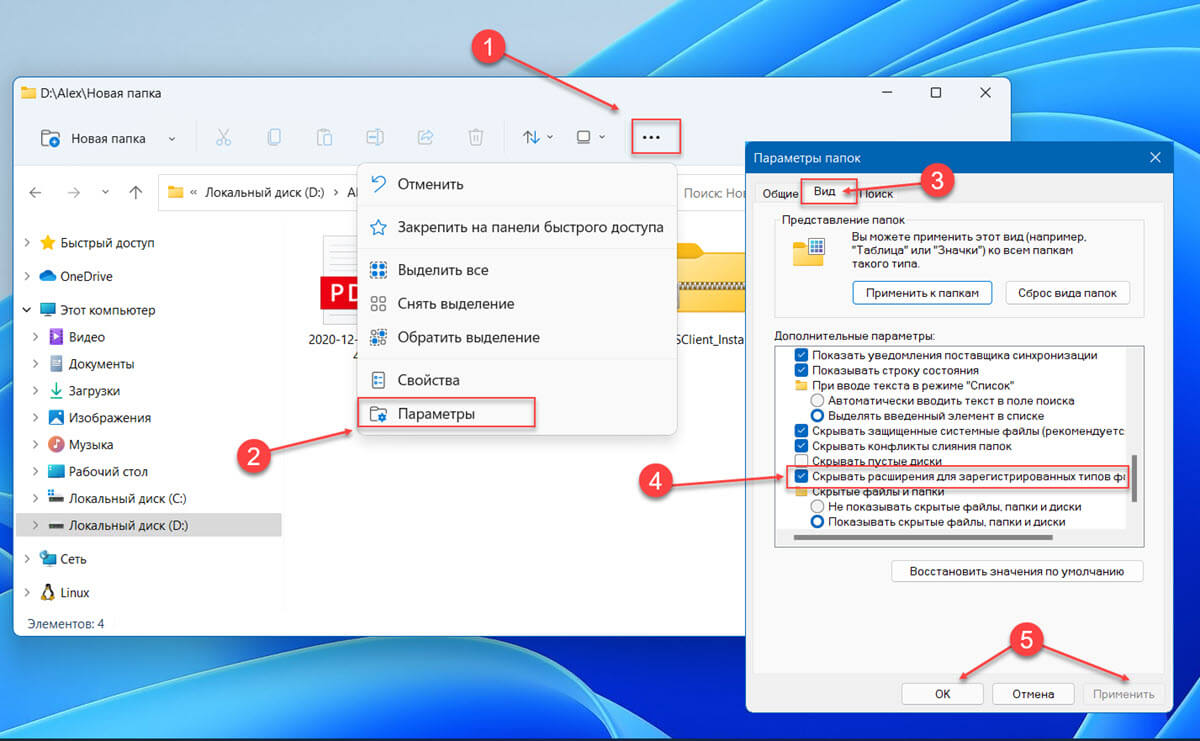
Как включить показ расширений для зарегистрированных типов файлов в параметрах проводника
Второй способ — использовать элемент панели управления «Параметры проводника». Открыть его можно одним из следующих способов:
- Открыть меню Проводника и выбрать пункт «Параметры».
- Открыть панель управления и открыть пункт «Параметры проводника»
- Нажать клавиши Win+R на клавиатуре, ввести control folders и нажать Enter.

В открывшихся параметрах проводника:
- Перейдите на вкладку «Вид».
- Снимите отметку с пункта «Скрывать расширения для зарегистрированных типов файлов».

- Примените настройки.

После выполненных действий расширения начнут показываться, во всяком случае для тех файлов, которые его имеют (вам могут встретиться и файлы без расширения).
Видео
File Extension is that which identifies the file type. If you are a regular Windows user, then it is not at all a problem to identify the file type. For it is very important to see file extension to identify the type of file you are trying to open from a security point of view. So in this post, we will see how to hide or show File Extensions in Windows 11/10/8/7 and why you should show them.
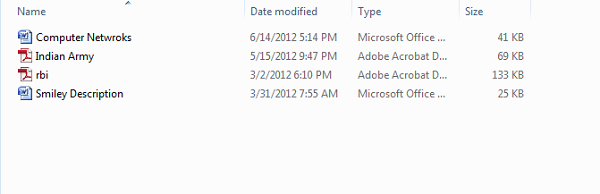
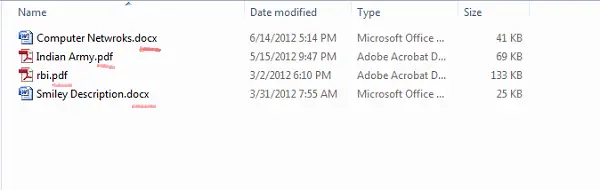
Since file names allow you to use multiple full stops, the real name of a malware file could be realword.docx.exe. But because you have not set Windows to show file extensions, you would see only realword.docx. Thinking it’s a Word document, you could well end up clicking on it and infecting your computer. If you had, on the other hand, set your PC to show file extensions, you would see its full name – realword.docx.exe, which would help you to identify that it was actually an executable file and in all probability a malware file. This will thus help you tell if a file is malicious or not.
What are File Extensions & how are they useful
Different file types have different extensions. Audio files have .mp3, .wav, .wma, and more based on the program used to open that file. File extensions also help the operating system to identify the corresponding program to open that particular file. So, you should be able to see file extensions to be at the safer side, and we will let you know how to enable options to see file extensions in Windows.
As mentioned earlier, by default Windows does not show file extensions and they are hidden. But, you can toggle the option to see them.
There are five ways how you can go about accessing this setting:
- Through the File Explorer Options
- Through Windows Explorer Ribbon
- Using the Registry
- Using Command Prompt
- Using Group Policy Editor.
1] Through Folder or File Explorer Options
To Show File Extensions in Windows 11/10 via File Explorer Options, follow these steps:
- Open Control Panel > Appearance and Personalization.
- Now, click on Folder Options or File Explorer Option, as it is now called
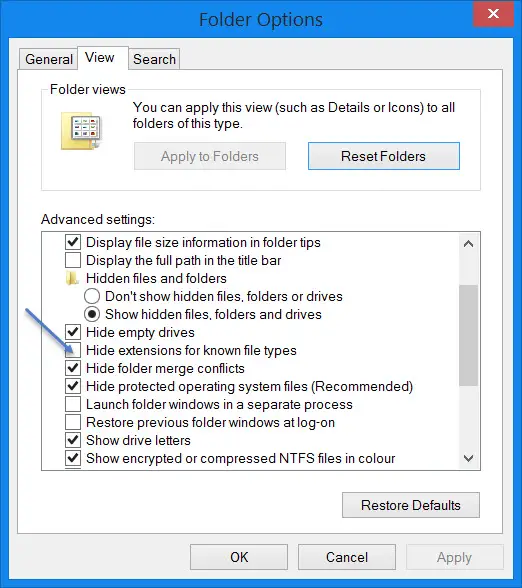
- Select the View tab.
- In this tab, under Advanced Settings, you will see the option Hide extensions for known file types.
- Uncheck this option
- Click on Apply and OK.
Windows 11/10 users may also search for File Explorer Options in Start search box and open this box.
Now, you can see file extensions for all files anywhere on your Windows system.
In Windows 11/10/8.1 Explorer, you can access File Explorer Options via Explorer.
Click View > Options > Change folder and search options.
Once here, you can do the needful as explained above.
In Windows 7, open Explorer, press Alt on your keyboard to make the Classic bar appear. Next, click on Tools > Folder Options. Now follow the steps mentioned above.
These are very simple steps to follow, and you do not need any third-party software to view file extensions. Windows provides us with everything which can be easily achieved, and the point lies in knowing and implementing them. This is the first way to see file extensions in Windows 7.
2] Via Windows File Explorer

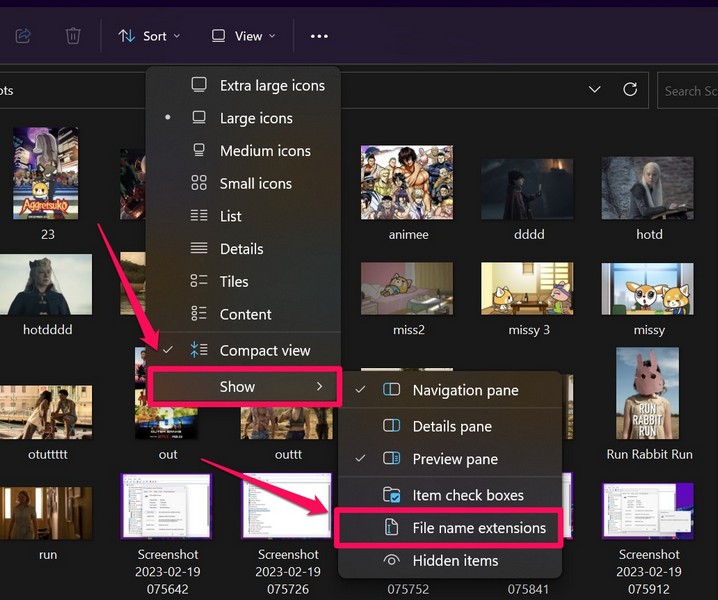
To show File name extensions in Windows 11:
- Open Explorer
- Click on View in the top menu
- Click on Show next
- Select File name extensions.
To show File name extensions in Windows 10, open Explorer and click on the View tab.
Simply select the File name extensions checkbox, and you are all set.
3] Using the Registry Editor
Hit the WINKEY + R button combination to launch the Run utility, type in regedit and hit Enter. Once Registry Editor opens, navigate to the following key-
Computer\HKEY_CURRENT_USER\Software\Microsoft\Windows\CurrentVersion\Explorer\Advanced
Look up for a DWORD entry labeled as HideFileExt.
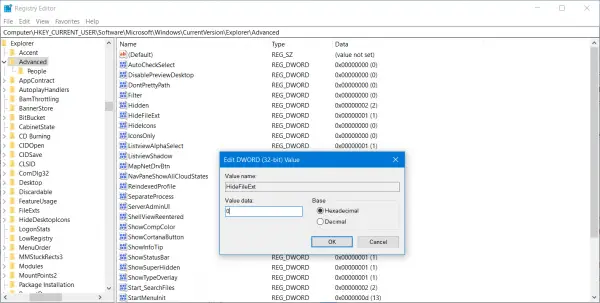
Double click on the mentioned DWORD entry and set its value as 0. This will show up the hidden file extensions.
A value of 0 will hide the file extensions.
Exit the Registry Editor and then reboot your computer for the changes to take effect.
4] Use Windows Command Prompt
This fix can be used in both the scenarios mentioned above. Insert a bootable drive of Windows 11/10 installer.
Start by hitting the WINKEY + X combinations and select Command Prompt (Admin) to launch Command Prompt with Administrator Privileges.
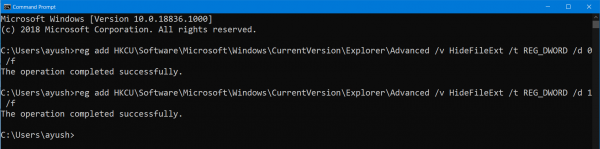
Navigate to the root location of that bootable device inside the Command Prompt command line. Once you get there, type in the following to show the file extensions-
reg add HKCU\Software\Microsoft\Windows\CurrentVersion\Explorer\Advanced /v HideFileExt /t REG_DWORD /d 0 /f
And then hit Enter.
You can also enter the following command to hide the file extensions,
reg add HKCU\Software\Microsoft\Windows\CurrentVersion\Explorer\Advanced /v HideFileExt /t REG_DWORD /d 1 /f
5] Using Group Policy Editor
You can also use the Group Policy Editor and change the setting here:
User Configuration > Preferences > Control Panel Settings > Folder Options.
Set “Show hidden files and folders” and uncheck “Hide extensions for known file types”.
Thus, you can set your Windows to show file extensions in Windows 11/10/8.
Read: How to create a file without an Extension in Windows.
How do I show file type extensions in Windows 11/10?
To show the file type extension or file extension in Windows 11/10, you need to open the Folder Options panel and remove the tick from the Hide extensions for known file types checkbox. At last, click the OK button to save the change. After that, you can find the file extensions of all the files you may have on your computer.
Read: How to open a file with no extension in Windows.
How do I see all file extensions in Windows?
The process to see all file extensions in Windows 11/10 is the same as the above one. That said, you need to remove the tick from the Hide extensions for known file types checkbox in the Folder Options window.
If you have anything to add, please do share it with us through comments.
Легко определяйте тип файла, включив отображение расширения файла рядом с именем в проводнике в Windows 11.
Расширения файлов позволяют любой операционной системе распознавать файл и запускать его с помощью уже установленной подходящей программы или приложения. Тем не менее, поскольку большинство пользователей не очень заботит, какой тип файла они используют, Microsoft Windows не отображает расширения файлов по умолчанию.
С точки зрения безопасности рекомендуется всегда проверять расширение загруженного файла из Интернета перед его запуском, чтобы защитить свой компьютер от атак вредоносных программ или программ-вымогателей (например, PDF-файлы и форматы файлов изображений, которые содержат вирусы — могут иметь расширение .EXE).
Помимо безопасности, если вы переходите на операционную систему Windows с другой (Linux или macOS). Отображение расширений файлов также может помочь вам быстрее познакомиться с типами файлов, используемыми операционной системой.
Различные способы отображения расширения имен файлов в проводнике
Есть несколько способов показать расширение файла в проводнике Windows 11, и вы можете выбрать тот, который вам больше подходит из перечисленных ниже вариантов.
- С помощью панели команд проводника
- С помощью параметров папки проводника
- С помощью столбца проводника тип файла
- С помощью редактора реестра
- С помощью Терминала Windows
- С помощью файла .bat
Включение расширения имен файлов на панели команд проводника
Это один из самых удобных способов показать расширения файлов в проводнике в Windows 11.
- Откройте проводник Windows 11, кликнув значок папки на панели задач. Кроме того, вы также можете нажать сочетание клавиш Windows E на клавиатуре, чтобы открыть его.
- Нажмите значок «Параметры макета и просмотра» в ленте проводника.
- Теперь наведите указатель мыши на опцию «Показать» и в новом контекстном меню, нажмите на опцию «Расширения имен файлов», чтобы в дальнейшем видеть расширения для любого файла имеющихся на вашем компьютере.
Показать расширение имен файлов с помощью «Параметров папок проводника»
Хотя этот способ требует от вас на несколько кликов больше, чем предыдущий. Однако, если вам нужно изменить несколько параметров проводника, это то, что нужно.
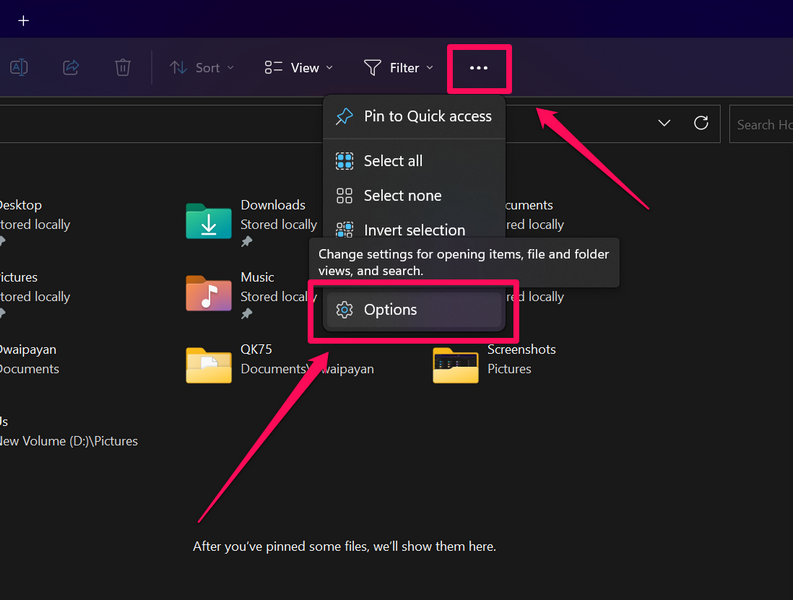
- Сначала запустите проводник, кликнув значок папки на панели задач, или любым другим удобным вам способом.
- Затем кликните многоточие … (три горизонтальные точки) в ленте проводника и нажмите на опцию «Параметры» в выпадающем меню.
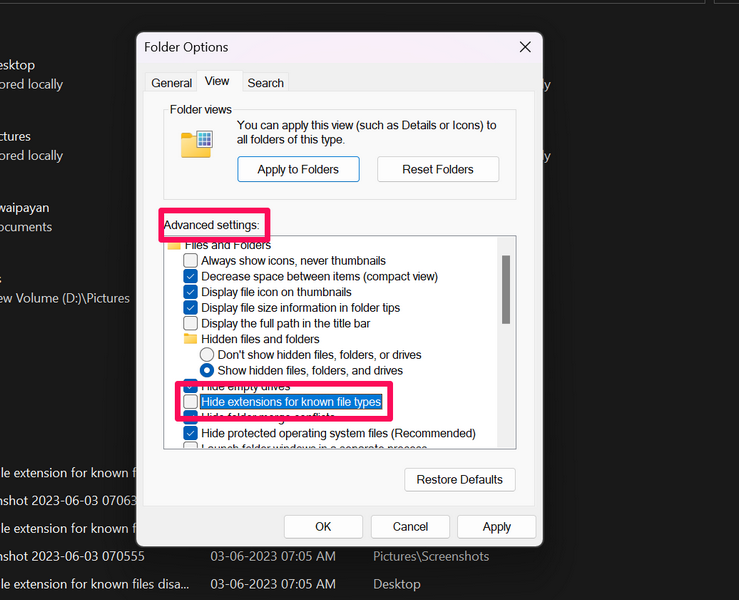
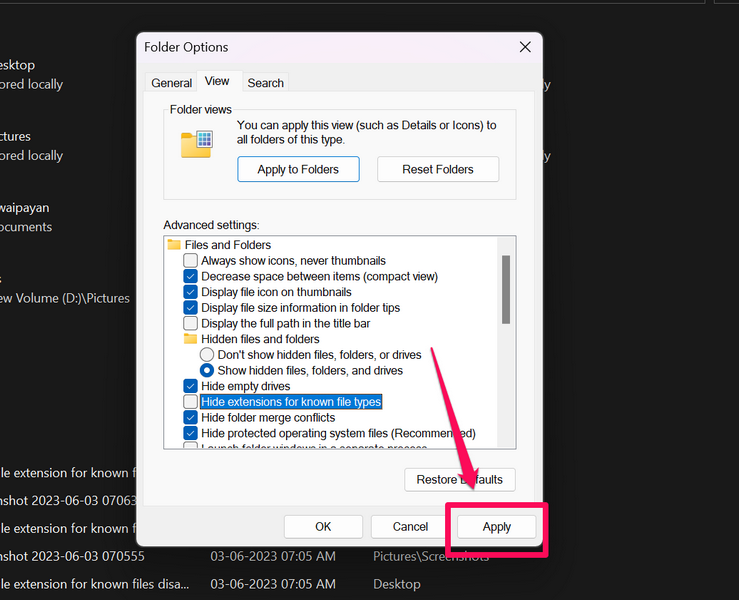
- В открывшемся окне «Параметры папок» перейдите на вкладку «Вид».
- Затем найдите в разделе «Дополнительные настройки» строку: «Скрывать расширения для зарегистрированных типов файлов», и установите флажок чтобы отменить действие параметра.
- Нажмите кнопку «Применить», чтобы применить изменения, нажмите «ОК», чтобы закрыть окно «Параметры папок».
Расширения файлов теперь будут видны на вашем ПК с Windows.
Добавить столбец «Тип файла» в проводнике
Добавление столбца «Тип» работает иначе, чем все предыдущие способы. Добавление столбца будет отображать тип файла в отдельном столбце проводника. Многие выбирают этот вариант только из соображений эстетики, поскольку этот способ не добавляет к имени файла расширения, но предоставляет вам важную информацию прямо на экране.
Примечание: Добавление столбца «Тип» не сможет отображать расширения файлов вне проводника на вашем ПК с Windows 11. В то время как все остальные способы смогут отображать расширения файлов непосредственно на рабочем столе.
- Для этого перейдите в нужную папку с помощью проводника.
- Кликните правой кнопкой мыши строку заголовка в проводнике, расположенную прямо под адресной строкой. Затем выберите параметр «Тип» в к меню, чтобы отобразить одноименный столбец.
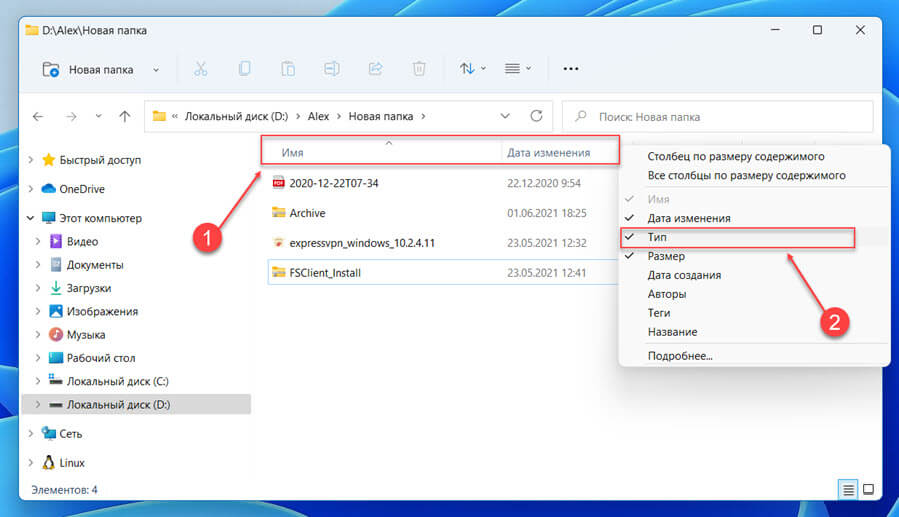
- После этого вы сможете увидеть расширения файлов для каждого из файлов в отдельном столбце на экране.
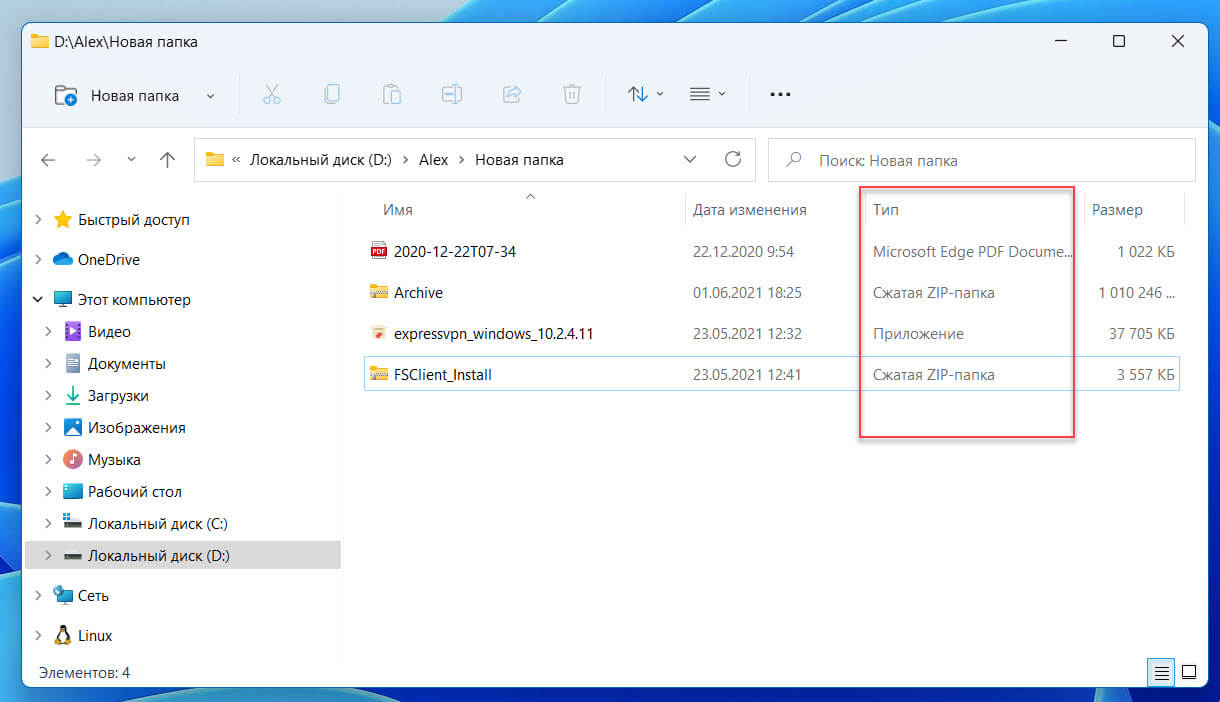
Примечание: Для некоторых файлов вместо расширений в столбце отображаются тип файла. Например: .EXE файлы будут отображаться как «Приложение».
Поскольку этот способ не отображает расширение всех файлов. Он лучше всего подходит для пользователей, уже знакомых с системой Windows и имеющих некоторые знания о расширениях и их соответствующих типах.
Если по какой-то причине ни один из вышеупомянутых вариантов не работает для вас, и вы не видите расширения файлов в Windows, редактор реестра — ваш лучший выбор.
Включить расширение файлов в проводнике с помощью редактора реестра
- Откройте редактор реестра
- Перейдите в следующий каталог. Вы также можете ввести или скопировать и вставить следующий путь в адресную строку редактора реестра:
HKEY_CURRENT_USER\Software\Microsoft\Windows\CurrentVersion\Explorer\Advanced
- Затем в правом разделе окна редактора реестра найдите и дважды кликните параметр HideFileExt.
- После этого измените значение на «0», чтобы всегда показывать расширения файлов, и нажмите «ОК» для подтверждения. Если вам когда-нибудь понадобится скрыть расширение файла, измените значение параметра «HideFileExt» на «1».

Примечание: После правки реестра может потребоваться перезапустить проводник или перезагрузить компьютер, чтобы изменения вступили в силу.
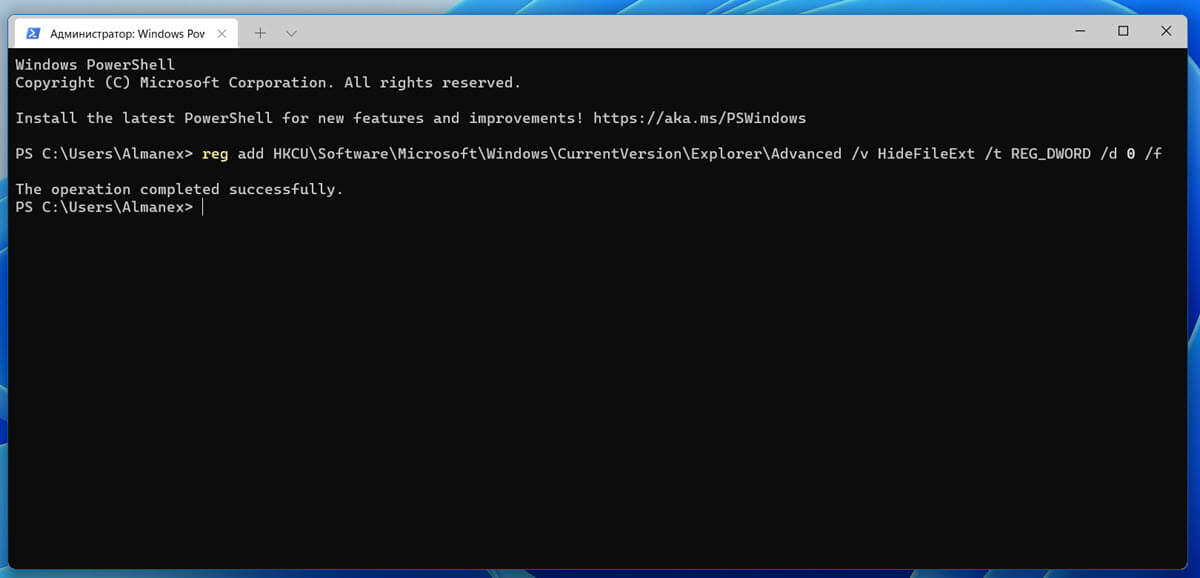
Включить расширение файлов в проводнике с Терминала Windows
Наверно один из самых быстрых способов включить отображение расширения имен файла.
- Запустите Терминал Windows от имени администратора
- Во вкладке с «PowerShell» или Командной строки, введите или скопируйте и вставьте следующую команду чтобы включить отображение расширений файлов:
reg add HKCU\Software\Microsoft\Windows\CurrentVersion\Explorer\Advanced /v HideFileExt /t REG_DWORD /d 0 /f
- Чтобы отключить отображение расширения, выполните следующую команду:
reg add HKCU\Software\Microsoft\Windows\CurrentVersion\Explorer\Advanced /v HideFileExt /t REG_DWORD /d 1 /f
Изменения должны применится мгновенно.
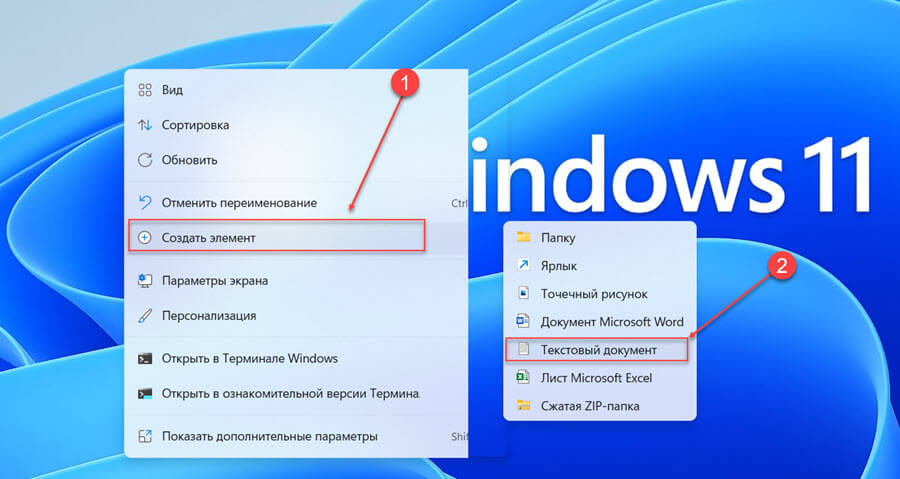
Вы также можете создать командный файл .bat и использовать его, когда вам нужно показать расширения файлов на нескольких компьютерах, или вы можете создать его для своих не очень технически подкованных друзей и членов семьи.
С помощью файла .bat
- Чтобы создать пакетный файл, кликните правой кнопкой мыши на рабочем столе и выберите в контекстном меню «Создать элемент» → «Текстовый документ». Затем дайте файлу соответствующее имя, которое поможет вам идентифицировать файл в дальнейшем, и нажмите Enter.
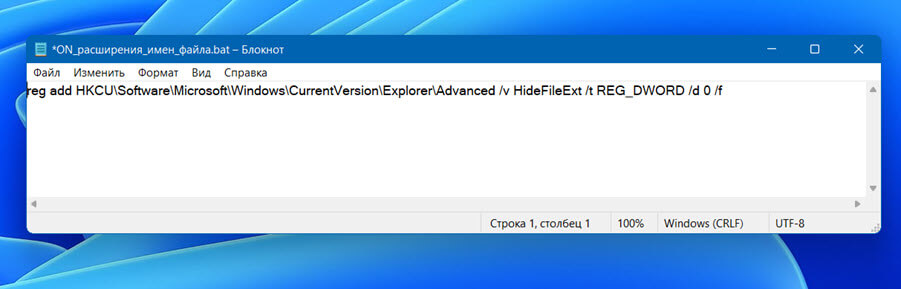
- После этого дважды кликните созданный файл. Скопируйте и вставьте следующую команду в текстовый файл, чтобы включить показ расширения файлов.
reg add HKCU\Software\Microsoft\Windows\CurrentVersion\Explorer\Advanced /v HideFileExt /t REG_DWORD /d 0 /f
- Если вы хотите скрыть расширение файлов на своем ПК с Windows, введите или вставьте следующий текст.
reg add HKCU\Software\Microsoft\Windows\CurrentVersion\Explorer\Advanced /v HideFileExt /t REG_DWORD /d 1 /f
- Перейдите в меню «Файл», выберите опцию «Сохранить как…» измените расширение текстового файла с .TXT на .BAT (<Ваше имя файла> .bat). Затем в строке «Тип» выберите «Все файлы» и нажмите кнопку «Сохранить».
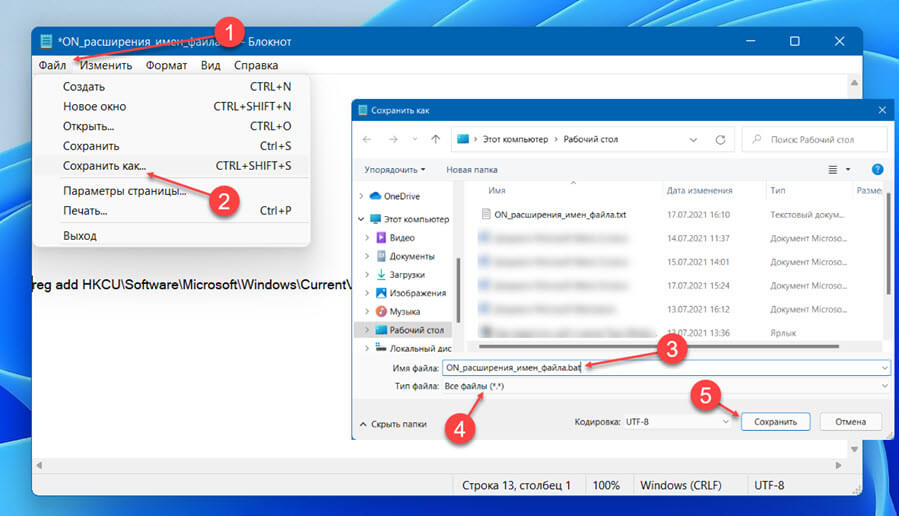
- Ваш командный файл будет создан в выбранном вами каталоге. Теперь вы можете перенести файл на другой компьютер с Windows и запустить его, дважды кликнув по нему.
Итак, теперь, вы теперь знаете, как показать расширение файла в проводнике Windows 11, и вы сможете создать командный файл для друзей.
Upon diving into Windows 11, you might notice an interesting quirk within File Explorer: it conceals the extensions for familiar Windows 11 file types as the default setting. Yet fear not, for there exist several avenues through which you can unveil these extensions.
A file’s extension, a sequence of three or four characters following the dot at the end of its name, symbolizes its format. Consider filenames like ‘my-notes.txt‘ or ‘my-document.docx‘. Although including extensions might seem superfluous once the file is saved, it serves as an additional visual cue to recognize the file format swiftly. Moreover, it proves beneficial when the need arises to switch between compatible extensions—say, transforming ‘.txt‘ to ‘.bat‘, especially when creating scripts or batch files. In this article, we’ll discuss how to show file extensions in Windows 11. So, let’s get started!
How to Show File Extensions Using File Explorer
Within Windows functionality, the File Explorer is an important tool, granting you access to and dominion over your operating system’s array of files. Moreover, this versatile utility accommodates the revelation of file extensions dwelling within your computer’s precincts. To undertake this venture, adhere to the following guidelines:
- Initiate the File Explorer by navigating through the Start menu bar. Simply type ‘file explorer’ and select the most pertinent option from the array of search outcomes.
- Go to the ‘View’ tab on the interface.
- Click “View” to see more options, then click “Show” to proceed.
- Select “File name extensions.”
- Confirm your intention to display file name extensions Windows 11 and watch the satisfying transformation.
- With this final step, your computing world will undergo a refreshing transformation. Watch as file extensions are revealed like a curtain being drawn back to reveal the hidden nature of each Windows 11 file.
See File Extensions via Command Prompt
If you face any problems with the avenue, don’t worry. You could also try using the Command Prompt. Here are the steps to get started:
- To start, open the Start menu and type “cmd” in the search bar. Choose the Command Prompt application from the search results.
- You’re ready to take control with the Command Prompt at your fingertips. Here’s how to show file extensions in Windows 11 command line:
reg add HKCU\Software\Microsoft\Windows\CurrentVersion\Explorer\Advanced /v HideFileExt /t REG_DWORD /d 0 /f
- Hit the ‘Enter‘ key to set this command into motion.
Using command lines lets you control your system and learn more about it. Using a specific command allows you to see file extensions and better understand your system.
View File Extensions through File Explorer Options
File Explorer options let you navigate your system’s settings. By following these steps, you can change how File Explorer behaves, including whether or not to show file extensions:
- Open the Start menu’s search bar and type ‘control panel.’ Choose the best match that appears.
- Inside the Control Panel, search for ‘file explorer options‘ and select the most relevant result.
- Click on the “View” tab.
- Look for ‘Advanced settings‘ and find the section named ‘Files and Folders.‘
- Find the box that says, “Hide extensions for known file types.” Uncheck it to trigger the display of hidden extensions.
- Confirm by clicking ‘OK.’ Your settings will be saved instantly.
Display File Extensions in Windows 11 via Folder Options
To show file extensions on Windows 11 using Folder Options, follow these steps:
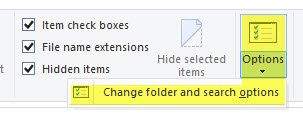
- Launch File Explorer and tap the three-dot menu on the upper toolbar. From there, select “Options.”
- Move to the “View” tab in the ensuing window. Scroll to find the setting you’re looking for.
- Spot the checkbox labeled “Hide extensions for known file types.” Uncheck it, then confirm by hitting “OK.”
- Explore a folder containing various file types, and you’ll now notice the file extensions accompanying each file name.
- If you wish to revert to the default hidden state, return to Folder Options and check the “Hide extensions for known file types” checkbox. Confirm by clicking “OK.”
Show File Extensions in Windows 11 via Windows Settings
To make file extensions visible in Windows 11 using the Settings app, follow these steps:
- Swiftly launch the Settings app by pressing “Windows + I“ keys together. Next, let’s head over to the left sidebar and click on “Privacy & Security.” Once you’re there, check out the right pane and click on “For developers.” It’s right there waiting for you!
- Locate the “File Explorer” section, then click “Show settings” next to the option “Change settings to show file extensions.”
- The familiar Folder Options window will open, akin to the previous method. In this window, clear the checkmark next to “Hide extensions for known file types.” Confirm by selecting “OK.”
- Now, your Windows 11 PC will unveil file extensions for easy access.
The Bottom Line
The new Windows 11 Explorer interface looks pretty nice. They’ve moved some of the most-used options to the View menu so you can get to them quickly. It’s important to turn on the display of file extensions in Windows 11 so you know what kind of file you’re about to open. To enhance your Windows 11 experience further, consider downloading SmartWindows. This cool application makes your Windows 11 experience smoother and faster, so you can get more done in less time.
SmartWindows
Restore Browser Tabs with SmartWindows. It maintains an active tab history and restores browser size as well as display position on one screen or many.
FAQs
How do I show all file extensions?
- Launch File Explorer.
- Select the View tab.
- Select the checkbox labeled “File name extension.”
- Optionally, you can also enable Hidden items.
- Now, file extensions will be visible.
What is the shortcut to show file extensions?
- Use Windows logo + E to open File Explorer.
- Press Alt, then V, and finally HF to toggle file name extensions.
How do I hide file extensions in Windows 11?
When in the Folder Options window, scroll to Advanced settings. You can hide or show file extensions by selecting or deselecting the “Hide extensions for known file types” checkbox in File Explorer. Confirm your choice by clicking Apply and OK at the bottom.
While browsing through files in Windows 11, being able to check the file extension of them makes it much easier to find the right files on your PC or laptop. In this case, the Show file extension feature in Windows 11 comes pretty handy as it shows the file extensions of each file in the system at the end of their titles. For instance, you will see a .jpg at the end of the name of an image file and a .exe if you happen to come across an executable file on your device.
However, by default, the Show file extensions feature is disabled in Windows 11. Hence, you will not be able to see the file extensions at the end of the file names on your Windows 11 PC or laptop unless you enable it in the system. And in this in-depth guide, we will help you learn just that, with easy-to-understand, step-by-step guides. Check them out in the following sections.
Now, there are a few ways via which you can enable the Show file extension feature on your Windows 11 PC or laptop. This will always show the file extensions as a suffix with the file names on your device.
However, there is a way to view the file extension of files in Windows 11 without actually enabling the Show file extension feature. Check out all the details about it and the other ways to view file extensions in Windows 11 right below.
1. View File Extension in File-Info Box UI in Windows 11
Starting with the easiest way to view file extensions in Windows 11, it is via the small file information box that appears for every file on PCs and laptops. This does not require users to enable the Show file extension feature in Windows 11 and they can view the file type just by hovering the cursor over a file on their PCs and laptops.
So, take the mouse cursor and put it on a file on your Windows 11 PC or laptop without clicking it. You will see a small file information box pop up near the cursor, containing key information about the file you are looking at. In this box, you can check the file extension of the file beside the Type/ Item type parameter.

Other than that, you can also view the side of the file, the length of a video file, and the date and time at which it was modified.
2. Enable File Name Extensions in Windows 11
Now, another way of viewing file extensions in Windows 11 is by enabling the File name extensions under the Show option in File Explorer. This will enable the Show file extension feature on your Windows 11 PC or laptop and you will be able to view the file extensions of each of the files at the end of their names on your device.
You can follow the steps right below to enable the File name extensions feature in File Explorer on your Windows 11 PC or laptop:
1. Use Windows + E to open File Explorer on your Windows 11 PC or laptop.
2. Click the View option on the top menu bar and take the cursor to the Show option at the bottom.
3. On the following drop-down menu, click the File name extensions option to enable it on your device.
4. Once you execute all the above steps on your Windows 11 PC or laptop, you will be able to view the file extensions of every file at the end of their names.
However, if you do not want the file extensions to be shown at the end of the file names on your Windows 11 PC or laptop, you can always disable the File name extensions option under the Show menu in File Explorer using the above steps.
3. Disable Hide Extensions for Known File Types in Windows 11
One other way of enabling the Show file extension feature on Windows 11 PCs and laptops involves disabling a certain setting within the Folder Options settings menu.
You can check out the steps right below to disable the said setting in Folder Options on your Windows 11 PC or laptop and view the file extensions of every known and unknown file type on your device:
1. Use Windows + E to launch File Explorer on your Windows 11 PC or laptop.
2. Click the three-dot button on the top menu bar and select Options on the drop-down menu.
3. Now, in the Folder Options window, go to the View tab on the top navigation bar.

4. Next, under the Advanced settings section, uncheck the Hide extensions for known file types option on the list.
5. Hit the Apply button below to save the change on your device.
Following this setting change in Windows 11, you will be able to view the file extensions of every known and unknown file type as a suffix to their names on your PC or laptop.
4. Enable Show File Extensions via Command Prompt in Windows 11
The Show file extensions feature in Windows 11 can also be enabled via the Command Prompt tool on your PC or laptop. However, this should be treated as a last resort method to enable the said feature in Windows 11 and should only be used when the above methods fail to show the file extensions on your device.
You can follow the steps right below to enable the Show file extension feature in Windows 11 via the Command Prompt tool on your PC or laptop:
1. Use Windows + S to open Windows search on your PC or laptop and type in cmd.
2. Once the Command Prompt tool shows up in the search results, click the Run as administrator button.

3. Click Yes on the following User Account Control prompt.
4. Once the Command Prompt tool launches, type in or copy-paste the following command and press Enter:
reg add HKCU\Software\Microsoft\Windows\CurrentVersion\Explorer\Advanced /v HideFileExt /t REG_DWORD /d 0 /f.5. Wait for the command to execute.
6. Exit the Command Prompt window after the process is completed.
You will not be able to see the file extensions for every file on your Windows 11 PC or laptop.
FAQs
What are file extensions in Windows 11?
File extensions, such as .jpg or .mp3, depict the type of files that are stored on Windows 11 PCs and laptops. These extensions essentially allow users to identify a file type and choose the relevant app or program to open the file on their Windows 11 device.
What are some examples of file extensions?
Examples of file extensions include .jpg, .jpeg, .mp3, .mp4. .exe, .json, .mkv, .mov, .doc, .docx, and many others.
Are file extensions visible by default in Windows 11?
No, file extensions are not visible by default in Windows 11. Users need to enable the File name extensions feature under the Show settings in Windows Explorer to view the file extensions of every file on their PCs or laptops.
How to turn off file extensions in Windows 11?
If users do not want to view the file extensions for the files on their Windows 11 PCs or laptops, they can disable the File name extensions option under the Show settings in File Explorer.
Now You Can Easily Show File Extensions in Windows 11!
So, there you have it! This was all about how to show file extensions in Windows 11 to easily identify file types while browsing through them in File Explorer on your PC or laptop. We hope this guide helps you enable the said setting on your PC or laptop and that you are able to view the file extensions of all your files in Windows 11.
If you want to learn how you can show or hide file extensions on Macs, running macOS 13 Ventura, you can check out the linked article.