
Are you curious to work with the Linux Operating System inside your PC/Laptop? Then you’re at the right place. This guide helps you in the hassle-free installation of Fedora Linux on your System.
Now, we are going to install Fedora Workstation v35 on our system.
What is Fedora?
Fedora Linux is a Linux distribution developed by the community-supported Fedora Project which is sponsored primarily by Red Hat, a subsidiary of IBM, with additional support from other companies.
If you want to know more about Linux and its distributions, check it out here.
Prerequisites
- 35GB+ free space in HDD/SSD
- 8/16GB Pen drive
- Windows 11/10
Note: This guide is only for the system which has UEFI BIOS and the type of SSD/HDD is GPT and System Type is x64-based.
How to check the BIOS Mode of your system?
- Click Start Button
- Search msinfo32 (or) System Information in the search bar
- Check BIOS Mode Property
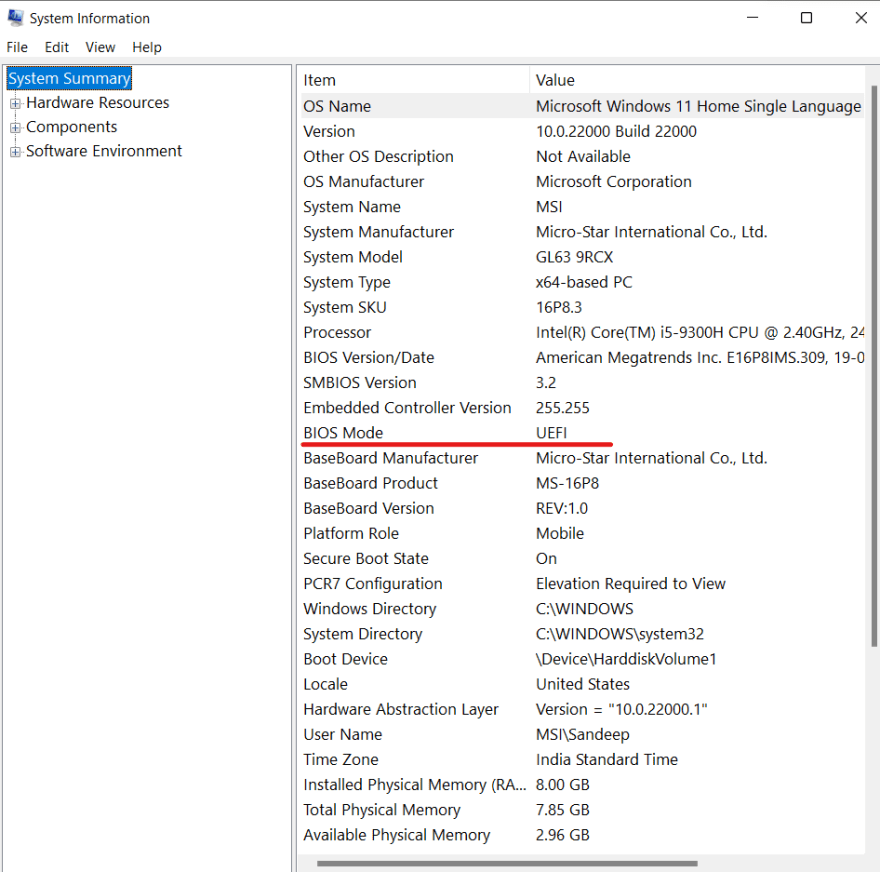
If it’s UEFI, you’re good to go.
How to check the SSD/HDD Mode of your system?
- Click Start Button
- Search for
cmd - Run
cmdas administartor - Type
diskpartand press enter. - Next, type
list diskand press enter.
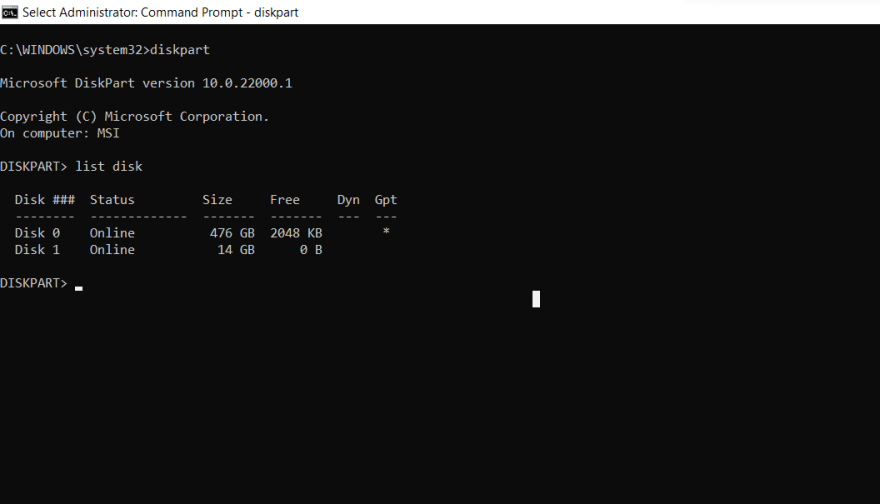
If you see * under GPT of Disk 0, you’re ready for installation of Fedora Linux in your System.
Softwares Required
- Fedora Workstation ISO

- Rufus for making USB bootable. Click here to know more.
Now, it’s time to create a bootable USB. So, format your USB beforehand.
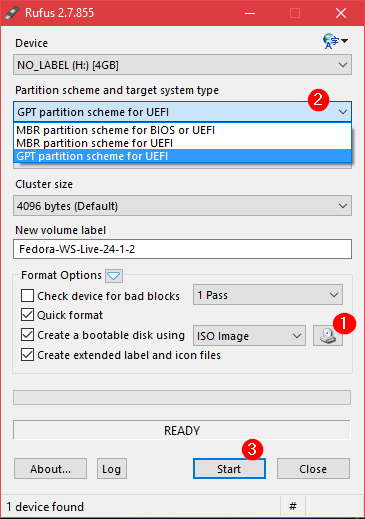
Create a Bootable USB using Rufus
- Open Rufus and plug your clean USB stick into your computer.
- Rufus will automatically detect your USB. Click on Device and choose the USB you want to use from the drop-down menu.
- Make sure the Boot Selection option is set to Disk or ISO image then click Select. Rufus will open a file explorer browser window, locate the ISO image which you downloaded named
Fedora-Workstation-Live-x86_64-XX-X.X.isoto burn onto the USB, and select it.
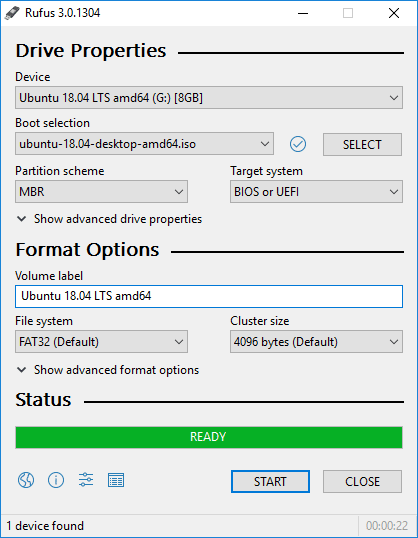
- Leave other options as default and click Start.
- You’ll get a warning saying that any data on the USB will be destroyed (this is normal). Click OK and Rufus will start creating the ISO image on the USB.
- Let it run in the background, jump to the next section.
- Once Rufus has finished creating the ISO image on the USB, you can close it and your bootable USB is ready to go!
Make a new Unallocated Partition.
-
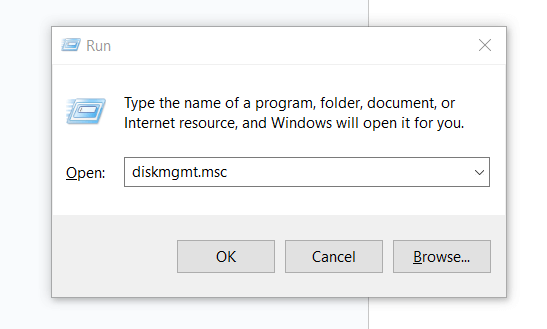
Press the
Windows key + Ron your keyboard to open the Run utility, or search for it in the Start menu. -
Type
diskmgmt.mscand press OK. -
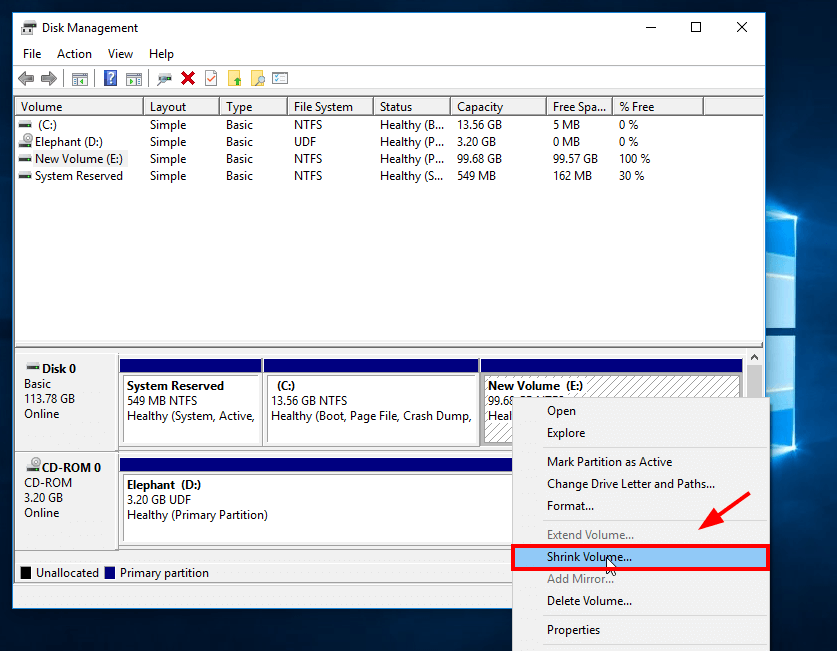
A menu will appear with a list of all your hard drives. Right-click on the drive you want to partition and select Shrink Volume.
-
You’ll be asked how much you want the drive to shrink. The amount you enter will be the amount of space left for your new partition. The
total size after shrinkwill be the space left in the original partition. -
Enter a value and Click Shrink. (Note: If you want 50GB partition, the value is 50 x 1024 = 51200).
-
Now, you’ll find a new Unallocated Partition under Disk 0.


Reboot your system into BIOS Mode.
- To boot into BIOS, Press the below keys before OEM Logo (Brand Logo) appears. the key may be
ESC,Del,F1,F2,F10,F12. If still, it’s not booting into BIOS, Check the below step. - Google your system model with BIOS mode at the end. You’ll find the solution.
- After booting into BIOS, disable
Secure Bootand Change the Boot Drive priority toUSB. - Save the Changes and Reboot.
Boot into Fedora
- If all steps have been performed correctly, you will see the below image.
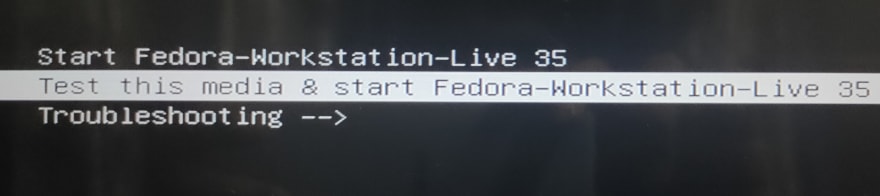
- Select
Test this media & start Fedora Workstation-Live XX - Wait for some time, you’ll see a window with two options.
- Click Install to Hard Drive. Again, wait for < 1 min.
- You will land on the below Window.
-
Click on the
Keyboardoption, Select your Keyboard Language and Click Continue. -
Similarly, Click on the
Date & Timeoption, Select your Time Zone and Click Done.
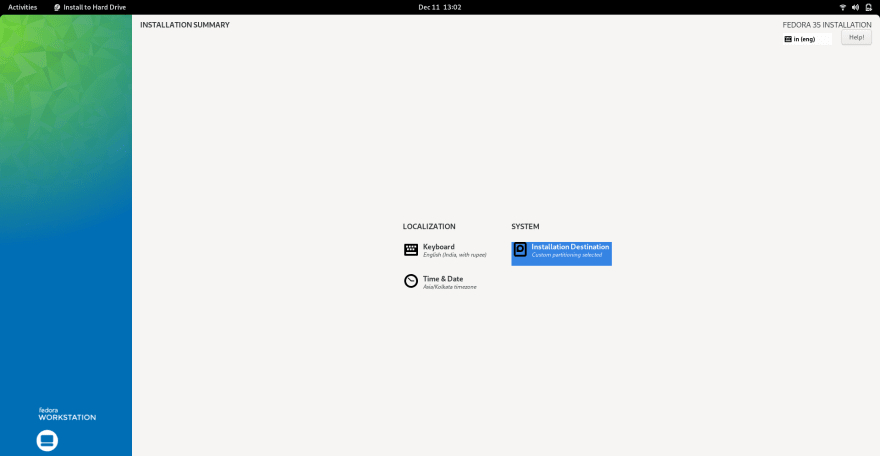
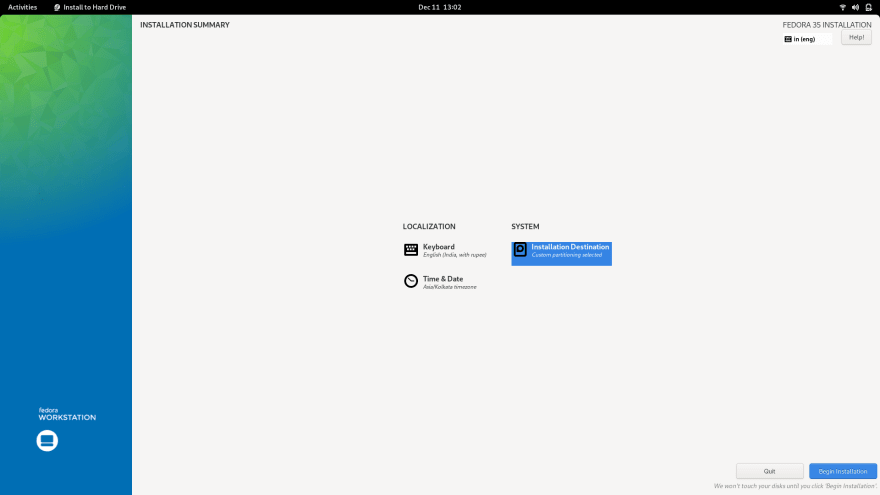
Installation
- Now, Click
Installation Destination.
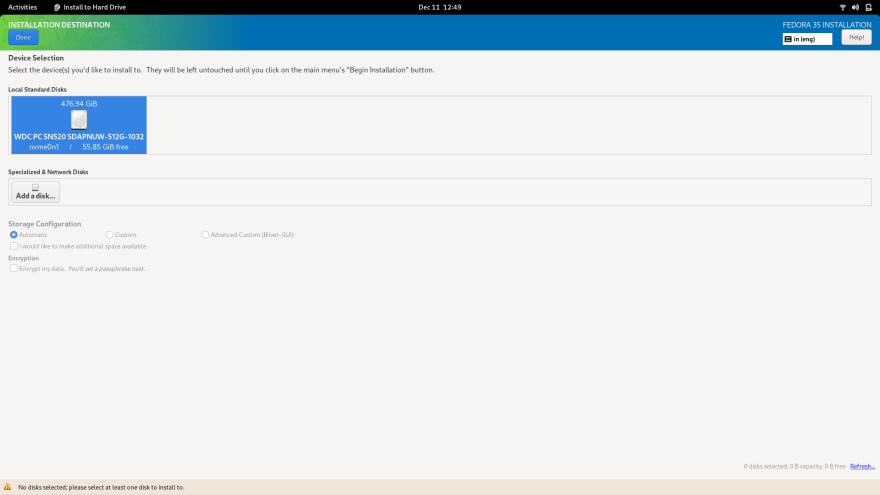
- Select your disk, Choose Custom under Storage Configuration and Click on Done.
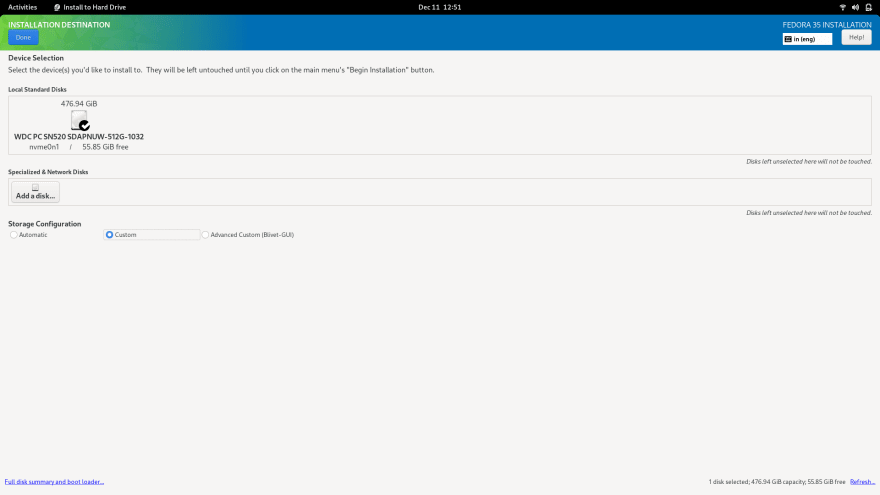
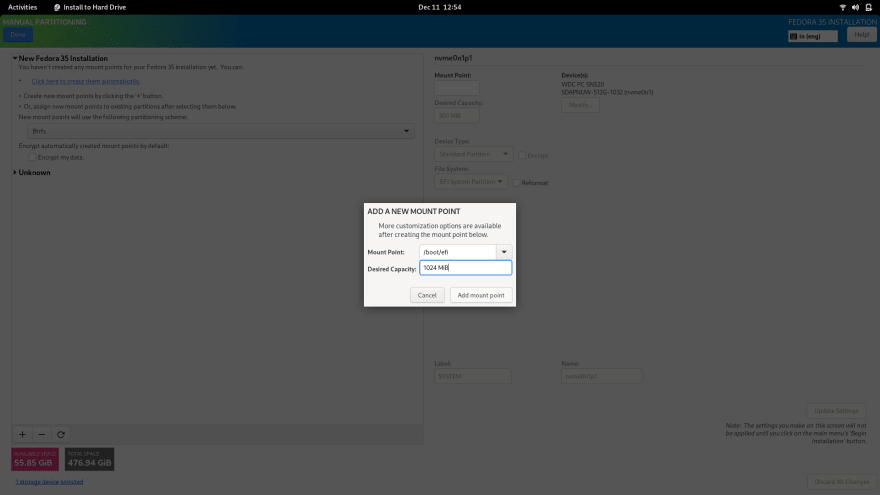
- Now, you’ll be in the below window and also verify that the Available Space is your Unallocated Partition Space.

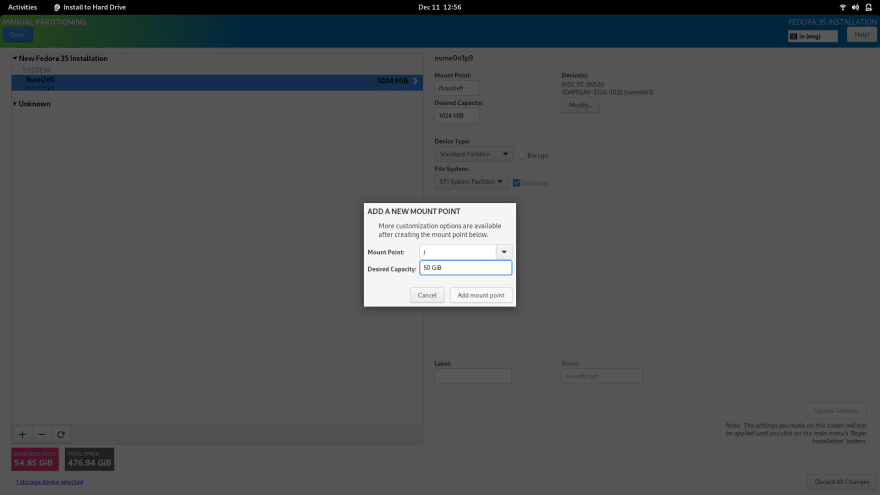
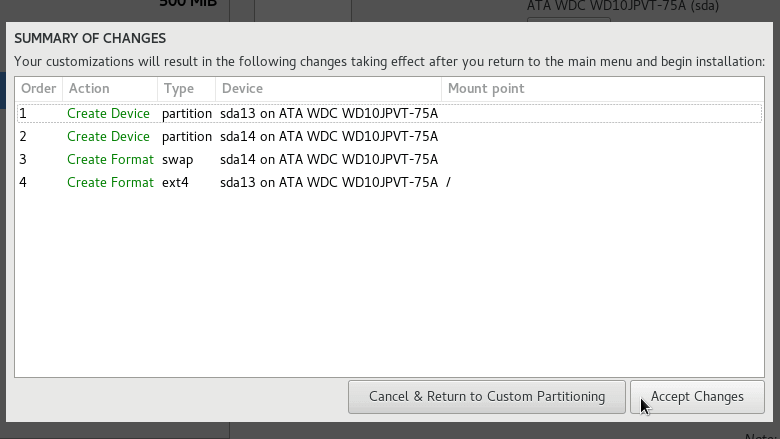
- Click on the + icon, a popup appears, Choose
/boot/efiUnder Mounting Point which is System’s EFI partition. Enter1024MiBin Desired capacity. Click on Add mount Point.
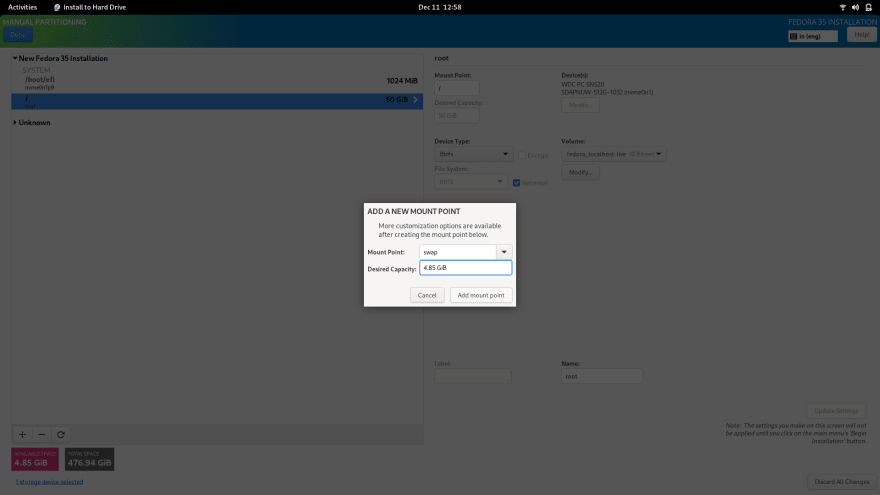
- Similarly, Click on the + icon again, In popup, Choose
/Under Mounting Point which is called Root Partition. Subtract 5GiB from Available Space and Enter remaining space in Desired capacity (Ex: 50 GiB). Click on Add mount Point. And Verify it’sDevice Typewhich is Btrfs.
- Similarly, Click on the + icon again, In Pop up, Choose
swapUnder Mounting Point, which is swap memory. Enter the remaining space in Desired capacity (Ex: 5 GiB). Click on Add mount Point.
- Finally, you’ll see all the partitions created.
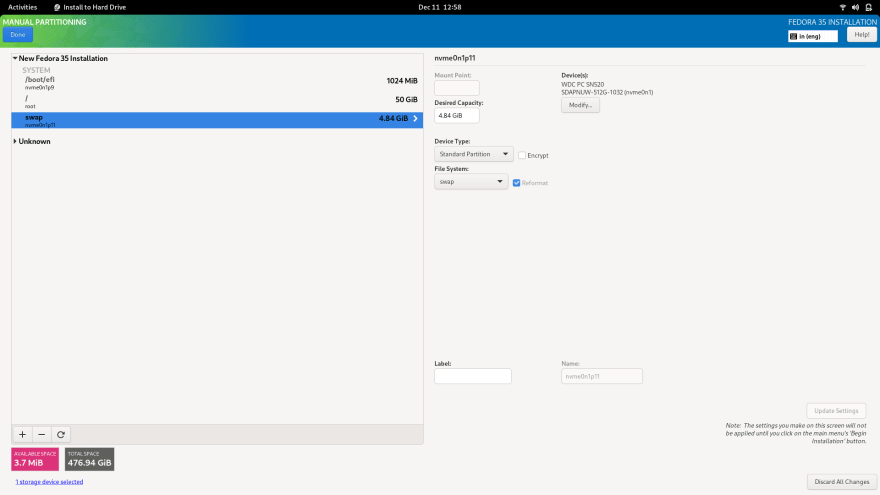
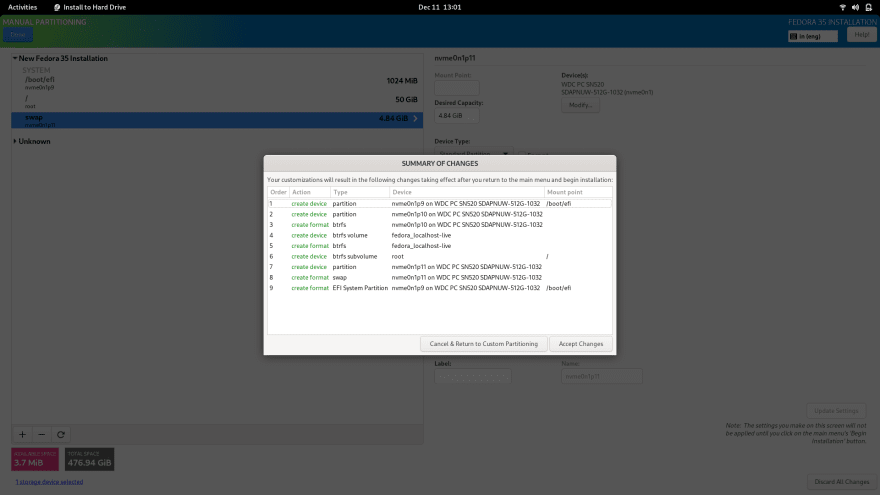
- Now, click on Done. Verify the Summary of Changes. And click on Accept Changes.
- You’ll see the below window. Now, click on Begin Installation.
Relax for 10-15 mins.
- Click on Finish Installation.
The system will restart automatically and you’ll see the GRUB Bootloader, Select Fedora, and Press Enter.
Enter your details and you’ll be finally booted into Fedora Linux.

Thanks for following the guide. Hope this helps you in some way 
Dual booting is the practice of installing multiple operating systems on the same PC. It’s a popular and convenient way of running multiple operating systems such as Linux and Windows on the same host without having to opt for virtualization which does not provide a bare-metal experience which sometimes would be necessary.
In this tutorial, we will walk you through the process of having a dual-boot setup of Windows 10 and the latest Fedora. At the time of writing this guide, Fedora 38 is the latest version.
Prerequisites
For this guide, you need to have the following:
- Windows 10 is installed on your PC, which will be the primary OS on which we will create a partition for installing Fedora.
- A fast and stable internet connection for downloading the Fedora ISO image.
- At least 8GB USB drive to be used as an installation medium.
Create a Free Space On Your Hard Drive
With Windows 10 as the primary OS, you need to reserve a partition on which you will install Fedora 38. To achieve this, first, launch the disk management utility by pressing the ‘Windows logo Key + R‘. Next, type ‘diskmgmt.msc‘ and hit ENTER.
This opens the ‘Disk Management‘ console that displays the current disk partitions on the Windows system.
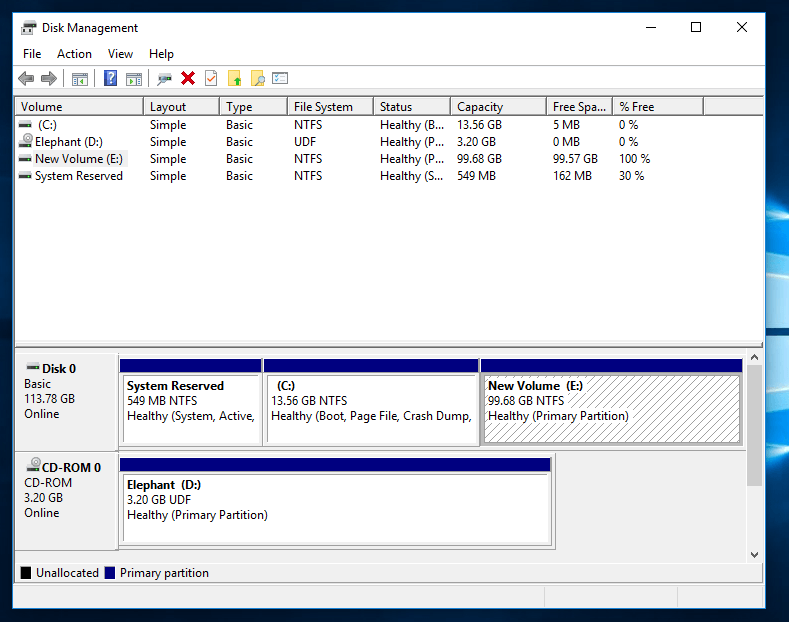
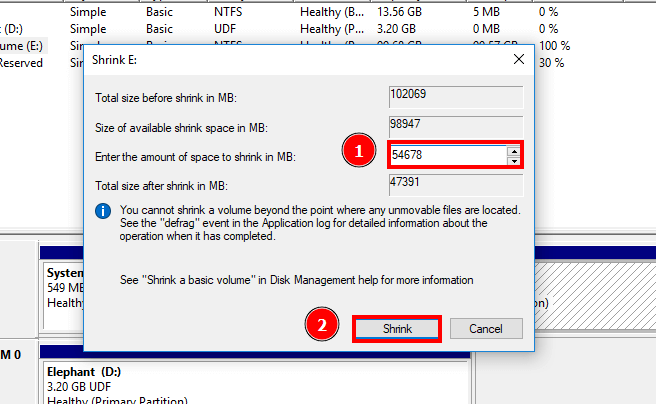
Next, we will create a reserved partition for Fedora 38. To do this, we will need to identify a volume and shrink some space. To demonstrate this, we will shrink some space on Volume E and create a new partition.
Therefore, we right-click on ‘New Volume E‘ and select ‘Shrink space‘.
Next, specify the amount of space to shrink which will be the size of the partition reserved for installing Fedora 38. In our case, we have specified 54678MB which is approximately 54GB.
Next, click ‘Shrink‘.
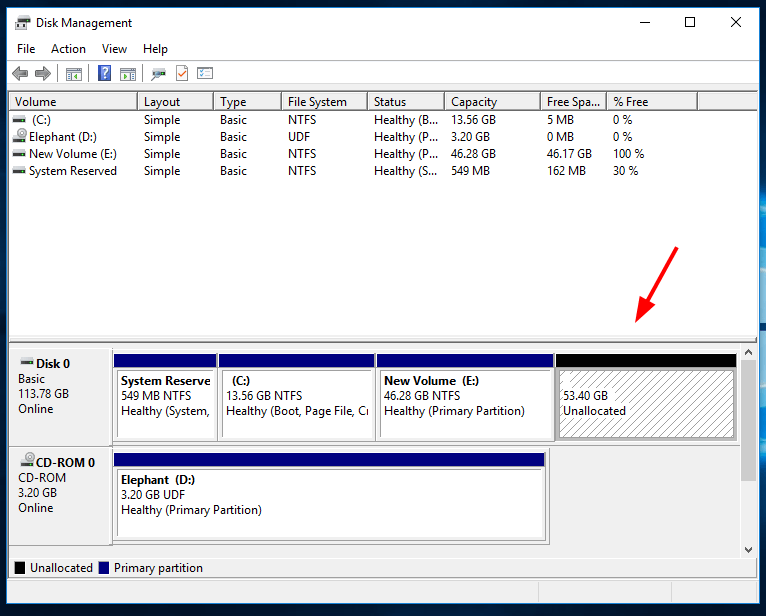
Below is our reserved partition which now appears as an unallocated partition.
Create a Bootable USB Drive of Fedora in Windows
The second step is to make a live USB medium for Fedora. First, download the latest Fedora ISO file from the official Fedora download page.
Once you have downloaded the ISO image, use a tool like Rufus or Balena Etcher to make the USB drive bootable.
Also, check out the following useful tools to make a bootable USB drive from an ISO image.
Next, plug in the USB medium to your PC and reboot. Be sure to configure the BIOS settings and set the USB installation media to have the highest boot priority so that the system can boot from it.
Start the Installation of Fedora
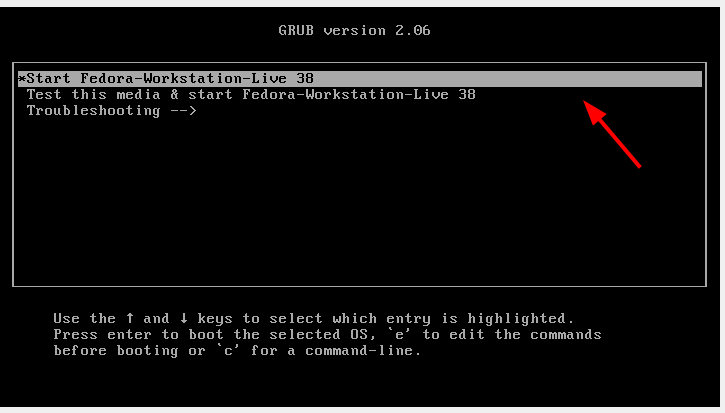
Once the system reboots, the GRUB bootloader will appear on your screen as shown. The first option is selected by default. So hit ENTER to begin the installation.
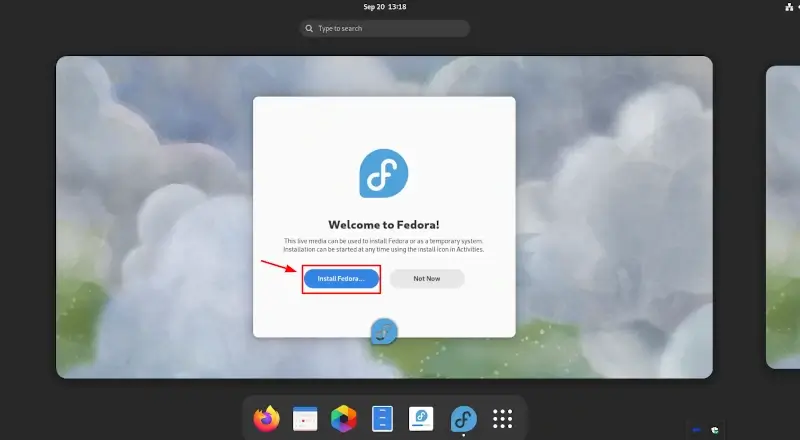
Shortly afterward, the Fedora 38 welcome screen will be displayed. Click the ‘Install Fedora’ button to begin the installation.
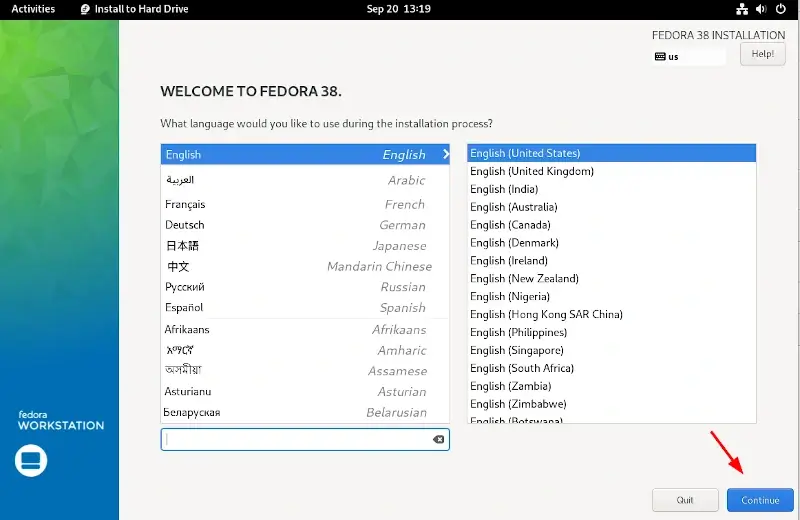
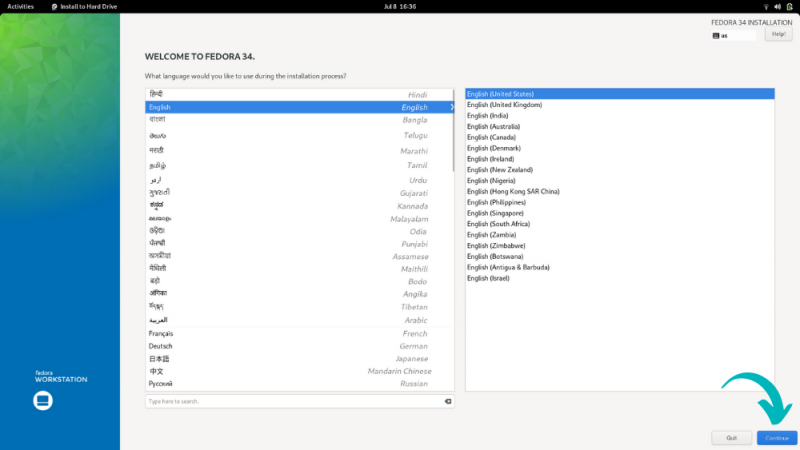
Next, select your preferred installation language and click ‘Continue’.
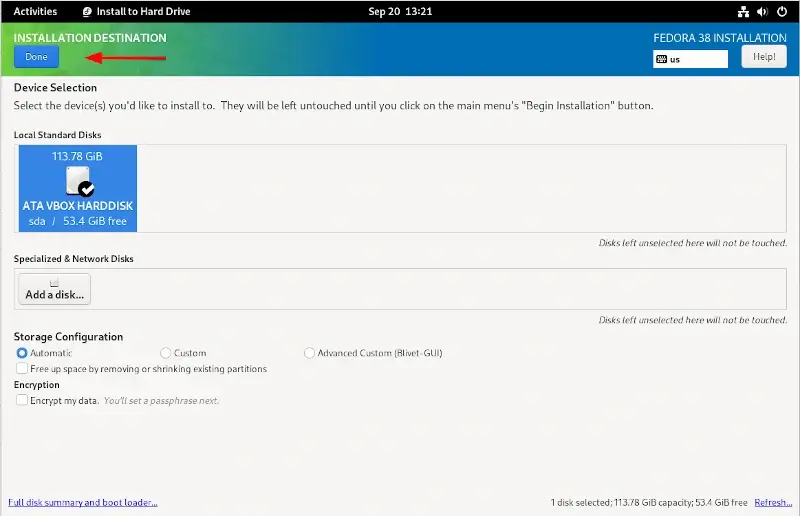
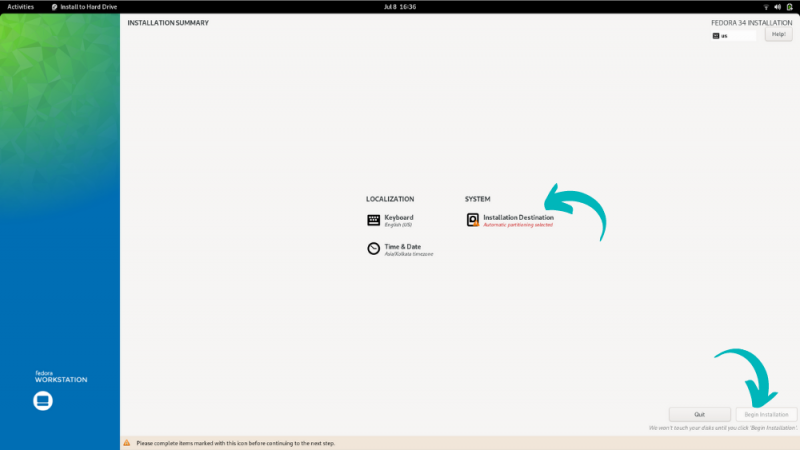
Moving on, the next step is to configure the partition table on your hard drive. So, click ‘Installation Destination’.
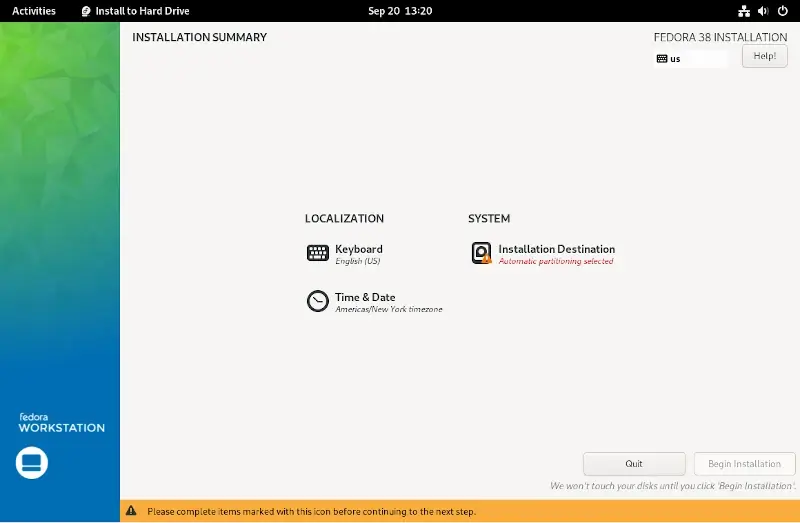
The PC hard drive is displayed Under ‘Device selection‘ with the amount of free space available for the installation. This should correspond to the reserved space created earlier in Windows. In our case, we have 53.4GB free of space.
By default, the automatic partitioning scheme is selected. We will go with this which places all the partitions under the root filesystem (/).
Next, click ‘Done’.
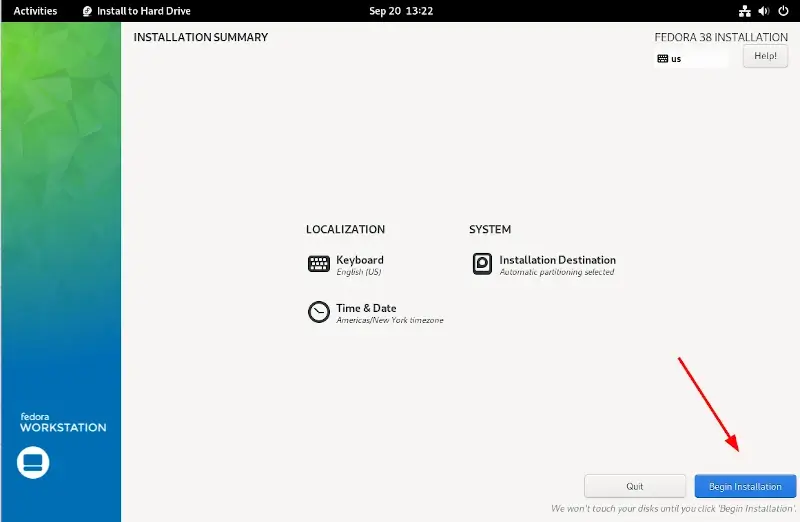
Once done, click the button to commence the installation of Fedora 38.
The installation will begin and will take some time depending on the state of your hard drive. In our case, this took roughly 15 minutes.

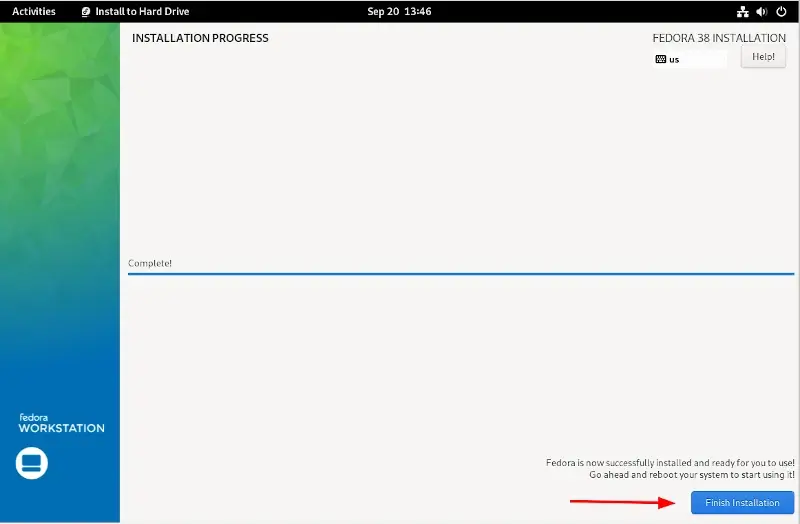
Once the installation is complete, click ‘Finish Installation’.
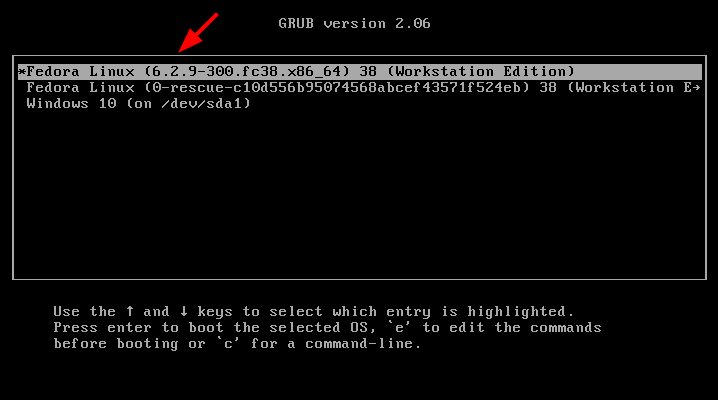
Be sure to reboot the system, and upon system reboot, you will see the Windows 10 entry on the GRUB menu as shown.
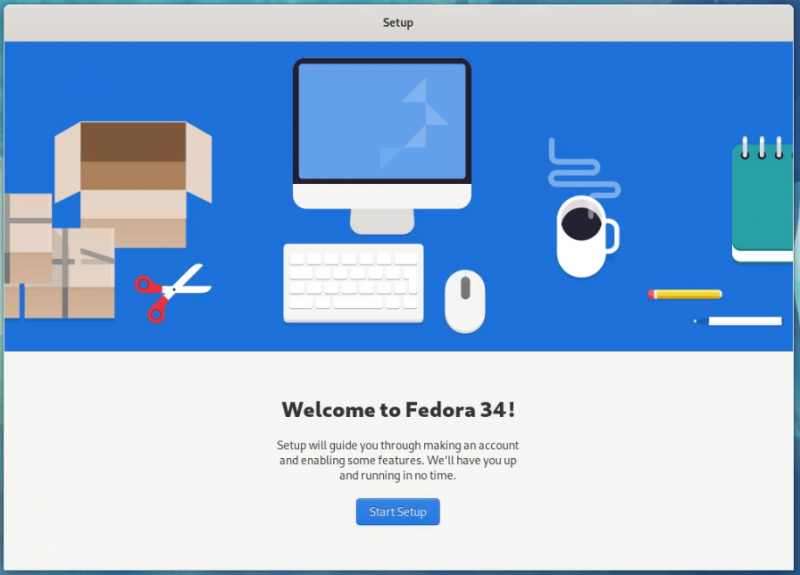
We will select the first option to finish setting up Fedora. Once Fedora starts up, click ‘Start Setup’ to continue setting it up.

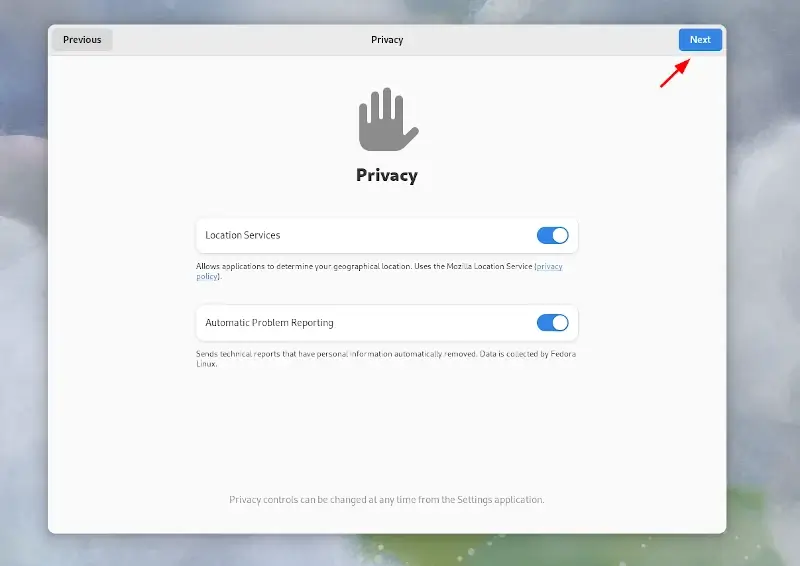
Decide whether to turn location services and automatic problem reporting on or off and hit ‘Next’.
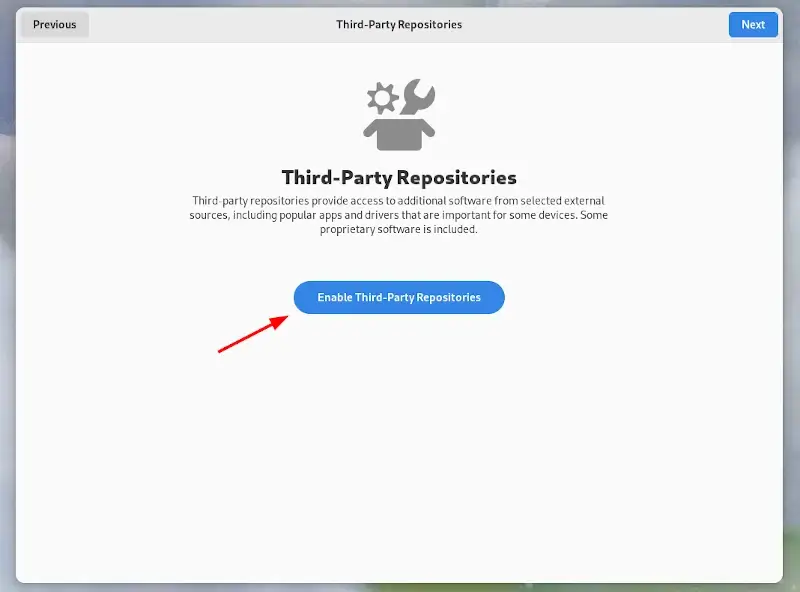
Next, click ‘Enable Third-Party Repositories’ if you want to have the benefit of having third-party repositories enabled by default. Then click ‘Next’.
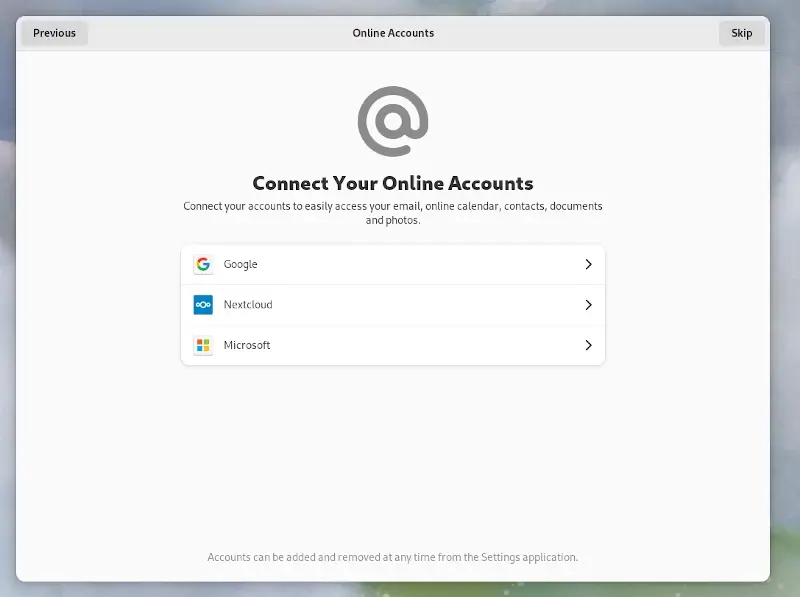
Choose whether to add any of your online accounts. You can skip this step if you wish to connect to them later. In this case, we will click ‘Skip’.
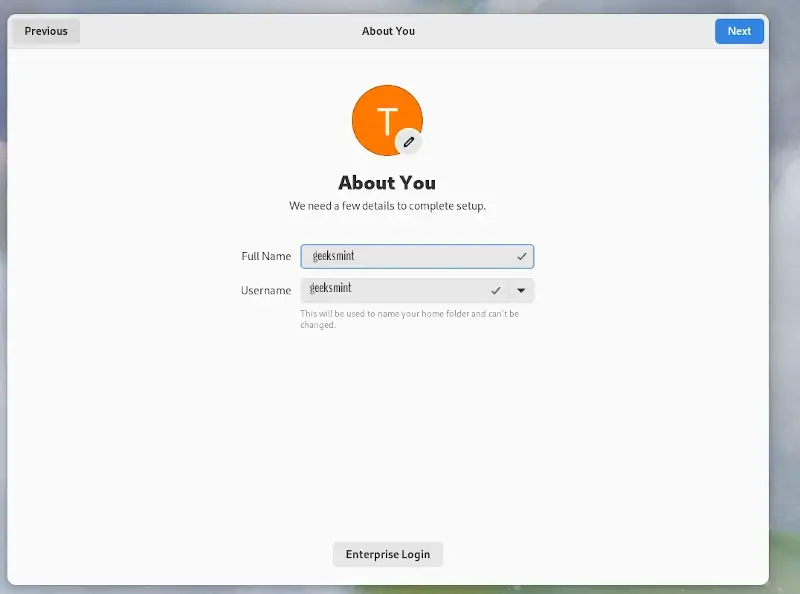
Next, type in your full name and username to create a regular login user. Then click ‘Next’.
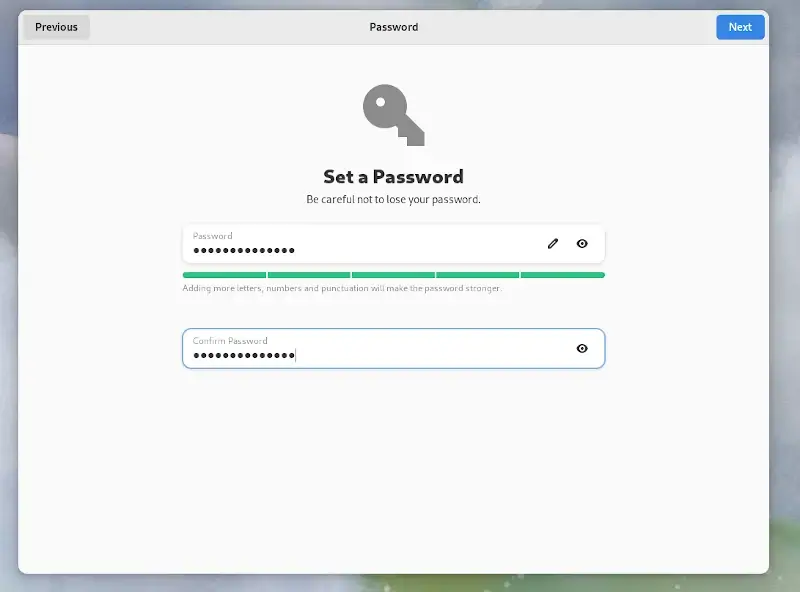
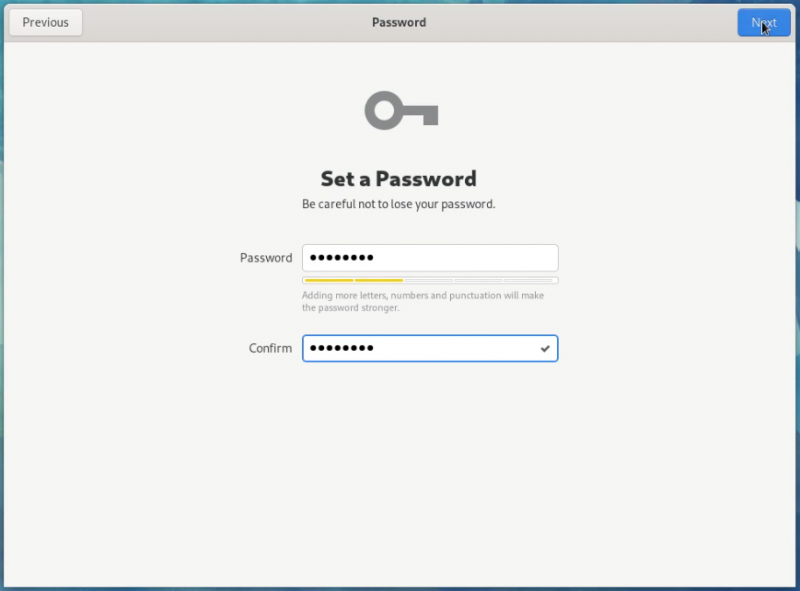
Be sure to also provide the user’s password. Then click ‘Next’.
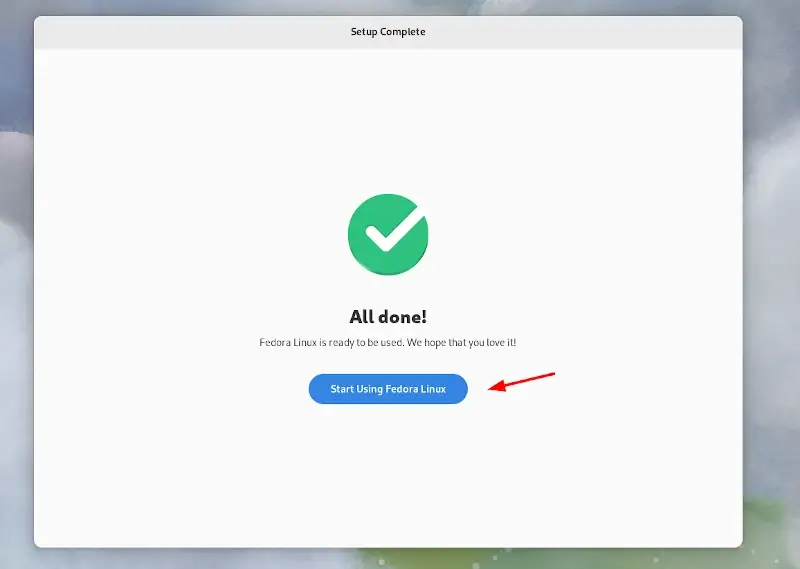
Finally, click ‘Start Using Fedora Linux’ to finish the Setup.
Conclusion
This wraps up our guide on the installation of a dual boot setup of Fedora 38 and Windows 10. Your feedback and comments are welcome.
Если вы хотите ознакомиться с дистрибутивами Linux, практически используемыми на всевозможных предприятиях, то идеальным
вариантом послужит Fedora. Поскольку она поддерживается Red Hat, работать с ней много приятнее нежели с Ubuntu. А если
дополнительно установить GNOME v3.20.2+, то система будет выглядеть просто великолепно.
Мы покажем, как грамотно сделать dualboot Windows 10 и Fedora.
P.S. Способ, приведённый в статье, подойдёт и для Fedora 28.
Вам понадобятся:
- от 30 до 50 Гб свободного места на жёстком диске.
- USB-накопитель (Pendrive, она же флешка).
- ISO образ Fedora, который может быть скачан здесь.
- Rufus — утилита, позволяющая создавать загрузочные Flash/Pen/Key/USB-диски.
1. Выделение места для новой ОС
Вызвав утилиту Disk Management сочетанием клавиш Win + X -> k, выберите раздел, у которого вы собираетесь
“позаимствовать” немного свободного места.
ПКМ -> Shrink Volume… -> Введите желаемый объём (в МБ) для сжатия.
Не сжимайте диск C, если там нет свободного места. Рекомендуется иметь минимум 30 Гб.


Вы увидите нераспределённое пространство.
2. Создание загрузочного образа
Откройте Rufus и выберите ISO.
Если ваш жесткий диск имеет схему разделов GPT, выберите GPT partition scheme for UEFI, в противном случае оставьте
всё как есть. Нажмите start, после чего ваш USB-накопитель будет отформатирован и назначен как загрузочный.
Если ОС Windows уже была установлена на ваш ноутбук, то он будет иметь GPT.
3. Загрузка в USB-накопитель
Нажмите Win + X -> U, а затем Shift + R.
Выберите Use a device, после чего USB drive. Или же, вы можете перезагрузить компьютер, нажимая F12 (Dell)
или ESC (hp), и выбрать USB-накопитель в параметрах загрузки.
4. Установка
Следуйте инструкциям, показанным на изображениях:


Для настройки разделов выберите Manual partitioning. Если у вас уже есть UEFI boot, тогда просто выберите
существующий раздел EFI и смонтируйте его в /boot/efi.
Почему же так важно выбрать существующий системный раздел EFI нашей системы?
ОС Windows от Microsoft испытывает проблемы, когда она видит более одного раздела EFI во время установки. На данный момент,
создание другого системного раздела EFI будет работать, однако, с повторной установкой Windows могут возникнуть проблемы.
После этого мы добавим один раздел для / и один для swap (подкачки), нажав +
Лучше указать размер swap-раздела от 5 ГБ до удвоенного размера оперативной памяти.


После этого вам нужно установить пароль root и создать нового пользователя. Когда установка закончится вы сможете
загрузиться в ОС. Просто перезапустите и завершите процесс установки.

Теперь у вас есть Fedora-29 вместе с Windows 10. Вы можете включить в настройках мыши распознавание касания по тачпаду в
качестве щелчка мыши и добавить сочетание клавиш Ctrl+Alt+T для запуска терминала.
Спасибо за внимание! Надеемся, что данная статья помогла вам.
Удачи!
Оригинальная статья: Dualboot Fedora 29 with Windows 10
Установка операционной системы Fedora рядом с Windows может быть полезной для пользователей, которые хотят попробовать новую ОС, не удаляя при этом свою текущую систему. Предлагаем вам пошаговую инструкцию для установки Fedora на ваш компьютер.
Шаг 1: Подготовка к установке
Перед установкой Fedora рядом с Windows необходимо подготовиться. В первую очередь, убедитесь, что у вас есть загрузочный DVD или флеш-накопитель с образом Fedora. Также убедитесь, что у вас есть достаточно свободного места на жестком диске для установки новой ОС.
Шаг 2: Загрузка Fedora
Подключите загрузочный DVD или флеш-накопитель с образом Fedora к вашему компьютеру и перезагрузите систему. У вас должно появиться меню выбора загрузки. Выберите опцию для загрузки Fedora.
Примечание: Если ваш компьютер не загружается с DVD или флеш-накопителя, убедитесь, что в биосе установлено правильное устройство загрузки.
Шаг 3: Установка Fedora
После загрузки системы с загрузочного носителя вы увидите экран установки Fedora. Следуйте инструкциям на экране для выбора языка, клавиатуры и других настроек.
Когда дойдет очередь выбора диска, убедитесь, что вы выбираете свободное место для установки Fedora рядом с Windows. Можно использовать инструменты установщика для создания разделов и настройки параметров установки.
После настройки параметров установки и выбора диска, нажмите кнопку «Установить» и подождите, пока установщик завершит процесс установки.
Шаг 4: Завершение установки
Когда установка Fedora будет завершена, перезагрузите компьютер. При загрузке вы должны увидеть меню выбора операционных систем, которое позволит вам выбрать, с какой ОС вы хотите работать.
Примечание: Если вы не видите меню выбора операционной системы, вам, возможно, потребуется настроить загрузчик GRUB.
Установка Fedora рядом с Windows — это отличный способ попробовать новую ОС и оставить свою текущую систему без изменений. Следуйте этой пошаговой инструкции и наслаждайтесь обновленным пользовательским опытом на своем компьютере.
Содержание
- Установка Fedora рядом с Windows: пошаговая инструкция
- Шаг 1: Создание резервной копии
- Шаг 2: Подготовка жесткого диска
- Шаг 3: Подготовка загрузочного USB-накопителя
- Шаг 4: Загрузка и установка Fedora
- Шаг 5: Запуск Fedora и проверка установки
- Подготовка к установке:
- Использование программного обеспечения для установки:
- Rufus
- UNetbootin
- Настройка двойной загрузки Windows и Fedora:
- Вопрос-ответ
- Какие минимальные требования нужны для установки Fedora на компьютер рядом с Windows?
- Какую версию Fedora лучше выбрать для установки рядом с Windows?
- Могу ли я удалить Windows после установки Fedora рядом с ним?
Установка Fedora рядом с Windows: пошаговая инструкция
Установка операционной системы Fedora вместе с уже установленной Windows может показаться сложной задачей для новичков. Однако, следуя данной пошаговой инструкции, вы сможете успешно установить Fedora на свой компьютер.
Шаг 1: Создание резервной копии
Перед началом установки рекомендуется создать резервную копию всех важных данных на вашем компьютере. Это поможет вам сохранить важные файлы в случае непредвиденных ситуаций.
Шаг 2: Подготовка жесткого диска
- Освободите место на жестком диске для установки Fedora. Для этого можно использовать программу для уменьшения раздела Windows.
- Создайте новый раздел на освободившейся части диска. Это можно сделать с помощью программы для работы с дисками, встроенной в Windows.
Шаг 3: Подготовка загрузочного USB-накопителя
Для установки Fedora вам понадобится загрузочный USB-накопитель. Вы можете создать его с помощью программы «Rufus» или «Etcher». На официальном сайте Fedora можно найти подробные инструкции по созданию загрузочного USB-накопителя.
Шаг 4: Загрузка и установка Fedora
- Подключите загрузочный USB-накопитель к вашему компьютеру.
- Перезагрузите компьютер и выберите загрузку с USB-накопителя.
- Выберите язык установки и нажмите «Установить Fedora».
- Выберите раскладку клавиатуры и нажмите «Продолжить».
- Выберите опцию «Установить рядом с существующей операционной системой» и нажмите «Продолжить».
- Выберите раздел, который вы создали ранее, и нажмите «Продолжить».
- Настройте параметры установки, такие как имя компьютера и пароль, и нажмите «Продолжить».
- Дождитесь завершения установки и перезагрузите компьютер.
Шаг 5: Запуск Fedora и проверка установки
После перезагрузки компьютера выберите операционную систему Fedora в меню загрузки и дождитесь запуска системы.
Проверьте работу Fedora, убедитесь, что все нужные вам программы доступны и работают корректно.
Теперь у вас установлена операционная система Fedora рядом с Windows! Вы можете выбирать, с какой системой запускать компьютер при каждой перезагрузке.
Подготовка к установке:
- Шаг 1: Сделайте резервную копию данных
- Шаг 2: Проверьте системные требования
- Шаг 3: Загрузите образ Fedora
- Шаг 4: Создайте загрузочную флешку
- Шаг 5: Создайте раздел для Fedora на жестком диске
- Шаг 6: Проверьте загрузку с USB
Перед началом установки операционной системы Fedora рядом с Windows рекомендуется сделать резервную копию всех важных данных на вашем компьютере. Это поможет избежать потери информации в случае неожиданных проблем или ошибок во время установки.
Перед установкой Fedora убедитесь, что ваш компьютер соответствует системным требованиям. Обратите внимание на минимальные и рекомендуемые требования к процессору, оперативной памяти и дисковому пространству, чтобы гарантировать правильную и стабильную работу системы.
Скачайте образ Fedora с официального сайта проекта. Выберите соответствующую версию операционной системы и загрузите файл ISO на ваш компьютер.
Используйте программу для создания загрузочной флешки, такую как Rufus или balenaEtcher, чтобы записать файл ISO на USB-накопитель. Это позволит вам загрузиться с флешки и установить Fedora на ваш компьютер.
Перед установкой Fedora рядом с Windows необходимо создать отдельный раздел на жестком диске для новой операционной системы. Вы можете использовать программу для управления дисками, такую как Диспетчер дисков в Windows, чтобы уменьшить размер существующего раздела и создать новый раздел для Fedora.
Перезагрузите компьютер и убедитесь, что он загружается с USB-накопителя, на котором находится загрузочный образ Fedora. Если он не загружается, проверьте настройки загрузки в BIOS или UEFI и убедитесь, что загрузка с USB разрешена.
Использование программного обеспечения для установки:
Для установки Fedora рядом с Windows существуют несколько программных решений. В данной инструкции мы рассмотрим два популярных инструмента: Rufus и UNetbootin.
Rufus
1. Скачайте Rufus с официального сайта по адресу: https://rufus.ie/.
2. Подключите USB-накопитель к компьютеру.
3. Запустите Rufus и выберите ваш USB-накопитель в качестве устройства для загрузки.
4. В поле «Создание загрузочного диска» выберите опцию «Образ ISO» и нажмите на кнопку с изображением диска, чтобы выбрать скачанный образ Fedora.
5. Проверьте, что все настройки указаны корректно и нажмите кнопку «Начать». Процесс создания загрузочного USB-накопителя может занять несколько минут.
6. После завершения процесса создания загрузочного USB-накопителя, вы можете перезагрузить компьютер и выбрать его в качестве устройства загрузки.
UNetbootin
1. Скачайте UNetbootin с официального сайта по адресу: https://unetbootin.github.io/.
2. Подключите USB-накопитель к компьютеру.
3. Запустите UNetbootin и выберите опцию «Дисковое изображение» (ISO), затем нажмите на кнопку с изображением многоточия (…), чтобы выбрать скачанный образ Fedora.
4. Убедитесь, что правильно выбран ваш USB-накопитель в поле «Тип и расположение» и нажмите кнопку «OK» для начала процесса создания загрузочного USB-накопителя.
5. После завершения процесса создания загрузочного USB-накопителя, вы можете перезагрузить компьютер и выбрать его в качестве устройства загрузки.
На выборе программы для создания загрузочного USB-накопителя могут повлиять ваш опыт работы с программами, а также предпочтения и требования к интерфейсу и функциональности.
Настройка двойной загрузки Windows и Fedora:
Для настройки двойной загрузки Windows и Fedora, выполните следующие шаги:
- Подготовьте установочный диск Fedora или создайте загрузочную флешку с Fedora.
- Вставьте установочный диск Fedora или подключите загрузочную флешку к компьютеру и перезагрузите систему.
- При загрузке компьютера выберите загрузочное устройство с Fedora.
- Запустите установку Fedora и следуйте инструкциям на экране для установки операционной системы на свободное место на жестком диске.
- По завершении установки Fedora перезагрузите компьютер.
- При загрузке компьютера выберите загрузочное устройство с Windows.
- Запустите Windows и загрузите программу для управления загрузкой операционных систем, например, EasyBCD.
- В программе EasyBCD добавьте новую запись в загрузчик, указав путь к загрузочному файлу Fedora.
- Сохраните настройки и перезагрузите компьютер.
- Теперь при загрузке компьютера у вас будет возможность выбрать операционную систему для загрузки.
Настройка двойной загрузки Windows и Fedora завершена. Теперь вы можете легко переключаться между операционными системами по вашему выбору.
Вопрос-ответ
Какие минимальные требования нужны для установки Fedora на компьютер рядом с Windows?
Для установки Fedora на компьютере рядом с Windows вам потребуется компьютер с процессором Pentium 4 или его эквивалентом, не менее 2 ГБ оперативной памяти, 20 ГБ свободного дискового пространства и совместимой видеокартой. Также вам понадобится загрузочный USB-накопитель или диск с установщиком Fedora.
Какую версию Fedora лучше выбрать для установки рядом с Windows?
Выбор версии Fedora зависит от ваших потребностей. Если вы новичок и хотите получить самый удобный и стабильный опыт, то рекомендуется выбрать последнюю стабильную версию Fedora. Если у вас старый компьютер или вы предпочитаете более старые версии программного обеспечения, то можно выбрать более старую версию Fedora.
Могу ли я удалить Windows после установки Fedora рядом с ним?
Да, вы можете удалить Windows после установки Fedora рядом с ним. Однако перед удалением Windows рекомендуется создать резервную копию всех важных данных на внешний накопитель или в облачное хранилище. Затем вы можете использовать инструменты управления дисками в Fedora для удаления разделов, занимаемых Windows, и расширения разделов Fedora до оставшегося свободного места на диске. После удаления Windows компьютер будет работать только с Fedora.
Brief: This detailed tutorial shows you how to dual boot Fedora Linux with Windows 10, step-by-step, accompanied by proper screenshots.
Dual booting Linux and Windows is one of the popular ways to enjoy the full potential of the two operating systems. You have both Linux and Windows installed on the same system and you can choose which one to use after starting your system.
If you have a system with Windows installed already, you’ll learn how to install Fedora alongside Windows in this tutorial.
Installing Fedora alongside Windows

The tutorial has been performed on a system with Windows already installed, GPT partitioning and UEFI boot. It should be applicable to other systems with MBR partitioning and legacy BIOS system as well, but I cannot confirm that.
Note: If your Windows system uses BitLocker encryption, it will be a good idea to disable it first before you go on installing Fedora.
Requirements
Here’s what you’ll need to follow this tutorial:
- A system preinstalled with Windows
- Good speed internet connection
- A USB key (pen drive) with at least 4 GB in size
- Optional: External USB disk for making back up of your existing data on Windows.
- Optional: Windows recovery or bootable disk (if you encounter any major boot issues, you can fix with it).
Let’s see the steps.
Step 1: Make a backup of data on your Windows system [optional]
Backup is always a good idea. You will be dealing with the disk partitions. In the rare unfortunate case, if you make a mistake and delete the wrong partition, you’ll lose your data.
The simplest way would to be to copy the data in Documents, Videos, Music, Pictures and other folders to an external USB disk. You can use an external HDD (slower but cheaper) or SSD (faster but expensive) and copy the important files and folders on it.
[lasso box=”B08GTXVG9P” link_id=”20925″ ref=”sandisk-500gb-extreme-portable-ssd-up-to-1050mb-s-usb-c-usb-3-2-gen-2-external-solid-state-drive-sdssde61-500g-g25″ id=”101803″]
[lasso box=”B08JKFY8FH” link_id=”20926″ ref=”toshiba-canvio-advance-1tb-portable-external-hard-drive-usb-3-0-black-hdtca10xk3aa” id=”101806″]
Step 2: Make some free space for Fedora installation
You need to create a partition where you’ll be installing Fedora. If you just have C drive, shrink it. If you have D, E or F drive, see if you can move their data to some other partition and delete or shrink one of them. Anything above 40 GB should be comfortable enough space for Fedora.
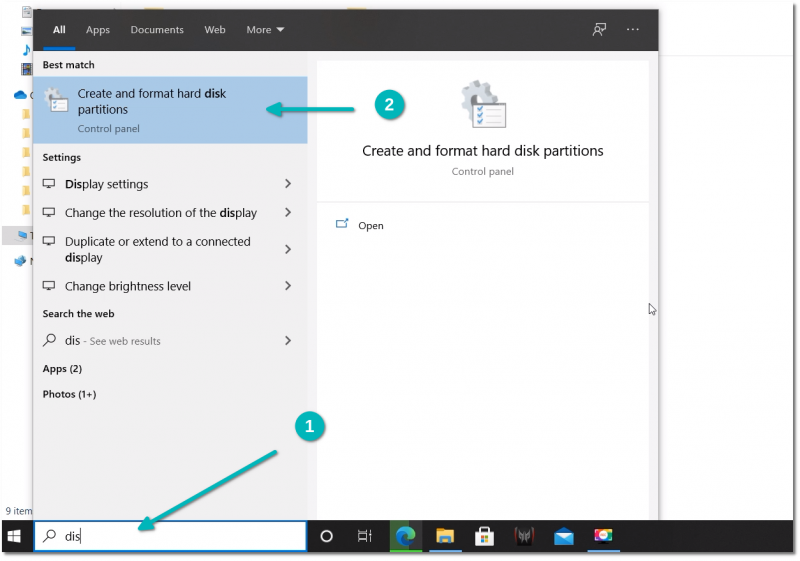
In the Windows menu, search for ‘disk partitions’ and go to ‘Create and format hard disk partitions’.
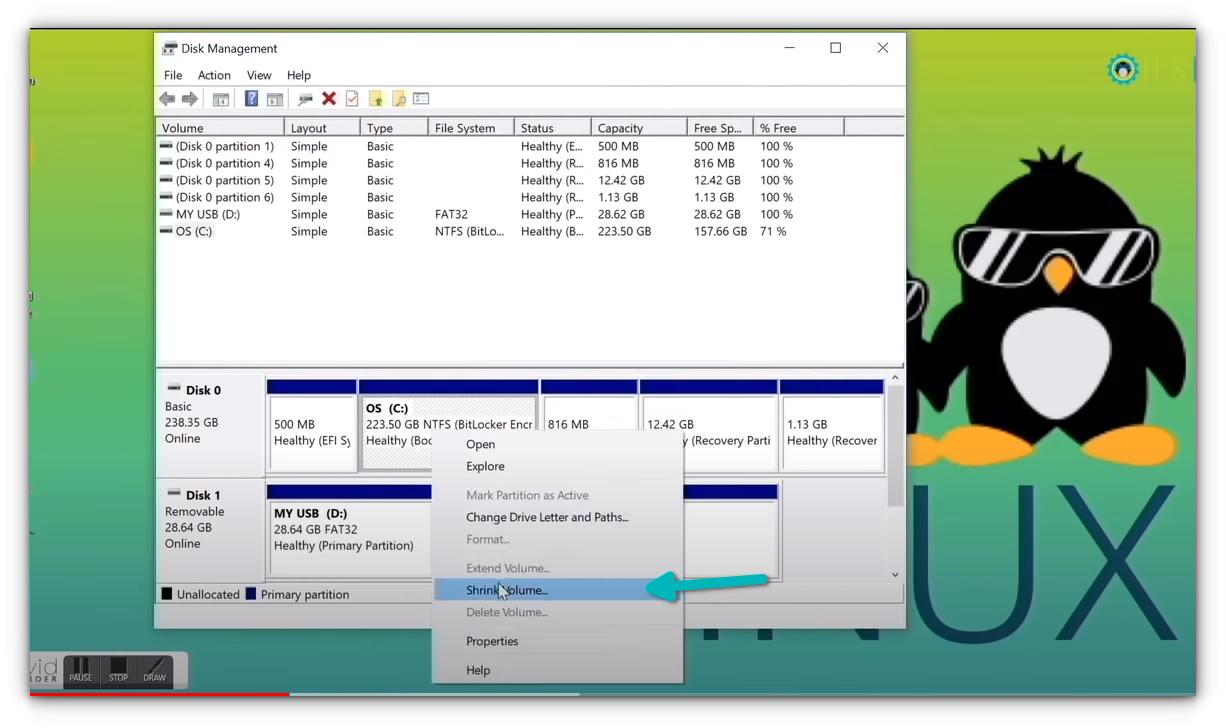
In the Disk Management tool, right-click on the drive which you want to partition and select shrink volume.
If you have just one partition like this, you need to make some free space out of it for Linux. If you have several partitions of considerable size, use any of them except C drive because it may erase the data.
Step 3: Making a live USB of Fedora in Windows
Now, this can be done in different ways. You can download the ISO and use Etcher or Rufus or some other tool to write the ISO image to the USB disk.
However, Fedora provides a dedicated tool for downloading and making live USB. I am going to use that in this tutorial. The Fedora team put some effort in creating this tool, so why not use it.
But first, plug in the USB key. Now, go to the download page of Fedora:
You’ll see the option to download the Fedora Media Writer tool for Windows.
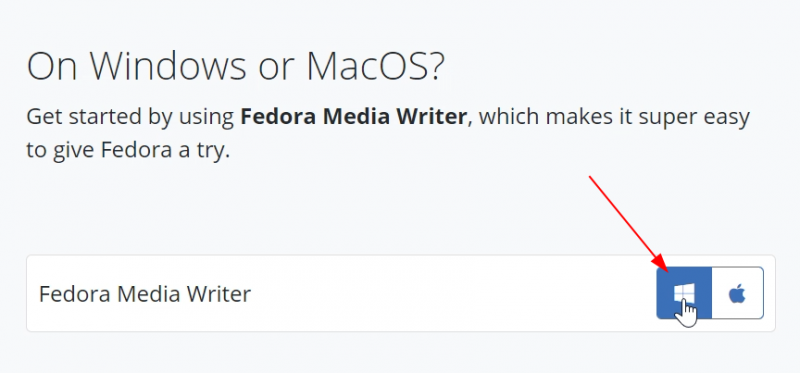
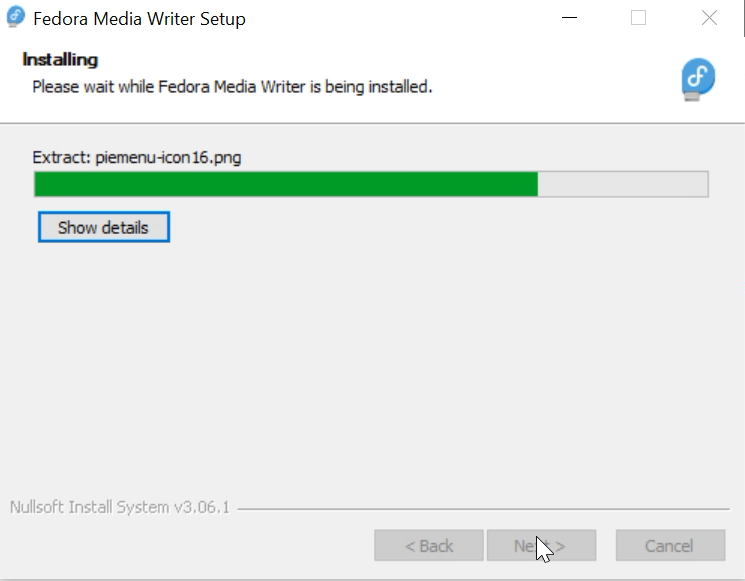
It will download an exe file. Once downloaded, go to your downloads folder and double-click the FedoraMediaWriter exe file to install the Fedora Media Writer tool. Just keep on hitting next.
Once installed, run the Fedora Media Writer tool. But before that, make sure that you have plugged in the USB.
It will give you the option to install various editions of Fedora. For desktops, go with Workstation.
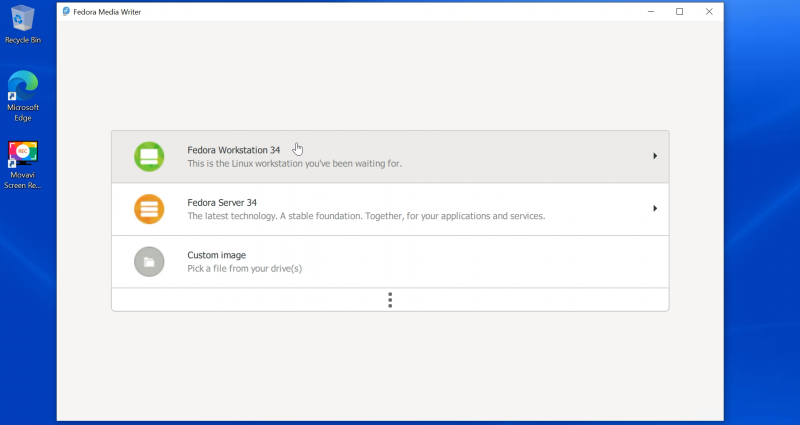
On the next screen, you’ll get the option to create live USB. When you hit that button, it starts downloading the ISO. It will also recognize your inserted USB key.
You need to have a good speed internet connection to download the 2 GB of ISO in a comfortable time span.
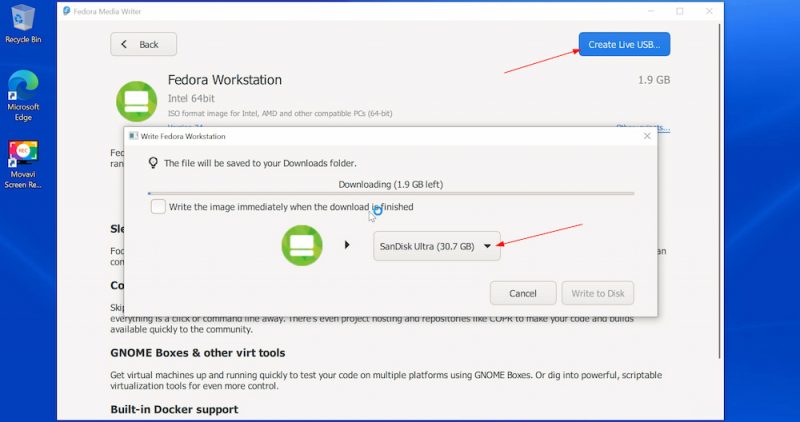
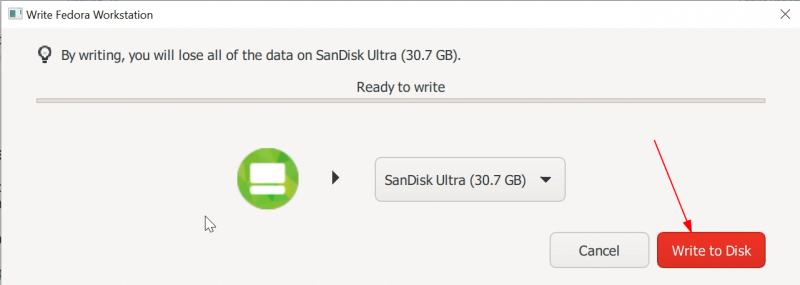
After downloading the ISO, it checks the download automatically and then gives you the option to write the ISO image to the USB disk, i.e. create the live USB. Hit the “Write to Disk” button.
It will take a couple of minutes to complete the process. It displays “Finished” message and you can close the Fedora Media Writer tool now.
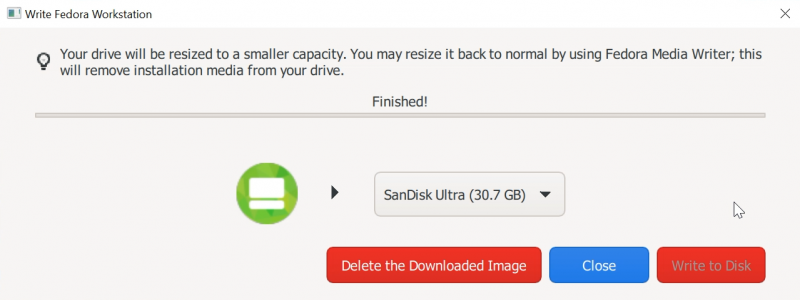
Good! So now you have the Fedora live USB ready with you. Time to use it for installing Fedora with Windows.
Step 4: Boot from live USB and install Fedora
Some systems do not allow you to boot from live USB with secure boot. If that’s the case with you, please disable secure boot.
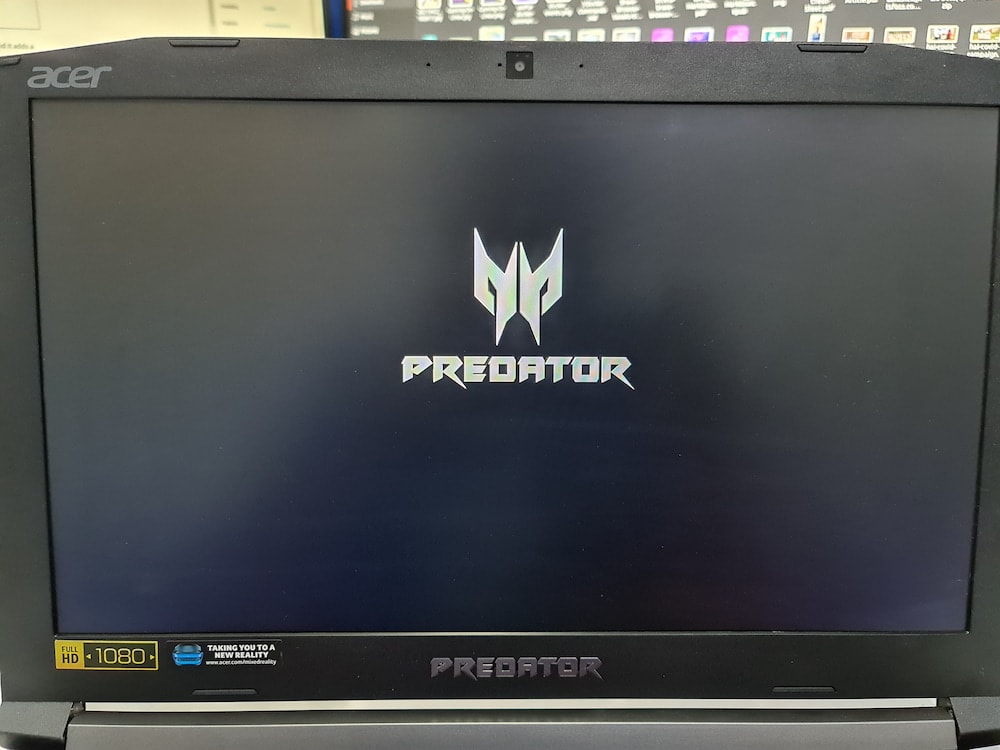
At the screen that shows the logo of your system manufacturer, press the F2 or F10 or F12 key. You may try pressing all of them one by one if you are not sure of the key. But be quick when you do that otherwise it will boot into the operating system.
This key is different for different brand of computers. Some may even use Esc or Del keys for this purpose.
In some rare cases, you may have to access the UEFI boot settings from within Windows.
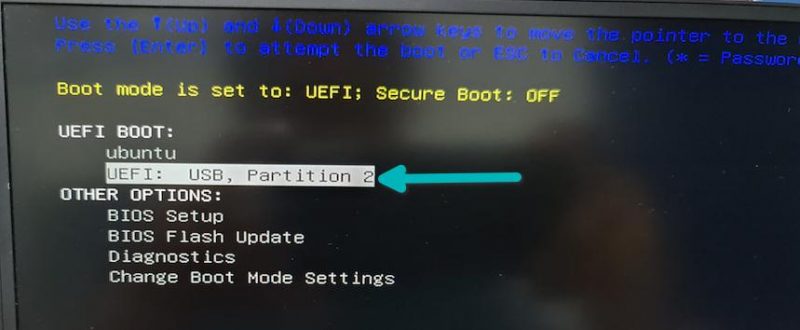
In the BIOS settings, normally, you should see a screen like this. Here, you use the arrow keys to move down to USB option and press enter to boot from the USB. Please note that the screen may look different in different systems.
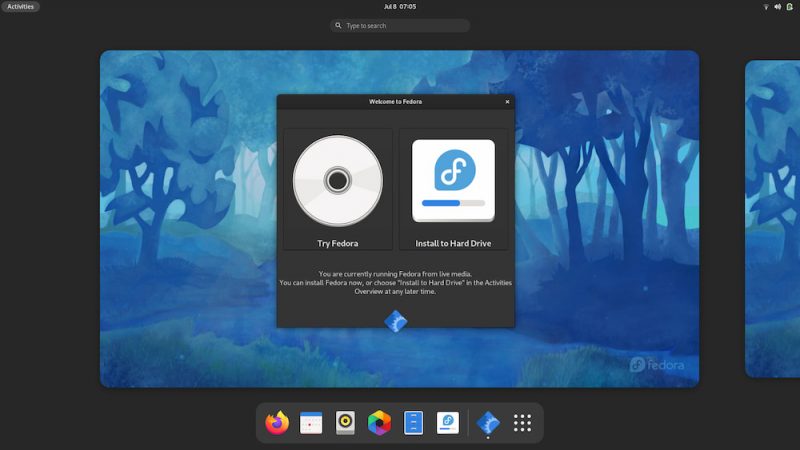
If things go right, you should see a screen like below. Go with the first option “Start Fedora Workstation”:

After some seconds, you should boot into the live Fedora session and see the option to try or install it. Go with “Install to Hard Drive”.
It will ask to choose the language of choice for the installation process.
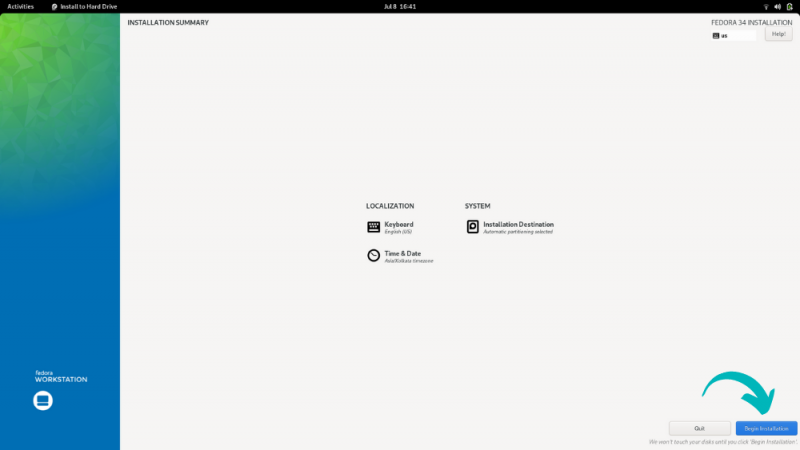
The next screen is important. If you had created the free space in the step 2, you should be able to hit on the “Begin Installation”. If you see an exclamation mark on the disk icon under System, click on it and see what kind of disk configuration you can use here.
If you have more than one disk, you can choose which disk to use for Fedora.
Select the disk and click on Done. You may see a warning message now. In my case, I did not create free space in the step 2 and hence it complained that there is not enough free space to install Fedora.
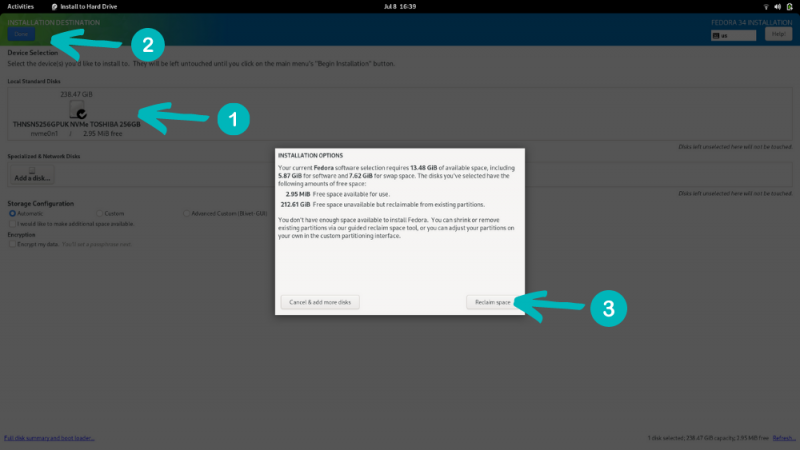
I clicked on reclaim space and shrank the Windows partition here.
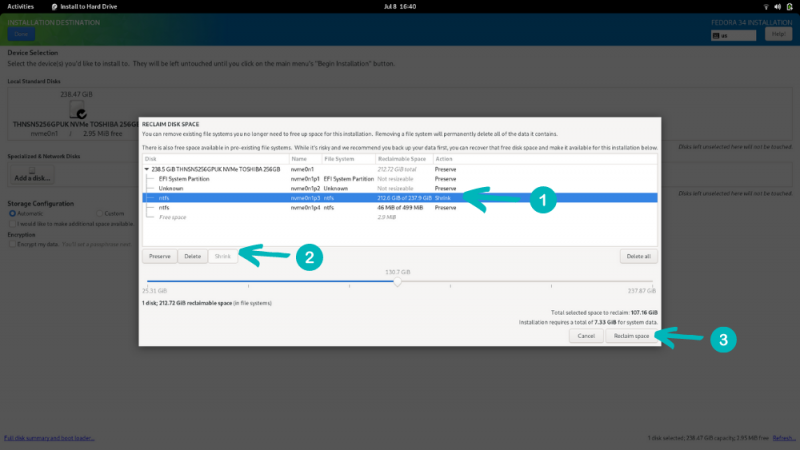
After this, the “Begin Installation” option appeared to start the installation.
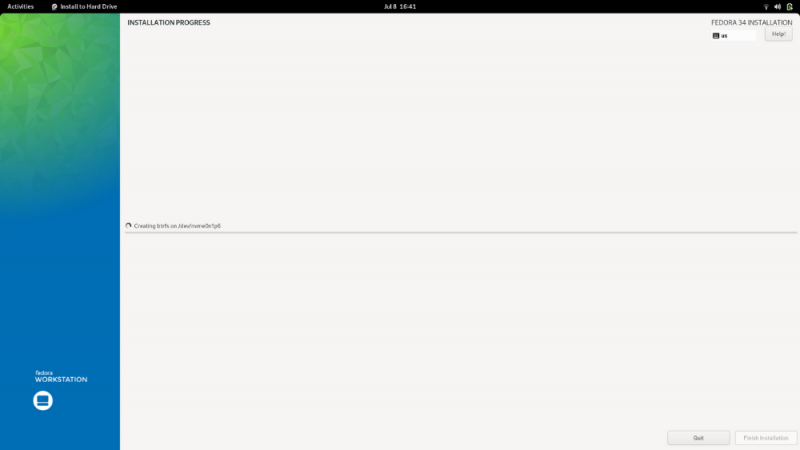
Now it’s just a waiting game. It will take a few minutes to extract files and install them.
When the process completes, you’ll see the “Finish Installation” button. Hit it.
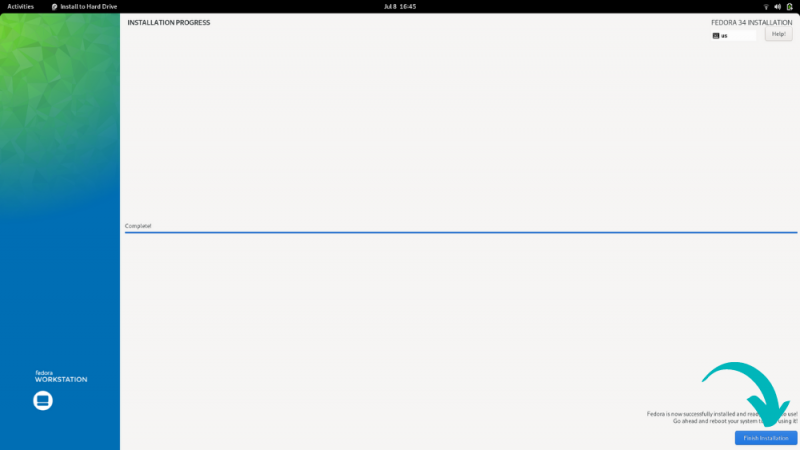
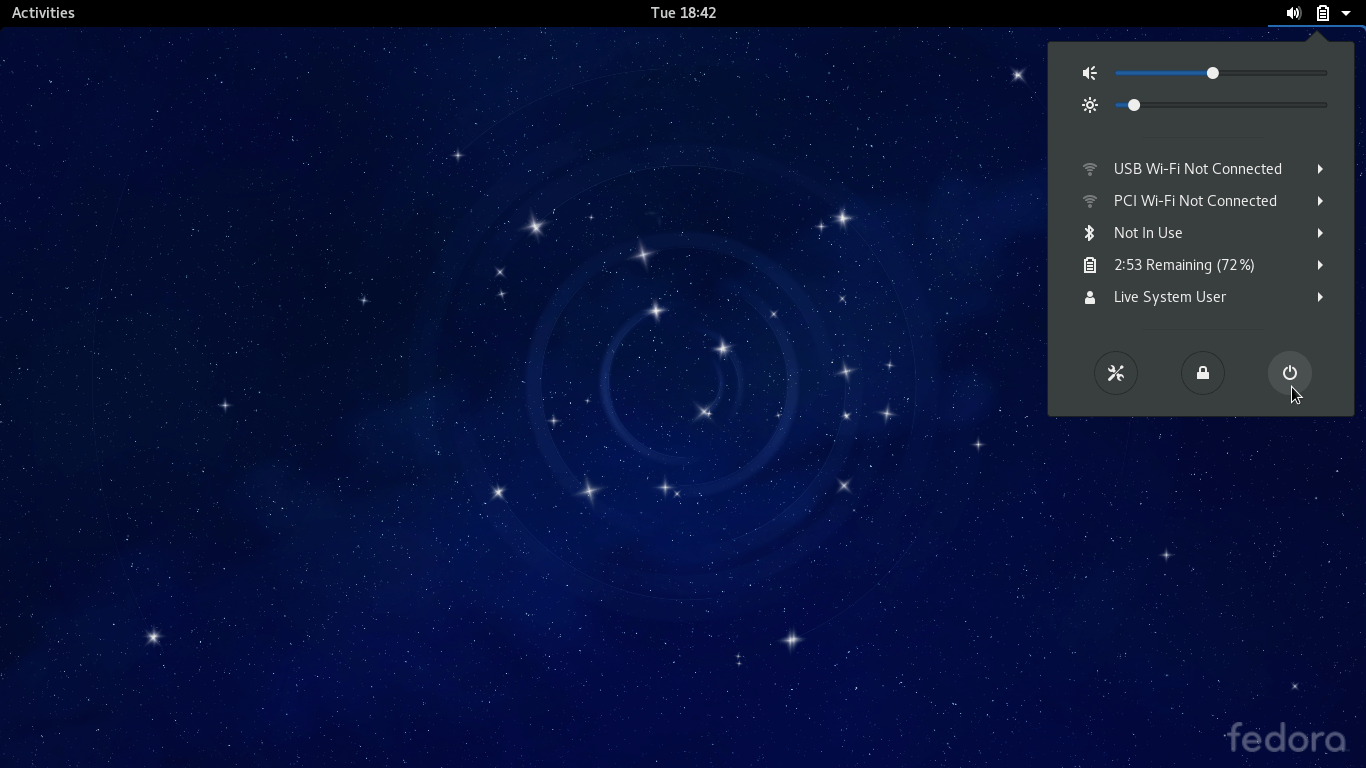
You’ll be back to Fedora live session. Click the top right corner to bring down the menu and select Restart.

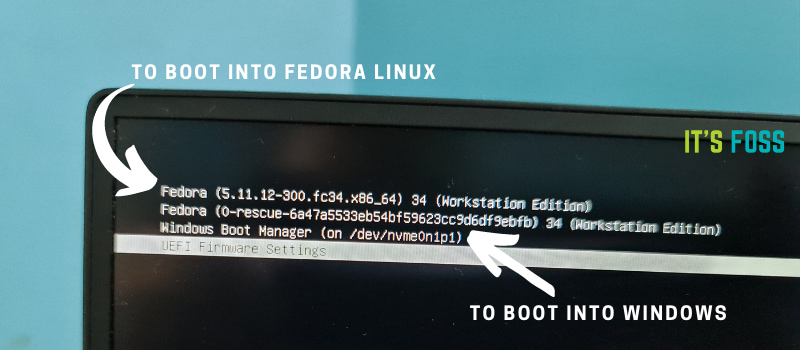
When the system starts now, you should see the Grub bootloader screen with option to boot into Fedora and Windows.
Step 5: Complete Fedora setup
You are almost there. Did you notice that Fedora didn’t ask you to enter username and password? Many distributions like Ubuntu ask you to create an admin user during the installation itself. On the other hand, Fedora gives you this option when you log in to the installed system for the first time.
When you first log in, it runs a setup and creation of user and password is part of this initial setup.

Once you do that, you are ready to enjoy Fedora Linux.
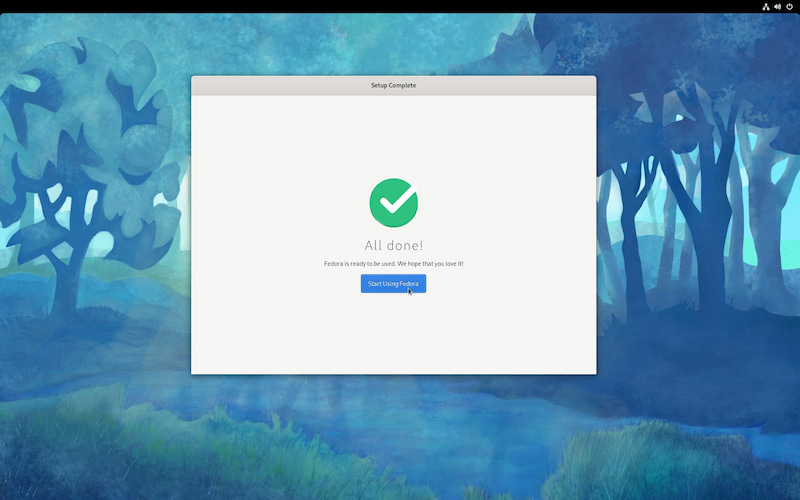
That’s it. You can enjoy Fedora Linux and Windows in dual boot mode on the same system.
If you have any questions or if you are facing any issues while following this tutorial, please let me know in the comment system.