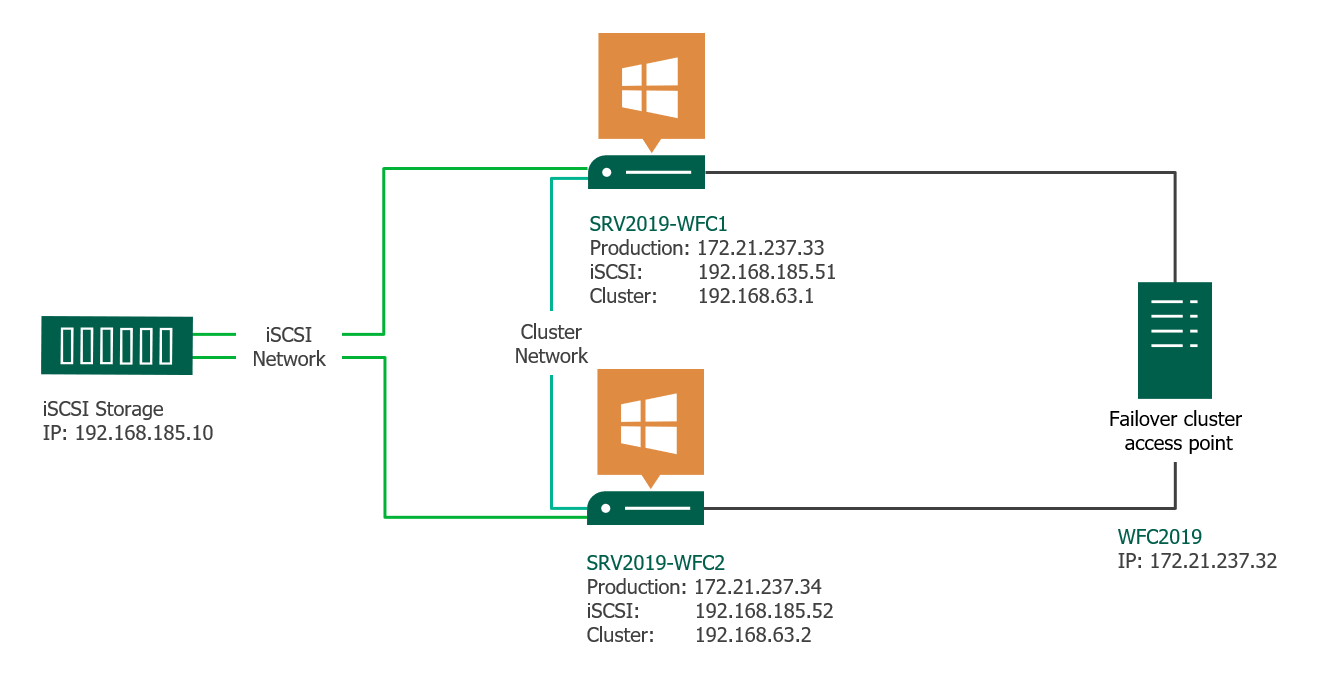
This article gives a short overview of how to create a Microsoft Windows Failover Cluster (WFC) with Windows Server 2019 or 2016. The result will be a two-node cluster with one shared disk and a cluster compute resource (computer object in Active Directory).
Preparation
It does not matter whether you use physical or virtual machines, just make sure your technology is suitable for Windows clusters. Before you start, make sure you meet the following prerequisites:
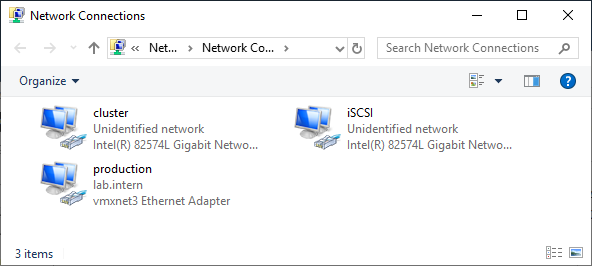
Two Windows 2019 machines with the latest updates installed. The machines have at least two network interfaces: one for production traffic, one for cluster traffic. In my example, there are three network interfaces (one additional for iSCSI traffic). I prefer static IP addresses, but you can also use DHCP.
Join both servers to your Microsoft Active Directory domain and make sure that both servers see the shared storage device available in disk management. Don’t bring the disk online yet.
The next step before we can really start is to add the Failover clustering feature (Server Manager > add roles and features).
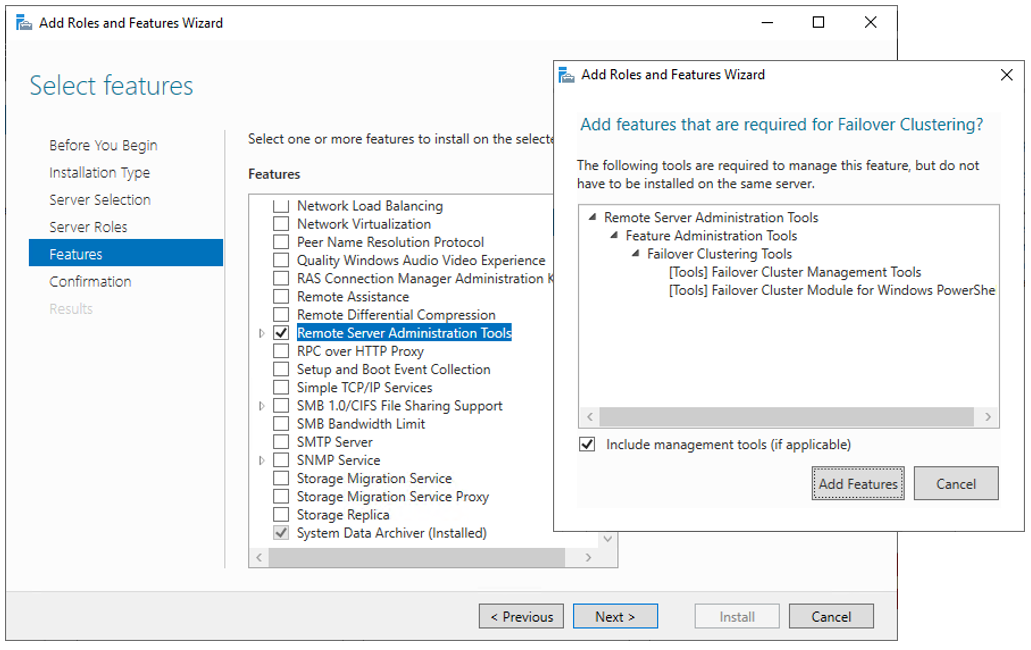
Reboot your server if required. As an alternative, you can also use the following PowerShell command:
Install-WindowsFeature -Name Failover-Clustering –IncludeManagementTools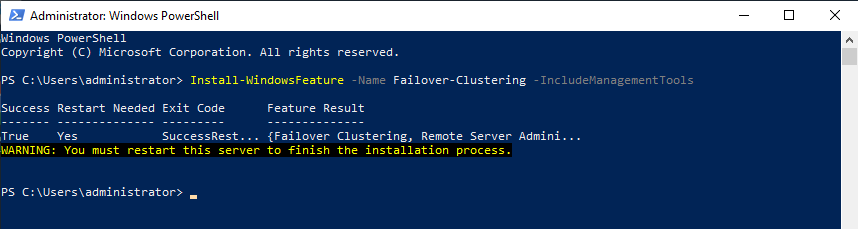
After a successful installation, the Failover Cluster Manager appears in the start menu in the Windows Administrative Tools.
After you installed the Failover-Clustering feature, you can bring the shared disk online and format it on one of the servers. Don’t change anything on the second server. On the second server, the disk stays offline.
After a refresh of the disk management, you can see something similar to this:
Server 1 Disk Management (disk status online)
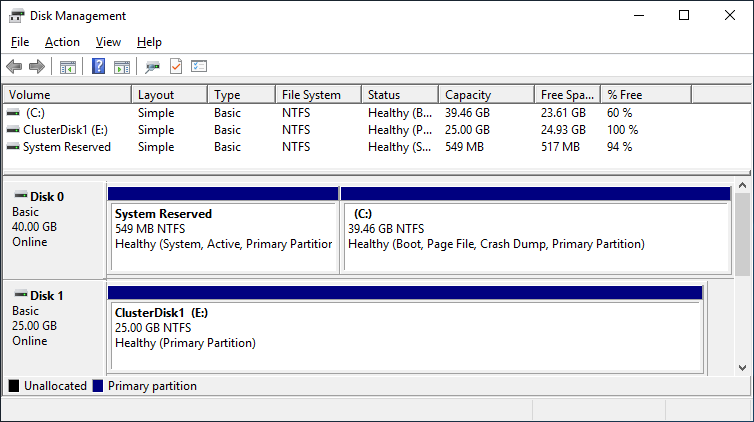
Server 2 Disk Management (disk status offline)
Failover Cluster readiness check
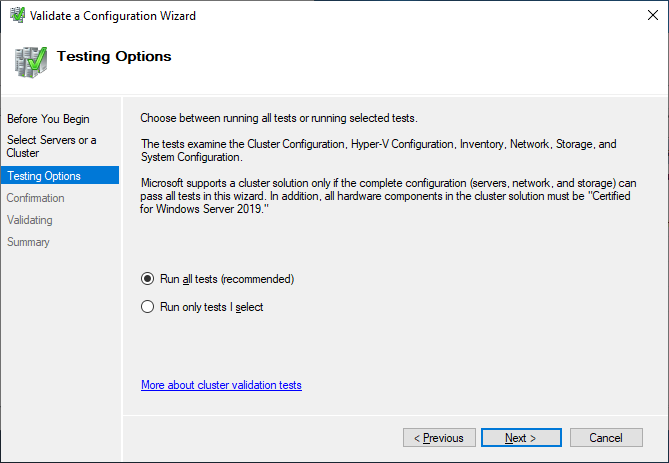
Before we create the cluster, we need to make sure that everything is set up properly. Start the Failover Cluster Manager from the start menu and scroll down to the management section and click Validate Configuration.

Select the two servers for validation.

Run all tests. There is also a description of which solutions Microsoft supports.
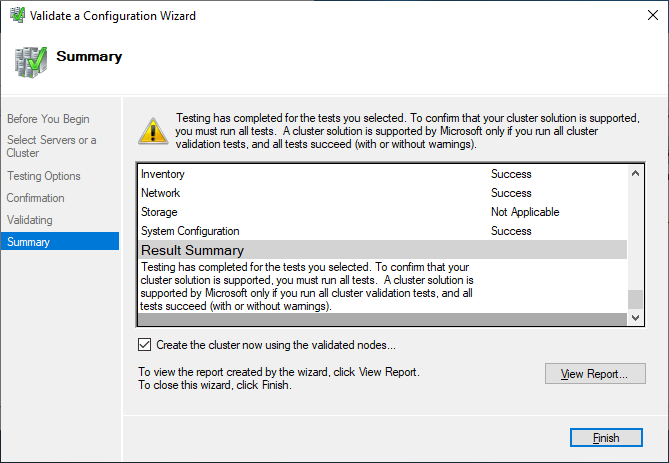
After you made sure that every applicable test passed with the status “successful,” you can create the cluster by using the checkbox Create the cluster now using the validated nodes, or you can do that later. If you have errors or warnings, you can use the detailed report by clicking on View Report.
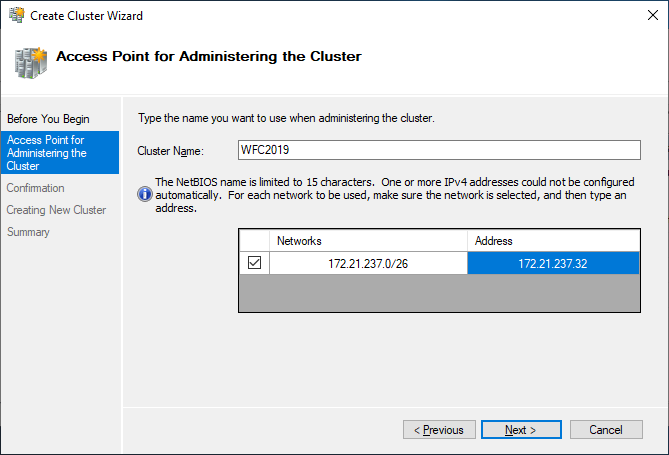
If you choose to create the cluster by clicking on Create Cluster in the Failover Cluster Manager, you will be prompted again to select the cluster nodes. If you use the Create the cluster now using the validated nodes checkbox from the cluster validation wizard, then you will skip that step. The next relevant step is to create the Access Point for Administering the Cluster. This will be the virtual object that clients will communicate with later. It is a computer object in Active Directory.
The wizard asks for the Cluster Name and IP address configuration.
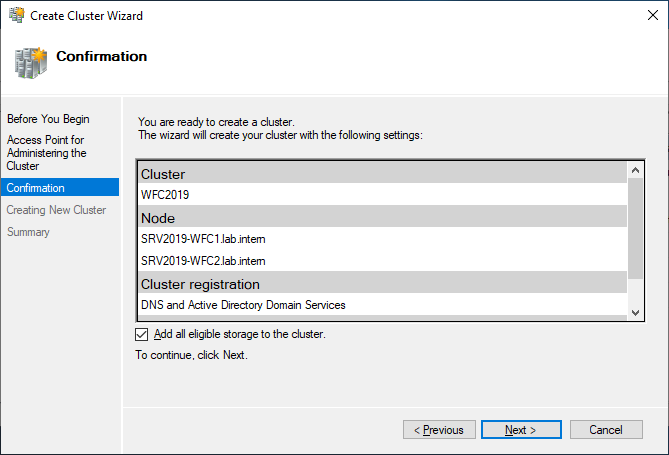
As a last step, confirm everything and wait for the cluster to be created.
The wizard will add the shared disk automatically to the cluster per default. If you did not configure it yet, then it is also possible afterwards.
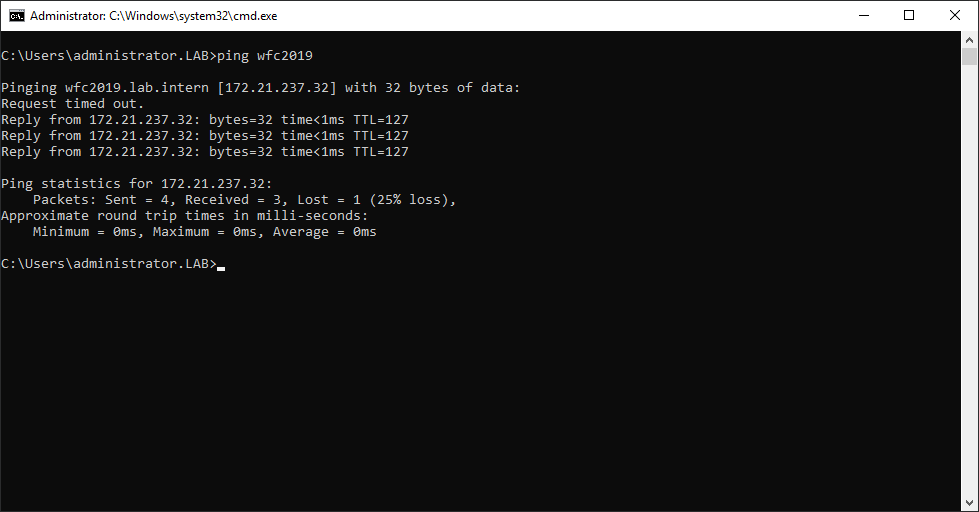
As a result, you can see a new Active Directory computer object named WFC2019.

You can ping the new computer to check whether it is online (if you allow ping on the Windows firewall).
As an alternative, you can create the cluster also with PowerShell. The following command will also add all eligible storage automatically:
New-Cluster -Name WFC2019 -Node SRV2019-WFC1, SRV2019-WFC2 -StaticAddress 172.21.237.32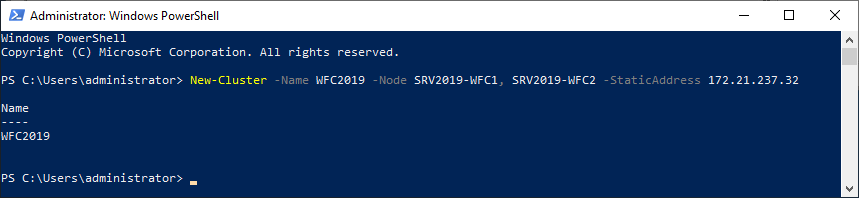
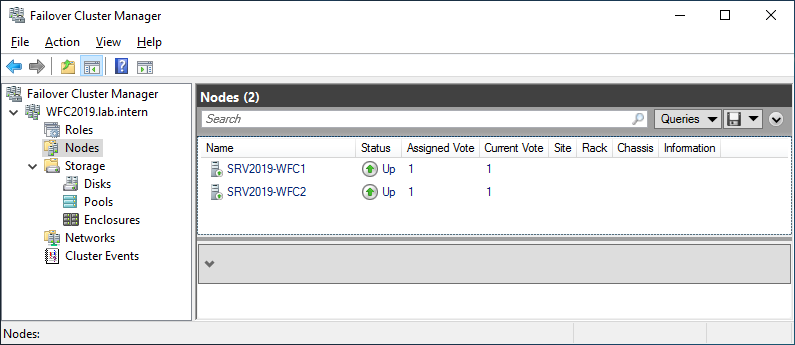
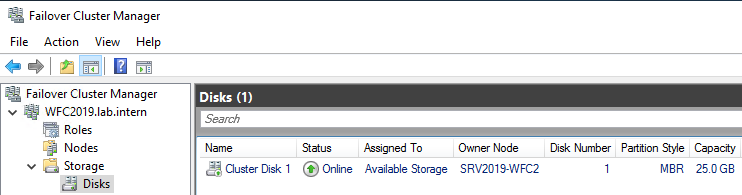
You can see the result in the Failover Cluster Manager in the Nodes and Storage > Disks sections.
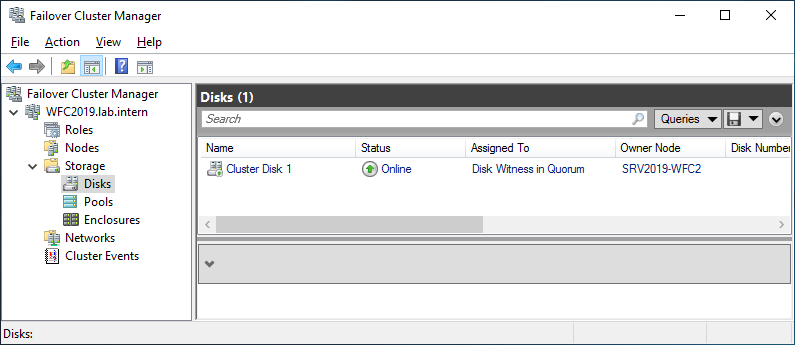
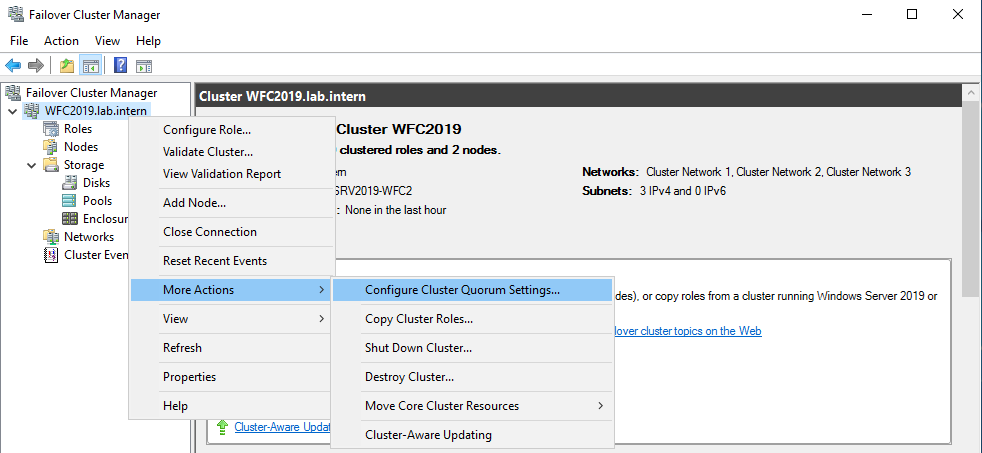
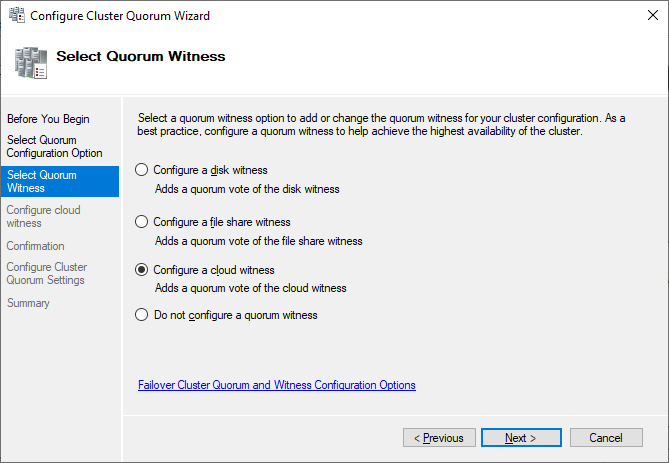
The picture shows that the disk is currently used as a quorum. As we want to use that disk for data, we need to configure the quorum manually. From the cluster context menu, choose More Actions > Configure Cluster Quorum Settings.
Here, we want to select the quorum witness manually.
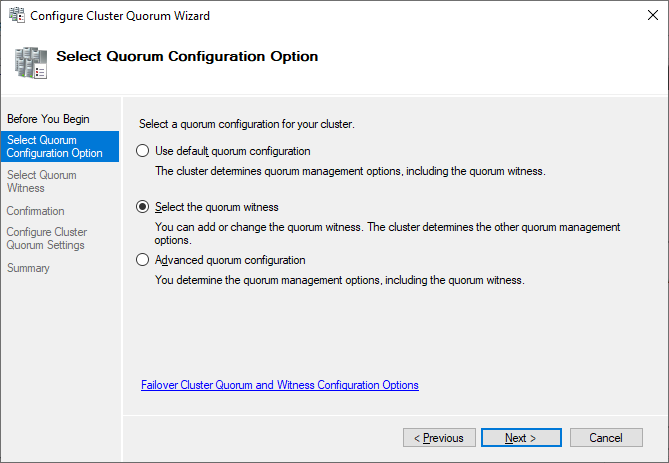
Currently, the cluster is using the disk configured earlier as a disk witness. Alternative options are the file share witness or an Azure storage account as witness. We will use the file share witness in this example. There is a step-by-step how-to on the Microsoft website for the cloud witness. I always recommend configuring a quorum witness for proper operations. So, the last option is not really an option for production.
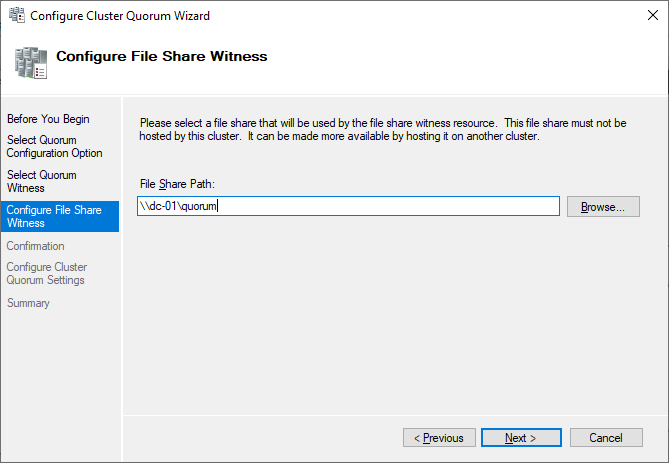
Just point to the path and finish the wizard.
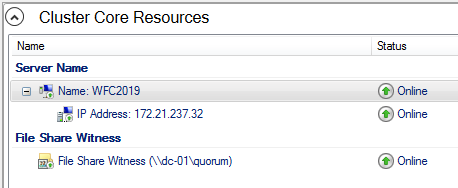
After that, the shared disk is available for use for data.
Congratulations, you have set up a Microsoft failover cluster with one shared disk.
Next steps and backup
One of the next steps would be to add a role to the cluster, which is out of scope of this article. As soon as the cluster contains data, it is also time to think about backing up the cluster. Veeam Agent for Microsoft Windows can back up Windows failover clusters with shared disks. We also recommend doing backups of the “entire system” of the cluster. This also backs up the operating systems of the cluster members. This helps to speed up restore of a failed cluster node, as you don’t need to search for drivers, etc. in case of a restore.
See More:
- On-Demand Sessions from VeeamON Virtual
Windows Server 2019 предоставляет возможность создания отказоустойчивого файлового кластера, что обеспечивает непрерывную работу серверов и защиту данных от потери. Кластеризация позволяет объединить несколько физических серверов в единую систему с общим доступом к файлам и ресурсам.
Преимущества отказоустойчивого файлового кластера в Windows Server 2019 очевидны. В случае отказа одного из серверов, другие берут на себя его работу, предотвращая простой системы и снижение производительности. Это особенно важно для бизнес-среды, где даже небольшой простой может привести к значительным финансовым потерям.
Настройка отказоустойчивого файлового кластера в Windows Server 2019 достаточно проста. Для этого необходимо выполнить несколько шагов. Сначала необходимо выбрать соответствующую роль и установить ее на каждом сервере в кластере. Затем следует настроить сетевые адаптеры и соединить их в общую сеть. После этого можно приступить к созданию кластера и настройке его параметров, таких как дисковая подсистема, системные ресурсы и права доступа.
Отказоустойчивый файловый кластер в Windows Server 2019 — это надежное решение для предотвращения простоев серверов и защиты данных от потери. Благодаря отказоустойчивому файловому кластеру организации могут быть уверены в непрерывной работе своей инфраструктуры и сохранности важных файлов и ресурсов.
Содержание
- Что такое отказоустойчивый файловый кластер?
- Возможности отказоустойчивого файлового кластера Windows Server 2019
- Зачем использовать отказоустойчивый файловый кластер?
- Шаги настройки отказоустойчивого файлового кластера
- Параметры безопасности в отказоустойчивом файловом кластере
- Мониторинг и управление отказоустойчивым файловым кластером
Что такое отказоустойчивый файловый кластер?
Отказоустойчивый файловый кластер представляет собой механизм, который обеспечивает непрерывную доступность файлов и данных путем создания высокодоступной и отказоустойчивой инфраструктуры.
Файловый кластер позволяет объединить несколько серверов в одну группу, которая работает как единая система хранения данных. Это позволяет повысить надежность и производительность системы, а также уменьшить простои и потерю данных при сбоях или отказах в работе отдельных серверов.
В отказоустойчивом файловом кластере есть несколько серверов, которые работают в режиме активного стенда или пассивного стенда. Активный стенд отвечает за обработку запросов и хранение данных, в то время как пассивный стенд находится в режиме ожидания и готов принять на себя задачи активного стенда, если он выходит из строя или не может выполнить свои функции.
Это достигается с помощью сетевого хранилища данных (SAN), которое обеспечивает соединение между серверами, а также обеспечивает дублирование данных и резервное копирование. Когда один сервер не может обработать запрос, интеллектуальный балансировщик нагрузки автоматически переключает задачи на другой сервер в кластере, что обеспечивает непрерывность работы системы.
Отказоустойчивый файловый кластер обеспечивает такие преимущества, как высокая доступность, масштабируемость, надежность и защита данных. Он также снижает риски потери данных и перерывов в работе системы, что особенно важно для критически важных приложений и сервисов.
Возможности отказоустойчивого файлового кластера Windows Server 2019
Windows Server 2019 предлагает широкий спектр возможностей для создания отказоустойчивого файлового кластера. Ниже перечислены некоторые из них:
| Возможность | Описание |
|---|---|
| Отказоустойчивый дисковый массив (FDM) | Windows Server 2019 поддерживает использование отказоустойчивых дисковых массивов, таких как RAID, для обеспечения сохранности данных на файловом кластере. FDM позволяет автоматически восстанавливать данные в случае выхода из строя одного из дисков. Это обеспечивает непрерывную работу и защиту от потери данных. |
| Дублирование данных | Windows Server 2019 позволяет создавать копии данных на разных узлах кластера. Это обеспечивает защиту от потери данных в случае сбоя узла. Дублирование данных можно настроить на уровне файлов, директорий или всего каталога. |
| Cluster Shared Volumes (CSV) | CSV позволяет совместно использовать диски кластера между узлами. Это обеспечивает доступность данных на всех узлах и улучшает производительность. CSV автоматически настраивает репликацию данных и управляет балансировкой нагрузки. |
| Многоканальная коммуникация | Windows Server 2019 поддерживает многоканальную коммуникацию между узлами кластера через разные сетевые интерфейсы. Это позволяет повысить пропускную способность и надежность сети. |
| Динамическое масштабирование | С помощью Windows Server 2019 можно динамически изменять конфигурацию кластера, добавлять и удалять узлы и диски без простоя. Это обеспечивает гибкость и масштабируемость решения. |
Все эти возможности позволяют создать отказоустойчивый и производительный файловый кластер на базе Windows Server 2019. Они обеспечивают сохранность данных, непрерывную работу и гибкость настройки.
Зачем использовать отказоустойчивый файловый кластер?
Вот несколько причин, почему использование отказоустойчивого файлового кластера является необходимым:
- Гарантированная доступность данных: Отказоустойчивый файловый кластер позволяет обеспечить непрерывный доступ к файлам и приложениям даже в случае отказа одного или нескольких серверов. Это обеспечивает высокую доступность данных и минимизирует потерю производительности из-за сбоев в работе.
- Устойчивость к отказам: Отказоустойчивый файловый кластер предоставляет механизмы для автоматического переключения на резервные сервера в случае отказа основного узла. Это позволяет минимизировать время простоя и обеспечивает непрерывное функционирование файловых серверов.
- Расширяемость и масштабируемость: Отказоустойчивый файловый кластер позволяет легко масштабировать и расширять сетевое хранилище при необходимости. Новые узлы можно добавлять в кластер без остановки работы и потери данных.
- Управление ресурсами: Отказоустойчивый файловый кластер предоставляет средства для эффективного управления ресурсами, такими как дисковое пространство, доступ к файлам и права пользователей. Это облегчает задачу администрирования и обеспечивает безопасность данных.
- Быстрое восстановление после сбоев: В случае сбоя отказоустойчивый файловый кластер автоматически восстанавливает работу на резервных узлах без необходимости ручного вмешательства. Это позволяет сэкономить время и ресурсы при восстановлении после неполадок.
Все эти преимущества делают отказоустойчивый файловый кластер идеальным решением для предприятий, где высокая доступность файловых серверов и безопасность данных являются приоритетными задачами.
Шаги настройки отказоустойчивого файлового кластера
Для создания отказоустойчивого файлового кластера в Windows Server 2019 необходимо выполнить ряд шагов:
| Шаг | Описание |
| 1 | Установка роли файлового сервера (File Server role) на каждом сервере, который будет входить в кластер. |
| 2 | Подготовка дисков для использования в кластере. Диски должны быть подключены к каждому серверу и должны быть доступны для создания раздела логического диска. |
| 3 | Настройка сети. У каждого сервера в кластере должны быть настроены сетевые адаптеры с уникальными IP-адресами. Также необходимо настроить сетевое хранилище для обмена данными между серверами. |
| 4 | Создание кластера. На одном из серверов необходимо запустить мастер создания кластера и указать все серверы, которые будут входить в кластер. |
| 5 | Настройка ресурсов кластера. Для создания отказоустойчивого файлового кластера необходимо создать ресурсы, такие как диски, сетевые имя и IP-адрес, а также настроить их взаимодействие с серверами. |
| 6 | Настройка фильтрации. Если требуется, можно настроить фильтры для определения, какие клиенты или приложения имеют доступ к ресурсам кластера. |
| 7 | Тестирование отказоустойчивости. После завершения настройки кластера необходимо провести тестирование отказоустойчивости для уверенности в его правильной работе. |
После завершения всех этих шагов, отказоустойчивый файловый кластер будет готов к использованию в Windows Server 2019.
Параметры безопасности в отказоустойчивом файловом кластере
Аутентификация и авторизация
Windows Server 2019 поддерживает различные методы аутентификации и авторизации, такие как Kerberos и NTLM, которые позволяют контролировать доступ к ресурсам кластера. Настройка правильных параметров аутентификации и авторизации позволяет предотвратить несанкционированный доступ к данным.
Шифрование данных
Шифрование данных является важным аспектом безопасности в отказоустойчивом файловом кластере. Windows Server 2019 предоставляет возможность использовать протоколы шифрования, такие как SSL/TLS и IPsec, для обеспечения безопасной передачи данных между узлами кластера. Настройка этих протоколов позволяет защитить данные от несанкционированного доступа и поддерживать их конфиденциальность.
Аудит и мониторинг
В отказоустойчивом файловом кластере Windows Server 2019 доступны функции аудита и мониторинга, которые позволяют отслеживать действия пользователей и проверять соответствие политик безопасности. Включение аудита и мониторинга позволяет быстро обнаружить и реагировать на потенциальные угрозы безопасности.
Управление доступом
Управление доступом к ресурсам кластера позволяет контролировать, какие пользователи и группы имеют право на доступ к данным. Windows Server 2019 предоставляет возможность настройки различных уровней доступа, таких как чтение, запись, исполнение и т. д. Регулировка этих параметров позволяет ограничить доступ к данным только аккредитованным пользователям или группам.
Обновления безопасности
Регулярные обновления безопасности являются неотъемлемой частью обеспечения безопасности в отказоустойчивом файловом кластере. Windows Server 2019 предоставляет регулярные обновления, исправляющие уязвимости и проблемы безопасности. Установка этих обновлений является обязательной мерой для предотвращения возможных атак.
Использование антивирусного программного обеспечения
Установка и использование антивирусного программного обеспечения является еще одной важной мерой для обеспечения безопасности в отказоустойчивом файловом кластере. Антивирусное ПО помогает обнаруживать и блокировать вредоносные программы и предотвращать потенциальные угрозы для данных в кластере.
Правильная настройка параметров безопасности в отказоустойчивом файловом кластере Windows Server 2019 является необходимым условием для обеспечения безопасности данных и доступа к ним. Каждый параметр требует внимательной настройки и контроля, чтобы предотвратить возможные угрозы безопасности.
Мониторинг и управление отказоустойчивым файловым кластером
Отказоустойчивый файловый кластер Windows Server 2019 предоставляет множество инструментов для мониторинга и управления. Эти инструменты позволяют своевременно обнаруживать сбои и ситуации, требующие вмешательства администратора, а также предоставляют возможность принять необходимые действия для восстановления нормальной работы кластера.
Один из основных инструментов для мониторинга файлового кластера — это диспетчер кластера Windows Server. Он предоставляет визуальное представление состояния кластера, позволяет отслеживать работу кластерных ресурсов, а также предоставляет возможность выполнения различных задач администрирования, таких как перезагрузка сервера или перемещение ресурсов на другой узел кластера.
Важным инструментом для управления отказоустойчивым файловым кластером является диспетчер отказов. Он позволяет настраивать различные параметры отказоустойчивости, такие как время ожидания ответа от узла, количество попыток восстановления и допустимое время простоя ресурсов. При возникновении сбоев диспетчер отказов автоматически принимает меры по восстановлению нормальной работы кластера.
Дополнительный инструмент для мониторинга и управления состоянием отказоустойчивого файлового кластера — это консоль управления Failover Cluster Manager. Она предоставляет более подробную информацию о состоянии кластера и ресурсов, а также позволяет выполнять более специфические задачи администрирования, такие как настройка балансировки нагрузки или добавление новых ресурсов в кластер.
Важным аспектом мониторинга и управления отказоустойчивым файловым кластером является также системное журналирование. Оно позволяет отслеживать события и ошибки, происходящие в кластере, и предоставляет средства для анализа и решения проблем. Возможности системного журнала Windows Server 2019 обеспечивают гибкость и удобство в работе с журналами событий.
При правильно настроенном мониторинге и управлении отказоустойчивым файловым кластером администратор может оперативно реагировать на сбои и проблемы, минимизируя время простоя и обеспечивая непрерывность работы критически важных приложений и сервисов.
В статье приводится краткий обзор
создания отказоустойчивого кластера Microsoft Windows (WFC) в ОС Windows Server
2019 или 2016. В результате вы получите двухузловой кластер с одним общим
диском и кластерный вычислительный ресурс (объект «компьютер» в Active
Directory).
Подготовка
Не имеет значения, какие машины вы
используете — физические или виртуальные, главное, чтобы технология подходила
для создания кластеров Windows. Перед тем, как начать, проверьте соответствие
необходимым требованиям:
Две машины Windows 2019 с установленными последними обновлениями. У них должно быть по крайней мере два сетевых интерфейса: один для производственного трафика и один для кластерного трафика. В моем примере у машин три сетевых интерфейса (один дополнительный для трафика iSCSI). Я предпочитаю статические IP-адреса, но также можно использовать DHCP.
Введите оба сервера в домен
Microsoft Active Directory и убедитесь, что они видят общий ресурс хранения,
доступный в Disk Management. Пока не переводите диск в режим «онлайн».
Далее необходимо добавить функциональность Failover clustering (Server Manager > Аdd roles and features).
Перезапустите сервер, если требуется. В качестве альтернативы можно использовать следующую команду PowerShell:
Install-WindowsFeature -Name Failover-Clustering –IncludeManagementTools
После успешной установки в меню
Start, в Windows
Administrative Tools появится Failover Cluster Manager .
После установки Failover-Clustering
можно перевести общий диск в режим «онлайн» и отформатировать его на одном из
серверов. Не меняйте ничего на втором сервере. Там диск остается в режиме
offline.
Обновив Disk Management, вы увидите
что-то типа такого:
Server 1 Disk Management (disk status online)
Server 2 Disk Management (disk status offline)
Проверка готовности
отказоустойчивого кластера
Перед созданием кластера необходимо убедиться, что все настройки правильно сконфигурированы. Запустите Failover Cluster Manager из меню Start, прокрутите до раздела Management и кликните Validate Configuration.
Выберите для валидации оба сервера.
Выполните все тесты. Там же есть описание того, какие решения поддерживает Microsoft.
После успешного прохождения всех нужных тестов, можно создать кластер, установив флажок Create the cluster now using the validated nodes (создать кластер с помощью валидированных узлов), или это можно сделать позже. Если во время тестирования возникали ошибки или предупреждения, можно просмотреть подробный отчет, кликнув на View Report.
Создание отказоустойчивого
кластера
Если вы решите создать кластер,
кликнув на Create Cluster в Failover Cluster Manager,
потребуется снова выбрать узлы кластера. Если вы используете флажок Create
the cluster now using the validated nodes в мастере валидации
кластера, выбирать узлы не понадобится. Следующим шагом будет создание точки
доступа для администрирования кластера — Access Point for
Administering the Cluster. Это будет виртуальный объект, с которым позже
будут коммуницировать клиенты. Это объект «компьютер» в Active Directory.
В мастере нужно будет задать имя кластера — Cluster Name и сетевую конфигурацию.
На последнем шаге подтвердите выбранные настройки и подождите создания кластера.
По умолчанию мастер автоматически
добавит общий диск к кластеру. Если вы его еще не сконфигурировали, будет
возможность сделать это позже.
В результате вы увидите новый объект «компьютер» Active Directory под названием WFC2019.
Вы можете отправить запрос к новому компьютеру, чтобы убедиться в его доступности (если ICMP-запросы разрешены в брандмауере Windows).
В качестве альтернативы можно создать кластер с помощью PowerShell. Следующая команда автоматически добавит подходящее хранилище:
New-Cluster -Name WFC2019 -Node SRV2019-WFC1, SRV2019-WFC2 -StaticAddress 172.21.237.32
Результат можно будет увидеть в Failover Cluster Manager, в разделах Nodes и Storage > Disks.
Иллюстрация показывает, что в данный момент диск используется в качестве кворума. Поскольку мы хотим использовать этот диск для данных, нам необходимо сконфигурировать кворум вручную. Из контекстного меню кластера выберите More Actions > Configure Cluster Quorum Settings (конфигурирование настроек кворума).
Мы хотим выбрать диск-свидетель вручную.
В данный момент кластер использует диск, ранее сконфигурированный как диск-свидетель. Альтернативно можно использовать в качестве свидетеля общую папку или учетную запись хранилища Azure. В этом примере мы используем в качестве свидетеля общую папку. На веб-сайте Microsoft представлены пошаговые инструкции по использованию свидетеля в облаке. Я всегда рекомендую конфигурировать свидетель кворума для правильной работы. Так что, последняя опция для производственной среды не актуальна.
Просто укажите путь и завершите мастер установки.
После этого общий диск можно использовать для работы с данными.
Поздравляю, вы сконфигурировали отказоустойчивый кластер Microsoft с одним общим диском.
Следующие шаги и резервное
копирование
Одним из следующих шагов будет
добавление роли для кластера, но это выходит за рамки данной статьи. Когда
кластер будет содержать данные, пора будет подумать о его резервном копировании.
Veeam Agent for Microsoft Windows может применяться для
резервного копирования отказоустойчивых кластеров Windows с общими дисками. Мы
также рекомендуем осуществлять резервное копирование «всей системы» кластера.
При этом выполняется резервное копирование операционных систем узлов кластера.
Это поможет ускорить восстановление отказавшего узла кластера, так как вам не
придется искать драйверы и прочее при восстановлении.
Руководство по созданию отказоустойчивых
кластеров для Windows Server 2019
| title | description | ms.topic | author | ms.author | manager | ms.date |
|---|---|---|---|---|---|---|
|
Create a failover cluster |
How to create a failover cluster for Windows Server 2012 R2, Windows Server 2012, Windows Server 2016, and Windows Server 2019. |
article |
JasonGerend |
jgerend |
lizross |
10/20/2021 |
Create a failover cluster
Applies to: Windows Server 2022, Windows Server 2019, Windows Server 2016, Windows Server 2012 R2, Windows Server 2012, Azure Stack HCI, versions 21H2 and 20H2
This topic shows how to create a failover cluster by using either the Failover Cluster Manager snap-in or Windows PowerShell. The topic covers a typical deployment, where computer objects for the cluster and its associated clustered roles are created in Active Directory Domain Services (AD DS). If you’re deploying a Storage Spaces Direct cluster, instead see Deploy Storage Spaces Direct. For information about using a failover cluster in Azure Stack HCI, see Create an Azure Stack HCI.
You can also deploy an Active Directory-detached cluster. This deployment method enables you to create a failover cluster without permissions to create computer objects in AD DS or the need to request that computer objects are prestaged in AD DS. This option is only available through Windows PowerShell, and is only recommended for specific scenarios. For more information, see Deploy an Active Directory-Detached Cluster.
Checklist: Create a failover cluster
| Status | Task | Reference |
|---|---|---|
| ☐ | Verify the prerequisites | Verify the prerequisites |
| ☐ | Install the Failover Clustering feature on every server that you want to add as a cluster node | Install the Failover Clustering feature |
| ☐ | Run the Cluster Validation Wizard to validate the configuration | Validate the configuration |
| ☐ | Run the Create Cluster Wizard to create the failover cluster | Create the failover cluster |
| ☐ | Create clustered roles to host cluster workloads | Create clustered roles |
Verify the prerequisites
Before you begin, verify the following prerequisites:
- Make sure that all servers that you want to add as cluster nodes are running the same version of Windows Server.
- Review the hardware requirements to make sure that your configuration is supported. For more information, see Failover Clustering Hardware Requirements and Storage Options. If you’re creating a Storage Spaces Direct cluster, see Storage Spaces Direct hardware requirements.
- To add clustered storage during cluster creation, make sure that all servers can access the storage. (You can also add clustered storage after you create the cluster.)
- Make sure that all servers that you want to add as cluster nodes are joined to the same Active Directory domain.
- (Optional) Create an organizational unit (OU) and move the computer accounts for the servers that you want to add as cluster nodes into the OU. As a best practice, we recommend that you place failover clusters in their own OU in AD DS. This can help you better control which Group Policy settings or security template settings affect the cluster nodes. By isolating clusters in their own OU, it also helps prevent against accidental deletion of cluster computer objects.
Additionally, verify the following account requirements:
- Make sure that the account you want to use to create the cluster is a domain user who has administrator rights on all servers that you want to add as cluster nodes.
- Make sure that either of the following is true:
- The user who creates the cluster has the Create Computer objects permission to the OU or the container where the servers that will form the cluster reside.
- If the user does not have the Create Computer objects permission, ask a domain administrator to prestage a cluster computer object for the cluster. For more information, see Prestage Cluster Computer Objects in Active Directory Domain Services.
[!NOTE]
This requirement does not apply if you want to create an Active Directory-detached cluster in Windows Server 2012 R2. For more information, see Deploy an Active Directory-Detached Cluster.
Install the Failover Clustering feature
You must install the Failover Clustering feature on every server that you want to add as a failover cluster node.
Install the Failover Clustering feature
-
Start Server Manager.
-
On the Manage menu, select Add Roles and Features.
-
On the Before you begin page, select Next.
-
On the Select installation type page, select Role-based or feature-based installation, and then select Next.
-
On the Select destination server page, select the server where you want to install the feature, and then select Next.
-
On the Select server roles page, select Next.
-
On the Select features page, select the Failover Clustering check box.
-
To install the failover cluster management tools, select Add Features, and then select Next.
-
On the Confirm installation selections page, select Install.
A server restart is not required for the Failover Clustering feature.
-
When the installation is completed, select Close.
-
Repeat this procedure on every server that you want to add as a failover cluster node.
[!NOTE]
After you install the Failover Clustering feature, we recommend that you apply the latest updates from Windows Update. Also, for a Windows Server 2012-based failover cluster, review the Recommended hotfixes and updates for Windows Server 2012-based failover clusters Microsoft Support article and install any updates that apply.
Validate the configuration
Before you create the failover cluster, we strongly recommend that you validate the configuration to make sure that the hardware and hardware settings are compatible with failover clustering. Microsoft supports a cluster solution only if the complete configuration passes all validation tests and if all hardware is certified for the version of Windows Server that the cluster nodes are running.
[!NOTE]
You must have at least two nodes to run all tests. If you have only one node, many of the critical storage tests do not run.
Run cluster validation tests
-
On a computer that has the Failover Cluster Management Tools installed from the Remote Server Administration Tools, or on a server where you installed the Failover Clustering feature, start Failover Cluster Manager. To do this on a server, start Server Manager, and then on the Tools menu, select Failover Cluster Manager.
-
In the Failover Cluster Manager pane, under Management, select Validate Configuration.
-
On the Before You Begin page, select Next.
-
On the Select Servers or a Cluster page, in the Enter name box, enter the NetBIOS name or the fully qualified domain name of a server that you plan to add as a failover cluster node, and then select Add. Repeat this step for each server that you want to add. To add multiple servers at the same time, separate the names by a comma or by a semicolon. For example, enter the names in the format
server1.contoso.com, server2.contoso.com. When you are finished, select Next. -
On the Testing Options page, select Run all tests (recommended), and then select Next.
-
On the Confirmation page, select Next.
The Validating page displays the status of the running tests.
-
On the Summary page, do either of the following:
-
If the results indicate that the tests completed successfully and the configuration is suited for clustering, and you want to create the cluster immediately, make sure that the Create the cluster now using the validated nodes check box is selected, and then select Finish. Then, continue to step 4 of the Create the failover cluster procedure.
-
If the results indicate that there were warnings or failures, select View Report to view the details and determine which issues must be corrected. Realize that a warning for a particular validation test indicates that this aspect of the failover cluster can be supported, but might not meet the recommended best practices.
[!NOTE]
If you receive a warning for the Validate Storage Spaces Persistent Reservation test, see the blog post Windows Failover Cluster validation warning indicates your disks don’t support the persistent reservations for Storage Spaces for more information.
-
For more information about hardware validation tests, see Validate Hardware for a Failover Cluster.
Create the failover cluster
To complete this step, make sure that the user account that you log on as meets the requirements that are outlined in the Verify the prerequisites section of this topic.
-
Start Server Manager.
-
On the Tools menu, select Failover Cluster Manager.
-
In the Failover Cluster Manager pane, under Management, select Create Cluster.
The Create Cluster Wizard opens.
-
On the Before You Begin page, select Next.
-
If the Select Servers page appears, in the Enter name box, enter the NetBIOS name or the fully qualified domain name of a server that you plan to add as a failover cluster node, and then select Add. Repeat this step for each server that you want to add. To add multiple servers at the same time, separate the names by a comma or a semicolon. For example, enter the names in the format server1.contoso.com; server2.contoso.com. When you are finished, select Next.
[!NOTE]
If you chose to create the cluster immediately after running validation in the configuration validating procedure, you will not see the Select Servers page. The nodes that were validated are automatically added to the Create Cluster Wizard so that you do not have to enter them again. -
If you skipped validation earlier, the Validation Warning page appears. We strongly recommend that you run cluster validation. Only clusters that pass all validation tests are supported by Microsoft. To run the validation tests, select Yes, and then select Next. Complete the Validate a Configuration Wizard as described in Validate the configuration.
-
On the Access Point for Administering the Cluster page, do the following:
-
In the Cluster Name box, enter the name that you want to use to administer the cluster. Before you do, review the following information:
- During cluster creation, this name is registered as the cluster computer object (also known as the cluster name object or CNO) in AD DS. If you specify a NetBIOS name for the cluster, the CNO is created in the same location where the computer objects for the cluster nodes reside. This can be either the default Computers container or an OU.
- To specify a different location for the CNO, you can enter the distinguished name of an OU in the Cluster Name box. For example: CN=ClusterName, OU=Clusters, DC=Contoso, DC=com.
- If a domain administrator has prestaged the CNO in a different OU than where the cluster nodes reside, specify the distinguished name that the domain administrator provides.
-
If the server does not have a network adapter that is configured to use DHCP, you must configure one or more static IP addresses for the failover cluster. Select the check box next to each network that you want to use for cluster management. Select the Address field next to a selected network, and then enter the IP address that you want to assign to the cluster. This IP address (or addresses) will be associated with the cluster name in Domain Name System (DNS).
[!NOTE]
If you’re using Windows Server 2019, you have the option to use a distributed network name for the cluster. A distributed network name uses the IP addresses of the member servers instead of requiring a dedicated IP address for the cluster. By default, Windows uses a distributed network name if it detects that you’re creating the cluster in Azure (so you don’t have to create an internal load balancer for the cluster), or a normal static or IP address if you’re running on-premises. For more info, see Distributed Network Name.- When you are finished, select Next.
-
-
On the Confirmation page, review the settings. By default, the Add all eligible storage to the cluster check box is selected. Clear this check box if you want to do either of the following:
- You want to configure storage later.
- You plan to create clustered storage spaces through Failover Cluster Manager or through the Failover Clustering Windows PowerShell cmdlets, and have not yet created storage spaces in File and Storage Services. For more information, see Deploy Clustered Storage Spaces.
-
Select Next to create the failover cluster.
-
On the Summary page, confirm that the failover cluster was successfully created. If there were any warnings or errors, view the summary output or select View Report to view the full report. Select Finish.
-
To confirm that the cluster was created, verify that the cluster name is listed under Failover Cluster Manager in the navigation tree. You can expand the cluster name, and then select items under Nodes, Storage or Networks to view the associated resources.
Realize that it may take some time for the cluster name to successfully replicate in DNS. After successful DNS registration and replication, if you select All Servers in Server Manager, the cluster name should be listed as a server with a Manageability status of Online.
After the cluster is created, you can do things such as verify cluster quorum configuration, and optionally, create Cluster Shared Volumes (CSV). For more information, see Understanding Quorum in Storage Spaces Direct and Use Cluster Shared Volumes in a failover cluster.
Create clustered roles
After you create the failover cluster, you can create clustered roles to host cluster workloads.
[!NOTE]
For clustered roles that require a client access point, a virtual computer object (VCO) is created in AD DS. By default, all VCOs for the cluster are created in the same container or OU as the CNO. Realize that after you create a cluster, you can move the CNO to any OU.
Here’s how to create a clustered role:
-
Use Server Manager or Windows PowerShell to install the role or feature that is required for a clustered role on each failover cluster node. For example, if you want to create a clustered file server, install the File Server role on all cluster nodes.
The following table shows the clustered roles that you can configure in the High Availability Wizard and the associated server role or feature that you must install as a prerequisite.
Clustered Role Role or Feature Prerequisite Namespace Server Namespaces (part of File Server role) DFS Namespace Server DHCP Server role Distributed Transaction Coordinator (DTC) None File Server File Server role Generic Application Not applicable Generic Script Not applicable Generic Service Not applicable Hyper-V Replica Broker Hyper-V role iSCSI Target Server iSCSI Target Server (part of File Server role) iSNS Server iSNS Server Service feature Message Queuing Message Queuing Services feature Other Server None Virtual Machine Hyper-V role WINS Server WINS Server feature -
In Failover Cluster Manager, expand the cluster name, right-click Roles, and then select Configure Role.
-
Follow the steps in the High Availability Wizard to create the clustered role.
-
To verify that the clustered role was created, in the Roles pane, make sure that the role has a status of Running. The Roles pane also indicates the owner node. To test failover, right-click the role, point to Move, and then select Select Node. In the Move Clustered Role dialog box, select the desired cluster node, and then select OK. In the Owner Node column, verify that the owner node changed.
Create a failover cluster by using Windows PowerShell
The following Windows PowerShell cmdlets perform the same functions as the preceding procedures in this topic. Enter each cmdlet on a single line, even though they may appear word-wrapped across several lines because of formatting constraints.
[!NOTE]
You must use Windows PowerShell to create an Active Directory-detached cluster in Windows Server 2012 R2. For information about the syntax, see Deploy an Active Directory-Detached Cluster.
The following example installs the Failover Clustering feature.
Install-WindowsFeature –Name Failover-Clustering –IncludeManagementTools
The following example runs all cluster validation tests on computers that are named Server1 and Server2.
Test-Cluster –Node Server1, Server2
[!NOTE]
The Test-Cluster cmdlet outputs the results to a log file in the current working directory. For example: C:Users<username>AppDataLocalTemp.
The following example creates a failover cluster that is named MyCluster with nodes Server1 and Server2, assigns the static IP address 192.168.1.12, and adds all eligible storage to the failover cluster.
New-Cluster –Name MyCluster –Node Server1, Server2 –StaticAddress 192.168.1.12
The following example creates the same failover cluster as in the previous example, but it does not add eligible storage to the failover cluster.
New-Cluster –Name MyCluster –Node Server1, Server2 –StaticAddress 192.168.1.12 -NoStorage
The following example creates a cluster that is named MyCluster in the Cluster OU of the domain Contoso.com.
New-Cluster -Name CN=MyCluster,OU=Cluster,DC=Contoso,DC=com -Node Server1, Server2
For examples of how to add clustered roles, see topics such as Add-ClusterFileServerRole and Add-ClusterGenericApplicationRole.
After the AD Detached failover Cluster is created backup the certificate with private key exportable option. Open MMC ==>File ==>Add remove Snap in ==>Certificates==>Services Accounts==>Next==>Local Computer==>Cluster Service==>Certificates==>ClussvcPersonal==>Select Certificate right click==>export ==>Next==>Yes export the Private Key ==>PfX Format==>Choose Password or you can add group ==>Next==>Select path where you want to store certificate==>Next ==>Finish.
More information
- Failover Clustering
- Deploy a Hyper-V Cluster
- Scale-Out File Server for Application Data
- Deploy an Active Directory-Detached Cluster
- Using Guest Clustering for High Availability
- Cluster-Aware Updating
- New-Cluster
- Test-Cluster
Installing the Cluster is easy now days. But just this I post a little blog on how to do this, In my blog stats it shows that the 2012 post is still very active , so time for an update to Windows Server 2019. in the creation there isn’t much changed, it gets only easier. but If you still not in PowerShell you got more clicks to do an less Coffee. And Windows Admin Center is also a great addition to manage a cluster. This blog post is also usable in Azure Only you need to add Storagespacesdirect and a CSV file share.
Just install a bare metal (VM) windows Server 2019 and do a domain join and the fun can start.
Installing the Cluster Feature in powershell
Install-WindowsFeature –Name Failover-Clustering –IncludeManagementTools
#Create cluster validation report
Test-Cluster -Node MVP19-01,MVP19-02
#Create new Cluster
New-Cluster -Name MVP1911-27 -Node MVP19-01,MVP19-02 -NoStorage -StaticAddress «10.255.255.45»
#place witness file on USB device from my router
Set-ClusterQuorum -FileShareWitness \SERVERSHARE -Credential $(Get-Credential)
Now that the basic cluster is ready we start with the HA share

File share witness enhancements We enabled the use of a file share witness in the following scenarios:
- Absent or extremely poor Internet access because of a remote location, preventing the use of a cloud witness.
- Lack of shared drives for a disk witness. This could be a Storage Spaces Direct hyperconverged configuration, a SQL Server Always On Availability Groups (AG), or an * Exchange Database Availability Group (DAG), none of which use shared disks.
- Lack of a domain controller connection due to the cluster being behind a DMZ.
-
A workgroup or cross-domain cluster for which there is no Active Directory cluster name object (CNO). Find out more about these enhancements in the following post in Server & Management Blogs: Failover Cluster File Share Witness and DFS.
We now also explicitly block the use of a DFS Namespaces share as a location. Adding a file share witness to a DFS share can cause stability issues for your cluster, and this configuration has never been supported. We added logic to detect if a share uses DFS Namespaces, and if DFS Namespaces is detected, Failover Cluster Manager blocks creation of the witness and displays an error message about not being supported.
that’s it the cluster is created, we can start with the File server
Next is installation of the file server role

A restart is needed! After the restart we can build the cluster with the HA file share
$servers = («MVP19-01», «MVP19-02»)
foreach ($server in $servers) {Install-WindowsFeature -Name file-services -ComputerName $server}
Now that the File Server Role is added we can add the Disk. Or use a disk that you already added before.
First we need to add a disk this can be done in the Failover Cluster manager or with PowerShell


Get-ClusterAvailableDisk | Add-ClusterDisk

The Roles are there and the Disk is added


Next step is adding the File server Role to the Cluster and add the HA File Share.
In this case I have a fail over disk and I use the File Server for general use.


So when adding the Disk it is not showing the disk. This is The disk is added to the cluster but the disk isn’t formatted!

Keep in mind that formating the cluster disk while it is online is not possible. You need to set the disk in maintenance mode else the format will fail.


So after the disk format we will see the Disk appear and can be added to the File server


After this the File server is up and running. As you can see the setup is screen intense, building this with PowerShell is a lot faster.
Powershell
add-ClusterFileServerRole -Storage «Cluster Disk 1» -Name MyFiles
New-SmbShare -Name «Data» -Path «J:Data» -EncryptData $True
Quick steps with powershell and even the share is created and encrypted

Next step is adding the file share.

go for the Quick setup


Pick the disk and select the folder with the data on the disk, if there is no data then create a folder that will hold the data later.

as you can see the UNC path from the File Server.


As you can see the settings can be adjusted for you needs and also set the right access, and keep in mind this needs to be don on the Cluster Level!

All Done

So creating a File Server and 2 file shares is Click intensive if you don’t use PowerShell.
But What about Windows Admin Center ? yes that would be an option also except here you can’t create a cluster role.


You can create a new role but no file server /share etc.
But when the share is created and running like now you can use Windows Admin Center for migration the data to the file share.

But more and more options are coming in Windows Admin Center below are some links that you can use to add your request to the UserVoice
https://docs.microsoft.com/en-us/windows-server/manage/windows-admin-center/use/manage-failover-clusters
More Coming
Failover cluster management in Windows Admin Center is actively under development and new features will be added in the near future. You can view the status and vote for features in UserVoice:
Feature Request
Show more clustered disk info
Support additional cluster actions
Support converged clusters running Hyper-V and Scale-Out File Server on different clusters
View CSV block cache
See all or propose new feature
+++++++++++++++
Follow Me on Twitter @ClusterMVP
Follow My blog https://robertsmit.wordpress.com
Linkedin Profile Robert Smit MVP Linkedin profile
Google : Robert Smit MVP profile
![]()
Robert Smit is Senior Technical Evangelist and is a current Microsoft MVP in Clustering as of 2009.
Robert has over 20 years experience in IT with experience in the educational, health-care and finance industries.
Robert’s past IT experience in the trenches of IT gives him the knowledge and insight that allows him to communicate effectively with IT professionals
who are trying to address real concerns around business continuity, disaster recovery and regulatory compliance issues. Robert holds the following certifications:
MCT — Microsoft Certified Trainer, MCTS — Windows Server Virtualization, MCSE, MCSA and MCPS. He is an active participant in the Microsoft newsgroup community and is currently focused on Hyper-V, Failover Clustering, SQL Server, Azure and all things related to Cloud Computing and Infrastructure Optimalization.
Follow Robert on Twitter @ClusterMVP
Or follow his blog https://robertsmit.wordpress.com
Linkedin Profile Http://nl.linkedin.com/in/robertsmit
Robert is also capable of transferring his knowledge to others which is a rare feature in the field of IT. He makes a point of not only solving issues but also of giving on the job training of his colleagues.
A customer says » Robert has been a big influence on our technical staff and I have to come to know him as a brilliant specialist concerning Microsoft Products. He was Capable with his in-depth knowledge of Microsoft products to troubleshoot problems and develop our infrastructure to a higher level. I would certainly hire him again in the future. »
Details of the Recommendation: «I have been coordinating with Robert implementing a very complex system. Although he was primarily a Microsoft infrastructure specialist; he was able to understand and debug .Net based complext Windows applications and websites. His input to improve performance of applications proved very helpful for the success of our project
View all posts by Robert Smit [MVP]
| title | description | manager | ms.topic | ms.author | author | ms.date |
|---|---|---|---|---|---|---|
|
Deploying a two-node clustered file server |
This article describes creating a two-node file server cluster |
femila |
article |
wscontent |
robinharwood |
10/22/2021 |
Deploying a two-node clustered file server
Applies to: Windows Server 2022, Windows Server 2019, Windows Server 2016
A failover cluster is a group of independent computers that work together to increase the availability of applications and services. The clustered servers (called nodes) are connected by physical cables and by software. If one of the cluster nodes fails, another node begins to provide service (a process known as failover). Users experience a minimum of disruptions in service. For information about using a failover cluster in Azure Stack HCI, see Create an Azure Stack HCI cluster using Windows Admin Center.
This guide describes the steps for installing and configuring a general purpose file server failover cluster that has two nodes. By creating the configuration in this guide, you can learn about failover clusters and familiarize yourself with the Failover Cluster Management snap-in interface in Windows Server 2019 or Windows Server 2016.
Overview for a two-node file server cluster
Servers in a failover cluster can function in a variety of roles, including the roles of file server, Hyper-V server, or database server, and can provide high availability for a variety of other services and applications. This guide describes how to configure a two-node file server cluster.
A failover cluster usually includes a storage unit that is physically connected to all the servers in the cluster, although any given volume in the storage is only accessed by one server at a time. The following diagram shows a two-node failover cluster connected to a storage unit.

Storage volumes or logical unit numbers (LUNs) exposed to the nodes in a cluster must not be exposed to other servers, including servers in another cluster. The following diagram illustrates this.

Note that for the maximum availability of any server, it is important to follow best practices for server management—for example, carefully managing the physical environment of the servers, testing software changes before fully implementing them, and carefully keeping track of software updates and configuration changes on all clustered servers.
The following scenario describes how a file server failover cluster can be configured. The files being shared are on the cluster storage, and either clustered server can act as the file server that shares them.
Shared folders in a failover cluster
The following list describes shared folder configuration functionality that is integrated into failover clustering:
-
Display is scoped to clustered shared folders only (no mixing with non-clustered shared folders): When a user views shared folders by specifying the path of a clustered file server, the display will include only the shared folders that are part of the specific file server role. It will exclude non-clustered shared folders and shares part of separate file server roles that happen to be on a node of the cluster.
-
Access-based enumeration: You can use access-based enumeration to hide a specified folder from users’ view. Instead of allowing users to see the folder but not access anything on it, you can choose to prevent them from seeing the folder at all. You can configure access-based enumeration for a clustered shared folder in the same way as for a non-clustered shared folder.
-
Offline access: You can configure offline access (caching) for a clustered shared folder in the same way as for a nonclustered shared folder.
-
Clustered disks are always recognized as part of the cluster: Whether you use the failover cluster interface, Windows Explorer, or the Share and Storage Management snap-in, Windows recognizes whether a disk has been designated as being in the cluster storage. If such a disk has already been configured in Failover Cluster Management as part of a clustered file server, you can then use any of the previously mentioned interfaces to create a share on the disk. If such a disk has not been configured as part of a clustered file server, you cannot mistakenly create a share on it. Instead, an error indicates that the disk must first be configured as part of a clustered file server before it can be shared.
-
Integration of Services for Network File System: The File Server role in Windows Server includes the optional role service called Services for Network File System (NFS). By installing the role service and configuring shared folders with Services for NFS, you can create a clustered file server that supports UNIX-based clients.
Requirements for a two-node failover cluster
For a failover cluster in Windows Server 2016 or Windows Server 2019 to be considered an officially supported solution by Microsoft, the solution must meet the following criteria.
-
All hardware and software components must meet the qualifications for the appropriate logo. For Windows Server 2016, this is the «Certified for Windows Server 2016» logo. For Windows Server 2019, this is the «Certified for Windows Server 2019» logo. For more information about what hardware and software systems have been certified, please visit the Microsoft Windows Server Catalog site.
-
The fully configured solution (servers, network, and storage) must pass all tests in the validation wizard, which is part of the failover cluster snap-in.
The following will be needed for a two-node failover cluster.
-
Servers: We recommend using matching computers with the same or similar components. The servers for a two-node failover cluster must run the same version of Windows Server. They should also have the same software updates (patches).
-
Network Adapters and cable: The network hardware, like other components in the failover cluster solution, must be compatible with Windows Server 2016 or Windows Server 2019. If you use iSCSI, the network adapters must be dedicated to either network communication or iSCSI, not both. In the network infrastructure that connects your cluster nodes, avoid having single points of failure. There are multiple ways of accomplishing this. You can connect your cluster nodes by multiple, distinct networks. Alternatively, you can connect your cluster nodes with one network that is constructed with teamed network adapters, redundant switches, redundant routers, or similar hardware that removes single points of failure.
[!NOTE]
If the cluster nodes are connected with a single network, the network will pass the redundancy requirement in the Validate a Configuration wizard. However, the report will include a warning that the network should not have a single point of failure. -
Device Controllers or appropriate adapters for storage:
- Serial Attached SCSI or Fibre Channel: If you are using Serial Attached SCSI or Fibre Channel, in all clustered servers, all components of the storage stack should be identical. It is required that the multipath I/O (MPIO) software and Device Specific Module (DSM) software components be identical. It is recommended that the mass-storage device controllers—that is, the host bus adapter (HBA), HBA drivers, and HBA firmware—that are attached to cluster storage be identical. If you use dissimilar HBAs, you should verify with the storage vendor that you are following their supported or recommended configurations.
- iSCSI: If you are using iSCSI, each clustered server must have one or more network adapters or host bus adapters that are dedicated to the ISCSI storage. The network you use for iSCSI cannot be used for network communication. In all clustered servers, the network adapters you use to connect to the iSCSI storage target should be identical, and we recommend that you use Gigabit Ethernet or higher.
-
Storage: You must use shared storage that is certified for Windows Server 2016 or Windows Server 2019.
For a two-node failover cluster, the storage should contain at least two separate volumes (LUNs) if using a witness disk for quorum. The witness disk is a disk in the cluster storage that is designated to hold a copy of the cluster configuration database. For this two-node cluster example, the quorum configuration will be Node and Disk Majority. Node and Disk Majority means that the nodes and the witness disk each contain copies of the cluster configuration, and the cluster has quorum as long as a majority (two out of three) of these copies are available. The other volume (LUN) will contain the files that are being shared to users.
Storage requirements include the following:
- To use the native disk support included in failover clustering, use basic disks, not dynamic disks.
- We recommend that you format the partitions with NTFS (for the witness disk, the partition must be NTFS).
- For the partition style of the disk, you can use either master boot record (MBR) or GUID partition table (GPT).
- The storage must respond correctly to specific SCSI commands, the storage must follow the standard called SCSI Primary Commands-3 (SPC-3). In particular, the storage must support Persistent Reservations as specified in the SPC-3 standard.
- The miniport driver used for the storage must work with the Microsoft Storport storage driver.
Deploying storage area networks with failover clusters
When deploying a storage area network (SAN) with a failover cluster, the following guidelines should be observed.
-
Confirm certification of the storage: Using the Windows Server Catalog site, confirm the vendor’s storage, including drivers, firmware and software, is certified for Windows Server 2016 or Windows Server 2019.
-
Isolate storage devices, one cluster per device: Servers from different clusters must not be able to access the same storage devices. In most cases, a LUN that is used for one set of cluster servers should be isolated from all other servers through LUN masking or zoning.
-
Consider using multipath I/O software: In a highly available storage fabric, you can deploy failover clusters with multiple host bus adapters by using multipath I/O software. This provides the highest level of redundancy and availability. The multipath solution must be based on Microsoft Multipath I/O (MPIO). The storage hardware vendor may supply an MPIO device-specific module (DSM) for your hardware, although Windows Server 2016 and Windows Server 2019 include one or more DSMs as part of the operating system.
Network infrastructure and domain account requirements
You will need the following network infrastructure for a two-node failover cluster and an administrative account with the following domain permissions:
-
Network settings and IP addresses: When you use identical network adapters for a network, also use identical communication settings on those adapters (for example, Speed, Duplex Mode, Flow Control, and Media Type). Also, compare the settings between the network adapter and the switch it connects to and make sure that no settings are in conflict.
If you have private networks that are not routed to the rest of your network infrastructure, ensure that each of these private networks uses a unique subnet. This is necessary even if you give each network adapter a unique IP address. For example, if you have a cluster node in a central office that uses one physical network, and another node in a branch office that uses a separate physical network, do not specify 10.0.0.0/24 for both networks, even if you give each adapter a unique IP address.
For more information about the network adapters, see Hardware requirements for a two-node failover cluster, earlier in this guide.
-
DNS: The servers in the cluster must be using Domain Name System (DNS) for name resolution. The DNS dynamic update protocol can be used.
-
Domain role: All servers in the cluster must be in the same Active Directory domain. As a best practice, all clustered servers should have the same domain role (either member server or domain controller). The recommended role is member server.
-
Domain controller: We recommend that your clustered servers be member servers. If they are, you need an additional server that acts as the domain controller in the domain that contains your failover cluster.
-
Clients: As needed for testing, you can connect one or more networked clients to the failover cluster that you create, and observe the effect on a client when you move or fail over the clustered file server from one cluster node to the other.
-
Account for administering the cluster: When you first create a cluster or add servers to it, you must be logged on to the domain with an account that has administrator rights and permissions on all servers in that cluster. The account does not need to be a Domain Admins account, but can be a Domain Users account that is in the Administrators group on each clustered server. In addition, if the account is not a Domain Admins account, the account (or the group that the account is a member of) must be given the Create Computer Objects and Read All Properties permissions in the domain organizational unit (OU) that is will reside in.
Steps for installing a two-node file server cluster
You must complete the following steps to install a two-node file server failover cluster.
Step 1: Connect the cluster servers to the networks and storage
Step 2: Install the failover cluster feature
Step 3: Validate the cluster configuration
Step 4: Create the cluster
If you have already installed the cluster nodes and want to configure a file server failover cluster, see Steps for configuring a two-node file server cluster, later in this guide.
Step 1: Connect the cluster servers to the networks and storage
For a failover cluster network, avoid having single points of failure. There are multiple ways of accomplishing this. You can connect your cluster nodes by multiple, distinct networks. Alternatively, you can connect your cluster nodes with one network that is constructed with teamed network adapters, redundant switches, redundant routers, or similar hardware that removes single points of failure (If you use a network for iSCSI, you must create this network in addition to the other networks).
For a two-node file server cluster, when you connect the servers to the cluster storage, you must expose at least two volumes (LUNs). You can expose additional volumes as needed for thorough testing of your configuration. Do not expose the clustered volumes to servers that are not in the cluster.
To connect the cluster servers to the networks and storage
-
Review the details about networks in Hardware requirements for a two-node failover cluster and Network infrastructure and domain account requirements for a two-node failover cluster, earlier in this guide.
-
Connect and configure the networks that the servers in the cluster will use.
-
If your test configuration includes clients or a non-clustered domain controller, make sure that these computers can connect to the clustered servers through at least one network.
-
Follow the manufacturer’s instructions for physically connecting the servers to the storage.
-
Ensure that the disks (LUNs) that you want to use in the cluster are exposed to the servers that you will cluster (and only those servers). You can use any of the following interfaces to expose disks or LUNs:
-
The interface provided by the manufacturer of the storage.
-
If you are using iSCSI, an appropriate iSCSI interface.
-
-
If you have purchased software that controls the format or function of the disk, follow instructions from the vendor about how to use that software with Windows Server.
-
On one of the servers that you want to cluster, click Start, click Administrative Tools, click Computer Management, and then click Disk Management. (If the User Account Control dialog box appears, confirm that the action it displays is what you want, and then click Continue.) In Disk Management, confirm that the cluster disks are visible.
-
If you want to have a storage volume larger than 2 terabytes, and you are using the Windows interface to control the format of the disk, convert that disk to the partition style called GUID partition table (GPT). To do this, back up any data on the disk, delete all volumes on the disk and then, in Disk Management, right-click the disk (not a partition) and click Convert to GPT Disk. For volumes smaller than 2 terabytes, instead of using GPT, you can use the partition style called master boot record (MBR).
-
Check the format of any exposed volume or LUN. We recommend NTFS for the format (for the witness disk, you must use NTFS).
Step 2: Install the file server role and failover cluster feature
In this step, the file server role and failover cluster feature will be installed. Both servers must be running either Windows Server 2016 or Windows Server 2019.
Using Server Manager
-
Open Server Manager and under the Manage drop down, select Add Roles and Features.

-
If the Before you begin window opens, choose Next.
-
For the Installation Type, select Role-based or feature-based installation and Next.
-
Ensure Select a server from the server pool is selected, the name of the machine is highlighted, and Next.
-
For the Server Role, from the list of roles, open File Services, select File Server, and Next.
-
For the Features, from the list of features, select Failover Clustering. A popup dialog will show that lists the administration tools also being installed. Keep all the selected, choose Add Features and Next.
-
On the Confirmation page, select Install.
-
Once the installation completes, restart the computer.
-
Repeat the steps on the second machine.


Using PowerShell
-
Open an administrative PowerShell session by right-clicking the Start button and then selecting Windows PowerShell (Admin).
-
To install the File Server Role, run the command:
Install-WindowsFeature -Name FS-FileServer
-
To install the Failover Clustering feature and its management tools, run the command:
Install-WindowsFeature -Name Failover-Clustering -IncludeManagementTools
-
Once they have completed, you can verify they are installed with the commands:
Get-WindowsFeature -Name FS-FileServer
Get-WindowsFeature -Name Failover-Clustering
-
Once verified they are installed, restart the machine with the command:
-
Repeat the steps on the second server.
Step 3: Validate the cluster configuration
Before creating a cluster, we strongly recommend that you validate your configuration. Validation helps you confirm that the configuration of your servers, network, and storage meets a set of specific requirements for failover clusters.
Using Failover Cluster Manager
-
From Server Manager, choose the Tools drop down and select Failover Cluster Manager.
-
In Failover Cluster Manager, go to the middle column under Management and choose Validate Configuration.
-
If the Before you begin window opens, choose Next.
-
In the Select Servers or a Cluster window, add in the names of the two machines that will be the nodes of the cluster. For example, if the names are NODE1 and NODE2, enter the name and select Add. You can also choose the Browse button to search Active Directory for the names. Once both are listed under Selected Servers, choose Next.
-
In the Testing Options window, select Run all tests (recommended), and Next.
-
On the Confirmation page, it will give you the listing of all the tests it will check. Choose Next and the tests will begin.
-
Once completed, the Summary page appears after the tests run. To view Help topics that will help you interpret the results, click More about cluster validation tests.
-
While still on the Summary page, click View Report and read the test results. Make any necessary changes in the configuration and rerun the tests.
To view the results of the tests after you close the wizard, see SystemRootClusterReportsValidation Report date and time.html. -
To view Help topics about cluster validation after you close the wizard, in Failover Cluster Management, click Help, click Help Topics, click the Contents tab, expand the contents for the failover cluster Help, and click Validating a Failover Cluster Configuration.
Using PowerShell
-
Open an administrative PowerShell session by right-clicking the Start button and then selecting Windows PowerShell (Admin).
-
To validate the machines (for example, the machine names being NODE1 and NODE2) for Failover Clustering, run the command:
Test-Cluster -Node "NODE1","NODE2"
-
To view the results of the tests after you close the wizard, see the file specified (in SystemRootClusterReports), then make any necessary changes in the configuration and rerun the tests.
For more info, see Validating a Failover Cluster Configuration.
Step 4: Create the Cluster
The following will create a cluster out of the machines and configuration you have.
Using Failover Cluster Manager
-
From Server Manager, choose the Tools drop down and select Failover Cluster Manager.
-
In Failover Cluster Manager, go to the middle column under Management and choose Create Cluster.
-
If the Before you begin window opens, choose Next.
-
In the Select Servers window, add in the names of the two machines that will be the nodes of the cluster. For example, if the names are NODE1 and NODE2, enter the name and select Add. You can also choose the Browse button to search Active Directory for the names. Once both are listed under Selected Servers, choose Next.
-
In the Access Point for Administering the Cluster window, input the name of the cluster you will be using. Please note that this is not the name you will be using to connect to your file shares with. This is for simply administrating the cluster.
[!NOTE]
If you are using static IP Addresses, you will need to select the network to use and input the IP Address it will use for the cluster name. If you are using DHCP for your IP Addresses, the IP Address will be configured automatically for you. -
Choose Next.
-
On the Confirmation page, verify what you have configured and select Next to create the Cluster.
-
On the Summary page, it will give you the configuration it has created. You can select View Report to see the report of the creation.
Using PowerShell
-
Open an administrative PowerShell session by right-clicking the Start button and then selecting Windows PowerShell (Admin).
-
Run the following command to create the cluster if you are using static IP Addresses. For example, the machine names are NODE1 and NODE2, the name of the cluster will be CLUSTER, and the IP Address will be 1.1.1.1.
New-Cluster -Name CLUSTER -Node "NODE1","NODE2" -StaticAddress 1.1.1.1
-
Run the following command to create the cluster if you are using DHCP for IP Addresses. For example, the machine names are NODE1 and NODE2, and the name of the cluster will be CLUSTER.
New-Cluster -Name CLUSTER -Node "NODE1","NODE2"
Steps for configuring a file server failover cluster
To configure a file server failover cluster, follow the below steps.
-
From Server Manager, choose the Tools drop down and select Failover Cluster Manager.
-
When Failover Cluster Manager opens, it should automatically bring in the name of the cluster you created. If it does not, go to the middle column under Management and choose Connect to Cluster. Input the name of the cluster you created and OK.
-
In the console tree, click the «>» sign next to the cluster that you created to expand the items underneath it.
-
Right mouse click on Roles and select Configure Role.
-
If the Before you begin window opens, choose Next.
-
In the list of roles, choose File Server and Next.
-
For the File Server Type, select File Server for general use and Next.
For info about Scale-Out File Server, see Scale-Out File Server overview. -
In the Client Access Point window, input the name of the file server you will be using. Please note that this is not the name of the cluster. This is for the file share connectivity. For example, if I want to connect to SERVER, the name inputted would be SERVER.
[!NOTE]
If you are using static IP Addresses, you will need to select the network to use and input the IP Address it will use for the cluster name. If you are using DHCP for your IP Addresses, the IP Address will be configured automatically for you. -
Choose Next.
-
In the Select Storage window, select the additional drive (not the witness) that will hold your shares, and click Next.
-
On the Confirmation page, verify your configuration and select Next.
-
On the Summary page, it will give you the configuration it has created. You can select View Report to see the report of the file server role creation.

[!NOTE]
If the role does not add or start correctly, the CNO (Cluster Name Object) may not have permission to create objects in Active Directory. The File Server role requires a Computer object of the same name as the «Client Access Point» provided in Step 8.
-
Under Roles in the console tree, you will see the new role you created listed as the name you created. With it highlighted, under the Actions pane on the right, choose Add a share.
-
Run through the share wizard inputting the following:
- Type of share it will be
- Location/path the folder shared will be
- The name of the share users will connect to
- Additional settings such as Access-based enumeration, caching, encryption, etc.
- File level permissions if they will be other than the defaults
-
On the Confirmation page, verify what you have configured, and select Create to create the file server share.
-
On the Results page, select Close if it created the share. If it could not create the share, it will give you the errors incurred.
-
Choose Close.
-
Repeat this process for any additional shares.
| title | description | manager | ms.topic | ms.author | author | ms.date |
|---|---|---|---|---|---|---|
|
Deploying a two-node clustered file server |
This article describes creating a two-node file server cluster |
femila |
article |
wscontent |
robinharwood |
10/22/2021 |
Deploying a two-node clustered file server
Applies to: Windows Server 2022, Windows Server 2019, Windows Server 2016
A failover cluster is a group of independent computers that work together to increase the availability of applications and services. The clustered servers (called nodes) are connected by physical cables and by software. If one of the cluster nodes fails, another node begins to provide service (a process known as failover). Users experience a minimum of disruptions in service. For information about using a failover cluster in Azure Stack HCI, see Create an Azure Stack HCI cluster using Windows Admin Center.
This guide describes the steps for installing and configuring a general purpose file server failover cluster that has two nodes. By creating the configuration in this guide, you can learn about failover clusters and familiarize yourself with the Failover Cluster Management snap-in interface in Windows Server 2019 or Windows Server 2016.
Overview for a two-node file server cluster
Servers in a failover cluster can function in a variety of roles, including the roles of file server, Hyper-V server, or database server, and can provide high availability for a variety of other services and applications. This guide describes how to configure a two-node file server cluster.
A failover cluster usually includes a storage unit that is physically connected to all the servers in the cluster, although any given volume in the storage is only accessed by one server at a time. The following diagram shows a two-node failover cluster connected to a storage unit.
Storage volumes or logical unit numbers (LUNs) exposed to the nodes in a cluster must not be exposed to other servers, including servers in another cluster. The following diagram illustrates this.
Note that for the maximum availability of any server, it is important to follow best practices for server management—for example, carefully managing the physical environment of the servers, testing software changes before fully implementing them, and carefully keeping track of software updates and configuration changes on all clustered servers.
The following scenario describes how a file server failover cluster can be configured. The files being shared are on the cluster storage, and either clustered server can act as the file server that shares them.
Shared folders in a failover cluster
The following list describes shared folder configuration functionality that is integrated into failover clustering:
-
Display is scoped to clustered shared folders only (no mixing with non-clustered shared folders): When a user views shared folders by specifying the path of a clustered file server, the display will include only the shared folders that are part of the specific file server role. It will exclude non-clustered shared folders and shares part of separate file server roles that happen to be on a node of the cluster.
-
Access-based enumeration: You can use access-based enumeration to hide a specified folder from users’ view. Instead of allowing users to see the folder but not access anything on it, you can choose to prevent them from seeing the folder at all. You can configure access-based enumeration for a clustered shared folder in the same way as for a non-clustered shared folder.
-
Offline access: You can configure offline access (caching) for a clustered shared folder in the same way as for a nonclustered shared folder.
-
Clustered disks are always recognized as part of the cluster: Whether you use the failover cluster interface, Windows Explorer, or the Share and Storage Management snap-in, Windows recognizes whether a disk has been designated as being in the cluster storage. If such a disk has already been configured in Failover Cluster Management as part of a clustered file server, you can then use any of the previously mentioned interfaces to create a share on the disk. If such a disk has not been configured as part of a clustered file server, you cannot mistakenly create a share on it. Instead, an error indicates that the disk must first be configured as part of a clustered file server before it can be shared.
-
Integration of Services for Network File System: The File Server role in Windows Server includes the optional role service called Services for Network File System (NFS). By installing the role service and configuring shared folders with Services for NFS, you can create a clustered file server that supports UNIX-based clients.
Requirements for a two-node failover cluster
For a failover cluster in Windows Server 2016 or Windows Server 2019 to be considered an officially supported solution by Microsoft, the solution must meet the following criteria.
-
All hardware and software components must meet the qualifications for the appropriate logo. For Windows Server 2016, this is the «Certified for Windows Server 2016» logo. For Windows Server 2019, this is the «Certified for Windows Server 2019» logo. For more information about what hardware and software systems have been certified, please visit the Microsoft Windows Server Catalog site.
-
The fully configured solution (servers, network, and storage) must pass all tests in the validation wizard, which is part of the failover cluster snap-in.
The following will be needed for a two-node failover cluster.
-
Servers: We recommend using matching computers with the same or similar components. The servers for a two-node failover cluster must run the same version of Windows Server. They should also have the same software updates (patches).
-
Network Adapters and cable: The network hardware, like other components in the failover cluster solution, must be compatible with Windows Server 2016 or Windows Server 2019. If you use iSCSI, the network adapters must be dedicated to either network communication or iSCSI, not both. In the network infrastructure that connects your cluster nodes, avoid having single points of failure. There are multiple ways of accomplishing this. You can connect your cluster nodes by multiple, distinct networks. Alternatively, you can connect your cluster nodes with one network that is constructed with teamed network adapters, redundant switches, redundant routers, or similar hardware that removes single points of failure.
[!NOTE]
If the cluster nodes are connected with a single network, the network will pass the redundancy requirement in the Validate a Configuration wizard. However, the report will include a warning that the network should not have a single point of failure. -
Device Controllers or appropriate adapters for storage:
- Serial Attached SCSI or Fibre Channel: If you are using Serial Attached SCSI or Fibre Channel, in all clustered servers, all components of the storage stack should be identical. It is required that the multipath I/O (MPIO) software and Device Specific Module (DSM) software components be identical. It is recommended that the mass-storage device controllers—that is, the host bus adapter (HBA), HBA drivers, and HBA firmware—that are attached to cluster storage be identical. If you use dissimilar HBAs, you should verify with the storage vendor that you are following their supported or recommended configurations.
- iSCSI: If you are using iSCSI, each clustered server must have one or more network adapters or host bus adapters that are dedicated to the ISCSI storage. The network you use for iSCSI cannot be used for network communication. In all clustered servers, the network adapters you use to connect to the iSCSI storage target should be identical, and we recommend that you use Gigabit Ethernet or higher.
-
Storage: You must use shared storage that is certified for Windows Server 2016 or Windows Server 2019.
For a two-node failover cluster, the storage should contain at least two separate volumes (LUNs) if using a witness disk for quorum. The witness disk is a disk in the cluster storage that is designated to hold a copy of the cluster configuration database. For this two-node cluster example, the quorum configuration will be Node and Disk Majority. Node and Disk Majority means that the nodes and the witness disk each contain copies of the cluster configuration, and the cluster has quorum as long as a majority (two out of three) of these copies are available. The other volume (LUN) will contain the files that are being shared to users.
Storage requirements include the following:
- To use the native disk support included in failover clustering, use basic disks, not dynamic disks.
- We recommend that you format the partitions with NTFS (for the witness disk, the partition must be NTFS).
- For the partition style of the disk, you can use either master boot record (MBR) or GUID partition table (GPT).
- The storage must respond correctly to specific SCSI commands, the storage must follow the standard called SCSI Primary Commands-3 (SPC-3). In particular, the storage must support Persistent Reservations as specified in the SPC-3 standard.
- The miniport driver used for the storage must work with the Microsoft Storport storage driver.
Deploying storage area networks with failover clusters
When deploying a storage area network (SAN) with a failover cluster, the following guidelines should be observed.
-
Confirm certification of the storage: Using the Windows Server Catalog site, confirm the vendor’s storage, including drivers, firmware and software, is certified for Windows Server 2016 or Windows Server 2019.
-
Isolate storage devices, one cluster per device: Servers from different clusters must not be able to access the same storage devices. In most cases, a LUN that is used for one set of cluster servers should be isolated from all other servers through LUN masking or zoning.
-
Consider using multipath I/O software: In a highly available storage fabric, you can deploy failover clusters with multiple host bus adapters by using multipath I/O software. This provides the highest level of redundancy and availability. The multipath solution must be based on Microsoft Multipath I/O (MPIO). The storage hardware vendor may supply an MPIO device-specific module (DSM) for your hardware, although Windows Server 2016 and Windows Server 2019 include one or more DSMs as part of the operating system.
Network infrastructure and domain account requirements
You will need the following network infrastructure for a two-node failover cluster and an administrative account with the following domain permissions:
-
Network settings and IP addresses: When you use identical network adapters for a network, also use identical communication settings on those adapters (for example, Speed, Duplex Mode, Flow Control, and Media Type). Also, compare the settings between the network adapter and the switch it connects to and make sure that no settings are in conflict.
If you have private networks that are not routed to the rest of your network infrastructure, ensure that each of these private networks uses a unique subnet. This is necessary even if you give each network adapter a unique IP address. For example, if you have a cluster node in a central office that uses one physical network, and another node in a branch office that uses a separate physical network, do not specify 10.0.0.0/24 for both networks, even if you give each adapter a unique IP address.
For more information about the network adapters, see Hardware requirements for a two-node failover cluster, earlier in this guide.
-
DNS: The servers in the cluster must be using Domain Name System (DNS) for name resolution. The DNS dynamic update protocol can be used.
-
Domain role: All servers in the cluster must be in the same Active Directory domain. As a best practice, all clustered servers should have the same domain role (either member server or domain controller). The recommended role is member server.
-
Domain controller: We recommend that your clustered servers be member servers. If they are, you need an additional server that acts as the domain controller in the domain that contains your failover cluster.
-
Clients: As needed for testing, you can connect one or more networked clients to the failover cluster that you create, and observe the effect on a client when you move or fail over the clustered file server from one cluster node to the other.
-
Account for administering the cluster: When you first create a cluster or add servers to it, you must be logged on to the domain with an account that has administrator rights and permissions on all servers in that cluster. The account does not need to be a Domain Admins account, but can be a Domain Users account that is in the Administrators group on each clustered server. In addition, if the account is not a Domain Admins account, the account (or the group that the account is a member of) must be given the Create Computer Objects and Read All Properties permissions in the domain organizational unit (OU) that is will reside in.
Steps for installing a two-node file server cluster
You must complete the following steps to install a two-node file server failover cluster.
Step 1: Connect the cluster servers to the networks and storage
Step 2: Install the failover cluster feature
Step 3: Validate the cluster configuration
Step 4: Create the cluster
If you have already installed the cluster nodes and want to configure a file server failover cluster, see Steps for configuring a two-node file server cluster, later in this guide.
Step 1: Connect the cluster servers to the networks and storage
For a failover cluster network, avoid having single points of failure. There are multiple ways of accomplishing this. You can connect your cluster nodes by multiple, distinct networks. Alternatively, you can connect your cluster nodes with one network that is constructed with teamed network adapters, redundant switches, redundant routers, or similar hardware that removes single points of failure (If you use a network for iSCSI, you must create this network in addition to the other networks).
For a two-node file server cluster, when you connect the servers to the cluster storage, you must expose at least two volumes (LUNs). You can expose additional volumes as needed for thorough testing of your configuration. Do not expose the clustered volumes to servers that are not in the cluster.
To connect the cluster servers to the networks and storage
-
Review the details about networks in Hardware requirements for a two-node failover cluster and Network infrastructure and domain account requirements for a two-node failover cluster, earlier in this guide.
-
Connect and configure the networks that the servers in the cluster will use.
-
If your test configuration includes clients or a non-clustered domain controller, make sure that these computers can connect to the clustered servers through at least one network.
-
Follow the manufacturer’s instructions for physically connecting the servers to the storage.
-
Ensure that the disks (LUNs) that you want to use in the cluster are exposed to the servers that you will cluster (and only those servers). You can use any of the following interfaces to expose disks or LUNs:
-
The interface provided by the manufacturer of the storage.
-
If you are using iSCSI, an appropriate iSCSI interface.
-
-
If you have purchased software that controls the format or function of the disk, follow instructions from the vendor about how to use that software with Windows Server.
-
On one of the servers that you want to cluster, click Start, click Administrative Tools, click Computer Management, and then click Disk Management. (If the User Account Control dialog box appears, confirm that the action it displays is what you want, and then click Continue.) In Disk Management, confirm that the cluster disks are visible.
-
If you want to have a storage volume larger than 2 terabytes, and you are using the Windows interface to control the format of the disk, convert that disk to the partition style called GUID partition table (GPT). To do this, back up any data on the disk, delete all volumes on the disk and then, in Disk Management, right-click the disk (not a partition) and click Convert to GPT Disk. For volumes smaller than 2 terabytes, instead of using GPT, you can use the partition style called master boot record (MBR).
-
Check the format of any exposed volume or LUN. We recommend NTFS for the format (for the witness disk, you must use NTFS).
Step 2: Install the file server role and failover cluster feature
In this step, the file server role and failover cluster feature will be installed. Both servers must be running either Windows Server 2016 or Windows Server 2019.
Using Server Manager
-
Open Server Manager and under the Manage drop down, select Add Roles and Features.
-
If the Before you begin window opens, choose Next.
-
For the Installation Type, select Role-based or feature-based installation and Next.
-
Ensure Select a server from the server pool is selected, the name of the machine is highlighted, and Next.
-
For the Server Role, from the list of roles, open File Services, select File Server, and Next.
-
For the Features, from the list of features, select Failover Clustering. A popup dialog will show that lists the administration tools also being installed. Keep all the selected, choose Add Features and Next.
-
On the Confirmation page, select Install.
-
Once the installation completes, restart the computer.
-
Repeat the steps on the second machine.
Using PowerShell
-
Open an administrative PowerShell session by right-clicking the Start button and then selecting Windows PowerShell (Admin).
-
To install the File Server Role, run the command:
Install-WindowsFeature -Name FS-FileServer
-
To install the Failover Clustering feature and its management tools, run the command:
Install-WindowsFeature -Name Failover-Clustering -IncludeManagementTools
-
Once they have completed, you can verify they are installed with the commands:
Get-WindowsFeature -Name FS-FileServer
Get-WindowsFeature -Name Failover-Clustering
-
Once verified they are installed, restart the machine with the command:
-
Repeat the steps on the second server.
Step 3: Validate the cluster configuration
Before creating a cluster, we strongly recommend that you validate your configuration. Validation helps you confirm that the configuration of your servers, network, and storage meets a set of specific requirements for failover clusters.
Using Failover Cluster Manager
-
From Server Manager, choose the Tools drop down and select Failover Cluster Manager.
-
In Failover Cluster Manager, go to the middle column under Management and choose Validate Configuration.
-
If the Before you begin window opens, choose Next.
-
In the Select Servers or a Cluster window, add in the names of the two machines that will be the nodes of the cluster. For example, if the names are NODE1 and NODE2, enter the name and select Add. You can also choose the Browse button to search Active Directory for the names. Once both are listed under Selected Servers, choose Next.
-
In the Testing Options window, select Run all tests (recommended), and Next.
-
On the Confirmation page, it will give you the listing of all the tests it will check. Choose Next and the tests will begin.
-
Once completed, the Summary page appears after the tests run. To view Help topics that will help you interpret the results, click More about cluster validation tests.
-
While still on the Summary page, click View Report and read the test results. Make any necessary changes in the configuration and rerun the tests.
To view the results of the tests after you close the wizard, see SystemRootClusterReportsValidation Report date and time.html. -
To view Help topics about cluster validation after you close the wizard, in Failover Cluster Management, click Help, click Help Topics, click the Contents tab, expand the contents for the failover cluster Help, and click Validating a Failover Cluster Configuration.
Using PowerShell
-
Open an administrative PowerShell session by right-clicking the Start button and then selecting Windows PowerShell (Admin).
-
To validate the machines (for example, the machine names being NODE1 and NODE2) for Failover Clustering, run the command:
Test-Cluster -Node "NODE1","NODE2"
-
To view the results of the tests after you close the wizard, see the file specified (in SystemRootClusterReports), then make any necessary changes in the configuration and rerun the tests.
For more info, see Validating a Failover Cluster Configuration.
Step 4: Create the Cluster
The following will create a cluster out of the machines and configuration you have.
Using Failover Cluster Manager
-
From Server Manager, choose the Tools drop down and select Failover Cluster Manager.
-
In Failover Cluster Manager, go to the middle column under Management and choose Create Cluster.
-
If the Before you begin window opens, choose Next.
-
In the Select Servers window, add in the names of the two machines that will be the nodes of the cluster. For example, if the names are NODE1 and NODE2, enter the name and select Add. You can also choose the Browse button to search Active Directory for the names. Once both are listed under Selected Servers, choose Next.
-
In the Access Point for Administering the Cluster window, input the name of the cluster you will be using. Please note that this is not the name you will be using to connect to your file shares with. This is for simply administrating the cluster.
[!NOTE]
If you are using static IP Addresses, you will need to select the network to use and input the IP Address it will use for the cluster name. If you are using DHCP for your IP Addresses, the IP Address will be configured automatically for you. -
Choose Next.
-
On the Confirmation page, verify what you have configured and select Next to create the Cluster.
-
On the Summary page, it will give you the configuration it has created. You can select View Report to see the report of the creation.
Using PowerShell
-
Open an administrative PowerShell session by right-clicking the Start button and then selecting Windows PowerShell (Admin).
-
Run the following command to create the cluster if you are using static IP Addresses. For example, the machine names are NODE1 and NODE2, the name of the cluster will be CLUSTER, and the IP Address will be 1.1.1.1.
New-Cluster -Name CLUSTER -Node "NODE1","NODE2" -StaticAddress 1.1.1.1
-
Run the following command to create the cluster if you are using DHCP for IP Addresses. For example, the machine names are NODE1 and NODE2, and the name of the cluster will be CLUSTER.
New-Cluster -Name CLUSTER -Node "NODE1","NODE2"
Steps for configuring a file server failover cluster
To configure a file server failover cluster, follow the below steps.
-
From Server Manager, choose the Tools drop down and select Failover Cluster Manager.
-
When Failover Cluster Manager opens, it should automatically bring in the name of the cluster you created. If it does not, go to the middle column under Management and choose Connect to Cluster. Input the name of the cluster you created and OK.
-
In the console tree, click the «>» sign next to the cluster that you created to expand the items underneath it.
-
Right mouse click on Roles and select Configure Role.
-
If the Before you begin window opens, choose Next.
-
In the list of roles, choose File Server and Next.
-
For the File Server Type, select File Server for general use and Next.
For info about Scale-Out File Server, see Scale-Out File Server overview. -
In the Client Access Point window, input the name of the file server you will be using. Please note that this is not the name of the cluster. This is for the file share connectivity. For example, if I want to connect to SERVER, the name inputted would be SERVER.
[!NOTE]
If you are using static IP Addresses, you will need to select the network to use and input the IP Address it will use for the cluster name. If you are using DHCP for your IP Addresses, the IP Address will be configured automatically for you. -
Choose Next.
-
In the Select Storage window, select the additional drive (not the witness) that will hold your shares, and click Next.
-
On the Confirmation page, verify your configuration and select Next.
-
On the Summary page, it will give you the configuration it has created. You can select View Report to see the report of the file server role creation.
[!NOTE]
If the role does not add or start correctly, the CNO (Cluster Name Object) may not have permission to create objects in Active Directory. The File Server role requires a Computer object of the same name as the «Client Access Point» provided in Step 8.
-
Under Roles in the console tree, you will see the new role you created listed as the name you created. With it highlighted, under the Actions pane on the right, choose Add a share.
-
Run through the share wizard inputting the following:
- Type of share it will be
- Location/path the folder shared will be
- The name of the share users will connect to
- Additional settings such as Access-based enumeration, caching, encryption, etc.
- File level permissions if they will be other than the defaults
-
On the Confirmation page, verify what you have configured, and select Create to create the file server share.
-
On the Results page, select Close if it created the share. If it could not create the share, it will give you the errors incurred.
-
Choose Close.
-
Repeat this process for any additional shares.
Installing the Cluster is easy now days. But just this I post a little blog on how to do this, In my blog stats it shows that the 2012 post is still very active , so time for an update to Windows Server 2019. in the creation there isn’t much changed, it gets only easier. but If you still not in PowerShell you got more clicks to do an less Coffee. And Windows Admin Center is also a great addition to manage a cluster. This blog post is also usable in Azure Only you need to add Storagespacesdirect and a CSV file share.
Just install a bare metal (VM) windows Server 2019 and do a domain join and the fun can start.
Installing the Cluster Feature in powershell
Install-WindowsFeature –Name Failover-Clustering –IncludeManagementTools
#Create cluster validation report
Test-Cluster -Node MVP19-01,MVP19-02
#Create new Cluster
New-Cluster -Name MVP1911-27 -Node MVP19-01,MVP19-02 -NoStorage -StaticAddress «10.255.255.45»
#place witness file on USB device from my router
Set-ClusterQuorum -FileShareWitness \\SERVER\SHARE -Credential $(Get-Credential)
Now that the basic cluster is ready we start with the HA share
File share witness enhancements We enabled the use of a file share witness in the following scenarios:
- Absent or extremely poor Internet access because of a remote location, preventing the use of a cloud witness.
- Lack of shared drives for a disk witness. This could be a Storage Spaces Direct hyperconverged configuration, a SQL Server Always On Availability Groups (AG), or an * Exchange Database Availability Group (DAG), none of which use shared disks.
- Lack of a domain controller connection due to the cluster being behind a DMZ.
-
A workgroup or cross-domain cluster for which there is no Active Directory cluster name object (CNO). Find out more about these enhancements in the following post in Server & Management Blogs: Failover Cluster File Share Witness and DFS.
We now also explicitly block the use of a DFS Namespaces share as a location. Adding a file share witness to a DFS share can cause stability issues for your cluster, and this configuration has never been supported. We added logic to detect if a share uses DFS Namespaces, and if DFS Namespaces is detected, Failover Cluster Manager blocks creation of the witness and displays an error message about not being supported.
that’s it the cluster is created, we can start with the File server
Next is installation of the file server role
A restart is needed! After the restart we can build the cluster with the HA file share
$servers = («MVP19-01», «MVP19-02»)
foreach ($server in $servers) {Install-WindowsFeature -Name file-services -ComputerName $server}
Now that the File Server Role is added we can add the Disk. Or use a disk that you already added before.
First we need to add a disk this can be done in the Failover Cluster manager or with PowerShell
Get-ClusterAvailableDisk | Add-ClusterDisk
The Roles are there and the Disk is added
Next step is adding the File server Role to the Cluster and add the HA File Share.
In this case I have a fail over disk and I use the File Server for general use.
So when adding the Disk it is not showing the disk. This is The disk is added to the cluster but the disk isn’t formatted!
Keep in mind that formating the cluster disk while it is online is not possible. You need to set the disk in maintenance mode else the format will fail.
So after the disk format we will see the Disk appear and can be added to the File server
After this the File server is up and running. As you can see the setup is screen intense, building this with PowerShell is a lot faster.
Powershell
add-ClusterFileServerRole -Storage «Cluster Disk 1» -Name MyFiles
New-SmbShare -Name «Data» -Path «J:\Data» -EncryptData $True
Quick steps with powershell and even the share is created and encrypted
Next step is adding the file share.
go for the Quick setup
Pick the disk and select the folder with the data on the disk, if there is no data then create a folder that will hold the data later.
as you can see the UNC path from the File Server.
As you can see the settings can be adjusted for you needs and also set the right access, and keep in mind this needs to be don on the Cluster Level!
All Done
So creating a File Server and 2 file shares is Click intensive if you don’t use PowerShell.
But What about Windows Admin Center ? yes that would be an option also except here you can’t create a cluster role.
You can create a new role but no file server /share etc.
But when the share is created and running like now you can use Windows Admin Center for migration the data to the file share.
But more and more options are coming in Windows Admin Center below are some links that you can use to add your request to the UserVoice
https://docs.microsoft.com/en-us/windows-server/manage/windows-admin-center/use/manage-failover-clusters
More Coming
Failover cluster management in Windows Admin Center is actively under development and new features will be added in the near future. You can view the status and vote for features in UserVoice:
Feature Request
Show more clustered disk info
Support additional cluster actions
Support converged clusters running Hyper-V and Scale-Out File Server on different clusters
View CSV block cache
See all or propose new feature
+++++++++++++++
Follow Me on Twitter @ClusterMVP
Follow My blog https://robertsmit.wordpress.com
Linkedin Profile Robert Smit MVP Linkedin profile
Google : Robert Smit MVP profile
![]()
Robert Smit is Senior Technical Evangelist and is a current Microsoft MVP in Clustering as of 2009.
Robert has over 20 years experience in IT with experience in the educational, health-care and finance industries.
Robert’s past IT experience in the trenches of IT gives him the knowledge and insight that allows him to communicate effectively with IT professionals
who are trying to address real concerns around business continuity, disaster recovery and regulatory compliance issues. Robert holds the following certifications:
MCT — Microsoft Certified Trainer, MCTS — Windows Server Virtualization, MCSE, MCSA and MCPS. He is an active participant in the Microsoft newsgroup community and is currently focused on Hyper-V, Failover Clustering, SQL Server, Azure and all things related to Cloud Computing and Infrastructure Optimalization.
Follow Robert on Twitter @ClusterMVP
Or follow his blog https://robertsmit.wordpress.com
Linkedin Profile Http://nl.linkedin.com/in/robertsmit
Robert is also capable of transferring his knowledge to others which is a rare feature in the field of IT. He makes a point of not only solving issues but also of giving on the job training of his colleagues.
A customer says » Robert has been a big influence on our technical staff and I have to come to know him as a brilliant specialist concerning Microsoft Products. He was Capable with his in-depth knowledge of Microsoft products to troubleshoot problems and develop our infrastructure to a higher level. I would certainly hire him again in the future. »
Details of the Recommendation: «I have been coordinating with Robert implementing a very complex system. Although he was primarily a Microsoft infrastructure specialist; he was able to understand and debug .Net based complext Windows applications and websites. His input to improve performance of applications proved very helpful for the success of our project
View all posts by Robert Smit [MVP]
In this tutorial, we would learn how to install and setup Failover cluster in Windows Server 2019 step by step. In the previous tutorial, we configures an iSCSI storage server and created three virtual disk.
To install and configure a failover cluster, let’s look at our network setup, then we follow some steps
- Our Network Environment
- Determine the Cluster Disks
- Add Failover Clustering Role
- Create the Failover Cluster
- Add Disks to the Cluster
1. Our Network Environment
Our lab network is set up using VirtualBox and consists of 4 computers:.
How to set up a domain network is explained here.
DC (192.168.1.90) – This is our domain controller.
Node1 (192.168.1.91) – This is one of the failover cluster nodes and a iSCSI initiator.
Node2 (192.168.1.92) – This is the second failover cluster nodes and an iSCSI initiator.
Node3 (192.168.1.93) – This is out iSCSI target server. It hosts the virtual disks
2. Determine the Cluster Disks
Before you start creating the failover cluster, you need to determine the disk that hold the cluster data. This is so that if a member of the cluster fails, then the data would still be available. In our setup, we have decided to host the disks in another computer (Node3). This is configured as iSCSI target server and contain 3 virtual disk.
The figure below shows Node3 with the 3 iSCSI disks configured.
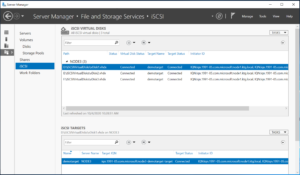
How to configure iSCSI target server and disks
Note: Ensure that the disks are iSCSI virtual disks are initialized on one of the failover nodes
3. Add the Failover Clustering Role
Now we have to install the Failover cluster role in Node1 and Node2. Follow the steps below to do that.
Step 1 – In Node1, click on Add Roles and Feature. This will launch the Add Roles and Features wizard. Follow the steps and select Failover Clustering as shown below. Then complete the installation.
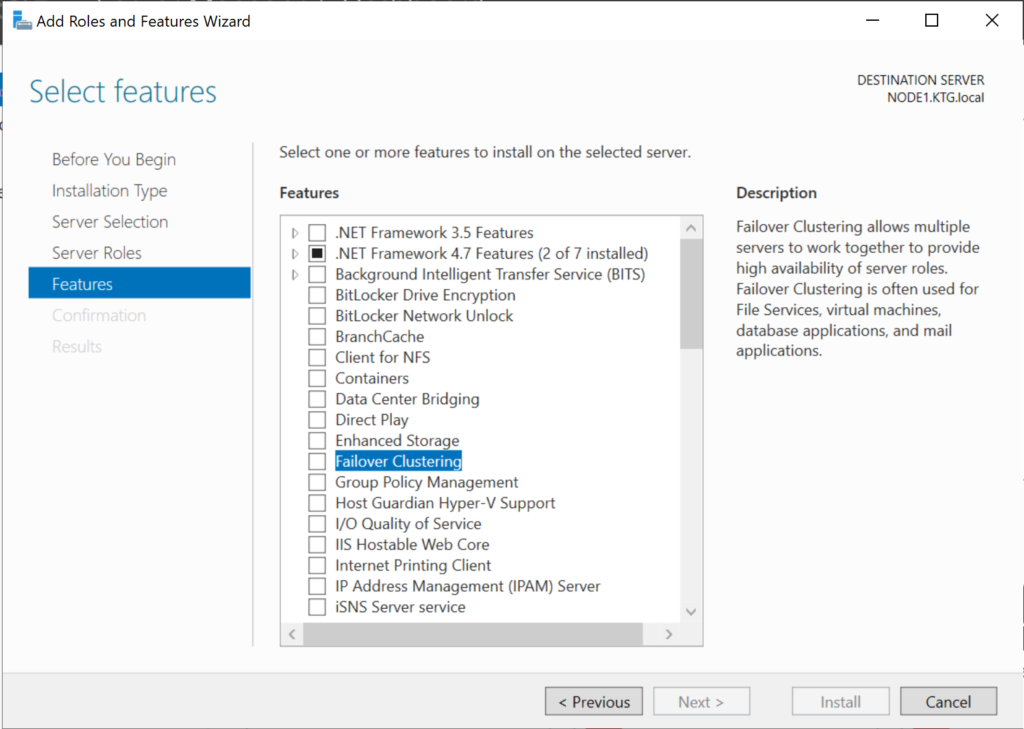
Step 2 – Repeat the process for Node2
4. Create the Failover Cluster
We would now use the Failover cluster manager to create a cluster. Follow the steps below:
Step 1 – In Node1, click on Manager and select Failover Cluster Manager. The window is shown below
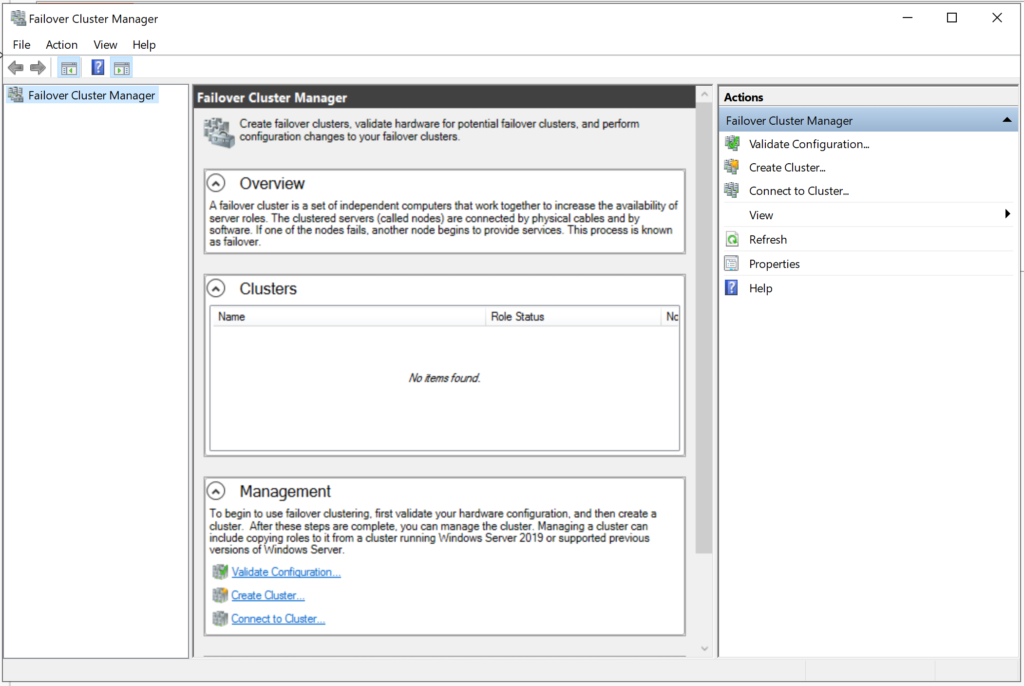
Step 2 – Click on Validate Configuration and follow the wizard steps to do the validation (this is done only in Node1). The wizard will ask you to specify the Servers you want to participate in the clustering. You will use AD to find Node1 and Node2 and select them.
At the end of the validation, you may have warning relating to unsigned drivers. Ignore these warnings because they come from VirtualBox Guest Additions.
Step 3 – Click on Create Cluster. You will have to select the Node1 and Node1. Then you need to specify the cluster name. The complete the cluster creation. The figure below shows the final screen indicating the cluster creation was successful.
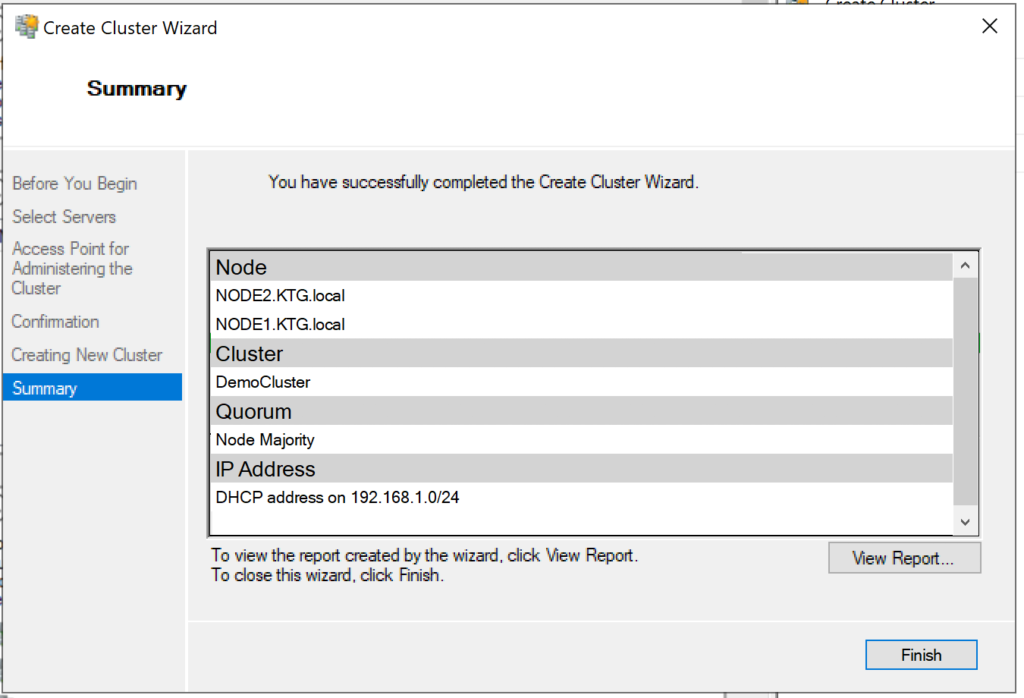
5. Add Disks to the Cluster
Failover clusters require disks and in this case we would used virtual disks from the iSCSI target server.
Step 1– Add storage to the cluster. To do that open the Failover Cluster manager as shown below.
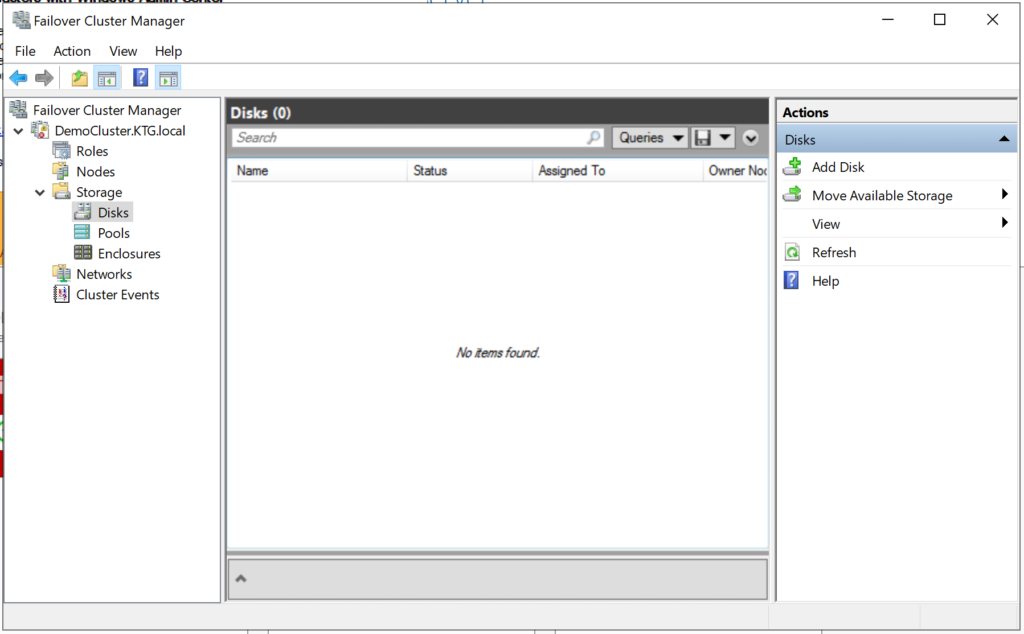
Step 2 – Click on Add Disk. The three iSCSI disks would be listed. Ensure that they are selected.
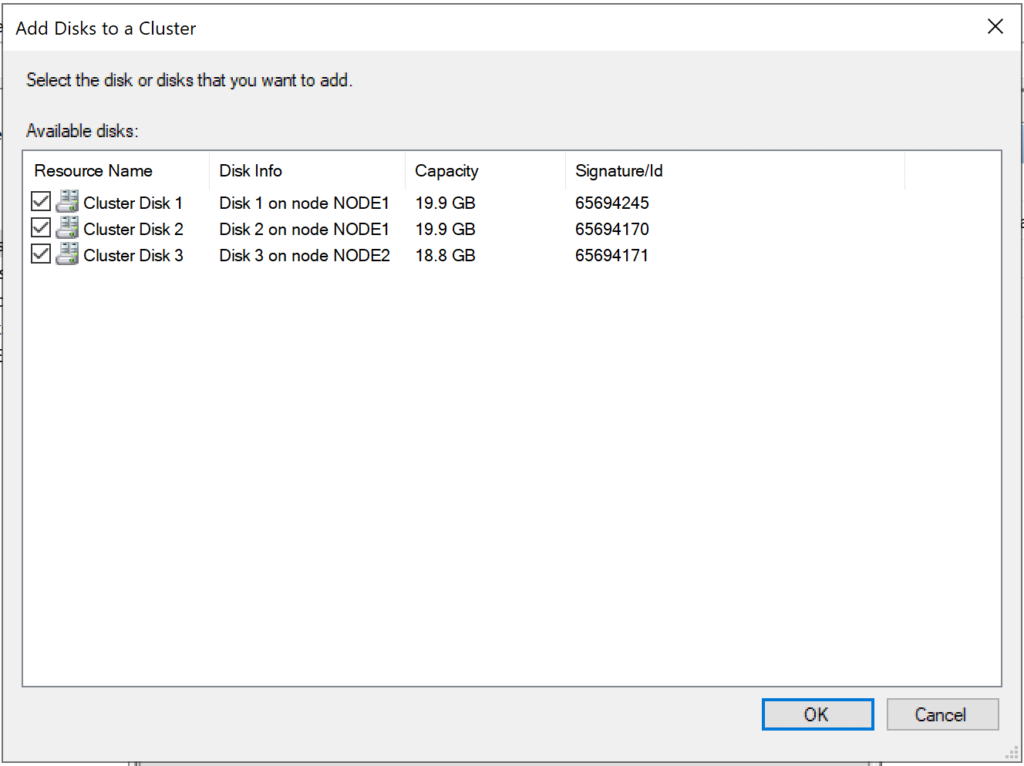
Click on OK.
At this point, the disks are added to the cluster and they are online as well. See the figure below
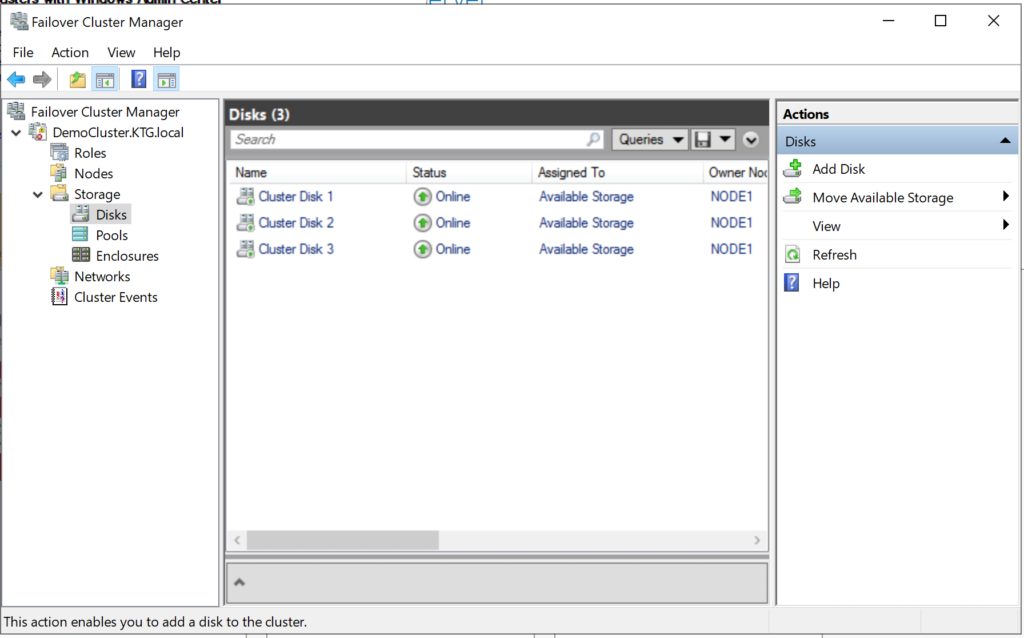
In subsequent tutorials, I discuss the concept of Witness in failover cluster and how to configure Quorum witness and Disk witness.
I also recommend you watch the video in my Youtube Channel.