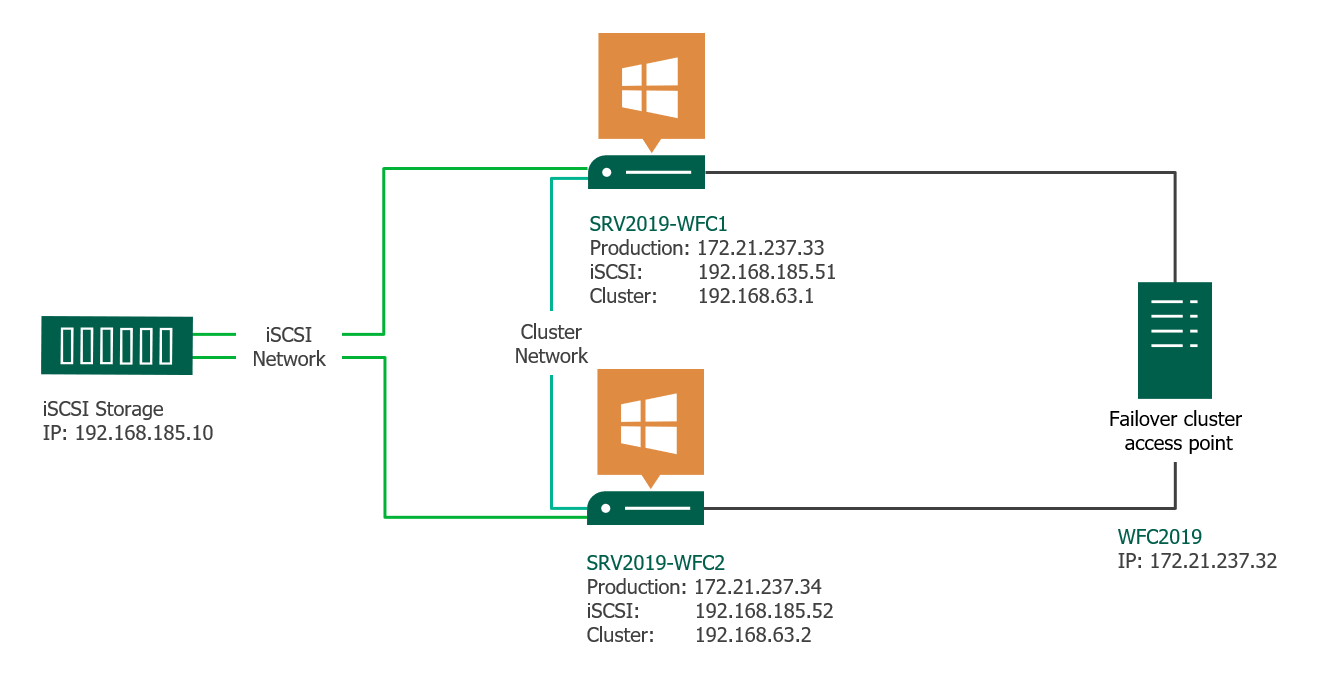
This article gives a short overview of how to create a Microsoft Windows Failover Cluster (WFC) with Windows Server 2019 or 2016. The result will be a two-node cluster with one shared disk and a cluster compute resource (computer object in Active Directory).
Preparation
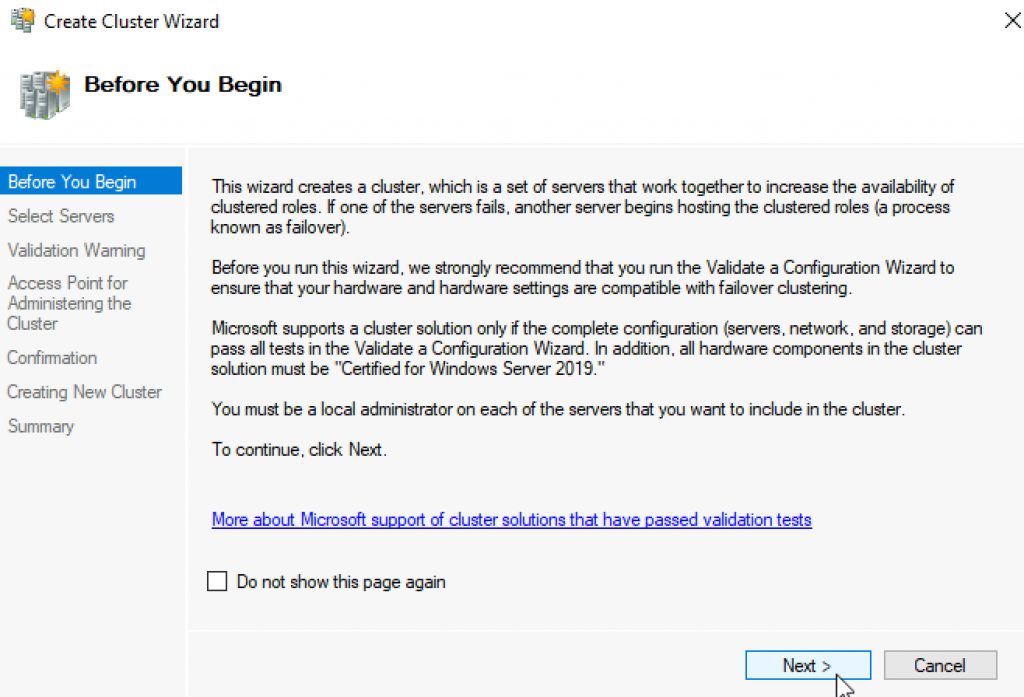
It does not matter whether you use physical or virtual machines, just make sure your technology is suitable for Windows clusters. Before you start, make sure you meet the following prerequisites:
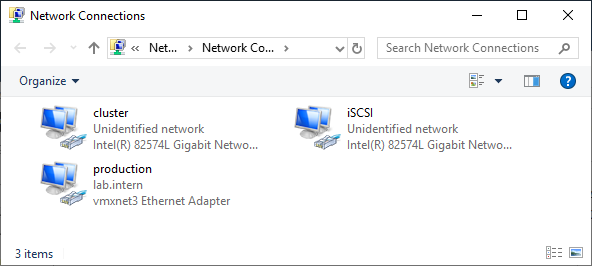
Two Windows 2019 machines with the latest updates installed. The machines have at least two network interfaces: one for production traffic, one for cluster traffic. In my example, there are three network interfaces (one additional for iSCSI traffic). I prefer static IP addresses, but you can also use DHCP.
Join both servers to your Microsoft Active Directory domain and make sure that both servers see the shared storage device available in disk management. Don’t bring the disk online yet.
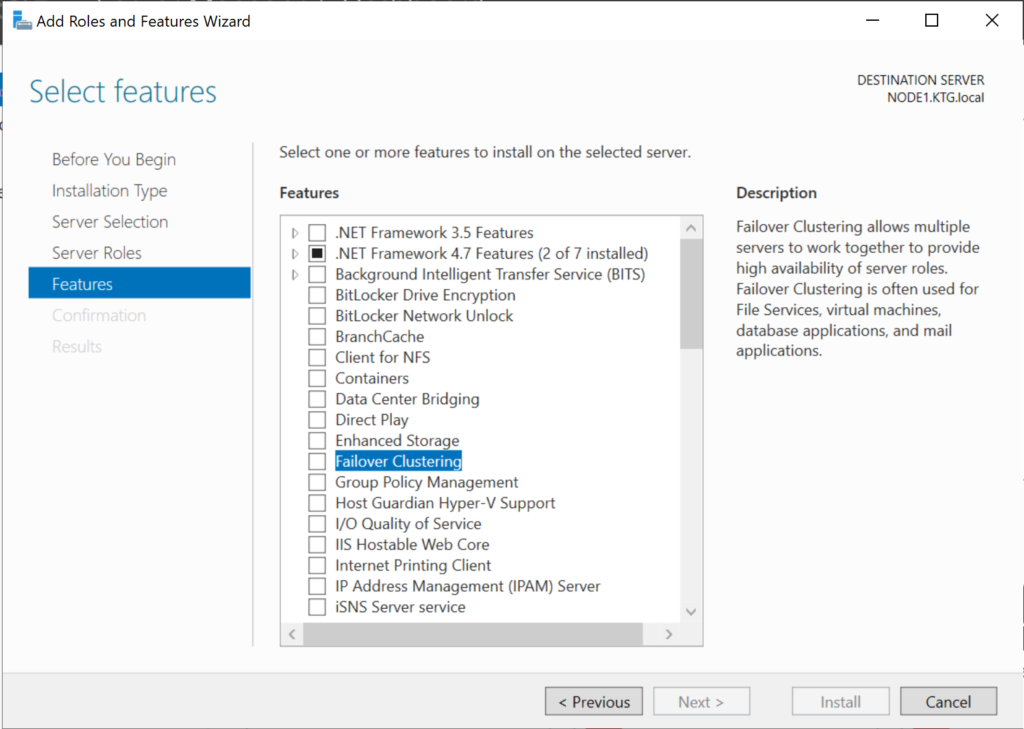
The next step before we can really start is to add the Failover clustering feature (Server Manager > add roles and features).
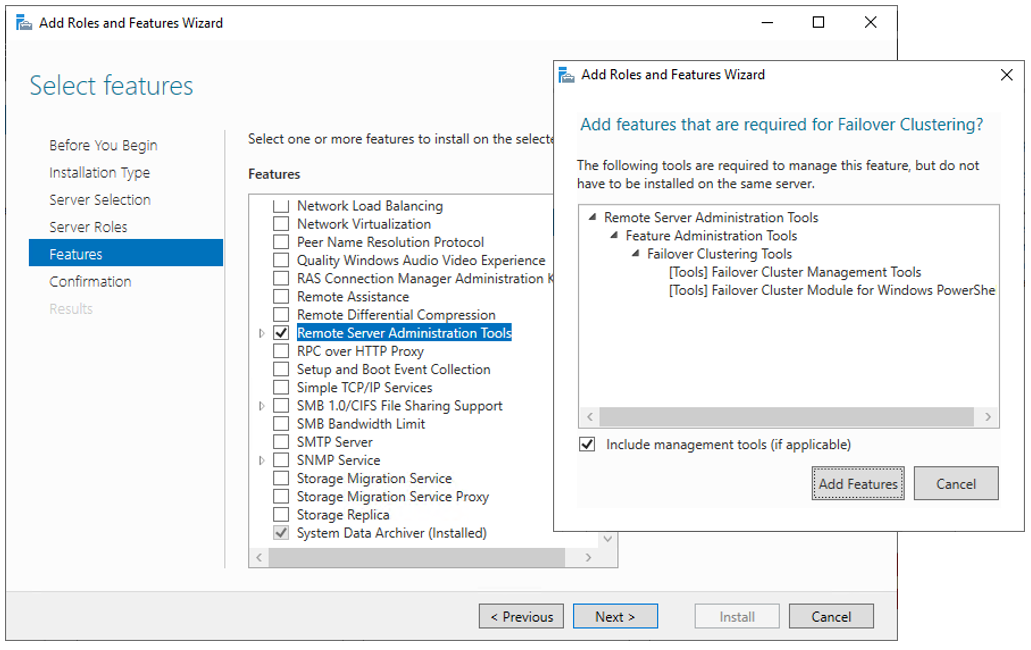
Reboot your server if required. As an alternative, you can also use the following PowerShell command:
Install-WindowsFeature -Name Failover-Clustering –IncludeManagementTools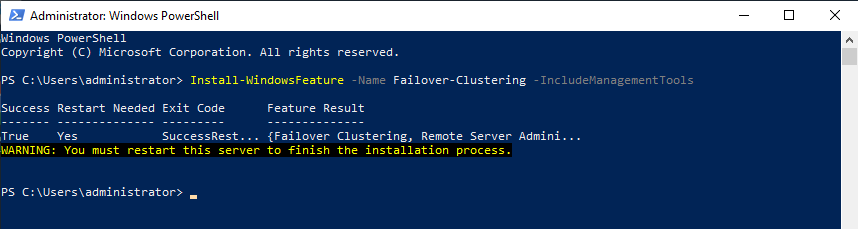
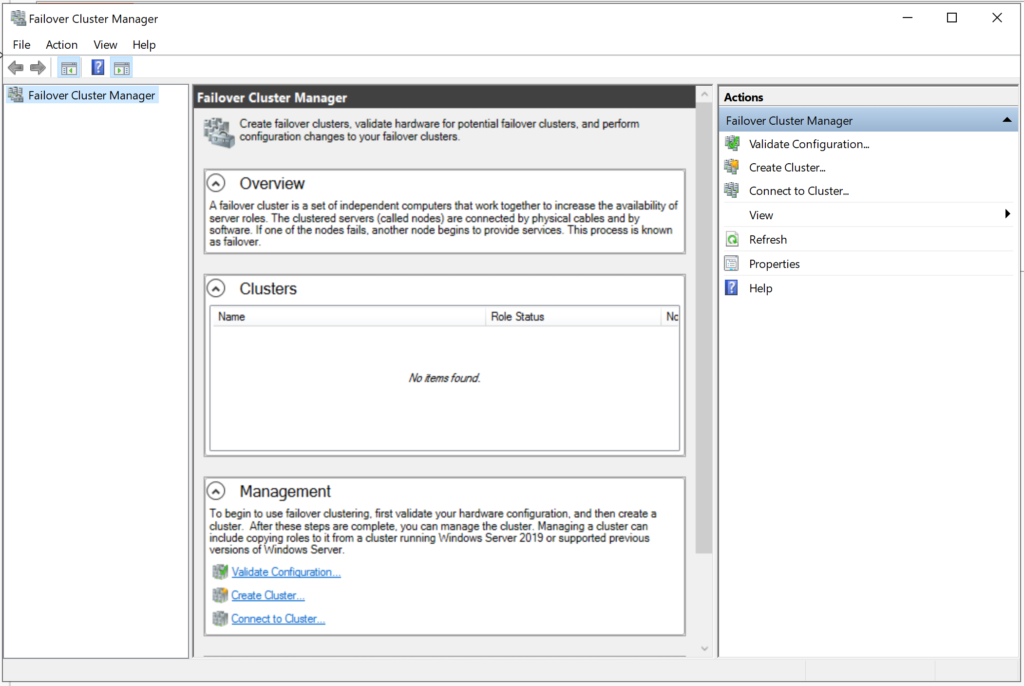
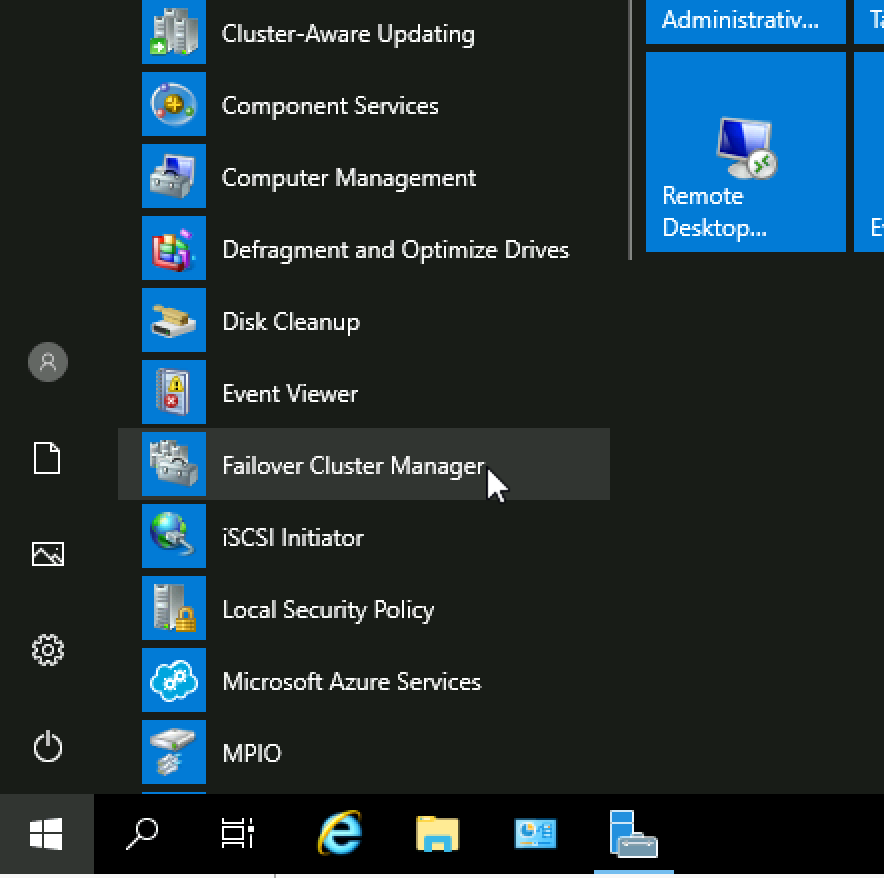
After a successful installation, the Failover Cluster Manager appears in the start menu in the Windows Administrative Tools.
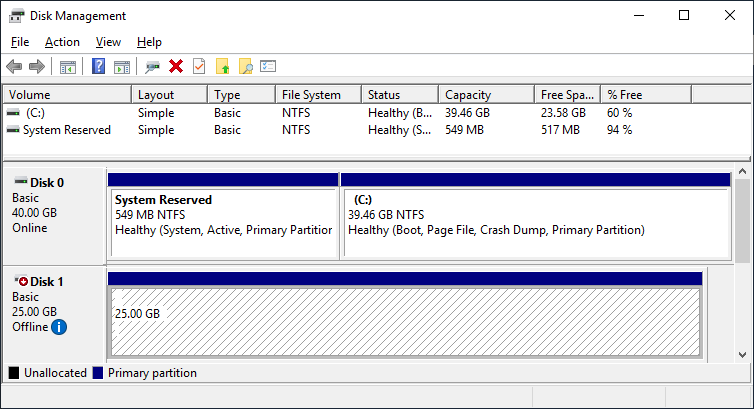
After you installed the Failover-Clustering feature, you can bring the shared disk online and format it on one of the servers. Don’t change anything on the second server. On the second server, the disk stays offline.
After a refresh of the disk management, you can see something similar to this:
Server 1 Disk Management (disk status online)
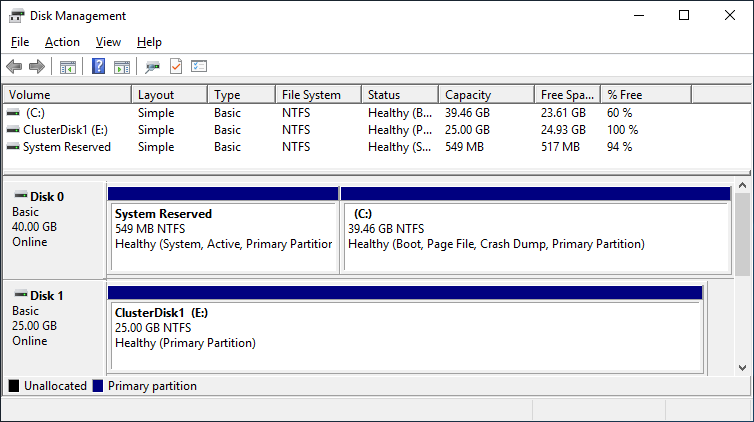
Server 2 Disk Management (disk status offline)
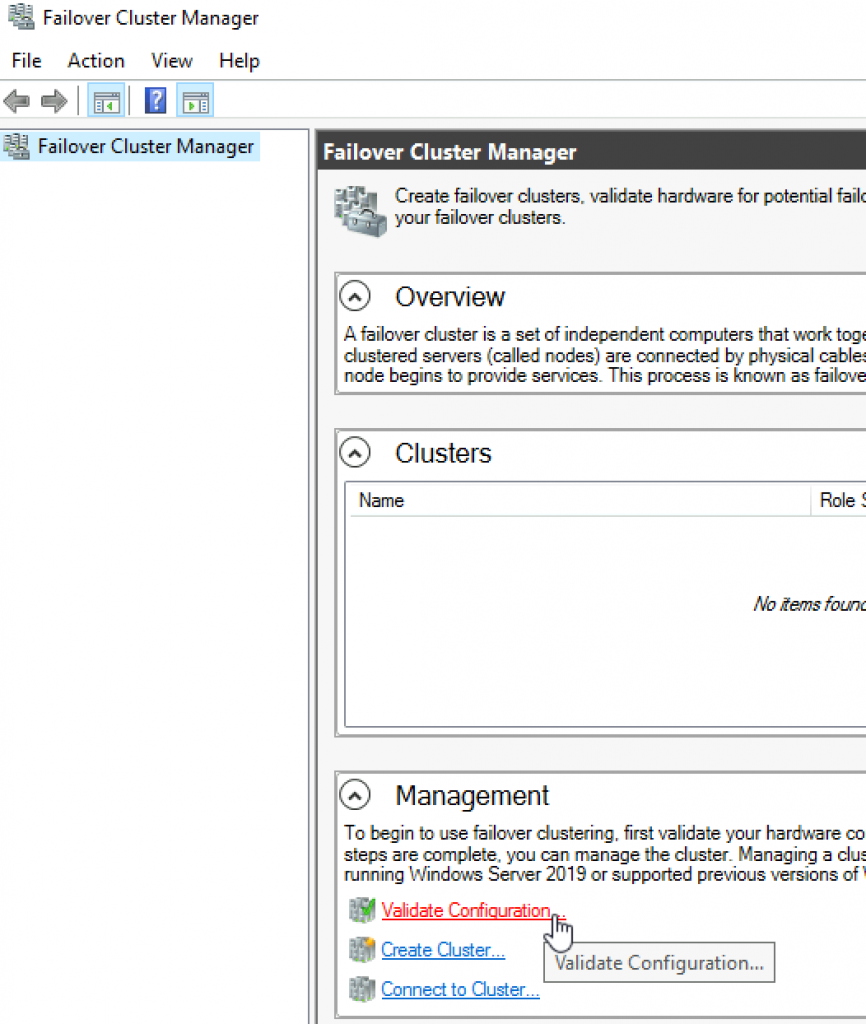
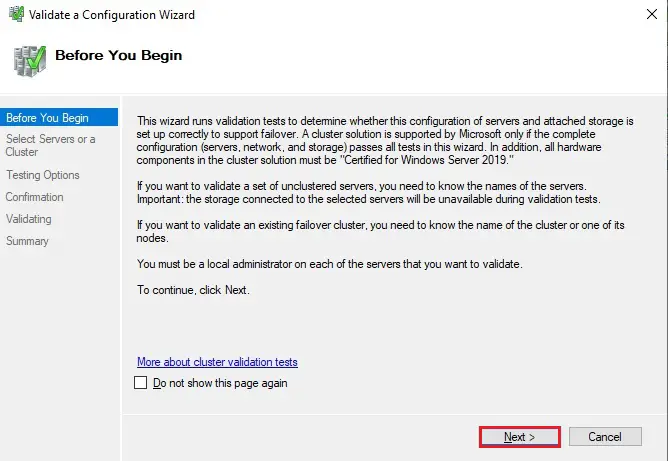
Failover Cluster readiness check
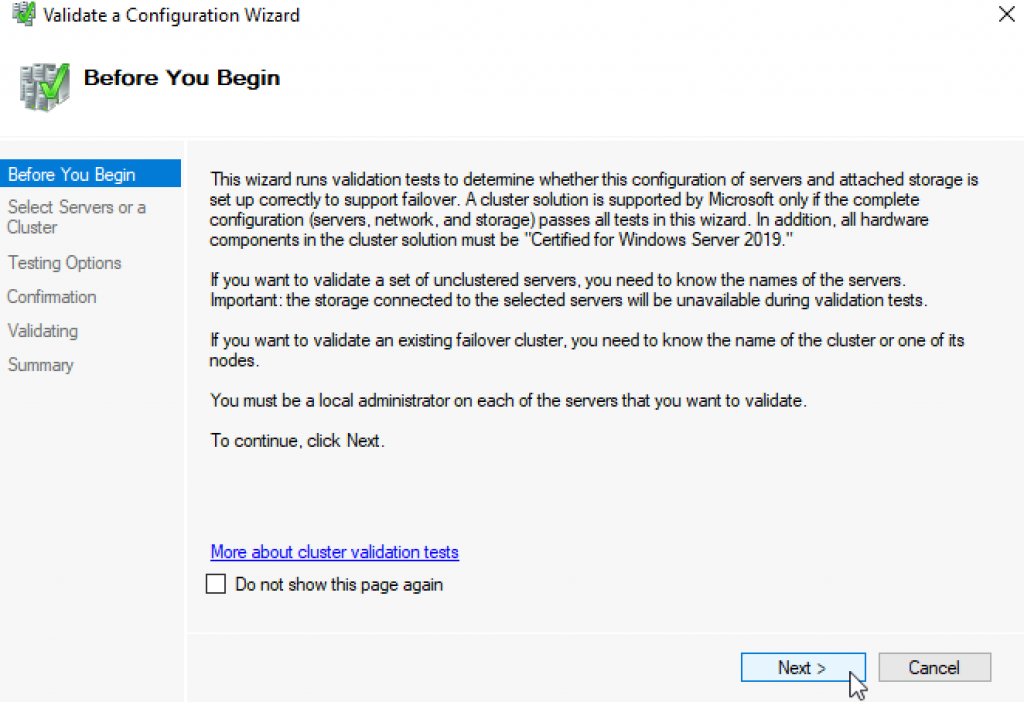
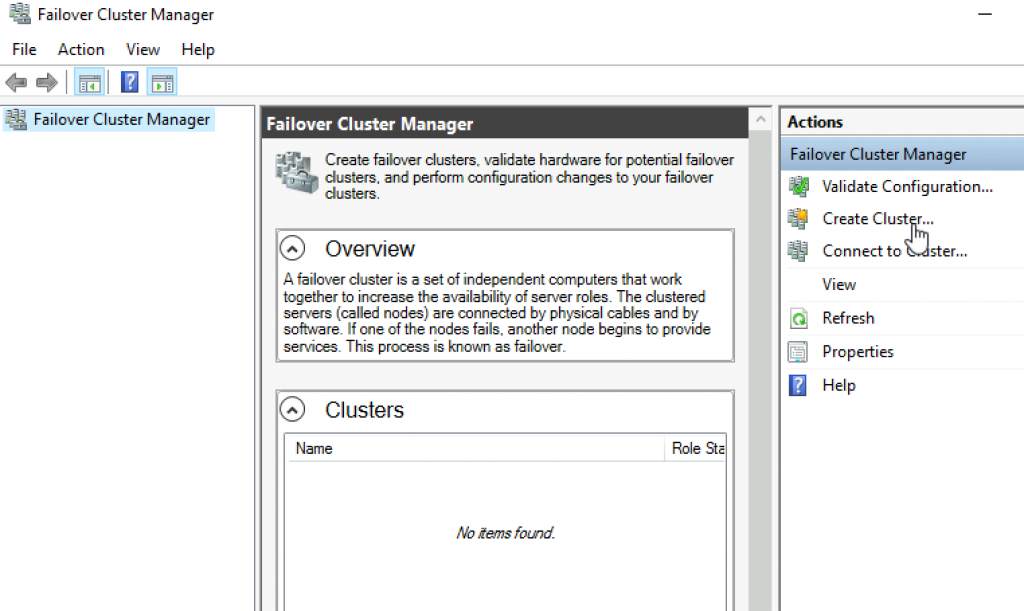
Before we create the cluster, we need to make sure that everything is set up properly. Start the Failover Cluster Manager from the start menu and scroll down to the management section and click Validate Configuration.

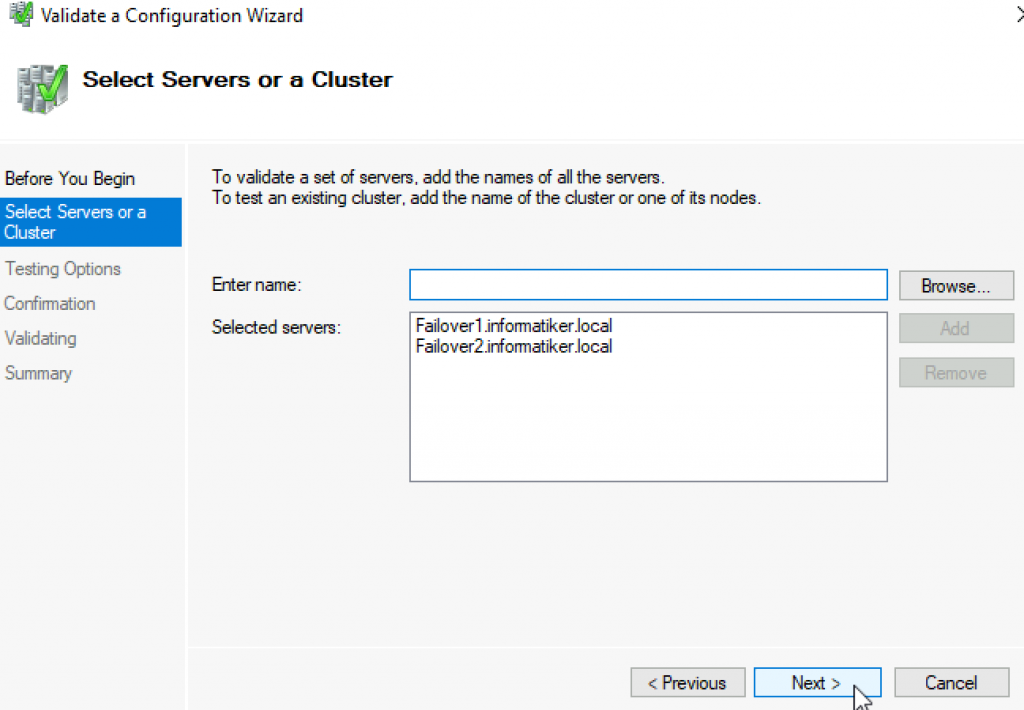
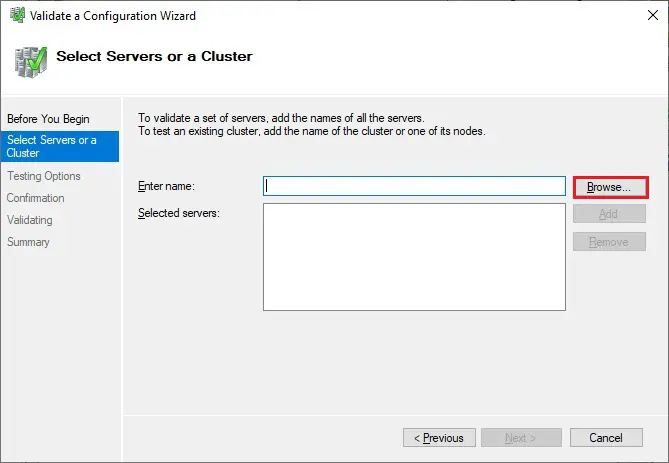
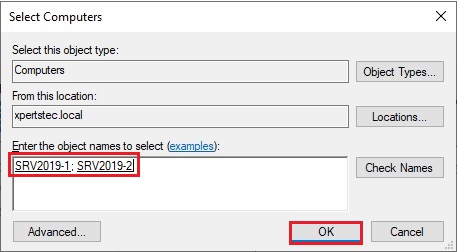
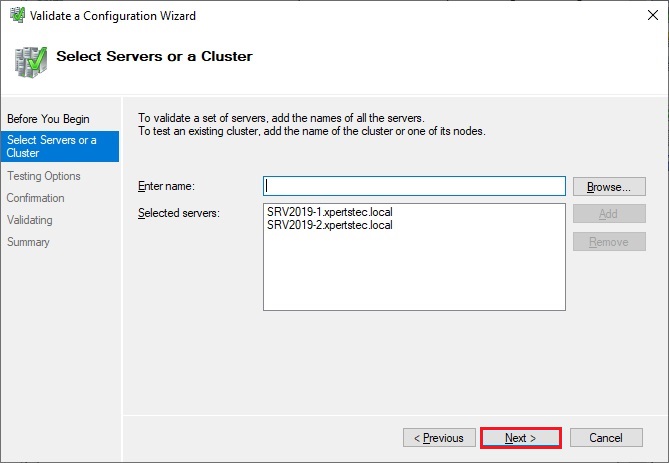
Select the two servers for validation.

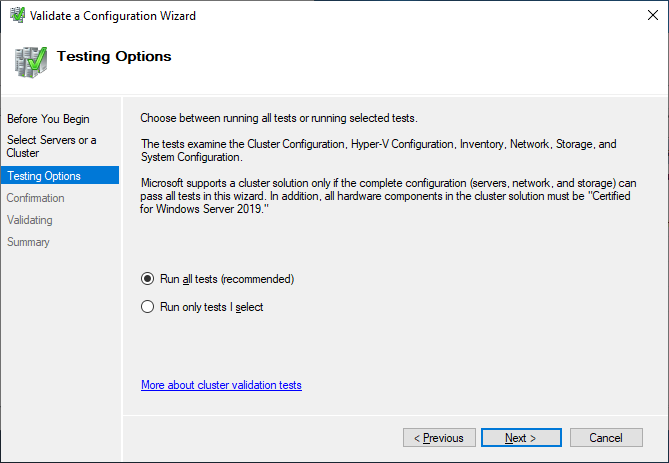
Run all tests. There is also a description of which solutions Microsoft supports.
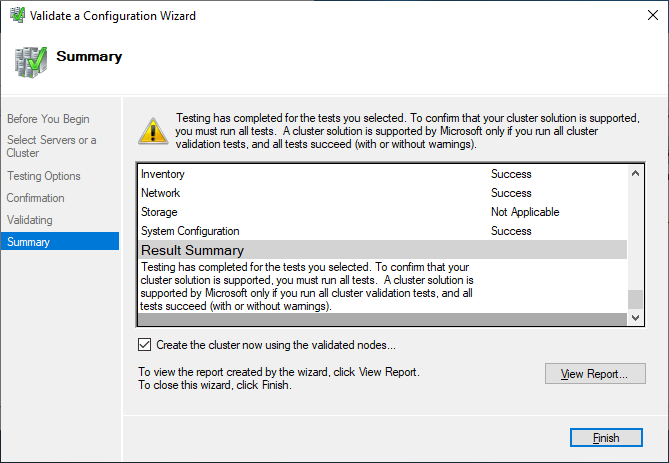
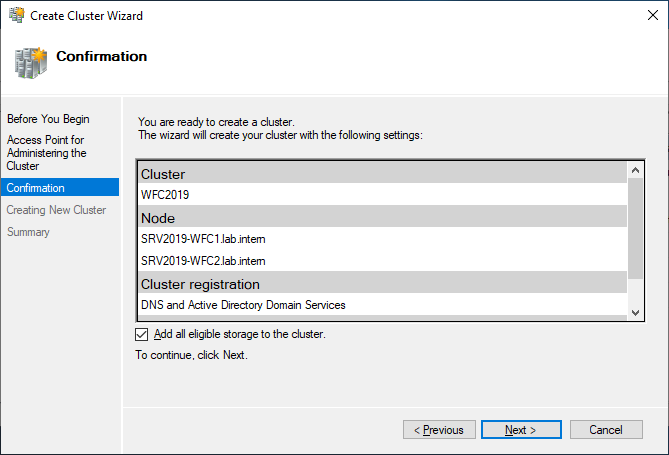
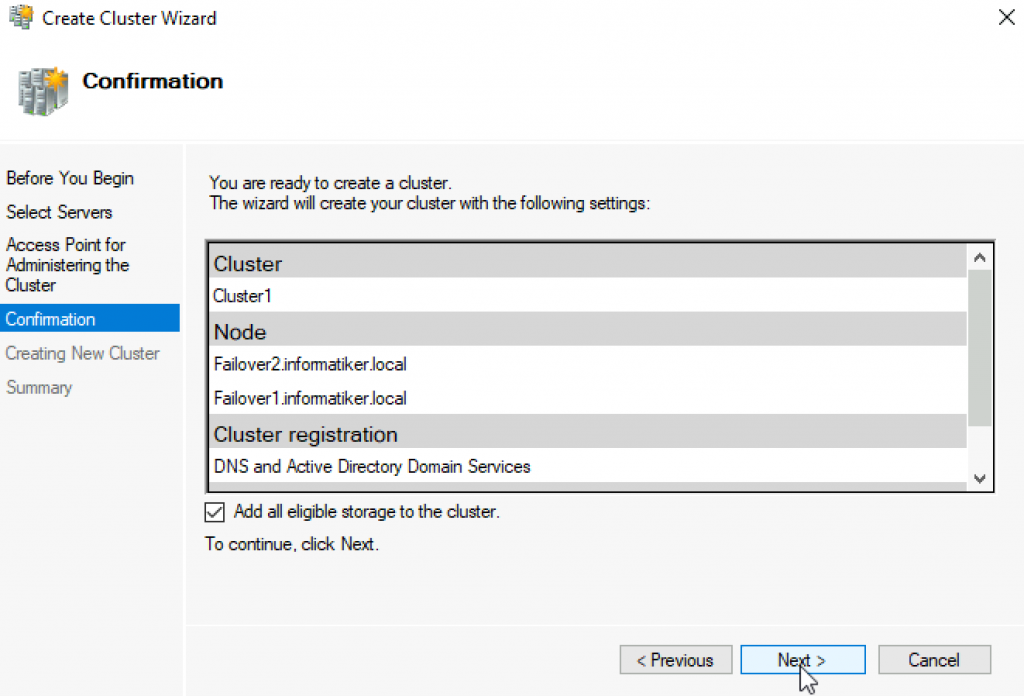
After you made sure that every applicable test passed with the status “successful,” you can create the cluster by using the checkbox Create the cluster now using the validated nodes, or you can do that later. If you have errors or warnings, you can use the detailed report by clicking on View Report.
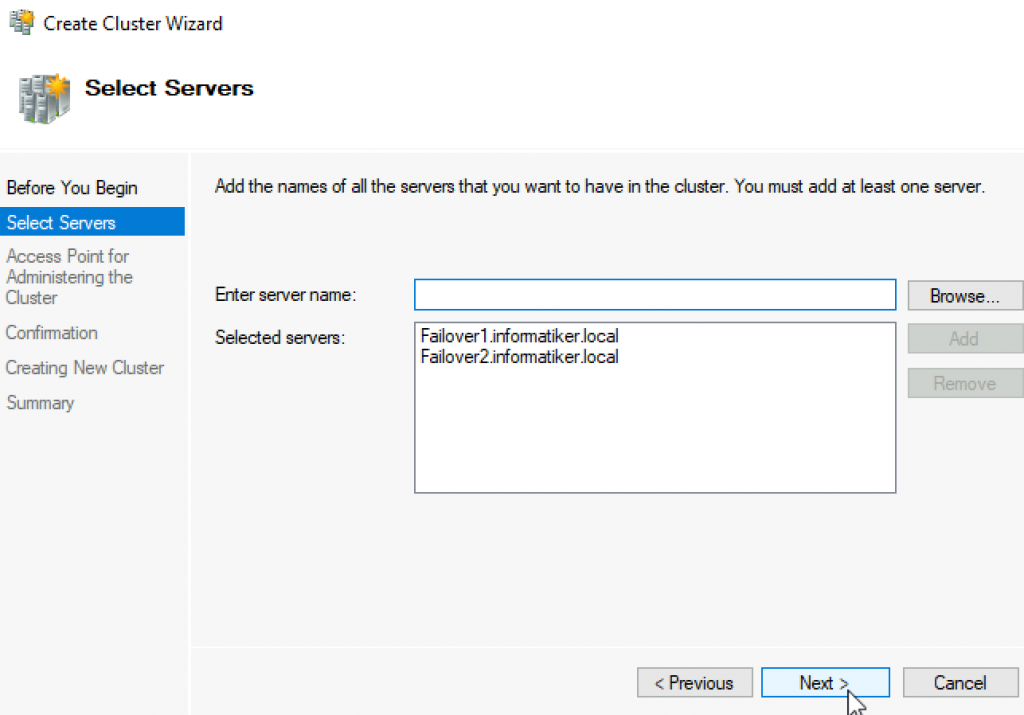
If you choose to create the cluster by clicking on Create Cluster in the Failover Cluster Manager, you will be prompted again to select the cluster nodes. If you use the Create the cluster now using the validated nodes checkbox from the cluster validation wizard, then you will skip that step. The next relevant step is to create the Access Point for Administering the Cluster. This will be the virtual object that clients will communicate with later. It is a computer object in Active Directory.
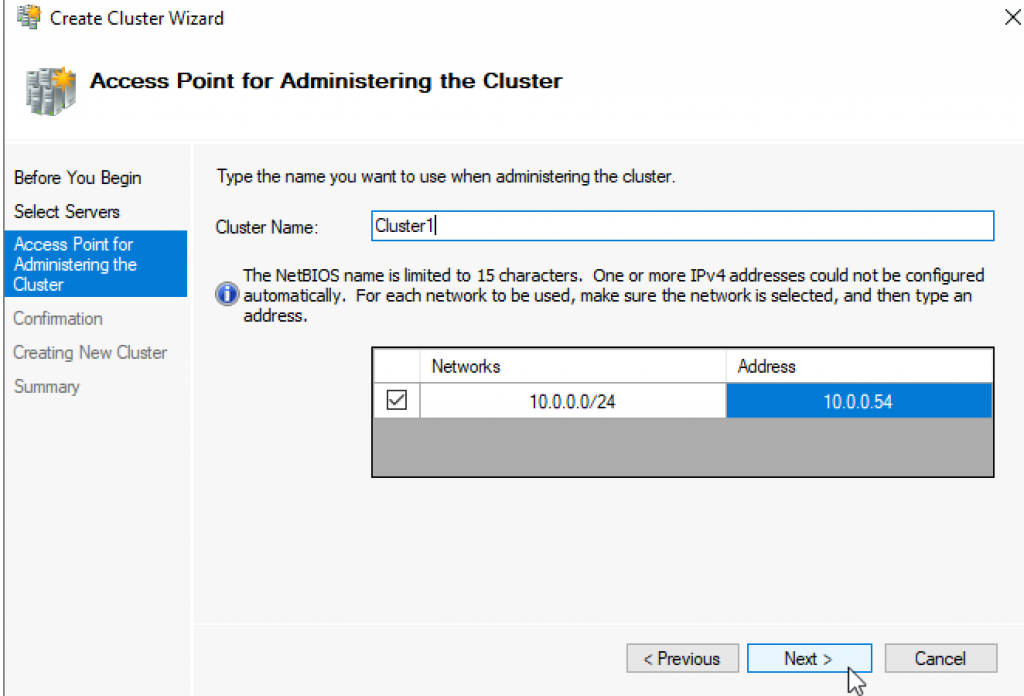
The wizard asks for the Cluster Name and IP address configuration.
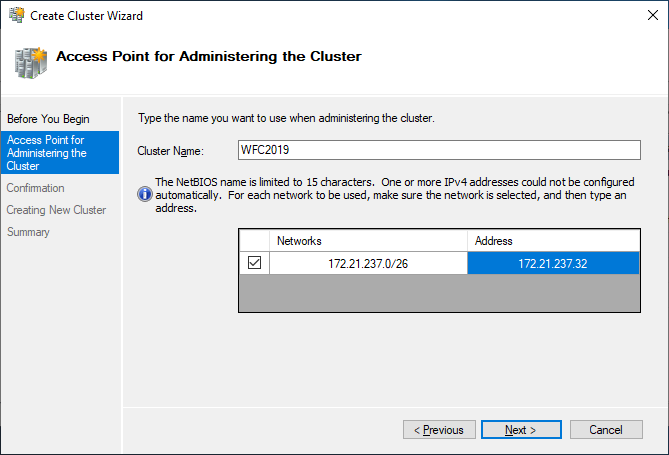
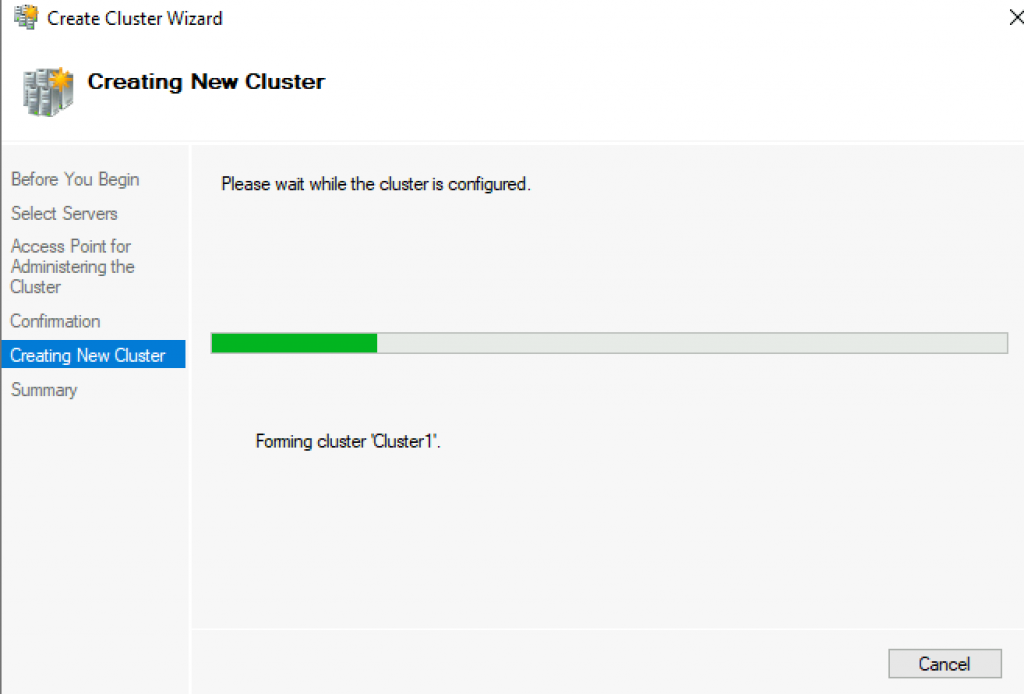
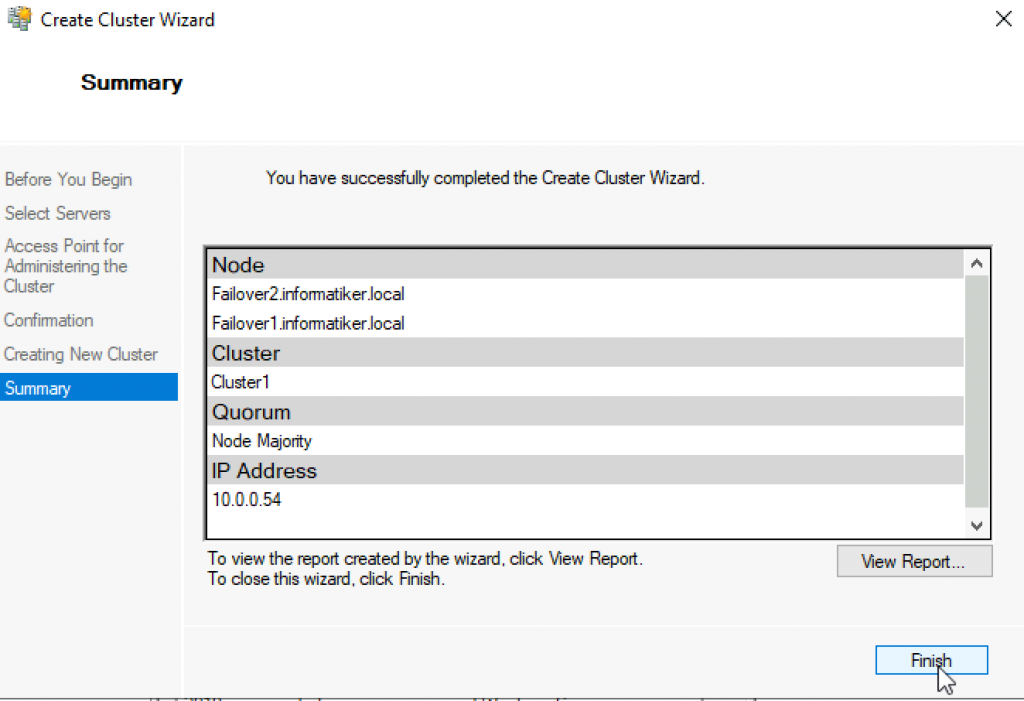
As a last step, confirm everything and wait for the cluster to be created.
The wizard will add the shared disk automatically to the cluster per default. If you did not configure it yet, then it is also possible afterwards.
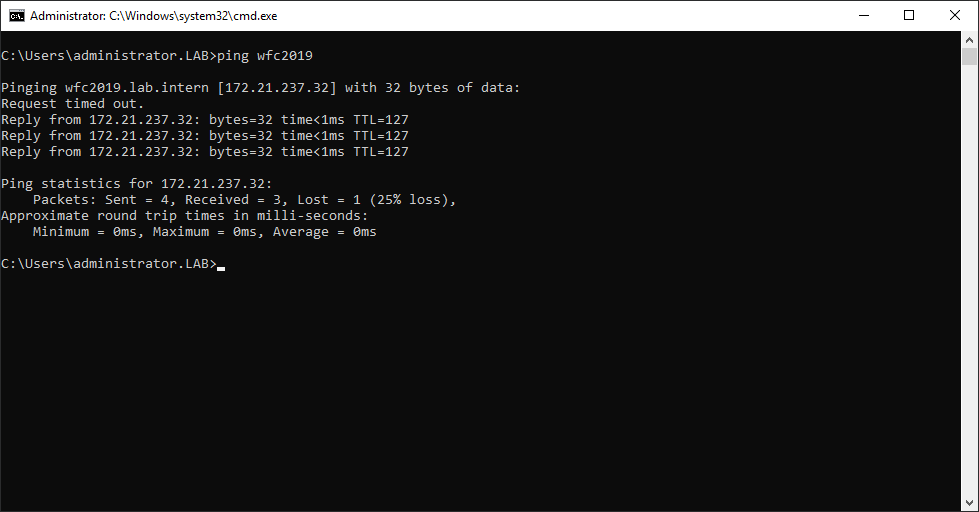
As a result, you can see a new Active Directory computer object named WFC2019.

You can ping the new computer to check whether it is online (if you allow ping on the Windows firewall).
As an alternative, you can create the cluster also with PowerShell. The following command will also add all eligible storage automatically:
New-Cluster -Name WFC2019 -Node SRV2019-WFC1, SRV2019-WFC2 -StaticAddress 172.21.237.32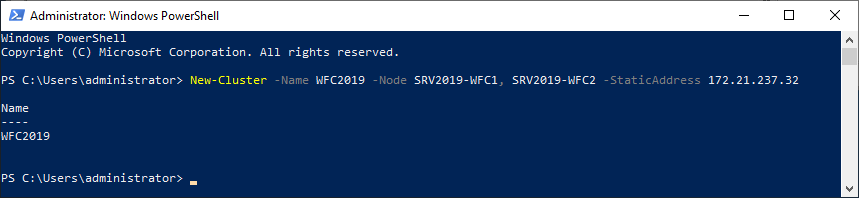
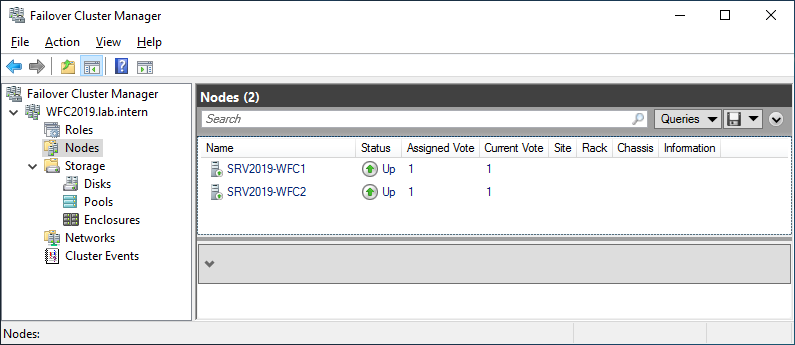
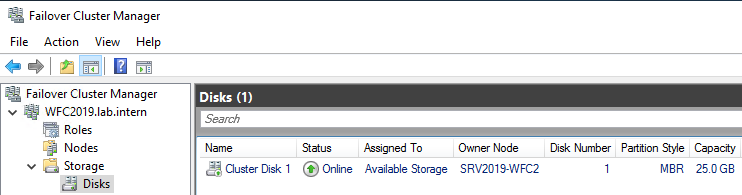
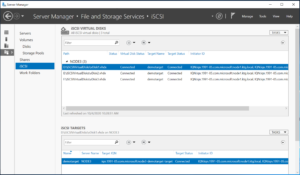
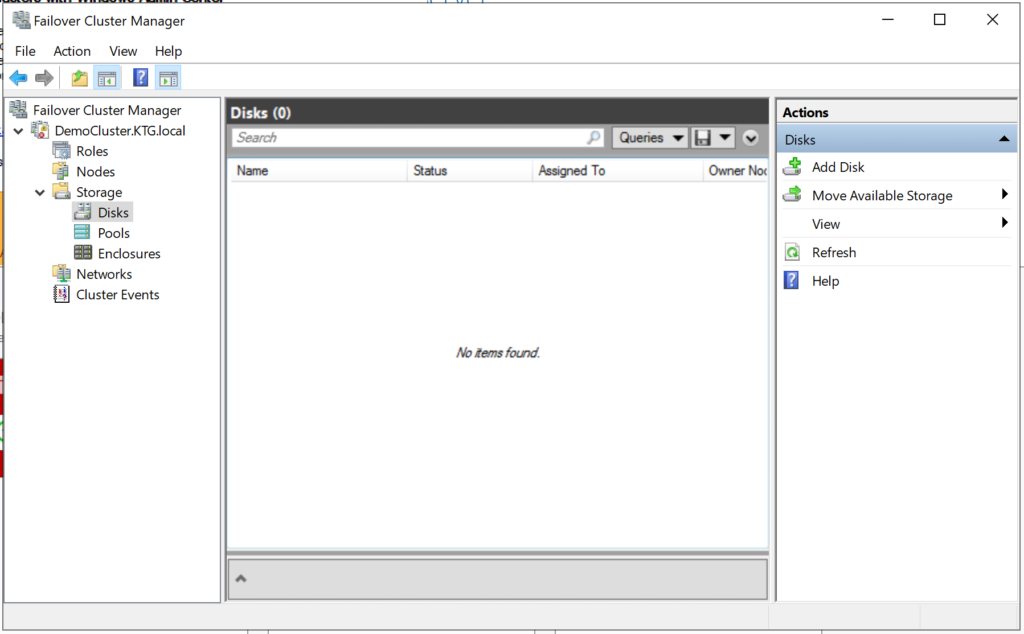
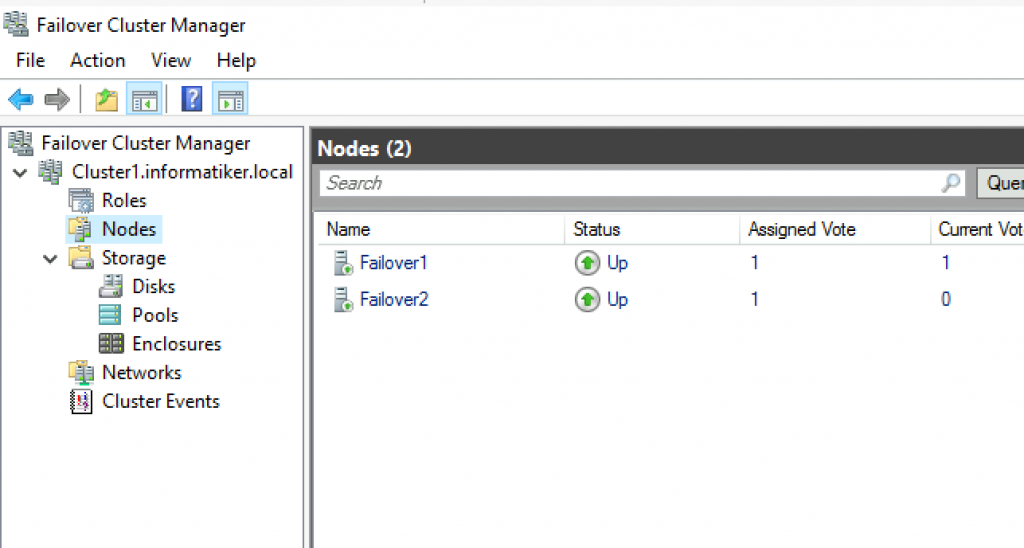
You can see the result in the Failover Cluster Manager in the Nodes and Storage > Disks sections.
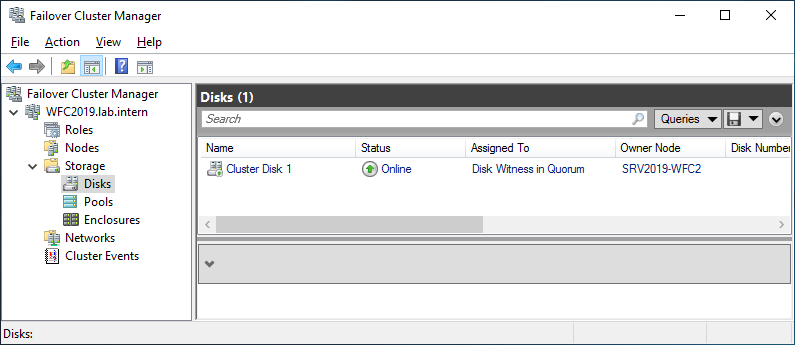
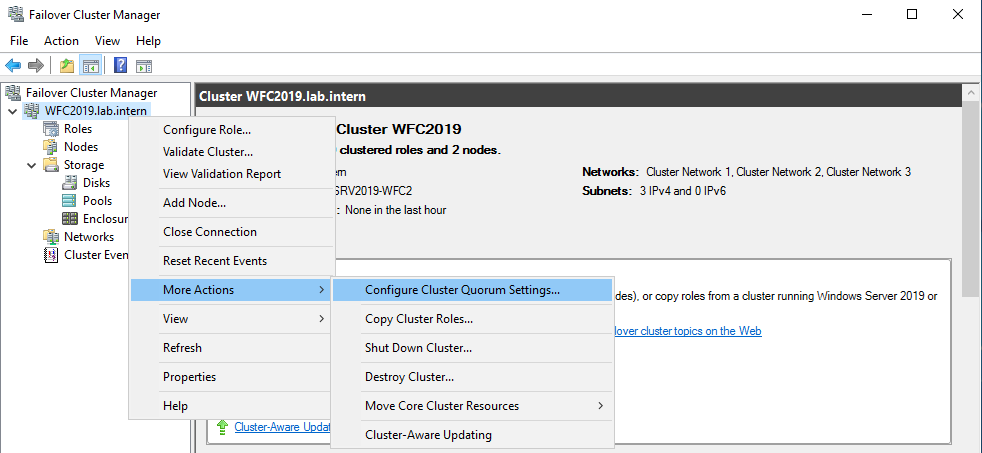
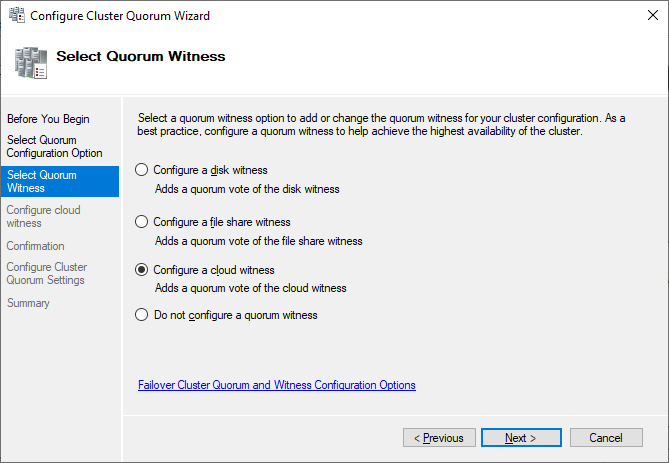
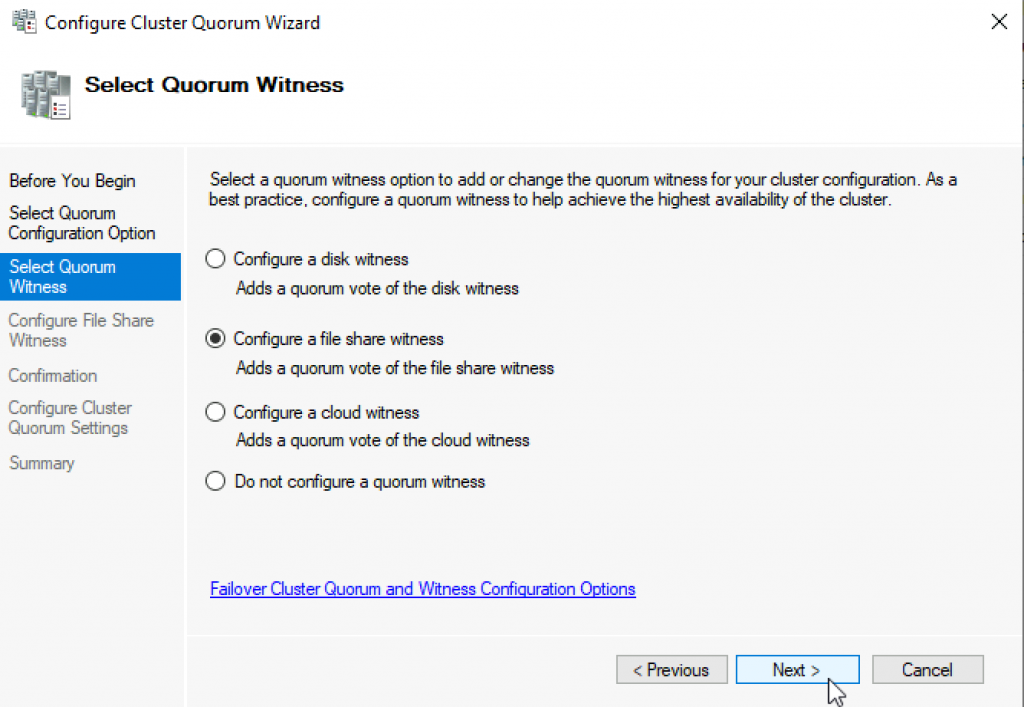
The picture shows that the disk is currently used as a quorum. As we want to use that disk for data, we need to configure the quorum manually. From the cluster context menu, choose More Actions > Configure Cluster Quorum Settings.
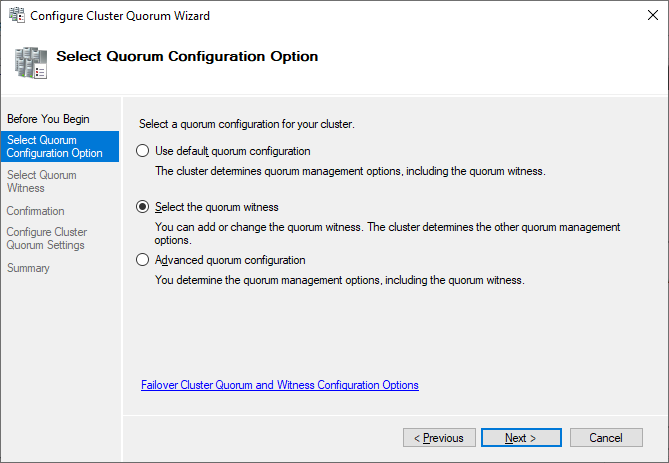
Here, we want to select the quorum witness manually.
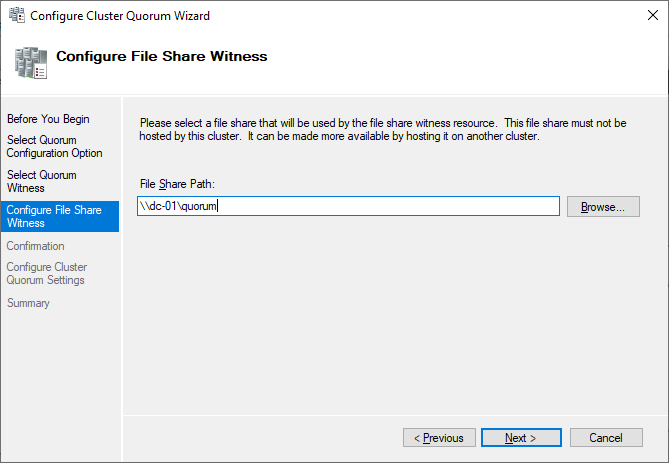
Currently, the cluster is using the disk configured earlier as a disk witness. Alternative options are the file share witness or an Azure storage account as witness. We will use the file share witness in this example. There is a step-by-step how-to on the Microsoft website for the cloud witness. I always recommend configuring a quorum witness for proper operations. So, the last option is not really an option for production.
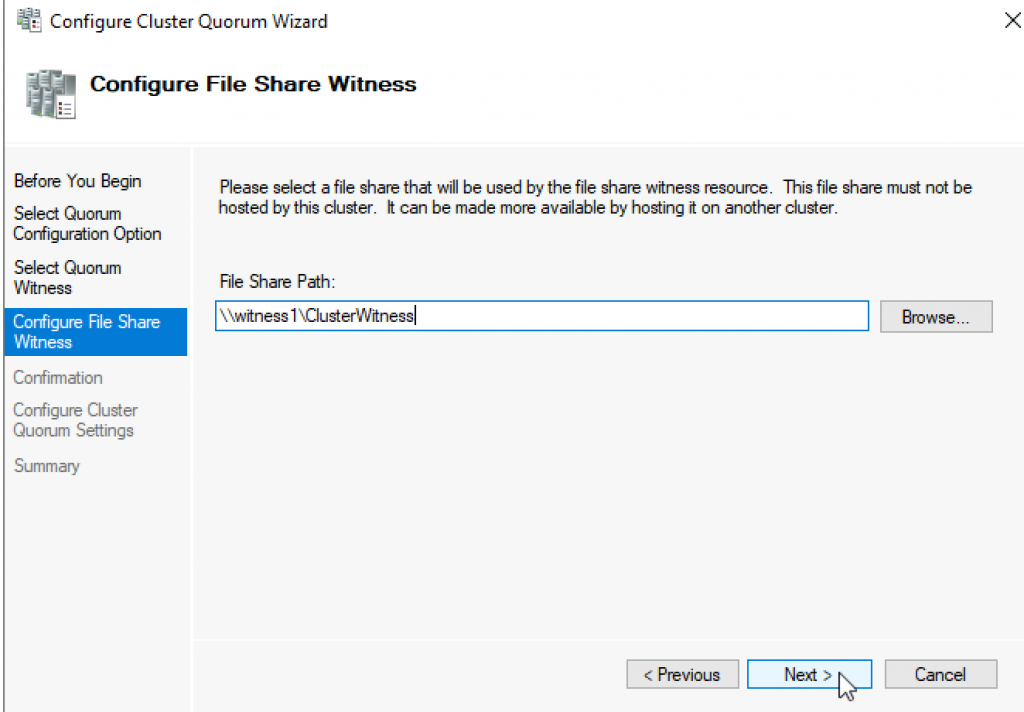
Just point to the path and finish the wizard.
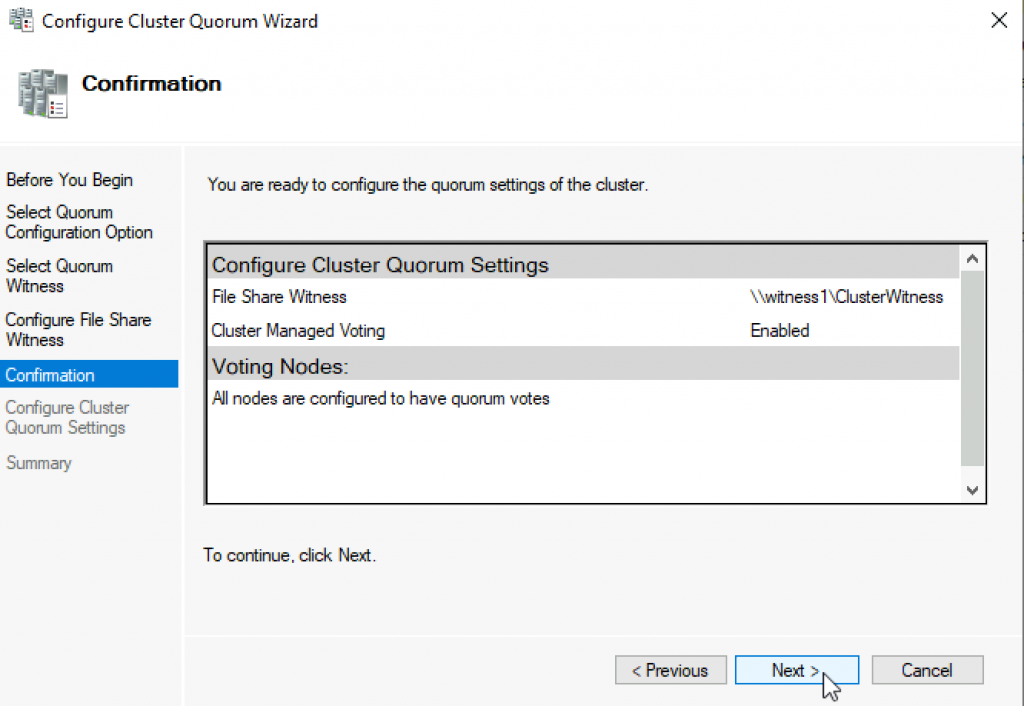
After that, the shared disk is available for use for data.
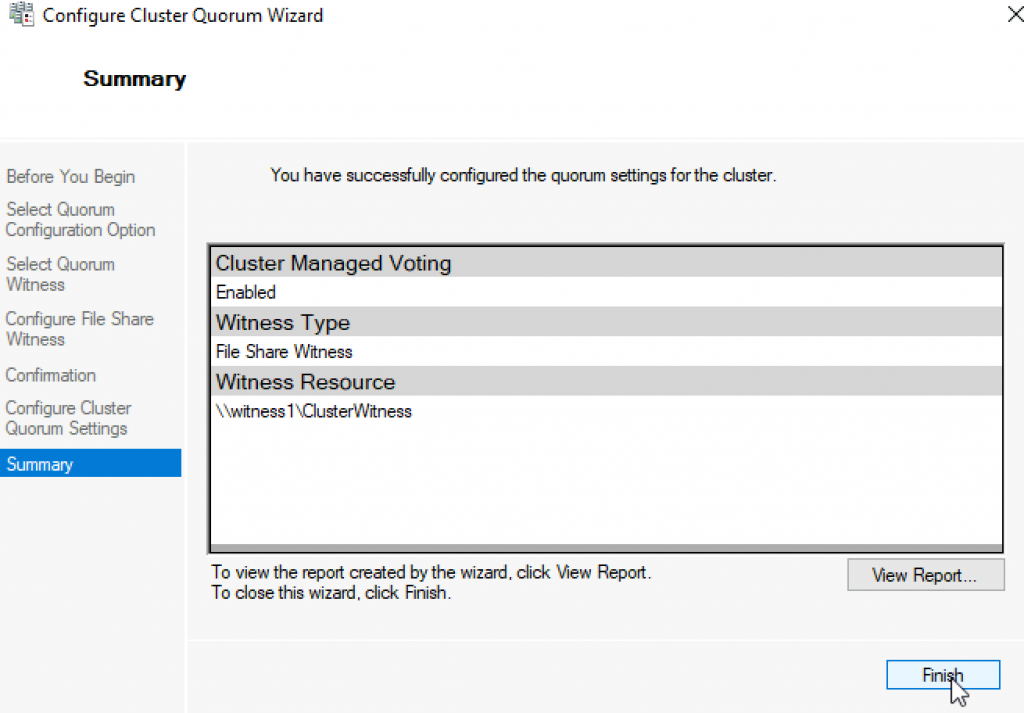
Congratulations, you have set up a Microsoft failover cluster with one shared disk.
Next steps and backup
One of the next steps would be to add a role to the cluster, which is out of scope of this article. As soon as the cluster contains data, it is also time to think about backing up the cluster. Veeam Agent for Microsoft Windows can back up Windows failover clusters with shared disks. We also recommend doing backups of the “entire system” of the cluster. This also backs up the operating systems of the cluster members. This helps to speed up restore of a failed cluster node, as you don’t need to search for drivers, etc. in case of a restore.
See More:
- On-Demand Sessions from VeeamON Virtual
In this tutorial, we would learn how to install and setup Failover cluster in Windows Server 2019 step by step. In the previous tutorial, we configures an iSCSI storage server and created three virtual disk.
To install and configure a failover cluster, let’s look at our network setup, then we follow some steps
- Our Network Environment
- Determine the Cluster Disks
- Add Failover Clustering Role
- Create the Failover Cluster
- Add Disks to the Cluster
1. Our Network Environment
Our lab network is set up using VirtualBox and consists of 4 computers:.
How to set up a domain network is explained here.
DC (192.168.1.90) – This is our domain controller.
Node1 (192.168.1.91) – This is one of the failover cluster nodes and a iSCSI initiator.
Node2 (192.168.1.92) – This is the second failover cluster nodes and an iSCSI initiator.
Node3 (192.168.1.93) – This is out iSCSI target server. It hosts the virtual disks
2. Determine the Cluster Disks
Before you start creating the failover cluster, you need to determine the disk that hold the cluster data. This is so that if a member of the cluster fails, then the data would still be available. In our setup, we have decided to host the disks in another computer (Node3). This is configured as iSCSI target server and contain 3 virtual disk.
The figure below shows Node3 with the 3 iSCSI disks configured.
How to configure iSCSI target server and disks
Note: Ensure that the disks are iSCSI virtual disks are initialized on one of the failover nodes
3. Add the Failover Clustering Role
Now we have to install the Failover cluster role in Node1 and Node2. Follow the steps below to do that.
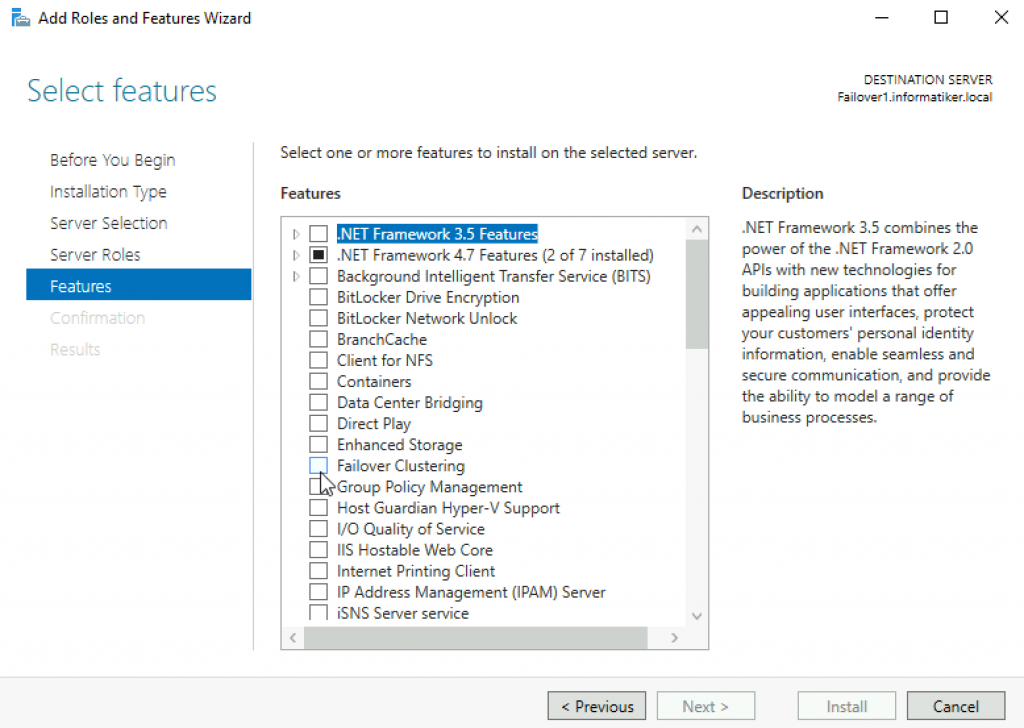
Step 1 – In Node1, click on Add Roles and Feature. This will launch the Add Roles and Features wizard. Follow the steps and select Failover Clustering as shown below. Then complete the installation.
Step 2 – Repeat the process for Node2
4. Create the Failover Cluster
We would now use the Failover cluster manager to create a cluster. Follow the steps below:
Step 1 – In Node1, click on Manager and select Failover Cluster Manager. The window is shown below
Step 2 – Click on Validate Configuration and follow the wizard steps to do the validation (this is done only in Node1). The wizard will ask you to specify the Servers you want to participate in the clustering. You will use AD to find Node1 and Node2 and select them.
At the end of the validation, you may have warning relating to unsigned drivers. Ignore these warnings because they come from VirtualBox Guest Additions.
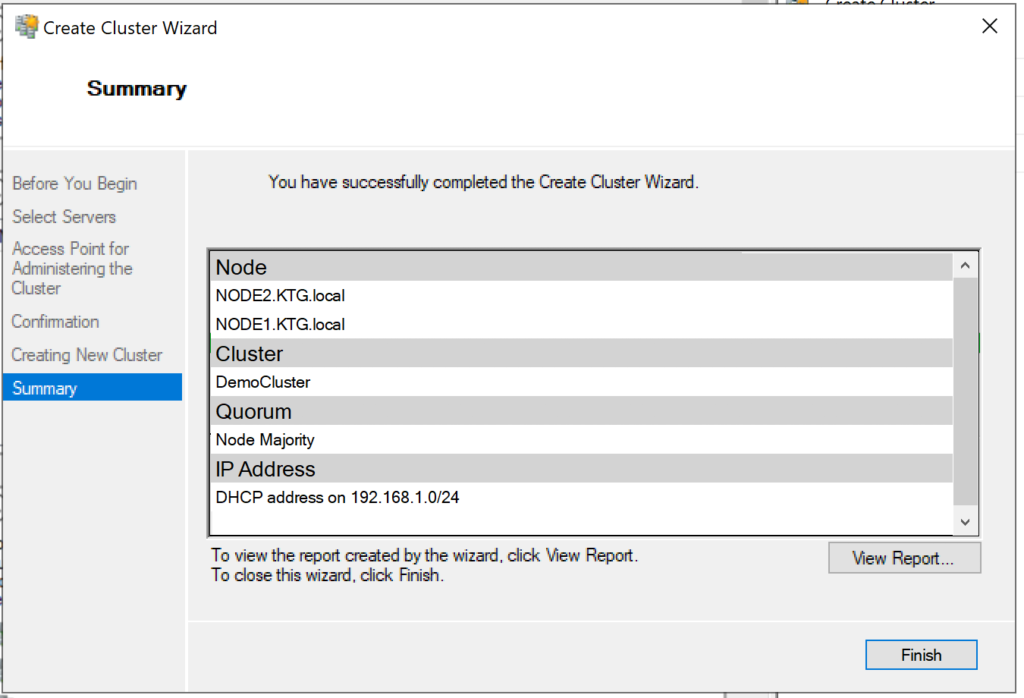
Step 3 – Click on Create Cluster. You will have to select the Node1 and Node1. Then you need to specify the cluster name. The complete the cluster creation. The figure below shows the final screen indicating the cluster creation was successful.
5. Add Disks to the Cluster
Failover clusters require disks and in this case we would used virtual disks from the iSCSI target server.
Step 1– Add storage to the cluster. To do that open the Failover Cluster manager as shown below.
Step 2 – Click on Add Disk. The three iSCSI disks would be listed. Ensure that they are selected.
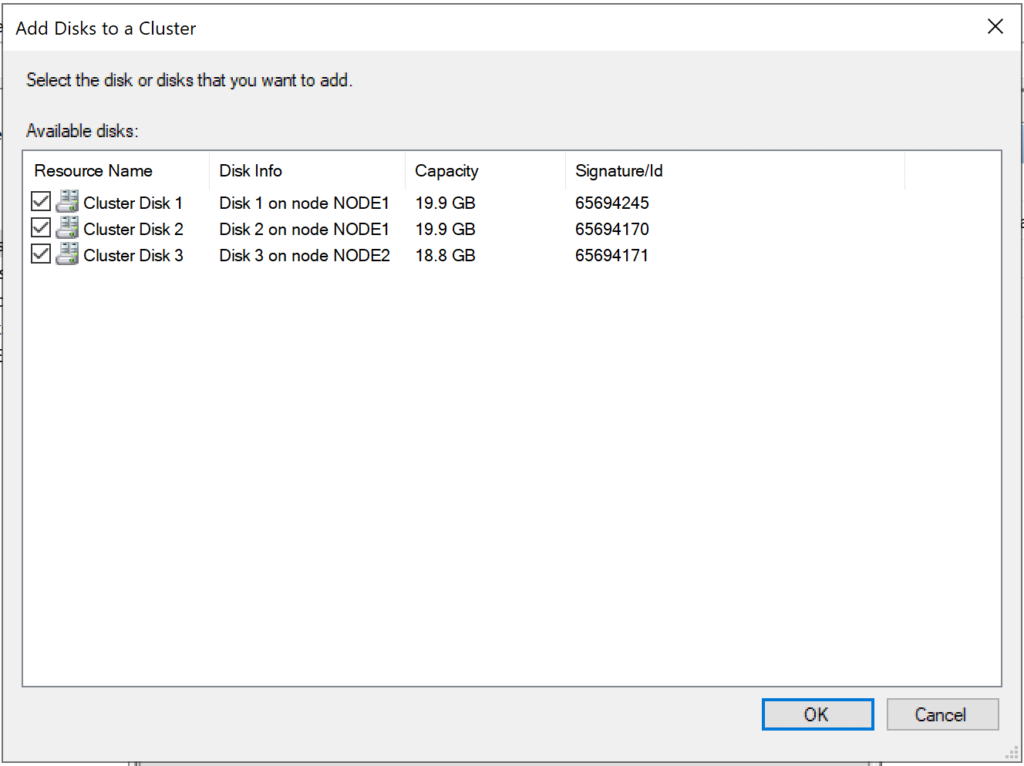
Click on OK.
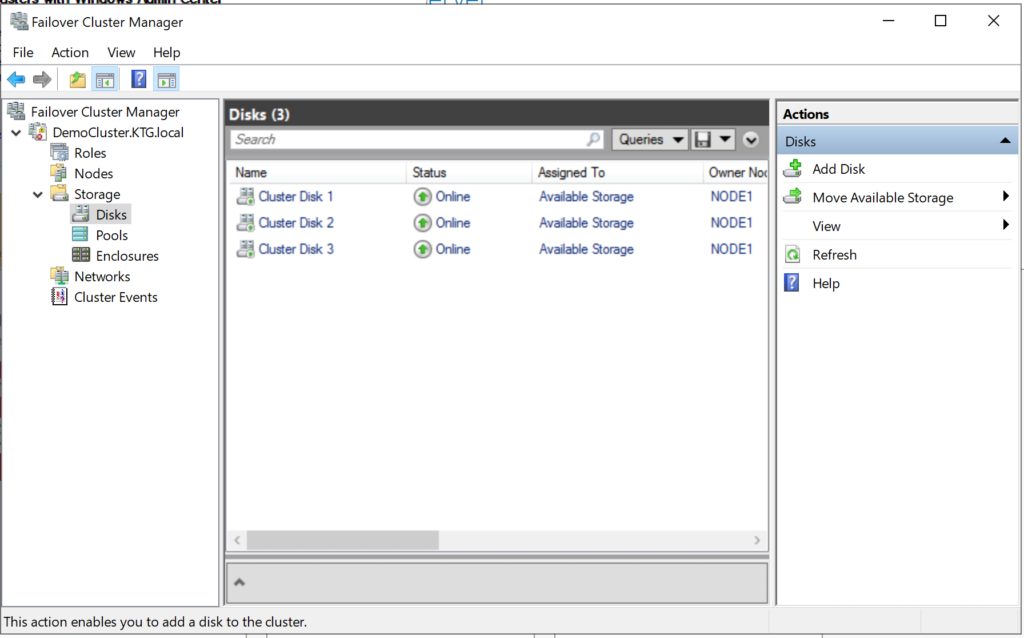
At this point, the disks are added to the cluster and they are online as well. See the figure below
In subsequent tutorials, I discuss the concept of Witness in failover cluster and how to configure Quorum witness and Disk witness.
I also recommend you watch the video in my Youtube Channel.
Failover clustering will enable you to make you Windows Server services highly available. In this guide we will go just through simple setup of failover clustering on Windows Server 2019 without setting up any services.
Before we begin
These are the resources you will need if you are completely new to Failover Clustering – https://docs.microsoft.com/en-us/windows-server/failover-clustering/create-failover-cluster
Prerequisites
I assume you know basic things about Windows Server before you attempt to do this.
DC
LAB for this guide consists of following:
Domain: informatiker.local
Domain Controller named DC1 – 10.0.0.31
ISCSI
One Windows Server ISCSI Target server named ISCSI1 (if you don’t know how to make ISCSI target server, here is the guide)
ISCSI1 – 10.0.0.50
That machine has one additional disk of 40GBs that will be assigned to ISCSI Target.
Optionally, you don’t have to bring up iscsi target server and configure iscsi for failover cluster – you can also bring up failover cluster without storage.
Failover cluster
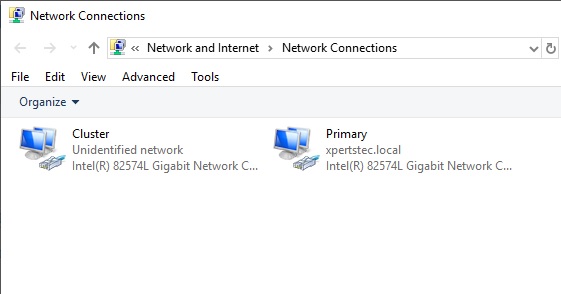
We will have two nodes that will have failover clustering installed. These machines will have two network cards – one for communication with network, and another one for clustering communication.
Failover1 – NIC1 10.0.0.52 NIC2 192.168.4.2
Failover2 – NIC1 10.0.0.53 NIC2 192.168.4.3
192.168.4.xx network is only for internal cluster configuration (heartbeat). On netowrk cards that will serve you as heartbeat and internal cluster communication – Control Panel | Network and Sharing Center | Change Adapter Settings | right click on network adapter that will serve for cluster communication – Properties | under Networking tab select IPv4 – Properties | click on Advanced button | under DNS tab deselect Register this connection’s addresses in DNS | WINS tab – select Disable NetBIOS over TCP/IP. Do this ONLY ON network adapters that will server for internal cluster communication!
All of these machines should be part of domain.
Be sure to enable MPIO Feature and iSCSI Initiator on both Failover1 and Failover2 machines. Be sure to follow my guide I posted above for creating ISCSI target, it has all the details in it.
MPIO is very important when you use shared storage.
Connect one 40GB disk you defined as ISCSI target to both Failover1 and Failover2, leave it offline at failover2 node.
Cluster is going to be named Cluster1
Cluster1 – 10.0.0.54
Cluster Witness. We need additional VM that will hold file share that ill be available to our cluster – Witness1
Witness1 – 10.0.0.55
Install Failover Clustering
We will go through the process on Failover1 node, you will repeat the process on Failover2 node. I will show you only important parts, I assume you know how to use Server Manager.
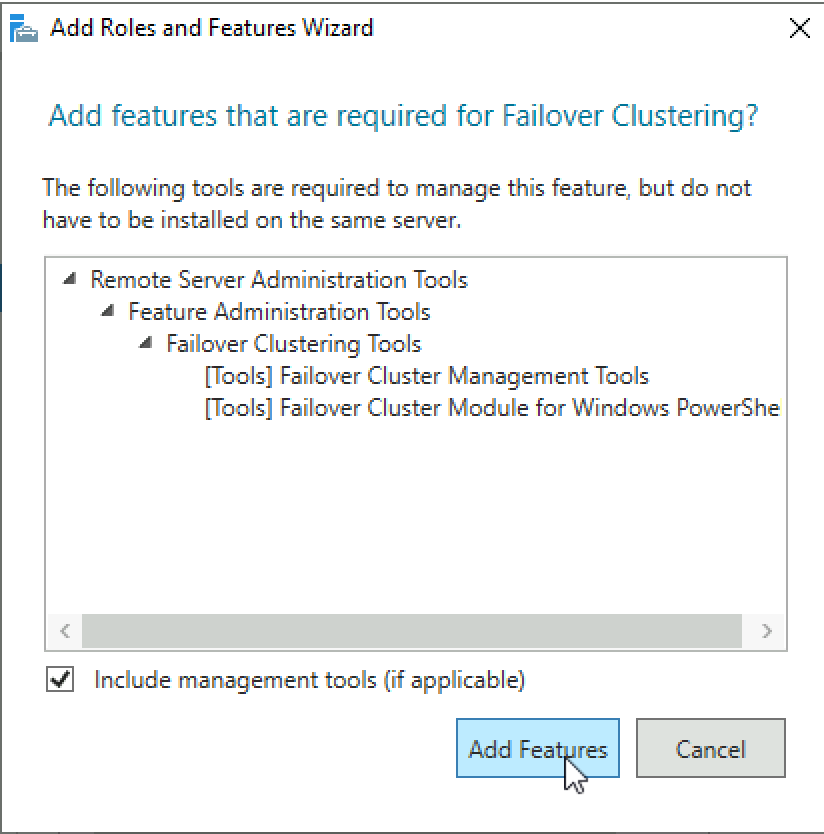
Open Server Manager | click on Manage | Add Roles And Features | on Features screen select Failover Clustering
Additional pop-up will appear, click on Add Features
Next
Install
Close wizard and reboot server.
Repeat this process on Failover2 node.
Validate Cluster Configuration
After you installed Failover Clustering on both nodes, login to Failover1 node, click on Start | Windows Administrative Tools | select Failover Cluster Manager
Click on Failover Cluster Manager, and from the middle screen select Validate Configuration…
Next
Select both servers (in my case Failover1 and Failover2) and select Next
Run all tests | Next
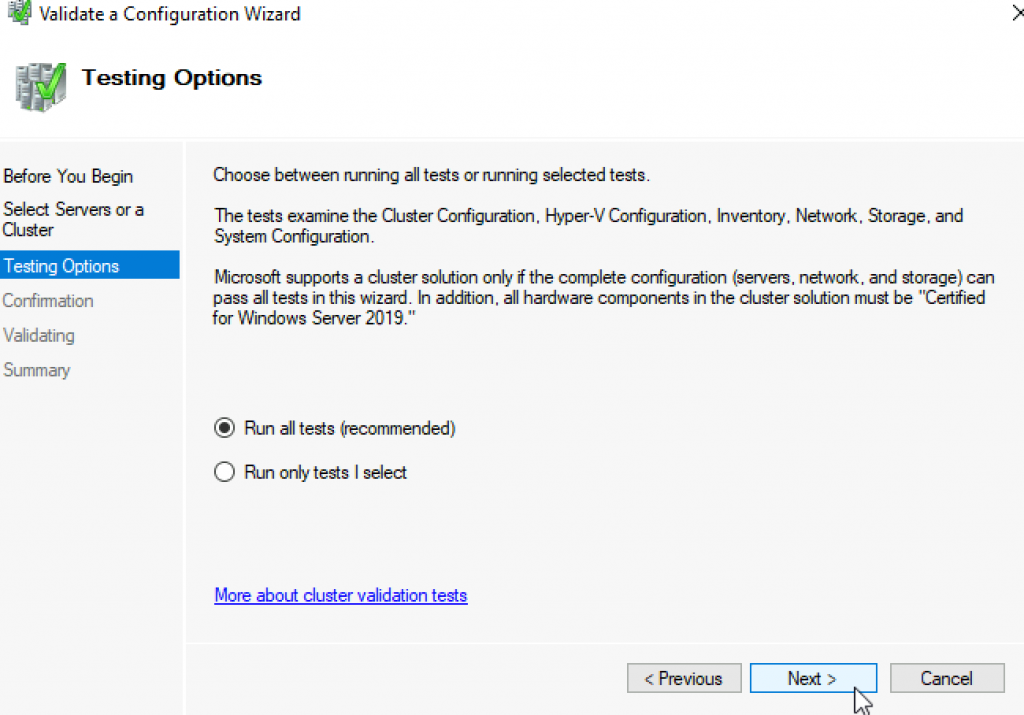
Next
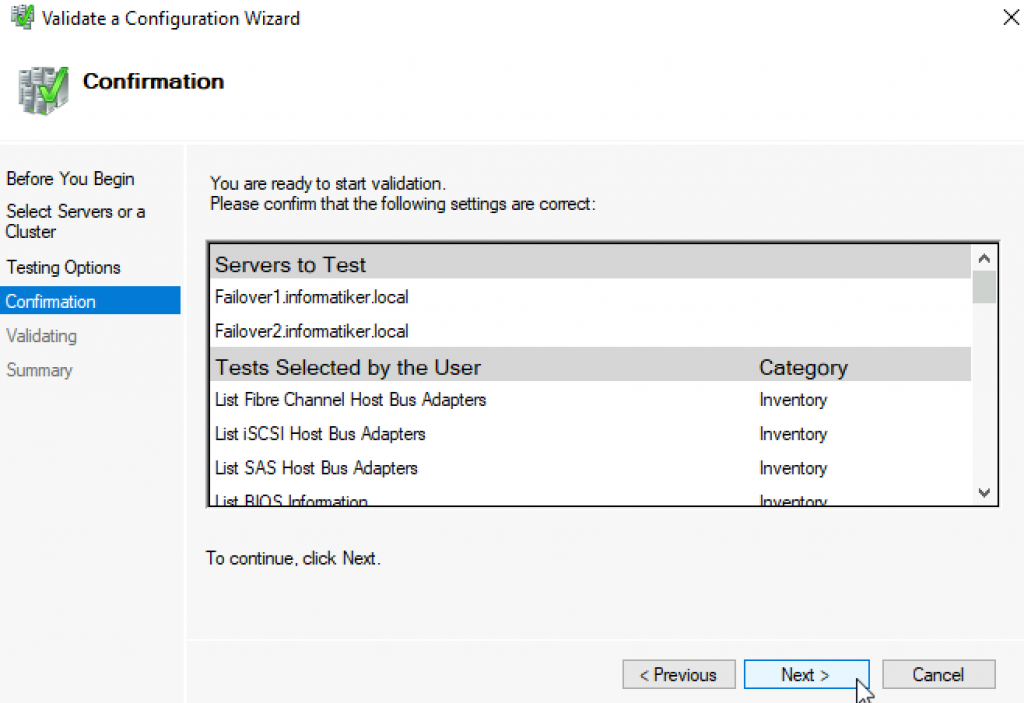
…
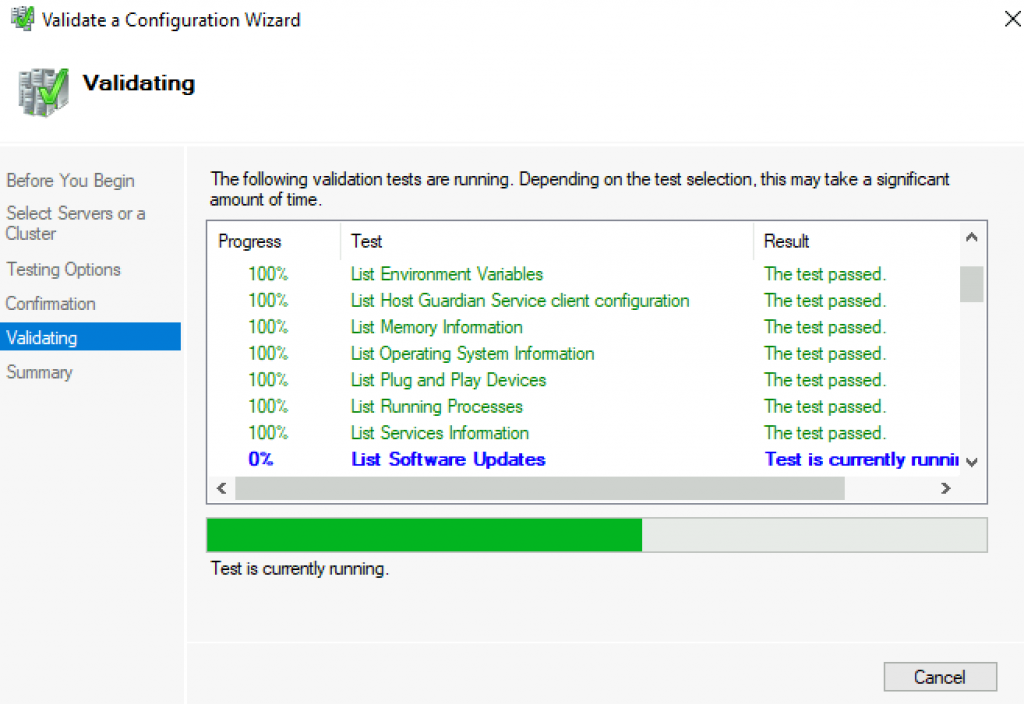
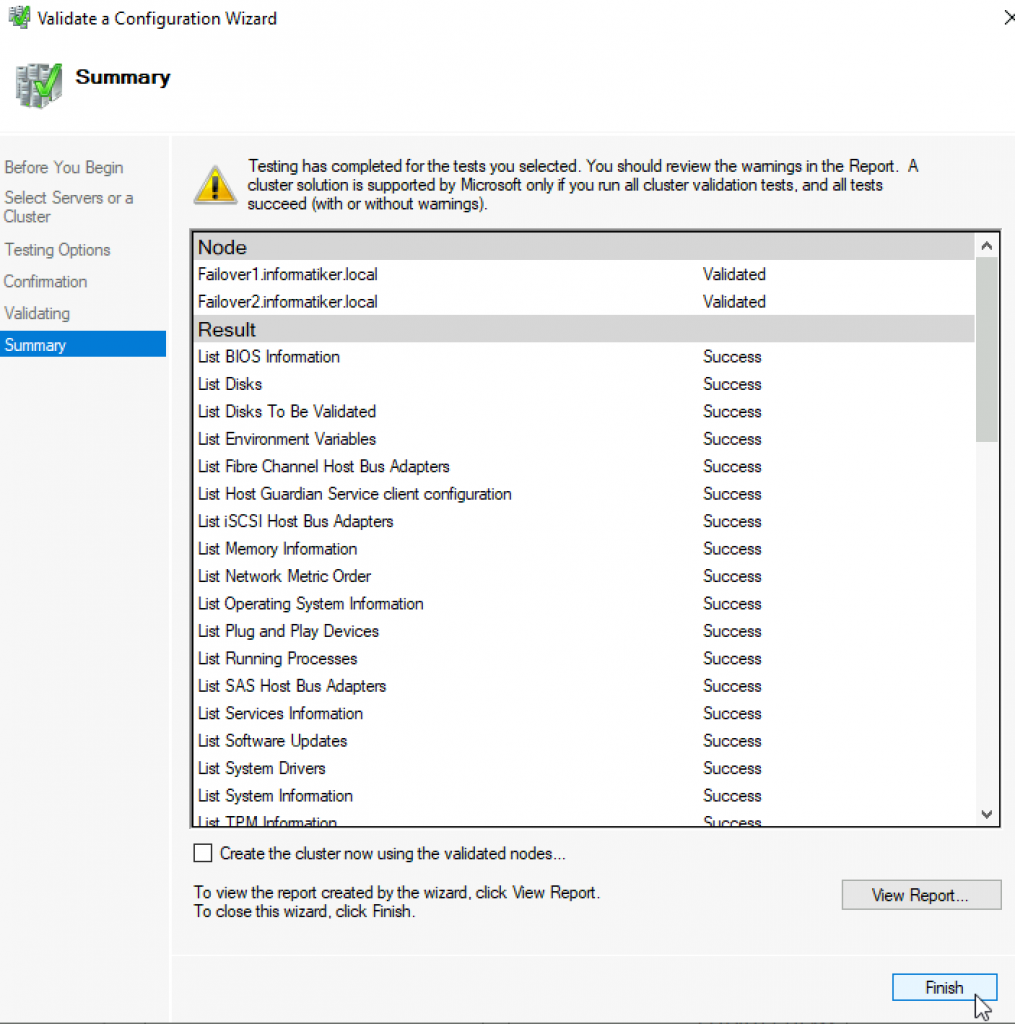
All test were success | Finish
We can proceed to creating cluster
Failover Cluster Manager | from Action screen, select Create Cluster
Next
Again select both servers that will be part of the cluster | Next
I will name cluster – Cluster1 and give it IP 10.0.54 | Next
Next
…
Success! Finish
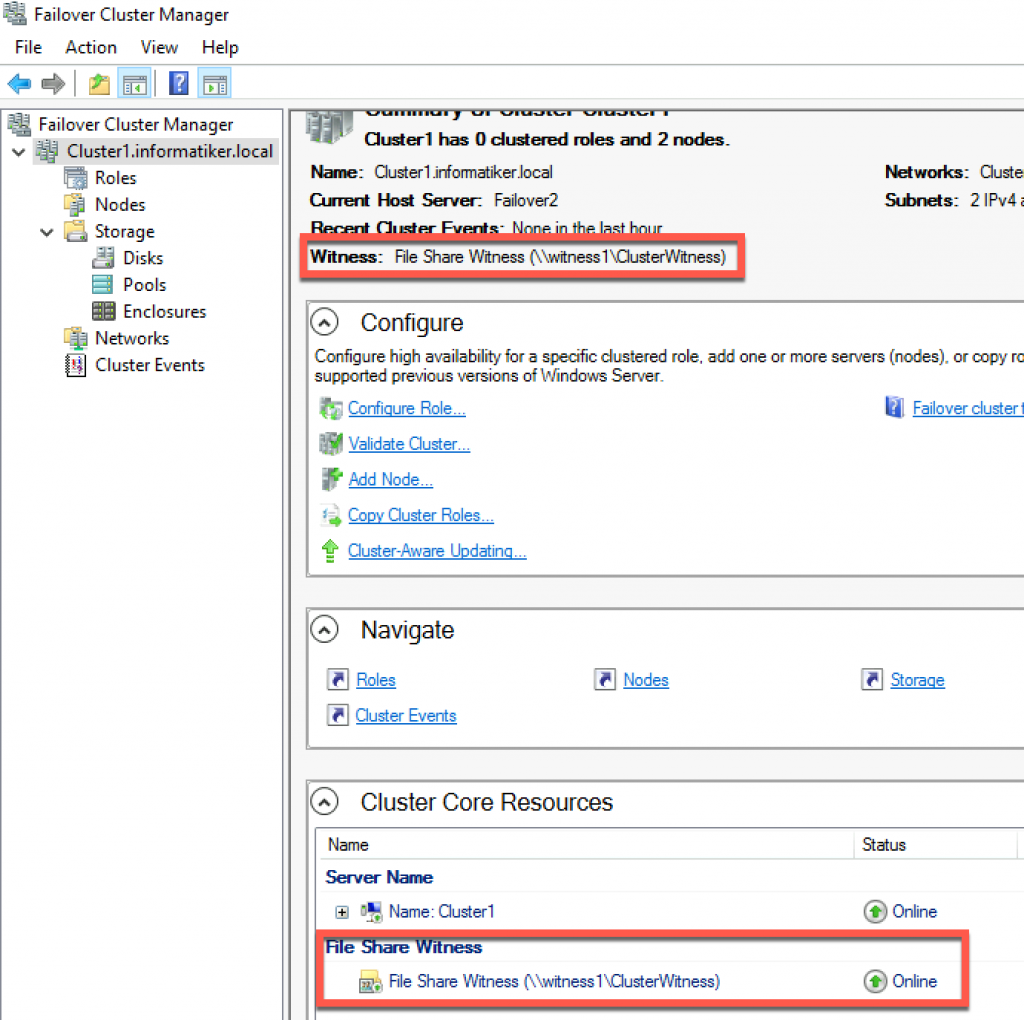
We can now see created cluster1 and two nodes as part of it.
Add Cluster Quorum Witness
Cluster Quorum Witness will enhance your Failover Cluster Availability. I will not go into detail about witness role, you can find many more details here – https://docs.microsoft.com/en-us/windows-server/failover-clustering/manage-cluster-quorum
In our scenario, we will add File Share as Witness. since we have only two nodes, witness and one node will always have to be up, for cluster to be valid. So, make sure you plan you outages and patching so that you always have two nodes up.
On Witness1 machine, I added folder named ClusterWitness and shared it. In the screenshot below – three things are MISSING – you should also add Failover1, Failover2 and Cluster1 computers to this fileshare with full rights. Also, visit security tab of the shared folder and repeat procedure there!!
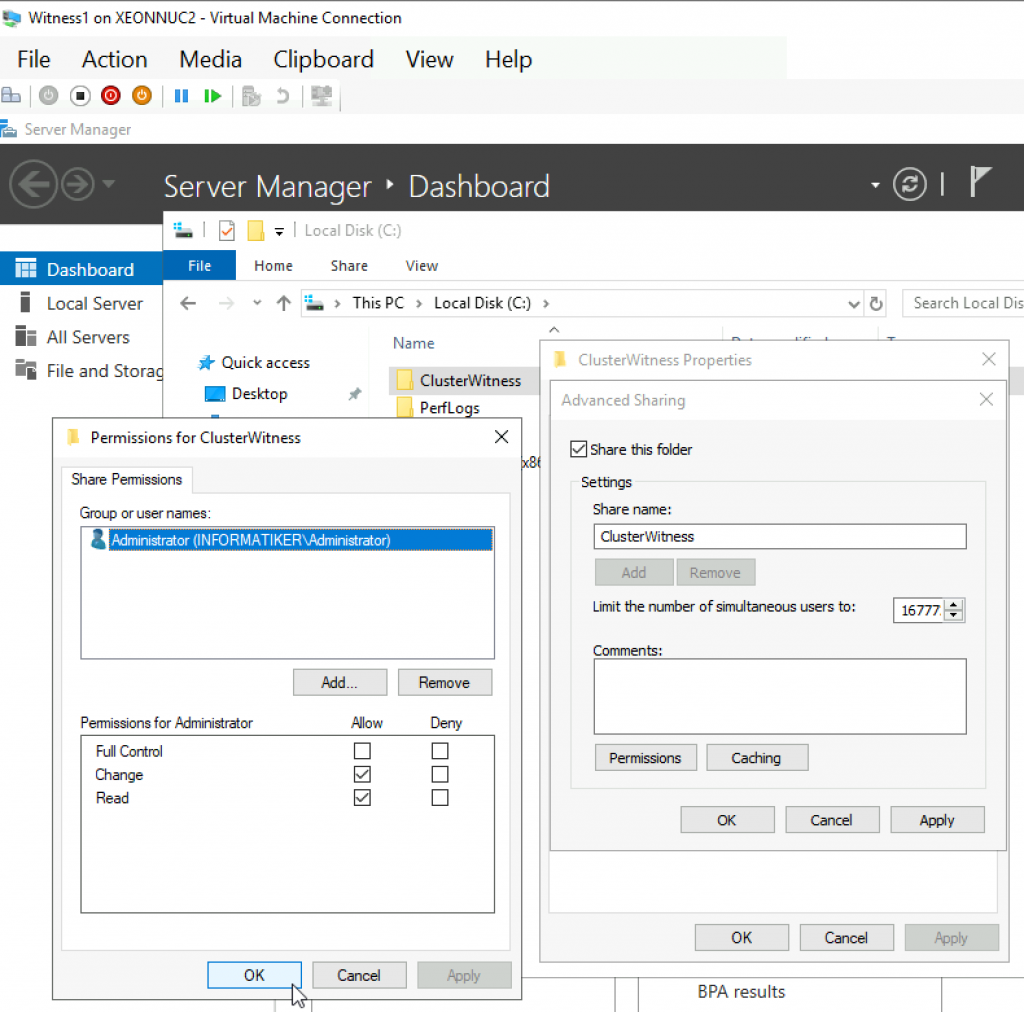
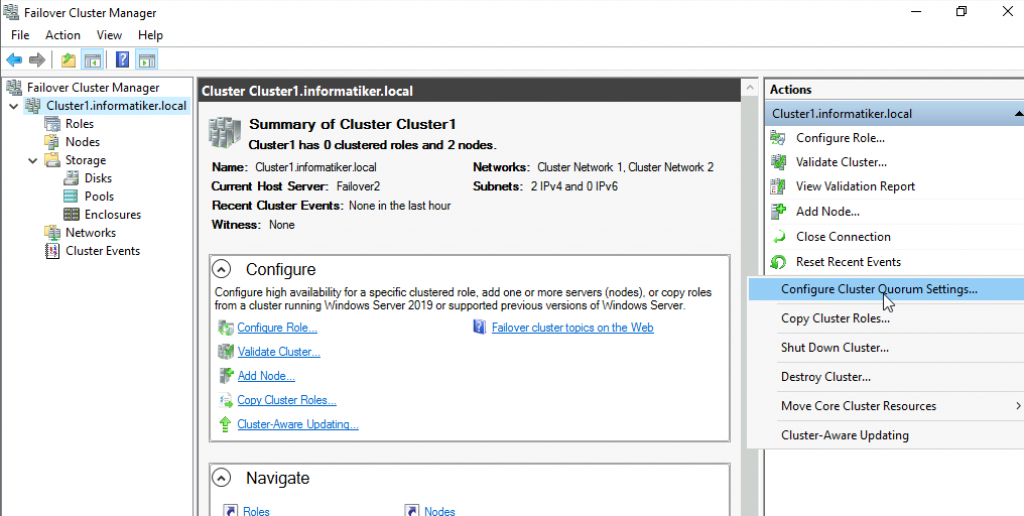
Back to Failover1 node – Open Failover Cluster Manager | select Actions | More Actions | Configure Cluster Quorum Settings
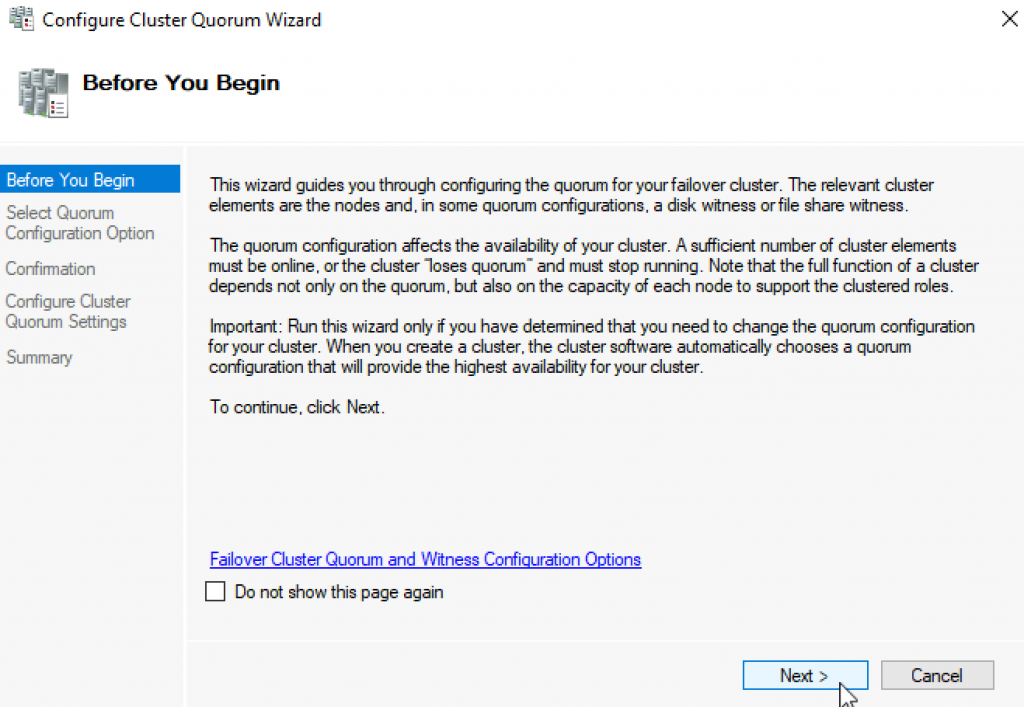
Next
Select the quorum witness | Next
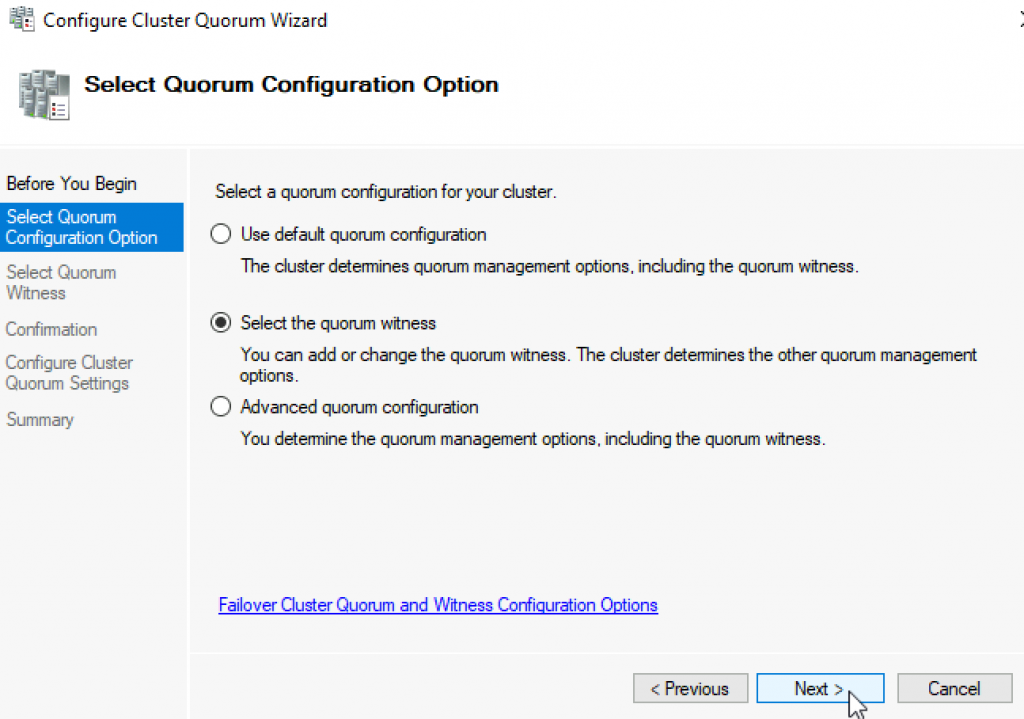
You have many options, today we will select “Configure a file share witness” Next
Enter FQDN to your file share on witness1. In my case it is \witness1\ClusterWitness | Next
Review and click Next
Success! Finish
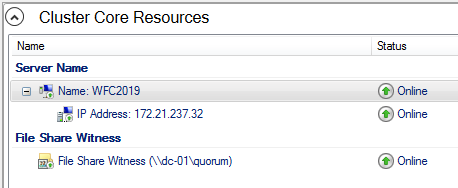
Now, we can see in Failover Cluster Manager that Witness is available.
That is it, we covered the basics and we can now start deploying various services in our clustered scenario.
Disclaimer
In this blog, we’ll learn the skill to make a Microsoft Windows Failover Cluster with Windows Server 2019. The environment may be a two-node cluster with one shared disk.
Environment details:
SRV2019-DC
10.0.0.20
SRV2019-1
Primary – 10.0.0.30
Cluster – 192.168.0.10
SRV2019-2
Primary : 10.0.0.40
Cluster: 192.168.0.20
iSCSI Storage : 10.0.0.100
Cluster Name – XTCLUSTER
Cluster IP Address – 10.0.0.110
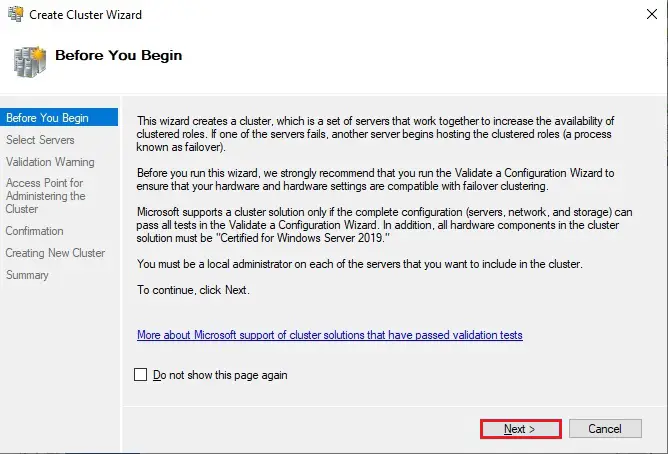
1- Before we start, make sure you meet the following prerequisites:
I have 2 Windows Server 2019 machines with the latest updates installed. The machines have at least two network interfaces, I rename them Primary and Cluster.
Join both servers to your Microsoft Active Directory domain and confirm that both servers see the shared memory device available in disk management. So, don’t bring the disk online yet.
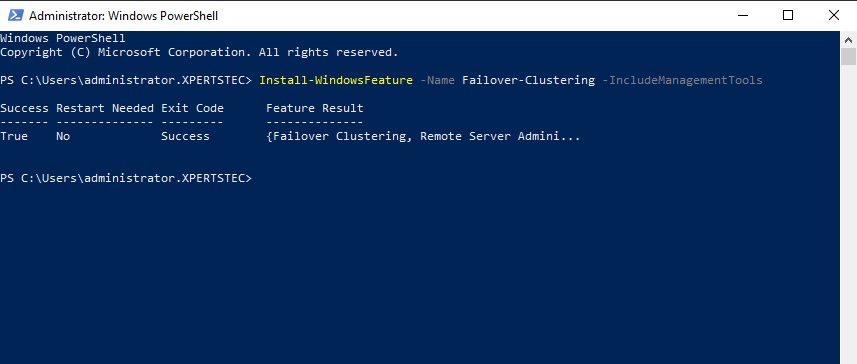
2- User the Following PowerShell command to enable failover clustering and management Toole 1 Node (SRV2019-1)
Install-WindowsFeature -Name Failover-Clustering –IncludeManagementTools
Failover Cluster Server 2019
Enabling Failover Manager Feature in 2 Node (SRV2019-2).
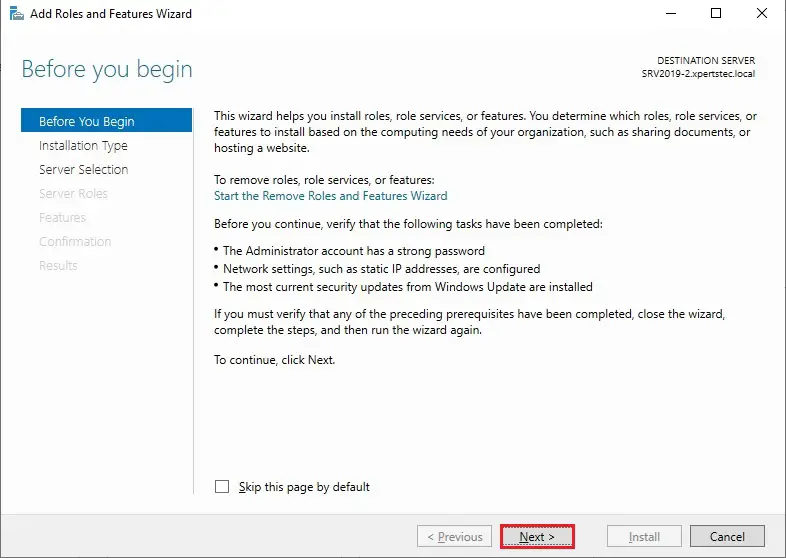
3- Open Server Manage select dashboard and then click on ADD Roles and Features.
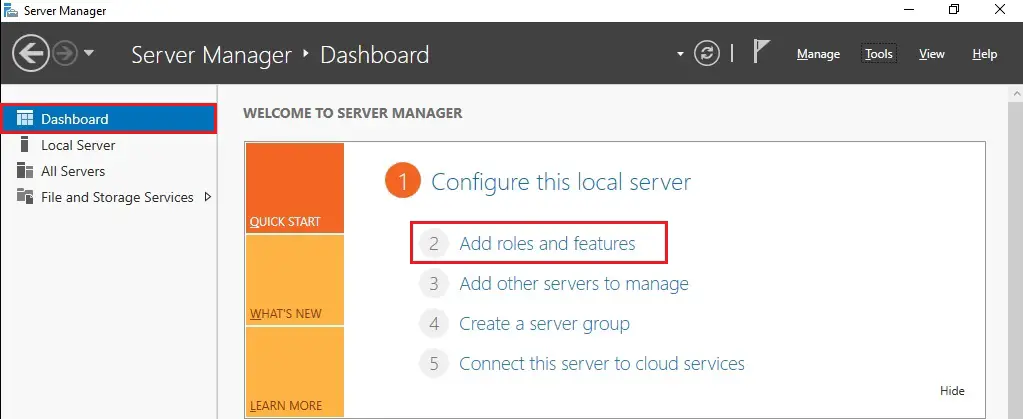
4- So, click Next.
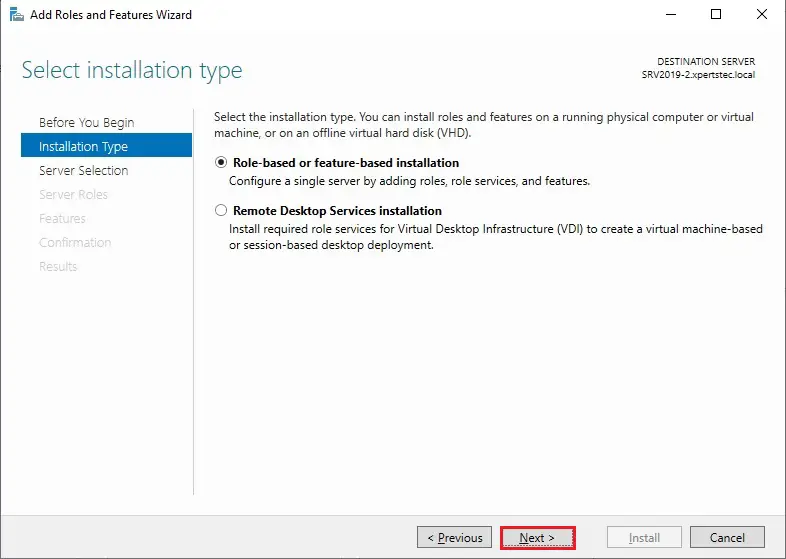
5- Click Role-based or feature-based installation and then click Next.
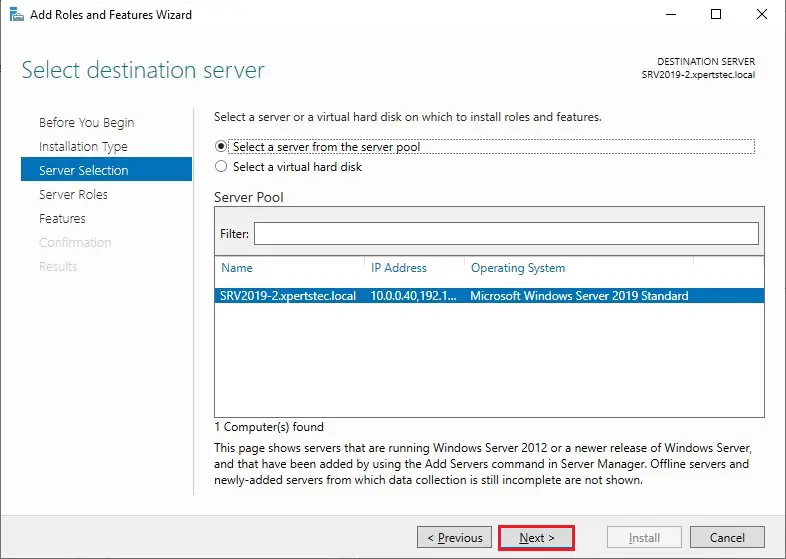
6- Select a server from the server pool and then click next.
7- So, click Next.
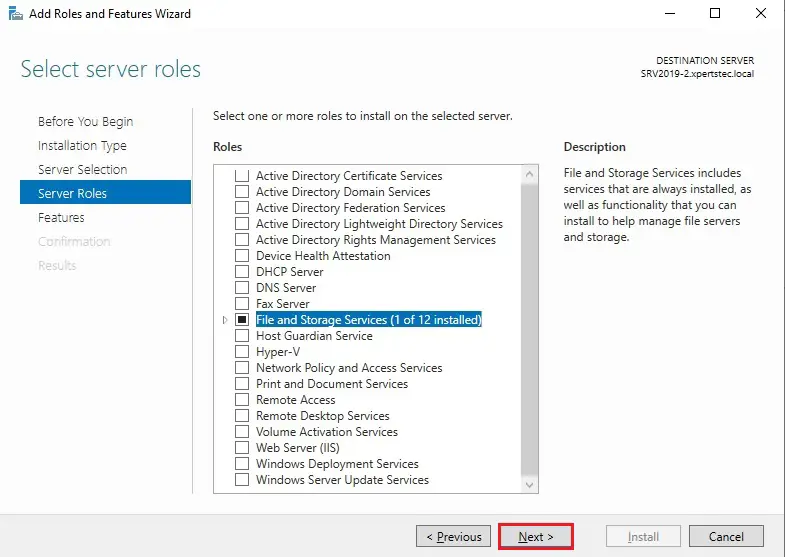
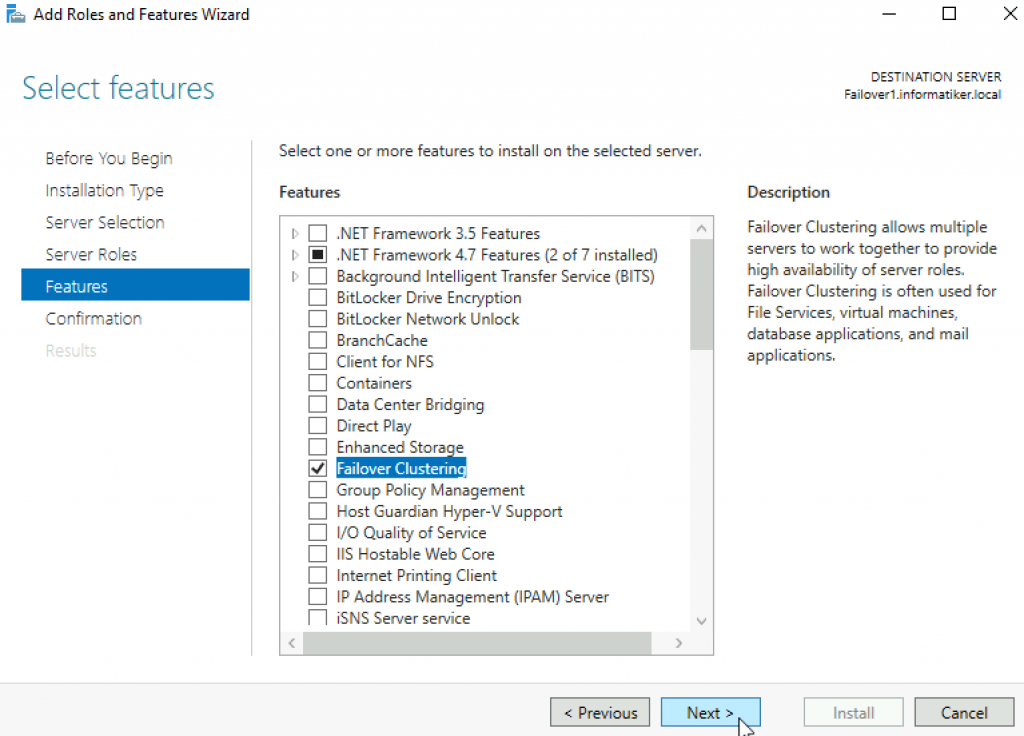
8- Select Failover clustering.
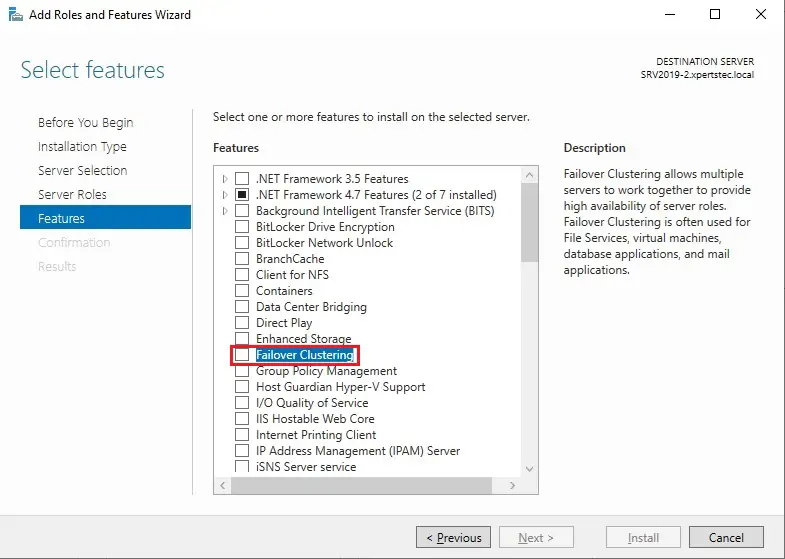
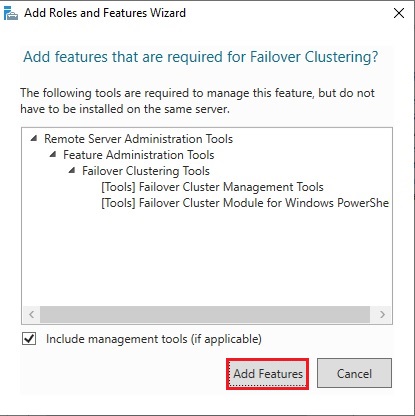
9- Click Add features.
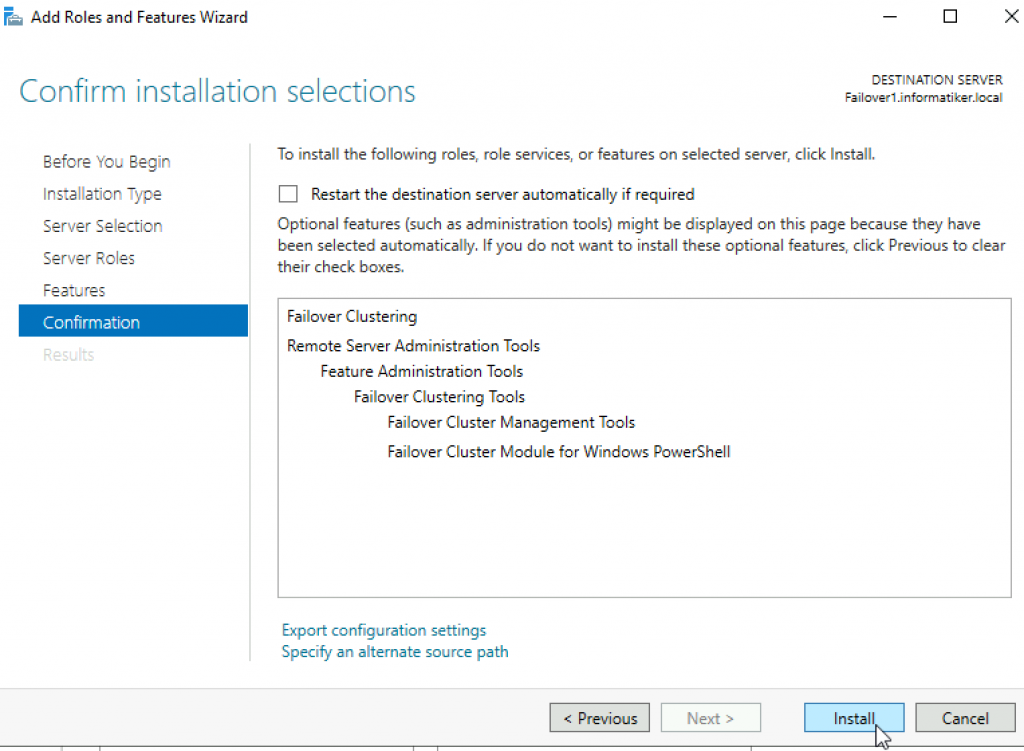
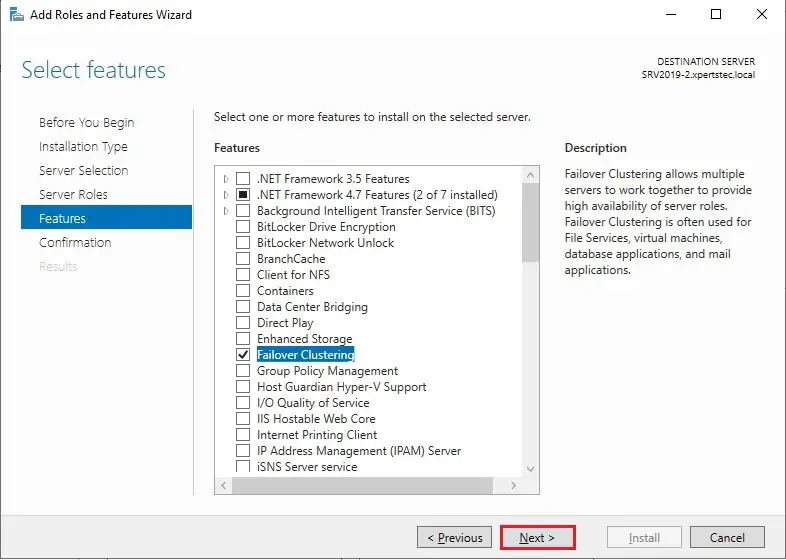
10- After enabling the failover clustering feature so, click next.
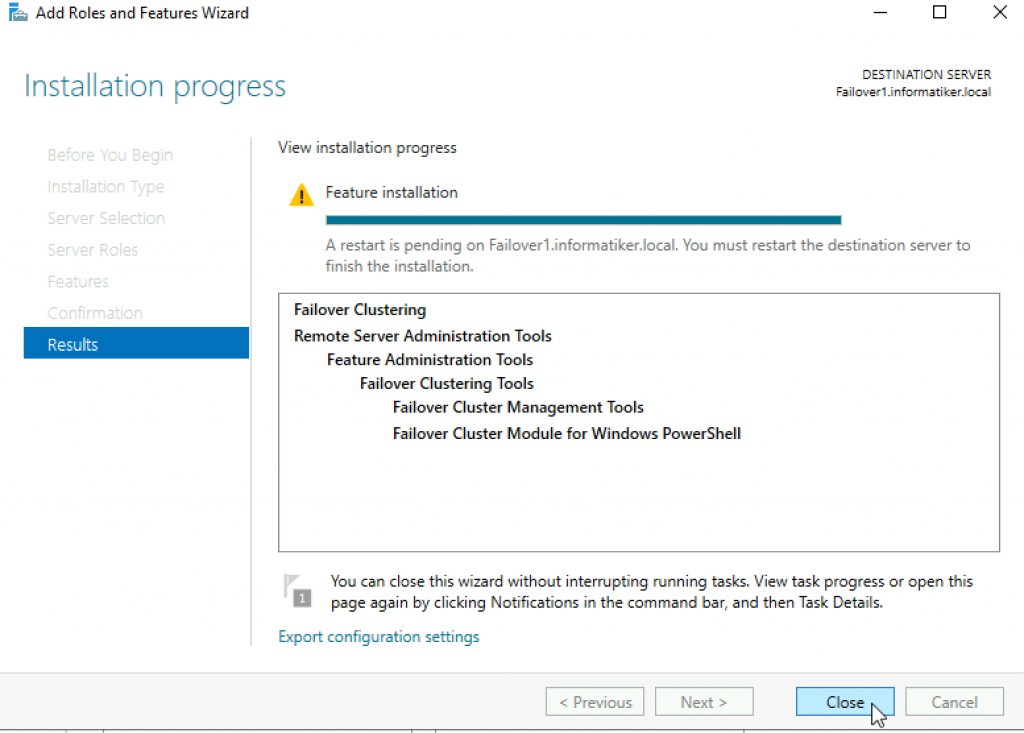
11- Then click Install.
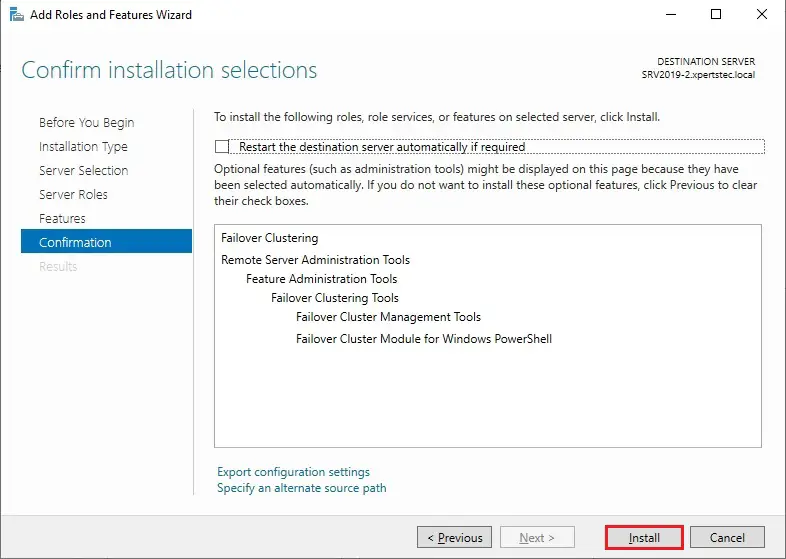
12- Successfully enable the Failover cluster feature so, click Close.
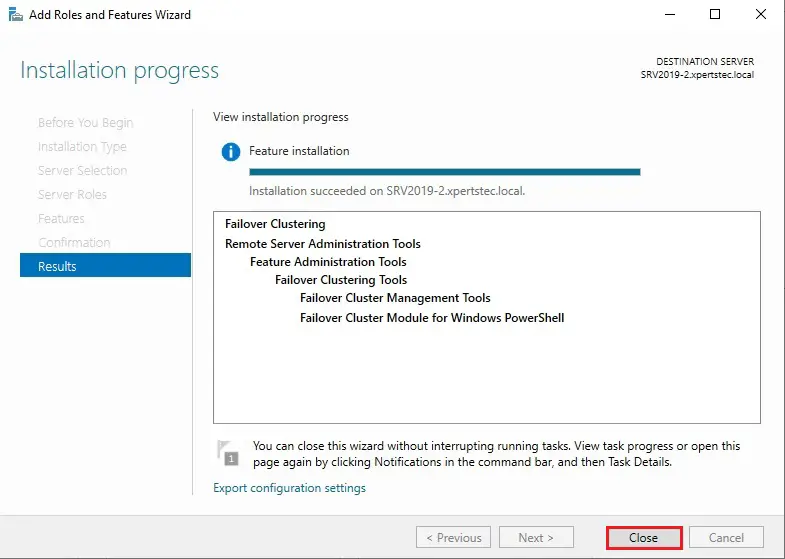
13- After a successful installation, it appears in the Server Manager, click Tools, and then Failover Cluster Manager.

After you installed the Failover Clustering feature so, you can bring the shared disk online and format it on one of the servers 1 Node (SRV2019-1).
The following steps are performed on the 1 Node (SRV2019-1).
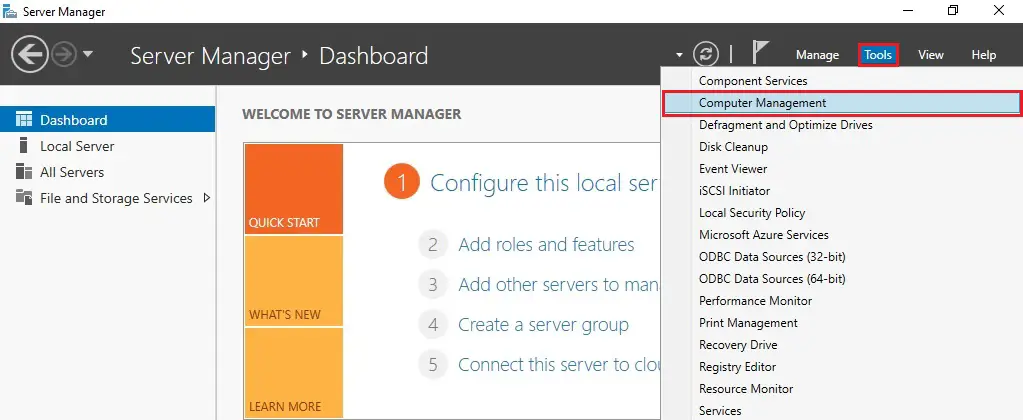
14- In Server Manager click Tools and then click Computer Management.
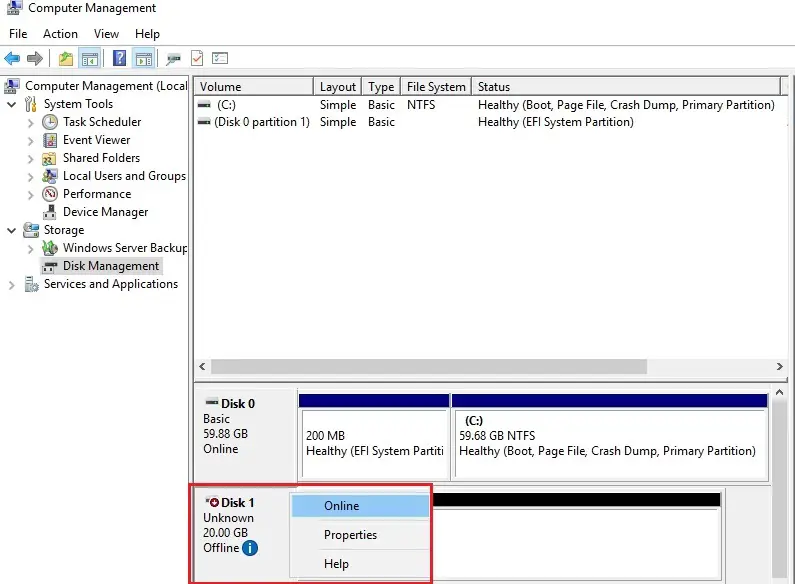
15- Click on Disk Management.
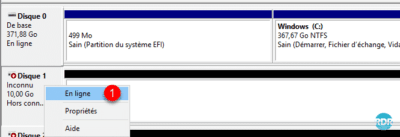
ou will see disk 1 which is in offline status right click on disk 1 and then select Online.
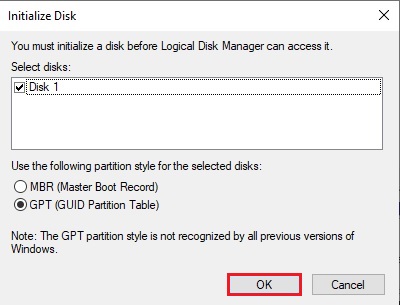
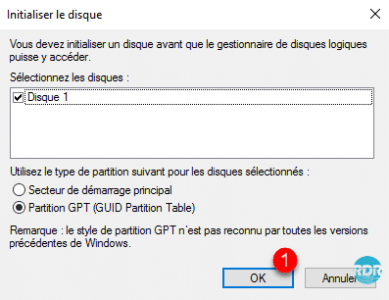
16- Right-click on disk 1 and click Initialize Disk.

17- Click OK.
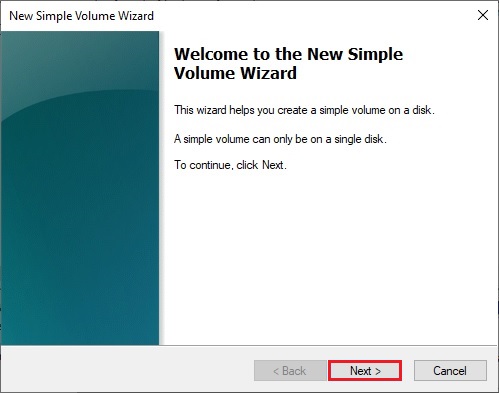
18- Right-click on unallocated disk 1 and select New Simple Volume.

19- Click Next.
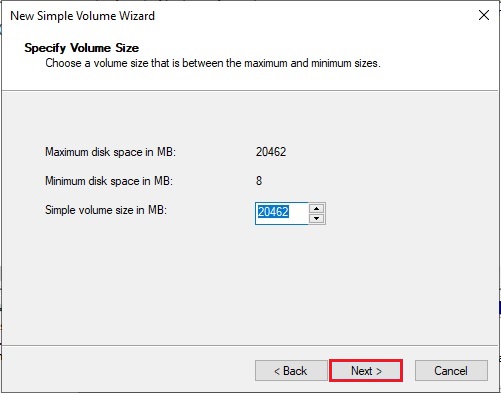
20- Click Next.
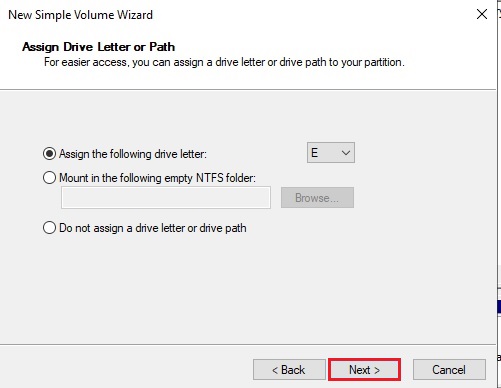
21- Assign a drive letter and click Next.
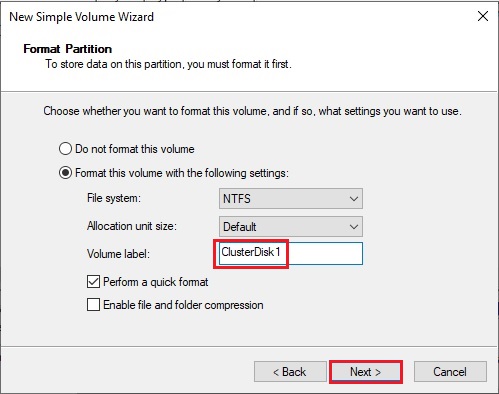
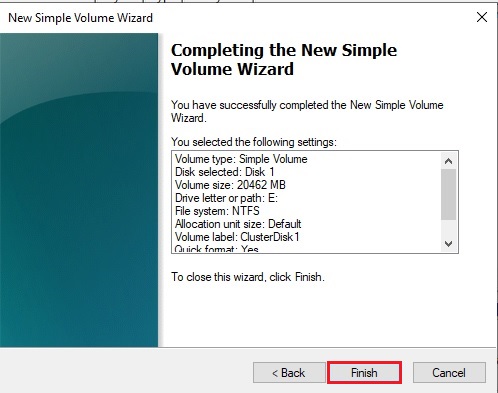
22- Type a volume label and click next.
23- Click Finish.
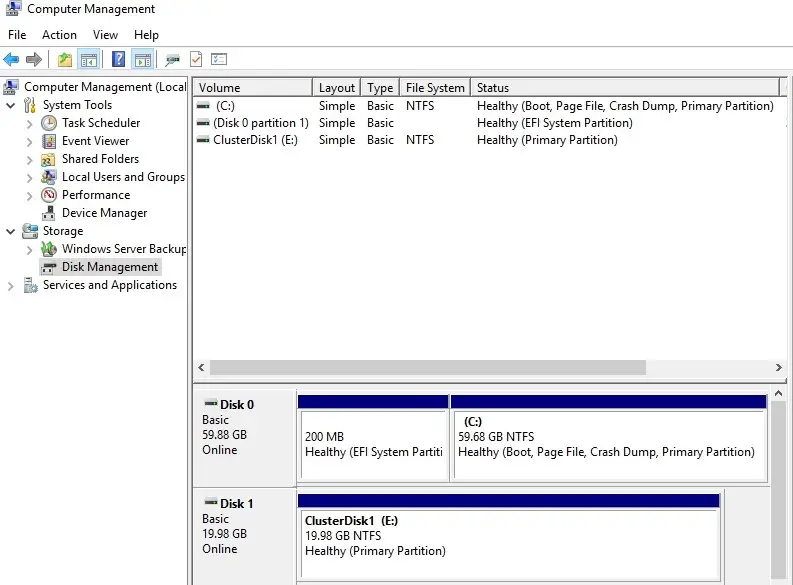
24- 1 Node (SRV2019-1) Disk Management (disk status online)
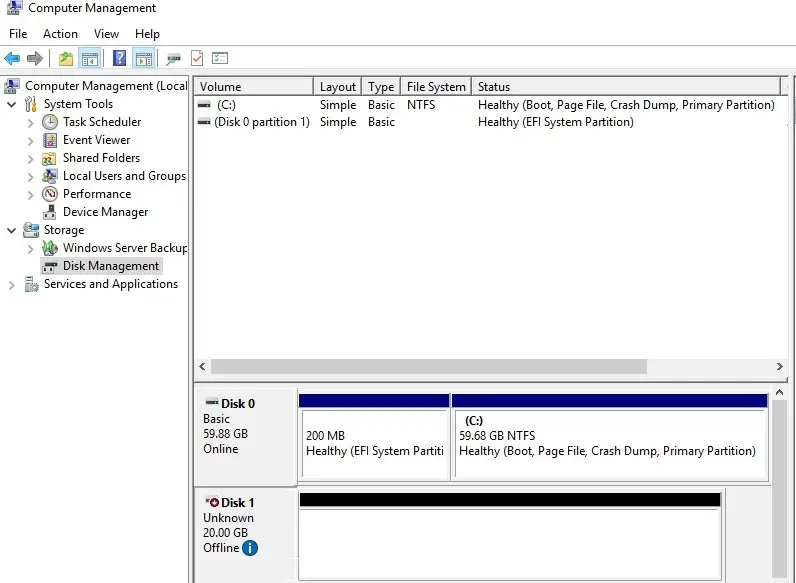
25- Please Don’t change anything on the 2nd Node (SRV2019-2), the disk stays offline. 2ND Node (SRV2019-2) Disk Management (disk status offline).
Failover Cluster readiness check-in 1 Node (SRV2019-1).
Before we create the cluster, we’d like to form sure that everything is about up properly.
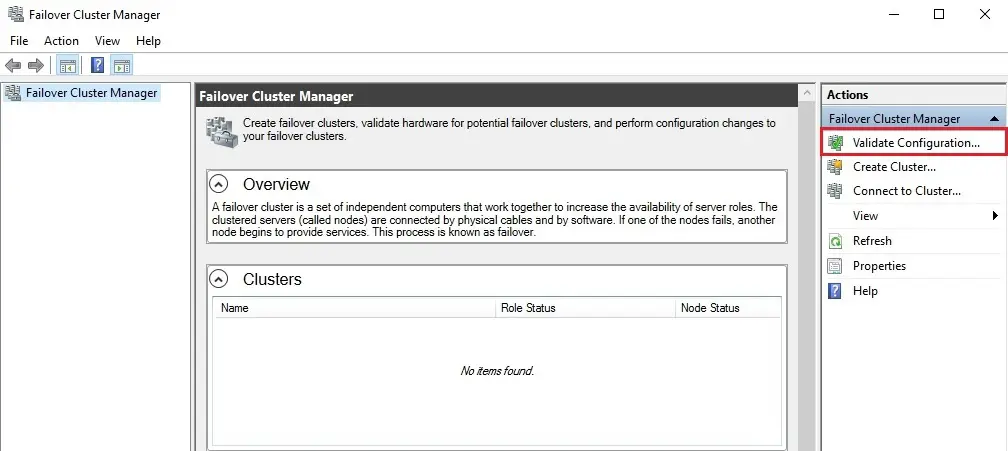
26- In Server Manager click Tools and Click Failover Cluster Manager.

27- Under Action menu click Validate Configuration.
28- Click Next.
29- Select the browse button.
30- Type both the Nodes name, click check name and click ok.
31- After Selecting the two-node servers for validation, click next.
32- Select Run all tests (recommended) and click next.
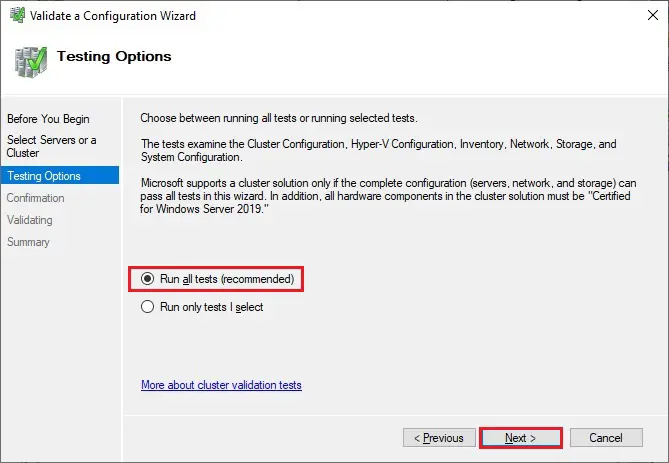
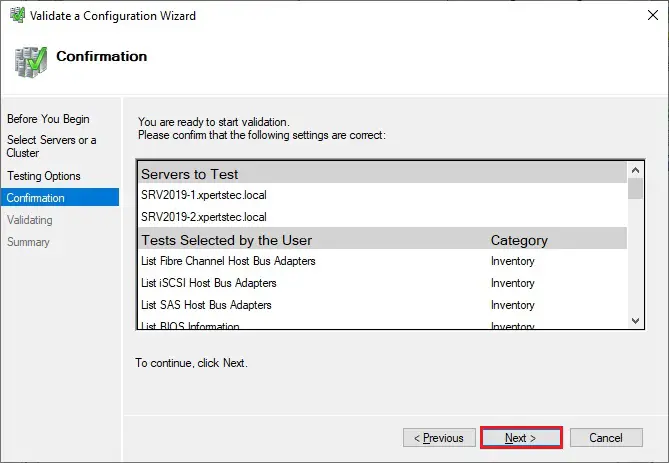
33- Review the validate configuration confirmation and click next.
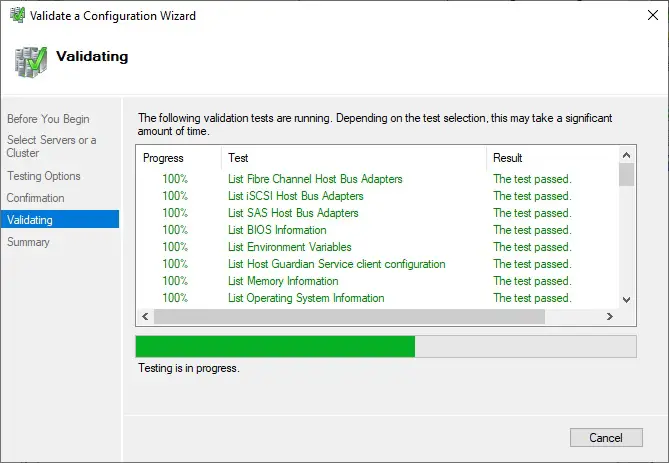
34- Cluster validation testing is in progress.
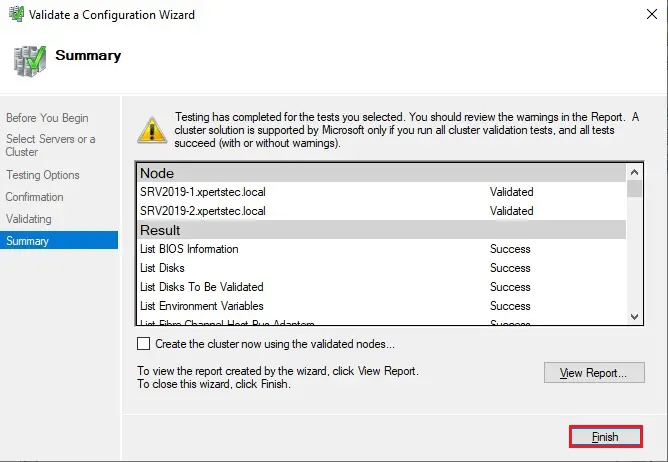
35- After you make sure that every applicable test passed with the status successful. If you have any errors or warnings, you can use the detailed report by clicking on View Report and click Finish.
Create a Failover Cluster Server 2019
36- Under Action Menu so, select Create Cluster.
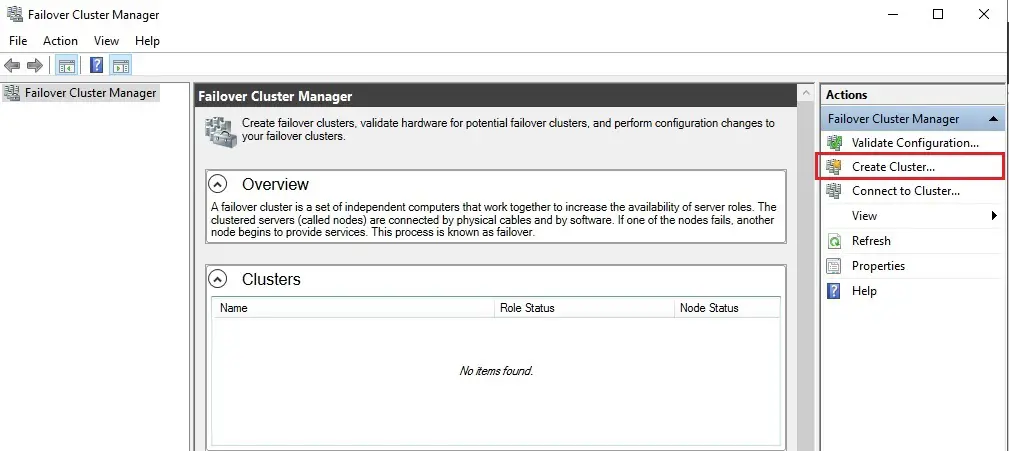
37- Click Next.
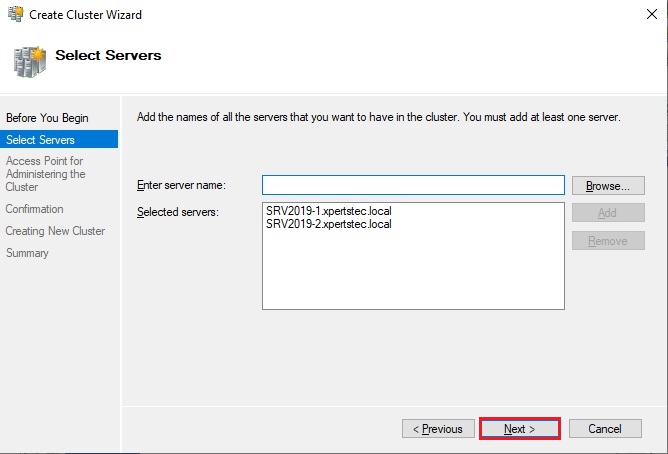
38- Click the browse button.

39- Type both the node names, click check names and click ok.

40- Both the servers nodes selected, click next.
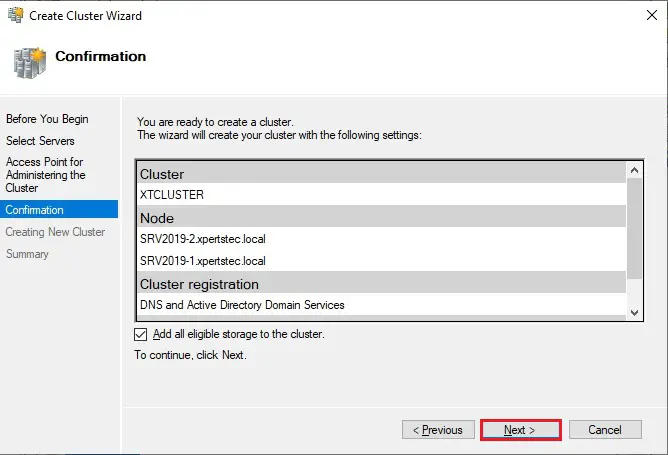
41- Type a Cluster name, select the IP address and click next.

42- As a last step, confirm everything, click next and wait for the cluster to be created.
43- Cluster setup successfully completed and click Finish.
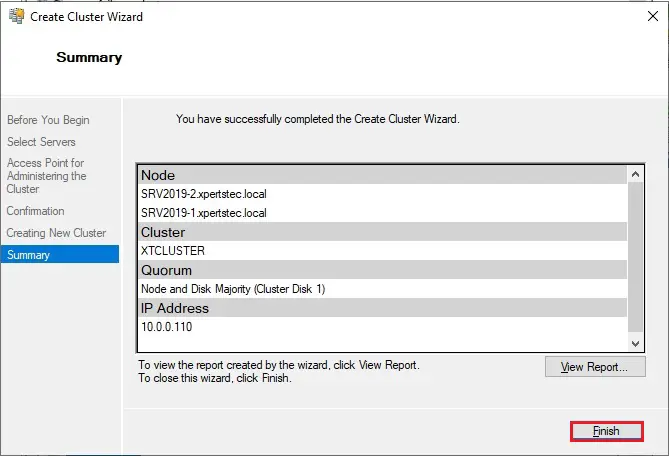
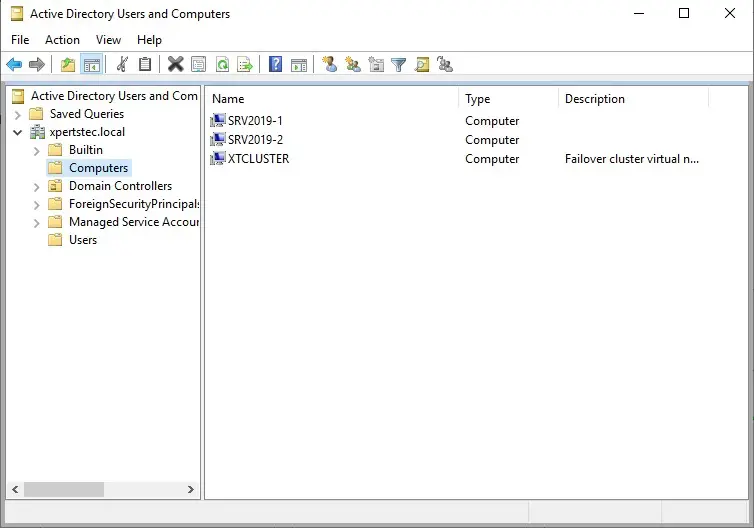
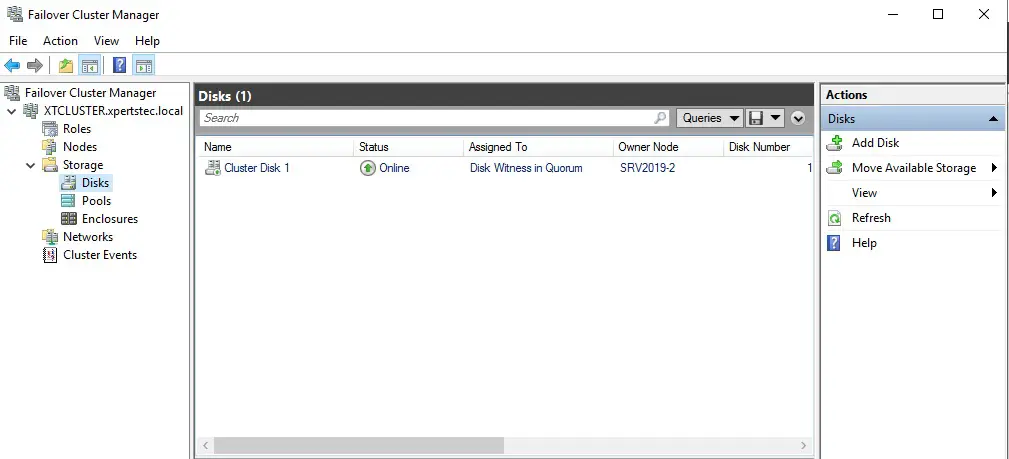
44- The wizard will add the shared disk automatically to the cluster per default. If you did not configure it yet, then it is also possible afterward. As a result, you can see a new Active Directory computer object named XTCLUSTER.
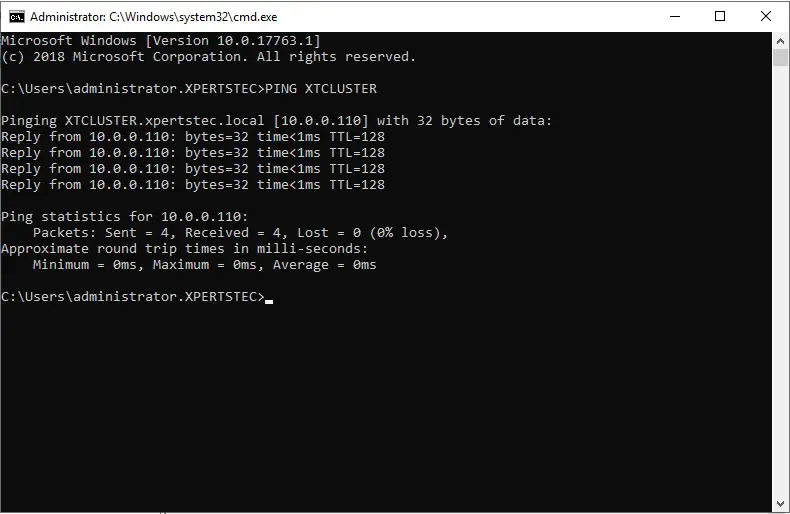
45- You can ping the new computer to check whether it is online (if you allow ping on the Windows firewall).
As an alternative, you’ll create the cluster also with PowerShell. the subsequent command also will add all eligible storage automatically:
New-Cluster -Name XTCLUSTER -Node SRV2019-1, SRV2019-2 -StaticAddress 10.0.0.110
46- Both the Nodes are up now.
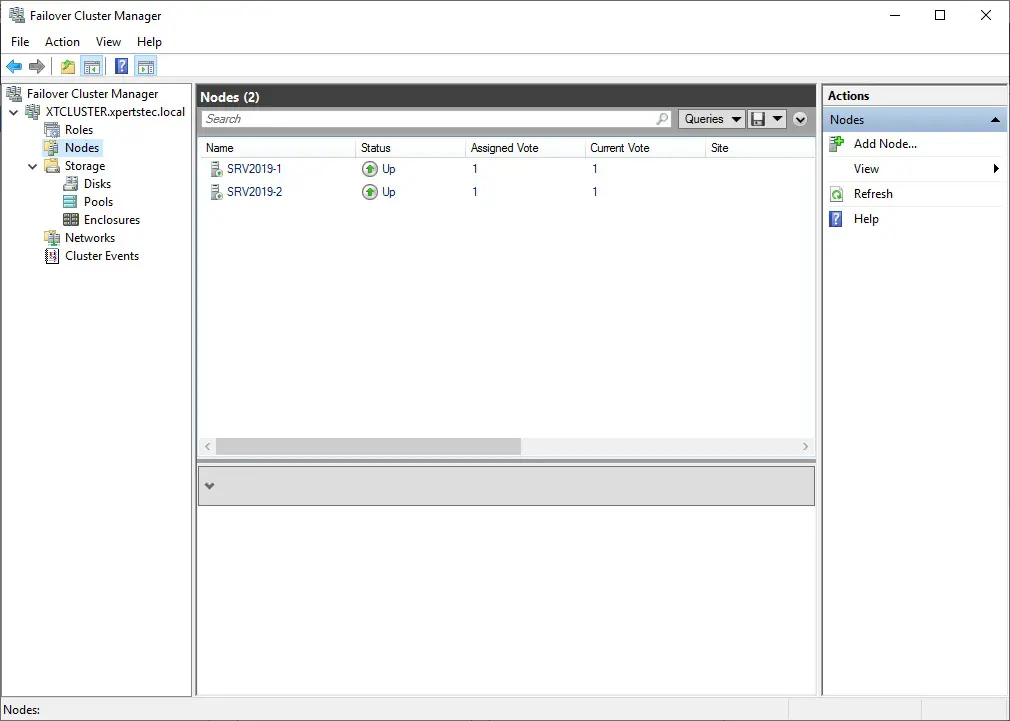
47- You can see the result in the Failover Cluster Manager in the Nodes and Storage under Disks sections.
For more information click here
How to Configure Network Load Balancing In Windows Server 2019.
Jamil Parvezhttps://www.xpertstec.com
Jamil Pervez works as a Network Administrator, based in Kuwait with a Primary focus on Microsoft technologies. Microsoft Certified MCSE, MCTP, MCITP, CCNP, CCIP, CCVP with 20 years of experience in administering Windows Servers, Exchange, VMWare, Veeam B&R, Veritas BackupExec.
Contents
Presentation
The failover clustering feature ensures high availability of a service by using multiple servers (nodes) that can make it work.
Some examples of services that can be used with the Failover Cluster feature:
- Hyper-V
- SQL Server
- DAG Exchange
- …
Prerequisites
- 2 servers minimum having the same hardware and software configuration.
- Nodes must be members of the same Active Directory domain.
- A SAN type of storage which presents to all the servers the same LUNs.
- A storage type SAN with a volume of 1 to 10 GB that will serve as a quorum.
- Recommended: A network adapter dedicated to the cluster.
Configuration of the control disk (Quorum)
Quorum is a very important element of the Failover Cluster, it has 2 main functions:
- Maintain online cluster maintaining a sufficient number of voters
- Contains a copy of the cluster configuration.
More information on quorum : https://docs.microsoft.com/fr-fr/windows-server/storage/storage-spaces/understand-quorum
The quorum configuration must be done on one of the nodes of the future failover cluster.
1. Present a LUN from 1 to 10GO to all nodes.
2. Open the Disk Manager. Right click on the disk and click on Online 1.
3. Right-click on the disk again and click Initialize Disk 1 .

4. Click OK 1 .
Right click on the disk and click on New Simple Volume. This one must be formatted in NTFS and with the letter Q.
![]()