Microsoft has greeted its Windows users with the new Windows 11 which comes with a ton of new features and also visual UI changes. One such change is the change in its Taskbar. Everything is now centered, along with no more Cortana logo and the Start menu logo is also changed from Windows 10 logo to the new Windows 11 one.
But there is always a section to which the new changes don’t suit and the same also applies to the new Windows 11 taskbar. There were users who were missing the old Windows 10 style Taskbar and hence they used Explorer Patched to get back the Taskbar from the previous version of Windows.
Installing the Explorer Patcher is really simple and straightforward. Simply download the exe file and run it. That’s it, you will now be able to use the Windows 10 Taskbar on your new Windows 11.
But for some reason, if you want to remove or uninstall the Explorer Patcher from your PC in order to get back the Windows 11 Taskbar, it can be tricky. As the Explorer Patcher doesn’t have an installation or uninstallation UI and works directly, it may confuse some users.
If you are one of those Explorer Patcher users who want to get rid of it from your Windows 11 PC, here are the 3 different ways to uninstall the Explorer Patcher.
Uninstalling the Explorer Patcher is not a big deal. In fact, you can uninstall it very easily by following any of the below-mentioned methods.
1. Uninstall Explorer Patcher Using Control Panel
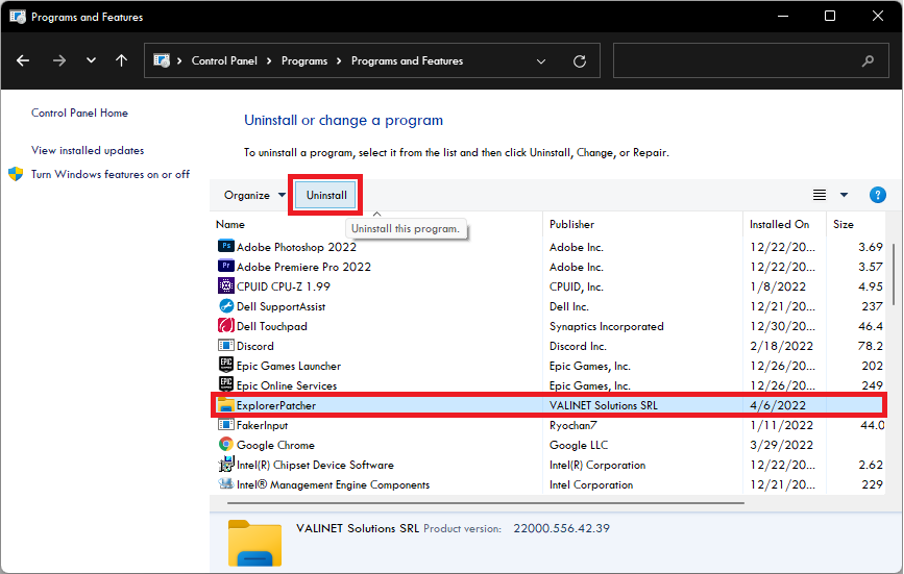
The Explorer Patcher can be uninstalled like any other installed application, by going into the Apps and features section of your Control Panel.
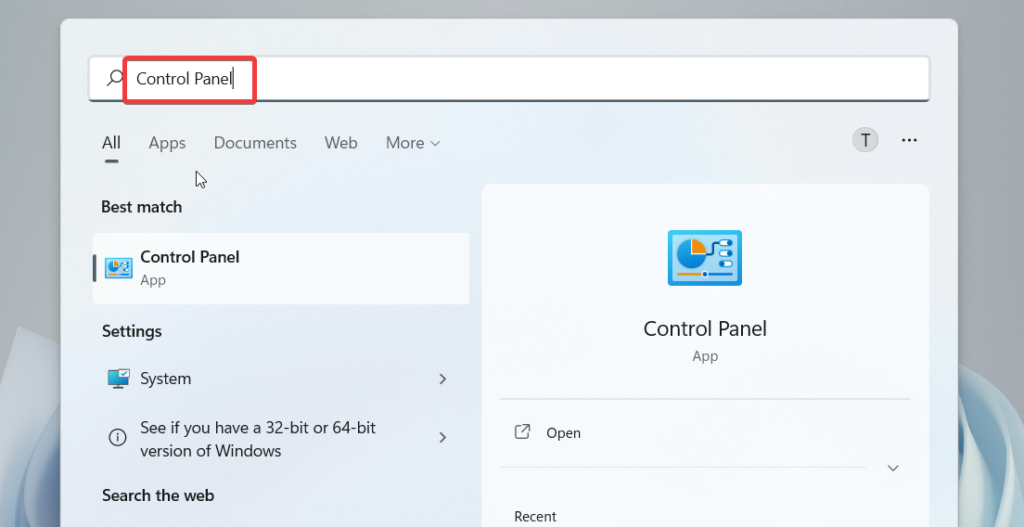
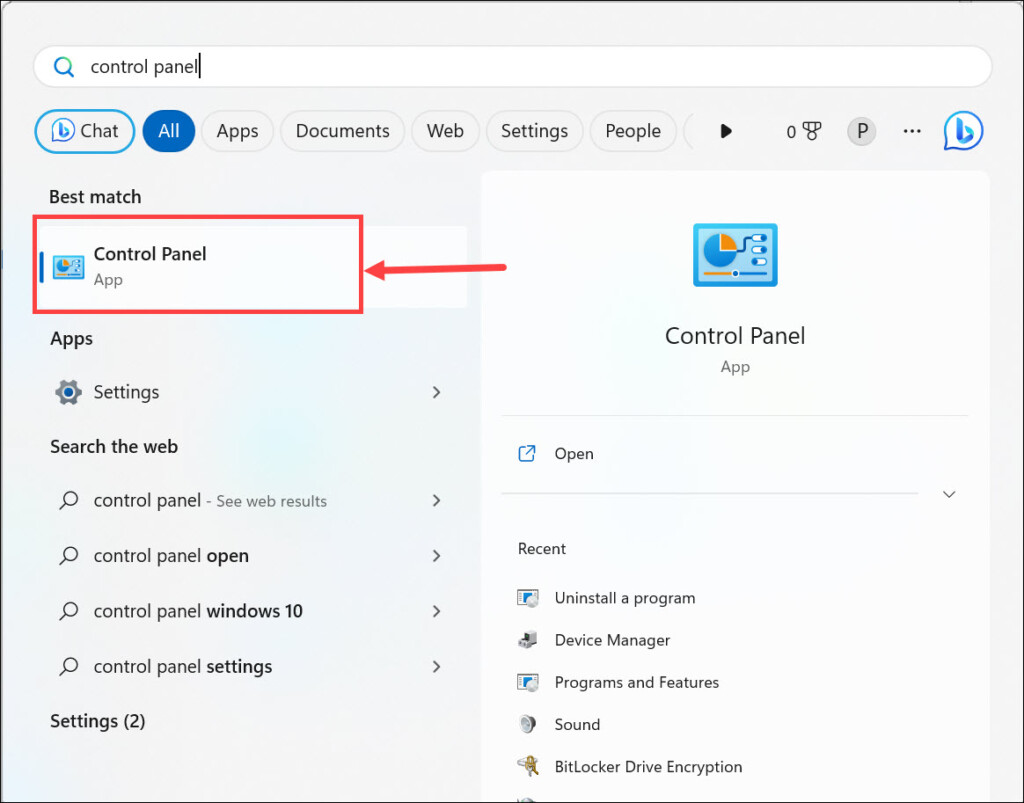
1. Search and open the Control Panel on your PC.

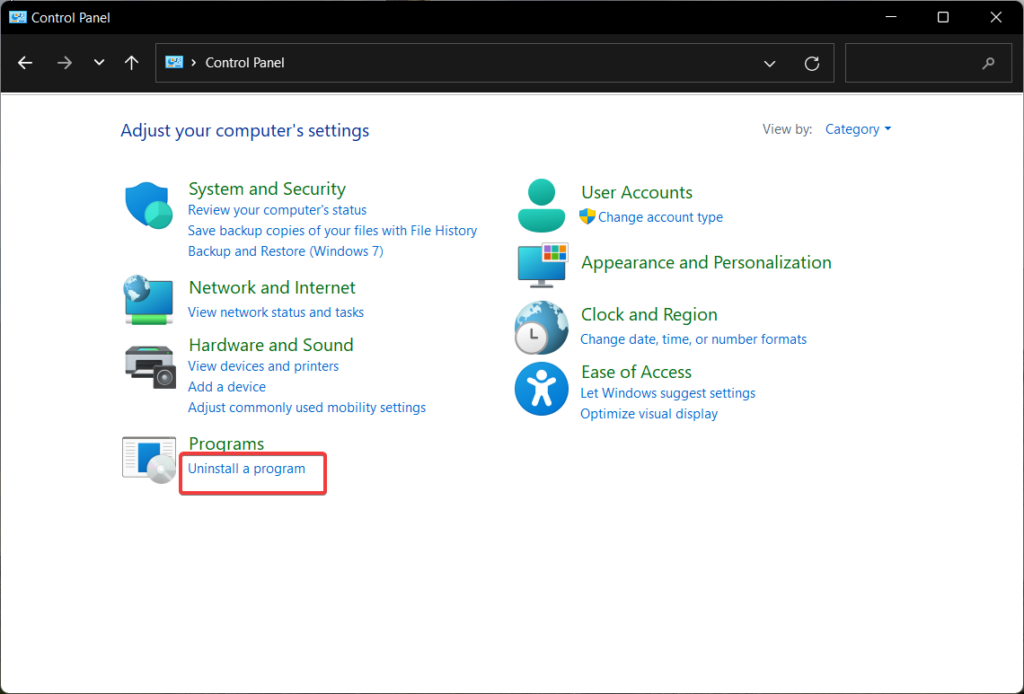
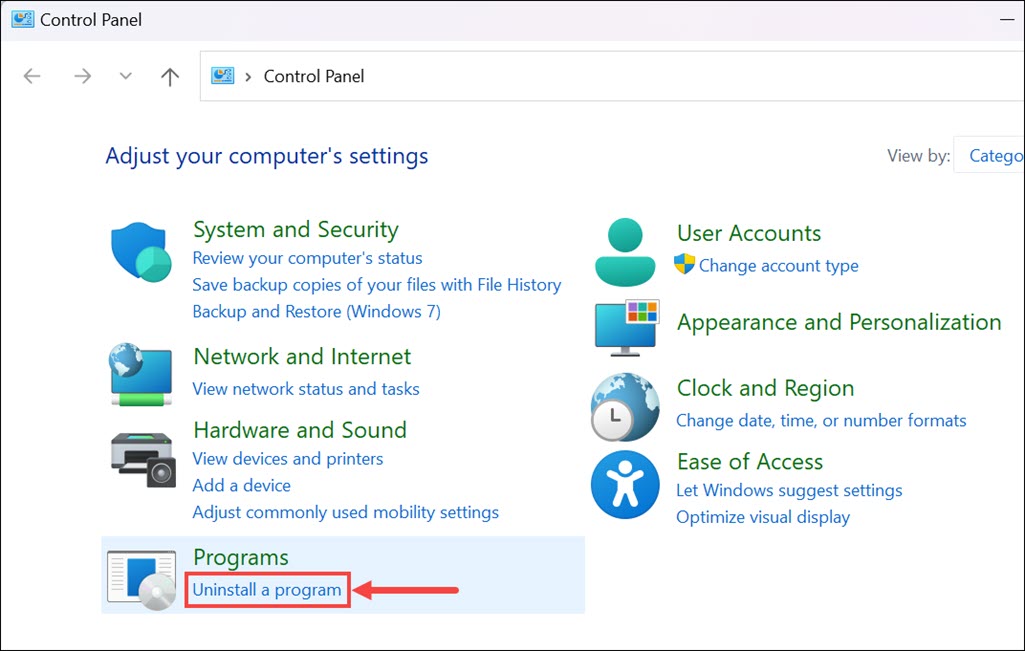
2. Switch the View by option to Category and click on the Uninstall a program option.

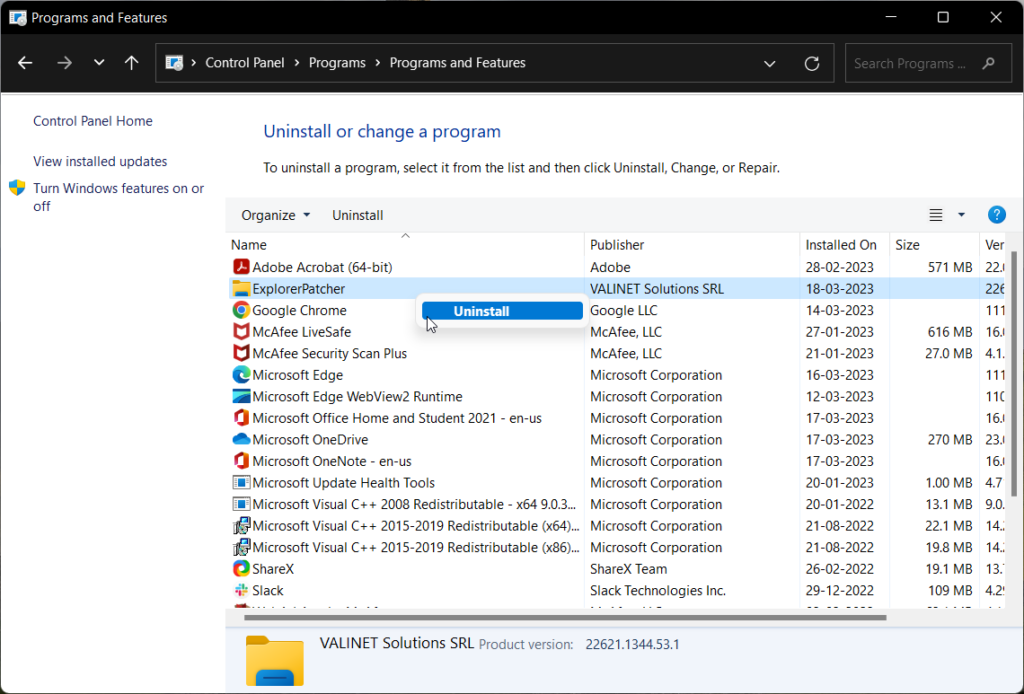
3. From the list of installed apps, select Explorer Patcher and click on Unisntall.

4. Click on Yes on the User Account Control windows to confirm the uninstallation.
This will uninstall the Explorer Patcher from your PC and your Taskbar will get back to the default one.
2. Uninstall Explorer Patcher Using Command Prompt
If you were not able to uninstall the Explorer Patcher from the Control Panel for some reason, then you can use the Windows Command Prompt to do so.
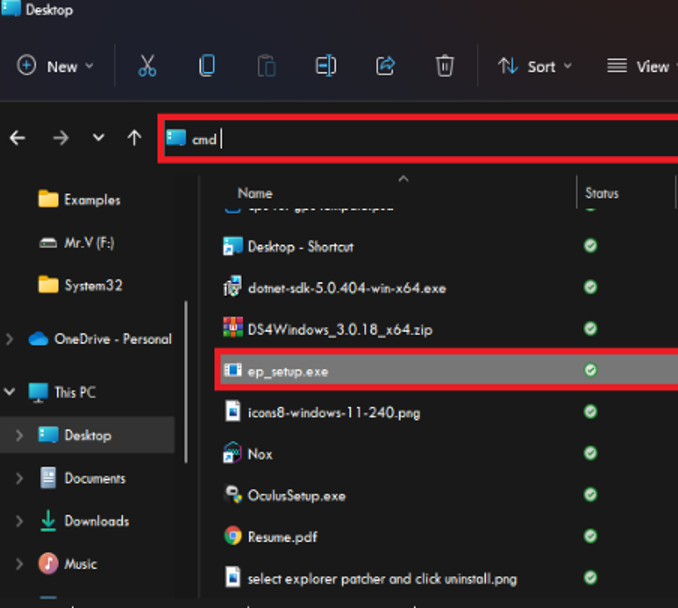
1. Open File Explorer on your PC. You can press Win + E on your keyboard to open it directly.
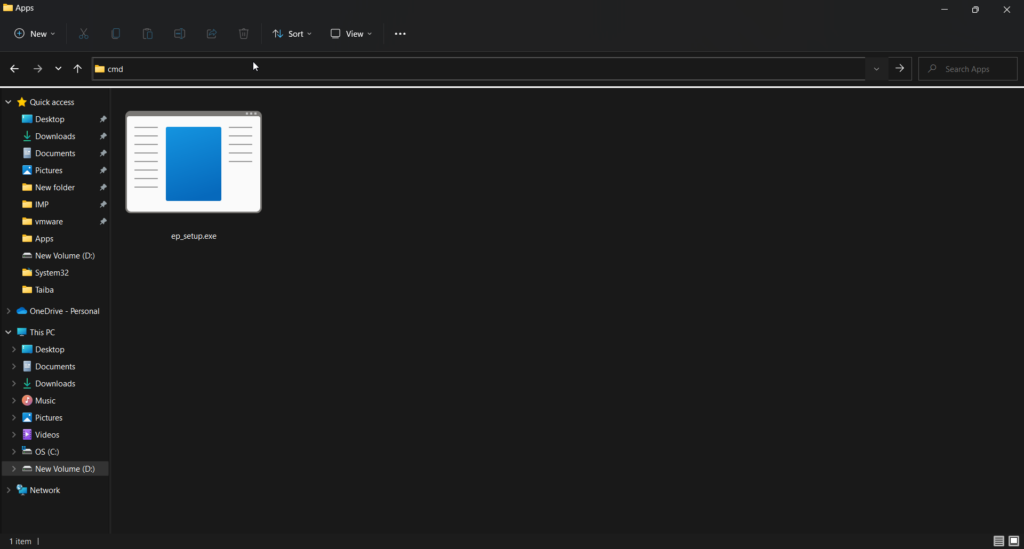
2. Now, navigate to the location where you have downloaded the Explorer Patcher exe file.
3. Enter CMD into the address bar of Windows Explorer and hit Enter. This will open a command prompt window in that location.

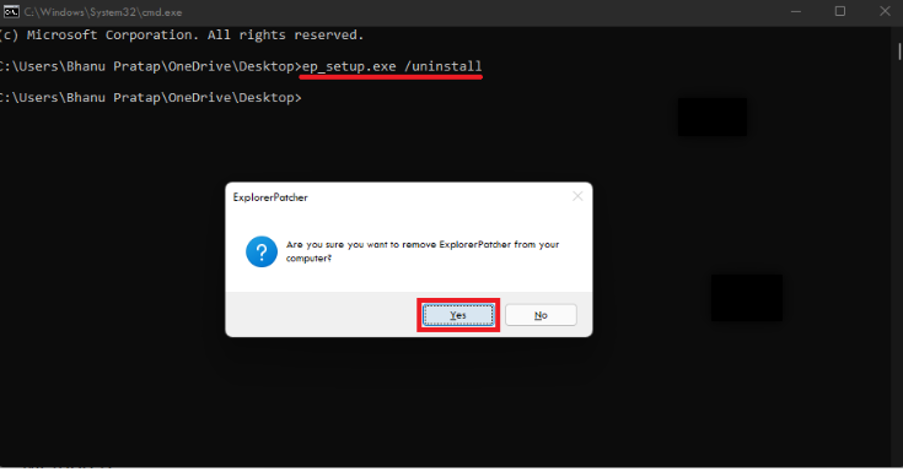
4. Now execute the following command:
ep_setup.exe /uninstall
5. Click on Yes to confirm the uninstallation.

Once done, the Explorer Patcher will no more be in the active state of your PC and the Taskbar will also get normal.
3. Uninstall Explorer Patcher by renaming the exe file
Lastly, there is one more method that you can use to uninstall the Explorer Patcher from your PC. This method includes the renaming of the downloaded Explorer Patcher exe file and running it.
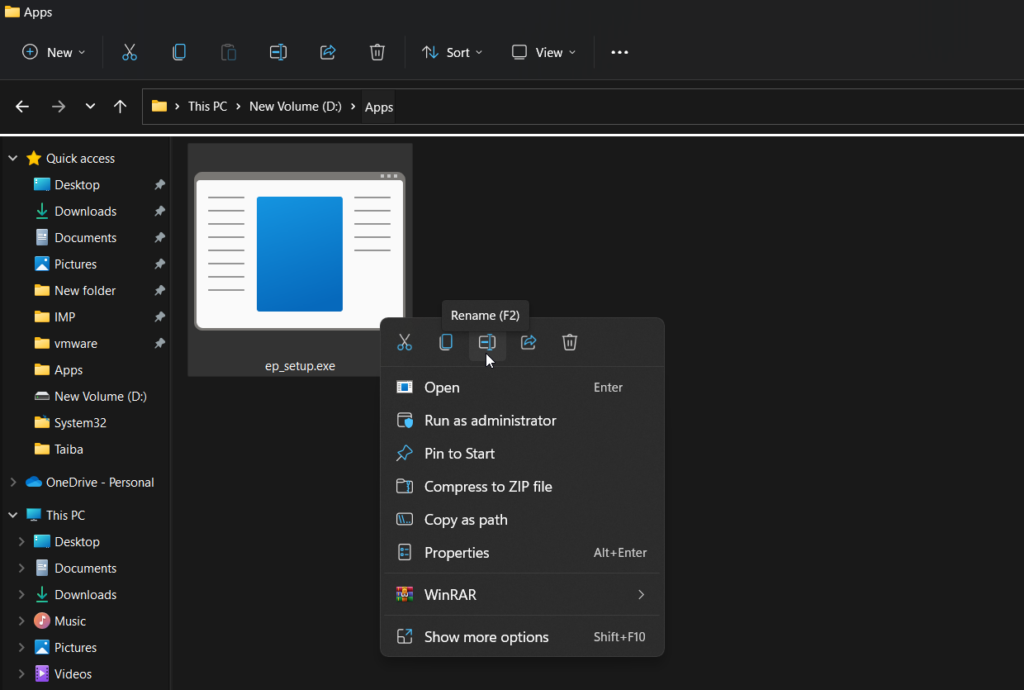
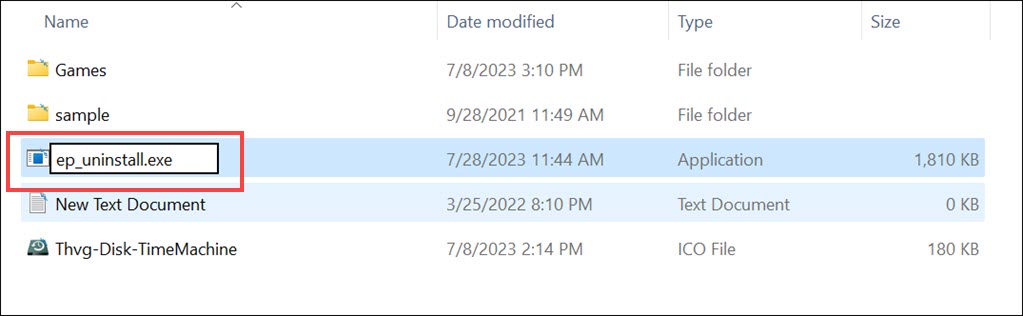
1. Navigate to the downloaded Explorer Patcher exe file and right-click on it.
2. Select the rename option and change its name to the following:
ep_uninstall.exe

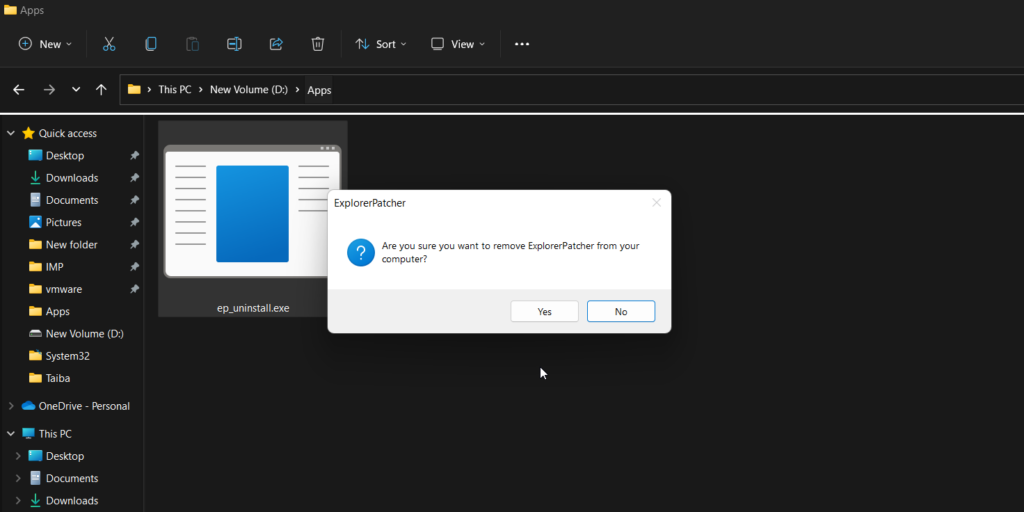
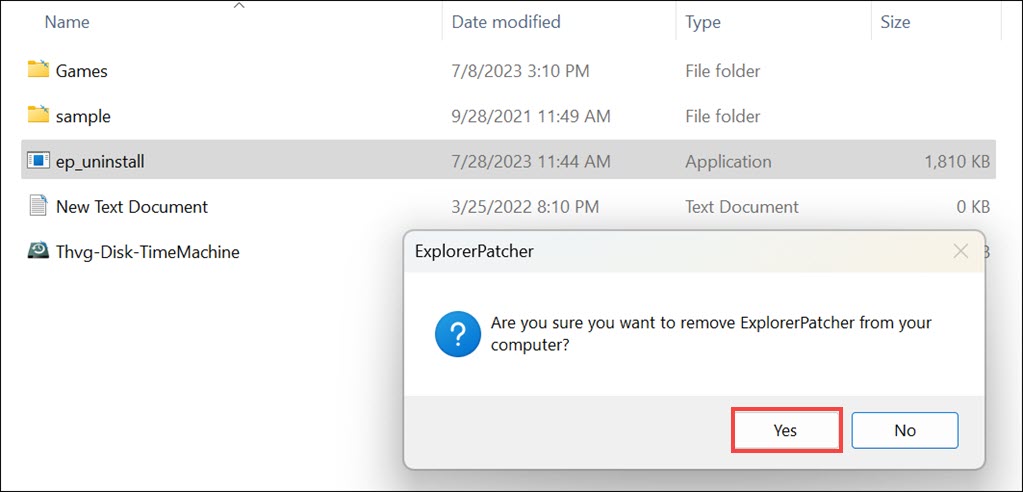
3. Once the file is renamed, run it by double-clicking on it.
4. Click on Yes to confirm the uninstallation.

That’s it. This will remove the Explorer Patcher from your PC.
Frequently Asked Questions (FAQs)
How do I Uninstall Explorer patcher?
To uninstall Explorer patcher on Windows, go to the Control Panel, select Programs and Features, find Explorer patcher in the list of installed programs, click Uninstall, follow the prompts, and restart your computer. Additionally, you can also uninstall it by using the command prompt or renaming the Explorer Patcher exe file as described above in this fixing guide.
Is Explorer patcher safe?
It’s hard to determine if Explorer patcher is safe because it depends on where it’s downloaded from and its specific type. Patching Explorer may cause harm to your computer such as system instability, security issues, or even malware infection. To minimize risks, download Explorer patchers only from trustworthy sources and keep your software updated with the latest security patches.
What does Explorer patcher do?
Explorer patcher modifies or updates system files for the Windows Explorer user interface. It can add new features, customize the appearance of the interface, or fix bugs and vulnerabilities. However, patching Explorer can be risky, causing system instability, security issues, or malware infection. Use Explorer patchers with caution and only download from trustworthy sources.
Bottom Line
So these were the 3 different ways by which you can uninstall the Explorer Patcher from your Windows 11 PC. The uninstallation is, however, nowhere tricky and can be done easily by using the Apps & features section of your Control Panel.
But for some reason, if this feature doesn’t work, you can use the other two methods to get the job done.
Also Read:
- Fix Invalid Value for Registry (JPG, JPEG, PNG, MP4, MP3) on Windows
- WaasMedicAgent.exe Explained & How to Fix its High Disk/CPU Usage
- How to Run Device Manager as Admin [CMD, PowerShell & Run]
- Fix DRIVER_IRQL_NOT_LESS_OR_EQUAL on Windows
- Fix nvlddmkm.sys failed BSOD error on Windows 11/10
You can use one of these three methods to uninstall ExplorerPatcher:
-Use «Programs and Features» in Control Panel, or «Apps and features» in the Settings app or
-Run ep_setup.exe /uninstall or
-Rename ep_setup.exe to ep_uninstall.exe and run that.
8 replies
![]()
although you can safely rename dxgi.dll in C:\Windows directory, ExplorerPatcher installer modifies somewhere else, so running uninstaller (for example, "%ProgramFiles%\ExplorerPatcher\ep_setup.exe" /uninstall) is also necessary.
![]()
Thanks for the help! I have uninstalled it and all I needed to do was install ep_setup.exe and open programs and features!
![]()
Good! Mission accomplished!
![]()
I had once renamed ep_setup.exe to explorerpatcher_setup.exe for my convenience. Now I renamed it to ep_uninstall.exe and ran it. The uninstall dialogue came up fine, but my Explorer hasn’t restarted, and bringing up Task Manager shows that the uninstaller is still running. What can I do?
![]()
Explorer Patcher is a third-party software allowing users to customize the appearance and functionality of Windows Explorer, the official file management tool of Windows. Explorer Patcher modifies system files to enable users to change things, like the color scheme, icons, and other user interface aspects.
However, Explorer patcher is known to cause instability or compatibility issues with other software or updates to the operating system. It also restricts the users from retrieving files and folders. Explorer Patcher is also known to cause abrupt crashing of Windows Explorer and prevent it from performing tasks.
Therefore, it is generally recommended to uninstall Explorer Patcher if you no longer need it. This blog post will cover three different methods to uninstall Explorer Patcher from your Windows 11 system. We will also provide step-by-step instructions for each method so that you can choose the best option.
Users have always questioned the security aspects of File Explorer. It is not a virus but causes different issues on your computer. Follow any of the three methods to uninstall Explorer Patcher from your computer:
1. Using Control Panel
Like any other installed program, the Explorer Patcher can be uninstalled in the Control Panel’s Programs and Features section. Follow the step-by-step process to successfully uninstall Explorer Patcher using Control Panel:
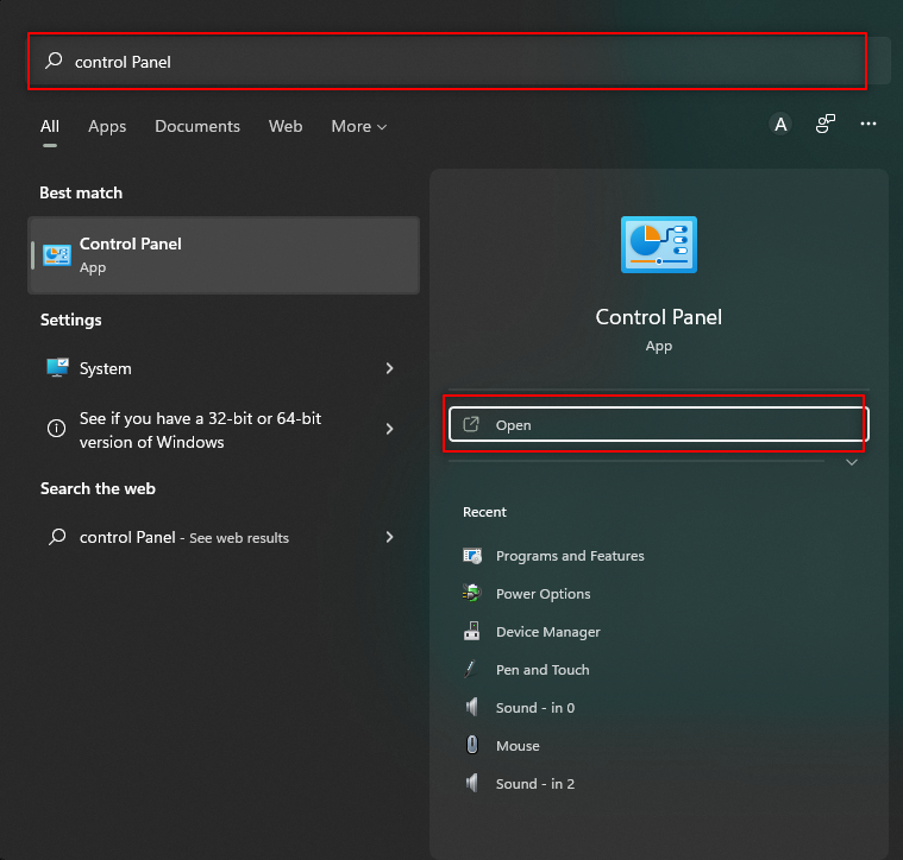
1. Press the Windows key to bring up the Start menu, type Control Panel and choose the relevant search result.
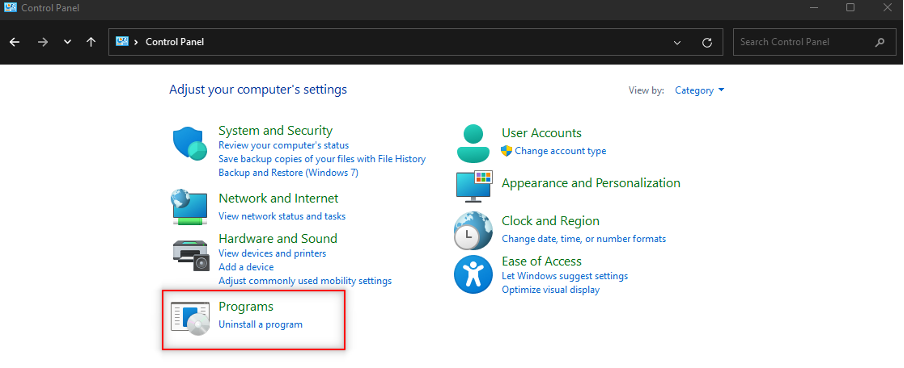
2. Next, switch the View by selecting Category and then click Uninstall a Software option.
3. Look for the Explorer Patcher program in the list of installed applications, right-click it, and choose Uninstall option.
4. Click the Yes button in the User Action Control prompt to confirm the uninstallation of the Explorer Patcher.
Your taskbar will return to its original default settings as in the prior Windows version signifying that the Explorer Patcher had been removed from your computer.
2. Using Command Prompt
If you prefer Command Line Interface (CUI) over Graphical User Interface (GUI), you will be delighted to know that it is possible to uninstall Explorer Patcher from Windows 11 via the Windows Command Prompt. The method is straightforward and is described below.
1. Launch the File Explorer app using the Windows + E shortcut combination.
2. After that, head to the directory where the Explorer Patcher installation file (ep.setup.exe) is located.
3. Now type cmd in the address bar of File Explorer and press the Enter key.
4. As soon as you will hit Enter, Command Prompt will appear on the screen. Type or copy-paste the following command and press Enter key to execute it.
ep_setup.exe/uninstall
5. A confirmation pop-up to uninstall Explorer Patcher will appear on the screen. Press the Yes button to approve the uninstallation.

Viola! Once the Explorer Patcher has been removed from your computer, and the Taskbar and File Explorer have attained the original look and feel of Windows 11.
3. By Renaming the Executable File
Here’s a workaround for uninstalling Explorer Patcher from your Windows 11 PC if the above two methods do not work. This approach requires that you rename the downloaded Explorer Patcher.exe file and then execute it. Follow the instructions below to uninstall Explorer Patcher from Windows 11 with a little trick:
1. Navigate to the location where the .exe file of the File Explorer that you downloaded is located.

2. Right-click the executable file and choose the rename option. Remember, you have to rename the file as ep_uninstall.exe.
3. Once done, double-click the newly renamed file to execute it. A pop-up saying Are you sure you want to remove ExplorerPatcher from your computer will appear on the screen. Click Yes to confirm the uninstallation.
How to Remove Explorer Patcher Settings From Windows 11?
Several users have reported that the three uninstallation methods of Explorer Patcher are unable to delete the Explorer Patcher settings. This can create problems later on by interfering with the File Explorer functionality. We need to modify the registry using the registry editor to get rid of the settings after the successful uninstallation of Explorer Patcher from Windows 11.
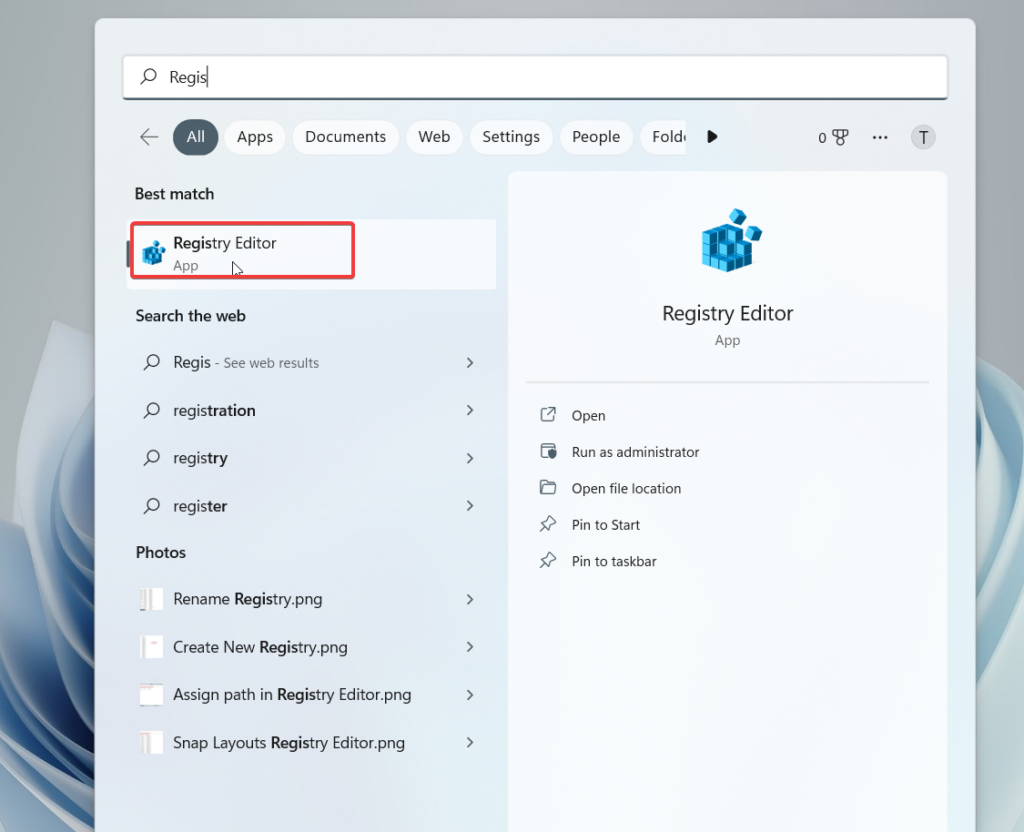
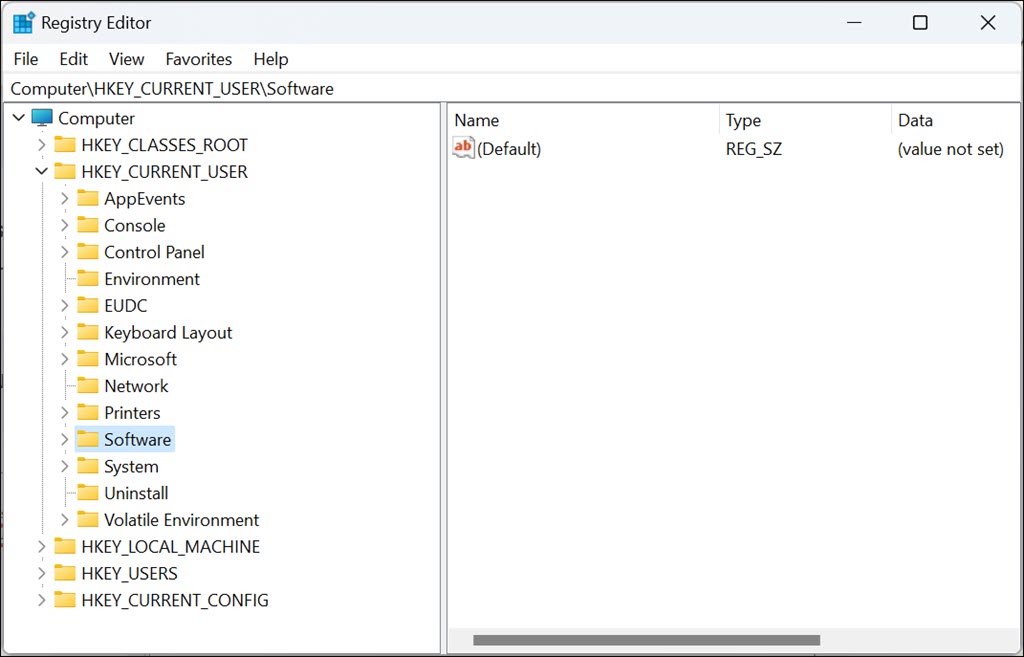
1. Press the Windows key, type Registry Editor in the Search bar, and choose the relevant search result.
2. In the Registry Editor window, type or paste the following location to access the Explorer Patcher keys.
HKEY_CURRENT_USER\Software\ExplorerPatcher 
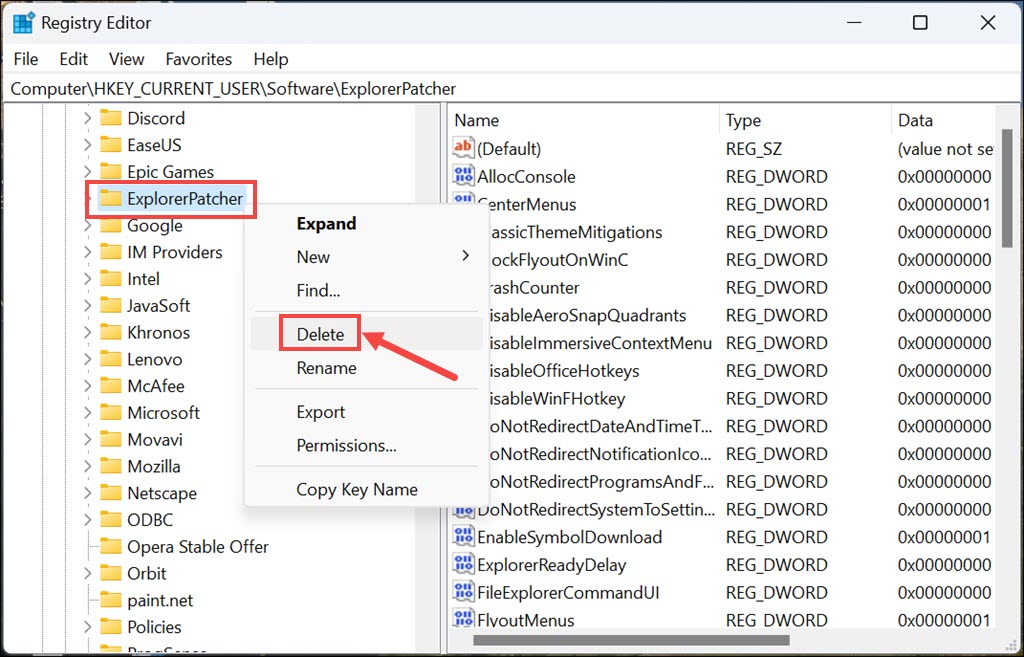
3. Here, right-click the Explorer Patcher key on the left panel and choose the Delete option from the context menu.
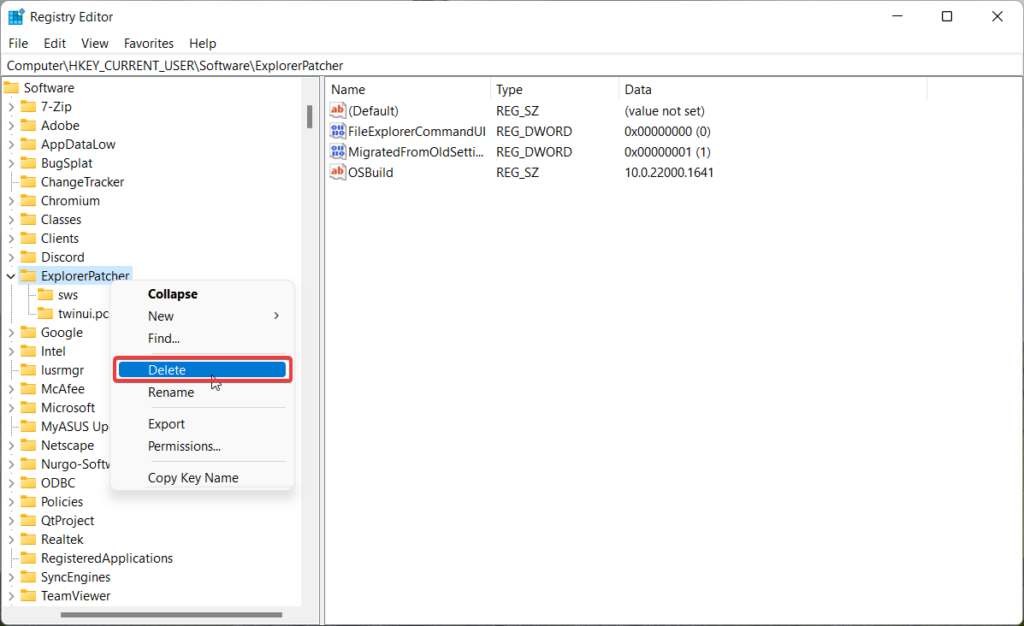
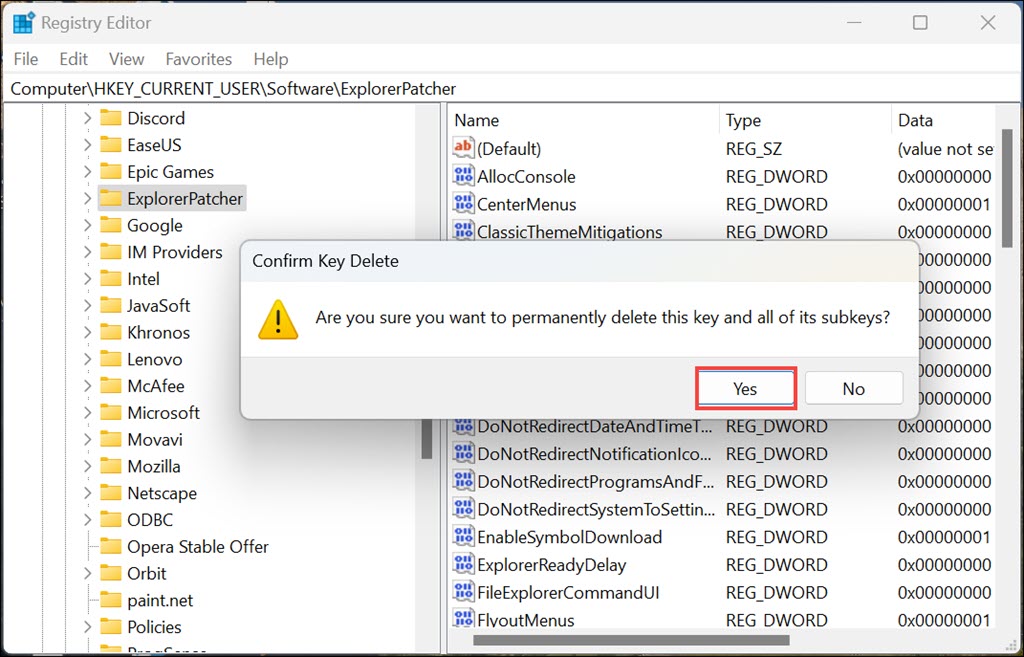
4. Confirm the deletion of the registry key and sub-keys by pressing the Yes button.

5. Access the next Explorer Patcher key at the following location.
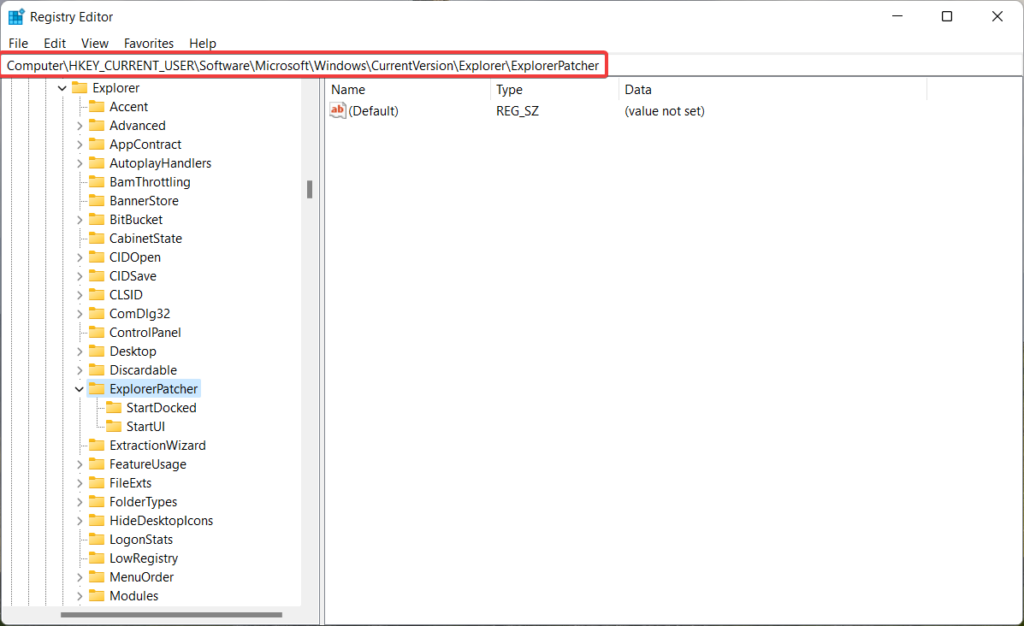
HKEY_CURRENT_USER\Software\Microsoft\Windows\CurrentVersion\Explorer\ExplorerPatcher6. Right-click the Explorer Patcher key in the left pane and click Delete.
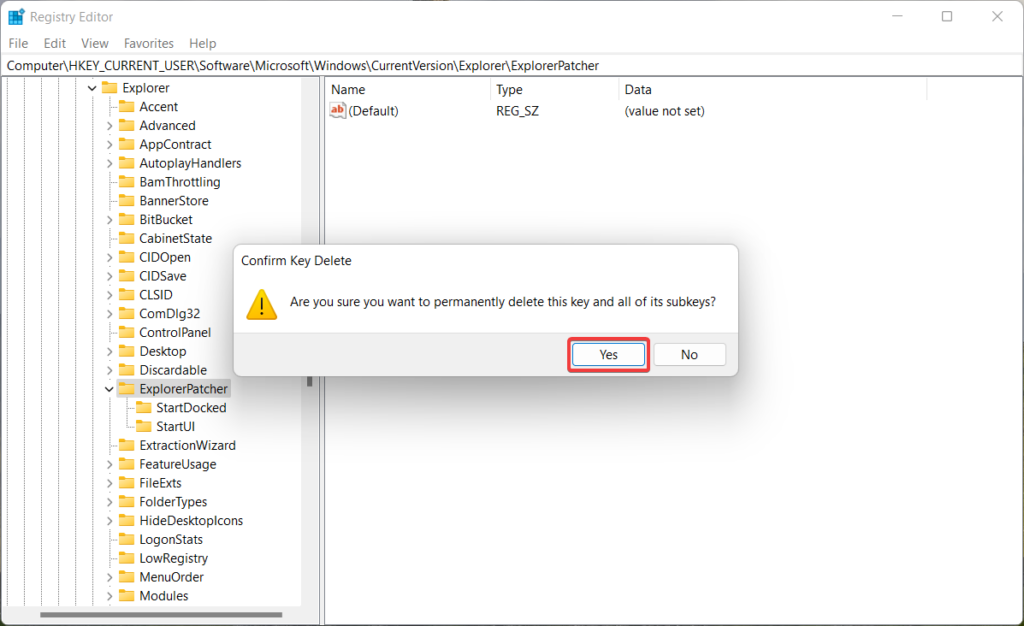
7. Press the Yes button once again to confirm the action.

That’s it! The Explorer Patcher settings have been successfully deleted from your Windows 11 PC.
Conclusion
These are the procedures for uninstalling Explorer Patcher from Windows 11 if they are causing issues on your Windows PC. You can also learn how to remove the Explorer Patcher settings after uninstalling it from Windows 11 PC. If you have any other queries, reach out to us in the comments section.
What is Explorer Patcher?
Explorer Patcher is an application that aims to improve our work environment in Windows 11 and make it more productive by restoring the old Microsoft operating system’s capabilities. The Windows Explorer Patcher will assist us in restoring the Windows taskbar and Windows 10 File Explorer if we need it. To accomplish this, place the a.DLL file in C:/Windows, and all of the files will be downloaded to our PC.
The old Windows 10 taskbar, the option to hide the search bar, the All Apps list, and the restoration of the classic power user menu are among the new features brought to Microsoft’s new operating system. It also lets us disable the new Windows context menu and the File Explorer command bar, as well as pick between the Windows 10 and 11 key shortcuts for switching between windows.
ExplorerPatcher’s security has also been questioned by users. It is not a virus, and installing it is absolutely risk-free. If you want to uninstall it from your computer, simply follow the instructions below:
1. Using Control Panel
The Explorer Patcher can be uninstalled in the Apps and Features part of the Control Panel, just like any other installed application.
Step 1: On your computer, search for “Control Panel” and open it.
Step 2: Then, change the View by choice to Category and select Uninstall a Program.
Step 3: Then, select Explorer Patcher from the list of installed apps and click Uninstall.
Step 4: To finalize the uninstallation, select Yes in the User Account Control Panel.
The Explorer Patcher will be uninstalled from your computer, and your taskbar will revert to its default state as it was in the previous Windows version.
2. Using Command Prompt
In case you were unable to uninstall Explorer Patcher on Windows 11 through the Control Panel for some reason, you can also try to do so using the Windows Command Prompt. Follow the steps mentioned below:
Step 1: Open the File Explorer program on your computer. To open it, press Win + E on your keyboard.
Step 2: Then, go to the folder where the Explorer Patcher exe file was downloaded.
Step 3: In the address bar of Windows Explorer, type cmd and press Enter. Then, the Command Prompt window will open.
Step 4: After that, run the following command:
Step 5: Finally, select “Yes” to confirm the uninstallation.
Viola! You have finally uninstalled the Explorer Patcher from your computer, and the Taskbar will return to normal.
3. By Renaming The exe File
Here comes another way to remove Explorer Patcher from your computer. This method entails renaming and running the downloaded Explorer Patcher exe file. To uninstall Explorer Patcher on Windows 11, follow the steps outlined below:
Step 1: To begin with, go to the downloaded Explorer Patcher exe file and then, right-click on it.
Step 2: Then, change the name of the file using the rename option to ep_uninstall.exe.
Step 3: Then, after you’ve renamed the file, double-click it to open it.
Step 4: Finally, to confirm the uninstallation, select Yes.
That is all there is to it. This will uninstall Explorer Patcher on Windows 11.
Final Words
These are the methods for uninstalling the Explorer Patcher from your Windows 11 computer. The uninstalling procedure is straightforward and can be completed through the Apps & Features section of your Control Panel in Windows 11. However, if this method does not work out for some reason, you can definitely try the other two techniques to complete the task.

ExplorerPatcher is a third-party utility that provides users with additional customization options for the Windows 11 user interface. While this tool can be beneficial for personalizing the Windows experience, there may be situations where users want to uninstall it.
Uninstalling ExplorerPatcher might be necessary if users encounter compatibility issues, system instability, or simply decide to revert to the original Windows 11 settings. In this comprehensive guide, we will explore the reasons to uninstall ExplorerPatcher, address concerns about its safety, and provide step-by-step instructions for uninstalling it from Windows 11 using different methods.
Is ExplorerPatcher a Virus?
Before we proceed to the uninstallation methods, it’s essential to address concerns about the safety of ExplorerPatcher. Many users might wonder whether ExplorerPatcher is a virus or if it poses any risks to their Windows 11 system.
The answer is no; ExplorerPatcher is not a virus. It is a legitimate third-party utility developed by enthusiasts to enhance the customization options available for the Windows 11 user interface. The program itself does not contain any malicious code or harmful components. However, as with any third-party software, there may be instances where modified or repackaged versions of ExplorerPatcher are distributed through unauthorized channels.
To ensure the safety of your system, always download ExplorerPatcher from trusted sources, such as the official developer’s page or reputable software repositories.
Now, let’s explore the methods to uninstall ExplorerPatcher from Windows 11.
How to Uninstall ExplorerPatcher in Windows 11
If you decide to uninstall ExplorerPatcher from your Windows 11 system, there are several methods you can use. Below, we will explain each method in detail, providing step-by-step instructions to guide you through the uninstallation process.
1. From Windows 11 App Settings
Uninstalling applications through Windows 11 App Settings is one of the most straightforward methods. Here’s how to do it:
1. Click the “Start” button in the taskbar, and then click on the gear-shaped icon to open Windows 11 Settings.
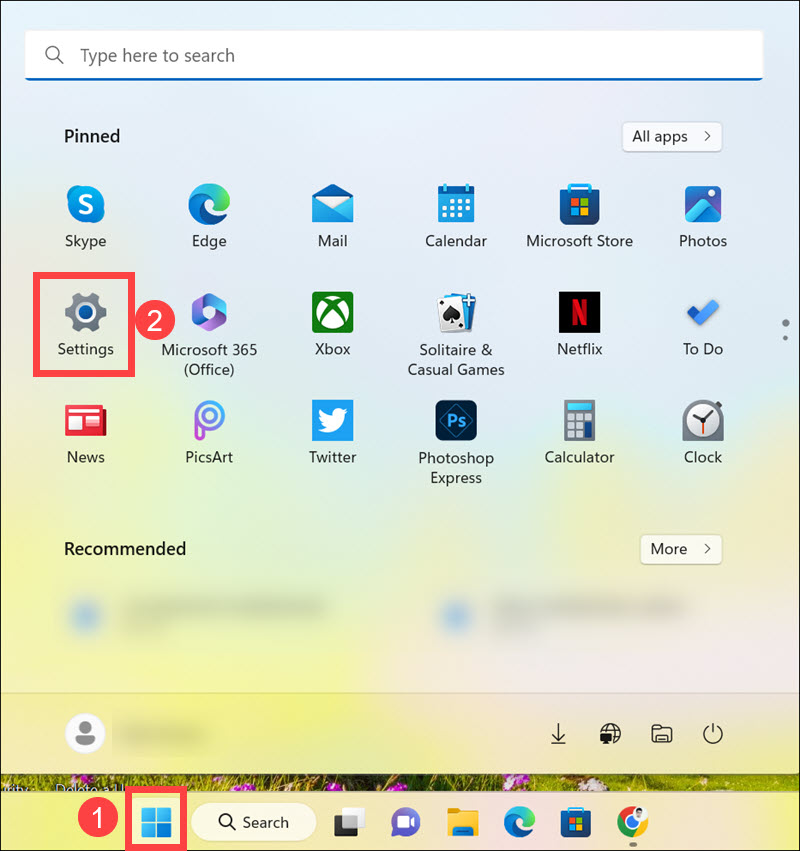
2. In the Windows Settings window, switch to the Apps section on the left-hand side menu and select Installed apps on the right.

3. Under the “Installed apps” section, you will see a list of installed applications. Scroll through the list to find ExplorerPatcher. You can also use the search box.
4. Next to ExplorerPatcher, click the three dots and select Uninstall. A Windows will prompt you to confirm the action.
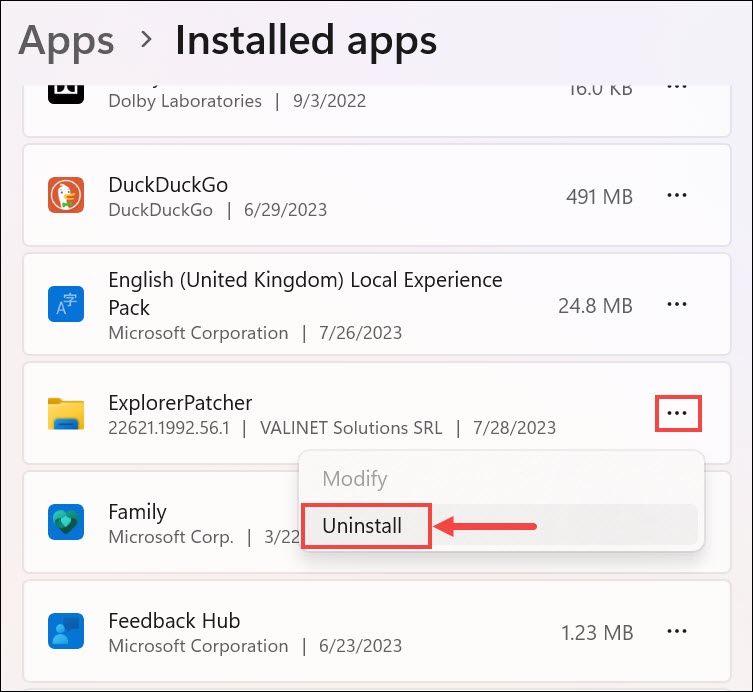
5. A confirmation prompt will appear, asking if you want to uninstall ExplorerPatcher. Click Uninstall to proceed. The uninstallation process will begin, and you may be asked to wait until it’s complete.

6. After the uninstallation process is finished, Windows will prompt you to restart your computer to complete the process.
2. From Control Panel
Windows 11 still provides access to Control Panel, which allows users to manage their installed programs. Here’s how to uninstall ExplorerPatcher using Control Panel:
1. On the Windows 11 search box, type Control Panel and click on its icon to launch it.
2. In the Control Panel window, navigate to the “Programs” section and click Uninstall a program.
3. In the “Uninstall or change a program” window, you’ll see a list of installed programs. Look for ExplorerPatcher in the list.
4. Select ExplorerPatcher from the list and click on the Uninstall button located at the top of the list. Windows will prompt you to confirm the uninstallation.
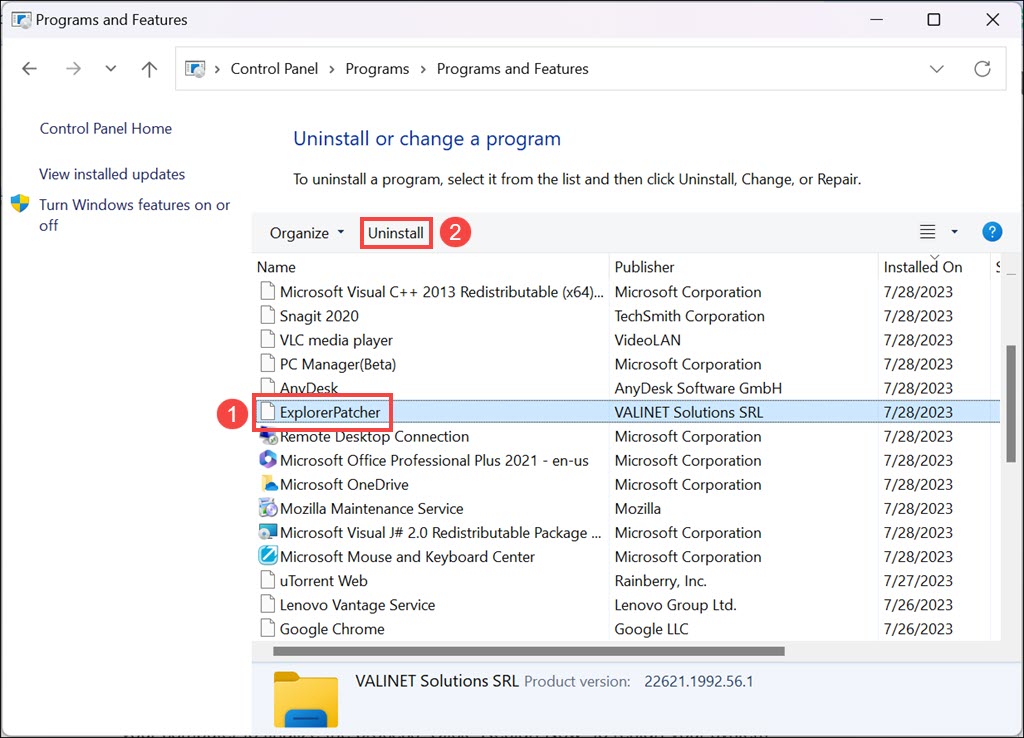
5. A confirmation prompt will appear, asking if you want to uninstall ExplorerPatcher. Click Yes to proceed. The uninstallation process will start, and you may need to wait until it’s complete.
6. After the uninstallation is finished, you will see the confirmation pop-up. Windows may recommend restarting your computer to finalize the process.
7. Click “Restart Now” to restart your system.
3. Using Windows Command Prompt
For users who prefer using Command Prompt, this method allows you to uninstall ExplorerPatcher through a series of commands. Here’s how to do it:
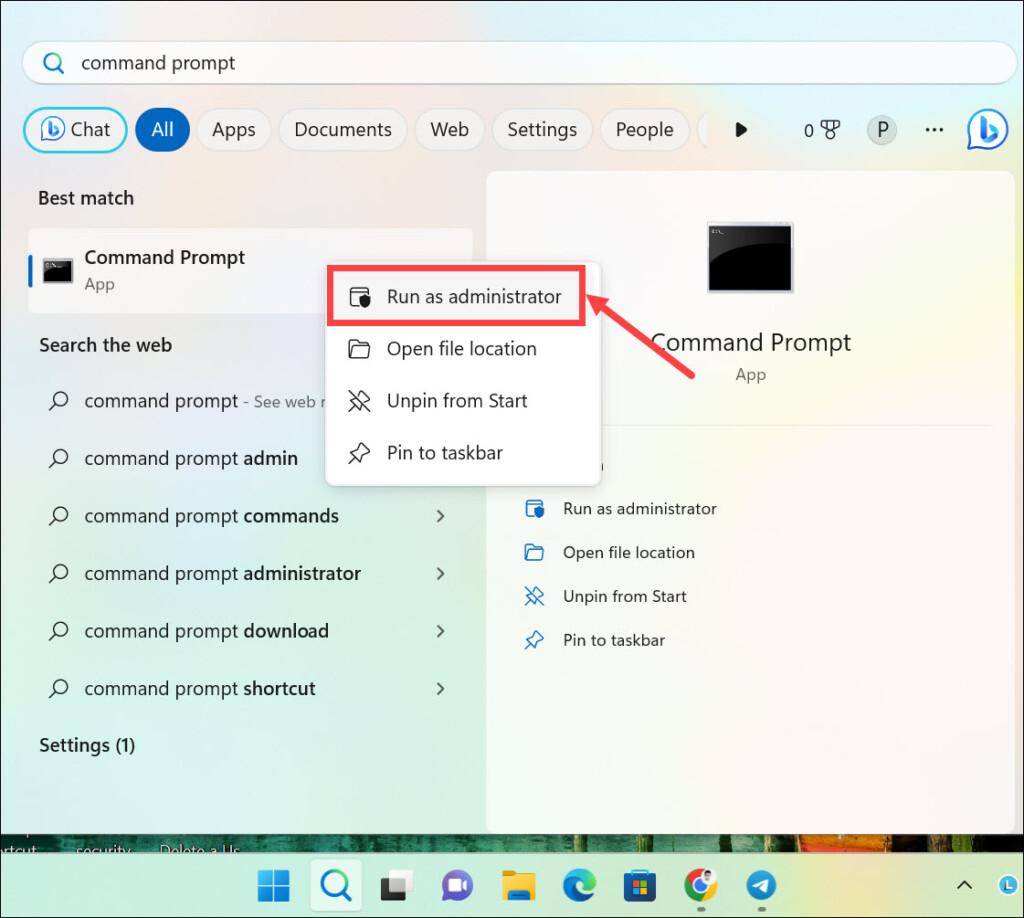
1. On the Windows 11 search box, type Command Prompt, right-click on it, and select Run as Administrator to open Command Prompt with administrator privileges.
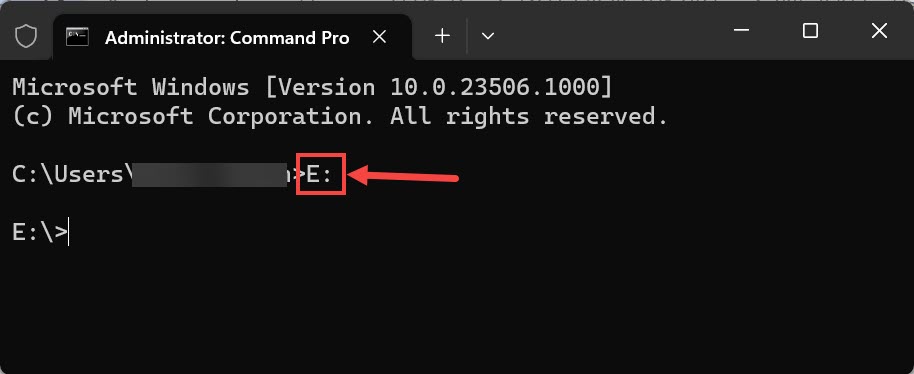
2. In the Command Prompt window, type “DriveLetter:” (replace “DriveLetter:” with the actual drive letter where ExplorerPatcher is installed; for example, here it is E:) and press Enter. This command will change the current directory to the location of ExplorerPatcher.
3. Once you are in the ExplorerPatcher drive, type “cd FolderName” (replace FolderName with the name of the folder where the installer is located; here it is Sample) and press Enter.
4. Now, after reaching the ExplorerPatcher installer location, use the “ep_setup.exe/uninstall” command. This will trigger the uninstallation process for ExplorerPatcher.
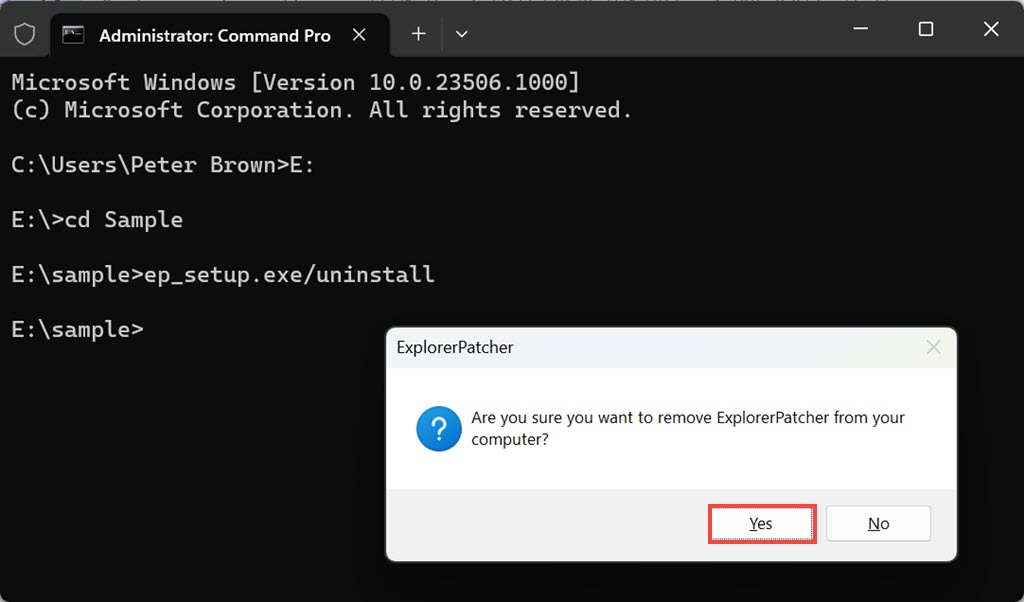
5. The uninstallation process will prompt you to confirm the action or provide additional instructions. Follow any on-screen prompts to complete the uninstallation.
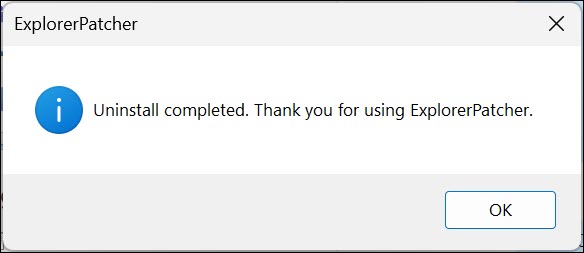
6. You will get the success pop-up.
7. After the uninstallation is complete, you may need to restart your computer to finalize the process. Type “shutdown /r /t 0” in Command Prompt and press Enter to restart your system immediately.
4. Running the Renamed ExplorerPatcher Installer
This method allows users to use the original ExplorerPatcher installer to initiate the uninstallation process. Follow these steps:
1. Find the original ExplorerPatcher installer file that you used to install the utility initially. The installer file usually has a “.exe” extension.
2. Right-click on the installer file and select “Rename.” Change the file name from “ep_setup.exe” to “ep_uninstall.exe“. This renaming step ensures that running the installer will trigger the uninstallation process instead of installation/reinstallation.
3. Double-click on the renamed installer file (“ep_uninstall.exe”). This will initiate the uninstallation process for ExplorerPatcher.
4. The uninstallation process will prompt you to confirm the action. Follow any on-screen prompts to complete the uninstallation.
5. After the uninstallation is complete, Windows may recommend restarting your computer to finalize the process.
Delete ExplorerPatcher Registry Key
After uninstalling ExplorerPatcher, there might still be remnants of the utility left in the Windows Registry. It’s essential to delete the associated registry key to ensure that no traces of ExplorerPatcher are left behind.
Editing the registry should be done with caution, as incorrect changes could cause system issues. Follow these steps to delete the ExplorerPatcher registry key:
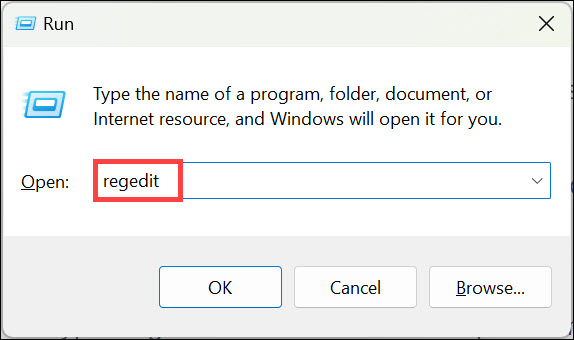
1. Press “Windows + R” on your keyboard to open the Run dialog. Type “regedit” and press Enter to open the Registry Editor.
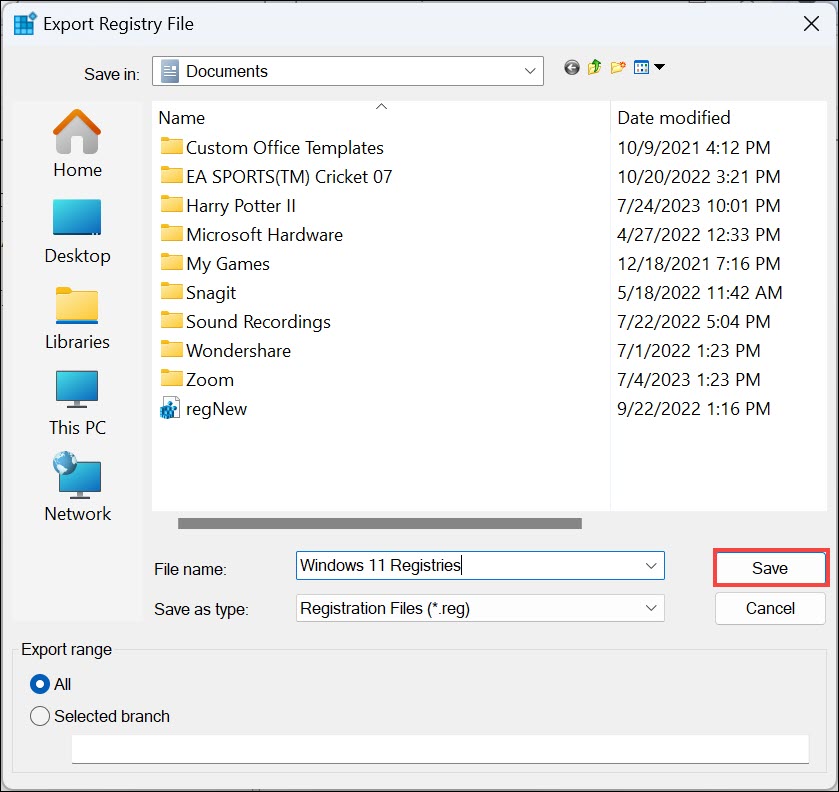
2. Before making any changes, it is advisable to create a backup of the registry. In the Registry Editor, click on File and select Export.

3. Choose a location to save the backup file, name the file, and click Save.
4. Now, in the Registry Editor, navigate to “HKEY_CURRENT_USER\SOFTWARE“.
5. Find the “ExplorerPatcher” key in the list of installed software. Right-click on it and select Delete.
5. A confirmation prompt will appear, asking if you want to delete the ExplorerPatcher registry key. Click Yes to proceed.
6. After deleting the registry key, restart your computer to ensure that any changes take effect.
FAQs
Can uninstalling ExplorerPatcher cause any issues on my Windows 11 system?
Uninstalling ExplorerPatcher itself should not cause any issues. However, if you made extensive customizations using the utility, uninstalling it may revert those changes, and you will need to reapply them manually or through alternative methods. Additionally, ensure that you create a Windows 11 restore point before uninstalling to have a backup option in case any issues arise during the process.
Can I reinstall ExplorerPatcher after uninstalling it?
Yes, after uninstalling ExplorerPatcher, you can reinstall it if you decide to use it again. Simply download the latest version of ExplorerPatcher from a trusted source and follow the installation instructions.
Are there any alternatives to ExplorerPatcher for customizing Windows 11?
Yes, there are several alternatives to ExplorerPatcher for customizing Windows 11. Some popular alternatives include Classic Shell, StartIsBack, and Open-Shell. However, always ensure that you download these utilities from reputable sources to avoid any security risks.
Bottom Line
ExplorerPatcher offers users valuable customization options for their Windows 11 experience, but there are situations where uninstalling the utility might be necessary. The uninstallation process can be easily executed through various methods.
Users can choose between uninstalling from Windows 11 App Settings, Control Panel, using the renamed installer, or via Command Prompt. Additionally, deleting the associated registry key ensures that no remnants of the utility are left in the Windows Registry.
Remember to create a Windows 11 restore point before uninstalling ExplorerPatcher as a precautionary measure. Following the step-by-step instructions provided in this guide, users can confidently uninstall ExplorerPatcher and restore their Windows 11 system to its default settings if they choose to do so.