У вас запускается «система автоматического восстановления при загрузке виндовс».
Только в вашем случае сия тулза не русифицирована. Возможно, у вас и вся система на английском. Но это несущественно.
Для начала, неплохо бы выяснить, что именно у вас там сломалось.
Если при выборе пункта «exit and continue to windows 8.1» после перезагрузки система возвращается в это же состояние, то для исправления ситуации перейдите до пункта «command prompt» и выберите его — откроется командная строка.
В командной строке выполните
| Windows Batch file | ||
|
В случае, если сия команда выпадает с ошибкой без выполнения действия, используйте
| Windows Batch file | ||
|
А после нахождения повреждений образа виндовс используйте
| Windows Batch file | ||
|
Эта команда проверяет/восстанавливает образ виндовс.
Далее, вам придётся снова запустить
| Windows Batch file | ||
|
для восстановления установленной системы из образа.
По завершению процесса вам нужно будет перезагрузиться
| Windows Batch file | ||
|
Continue is available on the main Choose an option screen and says Exit and continue to Windows 10 (or Windows 8.1/8). When you choose Continue, Advanced Startup Options will close, your computer will restart, and Windows 10 or 8 will start in normal mode.
How do I fix restart loop in Windows 10?
Once you have the installation media, insert it into your PC and follow the steps in Automatic Repair to fix the restart loop problem. Alternatively, tap Del or F1 when the system boots to access the UEFI/BIOS and then find Boot Manager. Select the recovery partition as the primary device and reboot your PC.
Why is Windows 10 stuck in endless reboot loop?
It might have fixed the Windows 10 continuous reboot problem. There are reports that Windows 10 conflicts with AMD graphics. If your Windows 10 stuck in restart loop, that might be caused by the outdated driver issues. Just have a try fixing the graphics drivers. You can use a professional driver utility for checking and fixing driver problems.
What causes Windows to go into automatic repair loop?
Normally, by running Automatic Repair, Windows diagnoses the start-up problem (missing or corrupt system files, drivers, registry settings, etc.), fix it and then restart the PC automatically. But when Windows didn’t shut down properly, it gets into automatic repair loop.
Why is my computer stuck in a restart loop?
There are several reasons why your computer is stuck in a restart loop, which is characterized by failure of Windows to load up correctly once you power on your PC. Instead of booting normally, the PC will fail to reach the logon screen before it resets to the boot screen and tries to load Windows.
How to fix reboot loop in Windows 10?
If any problem is detected, Startup Repair will attempt to fix Windows 10 reboot loop. If Startup Repair doesn’t fix the issue, you can go to ” Command Prompt ” under ” Advanced options ” and run the following command: Type “Bootrec /RebuildBcd” (without quotes) and then press Enter.
What to do if your PC is stuck in the rollback loop?
If the PC still remains stuck in the rollback loop of the Windows even after attempting possible fixes, the users can decide whether to restore Windows 10 to an immediate previous date. They can follow this option if they have reset Windows 10 or have saved restore point.
Why is there a rollback loop in Windows 10?
Windows Rollback Loop is one of the issues which have been observed to be taking place after the users choose an updated version of Windows 10. This issue takes place with the latest Windows 10 1803 version. This issue actually takes place by missing or broken system file error and disk error.
How to fix Windows 10 restart loop in safe mode?
How to Fix Windows 10 Restart Loop Caused by Windows Update in Safe Mode 1 Follow the command with net stop bits . 2 Once you get a response, browse C:WindowsSoftwareDistribution, erase all the directory contents and restart Windows 10. More
Use the ASO menu to troubleshoot problems in Windows 11, 10, and 8
Updated on March 29, 2023
What to Know
- Hold Shift while restarting your PC to start ASO, or if you can log in to Windows, find the option in Settings.
- Advanced Startup Options is just a menu of options; select a tool from the menu to use it.
- Options include reinstalling Windows, uninstalling Windows updates, running commands, and more.
This article shows how to use the Advanced Startup Options in Windows 11, 10, and 8.
How to Access the Advanced Startup Options Menu
There are a number of ways to get to the Advanced Startup Options menu. The easiest method depends on the situation you’re in that’s prompting the need to use one of these tools.
If you can access Windows normally, the quickest way to start Advanced Startup Options is through Settings:
- Windows 11: Settings > System > Recovery
- Windows 10: Settings > Update & Security > Recovery
- Windows 8: PC Settings > Update and Recovery > Recovery.
Take a look at the tutorial we linked to above if that’s not possible or if you need more help.
How to Use the Advanced Startup Options Menu
ASO is just a menu of tools—it doesn’t, itself, do anything. Choosing one of the available tools or other menus from Advanced Startup Options will open that tool or menu.
In other words, using Advanced Startup Options means using one of the available repair or recovery tools.
Some items available through this menu are nested inside other menus. If you need to back up, use the left arrow with the circle around it, which you’ll find to the left of the menu heading at the top of the screen.
What Is the Advanced Startup Options Menu Used For?
The tools available from the Advanced Startup Options menu can be used to run almost all of the repair, refresh/reset, and diagnostic tools available in Windows 11, 10, and 8 operating systems, even if Windows won’t start.
It also contains the Startup Settings menu which, among other things, is used to start Windows in Safe Mode.
The Advanced Startup Options Menu
Below is every icon or button you’ll see on this menu in Windows 11, Windows 10, and Windows 8. We’ll call out any differences between these versions of Windows.
If the menu item leads to another area of the menu, we’ll explain that. If it starts some recovery or repair feature, we’ll give a short description and link to more detailed information on that feature if we have it.
If you’ve configured a dual-boot system, you may also see Use another operating system (not shown here) on the main Advanced Startup Options menu.
Continue
Continue is available on the main Choose an option screen and says Exit and continue to Windows 11 (or Windows 10/8.1/8).
When you choose Continue, Advanced Startup Options will close, your computer will restart, and Windows will start in normal mode.
Obviously, if Windows isn’t starting properly, the very fact that brought you to Advanced Startup Options, then heading right back into Windows probably won’t be helpful.
However, if you found yourself on the ASO menu some other way, or are done with some other repair or diagnostic process, Continue is the quickest way out of Advanced Startup Options and back into Windows.
Use a Device
Use a device is available on the main Choose an option screen and says Use a USB drive, network connection, or Windows recovery DVD.
When you choose Use a device, a menu by that name appears, allowing you to boot from the various sources on your computer that are shown.
On most computers, you’ll see options for USB storage devices, DVD or BD drives, network boot sources (even if you don’t really have one of those set up), etc.
Only UEFI systems will have a Use a device option on Advanced Startup Options.
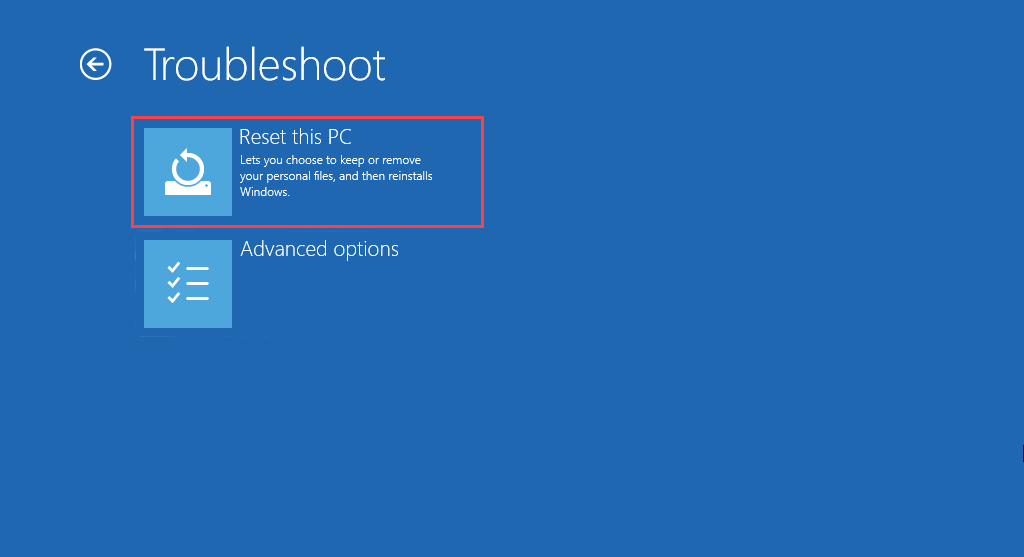
Troubleshoot
Troubleshoot is available on the main Choose an option screen and says Reset your PC or see advanced options.
In Windows 8, it says Refresh or reset your PC, or use advanced tools.
The Troubleshoot option opens up yet another menu, containing the Reset this PC and Advanced options items, both of which we discuss below.
The Troubleshoot menu is where all the repair and recovery features found in Advanced Startup Options are located, and is what you’ll want to choose if you want to do anything other than exit the ASO menu.
On some UEFI systems, you may also have a UEFI Firmware Settings option (not shown here) on the Troubleshoot menu.
Turn Off Your PC
Turn off your PC is available on the main Choose an option screen.
This option is pretty self-explanatory: it completely powers off your PC or device.
Reset This PC
Reset this PC is available from the Troubleshoot screen and says Lets you choose to keep or remove your files, and then reinstalls Windows.
Select Reset this PC to start the Reset This PC process, where you’re given two additional options, Keep my files or Remove everything.
The first option, great for when your computer is running slow or is buggy, removes all installed software and apps and resets all Windows settings, but nothing personal will be removed, like documents, music, etc.
The second option, much like a «factory reset» and great for starting over completely or before getting rid of your computer, removes everything, including installed apps and programs, settings, personal files, etc.
Reboot vs. Reset: What’s the Difference?
There is a complete walkthrough of the reset process available, including more on which choice is best.
In Windows 8, the first option above is called Refresh your PC and the second Reset your PC, both of which are available directly from the Troubleshoot screen.
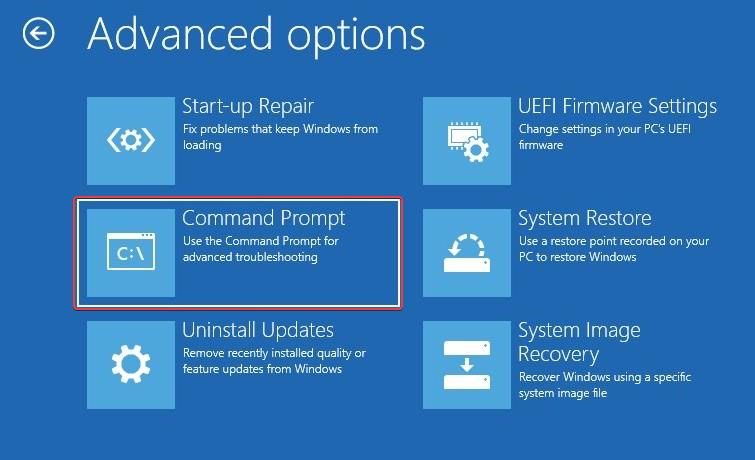
Advanced Options
Advanced options is available from the Troubleshoot screen.
The Advanced options option opens up yet another menu which contains the following items: System Restore, System Image Recovery, Startup Repair, Command Prompt, and Startup Settings, all of which we explain below in their own sections.
In Windows 10, if you’re part of the Insider testing program, you’ll also see a Go back to the previous build option.
The Advanced options menu is most similar to the System Recovery Options menu found in earlier versions of Windows.
System Restore
System Restore is available from the Advanced options screen and says Use a restore point recorded on your PC to restore Windows.
The System Restore option starts System Restore, the same time-machine-like «undo» tool you may have used or seen from within Windows.
A huge advantage of having the ability to use System Restore from the Advanced Startup Options menu is that you’re doing so from outside of Windows 11/10/8.
For example, if you suspect some driver or registry issue is preventing Windows from starting properly, but find yourself in the unfortunate situation of not being able to start Windows so that you can then start System Restore, this option becomes very valuable.
System Image Recovery
System Image Recovery is available from the Advanced options screen and says Recover Windows using a specific system image file.
The System Image Recovery option starts the Re-image your computer feature of System Image Recovery, which is used to restore a previously-saved complete image of your computer.
This is a great option if you’ve unsuccessfully tried other tools available on the Advanced Startup Options menu. Of course, to use this, you or your computer maker must have proactively created a system image to re-image from.
Startup Repair
Startup Repair is available from the Advanced options screen and says Fix problems that keep Windows from loading.
The Startup Repair option starts, you guessed it, an automated startup repair procedure. If Windows 11, 10, or 8 isn’t starting properly, like due to a BSOD or a serious «missing file» error, Startup Repair is an excellent first troubleshooting step.
Early versions of Windows 8 referred to Startup Repair as Automatic Repair.
Command Prompt
Command Prompt is available from the Advanced options screen and says Use the Command Prompt for advanced troubleshooting.
The Command Prompt option starts Command Prompt, the command-line tool you may be familiar with from within Windows.
Most commands that are available from the Command Prompt in Windows are also available in the Command Prompt included here as part of Advanced Startup Options.
When using the Command Prompt from Advanced Startup Options, be sure to verify the correct drive you’re executing commands on. In most Windows installations, the drive Windows is installed on is designated as C while inside Windows, but as D while in the ASO menu.
This is because the C drive letter is given to a 350 MB system reserved partition that’s normally hidden when you’re in Windows, leaving D to be assigned to the drive Windows is installed on. If you’re not sure, use the dir command to inspect the folders.
Startup Settings
Startup Settings is available from the Advanced options screen and says Change Windows startup behavior.
Choosing the Startup Settings option will restart your computer and bring up Startup Settings, a menu full of various special ways to boot to Windows, including Safe Mode.
The Startup Settings menu is most similar to the Advanced Boot Options menu in previous versions of Windows.
Startup Settings isn’t available from Advanced Startup Options when accessed in certain ways. If you don’t see Startup Settings but need access to the startup modes on that menu, see How Do I Start Windows in Safe Mode? for help.
Advanced Startup Options Menu Availability
The Advanced Startup Options menu is available in Windows 11, Windows 10, and Windows 8.
Some of the diagnostic and repair options available from Advanced Startup Options are also available in Windows 7 and Windows Vista from System Recovery Options.
In Windows XP, few of these tools are available, but what are can be reached from Recovery Console or via a Repair Install.
FAQ
-
How do I fix the endless reboot loop in Windows 10?
If Windows is stuck in an automatic repair loop and keeps restarting, make sure you’re booting to the correct drive, boot into Safe Mode, run the Fixboot and Chkdsk commands, or run Startup Repair from USB/DVD. If you still have problems, perform a System Restore, reset your PC, reinstall Windows, or replace your hard drive.
-
How do I boot into Advanced Startup on Windows 10?
Press and hold F8 on your keyboard as your computer starts up (before the Windows logo appears) to boot directly into the Advanced Startup Options menu.
Thanks for letting us know!
Get the Latest Tech News Delivered Every Day
Subscribe
Tutorial on how to repair the issue of computer with Microsoft Windows 10 operating system not able to boot or startup.
Assumption:
- There is no power related issue.
- There is no hardware related issue.
- The BIOS or UEFI settings has been done properly.
Issue
- Windows Boot Manager(bootmgr) files are missing or corrupt.
- Boot configuration data(BCD) is missing or corrupt.
- Windows OS files are missing or corrupt.
If the personal computer is unable to boot into Microsoft Windows 10 OS , then you have very limited tools to repair the the system and make it bootable without losing important files.
If you have tried booting the computer for three times and still it is not able to boot successfully then you should try repairing it using the methods shown here.
The repair will be done using Microsoft Windows Recovery environment present in Windows 10 installation media.
Process 1. Booting into Window 10 OS using Windows 10 installation Media
Microsoft Windows 10 Installation media (DVD or USB Flash Drive) is required. The version of Windows 10 installation media must be same as the version of Windows 10 installed in the computer.
- Prepare the Microsoft Windows 10 Installation media.
- Insert the installation media in the computer.
- Start the computer.
- Choose the Windows 10 installation media as temporary boot device from the BIOS or UEFI.
When the Windows 10 setup start from the Windows 10 installation media, do the following:
- Select the Keyboard or input method.
- Select Next button.

- Select Repair your computer.

Process 2. Try Booting into Window 10 using Windows 10 installation Media
If Exit and continue to windows 10 option is showing then it may be possible to boot into Window 10.
- Select Exit and continue to Windows 10.

If the computer boots successfully then user can repair the issue using various methods.
If the computer is not able to boot using this method then proceed to use other methods to solve this issue.
Process 3. Use command prompt tools to fix the issue
Follow the instruction of Process 1.
- Prepare the Microsoft Windows 10 Installation media.
- Insert the installation media in the computer.
- Start the computer.
- Choose the Windows 10 installation media as temporary boot device from the BIOS or UEFI.
When the Windows 10 setup start from the Windows 10 installation media, do the following:
- Select an appropriate option from the drop down list labelled Language to install.
- Select an appropriate option from the drop down list labelled Time and currency format.
- Select an appropriate option from the drop down list labelled Keyboard or input method.
- Select Next button.

- Select Repair your computer.
- Select Troubleshoot option.

- Select Command prompt option.
Computer with Legacy BIOS and Master Boot Record ( MBR) partition
This process is only for the computer with :
- Legacy BIOS
- UEFI BIOS with no Compatibility support module( CSM) and supports only legacy boot.
- UEFI BIOS with Compatibility support module( CSM) enabled which has been set to support legacy booting.
The partition style of hard disk or SSD in which Windows 10 is installed is Master Boot Record(MBR).
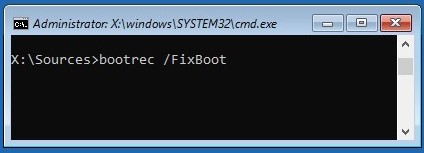
BOOTREC
boorec command is used to repair the MBR and the Boot Configuration Data (BCD) .

1. To Repair the Master Boot Record(MBR) type and Run the command :
- bootrec /fixmbr
2. To Repair boot sector type and Run the command :
- bootrec /fixboot
3. To repair the boot configuration data(BCD) , type and Run the command :
- bootrec /rebuildbcd
- Follow the instructions
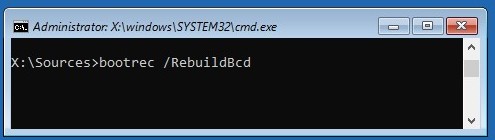
- If its asks Add installation to boot list? Yes(Y)/No(N)/All(A) , enter y and press Enter key to add the boot entry in BCD.

Don’t worry if a command does not get executed successfully.
Computer with UEFI BIOS and GUID Partition Table (GPT) partition
This process is only for the computer with :
- UEFI BIOS with no Compatibility support module(CSM) and supports only UEFI boot .
- UEFI BIOS with Compatibility support module(CSM) enabled which has been set to support UEFI booting or
- UEFI BIOS with Compatibility support module( CSM) disabled.
The partition style of hard disk or SSD in which Windows 10 is installed is GUID Partition Table(GPT).
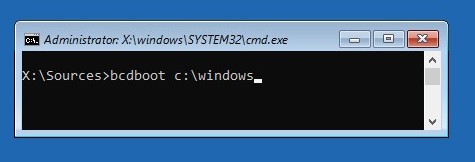
Drive letter of the Partition in which Windows 10 OS is installed
It is important to find out what is the drive letter of the partition(volume) in which Microsoft Windows 10 is installed. It will be used in the various command line tools.
There are many ways to know the Drive letter of Windows 10 OS partition. One simple way is to list the directory of each drive and look for Windows OS files in it.
To show the list of drives which has been assigned a drive letter :
- Type an run the command fsutil fsinfo drives.

- Now you need to check the list of directories in each drive(volume).
- To show the list of directories in each drive type and run the command dir <drive letter>: . (Example : dir c: , dir d: , dir x: ).
- The Drive in which Windows 10 OS in installed will have the directories with name Program Files, Users and Windows. (In this case its C: drive)
- Take note of the drive letter in which Windows OS is installed for later use.

To repair the system partition and the boot configuration data(BCD) , type and Run the command :
- bcdboot <drive letter>\windows. Replace
the <drive letter > with the drive letter of the partition in which
Windows 10 OS is installed. - Example (In this case the command is bcdboot c:\windows)
Run CKHDISK
Chkdsk utility can scan and repair the logical error in partition.
- Enter command chkdsk <drive letter> /f /offlinescanandfix. Replace the <drive letter> with the drive letter of the partition in which Windows 10 OS is installed. ( In this case the command is chkdsk c: /f /offlinescanandfix )

Run System File Check(SFC)
System File Check utility can scan the check the integrity of Windows 10 OS files. If any problem is found it will repair the Windows 10 OS files.
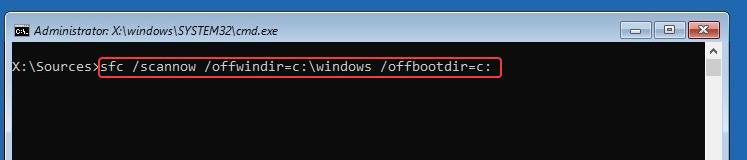
- Run the command sfc /scannow /offwindir=<drive letter>\windows /offbootdir=<drive Letter>. Replace
the drive letter with the drive letter of the partition in which
Windows 10 OS is installed. (In this case the command is sfc /scannow /offwindir=c:\windows /offbootdir=c: ) - Wait of system file check to complete the process.
- Type and run the Exit command.
- Remove the Microsoft Windows 10 Installation media (DVD or USB Flash Drive) from the computer.
- Restart the computer.
- Set Windows boot manager as the first boot device in the BIOS or UEFI BIOS if it not already done.
- The computer should be able to boot into Windows 10 successfully.
Whenever you experience moderate to severe issues in Windows 11 or Windows 10, you can rely on the Windows Recovery Environment (WinRE) to fix them. It provides several recovery options that let you perform advanced troubleshooting, from running startup repairs, uninstalling Windows updates, and resetting the operating system.
You’ve got multiple ways to boot Windows 11/10 into the Windows Recovery Environment. But that depends on the state of the operating system. For example, is Windows functional? Or do you have trouble even accessing the desktop area? Regardless, the methods below have you covered.

Once you boot into the Windows Recovery Environment, read on to learn more about the system recovery options that you can use to fix Windows 11/10.
Boot via Start Menu
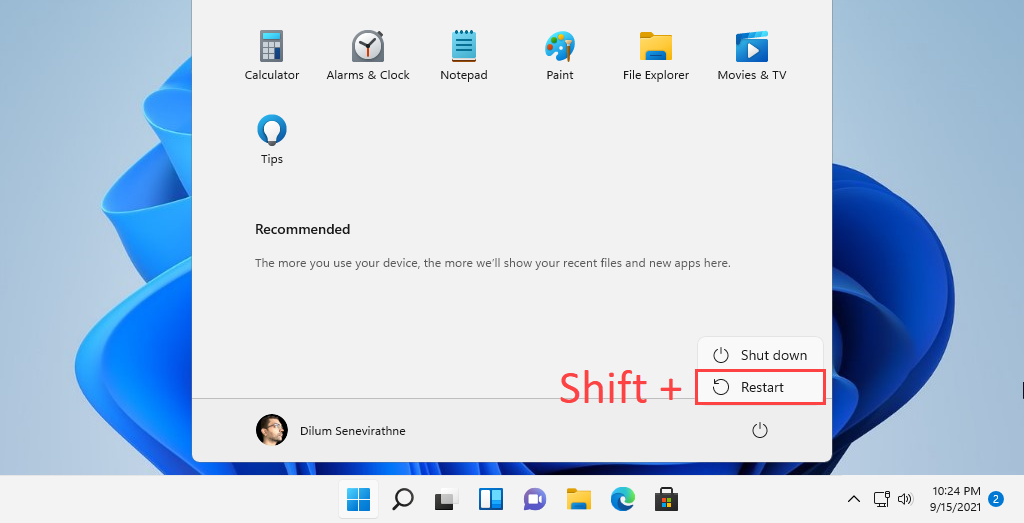
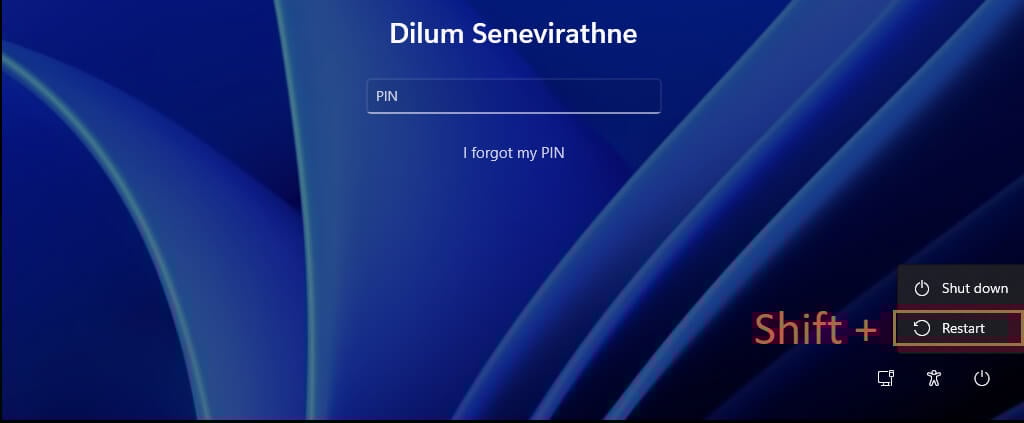
Assuming that you can boot into Windows 11 or Windows 10, the most convenient way to get to the Windows Recovery Environment is by restarting your computer as usual via the Start menu.
The only extra thing you must do is press and hold the Shift key as you select the Restart option.
Boot via Settings App
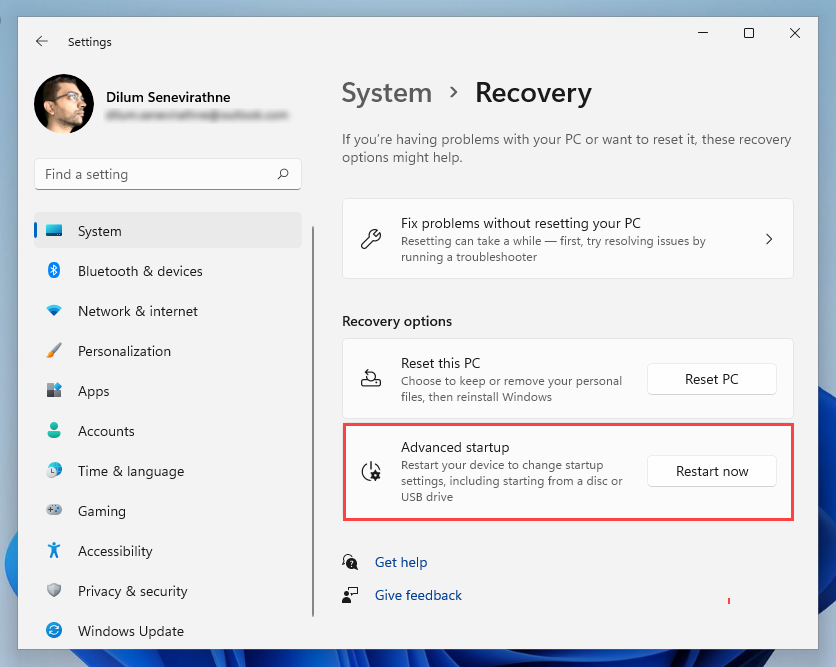
The Settings app in Windows 11 and Windows 10 features a dedicated option to reboot your PC into the Windows Recovery Environment. Using the method above is faster, but it should be helpful if you have trouble with the Start menu.
Begin by pressing Windows + I to bring up the Settings app. Then, go to System (or Update & Security in Windows 10) > Recovery and select the Restart now option within the Advanced startup section.
Boot via Security Screen
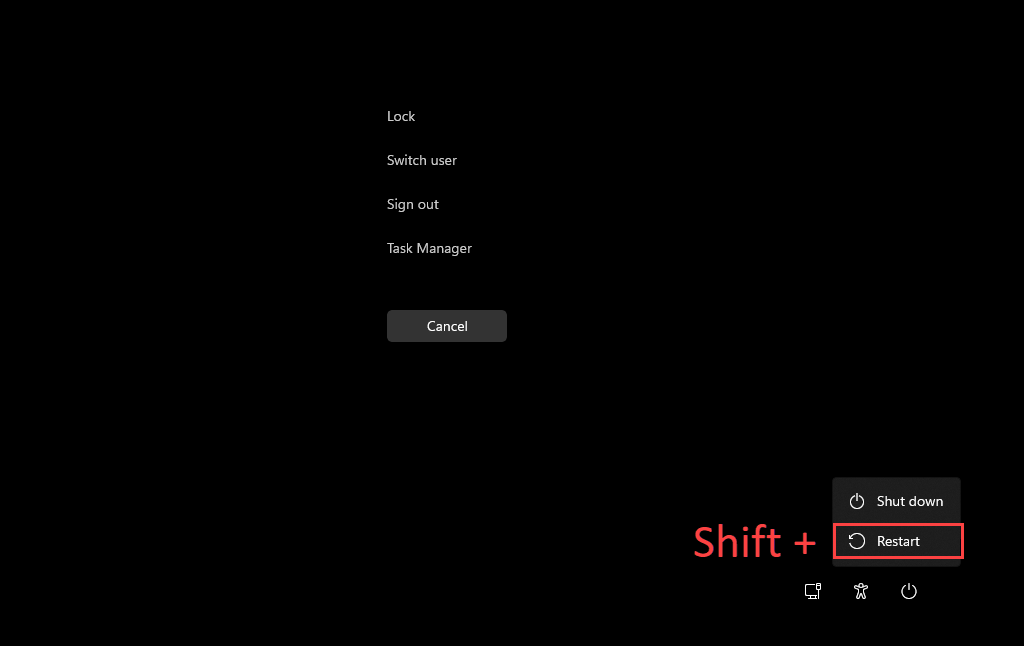
You can also get Windows 11/10 to boot into your system recovery options via the Security Screen. It’s the best method to use while dealing with an operating system that keeps freezing.
Press Ctrl + Alt + Del to open the Security Screen. Then, select the Power icon at the screen’s bottom-right, hold down the Shift key, and choose Restart.
Boot via Lock Screen
If you have trouble logging into Windows 11 or Windows 10, you can try booting into the Windows Recovery Environment via the Lock Screen. Again, select the Power icon and select Restart while holding down the Shift key.
Boot via Windows PowerShell
The Windows PowerShell console (which you can access via the programs list on the Start menu) offers another way to load the Windows Recovery Environment. Just type the following command and press Enter:
shutdown /r /o
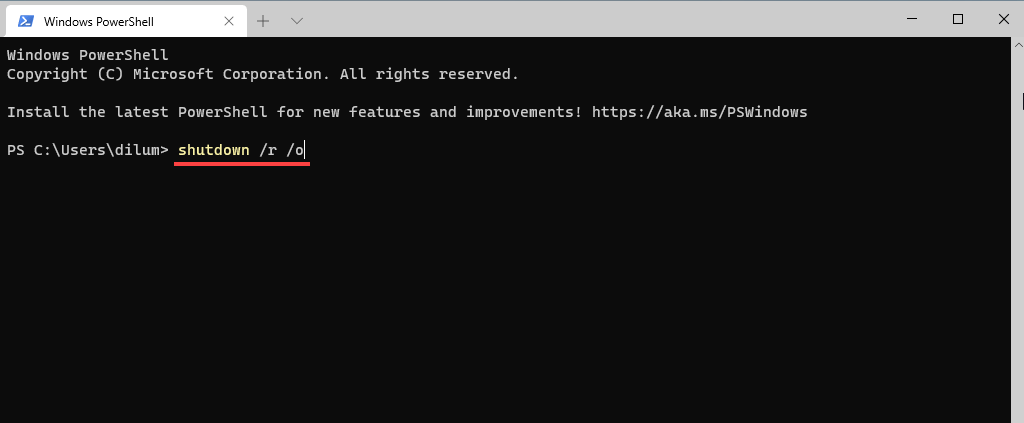
By default, Windows should boot into WinRE within 30 seconds. If you run into any trouble, try re-running the command with extra parameters. That force-closes all programs and reboots the operating system instantly:
shutdown /r /o /f /t 0
Another command that can help you access the system recovery options is the reagentc /boottore command. However, you must run it in an elevated Windows PowerShell console and then reboot your computer manually.
Boot via Hardware Recovery Button
It’s also possible to access WinRE by pressing a specific function key (e.g., F11, F10, or F9) on your PC immediately at startup. Don’t expect it to work on every desktop or laptop device.

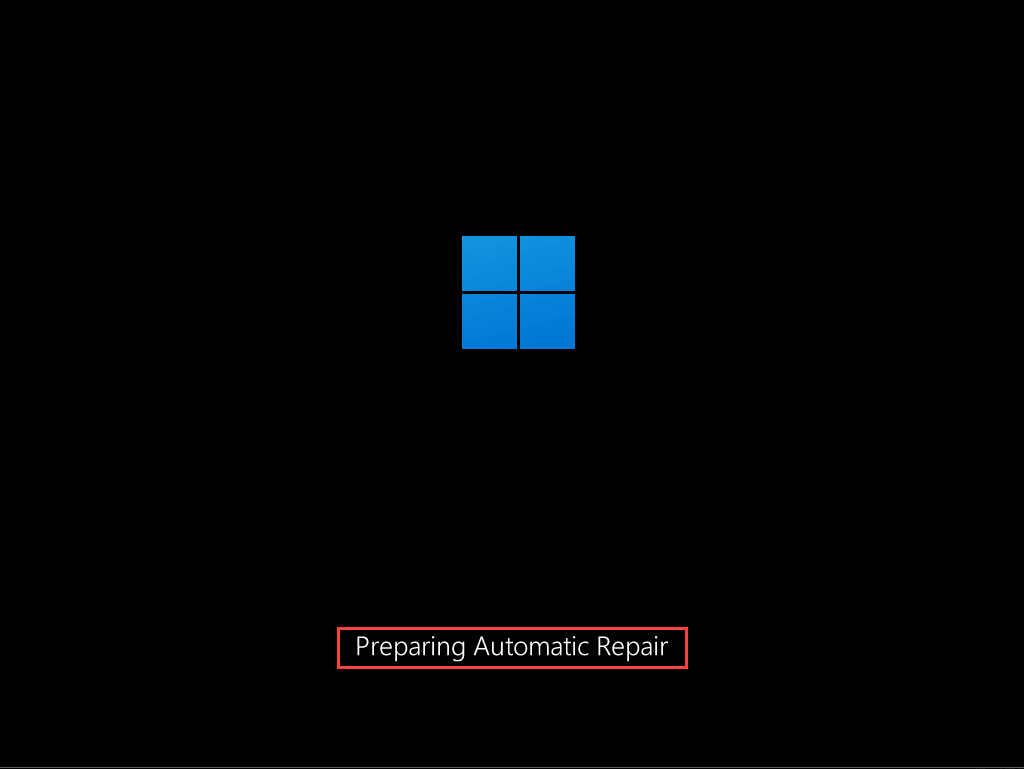
Boot via Automatic Repair
If Windows 11 or Windows 10 fails to load or freezes at startup, you can force your computer to enter the Windows Recovery Environment by forcibly shutting it down three times. To do that, press and hold the Power button until the screen turns off.
You should see the words Preparing Automatic Repair flash underneath the Windows 11/10 logo on the screen after the third attempt. Select Advanced Options when prompted to enter WinRE.
Boot via Using Installation Media
If you have a Windows 11/10 installation USB or disc, you can use it to enter the Windows Recovery Environment. Provided that you’ve then set up your computer to boot from a USB or DVD, press any key when your computer asks you to at startup.
On the Windows Setup that then shows up subsequently, select Next > Repair your computer.

Using the Windows System Recovery Options
Once you enter the Windows Recovery Environment, you must select Troubleshoot > Advanced Options to access your system recovery options. Or, you can choose Continue to boot into Windows 11/10 or Turn off your PC to exit and shut down your computer.
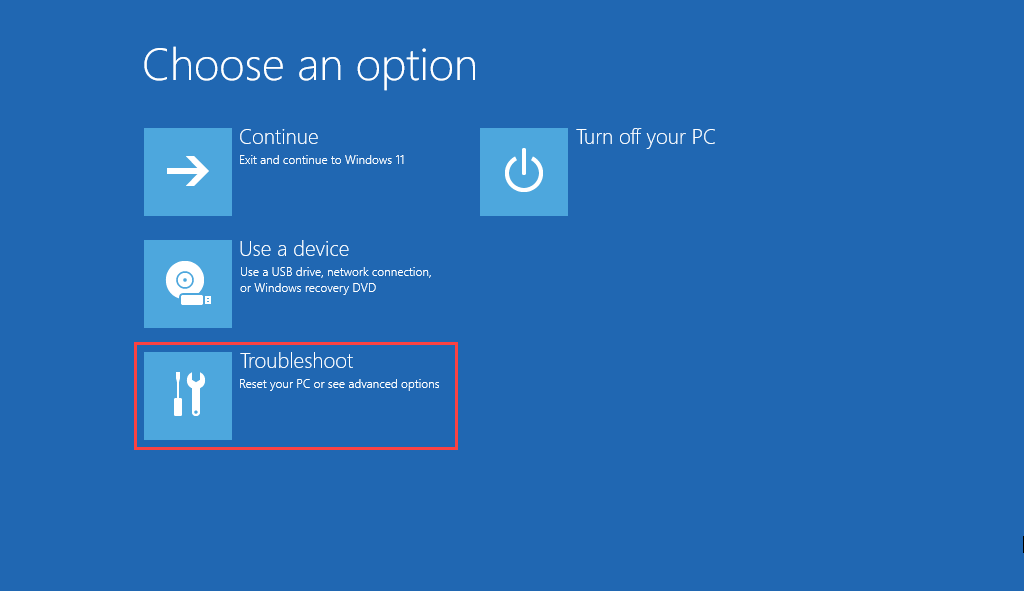
Here’s a brief rundown of the system recovery options that you have access to in WinRE:
Startup Repair: Prompts your computer to run a series of automatic repairs and helps fix problems preventing Windows 11 or Windows 10 from loading. It’s best to run this while troubleshooting Blue Screen of Death (BSOD) errors.
Startup Settings: This allows you to change the default startup behavior of the operating system. For example, you can use it to launch Windows 11/10 in Safe Mode.
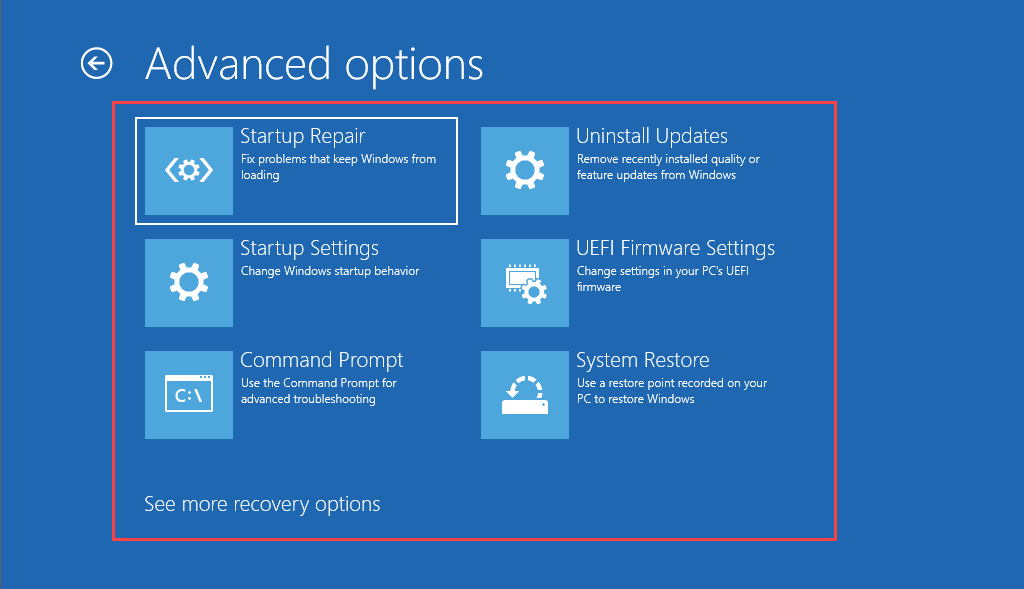
Command Prompt: Loads the Command Prompt console. You can use it to perform various command-line tools such as the System File Checker and Check Disk Utility.
Uninstall Updates: If an issue occurred right after applying a feature or quality update for Windows 11/10, this option lets you roll it back.
UEFI Firmware Settings: Helps you access your UEFI firmware settings quickly.
System Restore: If you’ve set up System Restore in Windows 11/10, this option lets you undo harmful changes by reverting your computer to an earlier state.
System Recovery Image: This lets you use a system recovery image to restore the data on your computer.
Reset this PC: This option is available after selecting Troubleshoot in WinRE. You can use it to reset Windows 10 or Windows 11 to factory settings. You also get the opportunity to keep personal data intact.
Start Fixing Windows 11/10
Using the system recovery options in the Windows Recovery Environment is not the solution to all issues that crop up in Windows 11 and Windows 10. If you continue to experience problems, you might want to take that extra step and reinstall Windows from scratch.
Do not share my Personal Information.