Недавно мы говорили о том, как выполнять различные Linux утилиты в Windows. Но для Windows 10 это, похоже, уже неактуально. Уже давно в Windows 10 появилась нативная поддержка оболочки Bash, в окружении дистрибутива Ubuntu благодаря подсистеме Linux для Windows 10.
Вы можете запускать различные дистрибутивы Linux в Windows без виртуализации, а с недавних пор, можно даже полноценно заставить работать графический интерфейс, правда для этого уже нужна вторая версия WSL. В этой статье мы рассмотрим как установить Linux в Windows 10.
Что такое WSL?
В начале цикла разработки Windows 10, Microsoft открыла страницу обсуждения и голосования за новые функции. Там зашел разговор о командной строке Windows. Разработчики спросили сообщество, что им не нравится в командной строке Windows и какие функции они хотели бы увидеть в новой версии.
Многие пользователи заявили что им нужны небольшие улучшения командной строки, другие же сказали что неплохо было бы иметь возможность использовать инструменты Linux / Unix и Bash в Windows 10. Много пользователей согласились с тем, что нужно сделать проще использование этих инструментов в Windows.
Прислушиваясь к голосу сообщества, в Microsoft первым делом улучшили CMD, PowerShell и другие инструменты командной строки. А во-вторых, они сделали, то что казалось невероятным несколько лет назад, они добавили реальный, нативный Bash вместе с поддержкой всех необходимых инструментов командной строки, работающих непосредственно на Windows, в среде, которая ведет себя как Linux. Это не какая-нибудь виртуальная машина, это реальный Linux в Windows.
Для реализации этого Microsoft построили новую инфраструктуру в Windows, это Windows Subsystem for Linux или WSL, на основе которой работает образ окружения Ubuntu, поставляемый партнером Canonical. Эта функция позволит разработчикам более эффективно использовать инструменты Linux. Инфраструктура основана на уже заброшенном проекте, Project Astoria, который должен был использоваться для запуска Android-приложений в Windows. Ее можно расценивать как противоположность Wine, только Wine запускает приложения Windows в Linux, подсистема Linux позволяет выполнять приложения Linux в Windows, точнее, только консольные приложения Bash в Windows 10.
С технической точки зрения, это вообще не Линукс. Каждая система GNU Linux должна быть основана на ядре Linux, здесь же просто есть возможность выполнять двоичные файлы, которые работают в Ubuntu.
С каждой новой версией в WSL всё меньше ограничений, вы уже можете использовать сервисы, а также с WSL 2 стали доступны графические приложения. Решение предназначено для разработчиков, которые хотят запускать linux-утилиты из командной строки Windows. Да, эти команды имеют доступ к файловой системе Windows, но вы не можете использовать их для автоматизации своих задач или в стандартной командной строке Windows. Теперь давайте разберемся как установить WSL в Windows 10.
1. Проверка версии системы
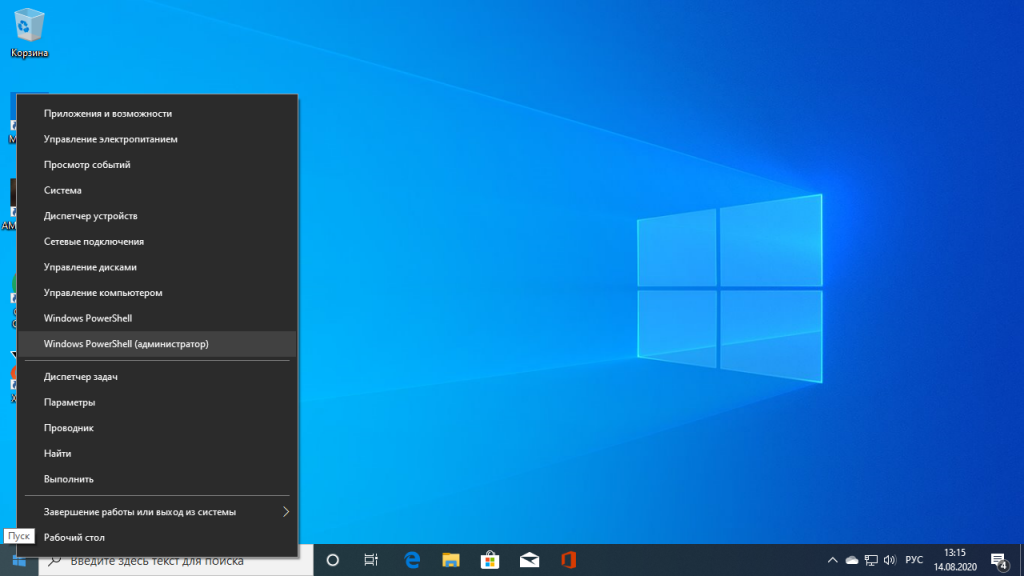
Вы можете установить WSL в Windows 10 начиная с версии Windows 10 Insider Preview 14316, а для WSL версии 2, которая принесла много улучшений нужно обновление Windows 10 19041 или новее. Сначала убедитесь, что у вас правильная версия Windows. Для этого октройте PowerShell кликнув правой кнопкой по иконке пуск:
Затем выполните команду:
[environment]::osversion
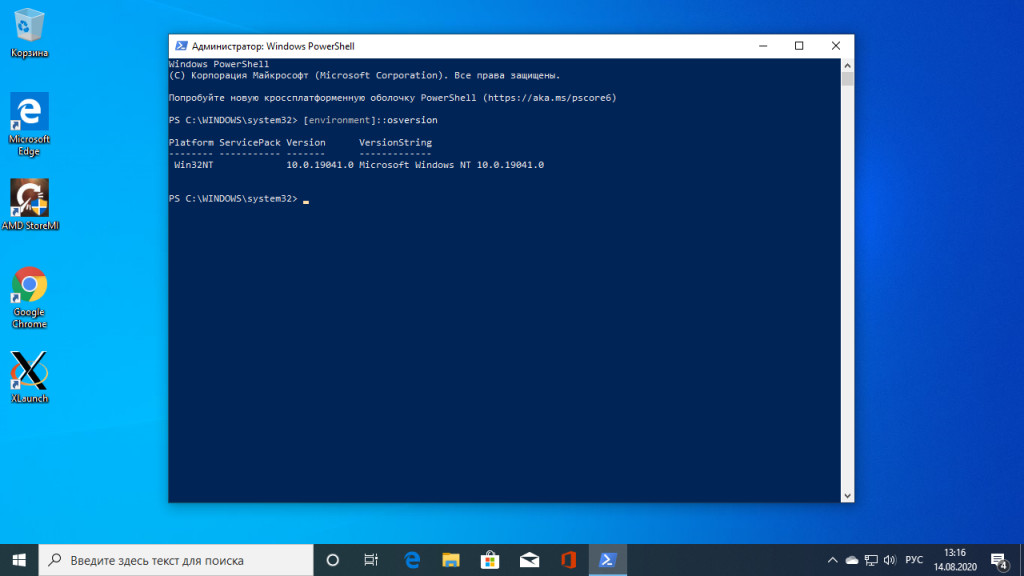
Если отображается версия как на снимке экрана или выше, значит всё хорошо. Иначе идите обновлять систему.
2. Активация WSL и виртуализации
Чтобы активировать компонент Windows Subsystem for Linux можно использовать уже открытую командную строку PowerShell. Для этого выполните:
dism.exe /online /enable-feature /featurename:Microsoft-Windows-Subsystem-Linux /all /norestart
Затем выполните ещё одну команду чтобы включить компонент виртуализации Hyper-V:
dism.exe /online /enable-feature /featurename:VirtualMachinePlatform /all /norestart
Когда эта работа будет выполнена перезапустите компьютер, чтобы все компоненты установились.
3. Активация WSL 2
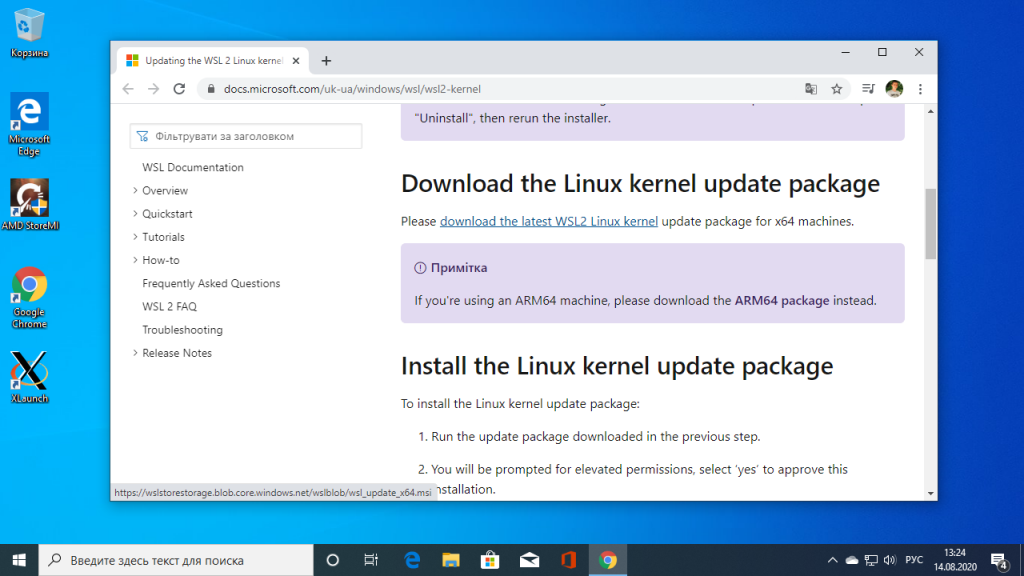
Чтобы установить WSL 2 необходимо скачать пакет с новым ядром с официального сайта Microsoft. Кликните по ссылке download the latest WSL2 Linux kernel:
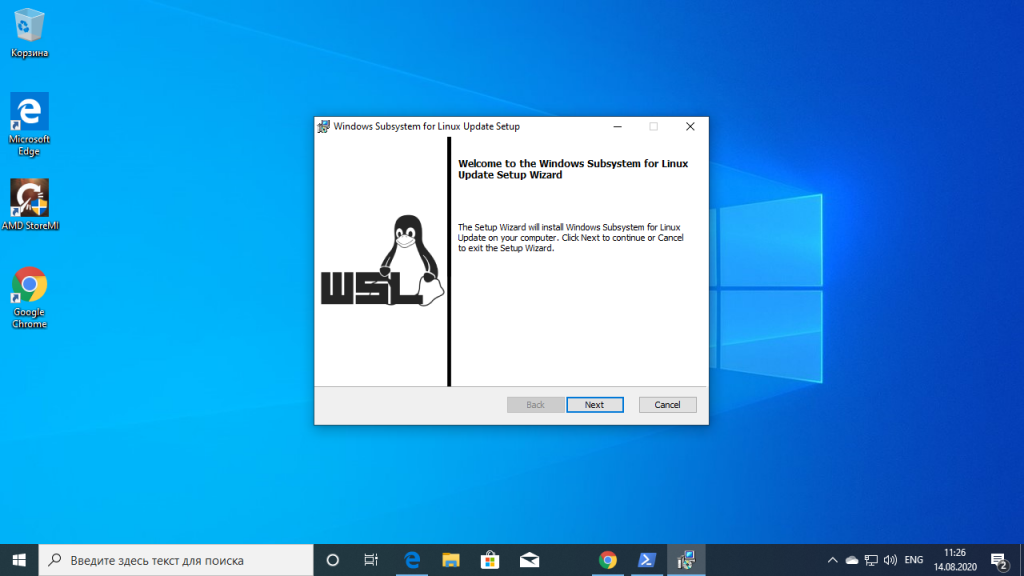
Затем установите загруженный файл:
Чтобы всегда по умолчанию использовалась версия WSL 2 необходимо выполнить такую команду:
wsl --set-default-version 2
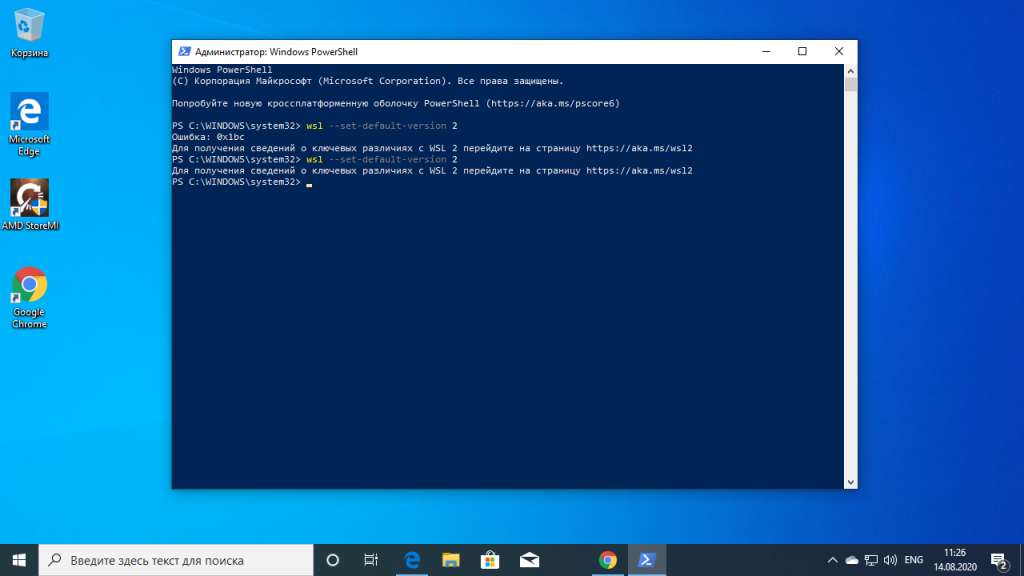
Если вы всё же получаете ошибку, с сообщением о том, что такой опции у этой команды нет, значит у вас старая версия Windows, обновляйте. Если команда не выдала ошибки — значит настройка WSL завершена успешно.
4. Установка Linux
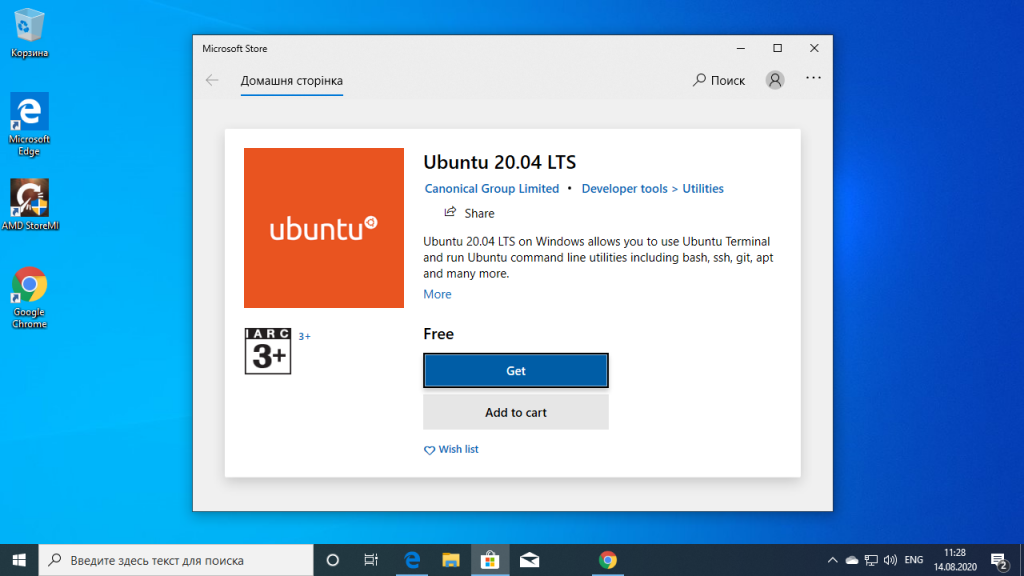
Далее вам надо установить какой-либо дистрибутив Linux из магазина Microsoft. Достаточно просто открыть магазин и набарть в поиске имя дистрибутива, например Ubuntu, затем нажмите кнопку Get:
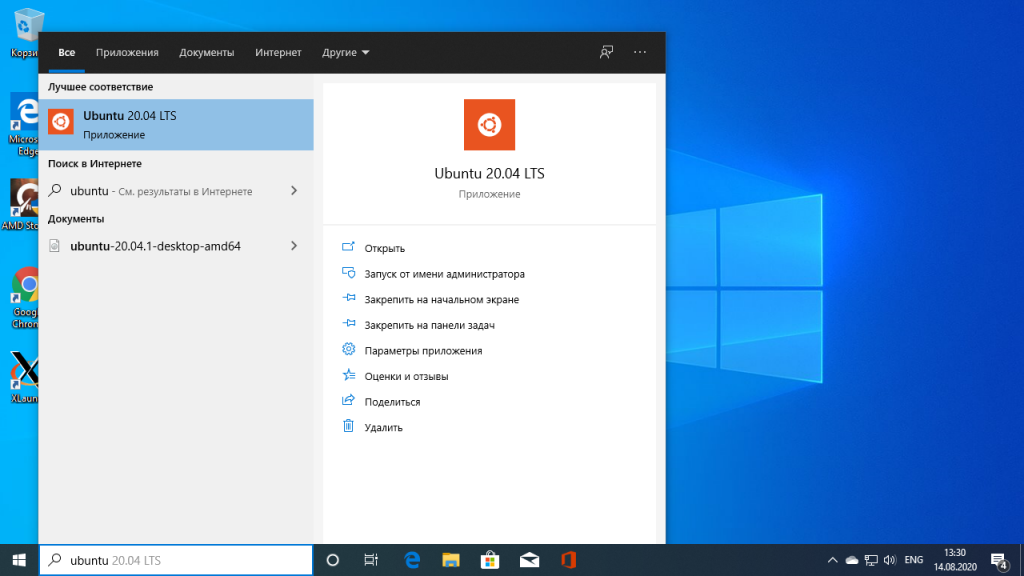
Дождитесь завершения установки и запустите загруженный дистрибутив из главного меню:
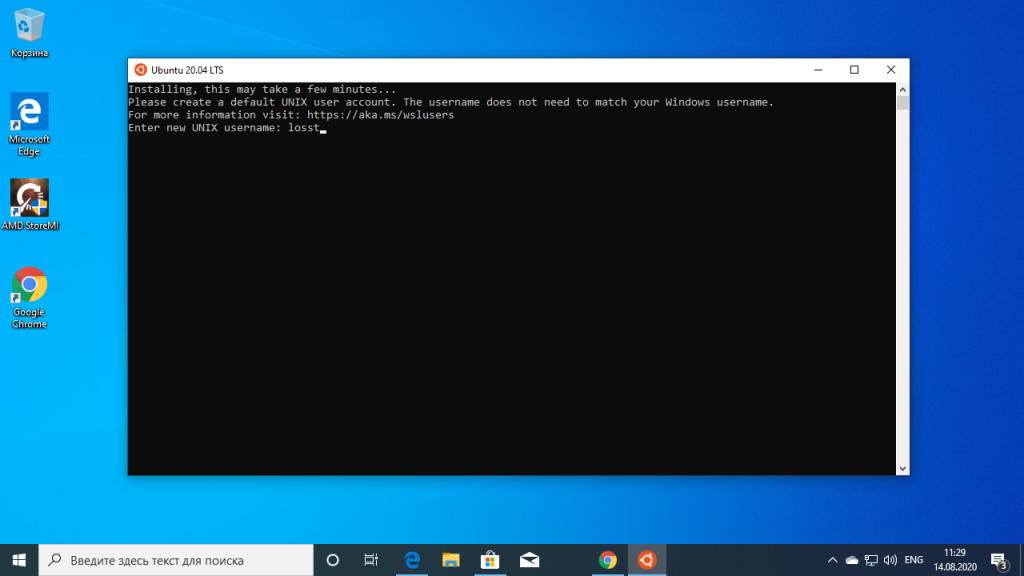
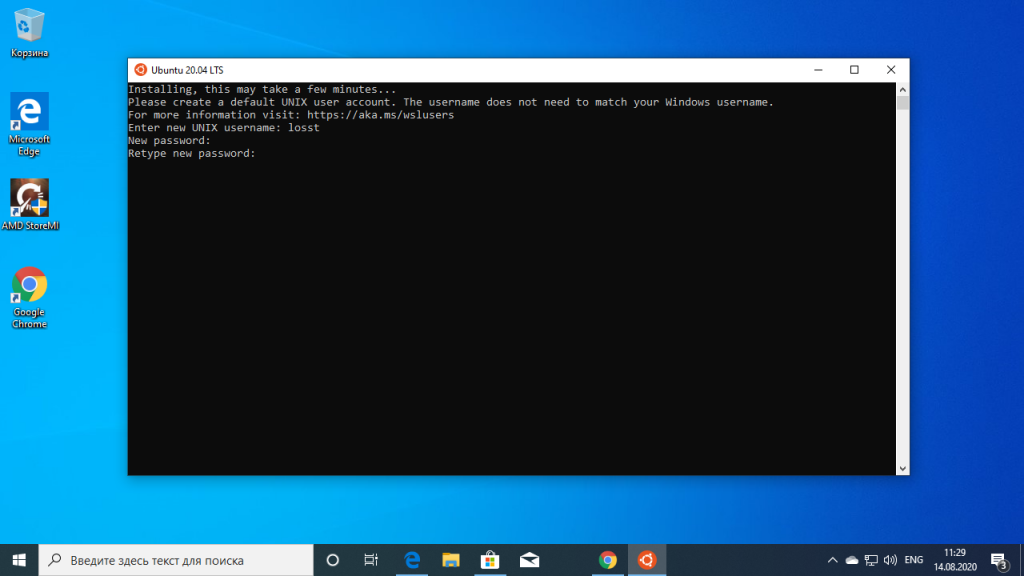
5. Настройка дистрибутива
При первом запуске будет выполняться настройка окружения. Вам необходимо указать имя пользователя:
Затем два раза пароль:
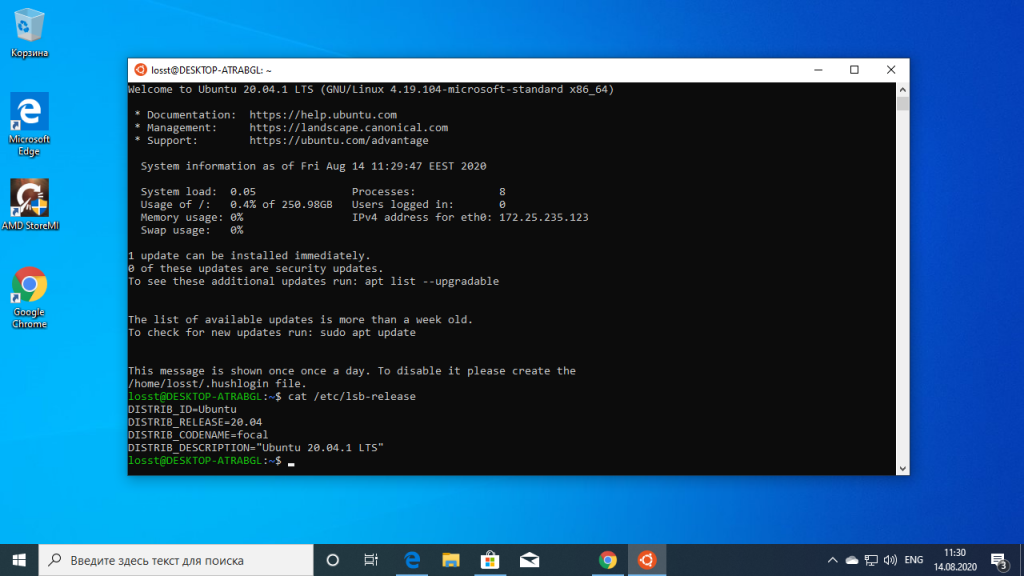
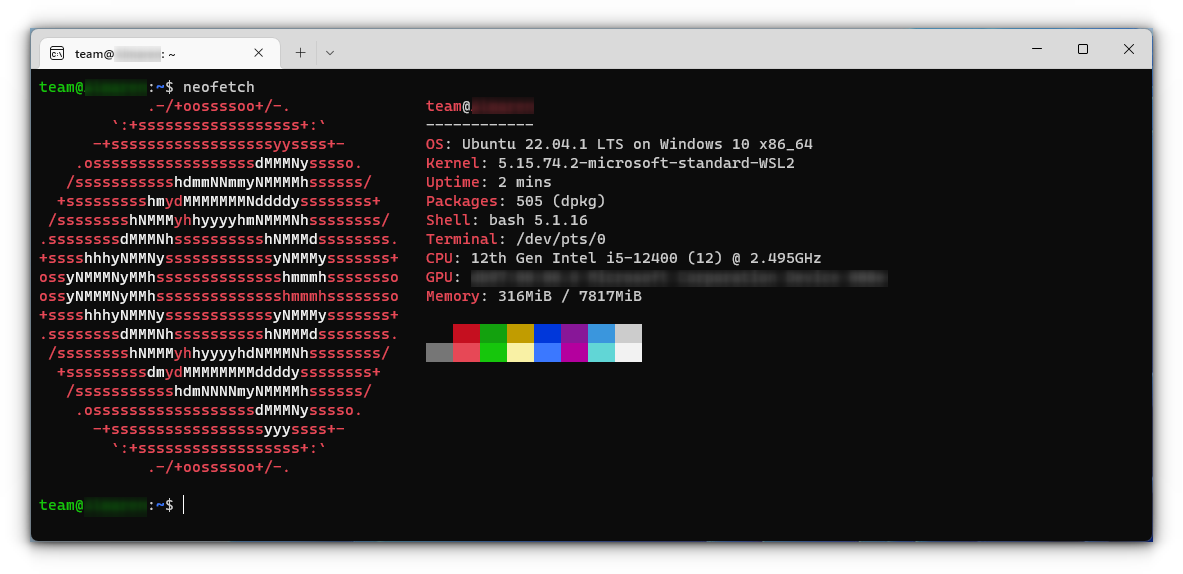
После этого вы сможете пользоваться оболочкой Bash в Windows 10:
6. Установка X сервера
Если вы хотите запускать графические приложения из WSL Windows, то вам понадобится установить в систему X сервер. Скачать его можно здесь.
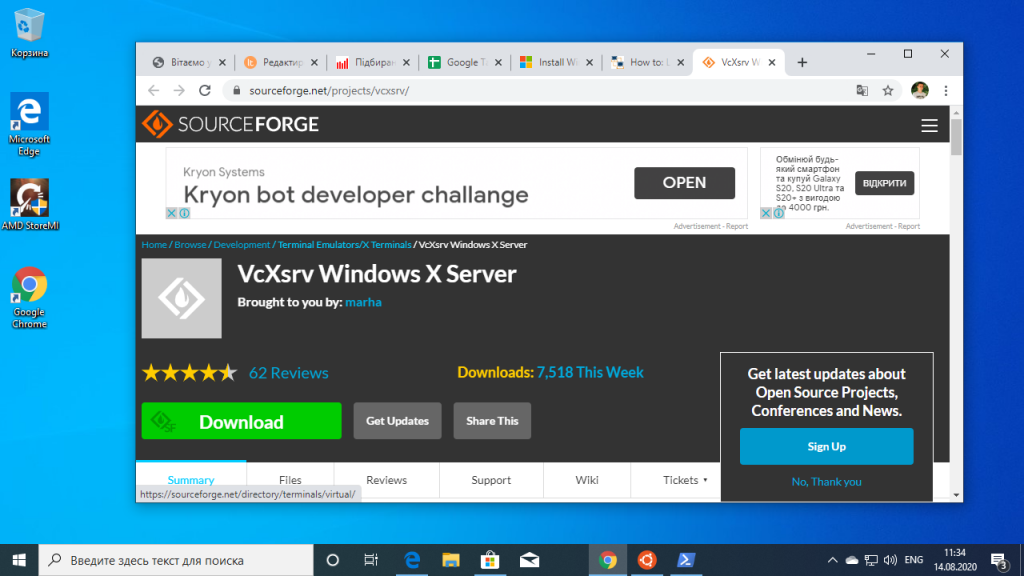
Затем просто установите.
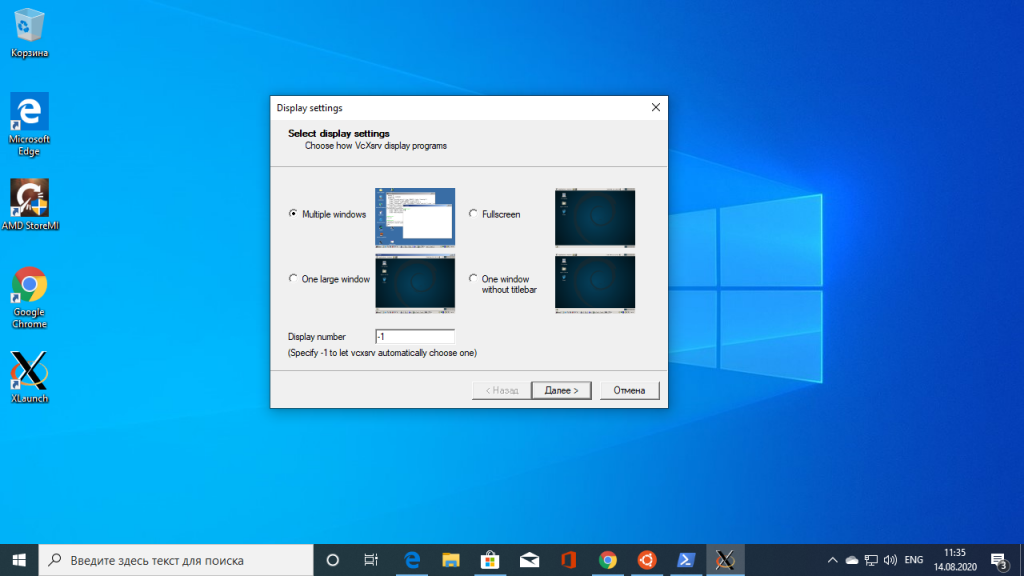
7. Запуск X сервера
После завершения установки на рабочем столе появится ярлык. В первом окне выберите Multipe windows чтобы окна программ, выполняемых на X сервере интегрировались в систему:
Затем выберите, что клиентов запускать не надо — Start no client:
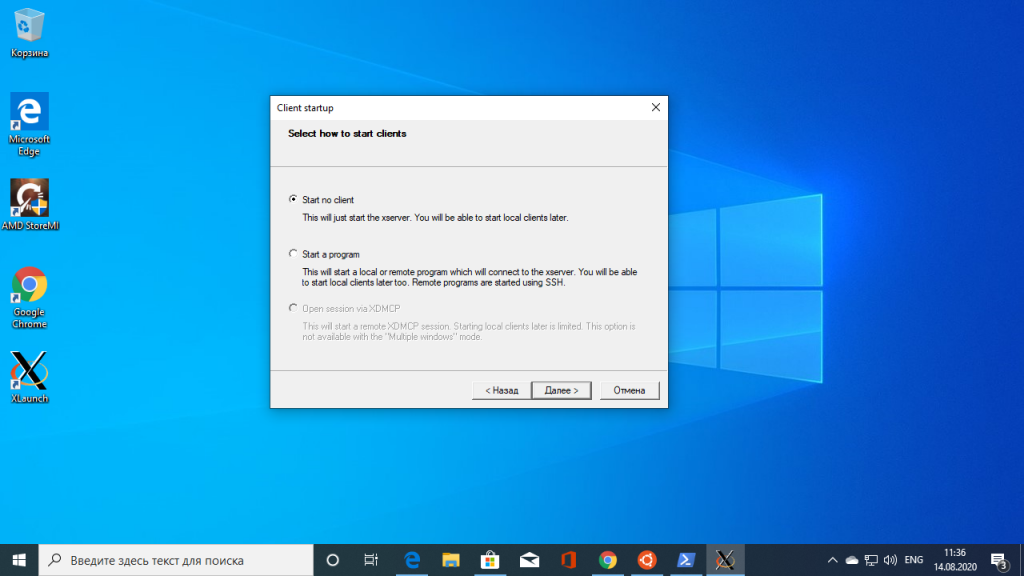
Поставьте все галочки, затем нажмите кнопку Next, а потом Finish для завершения установки.

Брандмауэр Windows тоже попросит разрешить доступ этому приложению в сеть. Надо разрешить.
8. Настройка подключения
Чтобы настроить подключение к X серверу из WSL нужно узнать какой адрес система Windows присвоила WSL окружению, для этого вернитесь к PowerShell и выполните:
ipconfig
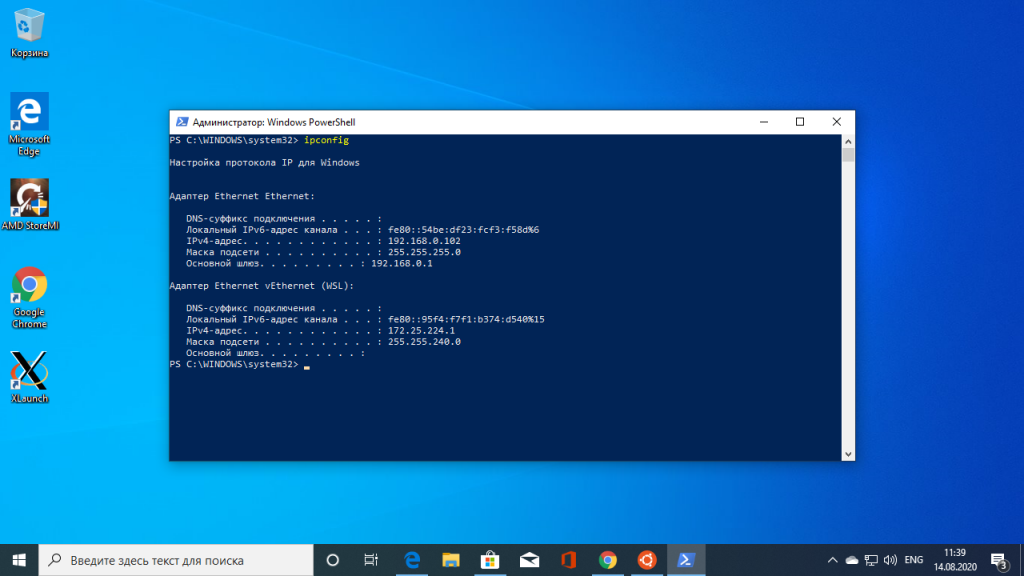
В данном случае это 172.25.224.1. Выполните в окружении дистрибутива такую команду:
export DISPLAY=172.25.224.1:0
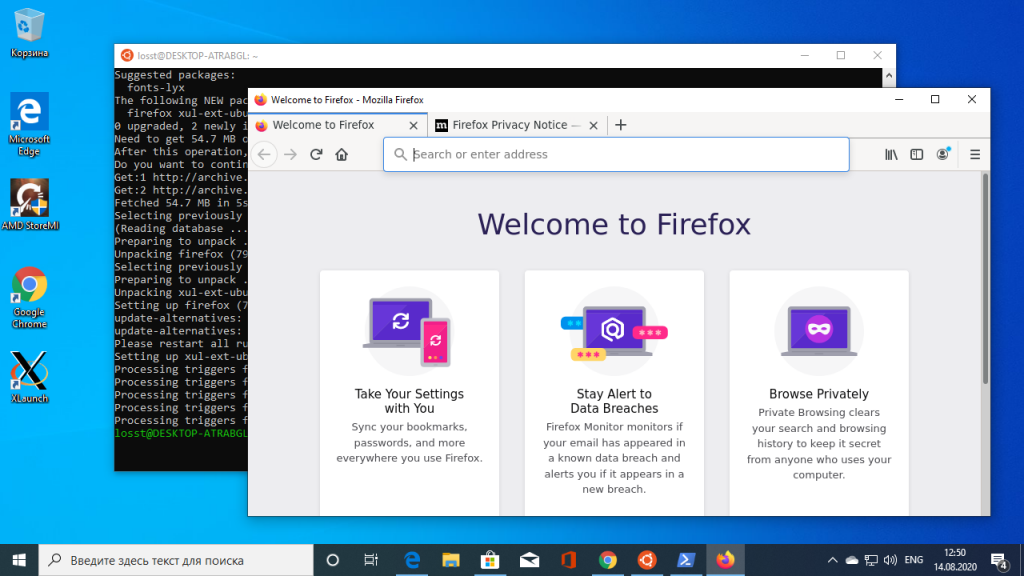
Шаг 9. Установка и запуск приложений
Для установки приложений в дистрибутив необходимо сначала обновить списки репозиториев:
sudo apt update
Затем установите графическое приложение, например, Firefox:
sudo apt install firefox
После этого его можно запустить:
firefox
На снимке вы видите графический интерфейс WSL для браузера Firefox, запущенного в Linux:
Использование WSL
Установка WSL Windows 10 завершена. Теперь у вас есть полноценная командная строка Ubuntu в Windows с оболочкой Bash. Поскольку используются одни и те же двоичные файлы, вы можете устанавливать программное обеспечение с помощью apt из репозиториев Ubuntu. Можно установить любое приложение, но не все будут работать.
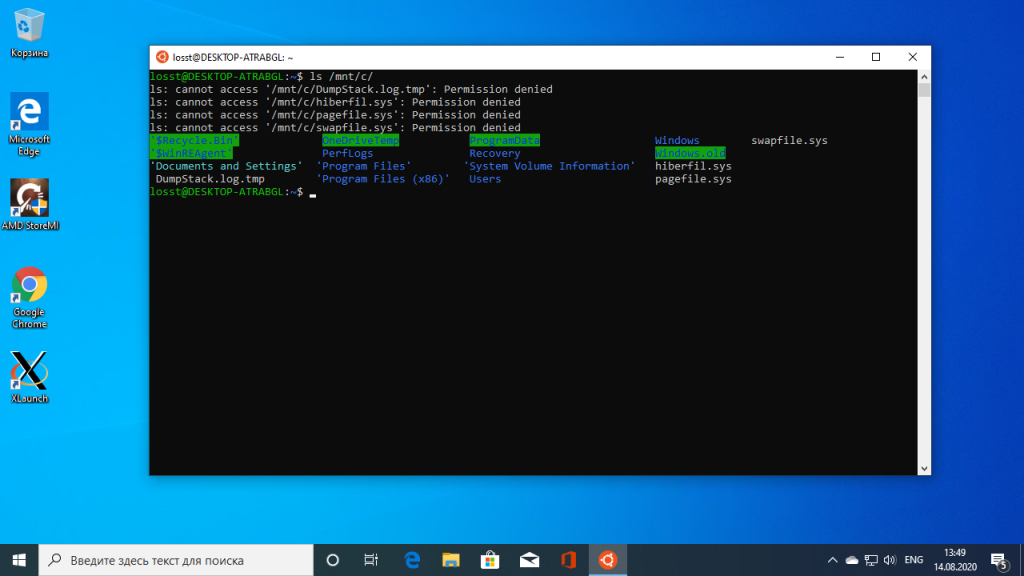
Если вы раньше уже пользовались Bash в Linux или MacOS, то будете чувствовать себя здесь как дома. Здесь не нужно использовать команду sudo, поскольку у оболочки уже есть права администратора. Ваша файловая система Windows доступна в /mnt/c.
Для управления и перемещения по каталогам используйте те же команды что и в Linux. Если вы привыкли к стандартной оболочке Windows, то вот основные команды, которые вам могут понадобится:
- cd — изменить текущий каталог;
- ls — посмотреть содержимое каталога;
- mv — переместить или переименовать файл;
- cp — скопировать файл;
- rm — удалить файл;
- mkdir — создать папку;
- vi или nano — открыть файл для редактирования.
Важно также понимать, что в отличии от WIndows, оболочка Bash и ее окружение чувствительны к регистру. Другими словами, file.txt и File.txt, это совсем разные файлы.
Для установки и обновления программ необходимо использовать команду apt-get. Вот небольшой список ее параметров:
- apt update — скачать списки программного обеспечения из репозиториев;
- apt install пакет — установить пакет;
- apt search слово — поиск пакета по слову;
- apt upgrade — загрузка и установка последних обновлений дистрибутива.
Не забудьте, что устанавливаемые в этой оболочке программы, ограничиваются по области действия оболочкой. Вы не можете получить доступ к ним из обычной командной строки PowerShell, CMD или в любом другом месте Windows. Также WSL не может напрямую взаимодействовать с исполняемыми файлами Windows, хотя обе среды имеют доступ к одним и тем же файлам на компьютере.
Выводы
Использование Linux в Windows как нельзя лучше подойдёт для разработчиков, но может понадобиться и начинающим пользователям, которые хотят познакомиться с системой. А что вы обо всём этом думаете? Использовали ли когда-нибудь WSL? Напишите в комментариях!
Обнаружили ошибку в тексте? Сообщите мне об этом. Выделите текст с ошибкой и нажмите Ctrl+Enter.
Уровень сложности
Простой
Время на прочтение
2 мин
Количество просмотров 5.7K
Для пользователя Linux командная строка Windows кажется чем-то непривычным и неудобным. С появлением WSL казалось, что проблема использования Bash решена, но запуск виртуальной машины требует времени, да и пути в WSL отличаются от Windows. Плюс скорость файловых операций на виртуальной машине хуже.
Ещё есть возможность использовать Bash через MSYS2, но мне хотелось найти что-то более компактное и легковесное, а также простое в настройке и установке.
Так как я часто использовал Linux на роутерах, то познакомился с BusyBox, набор UNIX-утилит командной строки, используемой в качестве основного интерфейса во встраиваемых операционных системах. Оказалось, есть версия BusyBox для Windows. В 2020 году появился Windows Terminal, а в нем есть возможность создавать вкладку с запуском конкретной программы.

Сложив эти два факта, пришла очевидная мысль, использовать BusyBox, содержащий в себе Bash, в Windows Terminal как отдельную консоль.

Для этого необходимо скачать BusyBox 64, и я, например положил файл в C:/Program Files/Busybox. А дальше создать новый профиль Windows Terminal и поменять его имя на Bash и указать команду для запуска как C:/Program Files/Busybox/busybox64.exe bash

У этого подхода был один минус, при запуске терминала не из конкретной папки, а из ярлыка на рабочем столе или из панели задач.

То адрес рабочей папки был C:/Windows/System32, и если случайно ввести команду удаления или создания файла, то мы портим важную системную папку. Обойти возможно используя аналог .bashrc или /etc/profile или .profile.

Но просто создать файл .profile мало, BusyBox для Windows их не считывает, для этого необходимо добавить путь к этому файлу в ENV в “Переменные среды”.

Теперь мы можем написать скрипт, который будет настраивать рабочую директорию при запуске консоли.
#!/bin/bash

domain=$(echo $PWD | tr '[:upper:]' '[:lower:]')

if [ $domain = "c:/windows/system32" ]; then
    cd $HOME
fi
Теперь если мы запустили терминал из ярлыка или панели задач, то рабочей директорией по умолчанию становится домашняя папка пользователя, а если мы запускаем из конкретной папки то, она и становится рабочей директорией.
Мы получили Bash в Windows Terminal с удобной начальной директорией.
Linux on Windows is a reality, thanks to the partnership between Canonical (parent company of Ubuntu) and Microsoft.
When Microsoft’s CEO announced that the Bash shell was coming to Windows, several people couldn’t believe it. #BashOnWindows trended on Twitter for days; such was the impact of this news.
But Bash on Windows (or Windows Subsystem for Linux) was not available to everyone immediately. People had to install the Windows 10 technical preview to install Linux on Windows 10.
That’s not the case anymore; it is pretty easy to install and use WSL now!
📋
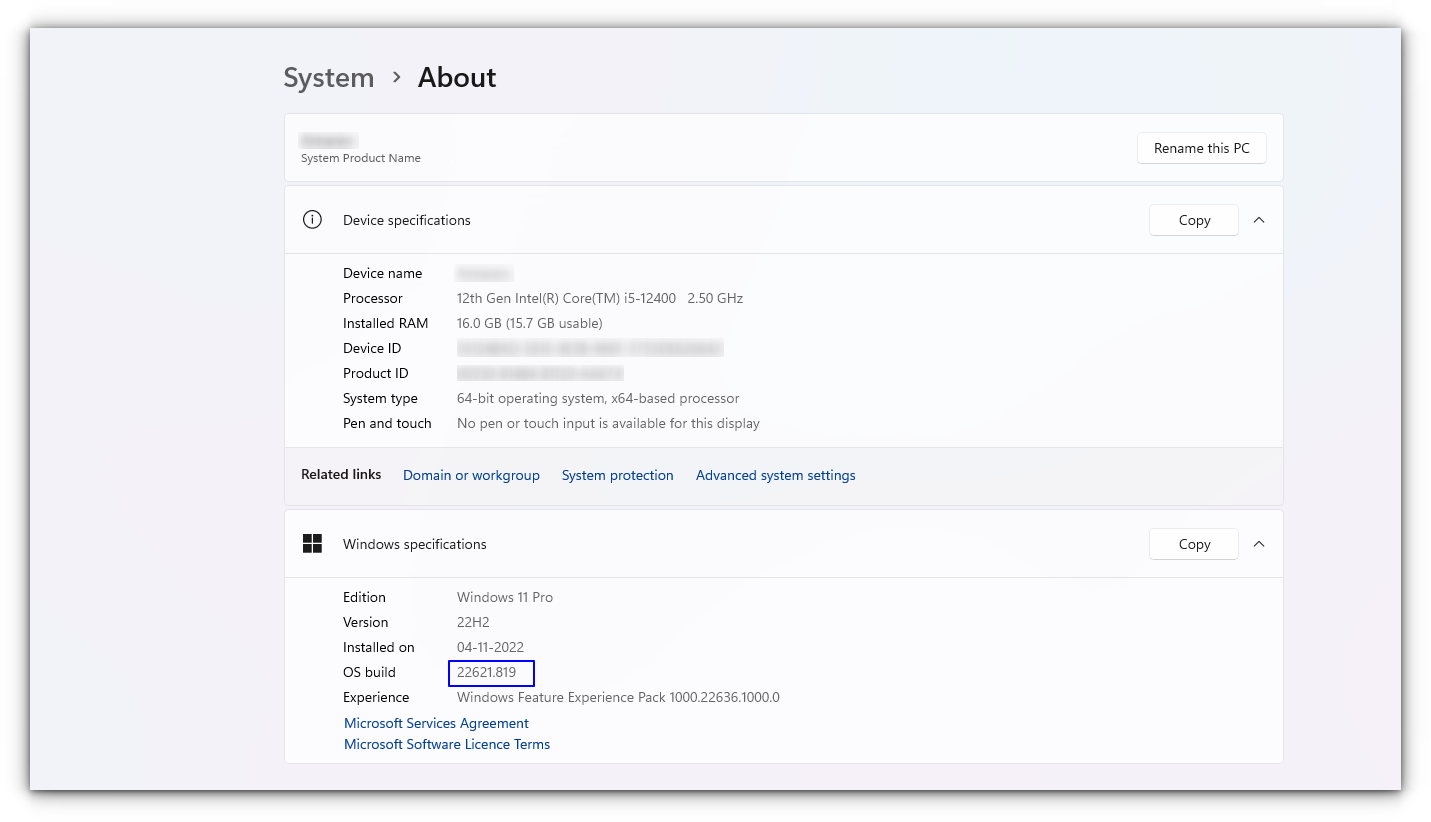
This tutorial was tested with the latest Windows 11 version 22H2, and build 22621.819. You might need to update your Windows installation if you have an older build to follow everything in this tutorial.
What is Bash on Windows?
Bash on Windows provides a Windows subsystem, and Linux runs atop it. It is not a virtual machine or an application like Cygwin. It is a complete Linux system inside Windows 10/11. It allows you to run the same Bash shell you find on Linux. You can run Linux commands inside Windows without installing a virtual machine or dual-boot Linux and Windows.
You install Linux inside Windows like a regular application. This is a good option if your main aim is to learn Linux/UNIX commands.
Check for System Compatibility
You must be running specific versions of Windows for the different features described in this article. Requirements necessary for a particular feature to work are described under its titles. To check your Windows version, search for about in the start menu.
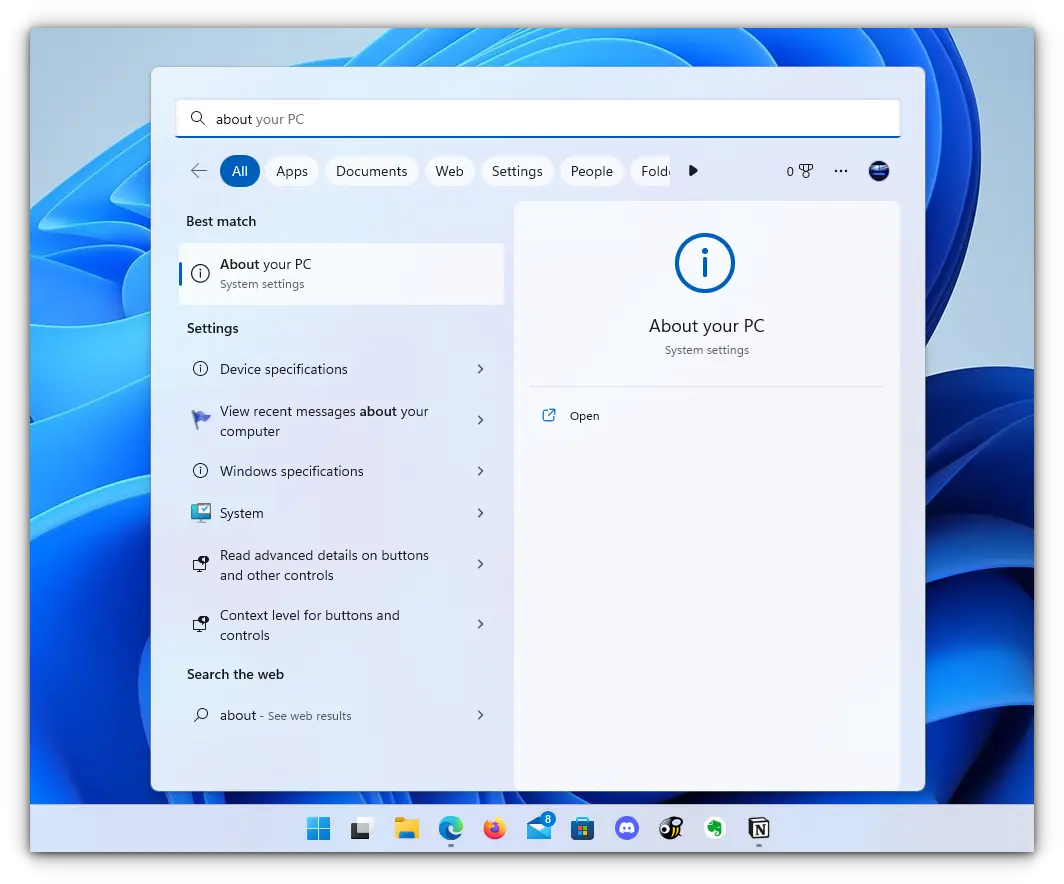
Here, you can see the build of your PC, as shown in the screenshot below. Make sure it is matching with the respective requirements described under various sub-headings here in this article.
- You must be running Windows 10 version 1607 (the Anniversary update) or above.
- WSL only runs on 64-bit versions 32-bit versions are not supported.
Install Bash in Newer Windows 10 and 11
The good thing is that the latest set of upgrades, including the stable release of WSL v1.0 released from Windows, makes it easier to install Bash on Windows.
There are two ways you can go about it:
- You can get it in one click from Windows Store.
- Choose to use the command-line.
1. Install WSL Using the Microsoft Store
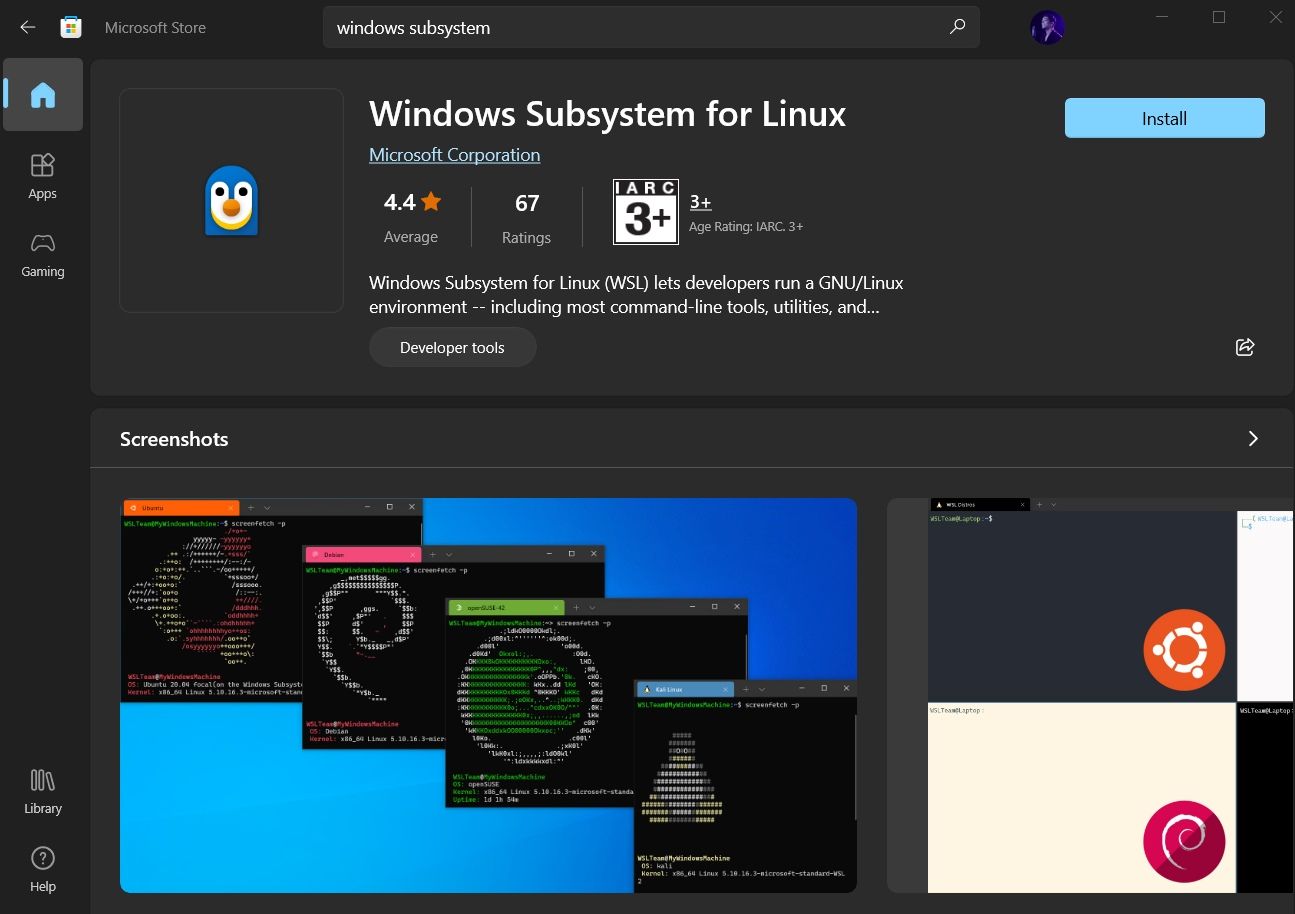
Launch the Microsoft Store and search for «Windows subsystem«.
Install it, and you’re done with the first step. Next, you have to install a Linux distribution.
So, if you try to open WSL, you will get to see a window informing you that no distribution is installed.
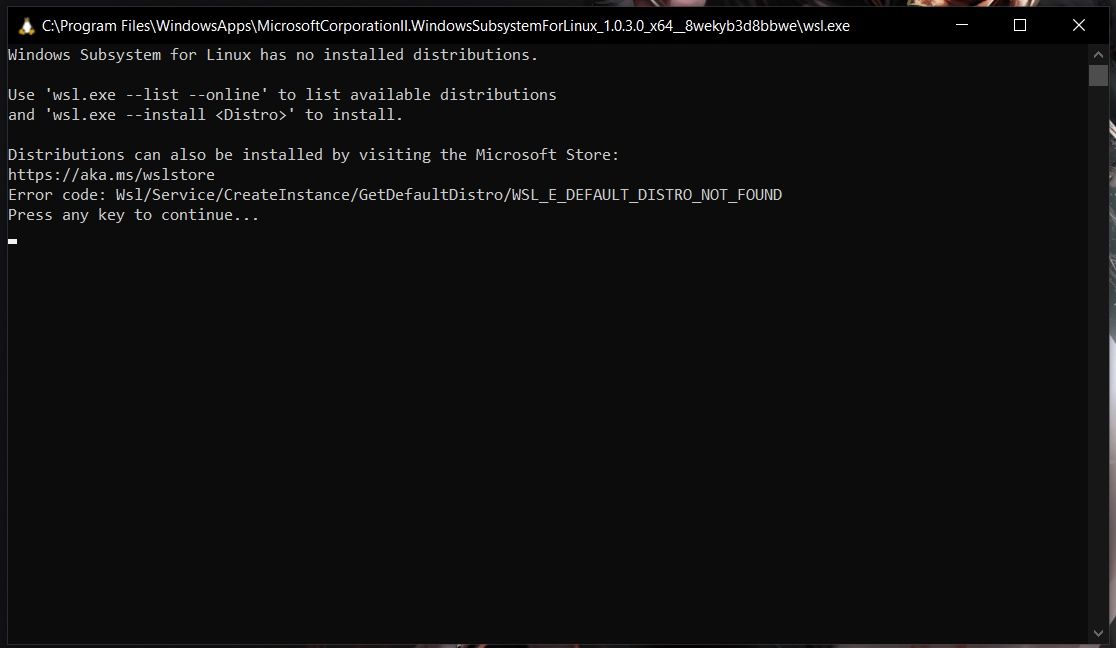
Similar to WSL, search for the distribution on Microsoft Store, and then install it.
For instance, I installed Ubuntu from the store as shown in the image below:
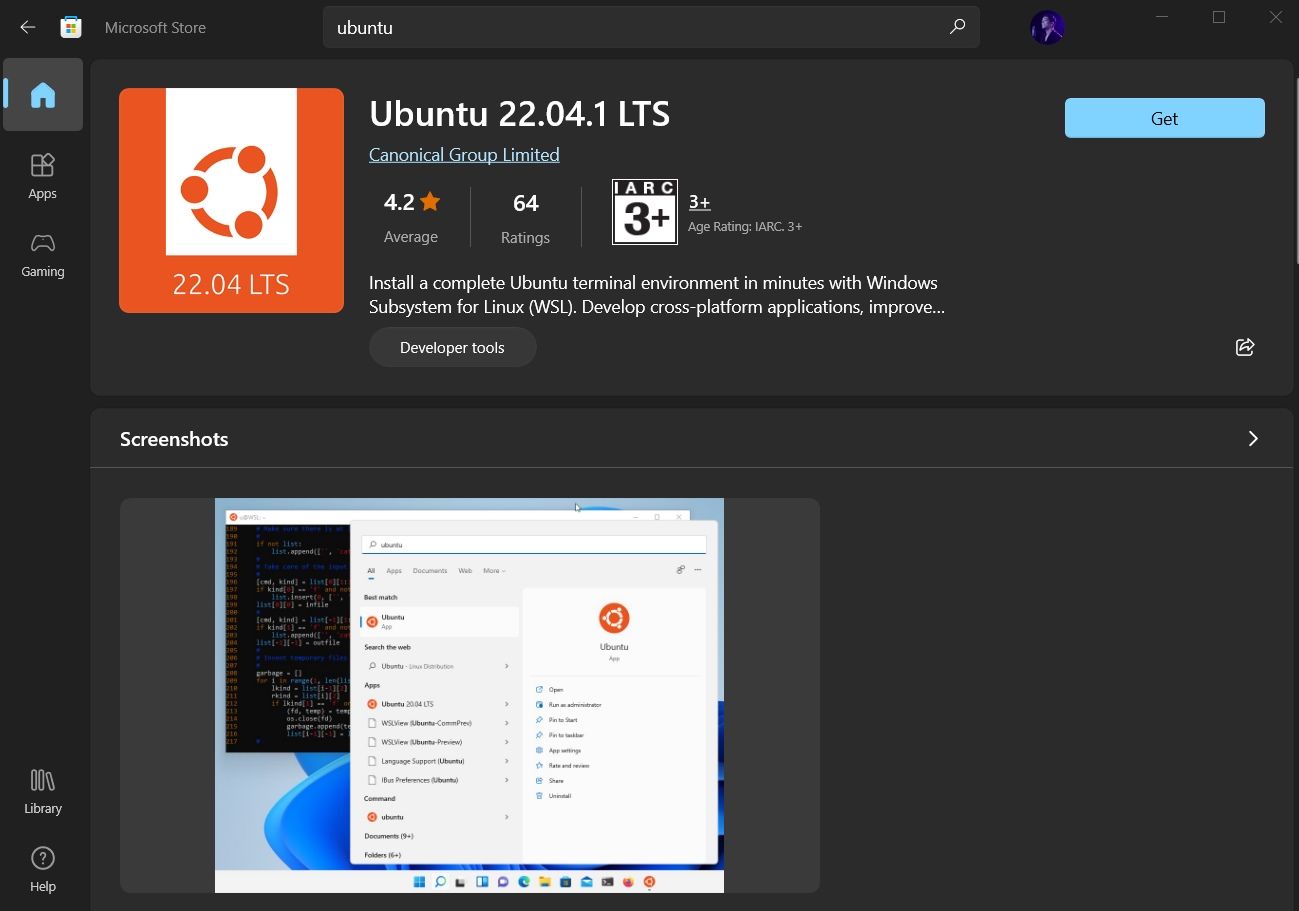
And, then proceed to «Open» it and it will automatically start installing. The procedure is same for any distribution you choose.
We then have to configure it, which is discussed right after installing it through the command line.
2. Install WSL and the default distribution using the command-line
In WSL, the default distribution is Ubuntu (which can be changed). To install, open Powershell as an administrator.
For this, search for Powershell in the start menu, right-click on Powershell and select Run as Administrator.
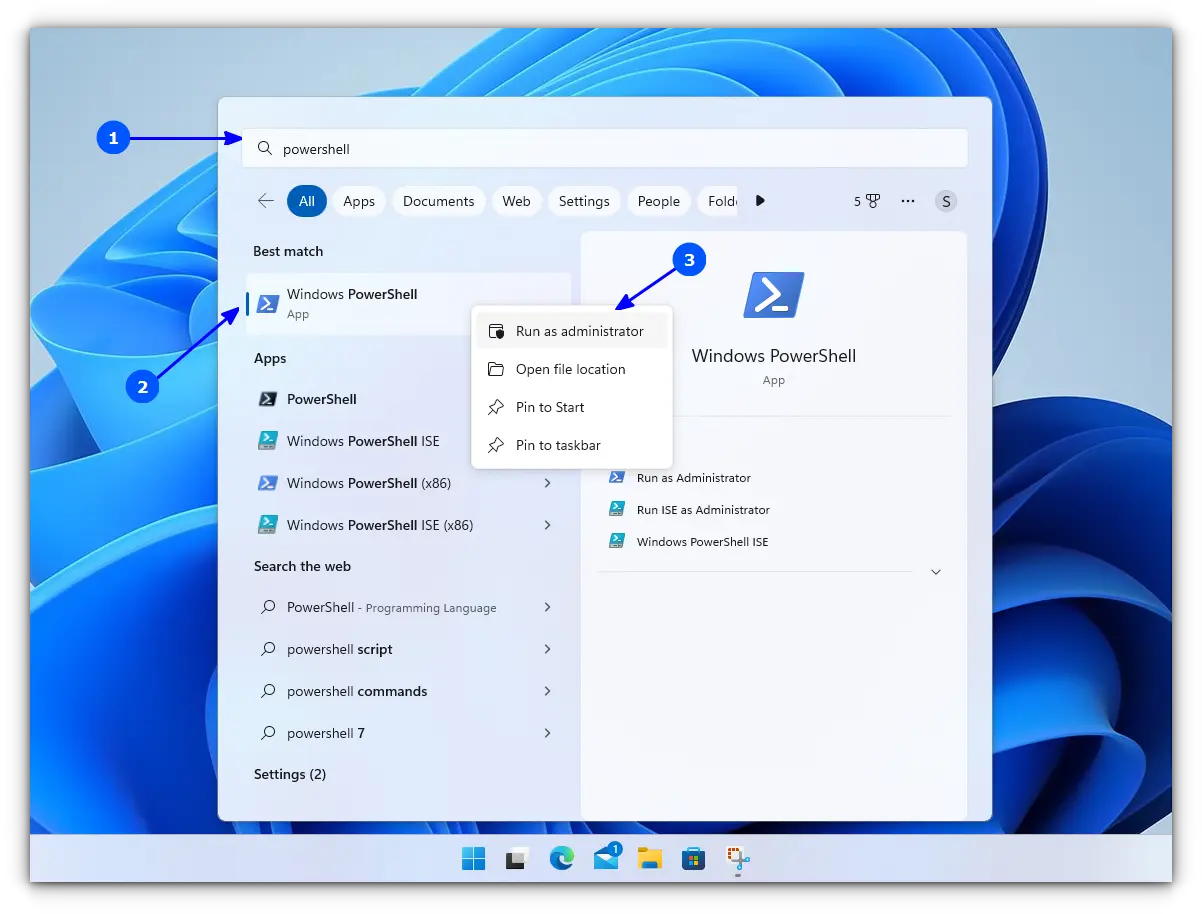
Inside Powershell, enter the following command to install WSL, along with all necessary features and the default distribution, that is, Ubuntu.
wsl --installOnce finished downloading and installing, you need to reboot to apply the changes.
Whether you installed WSL and Ubuntu using the Microsoft Store or the command line, you need to configure it.
Here’s how it is done:
🛠️ Configure the newly installed Ubuntu
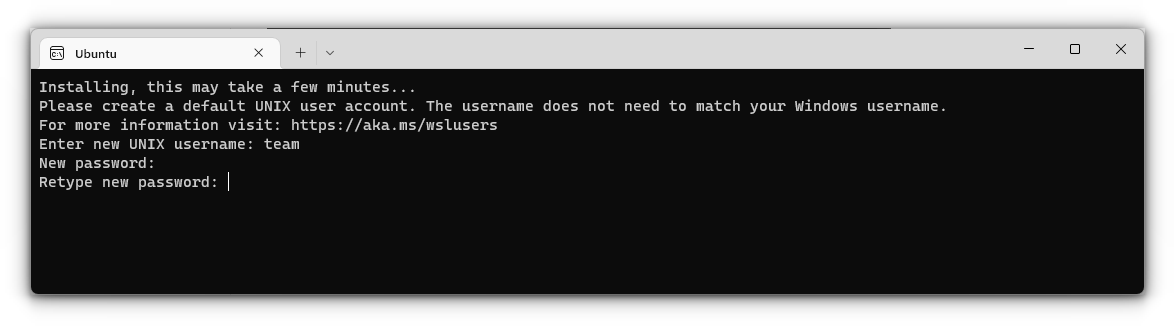
After rebooting, search for Ubuntu in Start Menu and open it.

It will ask you to enter a UNIX Username and Password. Enter these details and press enter key.
You will now be inside the terminal window of Ubuntu.
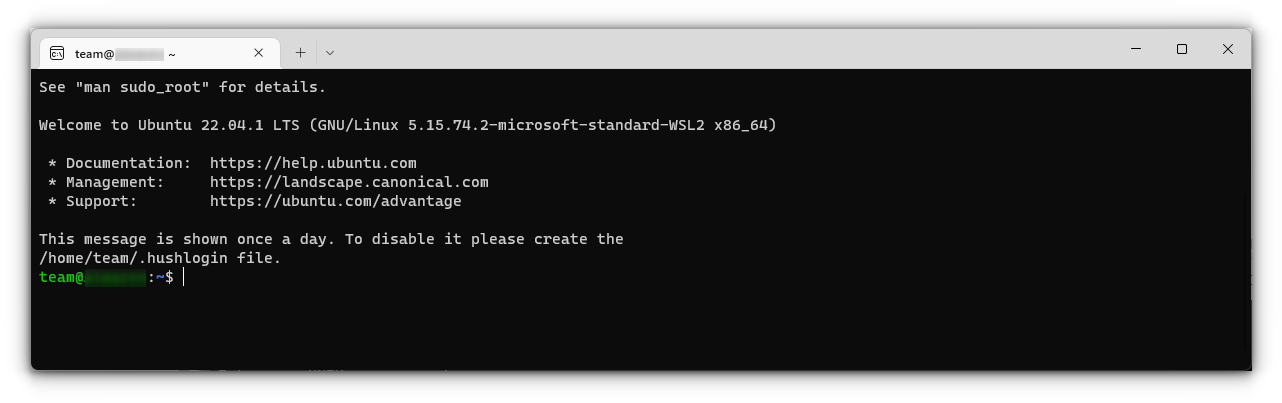
Once logged in, you need to update the installed Ubuntu. For this, enter the following commands one by one:
sudo apt update
sudo apt full-upgrade
After completing the update, you are good to go with Ubuntu in WSL.
Install Bash on Older Windows
If you have the minimum requirements mentioned in the beginning but are running an older Windows build, the previous method may not be supported. So there is a manual installation method.
Also, there are both WSL1 and WSL2 available. WSL2 offers some upgraded functionalities but has some minimum requirements to run:
- For x64 systems: Version 1903 or later, with Build 18362 or later.
- For ARM64 systems: Version 2004 or later, with Build 19041 or later.
So this brings us to two possibilities to install:
- Install Ubuntu with WSL1
- Install Ubuntu with WSL2
1. Install Ubuntu with WSL 1
This is a relatively simple procedure for those with a system incompatible with WSL2. First, you need to enable the Windows Subsystem for the Linux feature. This can be done through the command line. Open Powershell as an administrator and enter the following command:
dism.exe /online /enable-feature /featurename:Microsoft-Windows-Subsystem-Linux /all /norestartOr, to do this via GUI, follow the steps below:
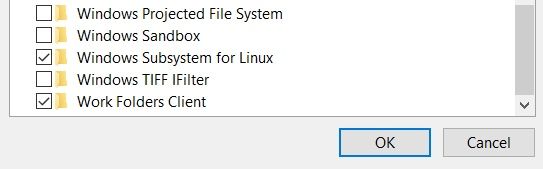
- Search for Windows Features in Start Menu.
- Turn on Windows Subsystem for the Linux feature.
- Reboot your system.
- Open the Windows store and search for the distribution of your choice to install.
Once installation is completed, open the Ubuntu app from the start menu. It will take a couple of seconds to install. You will be prompted to enter a username and password. Provide those credentials, and you are good to go with Ubuntu in WSL1.
2. Install Ubuntu with WSL 2
It is recommended to use WSL2 instead of WSL1 if you have support. To install Ubuntu with WSL2, you need to make sure that the Windows Subsystem for Linux feature is turned on. For this, as in the above case, execute the following command in an elevated Powershell:
dism.exe /online /enable-feature /featurename:Microsoft-Windows-Subsystem-Linux /all /norestartReboot the device once the command is completed.
After this, you need to enable the Virtual Machine Platform feature. Open the Powershell with admin privileges and enter the following command:
dism.exe /online /enable-feature /featurename:VirtualMachinePlatform /all /norestartOnce again, restart the device to complete the WSL install and update to WSL 2.
Now, download the Linux Kernel Update Package for x64 machines from the official website. If you are using ARM64 devices, use this link to download the latest kernel update package.
If you are not sure about the device architecture, enter the command below in Powershell to get the type:
systeminfo | find "System Type"When the file is downloaded, double-click on it and finish the installation of the Kernel update package.
Now, open PowerShell and run this command to set WSL 2 as the default version when installing a new Linux distribution:
wsl --set-default-version 2Once WSL2 is set as the default version, you can now install the Linux distribution of your choice.
Go to Windows Store and install Ubuntu, as described in the earlier steps. and the rest of the procedure is already described above.
Enjoy Linux inside Windows.
🔧 Troubleshooting Tip 1
«The WSL optional component is not enabled. Please enable it and try again.»
You may see an error like this when you try to run Linux inside Windows 10:
The WSL optional component is not enabled. Please enable it and try again.
See https://aka.ms/wslinstall for details.
Error: 0x8007007e
Press any key to continue...
And when you press any key, the application closes immediately.
The reason here is that the Windows Subsystem for Linux is not enabled in your case. You should enable it as explained in this guide. You can do that even after you have installed Linux.
🔧 Troubleshooting Tip 2
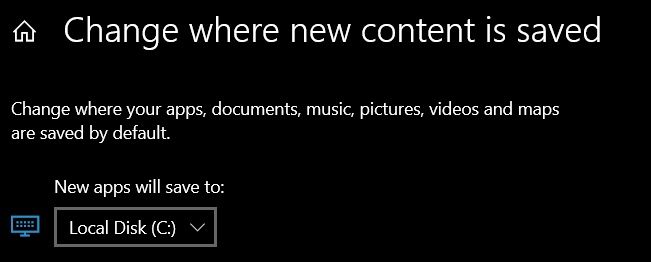
Installation failed with error 0x80070003
This is because Windows Subsystem for Linux only runs on the system drive i.e. the C drive. You should ensure that when you download Linux from the Windows Store, it is stored and installed in the C Drive.
On Windows 10, go to Settings -> Storage -> More Storage Settings -> Where new content is saved: Change where new content is saved and select C Drive here.
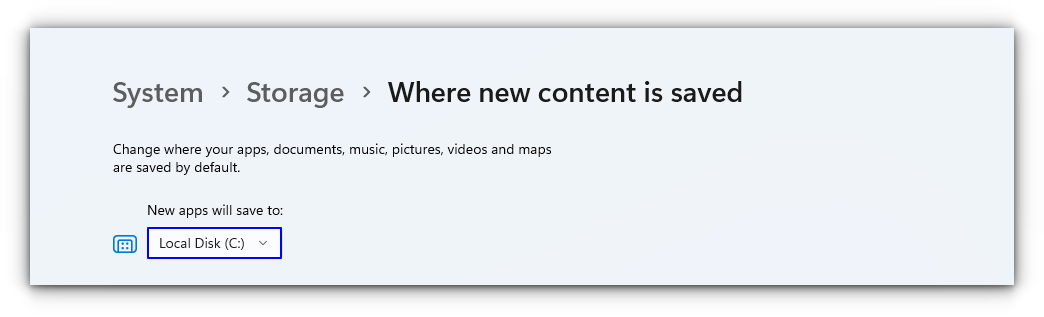
On Windows 11, go to Settings -> System -> Storage -> Advanced storage settings -> Where new content is saved and select C Drive here.
🔧 Troubleshooting Tip 3
«Failed to attach disk Error»
Sometimes, this error will appear when we reinstall the Ubuntu in WSL.
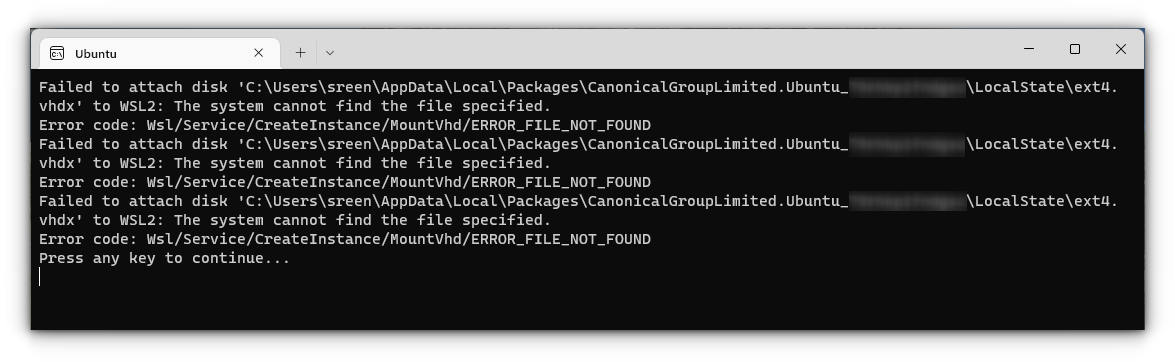
In this case, open Powershell and run the following command:
wsl -l -vThis will list the installed Linux systems. Find the name of the system, that is throwing the error, in my case Ubuntu. Now run the following command:
wsl --unregister UbuntuYou can restart the ubuntu app and it will run without any issues.
You can refer to more common troubleshooting methods from the official website.
Run GUI Apps On Windows Subsystem for Linux
The ability to run GUI apps on Windows Subsystem for Linux was introduced with the WSL 2 release in May 2020.
Windows Subsystem for Linux (WSL) with WSL2 now supports running Linux GUI applications (X11 and Wayland) on Windows in a fully integrated desktop experience. This allows you to install Linux applications and seamlessly integrate them into Windows desktop, including features like “pin to taskbar”.
📋
One crucial point is that you must be on Windows 10 Build 19044+ or Windows 11 to access this feature.
Step 1: Enable/Update WSL 2
This procedure has been explained in the above section and you can refer to it.
Step 2: Download and Install Graphics drivers
To run GUI apps, you need to install appropriate graphics drivers. You can use the following link to download the drivers according to your provider.
- Intel GPU Driver for WSL
- AMD GPU Driver for WSL
- NVIDIA GPU Driver for WSL
Once installed, you are all done.
Step 3: Install some GUI Apps
Now, go to your Ubuntu app and install any GUI app using the APT package manager. You should note that running apps from other sources like flatpak are problematic within WSL.
For this article, I installed the Gedit text editor using the following command:
sudo apt install gedit -yThis will install several MB of packages including required libraries. Once completed, you can run the following command to start the GUI Gedit app in Windows.:
gedit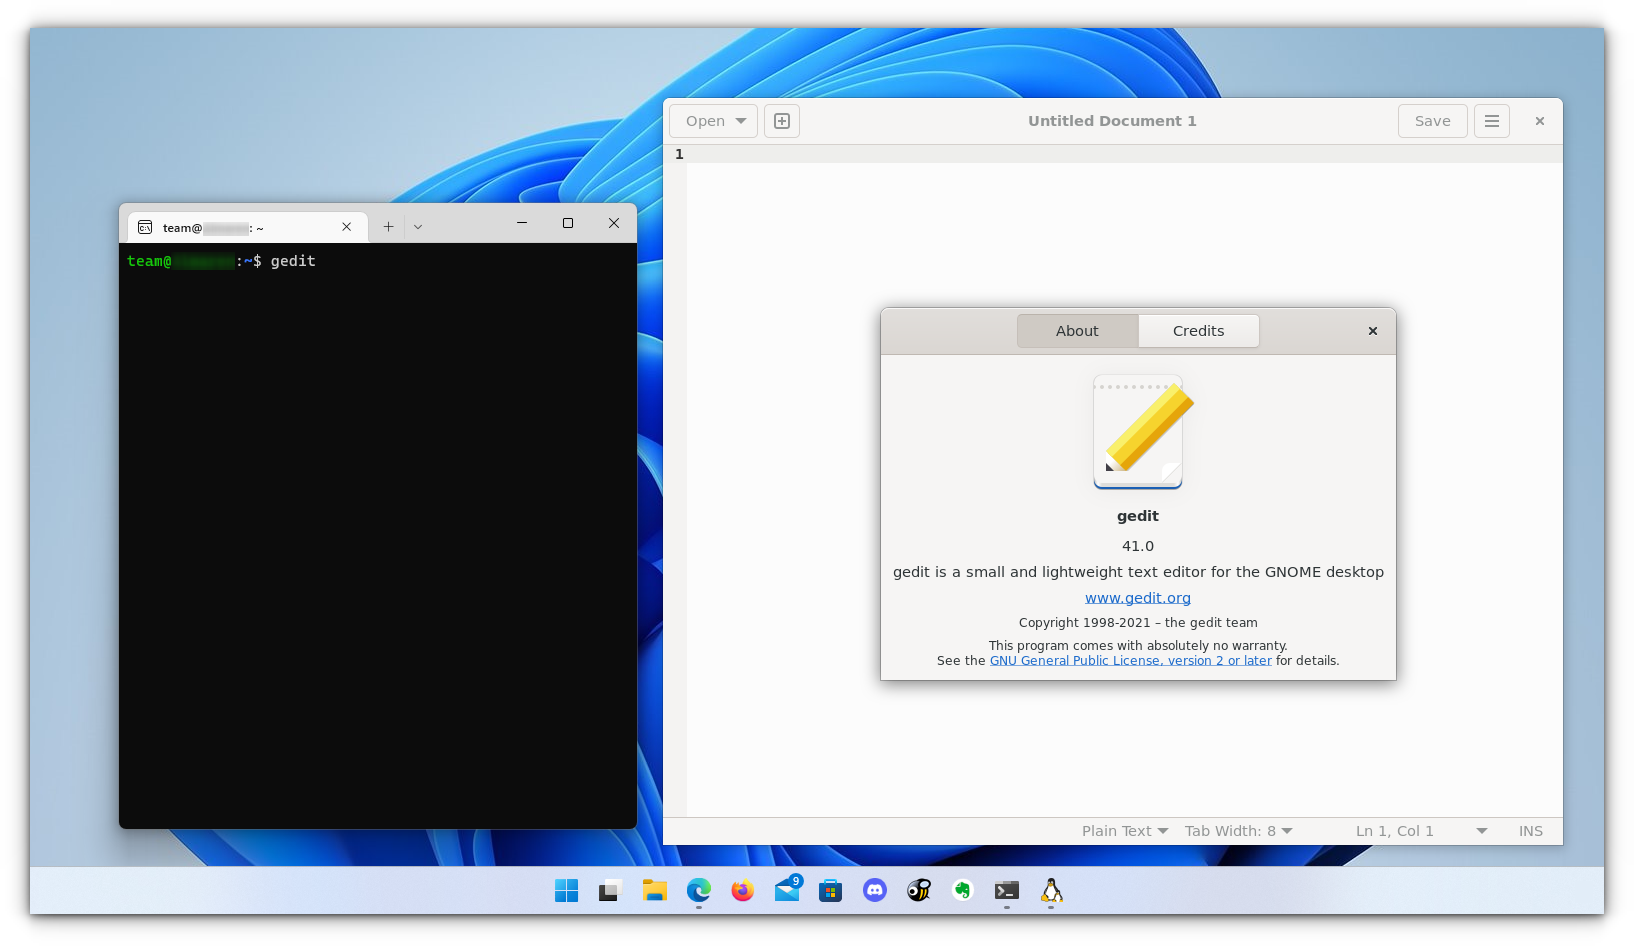
Similarly, you can install all the popular applications available to Linux, including Nautilus file manager, GIMP, etc. For more about running GUI applications in WSL, you can refer to the official documentation.
Install Linux Bash Shell on other older Windows 10
If you cannot get the Fall Creator’s update on Windows 10 for some reason, you can still install it if you have the Anniversary update of Windows 10. But here, you’ll have to enable developer mode. I still recommend upgrading to the Fall Creator’s update or the latest Windows 10 2004 version update though.
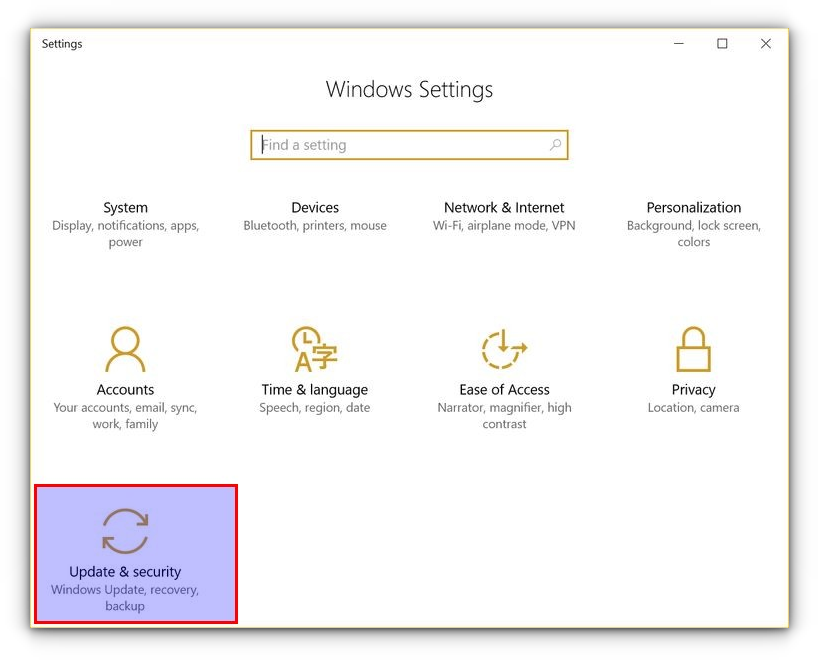
Press Windows Key + I to access Windows system settings. Here, go to Update & Security:
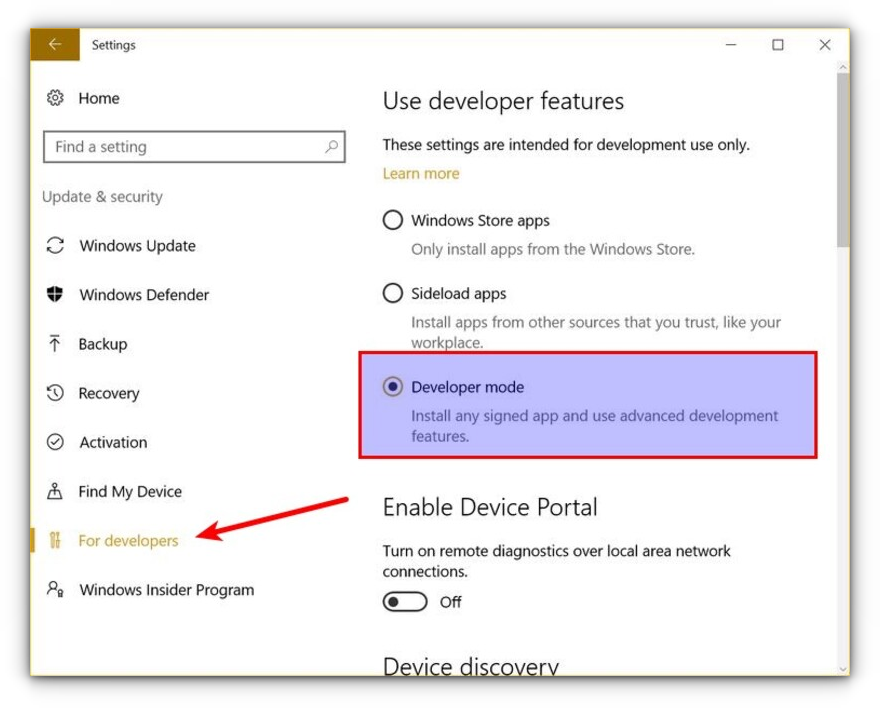
From the left side pane, choose “For developers.” You’ll see an option for “Developer mode.” Enable it.
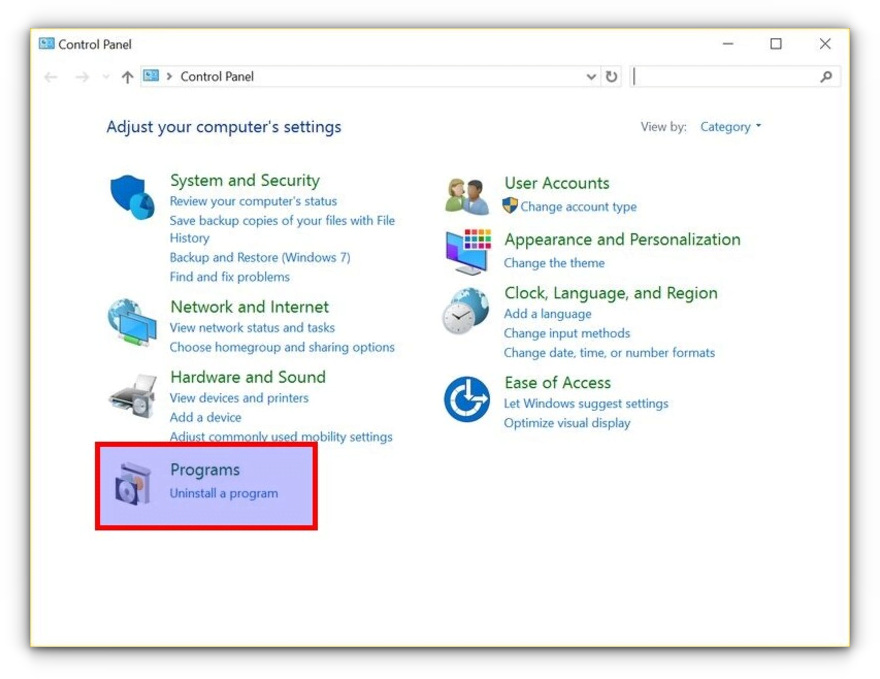
Now search for Control Panel and in Control Panel, click on “Programs”:
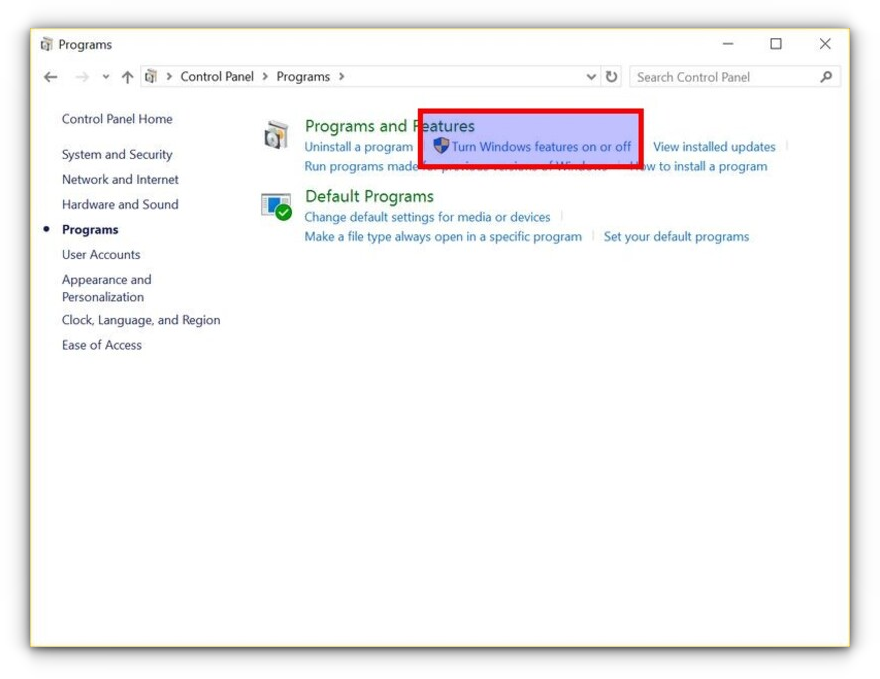
In Programs, click “Turn Windows features on or off”:
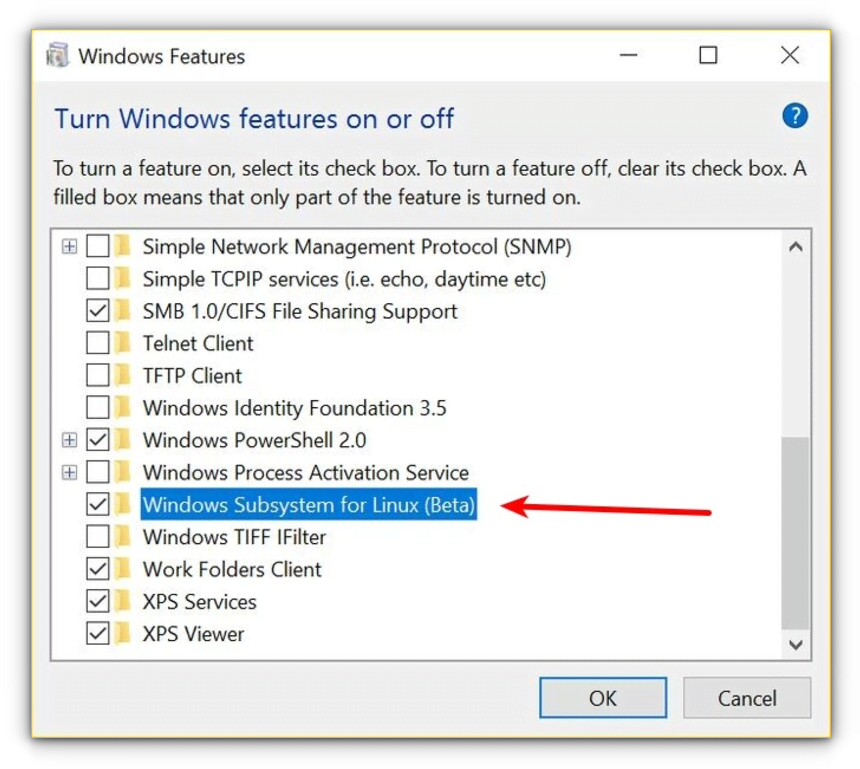
When you do this, you’ll see several Windows features. Look for “Windows Subsystem for Linux” and enable it.
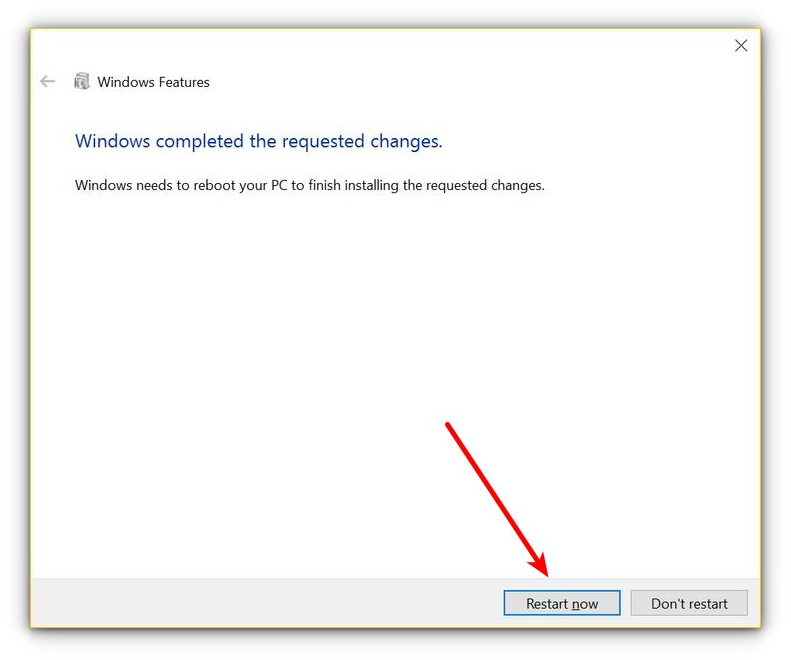
You’ll need to restart the system after doing this.
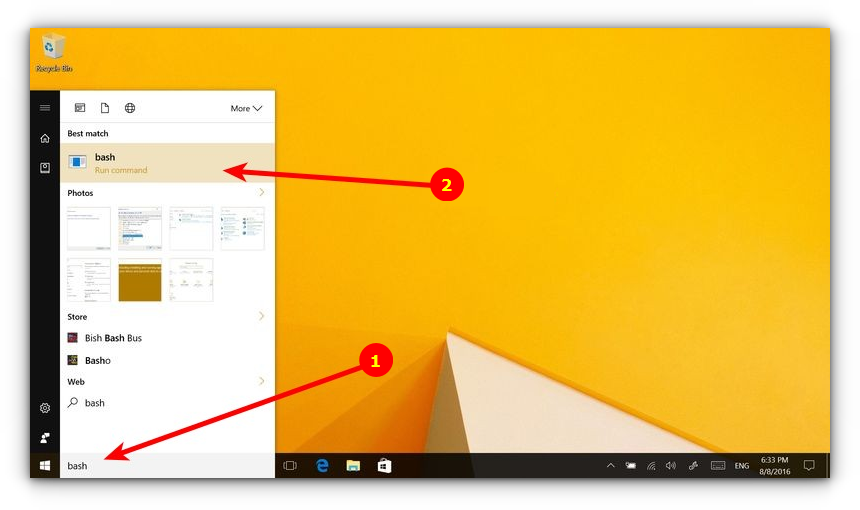
After restarting the computer, click the start button and search for “bash”.
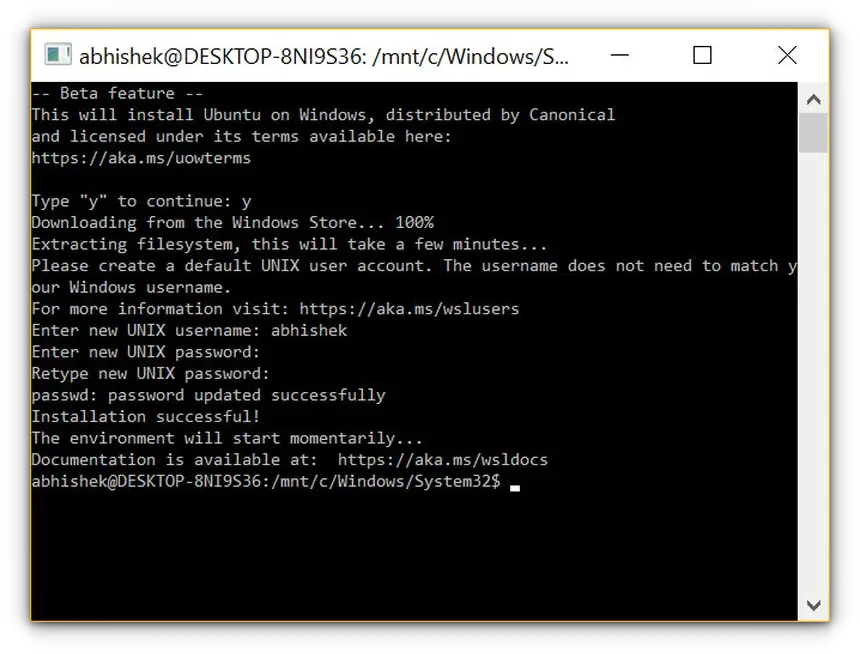
When you run it for the first time, you’ll be given the option to download and install Ubuntu. You’ll be asked to create a username and password during this process. It will install an entire Ubuntu Linux system, so have patience as it will take some time in downloading and installing Linux on Windows.
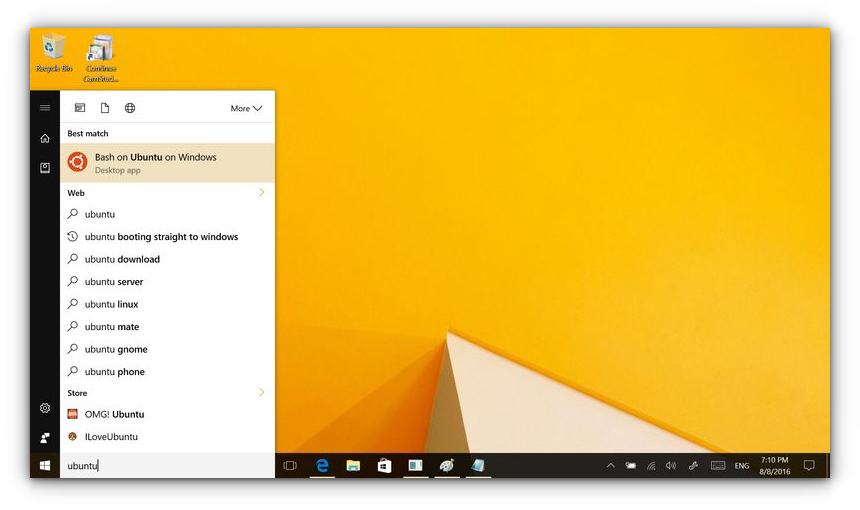
Once this is done, go back to the Start menu and search for Ubuntu or Bash.
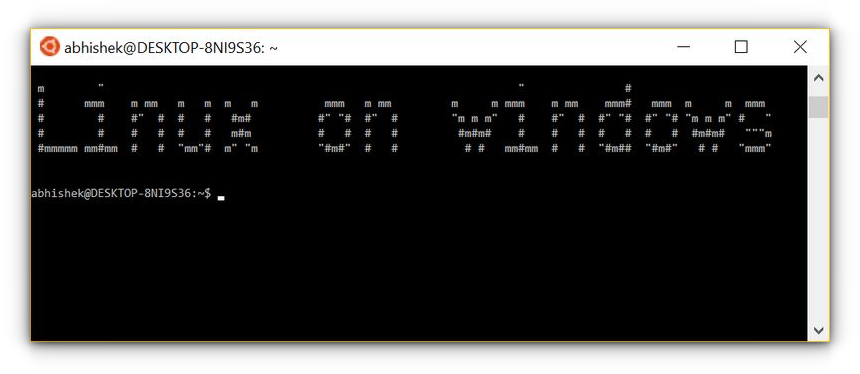
Now you have a command line version of Ubuntu Linux. You can use apt to install various command line tools in it.
💬 I hope you find this tutorial helpful for installing bash on Windows and experimenting with Linux GUI apps on Windows. No wonder WSL lets you play with Linux inside of Windows. If you have questions or suggestions, feel free to ask.
Bash has been one of the most well-known feature of Linux distributions, which due to its flexibility as well as ease of usage, made it popular among programmers. The Windows’ operating system’s command line interface, cmd.exe, on the other hand, lacked various capabilities of it’s Linux counterpart.
Microsoft, therefore, in their Anniversary Update, added several features to the Windows 10 OS, with bash being one of them. To install and use it on Windows 10, one need to perform the following steps :
- Start -> Settings -> Update&Security. Under the ‘Use Developer Features’, select ‘Developer mode’.

- Selecting the developer mode will pop the following alert. Click yes, and let the computer restart.


- Go to Control Panel -> Programs and Features -> Turn Windows Features On and Off. In the window that appears, check the ‘Windows Subsystem for Linux’ option, and click OK.

- This will trigger an alert asking for the system to be restarted to complete the installation of the required components. After the restart is complete, go to the command prompt, and type ‘bash’. Follow the instructions that appear to install bash from Windows store. After it is installed, it will be required to create a UNIX username. After completing the installation, exit the prompt.
- To access the shell, simply type ‘bash’ in the Windows command prompt, and everything is good to go.


Note that bash runs natively on Windows 10, which is different from using emulators like ‘cygwin’ for Windows which enabled GNU tools to run on unsupported Windows environment. Also, Linux subsystem for Windows 10 is only available on the 64-bit version of the OS.
Last Updated :
11 Jul, 2022
Like Article
Save Article