Electronic Software Distribution (ESD) — это канал распространения дистрибутивов через Microsoft Store и другие внутренние каналы компании.
Electronic Software Distribution (ESD) или электронная система распределения программного обеспечения (ESD), не столько формат, сколько настоящая технология распространения, продажи электронных дистрибутивов Microsoft.
Кроме общеизвестного и наиболее часто используемого ISO-формата, образы промежуточных сборок Windows в интернете могут быть также выложены и в ESD-формате (electronic software distribution), который является зашифрованным WIM-файлом.
Чтобы переконвертировать ESD-файл в ISO образ Вы можете воспользоваться предложенным ниже вариантом.
Скачиваем программу дешифратор-декриптор ESD имиджей esd-decrypter-wimlib-5_0.zip.
Создаем новую папку в любом месте, например на рабочем столе.
Распаковываем esd-decrypter-wimlib-5_0.zip в созданную папку, в неё же помещаем один из скачанных ESD имиджей.

Запускаем с правами администратора файл decrypt.cmd.

Чтобы создать имидж со стандартным WIM файлом, в открывшемся окне введите цифру 1, и нажмите клавишу Enter ↵.

Начнется процесс конвертирования.

И через 5-20 минут (в зависимости от мощности вашего компьютера) в этой же папке появится файл- образ с расширением .ISO.

Таким дистрибутивом может быть образ операционной системы Windows 10 (WIM файл). Все продукты в формате ESD сжаты и зашифрованы, например, образ Windows 10 на 35% меньше размером обычного ISO-образа Windows.
Электронное распространение программного обеспечения — это специфический способ продажи товаров через Internet. Отличительная особенность ESD заключается в том, что отпадает необходимость в доставке купленных товаров потребителям с помощью традиционных средств.
Стоимость доставки снижается практически до нуля. Сам товар и инструкция к нему загружаются на компьютер пользователя непосредственно из Internet.
-
Home
-
News
- Convert ESD to ISO via ESD to ISO Converters
By Amy | Follow |
Last Updated
If your Windows Updates are in ESD format, you have to convert ESD file to ISO. Then make a bootable USB drive and install Windows from the USB. Sometimes, you are required to decrypt and extract ESD files before performing the conversion. Here, MiniTool Partition Wizard offers you a full guide.
Microsoft uses the ESD (Electronic Software Download) image file to supply Windows upgrades, updates, and other components. To be specific, the latest Windows 10 builds are available in the ESD format. The ESD image files are compressed and encrypted.
Given that fact, you can’t directly open or use them as ISO files. You have to decrypt and extract the contents before you move on. Then convert ESD file to ISO with the methods below.
ESD Toolkit, a free and portable command-line tool, can automatically decrypt, extract, and convert files for you. Here, it can be used as an ESD to ISO converter to convert ESD file to ISO. The following steps show you how to do that.
Step 1: Download ESD Toolkit from its official website and then extract it manually.
Step 2: Copy the ESD image file to the folder of the ESD Toolkit. Having the ESD image file in the same folder as the contents of ESD Toolkit is pretty helpful.
Step 3: Open the ESD file with ESD Toolkit. To do that, drag and drop the ESD file onto the “ESDISO.bat” file to open it.
Step 4: In the command window, type “N” and hit Enter.
Step 5: When the program asks whether you want to use a custom destination for your ISO, type “N” and press Enter. If you want to save the ISO file in another location, type “Y” and set the location.
Step 6: Available ESD files will be listed in the command window, including the one that you open the program with. Type the number that represents the target ESD file and press Enter.
Step 7: After you select the file, ESD Toolkit will start the conversion process. Depending on your system resources, this process will take you 15-30 minutes.
Step 8: Once the process ends, the program will close and the converted ISO file can be found in the same directory as the ESD Toolkit.
Convert ESD to ISO via NTLite
NTLite is another ESD to ISO file converter that works on both x64 and x86 versions of Windows 7/8/8.1/10. It enables you to convert ESD to ISO smoothly. Here’s the tutorial on how to convert ESD file to ISO by using NTLite.
Note:
As NTLite doesn’t support encrypted ESD files, you need to decrypt them before converting to ISO.
Step 1: Download and install NTLite on your computer.
Tips:
You can simply get the free version to convert ESD image files.
Step 2: Launch NTLite and then drag & drop the ESD file onto the NTLite program. If a warning window prompts, click the OK button to continue.
Step 3: Choose Operating systems under the Image History category. Then click Convert > WIM (Standard, editable) option.
Step 4: The NTLite will decrypt and extract the ESD file. It will take you 15-30 minutes, so you just need to wait patiently.
Step 5: After the decryption and extraction have been finished, choose the extracted folder and click Create ISO.
Step 6: In the prompted window, input the ISO name and click OK.
Step 7: The ISO creation process takes you 2-5 minutes to complete.
Tips:
The ISO file will be automatically saved to the earlier shown destination.
In addition to ESD Toolkit and NTLite, ESD to ISO file converters like DISM++ and ESD Decryptor Utility to convert ESD to ISO. Then you can make a bootable USB with the help of USB bootable software. After that, install Windows from the USB by following the on-screen instructions.
A simple way to get a system without installation is to migrate the system from another computer. To do that, you need to use a system migration tool. MiniTool Partition Wizard is such a program, enabling you to migrate OS to SSD/HDD.
MiniTool Partition Wizard DemoClick to Download100%Clean & Safe
You can directly use the system after migration, which means that you don’t have to set up the system step by step. This is convenient and time-saving.
About The Author

Position: Columnist
Having writing articles about computer tech for a long time, I am rather experienced especially on the aspect of computer optimization, PC enhancement, as well as tech terms explanation. The habit of looking through tech forums makes me a great computer issues collector. And then, many articles related to these issues are released, which benefit plenty of users. Professional, effective, and innovative are always the pursuit of an editing worker.
Как правило, те из инсайдерских сборок Windows 10, которые можно скачать с торрентов и других свободных источников, распространяются в формате ESD, впрочем, ESD является не столько форматом, сколько технологией распространения программного обеспечения. По сути, файл ESD это тот же архив, что и ISO, но его нельзя использовать для записи и установки операционной системы с DVD или флешки.
Перед записью на переносной носитель файл ESD необходимо конвертировать в ISO. Для этих целей можно использовать наборы дешифровки, обычно поставляемые вместе с дистрибутивами Windows, но гораздо удобнее выполнять преобразование ESD в ISO с помощью утилиты ESD Decrypte, разработанной программистом Артёмом Кононенко.
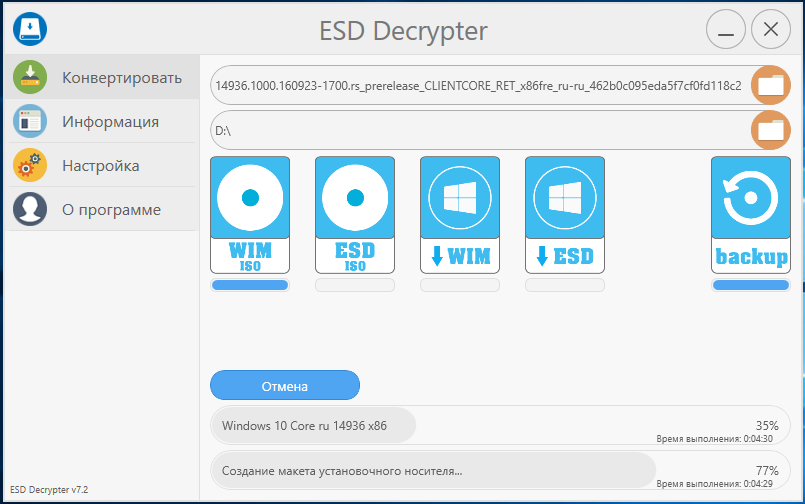
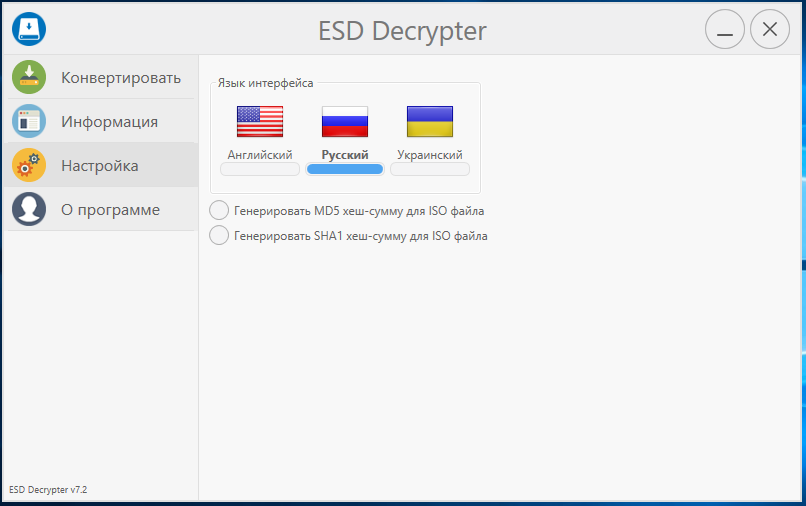
Утилита имеет простой и приятный на вид интерфейс с поддержкой русского языка, не требует установки, не содержит встроенной рекламы. Распространяется она совершенно бесплатно. Основные возможности ESD Decrypte включают создание на основе ESD-файла ISO-образа со стандартным install.wim, создание ISO-образа со сжатым install.esd, создание стандартного файла install.wim и сжатого install.esd.
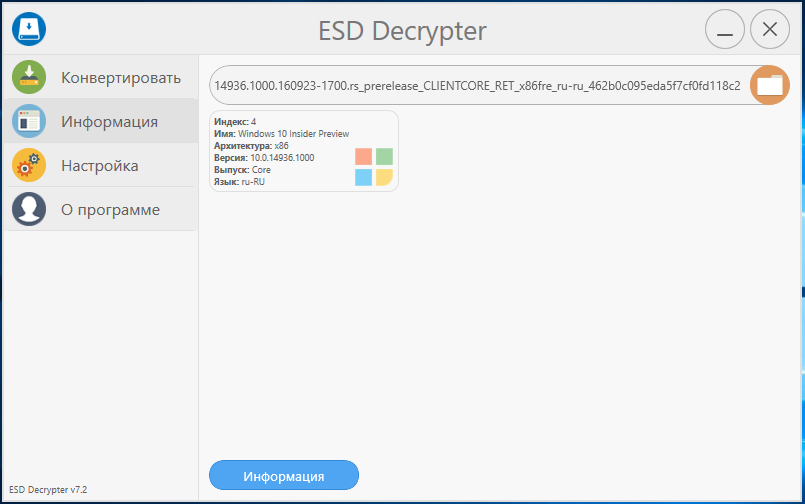
Также программкой поддерживается автоматическая проверка на доступность новой версии, создание резервной копии ESD-файла, получение подробно информации об ESD-образе (индекс, язык, выпуск, архитектура и т.д.) и генерирование хеш-сумм md5 и sha1 для ISO-образов. В настройках утилиты можно выбрать язык — присутствуют английский, русский и украинский.
Пользоваться ESD Decrypte предельно просто. В поле выбора файла указывается путь к исходному образу ESD, а в поле выбора директории — путь к папке, в которую будет сохранён образ ISO. Нажатие кнопки «Конвертировать» запускает процесс преобразования, прогресс которого будет показан в нижней части окна утилиты. В среднем время конвертирования занимает около получаса, а так всё зависит от производительности компьютера. ISO-файл ESD Decrypte сохраняет с приставкой esd, которую нужно удалить, оставив только расширение ISO.
Скачать утилиту: yadi.sk/d/fvd_XxvMw4KwP
![]() Загрузка…
Загрузка…
Electronic Software Download (ESD) files used in Microsoft’s proprietary Windows update format. Files downloaded through Windows Update will be saved locally in ESD format. However. Microsoft has now shifted to UUP-based formatting. People who still have ESD files need to use them from time to time.
ESD files are compressed and encrypted versions of WIM files and need to be decrypted before you can view and use the content within. Unlike ISO files, Windows does not natively support ESD files, and thus cannot be mounted.
A few methods are used in which you can convert an ESD file into an ISO file, so that they can be used easily.
Quick Summary
Convert ESD File to ISO
DISM++
Dism++ is a tool that gives a Graphical User Interface (GUI) to the Windows DISM utility. DISM is a powerful command-line tool from Microsoft for different Windows operations like adding/removing Windows components, compacting the operating system, installing/uninstalling Windows updates, backup and restore the system, etc.
While DISM is a command-line tool, DISM++ uses a GUI to perform the same tasks. In addition to other useful tasks, DISM++ can also convert ESD files to ISO format. The process is simple and can be done by non-professional users.
Perform the following to convert an ESD file to an ISO image:
- Download DISM++ from here.
- Unzip the downloaded file, navigate to the extracted folder and then run DISM++x64.exe or DISM++x86.exe (depending upon your operating systems architecture).

- Proceed by agreeing to the Terms and Conditions, and then click File from the top menu, then click ESD –> ISO.

- Click Browse (top) and select the ESD file to convert, then click Browse and enter a name and location for the converted ISO file. Once done, click Finish.


The DISM++ tool will now begin converting the ESD file into an ISO file. The conversion process may take some time to complete. Once completed, you will receive your desired ISO file in the directory you selected.
ESD Decryptor Utility
You can also perform the same as above using the ESD Decryptor Utility. This is a command-line tool that will convert any ESD file into an ISO image into a few simple cmdlets. Here is how:
- Download ESD Decrypter Utility and exctract the contents.
- Navigate to the extracted folder and run the “1.ESDISO.bat” file with administrative rights. This can be done by right-clicking it and then selecting Run as administrator from the context menu.
- The tool will now run using Command Prompt. You will be asked if you wish to use a custom Cyptographic key. Select No by entering “N.”

- You will then be asked if you want to use a custom Destination path. Enter “N” again.
- Now provide the complete path to the ESD file along with the extension when asked by the tool, then press Enter twice.


The tool will now begin decrypting and converting the ESD file into an ISO image, which will be saved automatically in the same directory as the extracted folder.
NTLite
NTLite is another tiny utility that converts your ESD files to ISO images. Follow the given steps to use this tool for conversion:
- Download NTLite (Free) and install the tool.
- From the utility, click Add at the top, and then click Image file (WIM, ESD, SWM) from the expanded menu.

- Now browse to the ESD file you want to convert and select it.
- Now click Create ISO from the top menu, and then select the name and location where you want to save the converted file.

Once selected, the tool will begin converting the ESD file into an ISO file, which can be found in the selected directory.
Closing Words
Once you have converted an ESD file into an ISO image, you should be able to use it like another ISO file.
There are other tools available online that we have not discussed in this post, such as ESDtoISO and ESD Toolkit. This is because ESDtoISO does not officially work, and the latter (ESD Toolkit) is basically a renamed version of the ESD Decrypter utility.
When we download an image of one of the Windows editions, we can find two types of formats that, although they fulfill the same function, have small differences at the time of processing and are the WIM and ESD formats..
WIM (Windows Image Format) is a disk image format developed by Microsoft in order to correctly implement the Windows 7, 8 or 10 operating system . With the DISM tool (Deployment Image Service Management Tool) we have the ability to execute multiple support and management tasks through a WIM file and thus preserve the integrity of the system.
ESD (Electronic Software Download) is a file format used by Microsoft to send updates to the system and other compatible software. Images in ESD are encrypted, therefore, decryption is required before proceeding to work on it..
These ESD images come by default when we use the Windows Media Creation tool which we obtain for free in the following link.
Windows Media Creation
It is ideal that we convert these ESD files to WIM in order to facilitate the tasks of support, control and administration of Windows..
Check ESD file
To verify that we have an .ESD file, we must access the downloaded image and verify in the SOURCES folder the file install: 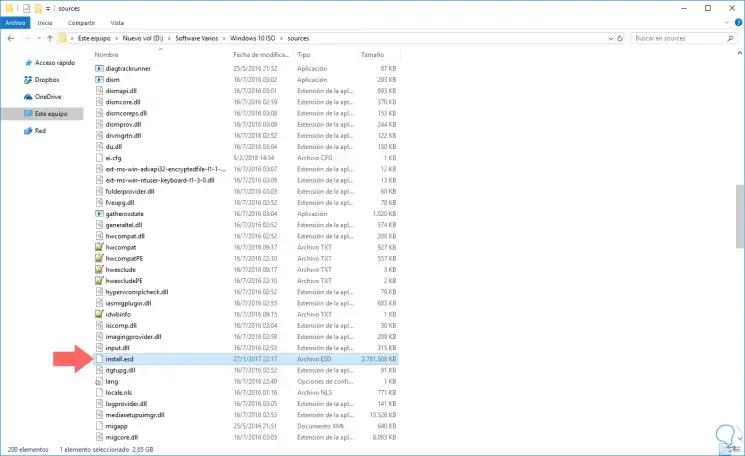
Now, in TechnoWikis we will see how to carry out this conversion process in a practical way.
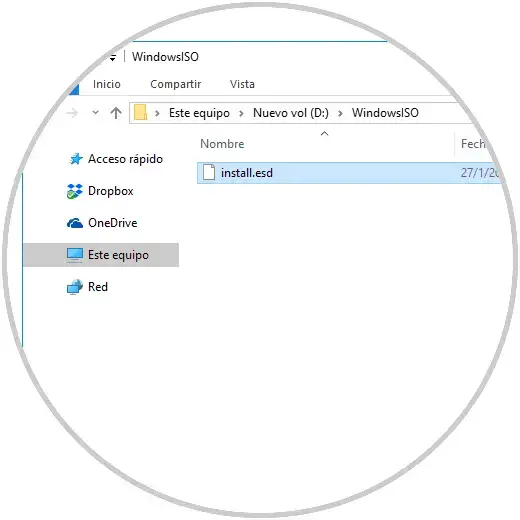
1. How to create folder and copy ESD file
The first step we will take will be to create a folder where the converted image will be hosted, in this case, we have called it WindowsISO and it is in partition D:
D: \ WindowsISO
Now, let’s copy the contents of X: \ Sources \ install.esd into the folder we created where X is the path where the install.esd file is located:
2. How to verify Windows operating system version of the .ESD file
Once we have copied this file, we will validate the system edition (s) stored in the ESD file, for this, we will access the command prompt as administrators and there we will execute one of the following lines:
If the ESD file was copied from a USB drive we run:
dism / Get-WimInfo /WimFile:D:\WindowsISO\install.esd
If the ESD file was copied from an ISO image we execute:
dism / Get-WimInfo /WimFile:D:\WindowsISO\Sources\install.esd
Pressing Enter we will see the following: 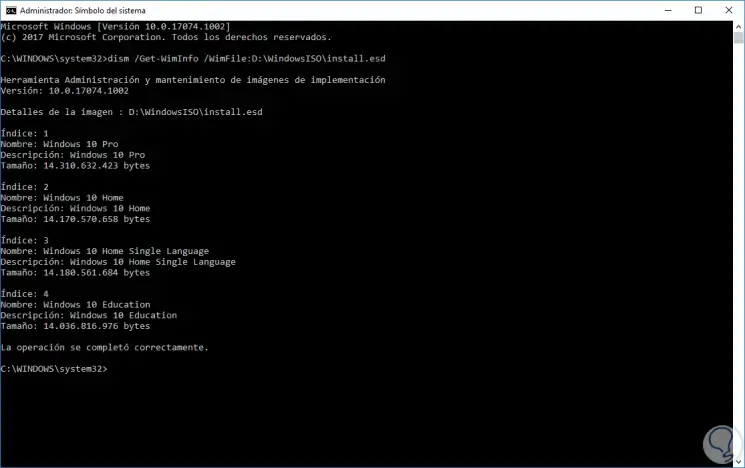
If the ISO uses 32-bit and 64-bit architecture it will be necessary to execute the following:
32 bit
dism / Get-WimInfo /WimFile:D:\WindowsISO\x86\Sources\install.esd
64 bits
dism / Get-WimInfo /WimFile:D:\WindowsISO\x64\Sources\install.esd
In the results generated, we must take into account the index number of the version to use, in this case we will use the Index 1 associated with Windows 10 Pro .
3. How to convert ESD to WIM with DISM command on Windows
As we mentioned before, DISM is a Windows utility for managing and maintaining images and we will use it for the conversion of ESD to WIM in a safe and functional way.
Step 1
To extract the ESD image to a WIM file, we will execute the following at the command prompt:
dism / Export-Image /SourceImageFile:D:\WindowsISO\install.esd / SourceIndex: 1 /DestinationImageFile:D:\WindowsISO\install.wim / Compress: Max / CheckIntegrity
We will see the following: 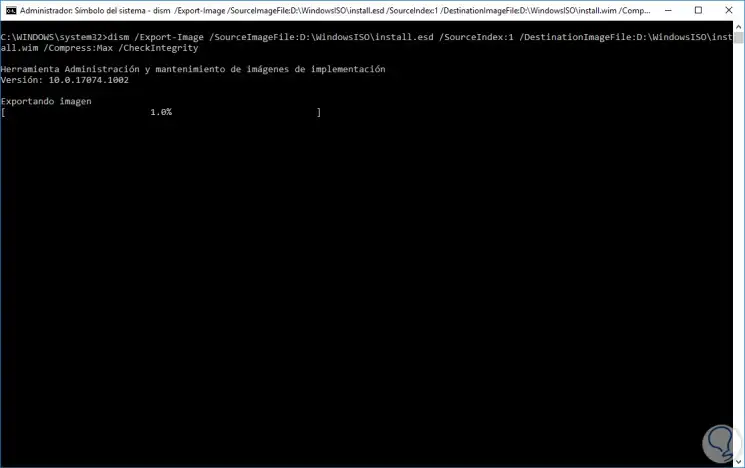
Step 2
During this process we can notice some slowness in the system and this is due to the use of resources that DISM makes in the system: 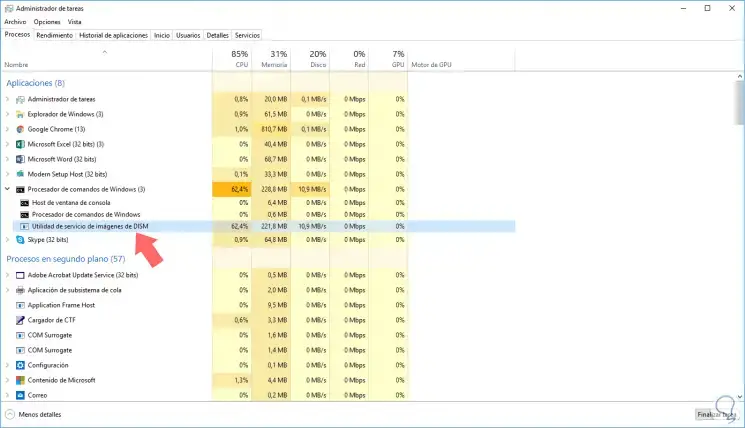
Step 3
Once the process is finished we will see the following: 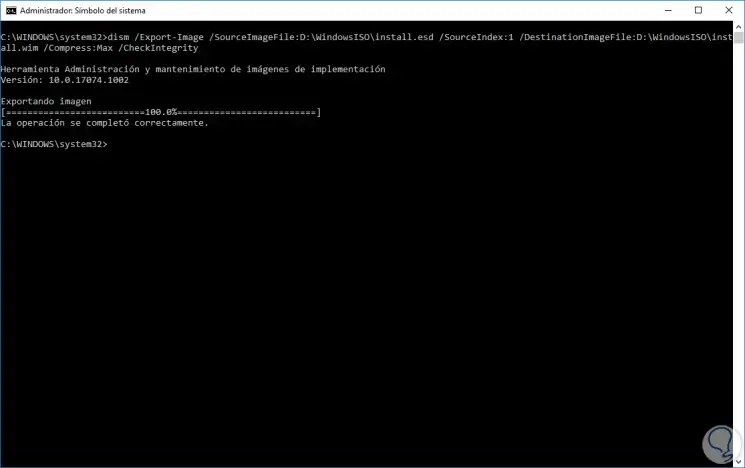
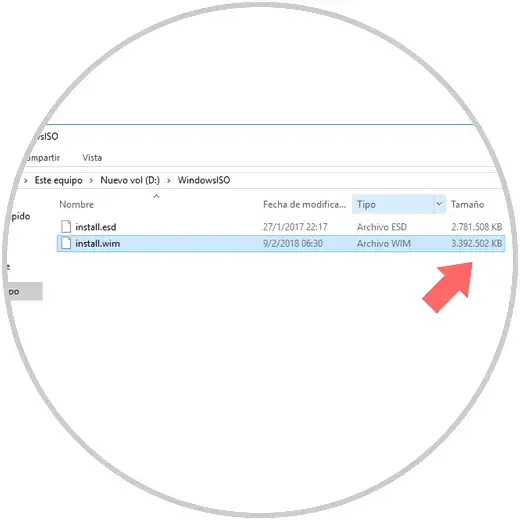
Step 4
Now, we can go to the destination folder and compare the two files:
4. How to convert ESD to ISO using Dism ++ Windows
This is a free tool which has a graphical interface for DISM and is based on CBS which simplifies its use process.
Step 1
Your download is available at the following link:
Dec ++
Some of the actions that we can carry out with this tool are:
- WinSxS cleaning
- Run Windows Update
- Convert from ESD to ISO
- Create backup copies
This utility is portable, therefore, a hard disk installation is not required. Once we extract the content and execute the file, the following will be displayed:
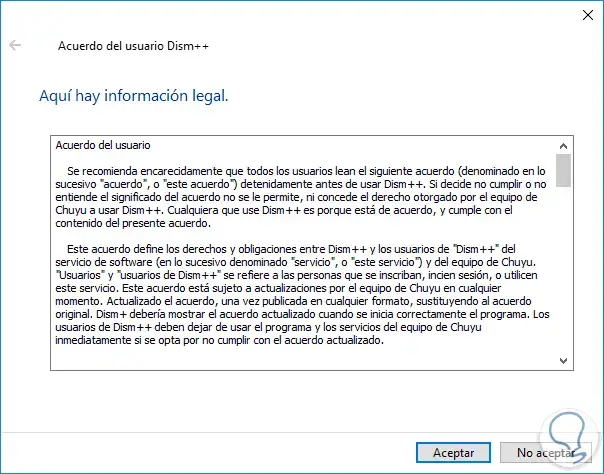
Step 2
There we accept the terms of the license and in the window displayed go to the File menu and select the option ESD to ISO:
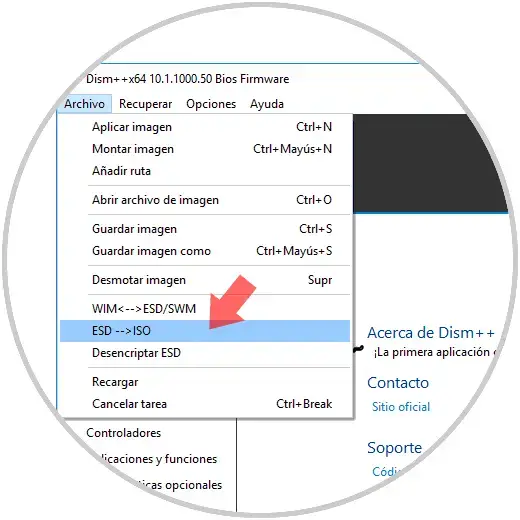
Step 3
The following window will be displayed where we define:
- Select the file install.esd
- We define the path where the ISO file will be stored
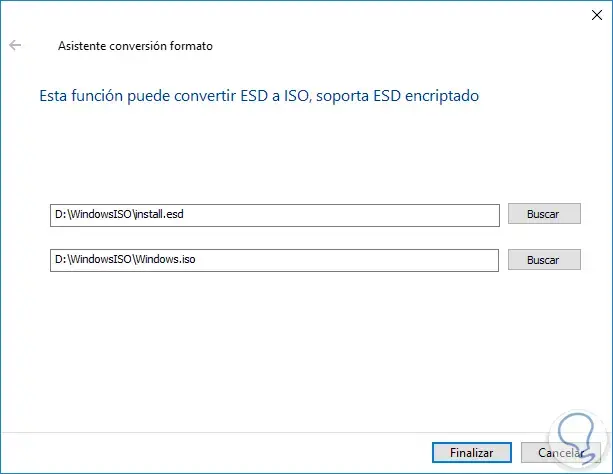
Click on Finish or we will use the following keys to start the conversion process:
+ F Ctrl + F
Thus, we have seen two options to convert ESD to WIM or ISO and take full advantage of these image formats in Windows environments, remember that this process applies to Windows 7, 8 or 10.