Windows is a wonderful operating system and what makes it even more wonderful is the ability to install various kinds of apps. That said, many things could stop you from installing new apps. One such error is “Error writing temporary file, Make sure your temp folder is valid”. In this post, we’ll know more about this error and have a look at some effective ways in which you can fix the error quickly.
What Is “Error Writing Temporary File, Make Sure Your Temp Folder Is Valid”
It is an NSIS or Nullsoft Scriptable Install System error. It occurs when you try to uninstall an application, run an installer package or even restart your computer. As the error code states, when this issue occurs, Windows cannot read or write inside the temp folder. The error also indicates that the .EXE file of the application has become corrupt due to one or the other reason because of which the Windows Installer file is affected and no changes can be made to the application.
What Are The Reasons Behind “Error Writing Temporary File, Make Sure Your Temp Folder Is Valid”
There could be several reasons behind this issue such as –
- PC infected with malware. More specifically, the installer package consists of malicious files.
- Misconfigured temp folder.
- Temp files have become corrupted.
- The installer package is pirated.
Best Ways To Fix “Error Writing Temporary File, Make Sure Your Temp Folder Is Valid”
Solution No. 1 – Try Running Installer As Admin
If you are unable to install the application normally as you would, you can try installing it as an administrator. This step will give complete permission to the installer to run the application on your PC. To run the installer as admin, right-click on the installer and select Run as administrator
Solution No. 2 – Remove Temporary Files Manually
As we said that the error at hand could have occurred because of corrupt temporary files or if temporary files are taking up too much storage space. In either case, here is how you can simply get rid of temporary files on your Windows PC.
1. Open the Run dialog box by pressing Windows + R

2. When the run dialog box opens, type %temp%.
3. Press Enter.
4. When the temporary files open, select all and click on Shift + Delete

Here, we’d like to add that there are more than one ways todelete temporary files on Windows. And, while it is a hassle-free process, there are times when you might find yourself in a situation where you are unable to delete temp files. If that’s the case, this post will help you out.
Solution No. 3 – Configure Appropriate Permissions
In case the temp folder is set to read-only, Windows won’t be able to save files in it. You might be wondering why is that a problem. Windows creates temp files for all kinds of applications, even for ones that you try to install. For this, the temp folder needs full control. And, here’s how that can be established –
1. Open Windows Explorer by pressing the Windows + E keys.
2. Navigate to C:\Users\UserName\AppData\Local. Change the UserName with yours.
3. Right-click on the Temp folder and select Properties.

4. Click on the Security tab.
5. Select your username and click on the Edit button next to To change permissions, click Edit.

6. Click on the Allow checkbox next to Full Control.
7. Click on Apply and then, OK
8. Restart your computer.
Solution No. 4 – Restart Windows Installer Service

As an additional measure, you can also restart Windows Installer Service. Here is how you can enable or disable Windows Installer Service.
Solution No. 5 – Fix Memory-Related Issues

If you are unable to install new software and are constantly running into the “Make sure your temp folder is valid” error message, it could be that there are memory-related issues. To resolve these issues, you can use Windows Memory Diagnostic Tool as shown in this post.
Solution No. 6 – Use A Third-Party Optimizer Program
At this point, if you are still not able to fix the issue, you can bring into force a third-party tool like Advanced System Optimizer. The tool can help identify common issues and fix them as well. It also has a dedicated memory optimizer that can help optimize the unallocated system memory.
How To Use Advanced System Optimizer To Fix Common Issues?
1. Download, run, and install Advanced System Optimizer.

2. From the left-hand side, click on Smart PC Care.

3. Click on the blue-colored Start Scan from the bottom-right corner and wait for the scan to complete.
4. Once the scan is complete, Advanced System Optimizer will enlist issues and actions that you can take.
Solution No. 7 – Compress The Installer File
You can try compressing the installer file to get rid of the “Make sure your temp folder is valid” error message. More specifically, here you can compress the .EXE file. To do that follow the steps mentioned below –
1. Open File Explorer.
2. Find the problematic installer file.
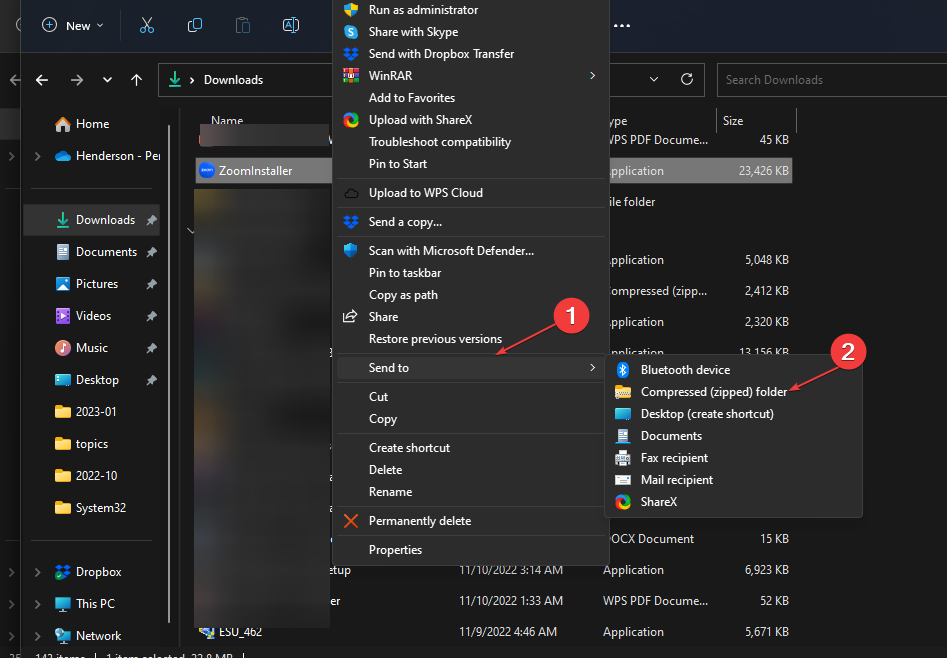
3. Right-click on the .EXE file and choose Send to > Compressed (zipped) folder.
4. Launch the installer from the zipped folder.

Solution No. 8 – Reinstall The Program
You may also want to check the program for malware since it could be the case that the installer package consists of malware because of which you are repeatedly getting the message. Once you have ascertained that the application you want to download or even its files are not malware, uninstall the program completely, wait for some time, and reinstall the program.
Can You Now Install Programs?
We hope that after you have tried the measures above, you have been able to fix the “Make sure your temp folder is valid” error. For more such content, keep reading WeTheGeek. You can also find us on Facebook, Pinterest, YouTube, Instagram, and Twitter.
Yesterday, I was trying to install Team Viewer software on my Windows 10 machine.
I downloaded Team Viewer from their official website and then started installing it by double-clicking the application file. However, as soon as I double-clicked the setup file, an error message popped up and said:
I got the same error around a year ago on my Windows 7 machine as well. Fortunately, I knew few methods this time to fix this error.
But, I also thought of writing this article so that it can benefit other users also who are getting the same error.
Why Does Error Writing Temporary File Occur?
First of all, let me make this very clear that this error is not specific to Team Viewer or any other software.
You can get this error while installing any software. It has nothing to do with the software being installed. It’s just some settings in your system that needs to be fixed.
Now coming back to the root cause of this error. Whenever you try to install any software on a Windows machine, it looks for the temp folder to store some data as it writes the registry.
If the temp folder is not set up correctly on your system, this can very well cause error. In such a case, we need to play a bit with the environment variables on our system which you will see shortly.
In the upcoming section, you will get to look at a number of verified methods that can potentially resolve this issue.
Let us get started to implement the methods to get rid of this error. By the end of this section, you should be able to install the software that this causing.
Method 1: Compress The Folder (Workaround)
This is one of the workarounds that has worked very well for most of the users. Since it is easy and less time-consuming, we recommend you implement this method first before trying to implement the other methods. Simply follow the steps given below to implement this workaround:
- Go to the Downloads folder and look for the Installer file that was causing this error.
- Right-click on this file and choose the Send to option.
- This will open another menu. Here, choose the Compressed (Zipped) folder option.
- Your installed file will be zipped inside a folder with the same name.
- Now open this zipped folder.
- Double click on the installer file to start the installation process.
- This should run now without any error. For me, this worked. However, if this workaround is not able to resolve this issue for you, better try the next methods that we listed below. These are much more technical and can resolve this issue once and for all.
Method 2: Check If You Have Correct Environment Variable Set Up
As mentioned above, this error usually occurs when the installer is not able to locate the temp folder on your machine.
How would the installer come to know the exact path of the temp folder? Well, we have some Environment Variables defined in our system. These variables let the installer know the exact path to the temp folder.
Let us, deep-dive, into this method and verify if we have the correct variables defined. If not, we can set them up correctly.
- Right-click on My Computer/ Computer/ This PC depending on the Windows version you are using.
- This will open a Control Panel window. Here, click on the Advanced System Settings option from the left menu.
- Now click on the Environment Variables button.
- Here, you will see all the defined environment variables. You need to check if you have TEMP and TMP environment variables defined exactly as shown in the screenshot below.
- If these are not defined in your system, simply click on the New button and add them one by one.
- Once done, try installing the software that was causing the Error writing temporary file. Hopefully, you should be able to install the software this time.
Method 3: Clean Reboot Your System
The steps listed below will help you in clean rebooting your PC. This can also fix the Error Writing temporary file issue. After implementing these methods, try to install the software that is causing this error and let us know how this method worked for you.
- Go to Control Panel and choose the System and Security link.
- Now select Administrative Tools.
- Double click on the System Configuration option.
- Now choose the Services tab.
- Checkmark Hide all Microsoft services options.
- Now press the Disable all button on the left. Click Apply and OK button.
- Now Restart the system by clicking on the Restart button.
- That’s all. You have clean rebooted your system. Now try installing the software and check if the error still persists.
Method 4: Change The Permission
- Click the Start button and click My Computer.
- Double-click to open drive C.
- Right-click the Windows folder and choose Properties.
- Click to clear the Read-only check box if it is selected.
- Repeat these steps for the TEMP folder and the System folder inside the Windows folder.
- Once these steps are complete, close any open windows and restart the computer.
Method 5: Run “chkdsk” Command
- Open Command Prompt as administrator.
- Enter chkdsk X: /r and press Enter. Be sure to replace X with the letter that matches your hard drive partition that you’re installing the application to. If you’re trying to scan your system partition you’ll have to schedule a restart and scan your partition before Windows 10 starts.
- Now try to run the installation process again.
Final Words
In case of any issues regarding the methods given above, feel free to reach out to us via comments or the Contact Us page. We will try to resolve your issue at the earliest. Stay tuned. Thanks.

Robert Borowski is passionate about blogging and wants to share knowledge with others. His passion, dedication, and quick decision-making quality make him stand from others.
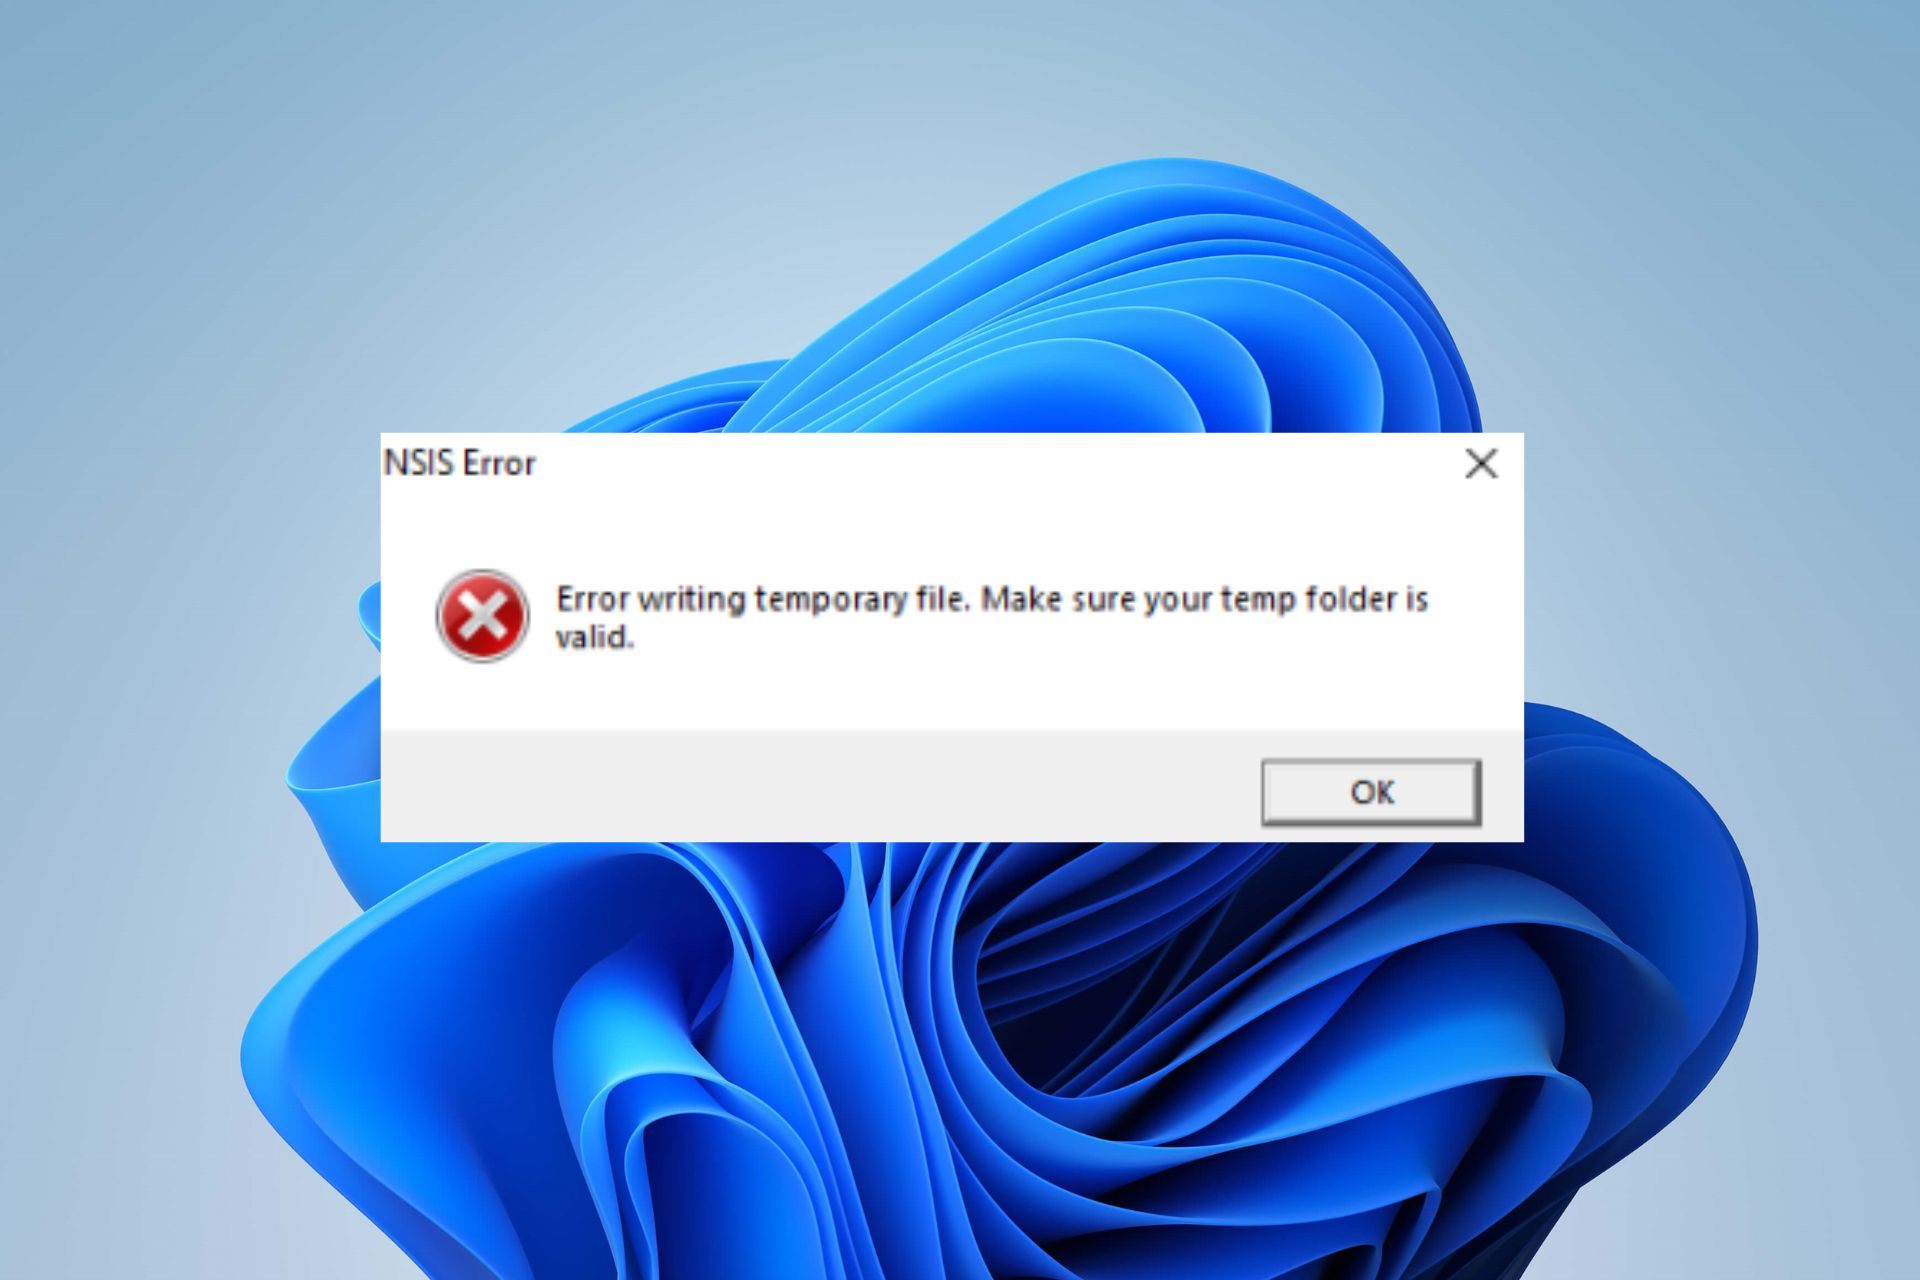
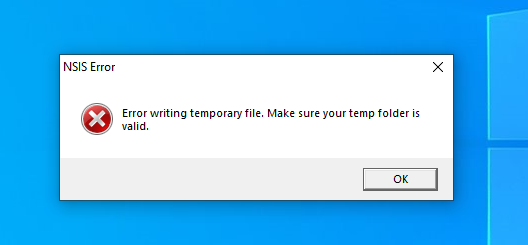
We normally don’t expect any trouble after double-clicking an installer file or uninstalling an app through a right-click. But sometimes a pop-up error message may show on our screen saying «Error writing temporary file. Make sure your temp folder is valid.» If you can’t get rid of the annoying message, one of the following methods will fix the problem in Windows 10 and Windows 11.
Tip: want to ensure that the installation file is malware-free? Use one of these reputable website links to download all official Windows software.
Content
- What Is the «Make Sure Your Temp Folder Is Valid» NSIS Error?
- 1. Delete Temporary Files in Windows
- 2. Redownload the Program and Launch a New Installer
- 3. Run the Installation from a Created ZIP Folder
- 4. Configure Windows Folder Permissions to Disable Read-Only Access
- 5. Check for Memory Issues Using Windows Memory Diagnostic
- 6. Clean Reboot Your Windows Device
- 7. Do a Cloud Reset
- Frequently Asked Questions
NSIS (Nullsoft Scriptable Install System) errors are specific types of errors that affect Windows installers, indicating that their .EXE files are corrupted due to software changes, incomplete downloads, or viruses creeping in during the installation. Prominent NSIS errors include the error we’re discussing in this article and «Error launching installer.»
The Windows Temp folder plays an important role in installing or uninstalling any app/program, as it hosts all temporary files and cached data. If the Temp folder isn’t set correctly, or if there are any memory/malware issues, the user won’t have the permissions to read/write the .EXE files. This means they can’t modify it to finish an installation or uninstallation.

Under these conditions, whenever you double-click the .EXE setup file or right-click to uninstall in the Control Panel, a pop-up message shows stating this NSIS error: «Error writing temporary file. Make sure your Temp folder is valid.»
Even if you’re not dealing with installation issues, the annoying message may display after a PC restart and will keep refreshing on the screen once every few minutes. It doesn’t go away automatically.
To deal with the problem, you’ll need to regain ownership of the Temp folder and its path in one of the following ways.
1. Delete Temporary Files in Windows
It’s always a good idea to delete temporary files and cached data in the Temp folder. They occupy a lot of disk space, and some of these files may be responsible for causing conflicts with the installer software.
- Open the Temp folder path with the Windows Run command, Win + R, then type
%temp%.

- This will launch a new File Explorer window in Windows where all the temporary files are visible.
- Select the entire contents of the Temp folder using Ctrl + A and press the Delete button.

- Not all temporary files are deleted during a first attempt. You will need to keep pressing the «Try again» button until all of them are cleared.
- Once there is nothing left, refresh the Temp window and try to install/uninstall the app.

Tip: apart from the Temp folder, there are many other ways to clear the cache in Windows, such as Disk Cleanup, DNS Cache, setting up Storage Sense, and more.
2. Redownload the Program and Launch a New Installer
The «Make sure your temp folder is valid» error can occur if there is malware in the installer software. In such a case, it’s recommended to wait for some time and download the software again. Chances are the developers may have released the latest iteration of the software and that it took care of the pending issues.
If you have installed the older version, the newer installer will simply overwrite everything, and you can easily uninstall the new version later.

3. Run the Installation from a Created ZIP Folder
Here’s a neat workaround that will execute the installer in no time. While ZIP files can get corrupted during a download process, zipping the downloaded .EXE installer file is actually safer. It overwrites all of the installation information inside a zipped folder rather than your destination disk. When you run the installer within a compressed folder, it completely bypasses the error.
- Navigate to the folder where your installer file is located.
- In Windows 11, right-click to select the «Compress to ZIP file» option. Windows 10 users may be asked to select a compression software, such as WinRAR or WinZip.

- A zipped folder is created that includes all the installation files and dependencies.

- Navigate to the zipped folder path in Windows 11 and right-click to select «Open.» The installer will run from within the compressed folder. Windows 10 runs it from within the compressed folder software window.

Did you know you could open ZIP and RAR files easily in Google Drive? This is a good option for better compression and malware check using Google’s servers.
4. Configure Windows Folder Permissions to Disable Read-Only Access
This method should only be applied if you’re unable to locate the Temp folder in its assigned path traced using the environment variables. This would prevent you from making any changes in the Temp folder, thus creating problems installing or uninstalling software. Disabling «Read-only» access is the solution.
- Open System Properties from the Windows Run command by typing
sysdm.cpland hitting Enter.

- Navigate to the «Advanced» tab and open «Environment Variables» under «Startup and Recovery.»

- Check the path for the «Temp» and «Tmp» variables and write them down somewhere.

- Navigate to the Temp folder path in the File Explorer window. If you can’t find it here, it means you don’t have permission to access the Temp folder.

- To correct the problem, first find where the Temp folder is located using
%temp%in the Windows Run command. - Go back to the environment variables window and edit Temp under «User variables» to point to the correct temp folder path. Don’t edit the «System variables,» as by default, it will point to «C:\Windows\Temp.»

- Go to «C:\Windows» and right-click on the Windows folder to open its properties.

- Go to the «General» tab. The «Read-only» attribute is enabled by default. Disable it and apply the changes.
- Repeat the same for other folders in Windows, such as «System32» and the «Temp» folder.
- Restart your computer and observe the changes.

Good to know: sometimes accessing relevant Windows folders can be tricky. For example, you have to try various ways to control the WindowsApps folder.
5. Check for Memory Issues Using Windows Memory Diagnostic
If the Temp folder issues are due to memory problems, they can be solved using an administrative tool called Windows Memory Diagnostic. It is a one-stop solution for installation issues, such as random freezes, blue screen of death errors, and crashing apps.
- You can open it from the Windows search bar by looking for memory or using the Run command and typing
mdsched.exe.

- The app is available in a list of Windows administrative utilities.

- You will be asked to restart your PC and can do it right away or schedule the memory diagnosis for the next restart.

- After you finish the memory test, the PC will restart, and a log file will be generated, which will give you the source of any memory errors.
6. Clean Reboot Your Windows Device
A clean reboot restarts your Windows device with a minimum set of drivers and startup programs. This helps clean up any background programs that are interfering with normal Windows processes. Doing this would greatly help remove any errors in the temp folder path.
- Using the Windows Run command, open the System Configuration utility by typing
msconfig.

- Navigate to the «Services» tab as shown here to check the option for «Hide all Microsoft services.»

- Once the essential Microsoft services are removed from the picture, you can choose «Disable all» or just check a few programs to disable them.
- Do a Windows restart to apply the changes. Your PC will be back after it removes the past sources of the system error.

7. Do a Cloud Reset
Normally a System Restore works best to enable access to the Windows Temp folder. But if you are having any uninstallation issues, it is highly recommended not to go for a System Restore, as it may lead to multiple crash errors which keep occurring in an infinite loop.
A cloud-based reset is the best way to go. It’s safe and downloads the latest Windows version.
- Go to Windows Recovery options from «Settings -> System -> Recovery.»
- Click the «Reset PC» button, which will open a new pop-up window.
- If you’re unable to access your PC desktop screen because your PC won’t complete the restart process, you can also access the «Reset PC» option in Windows Safe Mode.

- The Safe Mode can be launched using Windows boot keys during a start. They can vary from PC to PC but include F2, F6, F12, or Del keys. (Check the laptop/PC manufacturer’s website for the exact data.)
- Select «Keep my files» in the option to remove all apps and settings but keep all of your personal files.

- When asked how you would like to reinstall Windows, choose the cloud download option instead or local reinstall.
- Keep the device constantly plugged in and connected to the Internet.
- Follow the rest of the on-screen instructions to reset your Windows device. It will involve a restart.

The whole process takes several hours, possibly up to a day, but you will be greeted with a brand-new Windows operating system upon completion.
Tip: are you worried about what should happen if Windows fails to start? We have you covered with these expert tips.
Frequently Asked Questions
How do I prevent NSIS errors?
All NSIS errors can be traced back to an installer file in your Windows PC. To prevent NSIS errors, it’s recommended to run all installer files through a SmartScreen filter and Windows Security scanning.
What does «Error writing temporary file» mean?
«Error writing temporary file» in Windows means there isn’t enough space to write anything (add or remove information) from the Temp or Tmp folder locations. Depending on the error source, it can also mean you do not have permission to write anything in the Temp folder.
Tmp files keep starting up on Windows startup. How can I fix it?
Tmp files are integral to your Windows PC but easily disposable. You can remove them by disabling them during a startup. For that, you need to control the Windows Startup folder.
Image credit: Pexels. All screenshots by Sayak Boral.

Sayak Boral is a technology writer with over eleven years of experience working in different industries including semiconductors, IoT, enterprise IT, telecommunications OSS/BSS, and network security. He has been writing for MakeTechEasier on a wide range of technical topics including Windows, Android, Internet, Hardware Guides, Browsers, Software Tools, and Product Reviews.
Subscribe to our newsletter!
Our latest tutorials delivered straight to your inbox
Often, corrupt Temp files are responsible for this error
by Henderson Jayden Harper
Passionate about technology, Crypto, software, Windows, and everything computer-related, he spends most of his time developing new skills and learning more about the tech world. He also enjoys… read more
Updated on
- You can encounter the Temp folder error on your PC when running an installer file or uninstalling an app.
- The error may occur due to corrupt temporary files in the temp folder and wrong temp folder configurations.
- Deleting the temp files and performing a clean boot can fix the error.
Windows PCs store temporary data created by Windows or programs running on your computer in temporary files. Temporarily files (tmp or temp files) hold data while a permanent file is writing. They are stored in the Temp folder.
However, issues with the above process may result in the Make sure your temp folder is valid or Your temp folder must allow execution errors.
Why do I get the Make sure your temp folder is valid error?
Getting the error message Error writing temporary file: Make sure your temp folder is valid on your computer indicates that the Temporary folder can’t store the related data when it adjusts the registry. Some notable causes of the error are:
- Corrupt temp files – Temporary files can corrupt the temp folder, causing issues with its activities.
- Malware and viruses – Malware and virus infection can cause a temp folder error when running an installer file or uninstalling an app. Also, it may corrupt system files on your computer.
- Wrong configuration in the Temp folder – Wrong configuration in the temp folder can cause problems storing related data as it writes the registry.
- NSIS error – The error writing temporary file make sure temp folder is valid may come from an improper installer and it also appears as error writing temporary file NSIS.
Now that we know what causes this error, we’ll discuss ways to fix it and get your temp folder working again.
How can I fix the Make sure your temp folder is valid error?
Before trying any advanced troubleshooting steps, go through the following preliminary checks:
How we test, review and rate?
We have worked for the past 6 months on building a new review system on how we produce content. Using it, we have subsequently redone most of our articles to provide actual hands-on expertise on the guides we made.
For more details you can read how we test, review, and rate at WindowsReport.
- Turn off background apps running on your PC.
- Restart Windows in Safe Mode and check if the error persists.
If these preliminary steps don’t fix the error, proceed with the following solutions.
1. Delete the temporary folder files
- Press Windows + R keys to open the Run window, type %temp% in the search space, and press Enter.
- Press Ctrl + A and right-click, then click on Delete from the drop-down.

- Navigate to the following path:
This PC\Local Disk (C):\Windows\Temp - Press Ctrl + A and delete all the temp files.
- Restart the PC and check if the Temp folder error persists.
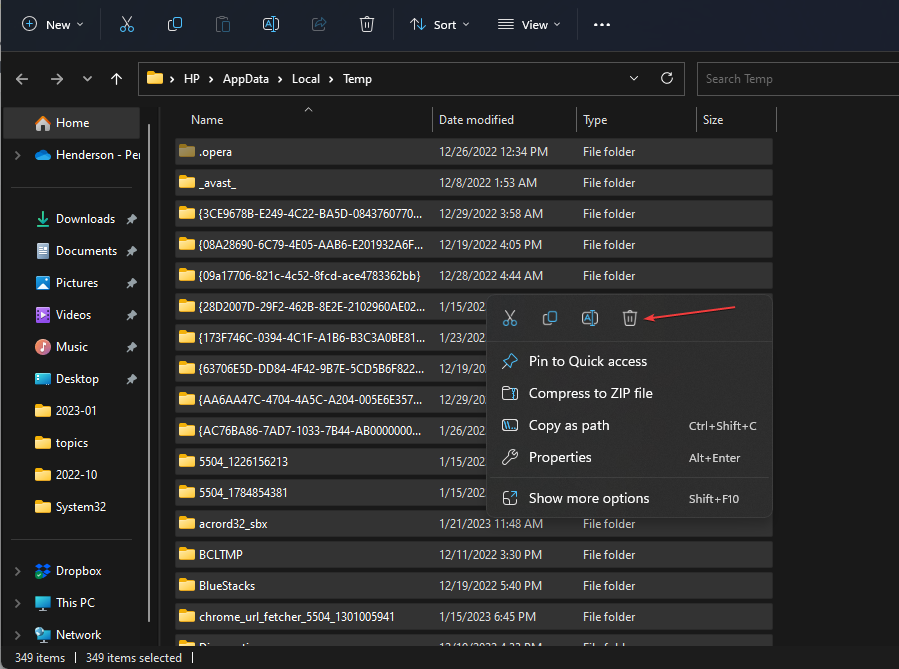
Deleting temp files on your PC will clear the corrupt files liable to cause the NSIS error writing temporary files. You can check our article about how to delete Temporary files on Windows 11 for more steps.
2. Perform a clean boot
- Press Windows + R key to open the Run dialog box, type msconfig, and click OK.
- Select the Services tab and check the box for the Hide all Microsoft services option, then click the Disable all button.

- Go to the Startup tab and click Open Task Manager.
- Select the startup programs and tap the Disable button.

- Restart your PC and check if the temp folder error persists.

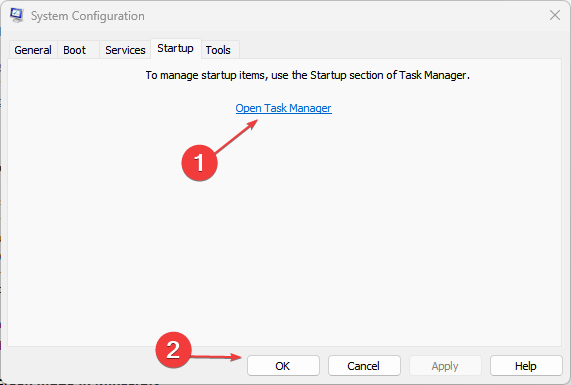
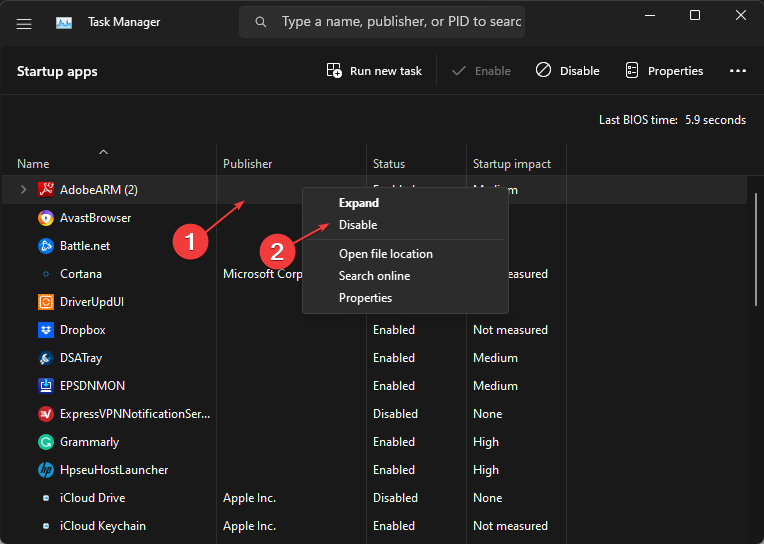
A clean boot prevents startup from running programs liable to cause the error from running when you start the system.
- High GPU Usage but Low FPS: 8 Ways to Fix This Issue
- Roblox Error 267: How to Fix it
- Teams Machine Wide-Installer: What is it & How to Set it Up
3. Run the chkdsk command
- Left-click the Start button, type command prompt, and click the Run as administrator option.
- Click Yes on the User Account Control prompt.
- Type the following commands and press Enter:
chkdsk C: /r
- Restart your PC.

Running the chkdsk command examines disk space and disk use. Also, it provides a status report specific to each file system and shows the errors found in the system file.
Check our guide on what to do if Command Prompt keeps crashing on your PC to fix it if you run into trouble.
4. Compress the installer file prompting the error
- Press the Windows + E key to open File Explorer.
- Navigate to the Downloads folder and find the installer file prompting the error.
- Right-click on the installer file and click on Send from the drop-down. Click on the Compressed (Ziped) folder option to zip the installer file inside a folder.

- Open the zipped folder and double-click the installer file to start the installation process.


The above steps should run the installer without any errors. Compressing the installer file prevents interference from other files.
Alternatively, you can read our guide about Temporary files and their functionality on Windows PCs.
In addition, you may check our guide about Temporary files not deleting and learn how to delete them on Windows 11.
Also, we recommend you check what to do if you encounter you need administrator permission to delete the folder error on your PC.
In conclusion, if you have further questions or suggestions on what to do if you encounter the error: make sure your Temp folder is valid; kindly drop them in the comments section.
![]()
Error writing a temporary file, Make sure your temp folder is valid indicates that there is a problem with the folder Windows uses to store temporary files. This error can result from several reasons, such as the temporary folder being set in a different location, being deleted, or the user account in Windows lacking permissions.
There are several fixes mentioned below. Let’s dive into the solutions and fix this error.
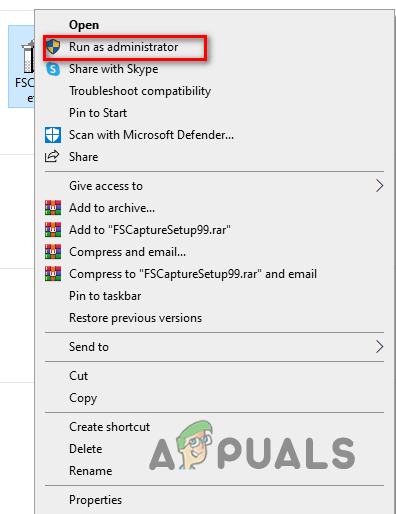
1. Run the installer as an admin.
If the installer does not have administrator permissions, it will not be able to access the temporary files folder, resulting in the following error. To fix this issue, it is recommended to run the installer as an administrator. Follow these steps:
- Right-click on the installer file.
- Now, left-click on “Run as Administrator.

Run as administrator - A dialogue box will appear with Yes and No options; click Yes.

Run as administrator window

If you are on a user account, please refer to the administrator of your computer to help you resolve this issue.
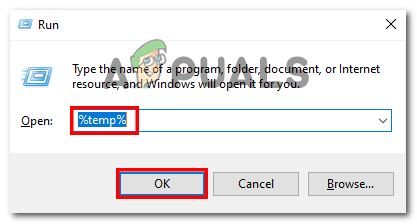
2. Clean temporary files.
If there is no space left on the disk where the temporary files folder is located, you will encounter the following error. In this case, it is recommended to clean up your temporary files folder to make space for new temporary files. Follow these steps to clear your temporary files folder:
- Press the Windows key + R to launch the Run dialog.
- Type %temp% and hit Enter.

Running temp command in run - Click Ctrl + A to select all items.
- Then, click Delete or press Ctrl+Delete to delete all files at once.
It’s okay if some files are unable to be deleted; it happens when those temporary files are being used by a process. They will be deleted eventually when the program is done using them.
3. Restart the Windows Installer service.
The Installer service assists with the installation and removal of software in Windows. This service may occasionally experience problems or stop functioning, which can interfere with the installation or removal of programs. Setting the parameters of this service back to default may fix it, enabling you to install the desired program.
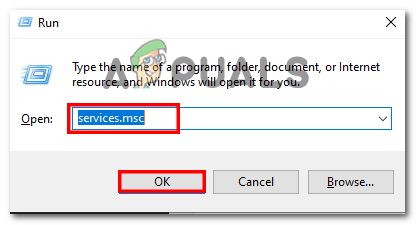
- Open the Run dialog by pressing Win + R on the keyboard.
- Type “services.msc” in the dialog box.

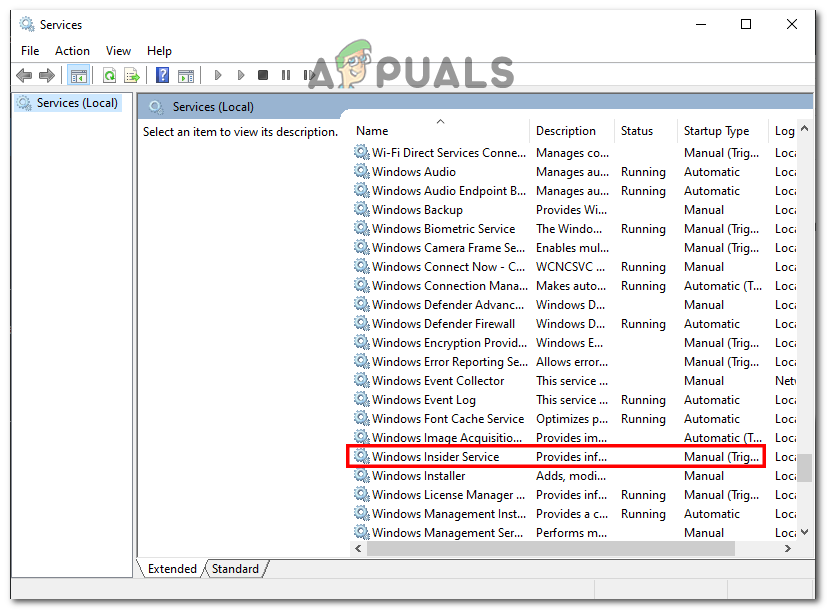
Restarting windows installer - In the services tab, Scroll down and find “Windows Installer”

Restarting windows installer - Right-Click on Windows Installer and select the “Restart” button from the context menu.

Restarting windows installer
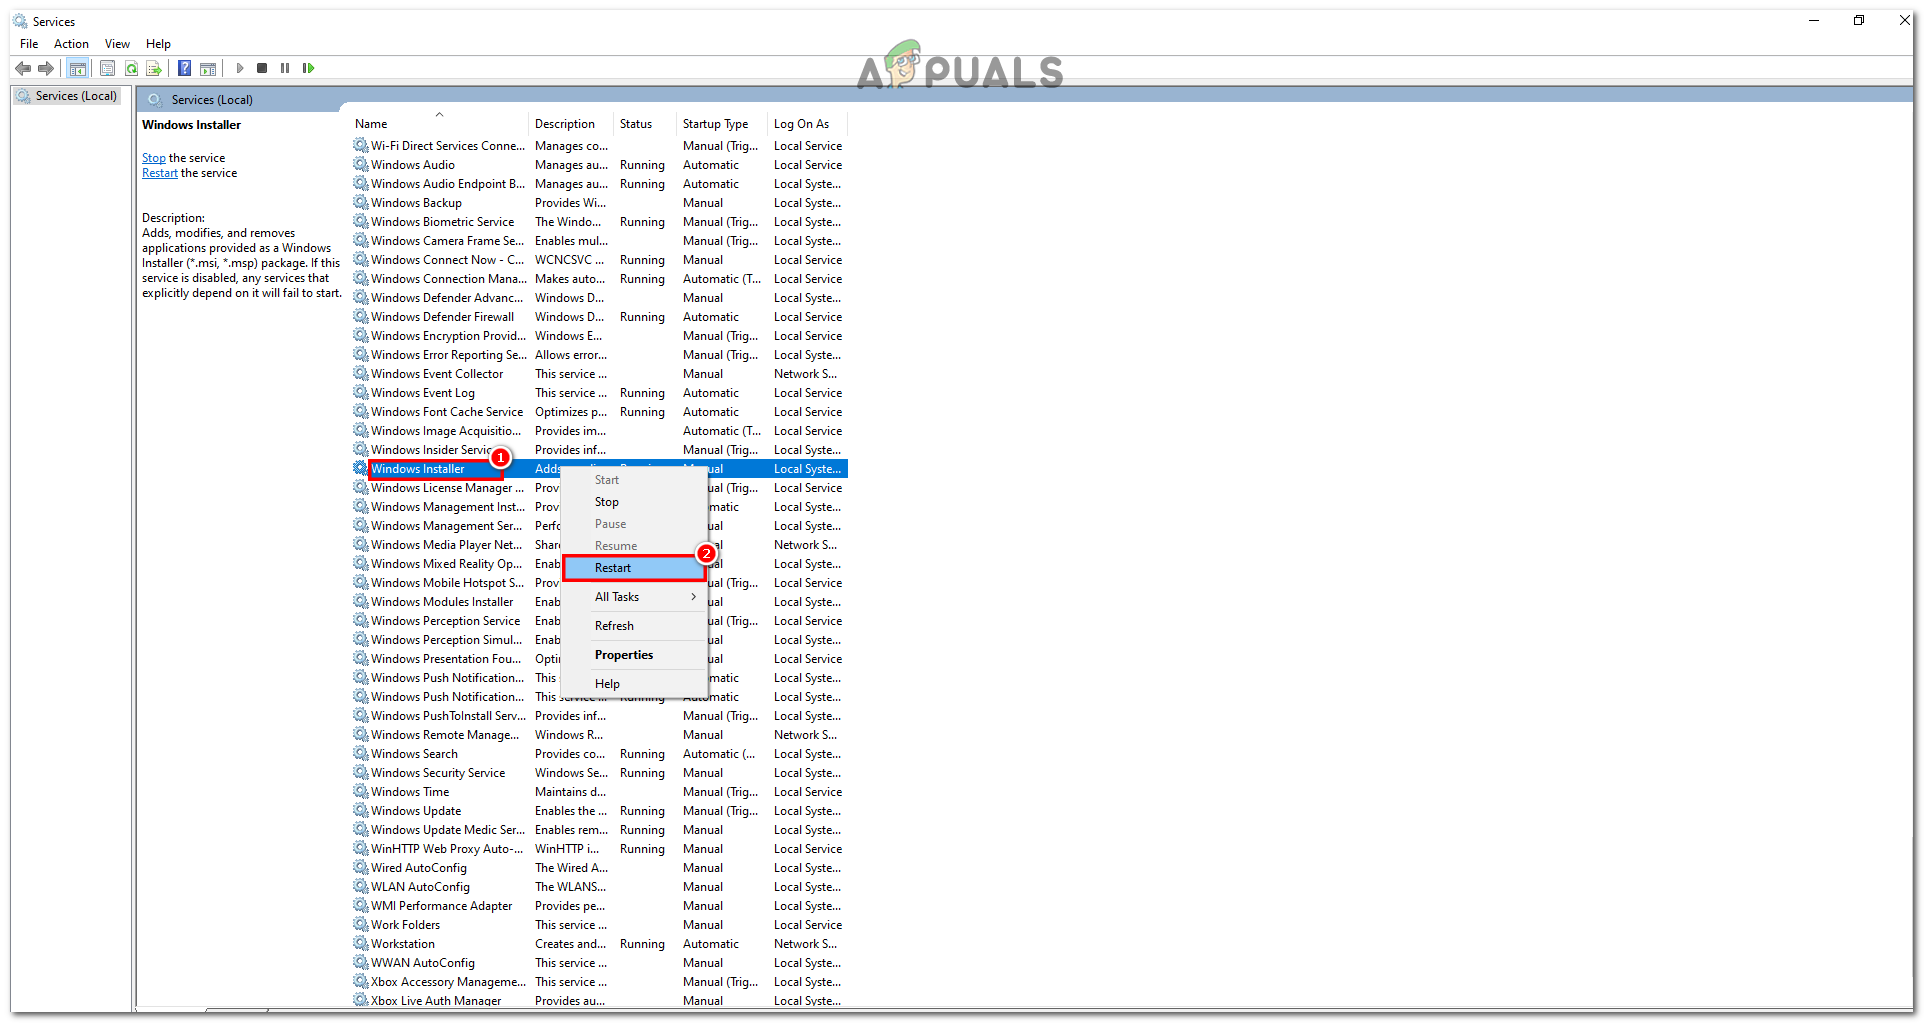
Check to see whether the error is fixed.
4. Change the path of the Temp folder.
Some locations in Windows have very restricted access; only certain services and programs that Windows allows can access these locations, while an average user account cannot. In this case, we will define a new temporary files location for all the temporary files, allowing Windows to direct the program installer to this new location, which is much less restrictive than the normal temporary files location. Please follow these steps:
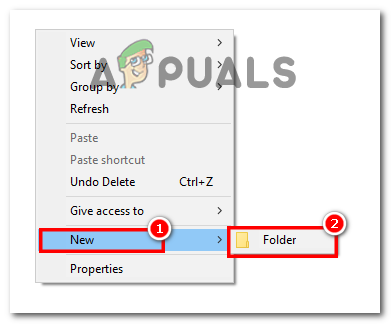
- Locate the C Drive.
- Now, Right-Click and create a folder.

Creating folder in C Drive - Press Win + I to launch the Settings tab and Navigate to System.

Opening Windows Settings - Then, go to ‘About‘.
- Click on Advanced System Settings, which is under the device’s specifications.

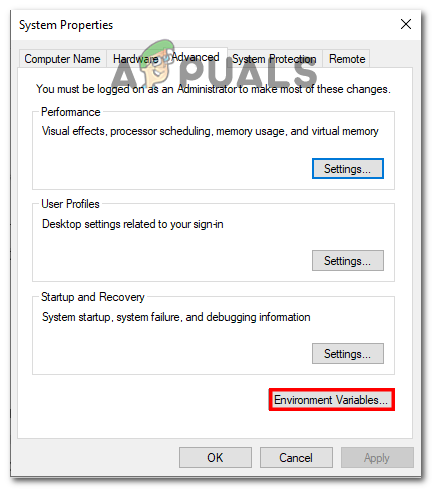
Going to Advanced Settings - Then, click on Environmental Variables.

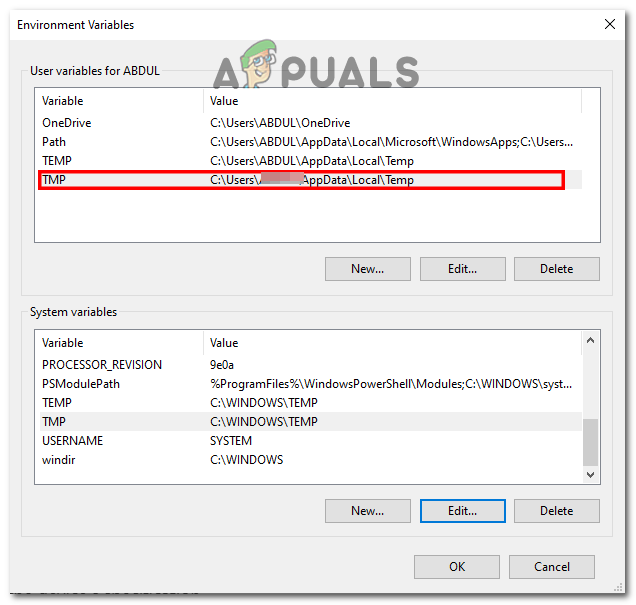
Opening Environment Variables - Double-click on the TMP variable.

Clicking TMP variable - The existing location or variable value would be
%USERPROFILE%\AppData\Local\Temp
- Change this variable to the location where you created the folder; in this case, that would be:
C:\Temp
Click on “OK.

Changing the Variable value - Now, close all the windows and restart your computer.


Check to see if the issue persists.
5. Disable Windows Defender.
Windows Defender can sometimes block the installer from accessing the temporary files folder. This is done in order to protect your computer and prevent unnecessary access to vulnerable files in Windows. However, if you trust the installer of the program, you can temporarily disable Windows Defender to allow the installer to install the program. Follow these steps:
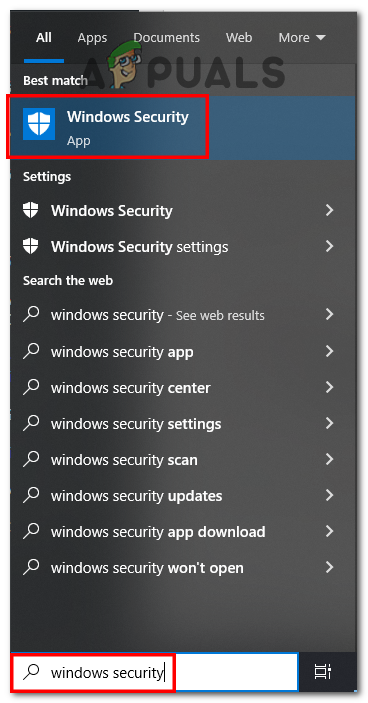
- IIn the Windows Search bar, enter “Windows Security.

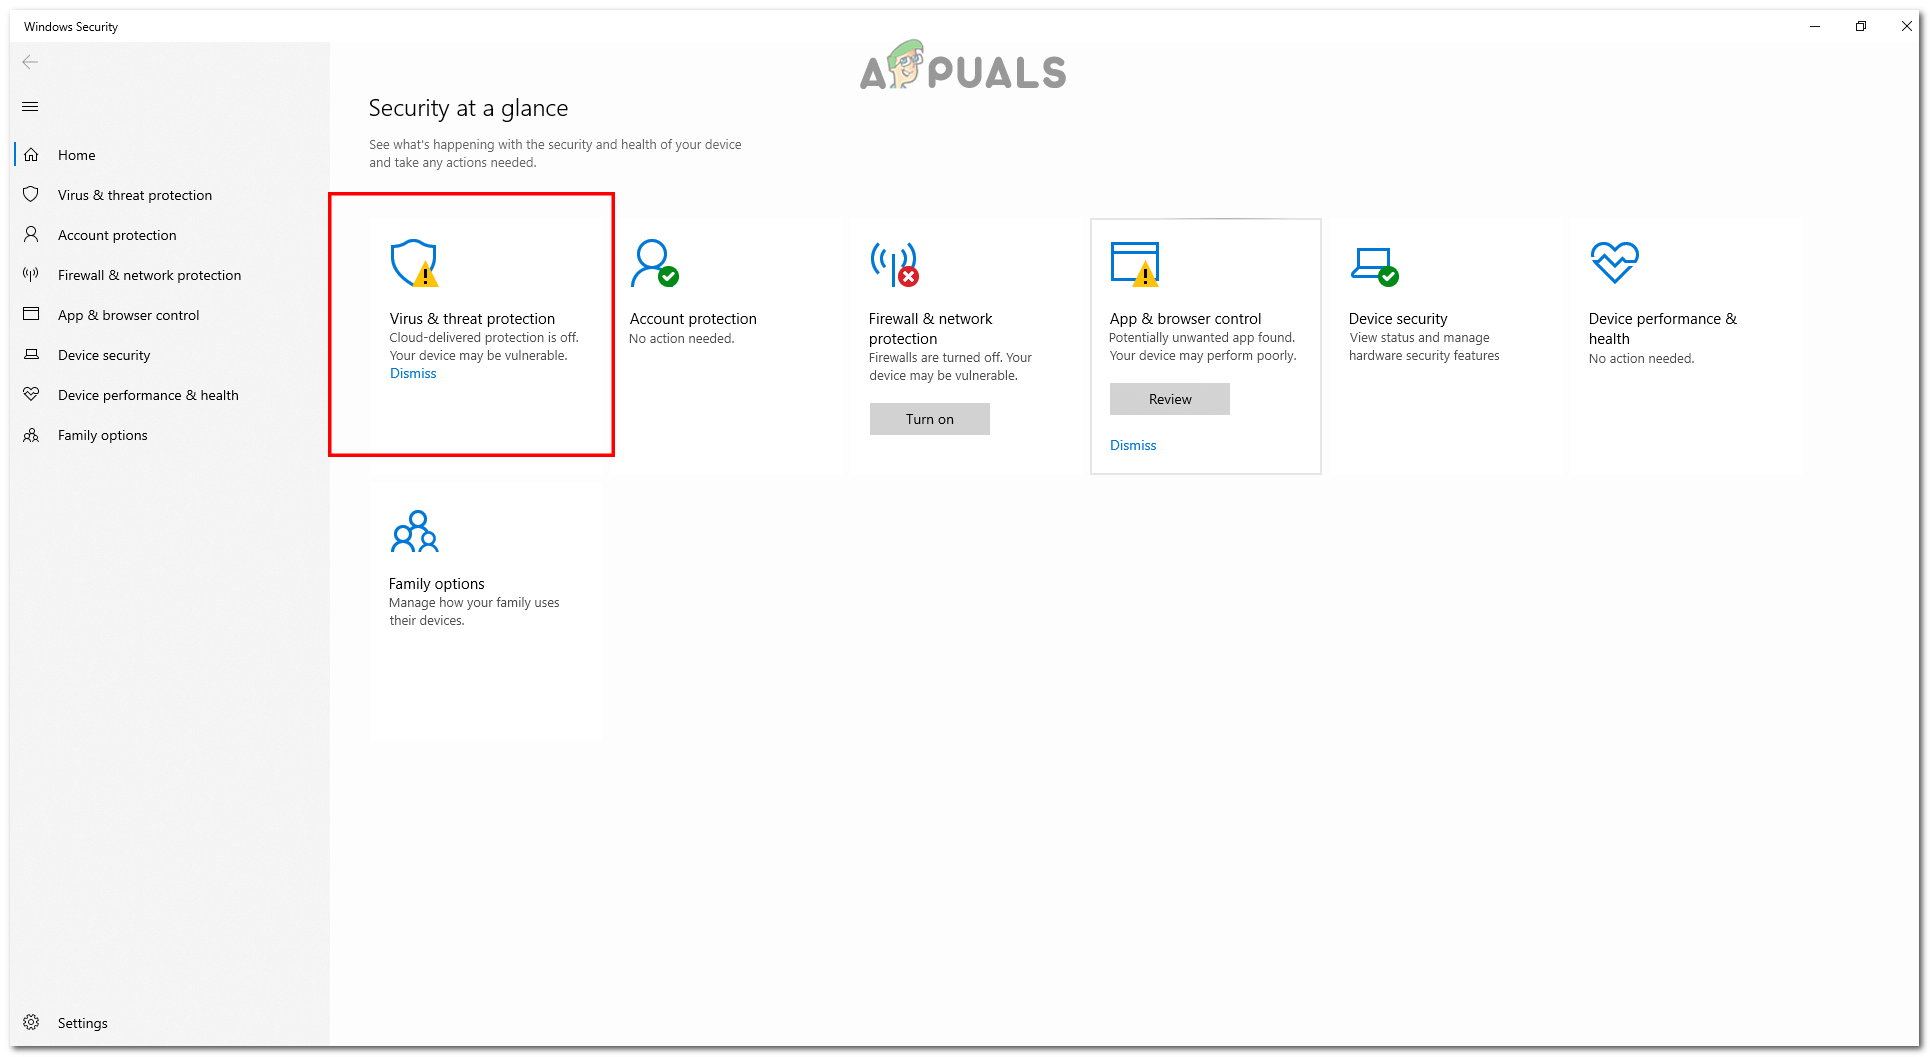
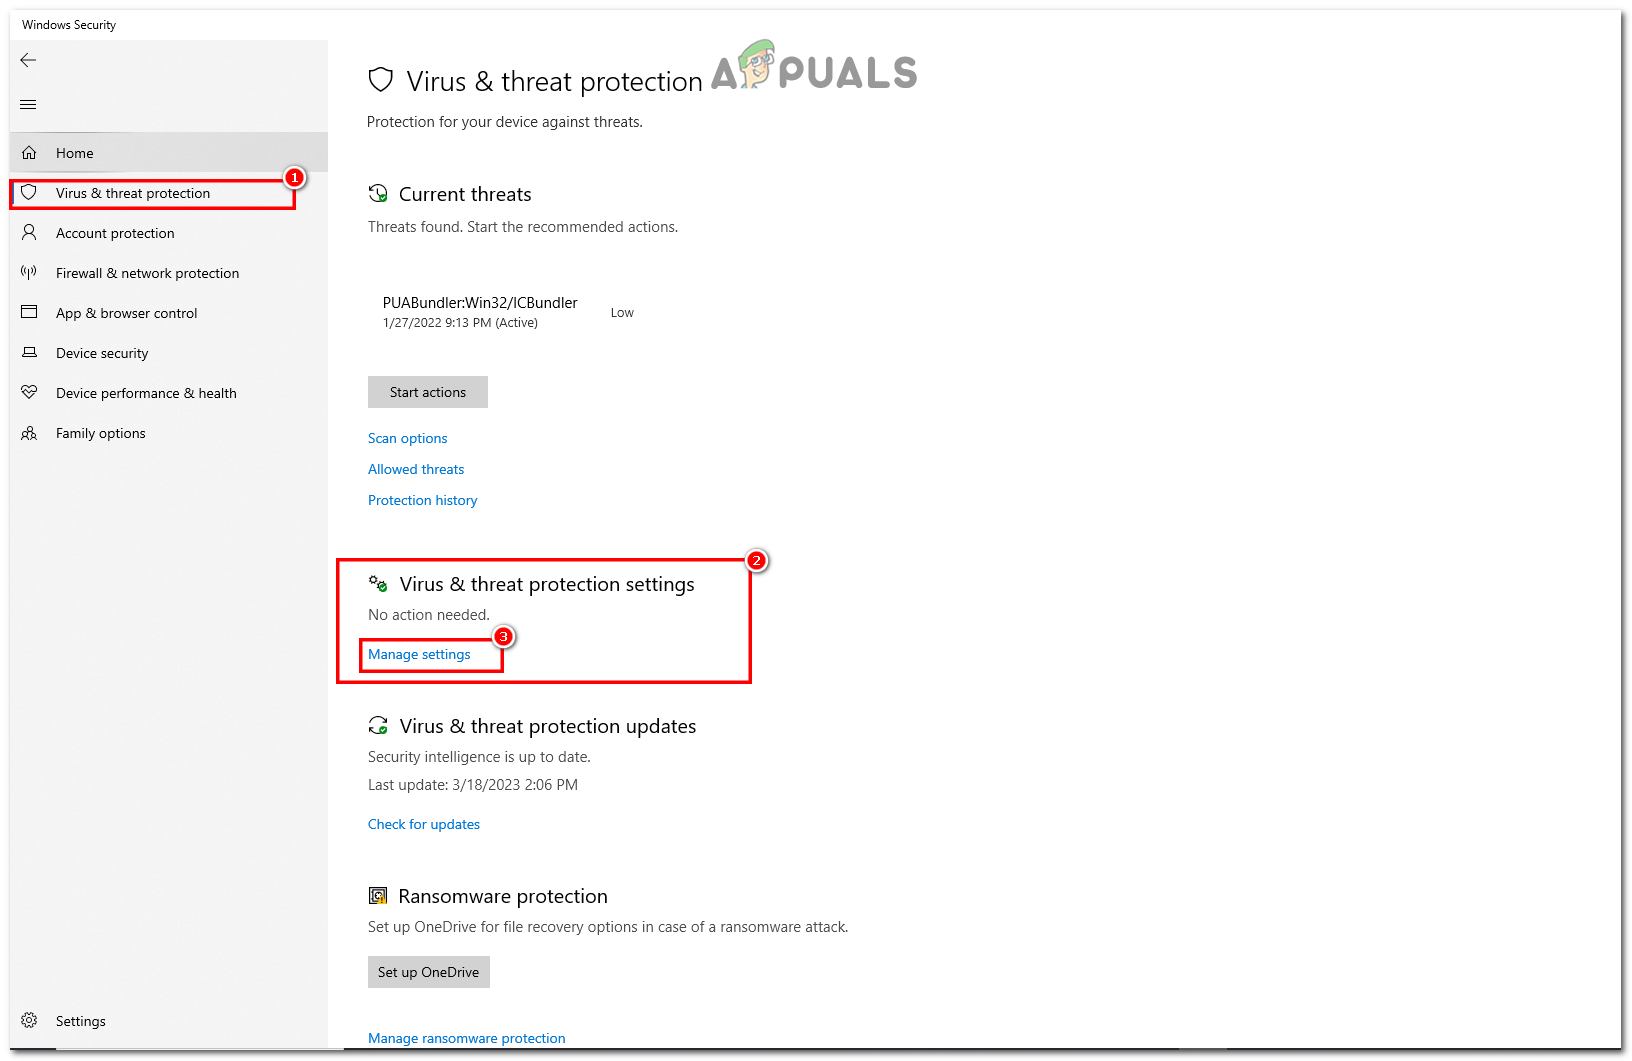
Disabling windows defender - Click on Virus & Threat Protection from the sidebar menu.

Disabling windows defender - Now, select “Manage Settings” under this section.

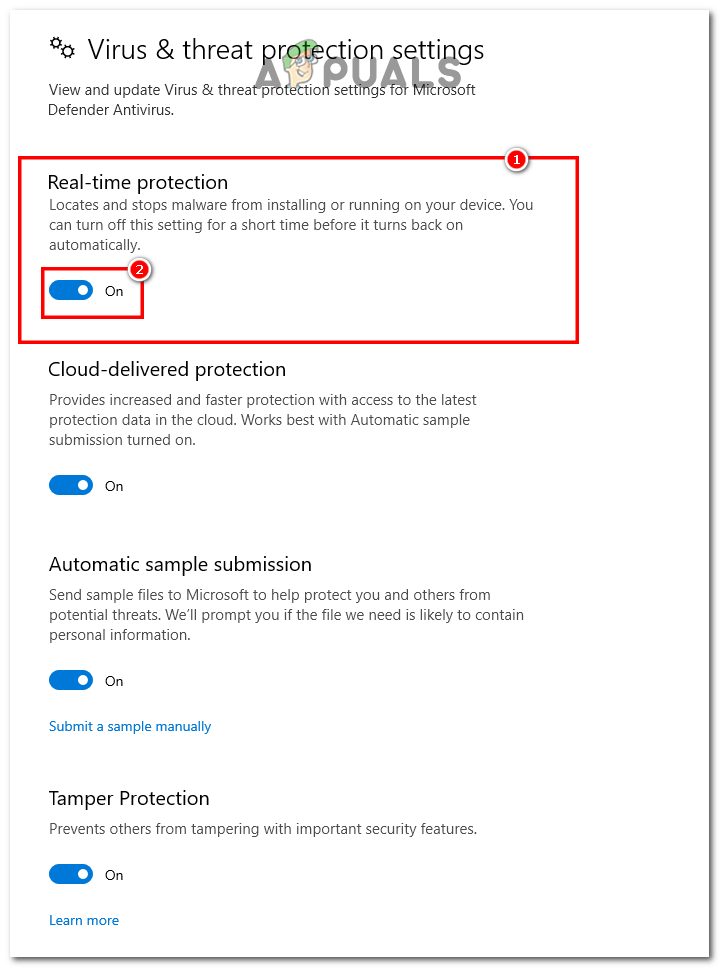
Disabling windows defender - Then, go to Toggle Off Real-time Protection.

Disabling windows defender - Restart your computer.
Now, check your installer by running it in administrative mode. Your error will be gone, and you can install any file you want while running it on your computer.

Kevin Arrows
Kevin Arrows is a highly experienced and knowledgeable technology specialist with over a decade of industry experience. He holds a Microsoft Certified Technology Specialist (MCTS) certification and has a deep passion for staying up-to-date on the latest tech developments. Kevin has written extensively on a wide range of tech-related topics, showcasing his expertise and knowledge in areas such as software development, cybersecurity, and cloud computing. His contributions to the tech field have been widely recognized and respected by his peers, and he is highly regarded for his ability to explain complex technical concepts in a clear and concise manner.