Try running the app in compatibility mode
by Claire Moraa
Claire likes to think she’s got a knack for solving problems and improving the quality of life for those around her. Driven by the forces of rationality, curiosity,… read more
Updated on
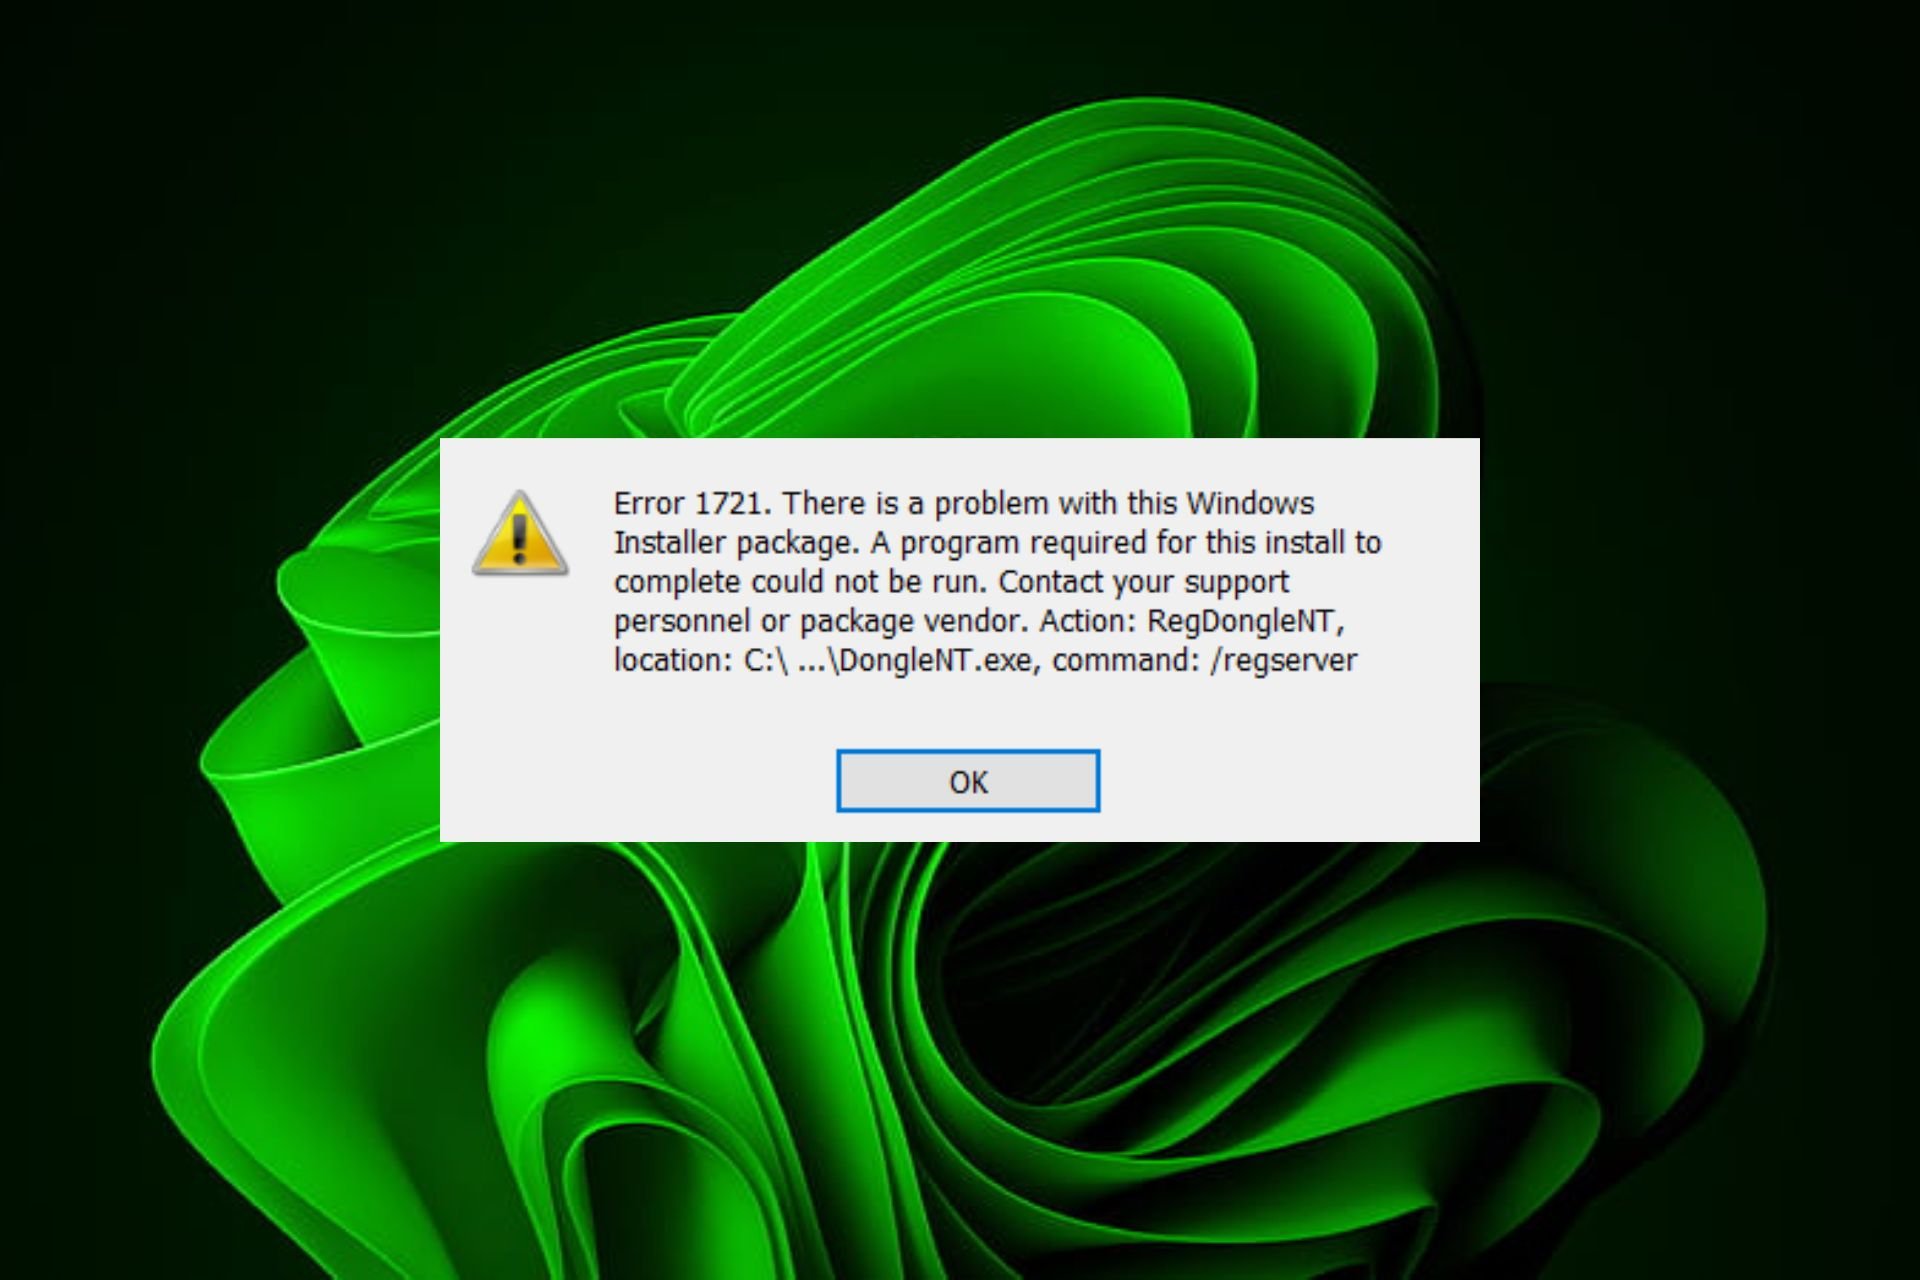
- Installing apps on any version of Windows shouldn’t be a time-consuming task, but it seems so from the error 1721.
- Users keep getting stalled by the Windows Installer service, and the installation of the program cannot be completed.
- Since it’s likely a compatibility error, a Windows update or running the program in compatibility mode should fix this issue.
XINSTALL BY CLICKING THE DOWNLOAD
FILE
Windows Installer is an essential Windows service, especially when you want to install programs. However, things don’t always go as planned, with users reporting an error code 1721. This error is accompanied by a there is a problem with this Windows installer package message.
Another similar error is 1722, but we’ve already covered that. Windows Installer can be used to install, repair, configure, and uninstall software while adding or removing features from a user’s computer. So why is it throwing the error 1721? Let’s find out.
Why am I getting the error 1721?
This common error occurs when there is an incompatibility between the Windows Installer and some other program on your computer.
The Windows Installer service allows your OS to install, modify, and repair applications provided as Windows Installer packages.
How we test, review and rate?
We have worked for the past 6 months on building a new review system on how we produce content. Using it, we have subsequently redone most of our articles to provide actual hands-on expertise on the guides we made.
For more details you can read how we test, review, and rate at WindowsReport.
It also detects changes in hardware and software that might affect applications. Since it acts as a point of control for all phases of the application installation process, if it fails, apps that depend on it may fail to launch.
Some of the reasons you’re getting the 1721 error when you try to install apps include:
- Insufficient permissions – This can occur if you do not have sufficient rights to modify the installation. Only administrators have the privilege to make changes to computers.
- Incorrectly installed program – If you have installed the wrong program, this can cause an issue with the Windows Installer Package.
- Incompatible program – It is possible that the app you are trying to install is not compatible with your current operating system or hardware configuration.
- Missing/invalid registry entries – Missing files or invalid entries in the registry can cause problems when attempting to install programs using Windows Installer Packages.
- Incompatible OS – The program must be written for the same version of Windows that you’re running.
- Windows installer service has stopped – If the service is not running, you may have trouble installing programs. This can happen if you have changed the default installation location in the registry or you have installed the application in another location on your computer.
How do I fix error 1721?
Ensure you fulfill the following prerequisites before attempting the complex solutions below:
- Verify that you are using a user account with administrative privileges.
- Ensure that the application is not blocked by your firewall.
- Check to see if there’s an update available for your version of Windows.
- Run the SFC scan to check for any damaged system files.
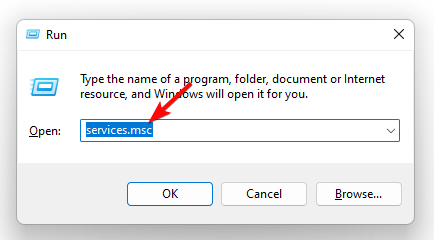
1. Restart the Windows Installer service
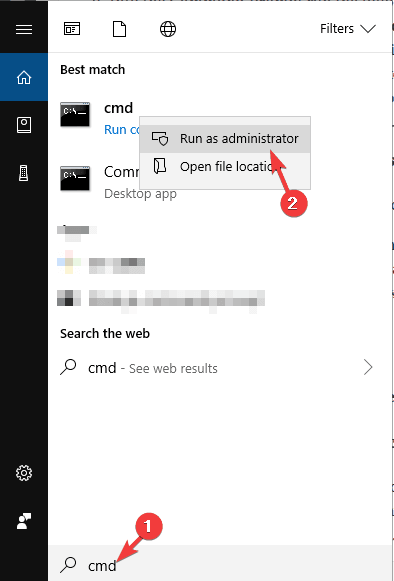
- Press the Windows + R keys to open the Run command.
- Type services.msc in the dialog box and hit Enter.

- Find Windows Installer, right-click on it, and select Stop.

- Right-click again, and this time select Restart.

2. Run the Program Install and Uninstall troubleshooter
- Download the Program Install and Uninstall troubleshooter and install it.
- Open it and click on Next.

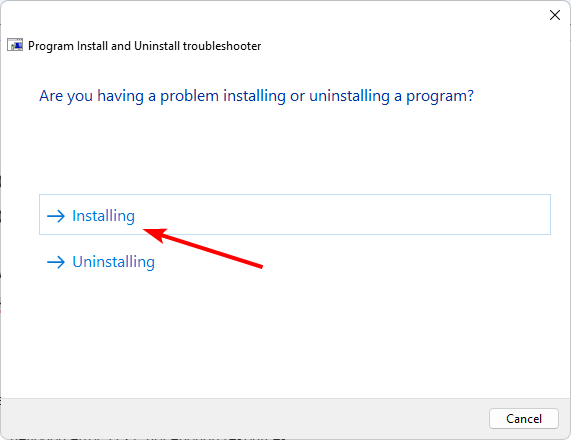
- You’ll be asked whether you have a problem installing or uninstalling a program. Select one option.
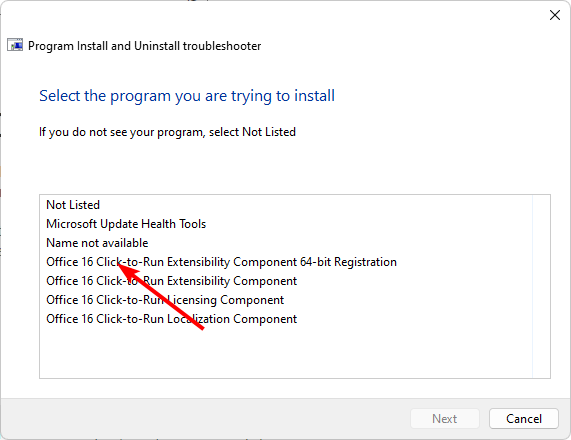
- Next, you’ll be asked to select the program that is not installing. Pick the problematic program from the list.
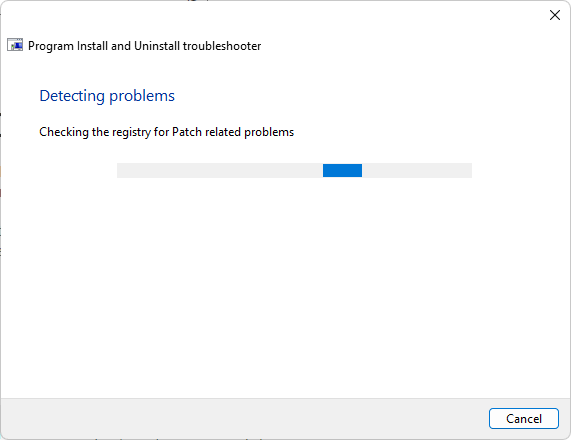
- The troubleshooter will start scanning for problems.
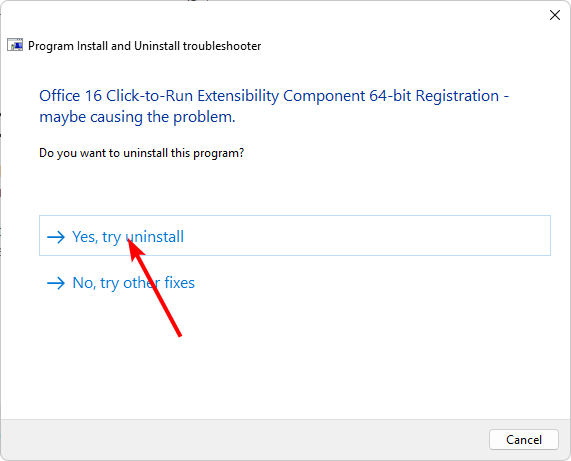
- Once it completes, you’ll be presented with two options. Pick either and wait for the troubleshooter to recommend fixes.

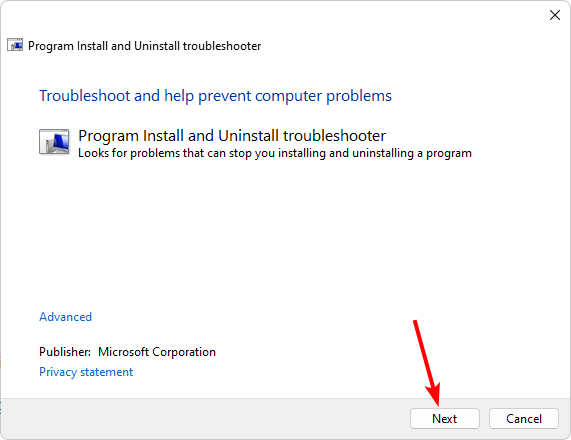
The Program Install and Uninstall troubleshooter helps you identify and fix problems that occur when installing or uninstalling programs on your computer. It can also help you uninstall programs that are causing problems with your computer.
- Fix: Set Time Zone Automatically Defaults to Wrong Time Zone
- 0X8007013 Install Error: How to Quickly Fix it
- Fix: DTS Audio Processing Settings are Unavailable
3. Install the problematic app in compatibility mode
- Locate the .exe file of the problematic problem usually in one of the following paths depending on your version of Windows:
C:\Program Files (x86)orC:\Program Files - Scroll down until you find the program you’re looking for.
- Right-click on the .exe file of the program and select Properties.
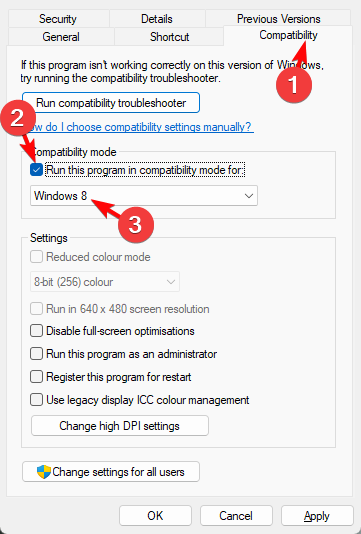
- Navigate to the Compatibility tab, check the Run this program in Compatibility mode option, and select Windows 8 from the drop-down menu.

- Allow the program to finish installing, then check whether the error persists.
Compatibility mode is a feature of Windows that lets you run older programs on your computer. It’s not exactly the same as running an older operating system, but it allows you to run some older programs that won’t work otherwise.
Many applications are written for earlier versions of Windows and have been tested only on those versions. When you try to run them on a newer version, you may find that they don’t work properly or at all.
This is because applications can use features only available on older versions of Windows and not on newer versions.
That’s it for the error 1721, but also check out our other article on what to do when you can’t access the Windows installer service.
We also have an expert recommendation list of the best installer software package, so don’t hesitate to visit that guide.
We’d love to hear your thoughts on this error and which solution helped you bypass it, so drop us a comment below.
![]()
-
Home
-
News
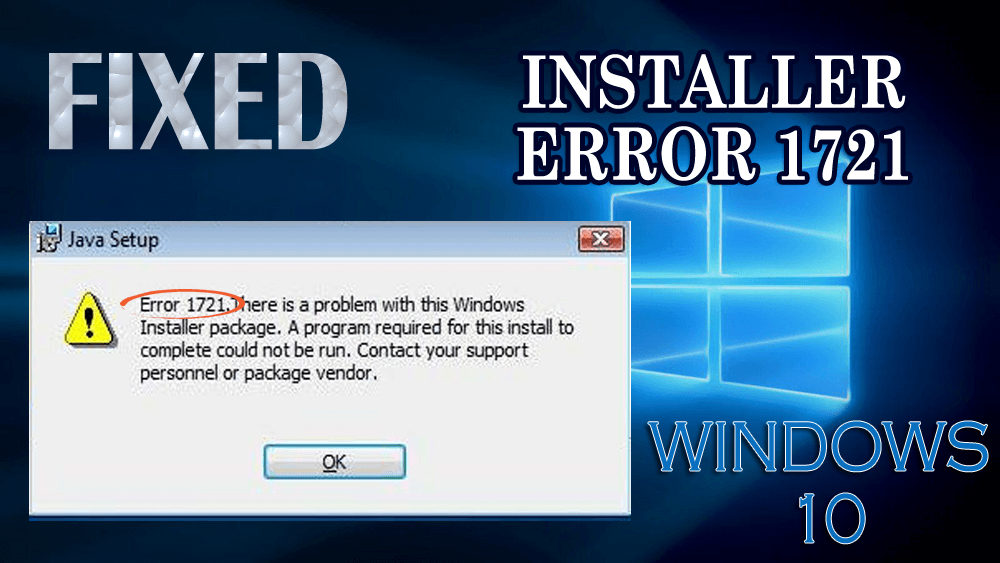
- [3+ Ways] How to Fix Error 1721 Installer Problem Windows 10/11?
By Helen | Follow |
Last Updated
This article described by MiniTool Software mainly discusses the Windows Installer error 1721 as well as its solutions. Generally, you can try to restart/update the service, run the target program in compatible mode, troubleshoot installation and uninstallation, etc. to fix the issue.
Error 1721. There is a problem with this Windows installer package. A program required for this install to complete could not be run. Contact your support personnel or package vendor.
Have you ever encountered such a Windows installation issue? How did you fix it? If you are still suffering from this bug, just refer to the following methods to deal with it!
The following methods apply to Windows 11/10/8.1/8/7.
Solution 1. Restart Windows Installer Service
Since this problem is related to the Windows installer, you can try to solve it by restarting its service.
- Open Windows Run command.
- Input msc and click OK to open the Services tool.
- Scroll down to find the Windows Installer Right-click on it and click Stop.
- Then, right-click on Windows Installer again and select Start.

Besides, make sure both Remote Procedure Call and DCOM Server Process Launcher services should be started and set to automatic. Just double-click to launch Windows Installer properties. Go to its Dependencies tab to see whether Remote Procedure Call and DCOM Server Process Launcher is listed there or not.

Sometimes, upgrading your Windows Installer to the latest version is the fix.
Solution 2. Install App in Compatibility Mode
The error 1721 may be caused due to the incompatibility of the target application and current Windows 11 or 10. If so, just try the below steps to handle the problem.
- Right-click on the setup file of the software and choose Properties.
- Navigate to the Compatibility tab.
- Check Run this program in compatibility mode and select Windows 8 in the dropdown menu.
- Click Apply > OK to save the changes.

Solution 3. Run Program Install and Uninstall Troubleshooter (for Windows 10)
If you come across error 1721 Windows 10 while trying to install Windows programs, you can rely on Program Install and Uninstall troubleshooter to fix it. The troubleshooter assists you to repair issues automatically when you are blocked from app installation or uninstallation. It also fixes corrupted registry keys.
1. Download Program Install and Uninstall troubleshooter.
2. Double-click the downloaded meta.diagcab file to open the Program Install and Uninstall troubleshooter.

3. Click on the Advanced option to Apply repairs automatically and click Next.
4. Select Installing or Uninstalling.

5. Select the program you are trying to install but fail. If you do not see your program, select Not Listed.

6. Then, make your decision, either uninstall the programmatic program or try other fixes.

If a program is not listed in the uninstall options, you will be asked for that program’s product code. To access the code, you’ll need a tool for reading MSI files for its properties. The Program Install and Uninstall troubleshooter can help you fix the following issues:
- Corrupted registry keys on the 64-bit operating system.
- Corrupted registry keys that control the update data.
- Unable to install new programs.
- Unable to completely uninstall or update existing programs.
- Unable to uninstall programs via Control Panel.
If you encounter error 1721 Windows installer when installing apps from Microsoft Store, you can try this way to solve the problem.
- Sign in to your Microsoft account.
- Update Windows to the latest version.
- Make sure the target app applies to Windows 10/11.
- Update your Microsoft Store.
- If you are trying to install a game, just troubleshoot the game installation.
- Repair or reset your app.
- Troubleshoot Windows Store apps in Settings.

Other Windows Installer Error 1721 Fixes
Besides, there are some other ways that may solve the error.
- In computer safe mode, run msiexec /unregister in Run command to unregister Windows Installer and run msiexec /regserver to re-register Windows Installer. Then, restart the PC.
- Temporarily disable any firewall or antivirus during the installation of the target program. Or, configure the firewall and security software to allow the installation.
- Check if any malware or virus (including entry or add-on) installed on your computer prevent the installation.
- Remove any damaged files with Windows Installer cleanup utility.
- Use a registry cleanup tool to delete corrupted registry files.
- Type net localgroup to see whether there is the “Power Users” item in the list. If not, type net localgroup “Power Users” /add to add Power Users.
- Run SFC scan.
- Perform a system restore.
Windows 11 Assistant Software Recommended
The new and powerful Windows 11 will bring you many benefits. At the same time, it will also bring you some unexpected damages such as data loss. Thus, it is strongly recommended that you back up your crucial files before or after upgrading to Win11 with a robust and reliable program like MiniTool ShadowMaker, which will assist you to protect your increasing data automatically on schedules!
MiniTool ShadowMaker TrialClick to Download100%Clean & Safe
About The Author

Position: Columnist
Helen Graduated from university in 2014 and started working as a tech editor in the same year. Her articles focus on video creation, editing, and conversion. She also has a good knowledge of disk management and data backup & recovery. Through an in-depth exploration of computer technology, Helen has successfully helped thousands of users solve their annoying problems.
Sometimes, you can encounter the “There is a problem with this Windows Installer package” error while trying to install an application through an MSI installer. This error occurs if your system can’t run a script, program, or DLL file necessary for such operations. You will also encounter corresponding error messages in each case:
- Error 1720: There is a problem with this Windows Installer package. A script required for this install to complete could not be run.
- Error 1721: There is a problem with this Windows Installer package. A program required for this install to complete could not be run.
- Error 1722: There is a problem with this Windows Installer package. A program run as part of the setup did not finish as expected.
- Error 1723: There is a problem with this Windows Installer package. A DLL required for this install to complete could not be run.
Even if they are different errors, you need similar solutions to resolve all of them. First, make sure to log in with an admin account and run the program as an administrator. Some installers require admin privileges to run properly. Also, make sure that there is enough space to install the application.
Table of Contents
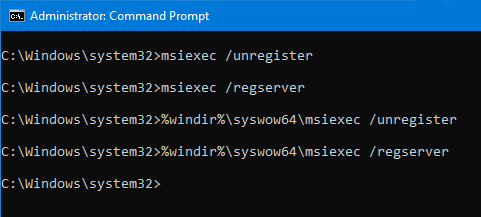
Re-register Windows Installer
Windows uses the MSIExec engine to run the MSI installer. If the registration of this engine becomes corrupt, you can’t run such installers. To resolve this issue, you need to unregister and then re-register the engine.
- Open Run.
- Type
cmdand press Ctrl + Shift + Enter to open the Elevated Command Prompt. - Enter the following commands:
MSIExec /unregisterMSIExec /regserver

Restart Windows Installer Service
You will also get this error if the Windows Installer service is not running properly or another instance of the installer engine is already running. We recommend checking for both issues at the same time.
- Open Run by pressing Win + R.
- Type
msconfigand press Enter to launch the System Configuration. - Go to the Services tab and search for Windows Installer.
- Make sure the box next to it is checked and press OK.

- Now, press Ctrl + Shift + Esc to open the Task Manager.
- Go to the Details tab.
- Look for
msiexec.exe. If it’s there, select it and click End Task.
- Then, open Run again.
- Type
services.mscand press Enter to open Window Services. - Look for Windows Installer and check its Startup Type.

- If it shows Disabled, double-click on it and set the Startup type drop-down list to Manual.
- Click on Start if the Service status indicates Stopped. Otherwise, click Stop and then Start to restart the service.


Restart your computer and check if the issue persists.
Re-register Some DLL Files
Like with the MSIExec engine, your system uses many DLL files while running the MSI installers. You can similarly re-register them to resolve any potential registration issues.
- Open the Elevated Command Prompt.
- Enter the following commands:
regsvr32 Actxprxy.dllregsvr32 Browseui.dllregsvr32 Mshtml.dllregsvr32 ole32.dllregsvr32 Oleaut32.dllregsvr32 Scrrun.dllregsvr32 Shdocvw.dllregsvr32 Shell32.dllregsvr32 urlmon.dll
- Don’t worry if you get a “The module was loaded but the entry point DllRegisterServer was not found” error, simply move on to the next command.

Troubleshoot Compatibility
If the error has the code 1721, it might be because the installer is for a previous version of Windows and therefore is not compatible with your current system. In such cases, you need to troubleshoot for program compatibility.
- Right-click on the installer and select Troubleshoot Compatibility or Show more options > Troubleshoot Compatibility.

- Select Try Recommended Settings.
- Then, click on Test the program.

- If the error doesn’t occur this time, go back to the Troubleshooter and select Next > Yes, save these settings for this program.


Install Necessary Windows Features and Updates
The installation of several programs on your system requires certain supporting software components and features. We recommend installing all such programs to prevent suffering from different installation errors. Even if you already have these components, they might have become corrupt, so it’s worth reinstalling them.
- All available Microsoft Visual C++ Runtime Packages
- Windows Management Framework
- Latest .NET Framework
You should also make sure to have the latest version of your Operating System. The newer applications require the most updated OS versions to be able to provide better features.
- Open Run.
- Type
ms-settings:windowsupdateand press Enter to open Windows Update Settings. - Click on Check for Updates to scan for and download available updates or Install now if your computer has already downloaded them.


Re-download the Installer
It is also possible that the installer you downloaded or transferred is not complete. You can check for such issues by checking its properties.
Select the installer and press Alt + Enter to open its Properties and compare the Size and Size on the disk from the General tab. If the Size on disk is much lower than the Size, the file is not complete.
In such cases, you need to download it again. Also, we recommend you ensure that the installer you download matches the system architecture of your computer while doing so.
Take Ownership of the Temp Folder
Many programs including installers make use of the Temp folder inside AppData to store temporary files. By default, each user accounts have the ownership and permissions of the Temp folder for that account. However, if this setting gets changed somehow, you will encounter many issues, including the above.
In such a scenario, you should see the error code 1723 in the error message, so it’s easier to recognize. You need to take ownership and provide permissions to this folder to resolve the issue.
- Open the Elevated Command Prompt.
- Enter the following commands:
takeown /F %Temp%icacls %Temp% /Grant %userdomain%\%username%:F

Uninstall Application Before Reinstalling
Sometimes the previous software of an application can also interfere with the new installation. In such cases, you need to uninstall the previous application first.
- Open Run.
- Type
appwiz.cpland press Enter to open Programs and Features. - Look for and select your application.
- Click on Uninstall or Uninstall/Change > Uninstall.

- Confirm with Yes and follow the on-screen instructions.

Then, update/reinstall the app again by launching a complete installer. If you can’t uninstall the applications, there may be some app-specific reasons causing such errors. You need to check official websites for what to do in such scenarios.
Remove Pending Installations Using Registry Editor
You will also get this error if you try running an installer when another one is already running on your system. Windows will usually warn you if something like this happens, but it can’t do so if the previous instance of installers is stuck. In such a case, you need to remove all pending installations first.
- Open Run.
- Type
regeditand press Enter to open the Registry Editor. - Navigate to
Computer\HKEY_LOCAL_MACHINE\Software\Microsoft\Windows\CurrentVersion\Installer
- If the InProgress key is present, delete all the entries inside it.
- Then go to Computer
HKEY_LOCAL_MACHINE\System\CurrentControlSet\Control\Session Manager - If PendingFileRenameOperations is there, delete all of its entries as well.

Install a Different Version of Application
Sometimes, the latest version of the application or its installer may have some bugs that are responsible for such issues. In such cases, you will only encounter the above error while trying to install one application but can successfully install other programs through MSI installers. You need to try installing a previous or different version of the app instead to resolve the issue.
Windows user comes across a few issues while installing Java or some other similar applications. One of the issues is the error 1721 Windows installer.
This error generally arises when you try to install, uninstall a program or the computer is not capable to read various files or the Windows installer package has some trouble. Then this error message appears.
Error 1721. There is a problem with this Windows Installer package. A program required for this install to complete could not be run. Contact your support personnel or package vendor.
You might be among those users encountering this problem as you are here reading this article and searching for a solution.
In this article, you will get the workarounds that will surely help you to overcome Windows 10 Installer error 1721.
So, what are you waiting for? Let’s get started…
Well, there are various solutions mentioned below that can make Windows installer error 1721 fix with ease and you can start the installation process again.
Table of Contents
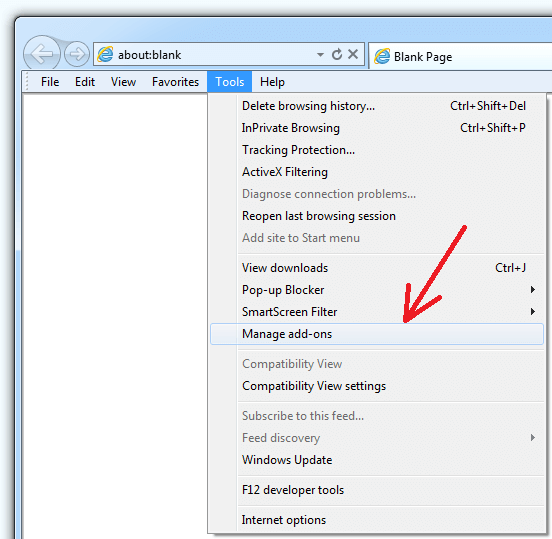
Solution 1: Disable Internet Explorer add-ons
Disabling the internet explorer add-ons might help you in solving the installer error 1721. Follow the below-given steps to do so:
- Open the Internet explorer
- Click on the Tools tab
- Select Manage add-ons
- In the Manage add-ons Windows, click on Add-ons that have been used by Internet Explorer
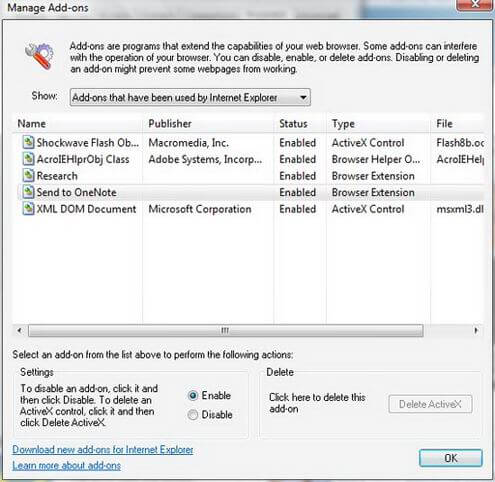
- Now, click on each add-on shown in the list
- Click on Disable and then OK
- You will receive a message For changes to take effect, you might need to restart Internet Explorer, click OK and close the Internet explorer
Restart your computer, try to install a program and check if the error 1721 windows 10 still appears or not.
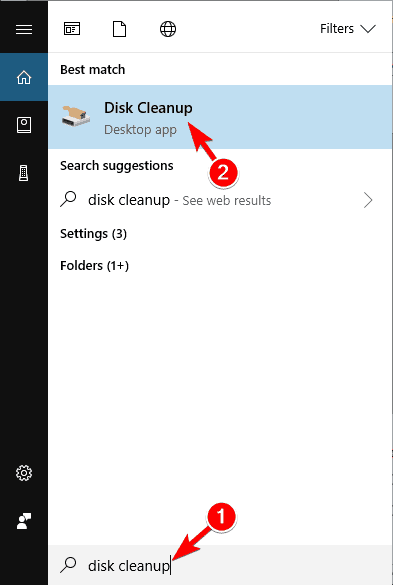
Solution 2: Try Disk Cleanup
Disk cleanup is a utility tool for computer maintenance that will help to flush out the files in the drive that is causing the installer error 1721.
Follow the steps to perform disk cleanup:
- Press the Windows icon
- Type disk cleanup and click on the search result
- Select the drive that requires cleanup and click on OK
- Click the file that you want to delete under Files to Delete and click on OK
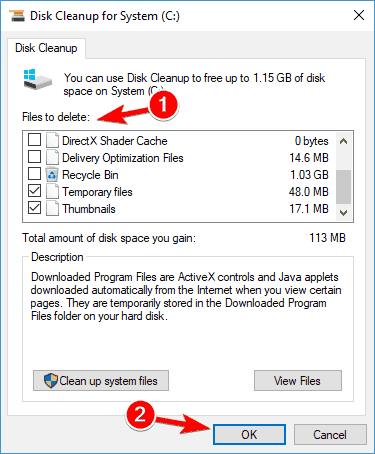
- In case you need to clean up files then click on clean up system files and click on OK
After performing a disk cleanup, try to install a program and see whether the error 1721 Windows installer is fixed or not.
Solution 3: Perform System Restore
Try performing system restore to get back to the previous version of your Windows to get rid of Windows 10 installer error 1721.
Follow the steps for system restore:
- Press the Windows icon
- Type create a restore point and click on it

- In the system properties windows, click on system restore
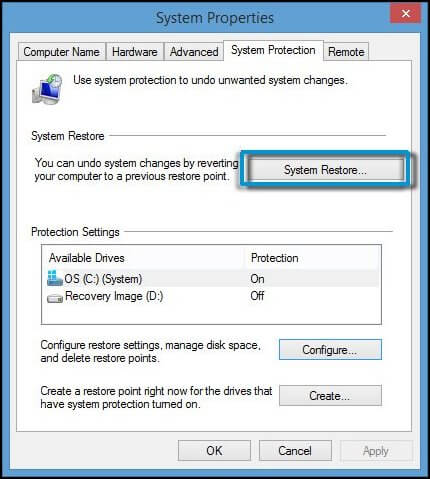
- Select the restore point for your computer
- Click on Scan for affected programs for the apps that are no longer needed
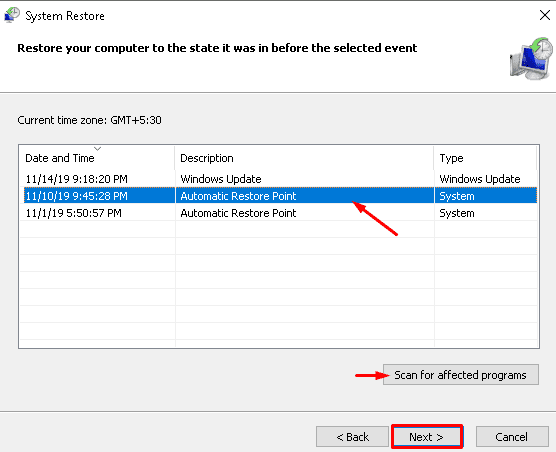
- Click on Next
- In the System restore Windows, click on Next
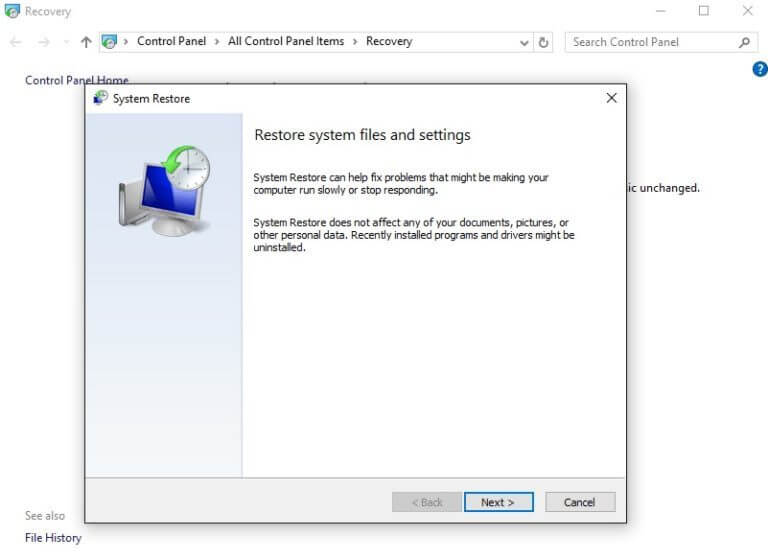
- Click on Finish
Once the above steps are completed your computer will be restored to its previous state and you no longer will face the installer error 1721.
Solution 4: Re-Register the Installer
This solution is simple, you just need to re-register the Windows installer in your system and that’s it the installer error 1721 will vanish.
Follow the steps to re-register the installer:
- First of all, boot your Windows into safe mode with admin privilege
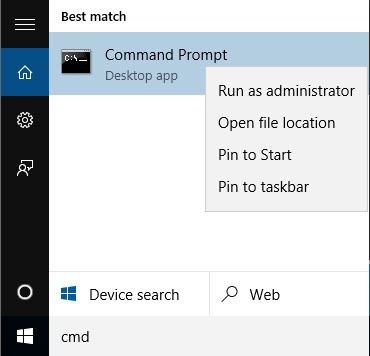
- After that press the Windows icon
- Type cmd, right-click on it and select Run as administrator
- In the command prompt window, type the below-given command and then press the enter key after each:
msiexec u/unregister
msiexec /register
- Close the command prompt
The above steps will re-register the Windows installer and fix the error 1721 Windows 10.
Solution 5: Run SFC Scan
There might be a possibility that due to missing or corrupted Windows files in the system the Windows 10 Installer error 1721 appears.
Therefore, it is suggested to run a system file checker (SFC) to repair those files. Follow the steps to run the SFC scan:
- Press the Windows icon
- Type cmd, right-click on it and select Run as administrator
- In the command prompt window, type sfc/scannow and hit the enter key
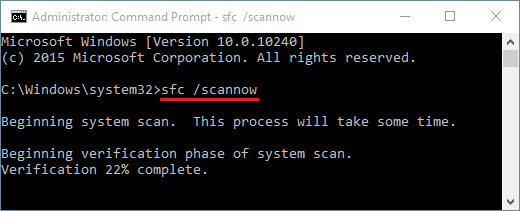
- This scanning process will take some time to scan your system so have patience.
Once the scanning is done, restart your Windows and see whether error 1721 Windows installer got solved or not.
Solution 6: Update Windows Installer
Many users are unaware of the installer version they are using and whether it is outdated or updated. Windows installer 4.5 is the current update of the installer.
If you are facing Windows installer error 1721 then it may be because of the outdated version of the installer. Download the new version and try to update it to fix this error.
Solution 7: Scan for Virus
If by any chance your system is infected with a virus or any other malicious program then there is a chance of Windows installer error 1721 to appear on the screen.
Therefore, to remove this error you need to scan your system for viruses and fix it. To scan your computer, you can try Spyhunter.
This will remove all the viruses, malware, and other malicious programs automatically and make your system virus-free.
Get Spyhunter to Remove Virus and Other Malicious Programs
Solution 8: Fix Error 1721 via Register Cleaner
In order to fix installer error 1721 in Windows 10 that appears in the runtime for installing or uninstalling the programs, you need to clear the register.
Cleaning the registry manually can be done only by experts so it is advised to try CCleaner. This will clean the registry without any hassle.
After running this tool, the Windows 10 installer error 1721 will be fixed with ease.
Get CCleaner to Clean the Registry and Fix the Issue
Solution 9: Uninstall the Programs
Try uninstalling the programs to get Windows installer error 1721 fix. Follow the steps to do so:
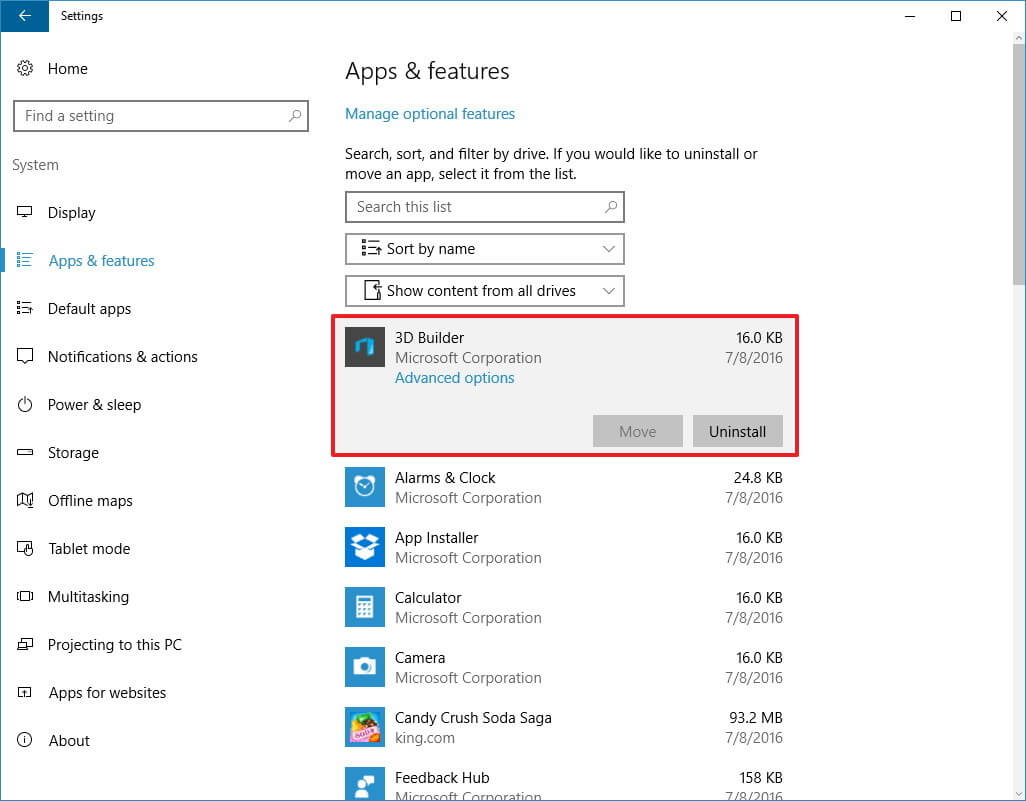
Press the Windows icon
- Go to settings
- Click on Apps
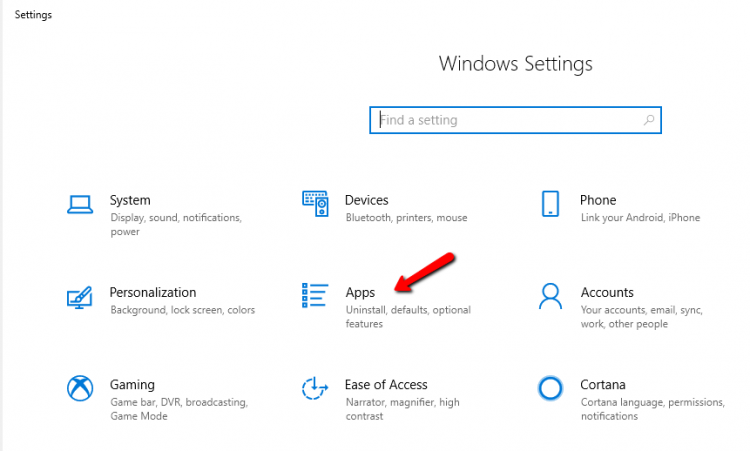
- Click on Apps & features
- Select the apps that are no longer in use
- Click on those apps and click on uninstall button
After uninstalling the app/ programs, try to install it again from the app store and see if the error 1721 Windows 10 is fixed or not. You can also try Revo Uninstaller to uninstall the programs and delete leftover files.
Get Revo Uninstaller to Uninstall the Programs Easily
Best & Easy Way to Fix the Windows 10 Installer Error 1721
The above stated manual solutions can be quite tricky for those who are a novice so for them here is an easy way to fix this error.
Try the PC Repair Tool. This is an advanced repair tool that will scan your computer just once, detect the errors such as BSOD, DLL, registry, game, update, etc. and also repair damaged, corrupted system files.
It optimizes and speeds up the performance of your PC for its smooth run.
Get PC Repair Tool to Fix the Windows 10 Installer Error 1721
Conclusion
So, that’s it…
This was all about how to fix an error 1721 Windows installer. I have listed down the solutions that will troubleshoot the installer error 1721.
If you find difficulty in performing the manuals the take the easy way to solve the error.
It is expected that all your queries are solved with the help of this article.

Hardeep has always been a Windows lover ever since she got her hands on her first Windows XP PC. She has always been enthusiastic about technological stuff, especially Artificial Intelligence (AI) computing. Before joining PC Error Fix, she worked as a freelancer and worked on numerous technical projects.