Время на прочтение
9 мин
Количество просмотров 32K
Вступление
Предлагаю вашему вниманию перевод статьи Bernardo Castilho посвященный привязке данных сущностей к элементам управления WinForms. Надеюсь, вам статья также поможет в работе как и мне.
- Скачать пример (EF4, C#) — 1.03 MB
- Скачать пример (EF4, C#, separating data layer from the UI layer) — 120 KB
- Скачать пример (EF4, VB, provided by Mr ‘VBForever’) — 946 KB
- Скачать пример (EF5, C#) — 1.3 MB
- Скачать пример (EF6 C#) = 1.3 MB
На сегодняшний день Winforms все еще остается платформой для многих бизнес-приложений, ориентированных на работу с данными, и привязка данных является неотъемлемой частью разработки для Winforms. Если вы использовали стандартные классы ADO.NET для работы с данными, то вы знакомы с инструментами, используемыми для создания классов DataSet и связывания этих классов во время разработки с помощью их свойств DataSource, DataMember или Binding.
Плохая новость заключается в том, что эти богатые возможности разработки не применимы к источникам данных Entity Framework. Даже простая привязка требует написания кода. Чтобы получить работающую базовую привязку, достаточно немного кода, но для получения полноценной привязки, к которой мы привыкли (такой как автоматическая сортировка, фильтрация, и иерархическое связывание), требуется существенный объем работы.
Хорошая новость заключается в том, что с помощью библиотеки EFWinForms можно легко выполнить привязку данных и создать повторно используемый компонент для привязки данных в Winforms. В библиотеке есть два компонента:
- EntityDataSource: компонент, который инкапсулирует модель сущности данных и представляет его элементы в качестве источников данных, пригодных для связывания, с полной поддержки во время разработки.
- EntityBindingNavigator: элемент управления, который обеспечивает навигацию для просмотра и предоставляет пользовательский интерфейса для добавления и удаления записей, сохранение или отмены изменений в базе данных.
Компонент EntityDataSource
Компонент EntityDataSource играет роль DataSet и BindingSource в стандартном ADO.NET программировании. Чтобы использовать его, сначала необходимо создать Entity Data Model.
После этого, перетащите компонент EntityDataSource на форму и свойство ObjectContextType типа ObjectContext установите в один из представленных Entity Data Model контекстов. (Если у вас EF6, используйте свойство DbContextType вместо ObjectContextType). Когда вы это сделаете, компонент EntityDataSource создает объект контекста и использует рефлексию, чтобы найти все источники данных, доступных в контексте. Эти источники данных, затем появляются в дизайнере с помощью реализации IListSource.
После этого Вы можете добавлять элементы управления на форму и связывать их с EntityDataSource с помощью их свойств DataSource, DataMember и Binding как обычно. Один EntityDataSource предоставляет доступ ко всем таблицам и представлениям в модели и сохраняет изменения только с помощью вызова метода SaveChanges.
Примеры
Лучший способ понять, как работает EntityDataSource рассмотреть несколько примеров. В следующем разделе рассказывается о том, как использовать EntityDataSource для реализации четырех типичных сценариев привязки данных. Все сценарии используют одну Entity Data Model, созданную на основе БД Northwind.
Чтобы использовать его, сначала необходимо создать Entity Data Model.
Создание Entity Data Model
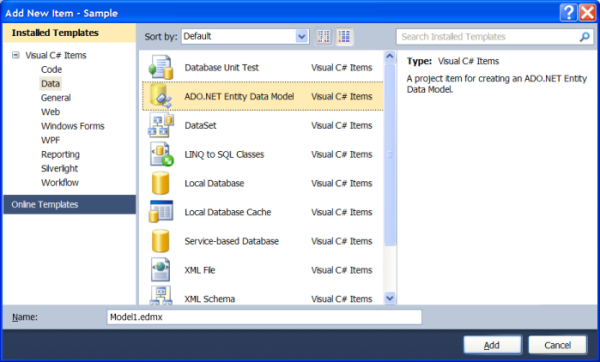
Чтобы создать Entity Data Model, щелкните правой кнопкой дерево проекта в окне Solution Explorer и затем выберите “Add | New Item…”.
Появится диалоговое окно “Add New Item”. Выберите “ADO.NET Entity Data Model”, задайте имя модели и щелкните расположенную внизу формы кнопку “Add”.

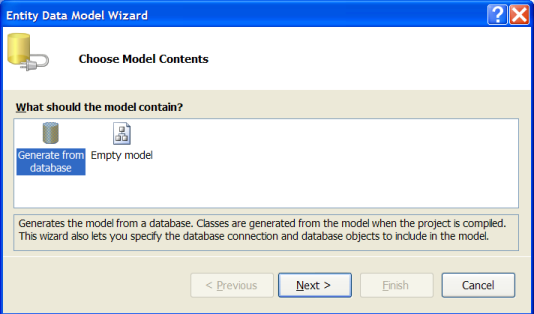
Появится диалоговое окно “Entity Data Model Wizard” в котором нужно выбрать какую модель вы будете создавать: модель, сгенерированную из существующей базы данных или пустую модель. Выберите первый вариант и нажмите “Next”.

Следующий шаг-выбор базы данных для создания модели. Вы можете выбрать существующее подключение, или используя кнопку “New Connection”, создать новое. В нашем примере мы создадим подключение к базе данных SQL Server «Northwind».

Файл базы данных называется “NorthWnd.mdf и входит в состав примера. После того как вы выбрали базу данных, мастер предложит вам выбрать таблицы, представления и хранимые процедуры, которые необходимо включить в Entity Data Model. В нашем примере мы просто выберем все таблицы, как показано на рисунке ниже:

Щелкните кнопку “Finish” чтобы создать модель. В ваш проект добавятся два элемента: файл “Model1.edmx” описывающий с помощью XML концептуальную модель и связанный с ним “Model1.Designer.cs” который содержит сгенерированный код, включая ObjectContext использующийся для доступа к данным и классы сущностей, такие как Product, Employee и т.п.
Щелкните два раза на edmx-файле. Появится окно Entity Data Model Designer, в котором можно просматривать, редактировать модель, а также пересоздать ее в любой момент, если вы вдруг измените схему базы данных или если вы захотите изменить список таблиц и представлений, которые необходимо включить в модель. Все автоматически сгенерированные классы в файле «Designer.cs” объявлены как частичные. Это позволяет нам расширять их, добавлением бизнес логики в отдельные файлы, которые не будут изменены, если вы пересоздадите модель из базы данных.
Теперь вы можете использовать модель данных так, как показано ниже:
	public Form1()
	{
		InitializeComponent();
		using
		(
		var ctx = new NORTHWNDEntities())
		{
		  dataGridView1.DataSource = ctx.Products.ToList();
		}
	}
Этот код создает объект ObjectContext, который предоставляет данные для модели, строит список, содержащий все товары (products), и показывает список в таблице. Вы можете отредактировать товары и сохранить изменения в базе данных путем вызова метода ctx.SaveChanges().
Если вы запустите код, то заметите некоторые серьезные ограничения: нельзя сортировать или фильтровать данные, нельзя добавлять или удалять элементы из списка и конечно же нельзя настроить столбцы таблицы (Grid) во время разработки с помощью редактора таблицы (Grid).
Эти ограничения обусловлены тем, что в качестве источника используется список (просто „мгновенный снимок“ данных). IBindingList, который Winforms создает автоматически, в этом случае обеспечивает лишь минимальную функциональность.
Создание Grid View (With AutoLookup)
Чтобы устранить эти недостатки, добавьте на форму компонент EntityDataSource и в окне Properties, установите его свойство ObjectContextType в “Sample.NORTHWNDEntities”, как показано на рисунке ниже (Примечание: если у вас EF6, используйте DbContextType вместо ObjectContextType):

Компонент EntityDataSource использует значение из ObjectContextType для создания контекста объекта, чтобы сгенерировать представления для всех элементов, описанных в модели данных.
Теперь добавьте элемент управления DataGridView на форму и в окне Properties, установите свойство DataSource в entityDataSource1, а свойство DataMember в Products, как показано ниже:

В DataGridView автоматически создадутся столбцы, чтобы отобразить свойства класса Product. В режиме дизайнера вы можете переупорядочить столбцы, установить их ширину, заголовок, выравнивание, формат, и т. д.
Если сейчас запустить проект, то вы увидите, что таблица заполняется автоматически, и вы можете выполнять все действия какие захотите, включая редактирование, сортировку, добавление или удаление элементов.
Все это возможно потому, что компонент EntityDataSource оборачивает список товаров в класс EntityBindingList, который реализует интерфейс IBindingListView и поддерживает сортировку, фильтрацию, добавление и удаление элементов.
Сохранение изменений
После редактирования данных, вы вероятно захотите сохранить изменения в базу данных. Для демонстрации того, как это можно сделать, добавьте на форму три кнопки и установите их свойство Text в “Save”, “Cancel”, and “Refresh” и присоедините к событиям Click этих кнопок следующие обработчики:
		// save/cancel/refresh changes in the data source
		void _btnSave_Click(object sender, EventArgs e)
		{
			entityDataSource1.SaveChanges();
		}
		void _btnCancel_Click(object sender, EventArgs e)
		{
			entityDataSource1.CancelChanges();
		}
		void _btnRefresh_Click(object sender, EventArgs e)
		{
			entityDataSource1.Refresh();
		}
Этот код не требует пояснений. Первая кнопка сохраняет все изменения обратно в базу данных. Вторая отменяет изменения путем повторного извлечения данных, и третья сохраняет изменения и выбирает данные заново.
Есть одна важная деталь, про которую часто забывают: при сохранении изменений в базу данных возможно появление исключений. Например, при сохранении изменений, нарушающих ограничения целостности БД. К сожалению, нет общих рецептов для борьбы с этим типом исключения. Их природа зависит от схемы базы данных и самого приложения.
Независимо от того, как вы планируете бороться с возможными исключениями, первое, что нужно сделать — это поймать их. Чтобы сделать это, нужно обернуть вызов метода SaveChanges блоком try/catch, или добавить обработчик события DataError в компонент EntityDataSource. Вот так наше приложение сможет обработать возможные ошибки при сохранении данных:
		// report any errors
		void entityDataSource1_DataError(object sender, DataErrorEventArgs e)
		{
			MessageBox.Show("Error Detected:\r\n" + e.Exception.Message);
			entityDataSource1.CancelChanges();
			e.Handled = true;
		}
Код выдает предупреждение, отменяет изменения, и устанавливает параметр Handled в True, чтобы указать, что ошибка уже обработана и генерировать исключения не нужно.
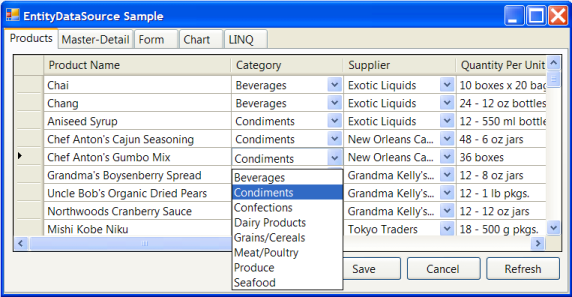
Использование поиска по словарям для представления связанных сущностей
Чтобы закончить с этим примером, давайте рассмотрим обычный сценарий. У класса Product есть два свойства — Category и Supplier, представляющие собой связанные сущности. По умолчанию эти свойства не представлены в таблице, но с помощью редактора колонок можно добавить столбцы для этих сущностей в нашу таблицу. Изображение ниже показывает, как это можно сделать:
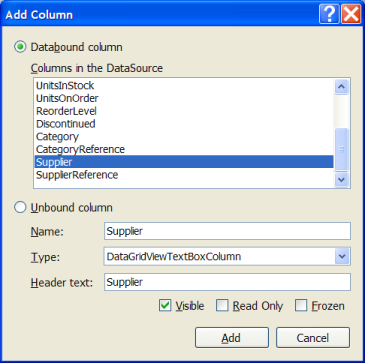
Проблема состоит в том, что DataGridView не знает, как отображать связанную сущность, по умолчанию просто используется метод ToString, и в результате мы получаем два столбцы „только для чтения“, ячейки которых заполнены значениями “Sample.Category” и “Sample.Supplier”.
Но для выполнения реальной работы требуется столбец, который показывает категории и имена поставщиков, в идеале с редактором, позволяющим изменять категории и поставщиков путем выбора из списков. Обычно это делается путем написания кода для создания и связывания пользовательских столбцов (в DataGridViewComboBoxColumn если вы используете элемент управления DataGridView).
Т.к. это распространенный сценарий, компонент EntityDataSource поддерживает расширенное свойство AutoLookup. Это свойство автоматически становится доступным в любом элементе управления DataGridView или C1FlexGrid размещенным на форме (в C1FlexGrid является популярным компонентом табличного представления данных, значительно быстрее и навороченней чем DataGridView).
Обратите внимание, что хотя компонент EntityDataSource поддерживает C1FlexGrid, сборка EFWinForms не зависит от сборки C1FlexGrid. Это достигается с помощью ключевого слово »dynamic», которое опирается главным образом на рефлексию, чтобы связывать свойства во время выполнения. Тот же самый механизм может использоваться, чтобы расширить компонент EntityDataSource для поддержки в других компонентах табличного представления данных.
На рисунке ниже показано, как можно включить свойство AutoLookup в DataGridView:

Как только вы включите свойство AutoLookup, компонент EntityDataSource будет автоматически сканировать столбцы в таблице, чтобы заменить столбцы, привязанные к сущностям на редактируемые столбцы, основанные на “data map”, содержащие список возможных значений связанных сущностей и отображения значений для каждого из них.
На рисунке ниже показан результат установки свойства AutoLookup в True:

Обратите внимание, как столбцы “Category” и “Supplier” показывают имена категорий и названия поставщиков, и что можно поменять поставщика для продукта, просто выбрав нового из списка.
Вы можете удивиться, как EntityDataSource выбирает нужное поле из связанных сущностей для отображения в таблице. Это делается с помощью следующего алгоритма:
- Если класс реализует метод ToString (а не просто наследует), тогда реализация ToString используется для представления сущности.
- В противном случае, если у класса есть свойство типа string, в названии которого есть слово “Name”, то это свойство используется для представления сущности.
- В противном случае, если у класса есть свойство типа string, в названии которого есть слово “Description”, то это свойство используется для представления сущности.
- Если ничего из вышеперечисленного не применяется, то привязка данных не может быть выполнена для этого класса.
Первое правило наиболее общее и гибкое. Например, класс Employee в базе данных «Northwind » имеет свойства Firstname и Lastname. Какое-то одно из них может быть использовано для представления сущностей в списке, но в идеале хотелось бы использовать оба. Чтобы сделать это, мы просто переопределим метод ToString в классе Employee и создадим строку состоящую из обоих свойств:
	/// <summary>
	/// Add a field with the employee's full name
	/// </summary>
	public partial class Employee
	{
		public string FullName
		{
		  get { return string.Format("{0} {1}", FirstName, LastName); }
		}
		public override string ToString()
		{
		  return FullName;
		}
	}
Обратите внимание, что использование частичного класса расширяет стандартный класс, созданный с помощью мастера ADO.NET Entity Framework. Если в какой-то момент вы решите заново сгенерировать модель сущности данных, наша реализация метода ToString не будет затронута.
В базе данных «Northwind», Employee — единственный класс, который требует каких-либо специальных методов для привязки данных. Все остальные классы имеют такие свойства, как “CustomerName” или “CategoryDescription”, которые автоматически используются компонентом EntityDataSource и обеспечивают необходимый эффект.
На этом первый пример окончен.
Search code, repositories, users, issues, pull requests…
Provide feedback
Saved searches
Use saved searches to filter your results more quickly
Sign up
Операции с данными. Практический пример
Данное руководство устарело. Актуальное руководство: Руководство по Entity Framework Core
Последнее обновление: 31.10.2015
Создадим полноценное приложение, которое будет выполнять все эти операции. Итак, создадим новый проект по типу Windows Forms. Новое приложение
будет работать с базой данных футболистов. В качестве подхода взаимодействия с БД выберем Code First.
Вначале добавим в проект новый класс, который описывает модель футболистов:
class Player
{
    public int Id { get; set; }
    public string Name { get; set; }
    public string Position { get; set; }
    public int Age { get; set; }
}
Тут всего четыре свойства: id, имя, позиция на поле и возраст. Также добавим в проект через NuGet пакет Entity Framework и новый класс контекста данных:
using System.Data.Entity;

class SoccerContext : DbContext
{
    public SoccerContext()
        :base("DefaultConnection")
    { }

    public DbSet<Player> Players { get; set; }
}
В файл конфигурации app.config после секции configSections добавим узел connectionStrings,
в котором определим строку подключения DefaultConnection:
<?xml version="1.0" encoding="utf-8"?>
<configuration>
  <configSections>
    <section name="entityFramework" type="System.Data.Entity.Internal.ConfigFile.EntityFrameworkSection, EntityFramework, Version=6.0.0.0, Culture=neutral, PublicKeyToken=b77a5c561934e089" requirePermission="false" />
  </configSections>
  <connectionStrings>
   <add name="DefaultConnection" connectionString="Data Source=.\SQLEXPRESS;Initial Catalog=Players;Integrated Security=True"
       providerName="System.Data.SqlClient"/>
 </connectionStrings>
  <!--остальное содержимое-->
</configuration>
Теперь визуальная часть. По умолчанию в проекте уже есть форма Form1. Добавим на нее элемент DataGridView, который будет отображать все данные из БД, а также
три кнопки на каждое действие — добавление, редактирование, удаление, чтобы в итоге форма выглядела так:
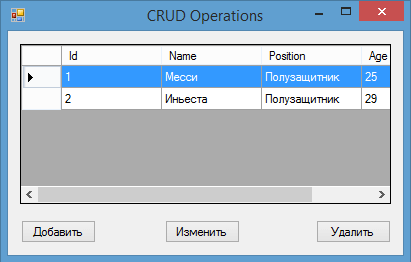
У элемента DataGridView установим в окне свойств для свойства AllowUserToAddRows значение False, а для
свойства SelectionMode значение FullRowSelect, чтобы можно было выделять всю строку.
Это основная форма, но добавление и редактирование объектов у нас будет происходить на вспомогательной форме. Итак, добавим в проект новую форму,
которую назовем PlayerForm. Она будет иметь следующий вид:

Здесь у нас текстовое поле для ввода имени, далее выпадающий список ComboBox, в который мы через свойство Items добавляем четыре позиции. И последнее поле —
NumericUpDown для ввода чисел для указания возраста. У всех этих трех полей установим свойство Modifiers
равным Protected Internal, чтобы эти поля были доступны из главной формы.
Также есть две кнопки. Для кнопки «ОК» в окне свойств для свойства DialogResult укажем значение OK, а для кнопки «Отмена» для того же свойства
установим значение Cancel.
Никакого кода данная форма не будет содержать. Теперь перейдем к основной форме Form1, которая и будет содержать всю логику. Весь ее код:
using System;
using System.Collections.Generic;
using System.Data;
using System.Data.Entity;
using System.Windows.Forms;

namespace CRUD
{
    public partial class Form1 : Form
    {
        SoccerContext db;
        public Form1()
        {
            InitializeComponent();

            db = new SoccerContext();
            db.Players.Load();

            dataGridView1.DataSource = db.Players.Local.ToBindingList();
        }
        // добавление
        private void button1_Click(object sender, EventArgs e)
        {
            PlayerForm plForm = new PlayerForm();
            DialogResult result = plForm.ShowDialog(this);

            if (result == DialogResult.Cancel)
                return;

            Player player = new Player();
            player.Age = (int)plForm.numericUpDown1.Value;
            player.Name = plForm.textBox1.Text;
            player.Position = plForm.comboBox1.SelectedItem.ToString();

            db.Players.Add(player);
            db.SaveChanges();

            MessageBox.Show("Новый объект добавлен");
        }
        // редактирование
        private void button2_Click(object sender, EventArgs e)
        {
            if(dataGridView1.SelectedRows.Count>0)
            {
                int index = dataGridView1.SelectedRows[0].Index;
                int id=0;
                bool converted = Int32.TryParse(dataGridView1[0, index].Value.ToString(),out id);
                if(converted==false)
                    return;

                Player player = db.Players.Find(id);

                PlayerForm plForm = new PlayerForm();

                plForm.numericUpDown1.Value = player.Age;
                plForm.comboBox1.SelectedItem = player.Position;
                plForm.textBox1.Text = player.Name;

                DialogResult result = plForm.ShowDialog(this);

                if (result == DialogResult.Cancel)
                    return;

                player.Age = (int)plForm.numericUpDown1.Value;
                player.Name = plForm.textBox1.Text;
                player.Position = plForm.comboBox1.SelectedItem.ToString();

                db.SaveChanges();
				dataGridView1.Refresh(); // обновляем грид
                MessageBox.Show("Объект обновлен");

            }
        }
        // удаление
        private void button3_Click(object sender, EventArgs e)
        {
            if (dataGridView1.SelectedRows.Count > 0)
            {
                int index = dataGridView1.SelectedRows[0].Index;
                int id = 0;
                bool converted = Int32.TryParse(dataGridView1[0, index].Value.ToString(), out id);
                if (converted == false)
                    return;

                Player player = db.Players.Find(id);
                db.Players.Remove(player);
                db.SaveChanges();

                MessageBox.Show("Объект удален");
            }
        }
    }
}
Чтобы получить данные из бд, используется выражение db.Players. Однако нам надо кроме того выполнить привязку к элементу DataGridView и динамически
отображать все изменения в случае добавления, редактирования или удаления. Поэтому вначале используется метод db.Players.Load(),
который загружает данные в объект DbContext, а затем выполняется привязка (dataGridView1.DataSource = db.Players.Local.ToBindingList())
Добавление
При добавлении объекта использует вторая форма:
Player player = new Player();
player.Age = (int)plForm.numericUpDown1.Value;
player.Name = plForm.textBox1.Text;
player.Position = plForm.comboBox1.SelectedItem.ToString();

db.Players.Add(player);
db.SaveChanges();
Для добавления объекта используется метод Add, определенный у класса DbSet. В этот метод передается новый объект, свойства
которого формируются из полей второй формы. Метод Add устанавливает значение Added в качестве состояния нового объекта. Поэтому метод db.SaveChanges() сгенерирует выражение INSERT для вставки модели в таблицу.
Редактирование
Редактирование имеет похожую логику. Только вначале мы передаем значения свойств объекта во вторую форму, а после получаем с нее же измененные
значения для свойств объекта.
В данном случае контекст данных автоматически отслеживает, что объект был изменен, и при вызове метода db.SaveChanges()
будет сформировано SQL-выражение UPDATE для данного объекта, которое обновит объект в базе данных.
Удаление
С удалением проще всего: получаем по id нужный объект в бд и передаем его в метод db.Players.Remove(player). Данный метод установит статус объекта в
Deleted, благодаря чему Entity Framework при выполнении метода db.SaveChanges() сгенерирует SQL-выражение DELETE.
- Download sample (EF4, C#) — 1.03 MB
- Download sample (EF4, C#, separating data layer from the UI layer) — 120 KB
- Download sample (EF4, VB, provided by Mr ‘VBForever’) — 946 KB
- Download sample (EF5, C#) — 1.3 MB
- Download sample (EF6 C#) = 1.3 MB
Introduction
The ADO.NET Entity Framework is Microsoft’s latest data technology. It allows you to create conceptual data models that are easy to program against. It also includes a layer that bridges the conceptual models to the actual data store, so you can easily transfer data between the conceptual model and a backing database.
If you are used to the traditional ADO.NET data classes (DataSet, DataAdapter, etc.), then you will probably find that working with the ADO.NET Entity Framework makes many things much simpler:
- Instead of working with classes that derive from
DataTableandDataRow(e.g.,CustomerDataTable,CustomerDataRow), you work with the actual objects (e.g.,Customer). The result is code that is much cleaner and more intuitive. - There are no data adapters. Data is retrieved automatically whenever you request it, and saving the changes only requires a call to the
SaveChangesmethod. - The data access layer code that is automatically generated by Visual Studio is easier to maintain, extend, and re-use.
We will not discuss the technical details of the ADO.NET Entity Framework. That is a deep subject, and well covered in many excellent articles and books. A few of those are listed in the References section at the end of this document.
Instead, we will focus on using the ADO.NET Entity Framework in WinForms applications. Although all the great features of the Entity Framework can be used in WinForms applications, there is little support for data binding. This is unfortunate since WinForms is still the platform of choice for many data-oriented business applications, and data binding is an essential part of WinForms development.
If you have used the traditional ADO.NET data classes, you are familiar with the Visual Studio tools used for creating DataSet classes, and binding controls to those classes at design time, by using their DataSource, DataMember, or Binding properties.
The bad news is this rich design time support is not applicable to Entity Framework data sources. Even simple binding scenarios require code. A little code is enough to get really basic bindings to work, but substantial work is required to get the full-fledged binding experience you are probably used to (including automatic sorting, filtering, and hierarchical binding, for example).
The good news is this support can be added with relatively little work, and the result can be encapsulated into a reusable component that enables rich binding scenarios for WinForms applications. That is the goal of the EFWinForms library presented here. The library contains two components:
EntityDataSource: A component that encapsulates an entity data model and exposes its elements as data sources suitable for binding, with full design-time support.EntityBindingNavigator: A control that provides navigation for a view, as well as a UI for adding and removing records, and saving or cancelling changes in the database.
The EntityDataSource Component
The EntityDataSource component plays the role of a DataSet and BindingSource in traditional ADO.NET programming.
To use it, you start by creating an Entity Data Model (this is the first step in any ADO.NET Entity Framework project, and is analogous to creating the DataSet class in traditional ADO.NET programming).
Once the data model has been created, you can drag an EntityDataSource component onto the form and set its ObjectContextType property to the type of ObjectContext represented by the Entity Data Model (note: if you are using the EF6 version of the project, use the DbContextType property instead of ObjectContextType). When you do that, the EntityDataSource component instantiates an object context and uses Reflection to find all data sources available in the context. These data sources are then exposed to designers using an IListSource implementation.
After that, you can add controls to the form and bind them to the EntityDataSource using their DataSource, DataMember, or Binding properties as usual. A single EntityDataSource provides access to all tables and views in the model, and saving changes only takes a call to the SaveChanges method.
Examples
The best way to understand how the EntityDataSource works is by looking at a few examples. The next sections describe how to use the EntityDataSource to implement four typical binding scenarios.
All scenarios use the same entity data model, based on the traditional NorthWind database.
Creating the Entity Data Model (Common Step)
To use the ADO.NET Entity Framework, you have to create an ADO.NET Entity Data Model. This is the layer that contains the conceptual data model and the infrastructure required to load and save the conceptual model from and to the database.
To create the Entity Data Model, right-click the project explorer tree in Visual Studio and select the “Add | New Item…” option. This will bring up the “Add New Item” dialog shown in the image below. Select the “ADO.NET Entity Data Model”, optionally give the model a meaningful name, and click the “Add” button at the bottom of the form.
This will bring up the “Entity Data Model Wizard” shown in the image below. The first step allows you to select whether you want to create the model from an existing database or from an empty model. Select the first option and click “Next”.
The next step is where you select the database that will define the model. You can select an existing connection, or use the “New Connection” button to create a new one. In our example, we will create a connection to the SQL Server version of the Northwind database.
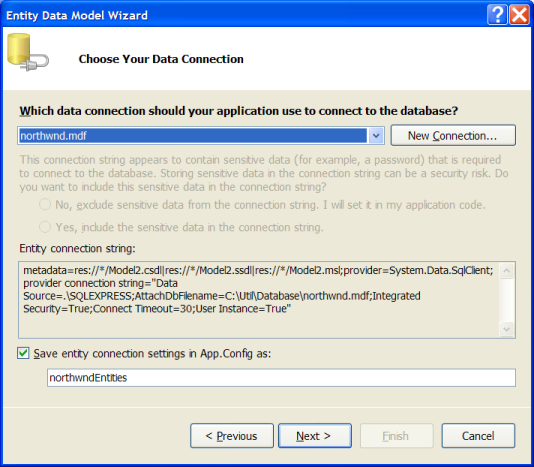
The database file is called “NorthWnd.MDF” and is included with the sample.
Once you’ve selected the database, the wizard will prompt you to choose the tables, views, and Stored Procedures you want to include in the Entity Data Model. In our sample, we will simply select all tables, as shown in the image below:

Click the “Finish” button to generate the model. This will add two items to your project: a “Model1.edmx” file that contains the XML definitions used by the ADO.NET Entity Framework to specify the model, and an associated “Model1.Designer.cs” that contains the generated code, including an ObjectContext used to access the data and data classes such as Product, Employee, etc.
Opening the edmx file shows the Entity Data Model Designer, which allows you to inspect and edit the model. It also allows you to re-generate the model at any time, which is important in case the database schema changes or if you change your mind about which tables and views you want to include in the model.
The automatically-generated data classes in the “Model1.Designer.cs” file are all declared as partial classes. This allows you to extend them by adding custom business logic in separate files which will not be modified if you decide to re-generate the model from the database.
At this point, you could start using the data model as follows:
public Form1()
{
    InitializeComponent();
    using (var ctx = new NORTHWNDEntities())
    {
      dataGridView1.DataSource = ctx.Products.ToList();
    }
}
The code creates an ObjectContext that exposes the data in the model, builds a list containing all the products, and shows the list on a grid. You can edit the products, and if we had not disposed of the context object, we could save the changes to the database by calling ctx.SaveChanges().
If you run the code, however, you will notice some serious limitations: you can’t sort or filter the data, you can’t add or remove items from the list, and of course you don’t get to customize the grid columns at design time using the grid’s column editor.
These limitations are due to the fact that the list used as a data source is simply a snapshot of the data. So although the objects in the list are “live”, the list itself is not. And the IBindingList that WinForms creates automatically for you in this case provides only minimal functionality.
Creating a Grid View (With AutoLookup)
To address these limitations, add an EntityDataSource component to the form and use the property window to set its ObjectContextType property to “Sample.NORTHWNDEntities”, as shown on the image below (note: if you are using the EF6 version of the project, use the DbContextType property instead of ObjectContextType):
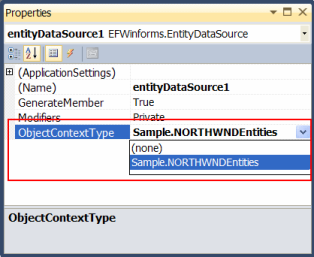
The EntityDataSource component uses the ObjectContextType value to create an object context that is used to generate views for all elements defined in the data model.
Now add a DataGridView control to the form and use the property window to set the DataSource property to the EntityDataSource component and the DataMember property to “Products”, as shown below:
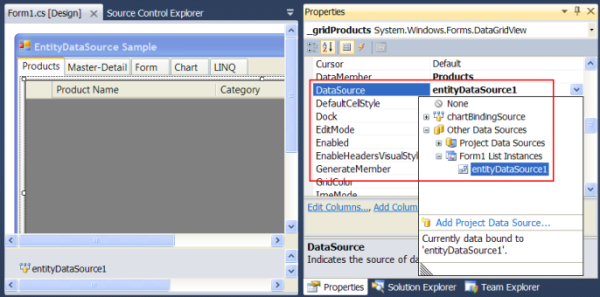
At this point, the grid will automatically create columns to expose the properties in the Product class. You can use the grid’s column designer to reorder the columns, set their width, caption, alignment, format, etc.
If you run the project now, you will see that the grid is automatically populated, and you can perform all the tasks you would expect, including editing, sorting, and adding or removing items.
This all works because the EntityDataSource component transparently wraps the product list into an EntityBindingList, a class that implements the IBindingListView interface and supports sorting, filtering, adding and removing items.
Saving the changes
After editing the data, at some point, you will probably want to save the changes back to the database. This is very easy to do, courtesy of the ADO.NET Entity Framework. To illustrate, add three buttons to the form, set their Text property to “Save”, “Cancel”, and “Refresh”, and attach the following handlers to the Click event:
void _btnSave_Click(object sender, EventArgs e)
{
    entityDataSource1.SaveChanges();
}
void _btnCancel_Click(object sender, EventArgs e)
{
    entityDataSource1.CancelChanges();
}
void _btnRefresh_Click(object sender, EventArgs e)
{
    entityDataSource1.Refresh();
}
The code is self-explanatory. The first button saves all the changes back to the database. The second cancels the changes by re-fetching the data and overwriting any changes, and the third re-fetches the data but preserves any changes.
There is one important detail missing however: when saving changes to the database, you have to be ready to deal with exceptions. A typical case is changes that would violate database constraints. Unfortunately, there are no general recipes for dealing with this type of exceptions. Their nature depends on the database schema and on the application itself.
Regardless of how you plan to deal with the possible exceptions, the first step is to catch them. To do this, you could add a try/catch block around the SaveChanges call, or you can attach a handler to the DataError event of the EntityDataSource component. Here is how our sample application handles possible errors when saving the data:
void entityDataSource1_DataError(object sender, DataErrorEventArgs e)
{
    MessageBox.Show("Error Detected:\r\n" + e.Exception.Message);
    entityDataSource1.CancelChanges();
    e.Handled = true;
}
The code issues a warning, cancels the changes, and sets the Handled parameter to true to indicate that the error has been handled and no exceptions should be thrown.
Using Lookup Dictionaries to Represent Related Entities
To finish this first example, let us explore a common scenario. The Product class has two properties — Category and Supplier — that represent related entities. By default, these properties are not included in the grid, but you could use the grid’s column editor to create those columns. The image below shows how to do that:

The problem with this is that the grid does not know how to represent the related entity, so it simply uses the ToString method, and the result is two read-only columns consisting only of “Sample.Category” and “Sample.Supplier”.
But what you really would like to have is a column that shows the category and supplier names, ideally with editors that allow you to edit the category and supplier by picking from lists. This is usually done by writing code to create and bind custom columns (a DataGridViewComboBoxColumn if you are using the DataGridView control).
Because this is such a common scenario, the EntityDataSource component provides an extender property called AutoLookup. This property is automatically made available on any DataGridView or C1FlexGrid control on the form (the C1FlexGrid is a popular grid control that is substantially faster and more feature-rich than the DataGridView).
Note that although the EntityDataSource component supports C1FlexGrid, the EFWinForms assembly does not depend on the C1FlexGrid assembly. This was accomplished using the «dynamic» keyword which essentially relies on Reflection to bind properties at runtime. The same mechanism could be used to extend the EntityDataSource component with support for other grids.
The image below shows how you can enable the AutoLookup property on a DataGridView:
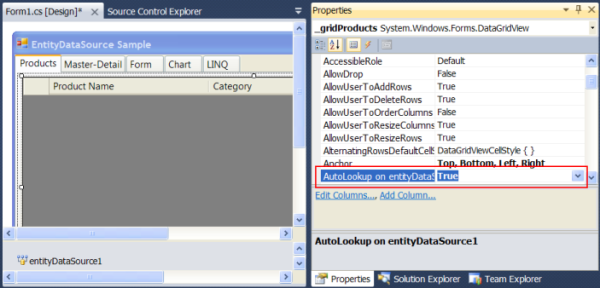
Once you enable the AutoLookup property on any grid, the EntityDataSource component will automatically scan the columns on the grid to replace any regular columns bound to related entities with editable columns based on a “data map” that contains a list of the possible related entities and display values for each one.
The image below shows the effect of setting AutoLookup to true on our products grid:
Notice how the “Category” and “Supplier” columns now show the category and supplier names, and how you can select a new supplier for a product by picking from a list.
At this point, you may be wondering how the EntityDataSource selected which fields of the related entities should be displayed on the grid. This is done using the following algorithm:
- If the class implements a
ToStringmethod (as opposed to simply inheriting it), then theToStringimplementation is used to represent the entity. - Otherwise, if the class contains a property of type
stringthat has “Name” in its name, then that property is used to represent the entity. - Otherwise, if the class contains a property of type
stringthat has “Description” in its name, then that property is used to represent the entity. - If none of the above applies, then a data map cannot be created for that class.
The first rule is the most general and flexible. For example, the Employee class in the Northwind database has FirstName and LastName properties. Either one could be used to represent the entity on a list, but ideally, you would like to use both. To do this, we simply override the ToString method in the Employee class and build the string representation we want to use:
public partial class Employee
{
    public string FullName
    {
      get { return string.Format("{0} {1}", FirstName, LastName); }
    }
    public override string ToString()
    {
      return FullName;
    }
}
Notice how this extends the default class created by the ADO.NET Entity Framework wizard. If at some point you decide to re-generate the entity data model, our new FullName property and ToString implementation will not be affected.
In the Northwind database, Employee is the only class that requires any special consideration for data maps. All other classes have properties such as “CustomerName” or “CategoryDescription” that are automatically used by the EntityDataSource and provide the desired effect.
This concludes the first example. In all examples that follow, we will set the AutoLookup property to true on all grids.
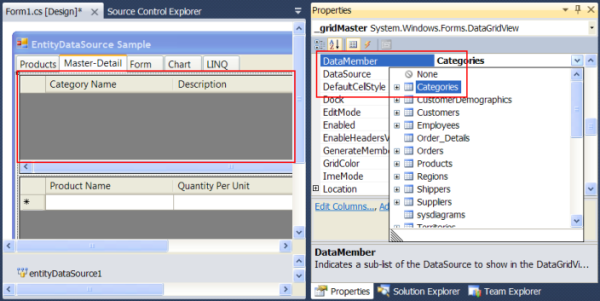
Creating a Master-Detail View
Many data models have entities that contain lists of related entities. For example, categories have lists of products, orders have order details, and so on. This type of relationship is often represented as two grids, a master that shows the “container” entities, and a detail that shows the list of related entities for the currently selected master.
Creating master-detail bindings in WinForms is extremely easy. To illustrate, let us add two grids to the form (in a new tab page). The top grid will display categories, and the bottom grid will display products in the currently selected category.
To create the bindings, select the top grid and set the DataSource property to the EntityDataSource component and the DataMember property to “Categories”, as shown below:
Next, select the bottom grid and again, set the DataSource property to the EntityDataSource component. This time, set the DataMember property to “Categories.Products”, as shown below:
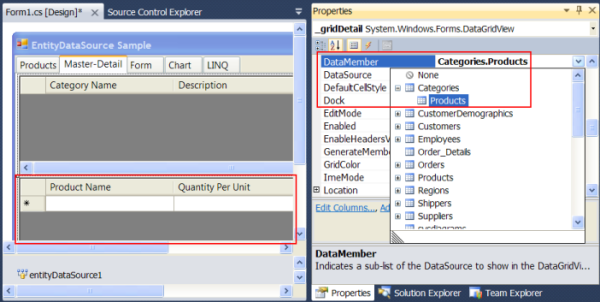
Notice how the DataMember property of the detail grid is set to “Categories.Products”, and not directly to “Products”. This is what causes the detail grid to be automatically synchronized with the current selection on the master grid.
As before, you can use the grid’s column editor to customize the columns and you can use the AutoLookup extender property to show related entities (such as each product’s Supplier).
If you run the project again, you will see that our master-detail page works as expected. As you browse through the categories on the top grid, you will see the corresponding products on the bottom grid.
Creating a Form View (With an EntityBindingNavigator)
Grids are great because they allow you to edit, organize, and navigate the data. But in many cases, a customized form-style layout may provide a better user experience. In these cases, you need to provide the user with a way to navigate through the data.
WinForms provides a BindingNavigator control that handles this for you. The BindingNavigator works with the BindingSource component to provide a record count, buttons to navigate to the first, previous, next, and last records, and buttons to add and remove records.
The EFWinForms assembly includes an EntityBindingNavigator control that provides similar functionality but works against the EntityDataSource component. In addition to the navigation functionality, the EntityBindingNavigator control includes buttons to save or cancel the changes.
To create the form view, start by adding an EntityBindingNavigator control to the page and setting its DataSource property to the EntityDataSource already on the form and the DataMember property to “Orders”. This will allow users to select the current order, to add or remove orders, to save the changes back to the database, or to cancel the changes.
Next, let us add some bound text boxes to the form. Start by adding an “Order Date” label and a text box next to it. Select the text box and click the ellipsis button next to the (DataBindings)/(Advanced) node in the property window:

This will bring up the “Formatting and Advanced Binding” dialog. Select the “Orders.OrderDate” node in the “Binding” drop down as shown in the image below.
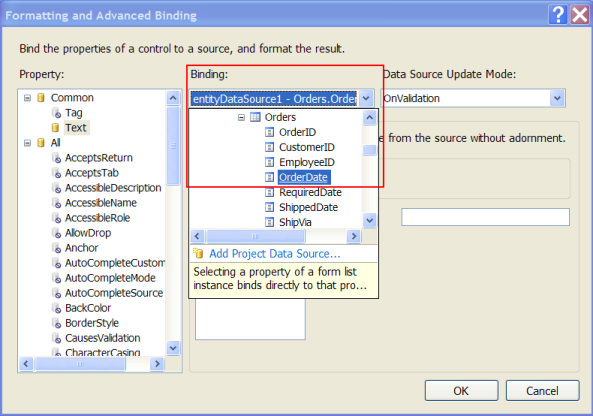
After picking the binding, use the same dialog to select the format you want to use for displaying the order date.
Repeat this process to add three more bound text boxes:
- “Customer”, bound to “Orders.Customer.CompanyName”,
- “Employee”, bound to “Orders.Employee.FullName”, and
- “Amount”, bound to “Orders.Amount”.
Notice that the Order class does not have an Amount property yet. We will create this property by extending the Order class in the same way we extended the Employee class earlier. Here is the implementation:
public partial class Order
{

    public decimal Amount
    {
      get
      {
        var q = from od in this.Order_Details select od.Amount;
        return q.Sum();
      }
    }
}
public partial class Order_Detail
{

    public decimal Amount
    {
      get { return Quantity * UnitPrice * (1 - (decimal)Discount); }
    }
}
The code uses LINQ to calculate the total amount for each Order_Detail and for each Order.
Finally, add a grid to the form and use the property window to set its DataSource property to the EntityDataSource component and the DataMember property to “Orders.Order_Details”. This is another example of hierarchical binding. When the user navigates to an order using the EntityBindingNavigator control, the grid will automatically display the details for the current order.
Use the grid’s column editor to add a column bound to the Product property of the order details, and make sure the AutoLookup property of the grid is set to true.
If you run the project now, you will see a screen similar to the one in the image below:
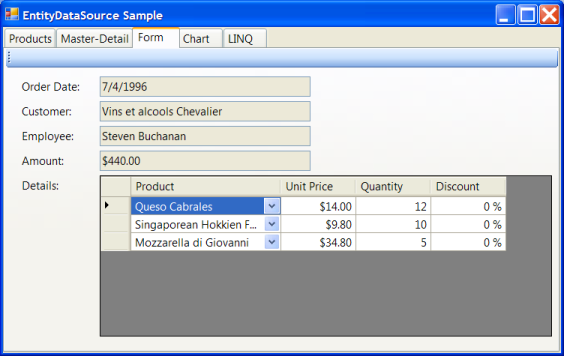
This single view demonstrates most features of the EFWinForms library: the EntityDataSource and EntityBindingNavigator components, the AutoLookup feature of the EntityDataSource, simple and hierarchical binding. And all this was done without writing a single line of code (except for the data extensions, which are not really part of the UI).
Creating a Chart View (With Filtering)
Now that we have covered grids and text boxes, our next example will show how you can use binding to create a chart based on a dynamic filter.
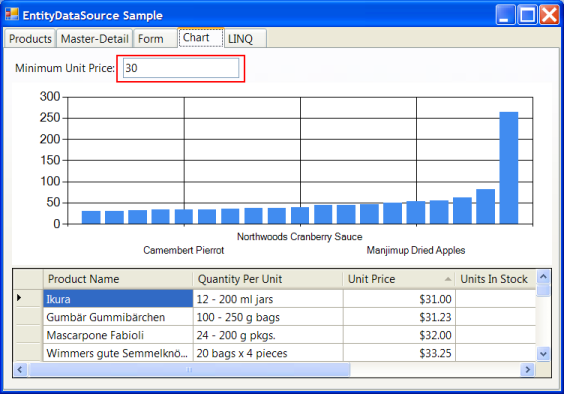
Our chart will show product unit prices. To avoid showing too much data, we will allow users to specify the minimum unit price that should be included in the chart.
The first step in this sample is the creation of a new EntityDataSource component. This is necessary because by default, each EntityDataSource exposes only one view of each table. If we applied the filter to the products table on the EntityDataSource we have been using throughout the sample, the filter would be applied to all the other samples as well. In some cases, that may be desirable, but that is not the case here. We want the filter to be applied only to the chart.
After adding the new EntityDataSource to the form, remember to set its ObjectContextType property to “Sample.NORTHWNDEntities”, as we did before.
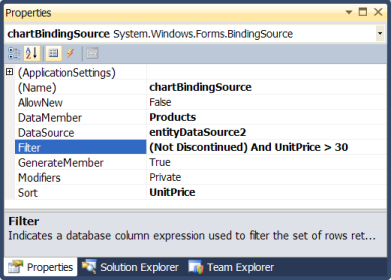
To make it easier to bind the data to the chart at design time, we will also add a regular BindingSource component to the form and will set its DataSource property to the new EntityDataSource component we just added to the form, and its DataMember property to “Products”. The BindingSource component also makes it easier to apply the filter by using the property window.
Also initialize the BindingSource by setting the Name property to “chartBindingSource”, the Filter property to “(Not Discontinued) And UnitPrice > 30”, and the Sort property to “UnitPrice”:
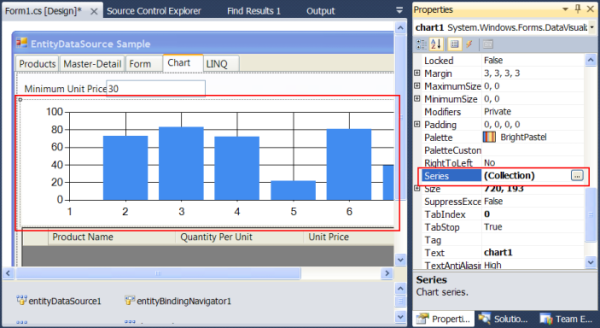
After adding the new EntityDataSource and BindingSource components to the form, let’s add the new UI, which consists of a text box where the user will enter the minimum unit price to chart, the chart control, and a grid to show the data being charted.
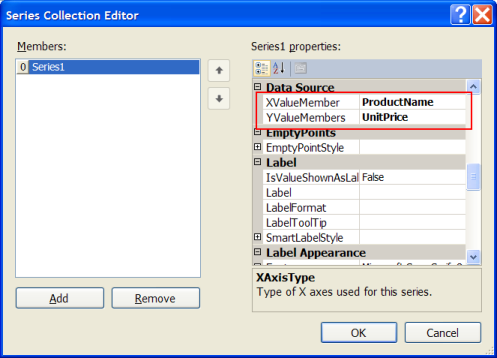
To bind the chart, start by setting its DataSource property to the BindingSource component we just added to the form. Then select the chart and use the ellipsis button to open the editor for the Series property:
This will bring up the series editor, which we will use to set the series XValueMember property to “ProductName” and YValueMember to “UnitPrice”:
Next, bind the grid by setting its DataSource property to the new BindingSource as we did for the chart. Notice that in this case, we don’t have to set the DataMember property since the binding source is already specific to the products table. Use the grid’s column editor to customize how the data should be displayed, and set the AutoLookup property to true in case you want to show related entities on the grid (e.g., product supplier).
To enable filtering, we will add handlers to two text box events:
void _txtMinPrice_Validated(object sender, EventArgs e)
{
    ApplyFilter();
}
void _txtMinPrice_KeyPress(object sender, KeyPressEventArgs e)
{
    if (e.KeyChar == 13)
    {
      ApplyFilter();
      e.Handled = true;
    }
}
And here is the method that actually applies the filter:
void ApplyFilter()
{

    var filter = "(Not Discontinued)";

    var minPrice = _txtMinPrice.Text.Trim();
    if (!string.IsNullOrEmpty(minPrice))
    {
      double d;
      if (!double.TryParse(minPrice, out d))
      {
        MessageBox.Show("Invalid Minimum Unit Price, please try again.");
      }
      else
      {
        filter += string.Format(" and (UnitPrice >= {0})", minPrice);
      }
    }

    chartBindingSource.Filter = filter;
}
The method builds a string expression that starts by specifying we don’t want to show any discontinued products, then adds the condition that the price must be greater than or equal to the minimum price specified by the user. Finally, the method applies the resulting expression to the Filter property of the BindingSource component.
Before our chart is ready, one more event handler must be added:
void chartBindingSource_ListChanged(object sender, ListChangedEventArgs e)
{
    chart1.DataBind();
}
Unlike the grids, which listen to changes in the data source, the chart must be explicitly updated when the data changes. This may be an optimization feature or a bug. Either way, calling the DataBind method updates the chart.
You can now run the project again and see the effect of changing the value of the minimum unit price on the chart: by default, the filter is set to show products with UnitPrice greater than or equal to $30:
If you raise the minimum unit price to $50 and press Enter, the chart immediately shows the change, and only five products remain:
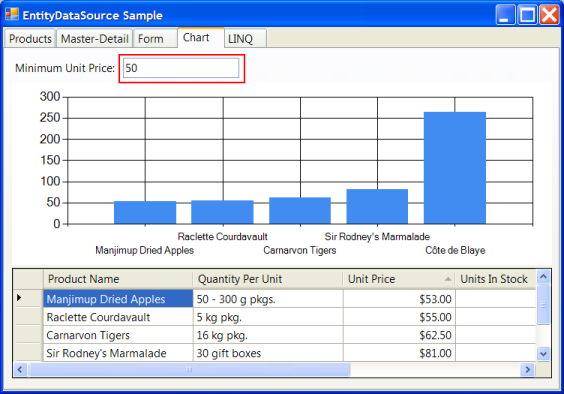
Notice that the grid is also filtered, and if you sort the data on the grid, the chart changes to reflect the new sort order.
Creating Custom Views (With LINQ)
One of the great features of the Entity Framework is that it works really well with LINQ, which provides great flexibility and productivity in creating custom views of your data.
You can convert the result of any LINQ query into a list and use that as a binding source, but as we discussed earlier, that has some limitations. Views created in this way cannot be sorted or filtered, for example.
The EntityDataSource class can help in this case as well. It has a CreateView method that takes any IEnumerable and turns it into an IBindingListView with support for sorting and filtering.
To illustrate this feature, let us create an additional tab with a DataGridView control in it. Unlike the previous samples, which used views already defined in the data model, this one will display a view created based on a LINQ query. Here is the code:
void ShowLinq()
{

    var q = from Order o in entityDataSource1.EntitySets["Orders"]
            select new
            {
              OrderID = o.OrderID,
              ShipName = o.ShipName,
              ShipAddress = o.ShipAddress,
              ShipCity = o.ShipCity,
              ShipCountry = o.ShipCountry,
              Customer = o.Customer.CompanyName,
              Address = o.Customer.Address,
              City = o.Customer.City,
              Country = o.Customer.Country,
              SalesPerson = o.Employee.FirstName + " " + o.Employee.LastName,
              OrderDate = o.OrderDate,
              RequiredDate = o.RequiredDate,
              ShippedDate = o.ShippedDate,
              Amount =
              (
                from Order_Detail od in o.Order_Details
                select (double)od.UnitPrice * od.Quantity * (1 - od.Discount)
              ).Sum()
            };

    var bindingList = entityDataSource1.CreateView(q);

    _gridLINQ.DataSource = bindingList;
}
The bulk of the code is a LINQ query that combines data from orders, customers, employees, and order details to generate a view that is similar to the “Invoices” query in the database. The query includes a nested query that adds the amounts of the order details for each order.
The result of the query is displayed on the grid, which can be sorted or filtered as usual:

Using a Data Layer to Separate Concerns
When this article was first published, many readers immediately pointed out that the sample application contained both the data access layer and the UI, and that this is bad design. I agree that in most applications this separation is a good idea. Separating the data layer from the UI has many advantages, including for example:
- Improved organization, clarity, and easier maintenance.
- The data layer can be re-used across many applications.
- Restricting access to the database improves database integrity and security.
Taking this into account, the tempting «Add Data Source» menus in Visual Studio seem less attractive. They allow you to add the data layer right into the application and bind it to the UI elements without any separation, which is great for creating applications quickly but often leads to maintenance headaches.
This section shows how you can use the EntityDataSource component to create reusable data layers that encapsulate all data access and provide data to UI layers implemented as separate assemblies. The result is a cleaner, safer, and easier to maintain architecture.
The solution described below is included in the SeparateConcerns.zip file. The solution consists of three projects:
- EFWinForms: This is the same class included in the original application. It defines the
EntityDataSourceclass used by the data layer. - DataLayer: This is the data access layer. The
DataSourceclass contains all the code related to database access, including the Entity Data Model and connection string. - SampleApplication: This is the UI layer. It implements a single master-detail form that uses the
DataLayerclass for all data access. The data binding works exactly as it did in the original sample, but this project has no knowledge whatsoever about the database (no connection string, data model, etc.).
Note that this is still a pure WinForms application. It doesn’t use WCF, Web Services, etc. It is just a minor variation on the original theme, showing that you can easily separate the data access layer from the UI if that is appropriate for your application and still enjoy the benefits of Entity Framework, WinForms, and data-binding.
Implementing the Data Layer
The data layer project implements a DataSource class that is implemented as follows:
public partial class DataSource : Component, IListSource
{

    EFWinforms.EntityDataSource _ds;
    const string DATABASEFILE = @"c:\util\database\northwnd.mdf";
    const string CONNECTIONSTRING =
        @"metadata=res://*/Model1.csdl|res://*/Model1.ssdl|res:" +
        @"//*/Model1.msl;provider=System.Data.SqlClient;" +
        @"provider connection string=""Data Source=.\SQLEXPRESS;" +
        @"AttachDbFilename=" + DATABASEFILE + ";" +
        @"Integrated Security=True;Connect Timeout=30;" +
        @"User Instance=True;MultipleActiveResultSets=True""";


    public DataSource()
    {
        InitializeComponent();


        if (!System.IO.File.Exists(DATABASEFILE))
        {
            throw new Exception("Database file not found. " +
                  "This sample requires the NorthWind database at " + DATABASEFILE);
        }


        _ds = new EFWinforms.EntityDataSource();


        _ds.ObjectContext = new northwndEntities(CONNECTIONSTRING);
    }
    public DataSource(IContainer container) : this()
    {
        container.Add(this);
    }


    public void SaveChanges()
    {


        _ds.SaveChanges();
    }


    bool IListSource.ContainsListCollection
    {
        get { return true; }
    }
    System.Collections.IList IListSource.GetList()
    {
        return ((IListSource)_ds).GetList();
    }
}
The DataSource class inherits from Component, which means it can be added to forms. It implements the IListSource interface, which means it can be used as a rich binding source.
The DataSource constructor instantiates an EntityDataSource and binds it to an Entity Data Model using the ObjectContext property. Notice that in this case, the connection string specifies an absolute location for the database. The class checks that the database file is properly installed and throws an exception if it can’t be found. Before running the project, you should copy the «northwnd.mdf» file to the «c:\util\database» folder. This is the same database file used in the original sample. (Hint: The nasty-looking connection string constant was copied from the App.Config file.)
The object model for the DataSource consists of a single SaveChanges method, which is implemented with a call to the underlying EntityDataSource component. This is necessary if you want clients to be able to save changes to the database (remember, the client no longer has any access to the database other than what the data layer provides). The method implementation can be used to perform whatever validation might be necessary before committing the changes to the database.
Finally, the IListSource interface is implemented by delegating all the calls to the underlying EntityDataSource component.
That is the entire data layer. In actual applications, you could customize it by working with the Entity Data Model, either using the designer or by writing custom business logic, exactly as we did in the original application.
Implementing the UI Layer
The UI layer is a separate WinForms application that consists of a single form shown below:
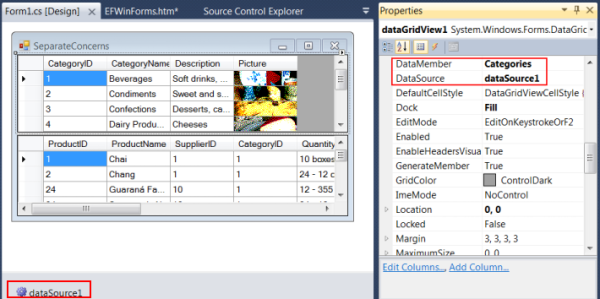
The form contains two grids and a DataSource component. The DataSource component is the one implemented by the data layer project and described above.
The grids are bound to the data source using the following properties (set at design time as usual):
dataGridView1.DataSource = dataSource1;
dataGridView1.DataMember = "Categories";


dataGridView2.DataSource = dataSource1;
dataGridView2.DataMember = "Categories.Products";
Notice how the data binding mechanism works exactly as it did in the original sample. But this time the UI has no knowledge of the database or the connection string. The data layer assembly could be used in other projects and maintained separately from the UI projects.
Limitations
I think the EFWinForms library is an interesting project that makes using the ADO.NET Entity Framework in WinForms a lot easier (and I hope after reading this article you agree).
But in its present state, it has a few limitations that you should consider before using it in your projects:
- Memory Requirements: The
EntityDataSourceclass does not include any type of server-side filtering, or any kind of smart caching or memory management. If you have a table with a million records, it will bring them all into memory and will not discard them until the component is disposed. - Context Scope: Each
EntityDataSourceinstance encapsulates anObjectContextand all the data it contains. You cannot easily share one context over the entire application. For example, if your application uses multiple forms, then each form will typically have anEntityDataSourceand its own copy of the data. Changes applied to objects in one context will not be visible to other contexts unless the data is saved to the database and the contexts are refreshed. - Limited Support for LINQ: As the last example showed, you can use the
EntityDataSourcewith arbitrary LINQ statements. But those views are somewhat limited, they don’t allow you to add or remove records, for example.
If any of these limitations concern you, there are options. You may choose to improve the library (the full source code is included, and any corrections or improvements would be highly appreciated).
Another option would be to use one of the several commercial products that are substantially more powerful than EFWinForms and include features such as smart data caching, virtual data sources, and multi-platform support. The References section below includes links to a few of these products. (One of the products listed, the ComponentOne Studio for Entity Framework, is produced by the company I work for, and is closely related to the content of this article.)
This article was written using version 4.x of the Microsoft Entity Framework. Since then, Microsoft released version 5, which is installed by default with Visual Studio 2012 but can also be used with Visual Studio 2010.
Version 5 of the Entity Framework has a number of additions and changes. The most visible difference from the perspective of this article is that models created with EF4 have an ObjectContext object that represents the database and ObjectSet<T> collections that represent the database tables. By contrast, EF5 models have a DbContext object that represents the database and DBSet<T> collections that represent the database tables.
The original version of the EFWinForms library is based on ObjectContext and ObjectSet classes and therefore does not work with the new EF5 models.
Fortunately, the mapping between the old and the new classes is straightforward. It only took me about 30 minutes to create a new version of the <string>EFWinForms library based on EF5. You can download this new version from the link at the top of the article, or you can get it directly from here: EFWinForms for Entity Framework 5.
Note: I had some trouble making the context Refresh method work correctly. At first it seemed to me EF5 simply ignored the value of the RefreshMode argument. It turned out (after some additional research and help from some readers) that EF5 does not detect changes automatically when you call the Refresh method. This can be fixed by calling the DbContext.ChangeTracker.DetectChanges method before calling Refresh. The code below shows the new call:
public void RefreshView()
{
  if (_list != null && Query != null)
  {

     _ds.DbContext.ChangeTracker.DetectChanges();


     var ctx = ((System.Data.Entity.Infrastructure.IObjectContextAdapter) _ds.DbContext).ObjectContext;
     ctx.Refresh(RefreshMode.ClientWins, Query);


     _list.Refresh();
  }
}
I have updated the code to address this and now both CancelChanges and RefreshView methods seem to work as they did in the EF4 version of the code.
Entity Framework 6
Several readers asked me about Entity Framework 6, which Microsoft released in October 2013. EF6 has some significant improvements over the previous version. You can find out details about the new features here:
http://blogs.msdn.com/b/adonet/archive/2013/10/17/ef6-rtm-available.aspx
Upgrading projects from EF5 to EF6 is easy and straightforward. Basically it requires using nuget to install EF6 in your projects (it will replace EF5 automatically), re-generating the data models with the EF6 design time tools, and adjusting some namespaces. You can find a nice detailed guide here:
http://msdn.microsoft.com/en-US/data/upgradeEF6
I followed the steps in this guide to upgrade the sample included in this article, and got it working within a couple of minutes. I did not have to change the code at all, except for the namespace adjustments, which was a nice surprise. I added the EF6 version of the project to the downloads included with the project. Hope you enjoy it.
References
The following links point to articles or books about the ADO.NET Entity Framework:
- Introduction to the Entity Framework
- Entity Framework 4 Tips for WinForms Development
- Simple Sample with Entity Framework
- Performance and the Entity Framework
- Introducing ADO.NET Entity Framework
- Use an Entity Framework Entity as a WinForms Data Source
- Programming Entity Framework
The following links point to some commercial products that support or extend the ADO.NET Entity Framework. The list is not exhaustive, and does not constitute a recommendation or endorsement. It is meant only as a starting point for your own research and to illustrate the rich eco-system that is quickly growing around the ADO.NET Entity Framework:
- ComponentOne Studio for Entity Framework
- CodeFluent Entities
- CodeSmith PLinqO for Entity Framework
- DevArt Entity Developer
- IdeaBlade DevForce
- LLBLGen Pro
History
- 8 July 2011: Updated the sample. The original sample contained a reference to a third-party assembly. The assembly is not used and can be safely deleted, but it may prevent some people from running the project. The updated version of the sample in the attachment removes the reference.
- 10 July 2011: Updated the sample. The EntityNavigator in one of the tabs had all buttons hidden, that is fixed in the version attached.
- 17 July 2011: Updated code to fix a couple of small issues related to hierarchical binding.
- 18 July 2011: Fixed a couple of minor issues related to design-time usage and setting the
ObjectContextproperty. - 19 July 2011: Added a section describing how you can separate the data layer from the UI layer, and added a new sample to demonstrate this.
- 25 July 2013: Added a section describing how to use the library with the Entity Framework 5, which ships with Visual Studio 2012.
- 5 February 2014: Added a section describing how to use the library with the Entity Framework 6, which is included with Visual Studio 2012 and 2013.

Table of Contents
- Introduction
- Building the sample
- Description
- Moving to Entity Framework
- Creating a Windows Forms solution
- Writing form level code
- Saving Data
- Async query and save information
- Changes to the backend database
- Custom BindingList Sort/Filter
- Common cheat sheet
- Accessing data
- Create operation
- Update operation
- Delete operation
- Entity State
- Find a entity by primary key
- Disable lazy loading
- Disable validation
- Deferred Execution
- Reading with selective navigation properties
- Logging Entity Framework
- Data Annotations
- SQL Injection
- General caveats
- Working from one project
- Summary
- References
- See also
- Source code
Introduction
The intended audience is for those developers that have been writing data centric solution in Visual Studio using SQL-Server with
TableAdapter with a desire to use Entity Framework rather than former methods for working with databases, DataAdapter or using SqlClient data provider. Each of these options have advantages and disadvantages were many times the selection was made based
on one or more factors such as “this option is easy for me not being a regular developer”, they used the first option found while the educated developer chooses smartly.
For details on differences between conventional methods of accessing data see part one of this series
Moving from ADO.NET to Entity Framework.
Time has brought new options for working with data, namely Entity Framework 6 classic or Entity Framework Core. The Entity Framework class families provide more power, streamline coding with more features than conventional methods of working with data in
Windows Form solutions.
Even with Entity Framework providing better methods of working with data, developers working with Windows Forms tend to not a) look at Entity Framework, they are satisfied with their current methods of coding b) are unsure how to use Entity Framework in
a Windows Form solution as most code samples on the Internet for Entity Framework are generally web based.
For those developers who are unsure about Entity Framework in Windows Forms solution this article will walk through reading, filtering, sorting, editing, deleting and adding data from a traditional Windows Form solution.
The database model below is a modified version of Microsoft’s North-Wind database. Originally North Wind tables were not the best design e.g. Customer table had a string for the primary key, contact information embedded in the customer table rather than
broken out into child tables. For experienced developers they will see opportunities to farther refine the database model, that is fine but the point here is to work with a simple schema.
As this series progresses the database schema for Customer table will have more child tables which will use the same methods to work with data as the start of this series, just more complex in nature for proper normalization of data.

The following screenshot is how data is presented. Note there are two ComboBox columns utilized in the DataGridView were all rows show these ComboBoxes. In the code when running the sample application those ComboBox controls will not show as showing them
simply clutters the screen. There are comments indicating to comment out two lines of code in form shown event of the main form to present the two ComboBoxes as shown below.

As progress is made through this series the form will change to accommodate new functionality.
Building the sample
Before building the Visual Studio, solution use the script under the folder data scripts to create a database, tables along with populating the tables. Once the database has been completed note that there are cascading rules for delete operations between
customer and contact tables so that when removing a customer the contact is removed. If there is no rule for cascade deletes attempting a delete would cause a runtime error. Note that in some cases the contact should not be removed, for these cases contacts
may have a active field which is set to false but available, then used the active flag toggles to true.
When building the solution note there are several NuGet packages used, if they are not found then right-click on Solution Explorer and select restore NuGet packages then build the solution.
Description
When using TableAdapters a developer selects «Add New Data Source» when a project is selected and the Data Source window is active. Clicking the link on the Data Source window will perform a step-by-step walkthrough to select a database which can be any database
which is supported while for this, the database will be a SQL-Server database from SQL-Express (local/attached database) or SQL-Server (server based database). Once a database and tables have been selected a visual representation is created in a .xsd file.
To the developer they see the tables but not all the code which the data wizard generated. When changes are made to the selected database and the generated code is refreshed any changes to the file will be overwritten. Making changes in the generated files
is not how changes should be made, instead partial classes are used. No matter, the point is, there is more code than needed in many cases.
Moving to Entity Framework
Moving over to Entity Framework, one of the choices is «EF Designer from database», this is very similar to TableAdapter methodology in that tables selected are shown in a canvas with a file extension of .edmx. Changes can be made to the database, refreshed
from the .edmx and if a developer had made changes to the data classes they are wiped out. As with TableAdapters partial classes provide a way to customize the generated classes. For example, implement an Interface on each class. The following Interface indicates
each class will have a Identifier property.
public
interface
IBaseEntity
{
int
Identifier { get; }
}
Where the following is how the Interface is implemented in a partial class for Entity Framework which can be done in any flavor of Entity Framework.
public
partial
classCustomer : IBaseEntity
{
public
int
Identifier
{
get
{
return
id;
}
}
}
Another class
public
partial
classGenderType : IBaseEntity
{
public
int
Identifier
{
get
{
return
GenderIdentifier;
}
}
}
Then when unit testing with live data rather than mocked data a method such as shown below can work against a common identifier (see the Find method below). The following method can be enhanced to include more information and also log information to a file.
public
bool
AnnihilateData(List<object> mAnnihilateList)
{
bool
mAnnihilateDataSuccessful = false;
using
(var destroyContext = new
PersonEntities())
{
for
(int
i = mAnnihilateList.Count - 1; i >= 0; i--)
{
try
{
var currentObject = mAnnihilateList[i];
var existingItem = destroyContext
.Set(currentObject.GetType())
.Find(((IBaseEntity)currentObject).Identifier);
if
(existingItem != null)
{
try
{
var attachedEntry = destroyContext.Entry(existingItem);
attachedEntry.CurrentValues.SetValues(currentObject);
destroyContext.Set(existingItem.GetType()).Attach(existingItem);
destroyContext.Set(existingItem.GetType()).Remove(existingItem);
}
catch
(Exception)
{
// ignore nothing do to as the object was not added in properly.
}
}
else
{
var item = currentObject.GetType();
}
}
catch
(Exception)
{
//catch and continue save what we can
}
}
try
{
var resultCount = destroyContext.SaveChanges();
var annihlationCount = mAnnihilateList.Count;
mAnnihilateDataSuccessful = (resultCount == annihlationCount);
}
catch
(Exception)
{
// keep on going
}
finally
{
destroyContext.Dispose();
}
}
return
mAnnihilateDataSuccessful;
}
While working with either a TableAdapter or with Entity Framework «EF Designer from database» appears an easy path to use there are pitfalls with both.
Here is a short list, with TableAdapter, modifiy the database (rename a field used on a Windows Form, refresh the data source in your project the field on the form is not refreshed so this must be handled manually. Also, creating partial classes and taping
into events has never been explained well in the Microsoft documentation, the namespace for the TableAdapter parent classes is in a completely different namespace than the project’s namespace.
With «EF Designer from database» when there is a large array of tables e.g. 30 plus the designer is easily corrupted. There is a work-around, create multiple designers and make sure that related tables are not split between designers as this can cause other
issues. Another downside is unlike code first method for working with databases using «EF Designer from database» it’s nearly impossible to do custom configuration with the Entity model.
The connection string for a model is in the DbContext class where «name=NorthWindModel» points to a connection string in the project’s app configuration file.
public
partial
classNorthWindAzureContext : DbContext
{
public
NorthWindAzureContext()
:
base("name=NorthWindModel")
{
}
With code first, the connection string can be setup as follows. In the example below the connection string is hard to code but there may be programmer’s logic that changes the connection string e.g. the server may be Express or full server, using SMO (SQL-Server
Management Objects) or TSQL a determination can be made if either or exists then set the connection string accordingly. Another reason for allowing a conditional connection string is to change from development to test to production environments.
public
NorthWindAzureContext()
:
base("data source=.\\SQLEXPRESS;initial catalog=NorthWindAzureForInserts;integrated security=True;MultipleActiveResultSets=True;App=EntityFramework")
{
}
By selecting «Code first from database» a developer can have full control over working with data and keep things light weight e.g. DataSet/DataTable method of working with data may endup being heavy in that there is functionality and events that may weigh down
a large application and all developers want their solution to be lightening fast.
To populate a ComboBox with country names and a ValueMember which is needed to write to a parent record e.g. country identifier for a customer the average developer will create a connection and command object, create a select statement and read returning data
into a DataTable followed by setting DisplayMember and ValueMember.
With Entity Framework the first class generated by Visual Studio for countries.
{
[System.Diagnostics.CodeAnalysis.SuppressMessage(
"Microsoft.Usage",
"CA2214:DoNotCallOverridableMethodsInConstructors")]
public
Country()
{
Customers =
new
HashSet<Customer>();
}
[Key]
public
int
CountryIdentifier { get;
set; }
public
string
Name { get;
set; }
[System.Diagnostics.CodeAnalysis.SuppressMessage(
"Microsoft.Usage",
"CA2227:CollectionPropertiesShouldBeReadOnly")]
public
virtual
ICollection<Customer> Customers { get;
set; }
}
Here DisplayMember and ValueMember are needed while using a class created for displaying countries in a ComboBox with no need to set DisplayMember or ValueMember. In the Data Annotation section below an alternate idea is used, a read-only property marked as
[NotMapped].
public
class
CountryItem
{
public
int? CountryIdentifier {
get;
set; }
public
string
CountyName { get;
set; }
public
override
stringToString()
{
return
CountyName;
}
}
To read data from the database the following performs the read. An important note is that by default when reading the Country Table related entities are also loaded which is not needed so by setting LazyLoadingEnabled = false will not cause related tables to
be loaded (more on this later).
public
List<CountryItem> GetCountries()
{
using
(var context = new
NorthWindAzureContext())
{
// indicates not to load Customers
context.Configuration.LazyLoadingEnabled =
false;
return
context.Countries.Select(country => new
CountryItem()
{
CountryIdentifier = country.CountryIdentifier,
CountyName = country.Name
}).ToList();
}
}
To load a ComboBox along with as the first item have a «Select».
var countries = _operations.GetCountries();
countries.Insert(0,
new
CountryItem() {CountryIdentifier = 0, CountyName = "Select"});
Either Data annotations (discussed later in this article) or standard assertion may be used to validate a country has been selected. The main take-away is control on how data is loaded. Going back to the method GetCountries, the ToList could be removed and
return IEnumerable then use .ToList in the form, running .ToList is when data is retrieved.
Creating a Windows Forms solution
Conventional wisdom for those new to development is to create a new Windows Forms project and write data operations directly in one or more forms.
Long time developers will split logic into classes in the same project while other long time developers will not only create classes in the same project but for reusable code will be placed into one or more class projects.
In the code presented here, code for data operations will reside in a form along with classes residing in other class projects.
The first task after creating a new Visual Studio solution is to create a class project (NorthWindDataLibrary) in this example which will contain methods to get data while editing, removing and adding data will be in the main form. Note this code will later
transition to have ninety percent of edit, remove and adding into the backend data class in the (in this case NorthWindDataLibrary).
Creating our Entity Framework classes.
- Right click on the project in Solution Explorer.
- Select Add -> New Item.
- Select Data, if the item ADO.NET Entity Data Model is not selected, select this item.
- Leave Name: Model alone for now.
- Press the Add button.
- In the next screen select «Code First from database» and press the Next button.
- On the next screen create a new connection to the database or select a pre-existing connection and press Next button.
- Select «Entity Framework 6.x» and press the Next button.
- On the first node for tables navigate to the dbo node, expand to see all tables.
- The following will be needed, Contacts, ContactType, Countries and Customers followed by pressing the Finish button.
- After a few seconds the Solution Explorer is active. Noe there are classes for each table selected and Model1.cs
- Right click on Model1.cs and rename to NorthWindAzureContext.cs
- Select the contents of app.config.
- Create a new Windows form project.
- Open it’s app.config, paste in what was just copied, the connection string is needed to access data with Entity Framework.
- Right click on Solution Explorer, select «Manage NuGet packages for the solution»
- Make Entity Framework the current item.
- On the right click the check box for the class project just created and finish with pressing install.
- Add a reference for the class project to the new windows form project.
- Build the solution to verify the code so far is good.
- Add the solution to source control e.g. Dev Ops (Visual Studio online) or GitHub so that if something breaks there are backups to revert too.
Next several classes are needed for providing choices when editing customer records in a DataGridView where several DataGridViewComboBox columns will be needed for contact type and country (see first screenshot).
The following class will permit assigning a list of the following class to a DataGridViewComobox and in other cases ListBox controls without setting DisplayMember as ToString is used when DisplayMember is not set.
public
class
ContactListBox
{
public
int? ContactId {
get;
set; }
public
string
Name { get;
set; }
public
override
stringToString()
{
return
Name;
}
}
Another class is needed to pull table data together.
namespace
NorthWindDataLibrary.Classes
{
/// <summary>
/// Container for displaying customers in a DataGridView
/// The Notification change via Bindable will be discussed
/// in a future article to this article.
/// </summary>
public
class
CustomerEntity : Bindable
{
public
int
CustomerIdentifier { get;
set; }
public
string
CompanyName
{
get
=> Get<string>();
set
=> Set(value);
}
public
int? ContactIdentifier {
get;
set; }
public
string
FirstName { get;
set; }
public
string
LastName { get;
set; }
public
int
ContactTypeIdentifier { get;
set; }
public
string
ContactTitle { get;
set; }
public
string
Address { get;
set; }
public
string
City { get;
set; }
public
string
PostalCode { get;
set; }
public
int? CountryIdentifier {
get;
set; }
public
string
CountyName { get;
set; }
}
}
Next, a class for reading data from the SQL-Server database. Note the class level private variable, _context, this is the object responsible for reading data where when data is requested a connection is opened, data is retrieved then Entity Framework closes
the connection.
The object _context is of type NorthWindAzureContext which inherits from DbContext where DbContext provides functionality to Write and execute queries, Materialize query results as entity objects, Track changes that are made to those objects, Persist object
changes back on the database and Bind objects in memory to UI controls.
Rules for DbContext in regards to Windows forms, one DbContext per form while in web applications operations should perform operations and dispose of the DbContext immediately.
If the context instance is created by a dependency injection container, it is usually the responsibility of the container to dispose the context.
using
System.Collections.Generic;
using
System.Linq;
namespace
NorthWindDataLibrary.Classes
{
public
class
Operations
{
/// <summary>
/// Context setup in AllCustomers method
/// </summary>
private
NorthWindAzureContext _context;
/// <summary>
/// Get all customers into a custom class suitable for viewing
/// in a DataGridView which in the form requires special attention
/// </summary>
/// <param name="context"></param>
/// <returns></returns>
public
List<CustomerEntity> AllCustomers(NorthWindAzureContext context)
{
_context = context;
var customerData = (
from customer
in
context.Customers
join contactType
in
context.ContactTypes on customer.ContactTypeIdentifier
equals contactType.ContactTypeIdentifier
join contact
in
context.Contacts on customer.ContactId equals contact.ContactId
select
new
CustomerEntity
{
CustomerIdentifier = customer.CustomerIdentifier,
CompanyName = customer.CompanyName,
ContactIdentifier = customer.ContactId,
FirstName = contact.FirstName,
LastName = contact.LastName,
ContactTypeIdentifier = contactType.ContactTypeIdentifier,
ContactTitle = contactType.ContactTitle,
Address = customer.Address,
City = customer.City,
PostalCode = customer.PostalCode,
CountryIdentifier = customer.CountryIdentifier,
CountyName = customer.Country.Name
}).ToList();
return
customerData;
}
/// <summary>
/// Get all countries
/// </summary>
/// <returns></returns>
public
List<CountryItem> GetCountries()
{
using
(var context = new
NorthWindAzureContext())
{
// indicates not to load Customers
context.Configuration.LazyLoadingEnabled =
false;
return
context.Countries.Select(country => new
CountryItem()
{
CountryIdentifier = country.CountryIdentifier,
CountyName = country.Name
}).ToList();
}
}
/// <summary>
/// Get all contact types
/// </summary>
/// <returns></returns>
public
List<ContactType> GetContactTypes()
{
using
(var context = new
NorthWindAzureContext())
{
context.Configuration.LazyLoadingEnabled =
false;
return
context.ContactTypes.ToList();
}
}
/// <summary>
/// Get all known contacts
/// </summary>
/// <returns></returns>
public
List<Contact> GetContacts()
{
using
(var context = new
NorthWindAzureContext())
{
// indicates not to load Customers
context.Configuration.LazyLoadingEnabled =
false;
return
context.Contacts.ToList();
}
}
/// <summary>
/// Remove customer by primary key
/// </summary>
/// <param name="pCustomerIdentifier"></param>
/// <returns></returns>
/// <remarks>
/// Discuss cascading delete rules
/// - how to check for child table usage
/// </remarks>
public
bool
RemoveCustomer(int
pCustomerIdentifier)
{
return
true;
}
}
}
Note It’s not hard to notice everything above and to come is void of DataSet/DataTable method of coding. This should mean those not very familiar working with classes and are eager to use Entity Framework, to get the most out of working with
Entity Framework now is a good time to get familiar working with classes.
Caveat on the method AllCustomers, to see how a conventional SELECT statement would look like see the SELECT below. In AllCustomers method there are only two joins as we can refer to country in the customer entity as lazy loading is enabled and country is a
related table (also called associations) populated when requesting customer data.
SELECT
Cust.CustomerIdentifier,
Cust.CompanyName,
Cust.ContactId,
Contacts.FirstName,
Contacts.LastName,
Cust.ContactTypeIdentifier,
CT.ContactTitle,
Cust.Address
AS
Street,
Cust.City,
Cust.PostalCode,
Cust.CountryIdentifier,
Countries.Name
AS
CountryName,
Cust.ModifiedDate
FROM
Customers AS
Cust
INNER
JOIN ContactType
AS
CT ON
Cust.ContactTypeIdentifier = CT.ContactTypeIdentifier
INNER
JOIN Contacts
ON
Cust.ContactId = Contacts.ContactId
INNER
JOIN Countries
ON
Cust.CountryIdentifier = Countries.CountryIdentifier
In Entity Framework, an entity can be related to other entities through an association or relationship. Each relationship contains two ends that describe the entity type and the multiplicity of the type (one, zero-or-one, or many) for the two entities in that
relationship. The relationship may be governed by a referential constraint, which describes which end in the relationship is a principal role and which is a dependent role. See also, relationships,
navigation properties and foreign keys.
Writing form level code
Before beginning to write code objectives need to be known, in this case data needs to be presented in a DataGridView control where several properties (country and contact details) will need a way to allow a user to change the current values, in this case
a
DataGridViewComboBox. Also, contact first and last name come from a child related table so this must be considered.
Another factor, provide the ability to sort/order columns in the DataGridView as simply assigning data to the DataGridView will not provide the ability to sort/order columns. In this case rather than rolling a in-house component to handle sorting a third
party free component (with source code) will be utilize.
For editing properties that are not of type DataGridViewComboBox columns the following code is used. In EditingControlShowing event of the DataGridView DataGridViewComboBox logic is handled so a check is made at the start of the event to detect if the current
cell is a DataGridViewComboBox by determining if the cell type is DataGridViewComboBoxEditingControl using a language extension method included in the source code. If not of type DataGridViewComboBoxEditingControl then exit the event, otherwise first determine
which of the two DataGridViewComboBox is current then subscribe to one of two events,
In these two events the proper country identifier or proper ContactType identifier is set to the foreign key in the current customer’s record, This must be done as when loading data there are joined tables that Entity Framework does not or can not track,
Manually setting these identifier will mark the customer as dirty.
private
void
DataGridView1_EditingControlShowing(
object
sender, DataGridViewEditingControlShowingEventArgs e)
{
if
(!gridView.CurrentCell.IsComboBoxCell()) return;
var comboBox = e.Control
as
ComboBox;
// ReSharper disable once PossibleNullReferenceException
comboBox.SelectionChangeCommitted -= SelectionChangeCommittedForCountryColumn;
comboBox.SelectionChangeCommitted -= SelectionChangeCommittedForContactTitleColumn;
if
(gridView.Columns[gridView.CurrentCell.ColumnIndex].Name ==
"CountyNameColumn")
{
comboBox.SelectionChangeCommitted += SelectionChangeCommittedForCountryColumn;
}
else
if
(gridView.Columns[gridView.CurrentCell.ColumnIndex].Name == "ContactTitleColumn")
{
comboBox.SelectionChangeCommitted += SelectionChangeCommittedForContactTitleColumn;
}
}
/// <summary>
/// Set backing customer field foreign key for Country for current customer record
/// </summary>
/// <param name="sender"></param>
/// <param name="e"></param>
private
void
SelectionChangeCommittedForCountryColumn(object
sender, EventArgs e)
{
var customer = _customersBindingSource.CurrentCustomerEntity();
var identifier = ((CountryItem)(((DataGridViewComboBoxEditingControl)sender).SelectedItem))
.CountryIdentifier;
customer.CountryIdentifier = identifier;
// ReSharper disable once PossibleNullReferenceException
context.Customers
.FirstOrDefault(cust => cust.CustomerIdentifier == customer.CustomerIdentifier)
.CountryIdentifier = identifier;
}
/// <summary>
/// Set backing customer field foreign key for contact title type for current customer record
/// </summary>
/// <param name="sender"></param>
/// <param name="e"></param>
private
void
SelectionChangeCommittedForContactTitleColumn(object
sender, EventArgs e)
{
var customer = _customersBindingSource.CurrentCustomerEntity();
var identifier = ((ContactType)(((DataGridViewComboBoxEditingControl)sender).SelectedItem))
.ContactTypeIdentifier;
customer.ContactTypeIdentifier = identifier;
// ReSharper disable once PossibleNullReferenceException
context.Customers
.FirstOrDefault(cust => cust.CustomerIdentifier == customer.CustomerIdentifier)
.ContactTypeIdentifier = identifier;
}
In the above code several language extensions were used to keep the code clean as possible.
Handling changes to properties other than country, contact type and contact first and last name is done in the DataGridView event CurrentCellDirtyStateChanges.
To get the column name the following line ask the column name via
OwningColumn.
var currentColumnName = gridView.CurrentCell.OwningColumn.Name;
Next line is used to get the current row’s customer identifier which is then used to get the associated customer object in the DbContext.
var customerEntity = _customersBindingSource.CurrentCustomerEntity();
var customer = context.Customers
.FirstOrDefault(cust =>
cust.CustomerIdentifier == customerEntity.CustomerIdentifier);
This is followed by a if statement to properly handle setting the property from the item in the DataGridView back to the actual Customer object which is done using CurrentValue of the proper Customer object.
context.Entry(customer).Property(gridView.CurrentCell.OwningColumn.DataPropertyName)
.CurrentValue = gridView.EditingControl.Text;
To delete the current row from the DataGridView the following line gains access to the object for obtaining the primary key. This also provides access to the company/customer name used in a MessageBox asking if the user wants to remove the record or not. If
they decide to remove the customer the customer state is marked as Deleted and then physically removed from the BindingSource. To permanently remove the record the save button needs to be used for the SaveChanges to propagate back to the backend SQL-Server
database.
private
void
bindingNavigatorDeleteCustomer_Click(object
sender, EventArgs e)
{
var currentCustomer = _customersBindingSource.CurrentCustomerEntity();
if
(Question($"Delete '{currentCustomer.CompanyName}'"))
{
var customer = context.Customers
.FirstOrDefault(cust =>
cust.CustomerIdentifier == currentCustomer.CustomerIdentifier);
context.Entry(customer).State = EntityState.Deleted;
_customersBindingSource.RemoveCurrent();
}
}
Saving Data
Clicking the save all button will save all changes back to the database then for this sample will show the count of changes to the IDE output window. Of course a Console.WriteLine would never be in a real application, this is here to show that
SaveChanges returns how many items were saved.
Console.WriteLine(context.SaveChanges());
One important feature which is needed is to stop the form from closing if there are any uncommitted changes which in this case is handled in the form closing event by inspecting HasChanges property of the change tracker for the active DbContext.
private
void
MainForm_Closing(object
sender, CancelEventArgs e)
{
if
(context.ChangeTracker.HasChanges())
{
if
(!Question("There are pending changes, abort?"))
{
e.Cancel =
true;
}
}
}
Async query and save information
Use asynchronous methods such as ToListAsync extension method will allow applications be remain
responsive when dealing with large sets of data. Using asynchronous methods in a windows forms requires checking for cross thread violations.
In the following method
ToListAsync is used.
public
async Task<List<CustomerEntity>> AllCustomersAsync(NorthWindAzureContext context)
{
_context = context;
var customerData = await (
from customer
in
context.Customers
join contactType
in
context.ContactTypes on customer.ContactTypeIdentifier
equals contactType.ContactTypeIdentifier
join contact
in
context.Contacts on customer.ContactId equals contact.ContactId
select
new
CustomerEntity
{
CustomerIdentifier = customer.CustomerIdentifier,
CompanyName = customer.CompanyName,
ContactIdentifier = customer.ContactId,
FirstName = contact.FirstName,
LastName = contact.LastName,
ContactTypeIdentifier = contactType.ContactTypeIdentifier,
ContactTitle = contactType.ContactTitle,
Address = customer.Address,
City = customer.City,
PostalCode = customer.PostalCode,
CountryIdentifier = customer.CountryIdentifier,
CountyName = customer.Country.Name
}).ToListAsync();
return
customerData;
}
In the form’s shown event the signature needs to include async.
private
async void
Form1_Shown(object
sender, EventArgs e)
In form shown the following code is responsible for loading customer data via the method above.
var result = await _operations.AllCustomersAsync(context)
.ConfigureAwait(false);
_customersView =
new
BindingListView<CustomerEntity>(result);
Loading data into the DataGridView and setting the
BindingNavigator’s
BindingSource property.
_customersBindingSource.DataSource = _customersView;
gridView.Invoke(new
Action(() =>
gridView.DataSource = _customersBindingSource));
gridView.Invoke(new
Action(() =>
gridView.ExpandColumns()));
bindingNavigator1.Invoke(new
Action(() =>
bindingNavigator1.BindingSource =
_customersBindingSource));
With the above code changes an application will be responsive while loading data. For the average application asynchronous programming is overkill so only use asynchronous techniques when the user interface
is not being responsive.
Saving changes synchronously, simply call SaveChanges on the DbContext.
private
void
SaveAllChangesButton_Click(object
sender, EventArgs e)
{
Console.WriteLine(context.SaveChanges());
}
For saving asynchronously the button click event needs async as per below to call
SaveChangesAysnc which as with SaveChanges returns a integer of number of changes.
private
async void
SaveAllChangesButtonAsync_Click(object
sender, EventArgs e)
{
Console.WriteLine(await context.SaveChangesAsync());
}
Changes to the backend database
It’s commonplace for a database schema to change as requirements change for a project. For example, using the database for the code sample contact information is stored in a contact table and a contact type table. Now an additional requirement is to store
the contact’s phone information and since a contact may have multiple phones (home, cell, work for instance) tables will need to be added to the database schema, device type e.g. desk or cell phone along if the phone number is active.
For those just starting out, add these tables to the database and run queries to ensure everything works as expected before moving on. The next step is to either create a new temporary model and perform the same steps as initially done to create the original
model, once created copy those tables and DbSet definitions to the original model. For others there are two additional options, use code
migrations or simply code the changes.
Custom BindingList Sort/Filter
The standard DataGridView does not know how to function in regards to sorting and filtering data with Entity Framework so a
custom component is used. Refer to source code to see how this component is implemented and note that to get to data several cast are needed. Current source code demonstrates filtering and will be discussed in depth
in the next article in this series.
Common cheat sheet
Accessing data
(this is similar to creating a SqlClient connection object), once the using statement has exited the connection is closed. When using a DbContext as a private form level variable after accessing data the connection is closed, each time data is needed a connection
is opened then closed when done.
using
(var context = new
NorthWindAzureContext())
{
// perform work
}
Create operation
using
(var context = new
NorthWindAzureContext())
{
context.Customers.Add(newCustomer);
context.SaveChanges();
}
Alternate
using
(var context = new
NorthWindAzureContext())
{
context.Entry(newCustomer).State = EntityState.Added;
context.SaveChanges();
}
Update operation
using
(var context = new
NorthWindAzureContext())
{
context.Entry(modifiedCustomer).State = EntityState.Modified;
context.SaveChanges();
}
Delete operation
using
(var context = new
NorthWindAzureContext())
{
context.Entry(customer).State = EntityState.Deleted;
context.SaveChanges();
}
Entity State
using
(var context = new
NorthWindAzureContext())
{
var currentState = context.Entry(customer).State;
}
Find a entity by primary key
using
(var context = new
NorthWindAzureContext())
{
customer = context.Customers.Find(2);
}
Disable lazy loading
context.Configuration.LazyLoadingEnabled =
false;
Disable validation
context.Configuration.ValidateOnSaveEnabled =
false;
Deferred Execution
Deferred execution means that the evaluation of an expression is delayed until its realized value is required. It greatly improves performance
by avoiding unnecessary execution.
There may be times when a query takes longer than expected to return which may be tolerable in a windows form project yet for a web application would be unacceptable. For this reason it’s important to understand deferred execution.
In the following example which may appear fine yet there is a problem. The problem is that using .ToList will immediately return all records in the Customer table which in this case has 50,000 records where the two where conditions are expected to return three
records. It will return three off the 50,000 which is the problem, returning 50,000 records then filtering down to three.
using
(var context = new
NorthWindAzureContext())
{
var results = context.Customers.ToList()
.Where(cust => cust.CountryIdentifier == 9)
.Where(cust => cust.ContactTypeIdentifier == 12);
}
(and this would be the same as above)
using
(var context = new
NorthWindAzureContext())
{
var results = context.Customers.ToList()
.Where(cust => cust.CountryIdentifier == 9 &&
cust.ContactTypeIdentifier == 12);
}
The following would perform the query without returning all 50,000 records.
using
(var context = new
NorthWindAzureContext())
{
var results = context.Customers.AsQueryable();
results = results.Where(cust => cust.CountryIdentifier == 9);
results = results.Where(cust => cust.ContactTypeIdentifier == 12);
}
Nothing is returned until results.ToList() is executed. The following does the same as the first query above, return 50,000 records then filters down to the first row.
public
Customer GetFirstCustomer()
{
using
(var context = new
NorthWindAzureContext())
{
return
context.Customers.ToList().FirstOrDefault();
}
}
While the following returns one record.
public
Customer GetFirstCustomer()
{
using
(var context = new
NorthWindAzureContext())
{
return
context.Customers.FirstOrDefault();
}
}
Reading with selective navigation properties
When LazyLoadingEnabled is enabled (which is default) selecting an entity such as Customer all navigation properties (child tables) are also loaded which may not be what a developer needs.
In the following example, all child tables are loaded.
using
(var context = new
NorthWindAzureContext())
{
var example = context.Customers.ToList();
}

Now with LazyLoadindEnabled = false
using
(var context = new
NorthWindAzureContext())
{
context.Configuration.LazyLoadingEnabled =
false;
var example = context.Customers.ToList();
}

In the following example ContactType is excluded as only Country and Contact have been included using the
Include extension method.
using
(var context = new
NorthWindAzureContext())
{
context.Configuration.LazyLoadingEnabled =
false;
var example = context.Customers
.Include(cust => cust.Country)
.Include(cust => cust.Contact)
.ToList();
}

Note that Contact in the above will still have Customer navigation property.

To remove Customer navigation property use the following code.
using
(var context = new
NorthWindAzureContext())
{
context.Configuration.LazyLoadingEnabled =
false;
var example = context.Customers
.Include(cust => cust.Country)
.Include(cust => cust.Contact)
.ToList();
foreach
(var customer in
example)
{
customer.Country.Customers =
null;
}
}
Logging Entity Framework
There may be times a developer needs to see the SQL which Entity Framework generated, for this simply use the following in development environment. All output is sent to the IDE Output window.
context.Database.Log = Console.Write;
If there is a requirement to save logging use a class to capture information to a text file while in development or test environment.
using
System;
using
System.IO;
namespace
ReadEditCustomerWithSpecialClass
{
public
class
FileLogger
{
public
static
voidLog(string
logInfo)
{
File.AppendAllText(
Path.Combine(
AppDomain.CurrentDomain.BaseDirectory,"context.log"),
logInfo);
}
}
}
Implementing logging using the class above (note it’s the same as Console.Write is done)
context.Database.Log = FileLogger.Log;
Logging can also be done using a logging library such as NLog, see the following example.
Data Annotations
With
Data Annotations attributes a developer can configure entity classes and properties ranging from changing a table’s known name, marking a property as a primary key using [Key], marking a property as required using [Required] and a good deal more.
Many articles will talk about data annotations with web solutions as one of the primary uses besides declarat’ing a property for describing classes and properties in a class is for user interface notification of failed validation when modifying or adding
a new record to the database. In the next article in this series validation will be discussed starting at the model level which will bubble up tp the windows form level.
It’s imperative to understand these attributes especially when working with code first methods for working with data as a developer can add an attribute in many cases rather than write client-side code. There are other benefits like being able to add properties
to a class that will not be tracked by Entity Framework e.g. [NotMapped] were a common usage would be to concatenate two fields perhaps first and last name of a person to display in a ComboBox or ListBox.
[NotMapped]
public
string
FullName => $"{FirstName} {LastName}";
Combining attributes, when classes are generated if a field is found to be required and has a max length code as shown below will be written.
[Required]
[StringLength(40)]
public
string
CompanyName { get;
set; }
These can be combined as followed
[Required, StringLength(40)]
public
string
CompanyName { get;
set; }
Another example, a user must login to an application or create a password for the first time they need to use an application. This can be done by adding a property (which we don’t want Entity Framework to track so it’s marked as [NotMapped]) and use the Compare
attribute as per below.
[Table("Customer")]
public
partial
classCustomer
{
public
int
Id { get;
set; }
public
string
FirstName { get;
set; }
public
string
LastName { get;
set; }
public
string
AccountNumber { get;
set; }
[Required(ErrorMessage =
"{0} is required")]
[StringLength(20, MinimumLength = 6)]
public
string
UserPassword { get;
set; }
[NotMapped]
[Compare("Password", ErrorMessage =
"Passwords do not match, please try again")]
[StringLength(20, MinimumLength = 6)]
public
string
PasswordConfirmation { get;
set; }
}
Usually with a password there are rules, must contain at least one digit, one lower and one upper cased character with min and max length. Rather than do this client side an additional attribute can be used.
[Required(ErrorMessage =
"{0} is required")]
[StringLength(20, MinimumLength = 6)]
[PasswordCheck(ErrorMessage =
"Must include a number and symbol in {0}")]
public
string
UserPassword { get;
set; }
Definition of PasswordCheck which would reside in a class library with classes representing rules for applying to property in the current and or future projects rather than rewriting them.
Note in the variable reason you might want a completely different message, that is up to you to either a) tell them the reason why b) have them reference a company page explaining the password rules.
public
class
PasswordCheck : ValidationAttribute
{
public
override
boolIsValid(object
value)
{
var validPassword =
false;
var reason =
string.Empty;
string
password = (value == null) ?
string.Empty : value.ToString();
if
(string.IsNullOrWhiteSpace(password) || password.Length < 6)
{
reason =
"new password must be at least 6 characters long. ";
}
else
{
Regex pattern =
new
Regex("((?=.*\\d)(?=.*[a-z])(?=.*[A-Z])(?=.*[@#$%]).{6,20})");
if
(!pattern.IsMatch(password))
{
reason +=
"Your new password must contain at least 1 symbol character and number.";
}
else
{
validPassword =
true;
}
}
if
(validPassword)
{
return
true;
}
else
{
return
false;
}
}
}
The above examples are just a few reasons for learning data annotations.
SQL Injection
LINQ to SQL passes all data to the database via SQL parameters. So, although the SQL query is composed dynamically, the values are substituted server side through parameters safeguarding against the most common cause of SQL injection attacks.
General caveats
In the code samples presented here all data has been bound to a DataGridView, data binding can also be done manually via DataBinding.Add e.g. Firstname.DataBinding.Add or using a wizard to do the binding for you (see the
following page) although the better method of the two is to do the databinding in code rather than a wizard.
Working from one project
Although having presented a Visual Studio solution which comprises of a forms and class projects a developer may at first want to build the first Entity Framework application in a single Windows forms project. Going this route it fine if the Entity Framework
code will never be used in another project the Entity Framework code may reside in the form but it’s even better to write the Entity Framework code in a separate class as this will make code not dependent on a single form.
This project requirements are for a hotel where guest may place orders for breakfast so that in the morning orders may be prepared so that when guest are ready their order will be ready.
The simplified database schema.

The model is generated the same as the first example in the forms project.

To present data a ListBox will be populated with guest names.

To populate this ListBox ToString is overridden with first and last name of the guest.
namespace
RestaurantDemo
{
using
System;
using
System.Collections.Generic;
using
System.ComponentModel.DataAnnotations;
using
System.ComponentModel.DataAnnotations.Schema;
using
System.Data.Entity.Spatial;
public
partial
classGuest
{
[System.Diagnostics.CodeAnalysis
.SuppressMessage(
"Microsoft.Usage",
"CA2214:DoNotCallOverridableMethodsInConstructors")]
public
Guest()
{
BreakfastOrders =
new
HashSet<BreakfastOrder>();
}
[Key]
public
int
GuestIdentifier { get;
set; }
public
int? RoomIdentifier {
get;
set; }
public
string
FirstName { get;
set; }
public
string
LastName { get;
set; }
[System.Diagnostics.CodeAnalysis
.SuppressMessage(
"Microsoft.Usage",
"CA2227:CollectionPropertiesShouldBeReadOnly")]
public
virtual
ICollection<BreakfastOrder> BreakfastOrders { get;
set; }
public
virtual
Room Room { get;
set; }
public
override
stringToString()
{
return
$"{FirstName} {LastName}";
}
}
}
Code to populate the ListBox in Operations class
public
List<Guest> TodayGuest()
{
using
(var context = new
RestaurantContext())
{
context.Configuration.LazyLoadingEnabled =
false;
return
context.Guests.ToList();
}
}
Which is implemented as follows in the form.
public
partial
classForm1 : Form
{
public
Form1()
{
InitializeComponent();
Shown += Form1_Shown;
}
private
void
Form1_Shown(object
sender, EventArgs e)
{
var ops =
new
Operations();
listBox1.DataSource = ops.TodayGuest();
}
When the button «Get breakfast order» is clicked the following retrieves the guest breakfast order.
/// <summary>
/// If a guest has a breakfast order return it, if nothing
/// ordered indicate no order was placed.
/// </summary>
/// <param name="guestIdentifier"></param>
/// <returns></returns>
public
string
GuestBreakfastOrderForToday(int
guestIdentifier)
{
var today = Now.Date;
using
(var context = new
RestaurantContext())
{
var results =
(
from orderItems
in
context.BreakfastOrderItems
join orderItem
in
context.BreakfastOrderItems on
orderItems.BreakfastItem.ItemIdentifier
equals orderItem.ItemIdentifier
where orderItem.BreakfastOrder.OrderDate == today &&
orderItem.GuestIdentifier == guestIdentifier
select orderItem
).ToList();
if
(results.Count >0)
{
// ReSharper disable once PossibleNullReferenceException
var room = context.Guests
.FirstOrDefault(g => g.GuestIdentifier == guestIdentifier).Room;
return
string.Join(Environment.NewLine, results
.Select(item => item.BreakfastItem.Item).ToArray()) +
$"\n\nRoom: {room.RoomDesginator}{room.RoomNumber}";
}
else
{
return
"No order placed";
}
}
}
Form code
private
void
GetBreakfastOrderButton_Click(object
sender, EventArgs e)
{
var guest = (Guest) listBox1.SelectedItem;
var ops =
new
Operations();
var guestOrder = ops.GuestBreakfastOrderForToday(guest.GuestIdentifier);
// ReSharper disable once LocalizableElement
MessageBox.Show($"{guest}\nOrder\n{guestOrder}");
}

Notes on the method Operations.GuestBreakfastOrderForToday, the variable today must be used rather than using
where orderItem.BreakfastOrder.OrderDate == Now.Date
As Entity Framework does not know how to deal with Now.Date. There are Entity Framework
functions to explore also. Another point is better understanding how to write the joins is to first write SQL SELECT statement, get it functioning then model your Entity Framework query against the working SQL SELECT statement.
Summary
In this second part of the series
moving from ADO.NET to Entity Framework the basic building blocks have been discussed in detail for displaying data in a Windows Form DataGridView along with starting off editing and saving data to the back-end database including simple filtering and sorting
of data in a DataGridView. In the next installment of this series adding new records and full editing of data will be taught using modal window forms which will complete what is needed to build a standard solution for one table with reference table so that
the next step will be working with master details in windows forms.
References
- MSDN Grouping samples with Entity Framework
6 data source - Unit Testing Entity Framework
See also
- Relationship in Entity Framework Using Code First Approach With Fluent API
- Entity Framework: Disconnected Entities
- Entity Framework: Wiki portal
- Entity Framework Introduction using C#, Part I
- Entity Framework Code First -Defining Foreign Keys using Data
Annotations and Fluent API - Entity Framework TechNet
- Moving from ADO.NET To Entity Framework
- Getting Started with Entity Framework Core: Database-First Development
- Entity Framework FAQ: Concurrency
- Entity Framework FAQ: Conceptual Model (EDM)
Source code
Source code resides in a
GitHub repository which requires (as indicating in the Building the sample section) creating the database first found in a folder named datascripts. There is source code that has not been discussed at this point and sections of code that are placeholders
for code in the next article in this series.