Вкладка улучшения отсутствует в Windows 10? Не можете изменить настройки звука на вашем устройстве? Не волнуйся. Мы вас прикрыли!
Итак, что такое вкладка улучшения в Windows и почему она используется? Вкладка «Улучшение» позволяет вам управлять различными настройками звука в Windows 10, включая усиление низких частот, виртуальную комнату, выравнивание громкости, коррекцию комнаты и т. Д. Включив эти параметры звука, вы можете улучшить качество прослушивания звука в Windows 10.
Вкладка улучшения может отсутствовать в Windows по нескольким причинам: несовместимые драйверы, вмешательство стороннего антивирусного инструмента, устаревшая ОС и т. Д. Кроме того, сбой вкладки улучшения может привести к ряду других проблем, которые могут не позволить звуку или микрофону работать должным образом. Следовательно, если на вашем устройстве отсутствует вкладка улучшения, вот несколько быстрых способов вернуть ее!
Давайте начнем.
1. Обновите аудиодрайверы.
Одним из наиболее эффективных решений проблемы «отсутствия вкладки улучшения» в Windows 10 является переустановка или обновление аудиодрайверов на вашем устройстве. Вот что вам нужно сделать, чтобы вручную обновить звуковые драйверы на ПК с Windows.
Нажмите комбинацию клавиш Windows + R, чтобы открыть диалоговое окно «Выполнить». Введите «Devmgmt.msc» в текстовое поле и нажмите Enter.
В окне диспетчера устройств разверните параметр «Звуковые, видео и игровые контроллеры». Щелкните правой кнопкой мыши звуковой драйвер, установленный на вашем устройстве, и выберите опцию «Обновить драйвер».
Следуйте инструкциям на экране, чтобы загрузить последнее обновление звуковых драйверов из Интернета.
После переустановки звуковых драйверов перезагрузите устройство и проверьте, можете ли вы просмотреть вкладку улучшения в окне настроек звука.
Звучит утомительно? Что ж, у нас есть один умный совет, который поможет вам избавиться от хлопот вручную обновлять системные драйверы. Загрузите и установите служебную программу Smart Driver Care на свой ПК с Windows, чтобы убедиться, что ваше устройство никогда не будет работать с устаревшими драйверами или программным обеспечением. Smart Driver Care автоматически сканирует и загружает последние обновления всех драйверов, установленных в вашей системе.
2. Добавьте аудиоустройство вручную.
Запустите окно поиска в меню «Пуск», введите «Панель управления» и нажмите Enter.
Нажмите на опцию «Добавить устройство», расположенную в разделе «Оборудование и звук».
Выберите свое аудиоустройство и следуйте инструкциям на экране, чтобы добавить его вручную.
После добавления аудиоустройства перезагрузите устройство, чтобы проверить, устранена ли проблема.
Переустановив аудиоустройство, вы можете обойти распространенные ошибки, ошибки и сбои, связанные с настройками звука.
3. Включите аудиоуслугу.
Нажмите комбинацию клавиш Windows + R, чтобы открыть диалоговое окно «Выполнить», введите в текстовое поле «services.msc» и нажмите Enter.
В списке служб Windows найдите файл службы «Windows Audio» на правой панели окна. Дважды нажмите на него.
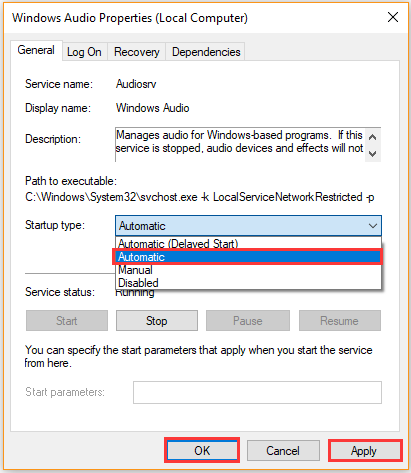
В окне «Свойства» аудиофайла Windows перейдите на вкладку «Общие», а затем выберите параметр «Автоматически» в качестве значения типа запуска.
4. Устранение проблем со звуком
Еще один способ решения проблемы «Отсутствует вкладка улучшения» в Windows 10 – запустить средство устранения неполадок со звуком. Вот что вам нужно сделать:
Щелкните правой кнопкой мыши значок «Громкость» на панели задач и выберите параметр «Устранение проблем со звуком».
Подождите несколько минут, пока Windows не просканирует и не исправит проблемы со звуком на вашем устройстве. После завершения процесса устранения неполадок перезагрузите устройство и проверьте, можете ли вы просмотреть вкладку «Улучшение».
Кроме того, вы также можете перейти в настройки Windows и выбрать «Обновление и безопасность». Перейдите в раздел «Устранение неполадок» на левой панели меню и нажмите кнопку «Запустить средство устранения неполадок», расположенную под опцией «Воспроизведение звука».
5. Отключите антивирусное программное обеспечение.
Установлено ли на вашем ПК с Windows какое-либо стороннее антивирусное программное обеспечение? Если да, то мы рекомендуем вам временно отключить его, чтобы проверить, не мешает ли он настройкам звука на вашем устройстве. В системном трее, расположенном на панели задач, найдите значок антивирусного программного обеспечения, щелкните его правой кнопкой мыши и быстро отключите его на данный момент.
После отключения антивирусного инструмента попробуйте снова получить доступ к настройкам звука, чтобы проверить, можете ли вы просмотреть вкладку «Улучшение».
Заключение
Вот несколько решений для устранения проблемы «Отсутствует вкладка улучшения» в Windows 10. Вкладка улучшения в окне настроек звука позволяет переключать громкость и устанавливать настройки звука таким образом, чтобы обеспечить иммерсивное звучание. Вы можете использовать любое из вышеупомянутых решений для восстановления вкладки улучшений на устройствах с Windows 10. По любым другим вопросам или помощи, не стесняйтесь оставлять свои вопросы в поле для комментариев!
-
Home
-
Partition Magic
- How to Fix Windows 10 Enhancements Tab Missing? [2 Ways]
By Ariel | Follow |
Last Updated
When opening the Properties of an audio device, many users find the Windows 10 enhancements tab missing. Are you also troubled by the issue? Now, you come to the right place. This post of MiniTool provides you with some tested solutions.
The enhancements tab can be used to control some important settings like Bass Boost, Virtual Surround, and Room Correction. However, many users found that there is no enhancements tab after updating to Windows 10. The vexing issue prevents them from listening to music and speaking.
What causes Windows 10 audio enhancements missing? According to a survey, it can be concluded that the issue is often related to corrupted or incompatible audio device drivers. A lot of users reported that the sound enhancements tab missing can be fixed by uninstalling or updating the Realtek audio drivers. Let’s have a try.
Solution 1. Uninstall or Update the Audio Drivers
The most common and effective solution to Windows 10 enhancements tab missing is to uninstall the corrupted audio drivers. According to user reports, the issue often occurs when using Conexant SmartAudio drivers and Realtek drivers. Here we will show you how to uninstall them.
Uninstall Conexant SmartAudio Drivers
Step 1. Type control in the search box and select the Control Panel app from the context menu.
Step 2. Change the View by type to Category, and then click on Uninstall a program under the Programs section.
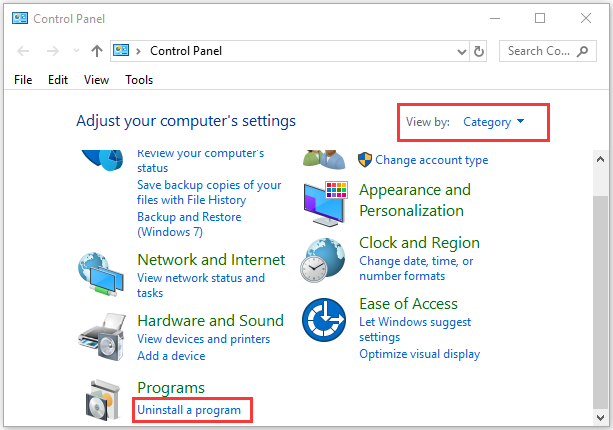
Step 3. Locate the Conexant SmartAudio driver from the list of installed programs, and then right click it and select Uninstall. Then follow the on-screen prompts to complete the uninstallation.
Now, reboot your computer and open the Properties of you sound device to see if there is no enhancements tab.
Uninstall Realtek Audio Drivers
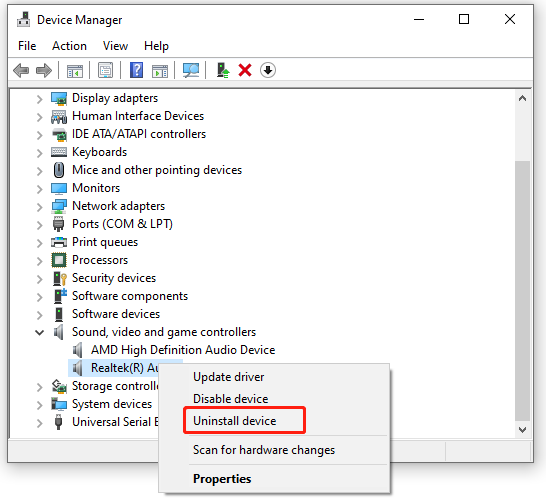
Step 1. Press Win + R keys to open the Run dialog box, and then type devmgmt.msc in the box and hit Enter to open this program.
Step 2. In the Device Manager window, expand the Sound, video and game controllers category, and then right-click on Realtek audio or Realtek High Definition Audio driver and select Uninstall device.
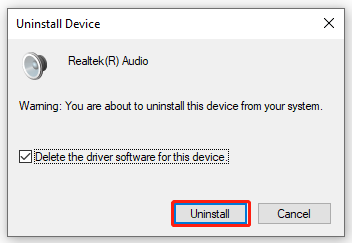
Step 3. Tick the checkbox of Delete the driver software for this device and click on Uninstall. Then follow the on-screen prompts to complete the operation.
Step 4. Once uninstalled, you can try using the official Microsoft driver. If the Windows 10 sound enhancements missing issue persists, you can try updating the Realtek audio drivers.
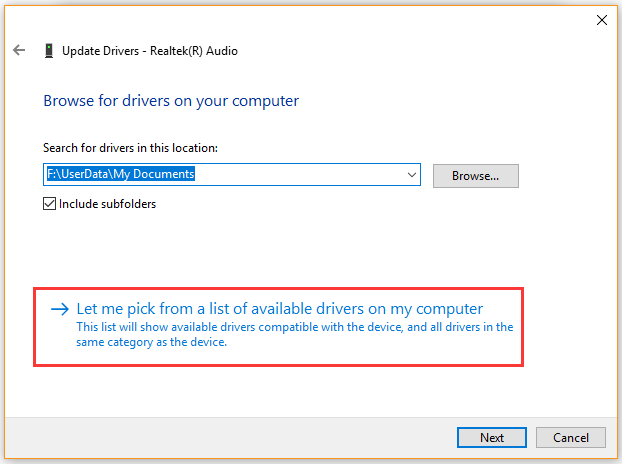
Step 5. Navigate back to the Device Manager window, right-click on the Realtek audio driver, and select Update driver. Then select Browse my computer for driver software and click on Let me pick from a list of available drivers on my computer in the pop-up window.
Step 6. After a while, tick the checkbox for Show compatible hardware and select High definition audio device from the list and click on Next. Then wait for the Realtek driver update to complete.
Once done, restart your computer and check if Windows 10 no enhancements tab is resolved.
It is possible that the related Windows audio services stop working or are disabled, which may trigger the Windows 10 enhancements tab missing problem. To rule out this situation, you can check if the Windows audio service is disabled. For that:
Step 1. Press the Win + R keys to open the Run dialog box, and then type services.msc into the box and hit Enter.
Step 2. Right-click the Windows Audio service from the list of services and select Properties.
Step 3. Select the Automatic from the Startup type menu and click on Stop to stop the service first.
Step 4. Click on Start to start the service again, and then click on Apply and OK to execute the changes.
Step 5. Follow Step 2 – 4 again to do the same thing for the Windows Windows Audio Endpoint Builder service.
Now, you can restart your computer and see if the Windows 10 audio enhancements missing problem is fixed.
About The Author

Position: Columnist
Ariel has been working as a highly professional computer-relevant technology editor at MiniTool for many years. She has a strong passion for researching all knowledge related to the computer’s disk, partition, and Windows OS. Up till now, she has finished thousands of articles covering a broad range of topics and helped lots of users fix various problems. She focuses on the fields of disk management, OS backup, and PDF editing and provides her readers with insightful and informative content.
Is the enhancement tab missing on Windows 10? Unable to tweak sound settings on your device? Don’t worry. We’ve got you covered!
So, what is an enhancement tab on Windows and why is it used? The Enhancement tab allows you to control various audio settings on Windows 10, including Bass Boost, Virtual Room, Loudness Equalization, Room Correction, and so on. By enabling these sound settings, you can enhance your audio listening experience on Windows 10.

The enhancement tab can go missing on Windows due to a couple of reasons be it, incompatible drivers, interference of a third-party antivirus tool, outdated OS, and so on. Also, the enhancement tab failure can lead to several other issues as well that may not allow the audio or the microphone to function properly. Hence, if the enhancement tab is missing on your device, here are a few quick ways to bring it back!
Also read: Bluetooth Speaker Connected But No Sound On Windows 10
How To Fix Enhancement Tab Missing on Windows 10 Issue
Let’s get started.
1. Update the Audio Drivers
One of the most effective solutions to fix the “enhancement tab missing” issue on Windows 10 is by reinstalling or updating the audio drivers on your device. Here’s what you need to do to manually update the sound drivers on Windows PC.
Press the Windows + R key combination to open the Run dialog box. Type “Devmgmt.msc” in the textbox and hit Enter.

In the Device Manager window, expand the “Sound, video, and game controllers” option. Right-click on the sound driver installed on your device and select the “Update Driver” option.

Follow the on-screen instructions to fetch the latest update of sound drivers from the web.
After reinstalling the sound drivers, reboot your device and check if you can view the enhancement tab in the sound settings window.

Sounds tedious? Well, we have one smart suggestion for you to save yourself from the hassle of manually updating the system drivers. Download and install the Smart Driver Care utility tool on your Windows PC to make sure that your device never runs on outdated drivers or software. Smart Driver Care automatically scans and fetches the latest update of all the drivers installed on your system.

2. Add the Audio Device Manually
Launch the Start menu search box, type “Control Panel” and hit Enter.
Tap the “Add a device” option placed under the “Hardware and Sound” section.

Select your audio device and then follow the on-screen instructions to add it manually.
Once the audio device has been added, reboot your device to check whether it fixed the issue.
By reinstalling the audio device, you can bypass common errors, bugs, and malfunction associated with the audio settings.
Also read: How To Add Windows 10 Equalizer: Best Way To Improve Sound On PC
3. Enable the Audio Service
Press the Windows + R key combination to open the Run dialog box, type “services.msc” in the textbox, and hit Enter.

In the Windows Services list, look for the “Windows Audio” service file on the right pane of the window. Double-tap on it.

In the Properties window of the Windows Audio file, switch to the “General” tab and then select the “Automatic” option as Startup type value.
Also read: Best Audio/Sound Equalizer for Windows 10 PC 2021
4. Troubleshoot Sound Problems
Another workaround to fix the “Enhancement tab missing” issue on Windows 10 is by running the sound troubleshooter. Here’s what you need to do:
Right-click on the ‘Volume” icon placed on the Taskbar, select the “Troubleshoot Sound Problems” option.
Wait for a few minutes until Windows scans and fixes sound-related issues on your device. Once the troubleshooting process is completed, reboot your device and check if you can view the “Enhancement tab”.

Alternatively, you can also head on to Windows Settings, select “Update and Security”. Switch to the “Troubleshoot” section from the left menu pane and tap the “Run the Troubleshooter” button placed underneath the “Playing Audio” option.
Also read: How to Fix Generic Audio Driver Detected in Windows 10
5. Disable the Antivirus Software
Is your Windows PC installed with any third-party antivirus software? If yes, then we recommend you temporarily disable it to check whether it was interfering with the sound settings on your device. In the System Tray placed on your Taskbar, look for the antivirus software icon, right-click on it and quickly disable it for the moment.

After disabling the antivirus tool, try accessing the sound settings again to see whether you can view the “Enhancement tab”.
Also read: 15+ Best Antivirus Software of 2021
Conclusion
Here were a few solutions to fix the “Enhancement tab missing” issue on Windows 10. The enhancement tab in the sound settings window allows you to toggle volume and set the audio settings in a way that delivers an immersive sound experience. You can use any of the above-mentioned solutions to restore the enhancement tab on Windows 10 devices. For any other queries or assistance, feel free to drop your questions in the comments box!
Enhancement – это инструмент, который позволяет улучшить функциональность вашей операционной системы Windows 10. С его помощью вы сможете настроить различные параметры работы вашей системы, улучшить производительность и повысить общую эффективность.
Включение Enhancement на Windows 10 может быть очень полезно, особенно если вы часто работаете на компьютере или занимаетесь играми. Это дает вам возможность настроить множество параметров, таких как настройки звука, разрешение экрана, эффекты визуализации и многое другое.
Для того чтобы включить Enhancement на Windows 10, следуйте этим простым шагам:
- Откройте меню «Пуск» и выберите «Настройки».
- В открывшемся окне «Настройки» выберите «Система».
- На панели слева выберите «Экран».
- Настройте разрешение экрана, яркость и другие параметры под свои предпочтения.
- Перейдите в раздел «Звук» и настройте звуковые эффекты и уровни громкости.
- В разделе «Параметры» вы также можете включить или отключить различные визуальные эффекты и анимацию.
После того как вы завершили настройку Enhancement на Windows 10, не забудьте сохранить изменения и перезагрузить компьютер, чтобы они вступили в силу.
Улучшение вашей операционной системы Windows 10 с помощью Enhancement позволит вам настроить ваш компьютер исходя из ваших потребностей и предпочтений. Это простая и эффективная инструкция поможет вам включить все главные функции Enhancement и наслаждаться улучшенным опытом работы на вашем компьютере.
Содержание
- Переходим в настройки
- Находим раздел «Система»
- Выбираем «Дисплей»
- Переходим в раздел «Видео»
- Включаем Enhancement
- Сохраняем изменения
Переходим в настройки
Для того чтобы включить Enhancement для Windows 10, вам необходимо открыть настройки вашей операционной системы. Вот пошаговая инструкция:
- Нажмите «Пуск» в левом нижнем углу экрана чтобы открыть меню «Пуск».
- Выберите пункт «Настройки», который обозначен значком шестеренки. Откроется окно с настройками вашей системы.
- В окне настроек выберите пункт «Система».
- На левой панели выберите пункт «Экран», чтобы перейти к настройкам экрана.
- Настройте разрешение экрана и другие параметры по вашему желанию. Прокрутите вниз до раздела «Расширенный режим отображения» и нажмите на ссылку «Дополнительные параметры дисплея».
- Откроется новое окно с дополнительными настройками дисплея. В нём переключите вкладку на «Монитор» и поставьте галочку напротив пункта «Включить Enhancement».
- Нажмите «Применить» и «ОК», чтобы сохранить изменения и закрыть окно настроек.
Теперь у вас включен Enhancement для Windows 10. Вы можете настроить его параметры до желаемого уровня.
Находим раздел «Система»
Чтобы включить Enhancement для Windows 10, необходимо найти раздел «Система» в настройках операционной системы. Этот раздел содержит различные параметры и опции управления системой. Следуйте указаниям ниже, чтобы найти раздел «Система» в Windows 10:
1. Откройте меню «Пуск»
Находится в левом нижнем углу рабочего стола Windows 10. Вы можете открыть меню «Пуск», кликнув на значок Windows в левом нижнем углу экрана или нажав клавишу с логотипом Windows на клавиатуре.
2. Выберите «Настройки»
Когда откроется меню «Пуск», найдите и кликните на пиктограмму «Настройки» (представленную значком шестеренки). Она находится в верхней части меню «Пуск» и выглядит как иконка с шестеренкой.
3. Зайдите в раздел «Система»
В меню «Настройки» найдите и кликните на пункт «Система». Обычно он находится в верхней части списка настроек.
4. Откройте раздел «Отображение»
Внутри раздела «Система» найдите и выберите пункт «Отображение». Для некоторых версий Windows 10 этот пункт может называться «Экран» или иметь другое название, связанное с настройками отображения.
5. Найдите и включите Enhancement
Внутри раздела «Отображение» найдите опцию или настройку, связанную с Enhancement. Обычно она называется «Повышение резкости» или «Увеличение четкости». Выберите эту опцию и включите ее, следуя указаниям на экране.
После завершения этих шагов Enhancement будет включен на вашем устройстве с операционной системой Windows 10. Обратите внимание, что наличие и название опции Enhancement может различаться в зависимости от версии Windows 10 и конкретного производителя вашего устройства.
Выбираем «Дисплей»
После того как мы открыли панель настроек, нам нужно выбрать вкладку «Дисплей». Для этого прокрутите список доступных настроек в левой части окна и выберите «Дисплей». Это позволит нам настроить параметры отображения экрана компьютера.
Переходим в раздел «Видео»
Чтобы включить Enhancement для Windows 10, вам необходимо открыть раздел «Видео» в настройках операционной системы. Следуйте указаниям ниже, чтобы перейти в этот раздел:
| Шаг 1: | Нажмите на кнопку «Пуск» в левом нижнем углу экрана или нажмите клавишу с логотипом Windows на клавиатуре для открытия меню «Пуск». |
| Шаг 2: | Выберите иконку настроек (колесо) в левой части меню «Пуск» для открытия панели настроек. |
| Шаг 3: | На странице настроек выберите раздел «Система». |
| Шаг 4: | В левой части страницы настроек системы выберите «Видео». |
После выполнения этих шагов вы будете перенаправлены в раздел «Видео» настроек Windows 10. Здесь вы найдете различные параметры и опции, связанные с видео и графикой. Вы можете настроить разрешение экрана, масштабирование и другие параметры, чтобы достичь наилучшего визуального опыта.
Включаем Enhancement
Для того чтобы включить Enhancement в операционной системе Windows 10, следуйте этим шагам:
- Нажмите на кнопку «Пуск» в левом нижнем углу экрана.
- Выберите «Настройки», чтобы открыть панель управления.
- В панели управления выберите категорию «Система».
- В открывшемся окне выберите «О программе» в левом меню.
- На странице «О программе» найдите и нажмите на ссылку «Параметры системы».
- В открывшемся окне «Свойства системы» выберите вкладку «Дополнительно».
- В разделе «Производительность» нажмите на кнопку «Настройки».
- В открывшемся окне «Настройки производительности» выберите вкладку «Визуальные эффекты».
- Убедитесь, что включена опция «Другие визуальные эффекты» и отметьте флажок рядом с «Enhancement».
- Нажмите на кнопку «Применить» и затем на «ОК», чтобы сохранить изменения.
После выполнения этих шагов Enhancement будет включен на вашей операционной системе Windows 10. Теперь вы сможете наслаждаться дополнительными визуальными эффектами и улучшенной работой интерфейса.
Сохраняем изменения
После того как вы внесли все необходимые изменения в настройки Enhancement, вам нужно сохранить их, чтобы они вступили в силу. Чтобы сохранить изменения, следуйте инструкциям ниже:
- Нажмите на кнопку «ОК». После того как вы внесли все необходимые изменения и настройки, нажмите на кнопку «ОК» в правом нижнем углу окна настроек Enhancement.
- Перезагрузите компьютер. Чтобы изменения вступили в силу, вам нужно перезагрузить компьютер. Нажмите на кнопку «Пуск» в левом нижнем углу экрана, выберите пункт «Выключить или перезагрузить» и выберите «Перезагрузить». Когда компьютер перезагрузится, изменения настроек Enhancement будут активированы.
Теперь вы успешно включили Enhancement для Windows 10 и наслаждаетесь улучшенным звуком и видео на вашем компьютере.
You see Enhancements tab missing from both Speakers and Microphone Properties, but have no idea how to fix it. Hopefully you find the methods to fix this problem helpful.
There are three methods below for you to try. You can try them one by one:
Method 1: Run audio troubleshooter
Method 2: Reinstall the audio driver
Method 3: Update the audio driver
Method 1: Run audio troubleshooter
To fix the Enhancements tab missing issue, you can use Windows built-in audio troubleshooter, which can detect the possible causes to this problem. Once the causes are detected, you just need to follow the wizard to fix the problem.
Refer to the below steps:
1) Right-click on the speaker icon in the task bar (see the below screenshot), and click on Troubleshoot sound problems. Then Windows will troubleshoot the problem.
2) Once the troubleshoot is done, you’ll see an Open Enhancements tab. Click on it and then click on the Levels tab. After that, the Enhancements tab should be back.
If this doesn’t work for you, try other two methods.
Method 2: Reinstall the audio driver
The Enhancements tab is part of the audio driver package. Once it’s missing, you can suspect the corrupted audio drivers. To fix the problem, you can reinstall the audio driver and see if the problem is resolved.
Here’s how to reinstall the audio driver.
Firstly, uninstall the audio driver.
1) Press Win+R keys to open the Run box.
2) Type ‘devmgmt.msc’ into the box and click OK.

3) Expand the category ‘Sound, video and game controllers’. Right-click on the audio device and select Uninstall device.

4) On the Confirm Device Removal dialogue, you’ll see a warning message that says “You are about to uninstall this device from your system”. Just check the box Delete the driver software for this device then click Uninstall to confirm the changes.

5) Restart your computer to allow Windows to reinstall the audio driver.
6) Check to see if the Enhancements tab is back. If it’s still missing, you can try to download and update the audio driver from the manufacturer’s site (See Method 3).
Method 3: Update the audio driver
Updating the audio driver may help fix the problem. You can download the latest audio driver from the PC manufacturer’s website.
Go to the manufacturer’s website, and navigate to the Support, Drivers or Download section, where you can download drivers there. Search for your PC model, then you can easily find and download the audio driver.
Alternatively, you can directly perform a search with your browser. To do that, open your browser and search for keyword combination “PC model + driver”.
Thank you for reading. If you have any questions, ideas or suggestions, feel free to leave a comment below.