Get Updates
Enter your email for any updates here.
Download Product Manual
Follow this operation manual.
Download Product Firmware
Ender-3 series replacement touch screen (except Ender-3Max)
07 Dec. 2022
Ender-3-Marlin2.0.1-HW-V4.2.2-SW-V1.2.1-Filament
29 Nov. 2022
Firmware applicable model and mainboard version
Printer model: Ender-3
Printer mainboard version: V4.2.2
Notes: The firmware is Support filament detection function
Mainboard update:
1. Format the TF card on the computer side, and select 4096 for the allocation unit size.
2. Put the firmware file «Ender-3-Marlin2.0.1-HW-V4.2.2-SW-V1.2.1-Filament.bin» into the root directory of TF card.
3. Turn off the printer and insert the TF card into the card slot on the motherboard.
4. Reboot and wait for the update to finish.
5. After finishing the update, remove the TF card from the motherboard slot and delete the bin file inside.
Ender-3Marlin2.0.6HW4.2.2Z350
29 Nov. 2022
Firmware applicable model and mainboard version
Printer model: Ender-3
Printer mainboard version: V4.2.2
Notes: The firmware is Ender-3 Z-axis height increase 350MM.
Mainboard update:
1. Format the TF card on the computer side, and select 4096 for the allocation unit size.
2. Put the firmware file «Ender-3Marlin2.0.6HW4.2.2Z350.bin» into the root directory of TF card.
3. Turn off the printer and insert the TF card into the card slot on the motherboard.
4. Reboot and wait for the update to finish.
5. After finishing the update, remove the TF card from the motherboard slot and delete the bin file inside.
GD-Ender-3HW4.2.2SW2.0.8.2EuropeMulti
29 Nov. 2022
Firmware applicable model and mainboard version
Printer model: Ender-3
Printer mainboard version: V4.22
Notes: Special firmware for Ender-3 with GD control chip,nine-language version
Mainboard update:
1. Format the TF card on the computer side, and select 4096 for the allocation unit size.
2. Put the firmware file «Ender-3Marlin2.0.6HW4.2.2.bin» into the root directory of TF card.
3. Turn off the printer and insert the TF card into the card slot on the motherboard.
4. Reboot and wait for the update to finish.
5. After finishing the update, remove the TF card from the motherboard slot and delete the bin file inside.
Ender-3Marlin2.0.6HW4.2.2
29 Nov. 2022
Firmware applicable model and mainboard version
Printer model: Ender-3
Printer mainboard version: V4.2.2
Notes: The firmware is Factory standard.
Mainboard update:
1. Format the TF card on the computer side, and select 4096 for the allocation unit size.
2. Put the firmware file «Ender-3Marlin2.0.6HW4.2.2.bin» into the root directory of TF card.
3. Turn off the printer and insert the TF card into the card slot on the motherboard.
4. Reboot and wait for the update to finish.
5. After finishing the update, remove the TF card from the motherboard slot and delete the bin file inside.
GD-Ender-3HW4.2.2SW2.0.8.2CRTouchFilamentEuropeMulti
29 Nov. 2022
Firmware applicable model and mainboard version
Printer model: Ender-3
Printer mainboard version: V4.2.2
Notes: The firmware is Ender-3 CR-touch/BL-touch version, compatible with support for filament detector.
Mainboard update:
1. Format the TF card on the computer side, and select 4096 for the allocation unit size.
2. Put the firmware file «GD-Ender-3HW4.2.2SW2.0.8.2CRTouchFilamentEuropeMulti.bin» into the root directory of TF card.
3. Turn off the printer and insert the TF card into the card slot on the motherboard.
4. Reboot and wait for the update to finish.
5. After finishing the update, remove the TF card from the motherboard slot and delete the bin file inside.
Ender-3Marlin2.0.6HW4.2.2BLTouchGD
16 Aug. 2022
Ender-3Marlin2.0.6HW4.2.2GD
16 Aug. 2022
Ender-3 Marlin2.0.6HW4.2.7 BLTouch Filament
02 Mar. 2022
Ender-3 BL TOUCH (without adapter board) + Filament Detection
31 Mar. 2022
Ender-3 BL TOUCH (without adapter board) + Filament Detection
Ender-3Marlin2.0.6HW4.2.7
24 Mar. 2022
Firmware of 4.2.7 motherboard without accessories.
Ender-3 Marlin2.0.6 CR-touch or BLtouch firmware
05 Aug. 2021
Ender-3 Marlin2.0.6 CR-touch or BLtouch firmware
Ender-3 4.2.7mainboard—High Temperature Full Hotend Kit firmware
15 Jun. 2021
Ender-3 4.2.2mainboard—High Temperature Full Hotend Kit firmware
15 Jun. 2021
Ender-3 Zaxis raised 350mm (8 bit)
03 Mar. 2021
Ender-3 4.2.7 mainboard (32bit)
28 Jan. 2021
Ender-3 4.2.2 mainboard (32bit)
28 Jan. 2021
Ender-3 1.1.5 silent mainboard (8bit)
28 Jan. 2021
Ender-3 1.1.4 mainboard (8bit)
28 Jan. 2021
Ender-3_1.1.6.2V_Source Code
22 Jul. 2020
Ender-3 SD Card File
22 Jul. 2020
Download Slicing Software
Так, прошу сразу не пинать, начитался и тут на форуме, и в инете и, либо я уже не понимаю, либо одно из двух.
Итак, имеется новенькая Винда 10 домашняя, 64 разрядная (обновился по лицензии онлайн). В этой Винде есть функционал просмотра STL, его анализа, правки и минимальный «детский» слайсер с отправкой в печать по сетке или юсб.
А значит, пора пробовать подключать принтер по юсб, благо про это пишут часто.
И вот тут начинается самый треш, старые дрова с флешки (новые перекачивал с сайта креалити) вроде поставились, но ошибка высыпАлась иногда ругаясь на 64бит , драйвер СР340 тоже свежий, качал и ставил СН341ser X64, а при подключении принтера по шнурку он определяется USB-SERIAL CH340 и всё (ну и номер порта юсб).
При попытке определить модель принтера предлагает все варианты, от Кубика до 3Д Системс. Короче фиаско, Кура 4.2.1 принтер по юсб не видит тоже.
На старом ноуте (он сдох собака, лет 15 ему было) с 7кой 32 бита и слайсером Креалити принтер по юсб определялся, а на компе вот….
Короче, помогите советом, только без стёба, и да все проги запускал с корня диска С., шнур юсб целый, по поведению принтера видно, что сигнал идёт (экран перезагружается и включается ненадолго вентилятор обдува детали)…
![]()
W10 does not recognize the Ender 3.
Control panel shows no port settings of any kind.
Does anyone know how to solve this.
contact Creality support.. oh thats right there isn’t any!
pay bottom dollar and you get that…
It depends on what controller they shipped to you…
Google tells me its a standard FTDI usb/serial converter
Download drivers from here [www.ftdichip.com]
But windows 10 should have detected this… so may not be a driver issue.
Edited 1 time(s). Last edit at 08/09/2018 11:09AM by Dust.
Thank you for replying.
Since this does not have a read me or setup file, how are they installed?
I am learning to cipher this week, spelling is next week.
Eneder = Ender
Edited 1 time(s). Last edit at 08/09/2018 12:31PM by dlw.
Be sure to «View optional updates» in the «Windows Update» control panel section.
Check the suggested drivers and click «Download and install«.
After this the CH340 will show up under «Device Manager«.

This solved the communication for me using Windows 10 (x64) and an Ender 3 with a new motherboard v4.2.7 with STM32F103 controller and TMC2225 stepper drivers.
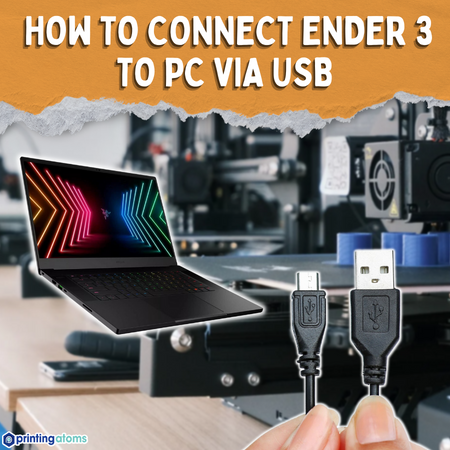
While the standard way of using an Ender 3 printer doesn’t involve a computer connection, there are moments when you might not want to use a USB stick or SD card. Since this printer has a USB port, you might wonder if there are ways to connect your Ender 3 (Pro/V2) to your PC.
To connect your Ender 3 to a PC, you have to download and install the printer driver and control software, such as Pronterface, Cura, or Simplify3D. Then use a mini USB or micro USB cable (depending on the model) to connect the printer to the PC.
Connecting Ender 3 To Computer in 5 Easy Steps
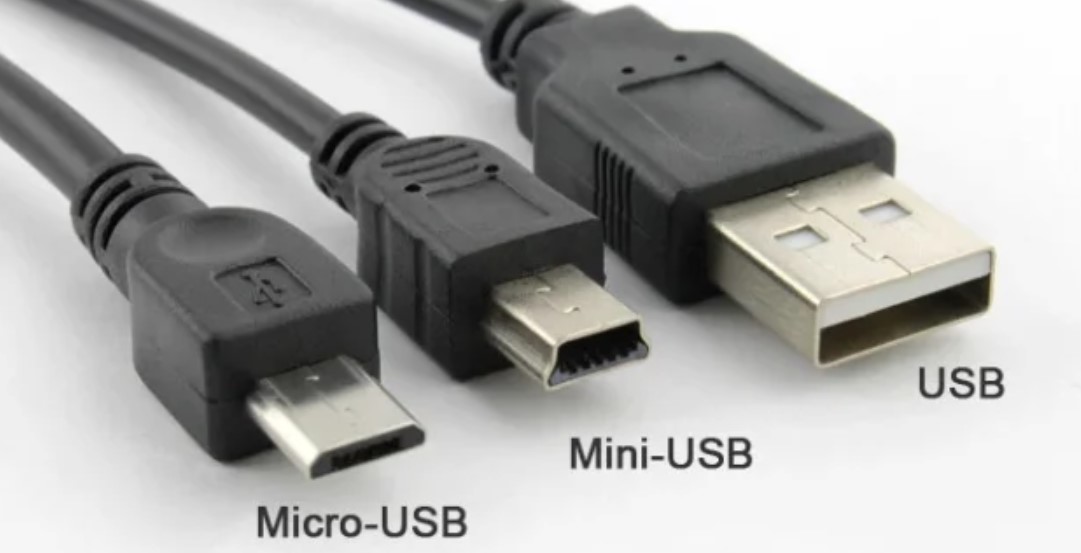
Connecting your Ender 3 to a computer comes in handy for several reasons. Beyond the remote control, you can update your printer’s firmware and software. All you need is the right USB cable – the Ender 3 Pro has a mini-USB port, whereas the Ender 3 V2 features a micro-USB port.
Things You Will Need
- Controlling software
- Hardware (the right type of USB cable based on your Ender 3 USB port)
1. Find the right USB cable
While not all Ender 3 printers use the same USB cable type, figuring one which kind you need for your printer is easy. You can look at the back or side of your printer to identify the USB port, or you can check the user manual.
To make it even easier for you, know that the Ender 3 Pro has a mini-USB port, whereas the Ender 3 V2 has a micro-USB port.
2. Download and install the controlling software
A controlling software might not be needed if you only want to update your product’s firmware. However, you have to install one if you want to print directly from your PC.
The most popular options include Cura and Pronterface, but there are some alternatives if you don’t like these ones for one reason or another. Both Cura and Pronterface are intuitive to use and represent a good option for beginners.
No matter what software you decide to use, download from an official source and install it following the instructions in the installation wizard. Launch the software once installed.
3. Connect your printer
Once the software is installed and running, open your computer’s Device Manager window by right-clicking the start menu and selecting the Device Manager option.
In the Device Manager window, click on the tab Ports, then connect your Ender 3 to the PC with the appropriate USB cable.
Starting out with 3D printing and want to AVOID rookie MISTAKES?
- Our new Filament Printing 101 Course is just for you! Lean how to create perfect professional prints without all the hassle.
- Don’t let common mistakes hold you back, click the link to learn more and get ahead now!
Check the Device Manager window; a new entry appearing in the Ports tab means that your 3D printer is now connected to the PC, and you can print to Ender 3 with a USB cable.
If you’ve connected the 3D printer USB, but there is no new entry, your computer might not recognize the printer, and you’ll have to install the appropriate Ender 3 Pro or Ender 3 V2 drivers – an easy way to find and download them is by googling Ender 3 Windows 10 drivers or a similar term if you’re using another Windows version or another operating system.
Disconnect the USB cable, then download and install the drivers. When ready, open the Device Manager and connect the cable to check for new entries.
4. Configure the port settings
Once the computer has recognized your 3D printer and added it to the Port list, right-click the new entry, select Properties, and navigate to Port Settings.
In the Port Settings tab, you’ll notice a drop down named Bits per Second. Click on it and select 128000. Save the settings by hitting the Apply or Save button; then, you can close the Properties tab and the Device Manager window.
5. Add the printer to your software
The only thing you have to do before being able to control your 3D printer from the PC is to add it to the software. The exact method may differ from software to software, but the process is generally intuitive.
In Pronterface, for instance, all you have to do is choose the correct port (the specific name as shown in Device Manager) and the 128000 rate. You can then hit the Connect button and wait until the software prompts you that the printer is online.
To add a printer to Cura, you have to open the Printer panel and select Add printer. You can then select the right printer from the dropdown list and hit the Add button to start controlling it.
How to 3D Print with Cura over USB
USB Port Not Working?
Whether you’re trying to connect your Ender 3 to a PC or use it with Raspberry Pi, there are moments when the printer isn’t detected by PC or Pi when connecting the USB cable. As frustrating as that is, there are two main reasons why your printer is not detecting the computer: due to a hardware glitch (most likely a faulty motherboard) or incompatibility issues. In the first case, restarting the computer might help.
Hard Reboot
If you are perfectly sure that the software you use is compatible with the printer, the USB port not working could be caused by a hardware problem. Restarting the computer or restoring the connection might help. Here’s how to do it.
- Disconnect the micro-USB or mini-USB cable connecting the printer.
- Turn off the printer and it. Keep it unplugged for at least 10 seconds, then plug it back in but don’t turn it on at this stage.
- Close the printer software on your computer and restart it. Alternatively, you can restart the computer.
- Once you’ve restarted the software, turn on the printer and wait for a few seconds until it’s properly booted.
- Open the printer software and check for the printer to see if you can connect it.
If you notice that Cura is not connecting to the printer via USB some of the times, but it works in other instances, you may have to replace the printer’s motherboard. Before doing that, check the USB cable and make sure it’s working properly.
Incompatibility Issue
Another thing to check before replacing your printer’s hardware is compatibility between the controlling software and the printer’s firmware.
For instance, Cura only supports USB printers that follow the RepRap/Marlin G-code protocol. If your printer uses a different firmware, the software will not recognize the printer. However, you should be able to see the printer in your computer’s Device Manager.
Tips To Remember When 3D Printing With Ender 3
3D printing with Ender 3 directly from your PC is all fun and games, but there are a few things to remember if you don’t want to fail mid-project.
Keep the Computer On
Once you send a printing command to your 3D printer via computer, it is crucial to maintain the connection from start to finish. This means that you have to keep the computer on – your PC going in sleep mode can interrupt the printing process.
For this reason, you should turn off the Sleep Mode and screensaver whenever you’re controlling the printer from your PC.
Don’t Plug Anything In While Printing
Sending commands to your 3D printer can take up a lot of resources, and plugging in any other devices while you’re using the Ender 3 could jeopardize your project.
Close All Other Programs
As mentioned above, 3D printing from a computer requires all available resources; that’s why you should close all other running programs before hitting the print command.
Use Battery Backup
Keeping the computer on at all times is crucial, and an outage can interrupt the printing process. For this reason, you should always use battery backup.
If you’re planning to connect the 3D printer to the PC, we recommend investing in a quality UPS device that should be on whenever you’re printing directly from the PC. If you’re using a laptop, make sure the battery is fully charged.
Don’t unplug your laptop to prevent draining the battery. In this way, your system will stay on even if the power is off.
Alongside your computer, your 3D printer should also have a battery backup.
Plug the USB Cable Directly into the Computer
If your computer has only one USB port and you generally plug in several devices, you might use a USB splitter. While the splitter comes in handy in many situations, it could negatively impact the quality of your print if you plug the printer into it because the splitter can reduce the USB bandwidth.
Considering that you should never plug in other devices when using the 3D printer, unplug the splitter and plug your Ender 3 directly into your PC.
3 Benefits Of Connecting Ender 3 To Computer
While 3D printers don’t require a computer connection, connecting them to a PC has numerous advantages. Let’s have a look at the most important.
Full Remote Control and Monitoring
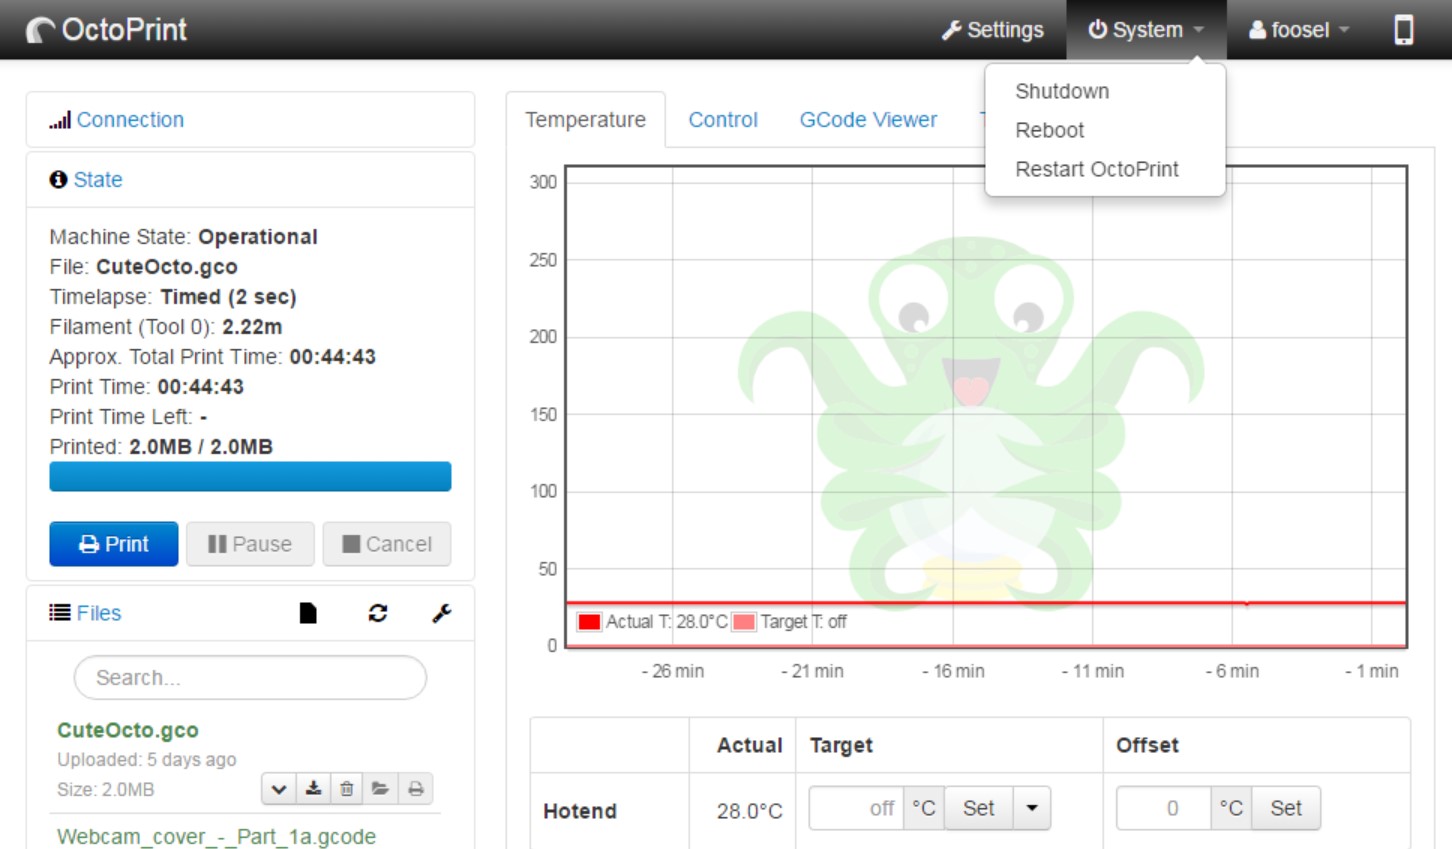
When you control the Ender 3 from the PC, you have full control over each print. For instance, OctoPrint allows you to print objects from anywhere as long as your printer is connected to the PC, monitor the progress via a webcam if you’re away, use the terminal command function, and so on.
Easy Upgrades
Upgrading your Ender 3 without connecting it to a PC means downloading the data, copying it to a USB stick or SD card, then using the stick or SD card to update the printer.
Connecting the Ender 3 to the PC allows you to upgrade the software or firmware directly, without the need for using external drives.
Direct Computer Control
Lastly, you can control the printer directly from the PC. You won’t have to save data on external drives; all you have to do is hit the print button after you’ve configured the software to get things done.
Bottom Line
Print to Ender 3 with a USB cable opens a world of possibilities regardless of your skill level. From updating and upgrading your printer to skipping the need for USB sticks or SD cards, connecting the Ender 3 to your computer is the best thing to do. We hope this guide can help you achieve your goal so that you can control and monitor the printer even from a distance.
References
Firmware Download – Creality
3D Printing 101 – The University of Tennessee, Knoxville
When you want to start a 3D print, you probably slice a 3D model on your computer, plug in a MicroSD card, save it, and then load it into the slot on your printer’s motherboard.
But what if there was an easier, much more concise way to go from a 3D model to a 3D print?
Well, there is!
The Creality Ender 3 (Pro/V2) features a Micro USB port on the motherboard, which you can use to connect your printer to your PC. With a connection between your computer and a 3D printer, you won’t have to fiddle with a MicroSD card because you can communicate with your printer and send prints using the USB connection.
Want to learn how you can connect your Creality Ender 3 (Pro/V2) to your personal computer? Well, just keep reading!
Table of Contents
- Why Connect to Your 3D Printer?
- How to Connect to an Ender 3 (Pro/V2): Step-By-Step
- 1. Turn On Devices
- 2. Plug In USB Cable
- 3. Install Slicing Software
- 4. Add the Ender to Cura
- 5. Test Print
- What 3D Software to Use?
- Pronterface
- Cura
- OctoPrint
- Disadvantages of Connecting Your Ender 3 to PC
- Conclusion
Why Connect to Your 3D Printer?
You might want to connect your 3D printer to your computer if you don’t like dealing with a MicroSD card, which is what you usually need to upload prints to the Ender 3.
Moreover, if you’re like me and have chubby fingers and always lose things, then you probably hate having to use the SD card. Connecting your Ender 3 to your computer via USB means you don’t have to deal with that stupid, ugly, and way-too-small SD card to print things.
Additionally, compared to the MicroSD card, a USB connection to your printer allows you to interact with the machine in more ways. For example, if the printer is connected to your PC, you can manually send G-code commands or even change the firmware on the motherboard.
Another reason you might want to connect your printer to your PC is if you don’t have a MicroSD card reader. I actually broke the first USB-to-MicroSD reader I got, so this is 100% a reasonable excuse for using a USB connection.
How to Connect to an Ender 3 (Pro/V2): Step-By-Step
Connecting your PC and Ender 3 (Pro/V2) is super simple, and I’ve gone over every step of how to connect Ender 3 to PC in the sections below.
It’s also worth mentioning that, while I made the instructions specifically for the Original Creality Ender 3, Ender 3 Pro, or Ender 3 V2, they should work on similar printers, such as other Creality machines.
1. Turn On Devices
First, you need to turn on the devices, including your Ender 3 and PC.
And, just so you know, when I say “PC”, I mean any form of personal computer, whether it’s a desktop, laptop, or a similar type of device (e.g. Raspberry Pi computer).
I probably don’t need to explain how to turn on your computer, but if you’re new to the Ender 3, make sure it’s plugged into the wall, and the switch is flipped on.
2. Plug In USB Cable
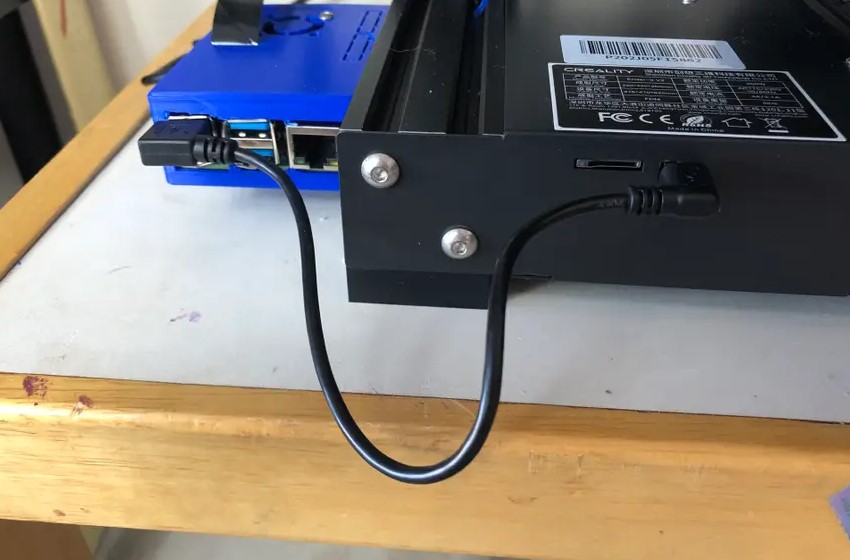
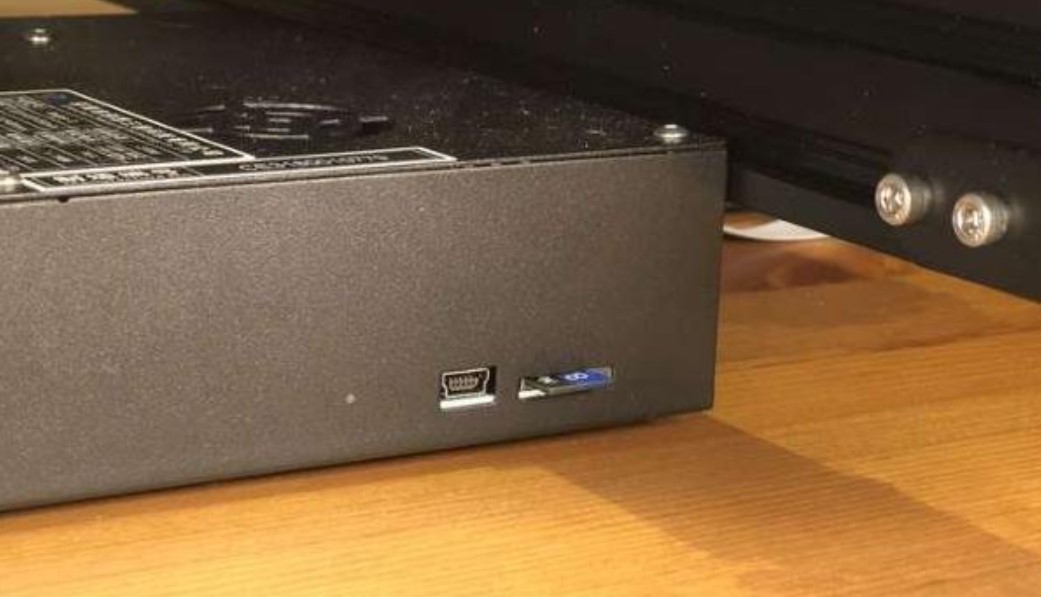
Next, grab the right cable for your printer depending on its motherboard USB port. The motherboards on the Original Ender 3 and Ender 3 Pro have a Mini USB port, so use a Mini USB cable. The motherboard on the Ender 3 V2 has a Micro USB port, so use a Micro USB cable.
Also, make sure that the USB cable can transfer data. Some cheap Micro and Mini USB cables only have power and ground wires (no signal).
Once you’ve got the right cable, plug the USB Type-A side of the cable into your PC’s USB port and the other side into the respective USB port on the Ender 3’s motherboard.
3. Install Slicing Software
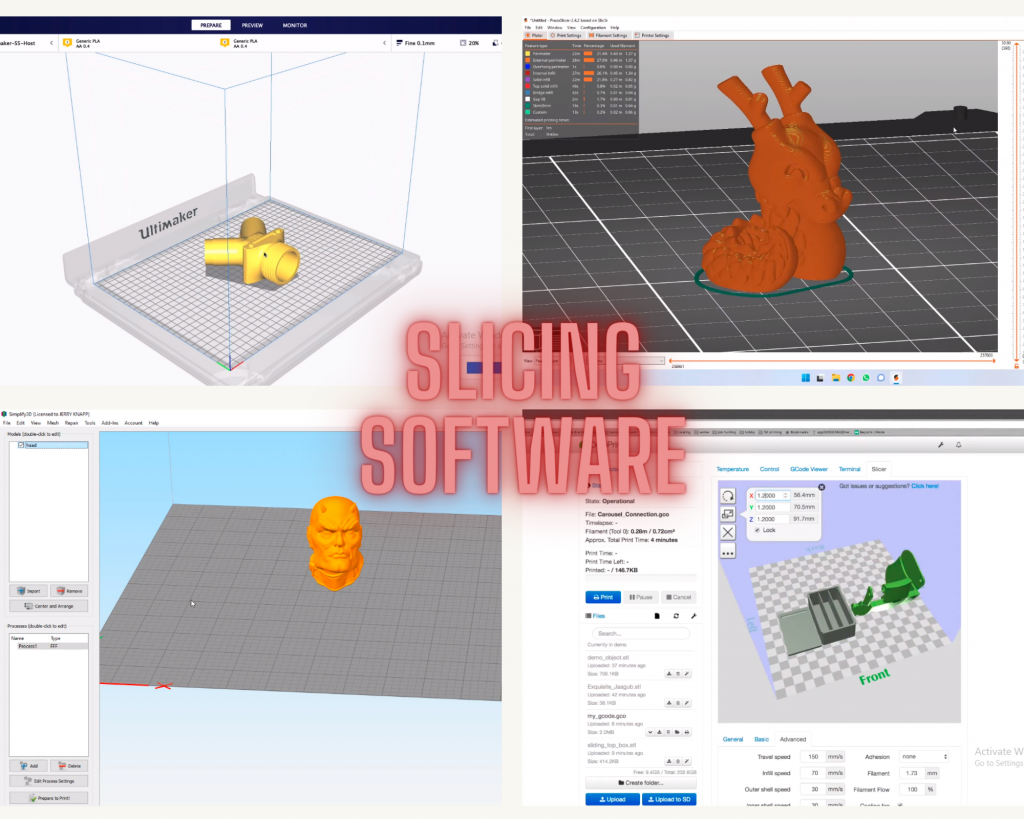
You probably already have a 3D slicer for your Ender 3 (Pro/V2) downloaded, but if not, make sure to install one on your PC.
I like to use Ultimaker Cura, as it offers the most print settings and it also allows you to communicate with your printer via a USB cable.
Other options include PrusaSlicer, Simplify3D, OctoPrint, and more.
4. Add the Ender to Cura
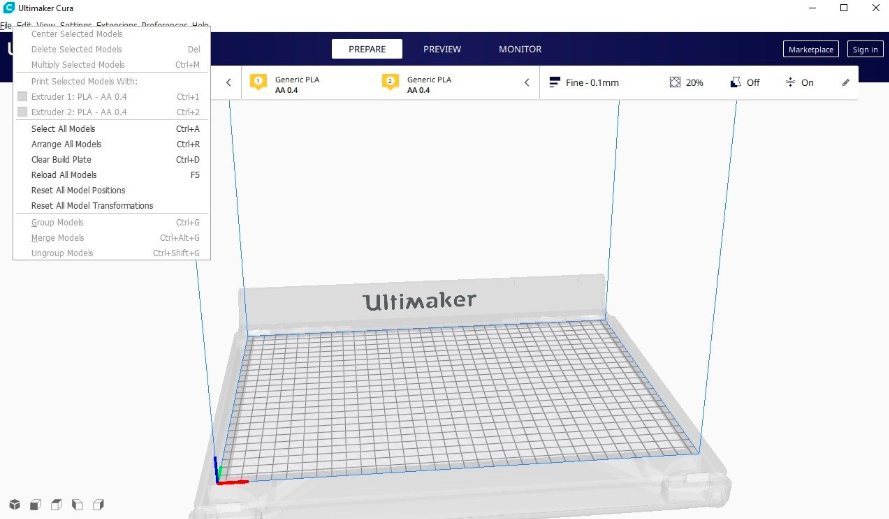
If you’re using Cura, which I recommend, make sure to add the Ender 3 (Pro/V2) to the slicing platform. This will create a profile (assortment of settings) for the printer so Cura what hardware you’re using.
To add the Ender 3 to Cura, start by clicking “Settings”, then “Printer”, and “Add Printer”. When the pop-up screen appears, select “Add a non-networked printer” and then go into the “Creality” selection and choose “Ender 3”. It doesn’t matter what version of the Ender 3 you choose, as the hardware is all the same from Cura’s POV.
5. Test Print
Once connected, upload a 3D model to Cura and slice it. There should be a “Print via USB” option in the bottom right corner of the interface. Click this to start your print, as seen in the image below:
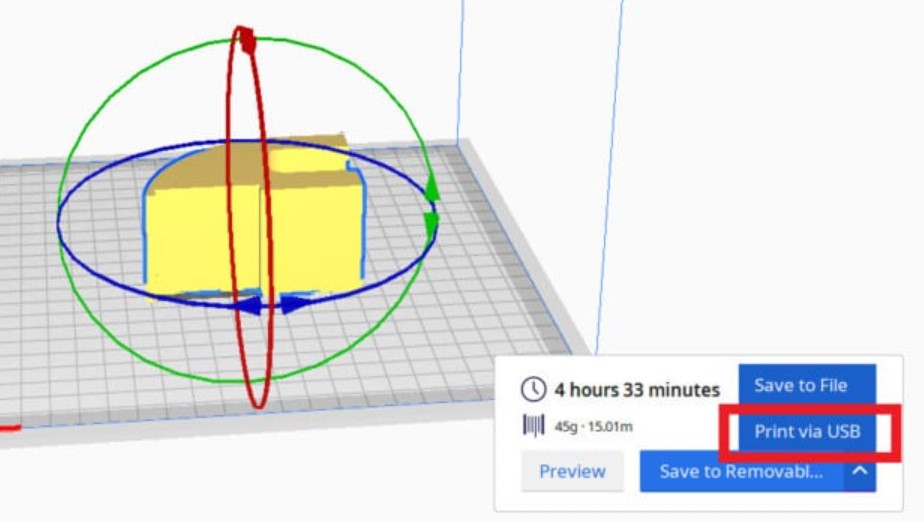
You can also go in the “Monitor” tab of Cura to find more control options. Moreover, you’ll be able to control your printer’s temperatures and movement.
And that’s it! You’ve successfully connected your Ender 3 to your PC!
What 3D Software to Use?
While I focused on Cura in the connection process, it’s not the only software you can use. I’ve listed the most popular software options below:
Pronterface
Pronterface, sometimes called Printrun, is a G-code terminal developed specifically for 3D printers and CNC machines. As a G-code terminal, Pronterface’s main purpose is to allow you to manually send G-code commands to your machine to tell the machine to perform specific actions like moving to its home position, PID tuning the hot end, or heating the nozzle.
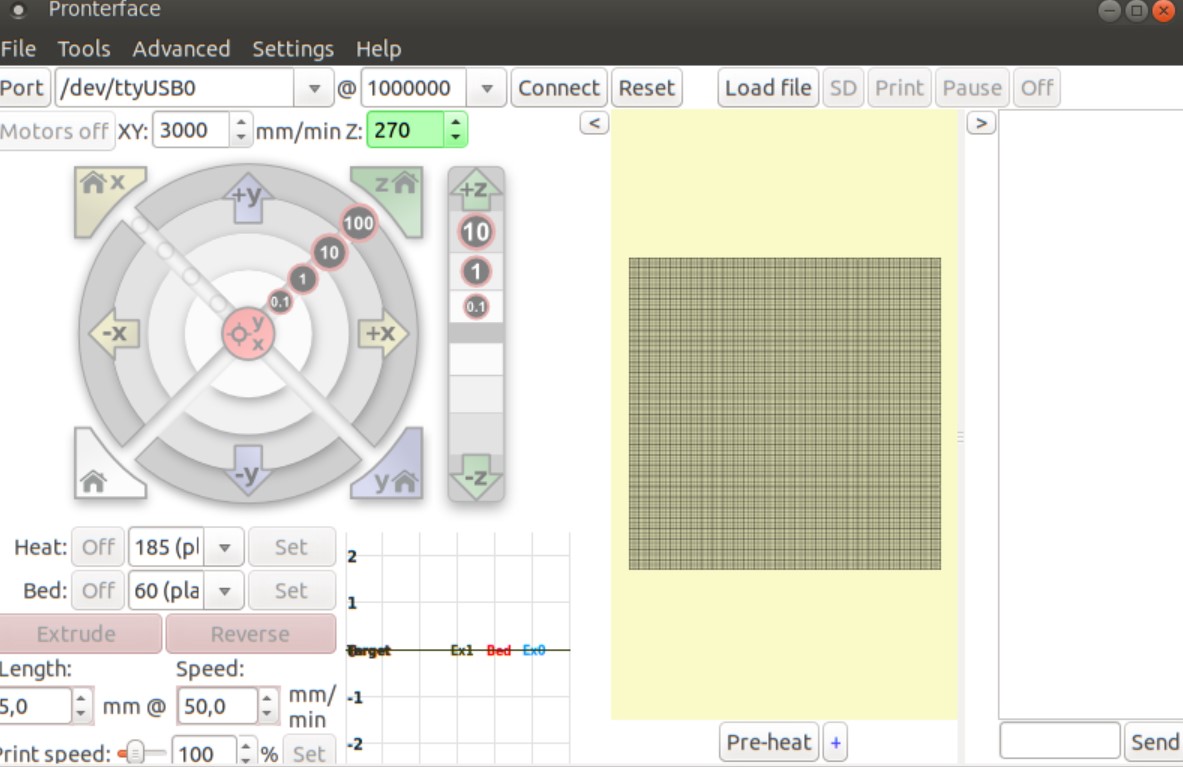
You can send G-code commands to your Ender 3 through Pronterface with a USB connection by selecting the right COM USB port and then typing in the command and clicking enter. Pronterface also provides some other relevant controls, like a joystick for easily telling different parts on your printer to move certain distances. There are even temperature inputs for the hot end and heated bed.
Cura
As we mentioned, Ultimaker Cura is a 3D slicer software, meaning it can turn a 3D model file (e.g. STL) into a set of G-code commands based on given parameters and settings. On top of its slicing capabilities, you can use the software to upload and start 3D prints on your Ender 3 over a USB connection.
And, in the “Monitor” tab on Cura, you’ll find an easy-to-use control panel for your USB-connected printer. There are buttons for moving the different axes of the printer and input boxes for setting the nozzle and bed temperature.
There’s even a firmware flashing feature on Cura, though it doesn’t usually work on the Ender 3.
OctoPrint
OctoPrint is an online remote control interface for 3D printers that runs off of a host computer, like a Raspberry Pi board, and is connected to a machine via a USB cable.
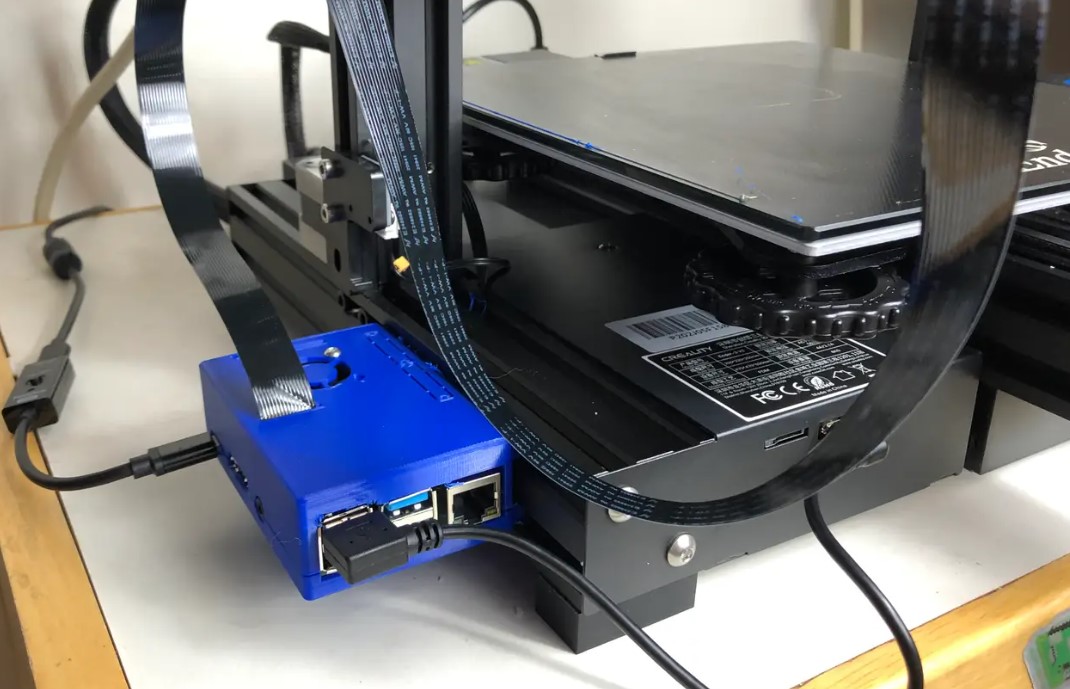
While OctoPrint is usually used to control a 3D printer remotely, you can also utilize its features to control your printer directly. Moreover, you can use the built-in G-code terminal and other control features on the online OctoPrint interface to control your connected Ender 3.
Disadvantages of Connecting Your Ender 3 to PC
There aren’t really many disadvantages of connecting your Ender 3 (Pro/V2) to your PC, but we can name a few.
First, a PC connection to your Ender 3 isn’t as stable as uploading a print using a MicroSD card. That’s because if your PC crashes, an ongoing print job will stop. On the other hand, an SD card can’t shut down or crash, making it a much more reliable option.
Additionally, connecting your Ender 3 to your PC doesn’t allow you to remotely control the printer as an OctoPrint server would. That’s because your PC needs a physical USB connection to your computer, whereas an OctoPrint server controls your 3D printer by offering an online server interface.
But besides these two fairly minuscule downsides, connecting your PC to your Ender 3 (Pro/V2) is a great idea.
Conclusion
If you hate dealing with a MicroSD card, whether because you lose it constantly or you just don’t like how you have to move it back and forth between your computer and 3D printer, then you should connect your printer to your PC!
Connecting an Ender 3 to a computer is super easy. All you’ve got to do is find the right USB cable, and plug it into your printer’s motherboard and your computer. And then you can open up a compatible software, such as Cura or Pronterface, and control your printer in many ways, whether it’s starting a print, PID tuning the hot end, or setting a temperature.
Hope this helps!