1.2K
показов
1.9K
открытий
Сегодня покажу как поставить WSL (Windows Subsystem for Linux) на Windows 11
В этой статье вы узнаете:
- Что такое WSL и для чего она нужна
- Гайд по установке WSL
- Настройка компилятора
- Что делать, если WSL потребляет избыточное количество оперативной памяти
Что такое WSL и для чего она нужна
WSL (Windows Subsystem for Linux) — это среда выполнения Linux, предоставляемая операционной системой Windows. WSL позволяет запускать исполняемые файлы Linux напрямую в Windows без необходимости установки отдельной виртуальной машины или перезагрузки компьютера.
WSL обеспечивает совместимость с ядром Linux, что позволяет пользователям запускать большинство командной строки и приложений Linux непосредственно в Windows. Оно включает в себя поддержку большинства дистрибутивов Linux, таких как Ubuntu, Debian, Fedora и других, и предлагает доступ к огромному количеству программ и утилит, которые разработаны для Linux.
Теперь перейдём к гайду
Гайд по установке WSL
Открываем PowerShell или Terminal от имени администратора
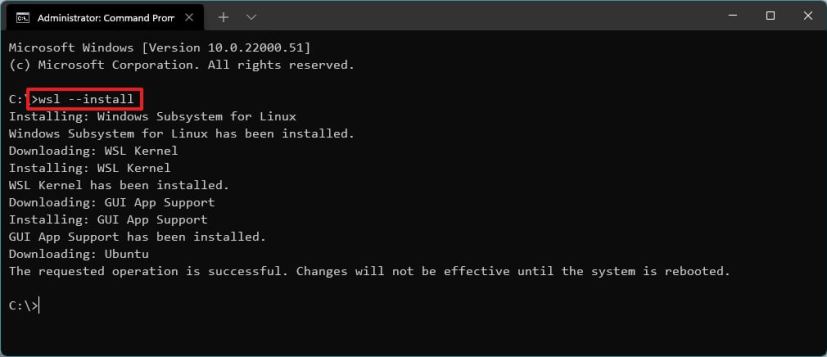
Вводим следующую команду: wsl —install
Ждём
По завершении установки перезагружаем наш ПК.
Мне нравится Ubuntu, поэтому я не буду её менять, но если ты хочешь поменять дистрибутив, то вот ссылка на инструкцию.
Теперь после установки WSL необходимо создать учетную запись пользователя и пароль для установленного дистрибутива Linux (в моём случаи речь идёт про Ubuntu):
На случай, если что-то пошло не так на этапе создания учётной записи вот мини-туториал как это можно исправить.
Важный нюанс: Windows не выполняет автоматическую установку обновлений или обновление дистрибутивов Linux. Это задача, выполнение которой большинство пользователей Linux предпочитают контролировать самостоятельно. Поэтому обновим нашу подсистему с помощью этой команды: sudo apt update && sudo apt upgrade
Настройка компилятора
Я использую WSL, чтобы компилировать программы на языке С, поэтому покажу команды для установки компилятора.
По очереди:
sudo apt-get update
sudo apt-get install cmake gcc clang gdb build-essential
sudo apt-get install valgrind
Важный момент: Проверим, установился ли у нас компилятор, должен появится номер: gcc —version
Что делать, если WSL потребляет избыточное количество оперативной памяти
Бонусом, я покажу, как снизить потребление оперативной памяти нашей подсистемой:
Есть два пути
Путь первый:
Открываем командную строку от администратора и вставить команду
wsl —shutdown, эта команда завершит процесс VmmemWSL.
Чтобы легко открыть командную строку можно зажать кнопки Win + X > пункт PowerShell (Администратор) > команда start cmd > нажимаем Enter.
Путь второй:
Можно также ограничить ресурсы Vmmem путем создания файла %UserProfile%\.wslconfig, внутри которого прописать:
[wsl2]
memory=2GB # Ограничиваем память для WSL2 VM.processors=5 # Ограничиваем количество процессов для WSL2 VM.
Чтобы создать файл с названием .wslconfig — нужно открыть блокнот Win + R > notepad > вставить содержимое > Сохранить как > в Тип файла указать Все файлы, после указать название и сохранить.
Кстати говоря, в этом файлике можете попробовать поставить значение memory равное 1, может ещё меньше будет))
На этом у меня всё, надеюсь моя статья помогла тебе решить твою проблему))
Благодарю за прочтение!
Microsoft announced Windows 11 on June 24. The software giant subsequently released the OS to members of the Windows Insider program, and it can currently be tested by those enrolled in the Dev and Beta channels. While many welcomed the new UI changes, some were still skeptical of several inconsistencies that continue to plague Windows in general.
However, one neat feature of Windows 11 is the improved Windows Subsystem for Linux (WSL), which can now handle graphics and audio natively. In this article, we take a look at what’s new in WSL in Windows 11 and how to get started with it.
More often than not, developers find themselves switching between the familiar interface of Windows and the ease of command line-based development toolchains in Linux. Also, those who deal with large data find a good number of open source tools natively developed for Linux. The Windows Subsystem for Linux, or WSL for short, enables developers to continue using Windows as their primary OS while giving access to native Linux binaries.
Users, therefore, don’t have to worry about the emulation overhead of running virtual machines or take the pains of configuring a dual-boot setup. While Cygwin does provide a POSIX compatibility layer for running Unix-like commands, it requires recompilation of those commands and as such has limited applicability. With WSL, Windows users can directly invoke the Linux shell just like any other program and run native Linux binaries.
Starting with Windows 10 1903, Microsoft introduced a new version of WSL called WSL 2 that offers tighter integration with the Windows filesystem, fast boot times, faster disk reads, and a fully functioning Linux kernel. Now with Windows 11, Microsoft is even adding GUI and real-time audio support.
Installing WSL in Windows 11
Installing the Windows Subsystem for Linux requires some prerequisites to be taken care of. Since WSL 2 uses an actual virtual machine, your CPU needs to support virtualization. While this shouldn’t be a problem with most modern CPUs from Intel and AMD powering desktops and laptops, this feature is generally turned off in the BIOS/UEFI of the computer.
Boot into the BIOS/UEFI interface of your PC (usually, this involves pressing DEL or F2 key during power-on; refer to your computer’s user guide for more information). Once inside the BIOS, search for Intel Virtualization Technology or AMD Secure Virtual Machine (also indicated as SVM) depending on your CPU and enable it. Save changes and restart the PC.
Upgrading from WSL 1 to WSL 2
Unless you are upgrading from a previous version of Windows with WSL 1, WSL 2 is used by default in all recent versions of Windows 10 (1903 and above) and Windows 11. Using the new GUI, audio, and filesystem enhancements requires a mandatory upgrade to WSL 2.
Follow the steps mentioned below to perform an in-place upgrade from WSL 1 to WSL 2:
1. Type the following in an elevated command prompt, Windows Terminal, or PowerShell.
wsl --set-version <distro-name> 22. Make sure to enter the exact name of the distro. If in doubt, just type:
wsl -l -v 3. This command lists the installed Linux distros, their current state, and the WSL version they are using. Use the name listed here in the previous command to convert a WSL 1 instance to WSL 2.
Enabling WSL in Windows 11
If this is the first time you are using WSL on Windows 11, you will be automatically offered a WSL 2 environment. All you need to do is to ensure CPU virtualization is enabled in the BIOS and WSL features are installed in your environment.
1. To enable WSL, click on the Start button.
2. Type “Turn Windows features on or off”, and in the dialog box enable Windows Subsystem for Linux, Windows Hypervisor Platform, and Virtual Machine Platform.
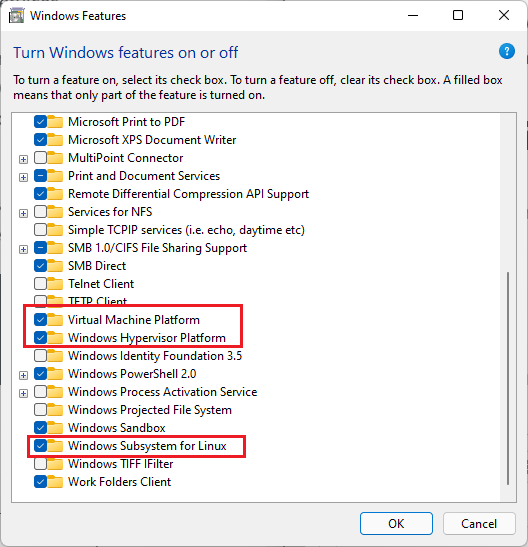
3. Click on Ok and restart the PC.
The best part about WSL 2 is that most kernel-level features are directly supplied by Windows Update. Your PC may automatically offer the WSL 2 kernel update. If not, just go to the Settings app, click on Windows Update, and click Check for updates to download the latest kernel that enables WSLg (short for WSL GUI) functionality.
At this point, note that you need to have the latest graphics drivers from Intel, NVIDIA, or AMD depending on your primary GPU adapter in order to get full GPU acceleration. You can use the beta drivers for your corresponding GPU or just install the latest public versions. Now that the prerequisites are taken care of, you are all set to install a Linux distro on your Windows 11 machine.
Installing a Linux distro in WSL 2 on Windows 11
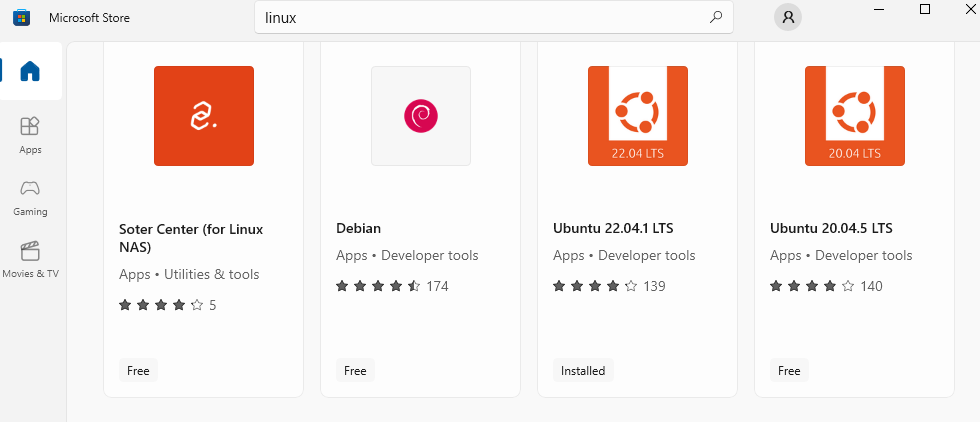
The easiest way to get Linux up and running on Windows 11 is to just go to the Microsoft Store and search for a distro of your choice. Currently available options include Ubuntu (16.04, 18.04, and 20.04), Kali Linux, SUSE Linux Enterprise Server, openSUSE leap, Fedora Remix for WSL, and Debian.
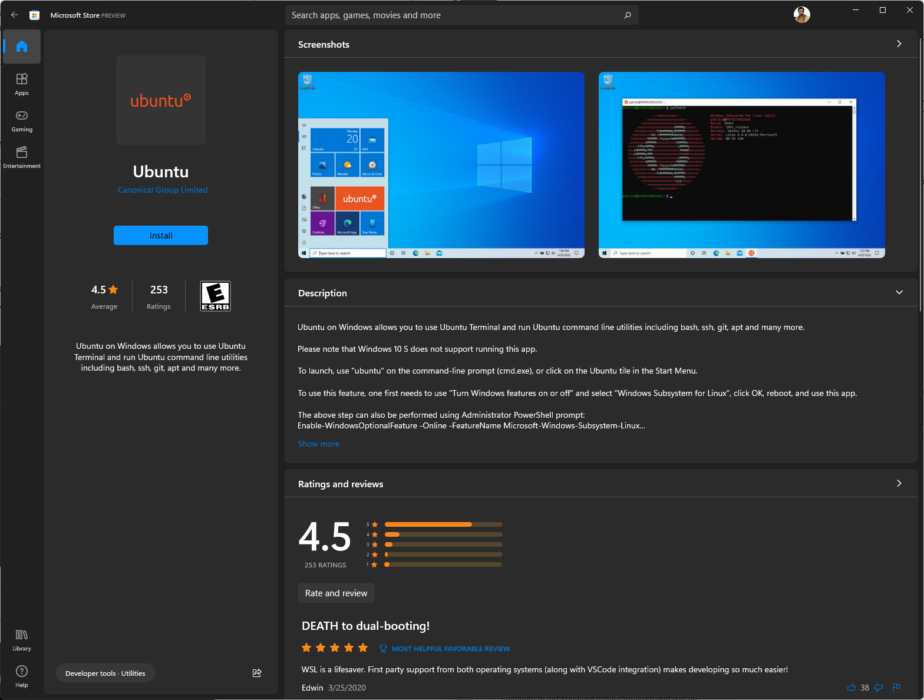
While the Microsoft Store allows for easy download and installation of these distros, the choices are currently limited. However, with WSL 2, it is possible to create and sideload your own distribution by obtaining the corresponding .tar file. For this article, we will use Ubuntu since it is very popular and there are excellent resources available online if you ever get stuck at a particular command or operation.
Some organizations or domain-joined PCs may have limited access to the Microsoft Store. In such cases, you can directly download the install packages from Microsoft. Follow the steps below to install the distro:
1. You can double-click the installer or use the below PowerShell command from the installer folder.
Add-AppxPackage .\distro_name.appx2. Once your distro of choice has been installed, it should pop up instantly on the Start Menu.
3. Just click on the icon to start an installation instance of Ubuntu.
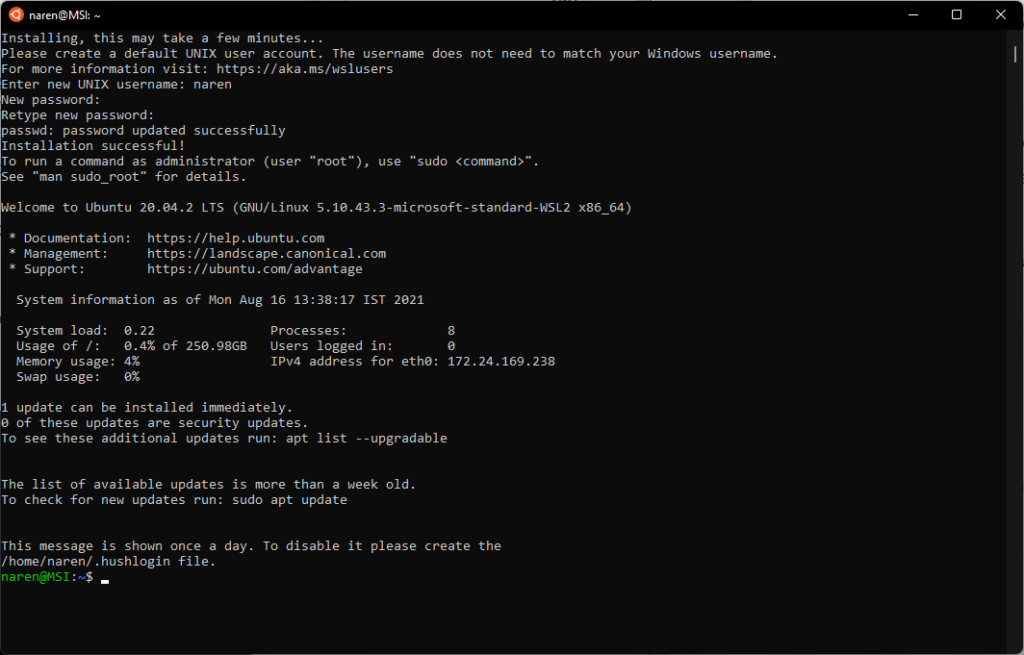
4. After a few seconds, you will be prompted to create a user account and password. If for some reason, the installer does not prompt you for a user account or password, it will directly log you in as root.
Remember that operating with root privileges is a bad security practice. There is no root password assigned by default, which makes it all the more vulnerable. It always helps to first assign a root password and then create a regular user account. Here’s how you can do it:
1. To assign a new root password, use the command:
sudo passwd root2. Next, enter and confirm the new root password. Be sure to note it down safely. To create a regular user account, which can then be used for root access as and when needed, type:
sudo adduser <username>3. Ubuntu will then ask to enter and confirm your password along with some other information such as your Full Name and Phone (this is optional).
4. This creates your dedicated /home directory and shows your username with a $ sign at the bash shell prompt.
The WSL 2 Ubuntu instance is now ready for use.
Update your WSL apps
At this point, we are done with installing Ubuntu and creating a user account and password. Before going on to further steps, it helps to do a quick update check and install the latest packages available for your distro version.
This ensures all your inbox packages are up to date and that you are using the latest features and security improvements. Follow the steps:
1. Enter the following commands to fetch new versions:
sudo apt-get update

sudo apt-get upgrade
2. At the bash prompt, the first time you run sudo, it asks you to enter your password, which should be valid for at least 15 minutes to run successive sudo commands.
Do note that apt-get upgrade will only refer to the repositories defined in /etc/apt/sources/list or /etc/apt/sources.list.d/ and upgrades accordingly.
3. For a more seamless update process, also run:
sudo apt-get dist-upgradeThis command can intelligently add or remove packages to ensure there are no redundancies in the system.
Check and upgrade Linux distro version
Generally, the Microsoft Store offers the latest long-term service (LTS) version of Ubuntu by default. It is recommended to use the LTS versions for maximum stability. You can check for new OS versions by running:
sudo do-release-upgradeHowever, ensure that the existing installation is up to date by first running the update and upgrade commands as described above. You can check your OS version by typing:
lsb_release -a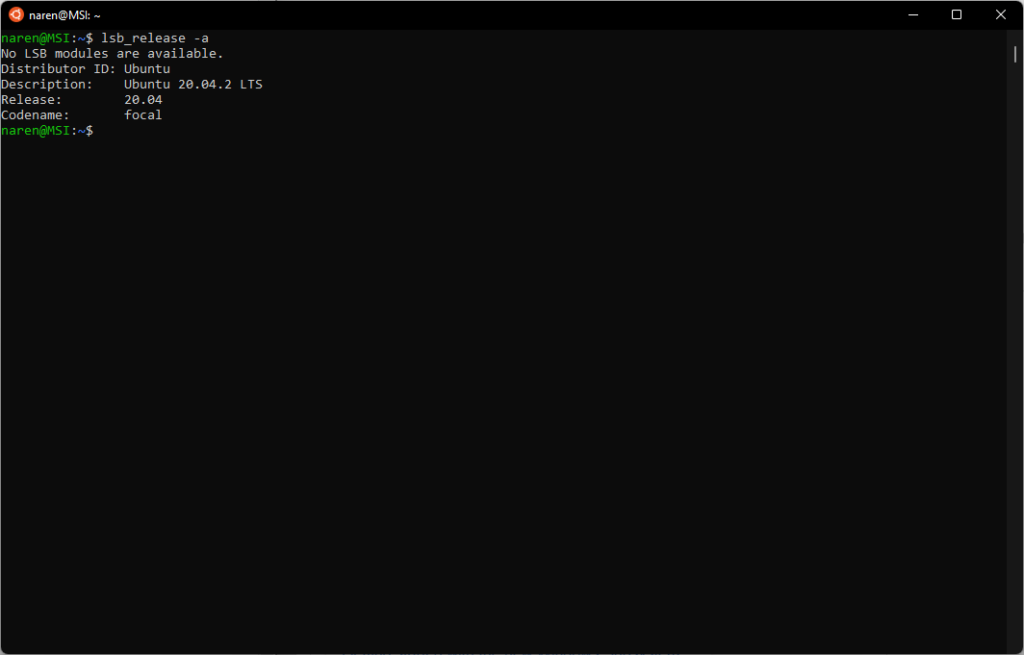
Do note that you can also get more information about any command by typing:
man <command name>Accessing Linux files in Windows 11 and vice-versa
Now that we have successfully installed and configured Ubuntu in Windows 11’s WSL 2, it helps to know how to seamlessly move between Linux and Windows files. In Linux, NTFS and other file systems can be mounted onto a dedicated mount directory.
One neat approach with WSL is that you can directly invoke a Linux terminal from a Windows folder and have the folder already mounted for you. This is made possible via a filesystem plugin called DrvFs that WSL uses to enable interop between the Linux instance and the Windows filesystem.
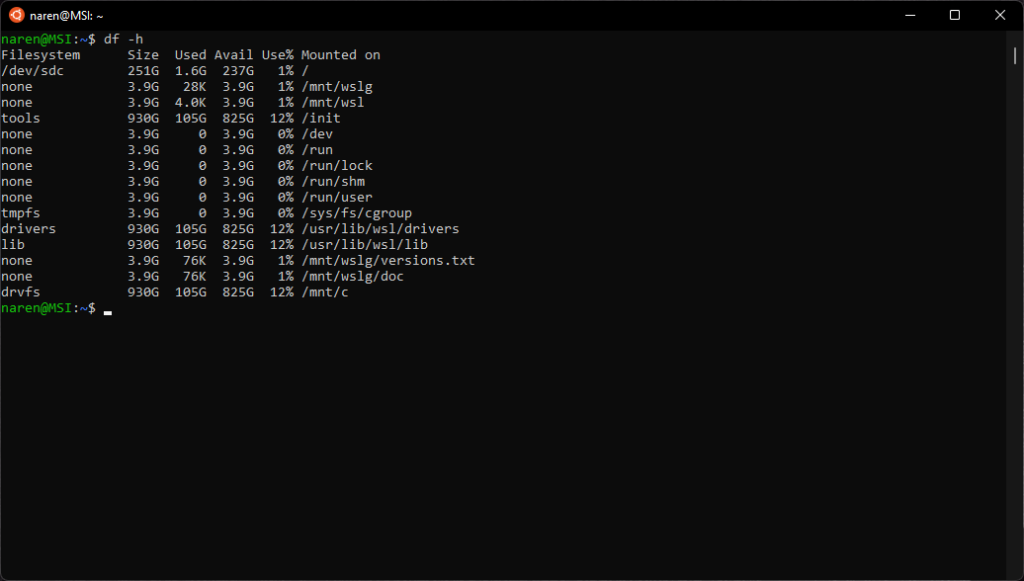
DrvFs automounts fixed disks such as HDDs and SSDs and makes them available for immediate use. The C drive is mounted on /mnt/c, D drive on /mnt/d, and so on.
1. You can verify this by running the df -h command to list all disks and their mount points. In this example, we have a single C drive, which is mounted on /mnt/c via DrvFs
2. To switch to a Windows drive onto WSL, type the following command in the command prompt and hit enter.
cd /mnt/c #substitute c with the corresponding drive letter as needed3. Just like regular Linux, you can also mount external storage devices by creating a mount point. Use the following command
sudo mkdir /media/<dir name> #where <dir name> can be any directory name you wish to mount onto.4. Then mount a drive or partition to this directory.
sudo mount /dev/<deviceID> /media/<dir name>5. To view the contents of the mounted drive, first switch to it using the command.
cd /media/<dir name>6. Lastly, list the contents using the command.
ls -lsSince the whole point of WSL is to have seamless interop between Linux and Windows, it is also possible to view Linux files directly under Windows and edit them with Windows programs.
Windows sees WSL as a PC on the network and mounts Linux as a network share to ensure file permissions are properly maintained as users switch between both operating systems. There are several ways to access WSL files from Windows.
Ways to access WSL Files from Windows
1. The easiest way is to simply look at the left-hand panel of File Explorer for an entry named “Linux”.
2. Clicking on that will list your installed distros as folders. Click the corresponding distro folder to access all Linux directories in that distro.
3. From there, you can create your own files and directories just like how you normally do in Windows.
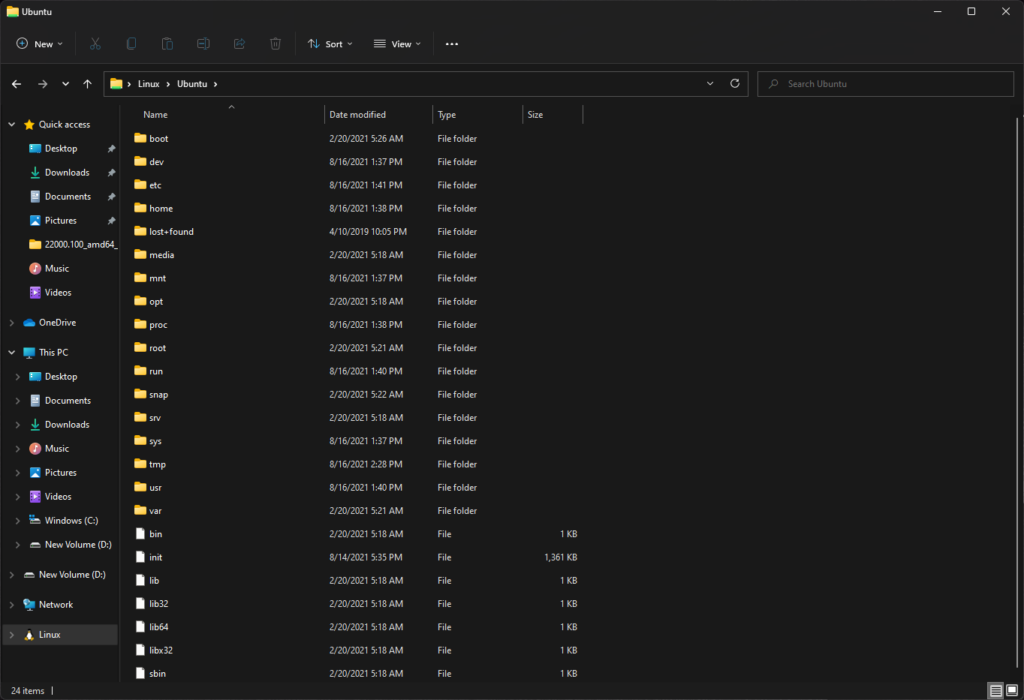
4. The above directory listing can also be reached by typing \\wsl$ in any File Explorer or Run dialog box in Windows.
5. If endless navigation is not your cup of tea, you can also type explorer.exe from any Linux directory in WSL. This will directly open the Windows File Explorer in the current working Linux directory.
In this article, we have familiarized ourselves with WSL 2 and how to successfully install and update a Linux instance within WSL 2. We have also seen how to seamlessly navigate with filesystems across both Windows and Linux. In the upcoming articles, we will look into installing graphics and audio apps and see how well they work in WSLg in Windows 11.
If you have something to add, drop your thoughts in the comments below.

Vaidyanathan is a cell and molecular biologist with a passion for all things tech. His interests include PC hardware, operating systems, smartphones, and gaming. When not writing about the latest tech developments or doing cutting-edge research in oncology, you can find him unwinding to some soulful music or trying his luck in a multiplayer arena.
- To install WSL on Windows 11, open PowerShell or Command Prompt (admin), run the “wsl –install” command, and restart the computer.
- The command will install WSL alongside the Ubuntu distribution.
- Or, to install WSL with a specific distro, run the “wsl –install -d DISTRO-NAME” command.
- Or, to install WSL from Microsoft Store, enable the “Virtual Machine Platform” feature and then download the WSL app from the Store.
On Windows 11, Microsoft simplified the installation process of the Windows Subsystem for Linux 2 (WSL) to only one command to download and install all the required components, which includes the virtual machine platform and Linux GUI apps.
In addition, the command also installs the latest Ubuntu distro by default. If you prefer another distribution of Linux, you can append an option in the command to install any of the supported distros. Alongside the new quick and easy process, you will also find another way to make it easier to update the kernel with only one command.
This guide will teach you the easy steps to install the WSL platform on your computer. In addition, we will outline the steps to update the Linux kernel on Windows 11.
- Install WSL on Windows 11
- Install WSL with specific distro on Windows 11
- Update WSL kernel on Windows 11
- Install WSL from Microsoft Store
To install WSL (Windows Subsystem for Linux) on Windows 11 from Command Prompt, use these steps:
-
Open Start on Windows 11.
-
Search for Command Prompt (or PowerShell), right-click the top result and select the Run as administrator option.
-
Type the following command to install the WSL on Windows 11 and press Enter:
wsl --install

-
Restart your computer to finish the WSL installation on Windows 11.
-
Continue with the Linux distro setup as necessary.
After you complete the steps, the required Linux components will install automatically on Windows 11 and the latest version of the Ubuntu Linux distribution.
Install WSL with specific distro on Windows 11
If you prefer another flavor of Linux, the WSL2 command includes an option to view and select a different distro.
To install WSL with a specific distro on Windows 11, use these steps:
-
Open Start.
-
Search for Command Prompt, right-click the top result, and select the Run as administrator option.
-
Type the following command to view a list of available WSL distros you can install on Windows 11 and press Enter:
wsl --list --online
Quick note: You can install Ubuntu, Debian, Kali Linux, openSUSE, and SUSE Linux Enterprise Server.
-
Type the following command to install the WSL with a specific distro on Windows 11 and press Enter:
wsl --install -d DISTRO-NAME

In the command, remember to replace “DISTRO-NAME” with the name of the distro you want to install, such as Debian.
-
Restart your computer to finish the WSL installation on Windows 11.
-
Continue with the Linux distro setup as necessary.

Once you complete the steps, the Windows Subsystem for Linux 2 components will install along with the distro of Linux you specified.
Update WSL kernel on Windows 11
To update the WSL kernel from Command Prompt, use these steps:
-
Open Start.
-
Search for Command Prompt, right-click the top result, and select the Run as administrator option.
-
Type the following command to update the WSL kernel on Windows 11 and press Enter:
wsl --update


After you complete the steps, if an update is available, it will download and install on your computer.
Install WSL from Microsoft Store
You can also download all the components wrapped into an app from the Microsoft Store. The benefit of using this approach is that feature will run isolated from Windows 11, and updates will be available through the Microsoft Store without waiting for the next version of the operating system to install the newest version.
To install WSL from the Microsoft Store, use these steps:
1. Enable Virtual Machine Platform
-
Open Start.
-
Search for Turn Windows Features on or off and click the top result to open the app.
-
Check the Virtual Machine Platform option.

-
Click the OK button.
-
Click the Restart button.

After completing the steps, you can download the app from the Microsoft Store.
2. Install Windows Subsystem for Linux app
-
Open the Windows Subsystem for Linux store page.
-
Click the Get button.
-
Click the Open button.
-
Click the Get button again.


3. Install Linux distro
-
Open Microsoft Store app.
-
Search for the Linux distro. For example, Debian.
-
Click the Get button.

-
Click the Open button.

Once you complete the steps, WSL will install on Windows 11, including the support for Linux GUI apps and the Linux distribution.
WSL or Windows Subsystem for Linux helps you run Linux binary executables on Windows machines. And, much like on Windows 10, the support for WSL on Windows 11 is still there.
Yes, you can also run Linux on your Windows machine as a virtual machine but WSL or WSL 2 is a better solution in the following ways:
- Lighter than a virtual machine and hence consumes lesser resources
- Natively integrated and support by the Windows operating system
- Easy and quick to setup and requires no 3rd-party softwares
- Boosts the development speed during cross device projects
However, using WSL is not recommended in the case of developing a GUI-based application as it doesn’t support GUI desktop apps.
Installing WSL on Windows 11
There are 2 ways to install WSL on Windows 11:
- Without command line (the non-techie way)
- Using command line (the techie way)
Let’s get through both of them…
Without Command Line
If you’re not familiar with the command line, don’t worry, you won’t need it in this way. Also, it’s the easiest way to install WSL on your Windows 11 computer.
Step 1: Enable Windows Subsystem for Linux
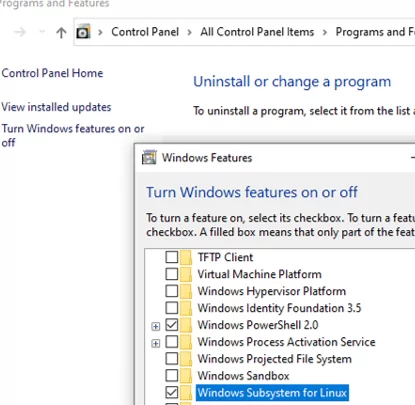
First of all, open the Windows search and search for the “Turn Windows features on or off” app (like shown in the screenshot below) and click on it to open.

After the app gets opened, scroll down till you see an option called Windows Subsystem for Linux — mark it checked. ☑️
(Since you didn’t have WSL enabled on your machine yet, it should be marked unchecked from earlier.)
After it’s checked, click on the OK button.
📢 After that, it’s very important to restart your computer (this may take a bit more time to restart than usual).
Step 2: Install your favorite Linux distro
You will have WSL enabled on your system as soon as the computer wakes after the restart. Now, it’s time to install the Linux distro of your choice.

First, open Microsoft Store and search for the Linux distro that you’re looking for and install. In my case, I will be installing Ubuntu 20.04 LTS as shown in the above screenshot.
Click on the Install button and it’ll take a few minutes to complete the installation process. And, as soon as it completes, your Windows 11 machine is now running Linux inside of it.
📢 You will have to again restart/reboot your computer after the installation gets finished.
Let’s see the other method to install WSL on Windows 11:
Using Command Line
If you understand the terminal commands, probably it’ll be easier for you to install WSL on your system.
Step 1: Install WSL from Windows Terminal
Right-click on the Start button and open Windows Terminal (Admin) as shown in the screenshot below.

After the terminal opens, run the following command to install WSL on the system.
wsl --installThe process will take a few minutes and you will have to restart your computer after that.
Step 2: Install your favorite distro
Now, it’s time to install the Linux distro of your choice.
Run the following command to see a list of all the available distros to install (see the below screenshot).
wsl -l -o
Make sure what distro you want to install and note down its exact Name from the left-side NAME column. Replace the NAME with the name of the distro that you want to install in the command below.
wsl --install -d NAMEFor example, if you have to install Ubuntu 20.04 then the command would be:
wsl --install -d Ubuntu-20.04Or, to install Debian, the command would be:
wsl --install -d DebianIt’ll take some time to finish and once more, you will have to reboot your computer after the installation process gets completed.
📢 Please note that you can also install multiple Linux distros on the WSL system.
There are 2 ways to launch the installed Linux distro on your machine:
☑️ Launch from the start menu (see the below screenshot)
When you start for the first time, you will have to provide a UNIX username and password. And, once the initial setup is complete, you will be able to use it.

☑️ Start directly from Windows Terminal (see the below screenshot)
Just click on the little dropdown arrow beside the plus button to see the option.

📢 Please note that you might not see the option for the installed Linux distro in the Windows Terminal dropdown. It will start appearing only after you complete the initial setup by launching the distro from the Start menu as explained in the previous step.
So that’s it. You can now start using the installed Linux distro on your newly set up WSL on Windows 11.
Related Topics
- How to Install Multiple Linux Distros on WSL on Windows 11
- Guide to Set Up Windows 11 for Blogging
- How to Take Screenshots in Windows 11
- Left-align taskbar in Windows 11
Frequently asked questions
How to solve the error 0x80370102 while launching the Linux distro?

After you try to run the installed Linux distro (Ubuntu or any other), you might get an error 0x80370102 saying “The Virtual machine could not be started because a required feature is not installed”.
There is a simple way to resolve that error, open the “Turn Windows features on or off” app by searching for it in the Start menu and mark “Virtual Machine Platform” as checked. Hit OK and you will have to restart your computer to apply the changes.
The error should get resolved by now.
How to resolve error 0x800701bc while starting the installed Linux distro?
Some users have also reported the error 0x800701bc saying “WSL 2 requires an update to its kernel component”. And, this solution seems to be working for some of the people.
However, it’s not confirmed yet. So, please be sure before applying the mentioned fix.
That’s it.
If you have a related query, feel free to let us know in the comments below.
Windows Subsystem for Linux (WSL) is a Windows feature that allows developers or testers to run native Linux apps, write scripts, and run bash commands directly from Windows. Starting with Windows 10 (2004) WSL 2 is available which uses a full-featured Linux kernel. It allows running apps or Docker containers, has a high load speed, consumes fewer resources, and supports background management, and kernel updates. Thus, you can run ELF64 apps able to access the Windows file system without using third-party ports (like Cygwin).
A Linux kernel (v4.19) image in Windows 10 is a lightweight virtual machine. To run it, you don’t need to install a full Hyper-V role. Linux system calls are translated into Windows calls on the fly without using any emulator (unlike WSL1).
By default, WSL is disabled. To enable it, open Start -> Control Panel -> All Control Panel Items -> Programs and Features -> Turn Windows features on or off, check Windows Subsystem for Linux, click OK, and restart your computer.
You can enable WSL feature on Windows 10/11 using DISM:
dism.exe /online /enable-feature /featurename:VirtualMachinePlatform /all /norestart
 dism.exe /online /enable-feature /featurename:Microsoft-Windows-Subsystem-Linux /all /norestart
or PowerShell:
Enable-WindowsOptionalFeature -Online -FeatureName Microsoft-Windows-Subsystem-Linux
 Enable-WindowsOptionalFeature -Online -FeatureName VirtualMachinePlatform
To install WSL in Windows Server 2022 or 2004+ Semi-Annual Channel (SAC), use the Install-WindowsFeature cmdlet:
Install-WindowsFeature -Name Microsoft-Windows-Subsystem-Linux
Then you need to restart your computer.
Intel VT (Intel Virtualization Technology) or AMD-V support must be enabled in the BIOS/UEFI settings of your computer.
Then update WSL to version 2. To do it, go to https://docs.microsoft.com/windows/wsl/wsl2-kernel, download wsl_update_x64.msi, and install it.
To make WSL2 a default architecture for new Linux distros, run the following command:
wsl --set-default-version 2
Then open Microsoft Store and enter “Linux” in the search bar. Select the distro you need from the list. Ubuntu, Debian, Kali Linux, SUSE Linux Enterprise Server15, openSUSE Leap 15-1, Fedora Remix for WSL, and others are available. In our example, we will use Ubuntu 20.04 LTS. Then click Get.
If you have Microsoft Store disabled or you want to install a WSL on the Windows Server Core edition, you can download an Ubuntu WSL image using the Invoke-WebRequest PowerShell cmdlet:
Invoke-WebRequest https://aka.ms/wslubuntu2004 -OutFile ubuntu-2004.zip –UseBasicParsing
Extract the archive with PowerShell:
Expand-Archive -Path .\ubuntu-2004.zip
Run the installation of the Linux image using the Ubuntu.exe file.
You can also download the image as an appx file and install it using Add-AppxPackage cmdlet.
After the installation, you can view the installed WSL version using this command:
wsl --list –-verbose

If your Linux environment has version 1, you need to change it to WSL2:
wsl --set-version Ubuntu-20.04 2
A virtual hard disk file with the OS Linux Ubuntu 20.04 is located in the user profile: C:\Users\username\AppData\Local\Packages\CanonicalGroupLimited.Ubuntu20.04onWindows_79rhkp1fndgsc\LocalState.
After the distribution has been installed, its icon appears in the Start menu. To start Ubuntu, open the Start menu, click its icon and the Bash shell will open. You can also start WSL using the wsl command. The first time you run the image, you will be prompted to create a user and password. To run commands as root, use an additional key (prefix): sudo. WSL has common commands for Bash and CMD, and you should remember that Linux is case-sensitive.
You can run Linux commands in CMD. To do it, you must first specify WSL. For example, to view the list of files and folders in your Windows directory, run the following commands:
wsl
 ls /mnt
 ls/mnt/c

wsl ls ‑la /proc/cpuinfo
 wsl ls ‑la “/mnt/c/Program Files”
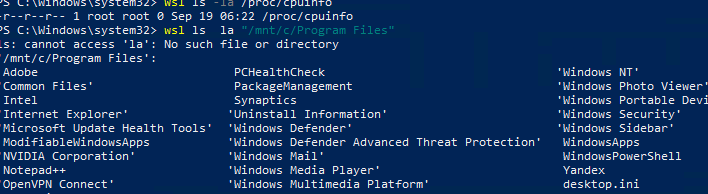
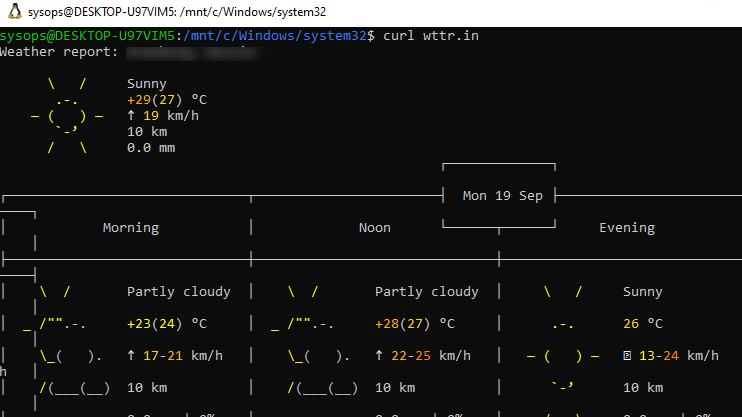
You can also open Windows Explorer using explorer.exe, Calculator (calc.exe), Notepad (notepad.exe), Paint (mspaint.exe), Calendar (cal), and Weather (curl wttr.in).
Another useful feature: you can open a WSL file from Windows using its system path. To do it, enter the file path in CMD:
notepad \\wsl$\Ubuntu-20.04\home\1122.txt
You can update the list of Ubuntu packages from the console using the following commands:
sudo apt-get update
 sudo apt-get upgrade
After the update, the …/LocalState folder will take up 1.5 GB.
From the Linux command prompt, you can view Windows files and folders, and access them. To make it more convenient to copy files, view directories and their contents, install Midnight Commander using the following command:
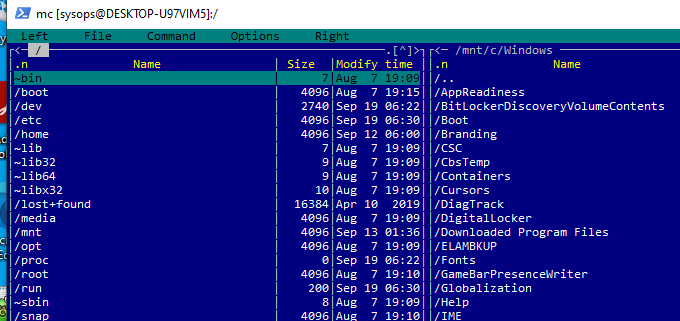
sudo apt-get install mc
You can run Midnight Commander both in Bash and in CMD. The screenshot below shows that both MC panels display the list of files from both OSs.
You can display network settings (an IP address) of your WSL subsystem:
ip addr | grep eth0
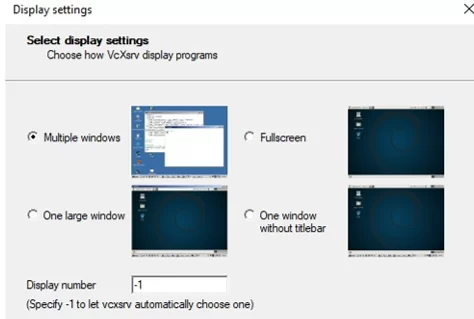
Apps with graphic interfaces don’t work in WSL. However, you can try to install and use them. To run graphic apps in Linux, download and install VcXsrv Windows X Server (https://sourceforge.net/projects/vcxsrv/) on Windows.
Use the apt-get package manager to install graphic apps. For example, a browser, a text editor, or anything else:
sudo apt-get install gedit
 sudo apt-get install firefox
 sudo apt-get install x11-app
Then create a file in the root directory:
cd /~
 vim .bash_login
Add the following line:
export DISPLAY=$(cat /etc/resolv.conf | grep nameserver | awk '{print $2}'):0
and save the file:
Esc -> :wr -> :q
Then you can run graphic Linux apps in WSL using the commands:
firefox
or
gedit
You can install multiple Linux distros on Windows 10/11 and run them simultaneously in different WSL spaces. You can display the list of all installed WSL distros in Windows with the command:
wsl --list –all
To stop all running Linux distributions and the WSL2 kernel, run the following command:
wsl --shutdown