Microsoft VBS, a feature of Windows 10, Windows Server 2016, and Windows Server 2019 operating systems, uses hardware and software virtualization to enhance system security by creating an isolated, hypervisor-restricted, specialized subsystem. Starting with vSphere 6.7, you can enable Microsoft virtualization-based security (VBS) on supported Windows guest operating systems.
For more detailed information about VBS, see the vSphere Security documentation.
With version 6.7, VMware added support for the Windows 10 virtualization-based security (VBS) feature to the vSphere suite. Microsoft’s VBS is also available for Windows Server 2016 operating systems (OSes).
Contents
- What is Virtualization-based Security (VBS)?
- What are the restrictions on VBS-enabled VMs?
- What are the vSphere requirements for VBS?
- How do you enable VBS?
- Final words
- Author
- Recent Posts

Vladan Seget is an independent consultant, professional blogger, vExpert 2009-2021, VCAP-DCA/DCD and MCSA. He has been working for over 20 years as a system engineer.
What is Virtualization-based Security (VBS)?
VBS uses hardware and software virtualization features to enhance Windows system security by creating an isolated, hypervisor-restricted, specialized subsystem.
Basically, Microsoft is using a Windows role (or component) called the Hyper-V role, which boots the OS. This hypervisor allows Microsoft to isolate some sensitive information in places that would normally be accessible to the OS. Here we can think of cached credentials and such things.
Most modern systems have a Trusted Platform Module (TPM) 2.0 device built into the hardware. However, someone had to do it in software. And this is the goal. To give you an idea, here is a screenshot from a VMware blog post.

Microsoft VBS
As you can see, the Windows 10 virtual machine (VM) has a hypervisor role active and has the credentials stored elsewhere.
What are the restrictions on VBS-enabled VMs?
VBS is only usable on Windows 10 and Windows Server 2016, and vSphere features exist that are not compatible with VBS:
- VMware Fault Tolerance (FT)
- vSphere PCI passthrough
- vSphere hot add for CPU or memory
What are the vSphere requirements for VBS?
As mentioned above, VBS is only available as of vSphere 6.7. The requirements for working with VBS are:
- A VM with virtual hardware 14
- Hardware virtualization and an input/output memory management unit (IOMMU) exposed to the VM
- Secure boot enabled
- EFI firmware
- 64-bit CPU
- Intel VT-d or AMD-Vi ARM64 system memory management units (SMMUs)
- TPM 2.0
How do you enable VBS?
In the VMware vSphere client, first connect to vSphere and select the VM for which you want to enable VBS.
- Shut down the VM and tick the Enable box next to Virtualization Based Security under VM Options.

Enabling VBS
Note: The VM has to be booting EFI (not BIOS) to satisfy the requirements. If you are creating new Windows 10 or Windows 2016 VMs, you should make sure you are selecting UEFI firmware before installing. After installing the system, it is pretty difficult to switch.
And once the VM is up and running, we’ll need to activate the Hyper-V role. You can do this through a simple command appwiz.cpl, which automatically brings up the window where we select Add/Remove Turn Windows features on and off. Once there, we can look for the Hyper-V section and check the box Hyper-V Hypervisor.

Enabling the Hyper V Hypervisor
If you want to add a Hyper-V role on Windows Server 2016, you’ll use the Add roles and features wizard within your Server Manager.
Once you’re done, it’ll ask you to reboot the system.
Let’s continue after the VM comes up.
- In the VM, open gpedit.msc and browse to:
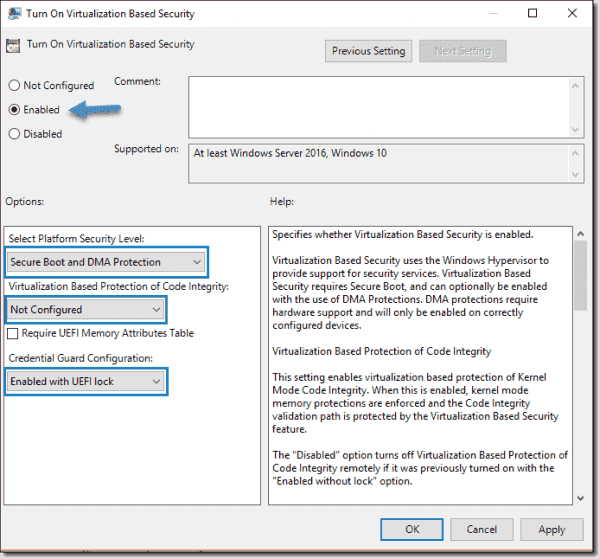
Computer Configuration > Administrative Templates > System > Device Guard > Turn On Virtualization Based Security. Set it to Enable and configure the options as follows:
- Select Platform Security Level: Secure Boot and DMA Protection
- Virtualization Based Protection of Code Integrity: Enabled with UEFI lock
- Credential Guard Configuration: Enabled with UEFI lock
If you want to be able to turn off Windows Defender Credential Guard remotely, choose Enabled without lock.
Credential Guard configuration
If you want to activate VBS for multiple systems, you can do this via Group Policy in your domain.
Final words
I think there will be further expansion of VBS in Windows Server 2019. It is a great feature that helps protect Windows against malware and all kinds of attacks where credentials are involved.
Subscribe to 4sysops newsletter!
VMware vSphere 6.7 has brought this feature in collaboration with Microsoft. It is great to see that these two giants now work hand in hand on features that improve security.
Virtualization Based Security (VBS) is a Microsoft Windows feature that was introduced in Windows 10, Windows Server 2016 and higher. Microsoft VBS uses hardware virtualization features to create and isolate a secure region of memory from the normal operating system. For example, Windows can use this isolated memory space to store credentials (Credential Guard) to mitigate the pass the hash vulnerability.
Virtualization Based Security effectively reduces the Windows attack surface, so even if a malicious actor gains access to the OS kernel, the protected content can prevent code execution and the access of secrets, such as system credentials
The communication between the Windows OS and the credentials that are stored in an isolated memory space, will be done over RPC calls.
Table of Contents
Requirements
VM Hardware Requirements
- VM hardware 14 or higher.
- Guest OS that supports Virtualized based Security that exists of the following VM hardware settings.
- IOMMU
- Hardware virtualization
- EUFI boot firmware
- Secureboot
- vTPM (Optionally)
The following will also be needed when using vTPM:
vCenter Requirements
- Enterprise plus license (for the native key provider)
- ESXI Cluster
- Key Provider (Native or 3th party)
Configure VMware Native Key Provider
Let me start by saying vTPM is not required to have to implement Microsoft VBS with Credential Guard. Credential Guard will work, but it will be less secure.
The only way to assign a Trusted Platform module device to a VM, is by having a configured key provider in vCenter (Native or 3th party). The key provider need to be maintained, so it will be an additional dependency in the infrastructure.
In the previous versions of vSphere, you could only configure external key providers like HyTrust to enable those security features. Guess what? VMware has finally released a native key provider called vSphere Native Key Provider.
Click here for more information about Key Providers.
We will use the vSphere Native Key Provider in this example.
1. Login to the vCenter web GUI, click on the vCenter object, click on Configure and select Key Providers.
2. Click on the ADD button and select ADD NATIVE KEY PROVIDERS to open the wizard.
 and Guard Credentials with vTPM in vCenter 7.0 U2 2")
3. Enter a name for the vSphere Native Key Provider and if needed enable the Use Key Provider only with TPM protected ESXI hosts if needed. In my lab, I disabled this option, because i’m using nested ESXI hosts.
Note: Use Key Provider only with TPM protected ESXI hosts will only enable the vSphere Key Provider on hosts that that physcially has a TPM 2.0 chip.
 and Guard Credentials with vTPM in vCenter 7.0 U2 3")
4. Create a backup of the vSphere Native Key Provider.
 and Guard Credentials with vTPM in vCenter 7.0 U2 4")
 and Guard Credentials with vTPM in vCenter 7.0 U2 5")
 and Guard Credentials with vTPM in vCenter 7.0 U2 6")
Microsoft VBS
Configure VBS in an existing Windows VM
Note: You should only enable the Virtualized Based Security option when the Windows Guest OS has been installed with an EUFI firmware. Converting from BIOS to EUFI could be a hard time in Windows.
- Select the Windows VM and click on edit settings.
- Click on the VM Options tab.
- Enable the Virtualized Based Security option.
- Click on Save to commit the changes.
Configure VBS in a new Windows VM
1. Create a new Windows VM (Windows 10, Windows 2016 or higher).
2. Select the latest compatibility mode to get the latest VM Hardware version.
 and Guard Credentials with vTPM in vCenter 7.0 U2 7")
3. Select a compatible Windows Guest OS Family that supports Microsoft Virtualized Based Security.
 and Guard Credentials with vTPM in vCenter 7.0 U2 8")
Have you noticed the guest OS output in the VM summary? This only means that the VM hardware has been optimized for the use of VBS. VBS still needs to be enabled inside the Guest OS.
 and Guard Credentials with vTPM in vCenter 7.0 U2 9")
Configure VBS in Guest OS
The virtual machine CLT02 has been configured with the required VM hardware components and is now ready to be configured for VBS in the Guest OS. Let’s have a look at the current System Information > System Summary on the CLT02 VM without VBS enabled in the Guest OS:
 and Guard Credentials with vTPM in vCenter 7.0 U2 10")
Next step is to enable the Microsoft VBS within the Guest OS with the security options you would like to have configured. More information can be found on the official Microsoft website.
- Open the local group policy with gpedit.msc and browse to Computer Configuration > Administrative Templates > System > Device Guard.
- Enable the setting: Turn On Virtualization Based Security.
- Configure the VBS options: (Configure the options according your needs.)
| Option | Value | Info |
| Select Platform Security Level | Secure Boot and DMA protection | Among the commands that follow, you can choose settings for Secure Boot and Secure Boot with DMA. In most situations, we recommend that you choose Secure Boot. This option provides Secure Boot with as much protection as is supported by a given computer’s hardware. A computer with input/output memory management units (IOMMUs) will have Secure Boot with DMA protection. A computer without IOMMUs will simply have Secure Boot enabled. |
| Virtualization Based Protection Of Code Integrity | Enabled with EUFI Lock | This setting enables virtualization based protection of Kernel Mode Code Integrity. When this is enabled, kernel mode memory protections are enforced and the Code Integrity validation path is protected by the Virtualization Based Security feature.
The “Enabled with UEFI lock” option ensures that Virtualization Based Protection of Code Integrity cannot be disabled remotely. In order to disable the feature, you must set the Group Policy to “Disabled” as well as remove the security functionality from each computer, with a physically present user, in order to clear configuration persisted in UEFI |
| Require EUFI Memory Attributes Table | Checked | The “Require UEFI Memory Attributes Table” option will only enable Virtualization Based Protection of Code Integrity on devices with UEFI firmware support for the Memory Attributes Table. Devices without the UEFI Memory Attributes Table may have firmware that is incompatible with Virtualization Based Protection of Code Integrity which in some cases can lead to crashes or data loss or incompatibility with certain plug-in cards. If not setting this option the targeted devices should be tested to ensure compatibility. |
| Credential Guard Configuration | Enabled with EUFI Lock | This setting lets users turn on Credential Guard with virtualization-based security to help protect credentials.
The “Enabled with UEFI lock” option ensures that Virtualization Based Protection of Code Integrity cannot be disabled remotely. In order to disable the feature, you must set the Group Policy to “Disabled” as well as remove the security functionality from each computer, with a physically present user, in order to clear configuration persisted in UEFI |
| Secure Launch Configuration | Enabled | This setting sets the configuration of Secure Launch to secure the boot chain. |
 and Guard Credentials with vTPM in vCenter 7.0 U2 11")
4. Reboot the server to activate the VBS functionalities.
 and Guard Credentials with vTPM in vCenter 7.0 U2 12")
Verify with Device Guard and Credential Guard hardware readiness tool
Microsoft released a PowerShell script to verify the readiness of VBS with those security options on your Windows system. You can also enable and disable VBS security options with it. The script can be downloaded from here.
- Download the Device Guard and Credential Guard hardware readiness tool powershell script.
- Run the following command to verify if this device is Device Guard and Credential Guard capable.
.\DG_Readiness_Tool_v3.6.ps1 -Capable
Note: Running the script for the first time requires a reboot, because of the Driver verifier that needs to be enabled.
 and Guard Credentials with vTPM in vCenter 7.0 U2 13")
3. Re-run the script again and this time you would see something like this.
HVCI and Credential Guard is enabled, the only thing that is absent is TPM.
 and Guard Credentials with vTPM in vCenter 7.0 U2 14")
4. Power off the Windows VM and add a Trusted Platform Module (vTPM).
Note: if you cannot see Trusted Platform Module under Other devices you probably don’t have a configured Key Provider in vCenter.
 and Guard Credentials with vTPM in vCenter 7.0 U2 15")
5. Power on the Windows VM and perform the same powershell command.
 and Guard Credentials with vTPM in vCenter 7.0 U2 16")
We now have VBS running with Credential Guard on our Windows 2019 test VM.
Pass the Hash tests
On a machine without VBS
In my home lab, I have a Windows 2019 VM with VBS not enabled. Let’s see perform the Pass The Hash method on this VM. I’m using the Mimikatz tool for this demo. Once a user logged into Windows, the credentials will be saved in the Local Security Authority in memory. With Mimikatz, we can exploit this and retrieve NTLM hashes. With these hashes, we can decrypt the hash to retrieve the password in plain text, and we can also create an authentication token to execute tasks on other servers for example.
- Let’s start with logging in with a testuser that has local administrator rights on a member server.
 and Guard Credentials with vTPM in vCenter 7.0 U2 17")
2. Start Mimikatz and perform the following command to get debug rights (this or Local System rights is required for many Mimikatz commands).
privilege::debug
 and Guard Credentials with vTPM in vCenter 7.0 U2 18")
3. Let’s perform the following command to lists all available provider credentials. This usually shows recently logged on user and computer credentials.
sekurlsa::logonpasswords
 and Guard Credentials with vTPM in vCenter 7.0 U2 19")
We now have the NTLM hash of the user that has domain admin privileges.
Decrypt the hash
We can easily decrypt the hash to retrieve the password in plain text on hashes.com.
 and Guard Credentials with vTPM in vCenter 7.0 U2 20")
Create a authentication token with the hash.
We can also use the hash to create an authentication token to log on the domain controller for example. This can be done with Mimikatz as well.
- use the following command to create an authentication token:
sekurlsa::pth /user:domainuser /domain:vkb.lan /ntlm:hash
The authentication token has been created and a new CMD window opened. When verifying the active user with whoami, I can still see that the active user is named testuser.
 and Guard Credentials with vTPM in vCenter 7.0 U2 21")
2. Let’s switch over to powershell by entering the word powershell.
3. Perform the following command to start a powershell session to the domain controller with a domain admin user by using the authentication token:
Enter-PSSession -ComputerName domaincontroller.fqdn
We now have a powershell session to the domain controller with a domain admin user. This shows to you all, how easy the Pass The Hash method is.
 and Guard Credentials with vTPM in vCenter 7.0 U2 22")
On a machine with VBS
Microsoft VBS should mitigate the Pass The Hash hack by storing the credentials in an isolated memory space. Let’s perform the same steps on CLT02 that has VBS enabled.
- Open Mimikatz and get the debug privileges.
- Retrieve the logon passwords.
We are now unable to see the NTLM hash in Mimikatz, because the credentials are stored in an isolated memory space.
 and Guard Credentials with vTPM in vCenter 7.0 U2 23")
You can enable Microsoft virtualization-based security (VBS) for supported Windows guest operating systems at the same time you create a virtual machine.
Enabling VBS is a process that involves first enabling VBS in the virtual machine then enabling VBS in the Windows guest OS.
Prerequisites
See Virtualization-based Security Best Practices for acceptable CPUs.
Using Intel CPUs for VBS requires vSphere 6.7 or later. Create a virtual machine that uses hardware version 14 or later and one of the following supported guest operating systems:
- Windows 10 (64 bit)
- Windows Server 2016 (64 bit)
- Windows Server 2019 (64 bit)
Using AMD CPUs for VBS requires vSphere 7.0 Update 2 or later. Create a virtual machine that uses hardware version 18 or later and one of the following supported guest operating systems:
- Windows 10 (64 bit), version 1809
- Windows Server 2019 (64 bit)
Ensure that you install the latest patches for Windows 10, version 1809, and Windows Server 2019, before enabling VBS.
Procedure
- Connect to vCenter Server by using the vSphere Client.
- Select an object in the inventory that is a valid parent object of a virtual machine, for example, an ESXi host or a cluster.
- Right-click the object, select New Virtual Machine, and follow the prompts to create a virtual machine.
Option Action Select a creation type Create a virtual machine. Select a name and folder Specify a name and target location. Select a compute resource Specify an object for which you have privileges to create virtual machines. Select storage In the VM storage policy, select the storage policy. Select a compatible datastore. Select compatibility Intel CPU: Ensure that ESXi 6.7 and later is selected. AMD CPU: Ensure that ESXi 7.0 U2 and later is selected.
Select a guest OS Intel CPU: Select either Windows 10 (64-bit), Windows Server 2016 (64-bit), or Windows Server 2019 (64-bit). AMD CPU: Select either Windows 10 (64-bit) or Windows Server 2019 (64-bit).
Select the Enable Windows Virtualization Based Security check box.
Customize hardware Customize the hardware, for example, by changing disk size or CPU. Ready to complete Review the information and click Finish.
Results
Once the virtual machine is created, confirm that its Summary tab displays «VBS true» in the Guest OS description.
What to do next
See Enable Virtualization-based Security on the Guest Operating System.
Microsoft virtualization-based security, also known as “VBS”, is a feature of the Windows 10 and Windows Server 2016 operating systems. It uses hardware and software virtualization to enhance Windows system security by creating an isolated, hypervisor-restricted, specialized subsystem. Starting with vSphere 6.7, you can now enable Microsoft (VBS) on supported Windows guest operating systems.
You may or may not be familiar with these new Windows features. Based on conversations I have with security teams, you might want to become familiar! What you will hear first and foremost is the requirement for “Credential Guard” which is why I added that to the title. In order to level set the conversation in this blog I will go over the features as they related to a bare metal installation of Windows and then a Windows VM on ESXi.
Bare Metal .vs. Virtualized
What follows is my interpretation of the Microsoft technologies based on publicly available documentation and websites I have been following since the features became public.
As always, because we are talking about Microsoft features in their OS, you should consult their documentation for exact wording and guidance.
Windows on Bare Metal
In order to set the stage and help you better understand what is necessary to enable VBS on a hypervisor-based platform, let’s start by talking about enabling VBS on a laptop or desktop, where Windows is the bare metal installation.
To enable VBS on a laptop or desktop you need to ensure certain bios/firmware settings have been enabled and Windows is installed based on some of these settings. A brief list of things to be set include:
- UEFI firmware
- Secure Boot
- Hardware virtualization (Intel VT/AMD-V settings) and IOMMU
- Windows installed with all the above settings enabled
Only then can you enable VBS within the Microsoft Windows OS. The following graphic represents how Windows 10 is installed on the hardware and the components at play when you enable VBS.

After you have configured VBS in Windows the system will reboot and the Microsoft hypervisor will load and then Windows. The hypervisor will also leverage virtualization to bring up additional Windows components (e.g. credential management subsystem) in a separate memory space.
TPM 2.0 (Trusted Platform Module)
Most modern systems have a TPM 2.0 device built in to the hardware. (represented in the graphic above) If enabled then Windows will use it to secure credentials stored in the credentials subsystem. If the hardware TPM is not enabled in the BIOS or not in the hardware, then Windows will still use VBS and you can still enable Credential Guard but the credentials won’t be as secure.
Pass the Hash and Credential Guard
In a traditional Windows installation hashed credentials, including Active Directory credentials, were available to almost anyone with enough local OS privileges because they lived in the same memory as Windows. That was known as the Pass the Hash exploit. Enablement of a VBS feature called Credential Guard will keep account hash information outside the scope/memory of the Windows instance. This mitigates the Pass the Hash exploit according to Microsoft.
All communication between Windows and the additional Windows components are via RPC calls run through a Microsoft hypervisor-based communications channel.
ESXi on Bare Metal
Ok, so now let’s introduce vSphere into the mix. For some time now you have been able to install Windows 10 or Server 2016 as a virtual machine. Here’s an example of a standard VM running Windows 10 on an ESXi server.

In a vSphere world, ESXi is the bare metal installation. In order to support Windows 10 with VBS you have to present to the Windows 10 VM the same level of BIOS/Firmware/Hardware. Only in this case, the VM has no access to the bare metal so functionality will be virtualized.
In order to enable VBS the VM must be running at Virtual Hardware version 14. New versions of Virtual Hardware expose newer functionality and support for VBS comes with version 14.
The VM needs hardware virtualization and IOMMU to be exposed/granted to the VM. This is more popularly known as “Nested Virtualization”. Why do we need to run a Windows VM “nested”? Because the Microsoft’s hypervisor will be booting first so that it can provide to Windows the necessary capabilities for VBS.
Additionally, The VM needs to have Secure Boot enabled and be booting from the EFI firmware. Just like in our laptop/desktop example.
Note: If you are creating new Windows 10 or Windows 2016 VMs make sure you are selecting UEFI firmware before installing! Switching from traditional BIOS to UEFI (“EFI” in VM options) is “painful”. Switching after the fact introduces additional steps.
You can see in the image below that there is a new “Enable” checkbox for Virtualization Based Security. When you check that box all of the necessary changes are made. The VM is has CPU virtualization extensions exposed to it, IOMMU is turned on and EFI firmware and Secure Boot are enabled.

Virtual TPM 2.0
Notice how “virtual TPM” is not enabled by default when you select VBS. vSphere 6.7 allows for adding a “virtual TPM 2.0” device but that will introduce an additional requirement. You need vSphere VM Encryption. Here’s why.
A hardware TPM has the ability to store information securely in a hardware-based “vault”. A virtual TPM doesn’t have a hardware based “vault”* so instead, the data to be secured in the TPM is written to the “.nvram” file which is encrypted using VM Encryption. This provide a number of key features:
- Data written to the vTPM is secured with very strong encryption.
- Because we use VM Encryption, we retain the portability of virtual machines.
- A virtual machine with a vTPM can be vMotioned, backed up with existing tools, etc…
- Because the VM is encrypted, the predefined “No Cryptography Administrator” role can now be used to restrict permissions on the VM.
- This secures console access, prevents downloads of the VM from the datastore and enforces a “least privilege” operational model
- Encryption is only performed on the VM “Home” files and not the VMDK’s unless you choose to encrypt the VMDK’s.
- Impact to performance is minimal as we are only encrypting a few hundred kilobytes/megabytes of files on the datastore.
- The vTPM is not dependent on the physical TPM.
*A physical TPM has a number of technical challenges. It’s not designed for 100’s or 1000’s of VM’s to store their credentials. It’s too small for that. Storage in a TPM is measured in kilobytes, not gigabytes. It’s also a serial device so it is very slow.
More information on ESXi’s use of the hardware TPM and how vTPM’s work is coming in another blog article.
Windows with VBS on vSphere
Here’s an example of a standard Windows 10 VM and a Windows 10 VM with VBS enabled running on vSphere:

It’s all about “virtual hardware”
You can see that we are primarily talking about virtual hardware support in this blog article. The virtual machine that needs VBS is presented with nested virtualization, virtualized TPM, Firmware/BIOS support for Secure Boot and UEFI, etc. Same as on the laptop/desktop example. vSphere 6.7 provides that necessary virtual hardware support to allow Windows 10 and Windows 2016 to be able to function as designed.
For example, when you add a virtual TPM 2.0 device to the VM the Windows guest OS sees this as a standard TPM 2.0 device using existing Windows drivers.

At no time are we talking about anything “special” that has to be installed and run in the guest OS to make all of this work. Once all settings are enabled at the vSphere level you would use standard Microsoft methods to enable VBS in the Guest OS.
How easy is this?
Very! This builds upon our goal of making security easy to implement. In my testing in the lab this has worked quite well. I used the Microsoft Device Guard and Credential Guard hardware readiness tool to check compliance with VBS and enable Credential Guard. The tool is an easy to use PowerShell script. VBS can also be enabled with Group Policies.
Please consult your Microsoft Documentation for the best method to enable these features in your Windows guest OS and environment.
Operations
I find that many folks compare running an operating system on bare metal to running on vSphere as apples to apples. They really aren’t. It’s really more apples to oranges. What is different is that running VM’s on a hypervisor brings with it new operational methods and controls. You need to think more about VM’s as objects and how you can manage them at scale.
A laptop is a single entity with a number of hardware-based controls. You can lock the end user out of the system BIOS and set requirements for things like encryption based on their credentials. But in a virtualized desktop environment you don’t really need that because the end users don’t have access to the underlying hardware or management plane of the VM. Using the same methods as securing the laptop doesn’t translate directly to how you would secure a VM and some of them could actually interfere with how to properly secure them in the datacenter. So, be open to understanding the different use cases. Don’t try to jam the square peg into the round hole.
Wrap Up
Support for VBS and virtual TPM has been one of the most interesting moments in my career at VMware so far. From the time I presented the technology to a number of folks after it was announced at MS Tech Ed a couple of years ago to its release today has been a wild and fun ride.
I would like to tip my hat to the VMware engineers who made this happen at a VERY rapid rate. Microsoft worked closely with this engineering team so that we could provide a supported virtual hardware layer that Microsoft’s operating system could take advantage of. I would like to thank Microsoft as well for their support of this effort.
Expect more information on this and other 6.7 features as we get closer to VMworld! As always, you can reach me on Twitter at @vspheresecurity or @mikefoley. Those are probably the easiest and quickest ways to ask a question and get a response.
mike