Оглавление:
1. Зачем нужен лог загрузки
2. Где находится лог загрузки в Windows 10
3. Как включить лог загрузки в Windows 10
4. Как читать лог загрузки Windows 10
Зачем нужен лог загрузки
Многие пользователи вовсе не знают, что такое лог (или журнал) загрузки, и зачем он нужен. Если не вдаваться в детали, то лог загрузки — это простой текстовый файл, который содержит в себе информацию для анализа процесса старта компьютера и операционной системы.
Чаще всего лог загрузки необходим системным администраторам, чтобы понять, какие проблемы препятствуют загрузке операционной системы, вызывают те или иные ошибки при запуске программ или в процессе работы Windows. В логе загрузки отображается полный список загружаемых при старте компьютера драйверов и библиотек.
Где находится лог загрузки в Windows 10
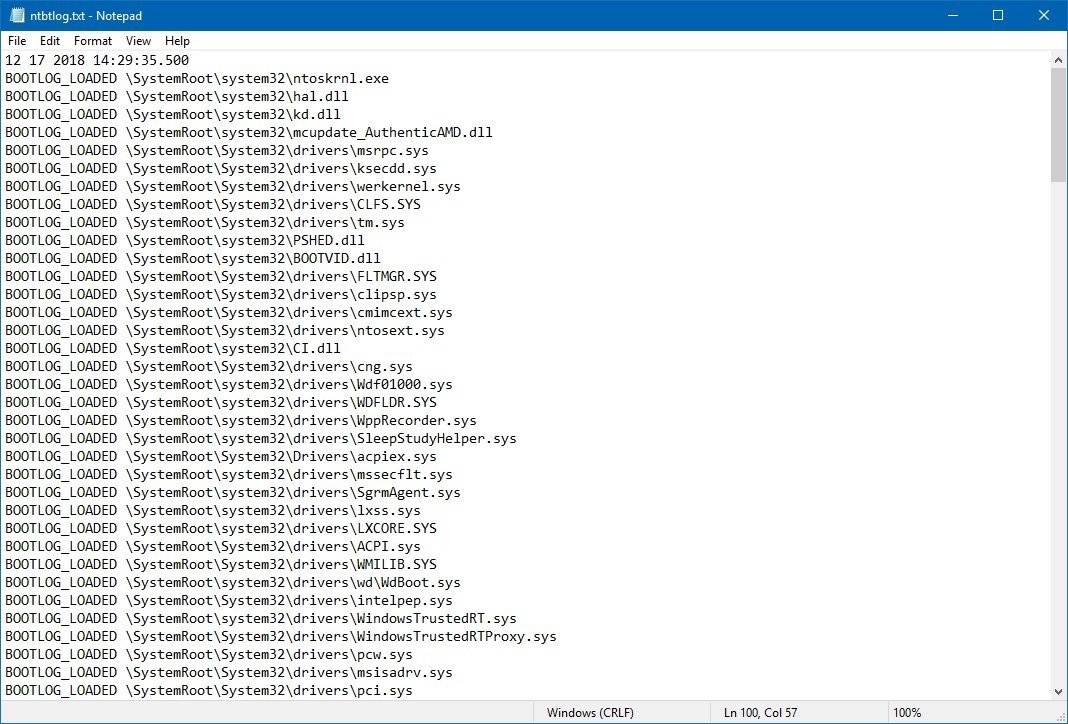
В операционной системе Windows 10 лог загрузки располагается на системном диске в папке Windows. Файл называется ntbtlog.txt.
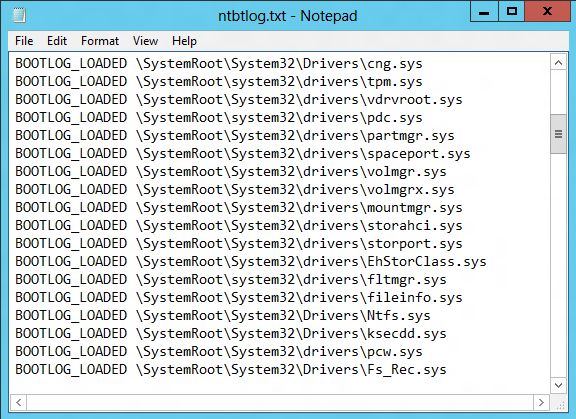
Обратите внимание: Как можно видеть, это обычный текстовый файл. Его можно открыть при помощи стандартного приложения “Блокнот” или других сторонних программ, которые позволяют работать с txt файлами.
Как включить лог загрузки в Windows 10
Чтобы текстовый файл ntbtlog.txt появился в папке Windows, нужно его сгенерировать. По умолчанию в Windows 10 отключен процесс создания данного файла при загрузке компьютера.
Включить создание файла журнала загрузки можно двумя способами:
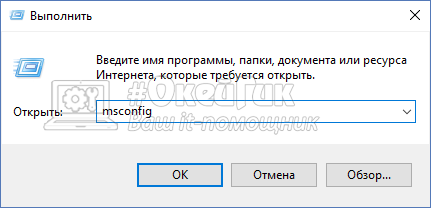
- Через настройки конфигурации системы. Чтобы это сделать, необходимо запустить утилиту “Конфигурация системы”. Для запуска этой утилиты нажмите на клавиатуре сочетание Win+R, чтобы открылось окошко “Выполнить”. В нем пропишите команду для запуска утилиты — msconfig.
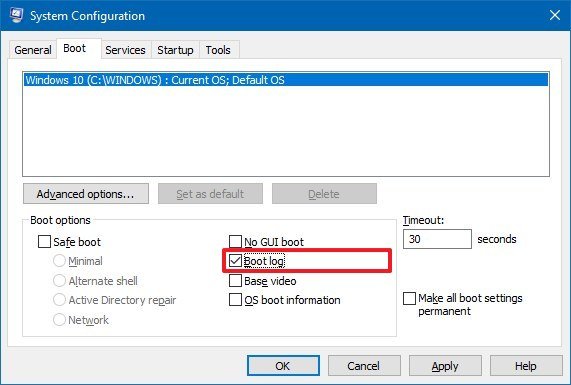
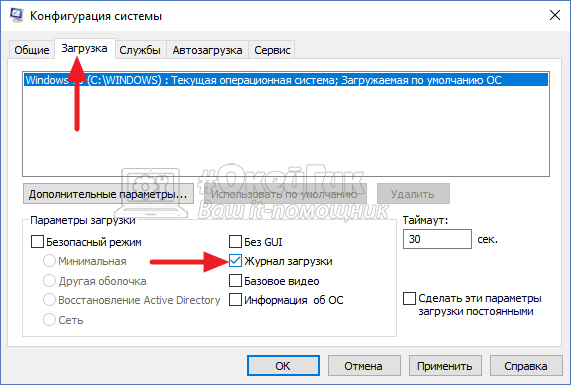
Откроется окно “Конфигурация систему”, где нужно сверху переключиться на вкладку “Загрузка” и далее в разделе “Параметры загрузки” установить галочку у пункта “Журнал загрузки”.
После этого нажмите “Применить” и “ОК”, чтобы изменения вступили в силу. Появится сообщение с предложением перезагрузить компьютер. Нажмите “Перезагрузка”, чтобы сразу выполнить создание лога загрузки в папке Windows.
В таком случае компьютер перезагрузится. Если нажать “Выход без перезагрузки”, тогда лог загрузки будет создан после следующей перезагрузки компьютера.
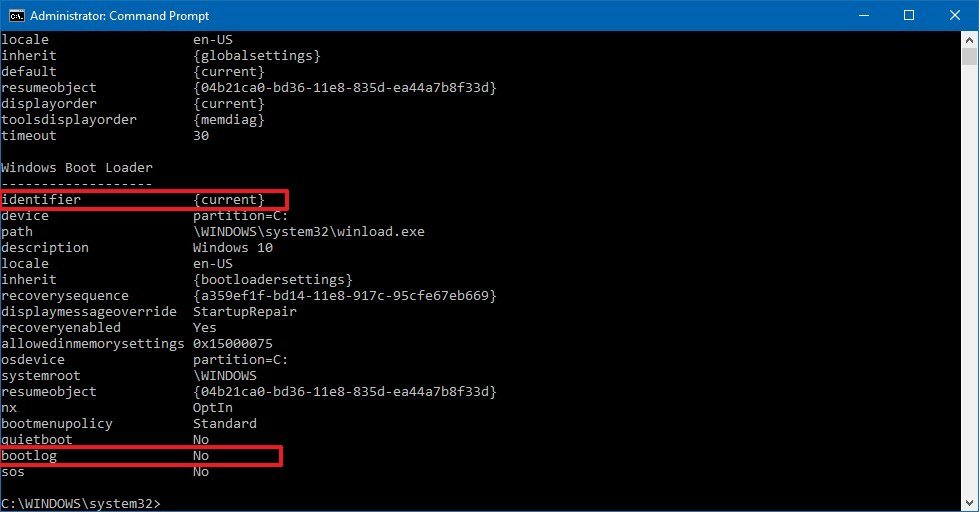
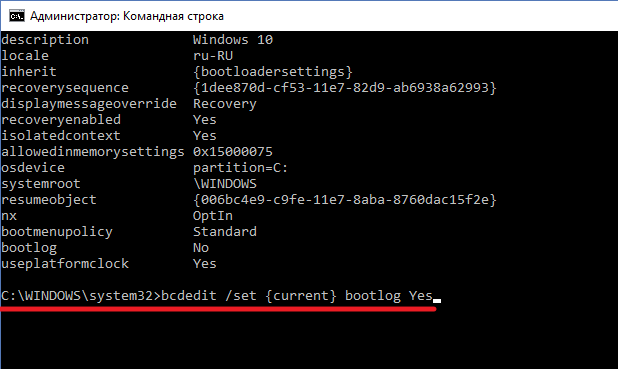
- Через командную строку. Второй способ предлагает использование командной строки. Чтобы создать через нее лог загрузки, запустите командную строку от имени администратора и используйте в ней команду bcdedit. После этой команды в окне консоли командной строки появятся сведения обо всех операционных системах, установленных на компьютере, и их загрузочных записях.
Если на компьютере установлена одна операционная система Windows 10 (как на примере на скриншоте), тогда будет отображаться два списка элементов — диспетчер загрузки и загрузка Windows. Необходимо обратиться к загрузке Windows, у которой имеется идентификатор current. Пропишите в командной строке следующее:
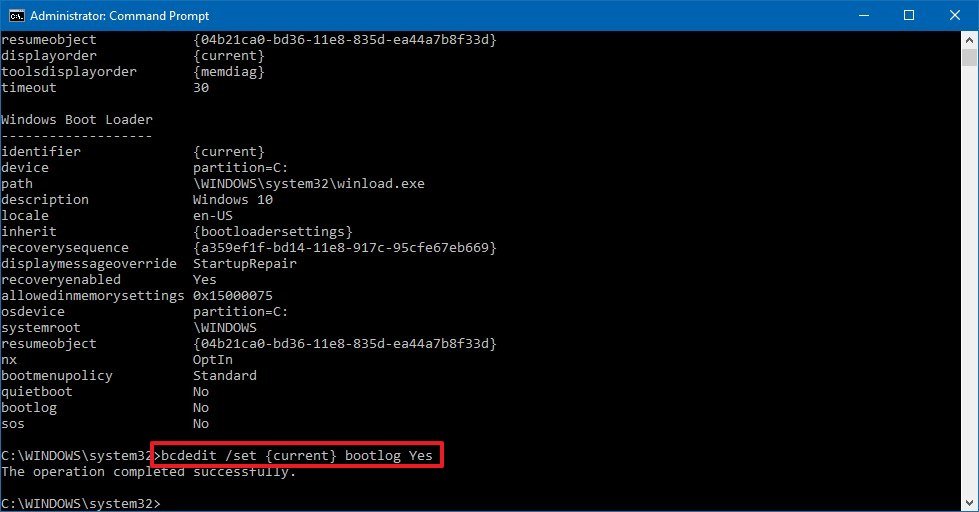
bcdedit /set {current} bootlog YesВажно: Если у вас идентификатор отличный от {current}, необходимо заменить на него часть команды, используемой выше.
После выполнения этой команды необходимо перезагрузить компьютер, чтобы лог загрузки был создан в папке Windows.
Как читать лог загрузки Windows 10
Несмотря на то что лог загрузки — это текстовый документ исключительно для системных администраторов, что-то полезное из него может вынести и обычный пользователь.
В журнале загрузки указывается перед каждым из компонентов — был он исполнен или нет:
- BOOTLOG_LOADED — означает, что драйвер был загружен без ошибок.
- BOOTLOG_NOT_LOADED — указывает, что во время загрузки операционной системы старт данного драйвера был пропущен.
На основании этой информации можно сделать выводы о том, с какими драйверами на компьютере могут быть проблемы.
(157 голос., средний: 4,50 из 5)
Загрузка…
Windows 10 is one of the most popular operating systems used by many computer users around the world. One of the most useful features of Windows 10 is the ability to boot log. Boot logging is a process that helps to diagnose and troubleshoot Windows booting issues. In this article, we will be discussing what is boot logging, why it is important, and how to enable it on Windows 10. So, if you are looking to learn more about boot logging Windows 10, read on!
Boot logging in Windows 10 is a feature that records events that occur when the system is started. It creates a log file that can be used to help diagnose and troubleshoot problems that occur during startup. Boot logging allows you to view the events that occurred during startup, such as services starting, drivers being loaded, and applications being launched. It can also be used to track down the cause of system crashes or hangs. To enable boot logging in Windows 10, open the Control Panel and click on System and Security. Under Security, select Advanced System Settings. Then, click the Advanced tab and select the Settings button under Startup and Recovery. Check the box next to ‘Write an event to the system log’, and click OK. This will enable boot logging, which will create a log file called Ntbtlog.txt.
What is Boot Logging in Windows 10?
Boot logging is a feature in Windows 10 that helps to view the startup process of the system. It is used to identify problems that arise during the startup process and helps to find the cause of any errors. Boot logging can be enabled in the advanced options of the system’s Settings app. Once enabled, it records all the events that occurred during the startup process and stores them in a log file. The log file can then be viewed in Windows Event Viewer to get detailed information about the startup process.
Boot logging is especially useful for troubleshooting problems like slow boot times, system freezes, or other errors that occur during startup. By analyzing the log file, users can identify the cause of the problem and fix it accordingly. This can help save time and resources by avoiding the need to manually troubleshoot the problem.
How to Enable Boot Logging in Windows 10?
Boot logging can be enabled in the advanced options of the system’s Settings app. To do this, open the Settings app and go to the Update & Security section. Now, click on the Troubleshoot tab and select Advanced Options. Here, you will see the option to enable Boot Logging.
Once enabled, the system will create a log file which can be viewed in the Windows Event Viewer. To open the log file, open the Event Viewer and go to the Windows Logs section. Here, you will find the log file under the System category.
How to Read the Boot Log File?
The boot log file is organized into different categories like Security, System, and Application. Each category contains events that occurred during the startup process. To read the log file, you need to understand the different categories and the events that they contain.
For example, the Security category contains information about the security measures taken during the boot process. The System category contains information about the system events that occurred during the boot process. The Application category contains information about the applications that were loaded during the boot process.
How to Use Boot Logging to Troubleshoot Problems?
Boot logging can be used to troubleshoot problems that arise during the startup process. By analyzing the log file, users can identify the cause of the problem and fix it accordingly. This can help save time and resources by avoiding the need to manually troubleshoot the problem.
To troubleshoot a problem, first identify the time when the problem occurred. Then, look for events in the log file that occurred at that time. This will help you identify the cause of the problem and take the necessary steps to fix it.
How to Disable Boot Logging in Windows 10?
Boot logging can be disabled in the same way that it is enabled. To do this, open the Settings app and go to the Update & Security section. Now, click on the Troubleshoot tab and select Advanced Options. Here, you will see the option to disable Boot Logging.
Top 6 Frequently Asked Questions
What is Boot Logging Windows 10?
Boot logging Windows 10 is a feature that records detailed information about the boot process and stores it in a text file. It is used to help diagnose and troubleshoot problems with the system, such as slow boot times or other errors.
How does Boot Logging work?
Boot logging works by recording a detailed log of the boot process. This includes all of the steps that take place, such as device enumeration, registry loading, driver loading, and system services initialization. This detailed log can then be used to identify and troubleshoot any issues that may be occurring during the boot process.
What information does the Boot Logging provide?
The boot logging feature provides detailed information about the boot process, including the type of device that was enumerated, the drivers that were loaded, the services that were started, and the registry entries that were accessed. This information can be used to identify any issues that may be occurring during the boot process.
How do I enable Boot Logging?
Boot logging can be enabled by going to the Advanced System Settings page in the Control Panel. From there, select the “Advanced” tab, then click on the “Startup and Recovery” button. In the “System Startup” section, select the “Write an event to the system log” checkbox, then click “OK” to save the changes.
Where is the Boot Logging information stored?
The boot logging information is stored in the “systemroot\minidump” folder in the Windows directory. This folder is normally located in the “C:\Windows” directory or the “C:\WINNT” directory, depending on the version of Windows that is installed.
How do I view the Boot Logging information?
The boot logging information can be viewed by opening the “systemroot\minidump” folder and opening the “bootlog.txt” file. This file contains all of the information that is recorded during the boot process. It can be opened with any text editor that is installed on the system.
In conclusion, Boot Logging in Windows 10 is an important feature that allows users to troubleshoot system problems. It provides detailed information about the startup process that can be incredibly helpful when diagnosing the cause of an issue. With its ability to log the startup process and enable users to identify the source of errors, Boot Logging can be an invaluable tool for diagnosing Windows 10 system problems.
The Advanced Boot Options screen lets you start Windows in advanced troubleshooting modes. You can access the menu by turning on your computer and pressing the F8 key before Windows starts.
Some options, such as safe mode, start Windows in a limited state, where only the bare essentials are started. If a problem doesn’t reappear when you start in safe mode, you can eliminate the default settings and basic device drivers and services as possible causes. Other options start Windows with advanced features intended for use by system administrators and IT professionals. For more information, go to the Microsoft website for IT professionals.
Repair Your Computer
Shows a list of system recovery tools you can use to repair startup problems, run diagnostics, or restore your system. This option is available only if the tools are installed on your computer’s hard disk. If you have a Windows installation disc, the system recovery tools are located on that disc.
Safe Mode
Starts Windows with a minimal set of drivers and services.
To start in safe mode:
-
Remove all floppy disks, CDs, and DVDs from your computer, and then restart your computer. Click the Start button , click the arrow next to the Shut Down button (or the arrow next to the Lock button), and then click Restart.
-
Do one of the following:
-
If your computer has a single operating system installed, press and hold the F8 key as your computer restarts. You need to press F8 before the Windows logo appears. If the Windows logo appears, you’ll need to try again by waiting until the Windows logon prompt appears, and then shutting down and restarting your computer.
-
If your computer has more than one operating system, use the arrow keys to highlight the operating system you want to start in safe mode, and then press F8.
-
-
On the Advanced Boot Options screen, use the arrow keys to highlight the safe mode option you want, and then press Enter.
-
Log on to your computer with a user account that has administrator rights.
-
Safe Mode with Networking. Starts Windows in safe mode and includes the network drivers and services needed to access the Internet or other computers on your network.
-
Safe Mode with Command Prompt. Starts Windows in safe mode with a command prompt window instead of the usual Windows interface. This option is intended for IT professionals and administrators.
-
Enable Boot Logging. Creates a file, ntbtlog.txt, that lists all the drivers that are installed during startup and that might be useful for advanced troubleshooting.
-
Enable low-resolution video (640×480). Starts Windows using your current video driver and using low resolution and refresh rate settings. You can use this mode to reset your display settings. For more information, see Change your screen resolution.
-
Last Known Good Configuration (advanced). Starts Windows with the last registry and driver configuration that worked successfully.
-
Directory Services Restore Mode. Starts Windows domain controller running Active Directory so that the directory service can be restored. This option is intended for IT professionals and administrators.
-
Debugging Mode. Starts Windows in an advanced troubleshooting mode intended for IT professionals and system administrators.
-
Disable automatic restart on system failure. Prevents Windows from automatically restarting if an error causes Windows to fail. Choose this option only if Windows is stuck in a loop where Windows fails, attempts to restart, and fails again repeatedly.
-
Disable Driver Signature Enforcement. Allows drivers containing improper signatures to be installed.
-
Start Windows Normally. Starts Windows in its normal mode.
Need more help?
Want more options?
Explore subscription benefits, browse training courses, learn how to secure your device, and more.
Communities help you ask and answer questions, give feedback, and hear from experts with rich knowledge.
Find solutions to common problems or get help from a support agent.
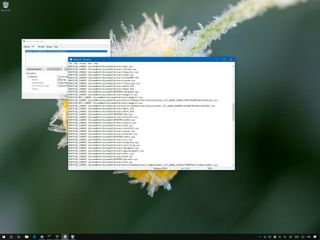
On Windows 10, when you’re having driver issues, you can enable the «Boot Log» option to create a special ntbtlog.txt file that includes a detailed list of the loaded and unloaded drivers during boot.
The option won’t fix any problems your device may be experiencing, but you can analyze this information to understand what might be preventing Windows 10 from loading correctly to find an appropriate fix.
In this Windows 10 guide, we walk you through the steps to enable «Boot Log» to collect information about the loaded and not loaded drivers during startup using System Configuration and Command Prompt.
- How to enable ‘Boot log’ using System Configuration
- How to enable ‘Boot log’ using Command Prompt
How to enable ‘Boot log’ using System Configuration
To log driver information during boot using System Configuration, use these steps:
- Open Start.
- Search for System Configuration and click the top result to open the experience.(Quick Tip: You can also use the Windows key + R keyboard shortcut to open the Run command, enter the msconfig command, and click OK to open System Information.)
- Click on the Boot tab.
- Check the Boot log option.
- Click the Apply button.
- Click the OK button.
- Click the Restart button.
Once you complete these steps, a special log file will be created with the drivers that were loaded, including those that were omitted.
Viewing the ntbtlog text file
To find and view the ntbtlog.txt file, use these steps:
- Use the Windows key + R keyboard shortcut to open the Run command.
- Type the following file path:
c:\Windows\ntbtlog.txt - Click the OK button.
In the text file, you can see a list of loaded and unloaded drivers during boot, which you can now use in your troubleshooting process to fix a related issue.
If you no longer need the «Boot Log,» you can disable the feature using the same instructions mentioned above, but on step No. 4, make sure to clear the option.
How to enable ‘Boot log’ using Command Prompt
To log driver information during boot using Command Prompt, use these steps:
- Open Start.
- Search for Command Prompt, right-click the top result, and select the Run as administrator option.
- Type the following command and press Enter:
bcdedit - Under the «Windows Boot Loader» section, note the «identifier» and «bootlog» information. For example:
- identifier — {current}.
- bootlog — No.
- Type the following command to enable logs during boot and press Enter:
bcdedit /set {current} bootlog YesIn the command, make sure to replace {current} with the information in your identifier.
After completing the steps, a log file will be created in the Windows folder with the drivers that were loaded, including those that were not loaded.
Viewing the ntbtlog text file
To find and view the «Boot Log» file, use these steps:
- Use the Windows key + R keyboard shortcut to open the Run command.
- Type the following file path:
c:\Windows\ntbtlog.txt - Click the OK button.
In the text file, you can see information about drivers that Windows 10 loaded and didn’t load during the boot process, which you can now use in your troubleshooting process to resolve a related problem.
You can always revert the changes using the same instructions outlined above, but on step No. 5, make sure to use this command:
bcdedit /set {current} bootlog No.
Although this guide is focused on Windows 10, the «Boot Log» option has been available for years, and you can also use the same instructions on Windows 8.1 and Windows 7.
More Windows 10 resources
For more helpful articles, coverage, and answers to common questions about Windows 10, visit the following resources:
- Windows 10 on Windows Central – All you need to know
- Windows 10 help, tips, and tricks
- Windows 10 forums on Windows Central
All the latest news, reviews, and guides for Windows and Xbox diehards.
Mauro Huculak is technical writer for WindowsCentral.com. His primary focus is to write comprehensive how-tos to help users get the most out of Windows 10 and its many related technologies. He has an IT background with professional certifications from Microsoft, Cisco, and CompTIA, and he’s a recognized member of the Microsoft MVP community.
To log driver information during boot using System Configuration, use these steps:
- Open Start.
- Search for System Configuration and click the top result to open the experience. …
- Click on the Boot tab.
- Check the Boot log option.
- Click the Apply button.
- Click the OK button.
- Click the Restart button.
- What is enable debugging?
- Where is the boot logging file?
- What is boot log msconfig?
- What does Enable Boot Logging mean Windows 10?
- Is it safe to enable USB debugging?
- What is OS boot information Windows 10?
- What is a boot trace?
- How do you calculate boot time?
- What is enable Safe Mode?
- What is enable Bootlogging Windows 8?
What is enable debugging?
The Enable debugging option turns on kernel debugging in Windows. This is an advanced troubleshooting method where startup information can be transmitted to another computer or device that’s running a debugger.
Where is the boot logging file?
In Windows, users can either enable or disable the Boot log feature. The log file is named as ntbtlog. txt which lists all the successfully loaded processes as well as an unsuccessful process during the boot process. The log is saved to drive C:\Windows\ntbtlog.
What is boot log msconfig?
With msconfig, you can set up a boot logger that will log every driver that is loaded during the boot process. Once you have this information, you can troubleshoot numerous problems. Here’s how to enable the boot log using Windows built-in msconfig.exe tool.
What does Enable Boot Logging mean Windows 10?
The boot log is a special text file which contains a list of loaded and unloaded drivers during the boot process. It can be helpful when you are troubleshooting startup issues. … Having the boot log enabled will allow you to analyze the internals of the boot process on your Windows 10 computer.
Is it safe to enable USB debugging?
Trustwave recommends that mobile devices should not be set to USB Debugging mode. When a device is in USB Debugging mode, a computer connected to the device can read all data, run commands, and install or remove apps. The security of the device settings and data could be compromised.
What is OS boot information Windows 10?
OS boot information —
Shows driver names as drivers are being loaded during the startup process.
What is a boot trace?
Boot-time tracing allows users to trace boot-time process including device initialization with full features of ftrace including per-event filter and actions, histograms, kprobe-events and synthetic-events, and trace instances.
How do you calculate boot time?
To see it, first launch Task Manager from the Start menu or the Ctrl+Shift+Esc keyboard shortcut. Next, click the «Startup» tab. You’ll see your «last BIOS time» in the top-right of the interface. The time is displayed in seconds and will vary between systems.
What is enable Safe Mode?
Safe mode is designed to help you find problems with your apps and widgets, but it disables parts of your phone. Pressing or holding certain buttons during start up will bring up recovery mode. For help with any step on your device, visit the Devices page, select your device, and find the steps there.
What is enable Bootlogging Windows 8?
Windows 8 provides you Boot Logging. It is used for troubleshooting driver related issues or problems. We are giving you Windows 8 Boot Logging with the help of Advanced Startup Settings. It helps you to get a list of all drivers in a system.
 Откроется окно “Конфигурация систему”, где нужно сверху переключиться на вкладку “Загрузка” и далее в разделе “Параметры загрузки” установить галочку у пункта “Журнал загрузки”.
  После этого нажмите “Применить” и “ОК”, чтобы изменения вступили в силу. Появится сообщение с предложением перезагрузить компьютер. Нажмите “Перезагрузка”, чтобы сразу выполнить создание лога загрузки в папке Windows.
 В таком случае компьютер перезагрузится. Если нажать “Выход без перезагрузки”, тогда лог загрузки будет создан после следующей перезагрузки компьютера.
 Если на компьютере установлена одна операционная система Windows 10 (как на примере на скриншоте), тогда будет отображаться два списка элементов — диспетчер загрузки и загрузка Windows. Необходимо обратиться к загрузке Windows, у которой имеется идентификатор current. Пропишите в командной строке следующее:
 Важно: Если у вас идентификатор отличный от {current}, необходимо заменить на него часть команды, используемой выше.