Установка переменных среды в Windows 11 может помочь вам настроить систему, запускать сценарии и настраивать приложения.
В этом руководстве мы обсудим три способа с пошаговыми инструкциями, чтобы вы могли настроить свою систему в соответствии со своими предпочтениями.
Существует три типа переменных среды.
- Переменные системной среды? Глобальные переменные имеют самый низкий приоритет и могут быть доступны всем пользователям и приложениям в Windows. Обычно они используются для определения общесистемных настроек.
- Переменные пользовательской среды? С более высоким приоритетом они применяются только к текущему пользователю и процессам, запущенным под этой учетной записью, и устанавливаются пользователем или приложениями, которые работают под этой учетной записью.
- Переменные среды процесса? Имея наивысший приоритет, они являются временными и применяются к текущему процессу и его дочерним процессам, предоставляя информацию о времени выполнения или настройку программы.
1. Использование приложения «Настройки»
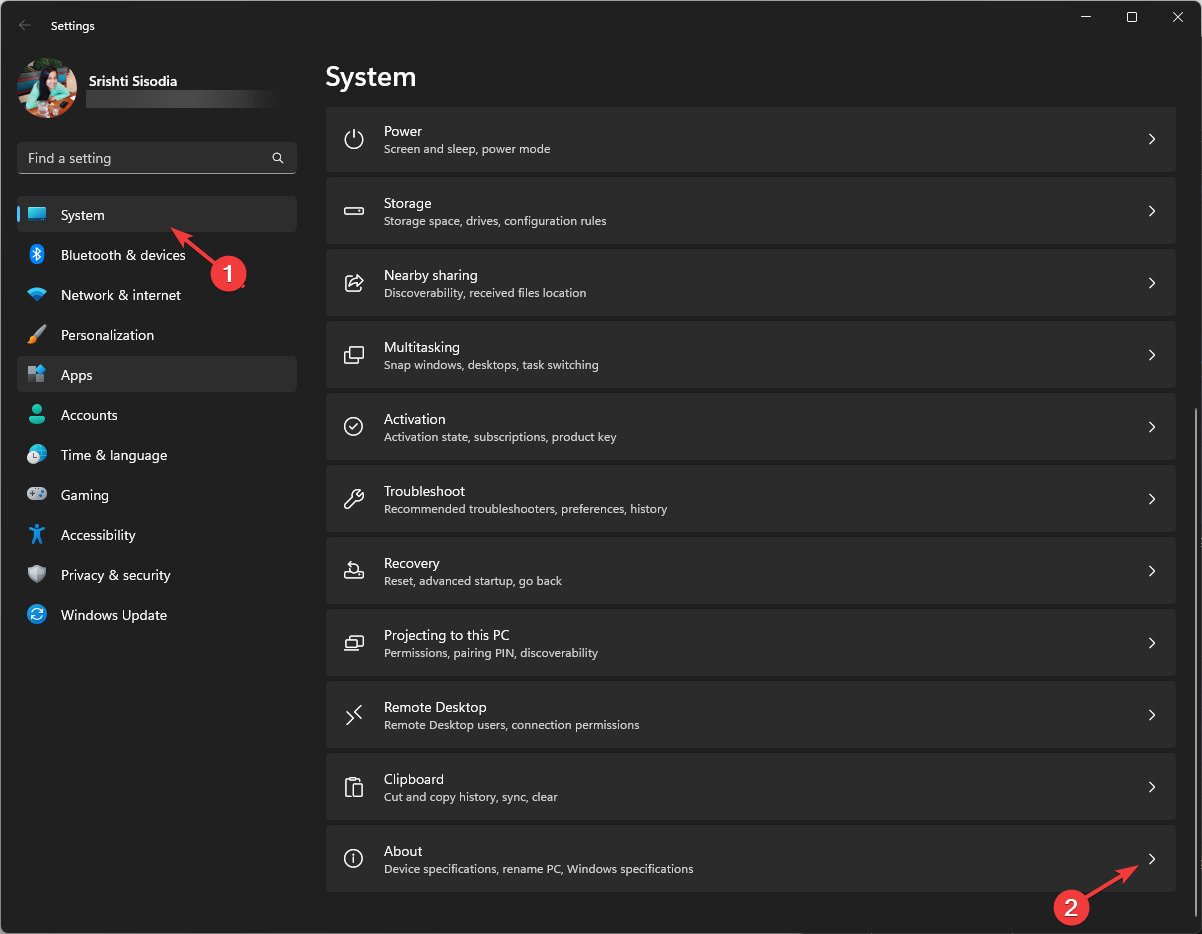
- Нажмите Windows + I, чтобы открытьНастройки.
- Перейдите в «Система», затем нажмитеО.
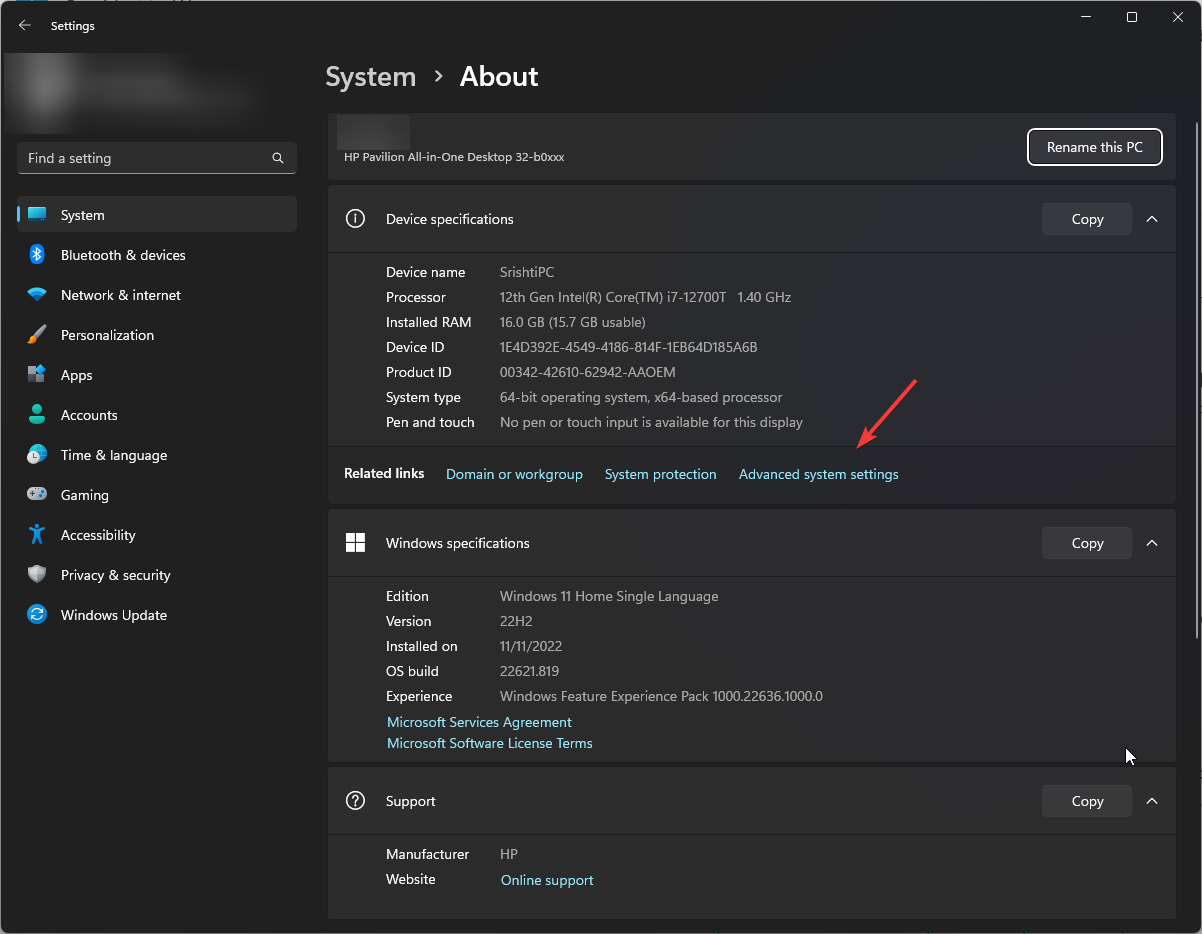
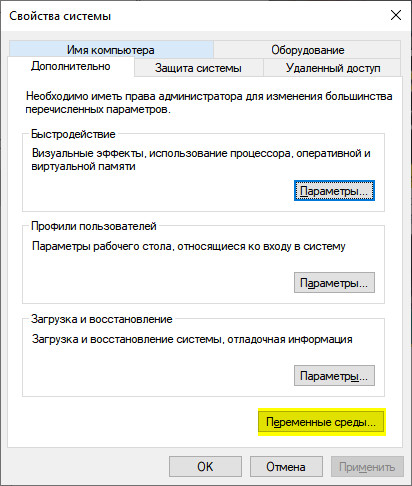
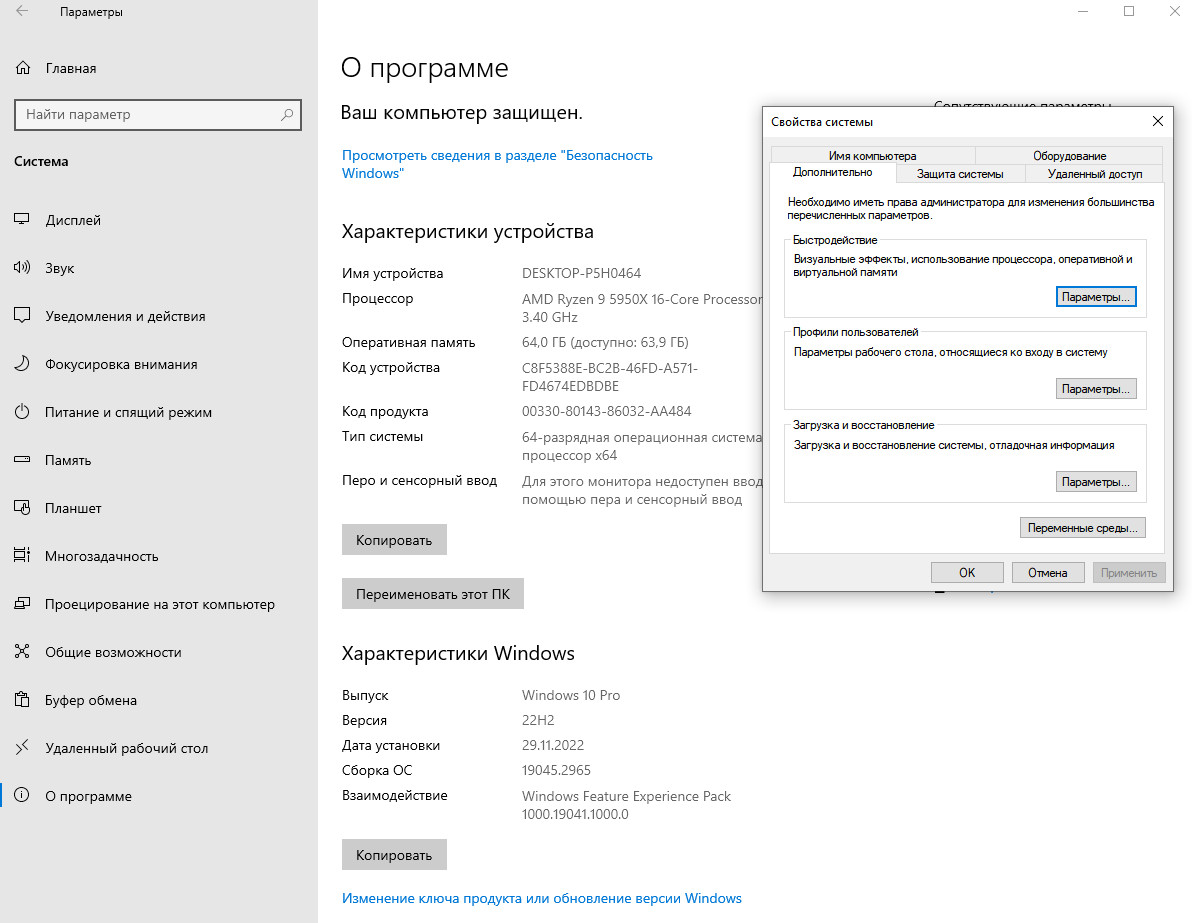
- Нажмите ссылку «Дополнительные параметры системы».

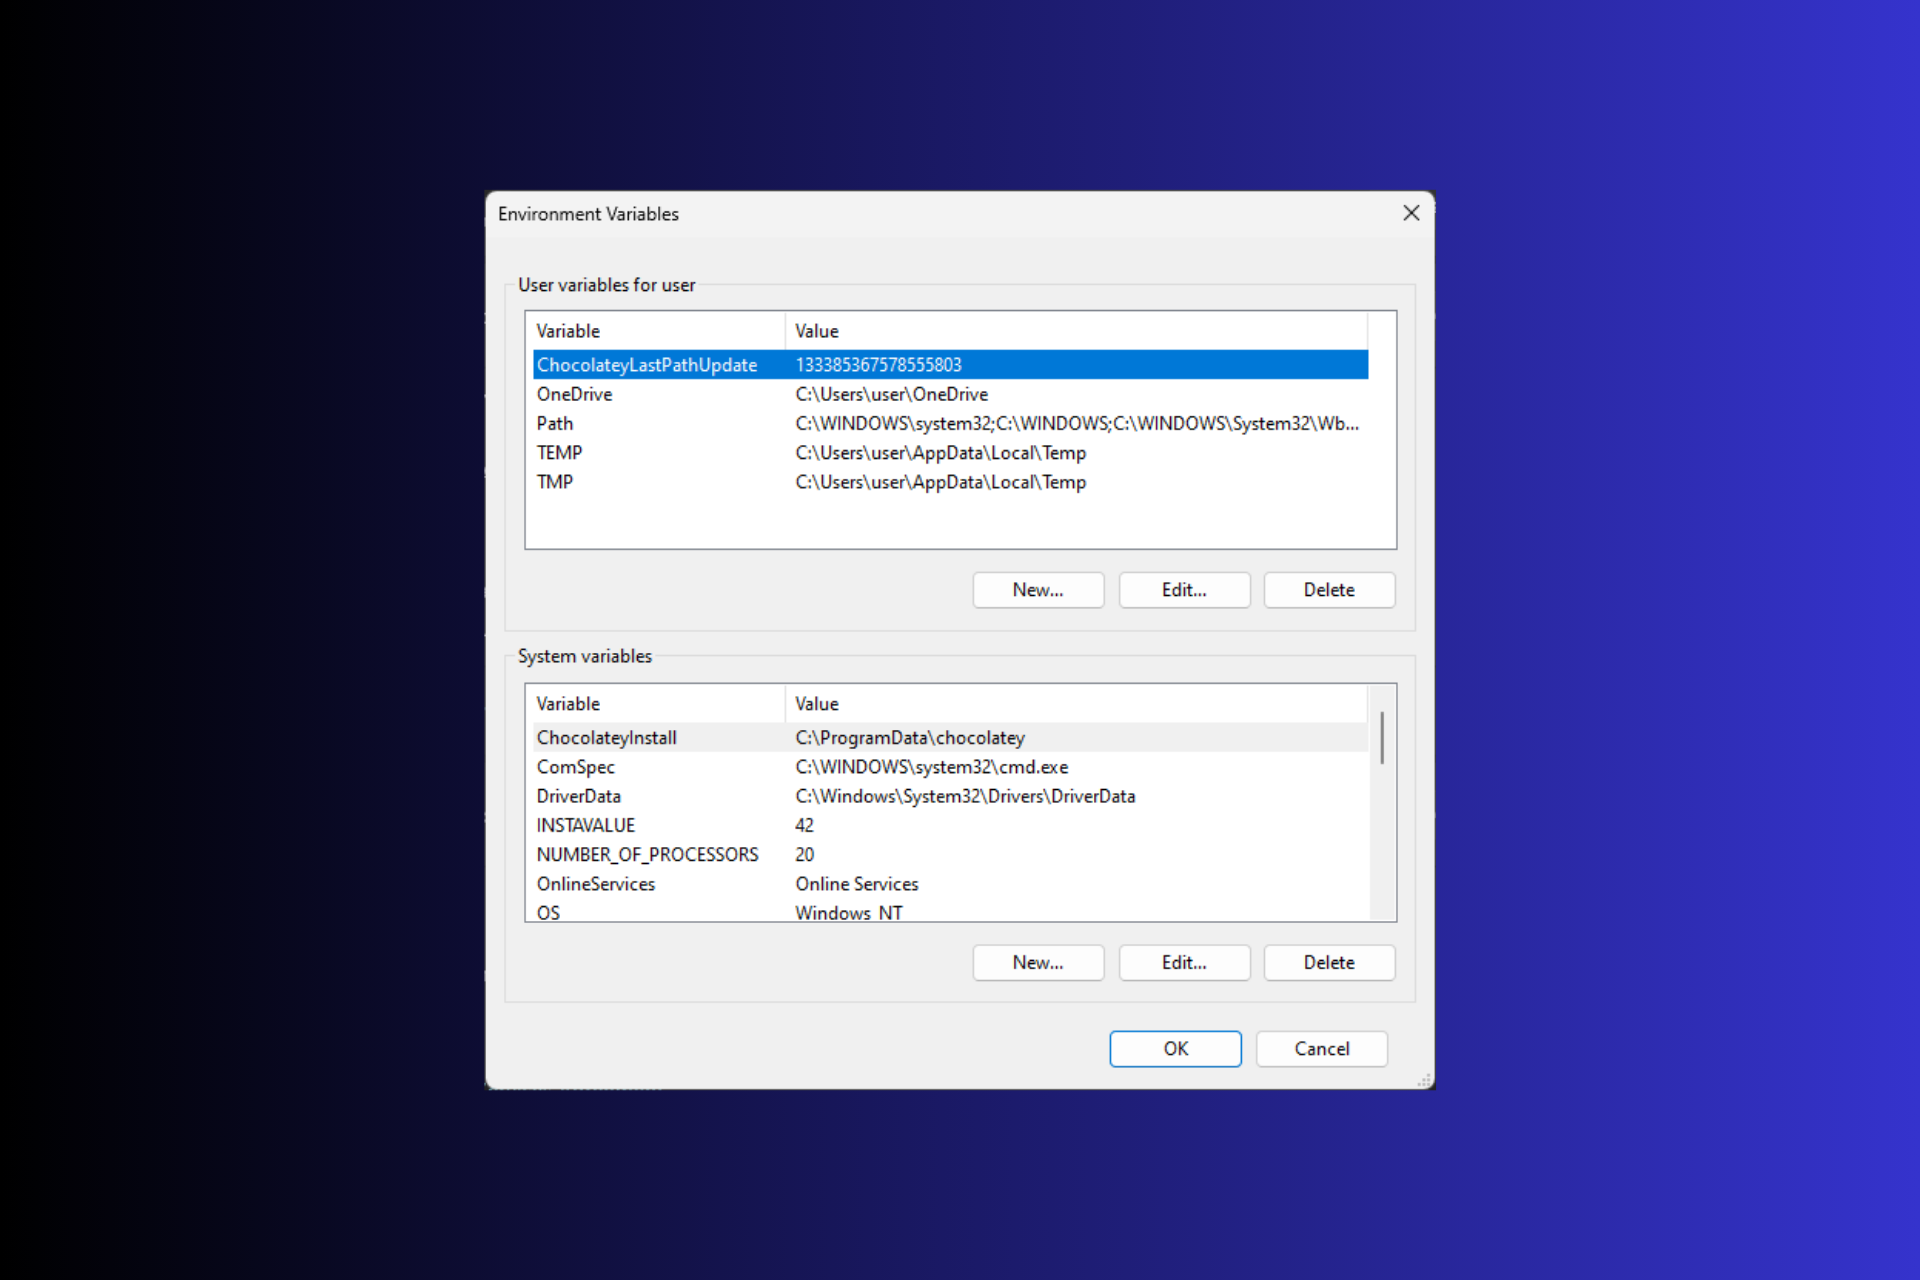
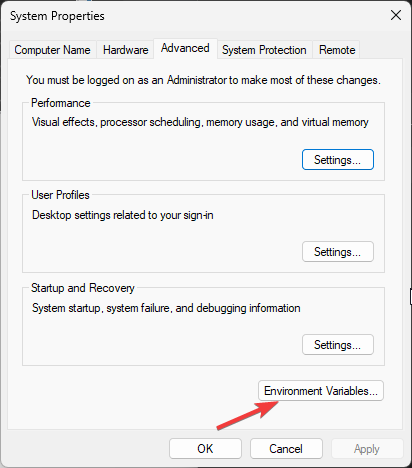
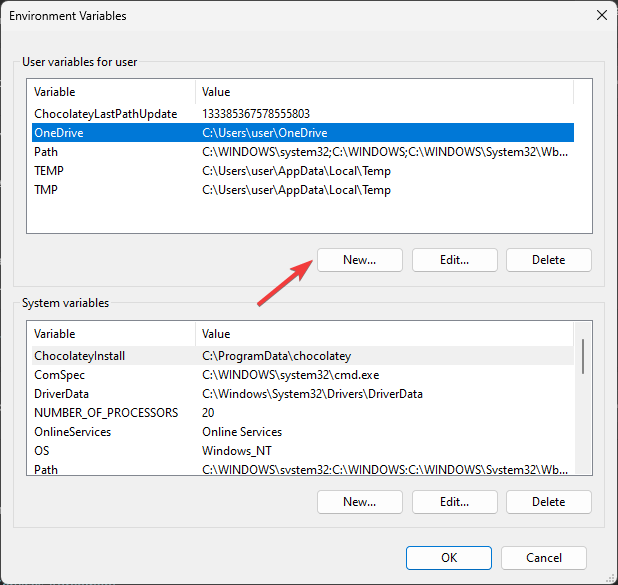
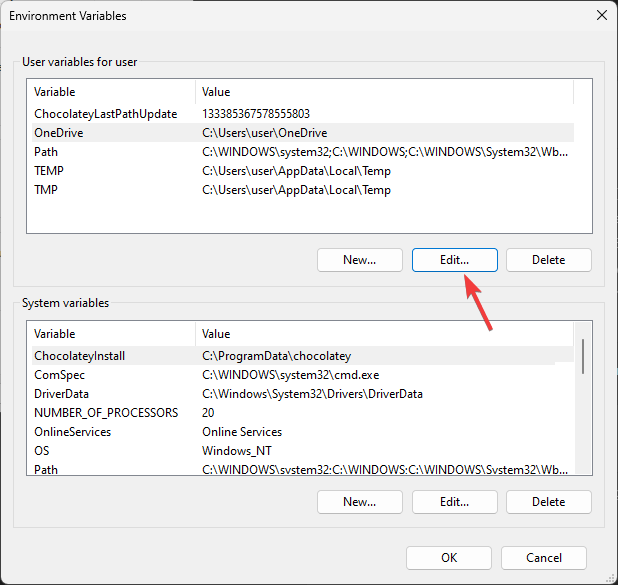
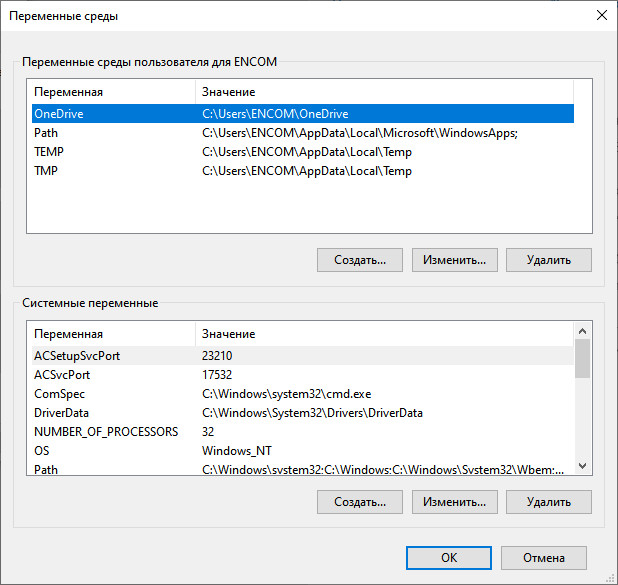
- В окне «Свойства системы» нажмитеПеременные среды.

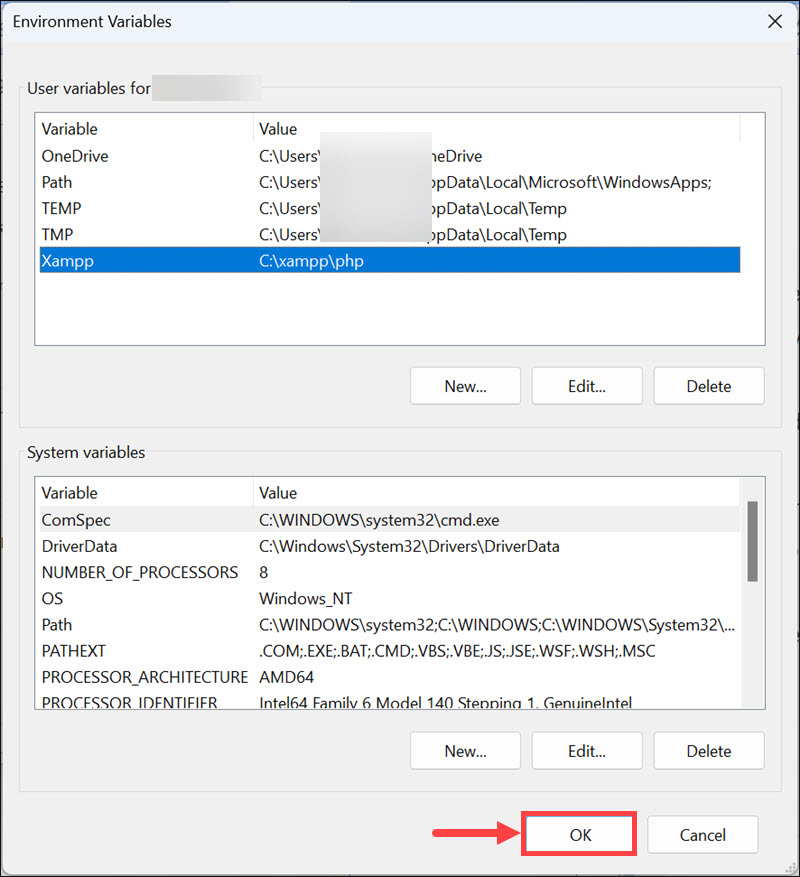
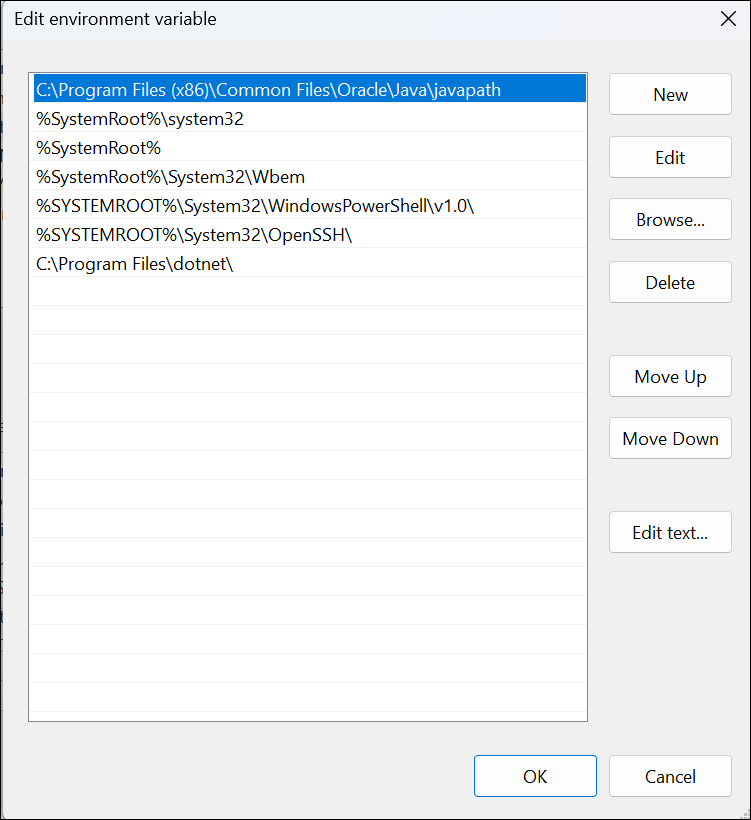
- Далее в окне «Переменные среды» вы увидите переменные двух типов. Выберите вариант из любогоПользовательские переменные для пользователяили Системные переменные и нажмитеНовый.

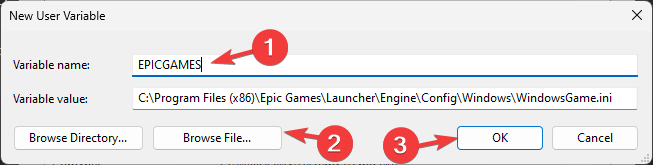
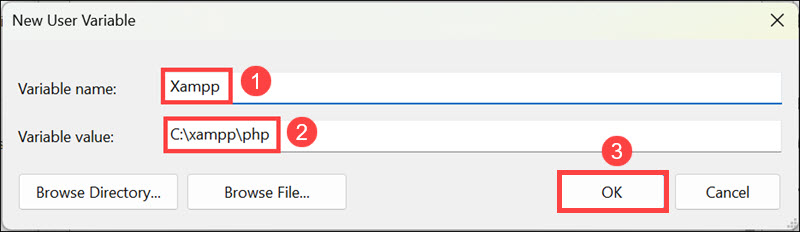
- В следующем окне введите имя переменной без пробелов, а дляЗначение переменной, нажмите кнопкуПросмотреть каталогили кнопку «Обзор файла».

- Выберите путь и нажмите «ОК».


2. Использование командной строки
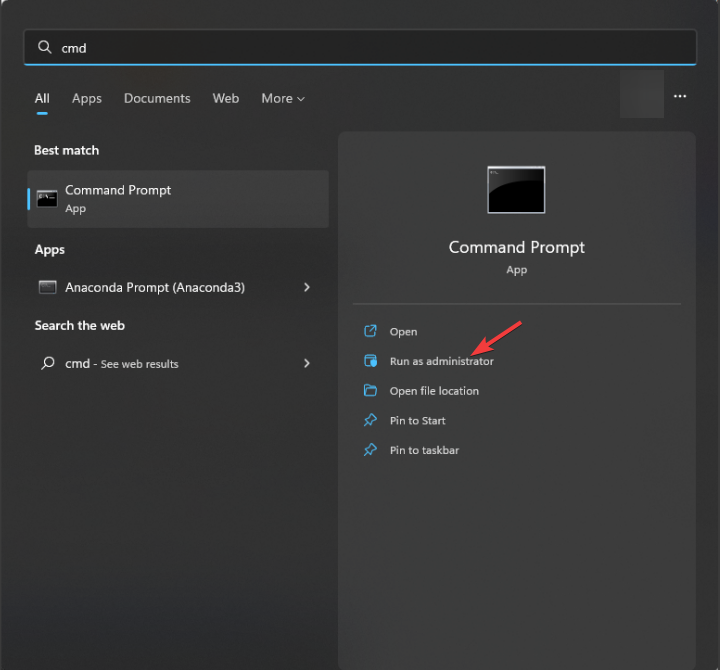
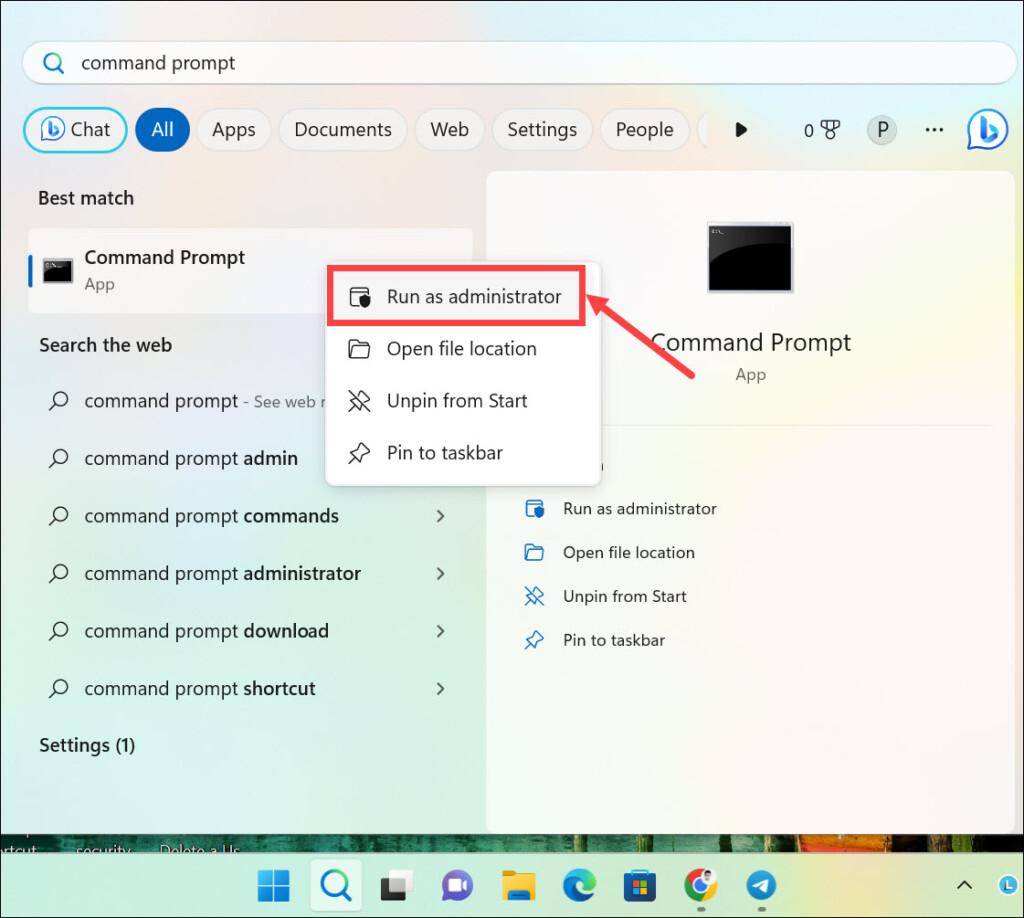
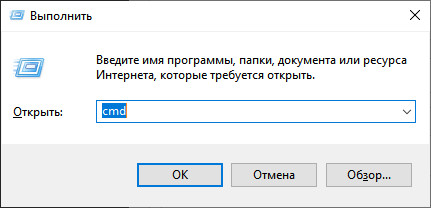
- Нажмите клавишу Windows, введитеcmdв строке поиска и нажмите «Запуск от имени администратора».

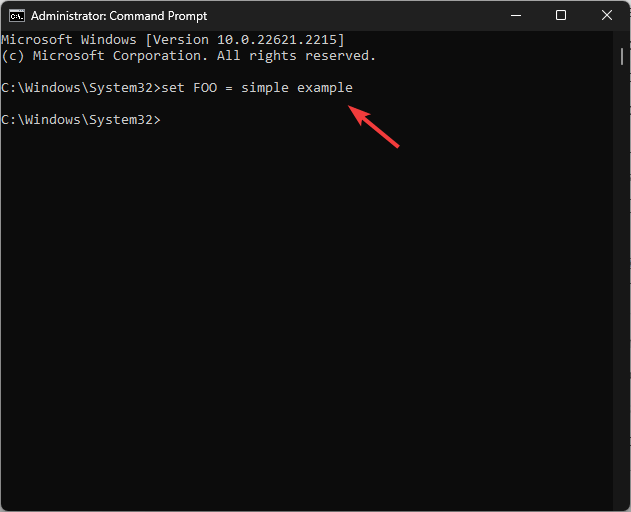
- Чтобы добавить временную переменную в вашу систему, используйте эту команду после замены VariableName и Variablevalue на нужную и нажмите Enter:
set VariableName = Variablevalue
- наборКоманда используется для определения переменной среды внутри процесса, для которого она задана, и будет удалена после закрытия окна.
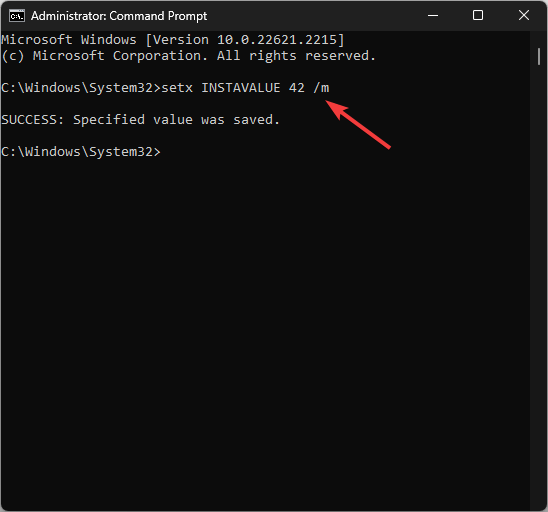
- Чтобы навсегда установить переменные среды, введите следующую команду, заменив имя переменной именем переменной и значение значением, которое вы хотите установить, и нажмите Enter:
setx Variablename Value /m
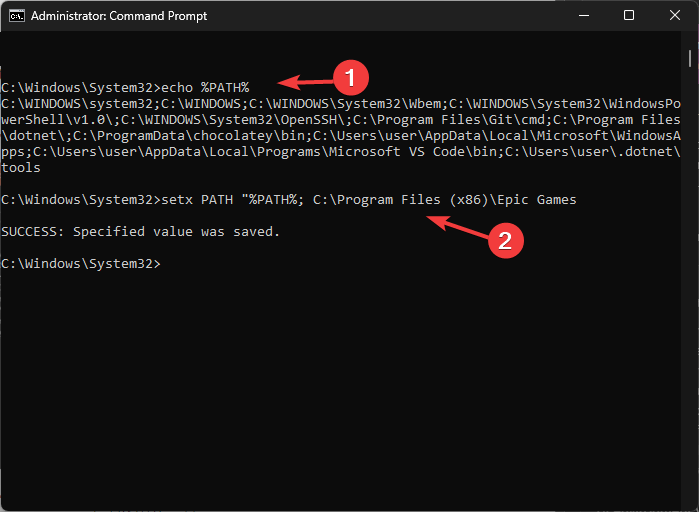
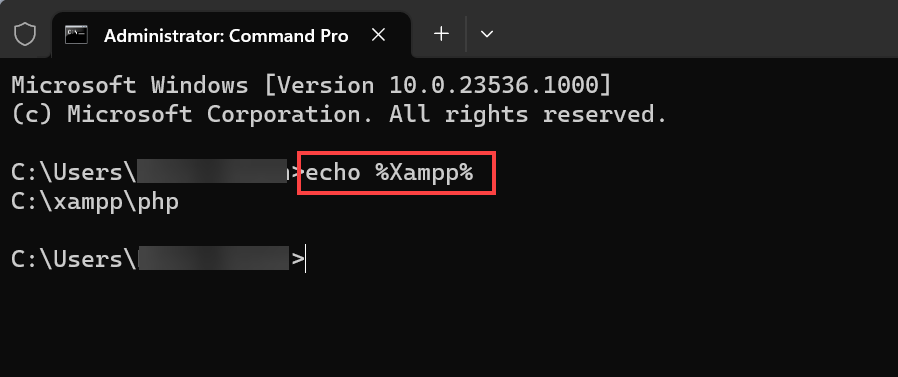
- Введите следующую команду, чтобы просмотреть переменные пути, и нажмите Enter:
echo %PATH% - Скопируйте и вставьте следующую команду, чтобы добавить еще одну переменную в каталог пути; замените значение PATH на путь, который вы хотите добавить, и нажмите Enter:
setx PATH "%PATH%; PATH Value
- Обновите окно переменных среды, чтобы увидеть новый добавленный путь.


3. Использование Windows PowerShell
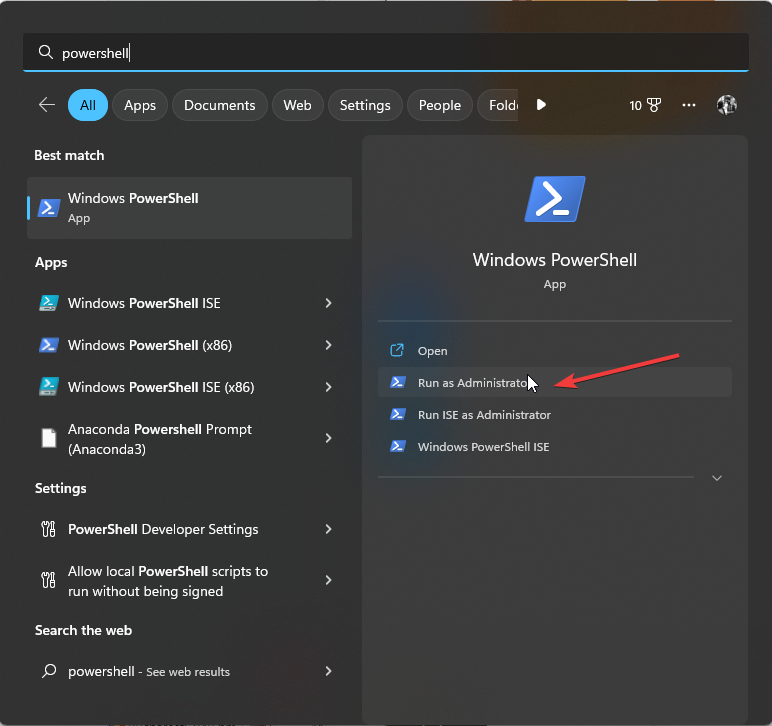
- Нажмите клавишу Windows, введитеPowerShellи нажмите «Запуск от имени администратора».

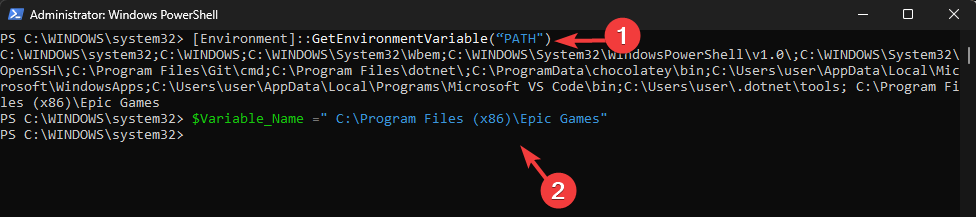
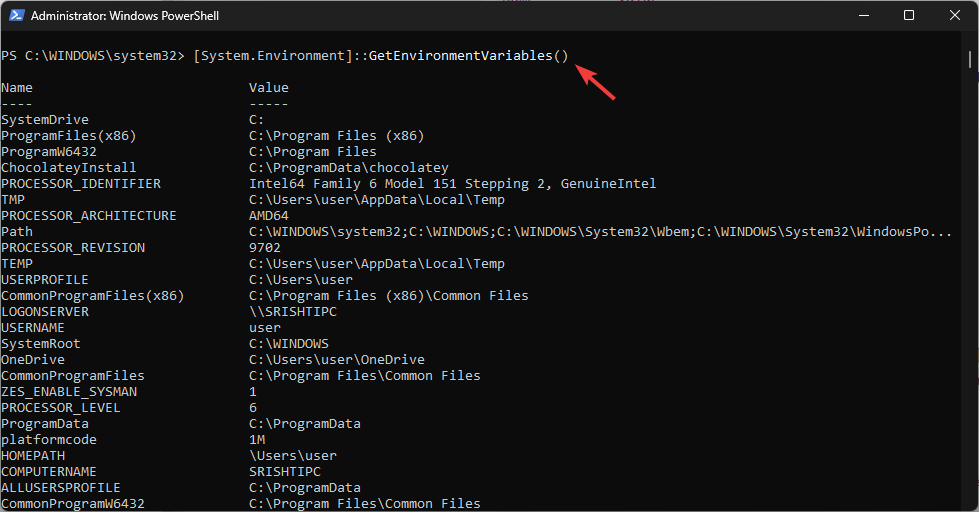
- Введите следующую команду для получения списка переменных пути и нажмите Enter:[Среда]::GetEnvironmentVariable(?PATH?)
- Скопируйте и вставьте следующую команду, чтобы объявить переменную пути после замены PATH на путь, который вы хотите добавить, и нажмите Enter:
$Variable_Name = "PATH"
- Чтобы добавить переменную в список переменных пути, используйте эту команду после замены пути к папке объявленным вами путем и нажмите Enter:[Среда]::SetEnvironmentVariable(?Путь к папке?, ?$PATH;$Variable_Name?)
- Перезагрузите компьютер, чтобы изменения вступили в силу.


Вы можете использовать любой из методов, чтобы добавить новую или отсутствующую переменную среды, чтобы предотвратить проблемы, например, когда система не может найти введенный параметр среды.
- Как получить и использовать высококонтрастные темы в Windows 11
- Как включить или отключить автоисправление слов с ошибками в Windows 11
- Как дать разрешения на чтение/запись, но не удалять
- Шифрование устройства отсутствует в Windows 11? Как вернуть это
Как редактировать переменные среды в Windows 11?
1. Использование приложения «Настройки»
- Нажмите Windows + I, чтобы открытьНастройки,затем перейдите в «Система», затемОи нажмите «Дополнительные параметры системы».
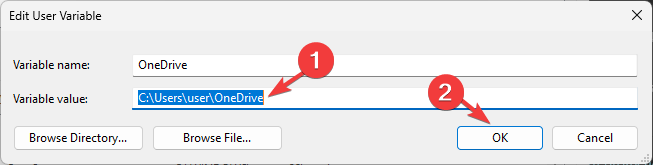
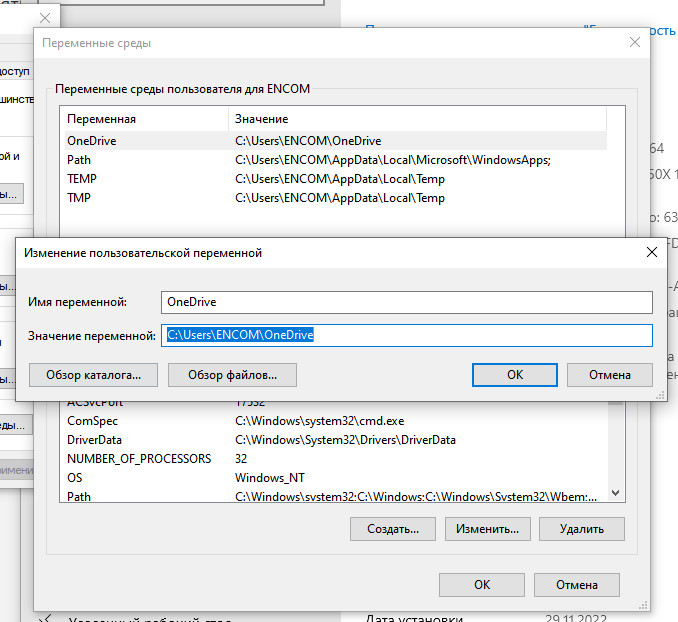
- НажмитеПеременные среды,затем выберите переменную, которую хотите изменить, и нажмитеРедактировать.
- Внесите изменения и нажмите «ОК» во всех трех окнах, чтобы сохранить изменения.
- Перезапустите окно «Переменная среды», чтобы увидеть изменения.


2. Использование редактора реестра
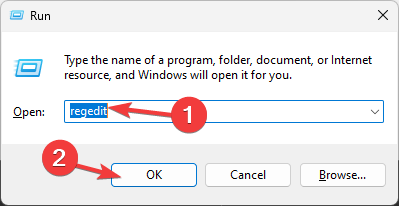
- Нажмите Windows + R, чтобы открытьБегатьдиалоговое окно.

- Типregeditи нажмите ОК, чтобы открытьРедактор реестра.
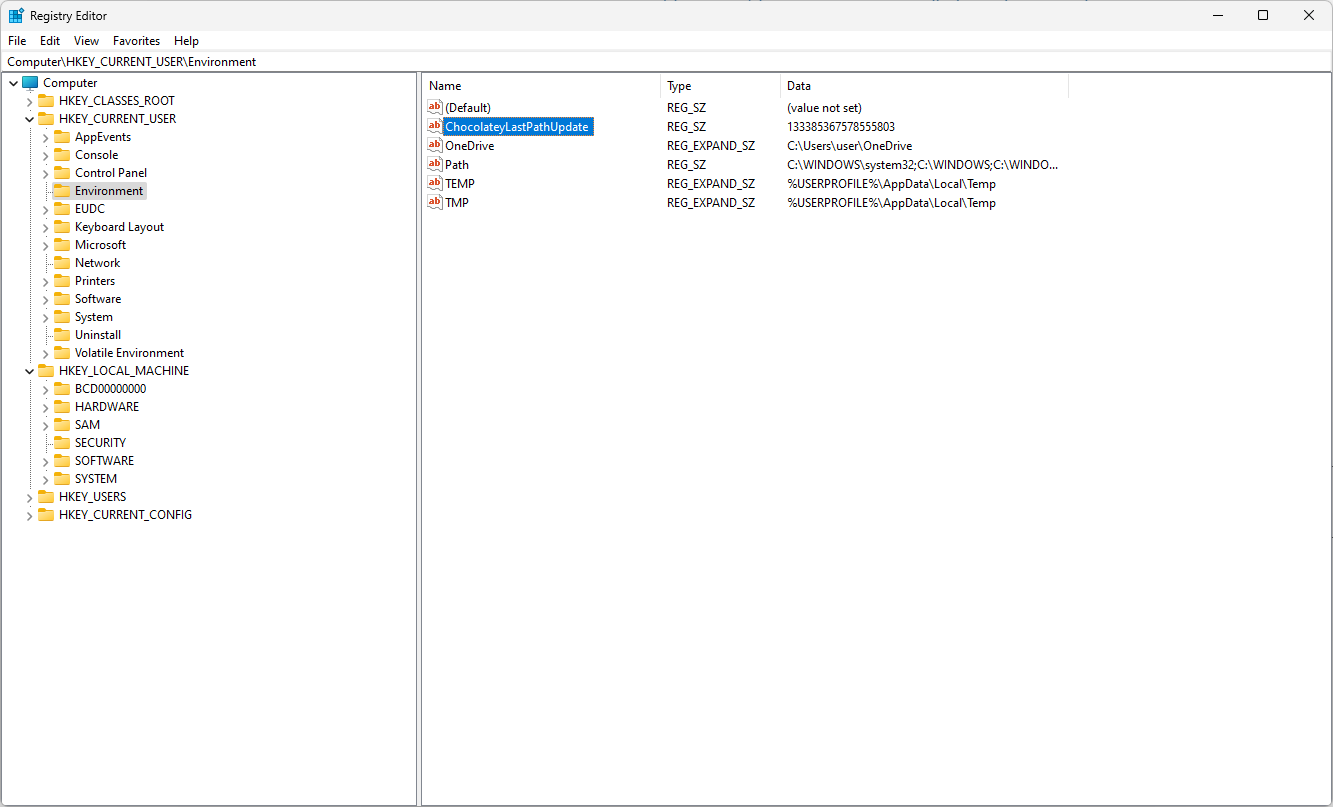
- Перейдите по этому пути, если вы вносите изменения в пользовательские переменные:
ComputerHKEY_CURRENT_USEREnvironment
- Для системных переменных перейдите по этому пути:
ComputerHKEY_LOCAL_MACHINESYSTEMCurrentControlSetControlSession ManagerEnvironment
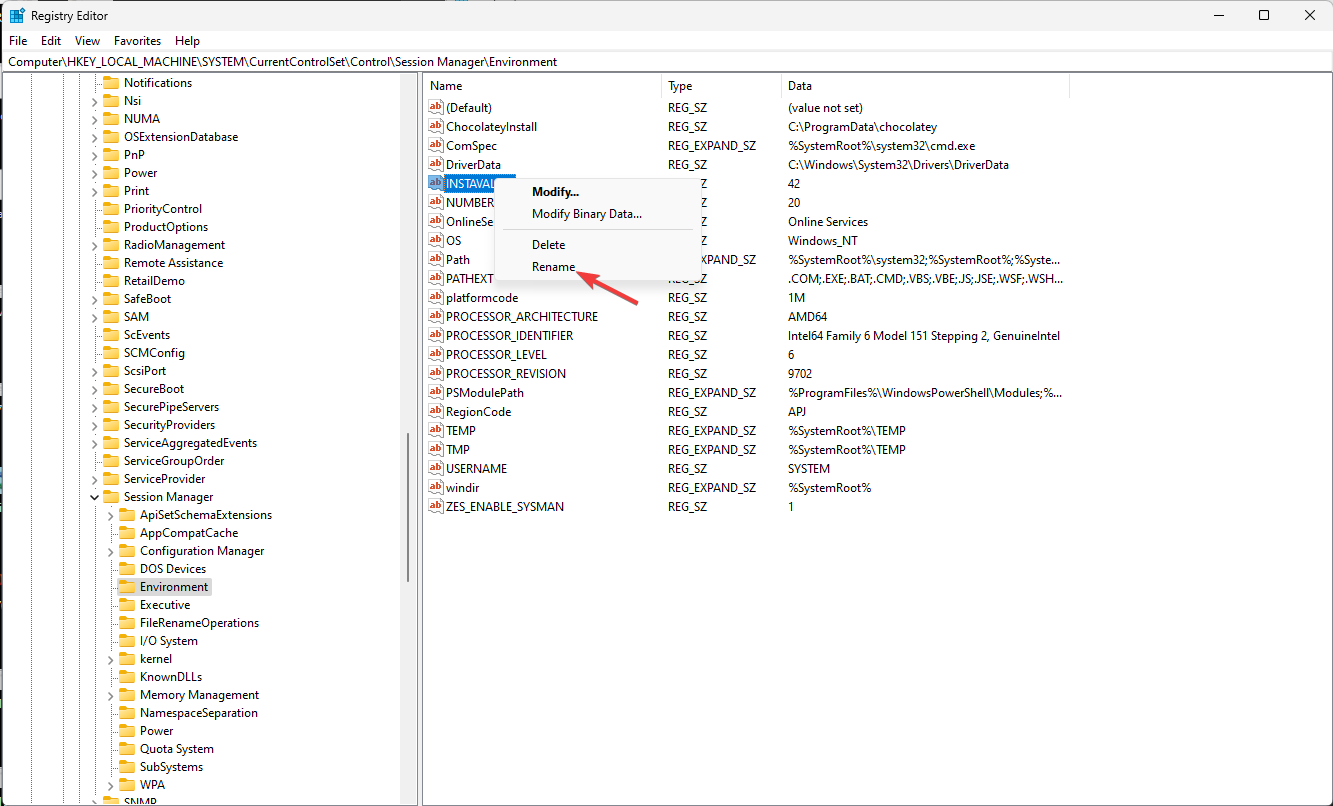
- Если вы хотите переименовать имя переменной, щелкните правой кнопкой мыши и выберитеПереименовать.
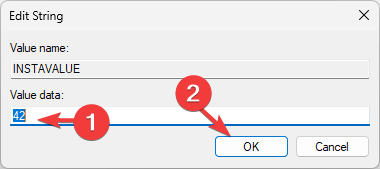
- Чтобы отредактировать данные значения, дважды щелкните переменную, измените данные значения и нажмите кнопкуХОРОШО.

- Перезагрузите компьютер, чтобы сохранить изменения.


3. Использование Windows PowerShell
- ОткрытьWindows PowerShellс правами администратора, выполнив те же шаги, упомянутые выше.
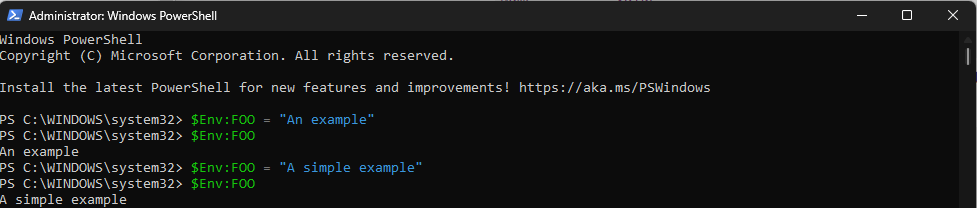
- Введите следующую команду, чтобы получить текущее значение переменной после замены VARIABLENAME именем переменной, и нажмите Enter:
$Env: VARIABLENAME
- Затем, чтобы обновить или отредактировать значение, скопируйте и вставьте следующую команду после заменыVARIABLEANMEвведите имя переменной и NEWVALUE — значение, которое вы хотите добавить, затем нажмите Enter:
$Env: VARIABLENAME = "NEWVALUE" - Перезагрузите компьютер, чтобы сохранить изменения.

Как получить список переменных среды в Windows?
Чтобы получить список переменных среды в Windows 11, вы можете открыть командную строку с правами администратора и ввестинабори нажмите Enter.

В Powershell с правами администратора, чтобы получить список переменных среды, скопируйте и вставьте следующую команду и нажмите Enter:[System.Environment]::GetEnvironmentVariables()

Если вы хотите распечатать список переменных среды, полученный в PowerShell, чтобы применить те же настройки на другом компьютере, прочтите это руководство.
Где хранятся переменные среды Windows?
Переменные среды можно найти в редакторе реестра. Системные переменные находятся вКомпьютерHKEY_LOCAL_MACHINESYSTEMCurrentControlSetControlSession ManagerEnvironment, где пользовательские переменные расположены по адресуКомпьютерHKEY_CURRENT_USERСреда
Установка переменных среды в Windows 11 может помочь вам настроить параметры системы; однако вы всегда должны проявлять осторожность при внесении изменений в системные переменные.
Не забудьте дважды проверить имя и значение переменной и всегда создавать резервную копию редактора реестра перед внесением изменений.
Застрял где-то? Не стесняйтесь упоминать свои вопросы в разделе комментариев ниже. Мы будем рады помочь Вам.
It’s easier than you think & more powerful than you know!
by Srishti Sisodia
Srishti Sisodia is an electronics engineer and writer with a passion for technology. She has extensive experience exploring the latest technological advancements and sharing her insights through informative… read more
Updated on
Reviewed by
Alex Serban

After moving away from the corporate work-style, Alex has found rewards in a lifestyle of constant analysis, team coordination and pestering his colleagues. Holding an MCSA Windows Server… read more
- Environment variables play a crucial role in the proper functioning of your operating system and installed apps.
- They store information like system paths, temporary file locations, and other user-specific settings.
- You can use Advanced system settings, Command Prompt, or Windows PowerShell to set it.
- Continue reading to know the detailed steps for each method.
Setting environment variables on Windows 11 can help you customize your system, run scripts, and configure applications.
In this guide, we will discuss three ways with step-by-step instructions to do that so you can configure your system according to your preferences.
There are three types of Environment Variables
- System Environment Variables – The global variables are at the lowest priority, can be accessed by all users & apps on a Windows, and are usually used to define system-wide settings.
- User Environment Variables – With a higher priority, these only apply to the current user & processes running under that account & are set by the user or apps that run under that account.
- Process Environment Variables – With the highest priority, they are temporary and apply to the current process & its child processes, providing runtime information or customization for a program.
How do I set & use Environment Variables on Windows 11?
1. Using the Settings app
- Press Windows + I to open Settings.
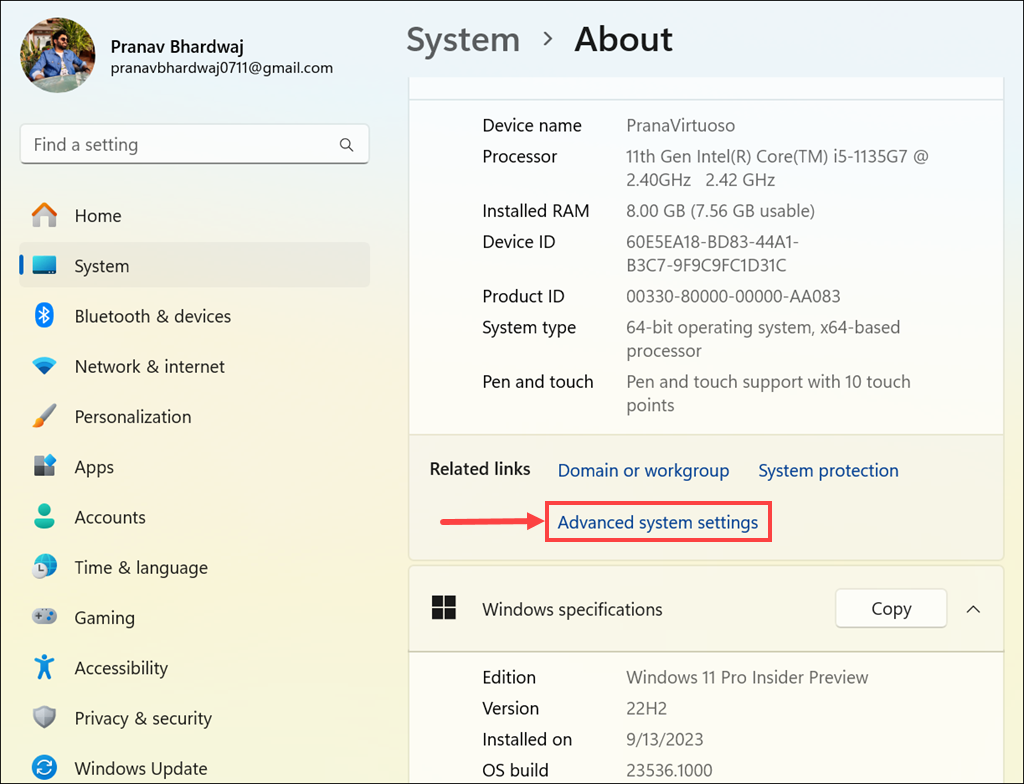
- Go to System, then click About.
- Click the Advanced system settings link.
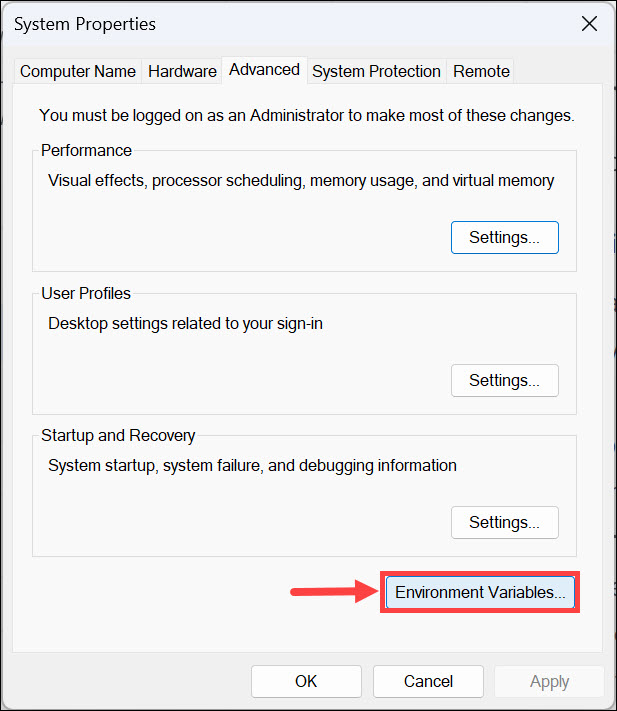
- On the System Properties window, click Environment Variables.
- Next, on the Environment Variables window, you will see two types of variables. Choose an option from either User variables for user or System variables and click New.
- On the following window, type in the Variable name without any spaces, and for Variable Value, click the Browse Directory or Browse File button.
- Select the path and click OK.
2. Using the Command Prompt
- Press the Windows key, type cmd in the search bar, and click Run as administrator.
- To add a temporary variable to your system, use this command after replacing VariableName & Variablevalue with the one you want and hit Enter:
set VariableName = Variablevalue - The set command is used to define an environment variable within the process for which it is defined and will be deleted once the window is closed.
- To set environment variables permanently, type the following command after replacing the Variablename with the name of the variable & Value with the value you want to set and press Enter:
setx Variablename Value /m - Now for the path variables, type the following command to list all of them and hit Enter:
echo %PATH% - Copy & paste the following command to add another variable to the path directory; replace the PATH value with the path you want to add and press Enter:
setx PATH "%PATH%; PATH Value - Refresh the Environment variable window to see the newly added path.
3. Using the Windows PowerShell
- Press the Windows key, type powershell, and click Run as administrator.
- Type the following command to list of path variables and press Enter: [Environment]::GetEnvironmentVariable(“PATH”)
- Copy & paste the following command to declare a path variable after replacing PATH with the path you want to add and hit Enter:
$Variable_Name = "PATH" - To add the variable to the Path Variable list, use this command after replacing Folder PATH with the path you declared and press Enter: [Environment]::SetEnvironmentVariable(“Folder PATH”, “$PATH;$Variable_Name”)
- Restart your computer to let the changes take effect.
You can use any of the methods to add a new or missing environment variable to prevent issues like the system could not find the environment option that was entered
How we test, review and rate?
We have worked for the past 6 months on building a new review system on how we produce content. Using it, we have subsequently redone most of our articles to provide actual hands-on expertise on the guides we made.
For more details you can read how we test, review, and rate at WindowsReport.
- How to Type Accents on Windows 11
- How to Disable the Insert Your Security Key Into the USB Port popup
How do I edit Environment Variables on Windows 11?
1. Using the Settings app
- Press Windows + I to open Settings, then go to System > About >Advanced system settings.
- Click Environment Variables, then select the variable you want to edit and click Edit.
- Make the changes and click OK on all three windows to save the changes.
- Restart the Environment Variable window to see the changes.
2. Using the Registry Editor
- Press Windows + R to open the Run dialog box.
- Type regedit and click OK to open Registry Editor.
- Navigate to this path if you are making changes to User Variables:
Computer\HKEY_CURRENT_USER\Environment - For System Variables, go to this path:
Computer\HKEY_LOCAL_MACHINE\SYSTEM\CurrentControlSet\Control\Session Manager\Environment - Once you have located either of the variables, you can change the name by right-clicking and selecting Rename.
- To edit the value, double-click the variable, change the Value data, and click OK.
- Restart your computer to save the changes.
3. Using the Windows PowerShell
- Open Windows PowerShell with administrator privileges using the same steps mentioned above.
- Type the following command to get the current value of the variable after replacing VARIABLENAME with the variable name and press Enter:
$Env: VARIABLENAME - Next, to update or edit the value, copy & paste the following command after replacing the VARIABLEANME with the name of the variable & NEWVALUE with the value that you want to add, then hit Enter:
$Env: VARIABLENAME = "NEWVALUE" - Reboot your PC to save the changes.
How do I get a list of Environment Variables in Windows?
To get a list of environment variables in Windows 11, you can open Command Prompt with administrator rights and type set, and hit Enter.
In Powershell, with admin privileges to get a list of environment variables, copy & paste the following command and hit Enter: [System.Environment]::GetEnvironmentVariables()
If you want to print the environment variables list you got on PowerShell to apply the same settings on another computer, read this guide.
Where are Windows environment variables stored?
You can find the environment variables in Registry Editor. The system variables are found in Computer\HKEY_LOCAL_MACHINE\SYSTEM\CurrentControlSet\Control\Session Manager\Environment, wherein the user variables are located at Computer\HKEY_CURRENT_USER\Environment
Setting environment variables on Windows 11 can help you customize your system settings; however, you must always exercise caution when making changes to system variables.
Remember to double-check the variable name & value, and always create a backup of your registry editor before making changes.
Stuck somewhere? Don’t hesitate to mention your queries in the comments section below. We will be happy to assist you.
![]()
Environment variables may sound like technical jargon, but they are crucial components of your Windows 11 operating system. These variables store essential information that helps your computer run smoothly and ensures that various software applications can find the resources they need.
Whether you’re a power user, developer, or just someone looking to troubleshoot issues on your PC, understanding how to set environment variables in Windows 11 is a valuable skill.
In this comprehensive guide, we will learn about environment variables, walk through the process of setting them, learn how to edit them, and even delve into the Windows PATH variable. By the end of this article, you’ll be equipped with the knowledge to harness the potential of environment variables on your Windows 11 machine.
What are Environment Variables?
Before we dive into setting environment variables, let’s understand what they are and why they are essential. Environment variables are dynamic values that store information about the system environment.
These variables can be system-wide or user-specific and play a vital role in how applications and the operating system itself function. They serve as placeholders for various system properties, directories, and user preferences.
Here are some key aspects of environment variables:
System Configuration
Environment variables store information about system configuration, such as the location of system files, system paths, and system settings. For example, the “SystemRoot” variable stores the path to the Windows system folder.
User Preferences
They can also hold user-specific settings and preferences, making them adaptable to individual users. For instance, you can create a custom environment variable to store your preferred default download directory.
Access By Applications
Applications and scripts can access these variables to retrieve critical information, like the location of essential files or temporary storage directories. For instance, software installations often use environment variables to determine where to store program files.
Modifiable
In Windows, users have the ability to modify or add environment variables to customize their computing experience. This flexibility allows you to tailor your system to your specific needs.
Now that we have a grasp of what environment variables are let’s delve into how to set them in Windows 11.
Setting environment variables in Windows 11 can be done through the System Properties menu. Follow these steps to create a new environment variable:
1. Press Win + X and select “System” from the context menu.
2. Under the System window, click the “Advanced system settings” on the left-hand side.
3. In the System Properties window, click the “Environment Variables…” button in the “Advanced” tab.
4. Under the “User variables” or “System variables” section, depending on whether you want the variable to be user-specific or system-wide, click the New button.
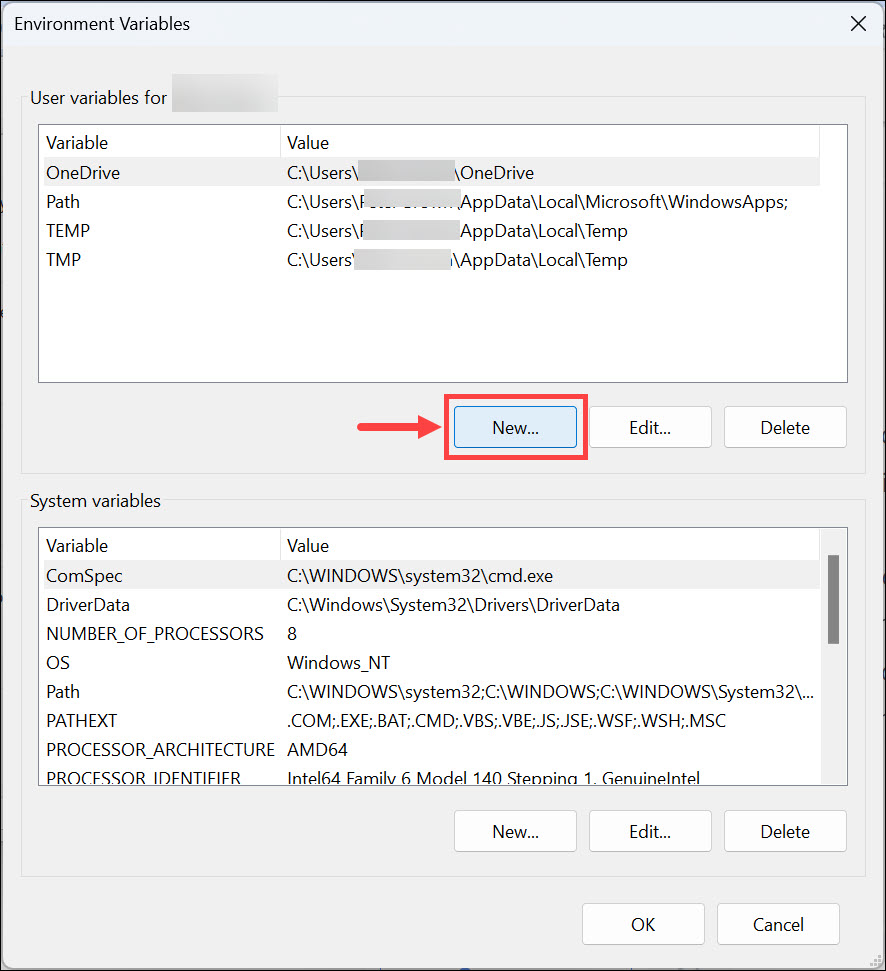
5. Enter a name for your variable in the “Variable name” field. Variable names are case-insensitive.
6. In the “Variable value” field, provide the value you want the variable to hold. This value can be a directory path, a string, or even a numerical value.
7. Next, click OK to create the new environment variable.
8. Finally, remember to click the OK button under the main Environment Variables window; otherwise, the newly created variable won’t work.
Congratulations! You’ve successfully created a new environment variable in Windows 11. Now, let’s explore how to use the newly created environment variable.
Using the Newly Created Environment Variable
Once you’ve created an environment variable, you can utilize it in various ways, such as configuring applications, setting default directories, or even automating tasks. Here’s how to use the newly created environment variable:
Through Command Prompt or PowerShell
1. Search for Command Prompt or PowerShell, right-click on the app icon, and select Run as Administrator.
2. Type the echo %variablename% command in the Command Prompt window and press enter. Replace the variablename with the variable name you created.
Through Run Command Window
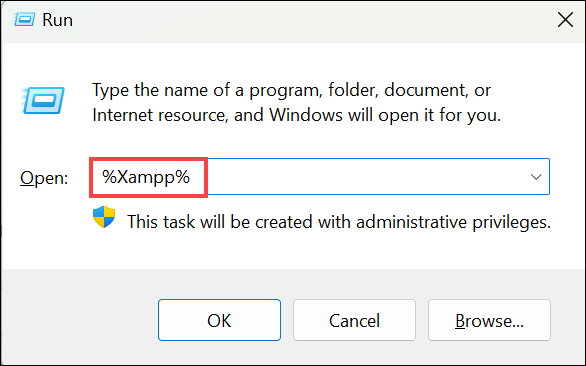
1. Press Windows + R to launch the Run Command Window.
2. Type the %variablename% command and hit enter. Replace the variablename with the variable name you created.
Now that you know how to use environment variables, let’s explore how to edit them if the need arises.
How to Edit Environment Variables in Windows 11
Editing environment variables in Windows 11 is a straightforward process. Here’s how to do it:
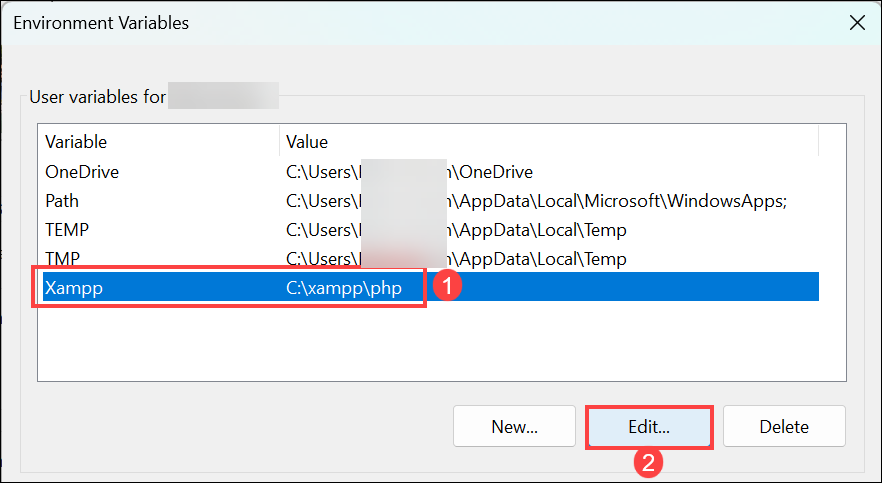
1. Follow the same steps as described earlier to access the “Environment Variables” window under System Properties.
2. In the “Environment Variables” window, select the variable you want to edit from the list under “User variables” or “System variables” and click the Edit button.
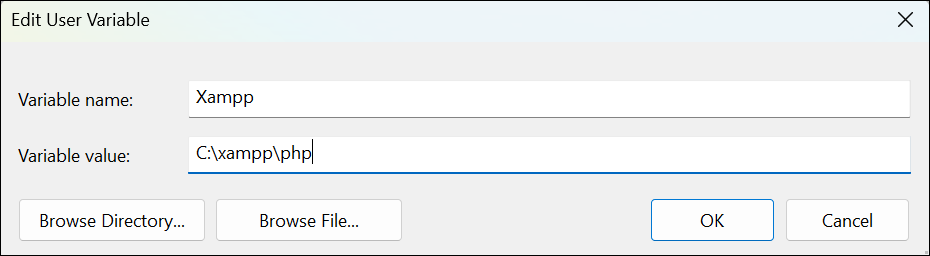
3. In the “Edit User Variable” window, you’ll see the current variable name and value. Modify the variable name or value as needed.
4. Click OK to save your changes.
5. Finally, remember to click the OK button under the main Environment Variables window; otherwise, changes won’t be effective.
You’ve successfully edited an environment variable in Windows 11.
What is Windows PATH Variable
The PATH variable in Windows is a crucial environment variable that specifies a set of directories where executable files are located. When you run a command in the Command Prompt or PowerShell, Windows searches these directories for the corresponding executable.
Understanding and managing the PATH variable can help you streamline your workflow by allowing you to execute commands from any location in the command prompt.
How to Set Windows PATH Variable
To set or modify the Windows PATH variable in Windows 11, follow these steps:
1. Open the “Environment Variables” window as described earlier.
2. In the “Environment Variables” window, under “User variables” or “System variables,” find and select the “Path” variable and click the Edit button.
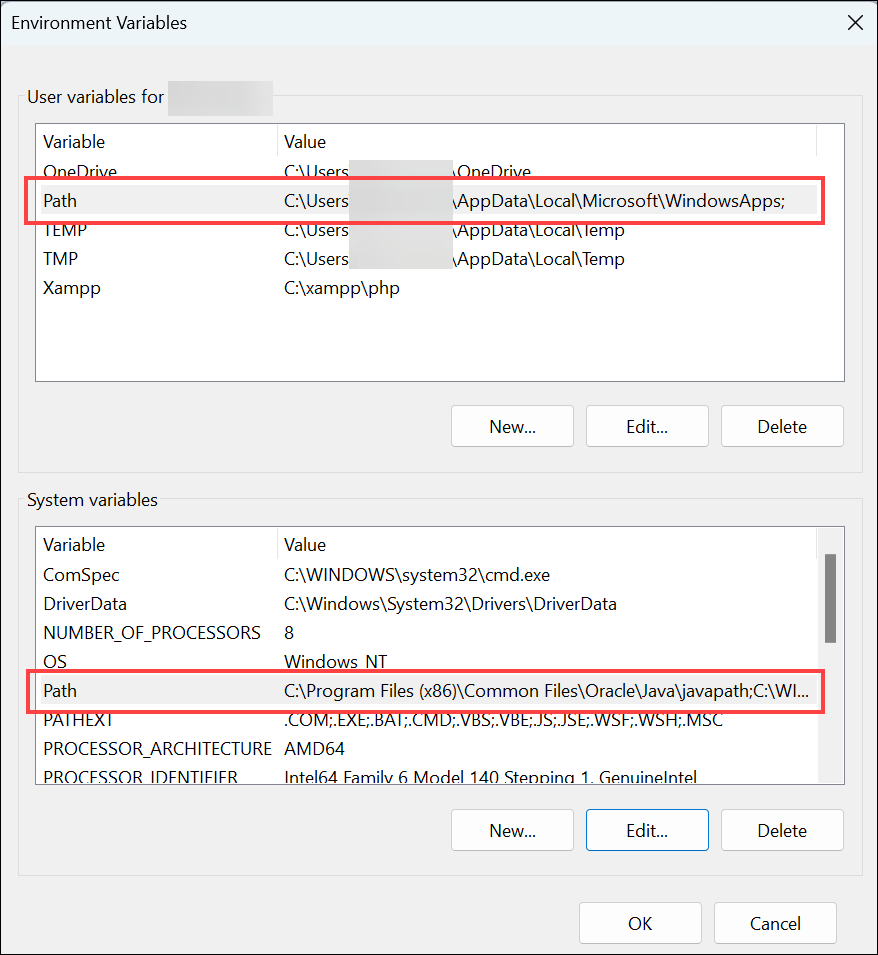
3. In the “Edit Environment Variable” window, you’ll see a list of paths. Click New to add a new path, and enter the directory path you want to add.
4. To modify an existing path, select it and click Edit.
5. Click OK to save your changes.
The Windows PATH variable has been updated with your new paths or modifications.
FAQs
Can I delete environment variables I no longer need?
Yes, you can delete environment variables. To do this, select the variable in the “Environment Variables” window and click the “Delete” button.
What happens if I create a user-specific environment variable and then delete my user account?
When you delete your user account, the user-specific environment variables associated with that account are also deleted.
Can I use environment variables in batch scripts or PowerShell scripts?
Yes, environment variables are commonly used in scripts to make them more dynamic and adaptable to different system configurations.
Take Control of Environment Variables
Understanding how to set, use, and manage environment variables in Windows 11 is a valuable skill that can enhance your computing experience and productivity. Environment variables are the building blocks that allow you to customize your system, configure applications, and automate tasks.
By following the steps outlined in this guide, you’ve gained the knowledge to set up and use the environment variables and the Windows PATH variable, making your Windows 11 experience more versatile and efficient.
Environment variables are variables that are defined in the operating system to configure certain parameters such as the path to search for a command or executable, folder for temporary files, application-specific options, etc,. There are two types of environment variables — user environment variables and system environment variables. User environment variables are specfic to each user that it is set for, while system environment variables are available to everyone on that computer.
In this article you will learn how to
- View Environment variables
- Add / Modify Environment variables
- Add / Modify / Remove PATH variable
- Manage environment variables from Advanced System Settings
View Environment Variables
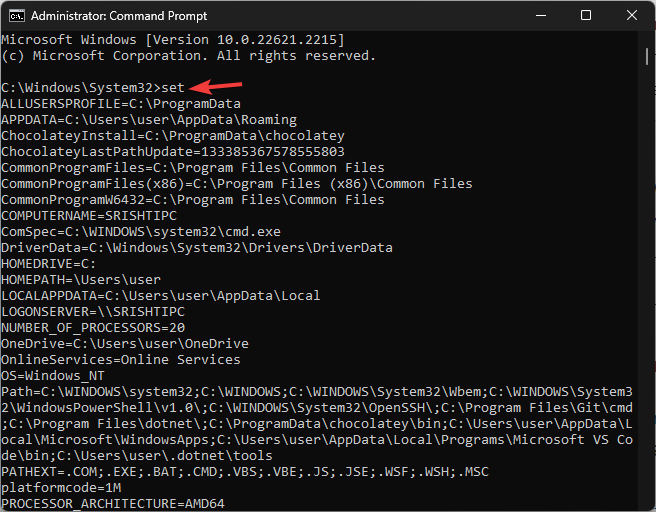
The SET command is used to view environment variables from the command line. To view all environment variables,
- Open command prompt — click the search icon and type cmd in the search bar. Then click on the Command Prompt from the results.
-
On the Command Prompt, type set and press Enter.
C:\> set
ALLUSERSPROFILE=C:\ProgramData
CommonProgramFiles=C:\Program Files\Common Files
CommonProgramFiles(x86)=C:\Program Files (x86)\Common Files
CommonProgramW6432=C:\Program Files\Common Files
-
To view any specific variable, the command is
setfollowed by that variable name.C:\> set windir windir=C:\WINDOWS
Add or Modify Environment Variable
Use the setx command to add a new environment variable permanently or to modify an existing environment variable.
If you want to add or modify a environment variable temporarily to the current command window only, then the command to use is set.
setx variableName value
or
set variableName=value
Example
c:\> setx TESTVAR someValue
SUCCESS: Specified value was saved.
Now, open a new command prompt and run the set command to verify that the new environment variable is created.
c:\> Set testvar
TESTVAR=someValue
Adding System Environment Variables
By default, the setx command adds the variables as user variable in the local environment. To add a variable to the system environment use the /m parameter. You also need run the command prompt as an administrator.
c:\> setx TESTVAR someValue /m
SUCCESS: Specified value was saved.
If the command windows is not run in administrator mode then you will get the following error
ERROR: Access to the registry path is denied.
The variables in the system environment are available to all users of the computer.
Difference between SET and SETX
The SET command is used to view, create and modify environment variables temporarily for the current command window. The variable that you add using SET are not available on any future command windows.
SETX command adds the variables permanently. The variables that are added using SETX are not available on the current command window but will be available on all future windows.
You cannot use setx to remove a environment variable but you can use set to remove a variable from the current command window.
Setting PATH variable
The PATH variable defines the search path for executable files. You can set the PATH variable from the command line or GUI.
View current PATH
To view the current path you can simply run the path command or echo %PATH% command.
c:\> path
PATH=C:\windows\system32;C:\windows;C:\windows\System32\Wbem;C:\windows\System32\WindowsPowerShell\v1.0\;C:\Program Files\Intel\Intel(R) Management Engine Components\DAL;C:\WINDOWS\system32;C:\WINDOWS;C:\WINDOWS\System32\Wbem;C:\WINDOWS\System32\WindowsPowerShell\v1.0\;C:\WINDOWS\System32\OpenSSH\;
Add path to current PATH
To add new path to the exiting path, use the SET or SETX command.
For example, to add the directory c:\NewFolder to existing path, the command is
c:\> set PATH=c:\NewFolder;%PATH%
Modify an existing path
The SET and SETX commands can be also used to modify an existing path. The syntax for this command is
set PATH=%PATH:current_path=new_path%
For example, to change c:\NewFolder in the current path to c:\AnotherFolder, the command is
set PATH=%PATH:c:\NewFolder;=c:\AnotherFolder;%
Remove path from current PATH
The syntax for removing a folder path from the current PATH is same as modifying an existing path explained above, except that you just have to omit the new path.
set PATH=%PATH:path_to_remove;=%
For example, to remove c:\AnotherFolder; from the existing path, the command is
set PATH=%PATH:c:\AnotherFolder;=%
Manage Environment variables from Advanced System Settings
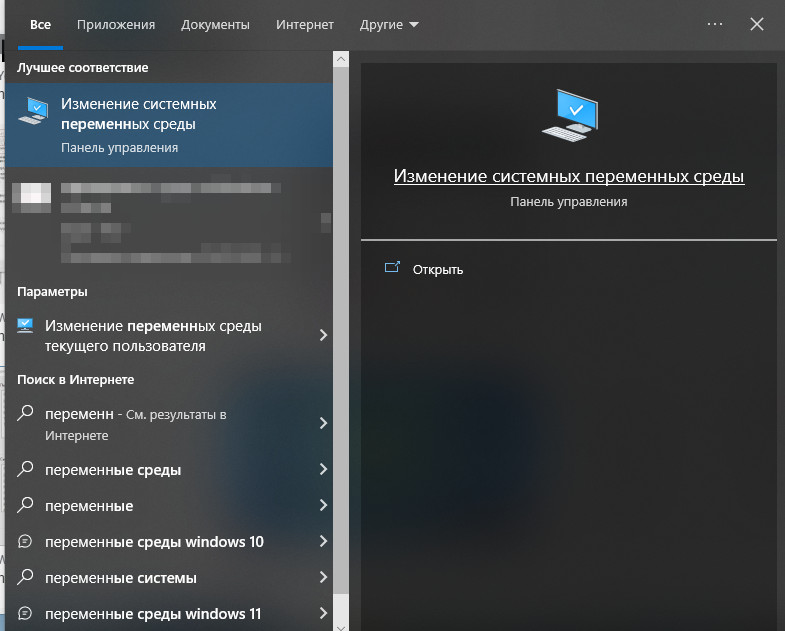
You could also manage environment variables from Advanced System Settings in Windows. Type env in the search box and select Edit environment variables for your account. This will open Environment Settings dialog from where you can add, edit and delete system and user environment variables.

MACDATA » Windows 11 » Переменные среды Windows 11 и 10: как управлять, изменять и создавать
Переменные среды в операционных системах Windows 11 и 10 являются важным компонентом, который позволяет программам и приложениям работать в определенном окружении на компьютере. Они содержат информацию о путях к различным файлам и программам, а также другие настройки и значения, которые используют приложения для определения своих настроек и поведения.
Изменение переменных среды может быть полезно, например, когда требуется добавить новые пути для поиска файлов, изменить настройки времени, языка и кодировки приложений, или установить и использовать различные системные переменные, которые используются программами для принятия решений.
В обзоре вы узнаете, как управлять, изменять и создавать переменные среды в Windows 11 и 10, и получите инструкции, как это может помочь улучшить работу вашего компьютера и приложений.
Что такое переменные среды в Windows 11 и 10
Определение переменных среды
Переменные среды — это системные переменные, которые используются для хранения значений, доступных для всех процессов, запущенных на компьютере. В случае Windows 11 и 10, переменные среды используются для определения путей к различным системным директориям и файлам, настройки параметров и других конфигурационных значений.
Как работают переменные среды
Переменные среды создаются различными программами при установке на компьютер. При этом системе указывается, какие значения необходимо присвоить этим переменным. В дальнейшем, при запуске программы, она считывает значения этих переменных среды, что позволяет ей правильно работать с различными файлами и директориями на компьютере.
Изменение переменных среды
Для изменения значений переменных среды в Windows 11 и 10 необходимо открыть соответствующий элемент управления в операционной системе. Здесь можно создать новые переменные среды, изменить значения существующих переменных или удалить ненужные переменные. При этом следует быть осторожными, чтобы не повредить другие программы, которые могут зависеть от этих переменных.
Как управлять переменными среды в Windows 11 и 10 через настройки

1. Открыть настройки системы
Для начала управления переменными среды в Windows 11 и 10 нужно открыть настройки системы. Для этого нужно нажать правой кнопкой мыши на кнопке «Пуск» и выбрать «Система«. Также переменные среды в Windows можно найти через поиск в меню Пуск.
2. Выбрать переменные среды
Далее нужно выбрать раздел «Дополнительные настройки системы» и нажать на кнопку «Переменные среды«.
3. Добавление новой переменной среды Windows
Если требуется добавить новую переменную среды Windows, то нужно нажать на кнопку «Новая переменная«. Далее необходимо указать имя переменной и ее значение.
4. Изменение существующей переменной среды Windows
Для изменения существующей переменной среды нужно найти ее в списке, выбрать и нажать на кнопку «Изменить«. Далее необходимо отредактировать значение переменной и сохранить изменения.
5. Удаление переменной среды Windows
Чтобы удалить переменную среды Windows, нужно выбрать ее в списке и нажать на кнопку «Удалить«.
6. Использование переменных среды в командной строке
Переменные среды Windows 11 и 10 используются не только для настройки системы, но и для управления приложениями через командную строку. Для использования переменной среды в командной строке нужно указывать переменную в виде %ИМЯ_ПЕРЕМЕННОЙ%.
Как изменить переменную среды в Windows 11 и 10 через командную строку
1. Откройте командную строку
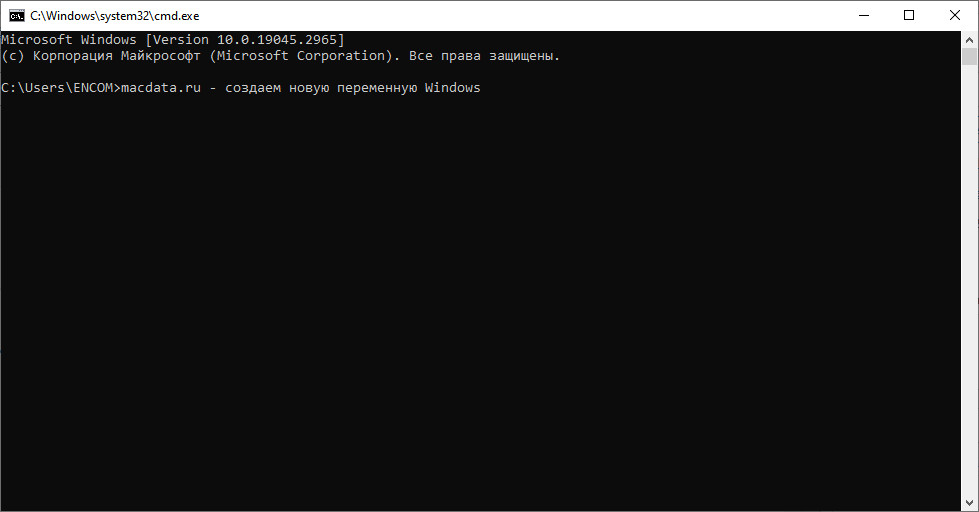
Для этого нажмите на кнопку «Пуск» и введите «cmd» в строку поиска. После чего нажмите на команду «Командная строка».
2. Введите команду для просмотра существующих переменных среды
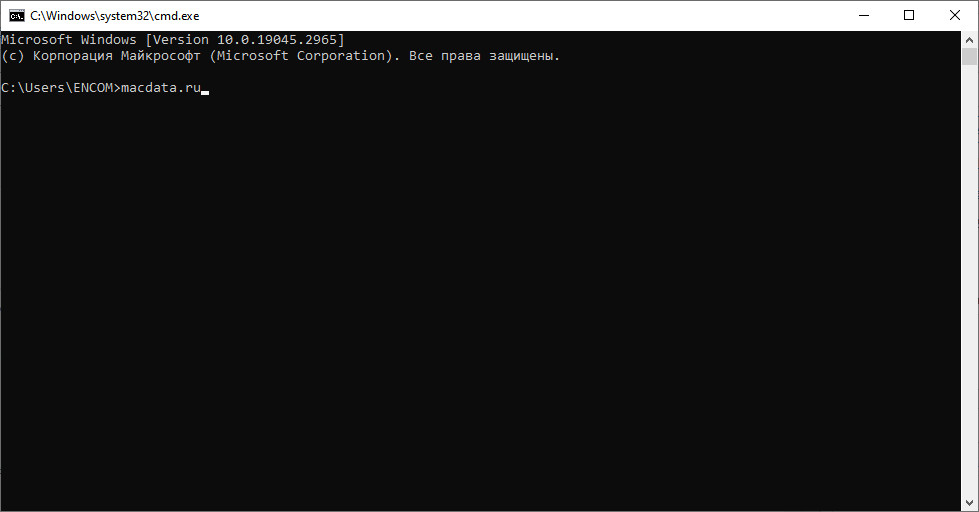
Введите команду «set» и нажмите на клавишу Enter. Все существующие переменные среды будут отображены на экране.
3. Измените значение переменной среды
Введите команду «setx», после чего укажите название переменной среды, которую вы хотите изменить, и ее новое значение. Например:
setx PATH «C:\новый_путь»;
В данном примере мы изменили переменную PATH и присвоили ей новое значение «C:\новый_путь«.
4. Проверьте изменения
Введите команду «echo %название_переменной%» для того, чтобы убедиться, что значение переменной изменилось. Новое значение должно отобразиться на экране.
Теперь вы знаете, как изменить переменную среды в Windows 11 и 10 через командную строку.
Как создать новую переменную среды в Windows 11 и 10 через настройки
Шаг 1. Открытие настроек
Для того чтобы создать новую переменную среды в Windows 11 и 10, нужно открыть настройки компьютера. Для этого нажмите на кнопку «Пуск» в левом нижнем углу экрана и выберите «Настройки» (шестеренка).
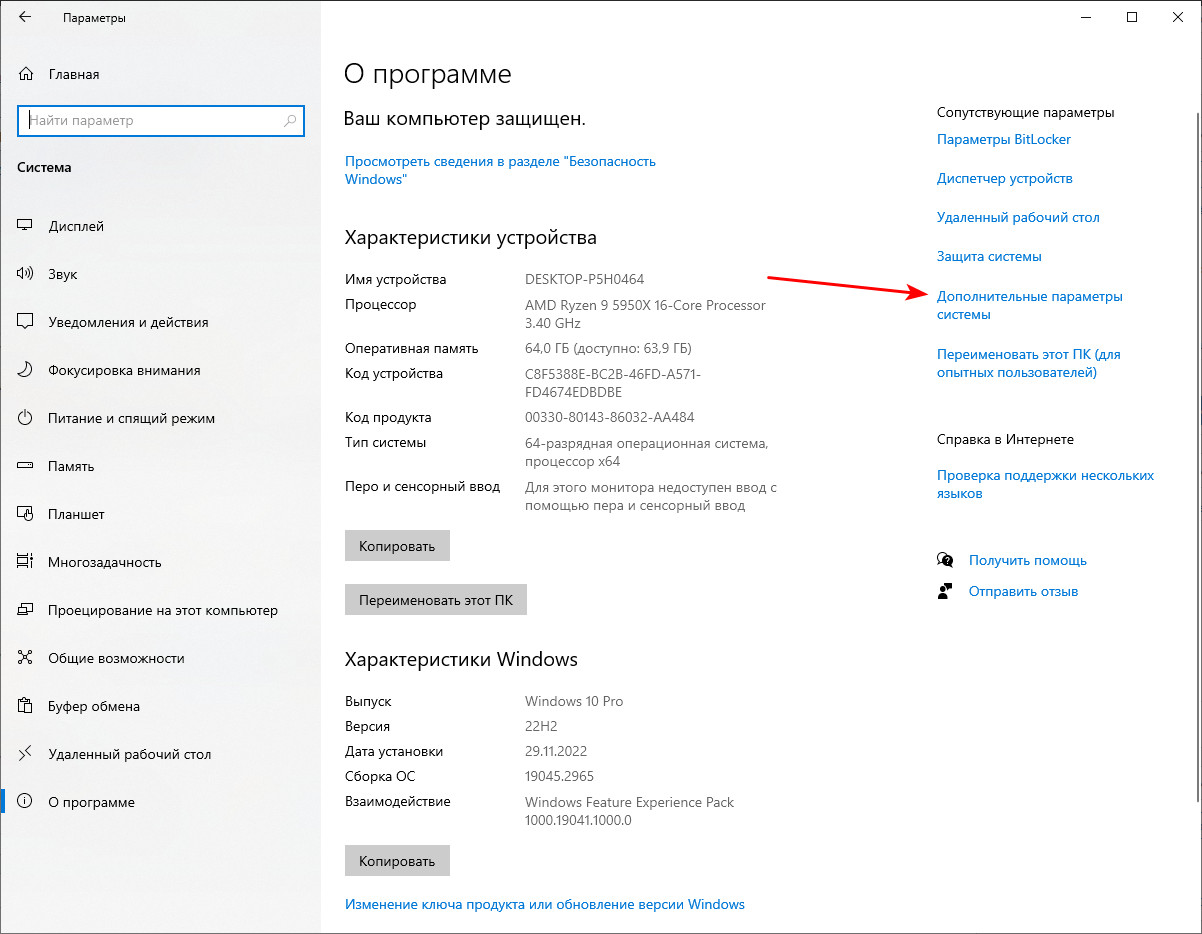
Шаг 2. Переход в «Система»
В меню настроек выберите «Система«. Далее выберите на вкладке слева «Дополнительные параметры системы«.
Шаг 3. Добавление новой переменной среды
На вкладке «Дополнительные параметры системы» выберите в разделе «Переменные среды» кнопку «Новая». В появившемся окне введите имя переменной и ее значение. Например, имя переменной может быть «MY_VAR«, а значение «C:\Program Files\MyApp«.
После того, как вы ввели имя переменной среды и ее значение, нажмите на кнопку «ОК» и закройте все окна настроек.
Проверка наличия переменной среды
Чтобы проверить, что переменная была успешно добавлена, можно открыть командную строку и ввести команду «echo %MY_VAR%«. Если вы увидите значение переменной (в нашем примере «C:\Program Files\MyApp«), то все прошло успешно.
Как создать новую переменную среды в Windows 11 и 10 через командную строку
Шаг 1: Открыть командную строку
Для начала работы с созданием новых переменных среды в Windows 11 и 10 необходимо открыть командную строку. Для этого в меню «Пуск» следует найти раздел «Windows PowerShell» и нажать на него правой кнопкой мыши. В появившемся контекстном меню нужно выбрать пункт «Запустить от имени администратора».
Шаг 2: Ввести команду для создания переменной среды
Как только командная строка откроется, можно начинать создание новой переменной среды. Для этого следует ввести команду setx name value, где «name» представляет собой название переменной, а «value» — значение.
Шаг 3: Проверить, что новая переменная была создана
После ввода команды создания переменной можно проверить, что она была успешно создана. Для этого можно ввести команду set, которая выведет все текущие переменные среды. Если новая переменная присутствует в списке, значит она успешно создана.
А так, можно заявить что создание новой переменной среды в Windows 11 и 10 через командную строку — простой процесс, который не потребует много времени и усилий. Следуя предложенной инструкции, можно без труда создавать новые переменные и управлять средой.
Примеры использования переменных среды в Windows 11 и 10
1. Настройка путей поиска файлов
Переменные среды позволяют настроить пути поиска файлов, которые используются приложениями. Например, переменная среды PATH определяет список директорий, в которых операционная система будет искать исполняемые файлы. Вы можете изменять этот список, чтобы добавлять новые пути и удалять старые.
Чтобы добавить путь к переменной PATH, нужно зайти в свойства системы, выбрав пункт «Изменить переменные среды» в разделе «Дополнительные параметры системы«. Далее выбрать переменную PATH и добавить в список нужный путь.
2. Сохранение файлов в определенную папку
Вы можете использовать переменную среды для определения директории, в которую будут автоматически сохраняться все загружаемые файлы. Например, вы можете создать переменную среды с именем DOWNLOADS, которая будет содержать путь к директории загрузок.
Чтобы создать переменную среды, нужно зайти в свойства системы, выбрав пункт «Изменить переменные среды» в разделе «Дополнительные параметры системы«. Далее выбрать переменную и указать ее значение.
3. Управление настройками приложений
Некоторые приложения могут использовать переменные среды для своей работы. Например, вы можете использовать переменную среды TEMP для указания временной директории, в которой будут сохраняться временные файлы. Это может быть полезно для решения проблем с доступом на диске.
Чтобы управлять переменными среды для конкретного приложения, нужно зайти в его свойства и выбрать вкладку «Совместимость». Далее выбрать пункт «Настроить для этого приложения» и настроить нужные значения переменных.
Ответы на вопросы
Какие переменные среды в Windows 11 и 10 можно изменять?
В Windows 11 и 10 можно изменять множество переменных среды, включая PATH, JAVA_HOME, TMP, TEMP, и другие. Однако, изменение некоторых переменных может оказать влияние на работу операционной системы, поэтому следует быть осторожным и иметь понимание того, что вы делаете.
Как создать новую переменную среды в Windows 11 и 10?
Чтобы создать новую переменную среды в Windows 11 и 10, нужно открыть «Панель управления», выбрать «Система и безопасность», затем «Система», «Дополнительные параметры системы», вкладку «Дополнительно» и нажать «Переменные среды». В открывшемся окне нужно нажать «Создать», ввести имя переменной и ее значение, и нажать «ОК».
Как узнать значение переменной среды в Windows 11 и 10?
Чтобы узнать значение переменной среды в Windows 11 и 10, нужно открыть командную строку, ввести команду «echo %имя_переменной%» и нажать Enter. Например, для получения значения переменной PATH нужно ввести «echo %PATH%».
Как изменить значение переменной среды в Windows 11 и 10?
Чтобы изменить значение переменной среды в Windows 11 и 10, нужно открыть «Панель управления», выбрать «Система и безопасность», затем «Система», «Дополнительные параметры системы», вкладку «Дополнительно» и нажать «Переменные среды». В открывшемся окне нужно выбрать переменную, нажать «Изменить», ввести новое значение и нажать «ОК».
Зачем нужно изменять переменные среды в Windows 11 и 10?
Изменение переменных среды в Windows 11 и 10 может понадобиться для установки и настройки различных программ, управления путями к файлам и папкам, определения пути к JDK и другим инструментам разработки, а также для оптимизации работы операционной системы.
Как удалить переменную среды в Windows 11 и 10?
Чтобы удалить переменную среды в Windows 11 и 10, нужно открыть «Панель управления», выбрать «Система и безопасность», затем «Система», «Дополнительные параметры системы», вкладку «Дополнительно» и нажать «Переменные среды». В открывшемся окне нужно выбрать переменную, нажать «Удалить» и подтвердить удаление.
Как изменить переменную среды только для одной сессии в Windows 11 и 10?
Чтобы изменить переменную среды только для одной сессии в Windows 11 и 10, нужно открыть командную строку, ввести команду «set имя_переменной=значение» и нажать Enter. Например, для изменения переменной PATH нужно ввести «set PATH=C:\NewPath». При этом, изменение переменной будет доступно только в текущей сессии, после ее завершения переменная вернется к своему первоначальному значению.
Как добавить новое значение в переменную среды в Windows 11 и 10?
Чтобы добавить новое значение в переменную среды в Windows 11 и 10, нужно открыть «Панель управления», выбрать «Система и безопасность», затем «Система», «Дополнительные параметры системы», вкладку «Дополнительно» и нажать «Переменные среды». В открывшемся окне нужно выбрать переменную, нажать «Изменить», ввести новое значение, разделив его символом «;», и нажать «ОК». Например, для добавления пути «C:\NewFolder» в переменную PATH нужно ввести «C:\NewFolder;%PATH%».
Как проверить текущие переменные среды в Windows 11 и 10?
Чтобы проверить текущие переменные среды в Windows 11 и 10, нужно открыть командную строку, ввести команду «set» и нажать Enter. Появится список всех переменных среды и их значений.
Какую переменную среды лучше не изменять в Windows 11 и 10?
Одной из переменных среды, которую не рекомендуется изменять в Windows 11 и 10, является переменная PATH. Изменение этой переменной может привести к непредсказуемым последствиям, таким как невозможность запуска системных утилит и программ, несовместимость с другими программами и т.д. Если вы все же решаетесь изменять переменную PATH, будьте предельно осторожны и делайте резервные копии.