Environment variables are a set of values that are instrumental in Windows OS and can be used to customize the operating system to suit user needs. It is used to communicate information between different processes and applications. They are essential for various applications to run smoothly, so it’s important to make sure that they’re working correctly.
If you are having problems with your environment variables not working in Windows 11, don’t worry – you’re not alone. This is a common problem that many people experience. Fortunately, there are a few steps you can take to troubleshoot and fix the issue. In this blog post, we will discuss the causes of this problem and how to fix it. We will also provide some tips for preventing this issue from happening in the future.
There are several reasons why environment variables might not be working in Windows 11.
Incorrect setup: One of the most common causes is that the user has set up their environment incorrectly.
Corrupted files: Another possible cause is a corrupt or missing system file, which can occur due to an incomplete installation, malware infection, or other system issues.
Incorrect path added: If the incorrect path has been added to the environment variable settings, this could be causing the issue.
Malware infection: Malware infections can damage essential system files that are required for environment variables to work properly.
Fix Environment Variables Not Working in Windows 11
Now that we know some of the causes of this issue let’s look at how to fix it.
1. Add Environment Variables Correctly
Firstly, make sure that you’ve added the environment variables correctly. Depending on what version of Windows you’re using, there are different ways to add environment variables in the system settings. Here are the steps to correctly add an Environment Variable on Windows 11:
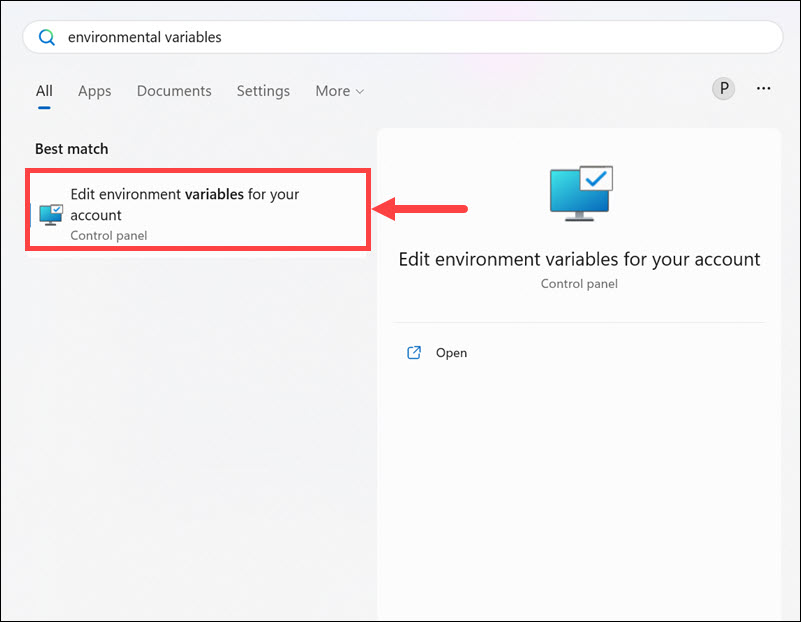
1. Open the Start menu and type ‘environment variables’ in the search box.
2. Select Edit environment variables for your account from the search results.
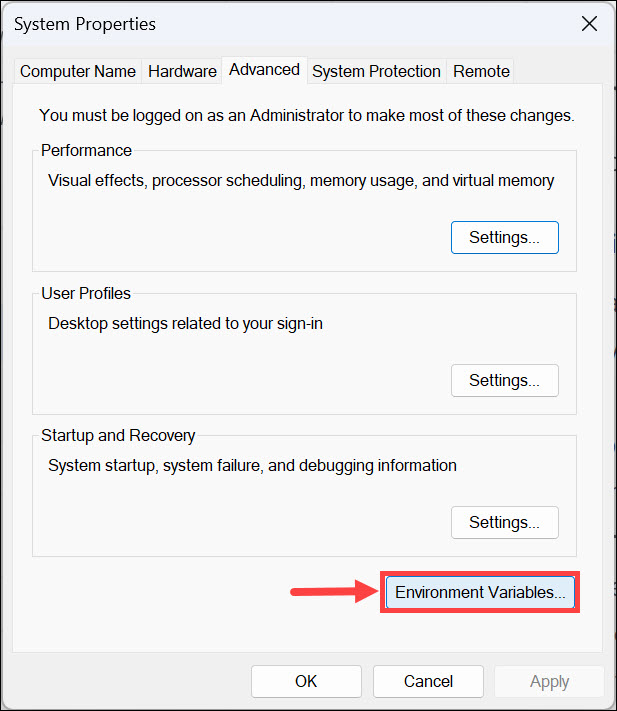
3. Under the Advanced tab, click the Environment Variables button.
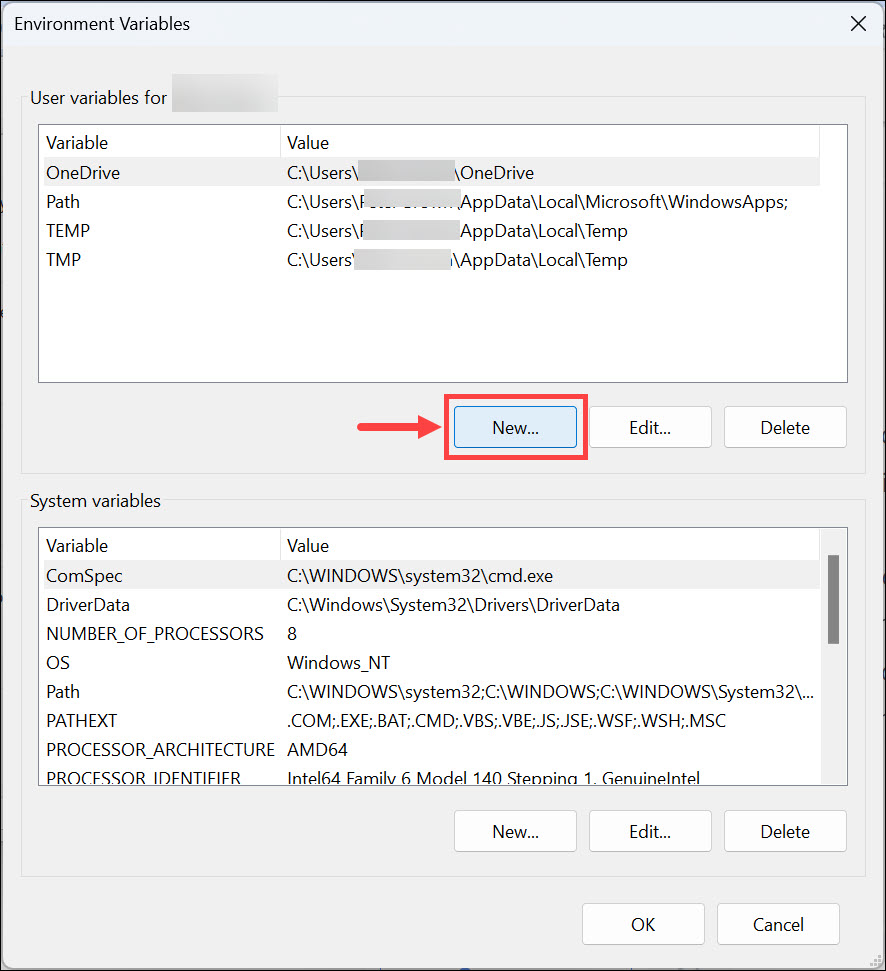
4. Click on New to add a new environment variable.
5. Enter the name of the variable and its value, then click OK. Ensure that the under variable value, you put the correct path.
6. Don’t forget to click OK under the main Environment Variables window.
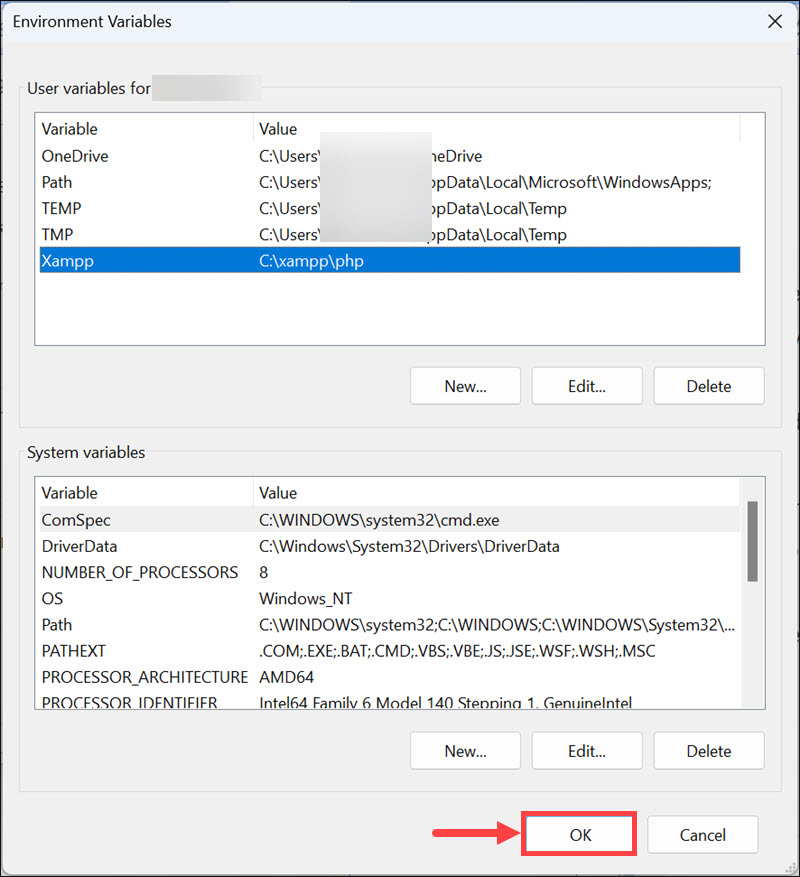
2. Change Variable Type for Variable Within Variable
If you are experiencing this issue with a particular environment variable, it might be due to the wrong variable type. You must know that if you use any variable within another variable, this variable type must be set as REG_EXPAND_SZ in the Windows Registry. To fix this, you can change the Variable type from the Registry editor.
Here are the steps to change the Variable Type for a Variable within a Variable from the registry editor:
1. Open the Run Command Box by pressing Windows + R, type ‘regedit’ in the search box, and press Enter.
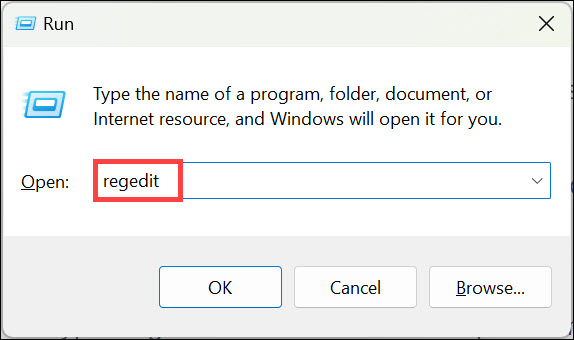
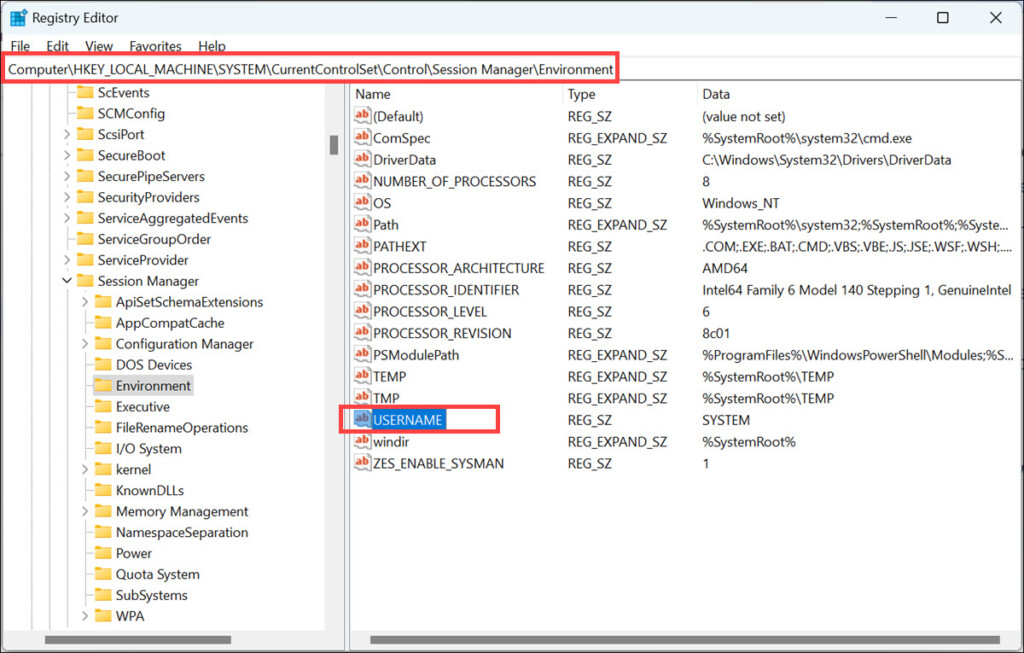
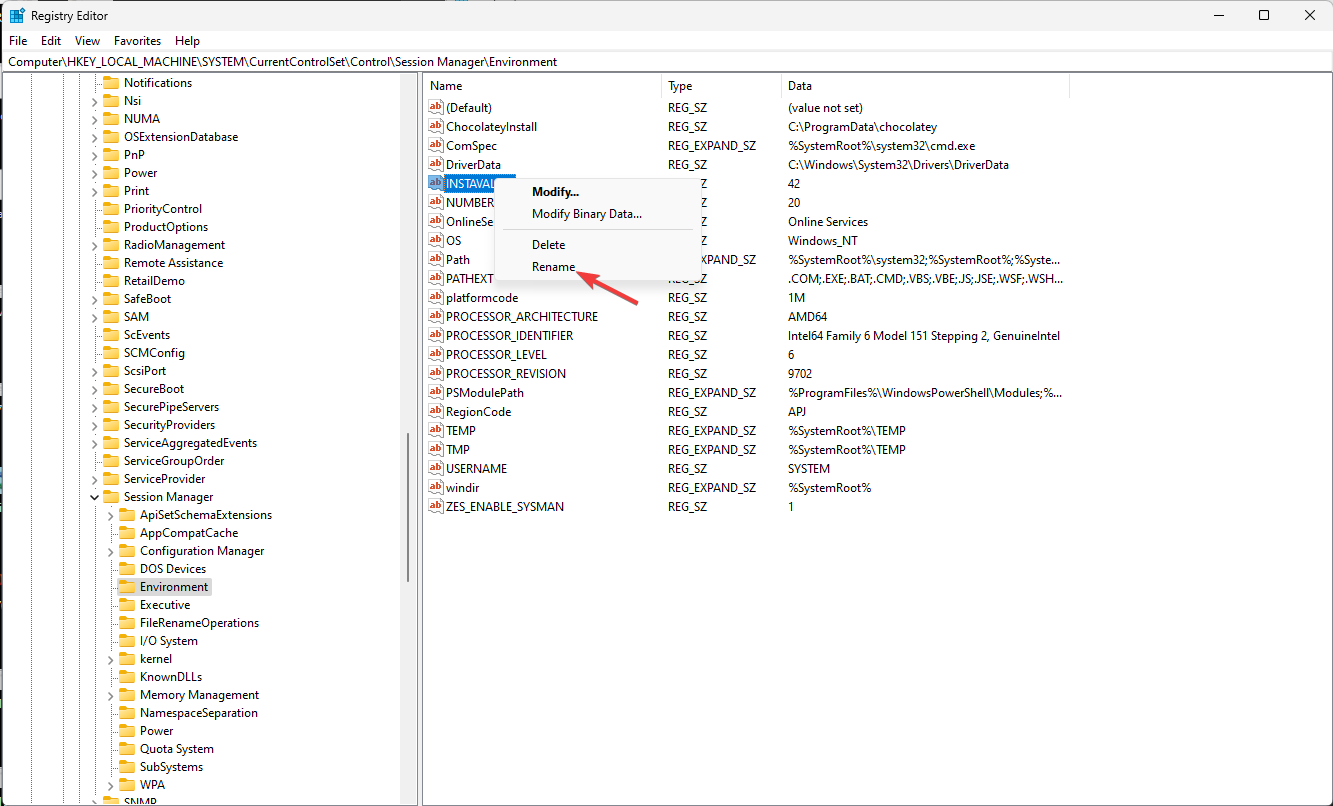
2. In the Registry Editor window, navigate to this location: HKEY_LOCAL_MACHINE\SYSTEM\CurrentControlSet\Control\Session Manager\Environment
3. Look for the variable whose variable type you want to change and copy its Value data.
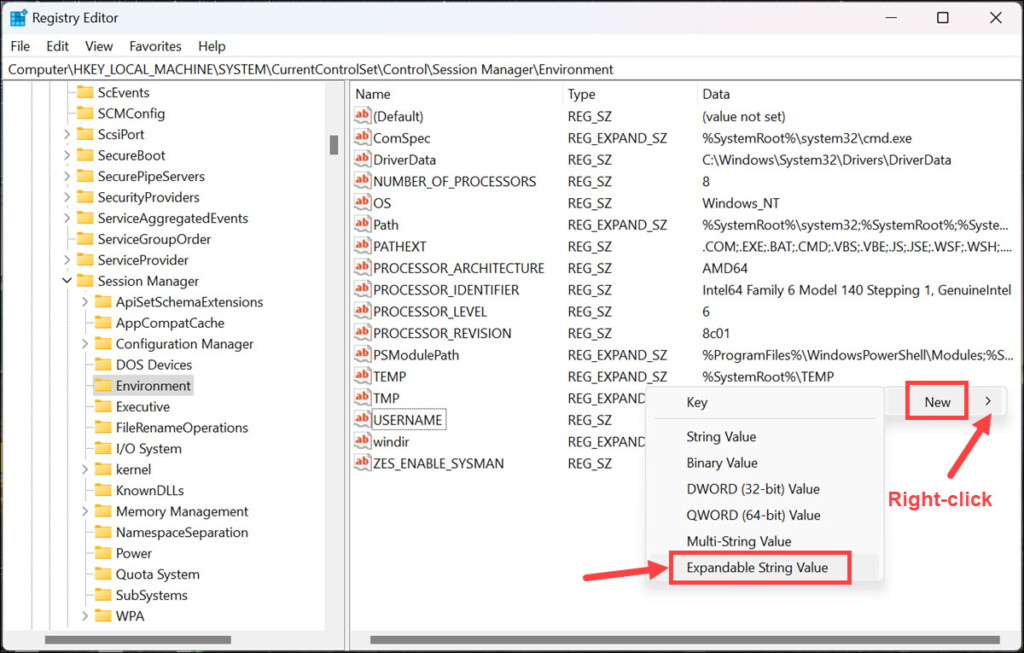
4. Now, right-click on the empty space, and select New->Expandable String Value. Name it exactly as the variable whose type you want to change.
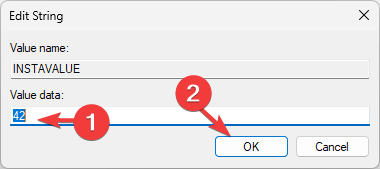
5. Paste the Value data that you copied into this new String’s Value data.
6. Delete the original string.
3. Run a System File Scan
If the issue is related to corrupted or missing system files, you can run a System File Scan (SFC) to repair these files.
Here are the steps to perform an SFC scan:
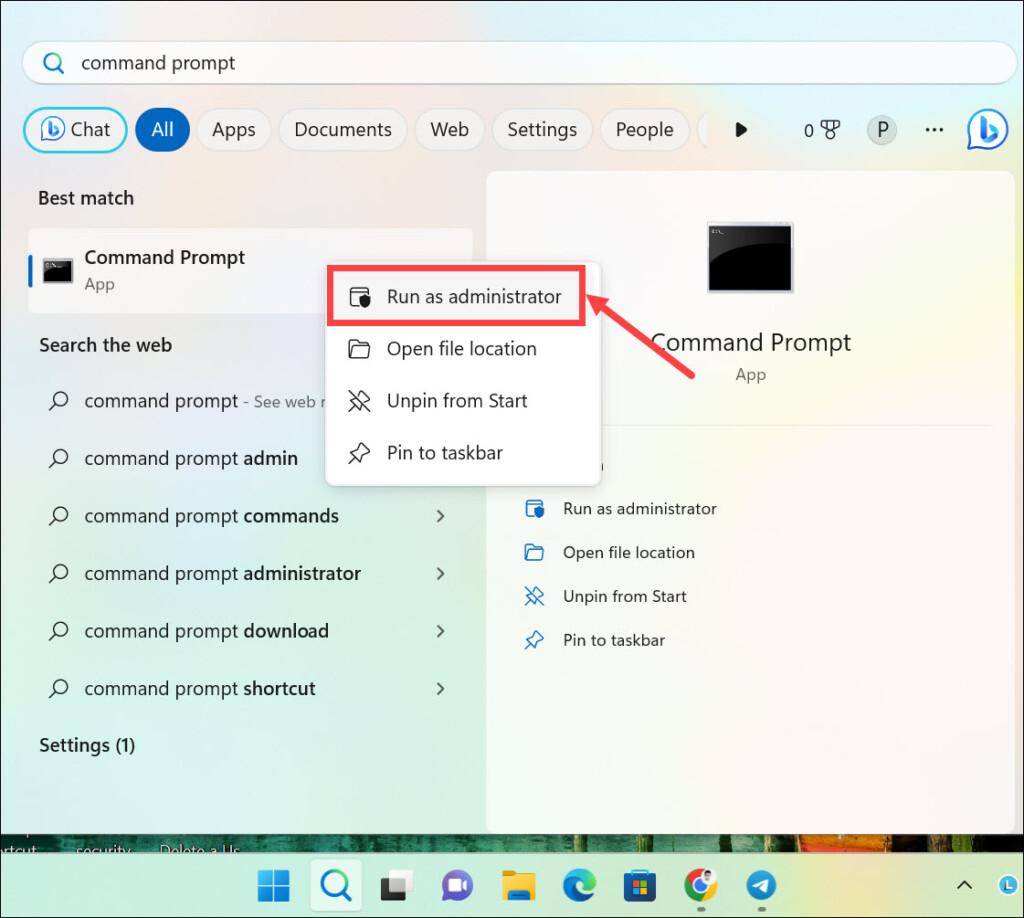
1. Open the Start menu and type ‘command prompt’ in the search box.
2. Right-click on Command Prompt and select ‘Run as administrator’ from the options.
3. In the Command Prompt window, type sfc /scannow and press enter. This will initiate a system scan which will repair corrupted system files, if any.
4. After the scan is complete, restart your computer to apply all changes.
4. Run an Antimalware Scan
If a malware infection is causing the issue, you should run an antimalware scan. You can use the built-in Windows Defender or use a reliable third-party solution to scan and remove malicious files.
Here is how to scan using Windows Defender on Windows 11:
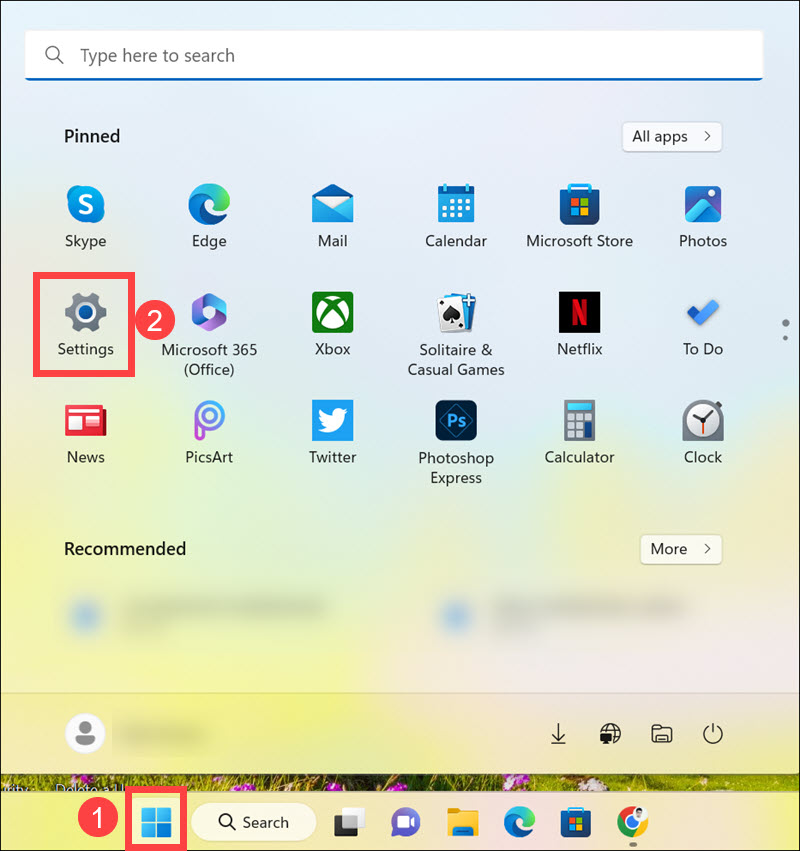
1. Click the Start button and select Settings from the Start menu.
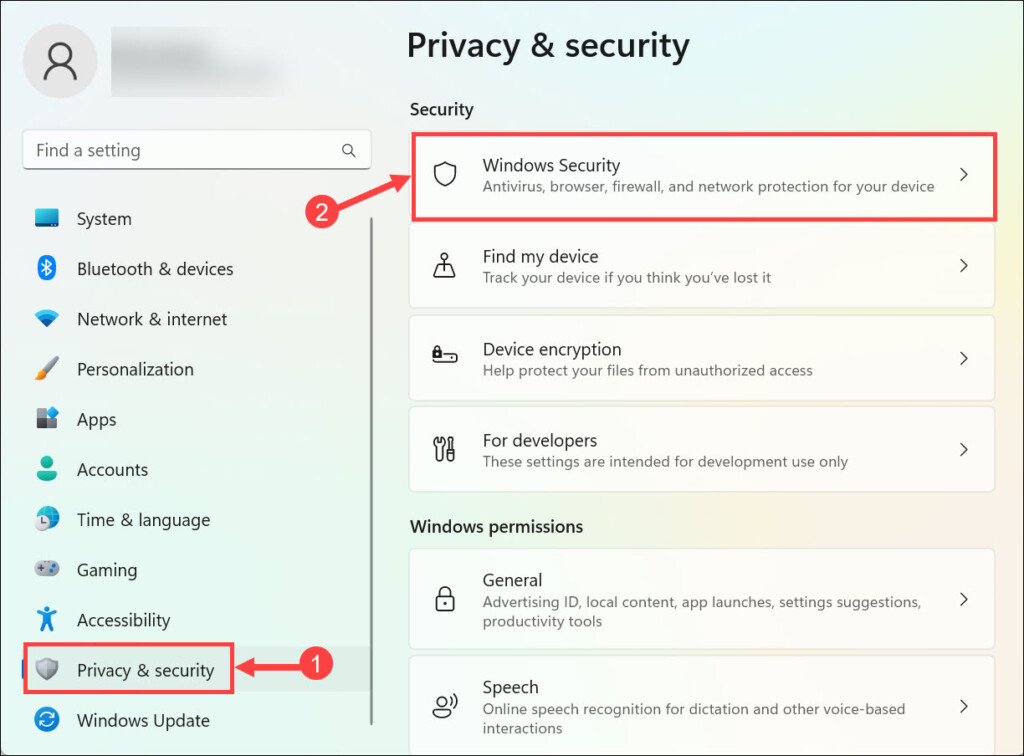
2. Switch to the Privacy & security tab on the left and select Windows Security on the right.
3. Next, select Virus & threat protection below “Protection areas.”
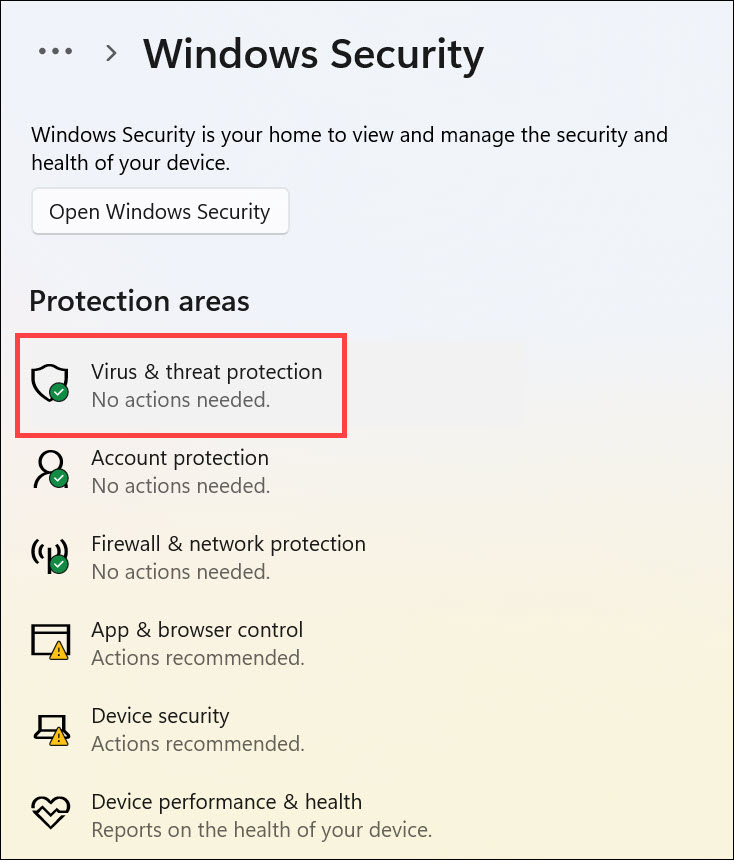
4. Click the Scan options to get different scanning options.
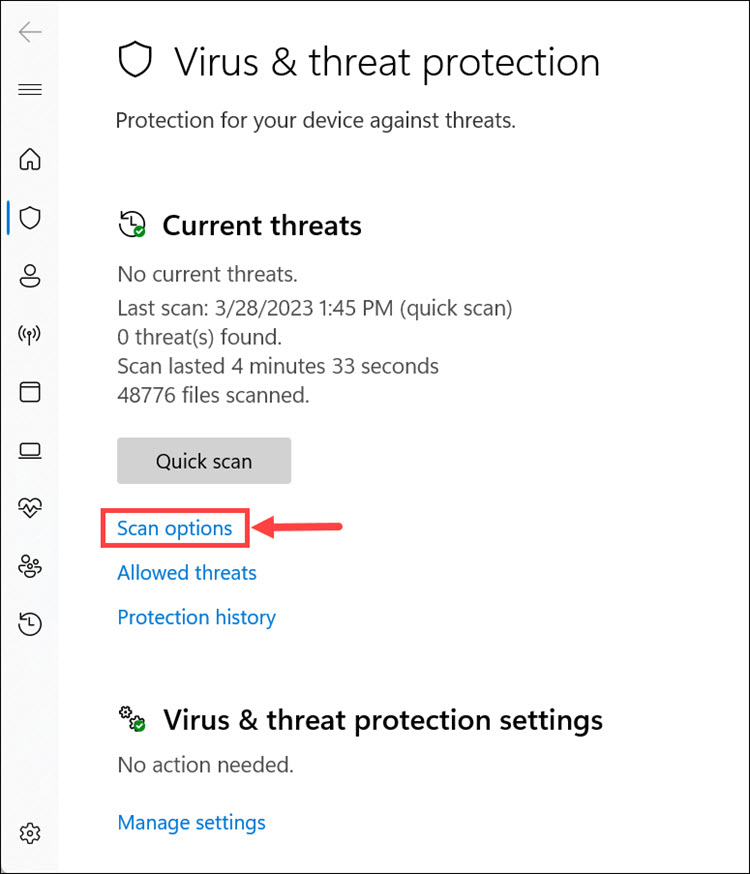
5. Select Full scan from the menu and click Scan now.
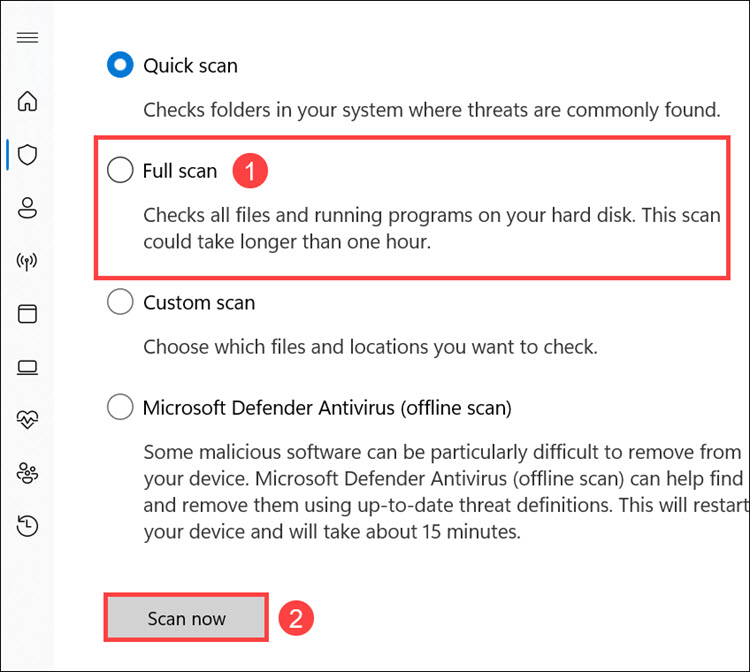
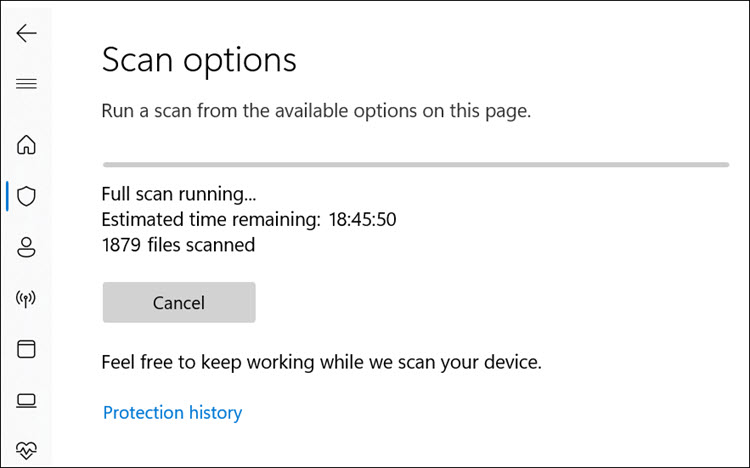
6. The Windows Defender full scan will begin.
FAQs
What are Environment Variables?
Environment variables are a set of dynamic values that affect the way programs run on a computer. They can be used to specify directories, system settings, and user preferences. These variables can also help reduce complexity in programs by allowing for different behavior depending on their values.
Where are Environment Variables stored?
Environment variables are stored in the Windows registry, which is a database that maintains settings and configurations for the operating system.
Final Words
Fixing environment variables not working in Windows 11 can be tricky, but with the right knowledge, you can get it done in no time. Follow the steps outlined above to make sure that your environment variables are set up correctly, change their types when needed, and scan for any malware or corrupted system files. With these steps, you should be able to get your environment variables working again in no time.
Установка переменных среды в Windows 11 может помочь вам настроить систему, запускать сценарии и настраивать приложения.
В этом руководстве мы обсудим три способа с пошаговыми инструкциями, чтобы вы могли настроить свою систему в соответствии со своими предпочтениями.
Существует три типа переменных среды.
- Переменные системной среды? Глобальные переменные имеют самый низкий приоритет и могут быть доступны всем пользователям и приложениям в Windows. Обычно они используются для определения общесистемных настроек.
- Переменные пользовательской среды? С более высоким приоритетом они применяются только к текущему пользователю и процессам, запущенным под этой учетной записью, и устанавливаются пользователем или приложениями, которые работают под этой учетной записью.
- Переменные среды процесса? Имея наивысший приоритет, они являются временными и применяются к текущему процессу и его дочерним процессам, предоставляя информацию о времени выполнения или настройку программы.
1. Использование приложения «Настройки»
- Нажмите Windows + I, чтобы открытьНастройки.
- Перейдите в «Система», затем нажмитеО.
- Нажмите ссылку «Дополнительные параметры системы».
- В окне «Свойства системы» нажмитеПеременные среды.
- Далее в окне «Переменные среды» вы увидите переменные двух типов. Выберите вариант из любогоПользовательские переменные для пользователяили Системные переменные и нажмитеНовый.
- В следующем окне введите имя переменной без пробелов, а дляЗначение переменной, нажмите кнопкуПросмотреть каталогили кнопку «Обзор файла».
- Выберите путь и нажмите «ОК».
2. Использование командной строки
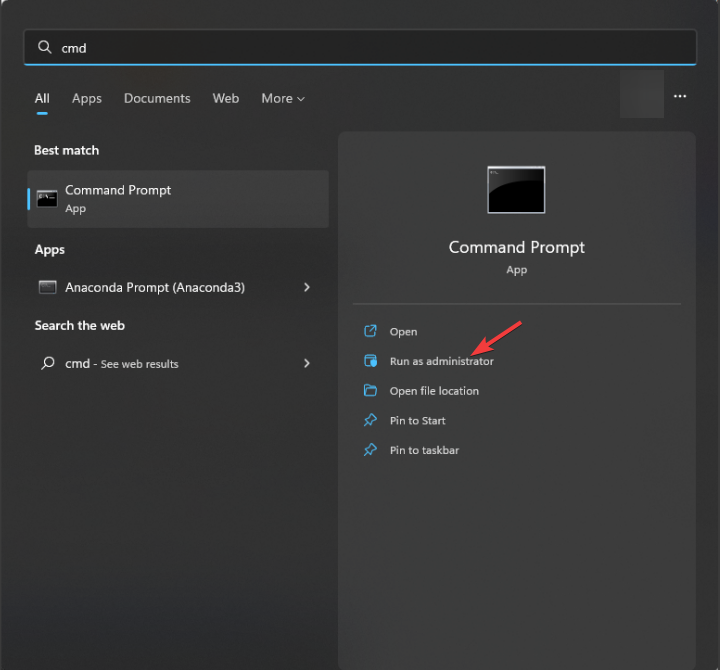
- Нажмите клавишу Windows, введитеcmdв строке поиска и нажмите «Запуск от имени администратора».
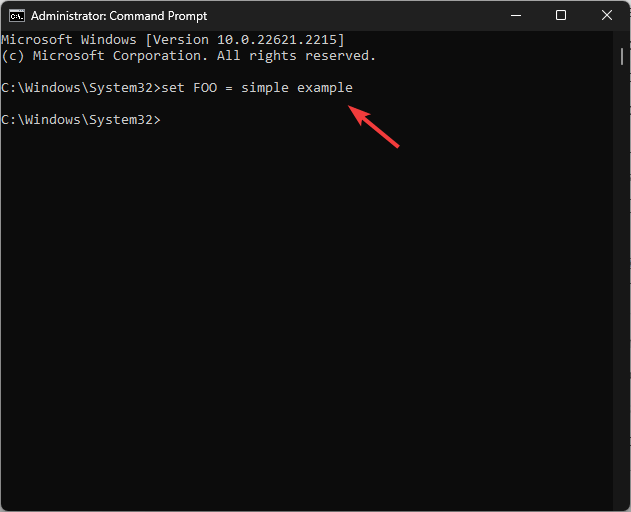
- Чтобы добавить временную переменную в вашу систему, используйте эту команду после замены VariableName и Variablevalue на нужную и нажмите Enter:
set VariableName = Variablevalue - наборКоманда используется для определения переменной среды внутри процесса, для которого она задана, и будет удалена после закрытия окна.
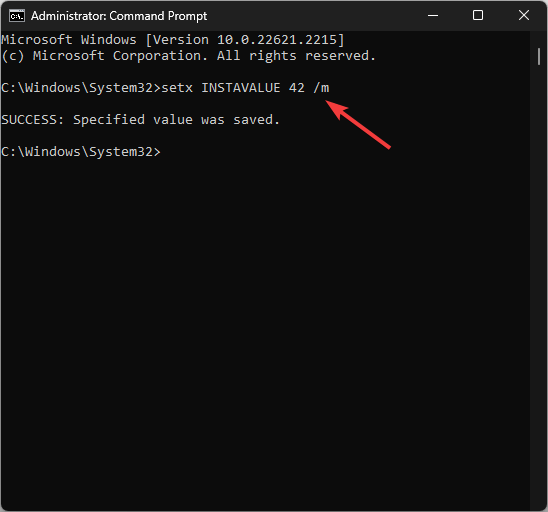
- Чтобы навсегда установить переменные среды, введите следующую команду, заменив имя переменной именем переменной и значение значением, которое вы хотите установить, и нажмите Enter:
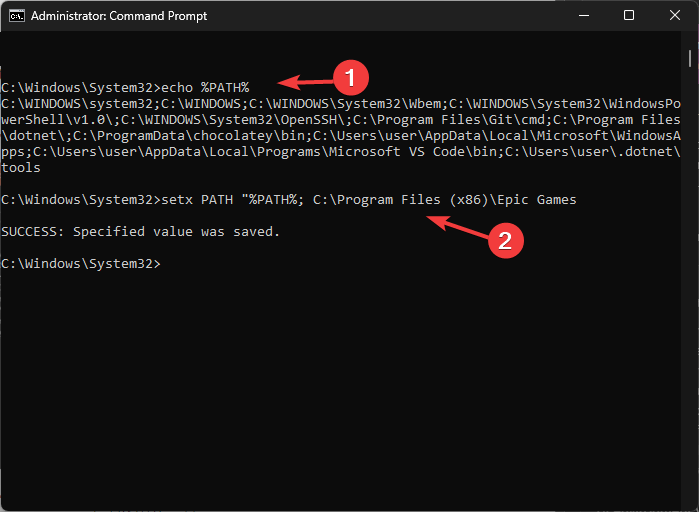
setx Variablename Value /m - Введите следующую команду, чтобы просмотреть переменные пути, и нажмите Enter:
echo %PATH% - Скопируйте и вставьте следующую команду, чтобы добавить еще одну переменную в каталог пути; замените значение PATH на путь, который вы хотите добавить, и нажмите Enter:
setx PATH "%PATH%; PATH Value - Обновите окно переменных среды, чтобы увидеть новый добавленный путь.
3. Использование Windows PowerShell
- Нажмите клавишу Windows, введитеPowerShellи нажмите «Запуск от имени администратора».
- Введите следующую команду для получения списка переменных пути и нажмите Enter:[Среда]::GetEnvironmentVariable(?PATH?)
- Скопируйте и вставьте следующую команду, чтобы объявить переменную пути после замены PATH на путь, который вы хотите добавить, и нажмите Enter:
$Variable_Name = "PATH" - Чтобы добавить переменную в список переменных пути, используйте эту команду после замены пути к папке объявленным вами путем и нажмите Enter:[Среда]::SetEnvironmentVariable(?Путь к папке?, ?$PATH;$Variable_Name?)
- Перезагрузите компьютер, чтобы изменения вступили в силу.
Вы можете использовать любой из методов, чтобы добавить новую или отсутствующую переменную среды, чтобы предотвратить проблемы, например, когда система не может найти введенный параметр среды.
- Как получить и использовать высококонтрастные темы в Windows 11
- Как включить или отключить автоисправление слов с ошибками в Windows 11
- Как дать разрешения на чтение/запись, но не удалять
- Шифрование устройства отсутствует в Windows 11? Как вернуть это
Как редактировать переменные среды в Windows 11?
1. Использование приложения «Настройки»
- Нажмите Windows + I, чтобы открытьНастройки,затем перейдите в «Система», затемОи нажмите «Дополнительные параметры системы».
- НажмитеПеременные среды,затем выберите переменную, которую хотите изменить, и нажмитеРедактировать.
- Внесите изменения и нажмите «ОК» во всех трех окнах, чтобы сохранить изменения.
- Перезапустите окно «Переменная среды», чтобы увидеть изменения.
2. Использование редактора реестра
- Нажмите Windows + R, чтобы открытьБегатьдиалоговое окно.
- Типregeditи нажмите ОК, чтобы открытьРедактор реестра.
- Перейдите по этому пути, если вы вносите изменения в пользовательские переменные:
ComputerHKEY_CURRENT_USEREnvironment - Для системных переменных перейдите по этому пути:
ComputerHKEY_LOCAL_MACHINESYSTEMCurrentControlSetControlSession ManagerEnvironment - Если вы хотите переименовать имя переменной, щелкните правой кнопкой мыши и выберитеПереименовать.
- Чтобы отредактировать данные значения, дважды щелкните переменную, измените данные значения и нажмите кнопкуХОРОШО.
- Перезагрузите компьютер, чтобы сохранить изменения.
3. Использование Windows PowerShell
- ОткрытьWindows PowerShellс правами администратора, выполнив те же шаги, упомянутые выше.
- Введите следующую команду, чтобы получить текущее значение переменной после замены VARIABLENAME именем переменной, и нажмите Enter:
$Env: VARIABLENAME - Затем, чтобы обновить или отредактировать значение, скопируйте и вставьте следующую команду после заменыVARIABLEANMEвведите имя переменной и NEWVALUE — значение, которое вы хотите добавить, затем нажмите Enter:
$Env: VARIABLENAME = "NEWVALUE" - Перезагрузите компьютер, чтобы сохранить изменения.
Как получить список переменных среды в Windows?
Чтобы получить список переменных среды в Windows 11, вы можете открыть командную строку с правами администратора и ввестинабори нажмите Enter.
В Powershell с правами администратора, чтобы получить список переменных среды, скопируйте и вставьте следующую команду и нажмите Enter:[System.Environment]::GetEnvironmentVariables()
Если вы хотите распечатать список переменных среды, полученный в PowerShell, чтобы применить те же настройки на другом компьютере, прочтите это руководство.
Где хранятся переменные среды Windows?
Переменные среды можно найти в редакторе реестра. Системные переменные находятся вКомпьютерHKEY_LOCAL_MACHINESYSTEMCurrentControlSetControlSession ManagerEnvironment, где пользовательские переменные расположены по адресуКомпьютерHKEY_CURRENT_USERСреда
Установка переменных среды в Windows 11 может помочь вам настроить параметры системы; однако вы всегда должны проявлять осторожность при внесении изменений в системные переменные.
Не забудьте дважды проверить имя и значение переменной и всегда создавать резервную копию редактора реестра перед внесением изменений.
Застрял где-то? Не стесняйтесь упоминать свои вопросы в разделе комментариев ниже. Мы будем рады помочь Вам.
Всем привет! Переменные среды (Environment Variables) в Windows 10 и Windows 11 – это специальные переменные, которые можно свободно использовать в командной строке, скриптах или в некоторых командах во встроенных приложениях (как например, в окне «Выполнить»). Очень полезная вещь для тех людей, которые постоянно пользуются консолью или скриптами. Например, вам необязательно постоянно вручную указывать полный путь к папке, которая находится глубоко на диске – достаточно просто прописать переменную.
Сегодня в статье я расскажу, где находятся системные переменные среды (Environment Variables) Windows, как с ними работать и создавать. Если возникнут какие-то дополнительные вопросы – пишите в комментариях.
Содержание
- Где хранятся существующие переменные
- PATH и PATHEXT
- Создание переменной
- Задать вопрос автору статьи
Где хранятся существующие переменные
Для начала давайте посмотрим, где хранятся переменные окружения в Windows 10 или 11. Уже потом познакомимся с ними поближе и на примере поймем, как они работают в системе.
- Кликните правой кнопкой по вашему компьютеру и зайдите в «Свойства».
- Если у вас обычная Home-версия – слева выбираем ссылку «Дополнительные параметры системы». Если у вас последняя Pro-версия, тогда в разделе «О программе» в правом блоке листаем в самый низ и находим ссылку с таким же названием.
- Перейдите во вкладку «Дополнительно» и нажмите по кнопке «Переменные среды…».
Далее вы увидите две таблички. В первом столбце указаны «Переменные», которые вы можете использовать. А во втором столбце – это их значения, которые уже используются программами или скриптами. Верхний блок – это переменные локального пользователя, под которым вы сидите. Они могут быть созданы установленными программами или вами. Внизу строгие системные переменные.
Также можно посмотреть весь перечень в консоли – открываем командную строку. Далее вводим команду:
set > %homepath%\desktop\set.txt
Команда выполняется очень быстро. После этого смотрим на рабочий стол и открываем текстовый файл
set.txt
В нем хранятся все уже существующие переменные, которые вы можете использовать. Все эти переменные мы используем в любом месте, в скриптах или командной строке. Например, в прошлой команде мы уже использовали переменную %homepath% – которая заменяет данные о положении папки:
C:\Users\Имя
И еще один важный момент – все переменные обрамляются знаком процента (%) с двух сторон. Размер написанных букв переменных не важен:
%homepath% = %HOMEPATH% = %Homepath%
PATH и PATHEXT
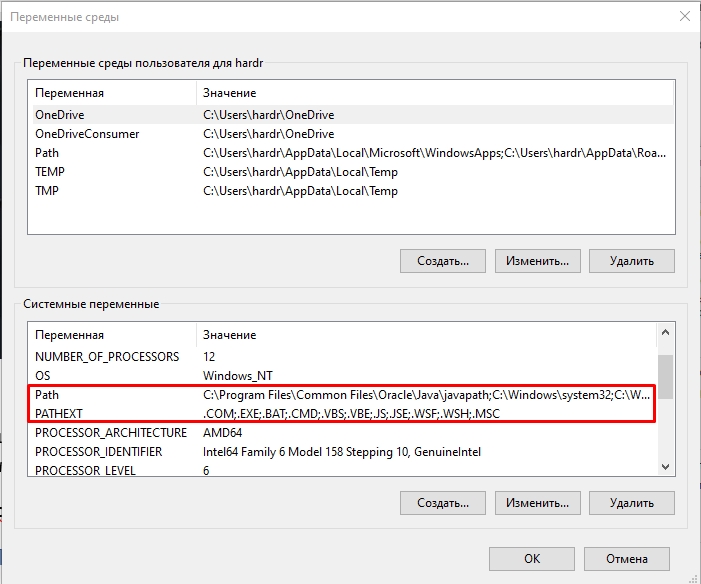
Вы могли заметить две интересные переменные PATH и PATHEXT, которые содержат в себе сразу целый массив значений. Как же с ними работать? – давайте разберем на конкретном примере.
Представим себе, что мы запускаем какую-то программу:
program.exe
С допиской переменной PATH. Если посмотреть в значения PATH, можно заметить, что это пути к определенным папкам на любом диске системы. Если вы будете использовать переменную PATH, в скрипте или консольной команде, то система пройдет по всему массиву – то есть по всем выделенным папкам и попробует найти program.exe и запустит его, если найдет. Давайте добавим свою директорию:
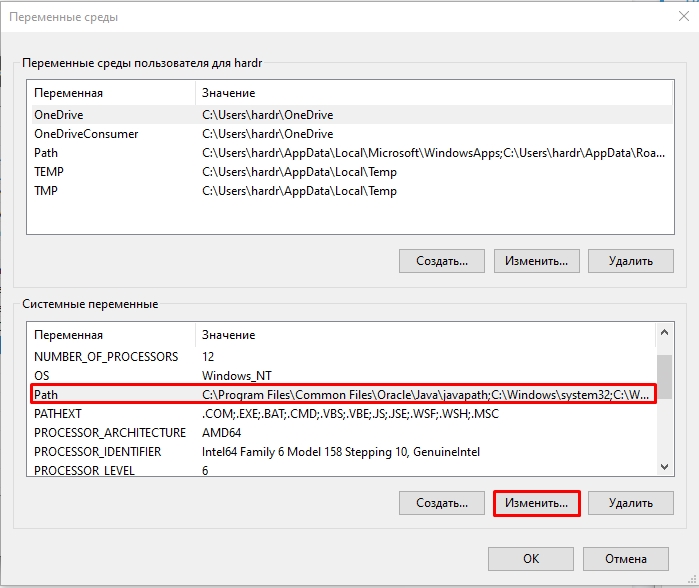
- Выделите PATH, нажав ЛКМ.
- Кликаем по кнопке «Изменить».
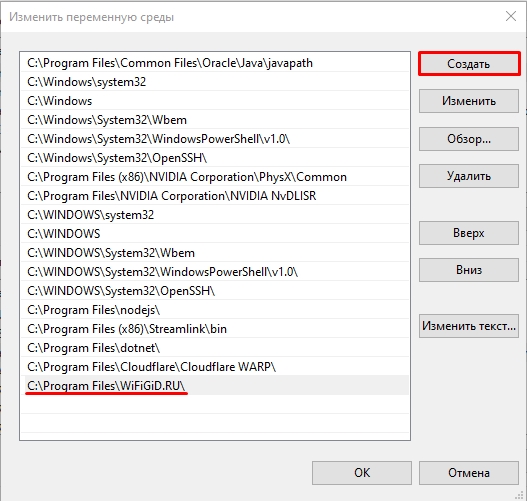
- Жмем «Создать».
- Далее вводим новую директорию. Желательно, чтобы эта директория была верной, и папка такая существовала. В конце жмем «ОК».
И еще один важный момент – после того как вы добавили новые переменные, надо чтобы они появились в системе. Для этого – или перезагружаем компьютер, или «Проводник». Только после этого переменными можно будет пользоваться. Для перезагрузки проводника, откройте консоль и введите две команды:
taskkill /F /IM explorer.exe
После этого вводим:
explorer.exe
Если вы будете работать с переменными среды в командной строке Windows 10 или Windows 11, то вам нужно также её перезапустить – закрываем и снова открываем приложение.
Ах, да…мы чуть не забыли про переменную PATHEXT, в которой хранятся различные расширения. Работает переменная примерно также. Вы можете не указывать расширение программы или объекта для запуска в скрипте или командной строке. Система автоматически будет брать расширения из массива PATHEXT и перебирать все варианты. Поэтому вместо:
program.exe
Можно просто указать:
program
Создание переменной
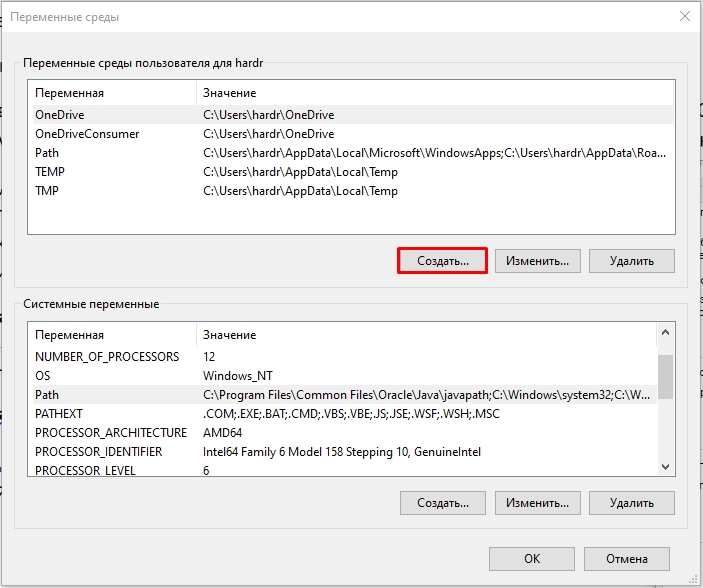
Давайте посмотрим, как создать переменную среды в Windows. Делается все очень просто. Выбираем верхний или нижний блок и жмем по кнопке «Создать». Еще раз повторюсь, что верхний блок предназначен для запуска команд под данным локальным пользователем.
Вводим «Имя переменной» и значение – куда можно указать путь к папке, файлу или запускаемой программе. Напомню, что здесь вы также можете использовать системные переменные, которые находятся в нижнем блоке. Жмем «ОК».
Напомню – чтобы переменная заработала, нужно будет перезагрузить «Проводник» (Explorer.exe). Про то как это сделать я уже писал в прошлой главе. Если остались вопросы и вы хотите получить помощь от портала WiFiGiD.RU – опишите свою проблему в комментариях. Также вы можете писать дополнения и предложения там же.
In Windows 11, the environment variables (env) can be easily set via the graphical user interface. The ENV on Windows or other operating-system needed by it to let it know exactly where the most important files are stored. And that can be a little different on every computer. For most Windows users, the system is located in the C:\Windows\ folder and programs in the C:\Program Files\folder. But it is not always the case.
And this is the reason why the paths are important locations, they are not permanently programmed, but are stored in so-called environment variables.
There are also environment variables that do not lead to any folders. These are variables like Dirverdata, PATHEXT, and more…
Environment variables are an important element of every operating system, including Windows 11. But how do you actually get them?
Add or Display system variables Path in Windows 11
1. Open Edit system environment variables
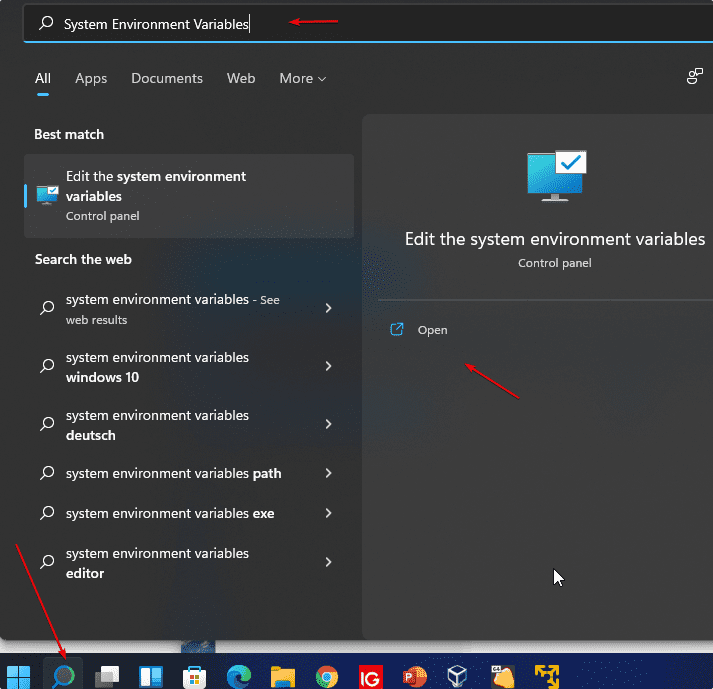
For this, you simply use the Windows 11 search and search for “Edit system environment variables“. Then simply select the result and the following window with the system properties will open.
2. System Properties
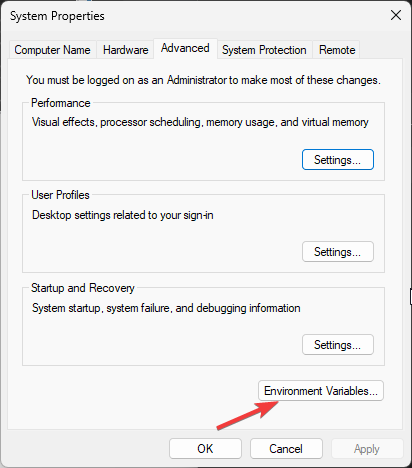
You will see the “System Properties” there click on the “Environment Variables …” button, which is already focused on in the given screenshot.
3. Add System Variables or User Variable on Windows 11
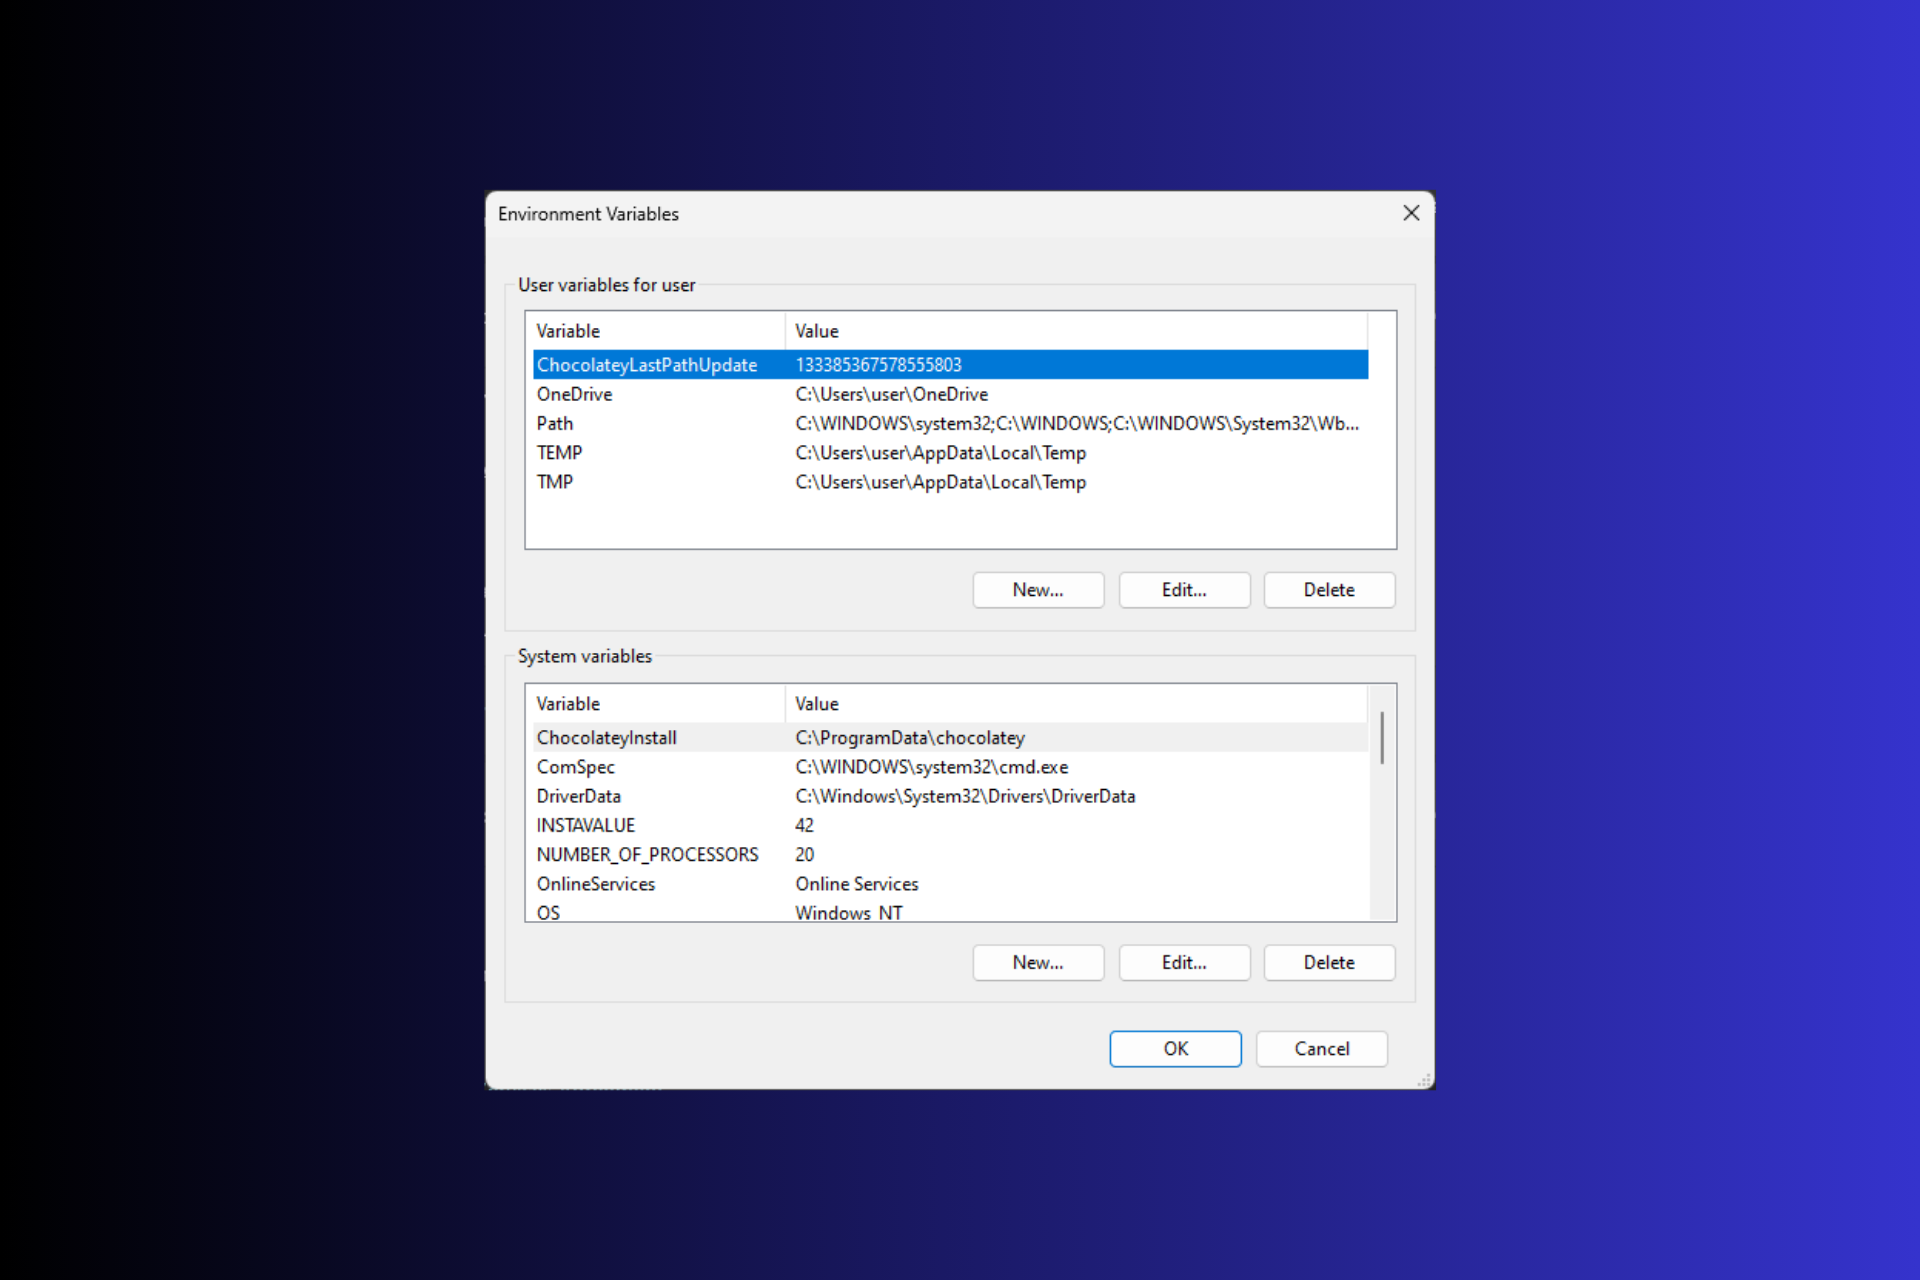
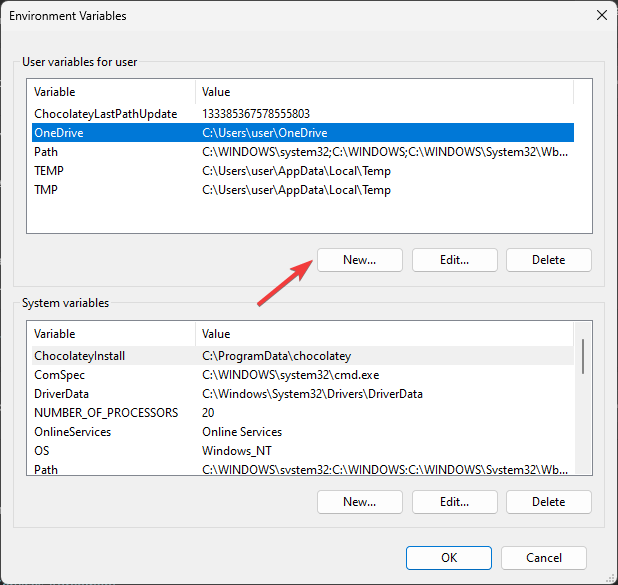
On the Environment Variable windows you will have two choices:
- User variables for your account; the folder path added under it will only be accessible by that particular user
- System variables for the entire operating system, hence any user account will be able to access the executables or folder declared under it.
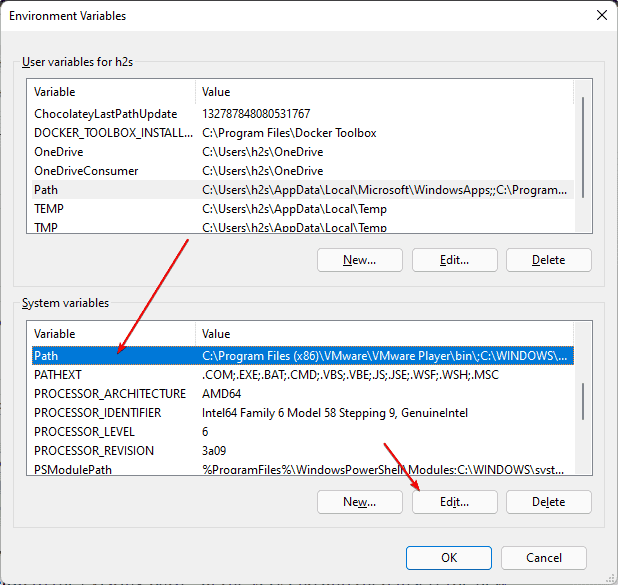
Added System variables are visible to all user accounts. If it is the case that only you use the PC, it is sufficient to set user variables. However, here we are going for “System Variables“. You can choose between as per your choice.
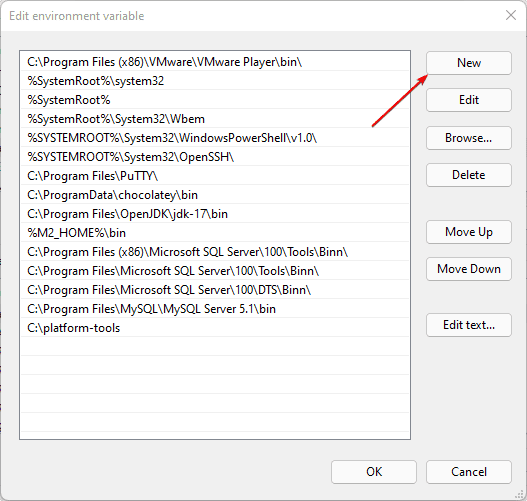
Select the Path and hit the Edit button.
4. Create a New Variable and add the path in Windows 11
As you click the Edit button in the above step, the corresponding window will open. After that add the path of the folder or executable that you want to add.
Alternatively, we can also browse the same.
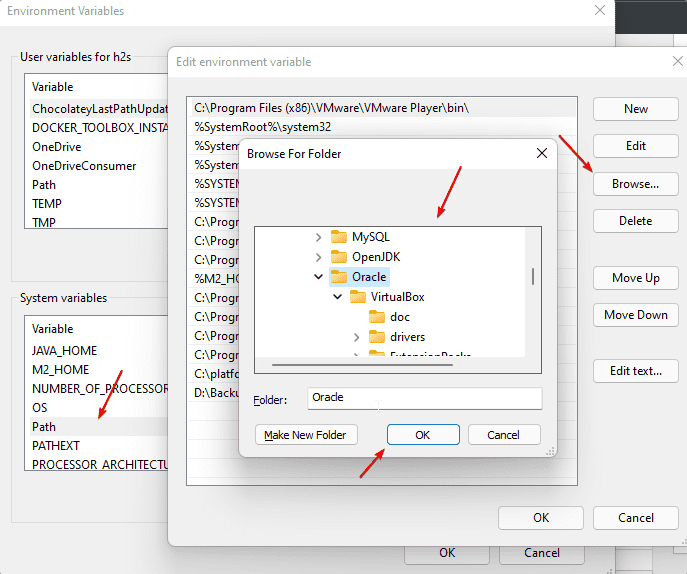
For example, to integrate the Oracle VirtualBox, simply edit the “Path” variable under the system or user variables. So follow the below steps…
• Select the Path variable, click on Edit … and click on Browse
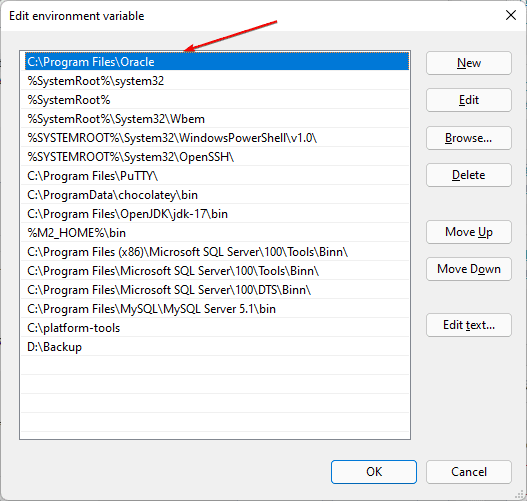
• A file explorer tree will open, go to the folder that you want to add, and hit the OK button.
Then confirm all windows with OK and restart the command line (Windows Terminal/PowerShell/Command Prompt) and start accessing your executable directly in it once. The old variables are still saved in the open instance.
In this way, we can add any path to our system on Windows 11 using the graphical user interface. the user can also remove any of the added paths in a similar way.
It’s easier than you think & more powerful than you know!
by Srishti Sisodia
Srishti Sisodia is an electronics engineer and writer with a passion for technology. She has extensive experience exploring the latest technological advancements and sharing her insights through informative… read more
Updated on
Reviewed by
Alex Serban
After moving away from the corporate work-style, Alex has found rewards in a lifestyle of constant analysis, team coordination and pestering his colleagues. Holding an MCSA Windows Server… read more
- Environment variables play a crucial role in the proper functioning of your operating system and installed apps.
- They store information like system paths, temporary file locations, and other user-specific settings.
- You can use Advanced system settings, Command Prompt, or Windows PowerShell to set it.
- Continue reading to know the detailed steps for each method.
Setting environment variables on Windows 11 can help you customize your system, run scripts, and configure applications.
In this guide, we will discuss three ways with step-by-step instructions to do that so you can configure your system according to your preferences.
There are three types of Environment Variables
- System Environment Variables – The global variables are at the lowest priority, can be accessed by all users & apps on a Windows, and are usually used to define system-wide settings.
- User Environment Variables – With a higher priority, these only apply to the current user & processes running under that account & are set by the user or apps that run under that account.
- Process Environment Variables – With the highest priority, they are temporary and apply to the current process & its child processes, providing runtime information or customization for a program.
How do I set & use Environment Variables on Windows 11?
1. Using the Settings app
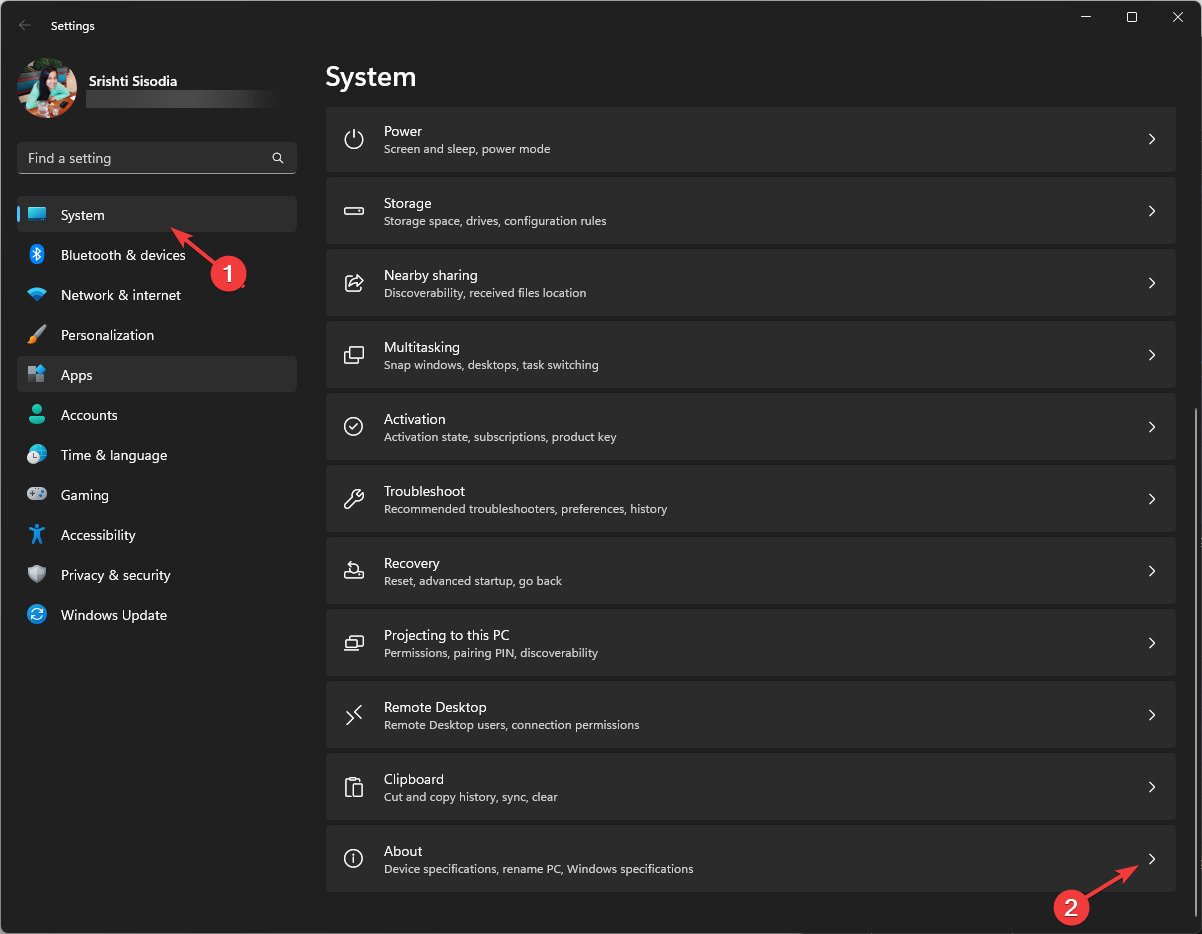
- Press Windows + I to open Settings.
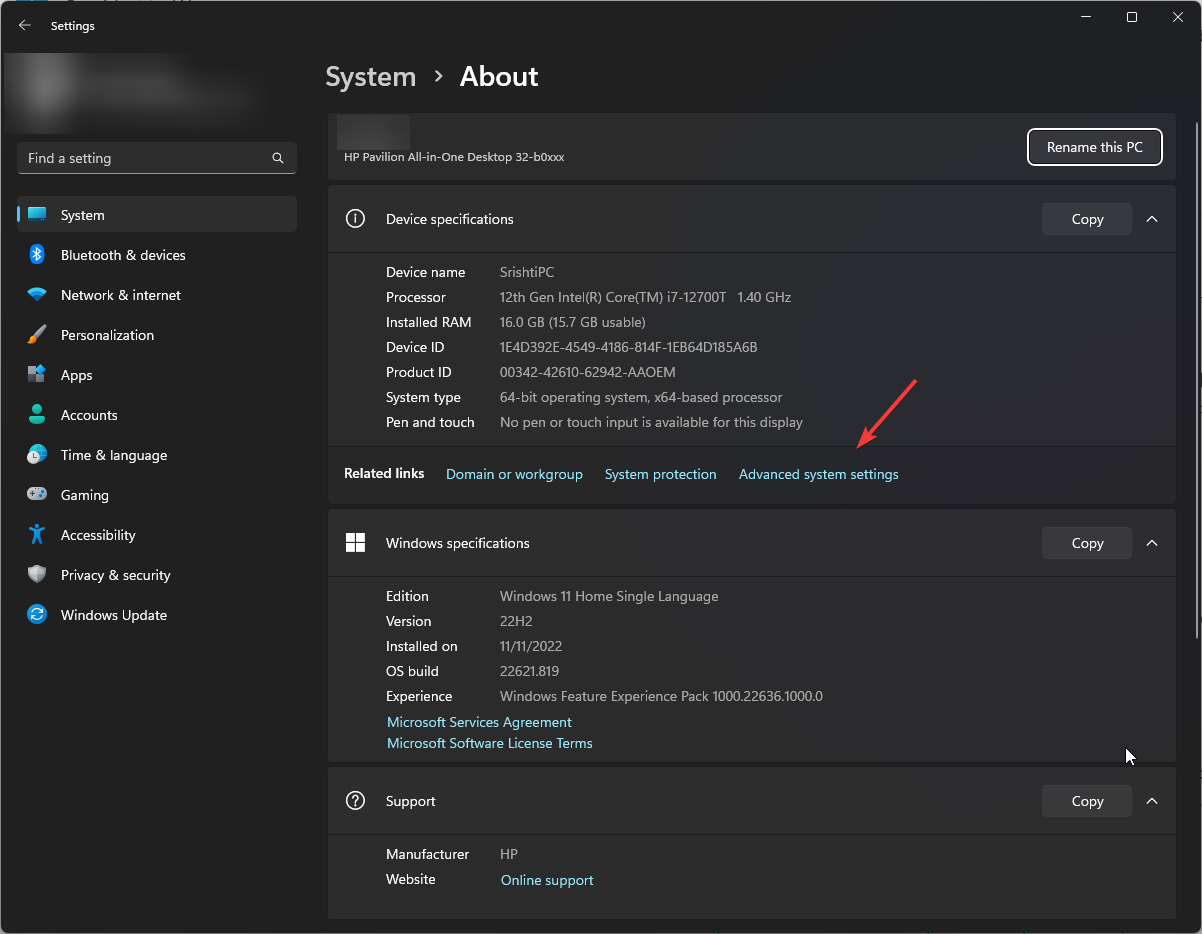
- Go to System, then click About.
- Click the Advanced system settings link.
- On the System Properties window, click Environment Variables.
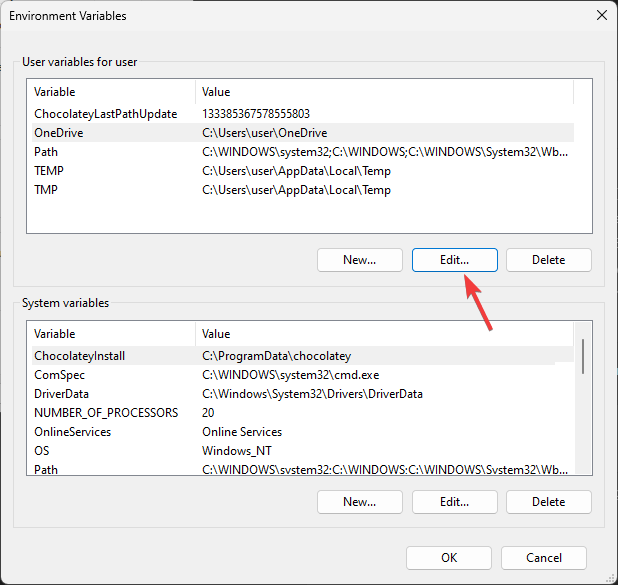
- Next, on the Environment Variables window, you will see two types of variables. Choose an option from either User variables for user or System variables and click New.
- On the following window, type in the Variable name without any spaces, and for Variable Value, click the Browse Directory or Browse File button.
- Select the path and click OK.
2. Using the Command Prompt
- Press the Windows key, type cmd in the search bar, and click Run as administrator.
- To add a temporary variable to your system, use this command after replacing VariableName & Variablevalue with the one you want and hit Enter:
set VariableName = Variablevalue - The set command is used to define an environment variable within the process for which it is defined and will be deleted once the window is closed.
- To set environment variables permanently, type the following command after replacing the Variablename with the name of the variable & Value with the value you want to set and press Enter:
setx Variablename Value /m - Now for the path variables, type the following command to list all of them and hit Enter:
echo %PATH% - Copy & paste the following command to add another variable to the path directory; replace the PATH value with the path you want to add and press Enter:
setx PATH "%PATH%; PATH Value - Refresh the Environment variable window to see the newly added path.
3. Using the Windows PowerShell
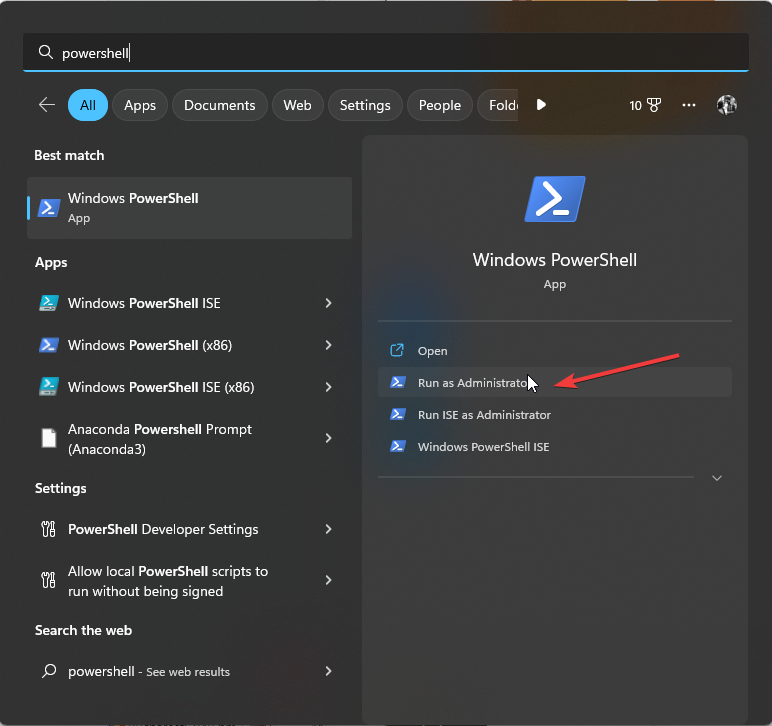
- Press the Windows key, type powershell, and click Run as administrator.
- Type the following command to list of path variables and press Enter: [Environment]::GetEnvironmentVariable(“PATH”)
- Copy & paste the following command to declare a path variable after replacing PATH with the path you want to add and hit Enter:
$Variable_Name = "PATH" - To add the variable to the Path Variable list, use this command after replacing Folder PATH with the path you declared and press Enter: [Environment]::SetEnvironmentVariable(“Folder PATH”, “$PATH;$Variable_Name”)
- Restart your computer to let the changes take effect.
You can use any of the methods to add a new or missing environment variable to prevent issues like the system could not find the environment option that was entered
How we test, review and rate?
We have worked for the past 6 months on building a new review system on how we produce content. Using it, we have subsequently redone most of our articles to provide actual hands-on expertise on the guides we made.
For more details you can read how we test, review, and rate at WindowsReport.
- How to Type Accents on Windows 11
- How to Disable the Insert Your Security Key Into the USB Port popup
How do I edit Environment Variables on Windows 11?
1. Using the Settings app
- Press Windows + I to open Settings, then go to System > About >Advanced system settings.
- Click Environment Variables, then select the variable you want to edit and click Edit.
- Make the changes and click OK on all three windows to save the changes.
- Restart the Environment Variable window to see the changes.
2. Using the Registry Editor
- Press Windows + R to open the Run dialog box.
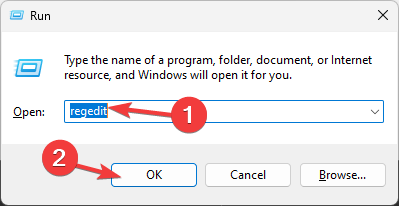
- Type regedit and click OK to open Registry Editor.
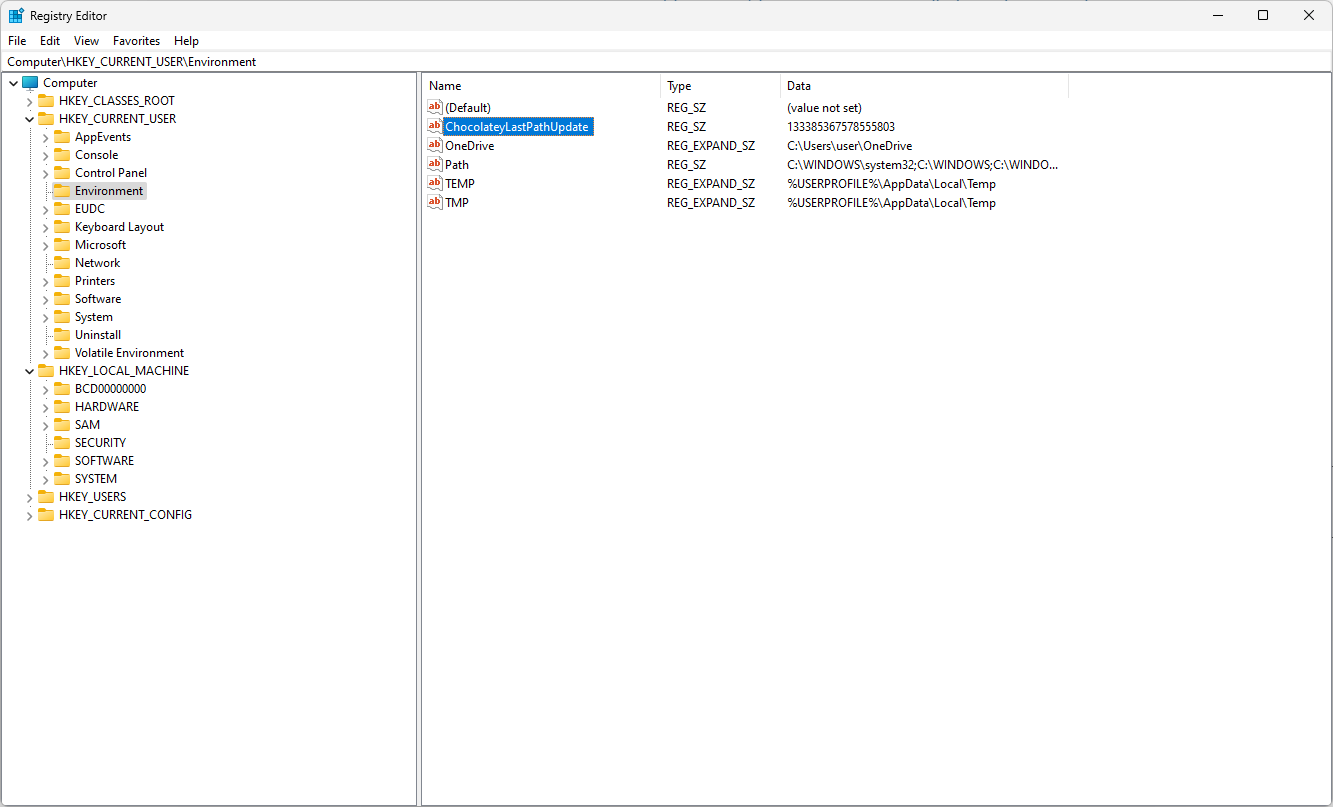
- Navigate to this path if you are making changes to User Variables:
Computer\HKEY_CURRENT_USER\Environment - For System Variables, go to this path:
Computer\HKEY_LOCAL_MACHINE\SYSTEM\CurrentControlSet\Control\Session Manager\Environment - Once you have located either of the variables, you can change the name by right-clicking and selecting Rename.
- To edit the value, double-click the variable, change the Value data, and click OK.
- Restart your computer to save the changes.
3. Using the Windows PowerShell
- Open Windows PowerShell with administrator privileges using the same steps mentioned above.
- Type the following command to get the current value of the variable after replacing VARIABLENAME with the variable name and press Enter:
$Env: VARIABLENAME - Next, to update or edit the value, copy & paste the following command after replacing the VARIABLEANME with the name of the variable & NEWVALUE with the value that you want to add, then hit Enter:
$Env: VARIABLENAME = "NEWVALUE" - Reboot your PC to save the changes.
How do I get a list of Environment Variables in Windows?
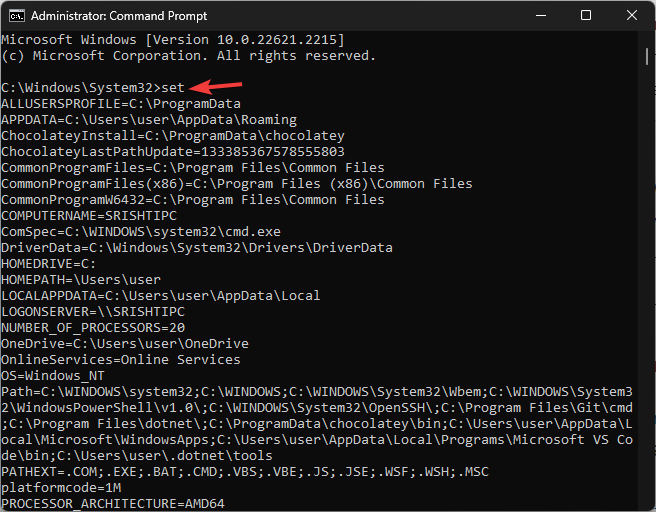
To get a list of environment variables in Windows 11, you can open Command Prompt with administrator rights and type set, and hit Enter.
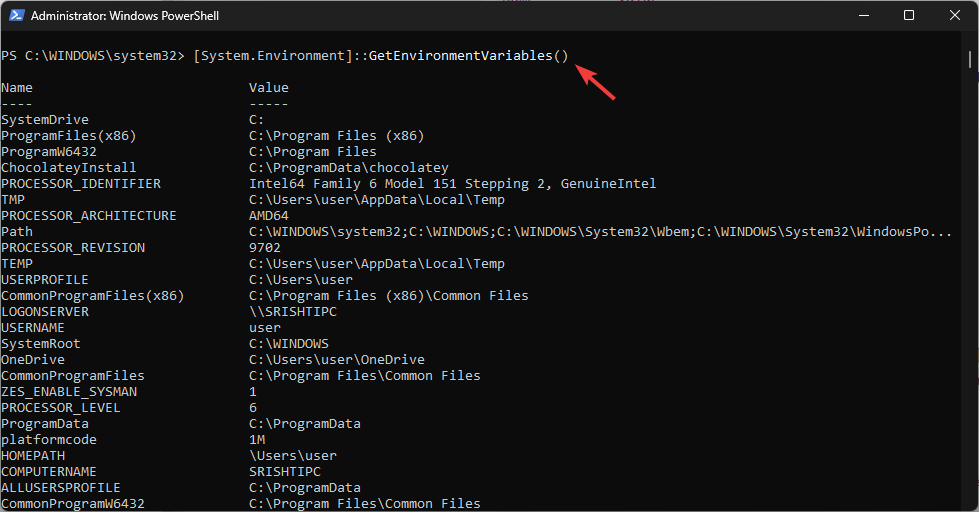
In Powershell, with admin privileges to get a list of environment variables, copy & paste the following command and hit Enter: [System.Environment]::GetEnvironmentVariables()
If you want to print the environment variables list you got on PowerShell to apply the same settings on another computer, read this guide.
Where are Windows environment variables stored?
You can find the environment variables in Registry Editor. The system variables are found in Computer\HKEY_LOCAL_MACHINE\SYSTEM\CurrentControlSet\Control\Session Manager\Environment, wherein the user variables are located at Computer\HKEY_CURRENT_USER\Environment
Setting environment variables on Windows 11 can help you customize your system settings; however, you must always exercise caution when making changes to system variables.
Remember to double-check the variable name & value, and always create a backup of your registry editor before making changes.
Stuck somewhere? Don’t hesitate to mention your queries in the comments section below. We will be happy to assist you.
