If you want to change the boot order of your computer, then you will need to change the default operating system (OS). By default, Windows Vista will be your default OS. Therefore, you will need to change the boot order of Windows 7 in order to select it. This can be done in the Control Panel, by going to the Startup tab. You will find a list of installed programs in the Autoruns folder. If you see any that are invalid, click the “Remove” button on the right side of the startup folder. When you are done, reboot your PC and you will be free from all the unwanted software.
The BIOS setup utility is a handy tool to change the boot order. Select the Advanced tab and then click Boot Order. Select a device to boot first. If there are more than one boot options, you can change the order of each one to customize the boot order. You can change the order of the loaders by choosing Default, Removable Devices, Network, and USB Device, depending on the settings you want.
What Do You Write in Edit Boot Options?
Before you can edit the boot menu, you need to know what you can write there. The default boot order of Windows 7 prevents you from choosing it. This means that you will need to change the default boot order of your computer. You can do this by using a program called Advanced Boot Menu Editor. If you don’t want to use the advanced boot menu editor, you can download a boot manager instead.
The first step in editing the boot menu is to open a command-line interface and run msconfig as an administrator. Type’startup’ in the search box, and then click OK. You’ll see a list of boot loaders. This list contains information about the operating system and identifier. You can change the timeout for the boot menu to allow yourself time to choose a boot entry.
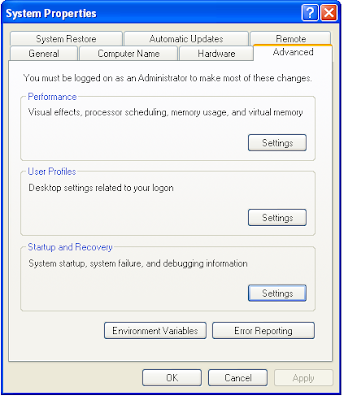
If you’re wondering how to edit Windows boot options in your operating system, you’ve come to the right place. You can edit the boot order and other options by using a command line tool called msconfig. Before you can edit the boot menu, however, you must first save your changes. Once you’ve done that, open the Startup and Recovery dialog box, and choose Advanced. On the Advanced boot tab, click the Boot option, and then choose the Operating System you want to boot from.
To access the BIOS setup utility, press Windows Key + I to open the Settings panel. Scroll down to Update & Security > Recovery. Select the option Restart now. If you need to restart your system immediately, you can hold Shift while selecting the option. Note: It may take a few tries to change the boot order, so make sure you save all important documents before pressing the button! Then, click Change defaults and select the operating system you want to use as your default.
How Do I Turn Off Edit Boot Options in Windows 7?
Most computers use a dual boot setup to allow users to change the order in which they load an operating system. While this process is straightforward, it may not be appropriate for every system. Regardless of the purpose of changing boot order, here are a few things to keep in mind. First, you need to determine what your system is configured for. If you have Windows Vista, it will be the default OS, and Windows 7 will not.
The process to delete an entry in the boot menu is simple if you have the right tools. The boot menu can be difficult to navigate without the right tools, but there are some tricks to make it easy. First, open msconfig. Once in the boot tab, press the Delete key. Next, type bcdedit in the search box. Note the identifier above the partition.
What Happens If You Delete Boot Option?
To delete the boot option, you must first format the partition. This is done if you are planning to install another operating system or want to extend other partitions. You can access the Disk Management tool by clicking the WinX menu shortcut and entering “msconfig”.
To recover the deleted OS, you can use a partition recovery software. Partition recovery software like EaseUS Partition Master is 100% safe, virus-free, and plug-free. Roxanne, the main contributor at EaseUS, likes to share her ideas with other users. She developed a software program that allows you to recover deleted operating systems. You can download it for free from its official website.
To move the boot option, you can use the + keys to navigate to the top of the boot menu. If you cannot find the option on the right-hand side, you can use function keys. Pressing Delete will delete it. Press the + key again to select it. The computer will now restart from the selected option. It will then display the first setup window. It is important to note that this process is destructive and should only be done if you are sure you want to use the old boot option.
What Does Noexecute Optin Mean?
Adding a switch to the boot order can change the way Windows starts. The noexecute parameter can be found in four flavors, /NOEXECUTE=OPTIN enables Data Execution Prevention for operating system and core system images. /NOEXECUTE=OPTOUT enables Data Execution Prevention for all processes. /NOEXECUTE=ALWAYSON enables Data Execution Protection for all kernel and image files.
Disabling auto restart can result in a blue screen of death. It’s important to remember that this error is caused by an out of date device driver. This can cause a STATUS_ACCESS_VIOLATION. If you disable automatic restart in Windows 7, you will probably experience this error message. To prevent this, make sure that your system is running as fast as possible.
What Does the Bootloader Do?
In Edit Boot Options Windows 7, you can change the default boot loader. To do this, you must open the command prompt as an administrator. Then type msconfig into the search field. Now, select the Advanced boot tab. In the Advanced boot tab, type “msconfig” and click OK. You will see the boot loader and its details. In this case, the default boot loader is Windows XP.
The Bootloader is an important part of the operating system and can be tweaked in the Edit-Boot-Options window. It is the boot software that enables Windows to load your OS. If your computer has a bootloader, it will be able to find the file. In most cases, it will be stored in the BCD store, which is much more secure. Administrators can assign rights to this partition and manage boot options.
To change the boot order, you must have administrator privileges. Run the Windows Boot Manager and choose the Boot menu. Select “Edit boot options” and then press the arrow keys to select “boot menu”. Once you have chosen the boot option, you can change the order of loaders by typing “bcdedit”. However, you should know that this operation may not be suitable for your system. If you still have problems with the bootloader, you should perform additional steps.
What is Boot Configuration?
To change the boot order in Windows 7, first go to your BIOS setup utility. Look for the Boot Order tab and select it. You will need administrator privileges in order to do this. After clicking on this tab, press the arrow keys to select a boot option from the list. Select the one you want to use as the default boot option, and then change the order as needed. Note that Windows 7 Home will be the first boot option listed.
You can add another boot entry by copying an existing one. Give it a friendly name, like “My Computer,” and then change the boot parameters. You can make this boot entry the default and enable Windows features. Change the boot menu timeout to increase your computer’s speed while allowing you to select a boot entry. Once you’ve completed this, click Apply and OK. You can also change the boot menu timeout to select the entry you want to use when Windows starts.
Learn More Here:
1.) Windows Help Center
2.) Windows – Wikipedia
3.) Windows Blog
4.) Windows Central
Время на прочтение
2 мин
Количество просмотров 95K
Disclaimer: не ждите откровений. У меня возникла проблема, решение не смог ни нагуглить, ни нахабрить — пришлось решать самому. Кому-то из гуру может показаться очевидным, кому-то может пригодиться.
Недавно возникла задача перегрузить компьютер с Win7 в Safe Mode. Все как обычно: Restart, список вариантов загрузки, F8… и ничего! Нажатие F8 вместо отображения меню с вариантами Safe Mode и прочими твиками просто загружает Windows обычным способом. Непорядок!
Коллективный разум через Google Search подсказал, что можно загрузиться в Safe Mode через MSConfig.exe: запускаем, переходим во вкладку Boot, выбираем нужный вариант загрузки и ставим галку напротив Safe Mode. Пробуем — работает! Заканчиваем дела в Safe Mode (вычищаем недопроапгрейдившийся Outpost), запускаем MSConfig снова, снимаем галку Safe Mode и возвращаемся к нормальной жизни.
Проблема успешно обойдена, но не решена — разбираемся дальше. После медитации на экран с вариантами загрузки заметил, что нет сообщения «Press F8 for Advanced Boot Options». Интересно… Идем опять копаться в коллективном разуме: для достижения подобного эффекта предлагают патчить ntldr или ставить какие-то сторонние программы — не выход. Смотрим MSConfig (Boot -> Advanced Options, как бы созвучно) — ничего. Но MSConfig не показывает строки параметров загрузки (ладно, boot.ini в Win6.x уже нет, и строк никаких тоже нет) — смотрим bcdedit.exe:
Windows Boot Loader
-------------------
identifier              {current}
device                  partition=C:
path                    \Windows\system32\winload.exe
description             Windows 7
locale                  en-US
inherit                 {bootloadersettings}
recoverysequence        {1f0916c9-1973-11e0-9dde-cfa935f5faf7}
recoveryenabled         Yes
advancedoptions         No
osdevice                partition=C:
systemroot              \Windows
resumeobject            {1f0916c7-1973-11e0-9dde-cfa935f5faf7}
nx                      OptIn
А почему это advancedoptions = No? Правим: bcdedit.exe /set advancedoptions 1, перегружаемся — попадаем в Advanced Boot Options! Ура? Перегружаемся еще раз — снова попадаем в Advanced Boot Options!
Получается, или они всегда недоступны, или всегда показываются при загрузке — совсем не то, что нужно. Чтение справки bcdedit выявило еще один вариант: bcdedit.exe /deletevalue advancedoptions убирает форсированное включение/отключение Advanced Boot Options и позволяет пользователю выбирать — это оно!
Возможно, кому-то еще пригодится, если вдруг заметите, что F8 не срабатывает. Или, как защита от шаловливых ручек юзеров (в XP таки приходилось патчить ntldr). Должно точно так же работать в Vista, но не проверял. Интересно, какие еще фокусы можно творить с виндовым бутлоадером?
Windows allows users to edit the current boot menu by altering the booting options listed in it. There are different methods to alter it and it is important to note that different Microsoft OS versions use different methods to edit it. This tutorial explains how to edit the boot menu on Windows 8, Windows 7 and XP computers. At the end of this tutorial, you will learn how to disable Boot Loader by selecting a default OS.
How to Edit Boot Option In Windows XP
- Right click on my computer

- Click Properties
- Click Advanced
- Click Settings button near Startup and Recovery
- Click Edit and make necessary changes in the notepad which shows the current booting sequence and option
Change Boot Entry In Windows 7 and Windows 8
Here let us check how to add a new entry in Windows 8 computer. The same procedure can be followed for Windows 7 and Vista computers.
- Open Command Prompt in Run as Administrator mode
To open the command prompt in administrative mode, right click on Command prompt and select the option Run as administrator. To learn more about this step, visit the link below.
The requested operation requires elevation(Run as administrator) - How to View Windows Boot Loader
Type the command bcdedit and press enter
Note the equivalent value displayed here [{e2b1507b-eddc-11de-90a9-beb27b9d4437}] and use that value for your laptop.
- Command to Copy Current Boot Entry
Type bcdedit /copy {current} /d «DebugEntry» and press enter.
- Command to Remove an Entry
If you do not want additional Operating System entries while starting your PC, you can delete unwanted entries from Command Prompt. DOS Command to delete unwanted entry is:
bcdedit /delete {e2b1507b-eddc-11de-90a9-beb27b9d4437}

While booting a computer we can see a menu to select the Operating System to choose from a list of installed Operating SytmsS. Have you ever wonder where this information is saved? Boot.ini is the file where Windows stores the details of these options and OS menu. If we need to change any settings on this menu we need to edit the boot.ini file. To edit this file, follow the steps below.
Steps to Edit Boot.ini
- Click on the Windows Start menu and go to the Run/Search
- Type msconfig and press OK. Now System Configuration Utility Window will be opened where we can change the boot.ini settings.
- Click on the Boot.ini tab
Now you can change the settings in the boot.ini file such as setting the default Operating System, Set the show time to pick an Operating system, check all OS starting paths etc.

How to Disable the Windows Boot Menu Option
We can disable it without going to boot.ini file. To disable default boot menu option in Windows XP, follow the steps below.
- Right click on My Computer icon and click on Properties
- Click on Advanced tab
- Click on the Settings button under Startup and Recovery
- Select Default OS
Now you can select the default OS from the list of installed Operating Systems on your computer. After selecting the default Operating System we should set the Time to Display list of Operating Systems to 0 seconds. Now we need to click on OK.
- Reboot Your Computer
On next reboot onwards you will not see the list of all installed OS in your PC. We will directly log on to the default OS which we set here.
In this tutorial, you have learned how to edit the boot.ini file on a computer running with Microsoft OS. If you ever wonder how to put the same picture for all user accounts, follow the steps mentioned in the link below.
Default User Login Picture to all users
You see accessing and editing the boot.ini file in Windows is not a difficult task. Similarly, if you want to access the service window, you can follow the steps mentioned in the link below.
Different Methods to Access Service Window On Your Computer
| No: | Recent Posts |
|---|---|
| Access Services Window in Windows 10 | |
| You Don’t Have Administrative Rights To Run The Command | |
| Getting 169.254.X.X (APIPA) Windows Automatic Private IP Address | |
| Ping Gives Hardware Error | |
| Disable iPod Service On Windows | |
| Default User Login Picture to all users in Windows 10 | |
| PING: Transmit failed. General Failure | |
| Ping Request Could not Find Host | |
| Error 628: The Connection was Terminated by the Remote computer | |
| Error 797: A Connection to the Remote Access Server was not Made | |
| Adobe Flash Player has Stopped a Potentially Unsafe Operation | |
| A lot Of Backlinks Suddenly Disappeared | |
| Disk Boot Failure | |
| How to Reset BSNL WiFi Modem | |
| Check Reliance Netconnect Usage Bill | |
| Destination Net Unreachable |
Changing the Boot Order of Your Drives Press F1, F2, Delete, or the correct key for your specific system on the POST screen (or the screen that displays the computer manufacturer’s logo) to enter the BIOS setup screen. Look for where it says Boot, and enter the submenu. Select Boot Sequence, and press Enter.
Windows 7: Change the BIOS Boot Order F3. F4. F10. F12. Tab. Esc. Ctrl+Alt+F3. Ctrl+Alt+Del.
How do I select boot options in Windows 7?
The Advanced Boot Options screen lets you start Windows in advanced troubleshooting modes. You can access the menu by turning on your computer and pressing the F8 key before Windows starts. Some options, such as safe mode, start Windows in a limited state, where only the bare essentials are started.
How do I change boot options?
To edit boot options in Windows, use BCDEdit (BCDEdit.exe), a tool included in Windows. To use BCDEdit, you must be a member of the Administrators group on the computer. You can also use the System Configuration utility (MSConfig.exe) to change boot settings.
How do I change BIOS settings in Windows 7?
Here is how you can do it. Press and hold Shift, then turn off the system. Press and hold the function key on your computer that allows you to go into BIOS settings, F1, F2, F3, Esc, or Delete (please consult your PC manufacturer or go through your user manual). You will find the BIOS configuration.
How can I repair my Windows 7?
Follow these steps: Restart your computer. Press F8 before the Windows 7 logo appears. At the Advanced Boot Options menu, select the Repair your computer option. Press Enter. System Recovery Options should now be available.
How do I boot to BIOS in Windows 7?
How to open the BIOS in Windows 7 Turn off your computer. You can only open the BIOS right before you see the Microsoft Windows 7 logo when starting your computer. Turn on your computer. Press the BIOS key combination to open the BIOS on the computer. Common keys to open the BIOS are F2, F12, Delete, or Esc.
How do I get boot options?
How to Access Your Computer’s Boot Menu (If It Has One) To reduce the need to change your boot order, some computers have a Boot Menu option. Press the appropriate key—often F11 or F12—to access the boot menu while booting your computer.
What is the reboot key for Windows 7?
You can perform a basic reboot on Windows 7 by opening the Start menu → Clicking the arrow next to Shut Down → Clicking Restart. If you need to do further troubleshooting, hold F8 while rebooting to access the advanced startup options.
How do I boot into BIOS?
Get ready to act quickly: You need to start the computer and press a key on the keyboard before the BIOS hands over control to Windows. You have only a few seconds to perform this step. On this PC, you’d press F2 to enter the BIOS setup menu.
How do I remove boot options?
Deleting boot options from the UEFI Boot Order list From the System Utilities screen, select System Configuration > BIOS/Platform Configuration (RBSU) > Boot Options > Advanced UEFI Boot Maintenance > Delete Boot Option and press Enter. Select one or more options from the list. Select an option and press Enter.
How do I fix edit boot options?
Windows – Editing Boot Options Go to the Start Menu, type msconfig in the search box, and press Enter. Click on the Boot tab. Check the Safe boot check box under Boot options. Select the Minimal radio button for Safe Mode or Network for Safe Mode with Networking.
How do I change Windows boot options?
Generally, the steps go like this: Restart or turn on the computer. Press the key or keys to enter the Setup program. As a reminder, the most common key used to enter the Setup program is F1. Choose the menu option or options to display the boot sequence. Set the boot order. Save the changes and exit the Setup program.
How do I adjust BIOS settings?
How to Configure the BIOS Using the BIOS Setup Utility Enter the BIOS Setup Utility by pressing the F2 key while the system is performing the power-on self-test (POST). Use the following keyboard keys to navigate the BIOS Setup Utility: Navigate to the item to be modified. Press Enter to select the item.
How do I change BIOS settings?
Adjust Settings. Familiarize yourself with the BIOS controls. Since BIOS menus don’t support mouse input, you’ll need to use the arrow keys and other computer-specific keys to navigate the BIOS. You can usually find a list of controls in the bottom-right corner of the BIOS homepage.
How do I disable advanced boot options in Windows 7?
How to Disable Auto Restart From the ABO Menu in Windows 7 Using F8 Press F8 Before the Windows 7 Splash Screen. To begin, turn on or restart your PC. Choose the Disable Automatic Restart on System Failure Option. Wait While Windows 7 Attempts to Start. Document the Blue Screen of Death STOP Code.
How do I repair Windows 7 without reinstalling?
This article will introduce you how to repair Windows 7 without losing data with 6 ways. Safe mode and Last Known Good Configuration. Run Startup Repair. Run System Restore. Use the System File Checker tool to repair system files. Use Bootrec.exe repair tool for boot problems. Create a bootable rescue media.
How do I fix Windows 7 failed to start?
On the System Recovery Options menu, select Startup Repair, and then follow the on-screen instructions. When it completes, restart your computer to see if it fixed the problem. When the startup repair process is done, you may restart your computer and check if Windows failed to start Windows 7 error disappears.
How do I repair Windows 7 without a disk?
Restore without installation CD/DVD Turn on the computer. Press and hold the F8 key. At the Advanced Boot Options screen, choose Safe Mode with Command Prompt. Press Enter. Log in as Administrator. When Command Prompt appears, type this command: rstrui.exe. Press Enter.
How do I exit BIOS setup utility Windows 7?
Press the F10 key to exit the BIOS setup utility. In the Setup Confirmation dialog box, press the ENTER key to save the changes and exit.
What is the F12 boot menu?
The F12 Boot Menu allows you to choose which device that you would like to boot the computer’s Operating System from by pressing the F12 key during the computer’s Power On Self Test, or POST process. Some notebook and netbook models have the F12 Boot Menu disabled by default.
How do I get to the boot menu on startup?
When a computer is starting up, the user can access the Boot Menu by pressing one of several keyboard keys. Common keys for accessing the Boot Menu are Esc, F2, F10 or F12, depending on the manufacturer of the computer or motherboard. The specific key to press is usually specified on the computer’s startup screen.
![]()
Автор:
Обновлено: 18.02.2023
Стандартный загрузчик операционной системы Windows служит для выбора операционной системы или режима ее запуска. Чаще всего редактирование меню загрузки требуется при установке новой ОС поверх старой — лишняя запись заставляет каждый раз делать выбор между двумя системами, задерживая загрузку на 30 секунд или заставляя делать лишнее действие при запуске.
Старые версии Windows хранили всю загрузочную информацию в файле «boot.ini». Это обычный текстовый файл с несколькими строками данных, который хранился в корне диска С: и был скрыт.
Windows XP стал последней версией OS, в которой применялся это метод. В Win7 информация находится в специальном хранилище BCD (Boot Configuration Data), которое, в свою очередь, лежит в системной папке BOOT. Редактирование записей стало возможным следующими способами.

Меню загрузки Windows 7
Содержание
- Редактирование через меню «Система»
- Правка через утилиту «Конфигурация системы»
- Видео — Как отредактировать меню загрузки Windows 7
- Точная настройка загрузки с помощью командной строки
- Подключение виртуального жесткого диска (VHD)
- Редактирование с помощью сторонних программ
- Возможные проблемы и рекомендации
- Видео — Редактирование меню загрузки операционных систем
Редактирование через меню «Система»
Сильно урезанная версия настроек есть в подразделе «Загрузка» системного меню, которое находится в «Панели управления».
Шаг 1. Зайти в системные свойства компьютера. Это можно сделать двумя способами:
- кликнуть на иконку «Компьютер» правой кнопкой мышки, затем выбрать пункт меню «Свойства»;

Кликаем на иконку «Компьютер» правой кнопкой мышки, затем выбираем пункт меню «Свойства»
- осуществить переход через «Пуск» — «Панель управления» — «Система».

Открываем «Пуск», затем «Панель управления»

В режиме «Просмотр» выбираем значение «Крупные значки», открываем меню «Система»


Шаг 2. В открывшемся окне с описанием свойств компьютера и ОС перейти в «Дополнительные параметры системы», оттуда — в параметры «Загрузки и восстановления».

Переходим в «Дополнительные параметры системы»

В разделе «Загрузки и восстановления» нажимаем на блок «Параметры»
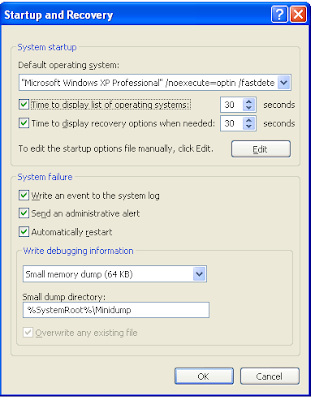
Шаг 3. В окне «Загрузка и восстановление» пользователю будут доступны следующие варианты:
- смена порядка запуска ОС по умолчанию;
- отключение выбора загрузки систем;
- выставление таймера на любой удобный срок.

В блоке «Загрузка операционной системы» настраиваем подходящие значения, нажимаем «ОК»

Справка! Несмотря на простоту и удобство этого способа, редактировать загрузочное меню таким образом нельзя, только выбирать настройки по умолчанию. Для прямых правок придется углубиться в системные приложения.
Правка через утилиту «Конфигурация системы»
Msconfig – специализированное приложение для настройки параметров OS от Майкрософт. Нужно в простых случаях, вроде лишней записи уже удаленной системы или автоматической загрузки Windows в безопасном режиме.
- Запустите меню «Выполнить» нажатием клавиш «Win+R», затем введите «msconfig» в появившейся строке, подтвердите действие кнопкой «ОК».

Вводим «msconfig» в появившейся строке, нажимаем «ОК»
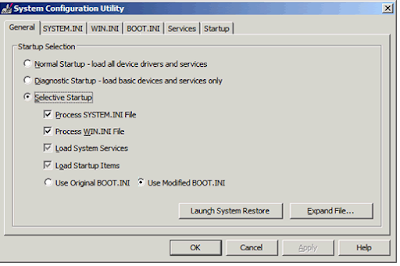
- Это запустит стандартное приложение для настройки операционной системы. Выберите вкладку «Загрузка».

Выбираем вкладку «Загрузка»
- В данном окне можно осуществить следующий набор действий с загрузочным меню:

Окно для редактирования меню загрузки системы


- просмотр информации о существующих записях;
- изменение порядка загрузки по дефолту;
- выбор дополнительных опций запуска ОС;
- редактирование стандартного 30-секундного таймера при запуске;
- удаление строки из меню.
Выделяем ненужную систему щелчком мышки, нажимаем по кнопке «Удалить»

Справка! Здесь возможностей для редактирования заметно больше, однако добавить свою запись или изменить уже существующую все еще нельзя. Для полного доступа к загрузочному меню придется использовать командную строку.
Видео — Как отредактировать меню загрузки Windows 7
Точная настройка загрузки с помощью командной строки
Правка раздела начиная с Vista проводится через специальную утилиту bcdedit. Так как она находится в папке «System32» каталога Windows, для запуска у командной строки должны быть администраторские права.
Шаг 1. Наберите в поиске меню «Пуск» команду «cmd».

Набираем в поиске меню «Пуск» команду «cmd»
Шаг 2. После того, как поиск найдет системное приложение — кликните по нему правой кнопкой мышки и запустите от администратора.

Кликаем по утилите правой кнопкой мышки и запускаем от администратора
Важно! Запуск командной строки через «Win+R» – «cmd» подойдет только в случае, если вы уже работаете под админским аккаунтом. В ином случае у bcdedit не будет прав для редактирования.
Шаг 3. Дальнейшие действия в командной строке проводятся при помощи bcdedit. Введите команду для просмотра информации, хранящейся в загрузочном секторе, активируйте команду нажатием по кнопке «Enter».

Вводим команду «bcdedit», жмем «Enter»
Важные для пользователя значения:
- идентификатор — код записи в меню, под (current) находится запущенная OS;
- device – системный диск, раздел или сетевой ресурс, на котором указывает запись;
- path – местонахождение файла winload.exe или другого загрузчика ОС;
- description – название, отображаемое при загрузке.

Важные значения для загрузки Windows

В «Диспетчере загрузки» стоит выделить:
- default – стандартная система для запуска, выбирается для загрузки по истечению времени на выбор;
- timeout – время для автоматического пропуска меню при бездействии пользователя;
- displayorder – порядковое расположение записей в меню.

Важные команды для «Диспетчера загрузки»

Для правки меню загрузки допишите после команды «bcdedit» следующие параметры и модификаторы:
- /default {идентификатор} — задать систему для загрузки по умолчанию;

В команде «bcdedit /default» вместо «идентификатор» пишем идентификатор своей системы
- /timeout 00 – установить время ожидания до автоматической загрузки в секундах;

Командой «bcdedit /timeout 00» устанавливаем время ожидания до автоматической загрузки в секундах
- /set {идентификатор} description ″Новая″ — смена названия записи;
Команда bcdedit для смены названия записи
- /create /d ″Windows 7″ /application osloader — создать новую запись с выбором операционной системы и стандартного загрузчика;

Команда bcdedit для создания новой записи с выбором операционной системы и стандартного загрузчика
- /set {идентификатор} device partition=K: — изменение установочного диска, часто требуется при переносе системы на другой HDD или SSD;

Команда для изменения установочного диска, часто требуется при переносе системы на другой HDD или SSD
- /delete {идентификатор} /cleanup — удаляет запись и очищает всю дополнительную информацию о ней из BCD;

Команда для удаления записей и очищения всей дополнительной информации из BCD
Важно! При использовании упрощенного идентификатора, вроде default, в конце команды необходим параметр /f. Для 32-значного кода ключ не требуется.
- /export ″D:Save″ — сохранение загрузочного файла в указанном месте;

Команда «bcdedit /export», с указанием своего диска, сохраняет загрузочные файлы в указанном месте
- /import ″D:Save″ — восстановление из существующей копии;
Команда «bcdedit /import» для восстановления из существующей копии
- /set {идентификатор} locale en-US — устанавливает язык меню. Русская локализация отмечается тегом «ru-Ru».


Для управления порядком загрузки используется команда «bcdedit /displayorder» с различными модификаторами. Проще всего для установки очереди будет использовать «/displayorder {идентификатор2} {идентификатор3} {идентификатор1}». Команда «/displayorder {идентификатор} /remove» удалит запись из списка выбора, оставив ее в самом файле.

Команда «bcdedit /displayorder» для установки очереди

Команда «bcdedit /displayorder» для удаления записей из списка выбора, оставив ее в самом файле
Чтобы получить полную справку по команде введите bcdedit или bcdedit.exe с ключом /?.

Для получения справки по команде вводим bcdedit или bcdedit.exe с ключом /?
Подключение виртуального жесткого диска (VHD)
Bcdedit позволяет работать и с виртуальными дисками, добавляя для них запись напрямую в загрузчик. Методика позволяет использовать виртуальную машину как обычную ОС, с возможностью запуска при старте компьютера:
Чтобы подключить VHD, нужно:
- Напечатать в консоли командной строки «bcdedit», запустить команду нажатием клавиши «Enter».

Печатаем в консоли командной строки «bcdedit», запускаем команду нажатием клавиши «Enter
- Скопировать существующую запись командой «bcdedit /copy {current} /d ″Виртуальный диск″». В кавычках — название строки в загрузочном меню.

Вводим команду «bcdedit /copy {current} /d ″Виртуальный диск″», жмем «Enter»
- Набрать «bcdedit /set {идентификатор} device vhd=[C:]storage.vhd», где «vhd» является ссылкой на расположение виртуального диска.

Копируем и вставляем команду со своими данными, жмем «Enter»
- Повторить вторую команду еще раз, заменив «device» на «osdevice».

Повторяем вторую команду еще раз, заменив device на osdevice, жмем «Enter»
- Подключить аппаратное обнаружение — «bcdedit /set {идентификатор} detecthal on».
- Через «bcdedit /displayorder {идентификатор} /addfirst» добавить запись в начало списка.

Вводим команду, заменив «addlast» на «addfirst»


Редактирование с помощью сторонних программ
Если стандартные методы слишком неудобны или сложны, пользователь может установить сторонние менеджеры меню загрузок. Одной из таких программ является EasyBCD.

Интерфейс EasyBCD
EasyBCD работает с командной строкой напрямую, предоставляя пользователю следующие возможности:
- настройка мультизагрузки нескольких операционных систем (в том числе Ubuntu, OS X и других);
- загрузка ОС с флешки, сетевого диска, ISO-файла или виртуального диска;
- починка неисправного загрузчика Windows и откат до стандартного состояния;
- стандартные действия — переименование, удаление, смена порядка, скрытие.
Для установки нового загрузочного раздела:
- Перейдите в «Bootloader Setup», выберите диск, на котором находится операционная система и отметьте ее версию. Для XP и Vista/7 способы записи отличаются, поэтому не ошибитесь в выборе опций. После нажмите «Write MBR» для записи данных в сектор.

Переходим в «Bootloader Setup», выбираем диск с системой, отмечаем ее версию, нажимаем «Write MBR»
- Добавление новой записи осуществляется в разделе «Add new entry». Там выбирается тип OS и название строки, а также автоматически детектируется необходимый носитель. После настройки необходимых параметров нужно кликнуть по опции «Add entry».

В разделе «Add new entry» выбираем новую запись, нажимаем «Add Entry»


Приложение поддерживает все системы, начиная с Windows XP, весит около полутора мегабайт.
Возможные проблемы и рекомендации
При установке новой операционной системы в некоторых случаях загрузчик может полностью затираться — например, вместо Windows 7, 8 и 10 в меню будет отображаться только «десятка». Чтобы избежать подобных трудностей перед установкой новой ОС, всегда делайте копию загрузчика. Это займет всего пару минут и защитит от возможных проблем.

Рекомендации по решению проблем, возникающих при редактировании меню загрузок системы
Повреждение загрузочного сектора, ошибочные изменения или опечатки в системных адресах могут привести к проблемам с запуском Windows. Если вы планируете серьезные правки — сохраните бэкап загрузочного файла и оставьте до самого конца в меню первоначальную строку, переименовав ее в WORK, TEST или LEGACY. В случае, когда правки пройдут неудачно, эта строка может стать последним шансом загрузить Windows без дополнительных действий.
Не следует изменять параметры, если вы не понимаете точно, что именно они делают. Для большинства пользователей правки загрузочного меню нужны только для удаления раздражающего меню при запуске. Для этого не стоит запускать командную строку — воспользуйтесь первым или вторым способом, они ничем не хуже.
Справка! Дополнительную информацию по задаче можно найти в одном из русскоязычных блогов Майкрософт по ссылке https://news.microsoft.com/ru-ru/microsoft-blogi/.
Видео — Редактирование меню загрузки операционных систем
Рекомендуем похожие статьи