
При работе Windows 10 нередко возникают ошибки, которые можно исправить, перезагрузив систему или переустановив отдельные приложения либо драйверы. Но в ряде случаев подобные сбои носят серьезный характер. К таким нарушениям относится ошибка dxgkrnl.sys с синим экраном в Windows 10 х64. Данный файл относится к ядру DirectX, который отвечает за ускорение «тяжелых» мультимедийных приложений.
Причины сбоя
Такая ошибка возникает по следующим причинам:
- некорректная работа драйвера видеокарты;
- компьютер заражен вирусами;
- поврежден жесткий диск;
- повреждения в системном реестре;
- ошибки в работе оперативной памяти;
- повреждения файлов системы.
Более распространенной причиной появления ошибки dxgkrnl.sys, при которой появляется синий экран, считается повреждение драйвера видеокарты.
Данная проблема не цикличная. То есть при возникновении такого сбоя компьютер автоматически перезагрузится, и пользователь сможет работать с операционной системой. Однако в ряде случаев проблема носит более серьезный характер. В подобных обстоятельствах для устранения сбоя придется загружать Windows 10 в безопасном режиме.
Как исправить ошибку dxgkrnl.sys на синем экране
Прежде чем приступать к поиску причины возникновения такого сбоя, рекомендуется проверить компьютер на вирусы. После этого работа операционной системы восстанавливается. При необходимости проверку следует проводить в безопасном режиме при подключенных или отключенных сетевых драйверах.
Диагностика DirectX
Как было отмечено ранее, основная причина появления синего экрана с надписью dxgkrnl.sys – сбой в DirectX. Поэтому последний необходимо проверить, для чего нужно:
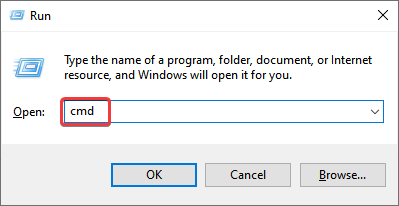
- Сочетанием клавиш «Win» и «R» запустить командное окно и прописать «dxdiag».

- В новом окне перейти на вкладку «Экран» и проставить галочки напротив DirectDraw, AGP и Direct3D, если та не стоит.
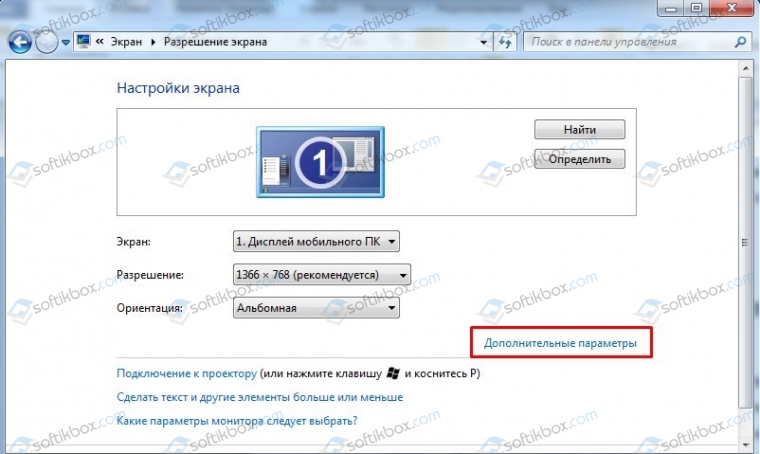
- Перейти в раздел «Параметры», открыть «Система» и запустить сначала «Дополнительные параметры дисплея», а затем – «Свойства видеоадаптера для дисплея».
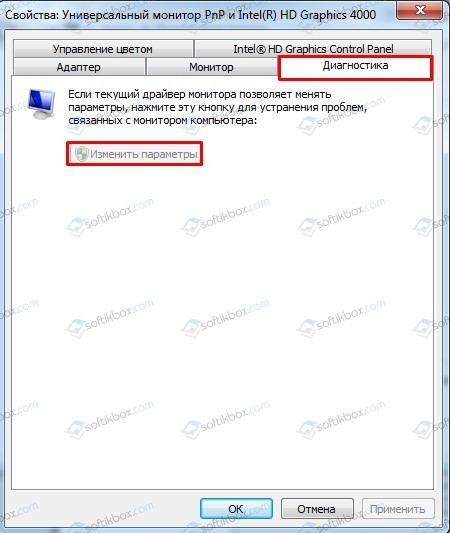
- В новом окне открыть раздел «Диагностика» и внести изменения в параметры.
- Включить аппаратное ускорение.
- Перезагрузить

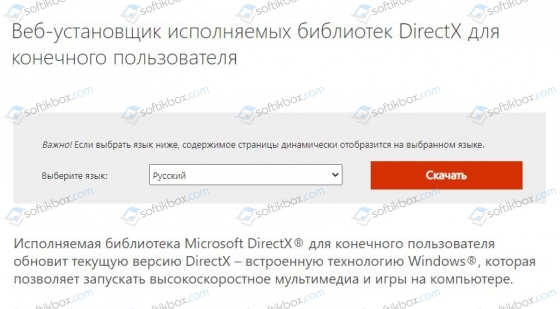
Если после описанных действий вновь появляется синий экран, следует установить последнюю версию DirectX, скачав соответствующий пакет с официального сайта разработчика.
Команды DISM и SFC
В случае, если ошибка вызвана повреждением системных файлов, то необходимо запустить встроенную утилиту отладки.
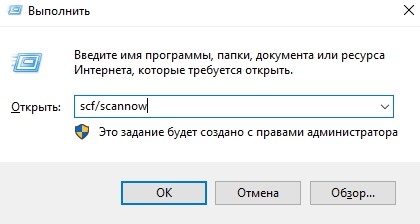
- Для этого нужно сочетанием «Win» и «R» открыть командное окно и запустить scf/scannow.
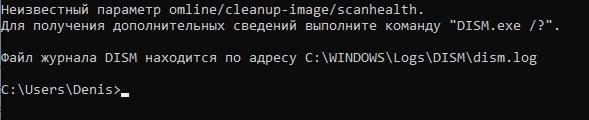
- Также рекомендуется на данном этапе заново развернуть образ системы. Данная процедура способна устранить неполадку. Для развертывания образа в командном окне (запускается с помощью cmd) нужно прописать DISM/Omline/Cleanup-Image/ScanHealth, а затем, нажав предварительно на «Enter» — DISM/Online/Cleanup-Image/RestoreHealth.
Обе процедуры рекомендуется проводить после того, как другие решения не принесут результатов.
Переустановка драйвера видеокарты
Данный метод решения проблемы считается универсальным и помогает в большинстве случаев. Для переустановки драйвера необходимо скачать соответствующий пакет с официального сайта разработчика (Nvidia, Intel или AMD в зависимости от типа используемой видеокарты). Эту процедуру рекомендуется проводить самостоятельно, так как встроенная утилита Microsoft не всегда верно проводит операцию. В частности, инструменты Windows 10 нередко находят неподходящие драйверы, вследствие чего ошибка продолжает появляться.
Узнать тип установленной видеокарты можно через раздел «Параметры». Если Windows после каждого включения продолжает автоматически перезагружаться, то описанную процедуру следует проводить в безопасном режиме при подключенных сетевых драйверах.
Во избежание повторного появления ошибки рекомендуется перед установкой нового пакета удалить старые драйверы. Это поможет исключить вероятность конфликтов между одинаковыми процессами.
Отключение SLI и Surround в Nvidia
Компания Nvidia дополняет собственные видеокарты технологией SLI, которая позволяет одновременно задействовать несколько графических процессоров. Это решение помогает улучшить рендеринг кадров, что повышает производительность воспроизведения мультимедийных файлов.
Технология Surround, также доступная с продукцией Nvidia, разработана для того, чтобы пользователи могли подключать к компьютеру одновременно более одного монитора. Но оба решения увеличивают число задействованных процессов, что повышает шансы на возникновение сбоев.
Поэтому для устранения неполадки нужно зайти в панель управления картой Nvidia и в одноименном разделе отключить SLI и Surround.
Resolve this BSOD error with our expert solutions
by Milan Stanojevic
Milan has been enthusiastic about technology ever since his childhood days, and this led him to take interest in all PC-related technologies. He’s a PC enthusiast and he… read more
Updated on
- The dxgkrnl.sys Windows 10 error usually happens due to driver problems.
- Using third-party software that restores your files will quickly fix the dxgkrnl.sys blue screen.
- Turning it off in the NVIDIA settings should also eliminate the issue if you’re using SLI.
- Some users suggested updating your Windows 10 and hardware drivers to the latest versions.
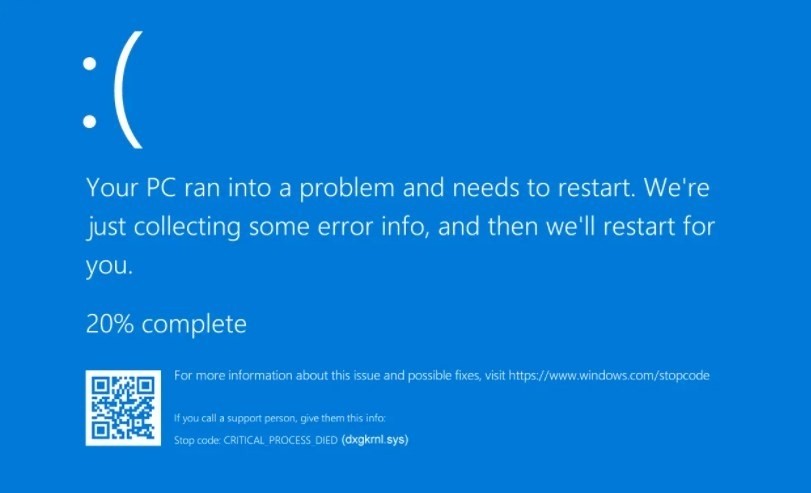
Blue Screen of Death errors can cause many problems, and users have reported that file DXGKRNL.sys causes these issues on Windows 10.
They’re unpleasant and unlikely to get solved out of the blue. If you experience such an error, let’s see how to fix it quickly.
Here are some more examples of this problem:
- dxgkrnl.sys failed – When facing this issue, check if there is any hardware failure that requires your attention.
- dxgkrnl.sys dpc latency Windows 10 – Is this your problem as well? Then, make sure to keep your Windows 10 and graphics card drivers updated.
- dxgkrnl.sys Windows 10 won’t boot – In this case, don’t hesitate to run the SFC scan and get further answers.
- driver_irql_not_less_or_equal dxgkrnl sys – When bothered by this error, the first thing you should do is turn off Nvidia Surround.
What causes the DXGKRNL.sys BSOD?
The DXGKRNL.sys BSOD is usually encountered when running an outdated version of DirectX. And to update DirectX, you need to update the graphics driver installed on the PC.
Besides, other underlying causes for the error include corrupt system files, problematic drivers, or connecting incompatible hardware to the PC. But these are unlikely scenarios, and the error usually involves the graphics driver.
How can I fix the BSOD error caused by DXGKRNL.sys?
1. Use a third-party BSoD fixer
The easiest and less consuming way to fix the blue screen DXGKRNL.sys in Windows 10 is by installing a third-party app that will do it for you.
The software can automatically scan your device for problematic files and restore or replace them with healthy ones, thus keeping your system up and going.
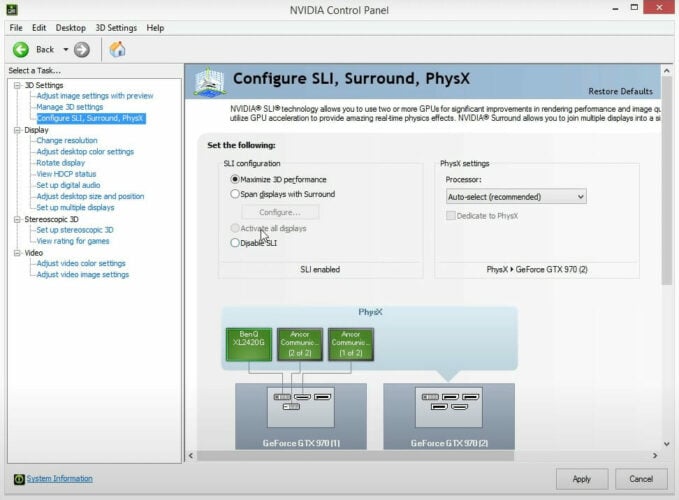
2. Disable SLI
- Open the Nvidia Control Panel.
- Go to 3D Settings from the navigation pane, and click on Configure SLI, Surround, PhysX.

- Make sure the Disable SLI option is selected, and click Apply to save the changes.
Many gamers use two Nvidia graphics cards in SLI mode for better performance. Although this sounds great, it has been reported that SLI can cause the system_service_exception DXGKRNL.sys error.
There’s a memory leak in VRAM when you use SLI on Windows 10, so to fix this issue, it’s advised that you disable SLI.
How we test, review and rate?
We have worked for the past 6 months on building a new review system on how we produce content. Using it, we have subsequently redone most of our articles to provide actual hands-on expertise on the guides we made.
For more details you can read how we test, review, and rate at WindowsReport.
After disabling SLI on your computer, verify if the DXGKRNL.sys fatal error is fixed.
3. Turn off Nvidia Surround
Nvidia Surround is a feature on Nvidia GPUs that lets you enjoy a 3D experience on multiple monitors.
Although this sounds like a fantastic feature for gamers, this feature has led to issues on Windows 10 and the System_Service_Exception DXGKRNL.sys BSOD error.
So far, the only solution is to turn off Nvidia Surround to fix this error. However, we also have to mention that sometimes Nvidia Surround can’t be turned off easily, and users have suggested using the CTRL + ALT + S or CTRL + ALT + R shortcut to turn it off.
If the shortcut isn’t working for you, try unplugging other monitors and booting with only one monitor plugged in. When you do that, the Nvidia Surround should be turned off automatically.
4. Keep your Windows 10 and GPU drivers updated
It has been reported that the graphics card driver causes this issue. Do you happen to you use the Nvidia graphic card? You should make sure you’re using the latest GPU driver available.
If you want to download any driver easily, you should install a third-party driver updater that will scan your PC for compatible hardware and software and then install the latest drivers.
All you have to do is choose whether to update all of the drivers at once or individually if you have reasons not to install specific ones.
5. Change graphics memory size in BIOS
- Restart your computer and keep pressing Del, F2, or F10 while your computer boots. The specific key may be different on your computer and should be listed during boot, or you can verify the same from the system manufacturer’s website.
- The Advanced, Advanced Chipset, or Advanced Features menu must be found.
- Locate Graphics Settings or Video Settings and change the memory size to 128 MB or more.
If you’re using integrated graphics, you might be able to fix this BSOD error by changing the graphics memory size in BIOS.
Users have reported successfully fixing errors caused by DXGKRNL.sys on ASUS laptops with integrated Intel HD 4400 graphics.
This solution should work for any other laptop or integrated graphic card, including DXGKRNL.sys latency AMD.
We must mention that changing the memory size for the integrated graphic card isn’t the same for all computers, and the process might be different depending on the BIOS you’re using.
6. Check for hardware malfunctions
There have been a few cases where a faulty RAM module or motherboard caused this issue. If your PC is under warranty, you might want to take it to the repair shop and have it checked for hardware malfunctions.
Since any installed hardware might be the underlying cause, the repair shop can quickly identify the one and make the necessary repairs to fix it or replace it with a functional component.
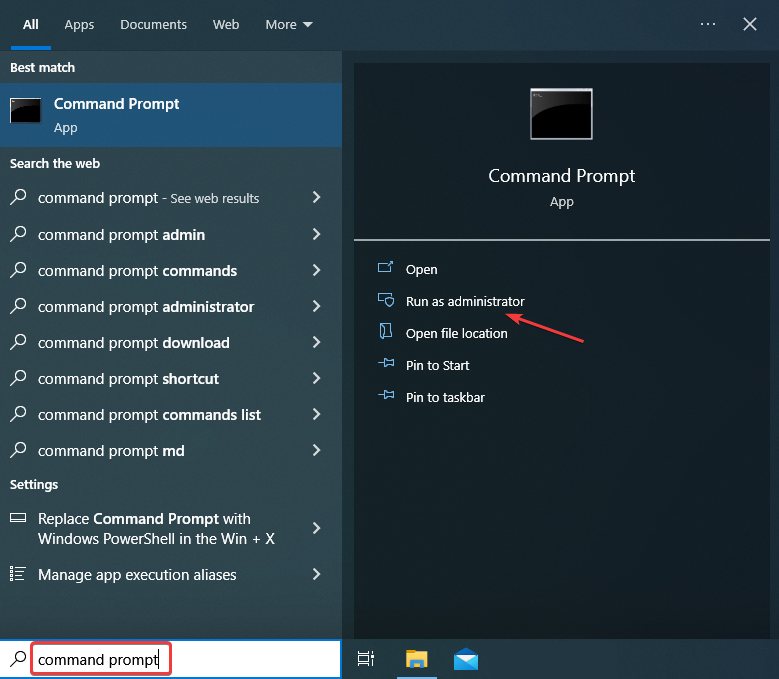
7. Run the SFC scan
- Type Command Prompt in the Search bar, and click on Run as administrator.

- Click Yes in the UAC prompt.
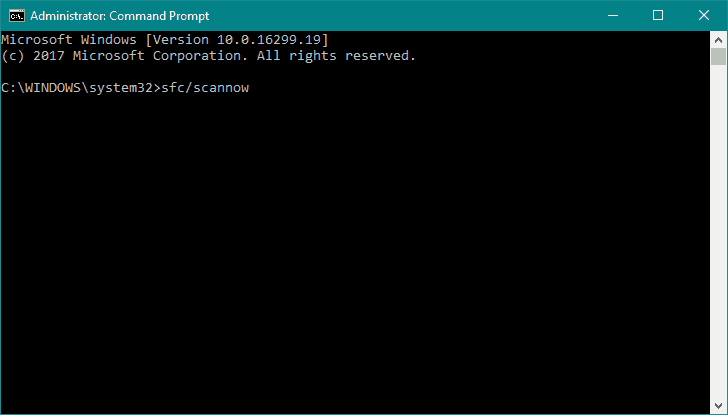
- Type in the following command, and press Enter:
sfc/scannow
- Wait for the process to finish.
- Restart your computer.
If none of the solutions from above managed to fix the DXGKRNL.sys not loaded error, it could be the corrupt system files to blame. And in this case, the SFC (System File Checker) scan will come to your aid.
- Security Settings Blocked Self-signed Application [Fix]
- Bugcheck 0x0000012B: How to Fix This BSoD
- Stop Error Code 0x0000008E: How to Fix it
- 0x000000ED BSOD: Unmountable Boot Volume [Error Fix]
8. Run the Blue Screen Troubleshooter

NOTE
If you can’t find the Blue Screen troubleshooter on the computer, head to the following method.
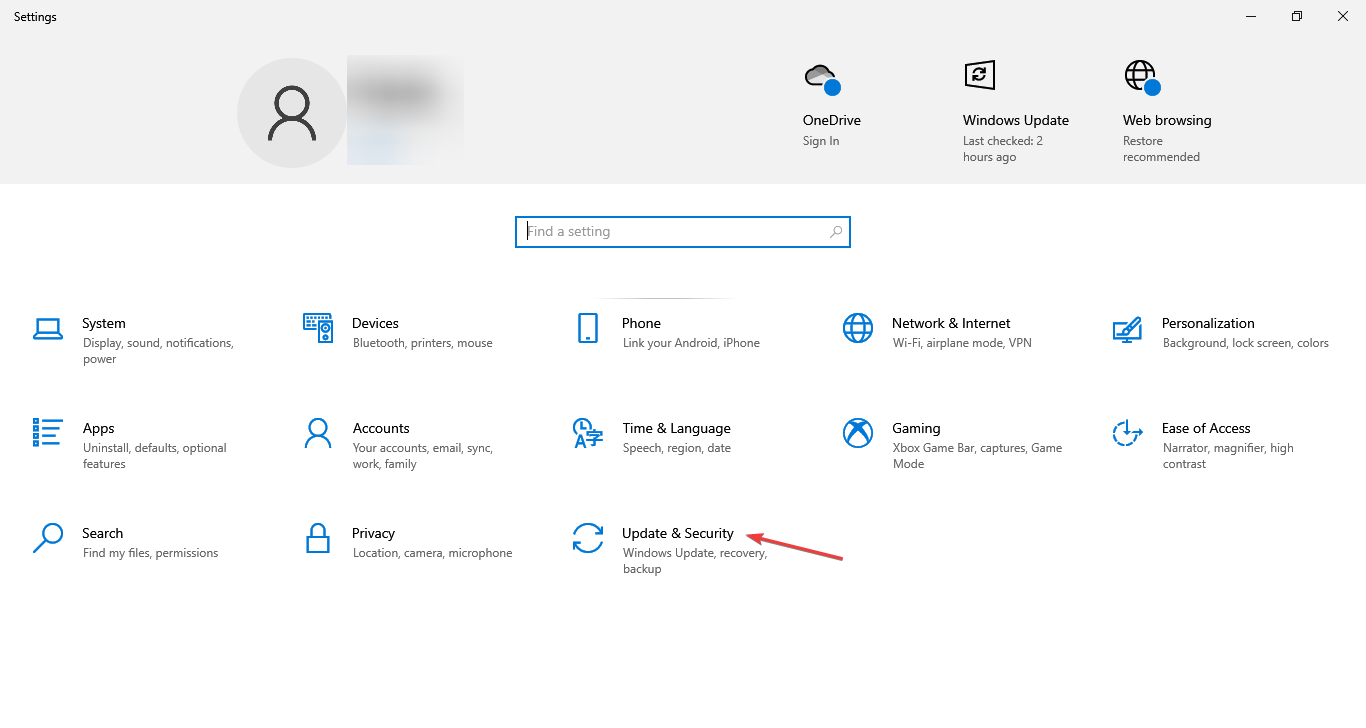
- Press Windows + I to open the Settings app, and click on Update & Security.

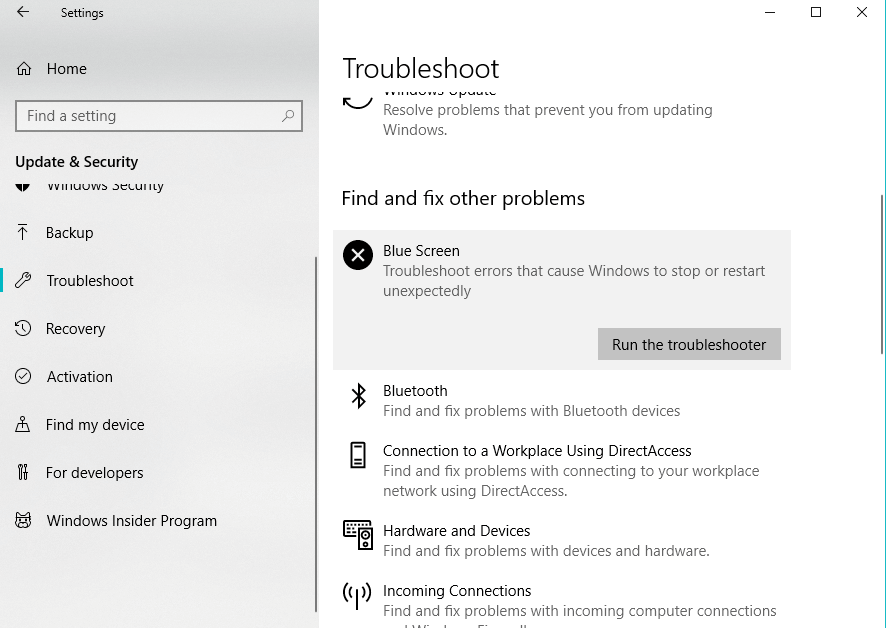
- Select Troubleshoot from the navigation pane, and click on Addition troubleshooters.
- Now, select Blue Screen, and click on the Run the troubleshooter button.

- Follow further instructions, and let the wizard finish the process.
- Restart your computer.

The following troubleshooting tool we’re going to try is Blue Screen, a built-in troubleshooter in Windows 10. After you are done with it, verify if the problem is resolved. If not, head to the final solution.
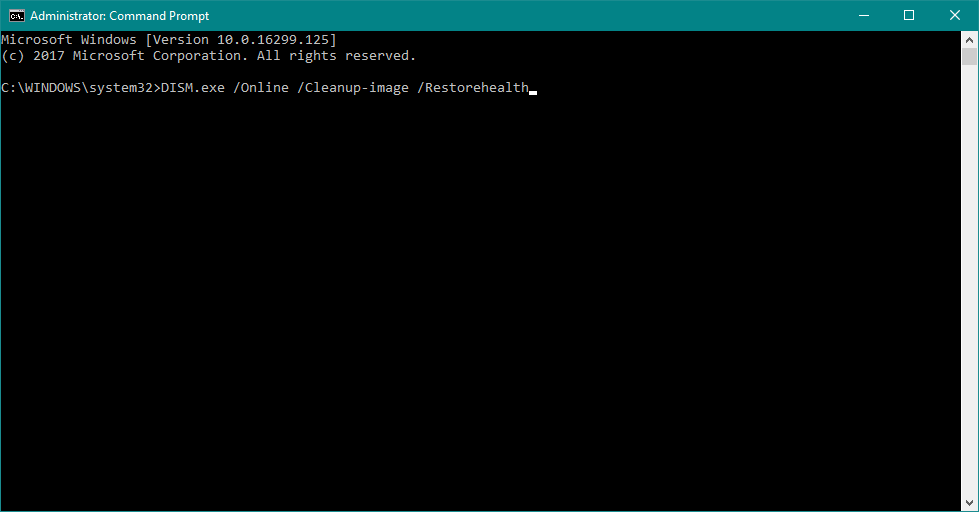
9. Run DISM
- Press Windows + R to open Run, type cmd, and hit Ctrl + Shift + Enter.

- Click Yes in the UAC prompt.
- In the command line, copy-paste these lines one by one and press Enter after each:
DISM/online/Cleanup-Image/ScanHealthDISM/Online/Cleanup-Image/RestoreHealth
Lastly, run the DISM (Deployment Image Servicing and Management) tool. It has been found to fix many BSOD errors and might help in the case of DXGKRNL.sys.
How do I replace Dxgkrnl sys?
DXGKRNL.sys is a DirectX Kernel File with a .sys (system) extension. It’s a critical file, which, when it goes missing or is corrupt, you are bound to encounter issues.
Now, if you plan to replace it, several websites claim to offer DXGKRNL.sys for download. However, proceed at your own risk after verifying the authenticity and reliability of the source.
A simple solution in case you are getting the DXGKRNL.sys error would be to perform a System Restore, and it would get the file back to its normal state, given you choose a restore point created before the error was first encountered. Another option is to factory reset Windows.
And that’s about it! We hope one of our solutions helped you eliminate the DXGKRNL.sys BSOD error on Windows 10.
Also, please find out the location of the BSOD log file since it will help identify the underlying cause and fix things.
If you have any other questions or suggestions, feel free to leave them in the comments section below, and we will certainly check them out.
![]()
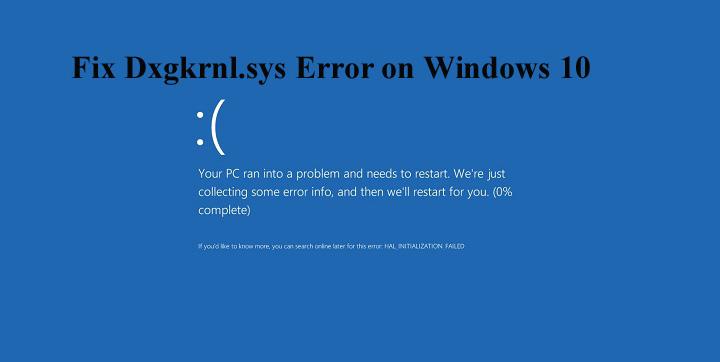
If the error dxgkrnl.sys blue screen of death is popping up on your Windows; then, you are not alone. Many Windows 10 users are facing this error.
But, no worries, you do not have to take the technical support because you can fix this error by yourself.
This error may occur when you are watching movies or playing a game. What are the causes of this error? How fix it?
If you are trying to find the answers to these questions, then you have arrived at the right place. Read on to fix Windows 10 dxgkrnl.sys BSOD error.
Why Does dxgkrnl.sys Blue Screen of Death Error Occur?
Dxgkrnl.sys blue screen of death error indicates the graphic display issue in your computer. Plus, if your PC has corrupted files or other hardware problems, then you may also encounter the blue screen of death error. The error is directly related to the DirectX driver.
Below are the solutions that will help you to solve Windows 10 dxgkrnl.sys BSOD error if you can enter safe mode or boot into Windows 10 after the error occurs.
PS: if you are facing the Windows NDIS.SYS blue screen error, here are the top solutions for you.
Solution 1: Keep Windows Updated
It is highly recommended to update Windows 10 to avoid unwanted problems and errors like dxgkrnl.sys BSOD error. You must update Windows 10 on your PC when the new update is introduced.
Follow these four steps to update Windows.
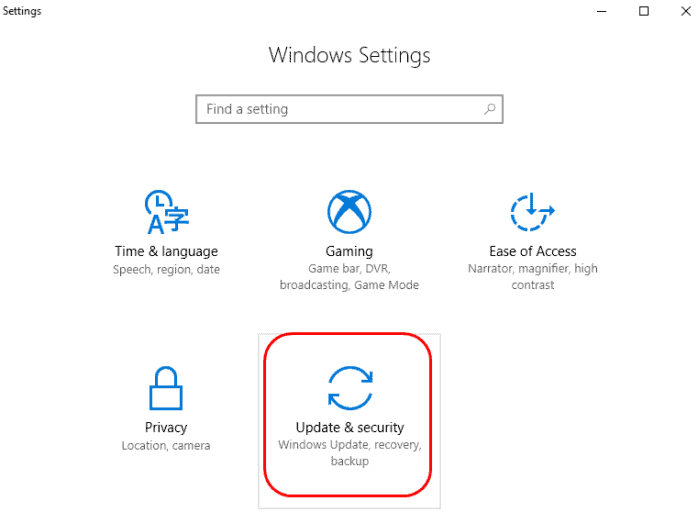
#1: Press Windows + X keys and click Settings.

#2: Click on the option ‘Update & Security.’
#3: Select the ‘Check for Update‘ option to allow Windows to search for the patches for your PC.
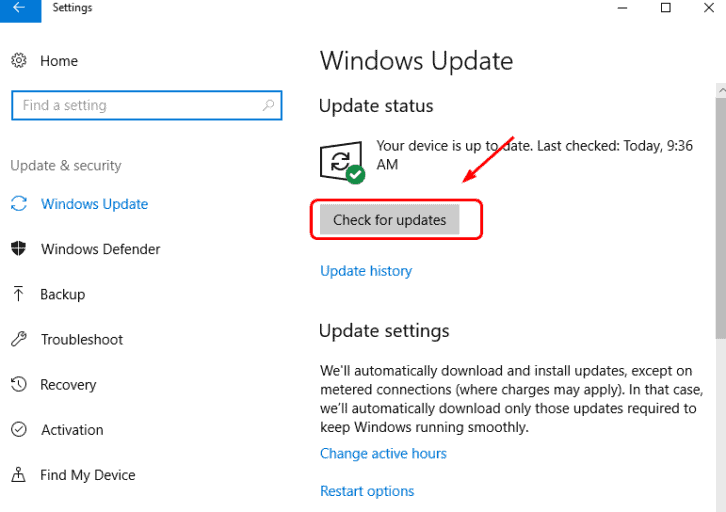
#4: Search for the latest update option and download it. Wait for the installation of the new version, and then restart your computer. After restarting your computer, it will show the new version installation completion.
Solution 2: Reinstall or Update Graphic Driver
The main cause of the Windows 10 dxgkrnl.sys error is when the operating system of your PC does not support the graphic driver version.
The system might not support the software or vice versa. In this case, it is best to reinstall the latest version of the graphic driver software, which supports the operating system.
In case you have not updated this software for a long time, you must update it or uninstall the current graphics card and install the latest version of the software.
However, if your PC is showing this error after installing the latest version of the graphic driver, uninstall the latest version and reinstall the older version instead.
Also, if you are bothered by the registry_error blue screen on Windows, click to fix it easily now.
Follow the Below Steps to Uninstall the Current Driver and Install the Latest Version of the Graphic Driver.
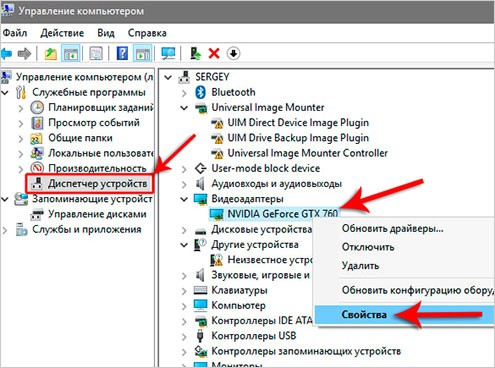
#1: Click the Windows Start and select Device Manager from the Start menu.
#2: Search for the option Display adapters and click on it to expand it.

#3: Right-click on the option Graphic driver and click on uninstall option to remove the current graphic driver from the system.
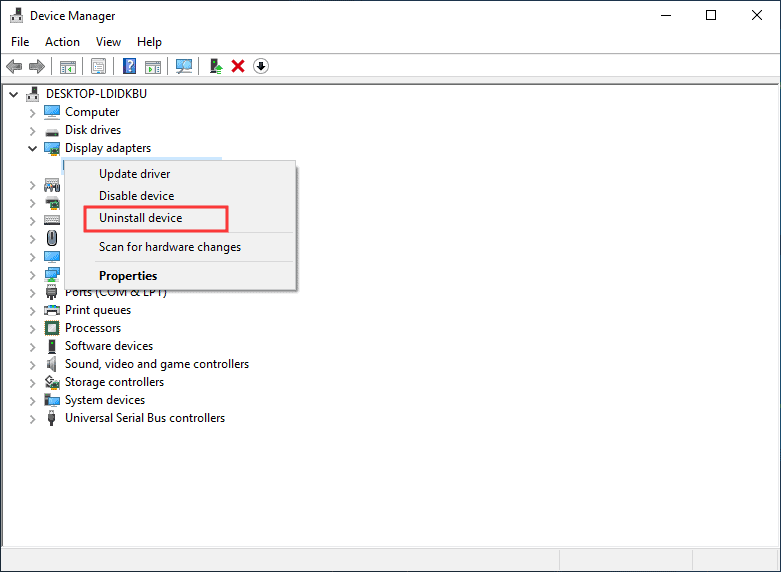
#4: Follow all the steps mentioned on the page to uninstall the device.
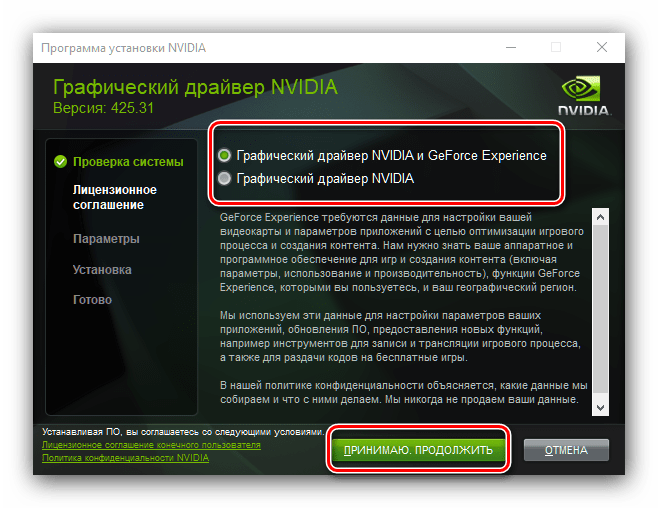
#5: Visit your graphic driver software page to download and install the latest version of the driver. For instance, if you use the NVIDIA GPU graphic driver, then go to the download page of the NVIDIA display driver.
#6: This is the crucial step. You must properly select the latest version of the graphic driver and select the correct version of your PC operating system to avoid any further errors. After selecting in the right corner, click the ‘Search’ bar.

#7: Lastly, click the ‘Download‘ button to download the new version of the graphic card driver. After installing the graphic driver, check whether the dxgkrnl.sys BSOD error has disappeared.

Expert Tip: If you are finding it difficult to install a new version of the graphic driver or think it is time-wasting, you can take help from other graphic card driver manager software to install a new version of the driver. It will automatically install the latest version of the driver for the graphic card. You can easily find one on the internet and download it.
The dxgkrnl.sys is related to the DirectX Graphics driver. Therefore you can fix this issue by running DirectX Diagnostic Tool on your Windows 10 system.
Follow these steps to run DirectX Diagnostic Tool on your computer system.
#1: From the below-mentioned methods, choose one to launch this Tool on your computer.
- Press the ‘Windows‘ and ‘R‘ keys at the same time to open a ‘Run‘ dialog box and enter ‘dxdiag,’ then press ok.
- Click on the Start Menu and open ‘Window PowerShell.’ Type ‘dxdiag‘ and press the ‘Enter‘ key.
- Launch ‘Command Prompt‘ and type ‘dxdiag.exe‘ and press the ‘Enter‘ key.
- Press ‘Windows‘ and ‘S‘ together to open a Window search box and type ‘dxdiag‘ and press the ‘best match’ button.
#2: Let the DirectX Diagnostic Tool scan your system and wait patiently till it finishes the work. When the scanning is finished, the main interface will open. The interface contains a lot of information.

#3: You can switch to the System, Display, Sound, and Input options and detect the problem if any. Each option contains detailed information; for example, if there is any display or multimedia problem, or audio problem on your PC, the tool will scan and fix the errors. You can find all this information in the ‘Note‘ box below the page.
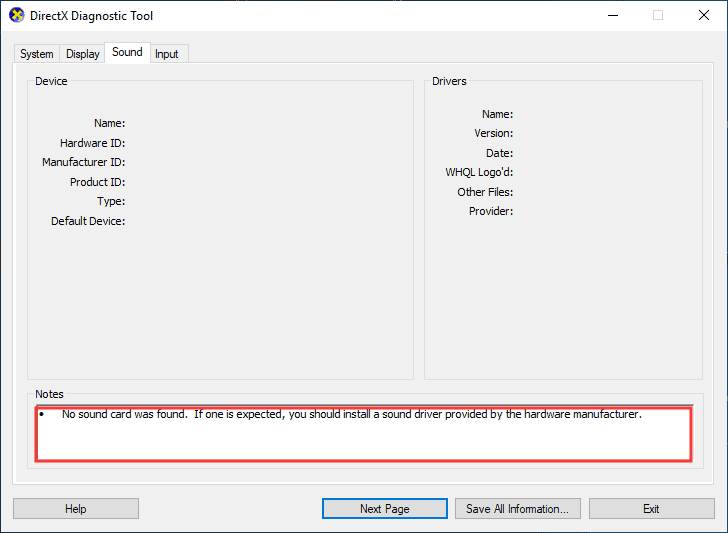
Furthermore, if you want to share the information with others for troubleshooting, click on the ‘Save All Information’ button. It will automatically save the full diagnostic report directly on your system.
With the help of the DirectX Diagnostic Tool, troubleshoot different hardware problems and fix the dxgkrnl.sys BSOD error. Run DirectX Diagnostic Tool to know if it works. If this method does not help you to get rid of the error, try another method.
Solution 4: Run System File Checker
Another major cause of dxgkrnl.sys BSOD error is the corrupted file that your PC might have. In this case, use System File Checker on your computer to analyze and correct the error.
You can find this software on your PC. If you are clueless about this software and do not know how to run ‘System File Checker,’ then follow the below steps.
#1: In the Windows Start search box, type in ‘cmd‘ to open the Command Prompt. Right-click on the Command Prompt and click on ‘Run as administrator.’

#2: Then type ‘sfc/scannow‘ and press the ‘Enter‘ key in order to run the tool. Wait until the tool scan and fix all the corrupted files. After completing the scanning process, verify that dxgkrnl.sys Blue Screen of Death error disappears.

Solution 5: Run DISM Command
Running DISM Command will also help your system get rid of all corrupted files from your PC and thus will help you fix the dxgkrnl.sys BSOD error.
If the System File Checker failed to scan the corrupted system files and fix them, you can use this method to encounter the error.
Follow these steps to use DISM Command.
#1: Press Windows and S at the same time to open the Windows search box.
#2: In the search box, type ‘cmd‘ to open the Command Prompt and select ‘Run as administrator.’
#3: Type the following commands one by one in the search box and press the ‘Enter‘ key after each command.
- DISM /Online /Cleanup-Image /CheckHealth
- DISM /Online /Cleanup-Image /ScanHealth
- DISM /Online /Cleanup-Image /RestoreHealth
Wait patiently until DISM completes the scanning and fixing of the corrupted files on your system.
Solution 6: Check Hardware Failure
If the above solutions are not helping in fixing the error, then you must take your PC to the repair store. Sometimes due to a faulty RAM module or motherboard, this error keeps on displaying on Windows 10.
However, before taking your system to the repair store, you must do one last thing, which is to turn off NVIDIA surround in case you use the NVIDIA graphics driver card. Here is how you can do it.
Press Ctrl+Alt+R or Ctrl+Alt+S on your keyboard to turn off the NVIDIA graphics driver card. If the key combinations are not helping in turning off NVIDIA graphic card, then you need to boot it with another monitor, and it will automatically turn it off. Recover Data from the system with dxgkrnl.sys BSOD error
Recover the Data from the System with dxgkrnl.sys BSOD Error
We highly recommend using MiniTool Partition Wizard Pro Ultimate in order to recover data from your PC with dxgkrnl.sys Blue Screen of Death error. MiniTool Partition Pro Ultimate is a professional data recovery and hard drive manager software.
It will help you recover data on USB, SSD, and HDD and recommend when to resize or move partitions, restore lost partitions, extend partitions, convert NTFS to FAT32, and so on.
Buy MiniTool Partition Pro Ultimate and install it on your normal system.
After Installing This Software, Follow the Steps Below to Retrieve System Data with dxgkrnl.sys BSOD Fault.
#1: After installing this software, click ‘Bootable Media,’ which you will find in the upper right corner of the main page to create a USB drive.

#2: After clicking on ‘Bootable Media,’ press WinPE-based media with MiniTool plug-in and then USB Flash Drive to create a new bootable USB drive. After burning the drive successfully, click on the ‘Finish‘ button to end the process.
#3: Connect the USB drive with your system with dxgkrnl.sys BSOD error. Then restart your system and enter BIOS so that you can set the drive as a first boot option. After that, boot the system from the drive.
#4: Then MiniTool Partition Wizard Pro Ultimate software will be automatically loaded into your system. If not, click on ‘Partition Wizard‘ present on the MiniTool PE loader page and manually load the software.

#5: Click on the Data Recovery option on the main page of the MiniTool Wizard Pro Ultimate.

#6: On the Data Recovery page, search for the partition, which includes important files, and press Scan to search the partition.

#7: After scanning, all the recovered files will be displayed all together. Search for the files you want to recover and click Save.

#8: After selecting all the files, you must save the files on a different drive. It is strongly recommended to use a different disk because the data may be overwritten. You must save the files on an external drive.

FAQs (Frequently Asked Questions)
- Q: What is the Dxgkrnl.sys error in Windows 10?
- The Dxgkrnl.sys error is related to the DirectX graphics kernel subsystem in Windows 10. It can cause system crashes, blue screen of death (BSOD), and other performance issues.
- Q: How can I update my graphics drivers in Windows 10?
- You can update your graphics drivers by visiting the manufacturer’s website and downloading the latest drivers for your specific graphics card model. Alternatively, you can use driver update software to automate the process.
- Q: Can malware cause the Dxgkrnl.sys error?
- Yes, malware infections can disrupt system processes and lead to the Dxgkrnl.sys error. It is important to run regular malware scans using reliable antivirus software.
- Q: Is it safe to use registry cleaner tools?
- While registry cleaner tools can help remove invalid or corrupted entries, it is crucial to exercise caution. Make a backup of the registry before making any changes and use reputable registry cleaner software.
- Q: When should I seek professional help for the Dxgkrnl.sys error?
- If you have tried the recommended methods and are still experiencing the error, it is advisable to seek professional assistance. Qualified technicians can diagnose and provide personalized solutions for your specific situation.
Final Thoughts
If you are facing dxgkrnl.sys BSOD error, then tries the above solution to fix the problem. We have not only covered fixing dxgkrnl.sys BSOD error but also provides you with detailed information for recovering the lost data from the PC.
In case you have different methods of solving this error, then feel free to tell us in the comment section below.
30.09.2020
Просмотров: 8925
За аппаратное ускорение мультимедийных приложений в Windows 7 и выше отвечает такой компонент, как DirectX. При его корректной работе 3D программы, игры, HD-видео и другие процессы запускаются без сбоев. Однако, если вы запустили софт и на вашем ПК, будь-то с Windows 7 или Windows 10 появился синий экран смерти Dxgkrnl.sys, то виной тому является DirectX или драйвер видеокарты. Поэтому, чтобы исправить такую неполадку, стоит воспользоваться следующими советами.
Читайте также: Что делать, если в Windows 10 вылетает синий экран смерти с ошибкой nvlddmkm sys?
Решаем BSOD или синий экран смерти Dxgkrnl.sys
Симптоматика синего экрана смерти Dxgkrnl.sys различная. В некоторых случаях система позволяет загрузиться до рабочего стола и запустить диагностику. Иногда, после 3-4 перезапусков Windows, Десятка автоматически перенаправляет пользователя в среду восстановления, через которую можно запустить восстановление всей системы. Однако, если синий экран Dxgkrnl.sys не получается исправить такими методами, то решение может быть следующим.
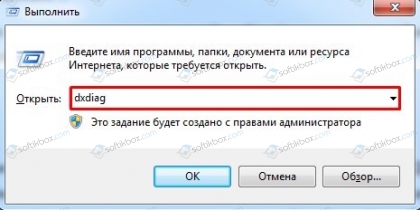
Для начала нужно проверить, что DirectX работает правильно. Для этого стоит набрать комбинацию клавиш «Win+R» и ввести «dxdiag».
Откроется новое окно. Нужно перейти во вкладку «Экран» и посмотреть, чтобы были включены такие опции, как DirectDraw, Direct3D и AGP.
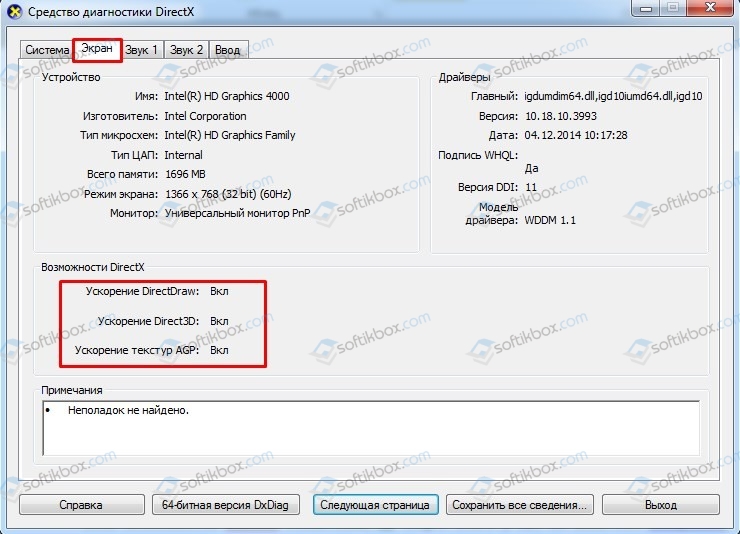
Если эти компоненты включены, то, возможно, у вас отключено в настройках системы аппаратное ускорение. Для того, чтобы его включить, нужно выполнить следующие действия:
- Если у вас Windows 10, то нужно перейти в «Параметры», «Система», «Дисплей», «Дополнительные параметры дисплея», «Свойства видеоадаптера для дисплея». Если у вас Windows 7, то можно «Панель управления», «Все элементы панели управления», «Экран», «Разрешение экрана» и нажать «Дополнительные параметры».
- Откроется небольшое окно. Нужно перейти во вкладку «Диагностика» и нажать «Изменить параметры».
- Перетаскиваем ползунок в положение «Включено» в пункте «Аппаратное ускорение».
- Перезагружаем систему, чтобы изменения вступили в силу.
Если помимо BSOD появляются другие неполадки, то установите последнюю версию DirectX.
Если переустановка компонента не дала результатов и ошибка с файлом dxgkrnl.sys продолжает появляться на вашем ПК, то стоит проверить систему на вирусы и целостность файлов. Для сканирования лучше использовать лечащую утилиту Dr.Web Curelt. Для проверки системы нужно запустить командную строку с правами Администратора и ввести такие команды:
- Dism /Online /Cleanup-Image /RestoreHealth
- sfc /scannow
Если с файлами все в порядке, то нужно переустановить драйвера видеокарты. Для этого рекомендуем предварительно скачать с официального сайта производителя видеокарты ПО, а не выполнять автоматический поиск нужного софта, так как Windows 10 часто ставит универсальный драйвер Microsoft, который не подходит для всех задач.
Если же и переустановка ПО для видеокарты не решила проблемы, то виновником ошибки может быть технология Surround, которую применяют Nvidia для объединения нескольких мониторов. Чтобы её отключить, нужно открыть Панель управления Nvidia и перейти в раздел «Настройка SLI, Surround, PsyhsX». Справа нужно снять отметки «SLI» и «Surround», если они включены. После перезагрузки системы будет работать один монитор, но корректно.
В случае, если вышеописанные способы не помогли решить проблему, то откат или обновление системы могут помочь избавиться от BSODа.
 Чаще всего, указанная ошибка возникает в следующем порядке: экран гаснет, появляется синий экран смерти с сообщением, что ошибка произошла где-то в nvlddmkm.sys, код ошибки stop 0x00000116. Бывает, что в сообщении на синем экране указывается не nvlddmkm.sys, а файлы dxgmms1.sys или dxgkrnl.sys — что является симптомом той же ошибки и решается аналогичным образом. Типичное сообщение также: драйвер перестал отвечать и был восстановлен.
Ошибка nvlddmkm.sys проявляет себя в Windows 7 x64 и, как оказалось, Windows 8 64-бит тоже не защищена от этой ошибки. Проблема связана с драйверами видеокарты NVidia. Итак, разбираемся, как решить проблему.
На различных форумах присутствуют разные способы решения ошибки nvlddmkm.sys, dxgkrnl.sys и dxgmms1.sys, которые в общих чертах сводятся к совету переустановить драйвера NVidia GeForce или подменить файл nvlddmkm.sys в папке System32. Я опишу эти способы ближе к концу инструкции по решению проблемы, но начну с чуть другого, работающего способа.
Исправляем ошибку nvlddmkm.sys

Синий экран смерти BSOD nvlddmkm.sys
Итак, начнем. Инструкция подходит при возникновении синего экрана смерти (BSOD) в Windows 7 и Windows 8 и появлении ошибки 0x00000116 VIDEO_TDR_ERROR (код может отличаться) с указанием одного из файлов:
- Nvlddmkm.sys
- Dxgkrnl.sys
- Dxgmms1.sys

Скачать драйвера NVidia
Первое, что следует сделать — скачать бесплатную программу DriverSweeper (найти в Google, предназначена для полного удаления любых драйверов из системы и всех файлов, с них связанных), а также последние драйвера WHQL для видеокарты NVidia с официального сайта http://nvidia.ru и программу для очистки реестра CCleaner. Установить DriverSweeper. Далее выполняем следующие действия:
- Зайдите в безопасный режим (в Windows 7 — по клавише F8 при включении компьютера, или: Как зайти в безопасный режим Windows 8).
- С помощью программы DriverSweeper удалите все файлы видеокарты (и не только) NVidia из системы — любые драйвера NVidia, включая звук HDMI и т.д.
- Также, пока вы еще находитесь в безопасном режиме, запустите CCleaner для очистки реестра в автоматическом режиме.
- Перезагрузитесь в нормальном режиме.
- Теперь два варианта. Первый: зайдите в диспетчер устройств, кликните правой кнопкой мыши по видеокарте NVidia GeForce и выберите «Обновить драйвер…», после этого, позвольте Windows найти последние драйвера для видеокарты. Или же Вы можете запустить установщик NVidia, который скачали до этого.
После того, как драйверы будут установлены, перезагрузите компьютер. Возможно также потребуется установить драйверы на HD Audio и, если нужно скачать PhysX с сайта NVidia.
Вот и все, начиная с версии драйверов NVidia WHQL 310.09 (а актуальная на момент написания инструкции версия 320.18), синий экран смерти не появляется, и, после выполнения вышеописанных действий, ошибка «драйвер перестал отвечать и был успешно восстановлен», связанная с файлом nvlddmkm.sys, появляться не будет.
Другие способы исправления ошибки
Итак, у вас установлены последние драйвера, Windows 7 или Windows 8 x64, вы играете какое-то время, экран становится черным, система сообщает, что драйвер перестал отвечать и был восстановлен, звук в игре продолжает играть или стал заикаться, появляется синий экран смерти и ошибка nvlddmkm.sys. Это может происходить и не во время игры. Вот какие решения предлагаются на различных форумах. По моему опыту, они не работают, но приведу их здесь:
- Переустановить драйвера для видеокарты NVidia GeForce с официального сайта
- Распаковать файл-установщик с сайта NVidia архиватором, предварительно сменив ему расширение на zip или rar, извлечь файл nvlddmkm.sy_ (или взять его в папке C:\NVIDIA\), распаковать его командой expand.exe nvlddmkm.sy_ nvlddmkm.sys и перенести получившийся файл в папку C:\windows\system32\drivers, затем перезагрузить компьютер.
Также возможными причинами появления данной ошибки могут быть:
- Разогнанная видеокарта (память или GPU)
- Несколько приложений, одновременно использующих GPU (например, майнинг Биткойнов и игра)
Надеюсь, я помог решить Вам проблему и избавиться от ошибок, связанных с файлами nvlddmkm.sys, dxgkrnl.sys и dxgmms1.sys.